| 3526 Views | Amin

In this session, we’ll explore how to configure, integrate, and optimize the webmail features in Bitrix24 CRM to streamline communication and enhance lead engagement. From setting up your email system to creating templates and running email campaigns, we’ll walk through practical scenarios to help you utilize these tools effectively for your organization’s needs.
Configuring Webmail for Seamless Communication
Setting up webmail in Bitrix24 is crucial for managing emails directly within the CRM. You’ll learn how to:
- Configure email accounts by adding IMAP server addresses, using SSL with default ports, and entering login credentials.
- Import emails from a specific time period (week/month) into Bitrix24 mailbox.
- Set up outgoing email parameters like the sender name and SMTP server address.
- Integrate your mailbox with CRM to:
- Convert imported emails into CRM activities.
- Route emails from existing clients to assigned CRM managers.
- Automatically create leads or contacts for new incoming or outgoing messages.
- Assign permissions for team members to send, receive, and reply to emails, ensuring collaborative email handling.
Adding Signatures and Email Templates for Quick Communication
Professional communication often requires predefined signatures and email templates. In this session, we’ll guide you through:
- Editing signatures to include links to scheduling calendars, confidentiality notices, and available times.
- Linking signatures to specific email accounts for ease of use.
- Creating email templates with predefined subjects and text, binding them to leads or deals, and using AI-powered tools to enhance the structure.
These features will help you send personalized emails efficiently while maintaining a consistent tone and format.
Running Email Campaigns and Marketing Automation
Email campaigns are a powerful tool for lead nurturing and customer engagement. You’ll learn how to:
- Configure robots to send automated emails triggered by actions such as viewing an email or clicking a specific link.
- Use triggers to change lead stages automatically based on customer interactions.
- Set up email marketing campaigns by connecting external SMTP servers for effective outreach.
Integrating Webmail with CRM for Advanced Functionality
We’ll also demonstrate advanced integration features such as:
- Generating new leads from specific email addresses and distributing them among team members in a predefined queue.
- Converting email attachments like vCards into contacts.
- Integrating emails with calendars to schedule appointments and maintain comprehensive client interaction records.
By mastering the webmail features in Bitrix24, you’ll streamline communication processes, enhance your team’s productivity, and create a seamless experience for managing customer interactions.
Detailed instructions are described below:
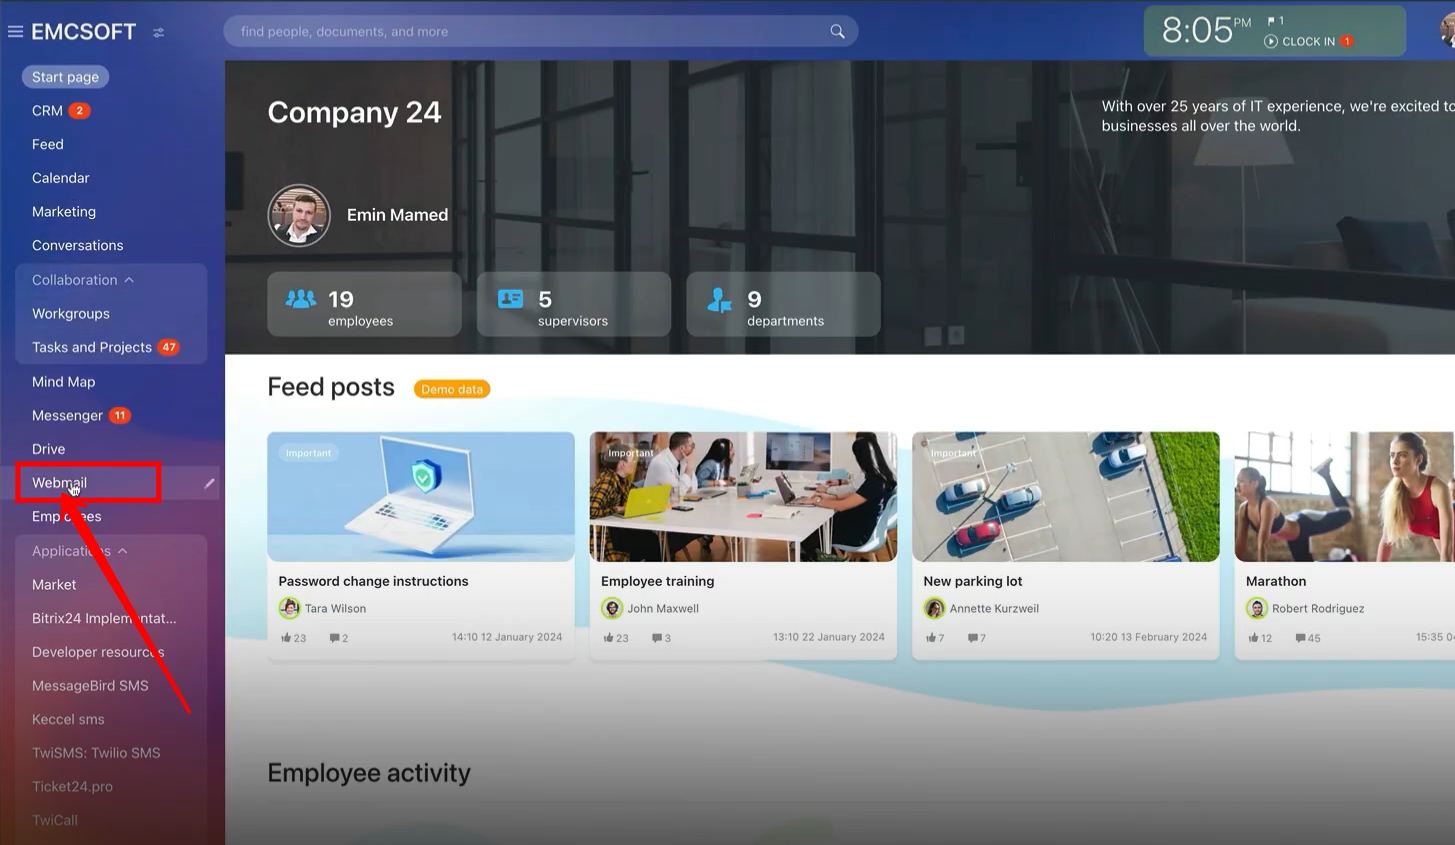
1. Go to “Webmail”.
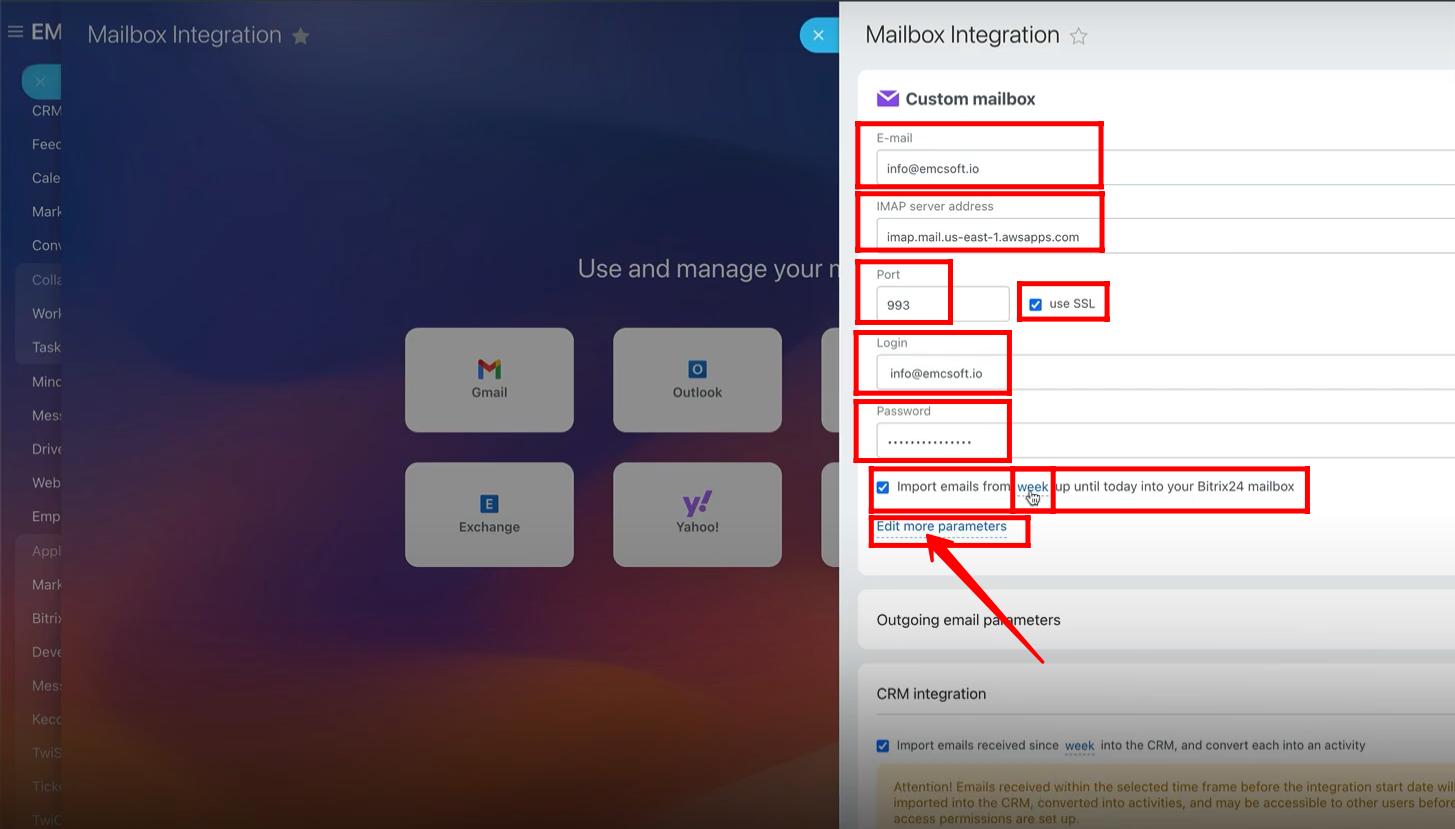
2. All other configurations are quite easy. Specifically, “Custom mailbox IMAP-SMTP” will be discussed here.

3. Within the “Custom mailbox” configuration panel, add your “E-mail” and “IMAP server address”. Generate your “IMAP server address” from ChatGPT, If you cannot find it. Check the box “Use SSL” and use the default Port (Recommended). Add “Login” and “Password”. Check the box, if you wish to “import emails from week or month/s into your Bitrix24 mailbox”. Click “Edit more parameters”.
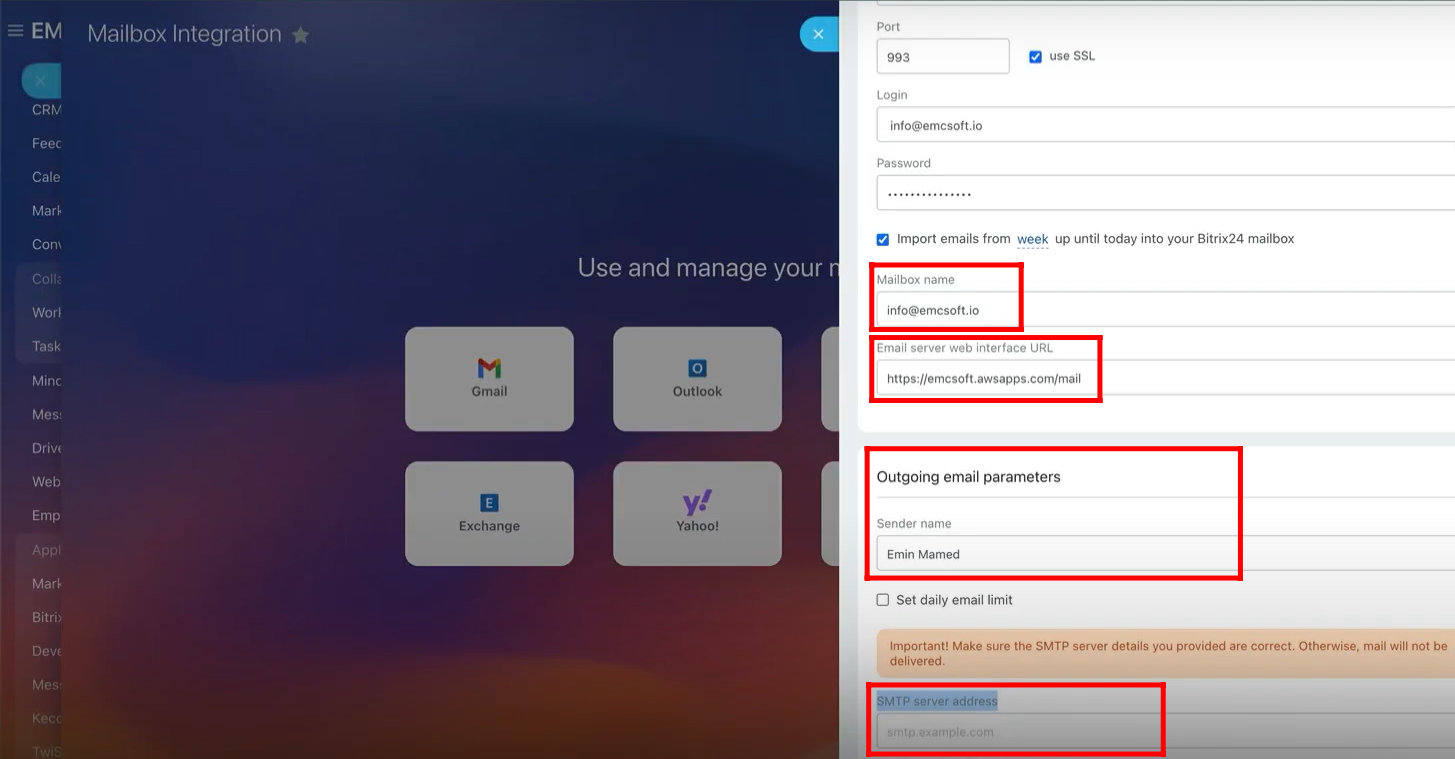
4. Give the name to your mailbox and add “Email server web interface URL”. If you want to setup “Outgoing email parameters”, you have to provide the external “SMTP server address” because it is mandatory to use in email marketing to send emails.
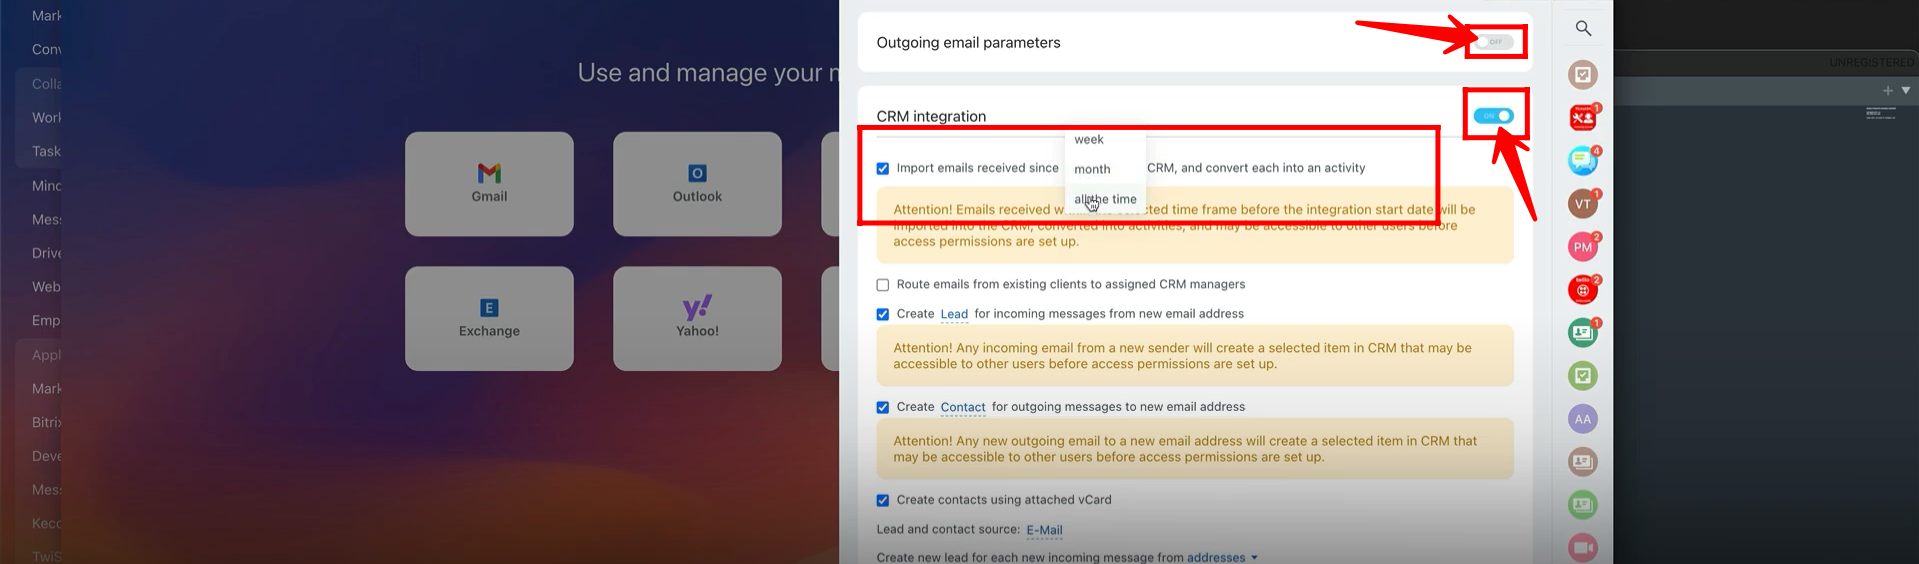
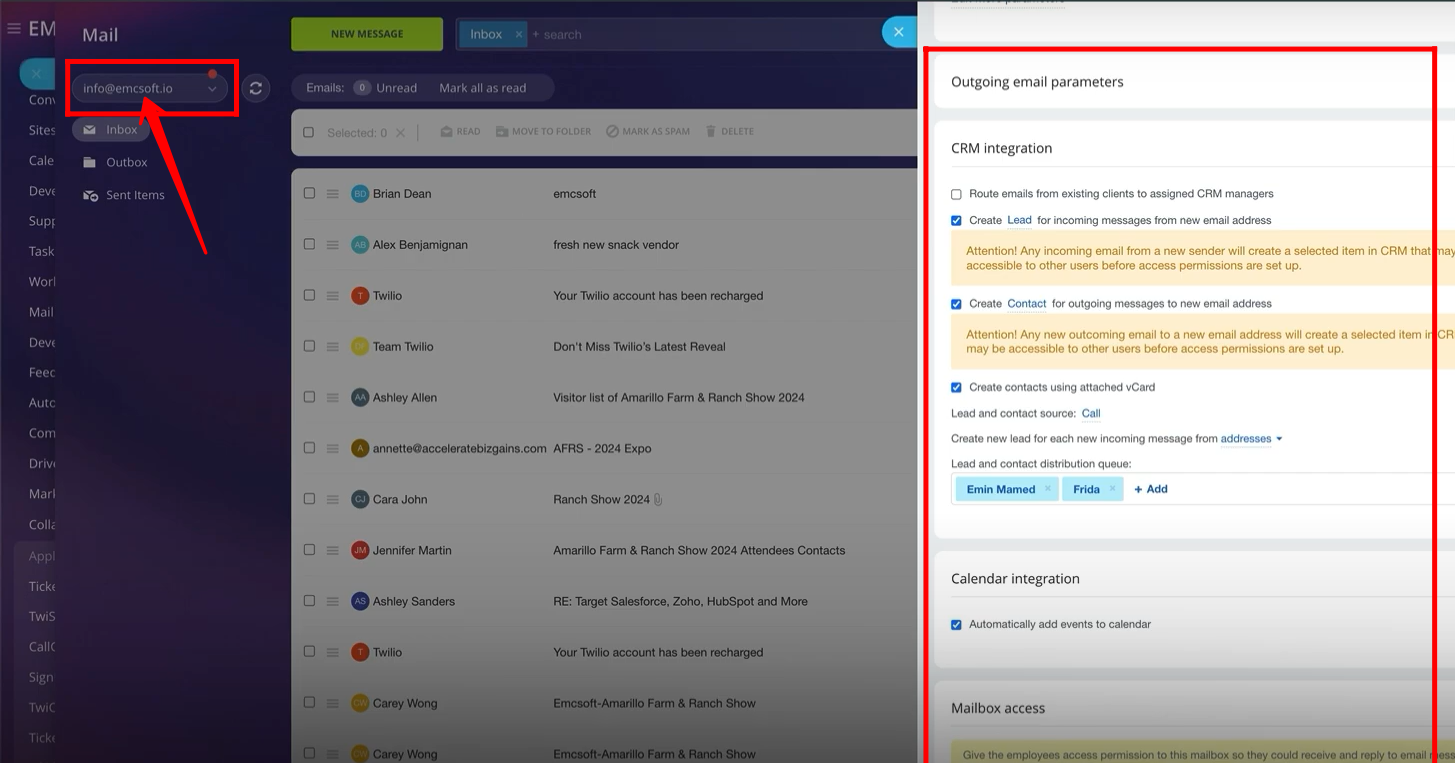
5. In this use case, “Outgoing email parameters” are not being used, this feature will be discussed later. Turn on “CRM Integration” and configure it. Check the box, if you wish to “import emails received since ‘week/month/all the time’ into the CRM and convert each into an activity”.
6. According to your business requirements, check the box if you want to “route emails from existing clients to assigned CRM managers”.
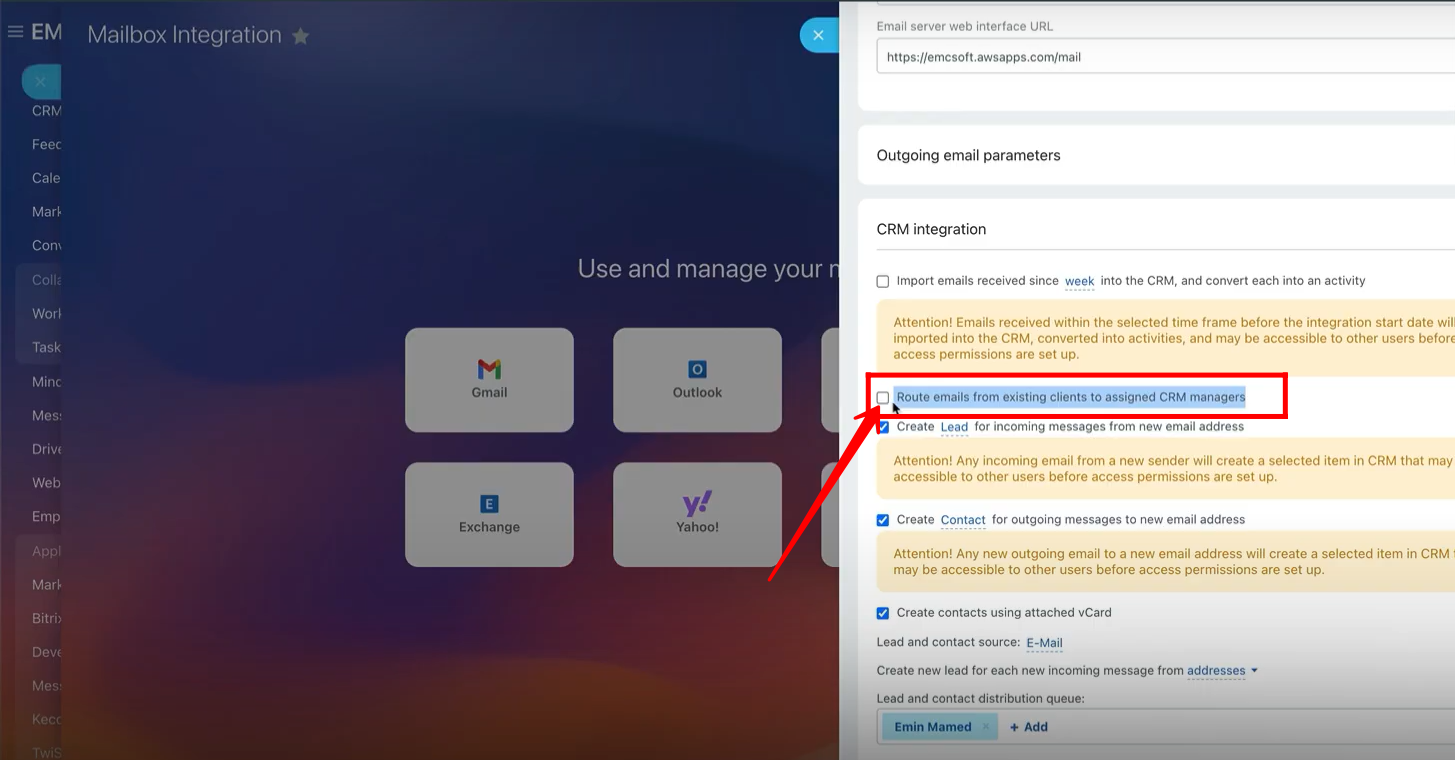
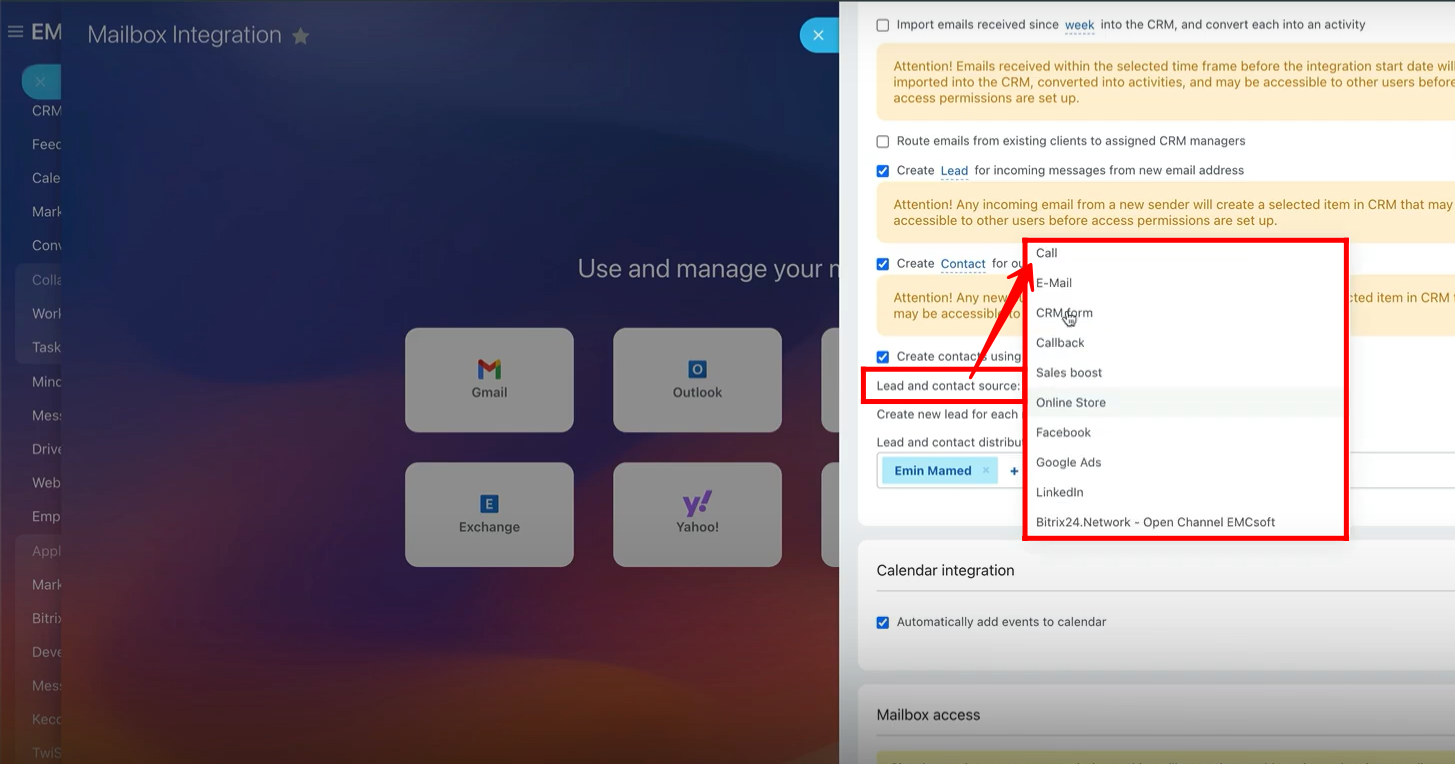
7. If you want to “create a ‘lead or contact’ for incoming messages from new email address”, then check the box to configure it. In this example, a lead is being created from new email address for incoming messages.
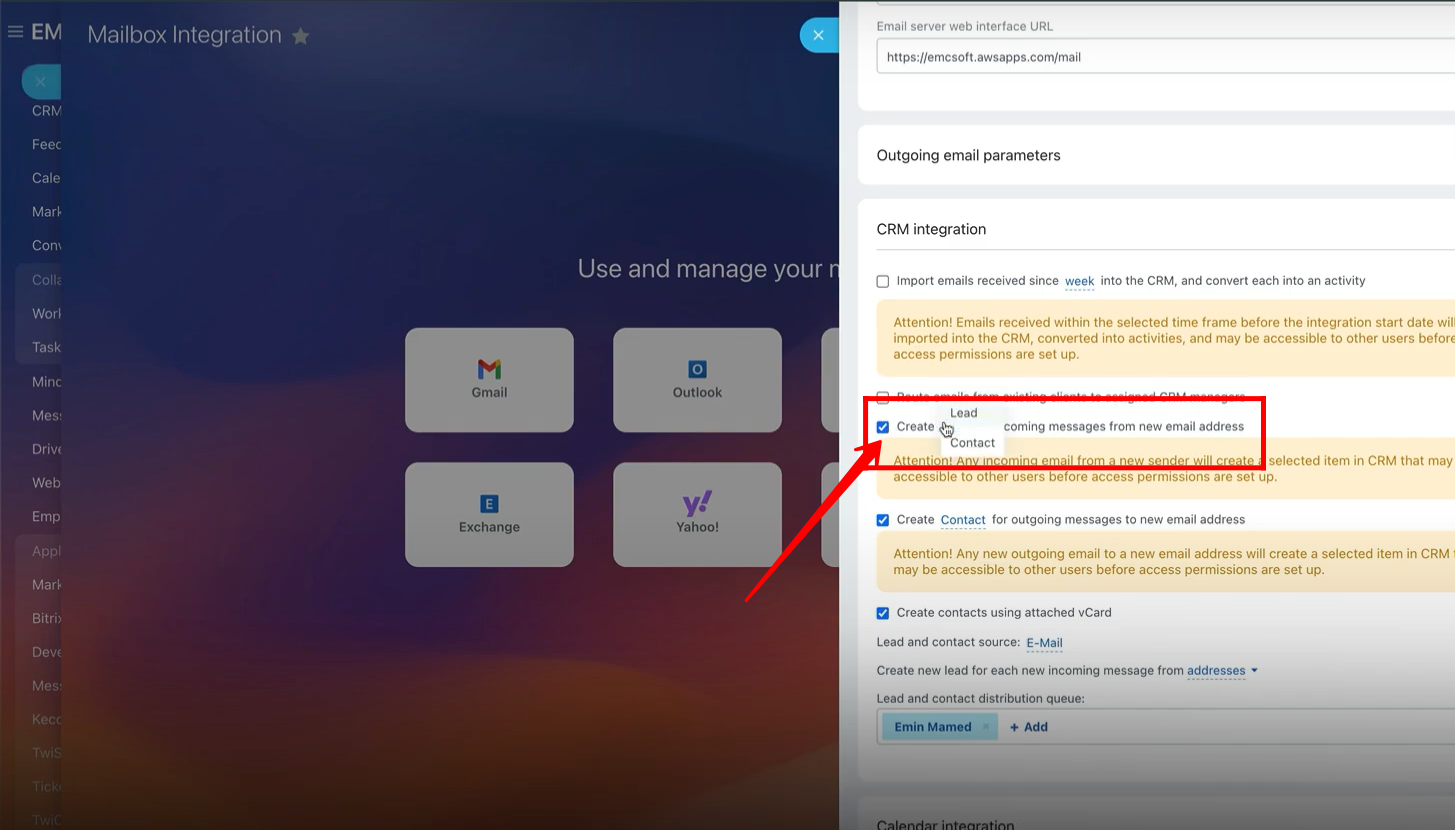
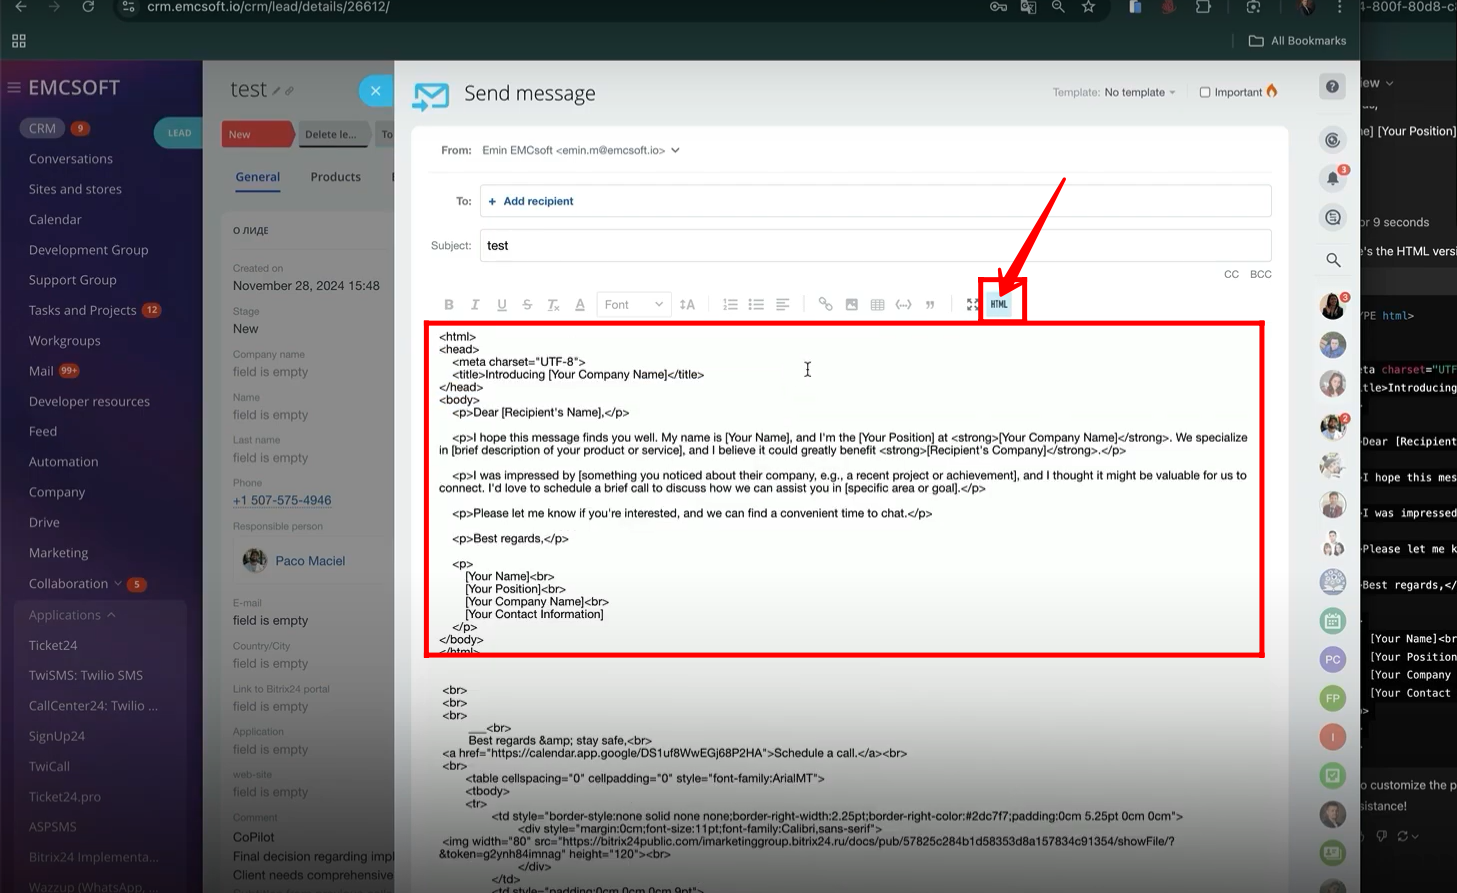
8. If you want to “create a ‘lead or contact’ for outgoing messages to new email address”, then check the box to configure it. In this example, a contact is being created to new email address for outgoing messages.
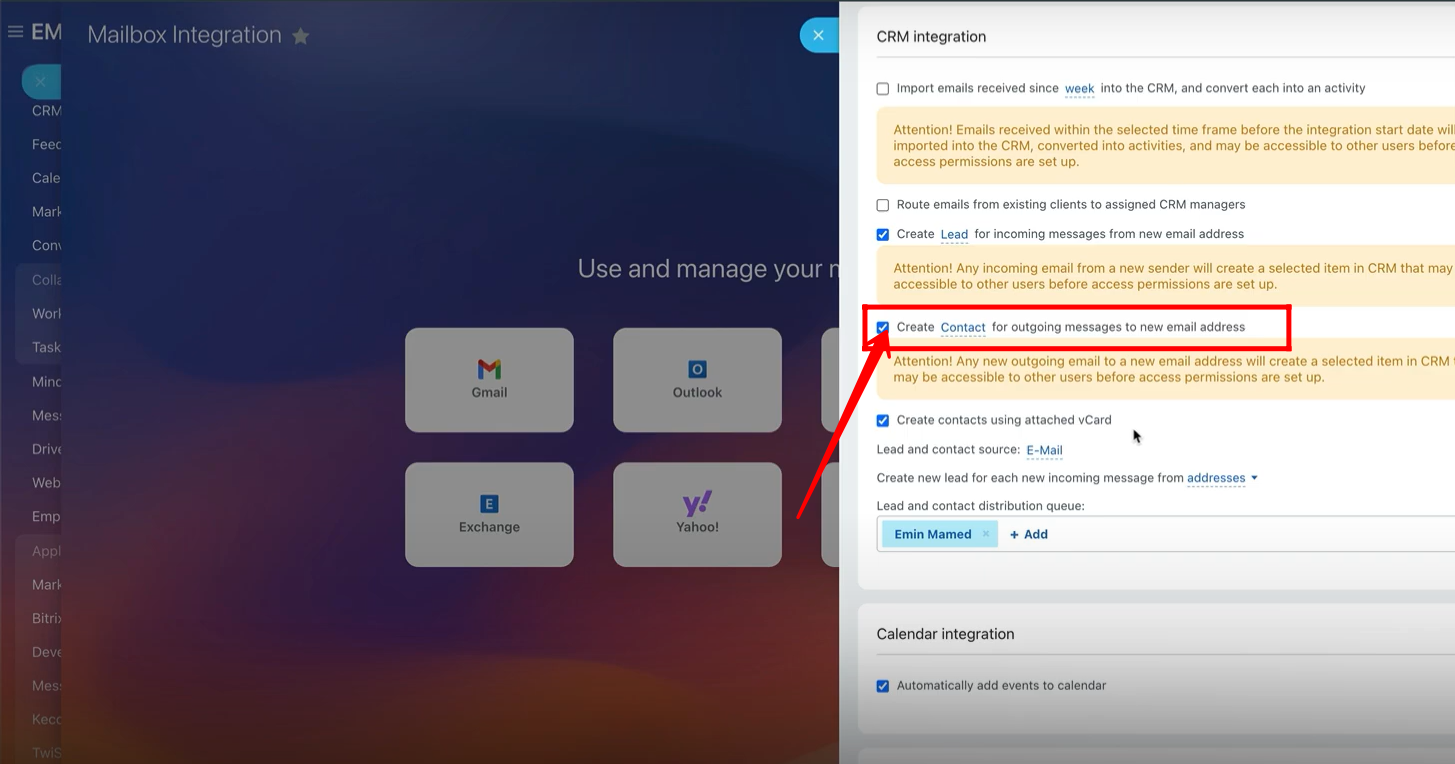
9. Check the box to “create contacts using attached vCard” according to your business process needs.
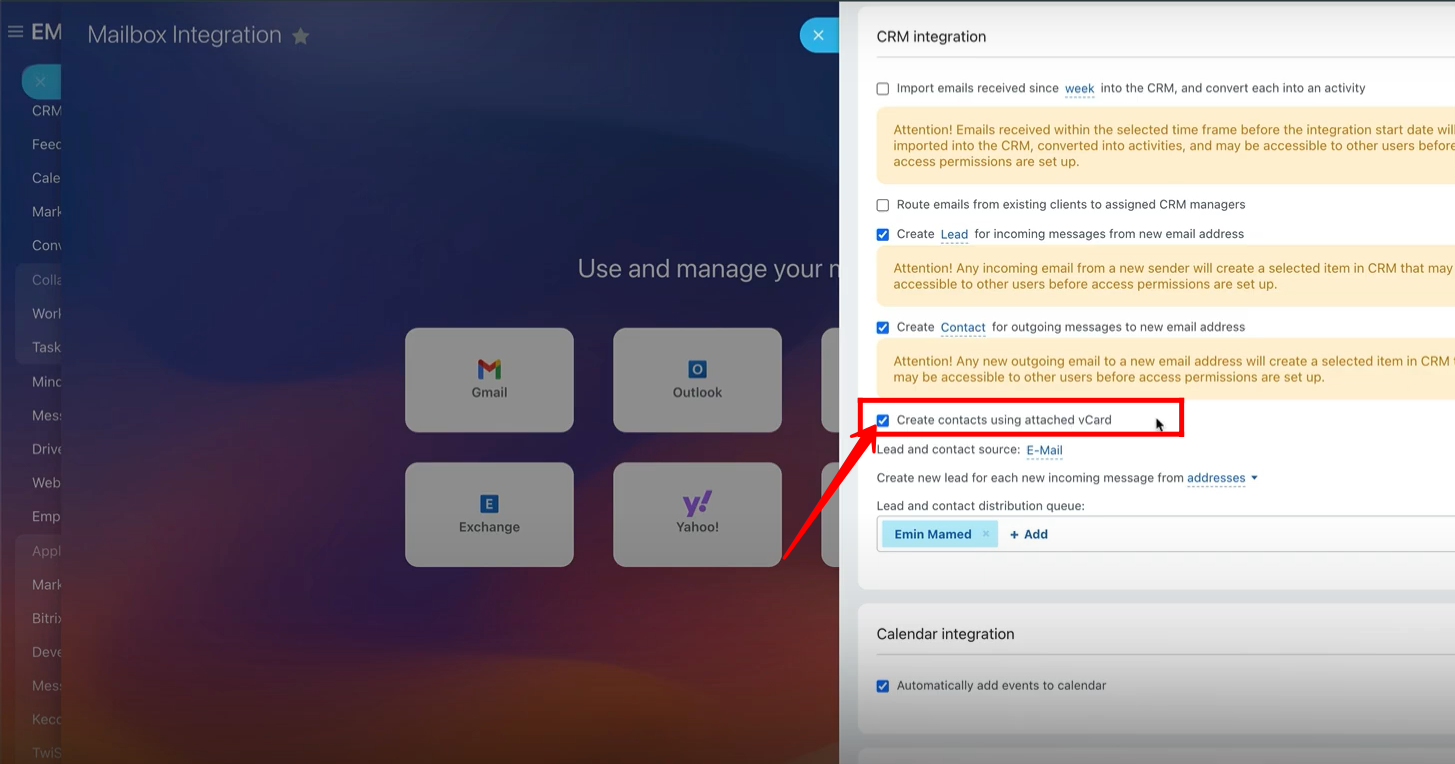
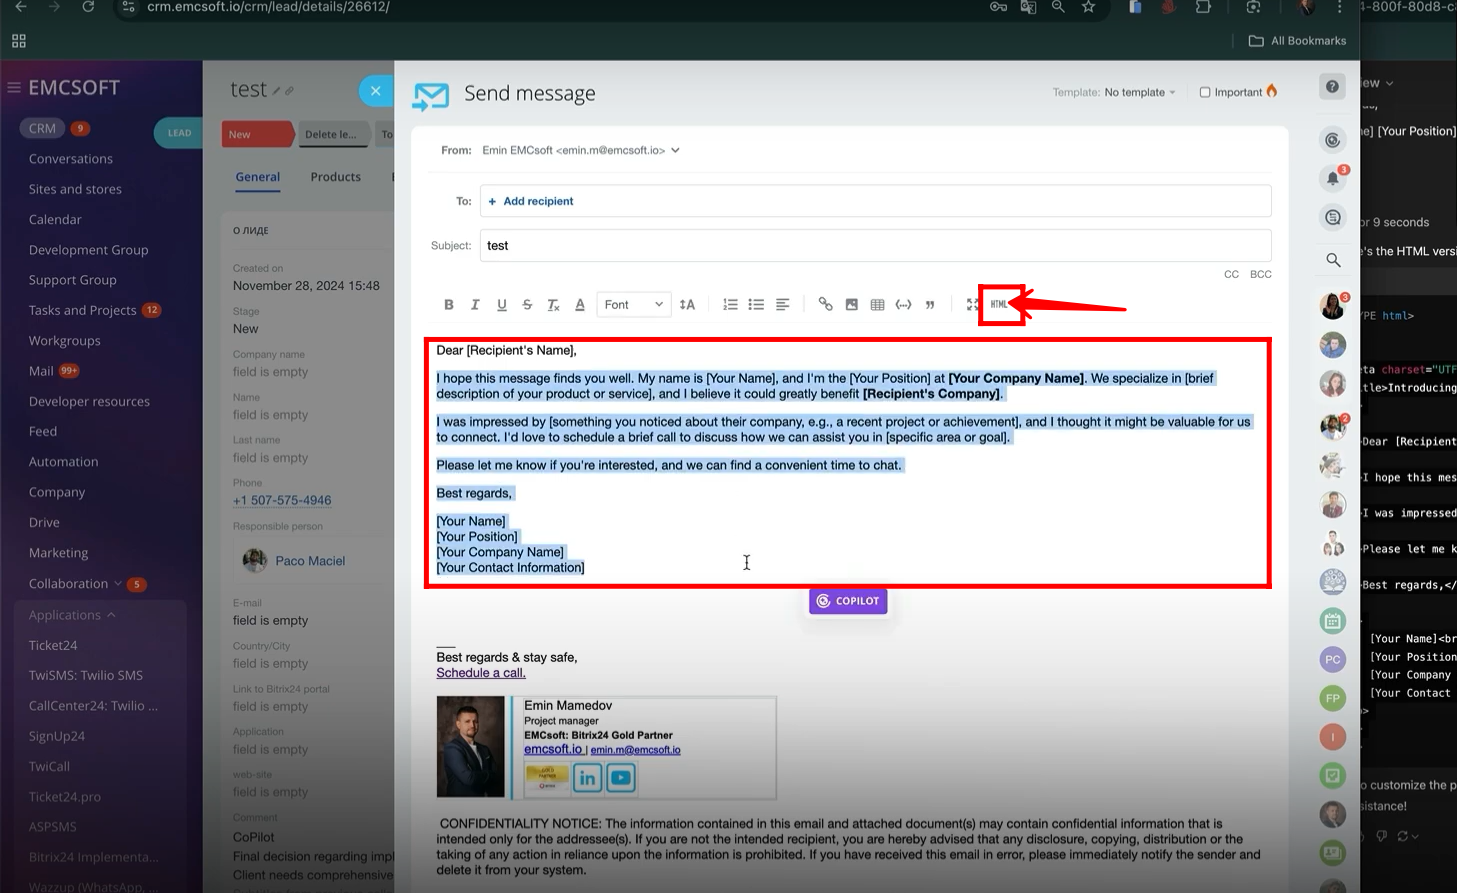
10. Select the “Lead and contact source” from a list of sources. In this example, “E-mail” is selected as a source.
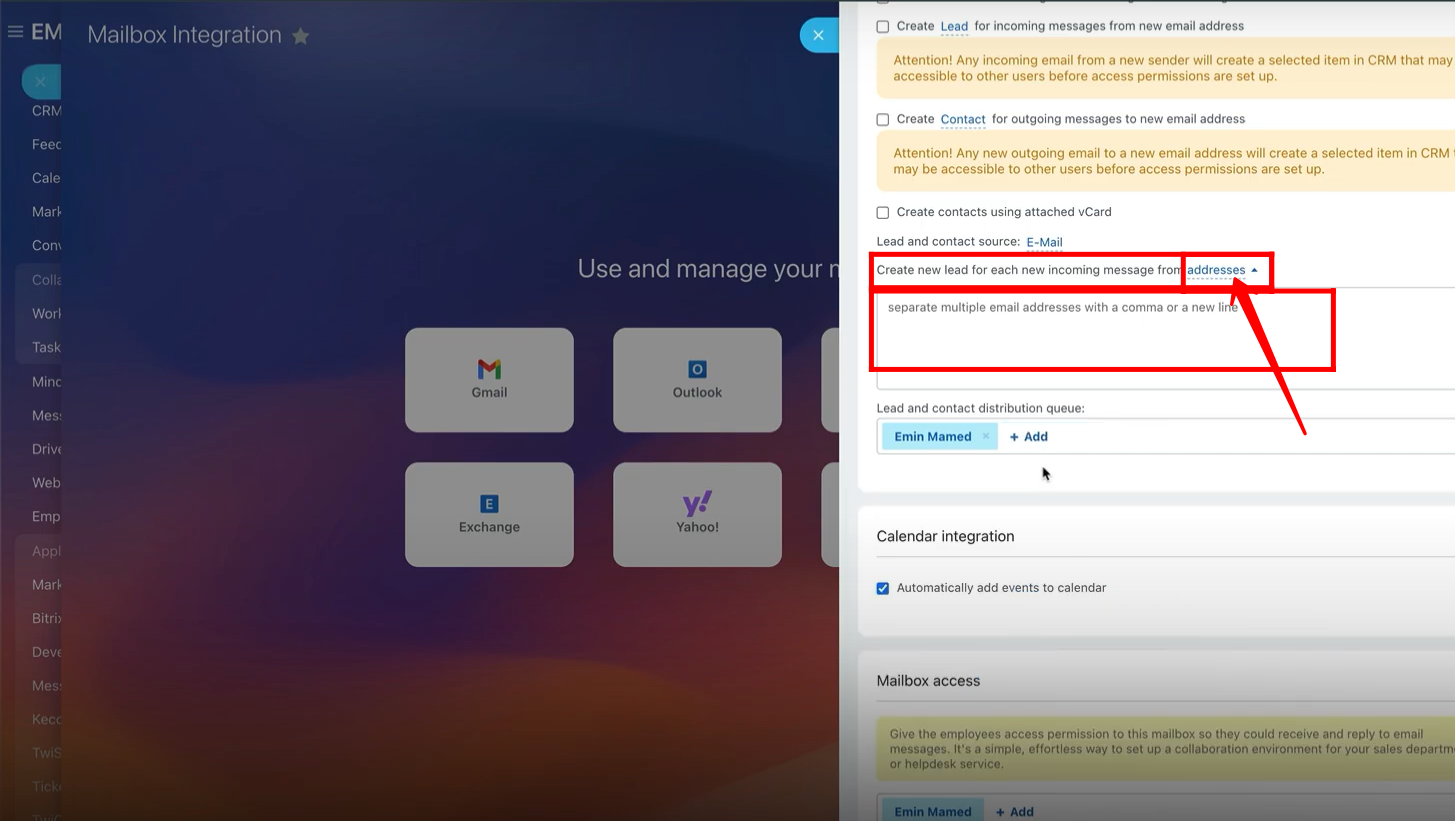
11. If you want to generate new leads for each new incoming message from specific email addresses, then mention all the email addresses in the box and separate those emails with a comma or a new line to be considered.
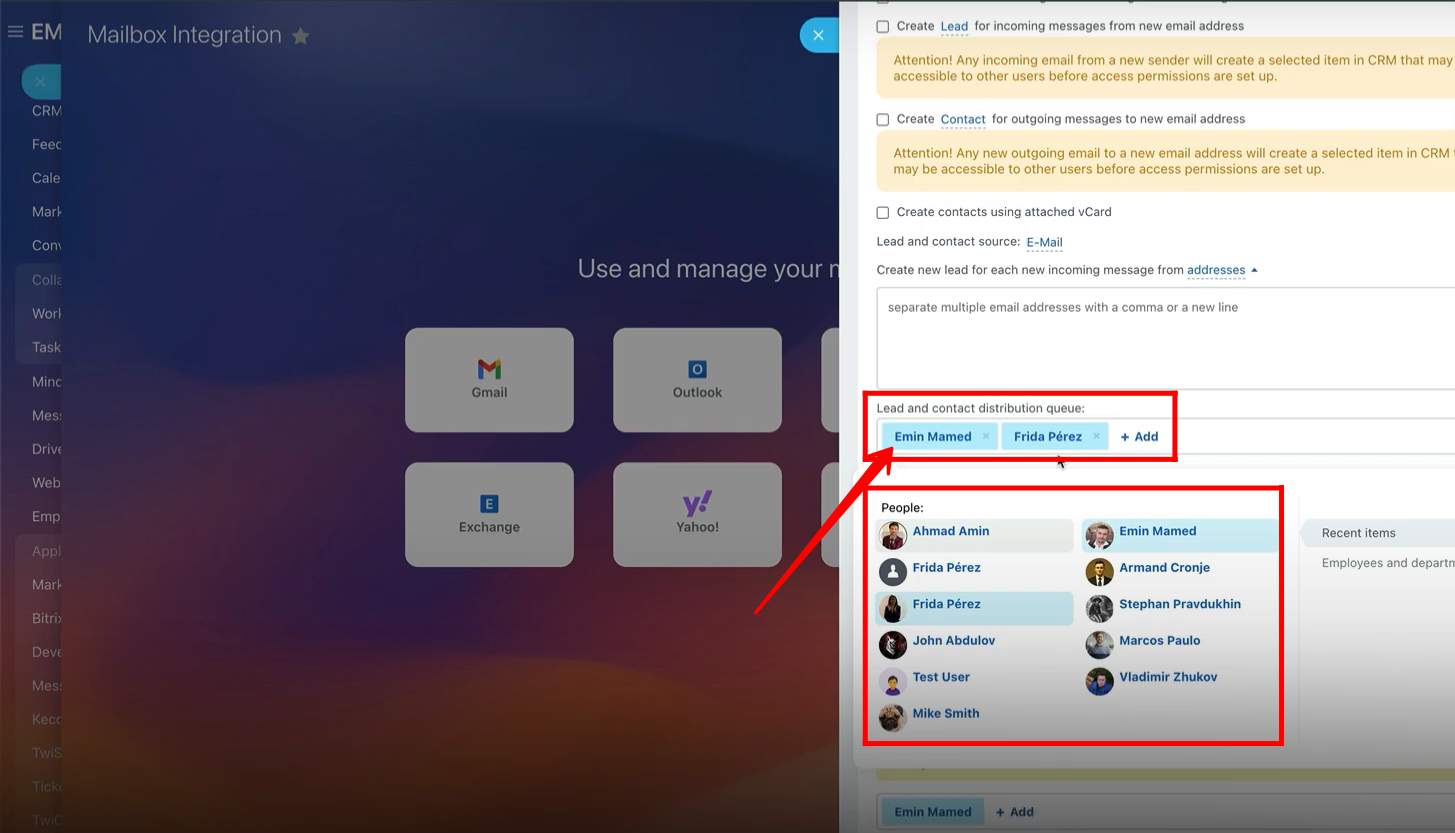
12. Newly generated leads and contacts from each new incoming messages will be distributed among multiple responsible persons in the same order as configured in the queue.
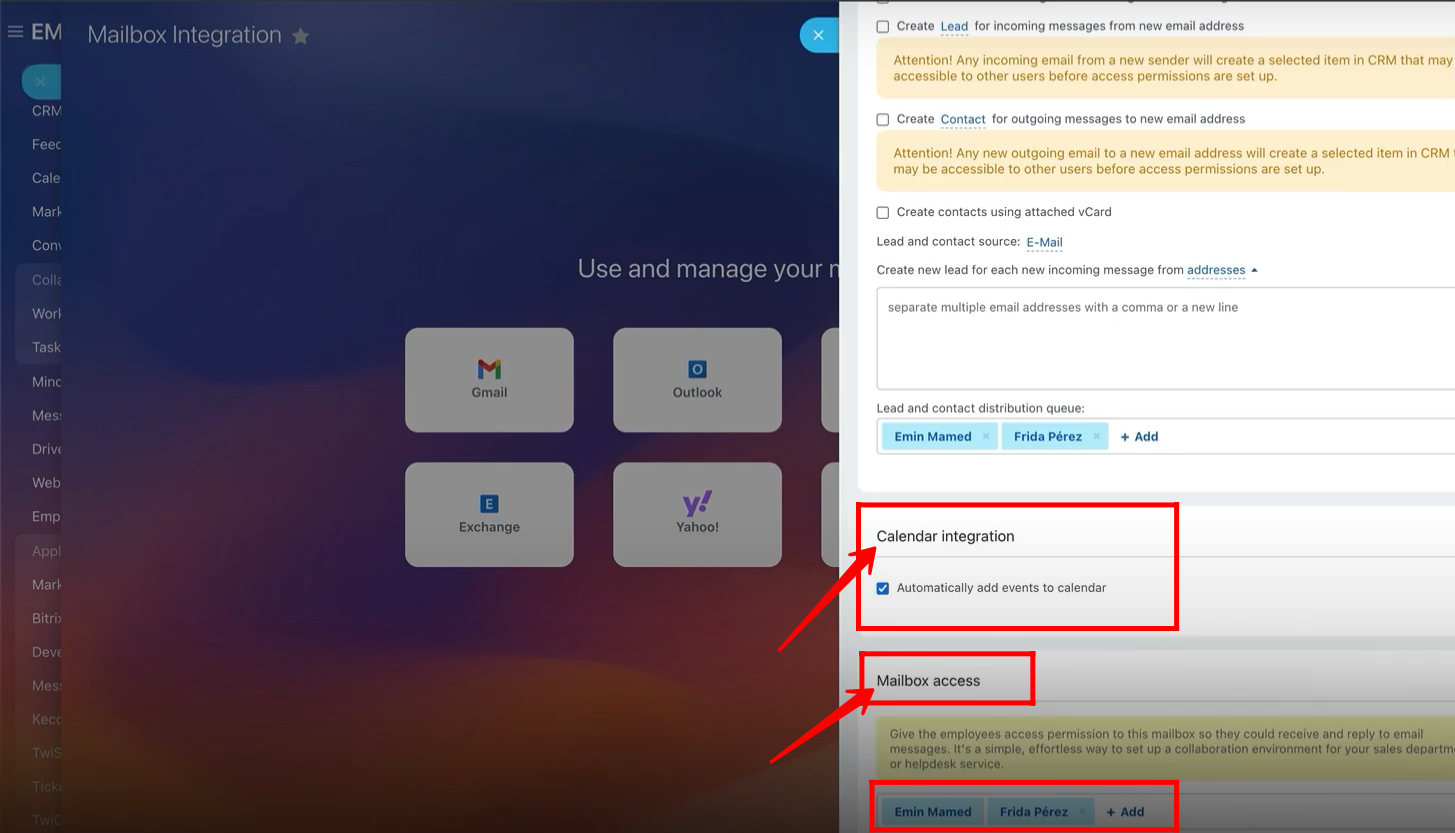
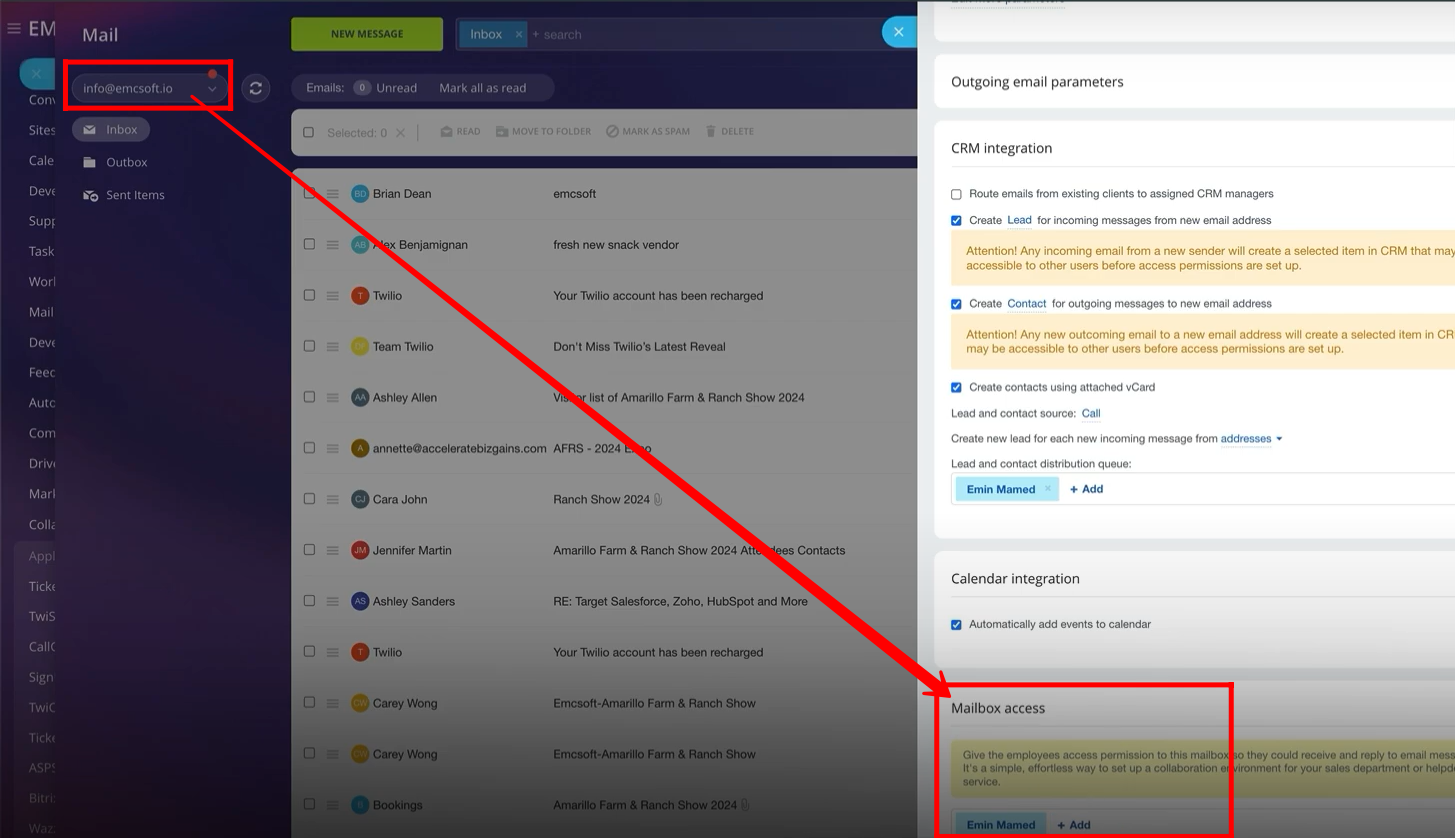
13. If you want to integrate the calendar, then turn it on. The events will be automatically added to the calendar. Add the employees from your business in the “Mailbox Access” to give them permission to the mailbox so they can receive and reply to email messages.
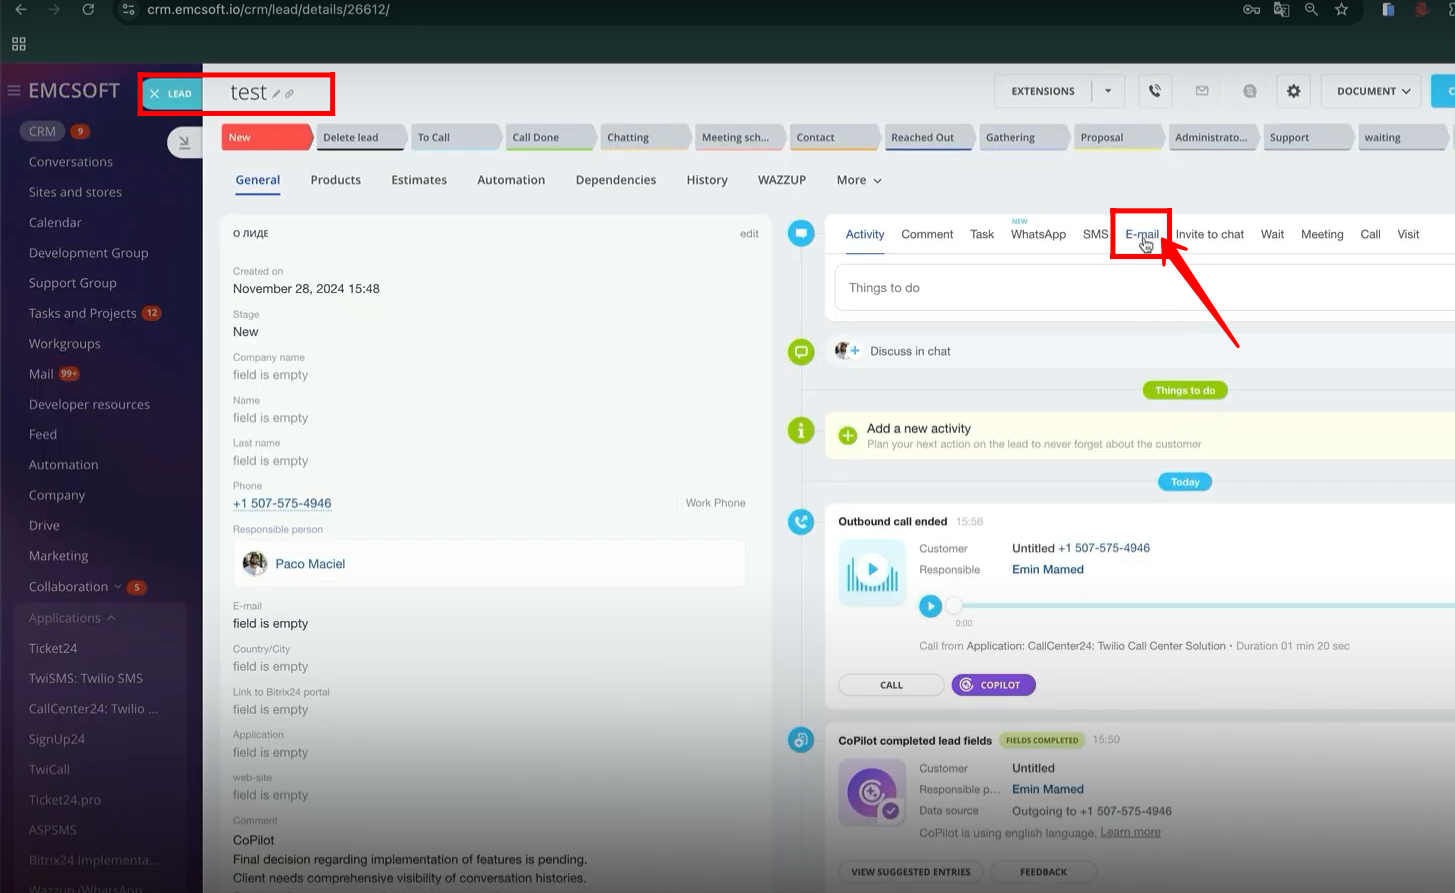
14. Open the “Mail” of the specific user or mailbox name and check the employees who have been assigned to that mailbox. Remember the mailbox name and email address are both “info@emcsoft.io” here.
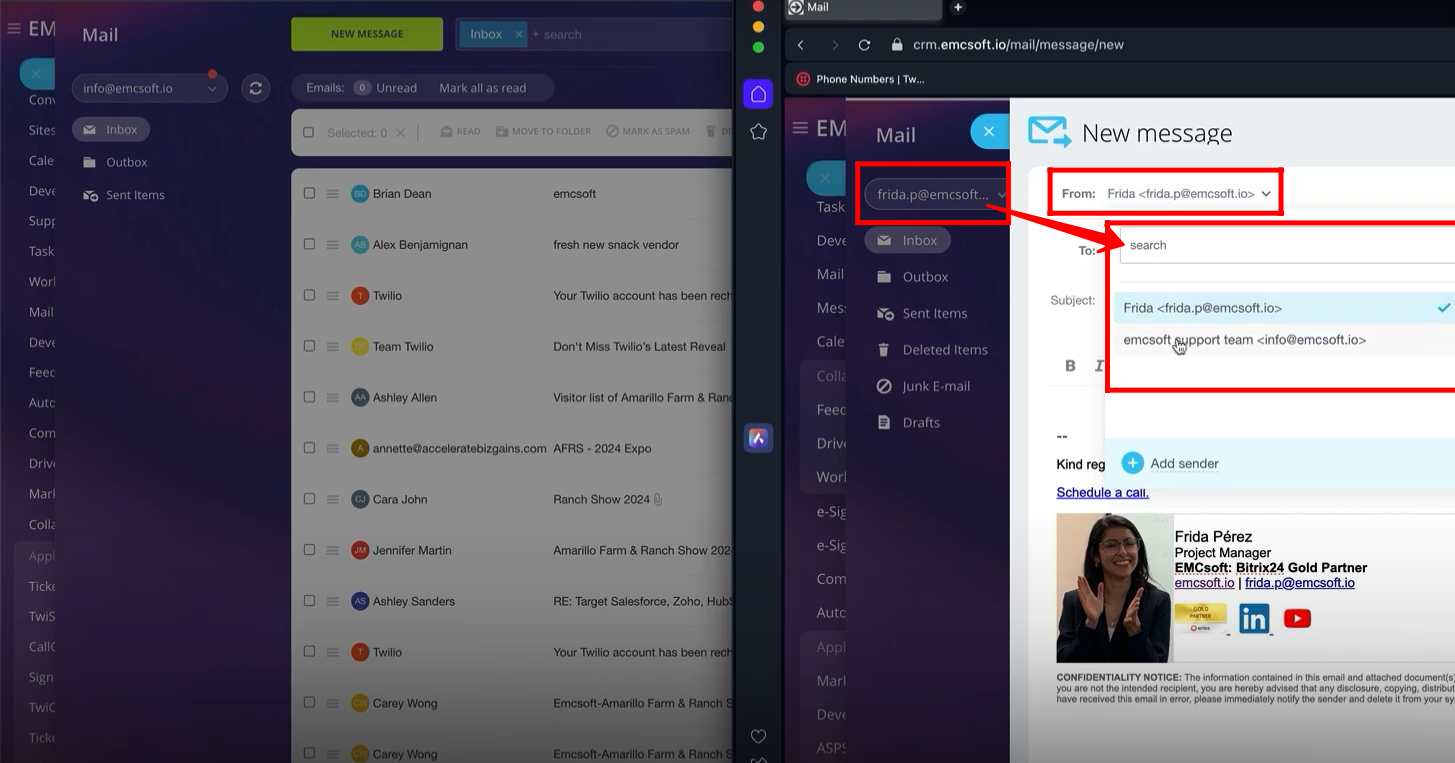
15. Open the portal of another employee who was assigned to the specific mailbox (info@emcsoft.io). Here, you can see, an employee named “Frida” is able to send email message from her email and assigned support team email address also.
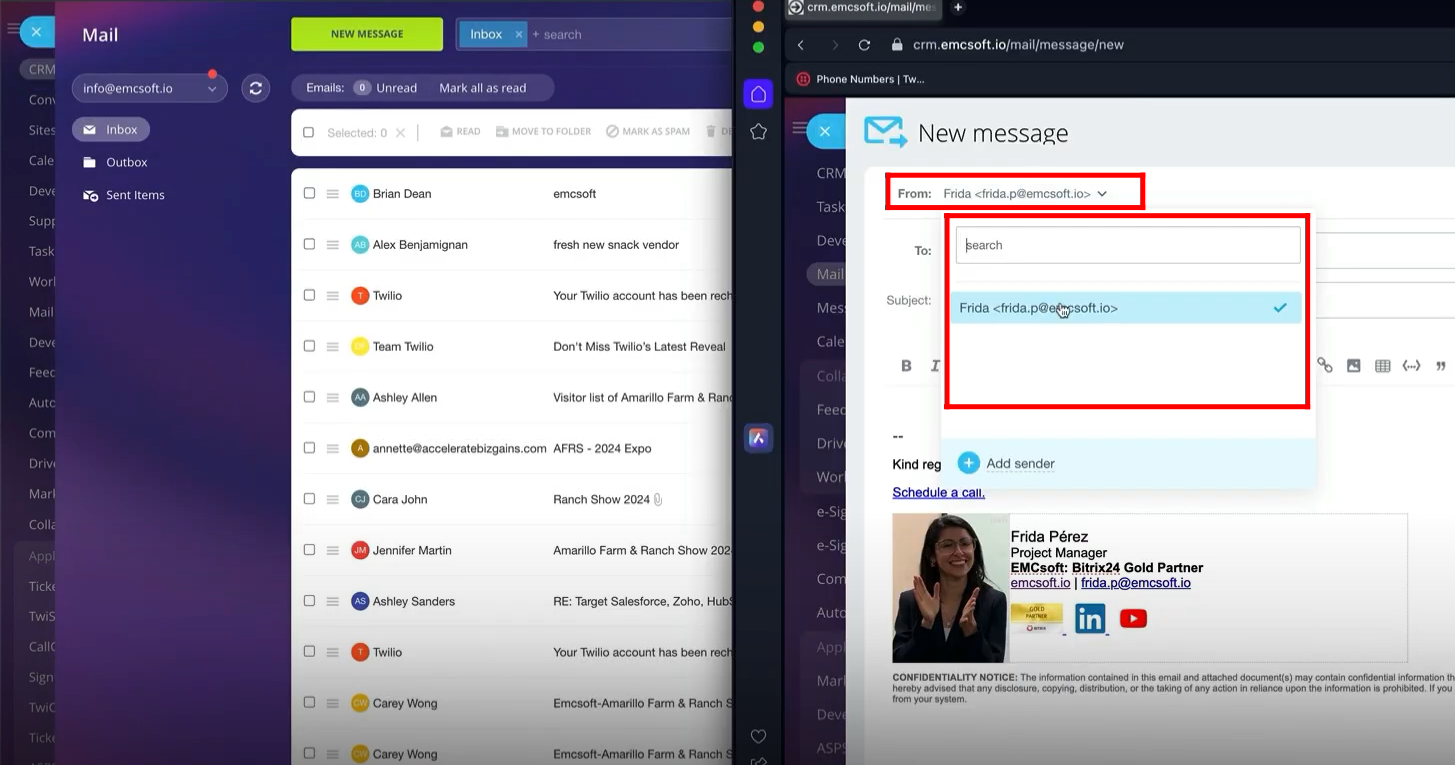
16. Go back to the same mailbox and remove the mailbox access from the employee “Frida” for testing purposes. Save it.
17. Here, you can see, an employee named “Frida” has no access to send messages from the email address “info@emcsoft.io” anymore.
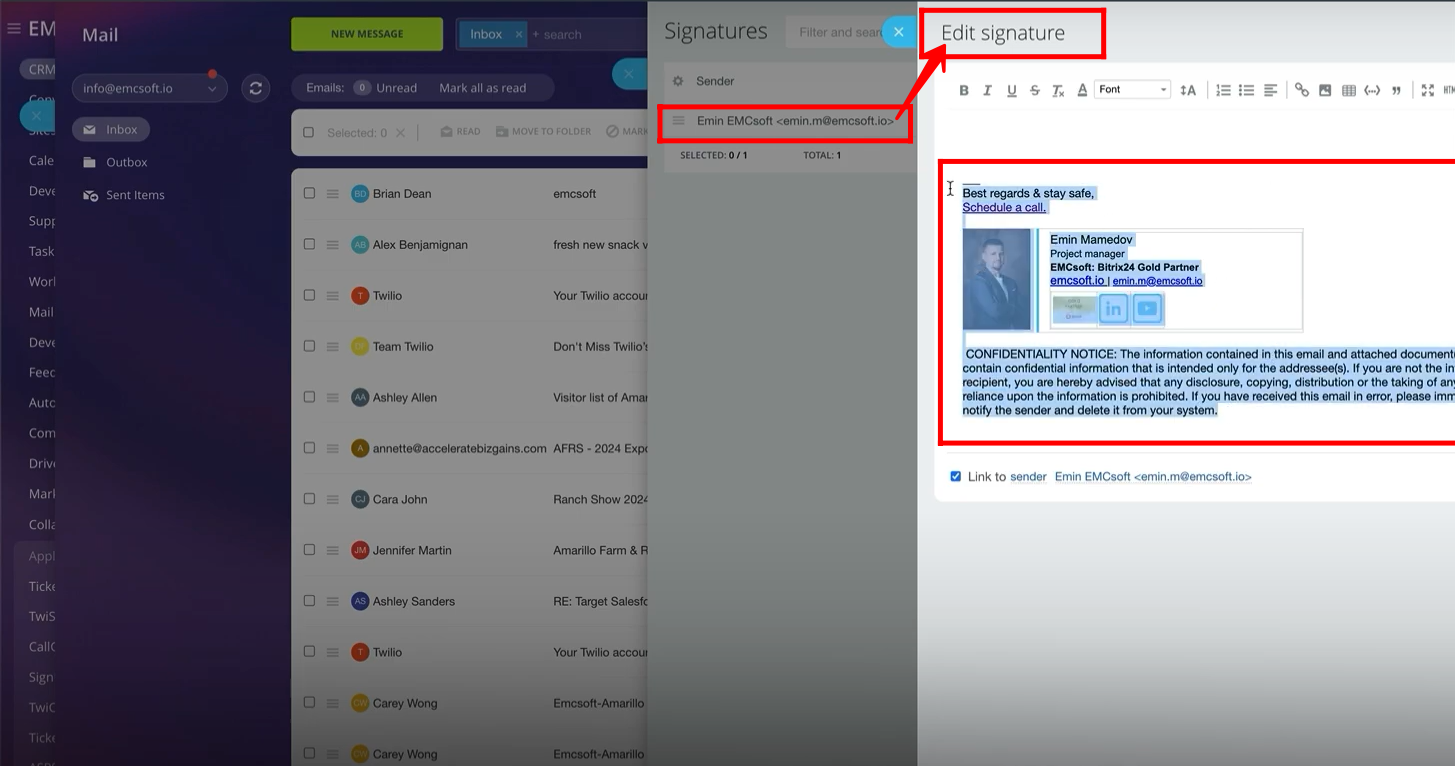
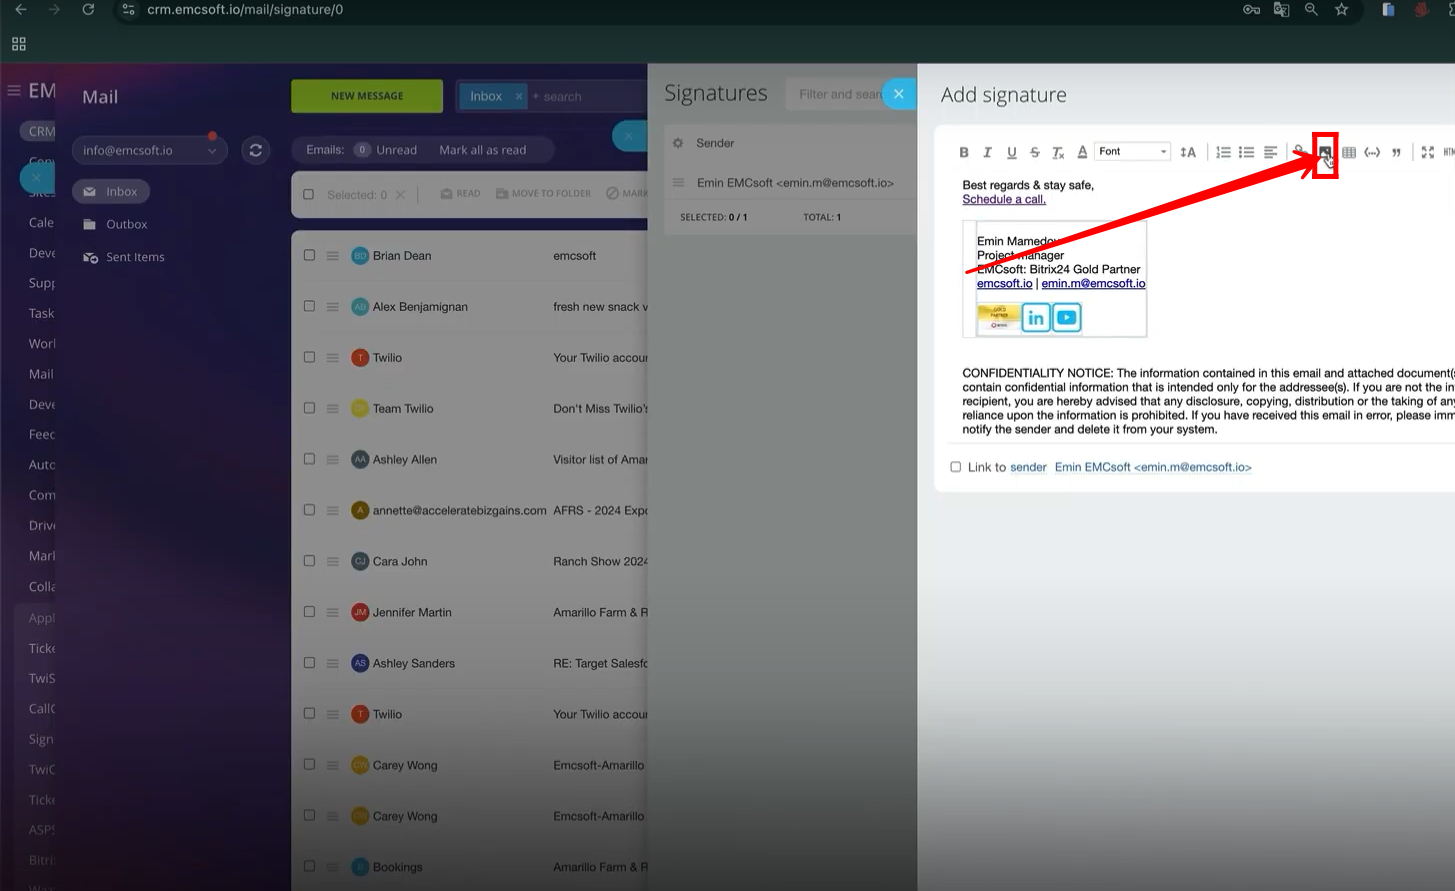
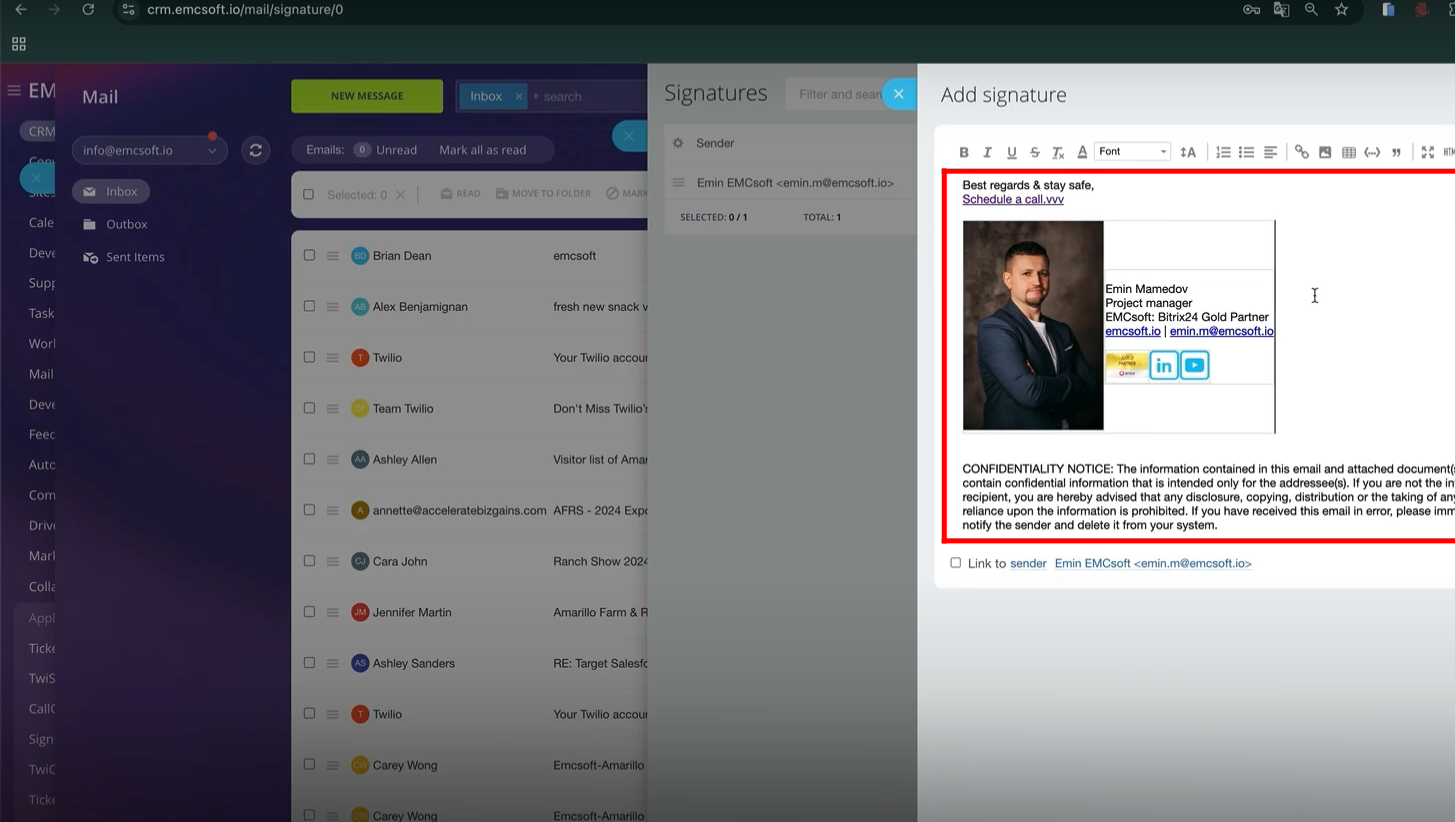
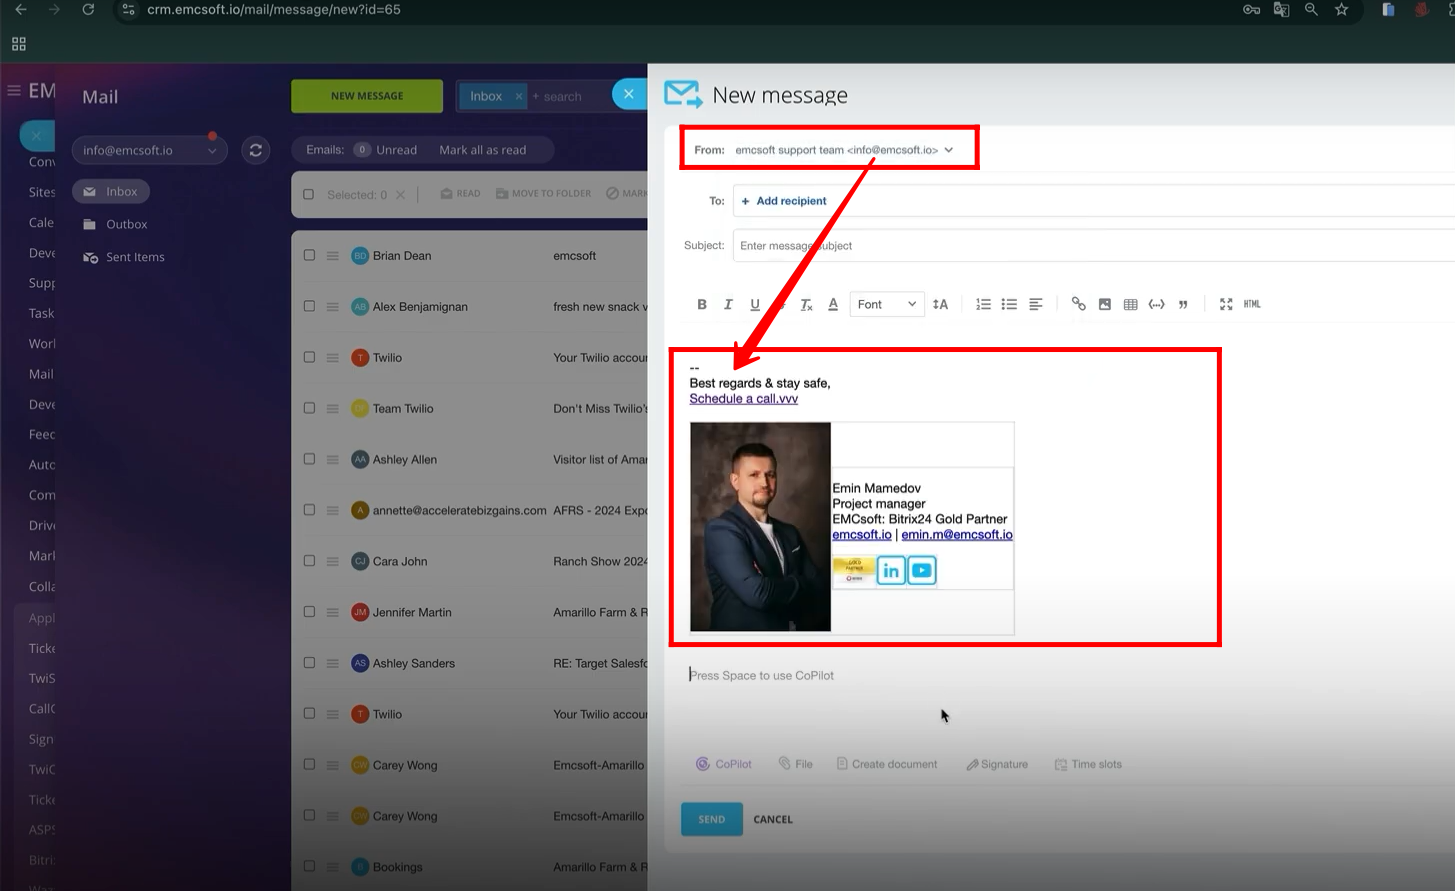
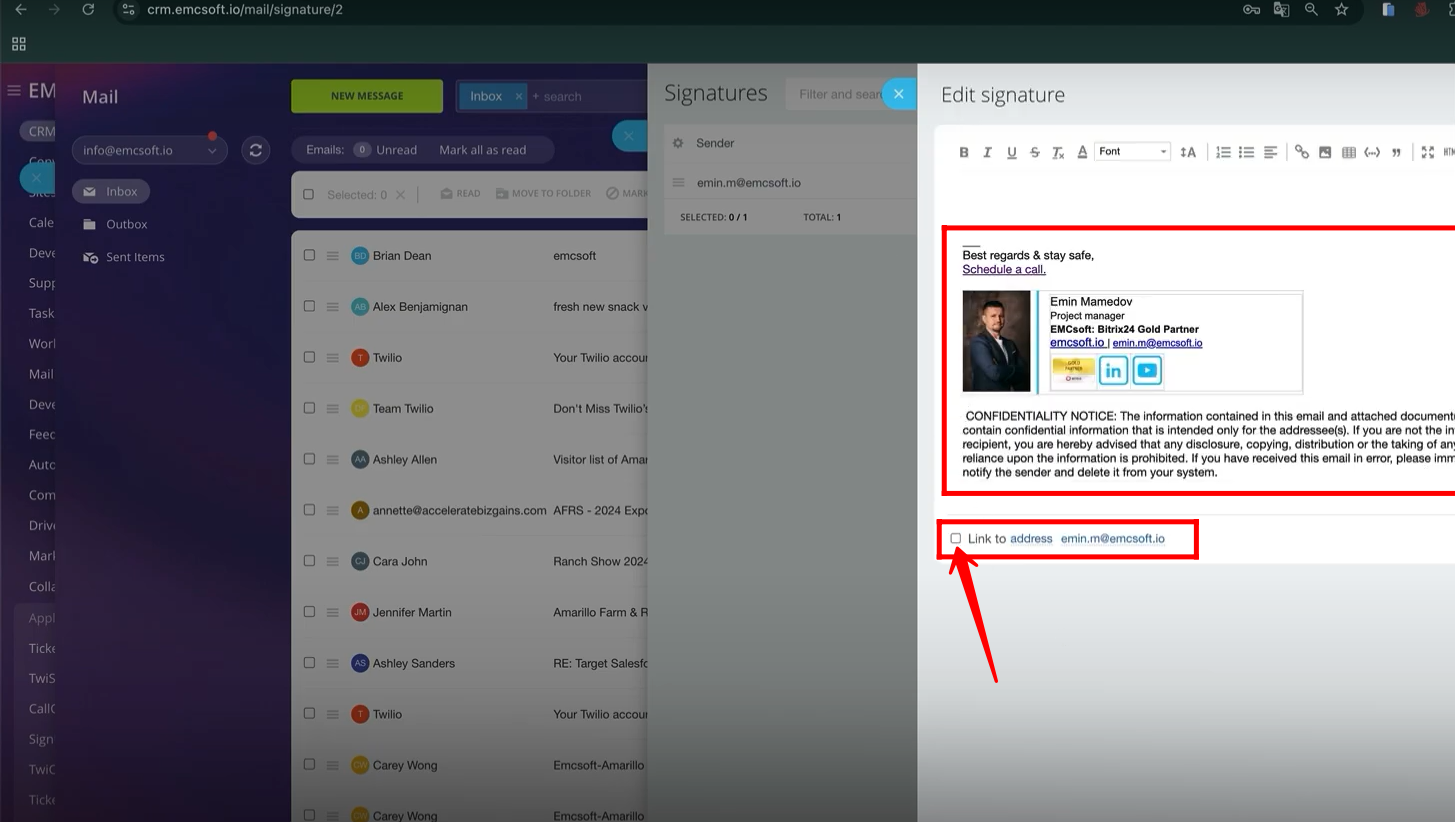
18. You can create “Signatures” for your emails. You can add a new signature or edit a previous one.

19. Open the already configured signature and here you can see the signature contains a “schedule link”, “picture”, “social icons with links” and “confidentiality notice”. Copy all the details to paste in the new signature configuration for testing purposes.
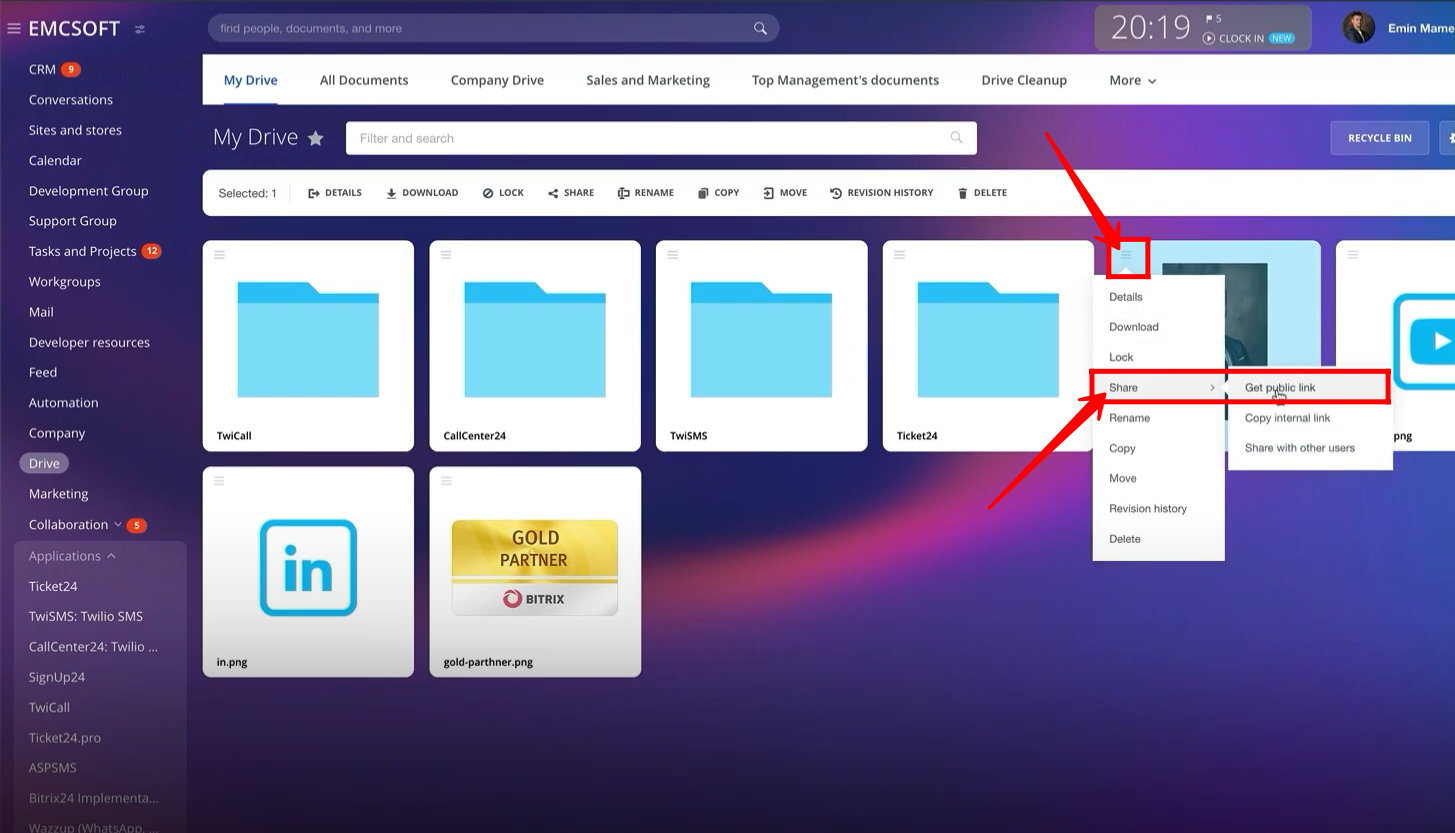
20. To use images in the signatures, the pictures must be uploaded to “Drive” in EMCsoft.

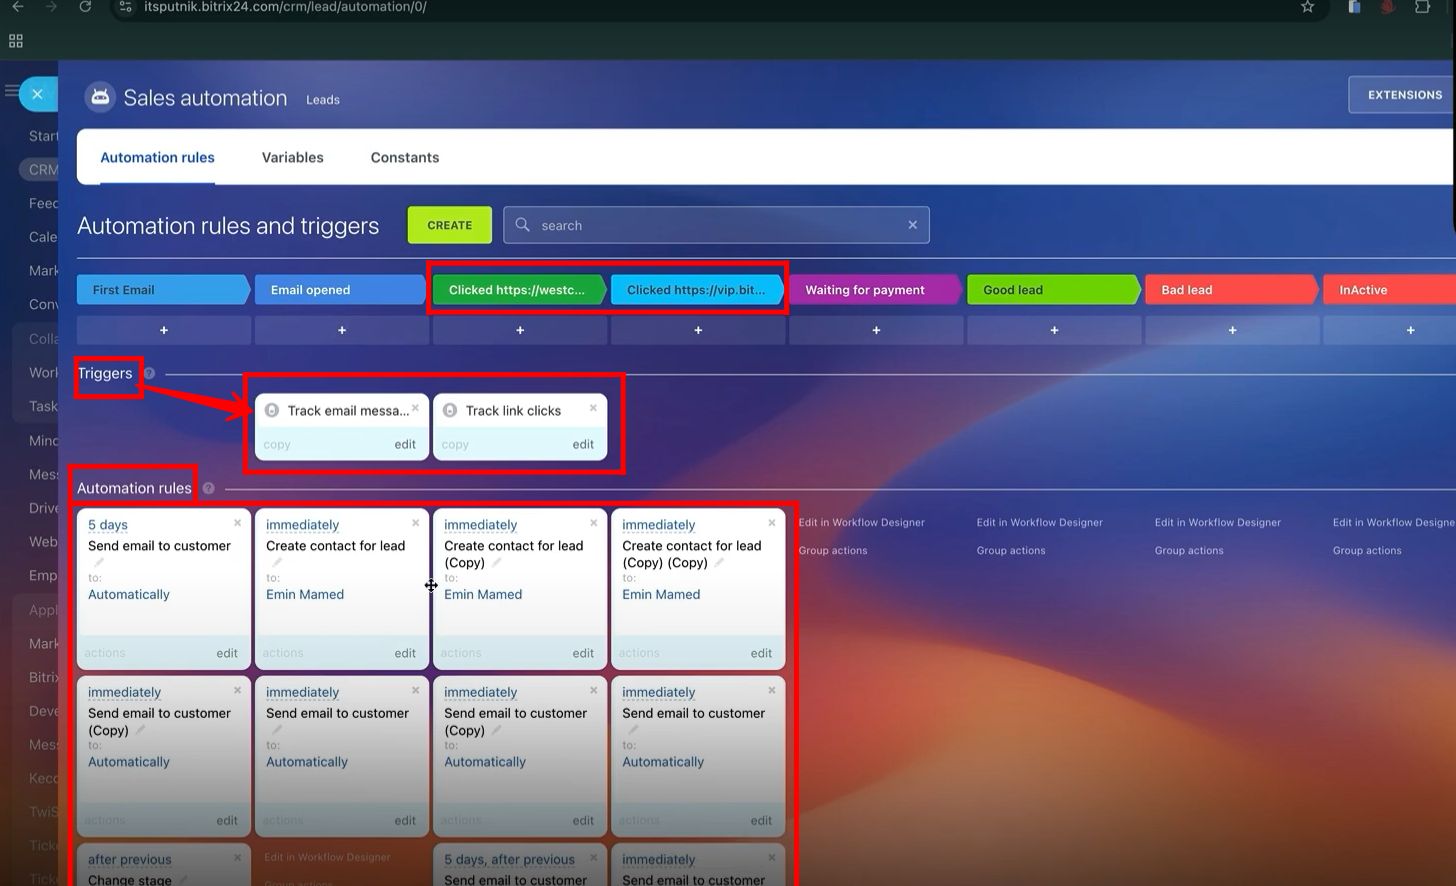
21. Click the “options” icon on the top-left corner of the image to be used in the signature. Go to “Share” and choose “Get public link”.
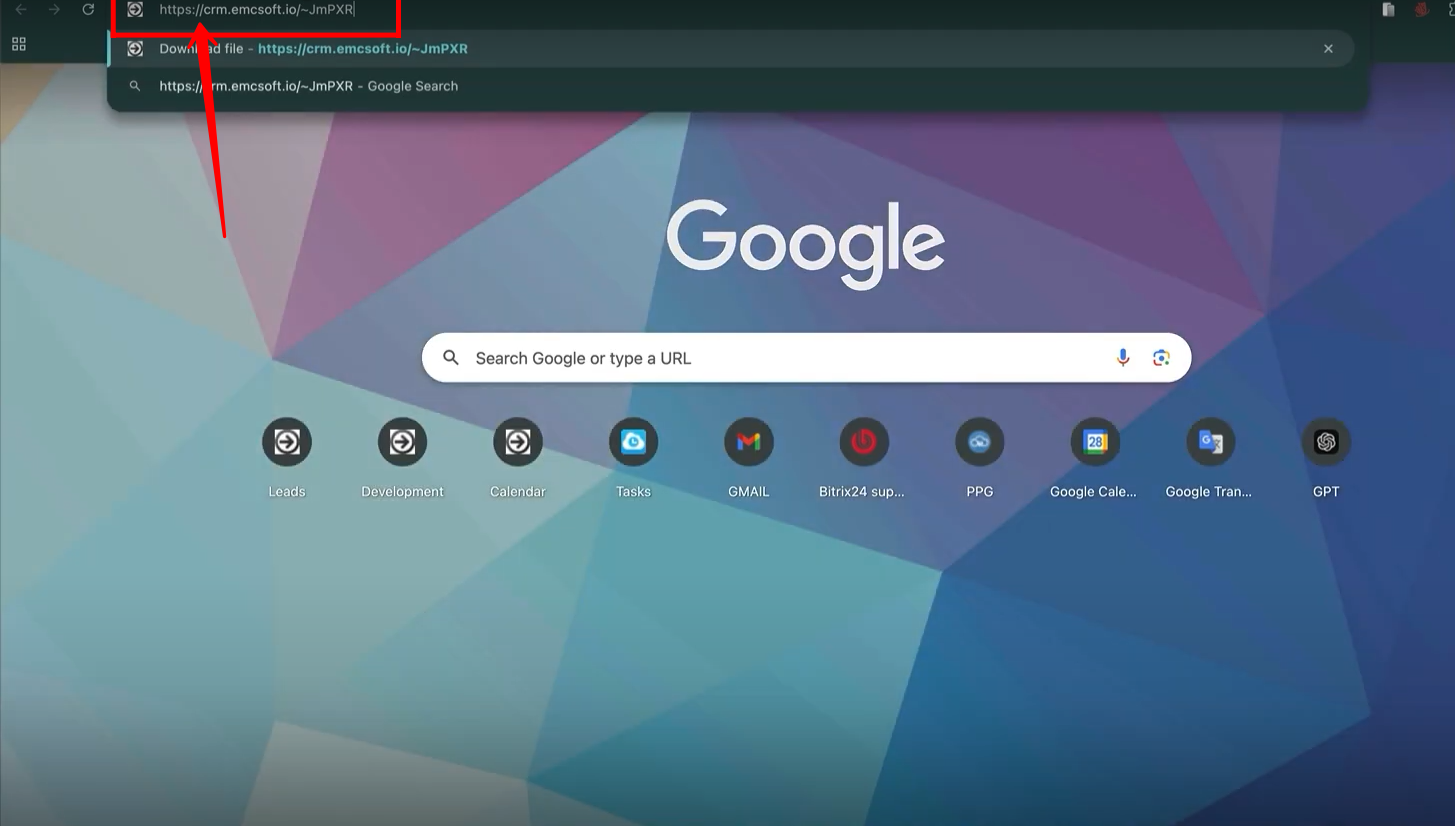
22. Paste the “public link” in the search bar and open it.
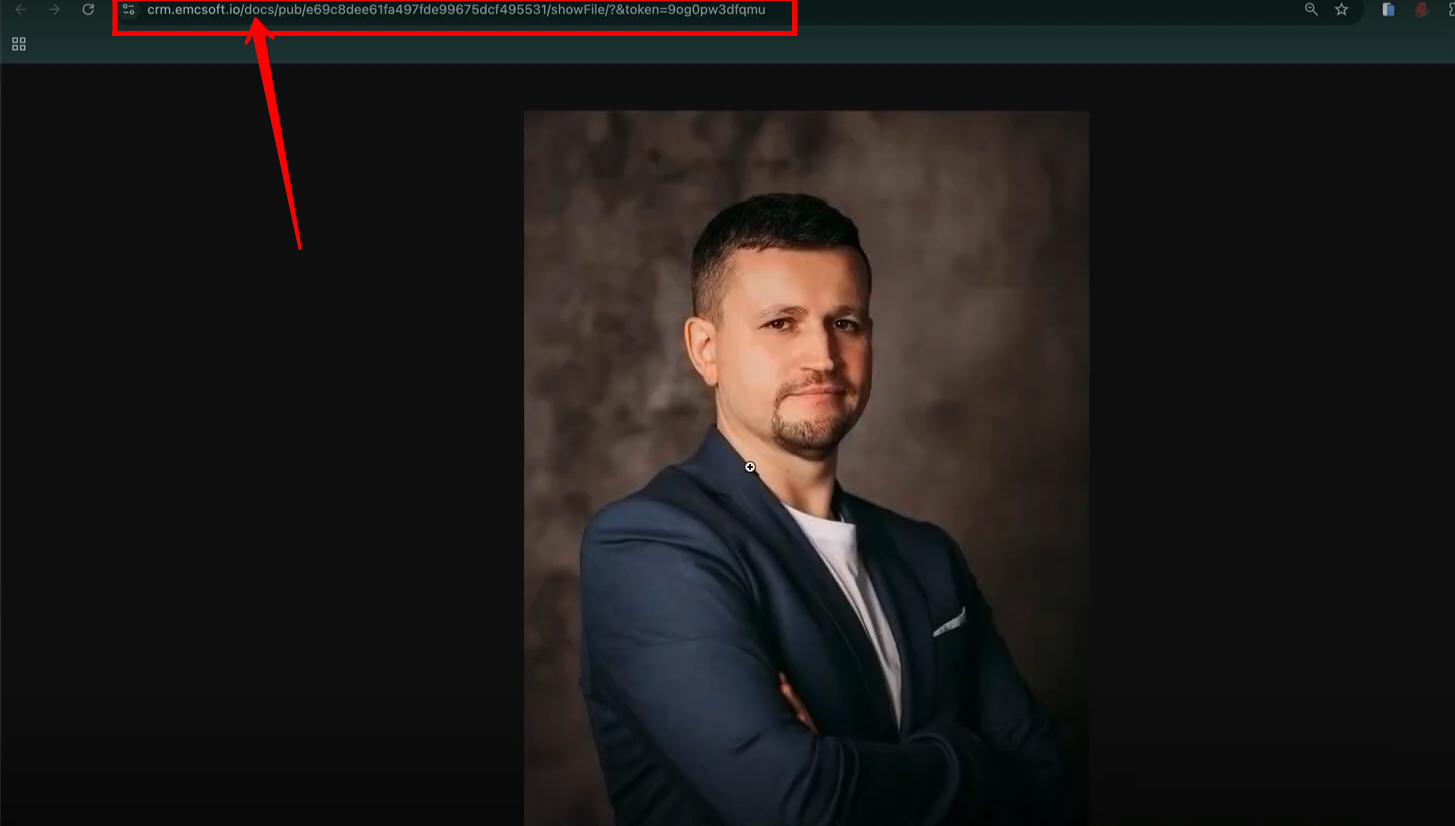
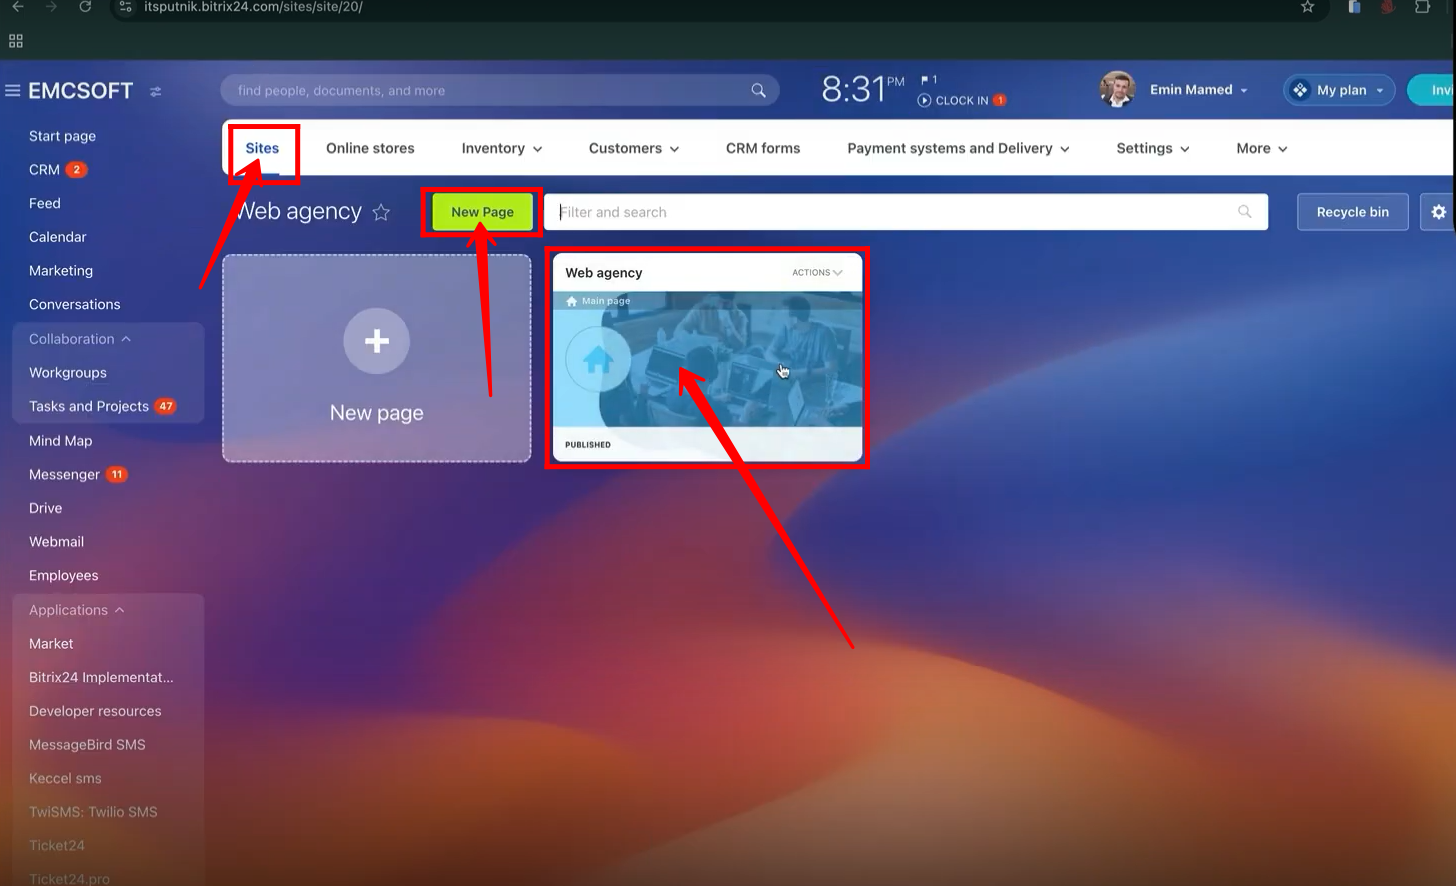
23. You will see the image details. Open the image only in new tab.
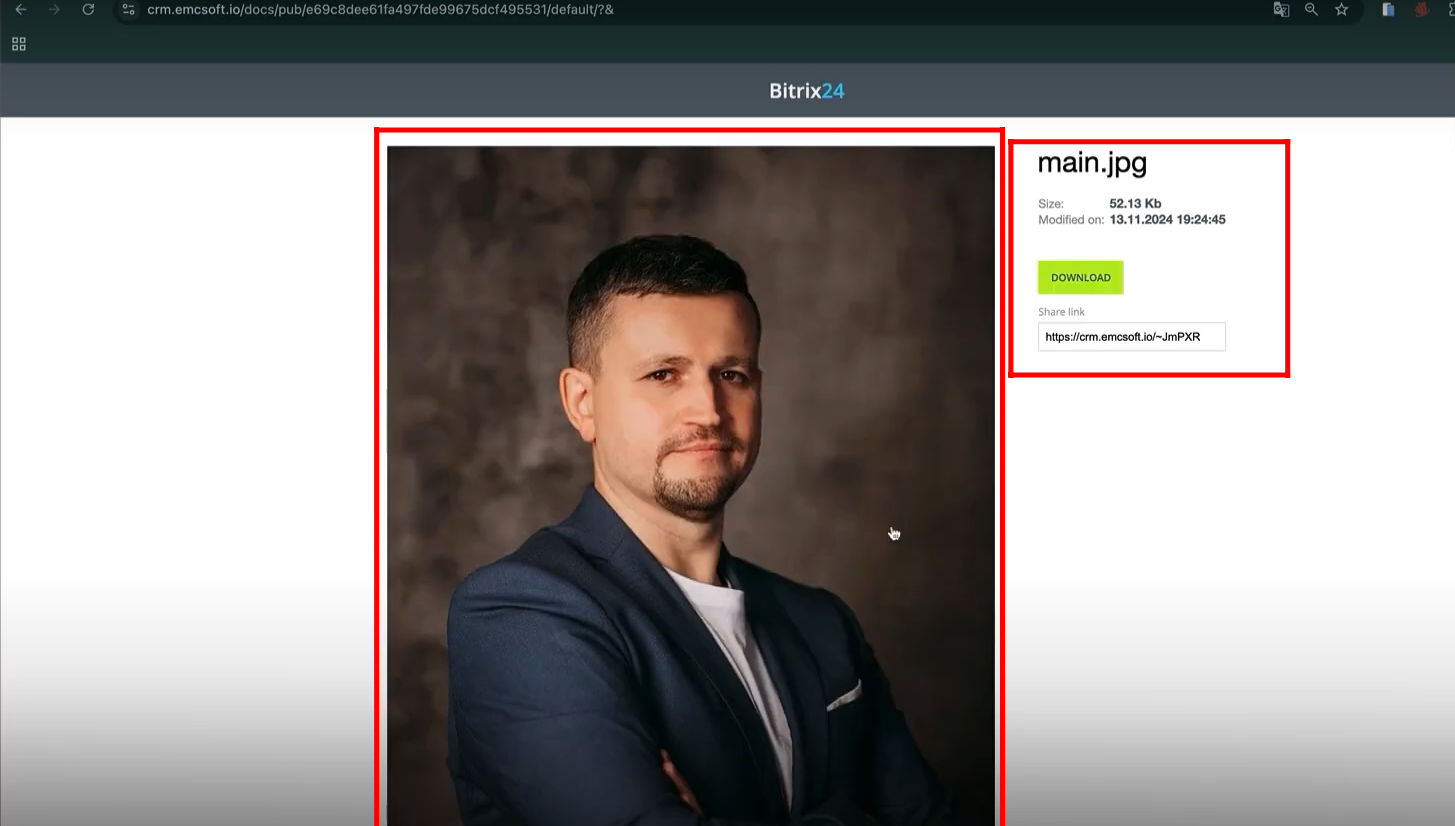
24. Copy the link to the image.
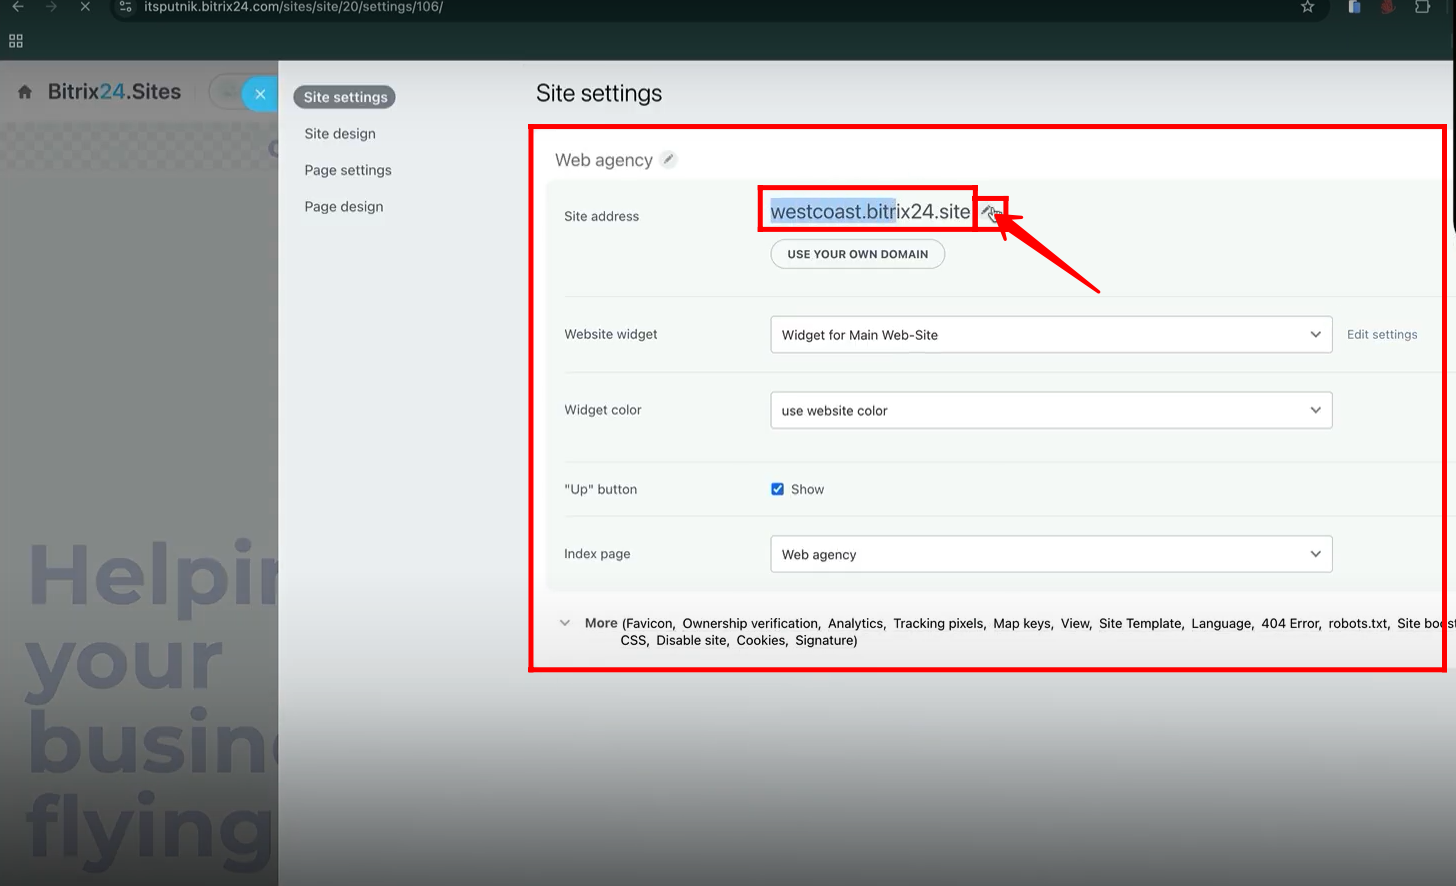
25. Go back to add a new signature and paste the details of the previous signature to test here. Remove the image and add it again by clicking the image icon.
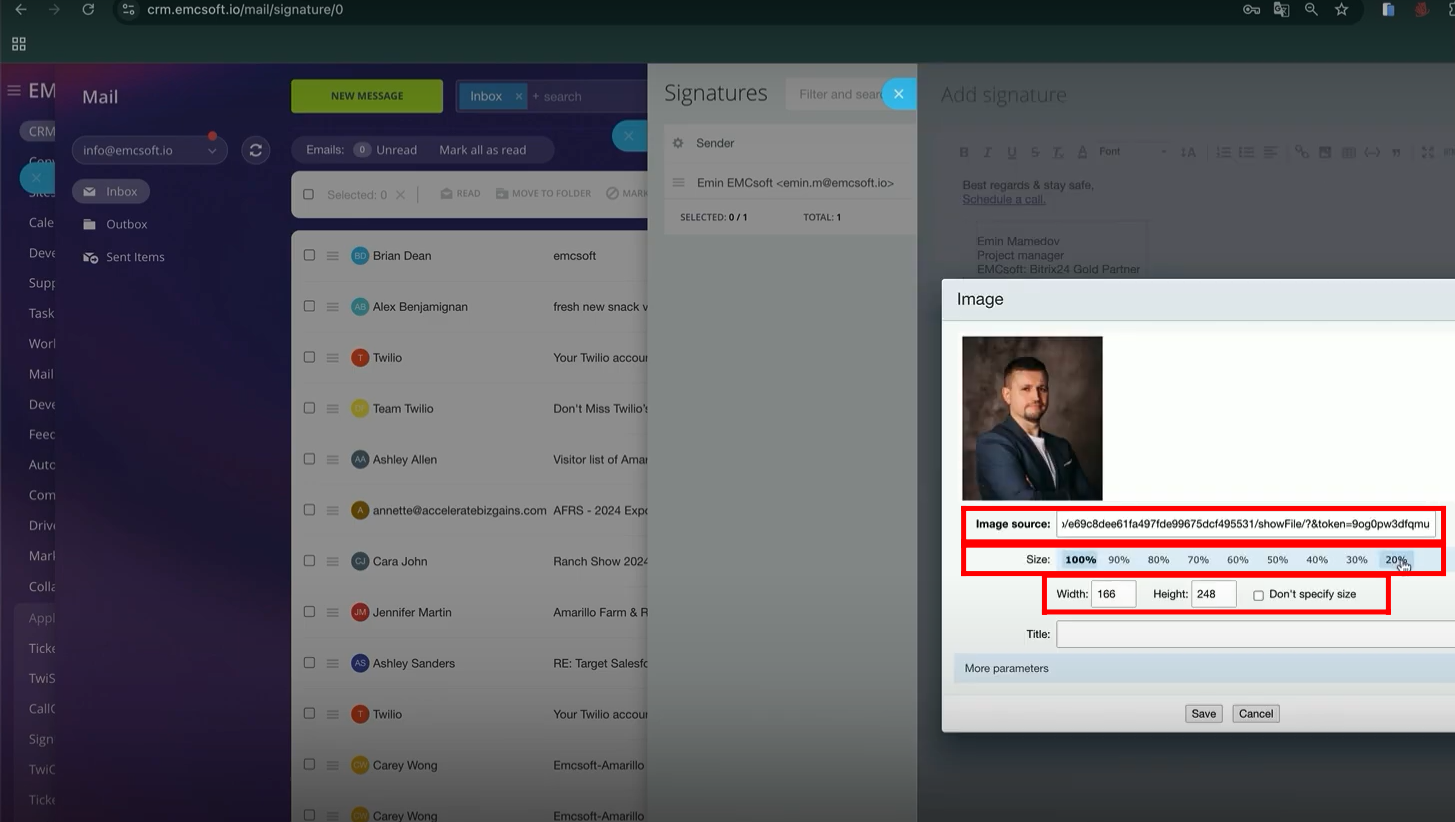
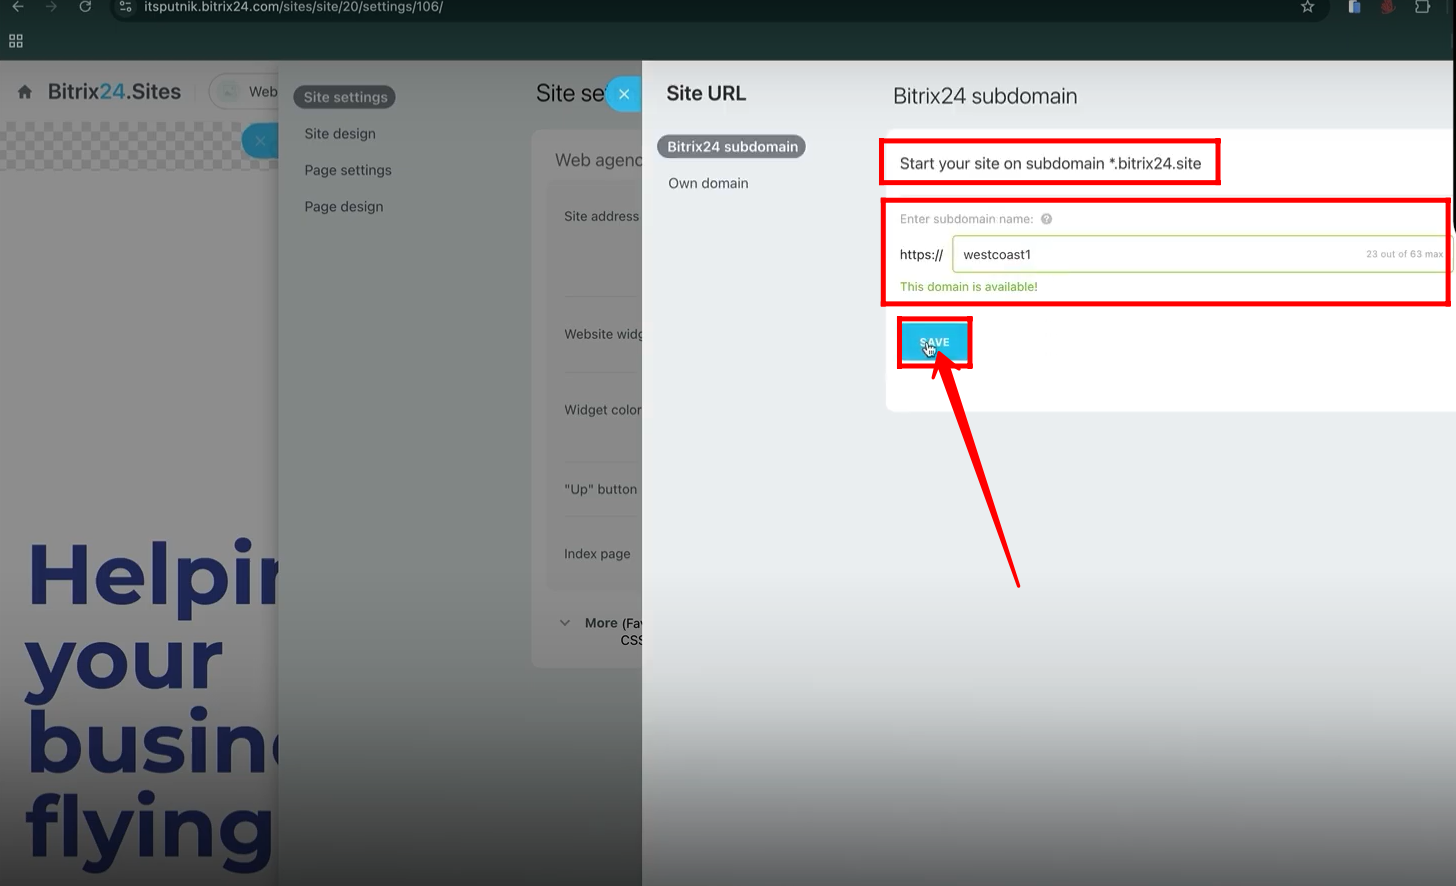
26. Paste the link as an image source. Adjust the size percentage of the image to be placed in the signature. Fix the width and height of the image. Write the title of the image. Click Save.
27. You can make a text as a hyperlink to your calendar for scheduling meetings. Select the text and click the “hyperlink” icon.
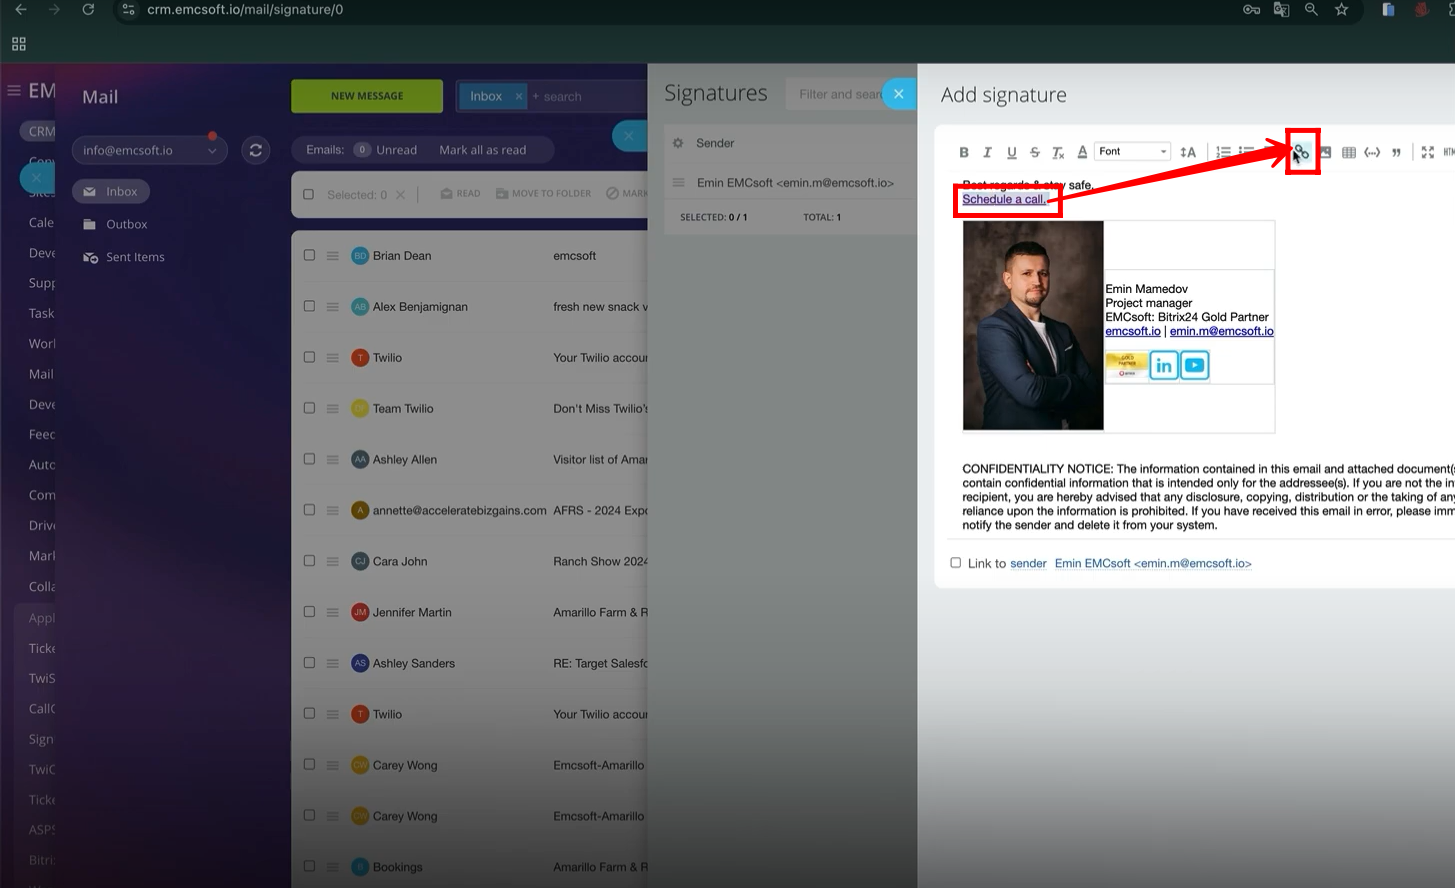
28. Select the “Link type”. Modify the text and add the link.
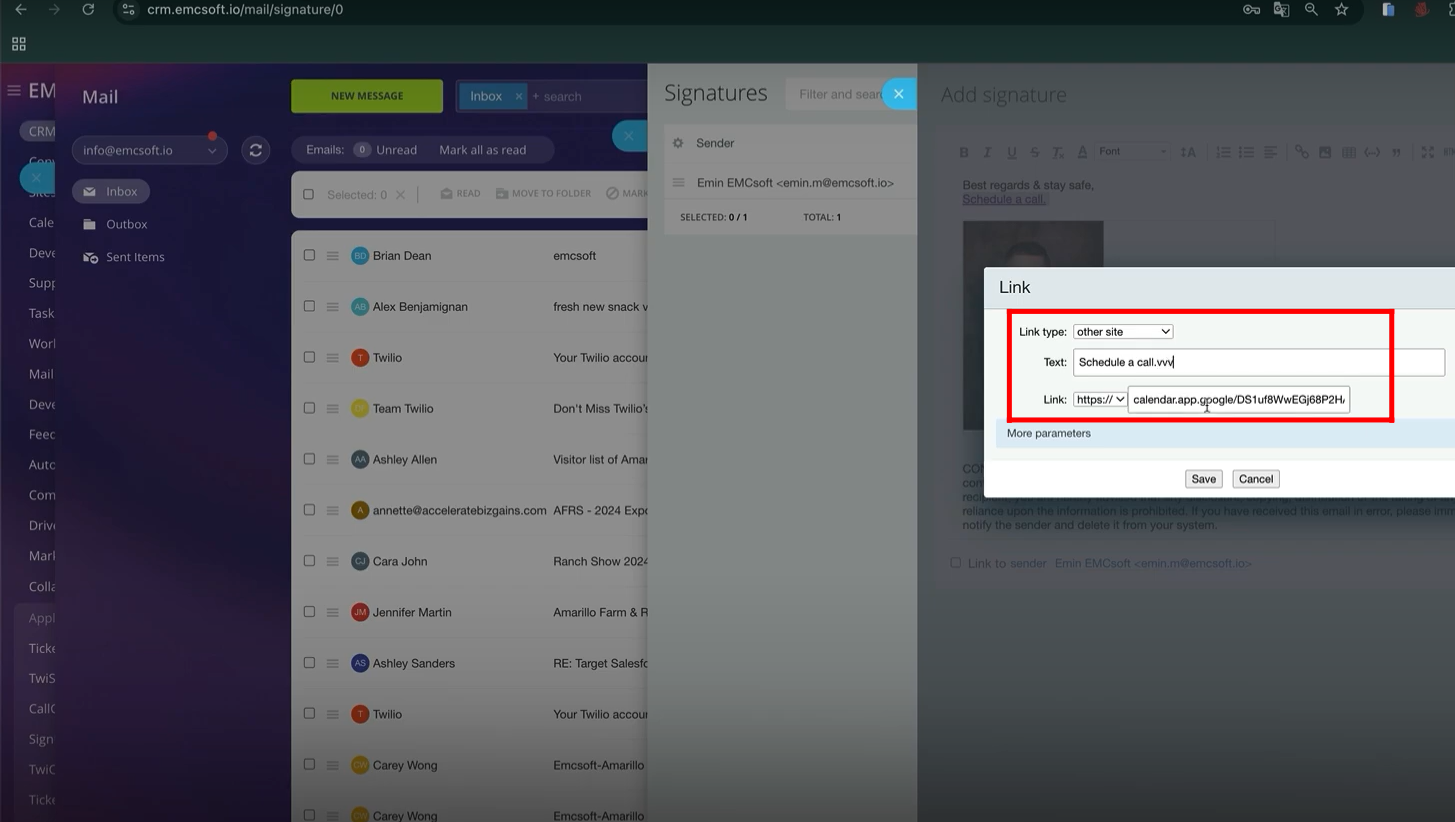
29. Modify the signature format according to your own business requirements. For now, we will move forward with this format.
30. If you want to link this signature with another email address, then check the box.
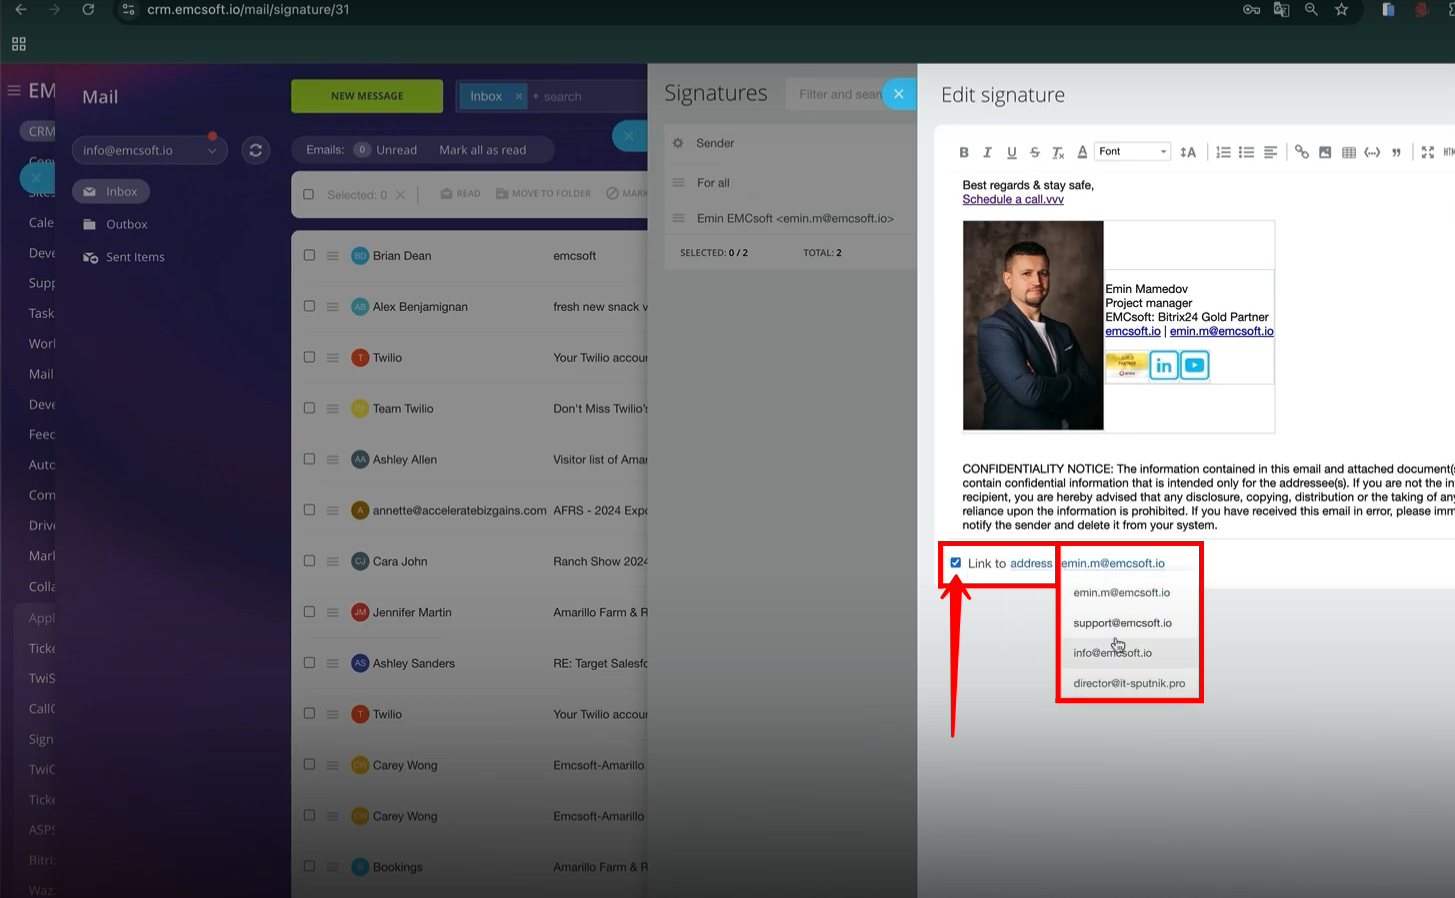
31. Create a new signature and edit it. For testing purposes, after removing the “confidentiality notice”, the signature format has been linked to the email address “info@emcsoft.io”.

32. The original signature format is linked to the email address “emin.m@emcsoft.io”.

33. Go back to write a new email message. After selecting the sender as “emin.m@emcsoft.io”, the signature with confidentiality notice will appear as configured before.
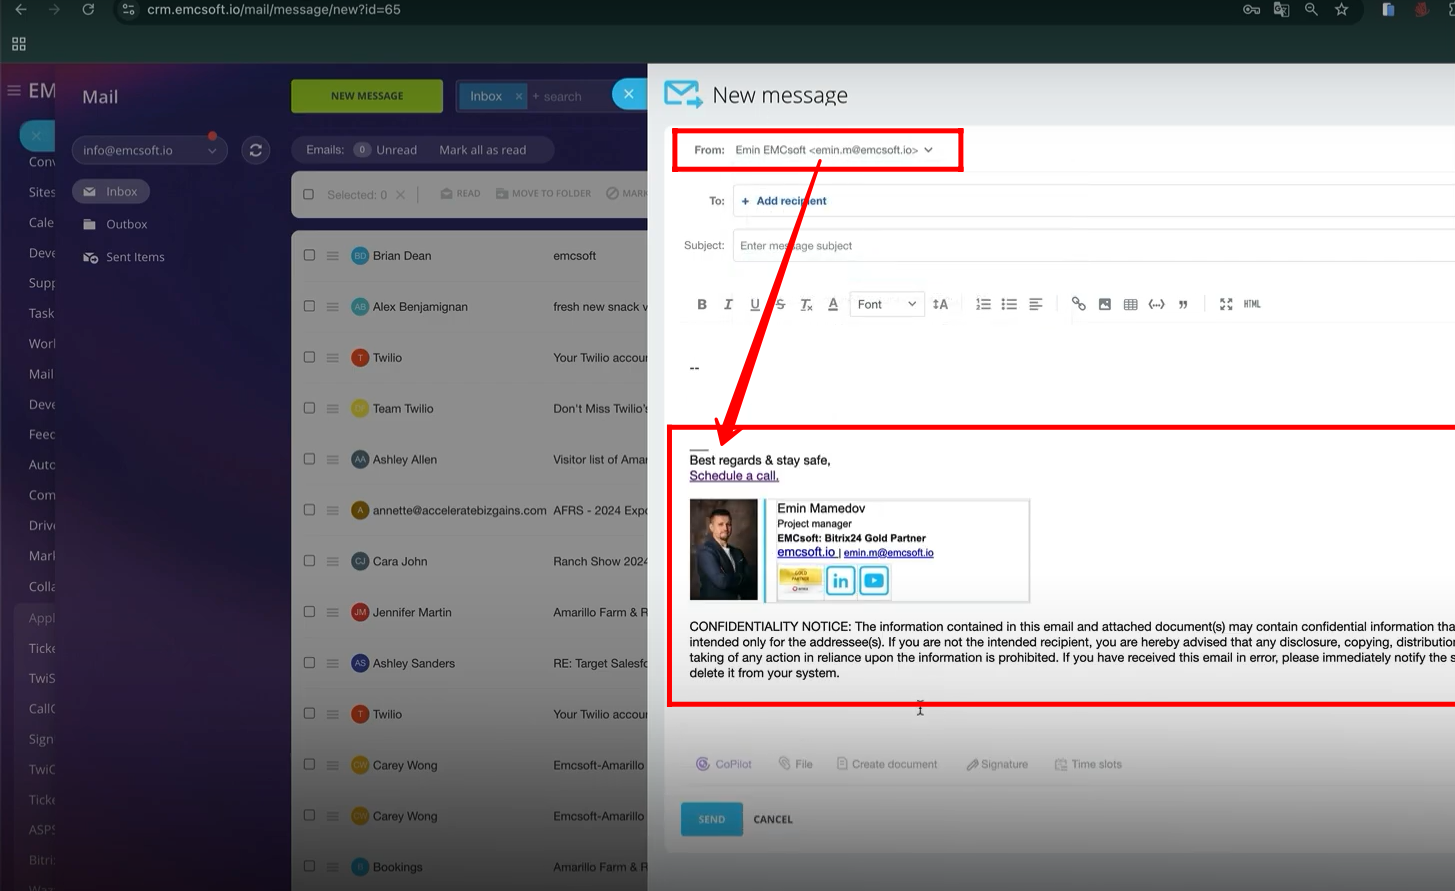
34. Change the sender to “info@emcsoft.io”, the signature without confidentiality notice will appear as configured before.
35. Go back to edit the signature and unlink the default format to use it for all senders.
36. Open any lead for testing purposes or generate a new lead. Go to the “E-mail” tab.
37. Generate an email text as well as the HTML form of the text from ChatGPT. Copy the HTML form of the email message.
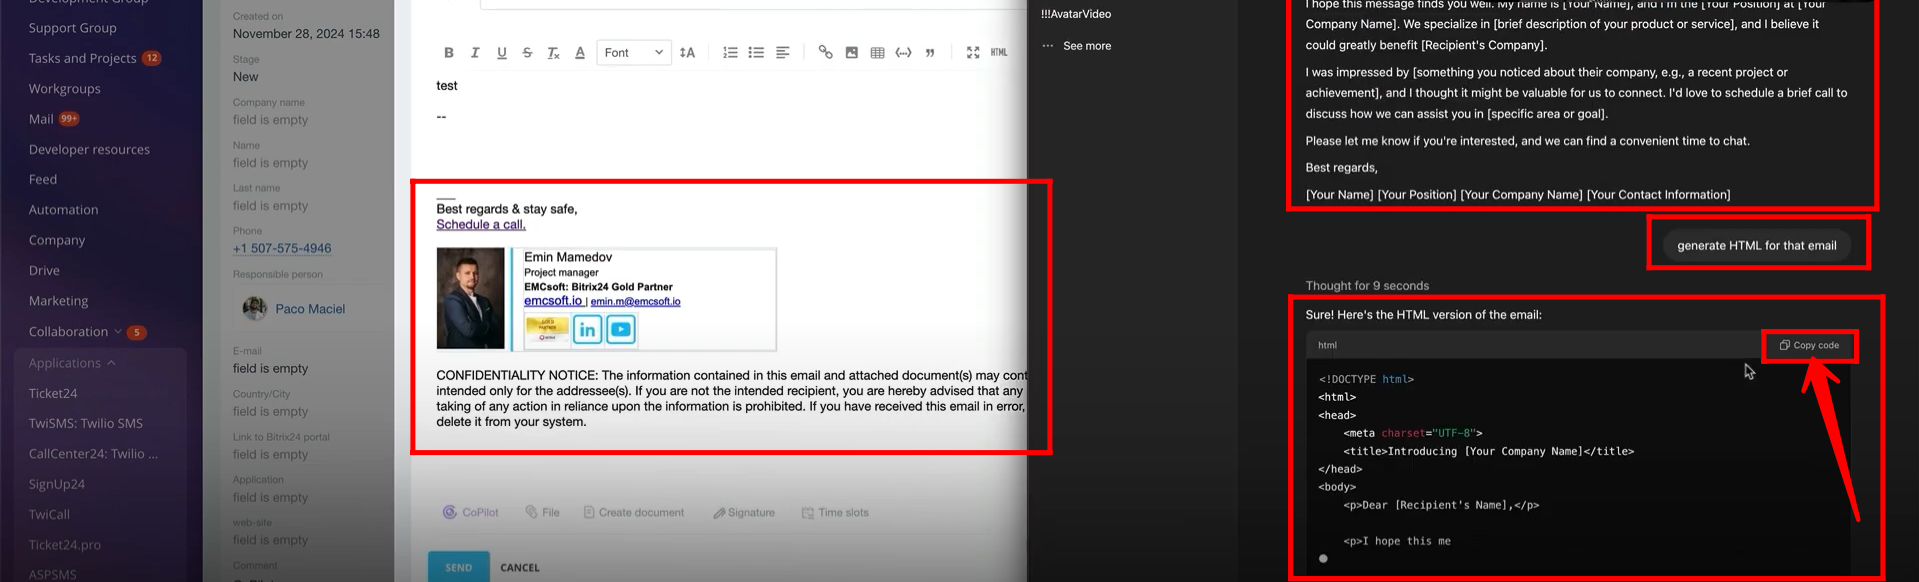
38. Go back to the “HTML” option within the email message editor. Paste the HTML form of your email at an appropriate place where you want.
39. Unselect the “HTML” option and you will see the normal form of the email text.
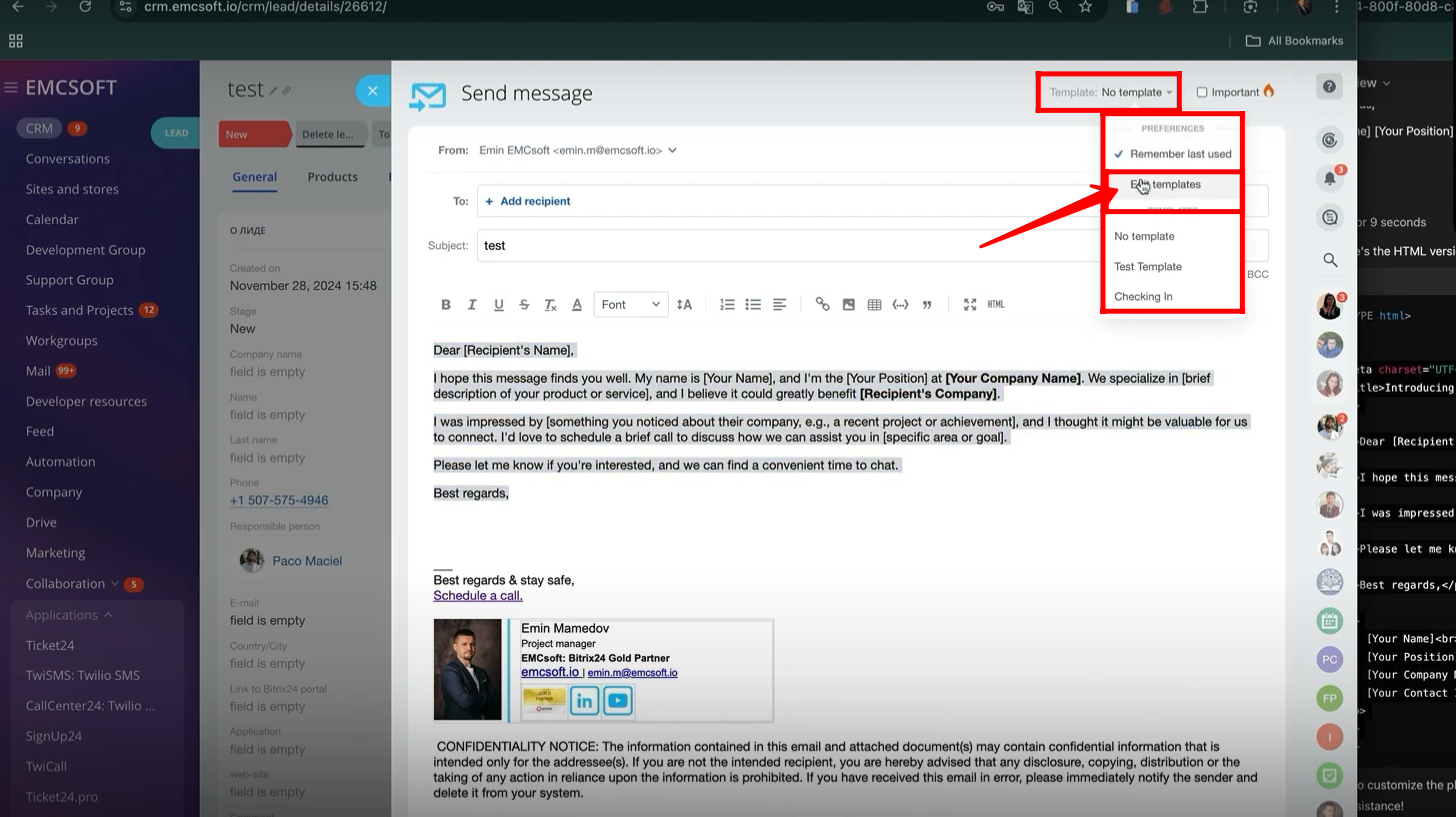
40. Similarly, to modify other templates, go to “Edit Templates”.
41. To add a new template, click “Add E-mail Template”.
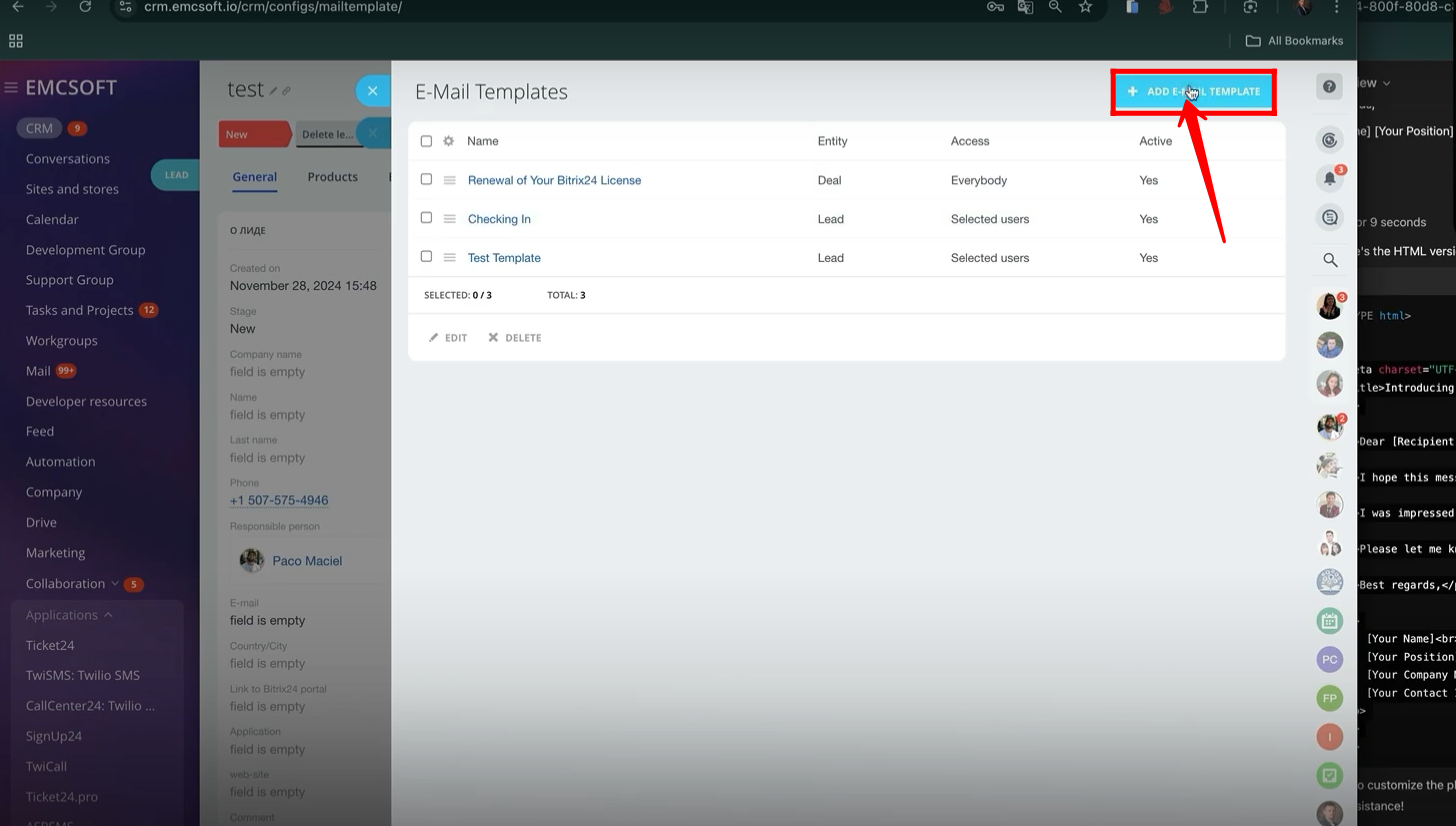
42. In the configuration of the email template, give the name of your template. Bind the e-mail template to the “Lead” or “Deal” according to your requirements. Share the template with other employees, so they can easily access the e-mail template. Select the sender and give the subject to your e-mail template. Add the e-mail template body in the “HTML” form for better flexibility to edit the text. You can also use “Copilot” to enhance the structure of the text or rephrase the text.
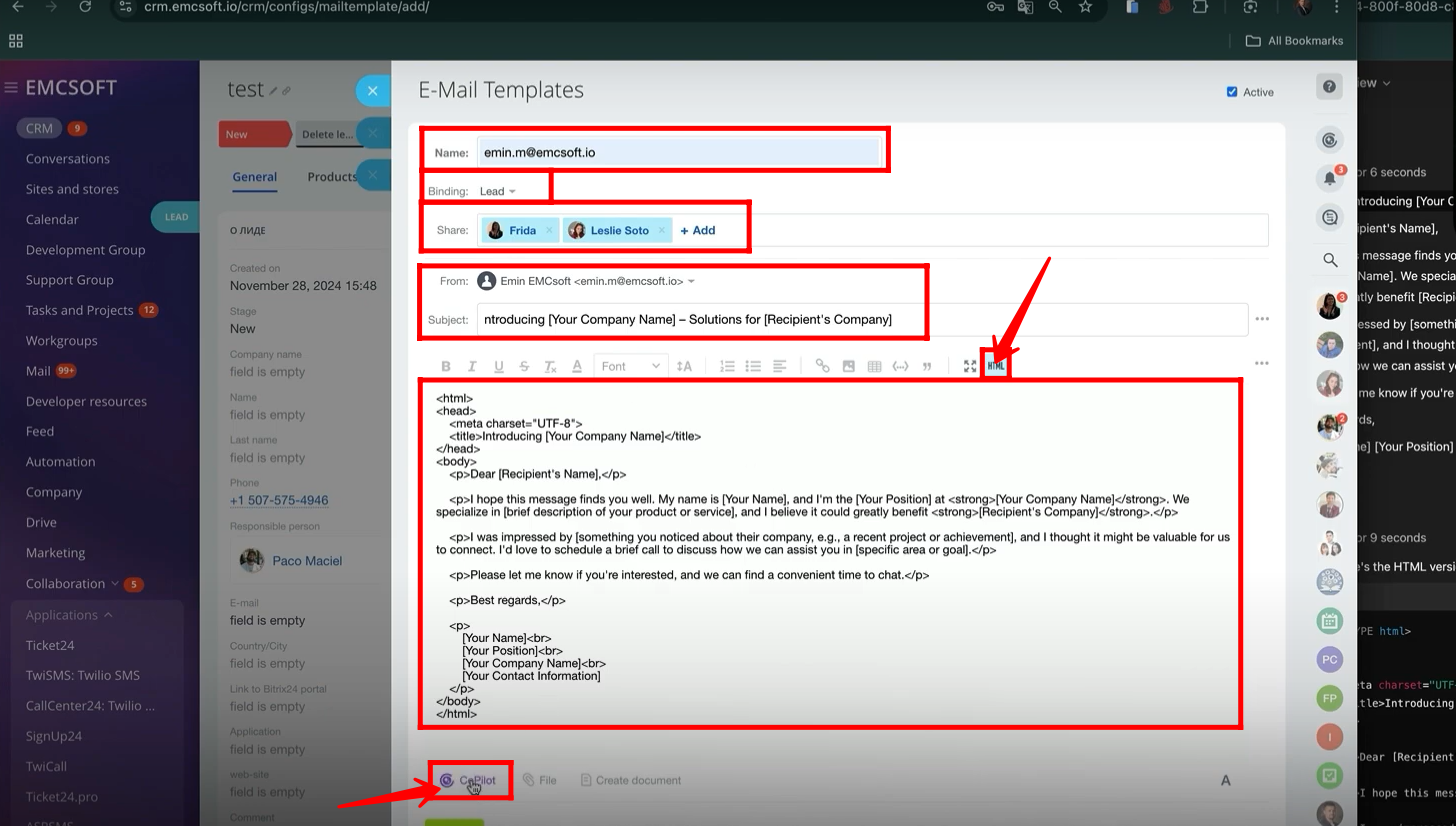
43. You can see that the e-mail body has been changed by the “Copilot”. You can improve the text structure according to your needs. Save it.

44. You can view that for writing a new email message, the previously configured template has been saved in the templates and can be used easily. Select the template.
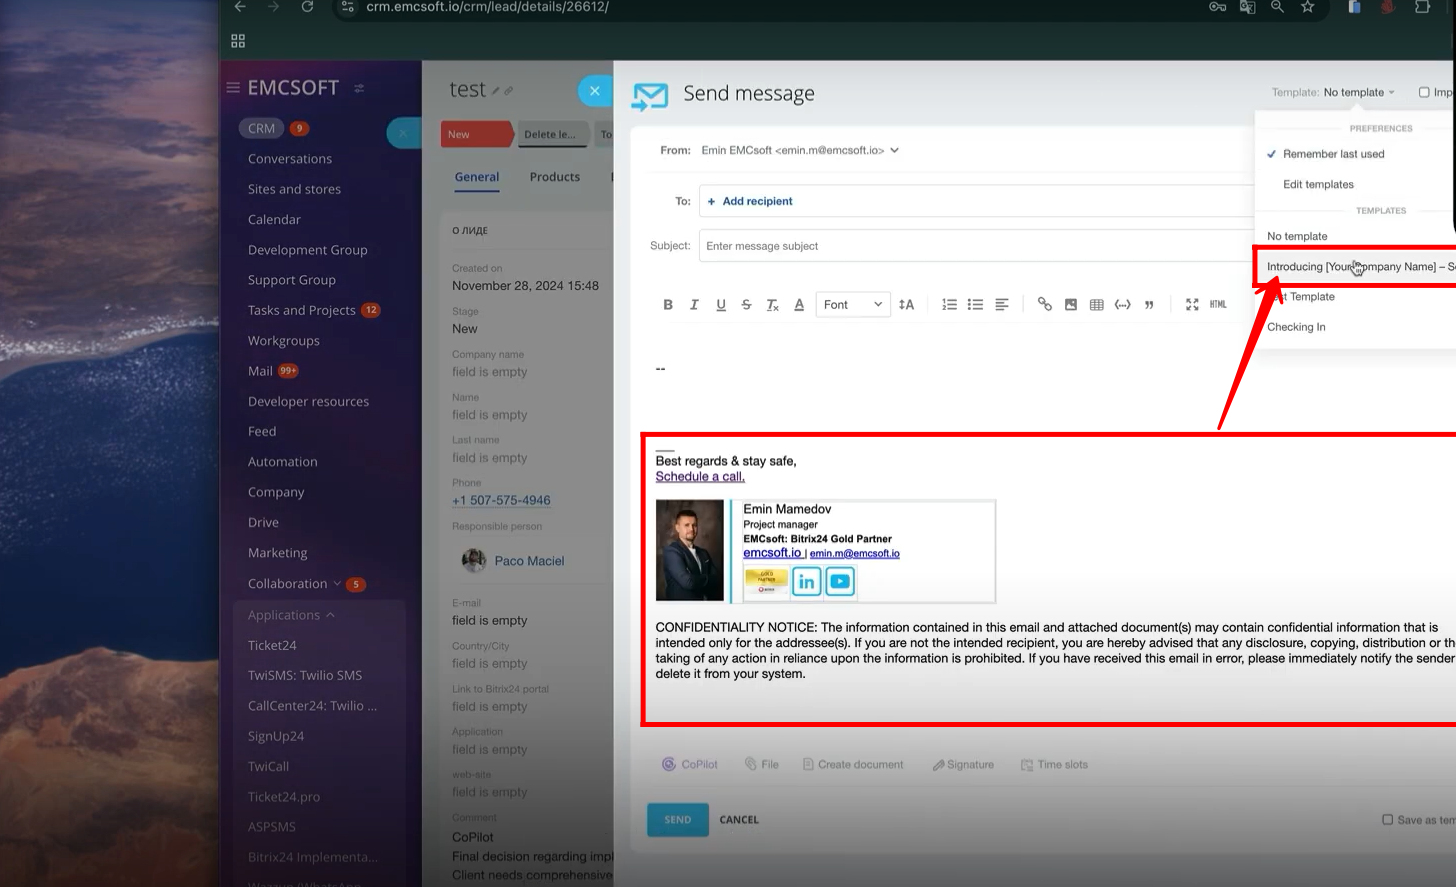
45. The template structure configurations have been automatically filled in the email details. That’s how, you can use saved signatures and e-mail templates.

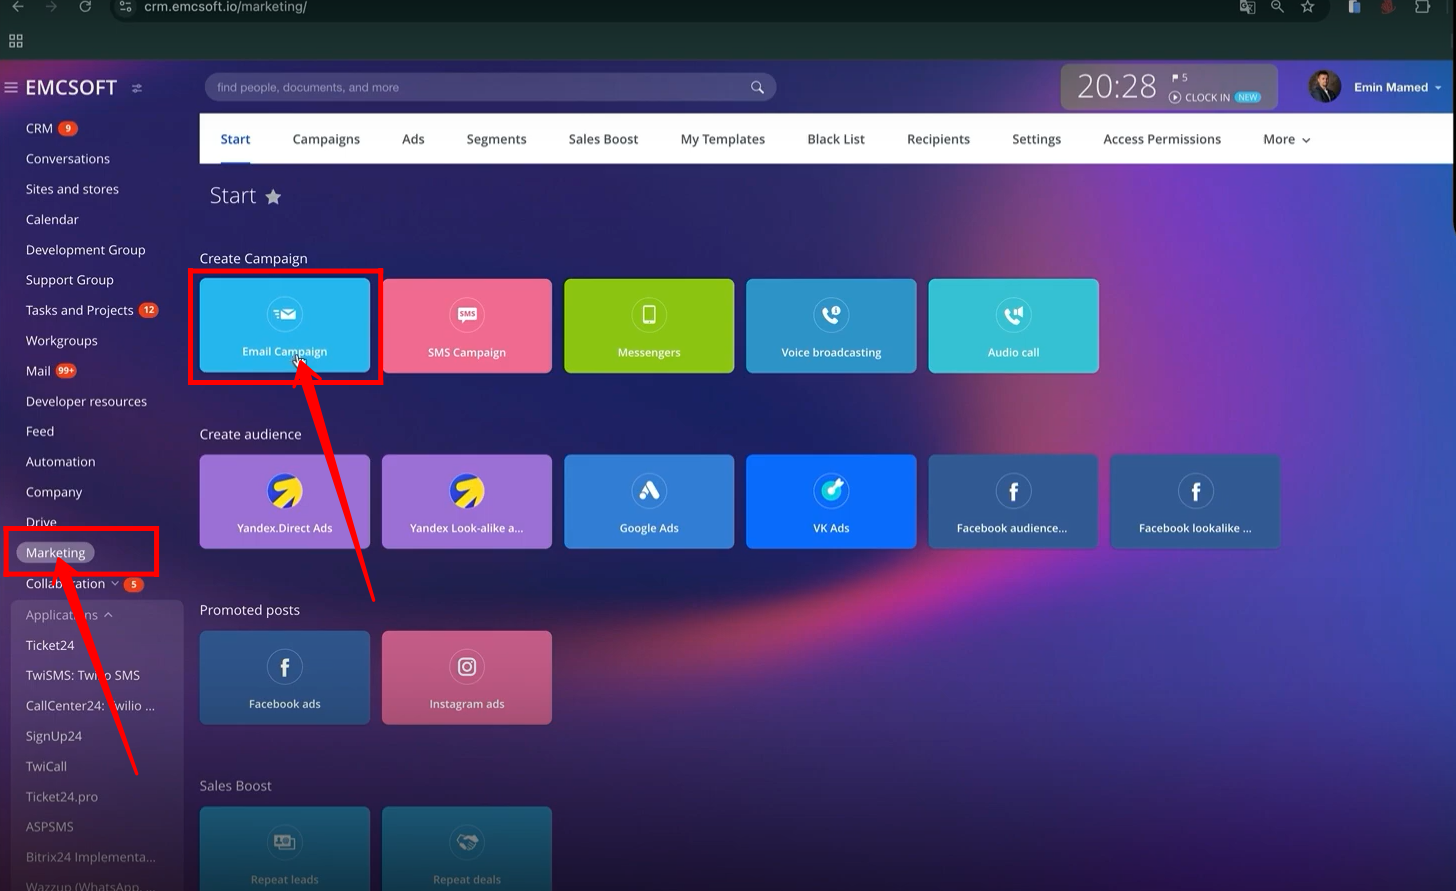
46. Now, go to “Marketing”. Click “Email Campaign”.
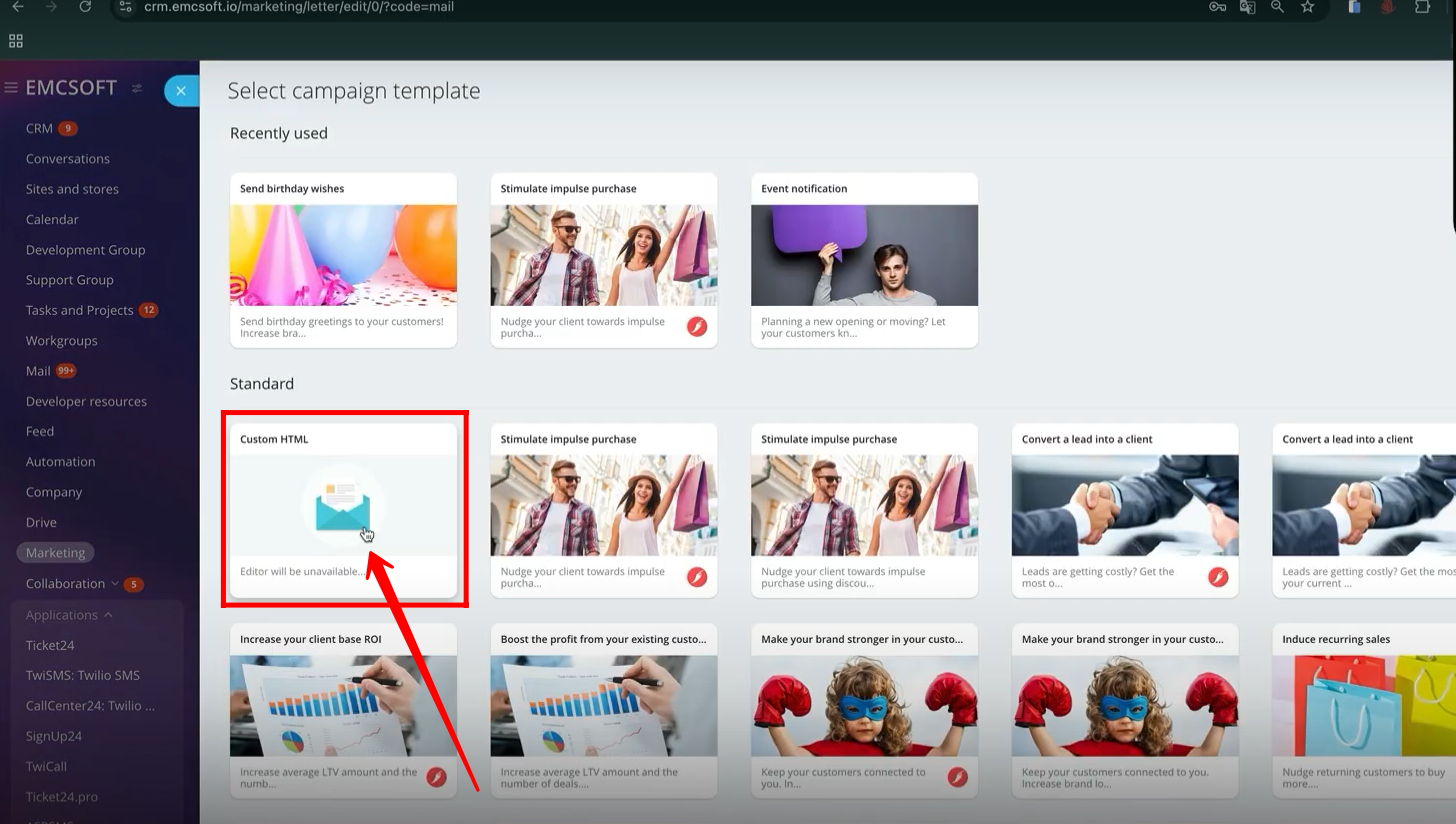
47. You can select the “campaign template” of your own choice. For testing purposes, here the “Custom HTML” template is being selected.
48. Add the subject of the campaign and select the sender. Write the message body of the email campaign. Click “More”.
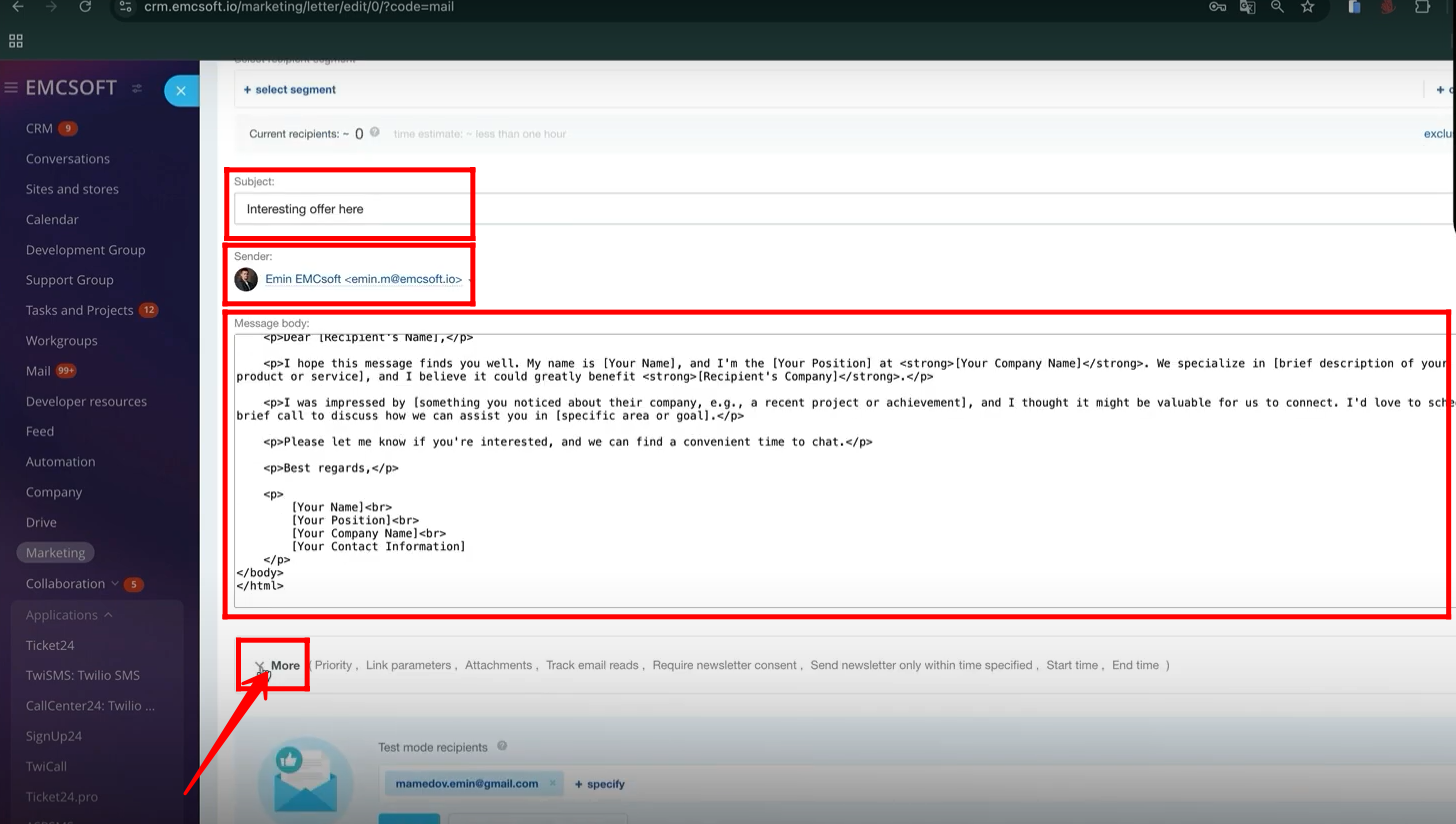
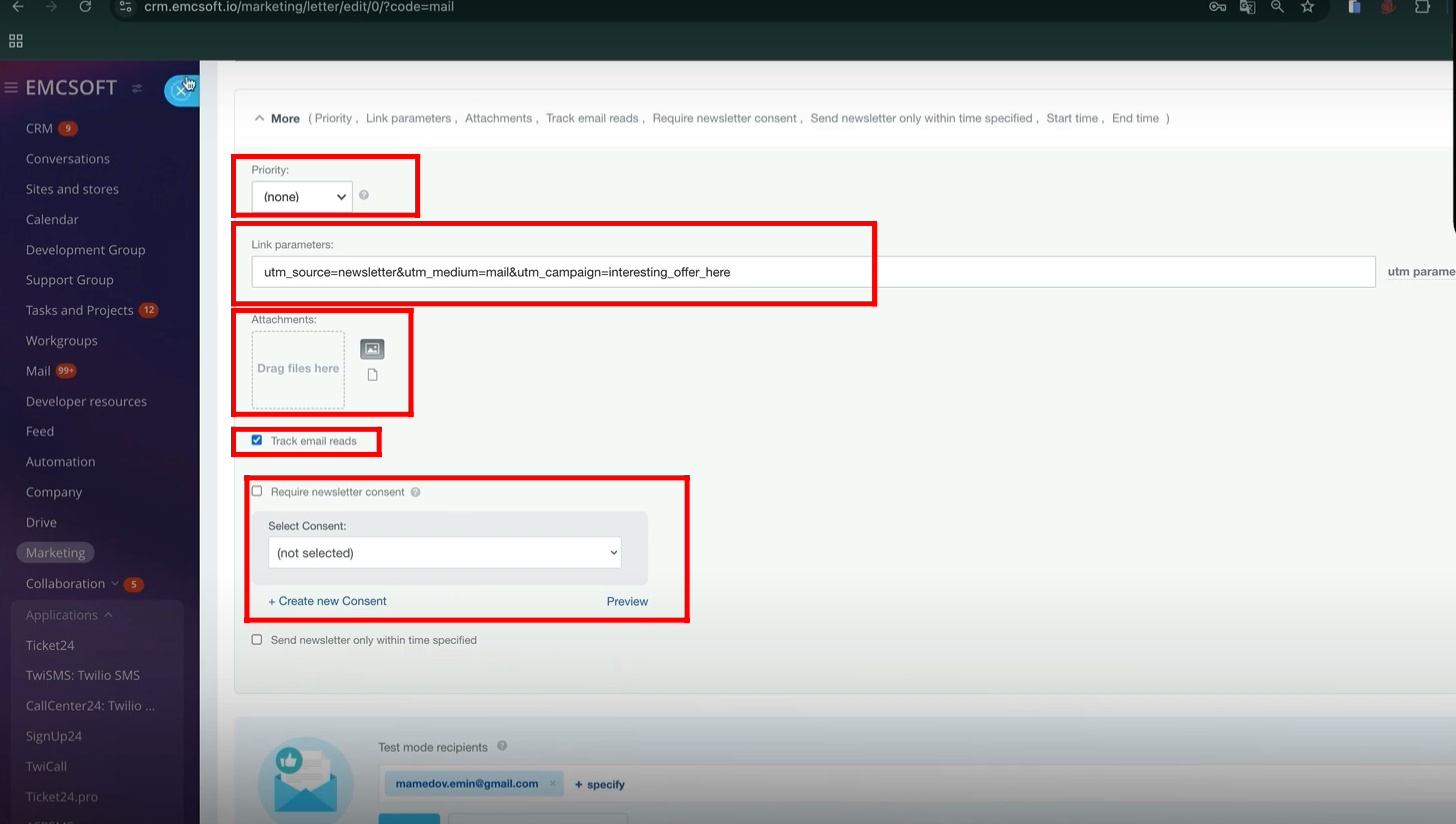
49. Select the “Priority” type and add “link parameters”. Attach the documents and check the box, if you want to track the email reads. Select the “Newsletter Consent” or create a new one. Save it.
50. Go to “CRM” and select “Leads” tab. Go to “Automation Rules”.
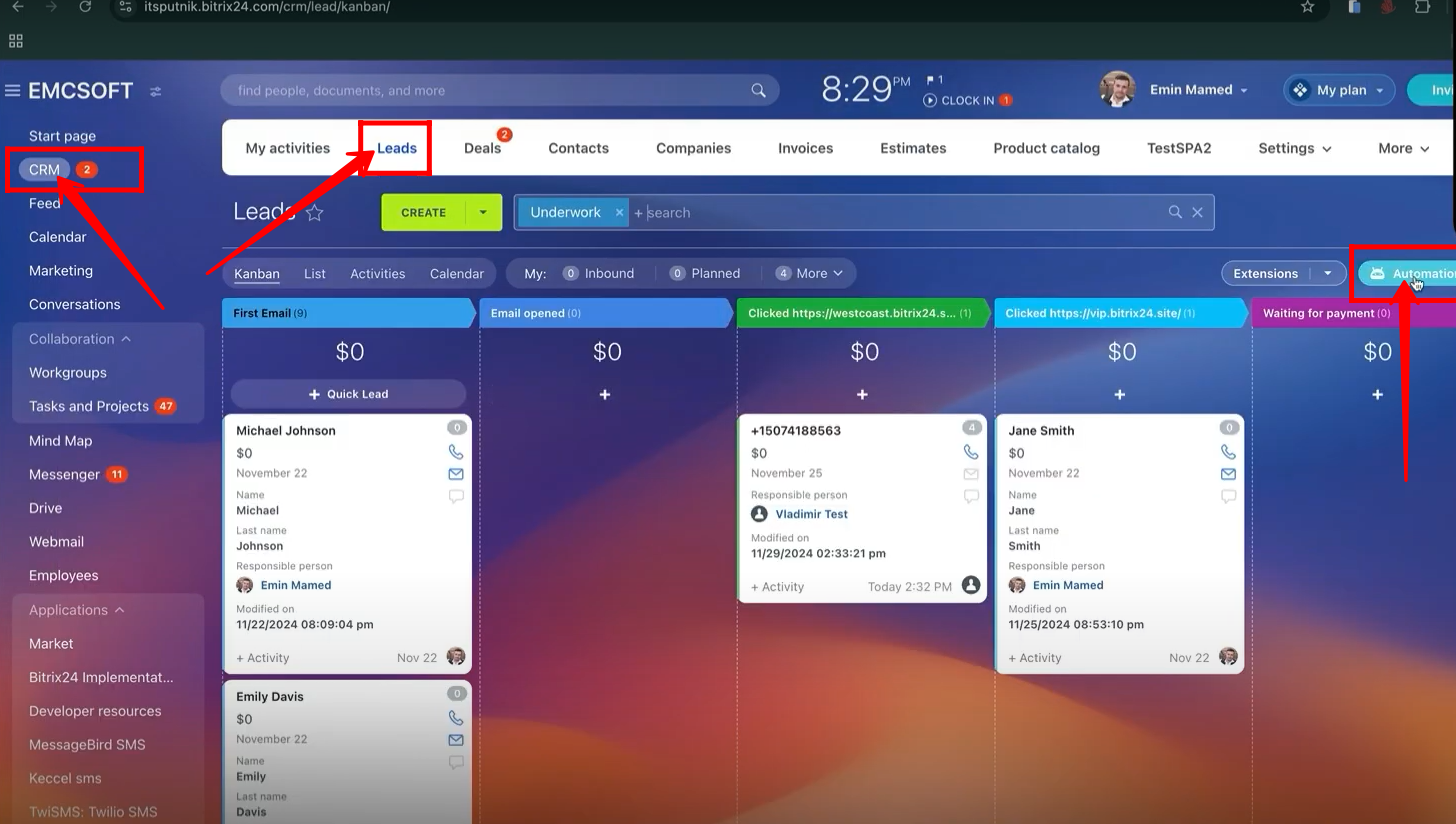
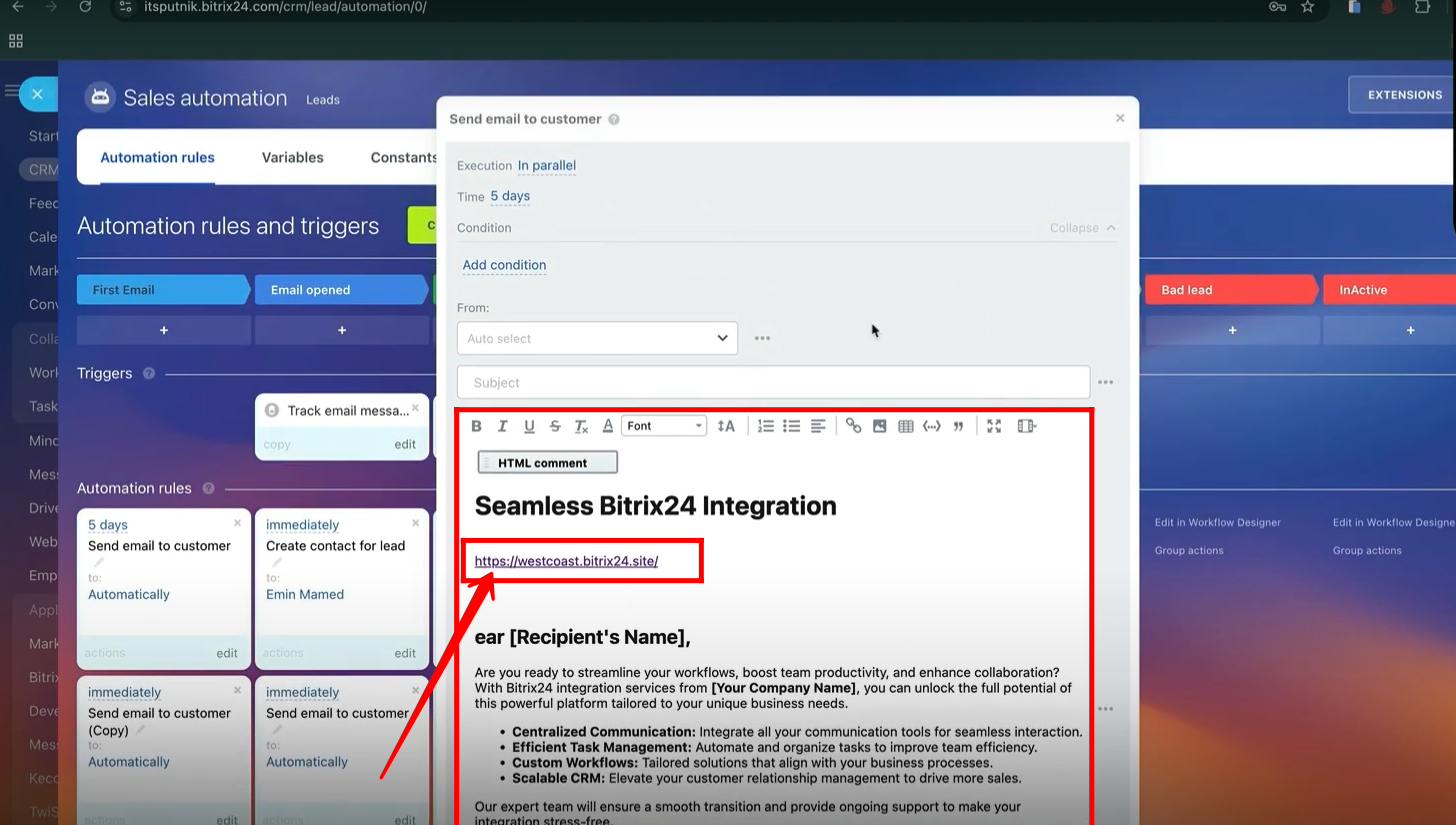
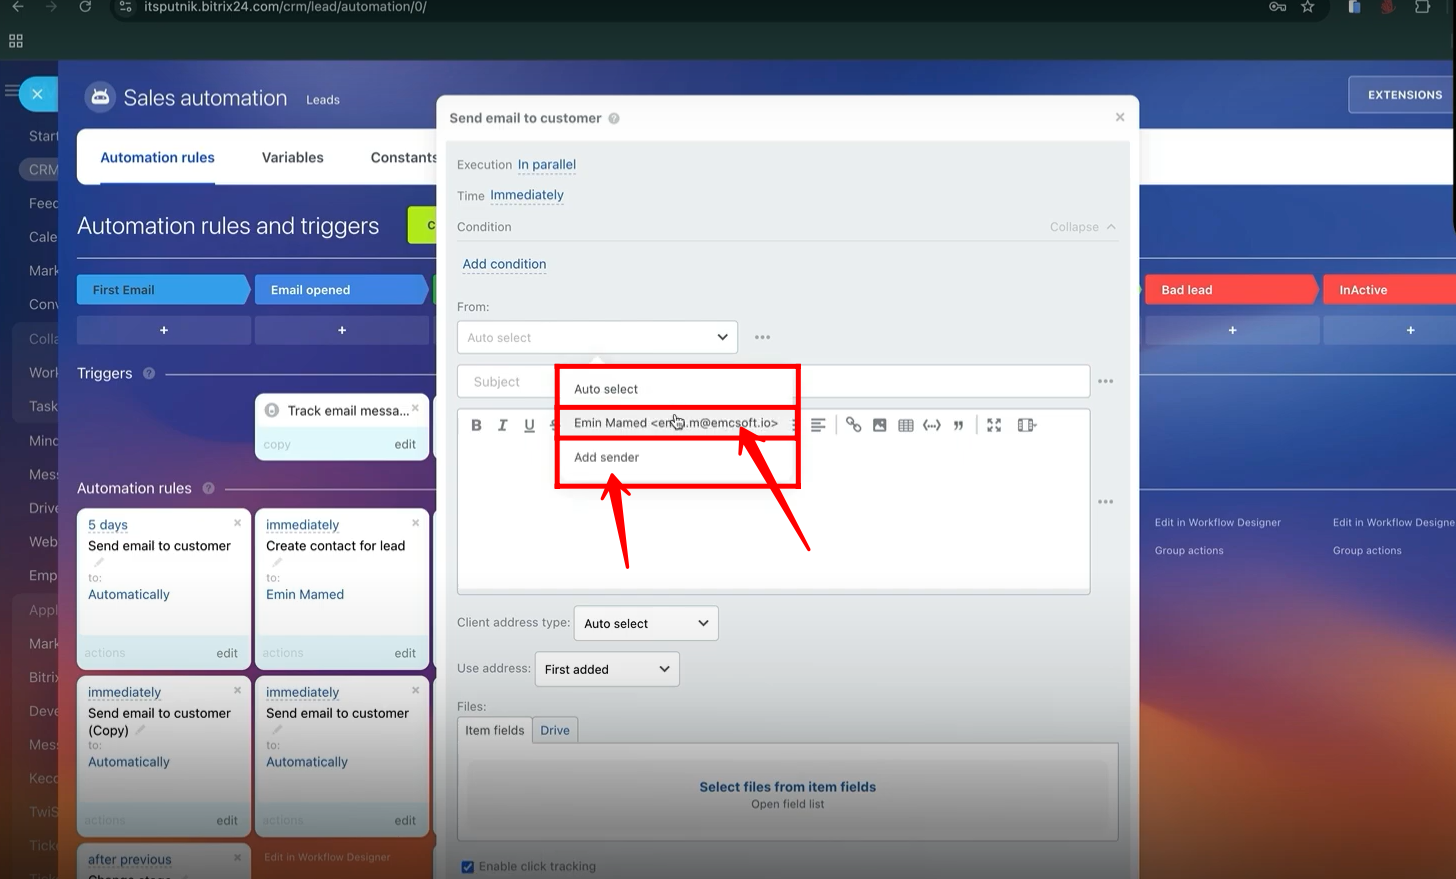
51. Create a new robot named “Send email to customer”. Fill in all the details and add the links in the email body to be tracked as clicked.
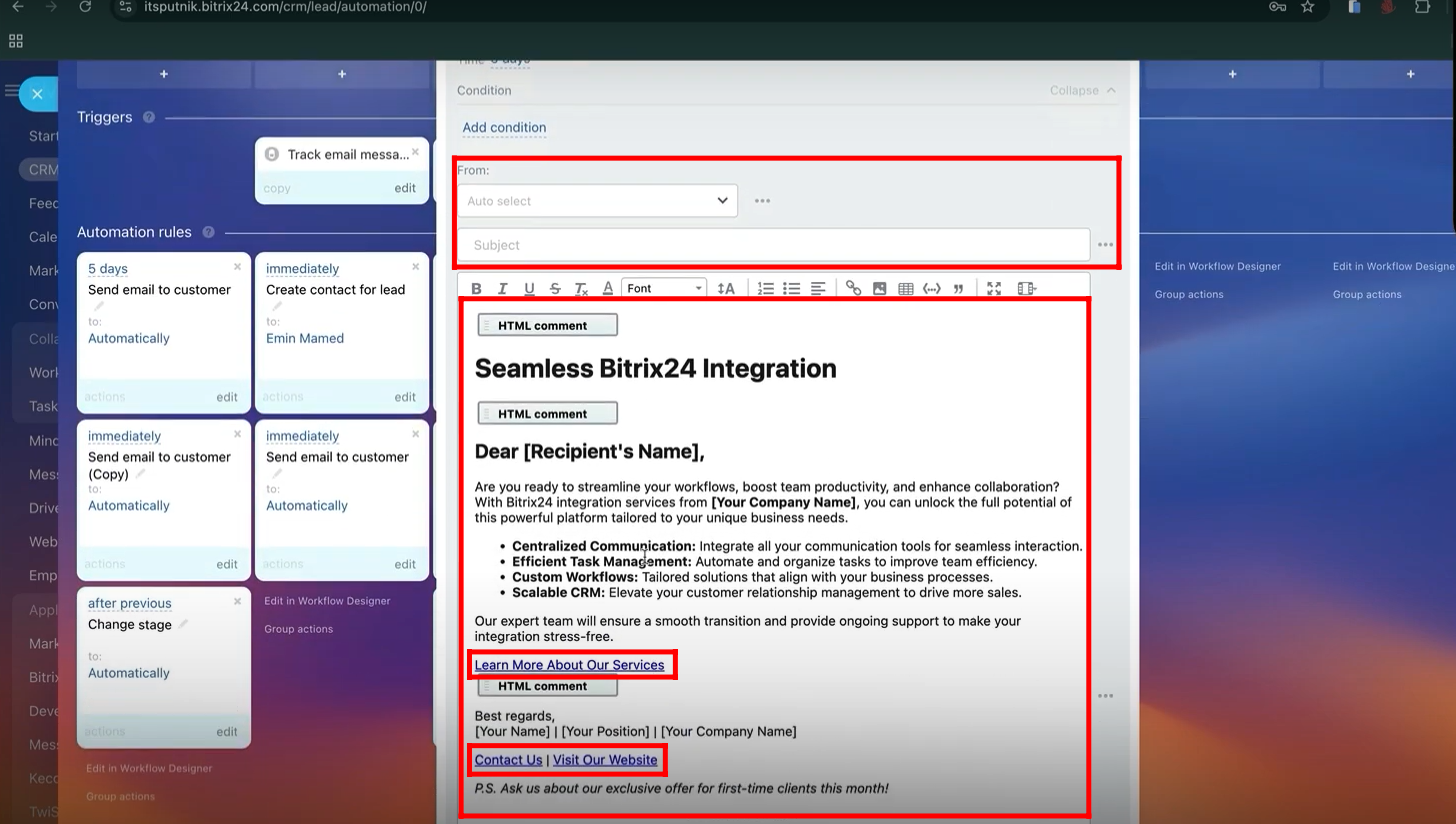
52. You can configure the automations by adding triggers to track messages and link clicks. As the trigger runs, the “email to customer” robot will change the stage according to your requirements.
53. For example, to track the links of your site to be clicked. Generate or copy an existing link to be tracked. Go to “Sites”. Create a new page or open the existing web agency.
54. Edit the “Site address” in “Site settings”.
55. You can configure a new “Site URL” as a subdomain.
56. However, open your web agency and click “Open Site”. Copy the Url.
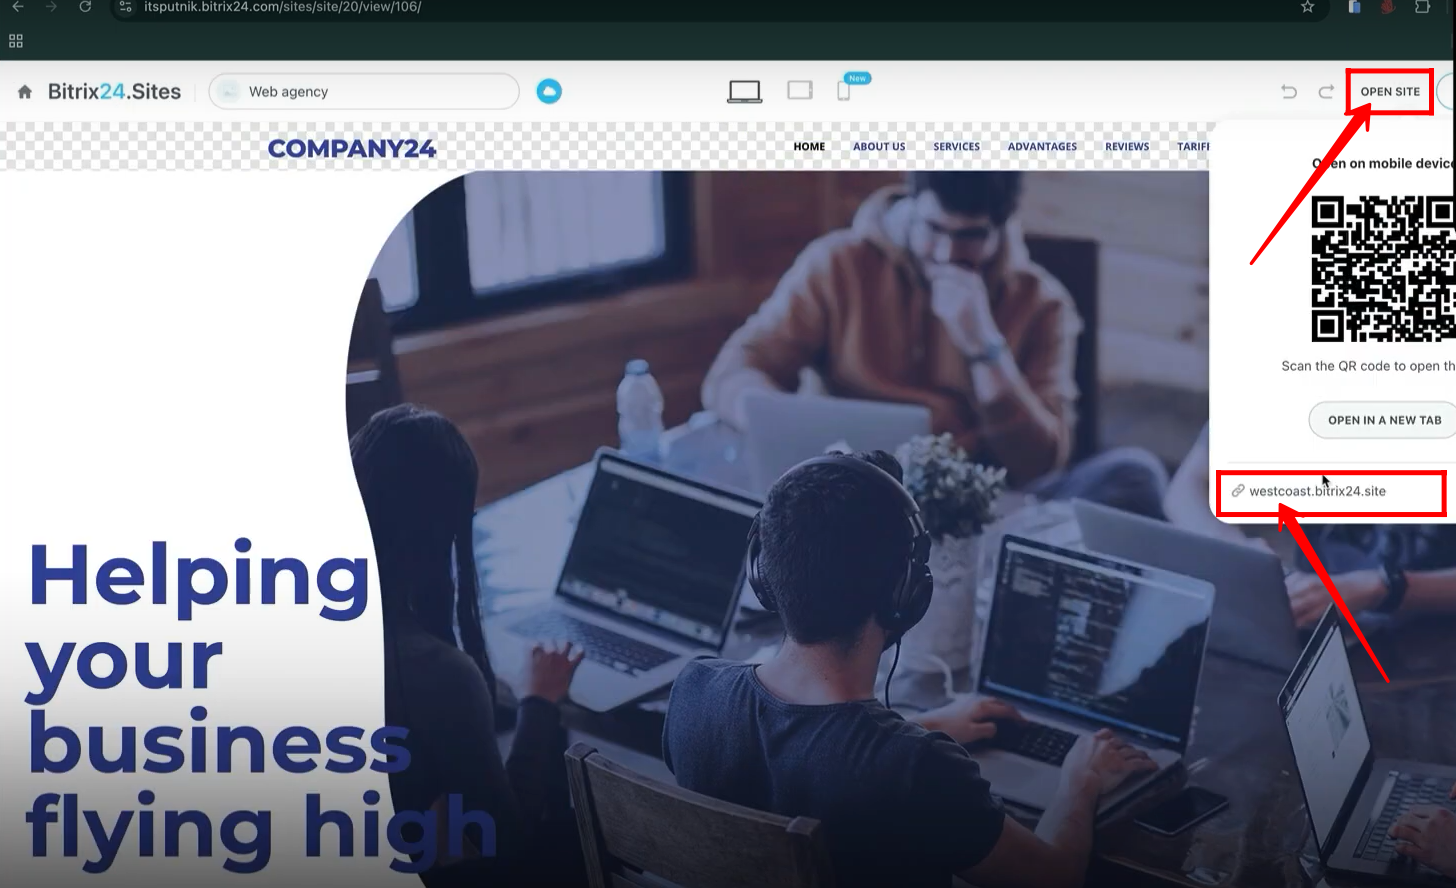
57. Add that link to your site in the email message body to be tracked. You can apply triggers to move rules to different stages according to your business logic. The automation rules and configurations for tracking links have been explained in the previous videos.
58. You can configure the different sequence of emails (results after applying triggers and rules simultaneously to move between stages) in e-mail marketing. But for e-mail marketing, you have to use external SMTP.
“You can also watch this video on Youtube”