| 3854 Views | Amin

Introduction
In today’s digital world, the use of technology to automate work and improve efficiency is an absolute necessity. Integrating different tools not only enhances productivity but also ensures smooth and seamless workflows. This article will guide you through the process of integrating Google Calendar with your Bitrix24 account, making your scheduling and meeting processes a breeze.
Step 1: Access Google Workspace
Start by accessing your Google Workspace. Here, you’ll navigate to the Google Cloud console (console.cloud.google.com). This is where you’ll create and manage your project.
Step 2: Setting Up the New Project
Once in the Google Cloud console, create a new project. The project name can be something relevant to your objective, such as “Bitrix24 Calendar Integration”. After creating the project, select it and proceed to enable APIs and Services.
Step 3: Configuring Consent Screen and App Information
The next step involves configuring the consent screen and providing relevant app information. Fill in the necessary details like app name, your email, etc. This information will be used to identify your application and your association with it.
Step 4: Enabling Google Calendar API and Updating Configuration
Now, proceed to enable the Google Calendar API. This can be found in the Google API library. Once you’ve enabled the API, make sure to save and update your configuration.
Step 5: Adding Test Users
A handy feature of Google’s console is the ability to add test users. While your app won’t be publicly available, you can add your email as a test user for the time being.
Step 6: Creating OAuth Client ID
This step involves creating an OAuth Client ID for your application. Select the web application option and leave the other settings as is.
Step 7: Adjusting Module Settings in Bitrix24
Now switch over to your Bitrix24 portal. Here, navigate to the admin panel, access the module settings, and find the Google services. You’ll need to copy the redirect URLs from Google to Bitrix24.
Step 8: Starting the Synchronization Process
Once all the configurations are set, start the synchronization process. Select ‘Connect Google’ and choose your account. Make sure to select the correct email address for the integration.
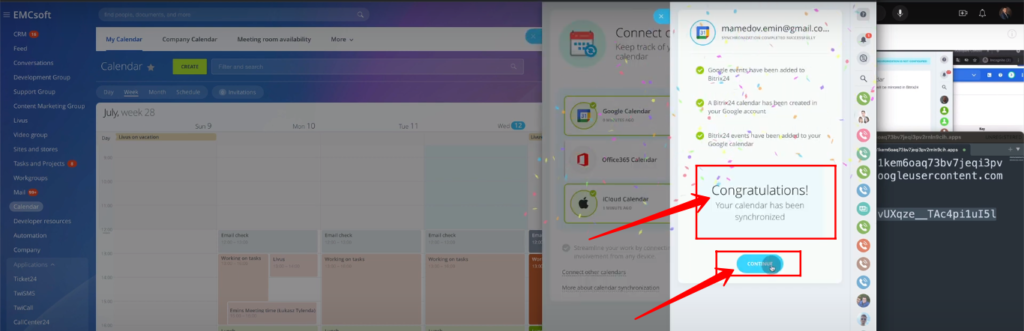
Step 9: Successful Integration
Upon successful completion of all steps, your Google Calendar will now be integrated with Bitrix24. You’ll be able to see all your meetings, appointments, and events in one place, streamlining your workflow and increasing productivity.
Conclusion
This comprehensive guide has provided you with all the necessary steps to successfully integrate Google Calendar with Bitrix24. With this integration, you can manage all your meetings and events more efficiently and effectively. Please feel free to leave a comment if you have any questions or need further clarification on any of the steps. Happy scheduling!
Detailed instructions on how to do this integration can be found below:
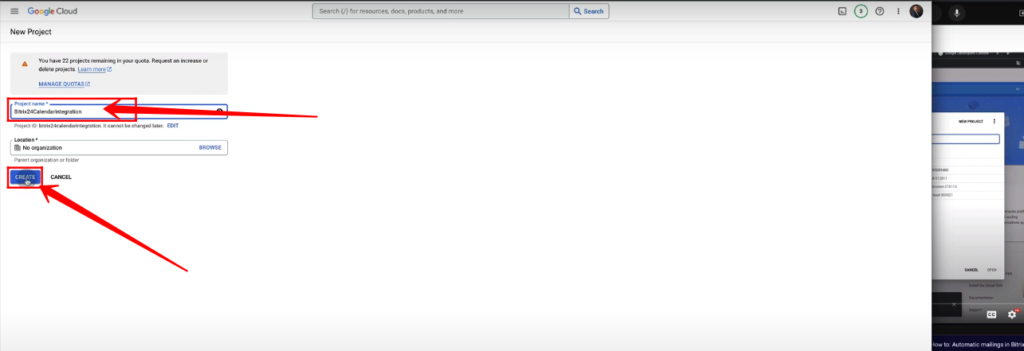
1. Go to “console.cloud.google.com”, Click “My First Project” and then click “New Project”.

2. Type your “Project Name” and click “Create”.
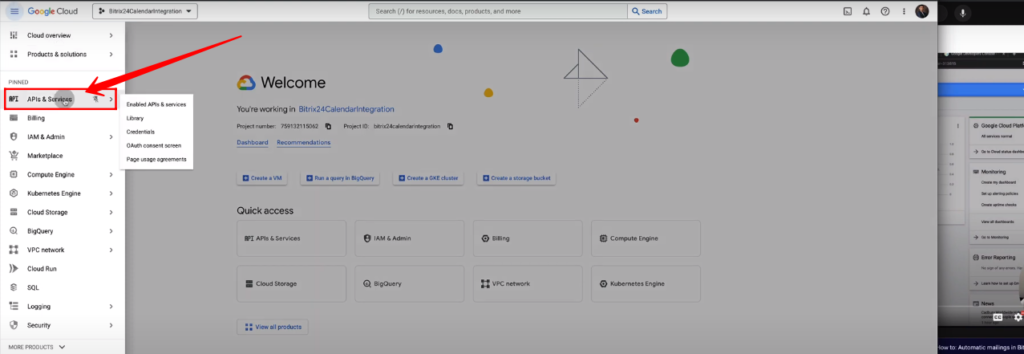
3. Select Your Newly Created Project from Projects’ list.

4. Select “APIs and Services” from the Side Scrollbar.
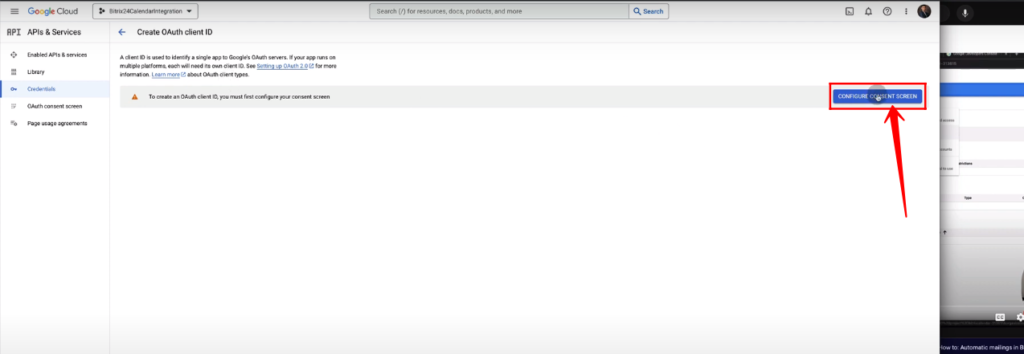
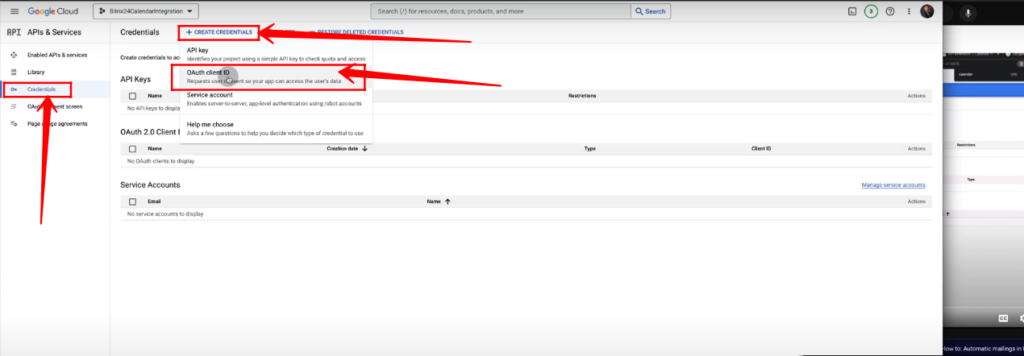
5. Go to “Credentials”, and click “Create Credentials”.

6. Click “OAuth Client ID”.

7. Click “Configure Consent Screen”.
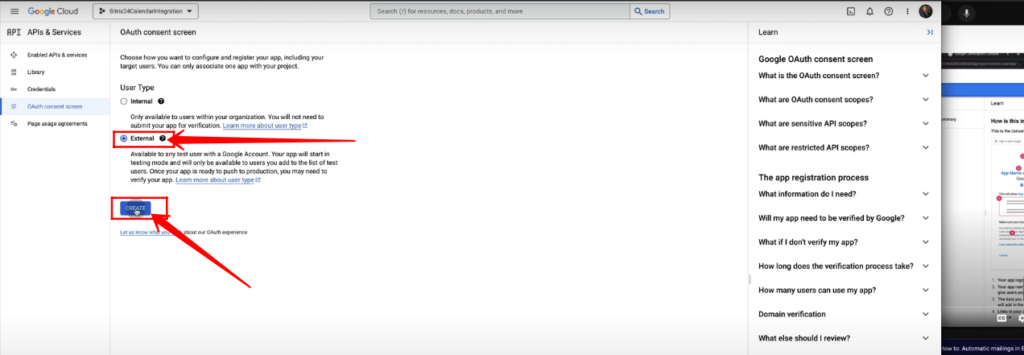
8. Check the option “External” and click “Create”.
9. Type your “App Name”, “User Email”, and “Developer’s Email”. Then click “Save and Continue”.

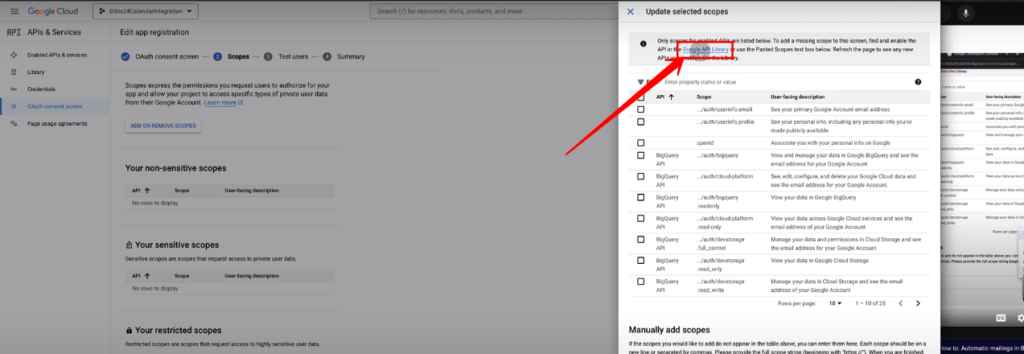
10. Click “Add or Remove Scopes”.

11. Go to “Google API Library”.
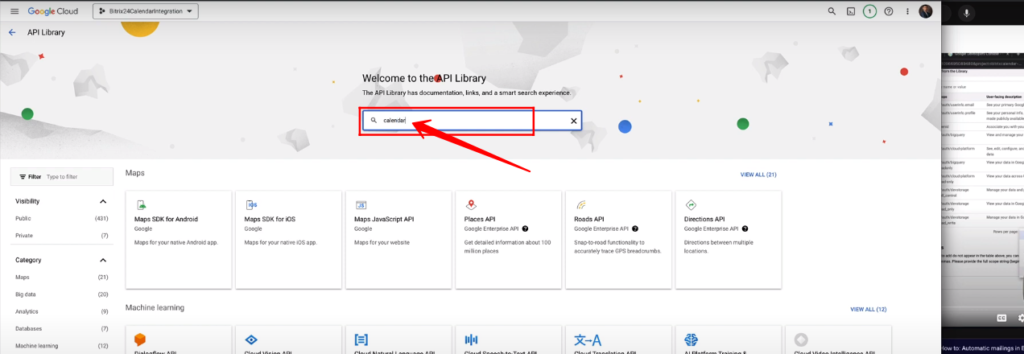
12. Search for “Calendar”.
13. Open both these services in new tabs.
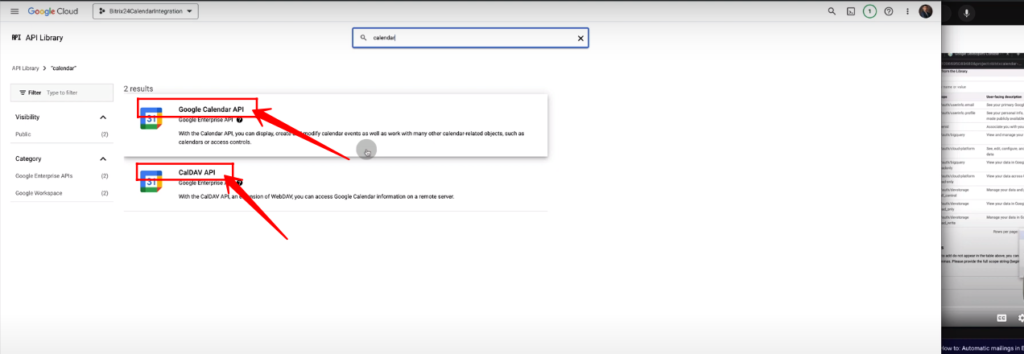
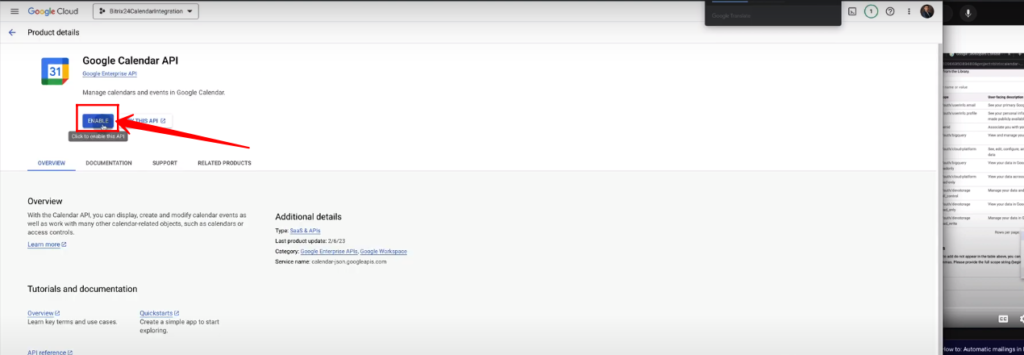
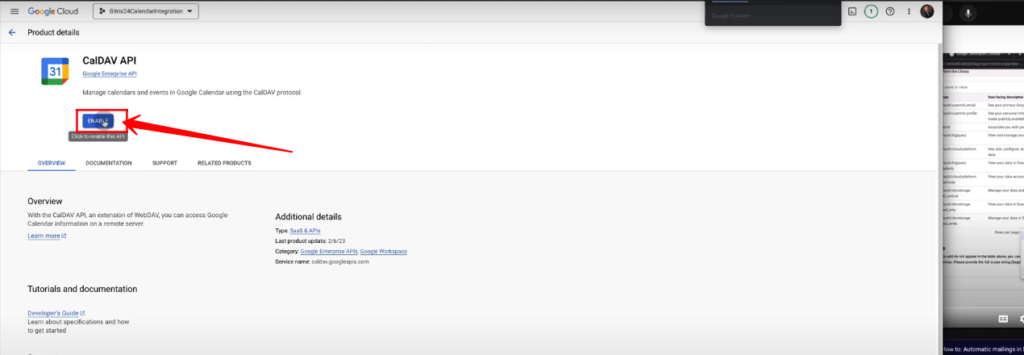
14. “Enable” the Google Calendar API.
15. “Enable” the CalDAV API. And Close both tabs.
16. Again Click “Save and Continue”.

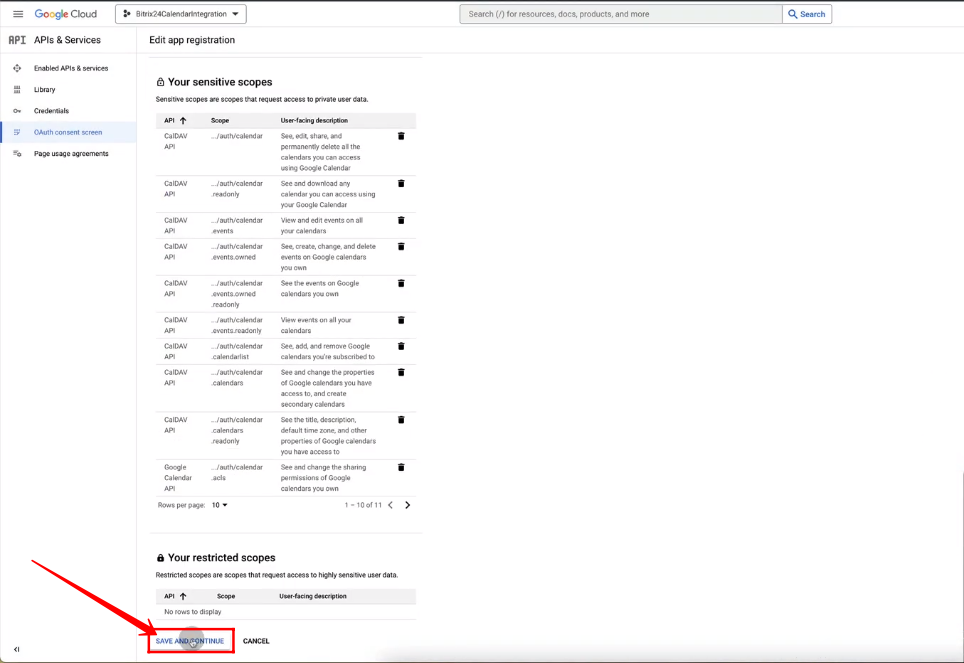
17. Click “Add or Remove Scopes”.

18. Search the keyword “Calendar” and Select all Calendar APIs.

19. Click “Update”.

20. Click “Save and Continue”.
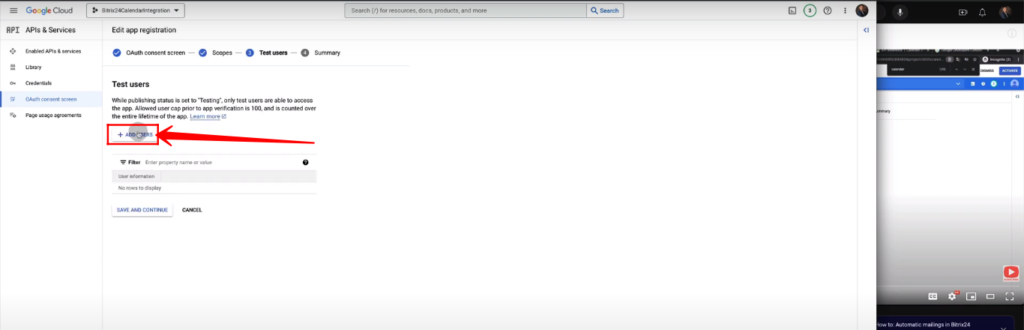
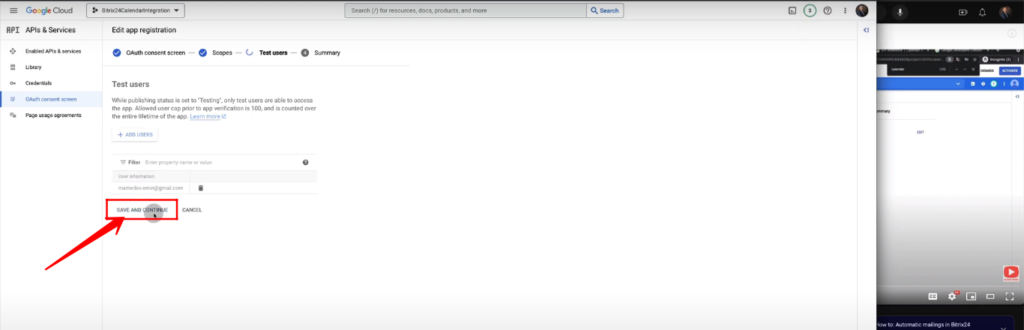
21. Click “Add Users”.
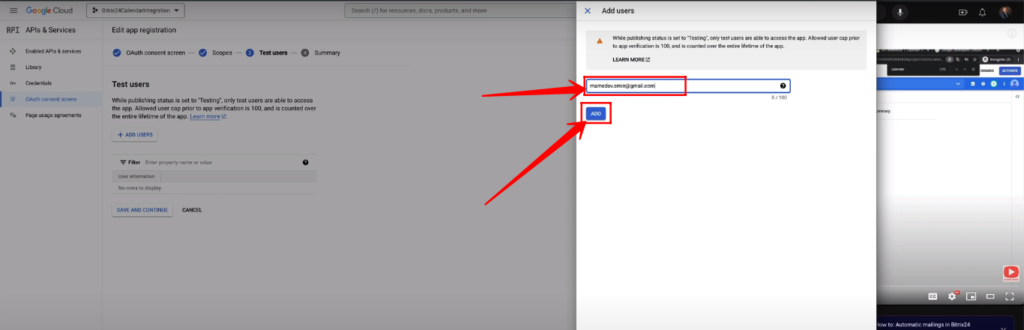
22. Type User Email and click “Add”.
23. Click “Save and Continue”.
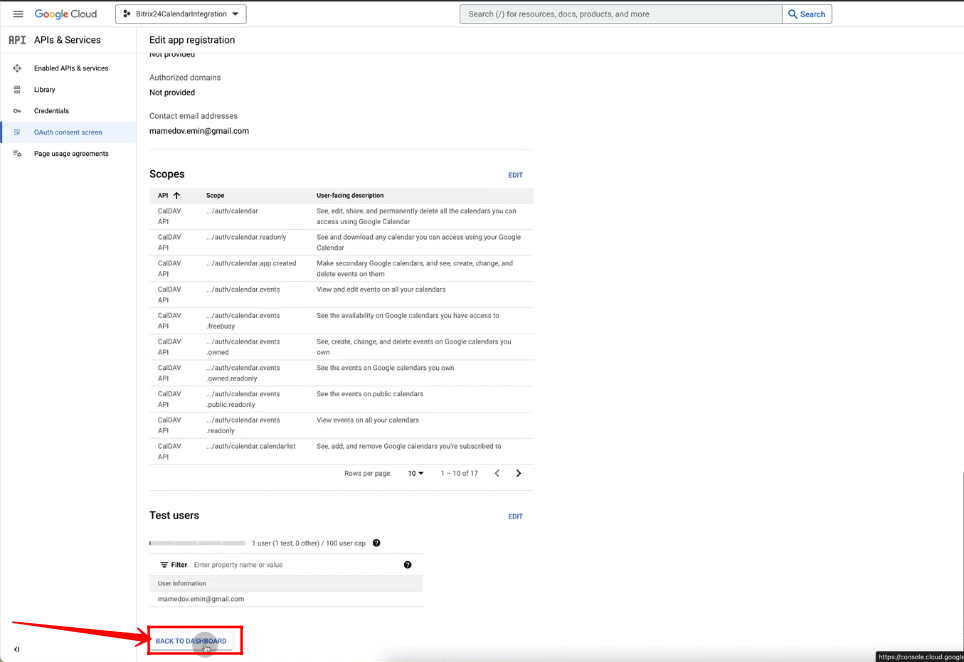
24. Again Click “Save and Continue”.
25. Go to “Credentials”, Click “Create Credentials” and Select “OAuth Client ID”.
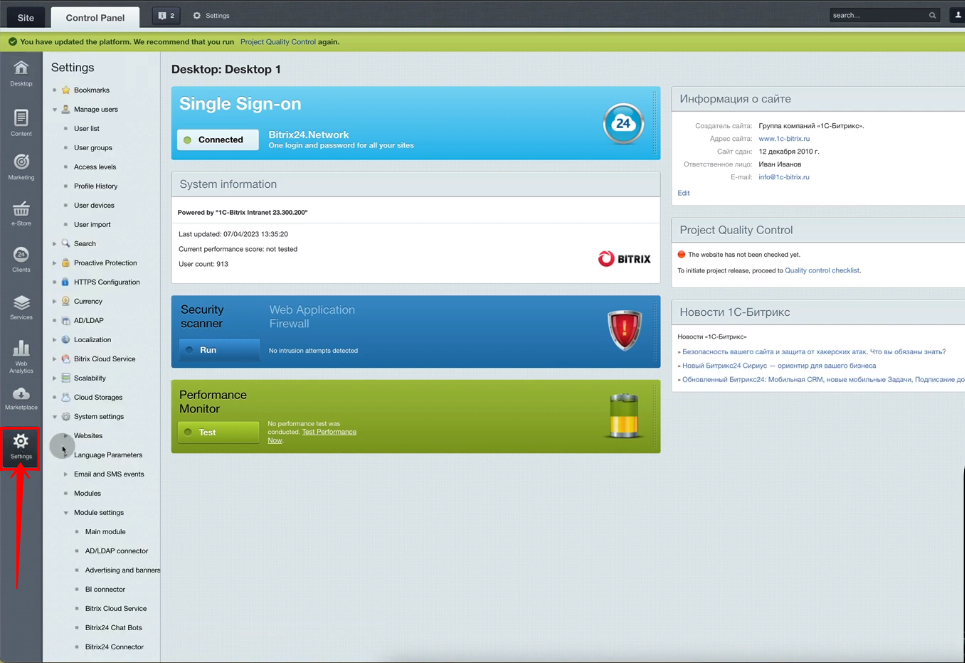
26. Go to “Contral panel”.

27. Go to “Settings”.
28. Select “Module Settings”.
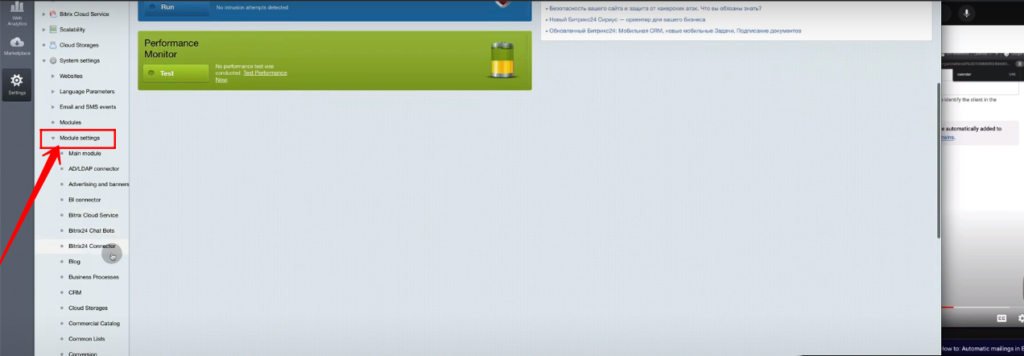
29. Click “Social Website Integration”.

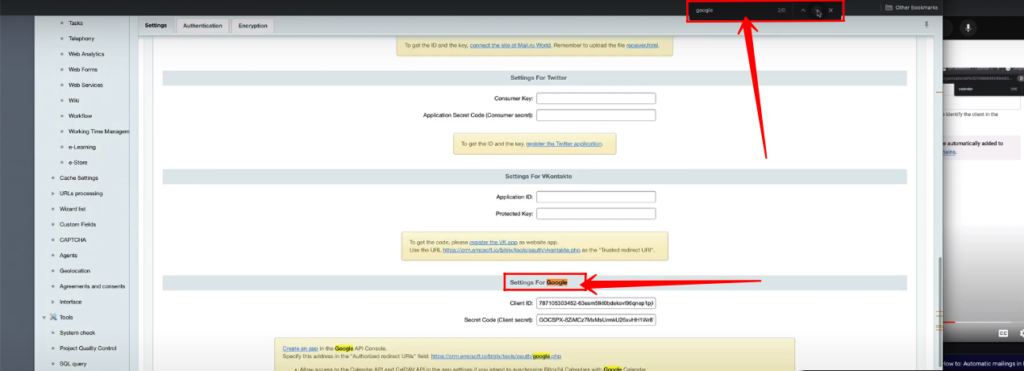
30. Apply the command “Ctrl + F” to find the word “google” and go to the highlighted area of the page.
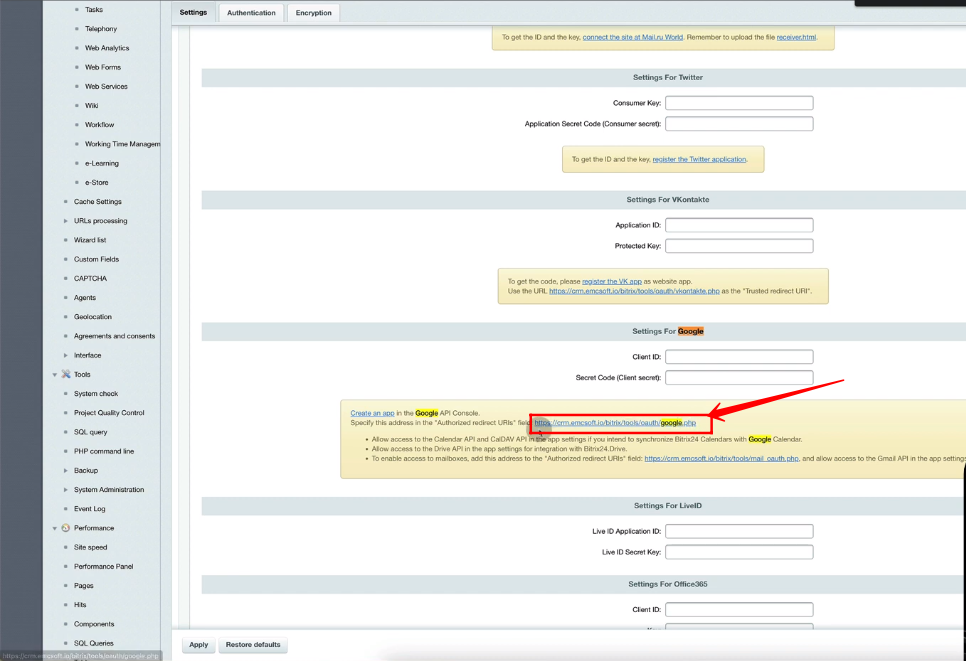
31. Copy the provided link.
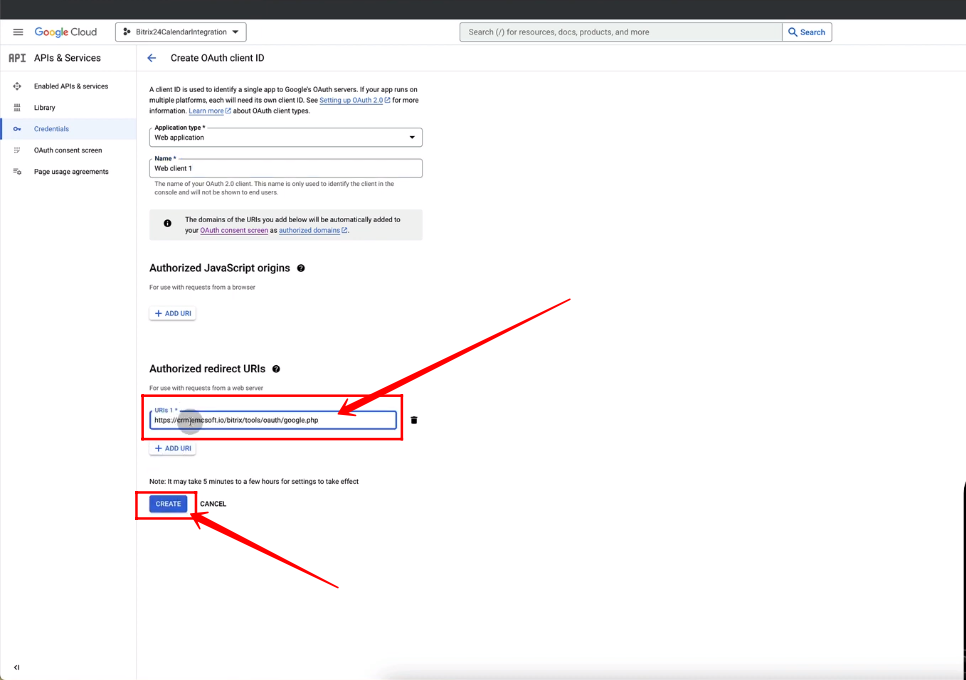
32. Select Application type as “Web Application”, type the name of application and click “Add URL”.
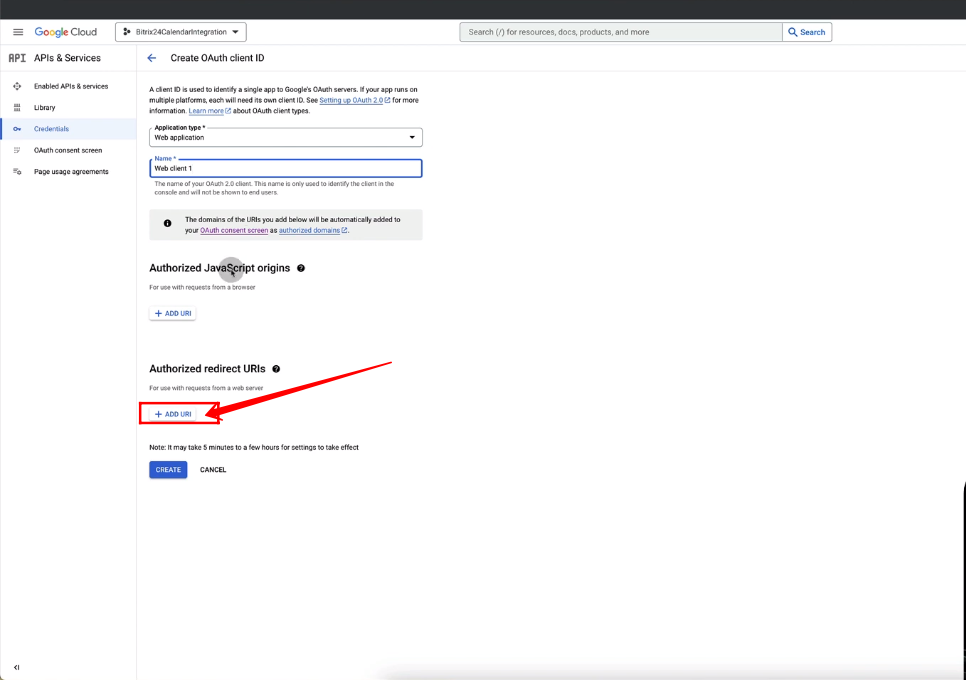
33. Paste the link and click “Create”.
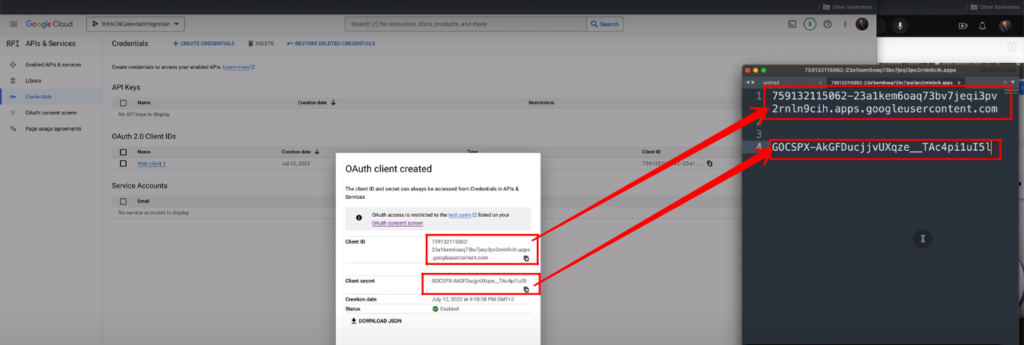
34. Now copy your “Client ID” and “Client Secret” in a notepad file.
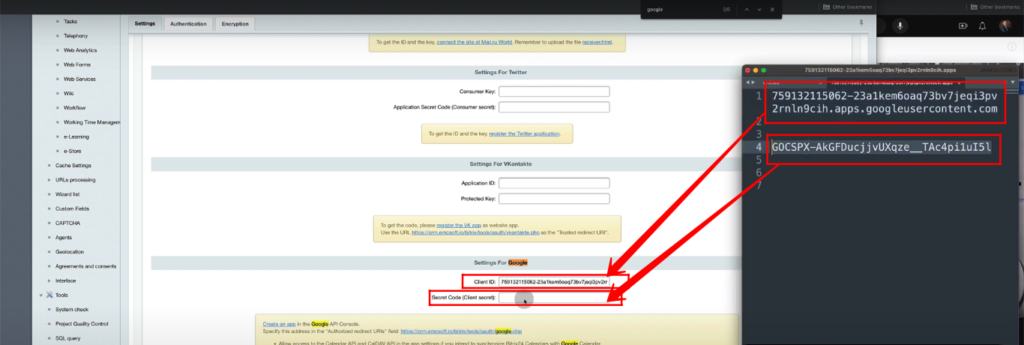
35. Now Paste “Client ID” and “Client Secret” in the respective fields in the control panel section of your EMCsoft Account.
36. Click “Apply”.

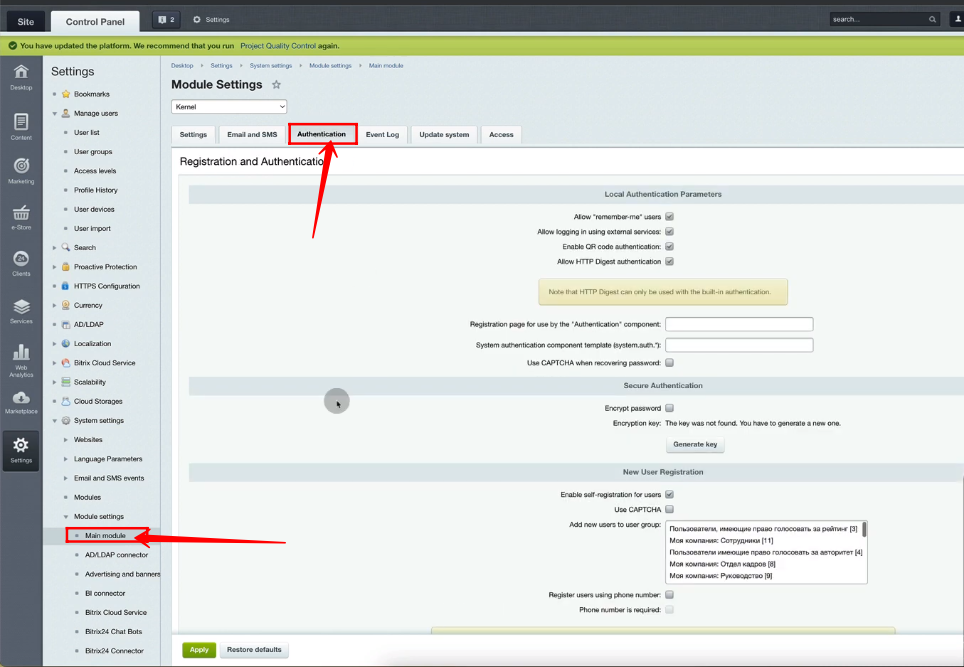
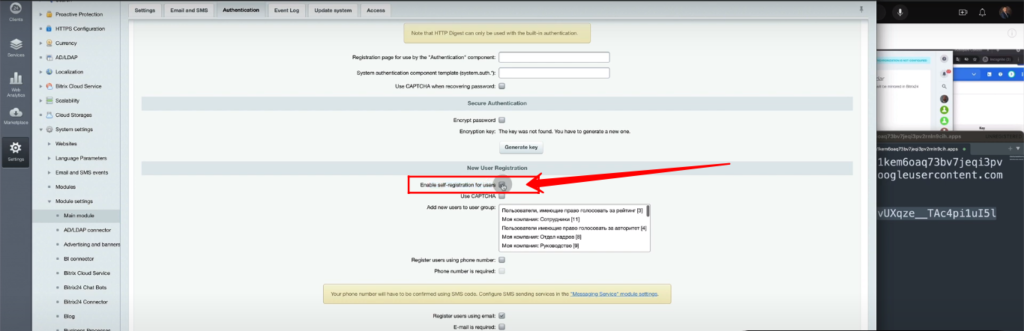
37. Go to “Main Module” and Select the “Authentication” tab.
38. Make sure to check the box “Enable self-registration for users”.
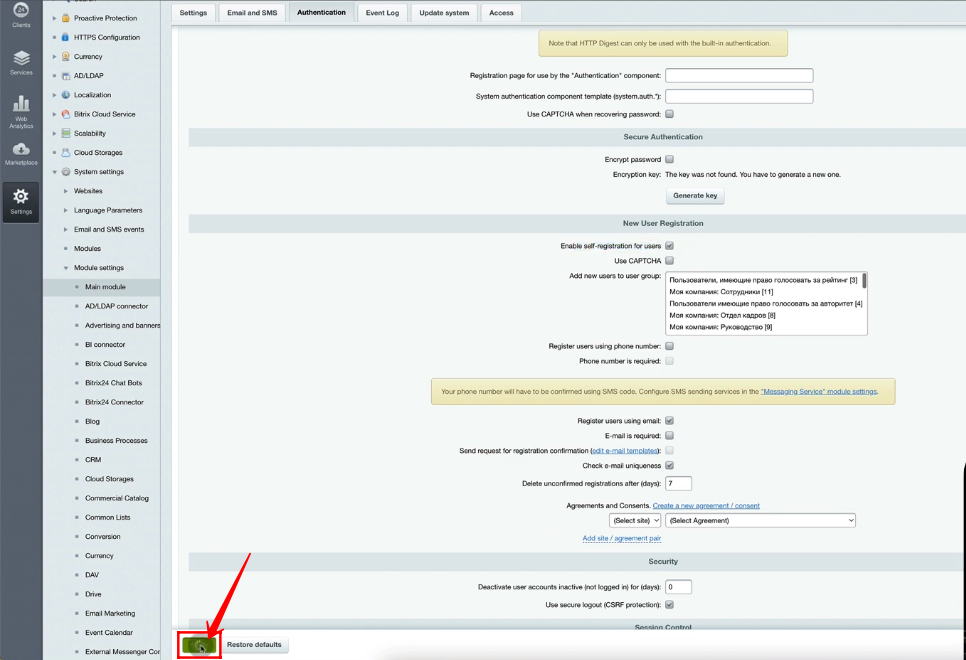
39. Click “Apply”.
40. Go to “Site”.

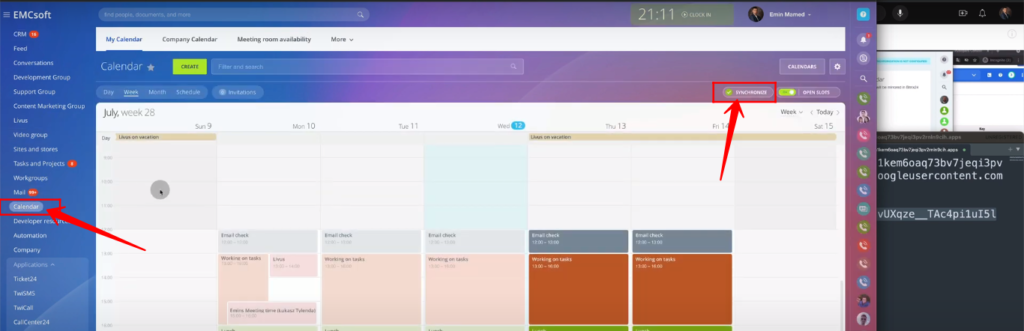
41. Select “Calendar” from Sidebar and Click “Synchronize”.
42. Connect to Google Calendar and Select your google account.
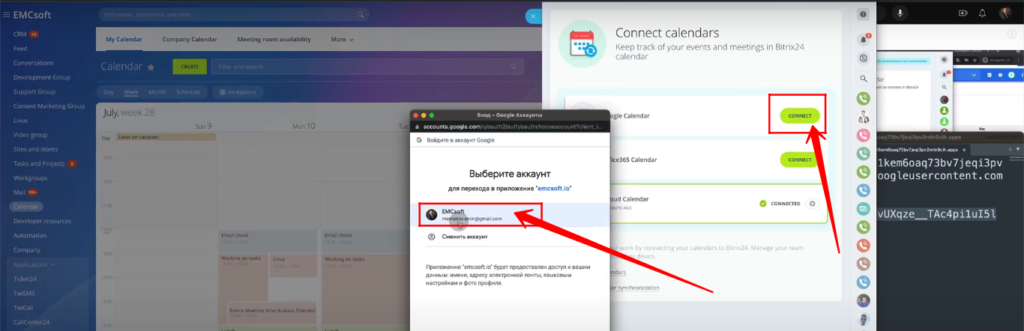
43. You have successfully Synchronized Calendar. Click “Continue”.
“You can also watch this video on Youtube”