| 1909 Views | Amin

In this article, you’ll discover:
1. How robots can effortlessly generate QR codes and distribute them to clients via email or SMS.
2. Explore how QR codes can streamline client registration processes. Whether it’s event sign-ups or tracking offline advertising, QR codes offer versatile solutions.
3. Learn how robotics can elevate CRM management by handling crucial elements like Leads, Deals, Contacts, and more, empowering you to optimize business processes.
4. Uncover the efficiency of using robots to gather CRM data and efficiently remove elements when necessary.
5. Dive into practical examples, illustrated with screenshots, demonstrating how to configure pauses for Deals or Leads, awaiting client activity, and scheduling targeted activities at specific stages.
Detailed instructions on how these robots can be used are described below.
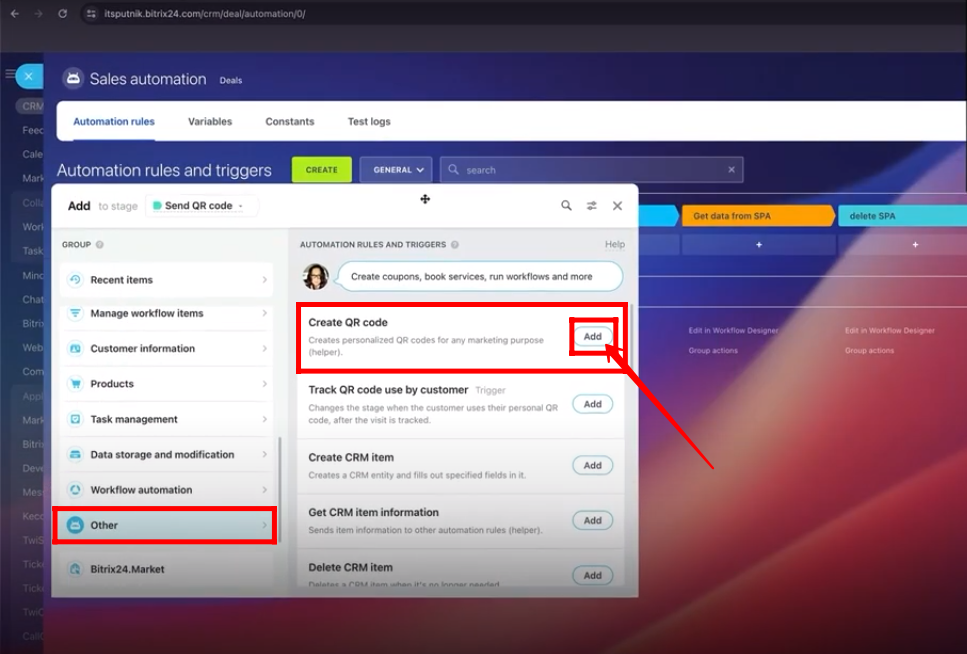
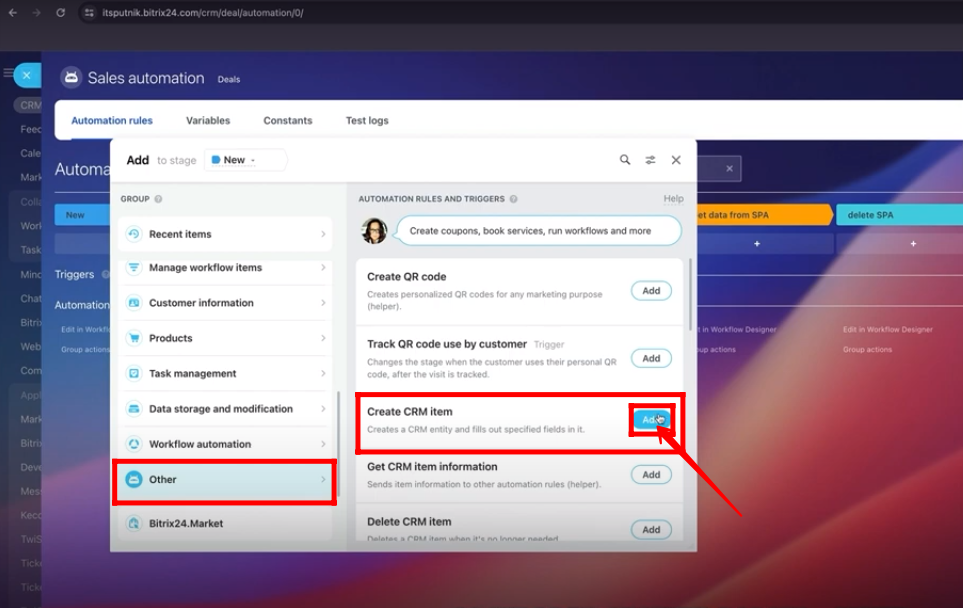
1. Go to “Automation Rules” within “Deals” section. Click “Create”. Go to “Others” and add “Create QR code” robot.
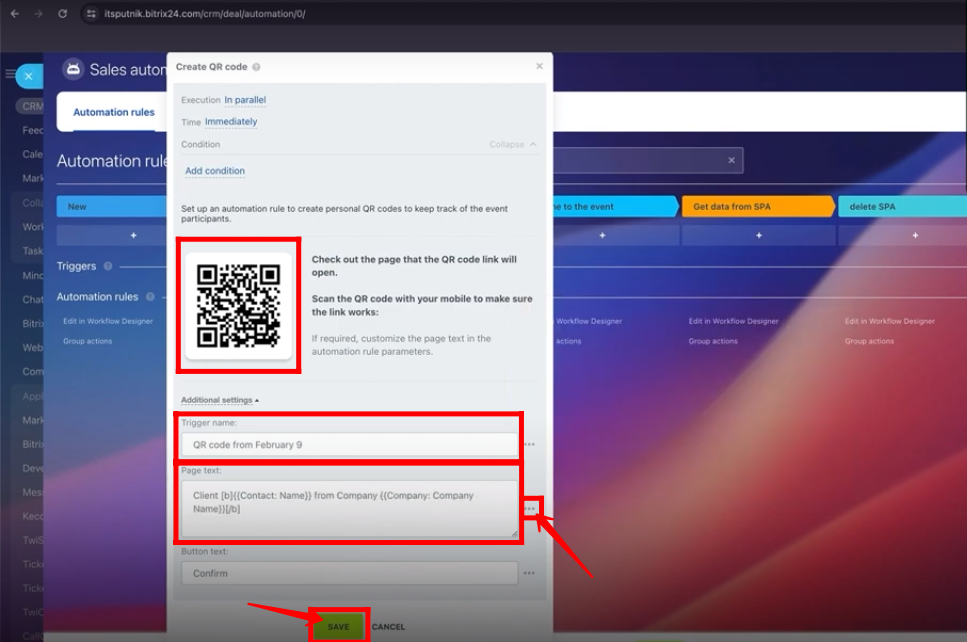
2. Now configure “Create QR code” robot. Type “Tigger Name” and “Page text”. If you want to use dynamic names, then select from three dots options. Click “Save”.
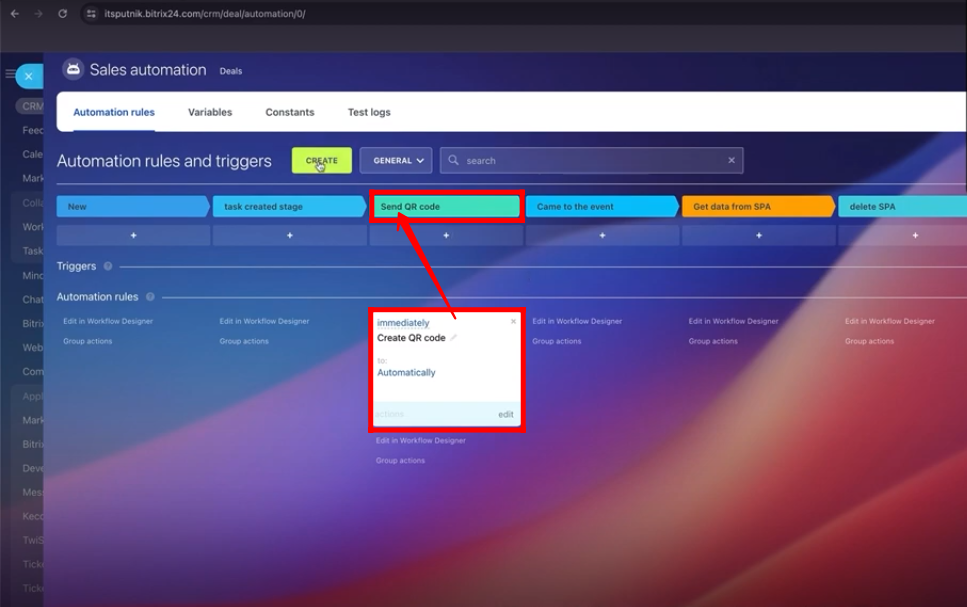
3. Create a new stage named “Send QR code”. Move “Create QR code” robot to “Send QR code” stage.
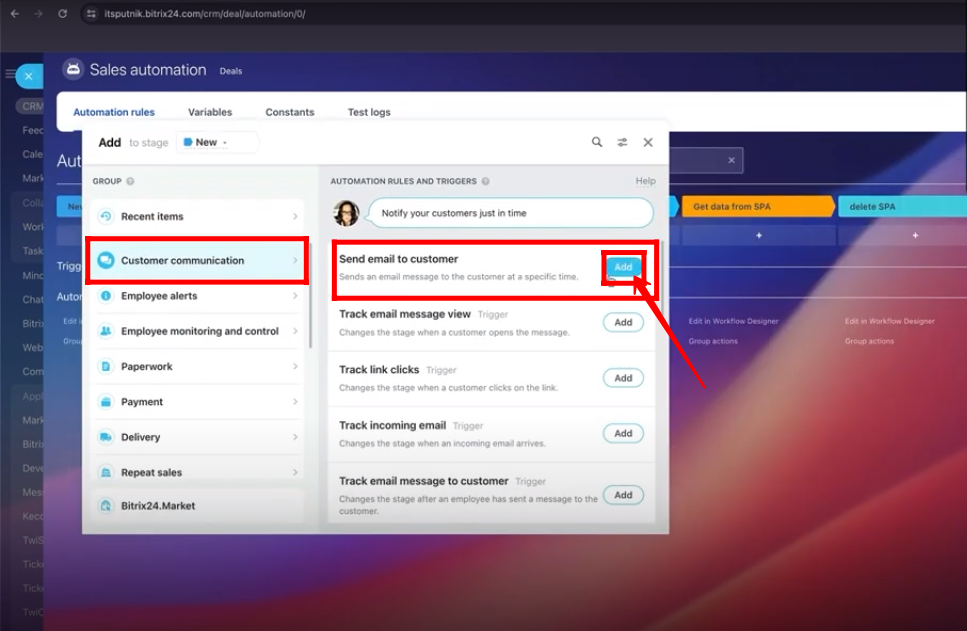
4. Go to “Automation Rules”. Click “Create” to add a new robot. Go to “Customer Communication” and add “Send email to customer” robot.
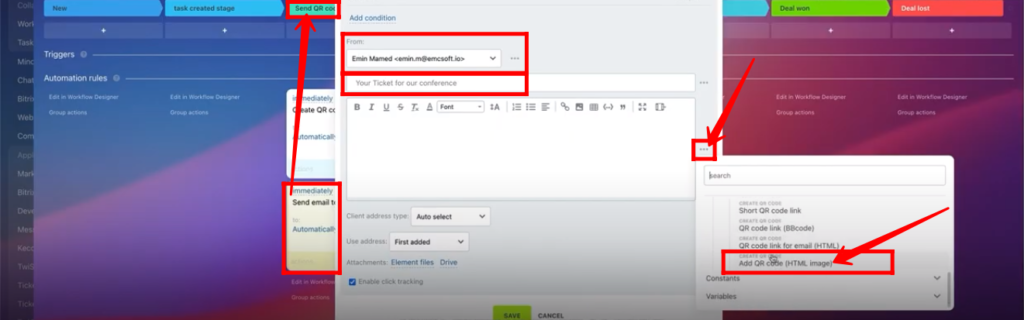
5. Move “Send email to customer” to “Send QR code” stage under “Create QR code” robot and edit it. Configure sender of email and type title of email. Add “HTML image” of QR code from three dots option in description of email.
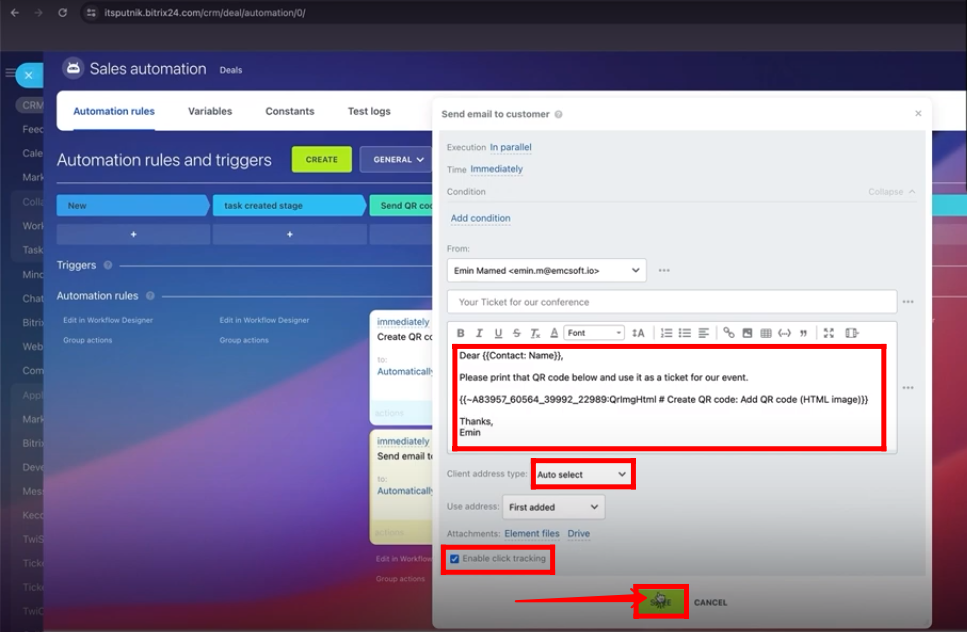
6. Here’s the description of email with dynamic “contact name” and “QR code”. Select “Client address type” as “Auto Select”. Check the box “Enable click tracking”. Click “Save”.
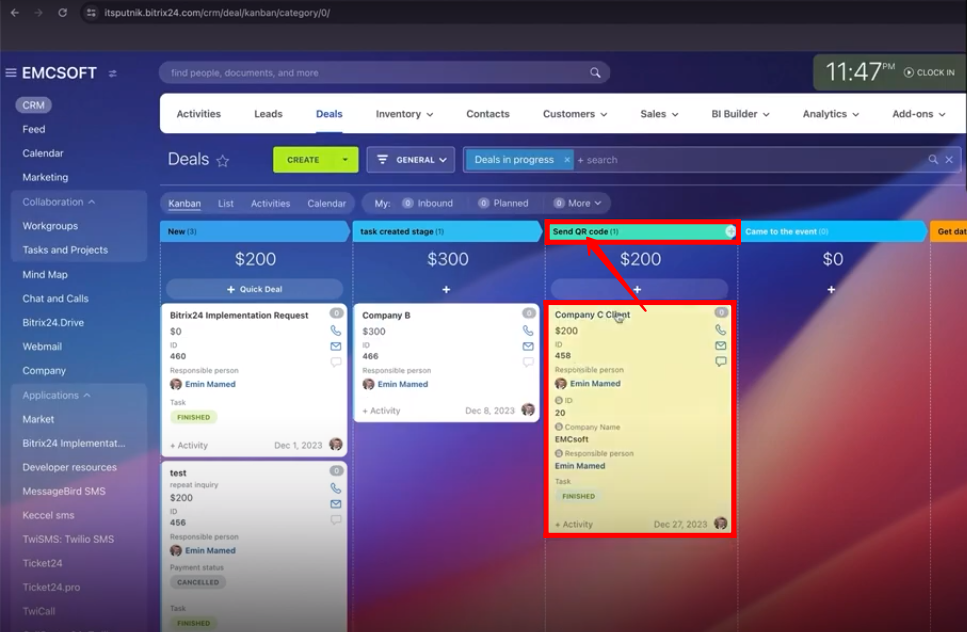
7. Move your deal to “Send QR code” stage for testing purpose. Open it.
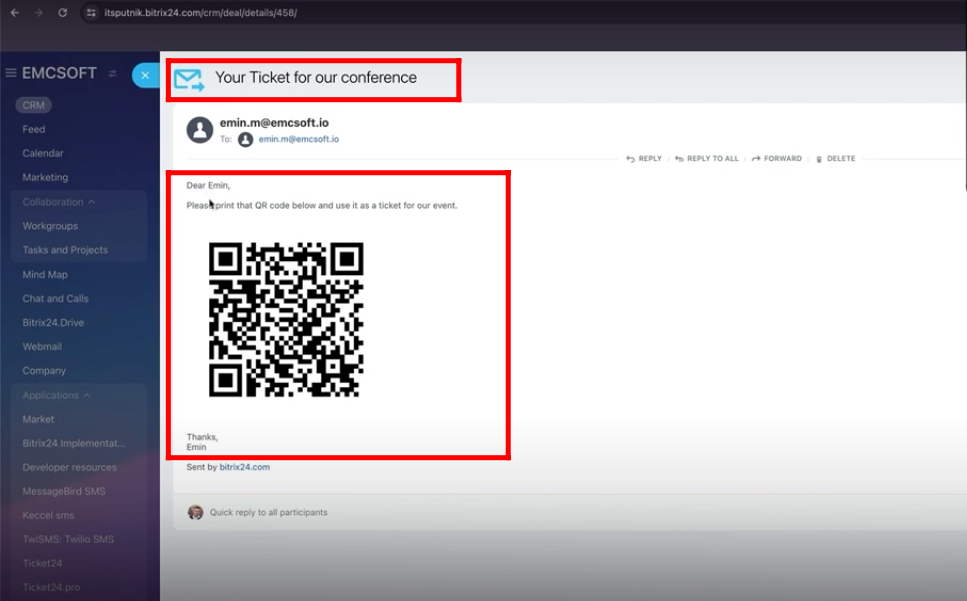
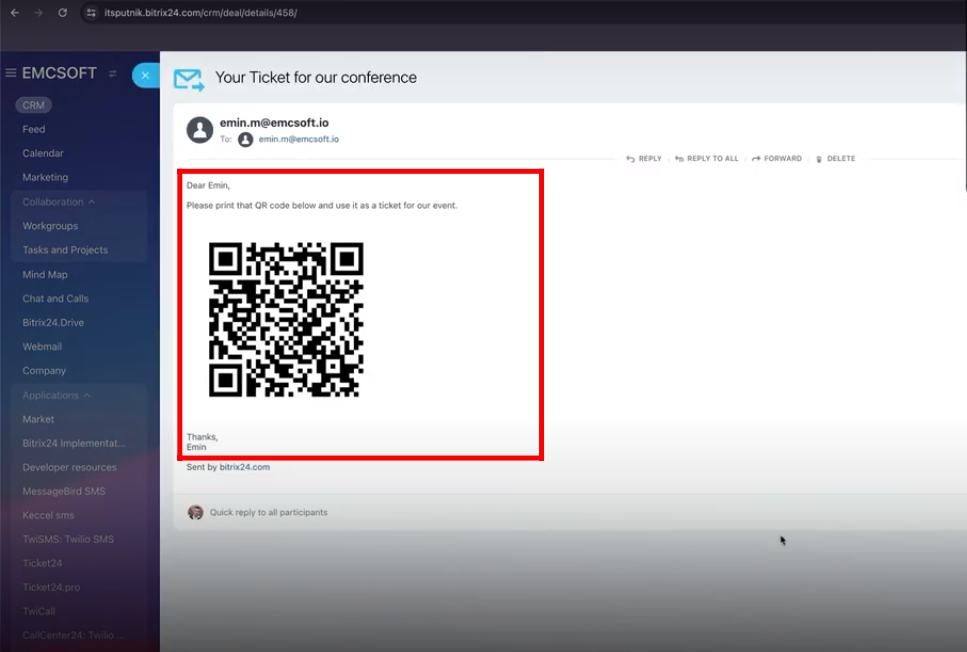
8. You can see the outgoing email with configured title. Open the email.
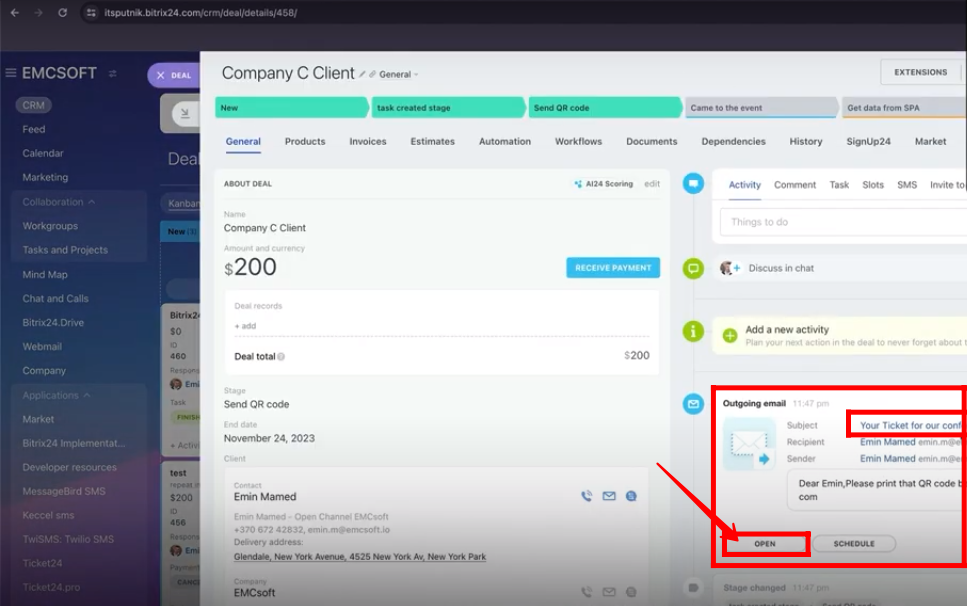
9. Now, you can see the email sent to customer with configure QR code in email body.
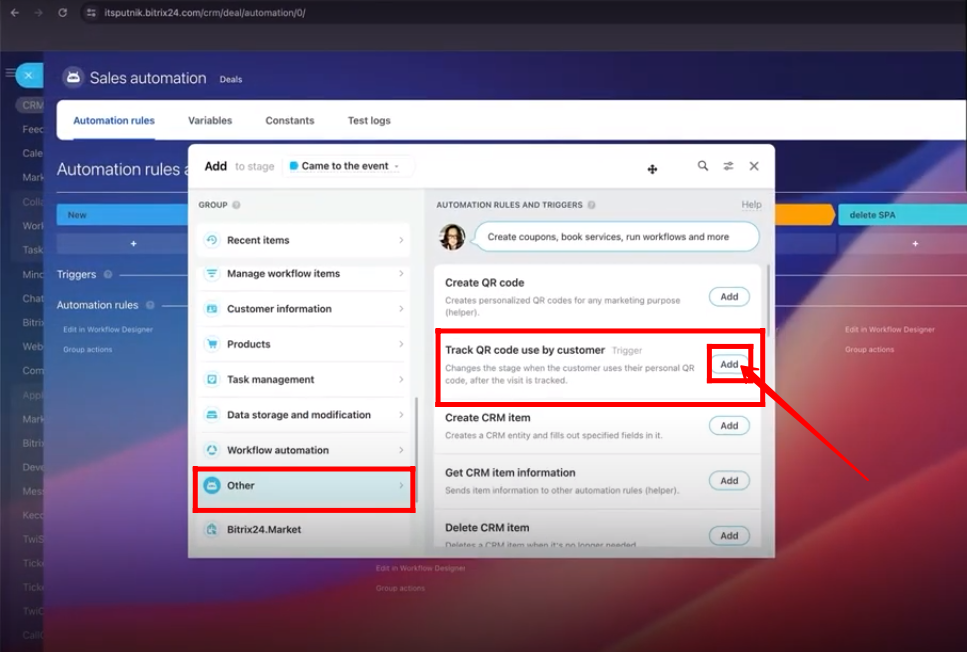
10. Within “Automation Rules”, go to “Other” and add “Track QR code use by customer” trigger.
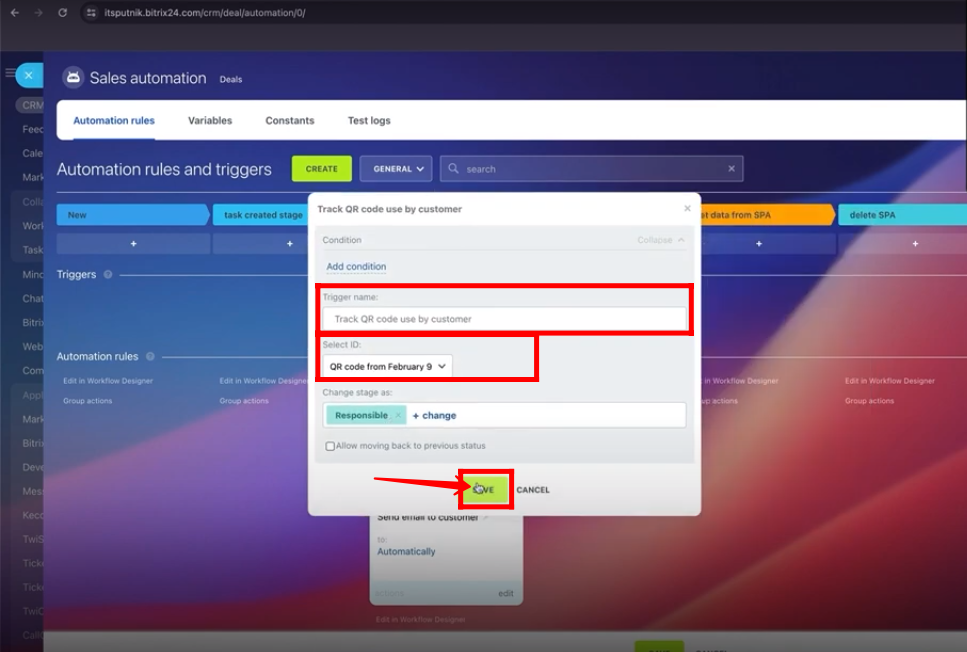
11. Type “Trigger name” and select “ID”. Click “Save”.
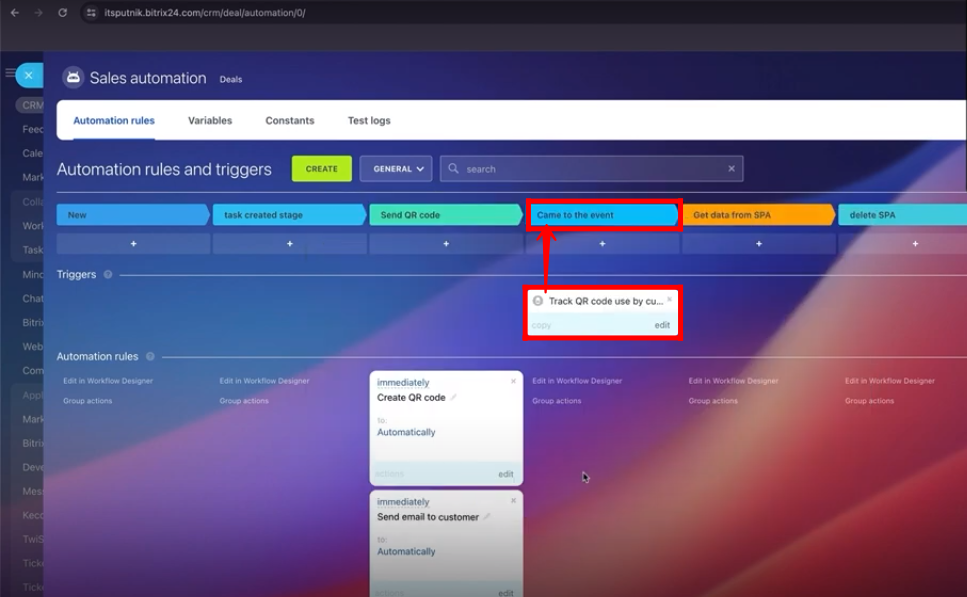
12. Create a new stage named “Came to the event”. Move “Track QR code use by customer” robot to “Came to the event” stage.
13. Open the outgoing email within deal again.
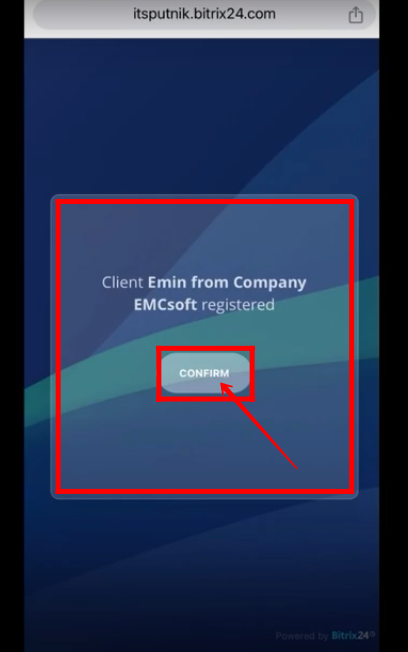
14. Scan the QR code from your mobile and click “Confirm”.
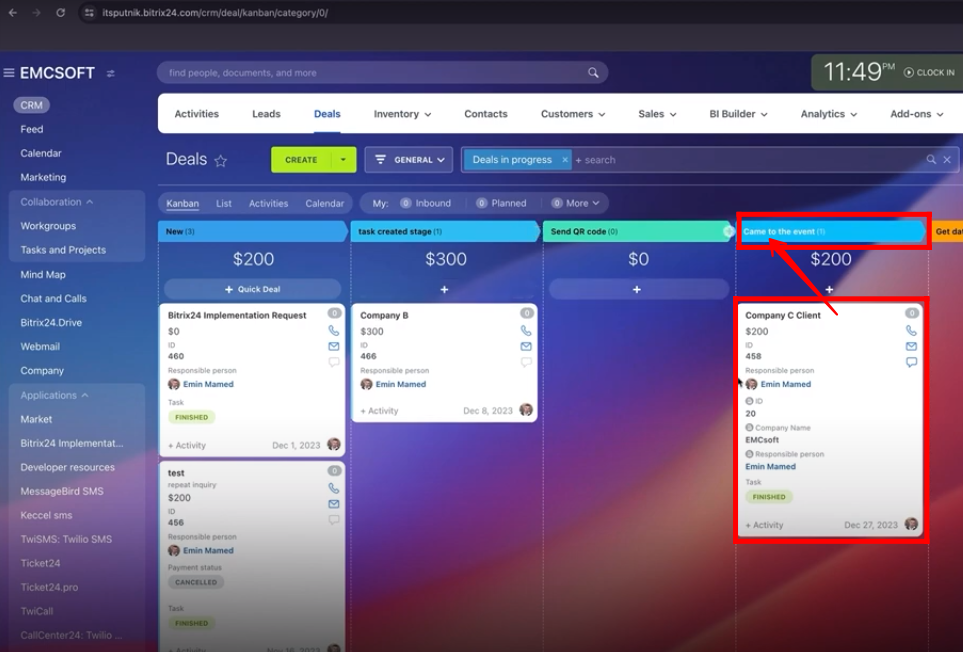
15. Refresh the tab. The deal will automatically move from “Send QR code” to “Came to the event” stage.
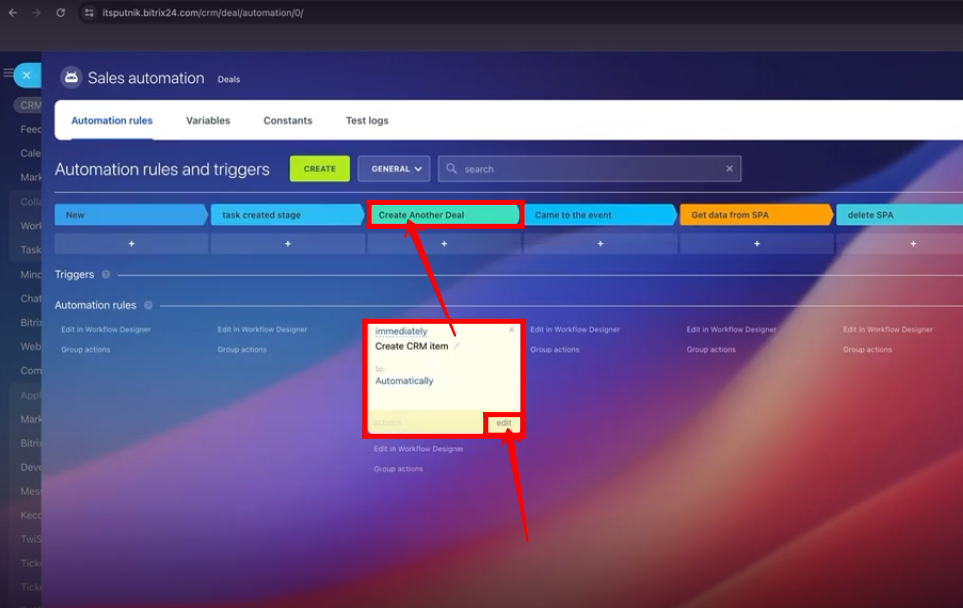
16. Within “Automation Rules”, go to “Other” and add “Create CRM item” robot.
17. Create a new stage named “Create Another Deal”. Move “Create CRM item” robot to “Create Another Deal” stage. Edit it.
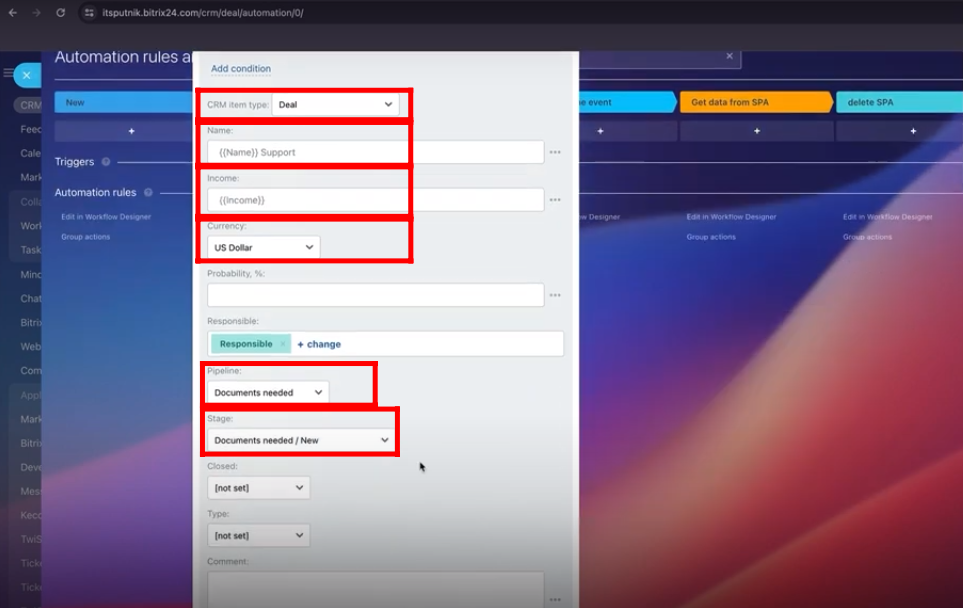
18. Select “CRM item type” as “Deal”. Add dynamic “Name” and “Income” of the deal respectively from three dots option. Select “Pipeline” and “stage”. Save it.
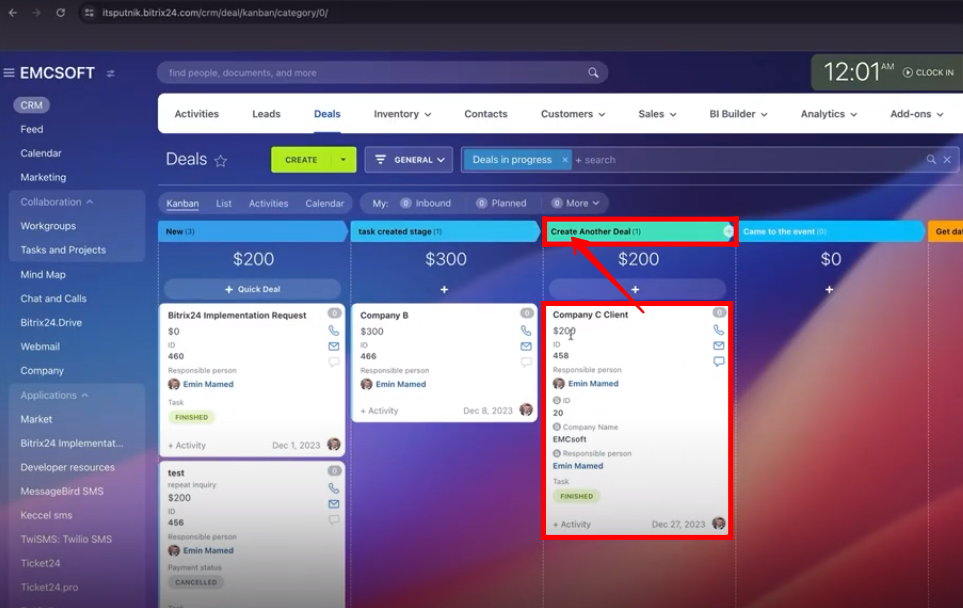
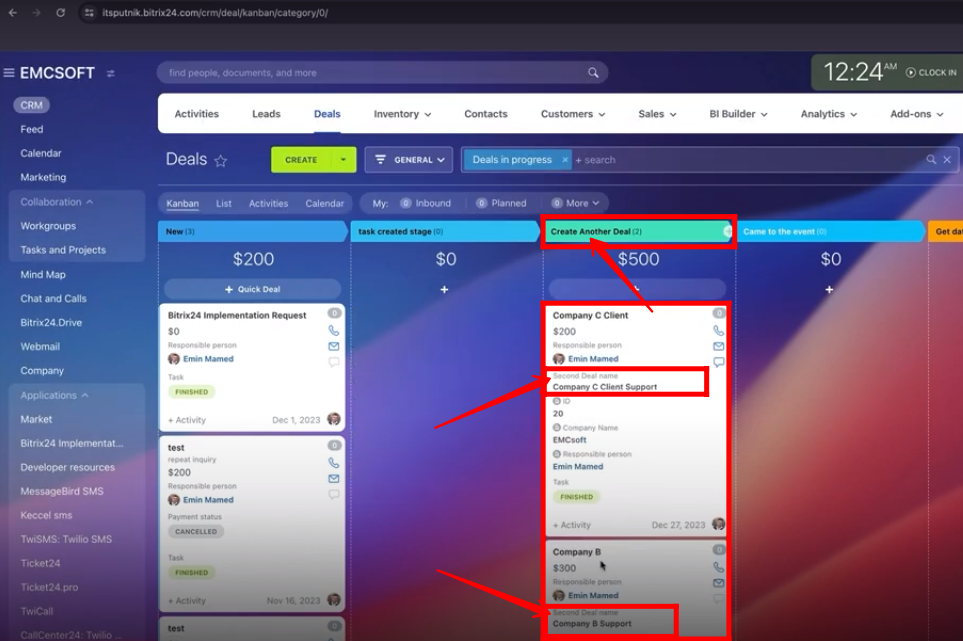
19. Roll back the test deal named “Company C Client” to “task created stage” stage and then again move to “Create Another Deal” stage.
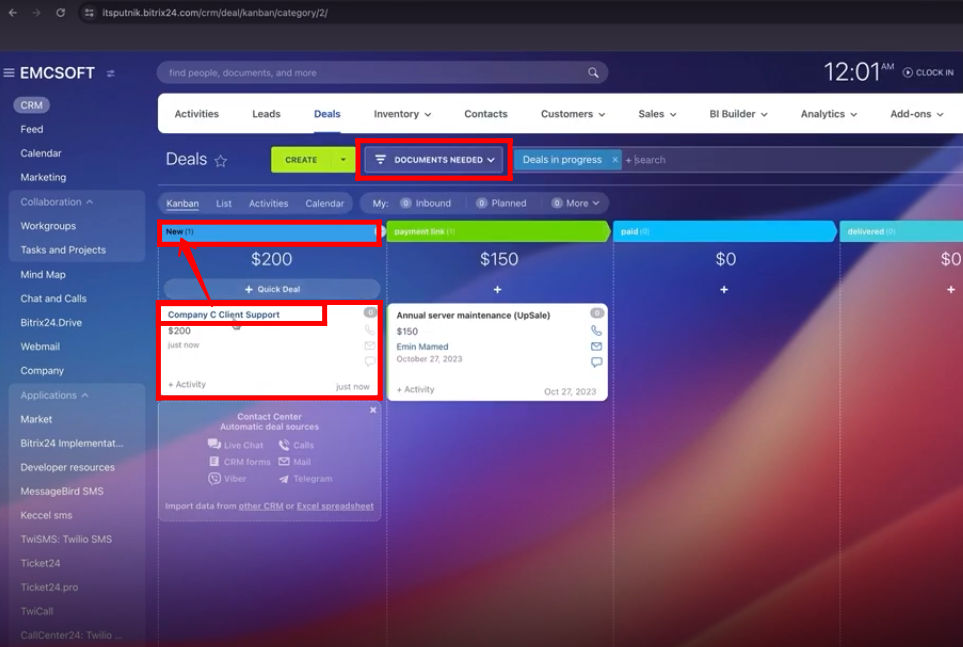
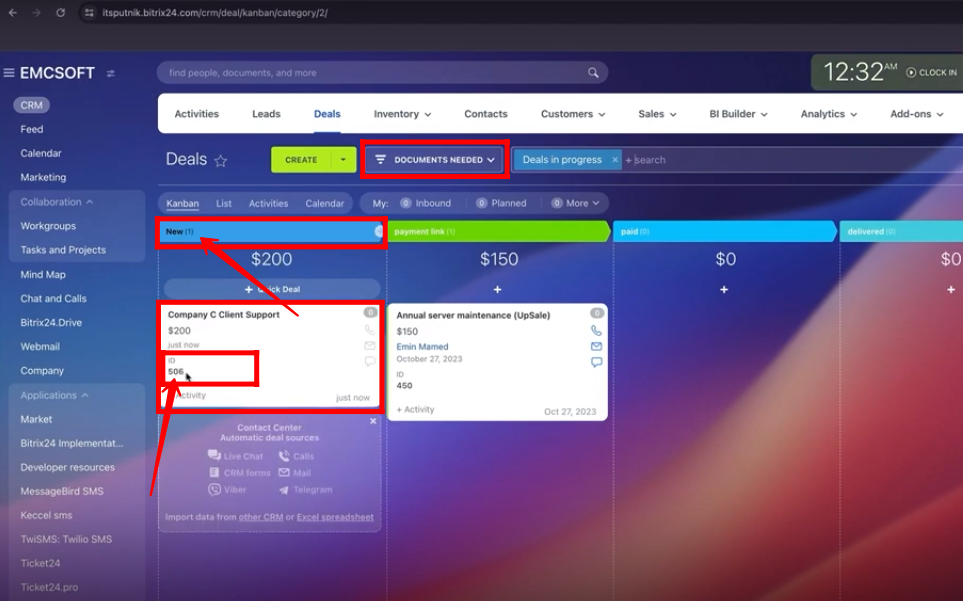
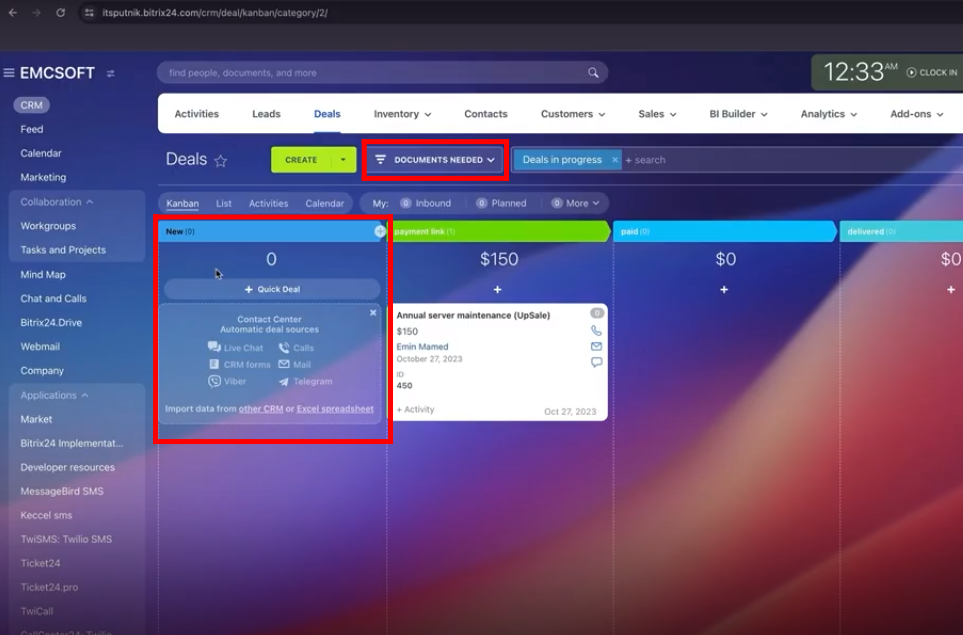
20. Open another funnel(Documents Needed), where you created a new “CRM item” within “Deals”. You can see a new deal has been generated under “New” stage with a configured name.
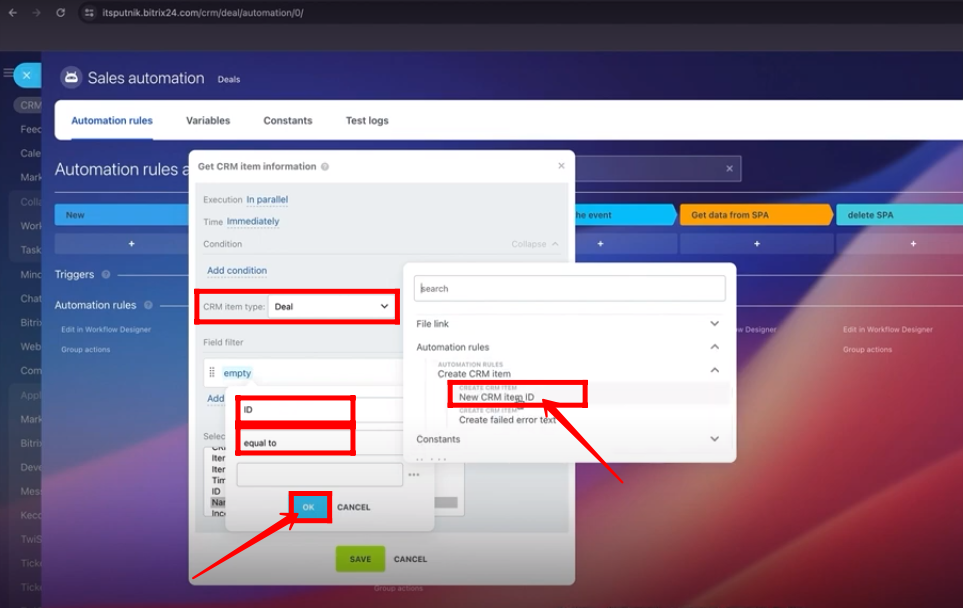
21. Within “Automation Rules”, go to “Other” and add “Get CRM item information” robot.

22. Select “CRM item type” as “Deal”. Apply condition as “ID equal to New CRM item ID” from three dots option. Click “OK”.
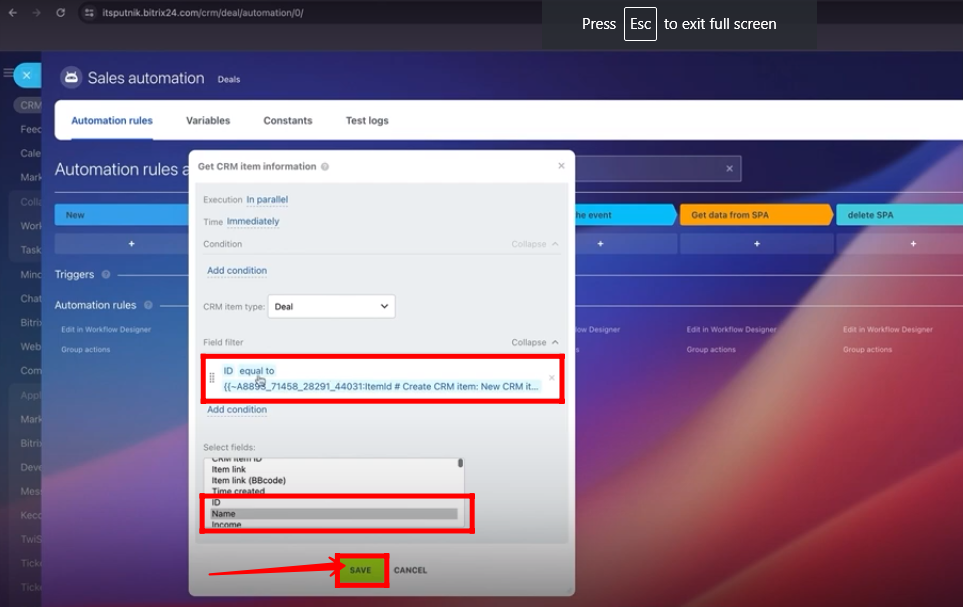
23. Select field as “Name”. Click “Save”.
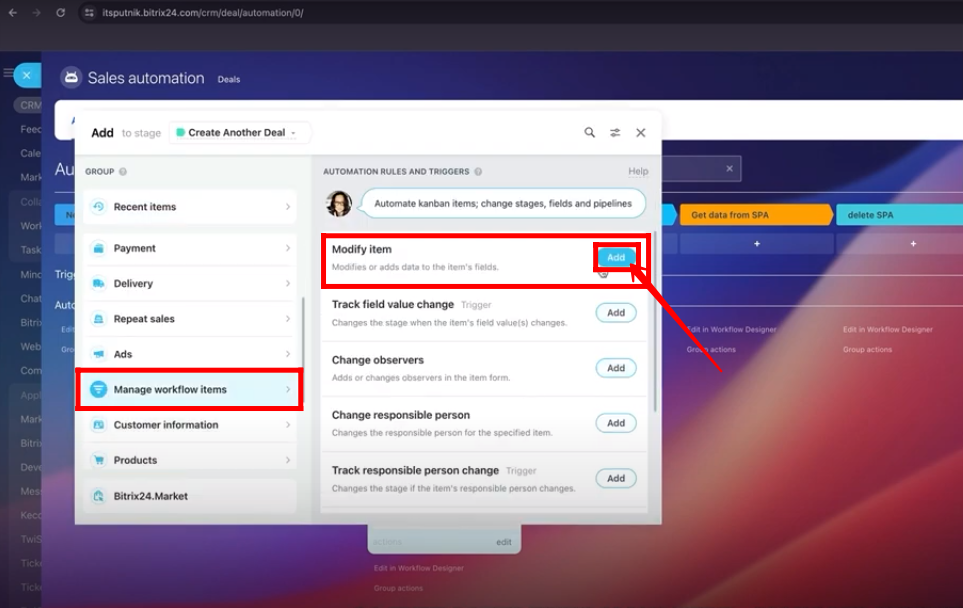
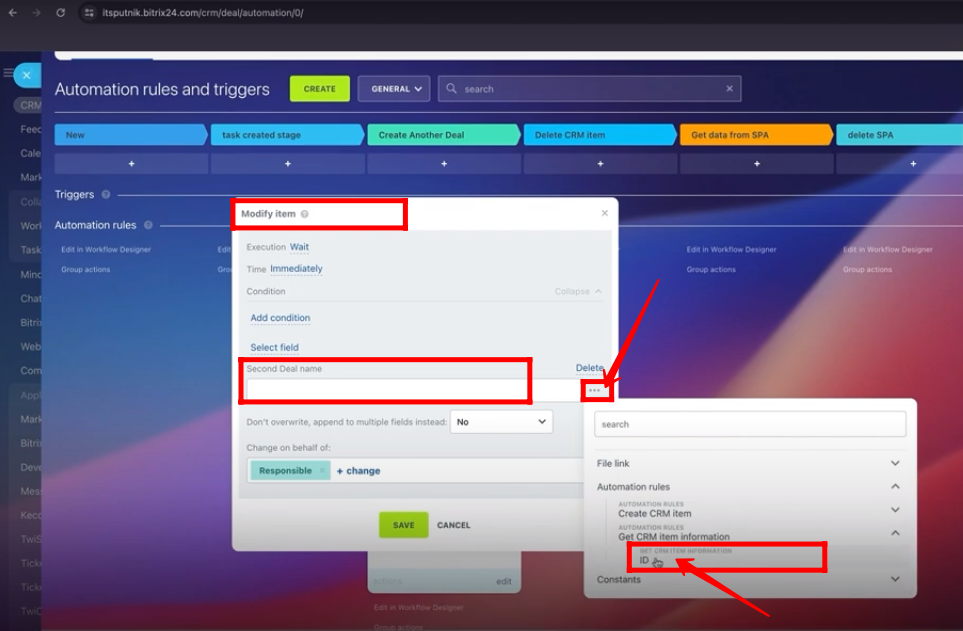
24. Within “Automation Rules”, go to “Manage Workflow items” and add “Modify item” robot.
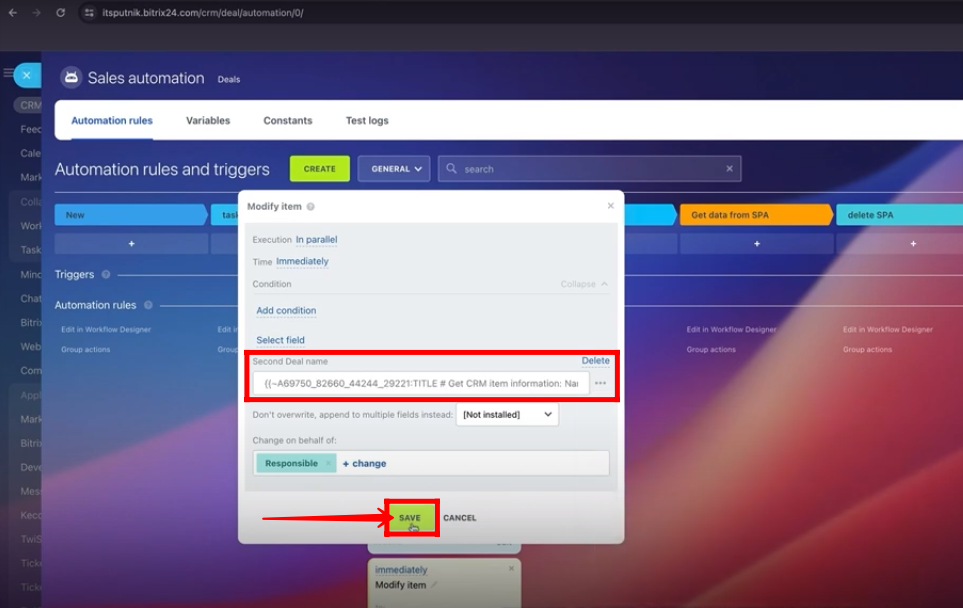
25. Create a new field named “Second Deal name” with type as “String” and select in “Modify item” robot. Apply “Name” under “Get CRM item information” from three dots option in “Select Deal name” field.

26. Click “Save”.
27. Make sure to place all these robots in sequence under “Create Another Deal” stage.

28. Roll back the test deal to “task create stage” and then to “Create Another Deal” stage and refresh the tab. You can see the “Second deal name” in details.
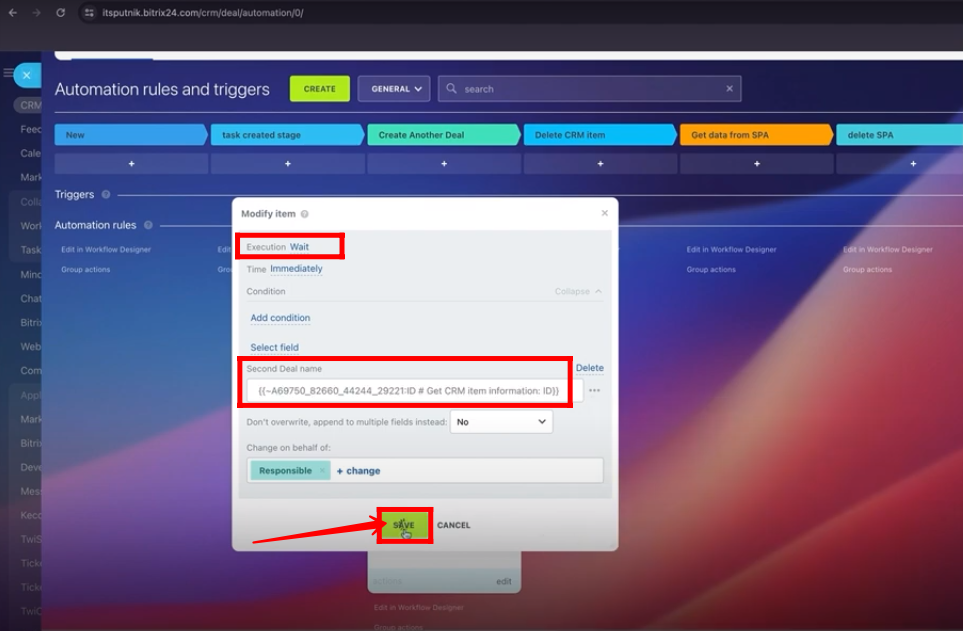
29. Modify the “modify item” robot. Execution must be “WAIT”. Select “ID” under “Get CRM item information” within “Second Deal name” field.
30. After selecting “ID” of deal, click “Save”.
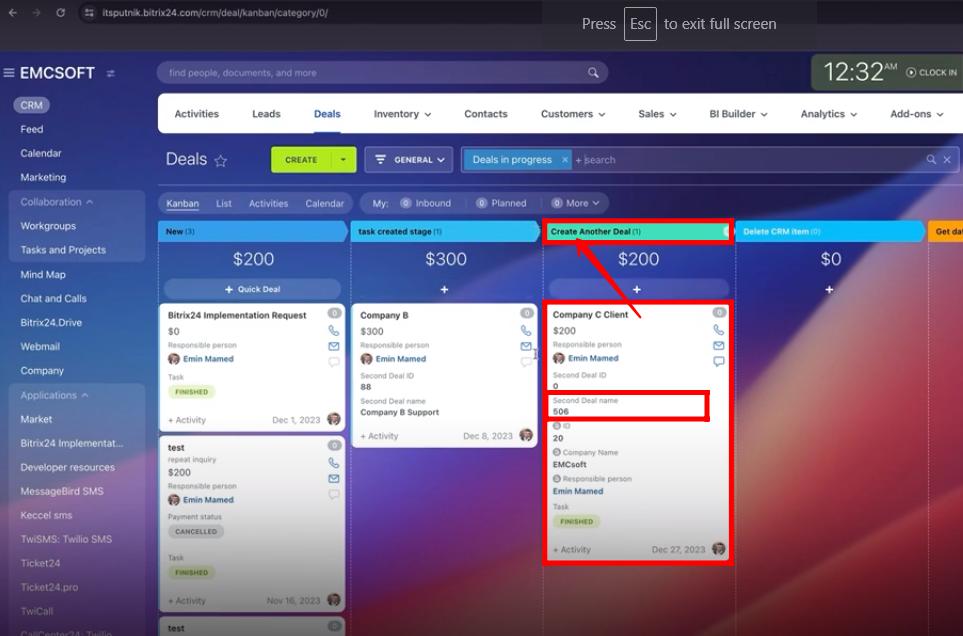
31. Roll back the test deal to “task create stage” and then to “Create Another Deal” stage and refresh the tab. You can see the “ID” written in “Second deal name” in details.
32. Go to another funnel(Documents Needed) within “Deals” and refresh the tab. You can see the “ID” of the deal in details of new deal under “New” stage.
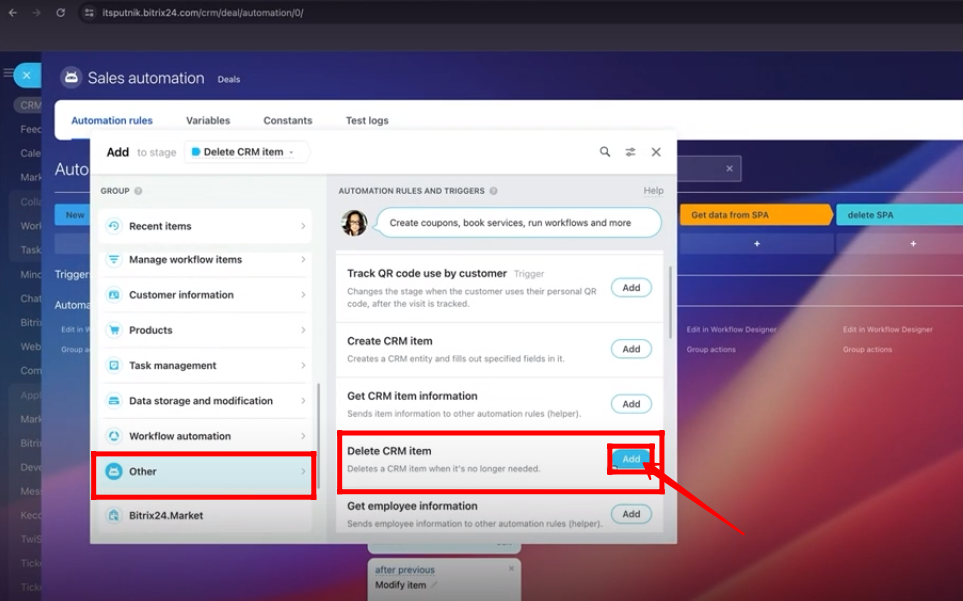
33. Within “Automation Rules”, go to “Other” and add “Delete CRM item” robot.
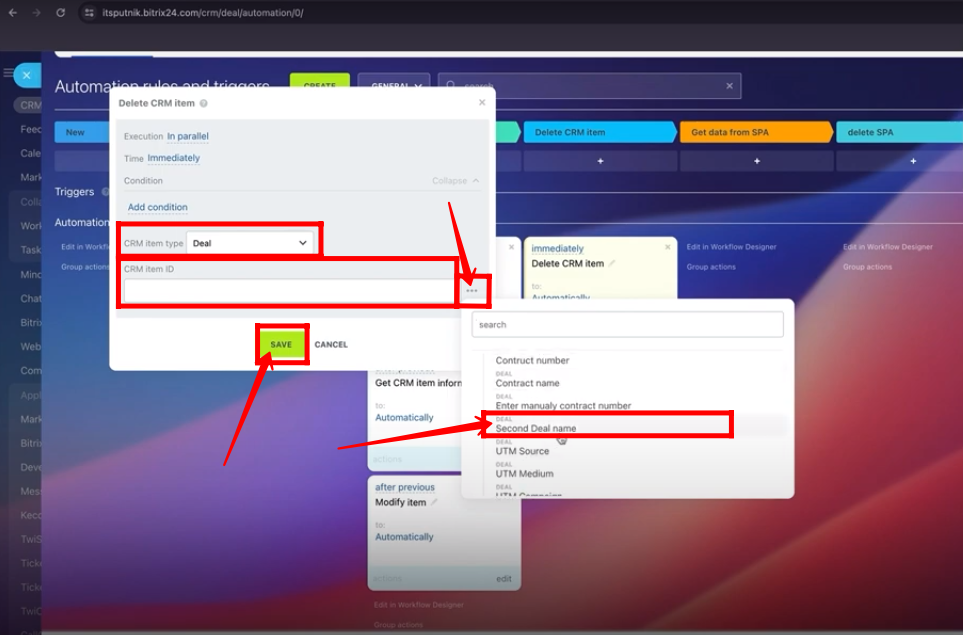
34. Select “CRM item type” as “Deal”. Select “Second Deal name” field in “CRM item ID” attribute from three dots option. Click “Save”.
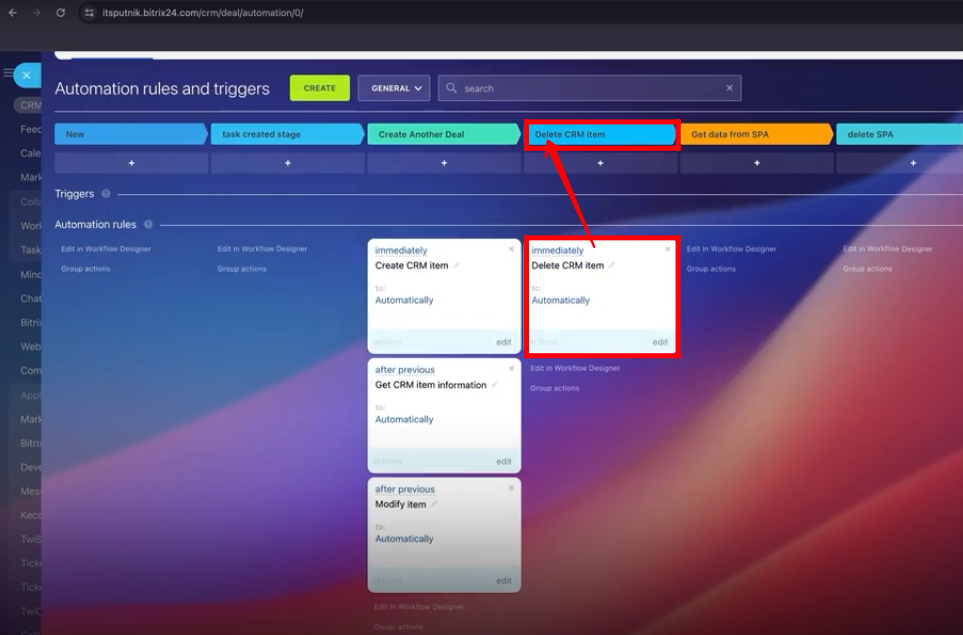
35. Create a new stage named “Delete CRM item”. Move “Delete CRM item” robot to “Delete CRM item” stage.
36. Move test deal to “Delete CRM item” stage.

37. Move to another funnel(Documents Needed) within “Deals” section. The newly configured deal(CRM item type) will be removed.
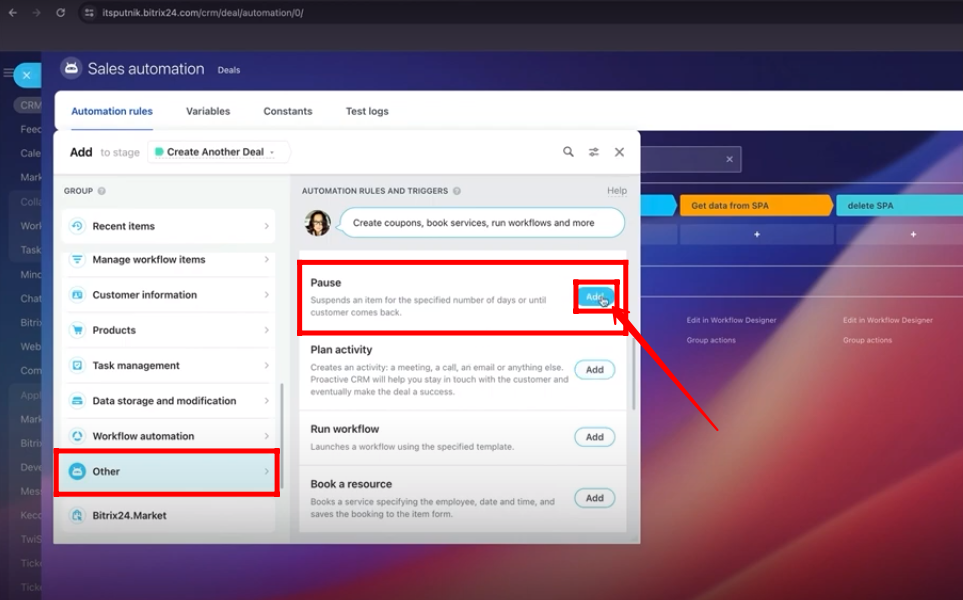
38. Go to “Automation Rules” within “Deals”. Click “Create”. Go to “Other” and add “Pause” robot.
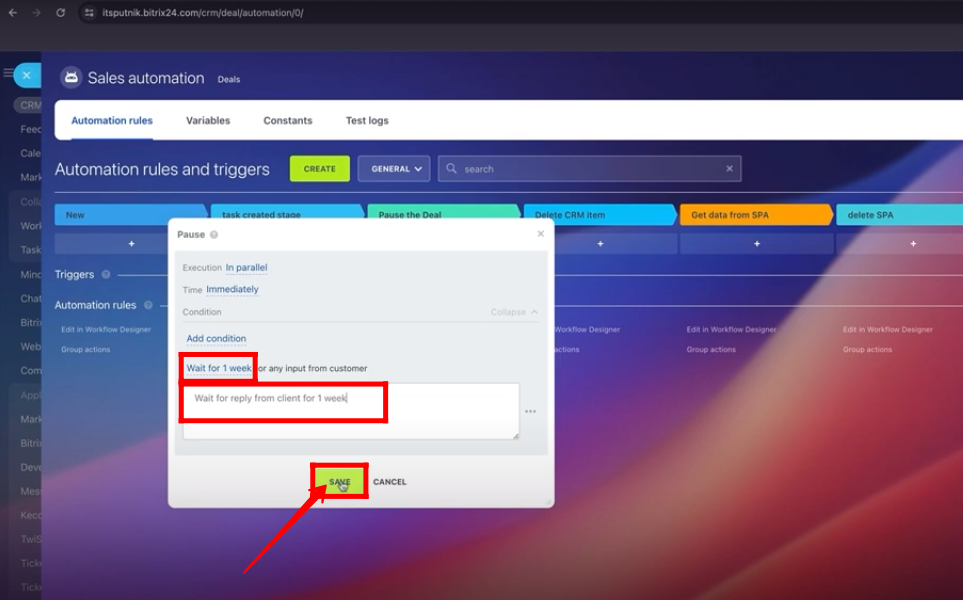
39. Apply wait time and type description. Click “Save”.
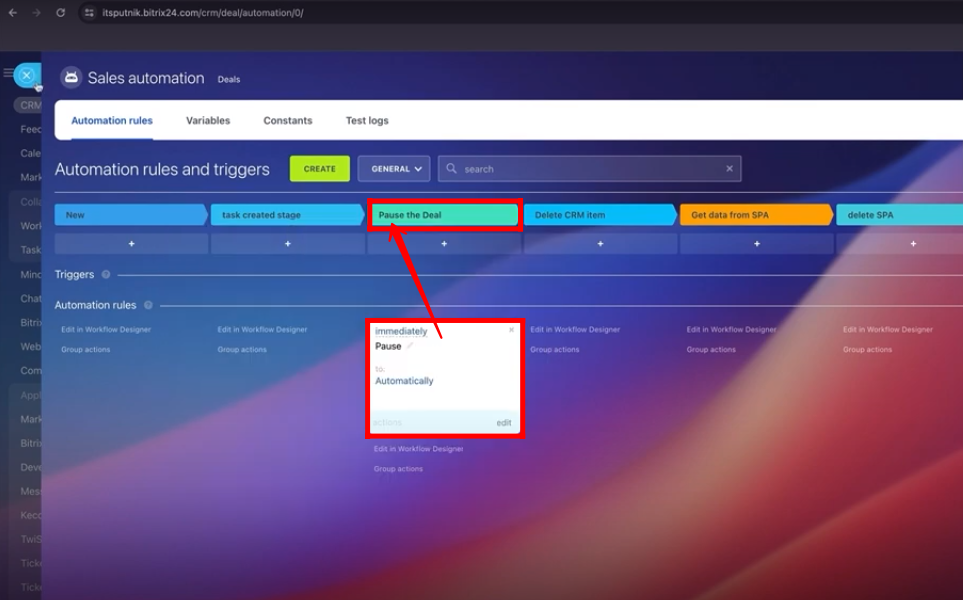
40. Delete all previous robots and move “Pause” robot to newly configured stage named as “Pause the Deal”.
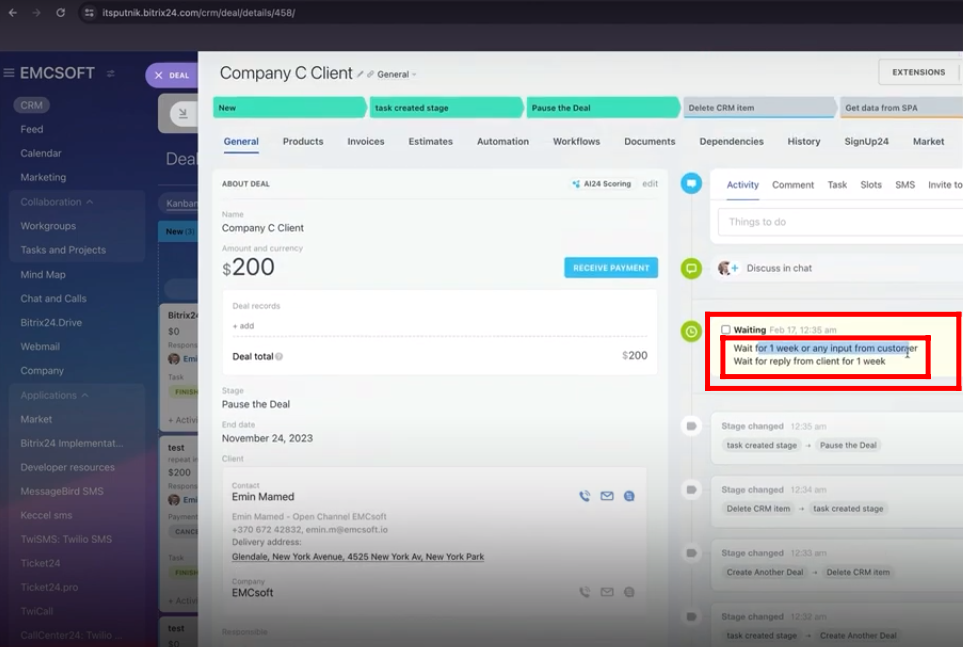
41. Move back the deal to “task created stage” stage and then again move to “Pause the Deal” stage. Open the deal.
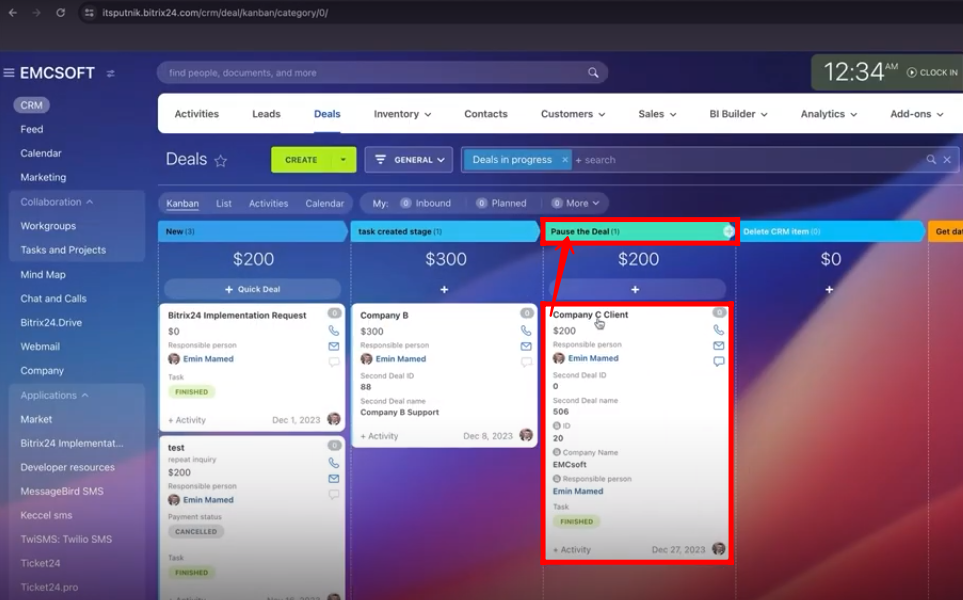
42. You can see a waiting item has been generated within deal.
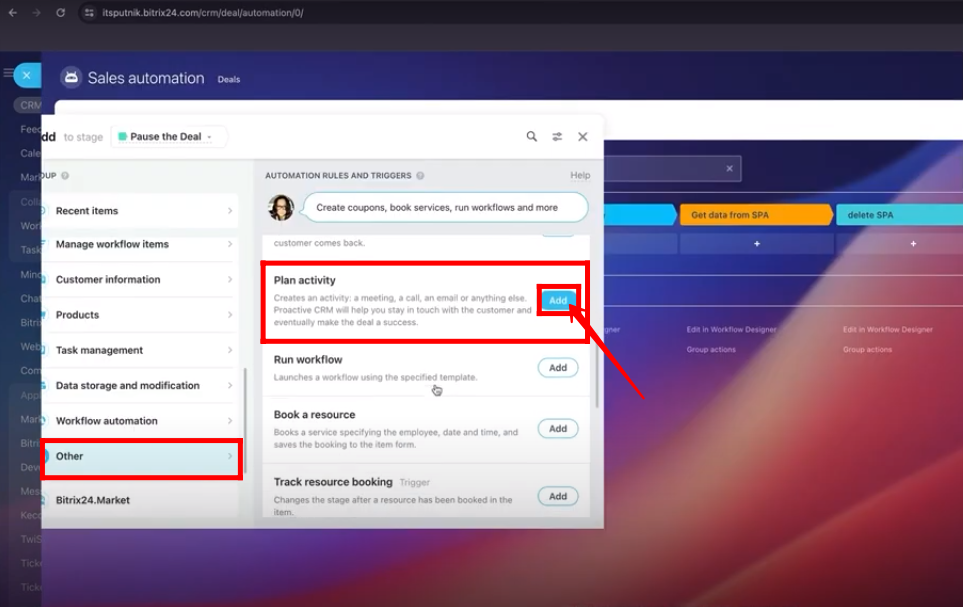
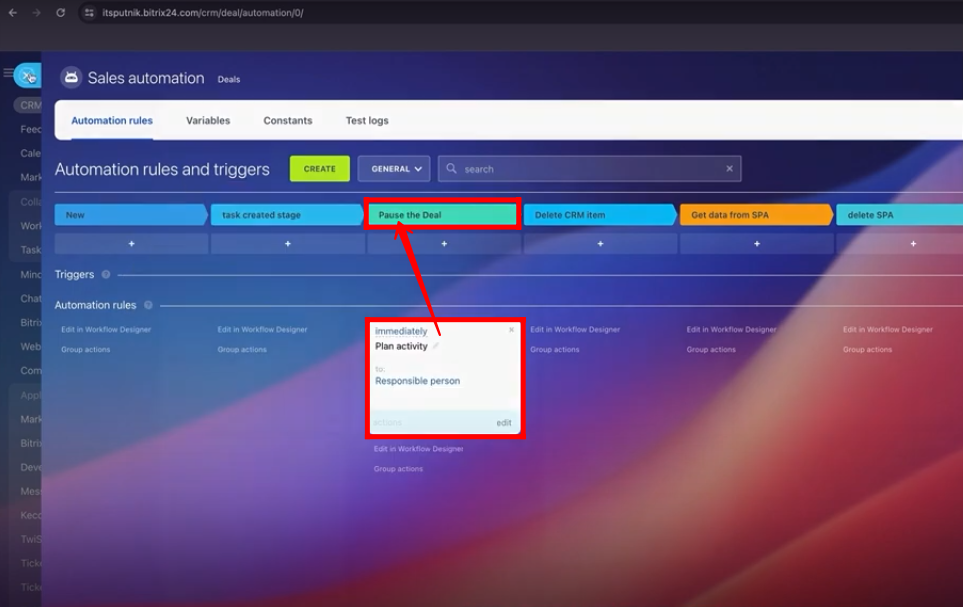
43. Go to “Automation Rules”. Click “Create”. Go to “Other” and add “Plan activity” robot.
44. Type description of plan activity and select deadline date. Click “Save”.
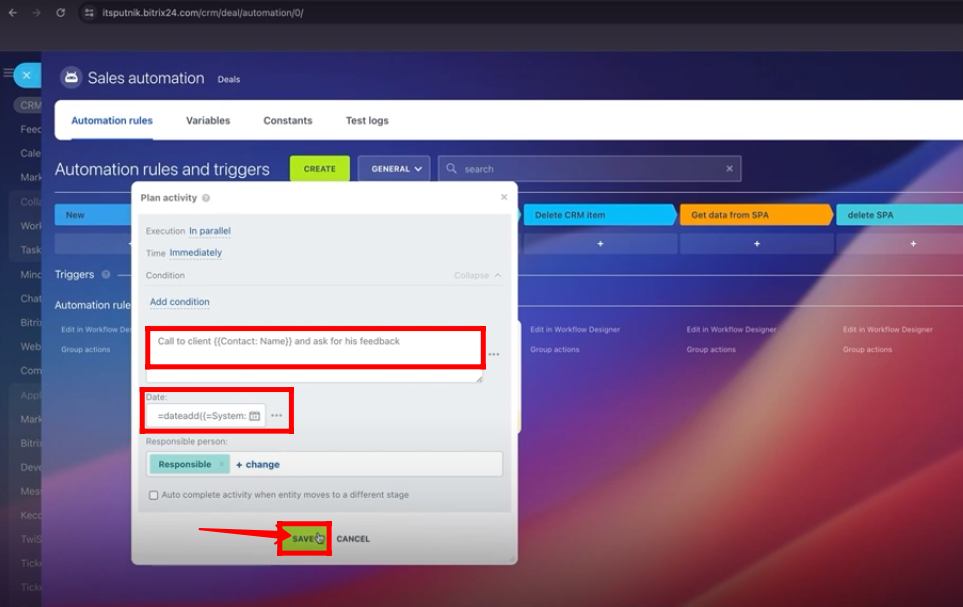
45. Move “Plan activity” robot to “Pause the Deal” stage for now.
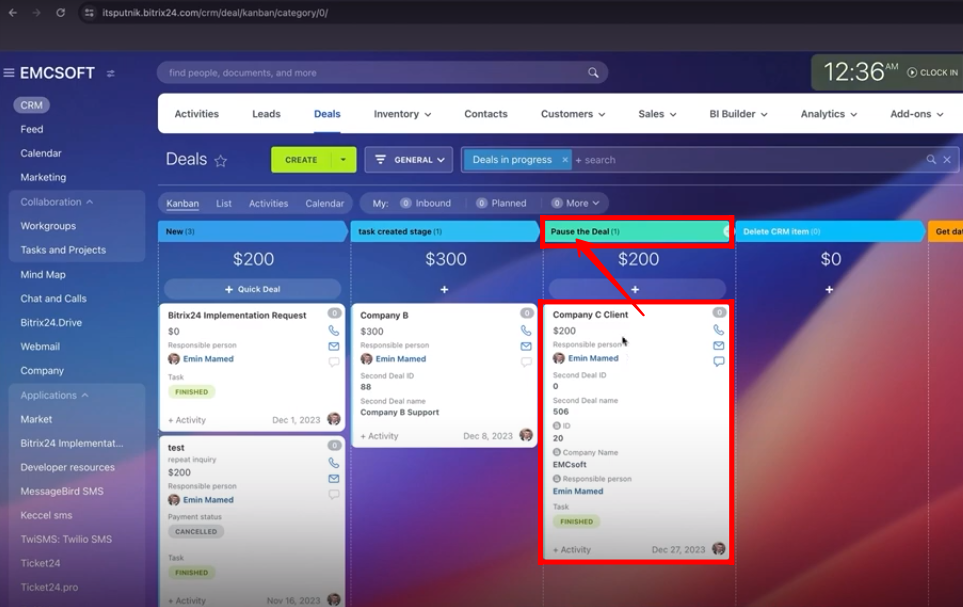
46. Roll back the test deal to “task created stage” stage and then again move to “Pause the Deal” stage. Open the deal.
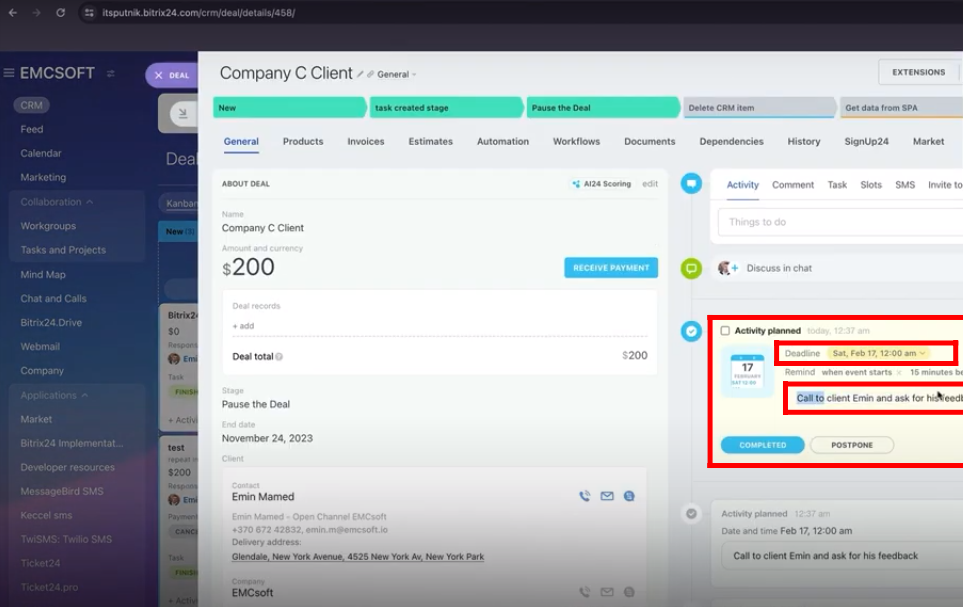
47. A new “Activity Plan” item has been generated within deal with configured deadline and description.
“You can also watch this video on Youtube”