| 4502 Views | Amin

In today’s tutorial, we’ll explore the robust functionalities of Bitrix24, specifically focusing on managing leads using various features such as list management in Kanban and calendar views, lead settings, and the use of the recycle bin. We’ll also demonstrate how to use filters effectively within leads and across Kanban boards, and showcase quick methods for creating and configuring fields when setting up new leads. These tools are crucial for efficient CRM management and optimizing workflow within Bitrix24.
Work in List, Kanban, and Calendar:
We begin by navigating through the list, Kanban, and calendar interfaces within Bitrix24. These features are vital for organizing and visualizing tasks and leads. By leveraging these views, users can easily manage their daily activities and track progress in a visually engaging manner. We’ll guide you on how to switch between these views and utilize them for maximum productivity.
Displaying the Lead Card in Kanban:
One of the key features in managing leads in Bitrix24 is the ability to display lead cards in the Kanban view. This visualization helps in quickly assessing the status of various leads at a glance. We’ll walk you through the process of setting up and customizing your Kanban board to include detailed lead cards, which provide essential information such as contact details, progress status, and upcoming deadlines.
Leads Settings Page:
Next, we delve into the leads settings page, where you can customize how leads are handled within your organization. From adjusting lead scoring to defining lead assignment rules, this section allows for a tailored approach to lead management. We’ll cover the step-by-step process of configuring these settings to align with your business processes.
Recycle Bin:
The recycle bin is a crucial tool for any CRM system, offering a safety net against accidental deletions. We’ll demonstrate how to recover deleted leads, ensuring that no valuable information is permanently lost. This feature provides peace of mind, allowing users to restore leads with all associated data intact.
Filters by Leads inside the Lead and in Kanban:
Filters are powerful tools in Bitrix24 that enable users to streamline their focus on specific leads or tasks within the lead and Kanban views. We’ll show you how to set up and apply filters to manage leads more efficiently, allowing for quick sorting and retrieval of information based on predefined criteria.
Quickly Create Leads and Configure Fields When Creating a Lead:
For users needing to quickly add new leads to the system, Bitrix24 offers streamlined options to create leads and configure necessary fields on the fly. This segment covers the steps to rapidly input new lead data and set up the essential fields that capture key information required for lead processing.
Detailed instructions are described below
1. Within the “Leads” tab, let’s uncover the “Kanban” view. You can add a new stage by clicking on the “+” icon.
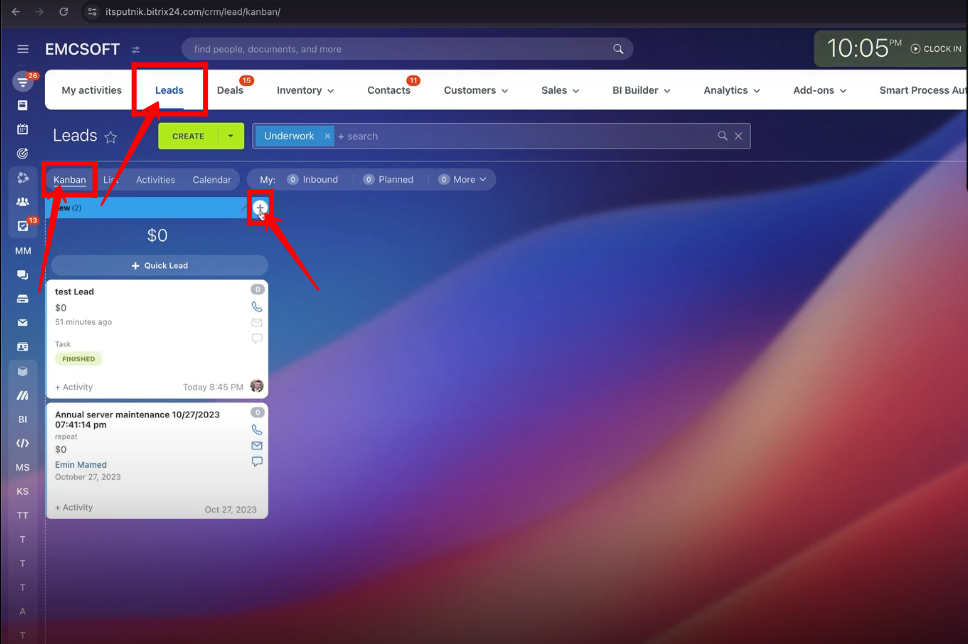
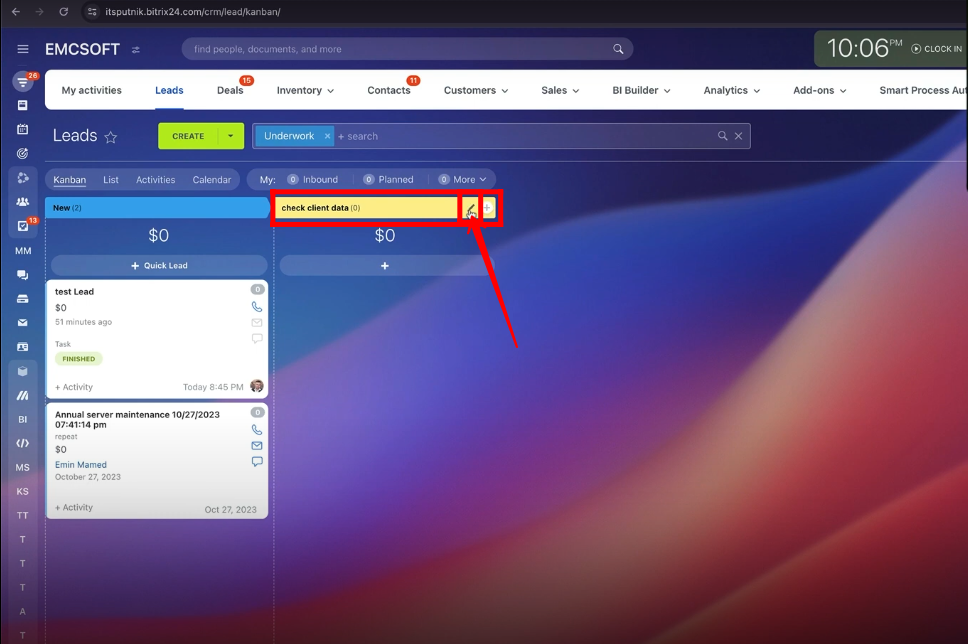
2. Name the stage, whatever you want according to your requirements. You can change the color of the stage bar by clicking on the edit icon.
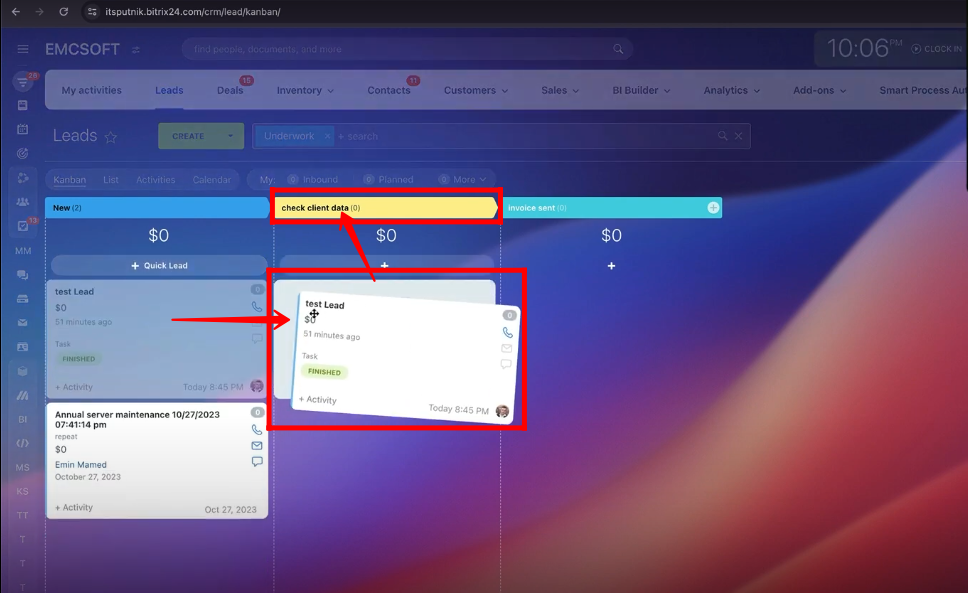
3. You can move any lead to any stage. In this case, a lead is being moved from the “New” to the “Check client data” stage to identify the progress of lead.
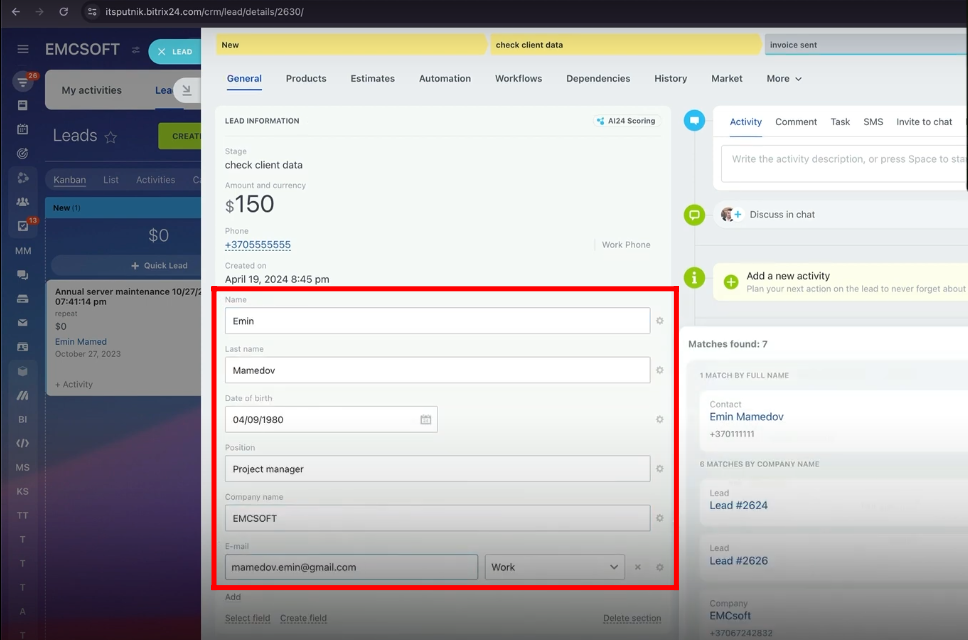
4. Open the lead and click “Select field”. You can “check” the attributes to view within the lead details.
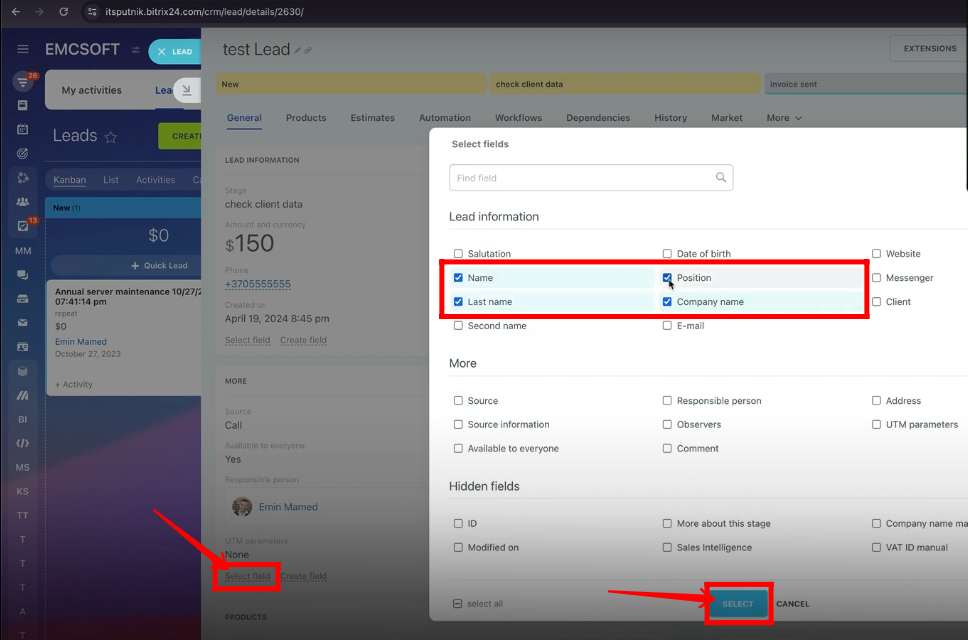
5. Here, you can see the selected attributes are being shown within the lead. All the attributes can be edited at any time.
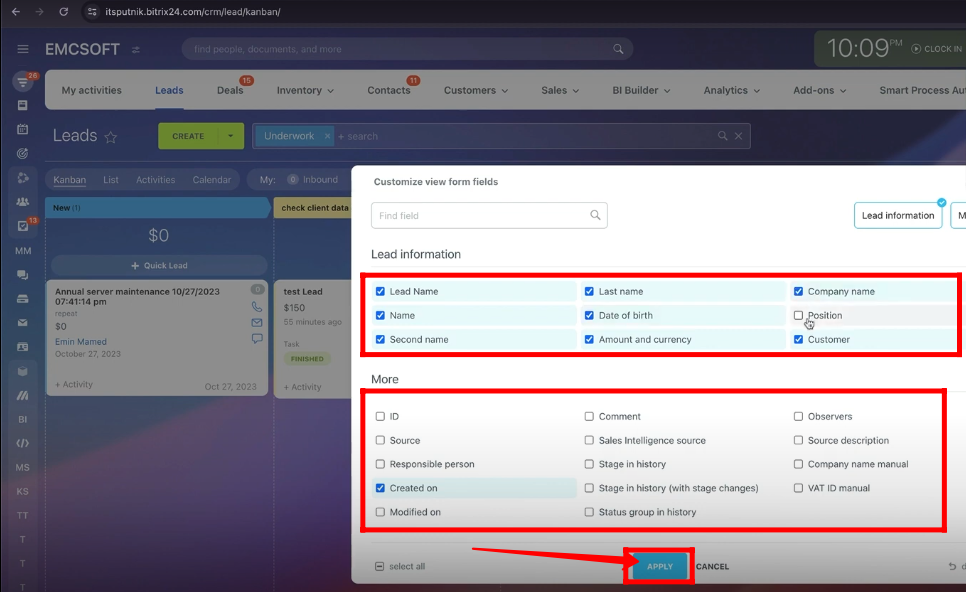
6. Click the “Settings” icon. Go to “Kanban Settings” and select “Configure view from fields”.
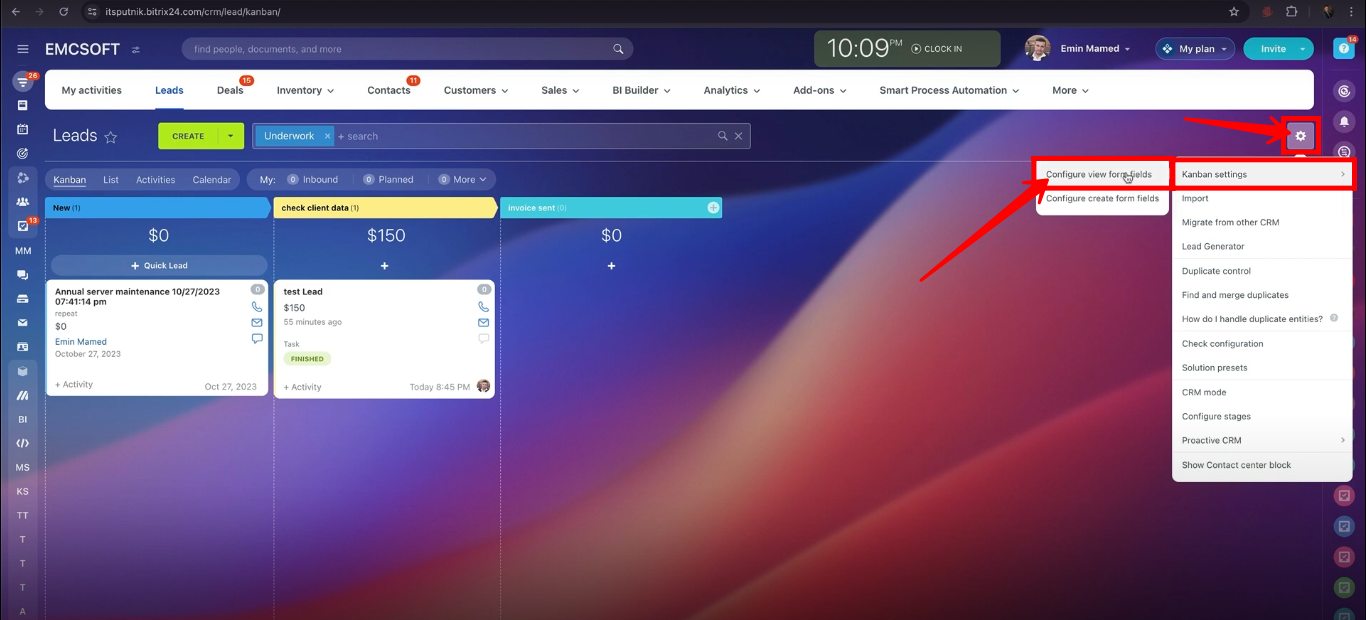
7. “Check” the attributes and click “Apply” to view all the selected details on the lead card.
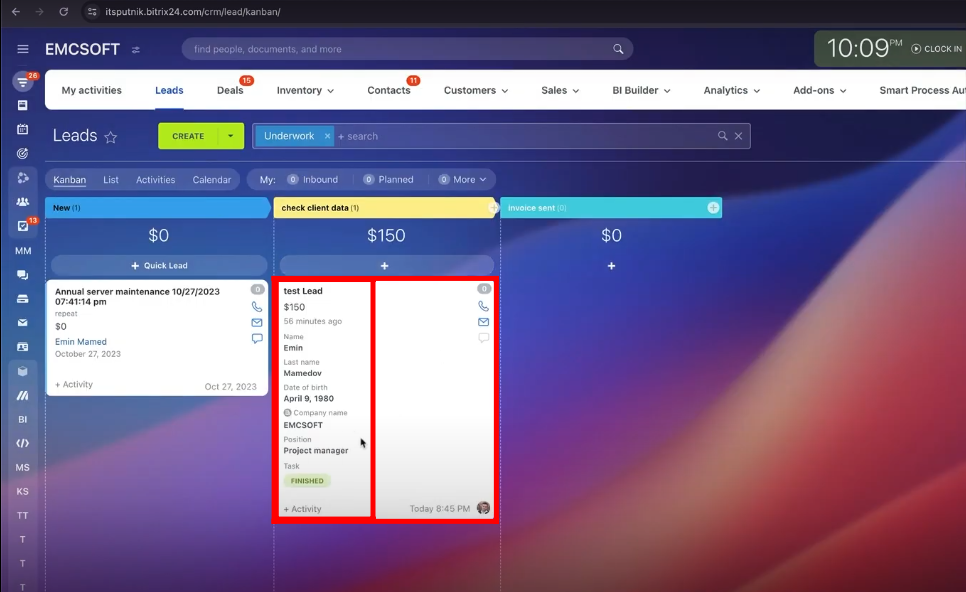
8. Here, you can see all the selected attributes on the lead card.
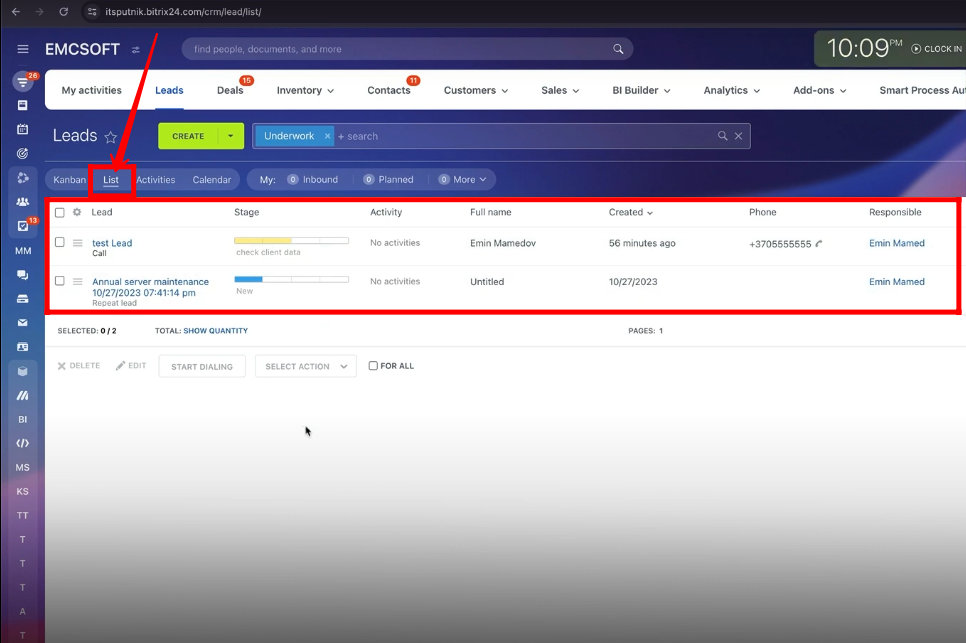
9. Now, move to the “List” view. Here, you can see all leads in tabular form showing all the details as columns and rows.
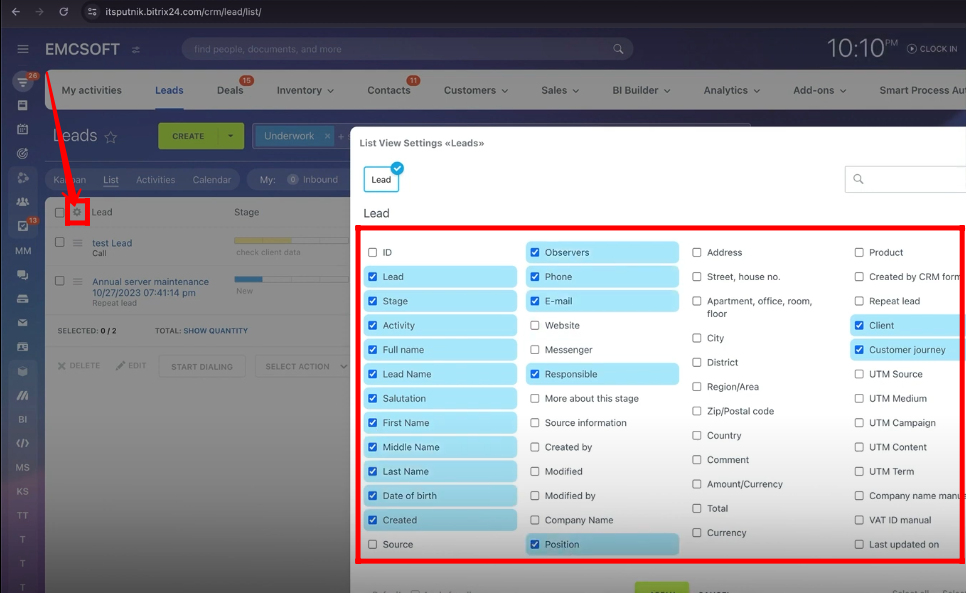
10. Click the “Settings” icon and select the attributes to get in the tabular form within the “list” view.
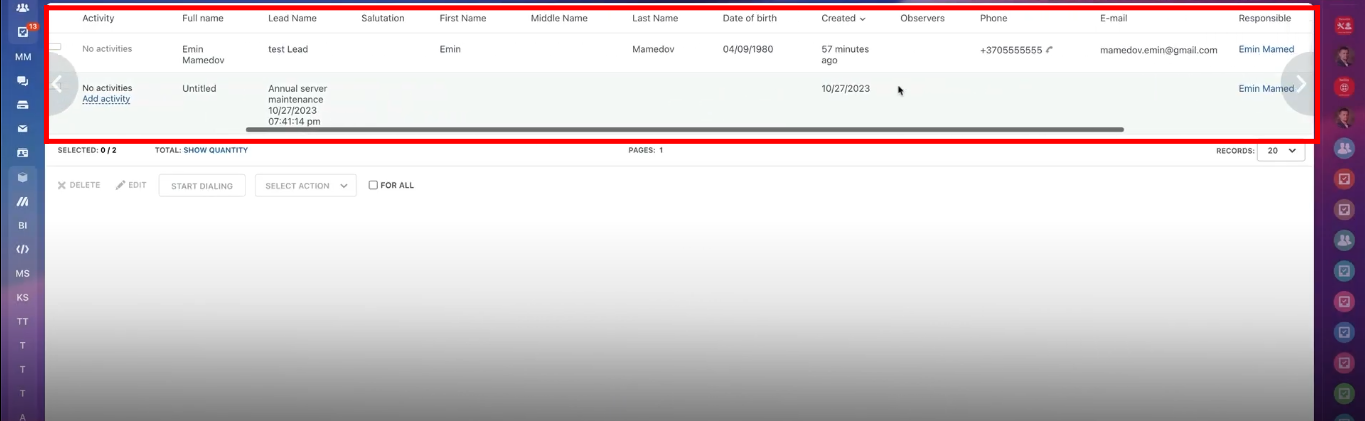
11. You can see all the selected attributes are being shown as a list or in tabular form.
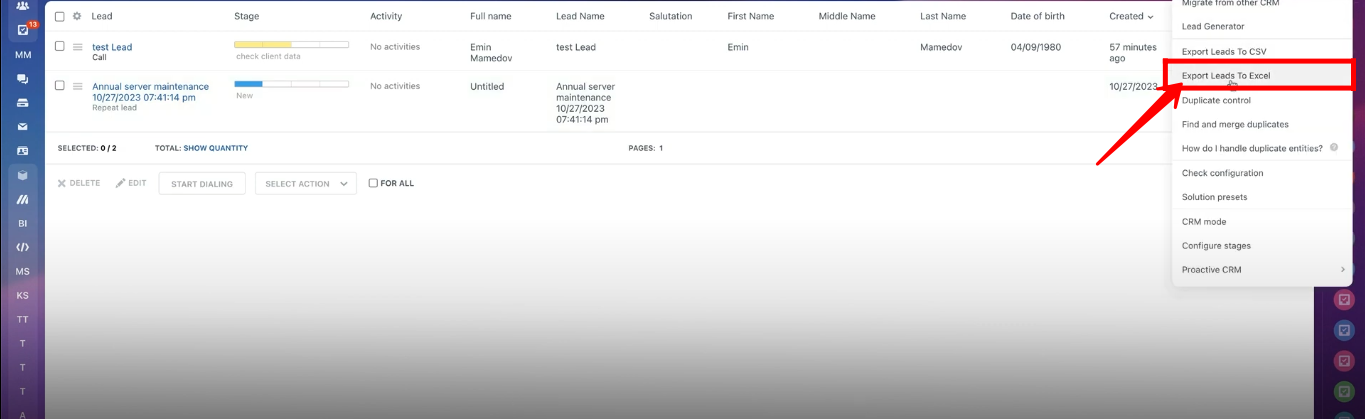
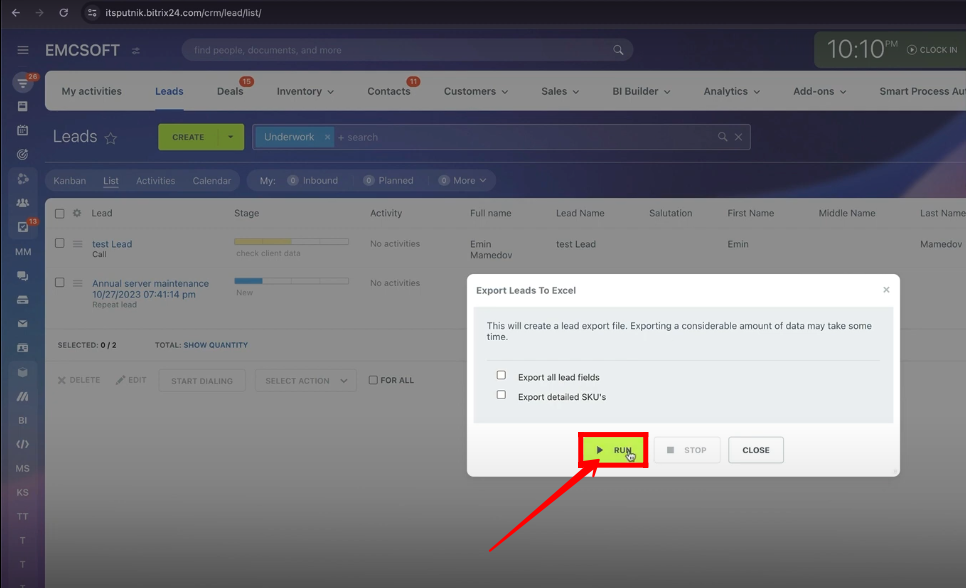
12. Select the option “Export Leads To Excel”.
13. Click the “Run” button. You can “check” the options according to your requirements.
14. Click “Download Export File”.
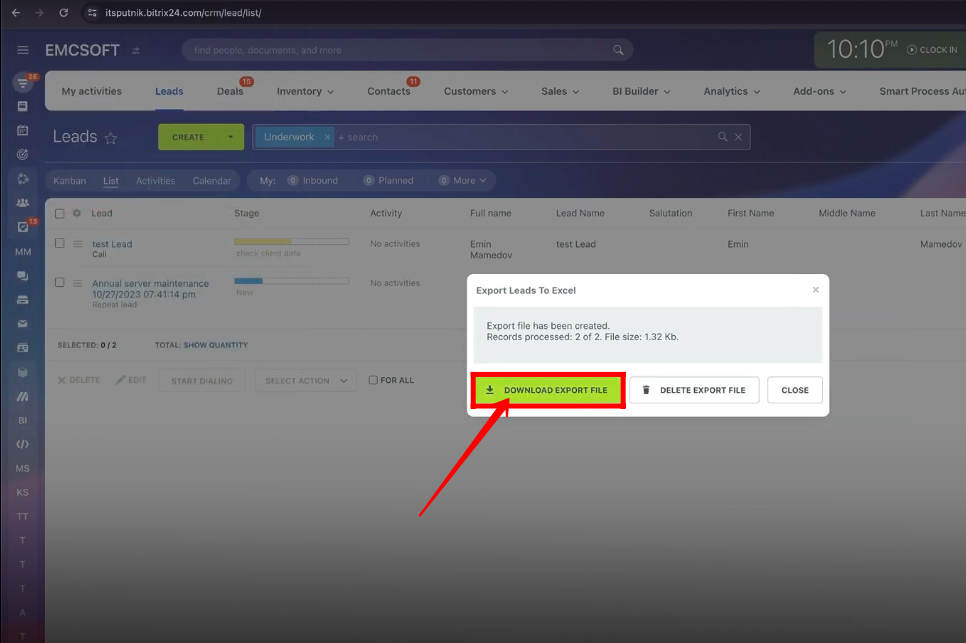
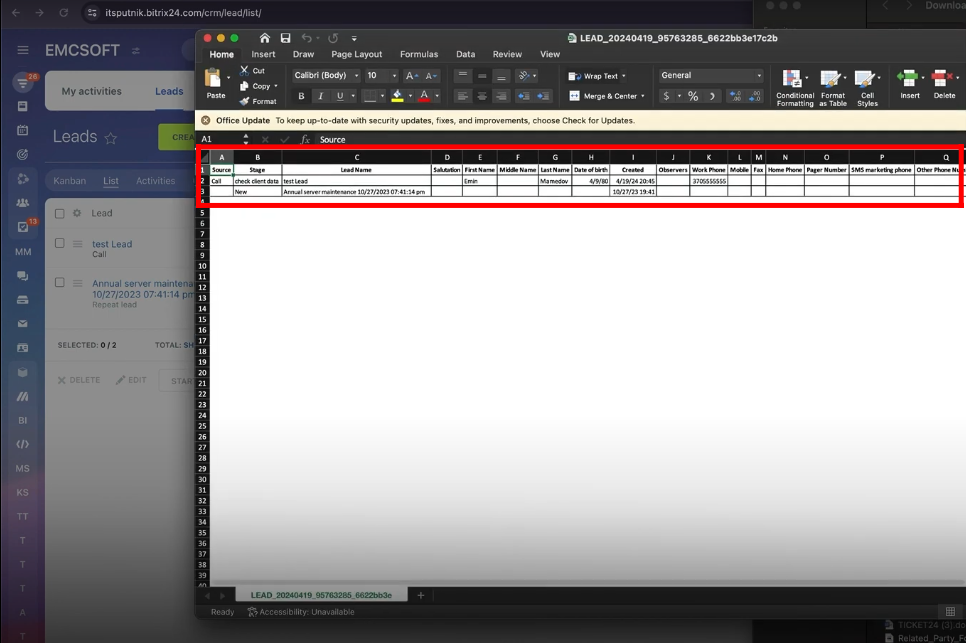
15. The Excel file containing all your existing leads in the “list” view has been downloaded.
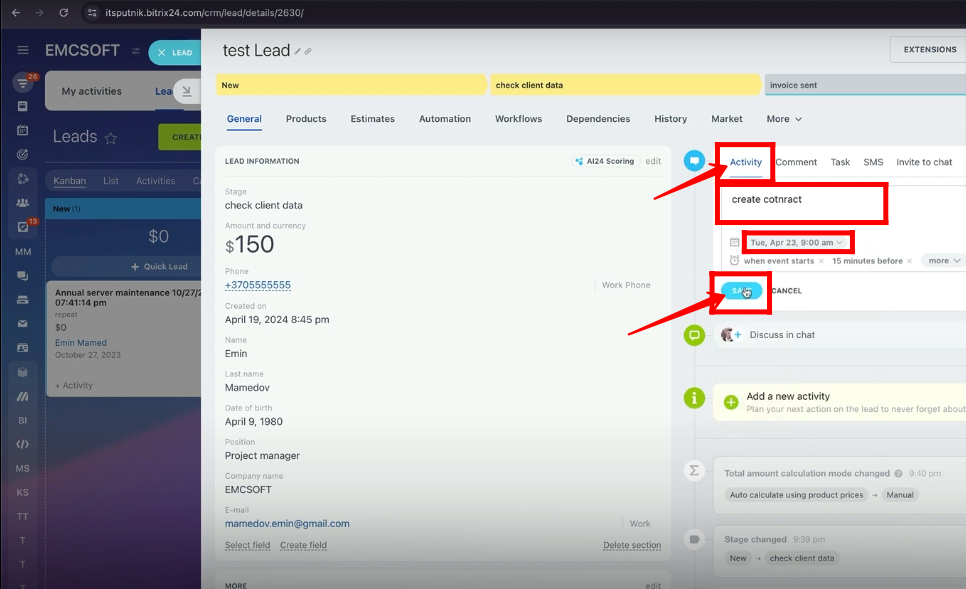
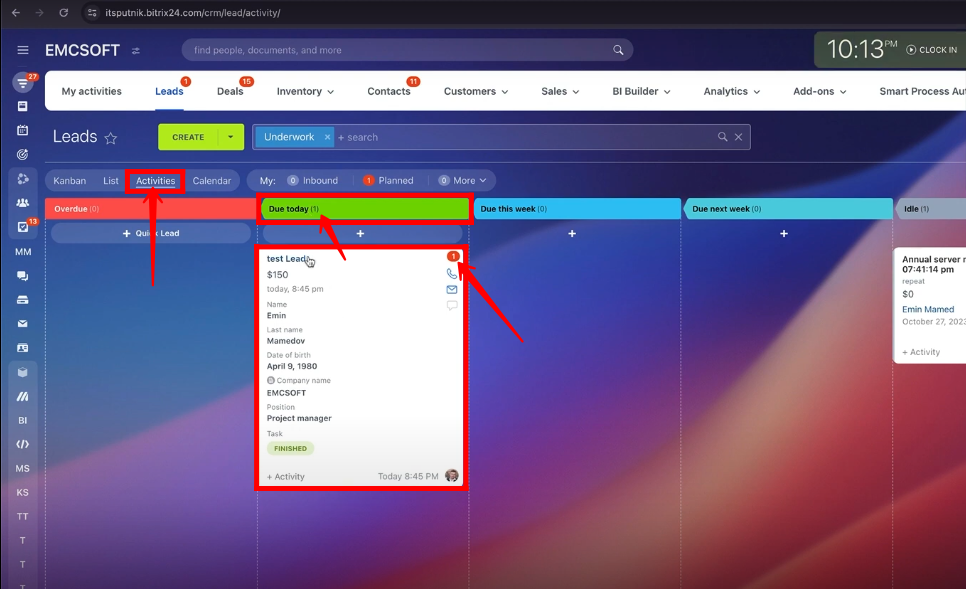
16. Open the lead within the “Kanban” view. Click “Activity”. Type the description of the activity, select “date” and click “Save”.
17. Go to the “Activities” view. You can see, the lead is under the stage that reflects the time of activity execution.
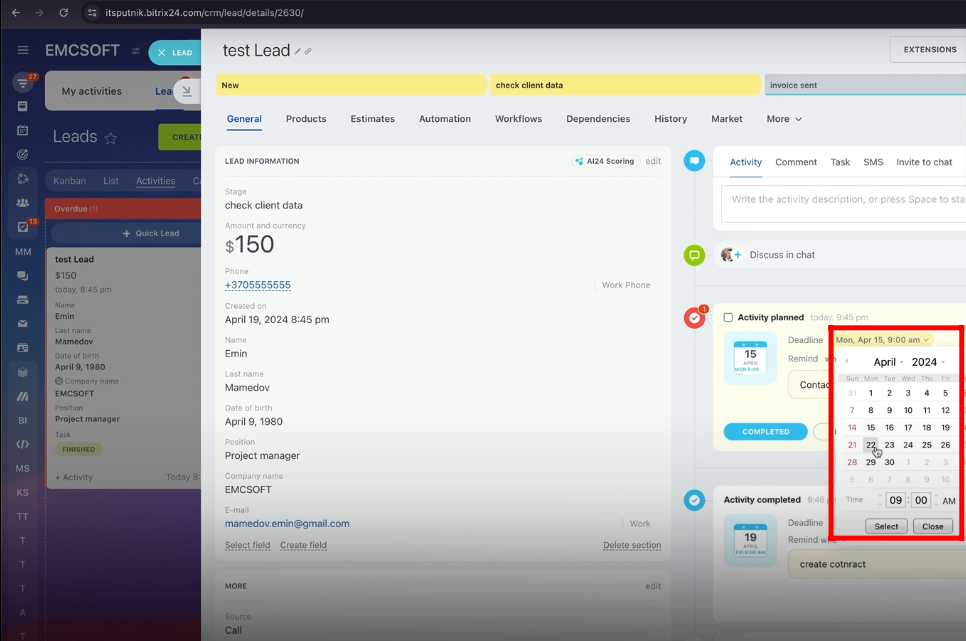
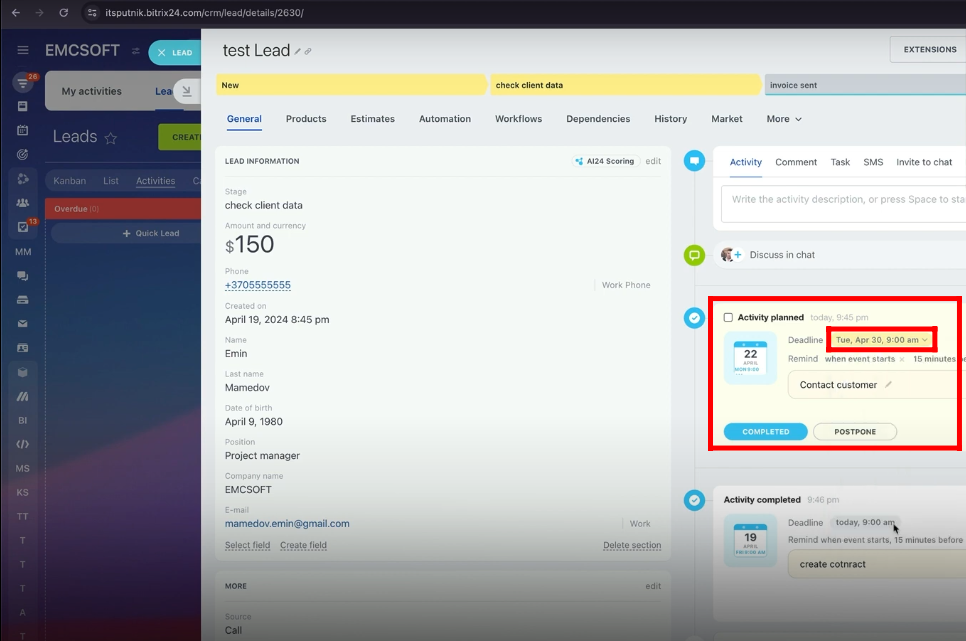
18. Open the lead and change the date of activity to next week from your current date.
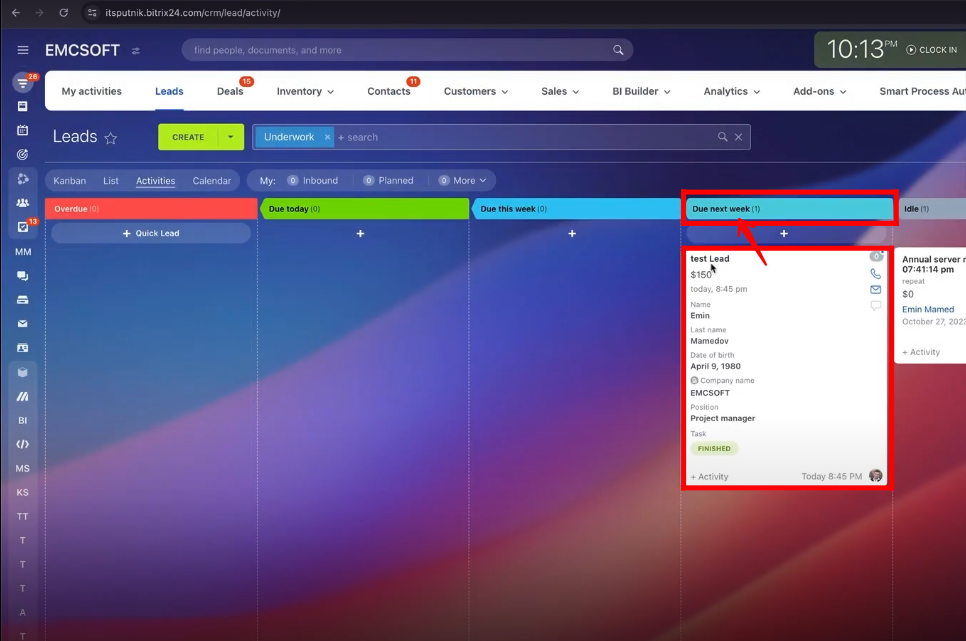
19. The lead is automatically shifted to the “Due next week” stage.
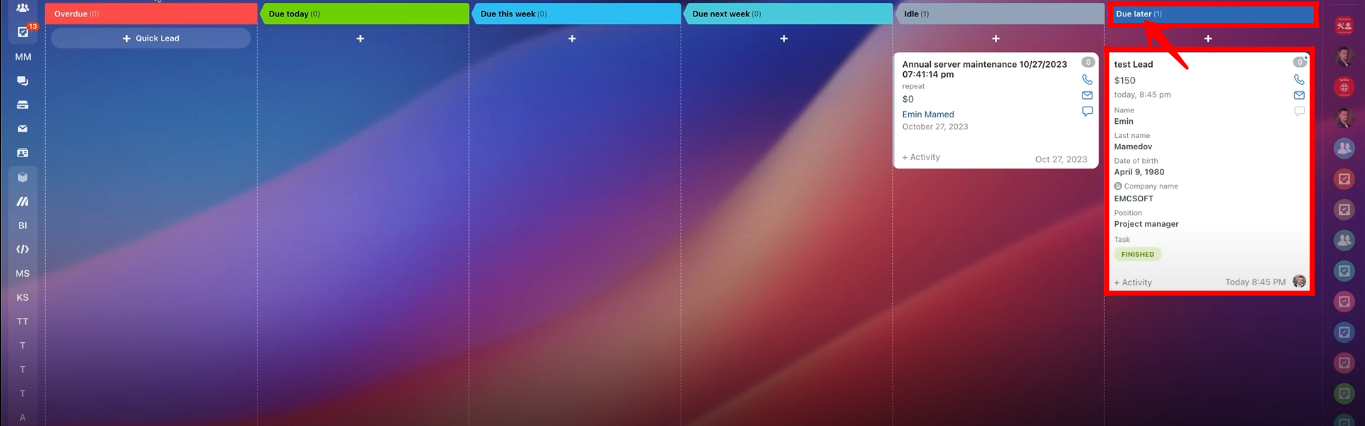
20. Now, ensure that the activity should be executed after one or two weeks.
21. The lead has been moved to the “Due later” stage.
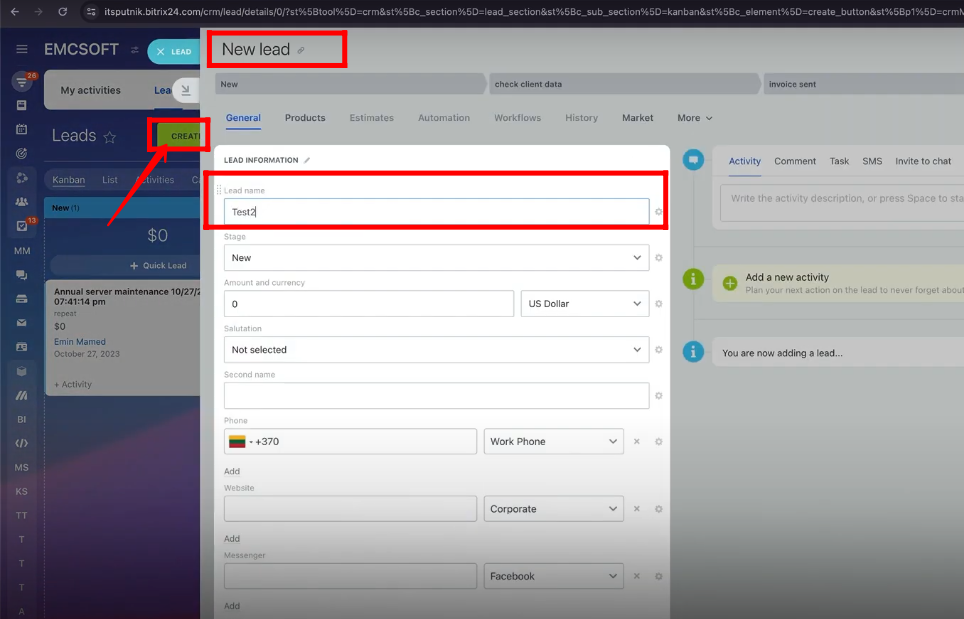
22. Within the “Kanban” view, click “Create”. Name the lead and click “Save” to create a new lead.
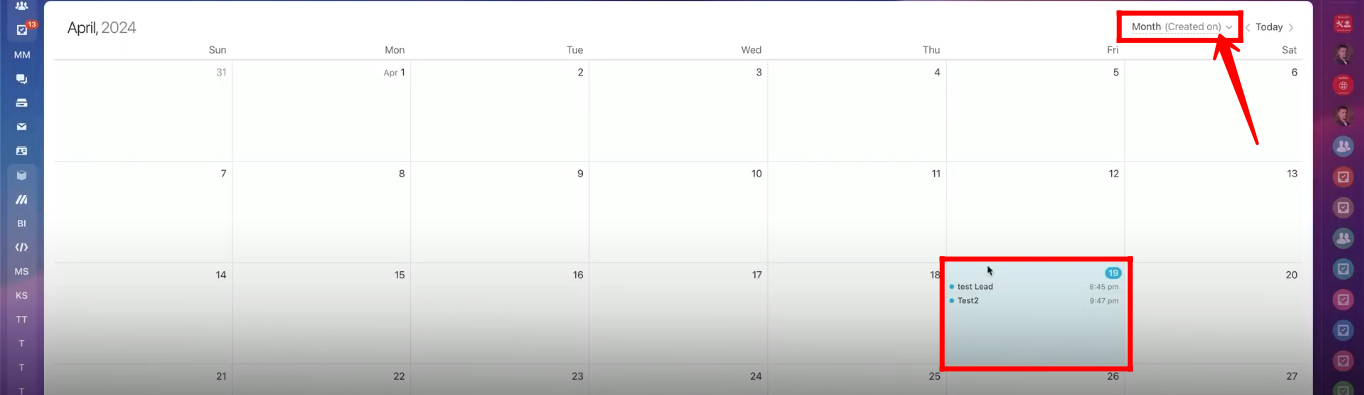
23. Go to the “Calendar” view. Apply the filter “Month(Created on)”. You can view the creation date of leads with titles of leads.
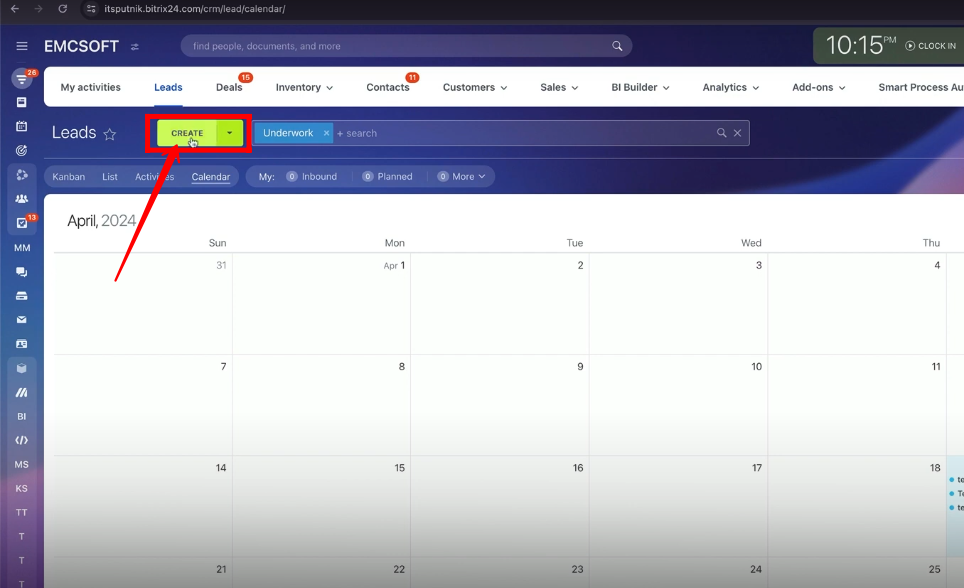
24. Within the “Calendar” view, click “Create” to generate a new lead.
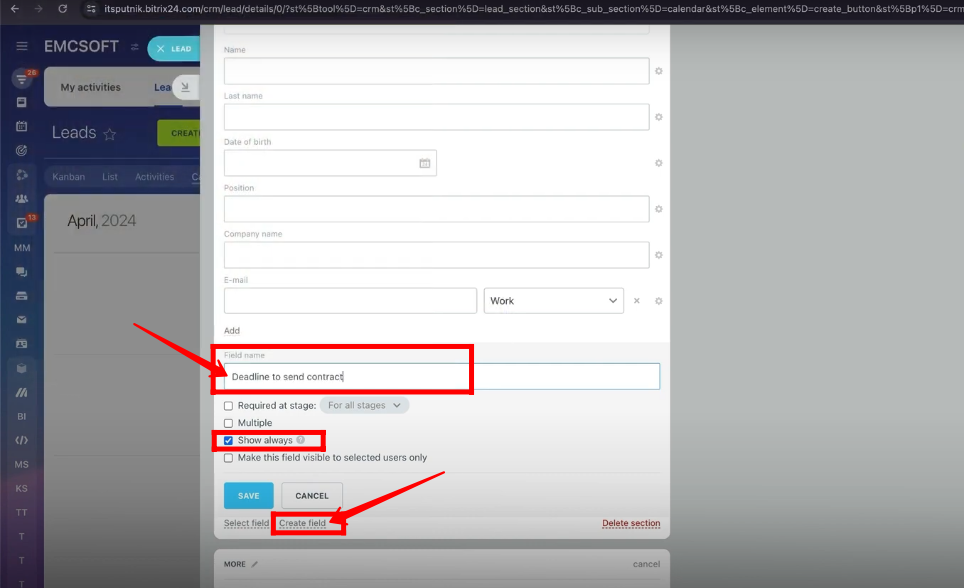
25. Name the lead and add a field by clicking “Create field” of type “Date”. Type the field name as “Deadline to send contract”.
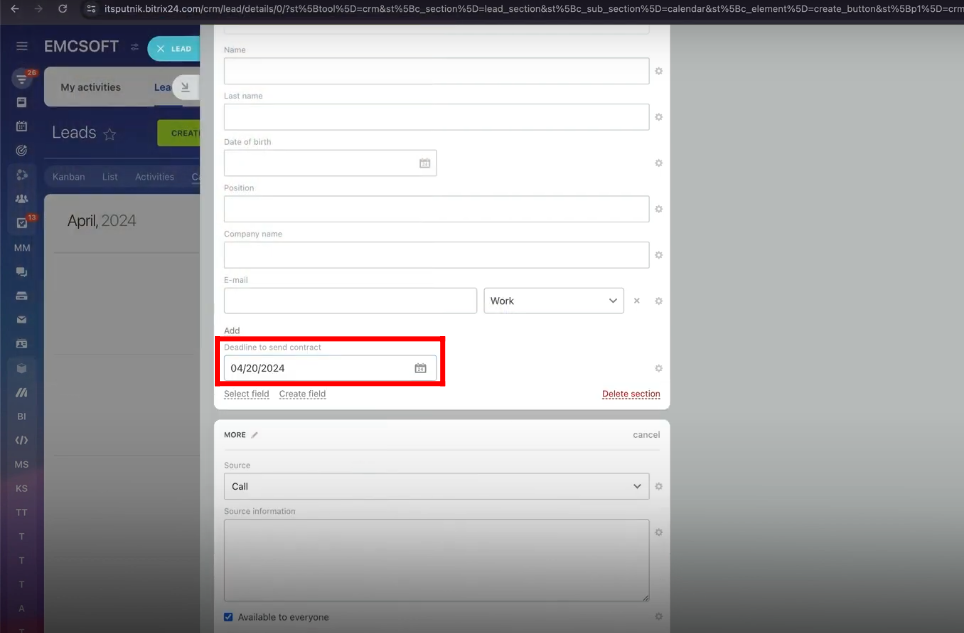
26. Add the date for testing purposes. Save it.
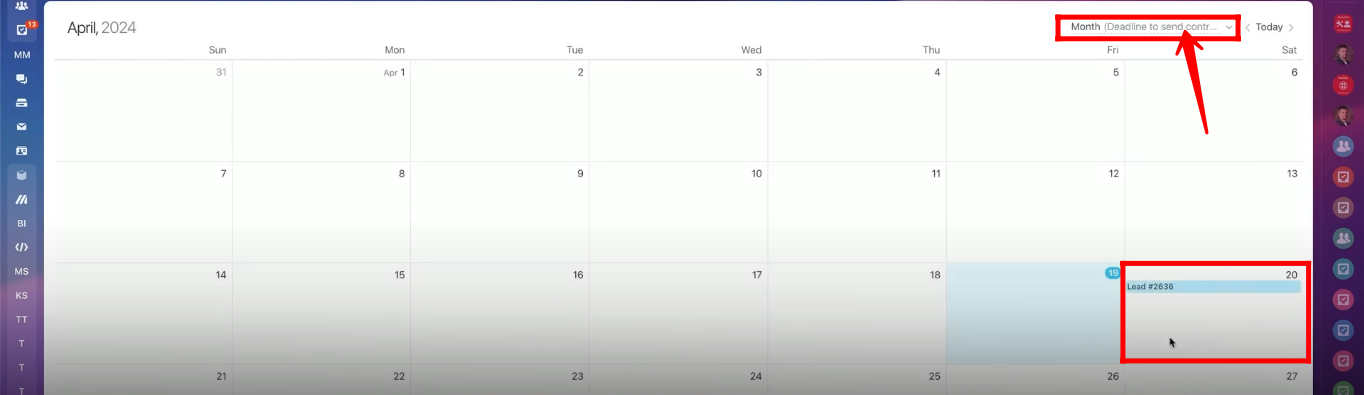
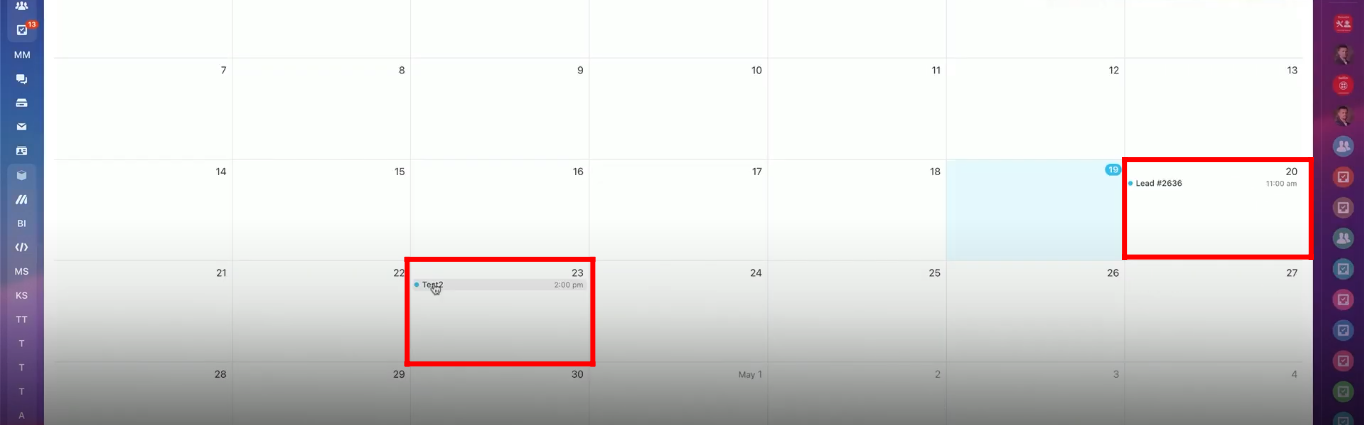
27. Change the filter to “Month (Deadline to send contract)”. You can view only that lead within the date that we mentioned in the deadline field.
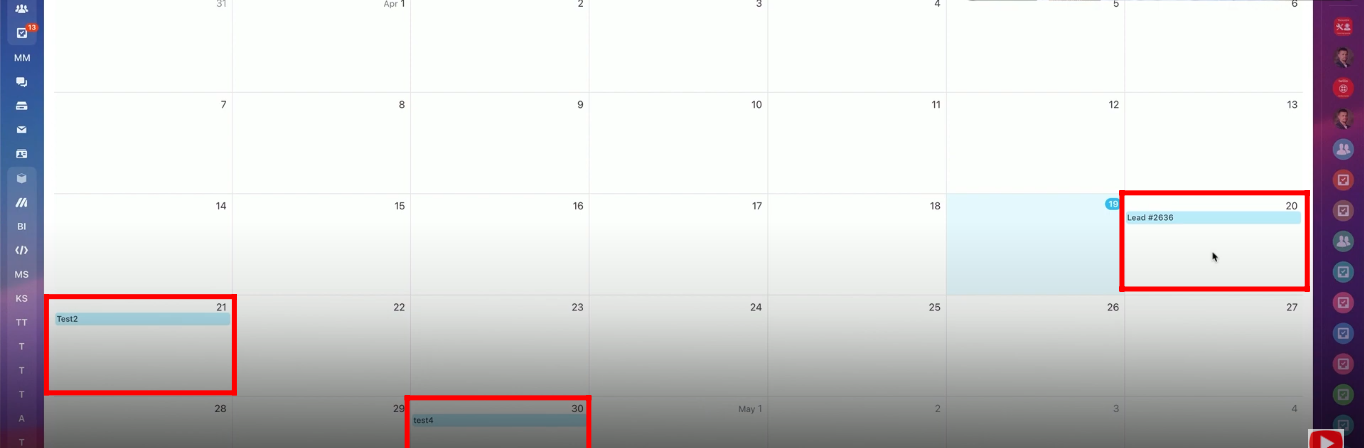
28. Add the deadline field in all other leads and apply the same filter “Month (Deadline to send contract)”. All the leads will be shown under their respective deadline date that you saved inside the leads.
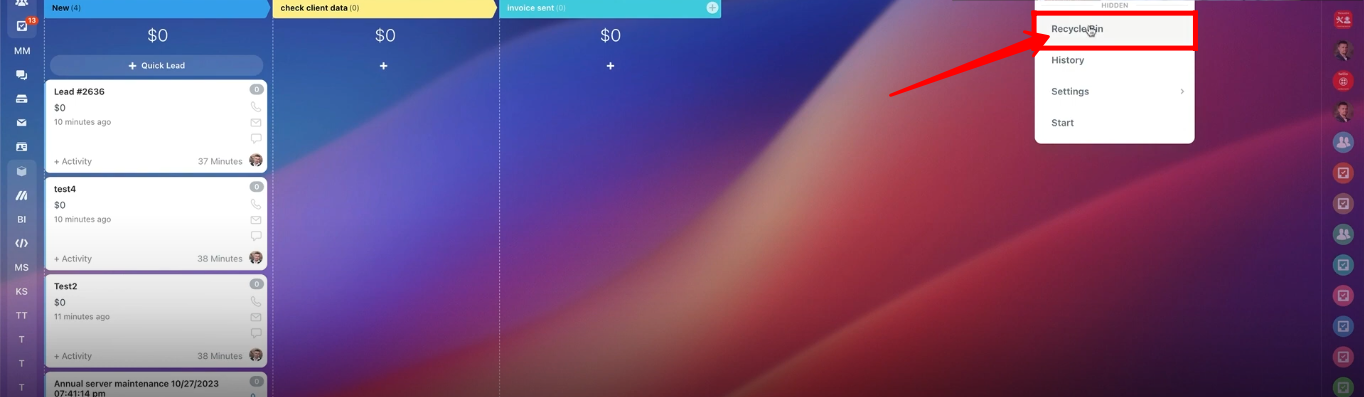
29. Now open the most recent lead that you created. Click “Create field” and select type as “Book a Resource”.
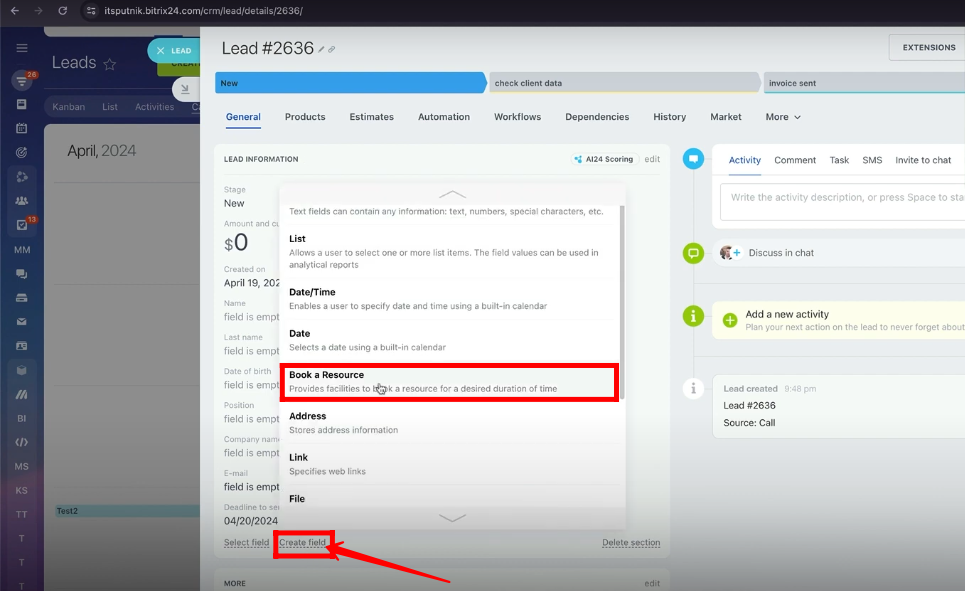
30. For testing purposes, add “Field name” as “Hair Cut”, “Resources” as “John” and “Mike”, “Services” as “Man HairCut” and “Women HaidCut” with their respective durations.
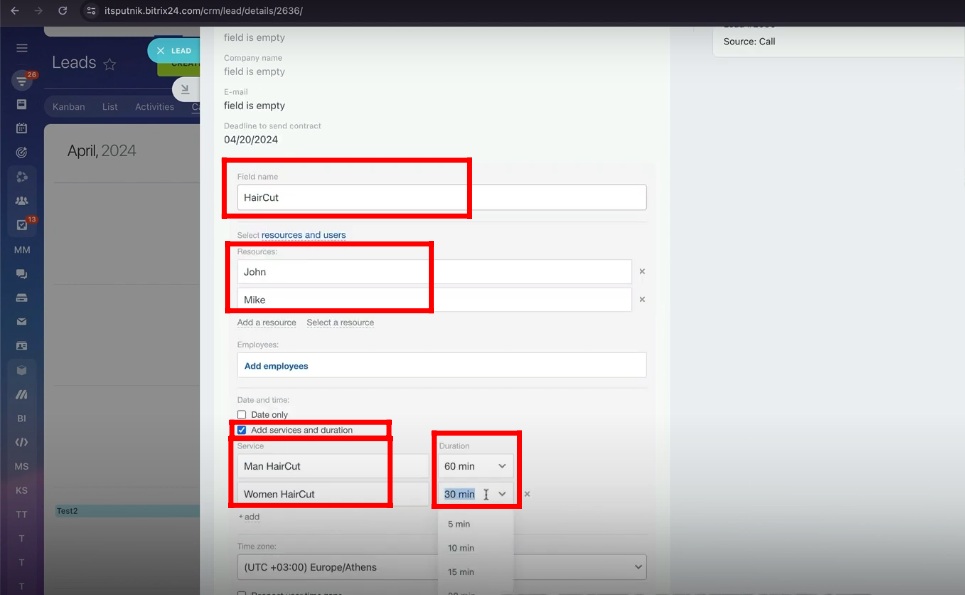
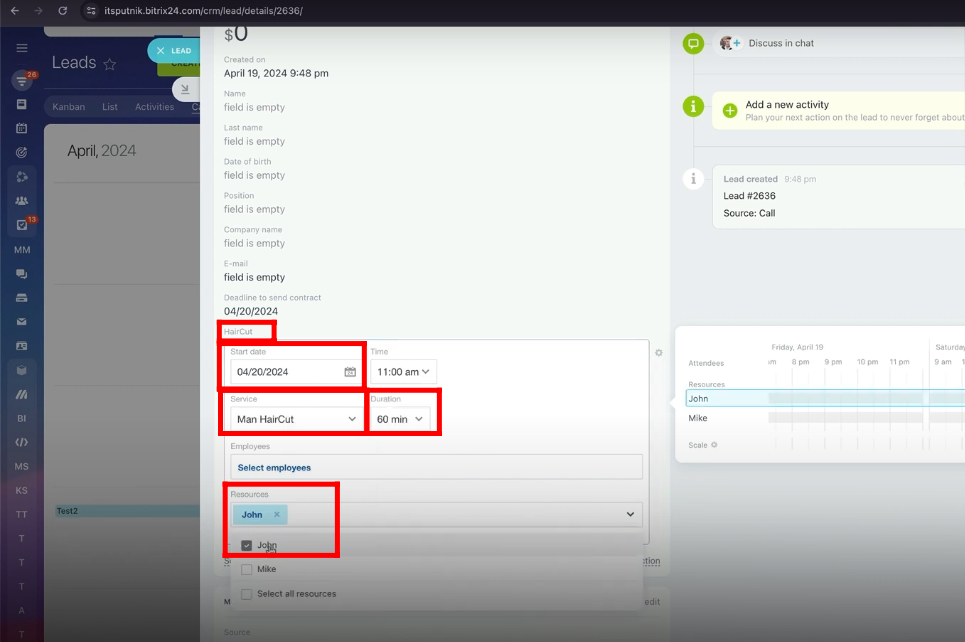
31. Now, within the same “HairCut” field, add “Start Date”, select “Service”, and add “Resource”.
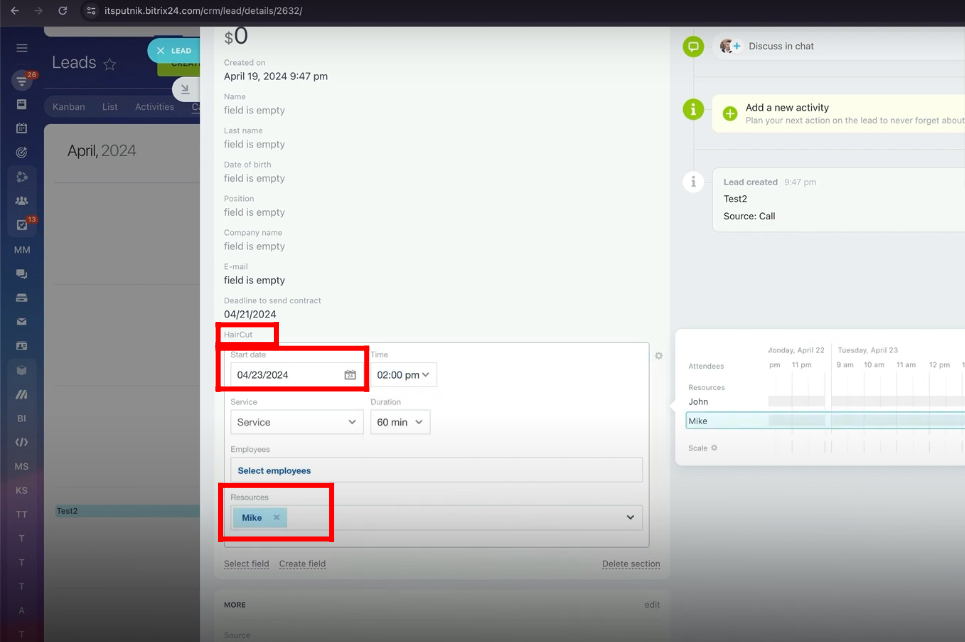
32. Open another lead and add details in the “HairCut” field such as “Starting Date”, “Service” and “Resources” of your own choice.
33. Apply the filter as “Month (HairCut)”.
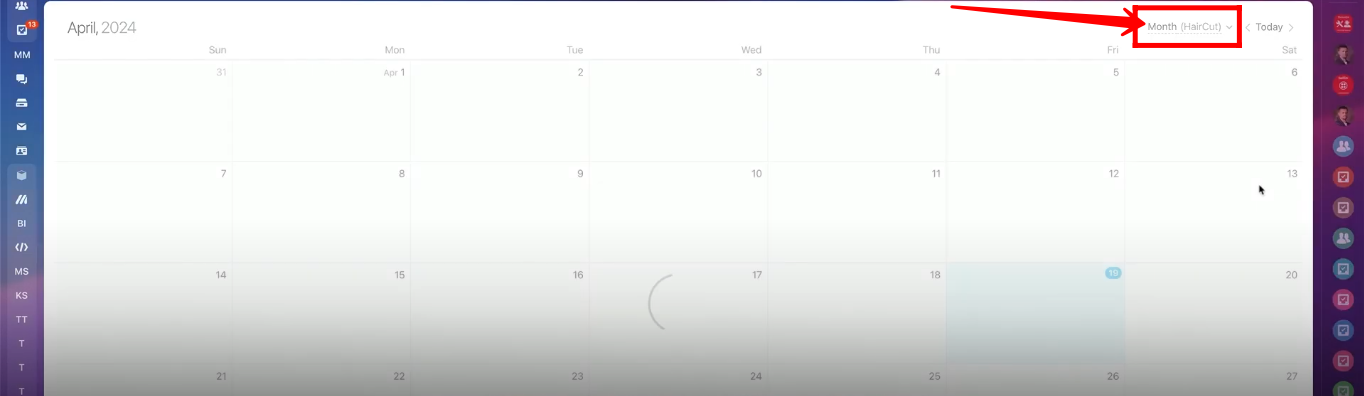
34. You can view the leads under the starting dates of their respective “HairCut” fields.
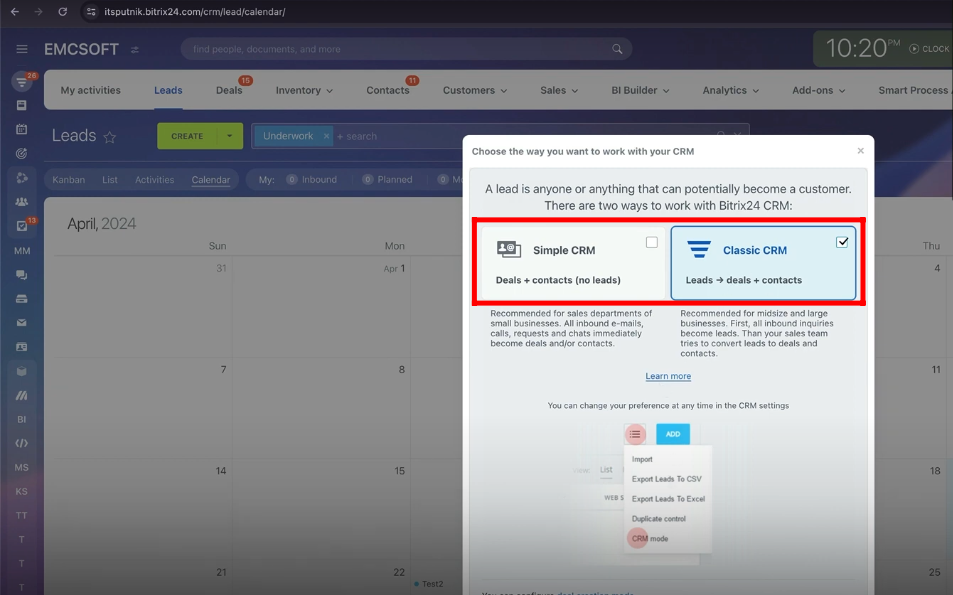
35. In Settings, you can select the mode of CRM, you want to work with according to your requirements. The two CRM modes are “Simple CRM: Deals + Contacts (No Leads)” and “Classic CRM: Leads -> Deals + Contacts”.
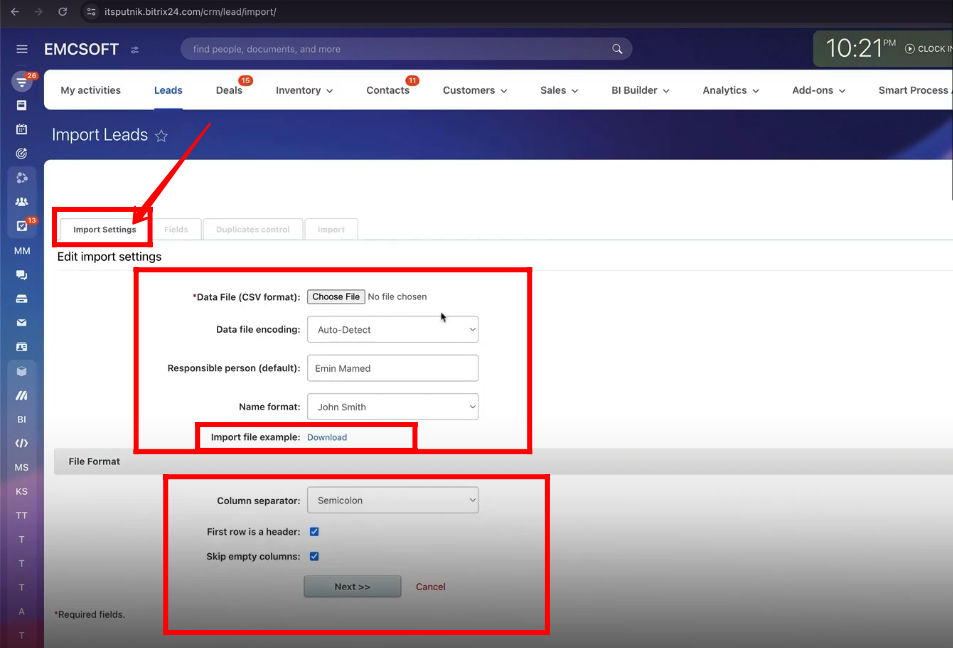
36. Within Settings, you get the option to import leads into EMCSoft CRM by uploading a “CSV” format file.
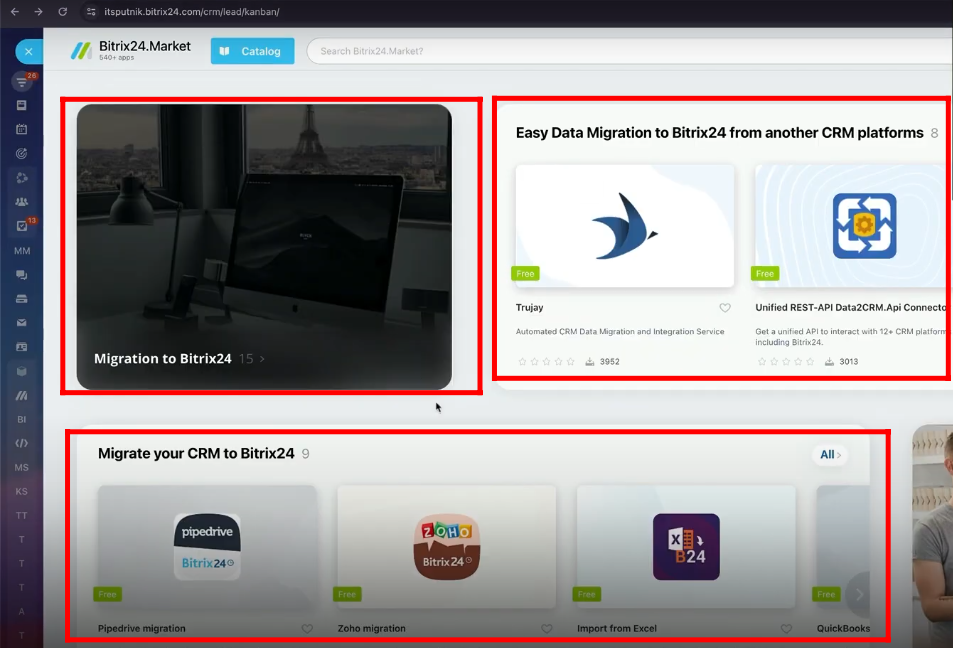
37. Also, if you want to migrate from another CRM to Bitrix, then you will get multiple apps in suggestions to do that job for you efficiently.
38. Here’s the setup of the “Lead Generator”. If you install an application, it will automatically generate leads for you(which will be discussed later).

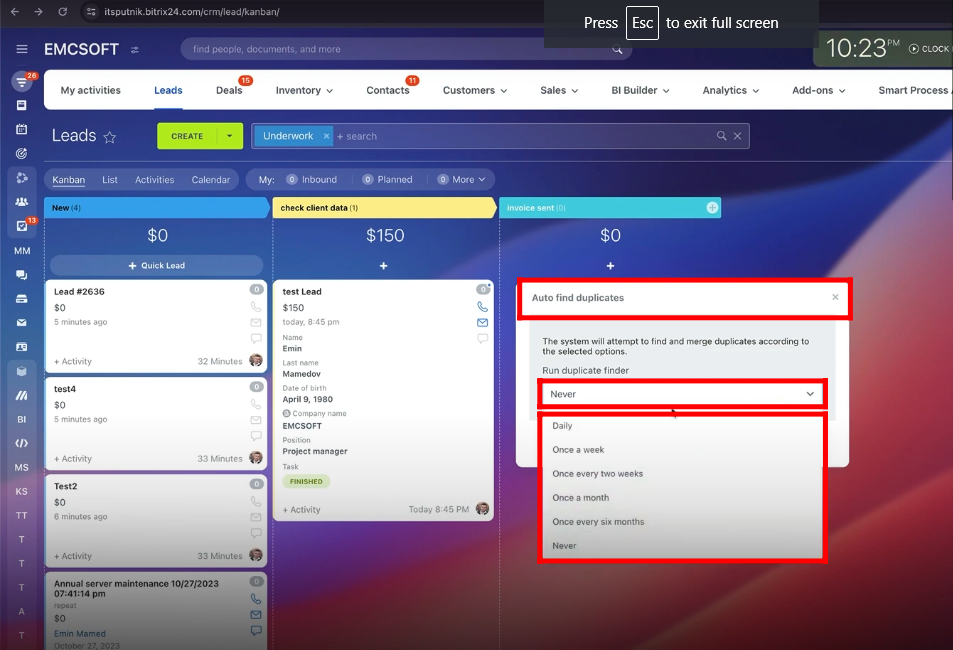
39. If you have a bunch of leads with the same email and phone number, automated to send notifications to the same responsible person then these settings can merge those leads into one and you can get optimized results.
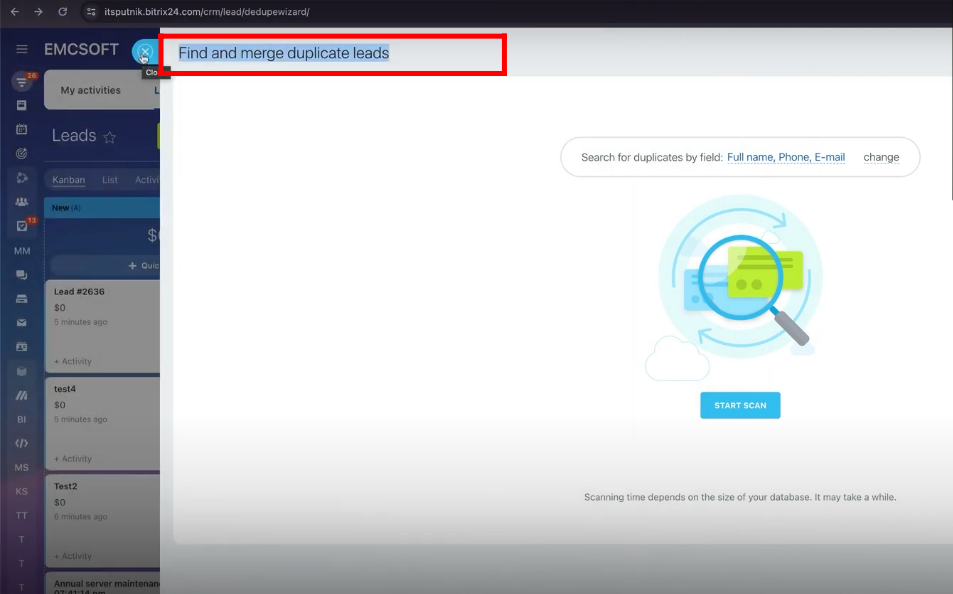
40. You automate the process to check the duplication of leads and the system will send you the notification after merging duplicates with specific options.
41. Within Settings, go to “Proactive CRM” and enable “Lead Smart Activities”.
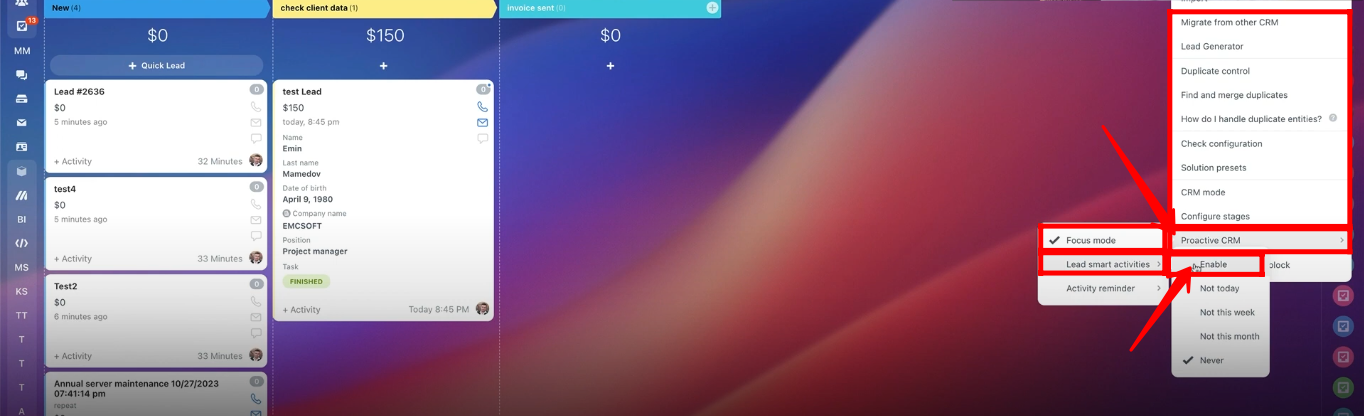
42. Now, whenever you open a lead and close it without doing anything. The settings will prompt you like this to enter some data within the lead. To ignore this feature, you can set the “Proactive CRM” option to “Focus mode”.

43. Go to “Recycle Bin”.
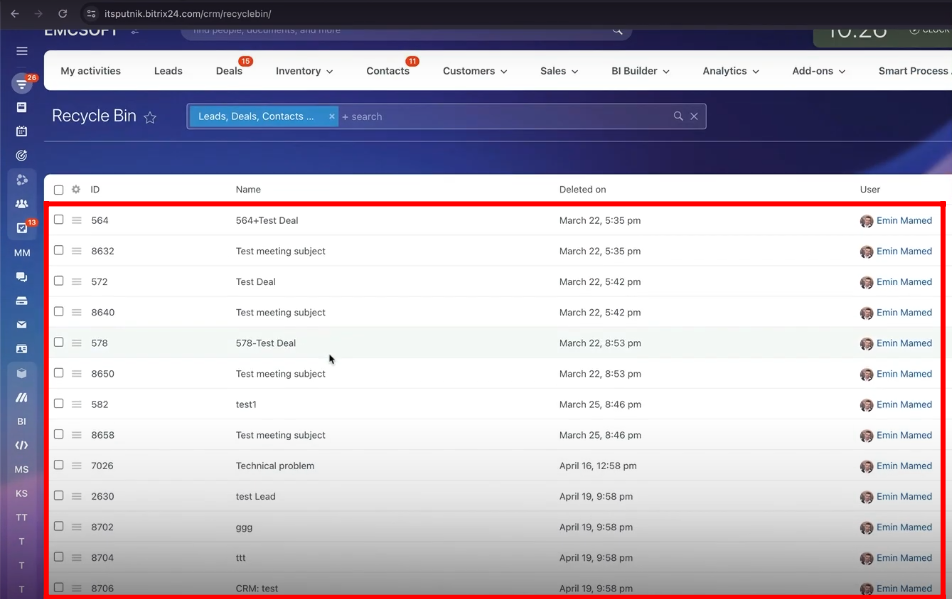
44. You can view all deleted leads, deals and contacts in tabular form. Any lead, deal or contact from the recycle bin can be recovered.
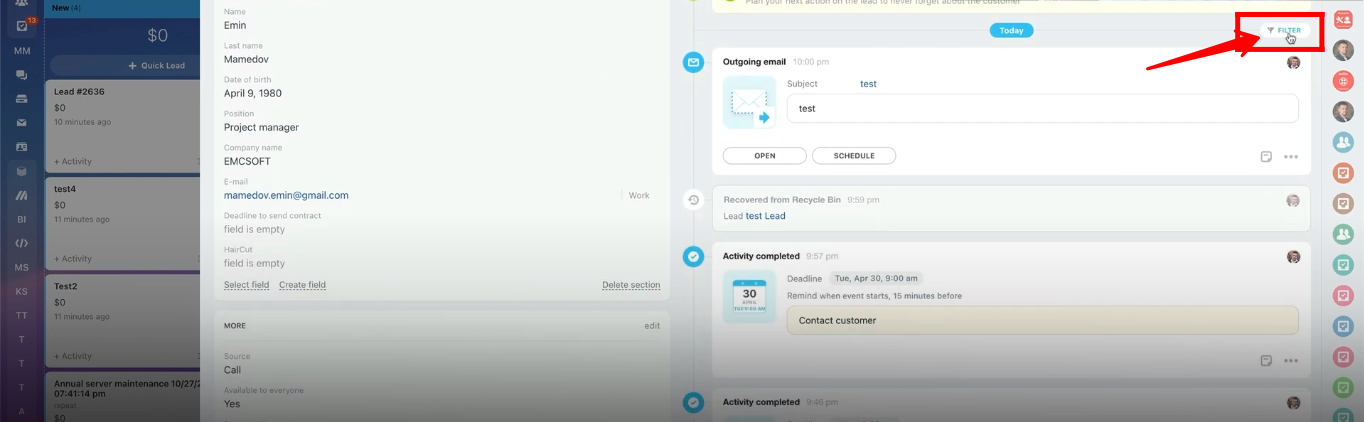
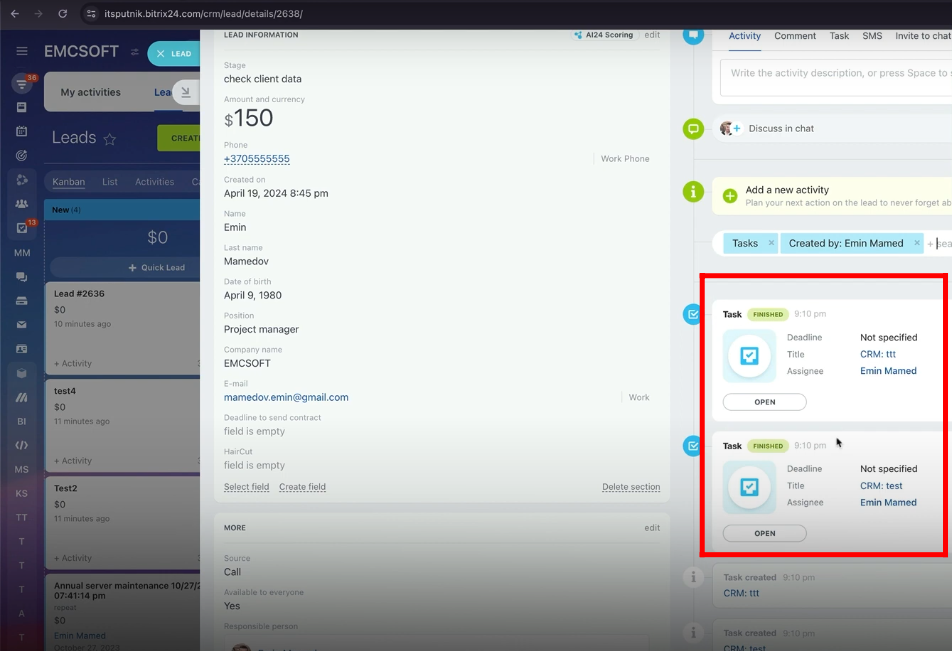
45. Within the lead, you can apply a filter.
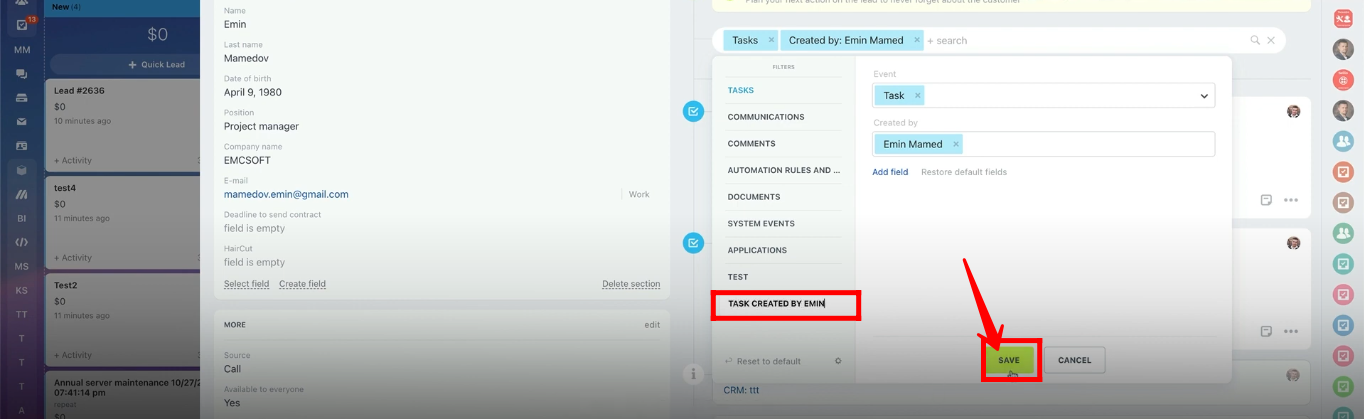
46. Let’s apply a filter of “Tasks” with the “Created By”(Emin Mamed) attribute and click “Search”.
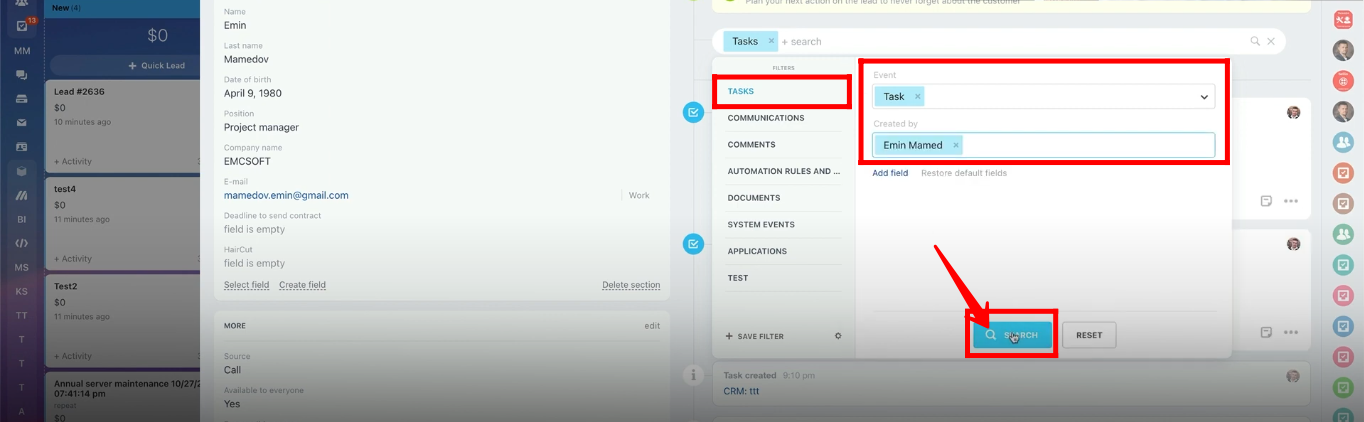
47. Now, you can view all the tasks within the lead created by “Emin Mamed”.
48. You can save the filter by the name of your own choice.
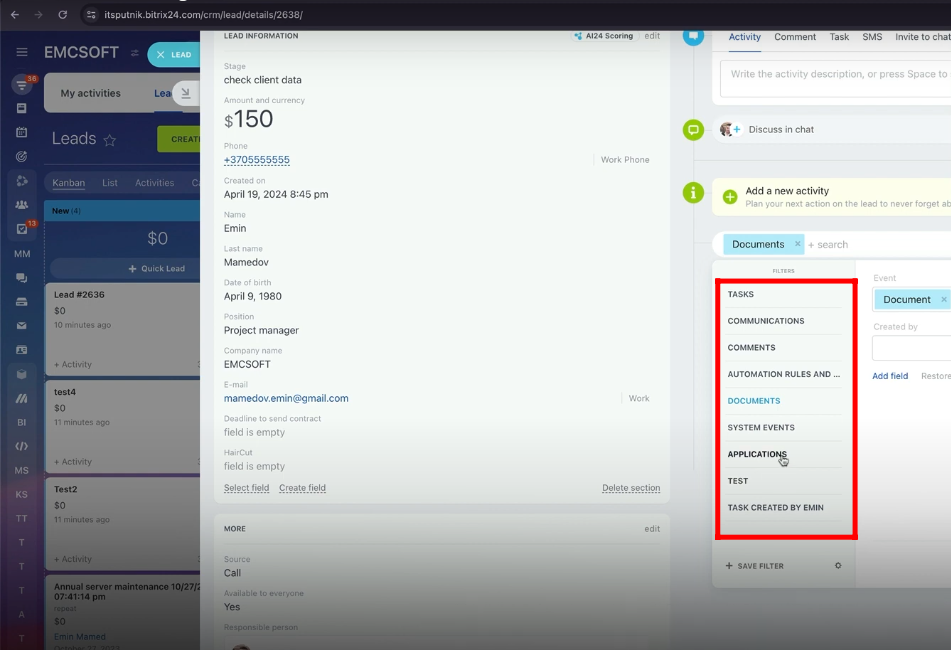
49. Multiple filter options are available there to apply such as Documents, Applications, Automation Rules, Communications, etc.
50. Within the “Kanban” view, leads can be filtered with multiple attributes like Lead name, Responsible person, Total, Created on, Status, etc.
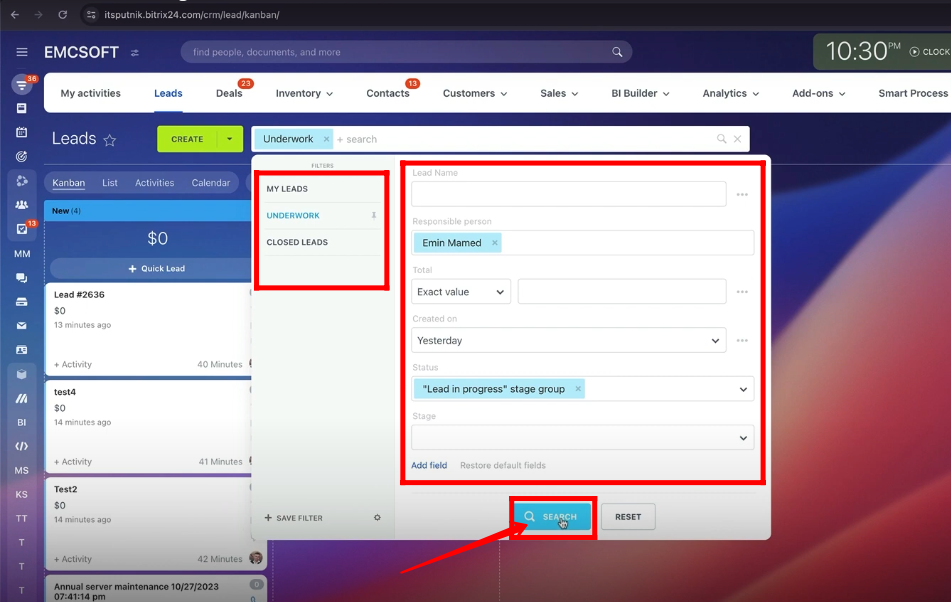
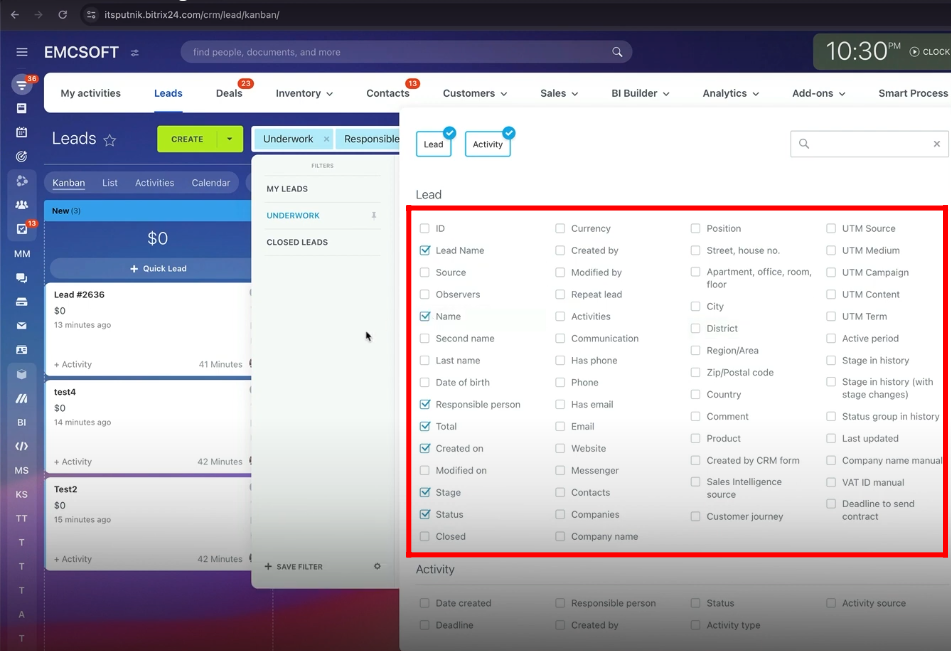
51. A new field can be added within the filters’ attributes.
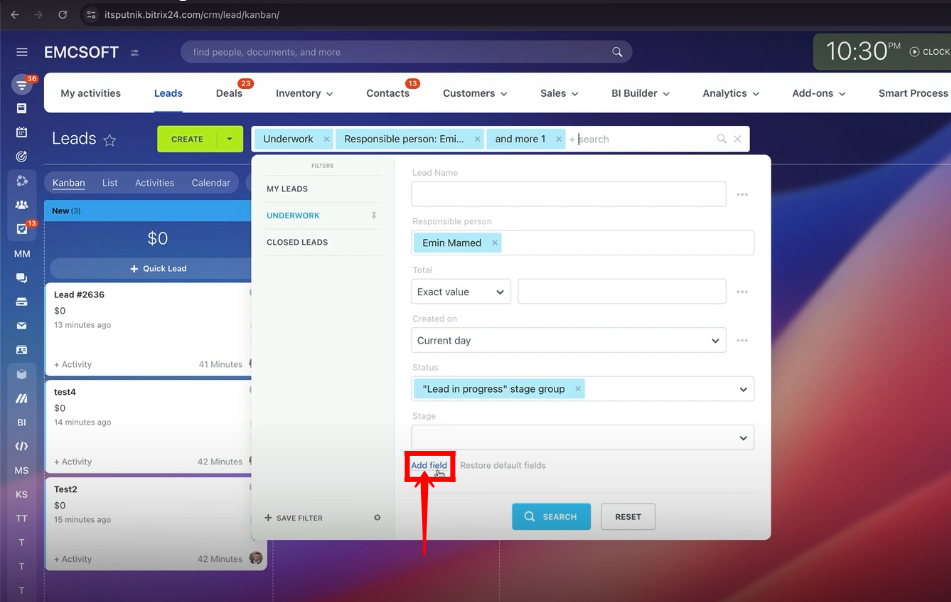
52. Select the attribute to apply in the filters panel.
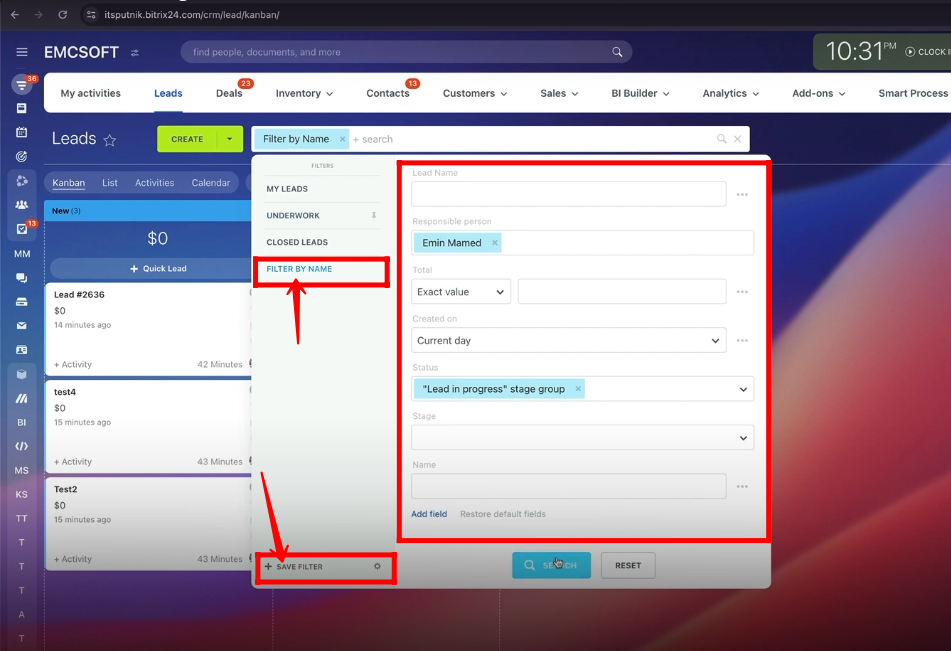
53. Filters can be saved by the name of your own choice.
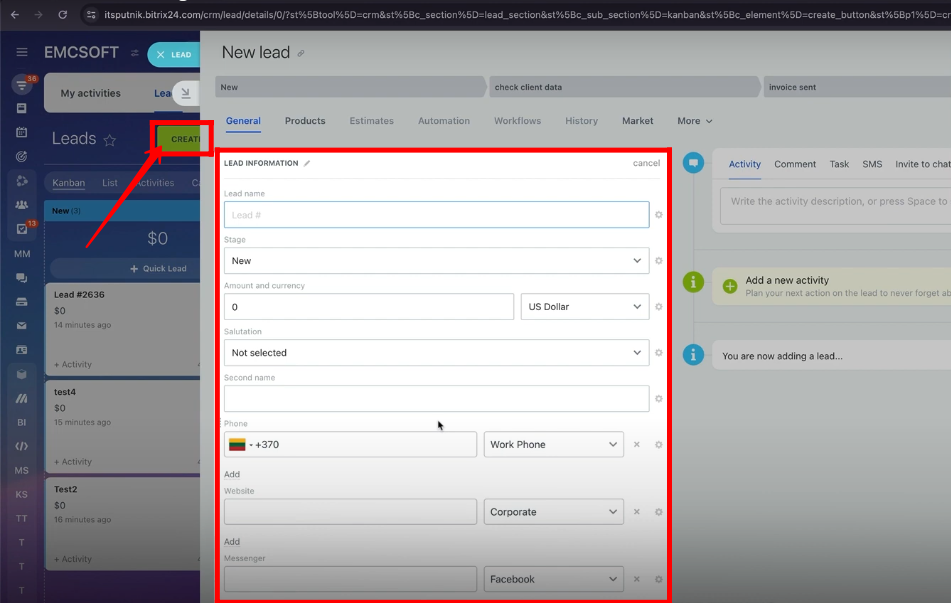
54. The first way to create a new lead is to click the “Create” button and all the details in the new lead configuration panel.
55. A new lead can also be generated by clicking on the “+” bar and editing all the details of lead in the lead card.
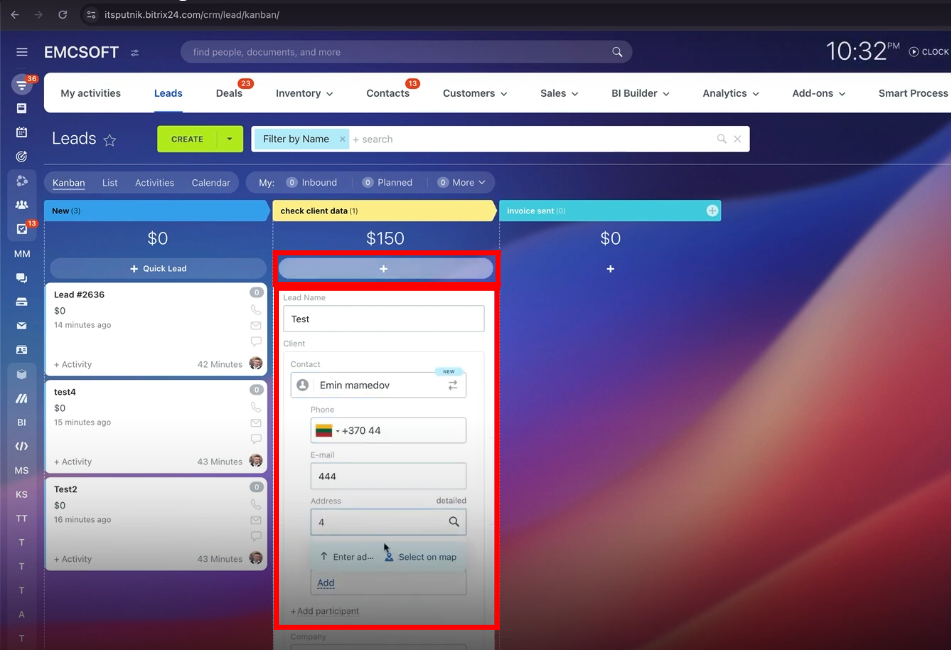
56. A new lead will be generated under the same stage.

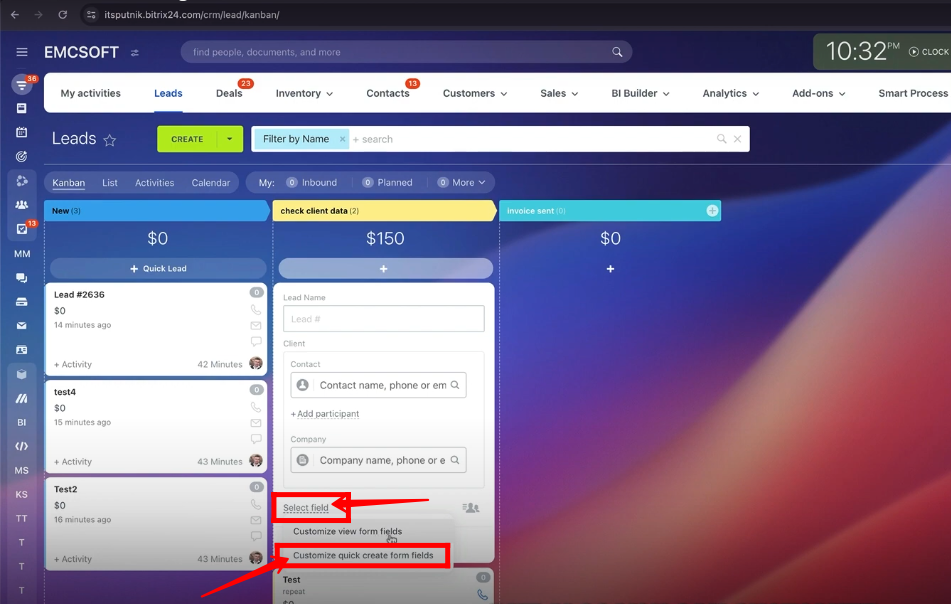
57. New fields in the lead card can be added by clicking “Select field” and then “Customize quick create form fields”.
58. Select the attributes to edit and add to the lead card.
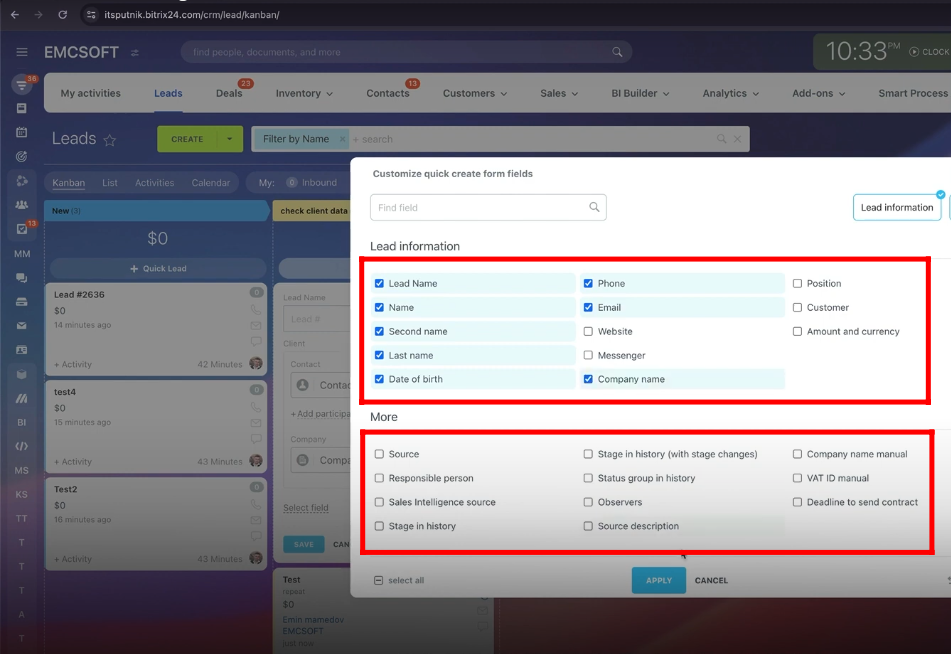
59. All the selected attributes will be added to the lead card configuration and details can be added.

“You can also watch this video on Youtube”