| 1917 Views | Amin

Welcome to Bitrix24 Training Course 17, where we delve into the intricacies of CRM Robots and specifically focus on Test Mode.
Introduction to Test Mode:
At the heart of efficient CRM operations lies the ability to thoroughly test automated processes. In this segment, we will demonstrate how to utilize Test Mode effectively to debug and refine your CRM robots.
Navigating to Test Mode:
To initiate Test Mode, navigate to the “Deals” section within your Bitrix24 account. Test Mode is currently available exclusively for deals. Once in the “Deals” section, proceed to the “Automation Rules.”
Setting up Test Mode:
Within the Automation Rules interface, locate the option for Test Mode. This feature allows you to simulate the execution of your robots without affecting live data. It’s a valuable tool for troubleshooting and fine-tuning your automation processes.
Creating Robots for Testing:
Before entering Test Mode, ensure that you have created the necessary robots for testing. In this tutorial, we demonstrate the creation of robots from scratch, including tasks such as customer communications via email and SMS.
Executing Test Mode:
Once your robots are set up, initiate Test Mode to simulate their execution. This process enables you to observe how your robots perform in various scenarios without impacting actual data or operations.
Troubleshooting in Test Mode:
During the testing process, be vigilant for any errors or unexpected outcomes. In our demonstration, we encounter errors such as missing email addresses or unspecified fields, which we promptly address and rectify.
Analyzing Test Logs:
Bitrix24 provides detailed logs of test executions, allowing you to analyze each step of the process comprehensively. These logs are invaluable for identifying issues and refining your automation strategies.
Transitioning to Live Data:
Once you’re satisfied with the performance of your robots in Test Mode, you can confidently transition to live data. However, it’s essential to conduct thorough testing before deploying automation in a production environment.
Detailed instructions on how these robots can be used are described below.
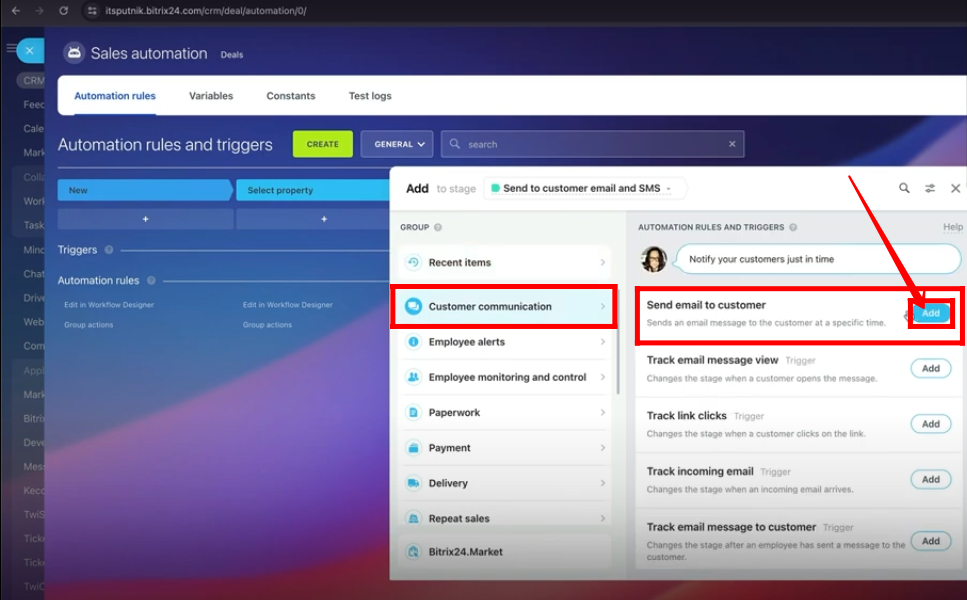
1. Add a robot “Send email to customer” within the “Customer Communication” section of automation rules.
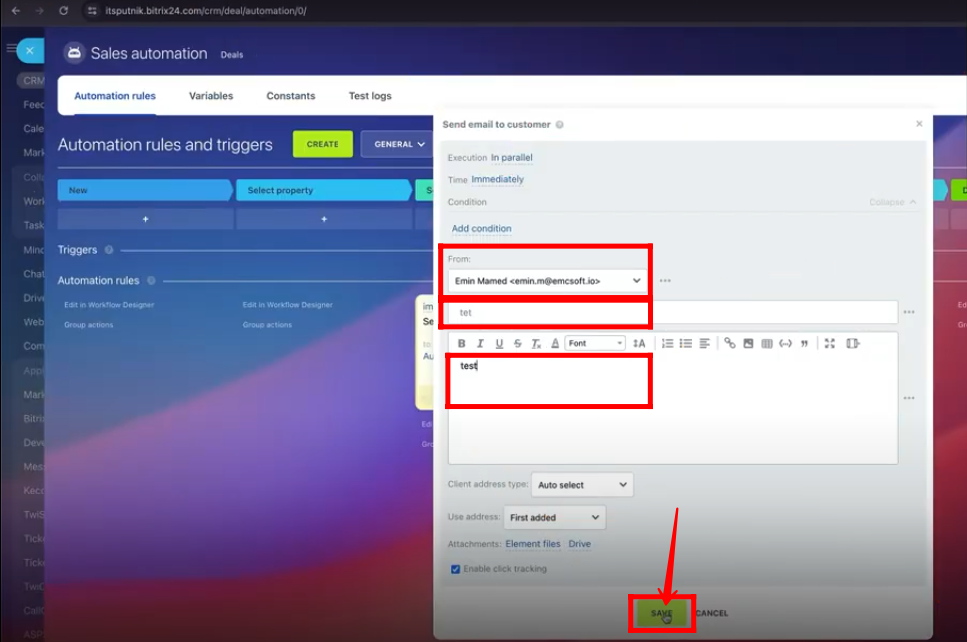
2. Configure the sender of the email. Type the title and description of the email. Save the robot.
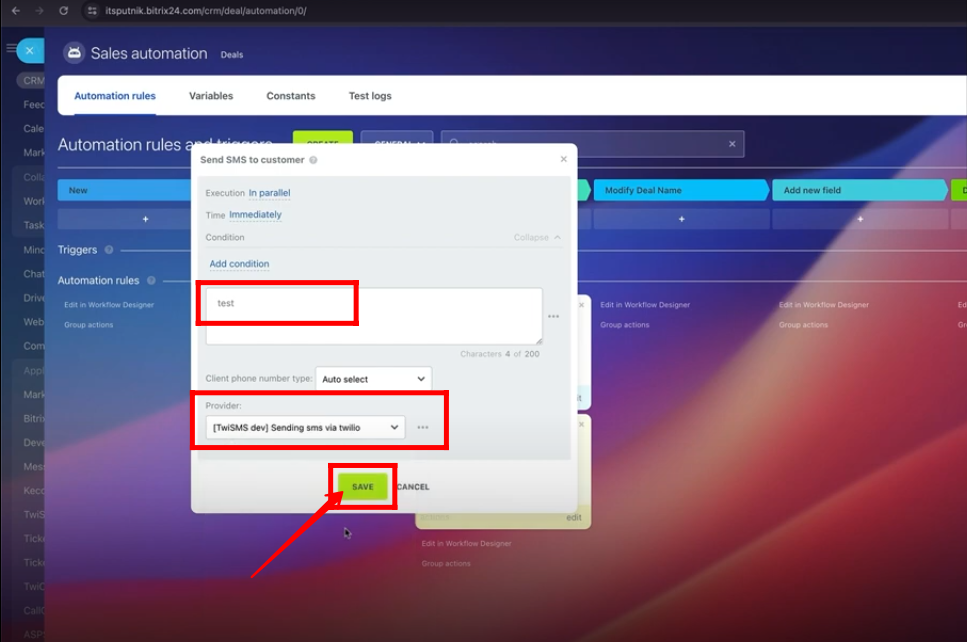
3. Add a new robot “Send SMS to customer”. Type description of the SMS. Select “Provider” as “[TwiSMS dev] Sending sms via twilio”. Click Save.
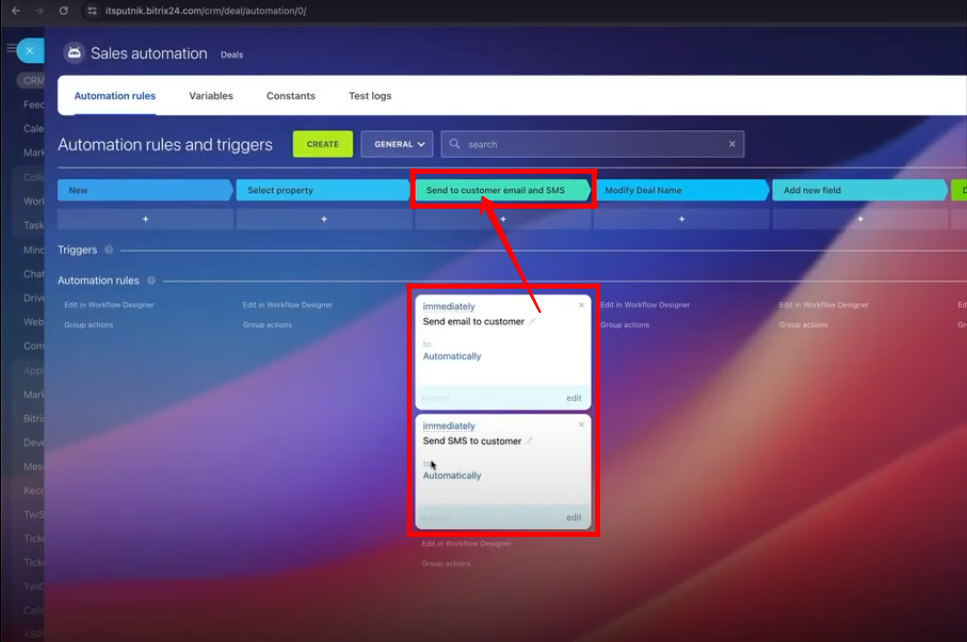
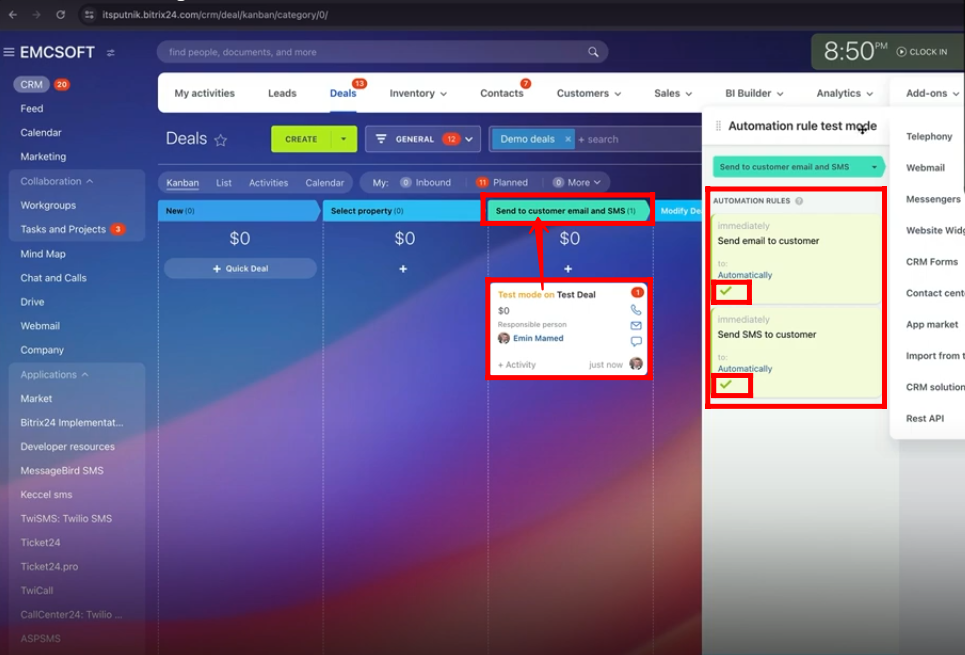
4. Move both robots “Send email to customer” and “Send SMS to customer” to “Send to customer email and SMS” stage.
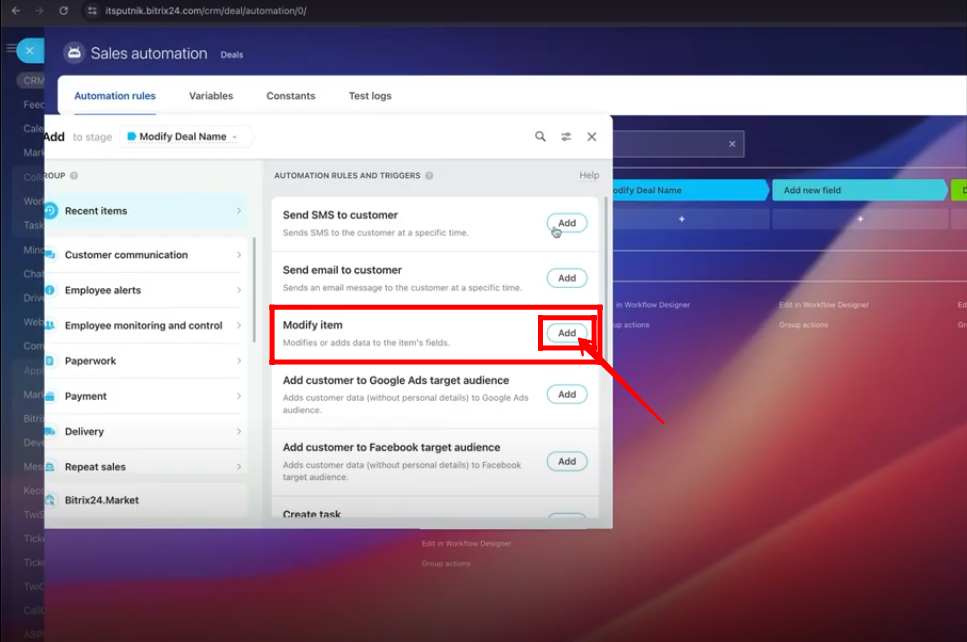
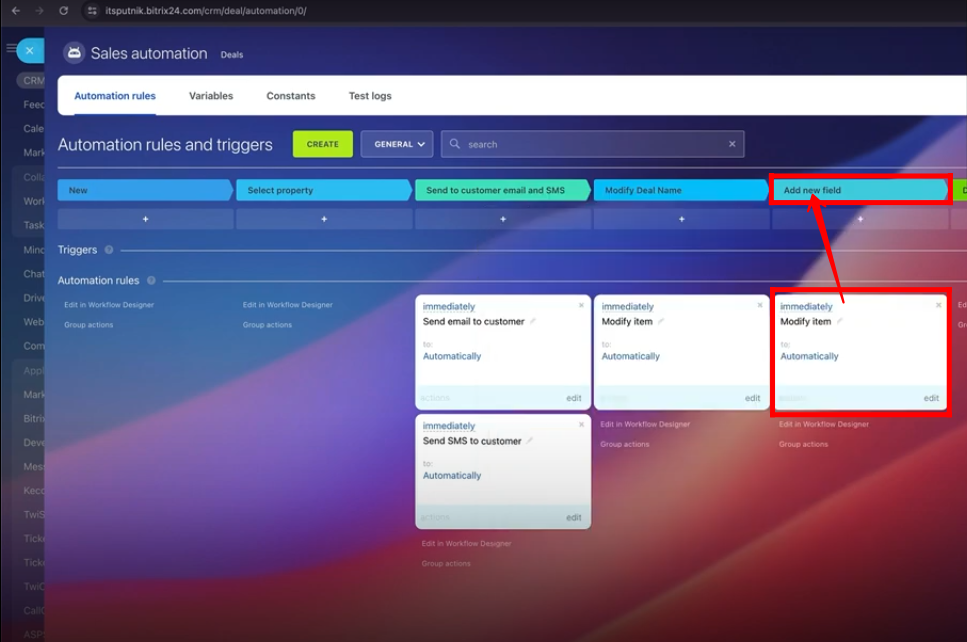
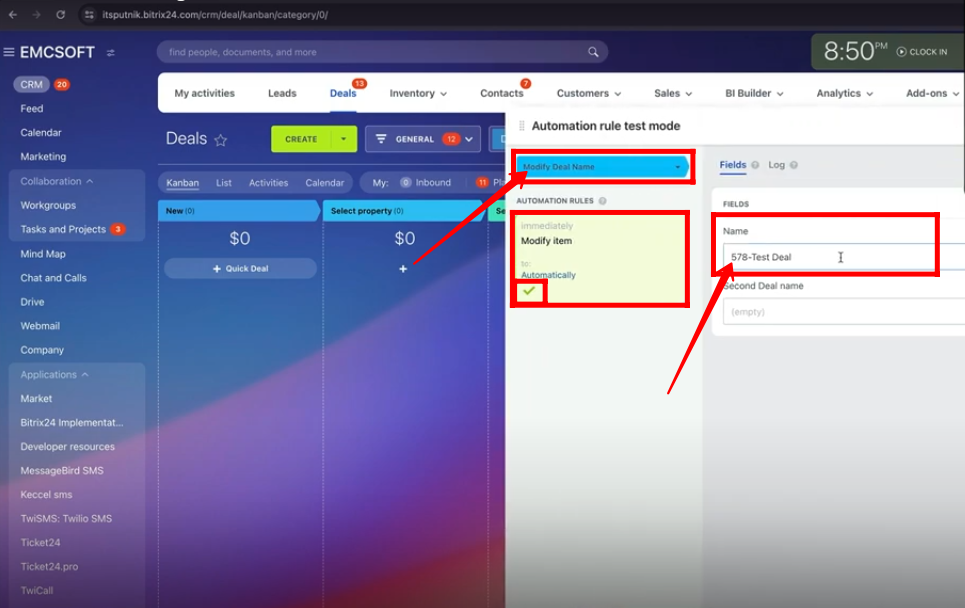
5. Add a new robot named “Modify item”.
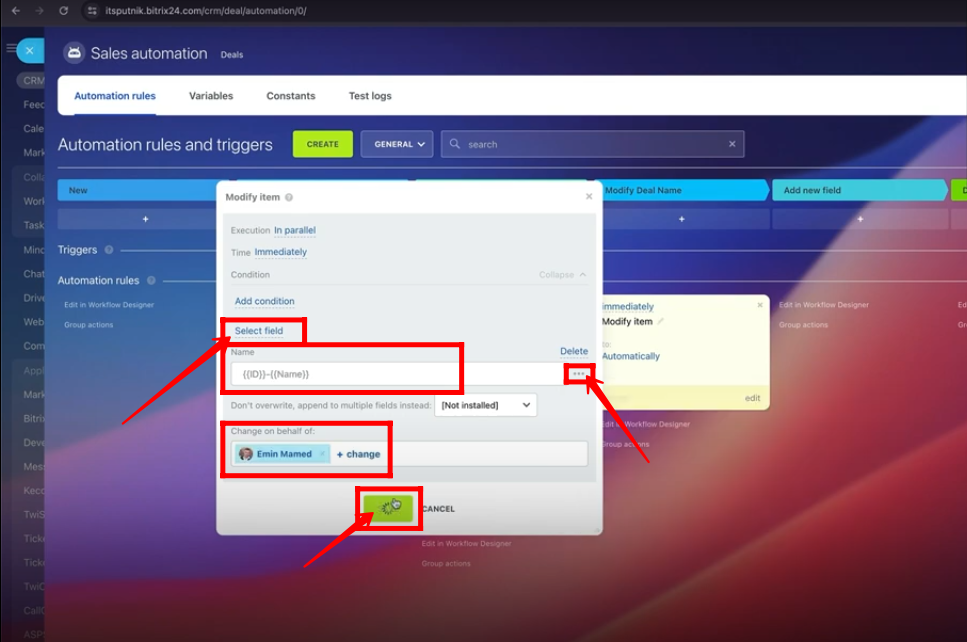
6. Click “Select field” and select the field as “Name”. Add dynamic deal ID and deal Name by selecting from three dots options in the Name field. Choose a responsible person in “Change on behalf of” field. Click “Save”.
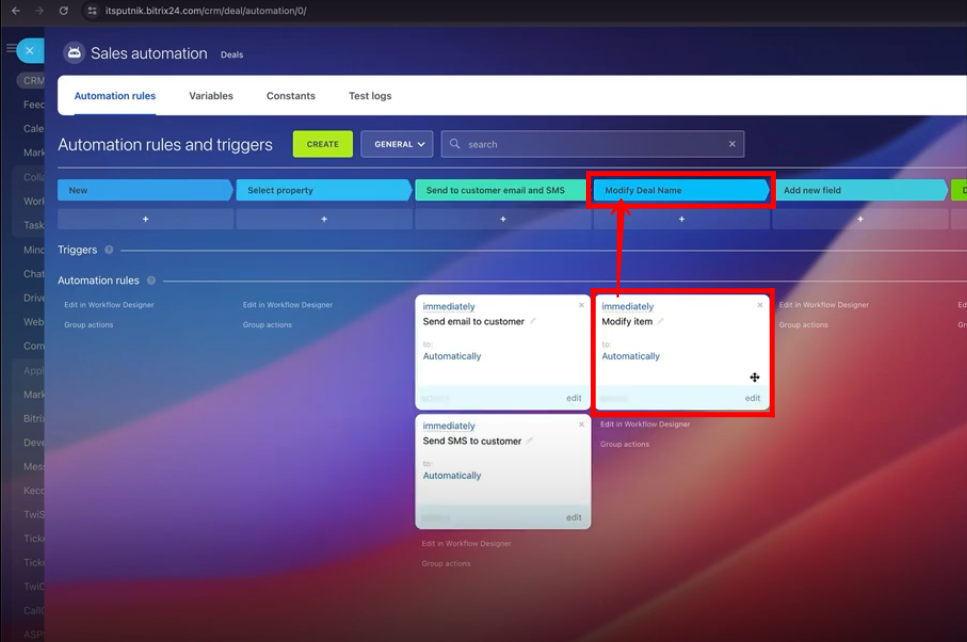
7. Move the robot “Modify item” to “Modify Deal Name” stage.
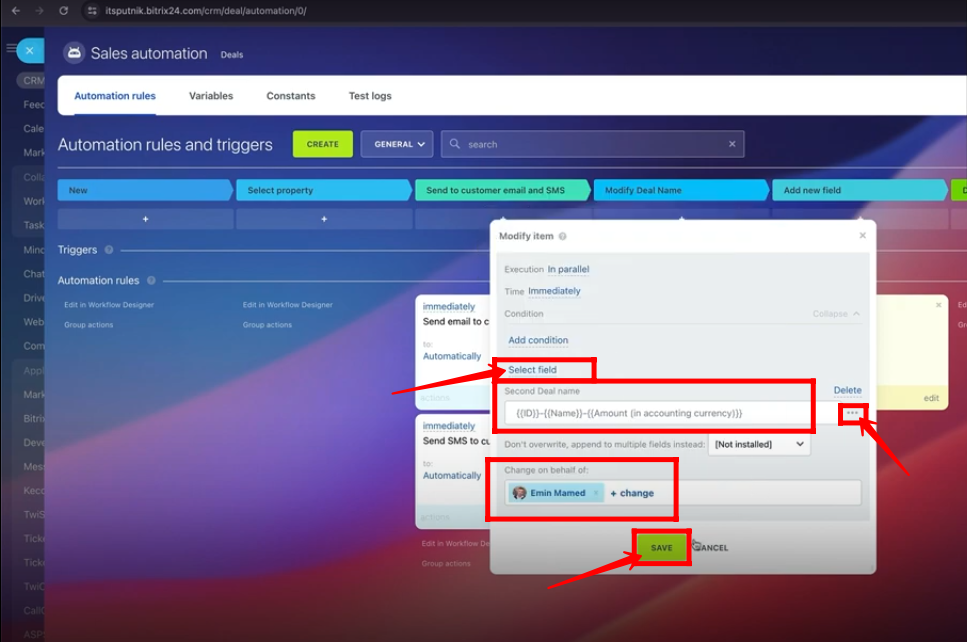
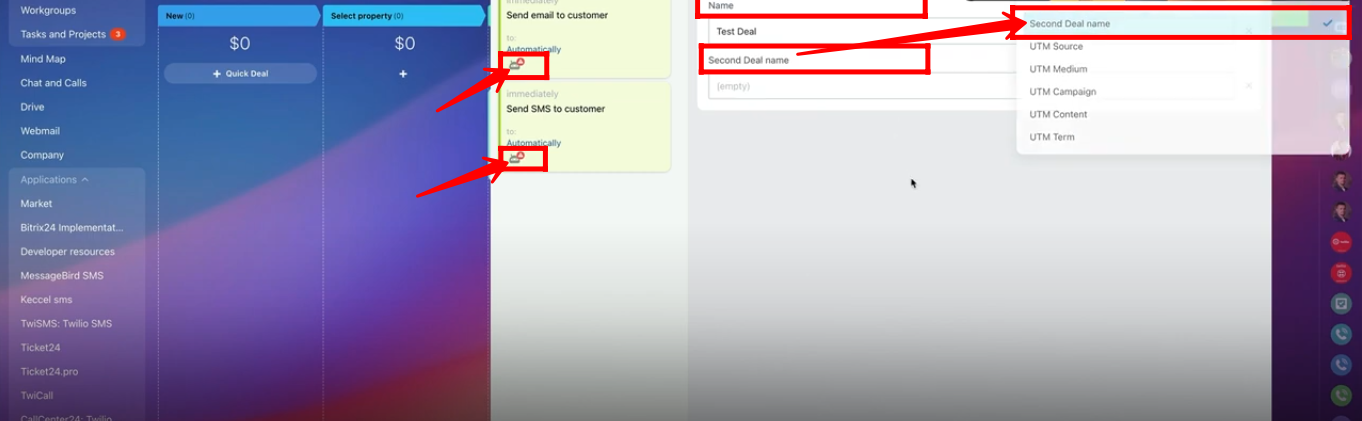
8. Add another “Modify item” robot. Click “Select field” and select the field as “Second Deal Name”. Add dynamic deal ID, deal Name and amount of the deal by selecting from three dots options in the “Second Deal name” field. Choose a responsible person in “Change on behalf of” field. Click “Save”.
9. Move the second “Modify item” robot to “Add new field” stage.
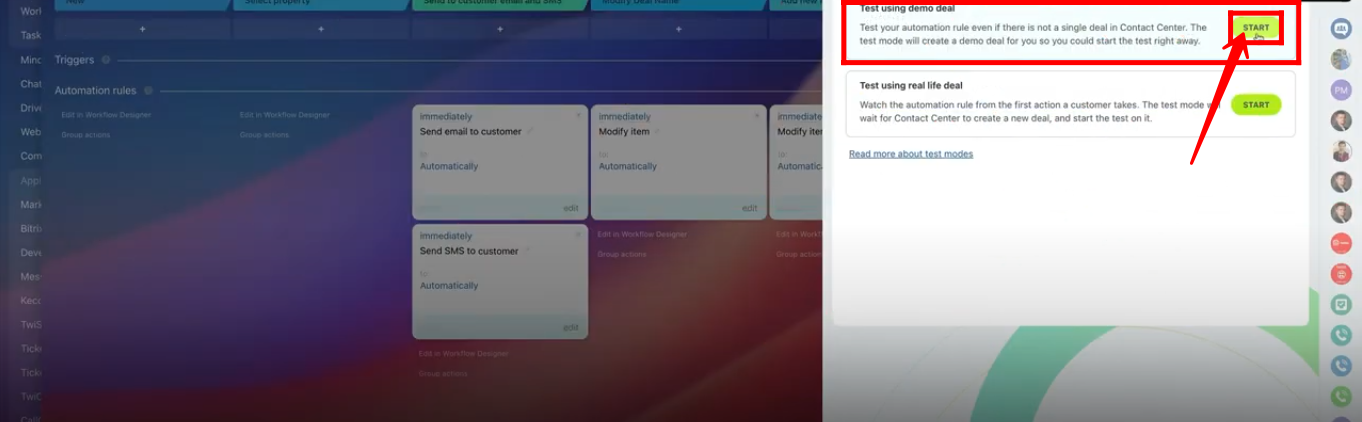
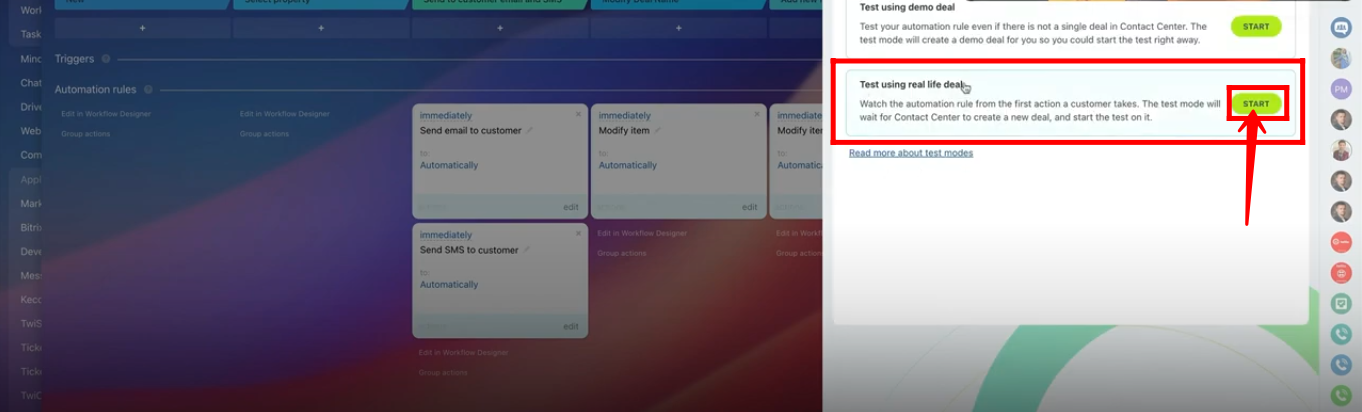
10. Try a “Test mode” feature within the deals section. Click “START” in the option “Test using demo deal”.
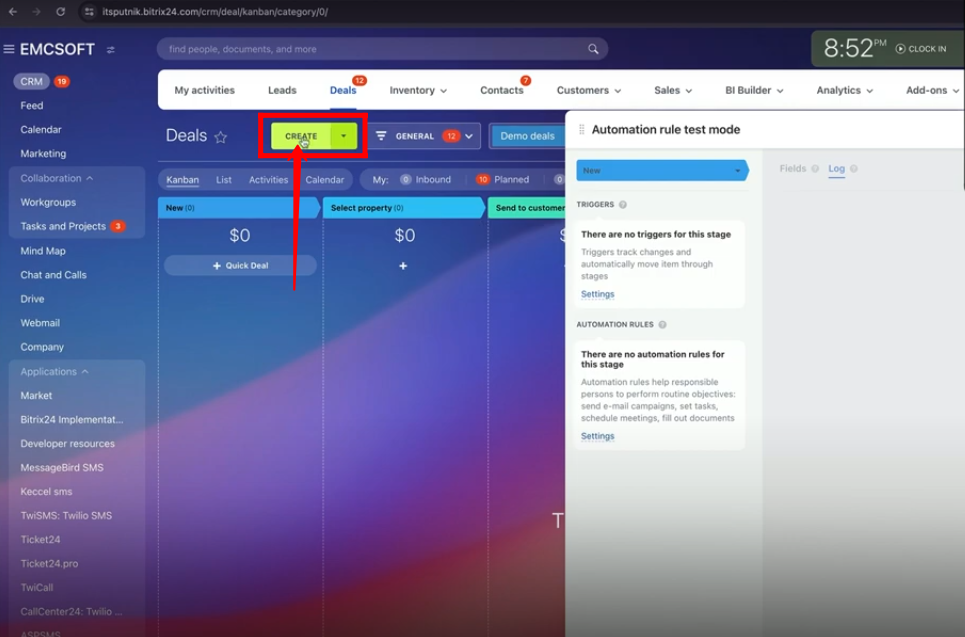
11. A new “Test mode” deal will be generated in “New” stage. You can change the stage of the test mode deal from a list of stages.
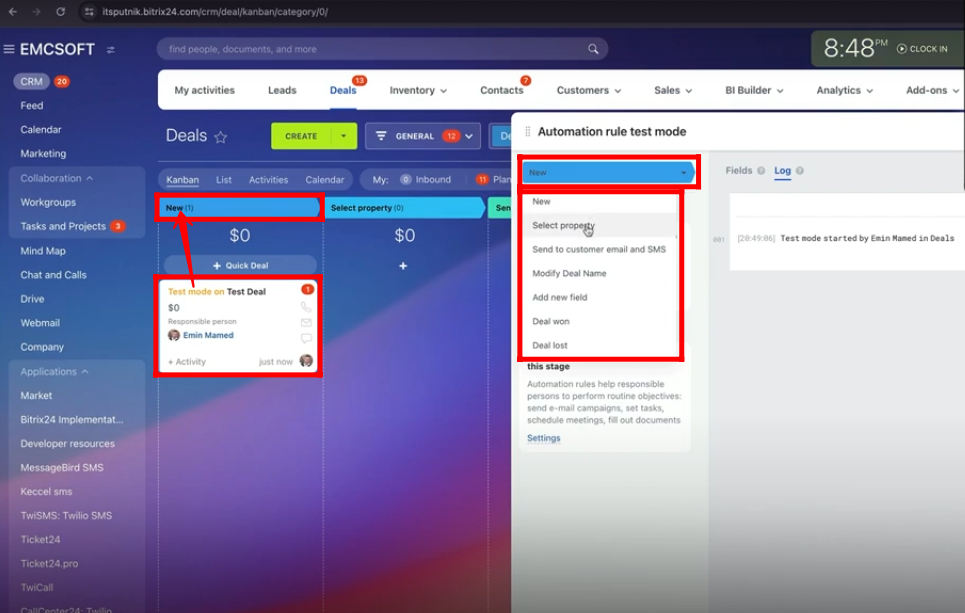
12. You can see that the stage of the test mode deal has been changed as we selected that stage from the list of stages.
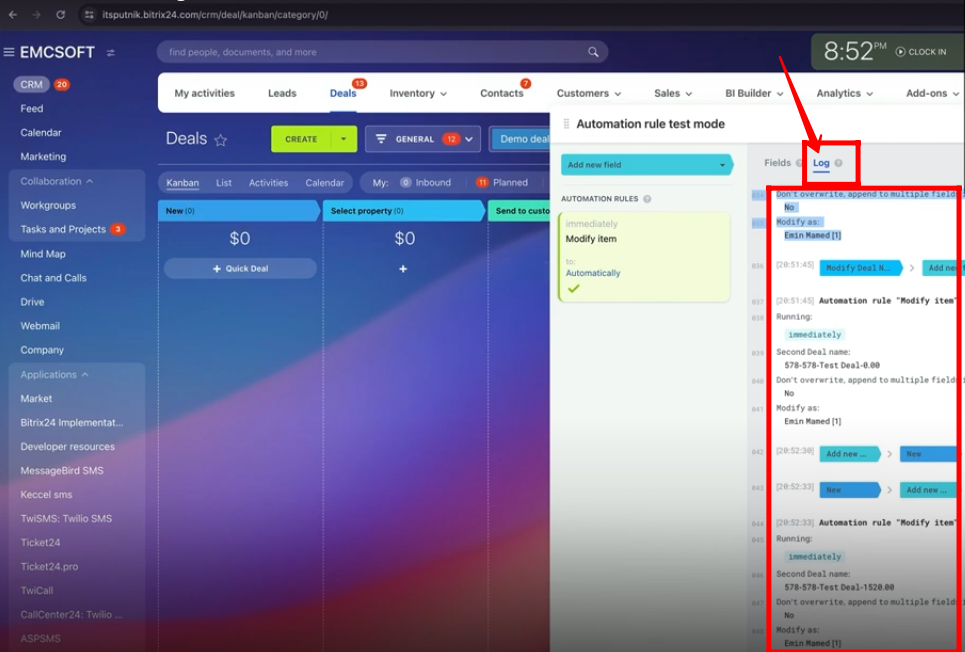
13. You can add fields (Name and Second Deal name) within the panel of automation rules test mode. You can view the errors within the executions of the robots. In this case, the contact details of the person within the Deal are not selected.
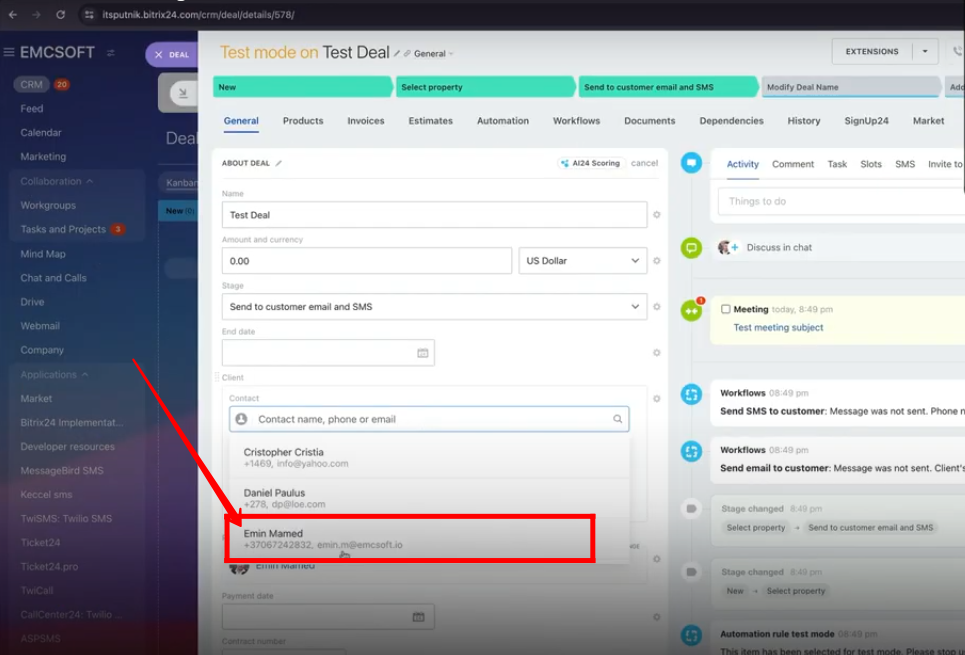
14. Open the test mode deal and select the contact person with phone number and email details.
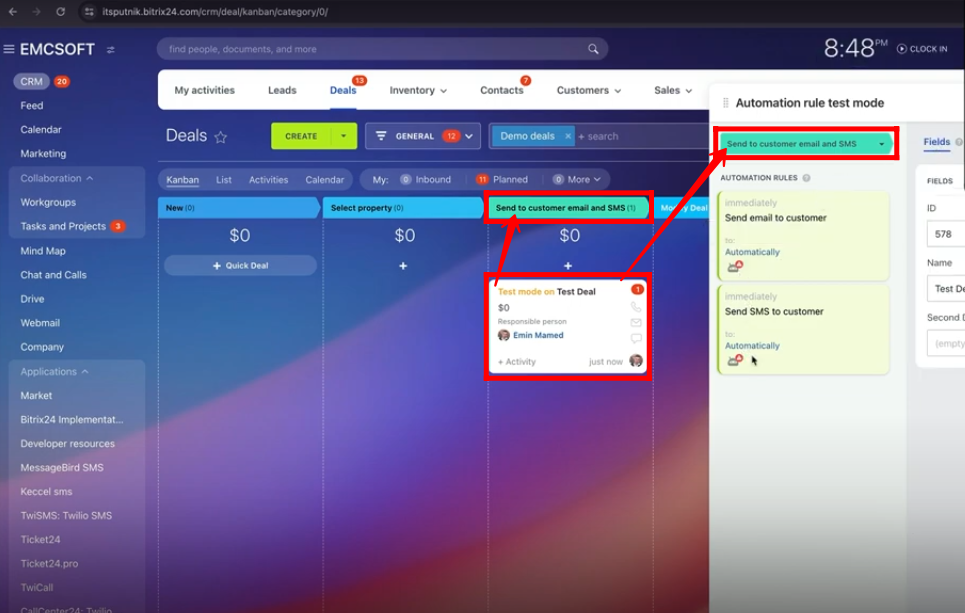
15. Change the stage of the test mode deal to “Select property” and again to “Send to customer email and SMS”. The robots have been executed successfully now. The email and SMS will be sent to the customer.
16. Change the stage of the test mode deal to “Modify Deal Name”. The robot “Modify item” for “Name” field will be executed successfully. You can see the configured structure of the “Name” field description(Deal ID and Name).
17. Change the stage of the test mode deal to “Add new field”. The robot “Modify item” for “Second Deal name” field will be executed successfully. You can see the configured structure of the “Second Deal name” field description(Deal ID, Name and Amount).

18. Click “logs” within the “automation rule test mode” panel and you can have a detailed view of all the activities that you have done recently.
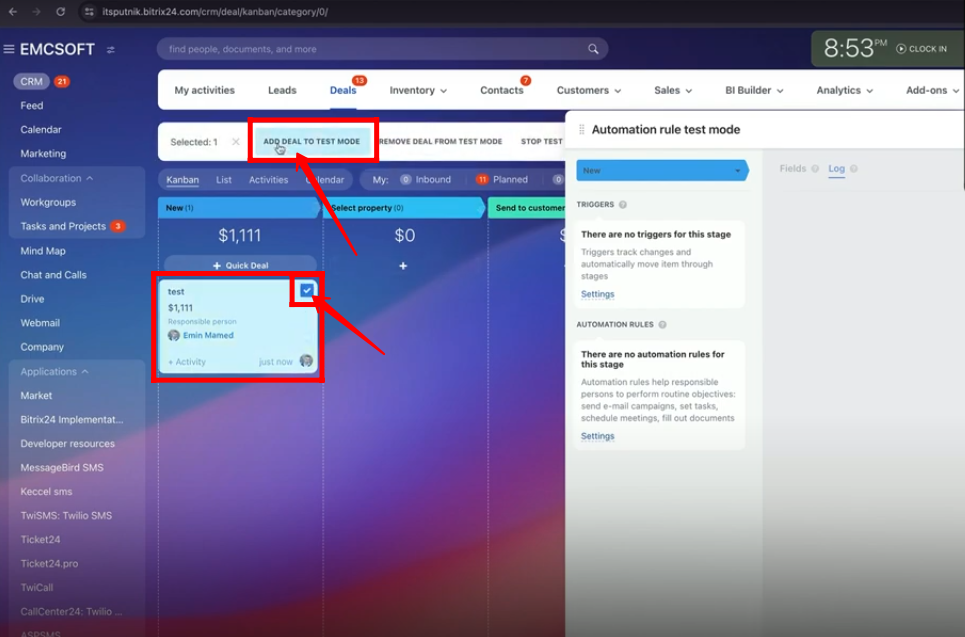
19. Similarly, you can try another test mode named “Test using real-life deal”. Click “START”.
20. Click “CREATE” to add/create a new deal manually.
21. Configure the basic details of the new deal such as “Name”, “Amount” and “Contact Person”.
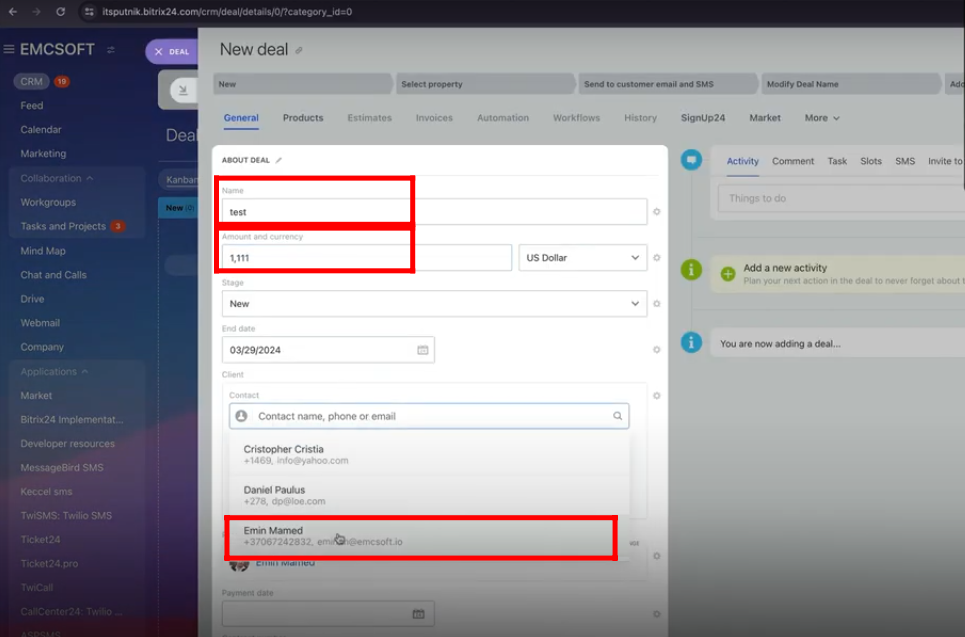
22. Select the deal and click “ADD DEAL TO TEST MODE”. All the next steps to run automation rules with testing mode will be the same as we have done before.
“You can also watch this video on Youtube”