| 4429 Views | Amin

In this session, we’ll learn how to efficiently import and export data in Bitrix24 CRM to manage leads, deals, contacts, and company details. Properly handling imports and exports is essential for keeping your CRM organized and ensuring that all your data is correctly mapped and accessible. We’ll go through simple steps to help you smoothly transfer data in and out of the system.
Import Leads, Deals, Contacts, and Company Details
Importing data into Bitrix24 is a straightforward process, but it’s important to follow the right order to ensure everything is mapped correctly. For instance:
- Import Contacts and Companies First: Before importing deals, make sure to import contact and company details. This ensures that deals can be correctly linked to their respective contacts or companies.
- Map Details During Import: When importing deals, Bitrix24 can automatically fetch contact or company information by matching names. This feature helps you save time and avoid manual linking errors.
We’ll guide you step-by-step through the import process to ensure your data is accurate and organized.
Export Data for Reports and Analysis
Exporting data allows you to create reports, share information, or back up your CRM records. With Bitrix24, you can export details for leads, deals, contacts, and companies. However:
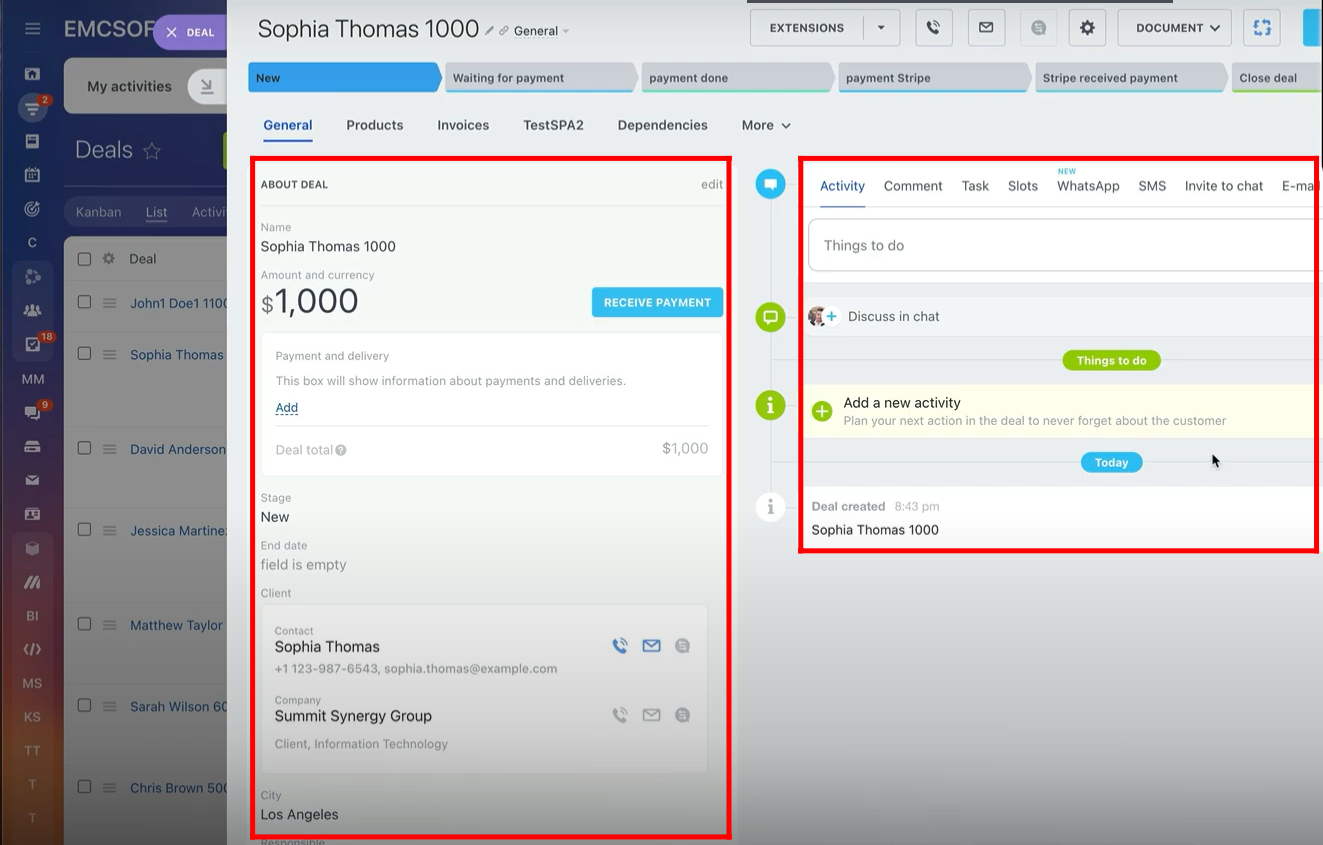
- Only the left-side fields (main details like names, statuses, and dates) of leads and deals can be exported.
- Right-side details such as comments, tasks, SMS, activities, and emails are not included in exports.
We’ll show you how to select and export the data you need while keeping it organized for external use.
Ensure Completeness of Exportable Data
To make sure you can export all relevant data, it’s important to prepare your CRM records carefully. We’ll demonstrate how to:
- Review and clean up your CRM entries before exporting.
- Include all essential details in the left-side fields of your deals and leads for a complete export.
Practical Scenarios for Import and Export
To help you understand how these features work in real-world situations, we’ll cover scenarios like:
- Importing new lead lists from external sources.
- Exporting deal data for financial analysis or reporting.
- Ensuring contact and company details are correctly linked to deals during import.
By mastering the import and export processes, you’ll be able to efficiently manage your CRM data, keep your system up to date, and share valuable information as needed.
Detailed instructions are described below:
1. Go to “Leads” tab. Open “List” view for better experience in importing leads.

2. Give prompt to Chatgpt or any other AI tool to generate basic leads attributes for testing purposes.

3. Go to “Settings” and click “Import”.

4. Click “Download” to get the exact format to import leads data.

5. Open the downloaded file and select both rows. Go to “Data” tab and click “Text to Columns” option.

6. Select “Delimited” and click “Next” to get clean data of column names.

7. Select Delimiters options “Tabs”, “Semicolon” and “Comma”. Click “Next”.

8. Choose “General” and click “Finish”.

9. You will get the clean and basic column data or attributes to import in EMCSoft.

10. Eliminate or delete the columns that are not available in your sample data. Copy and paste the data to your sheet after matching the data with the exact column name. Give the lead names as per your requirements or generate from ChatGpt. In this example, lead names are the full names of contact persons.

11. Save the sheet in “CSV UTF-8” format.

12. Go back to “Import Settings” in “Leads” tab and upload the csv file. Choose the “Data file encoding” as “UTF-8”. Give the “Responsible Person Name” and “Name” of the format.

13. Choose “Column Separator” as “Comma”. Check box the options “First row is a header” and “Skip empty Columns” according to the design of your csv file.

14. Map the attributes of the sheet(csv file) to the exact property names in EMCSoft data Configuration. For instance, “Phone number” and “email” named columns will be exactly maped to the property names “Work Phone” and “Work E-mail”. You can preview the data of your csv file. Click “Next”.

15. Select the option for how the duplicates should be treated at the time of importing. In this example, “Import all” option has been selected. You can control the uniqueness also for each attribute in your leads details. Click “Next”.

16. You can see that all the records have been imported successfully. Click “Done”.

17. Here, you can verify that all the sample leads data have been imported. Click “Settings icon” to control the data to show in the detail view of leads.

18. Here, you can check and uncheck the attributes of lead details to show in the views.

19. Go to “Deals” tab and click “List” view. Select all deals and apply “For All” option. Click “Delete” to clean the view for testing purposes. This step is optional to view only the sample data at the end after import.

20. Click the “Settings” icon and go to “Import Deals”.

21. Click the “Download” option to get the exact format of deals data attributes to import.

22. The contacts data must be imported first to import the deals. So, go to “Contacts” tab to import contacts data first.

23. Go to the “Import custom CSV” option.

24. Click the “Download” option to get the exact format of the contacts data to import.

25. Follow steps from “5” to “9”. Generate sample data of contacts from ChatGpt. Start copying your data in the sheet or enter manually. You may add more attributes or columns data according to format and your business requirements.

26. Copy all the contacts data in the sheet and verify if something is entered wrong in respective column. Save the file in “CSV UTF-8” format.

27. Choose the file to upload. Choose “Data Source” as “Custom” and “Data file encoding” as “UTF-8”. Choose the “Contact Type” and “Source” name. Write description if you want. Select whether the data to be imported will be “Available to Everyone” and “Included in Export”. Choose the “Responsible Person” and set the “Name Format”.

28. Choose “Column Separator” as “Comma”. Check the boxes of options “First row is a header” and “skip empty columns” according to your design of the sheet to be imported. Select further options as per your requirements and choose “Default Import Template”. Click “Next”.

29. Map the attributes of the sheet(csv file) to the exact property names in EMCSoft data Configuration. You can preview the data of your csv file. Click “Next”.

30. Select the option for how the duplicates should be treated at the time of importing. In this example, “Replace” option has been selected. You can control the uniqueness also for each attribute in your contact details. Click “Next”.

31. Here, you can view that all the contacts have been imported successfully. Click “Ready”.

32. All the contact details have been imported with contact types.

33. Now, open both sheets of “Deals” and “Contact” data format sheets. Add data of deals in its respective sheet and for contact details just add the contact names with name of attribute and values in the rows to map at the time of import. This mapping will get the details of contact persons from previously uploaded contact details.

34. Here, you can see, the columns “Deal Name”, “Amount” and “City” are new columns to Deals data. The “Contact” column consists of contact person names to get the respective details from contact details. In this example, the last row data person contact details are not configured before. Save the file in “CSV UTF-8” format.

35. Upload the csv file containing deals data. Choose the “Data File encoding” as “UTF-8”, “Responsible Person” and set the “Name format”. Choose “Column Separator” as “Comma”. Check the boxes of options “First row is a header” and “Skip empty columns” according to design of the csv file. Click “Next”.

36. Map the attributes of the sheet(csv file) to the exact property names in EMCSoft data Configuration. You can preview the data of your csv file. Click “Next”.

37. You can see that deals data have been imported successfully. Click “Ready”.

38. Now you can visualize all the deal data in the list view. The first deal has no client because it contains the name of the contact who has no previously saved contact details in the system. Open any other deal.

39. The contact details for the same person have been fetched already within the deal details.

40. Now, go to “Companies” tab. Click “Settings” icon and go to “Import Companies”.

41. Click “Download” to get the format of companies details to import.

42. Follow steps “5” to “9” to get the clean structure of attributes. Generate the random companies details and paste in the sheet. Limited number of column information is being imported for testing purposes.
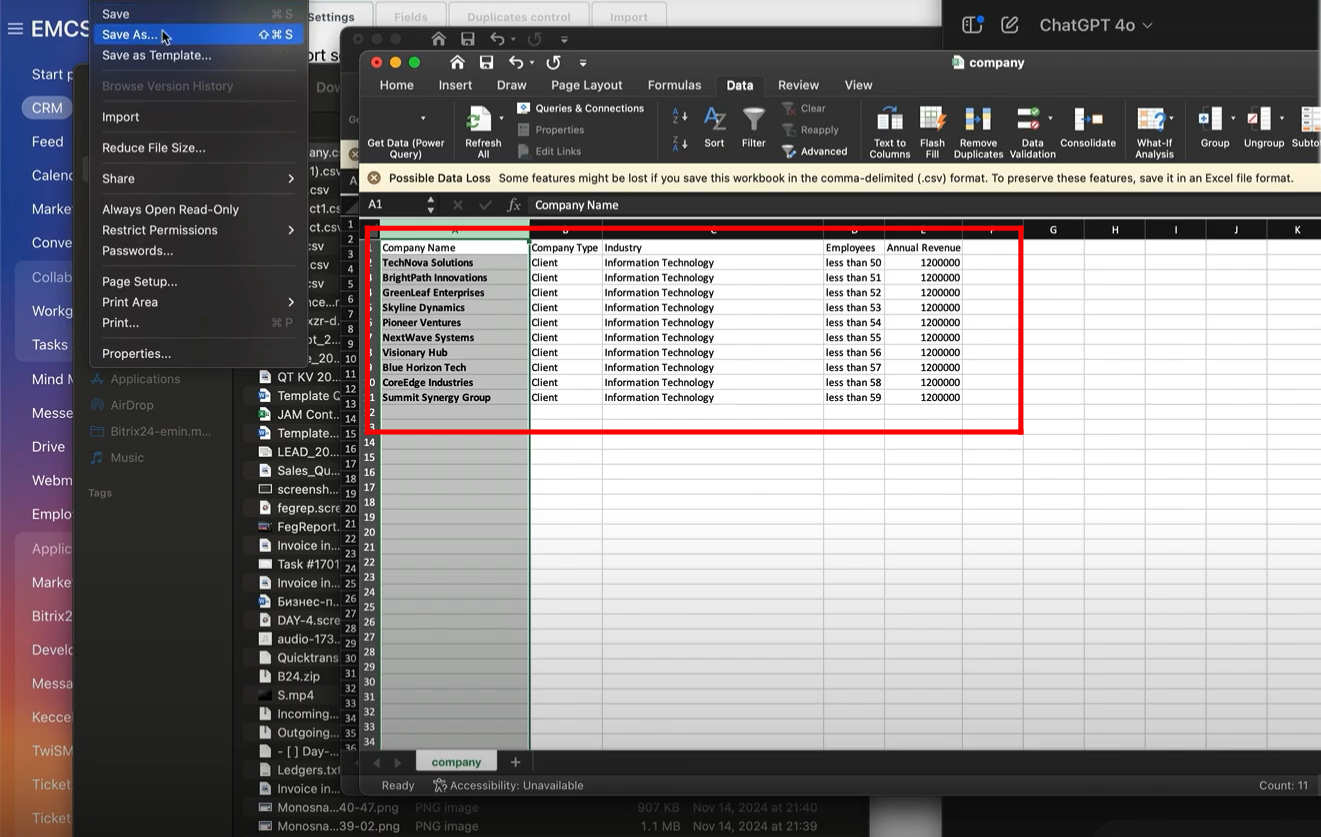
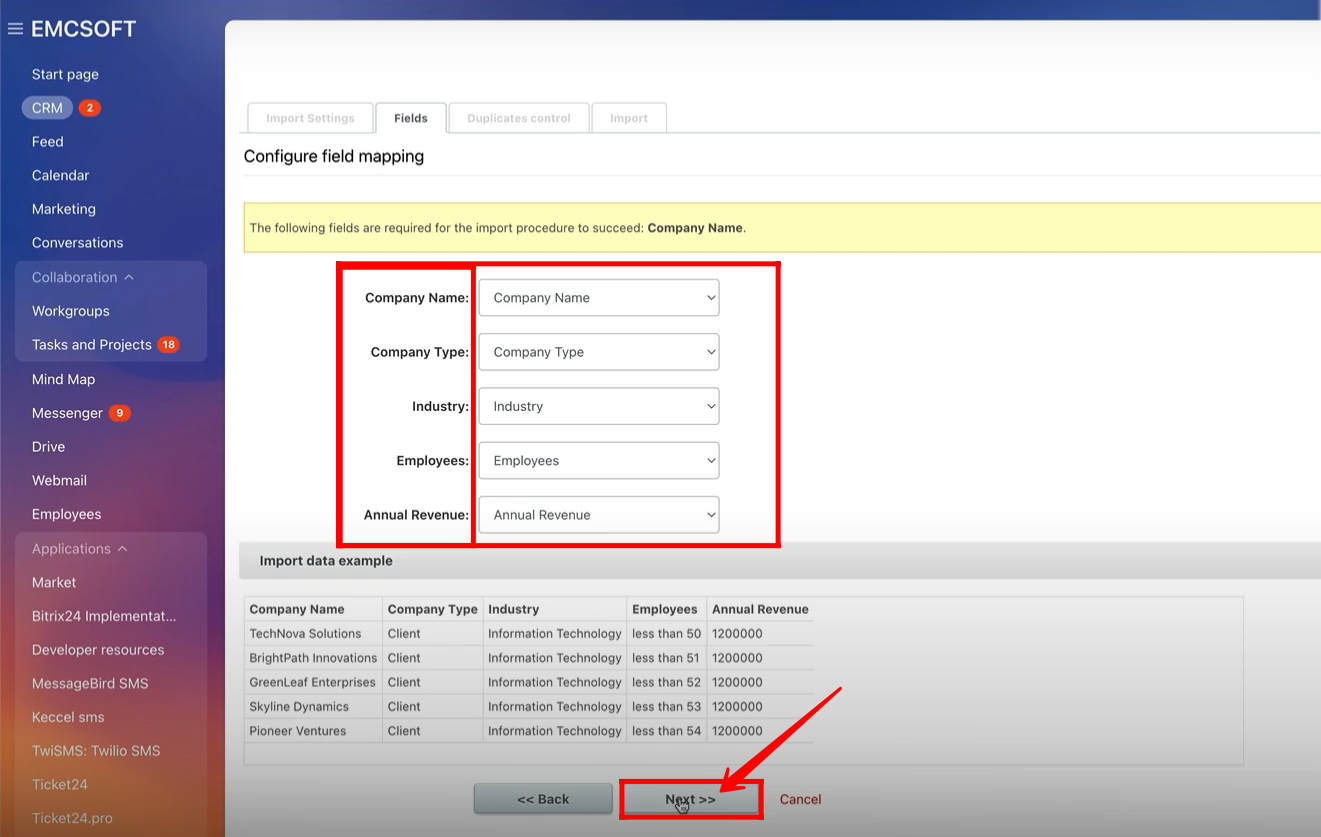
43. Upload the csv file. Choose the “Data file encoding” as “UTF-8”. Give the “Responsible Person Name” and set the “Name format”. Choose the “Column Separator” as “Comma”. Check the boxes of options “First row is a header” and “skip empty columns” according to your design of the sheet to be imported. Choose the “Default Import Template”. Click “Next”.
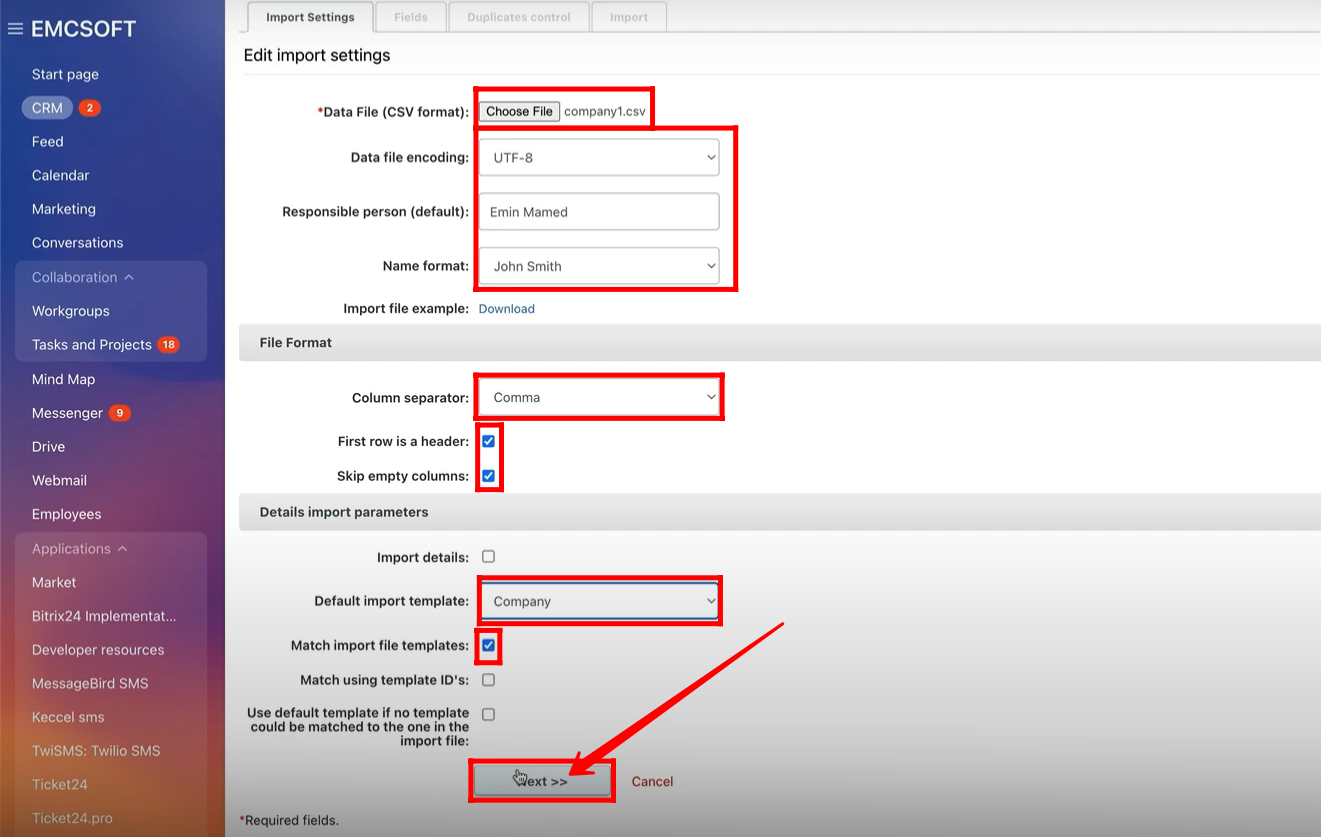
44. Map the attributes of the sheet(csv file) to the exact property names in EMCSoft data Configuration. You can preview the data of your csv file. Click “Next”.
45. Select the option for how the duplicates should be treated at the time of importing. In this example, “Import all” option has been selected. You can control the uniqueness also for each attribute in your companies details. Click “Next”.

46. You can see that all the companies details have been imported successfully. Click “Done”.

47. Here, all the companies detail attributes can be viewed after import.

48. Now, open both sheets of “Deals” and “Companies” data format sheets. Add deal data in its respective sheet and for company details, just add the company names with same column name and values in the rows to map at the time of import. This mapping will get the details of companies from previously uploaded company details.

49. Now, again go to “Import Deals” to import deals with company details fetching scenario.

50. Upload the csv file containing deals data. Choose the “Data File encoding” as “UTF-8”, “Responsible Person” and set the “Name format”. Choose “Column Separator” as “Comma”. Check the boxes of options “First row is a header” and “Skip empty columns” according to design of the csv file. Click “Next”.
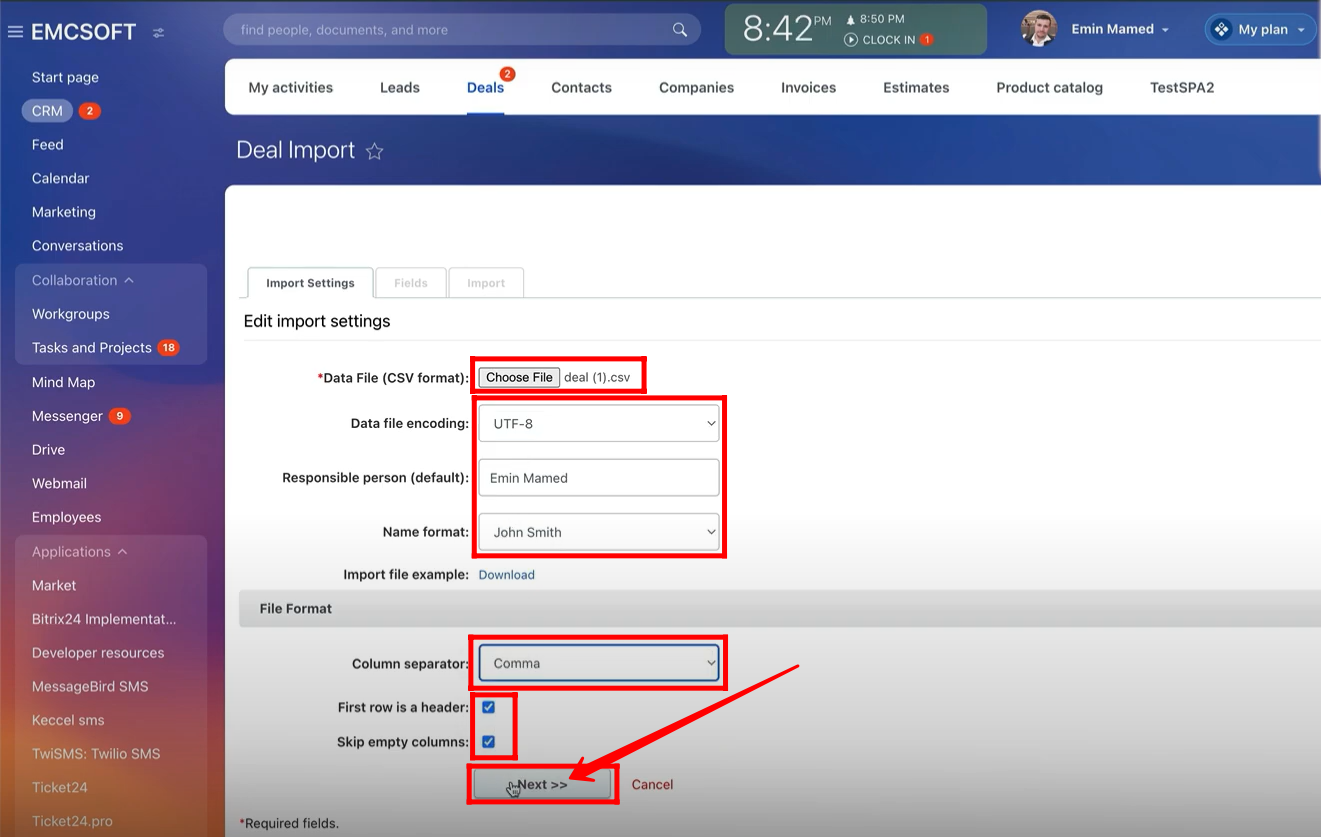
51. Map the attributes of the sheet(csv file) to the exact property names in EMCSoft data Configuration. You can preview the data of your csv file. Click “Next”.
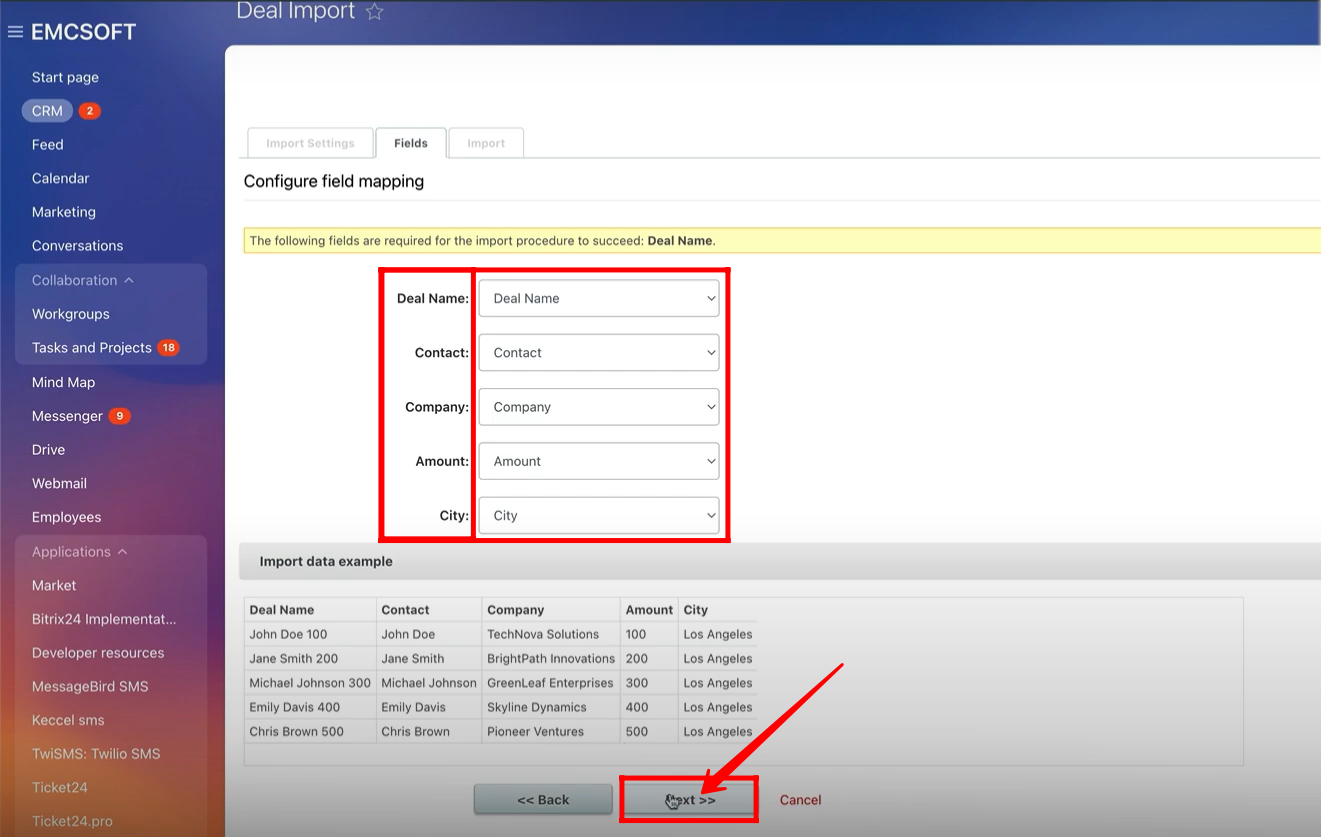
52. You can view that all the deals have been imported successfully. Click “Ready”.
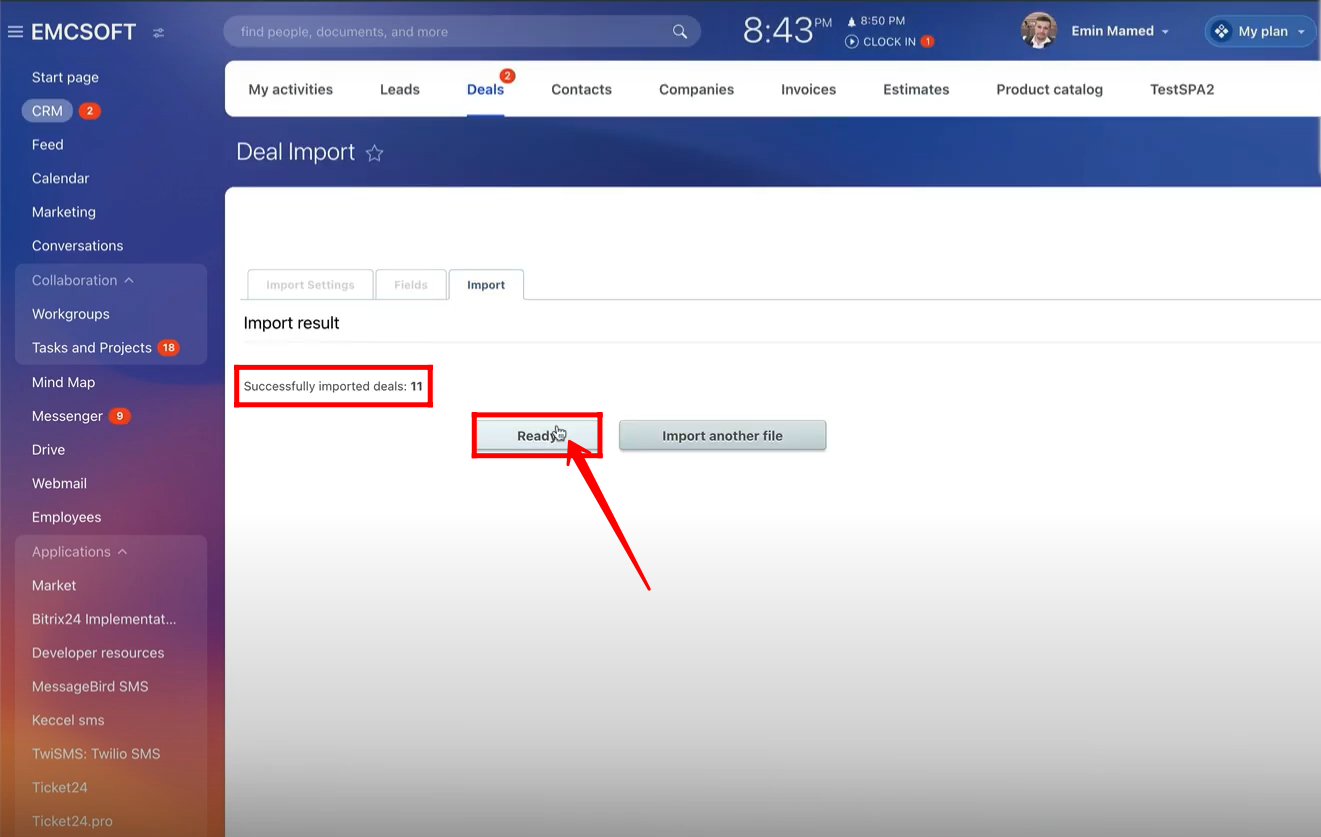
53. You can see that all deal data has been shown in the view. The first deal does not show client or company information because it contains the name of the contact that does not have previously saved contact or company details in the system. Open any other deal.
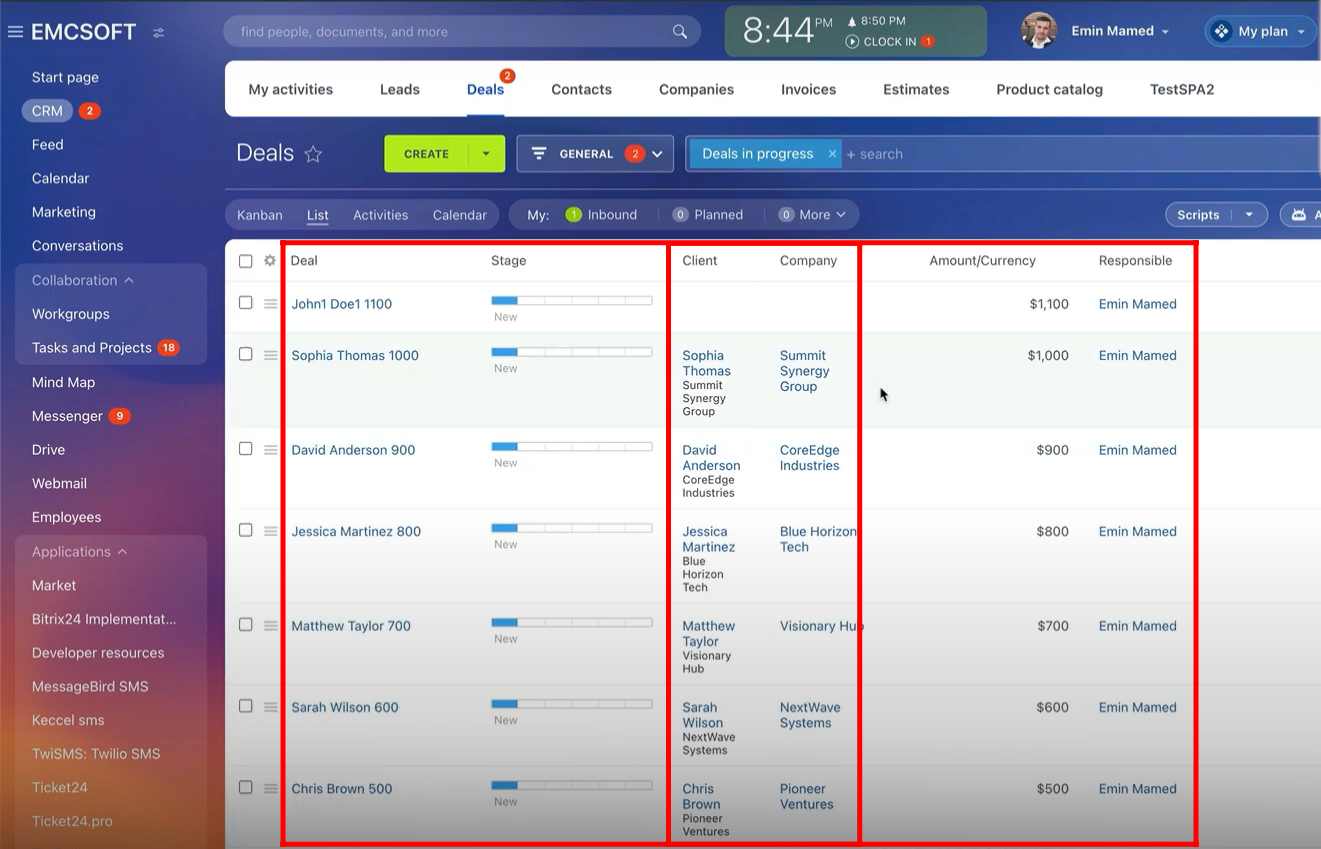
54. The contact and company details for the same person have been fetched already within the deal details.
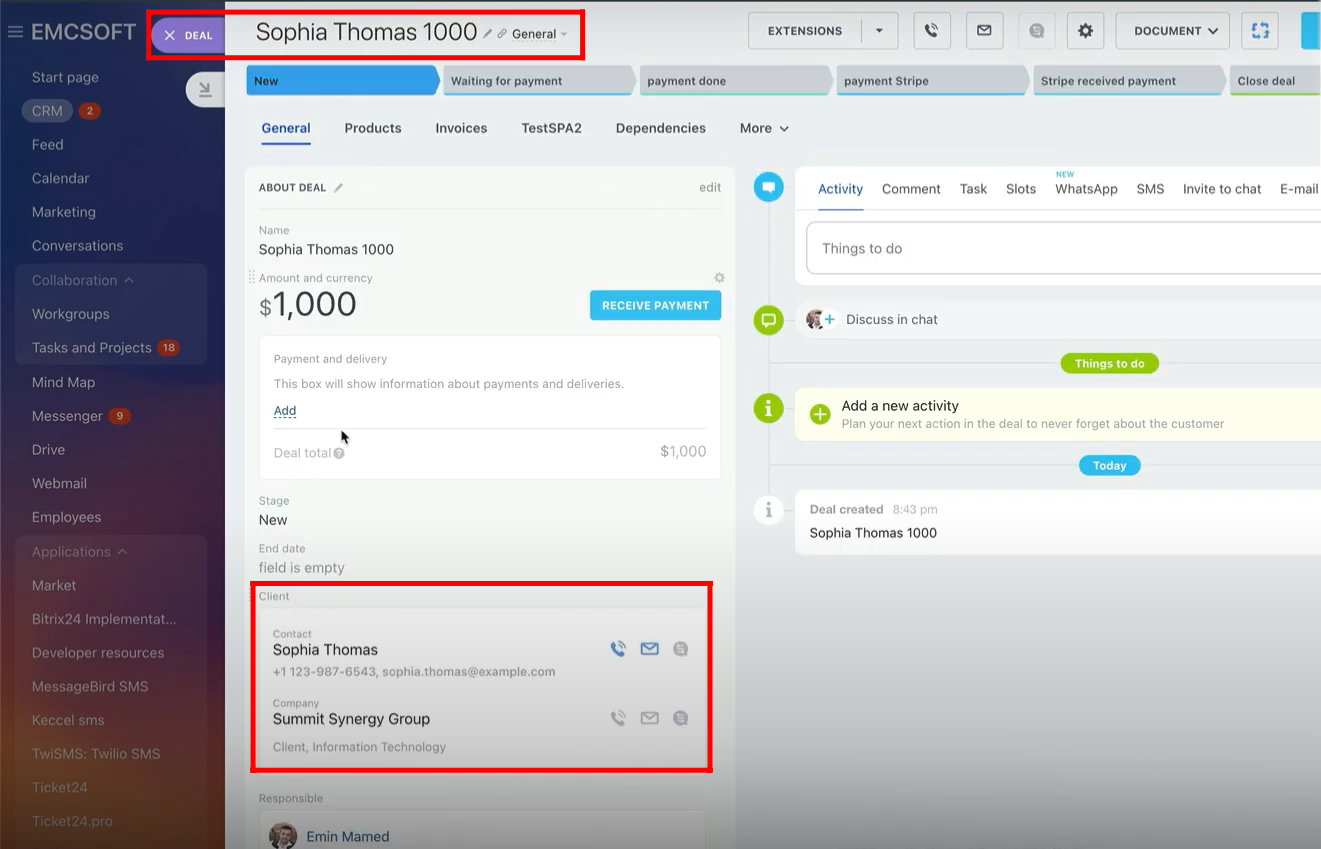
55. In deal details, you can hide and unhide the company/contact details by clicking “settings” icon.

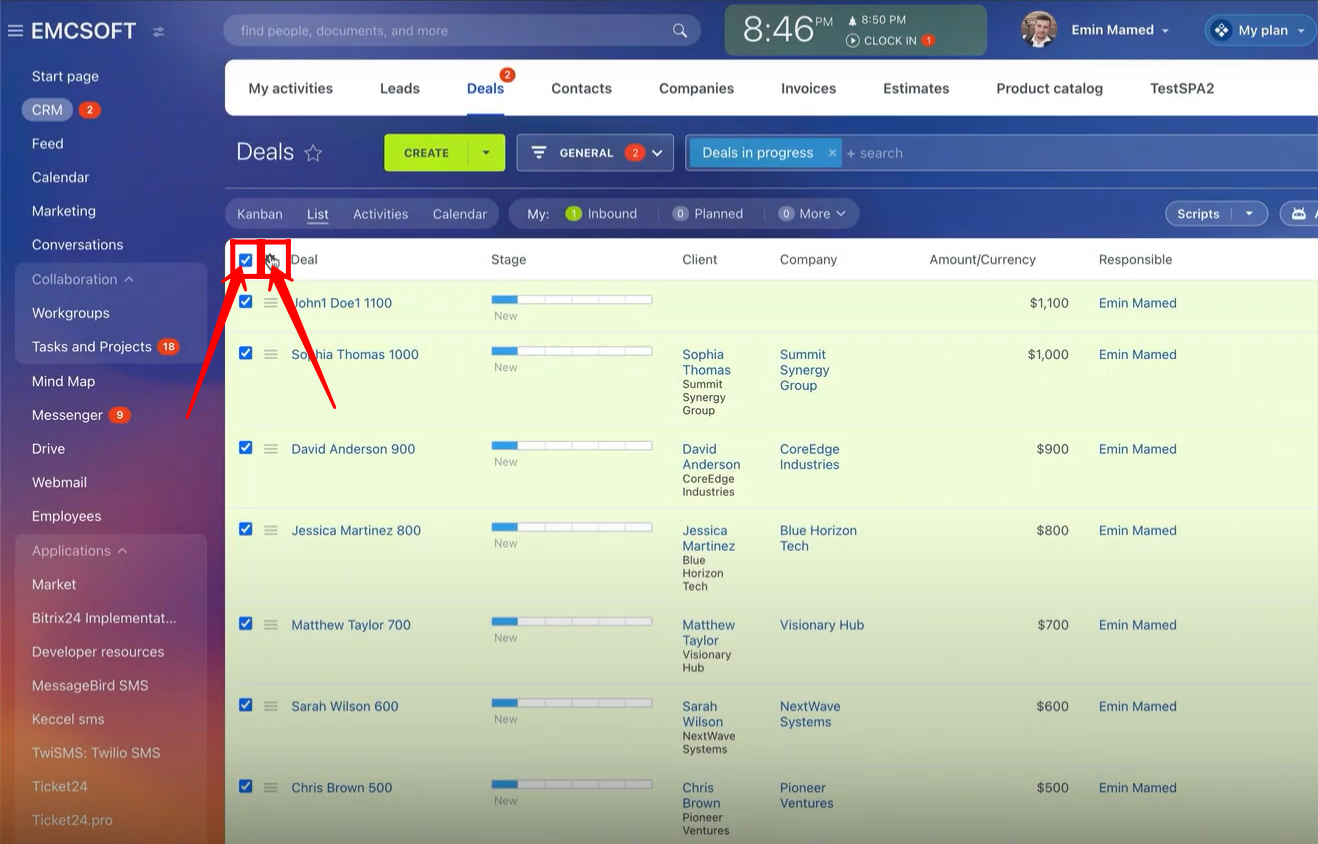
56. Before exporting data, select all and click “settings” icon.
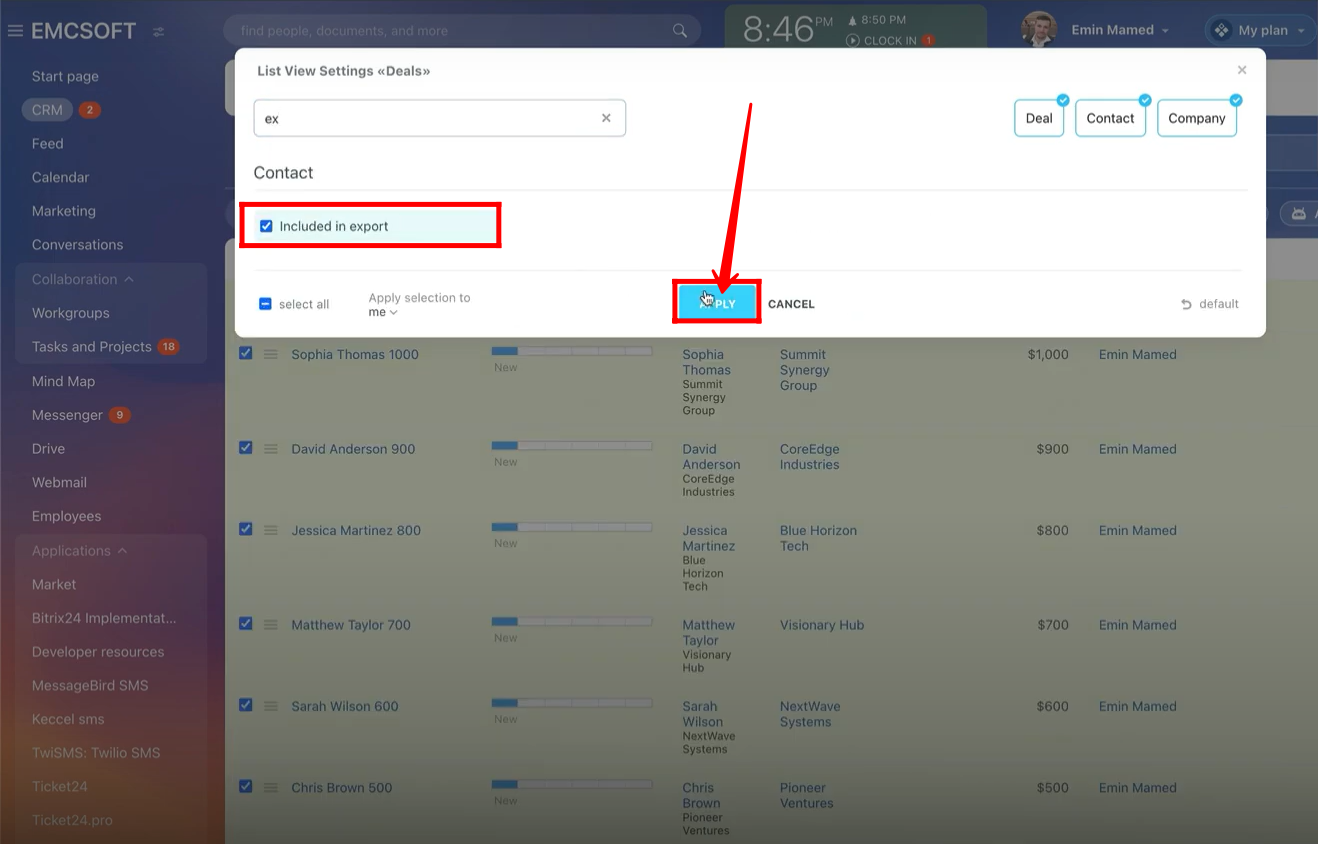
57. Search “export” and check the box for “Included in export” to export all the data. Click “Apply”. Now, all the items are eligible to be exported.
58. Click “Settings” icon and choose “Export Deals to Excel” because in this example, deals data is being exported.

59. Choose the options to be checked according to your requirements whether all fields of contacts and companies should be exported. Click “Run” to export.
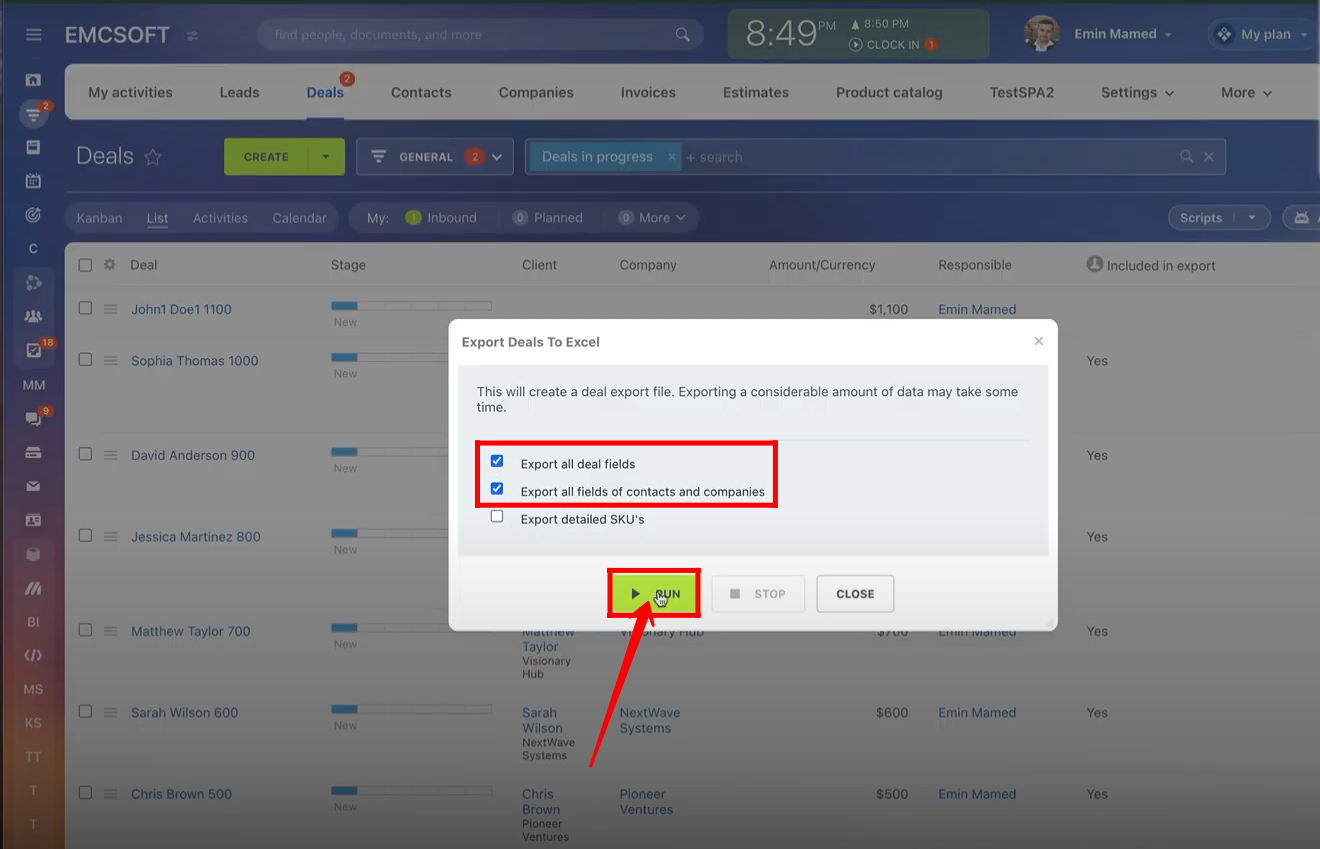
60. The exported sheet will contain all the company and contact person details also along with deals attributes.

61. In the deal or lead details, only the left-side details are able to be exported. The information on the right side such as Comments, Tasks, SMS, Activities, E-mails cannot be exported.
“You can also watch this video on Youtube”
