| 1191 Views | Amin
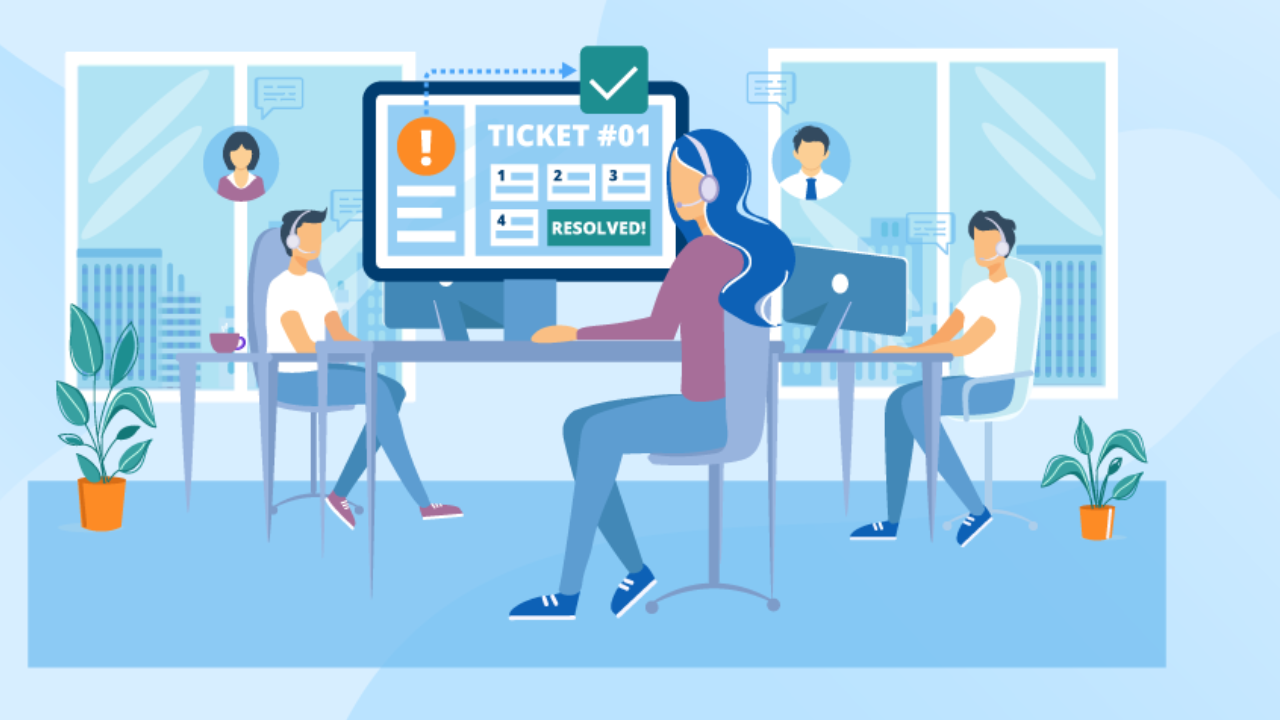
EMCsoft Ticketing system
As you might remember, we launched our Ticket24 free app recently in Bitrix market. Ticketing system is a simple and convenient communication tool with company clients. Using it, they can send inquiries, i.e. raise a tickets regarding your products and services.
We received huge feedback from our current and potential customers and worked hard on app improvement.
Now, we present a Pro version of our ticketing system which offers better filtration and management of tickets.
Hassle-free functionality
Pro version is also installed as an internal app. This allows to use a full range of customization available in Bitrix platform. Therefore, your managers are able to easily configure tickets thanks to the well-known, user friendly interface.
Nonetheless to say, this is a cheaper tool comparing to external apps or own app creation. External apps require time and effort from your employees to get adjusted. Moreover, you will need to connect that app with your CRM and you might need third party to do so with additional fees. And of course, creation of your own app is obviously the most expensive way.
In the Ticketing system you continue to use Bitrix24 functionality, the same cards: Contact, Company, Deals and so on. All tickets are shown as tasks inside Contact cards of your clients. So, your employees can be accustomed to the ticketing system in less than one day.
Choosing between simplicity and deep analytics
There is a thin line in making functionality simple but still advanced. Many examples show that developers go deeper and deeper in improvements and apps transform into complicated, heavy and tough to adapt solutions.
On the contrary are minimal functions to keep things as simple as possible. However, in this case users may not be satisfied and might ask for more features.
The point of support here is to listen to your target audience.
We in EMCsoft take feedbacks into careful consideration. Through this process we had a long way of developing our ticketing system from demo version and free app to the advanced pro version.
Our clients are located all over the world; they involve both small companies and big enterprises. Therefore, our goal was to keep simple interface which will be understandable by most of our customers and their clients’.
App fully integrated in Bitrix environment
This goal led us to the internal Bitrix24 app with full integration. So, our clients are able to modify Ticket24.pro using Bitrix instruments. For example, you can use automation rules and triggers for any tickets raised by your clients. Some examples we will observe below in detail.
Our team is ready to help you not only with built-in Bitrix robots, but also with specialized robots which require additional code to meet your company’s requirements.
In Ticket24.pro you can add up to 10 Workgroups where your clients can send a ticket. This can be useful when you want to use SLA for you clients or you have different departments with different responsible persons and want to allocate tickets between them. For example, in window installation companies accounting department will receive tickets concerned about refunds and sales department will collect tickets about measurement inquiries.
Glance at Ticket24.pro possibilities
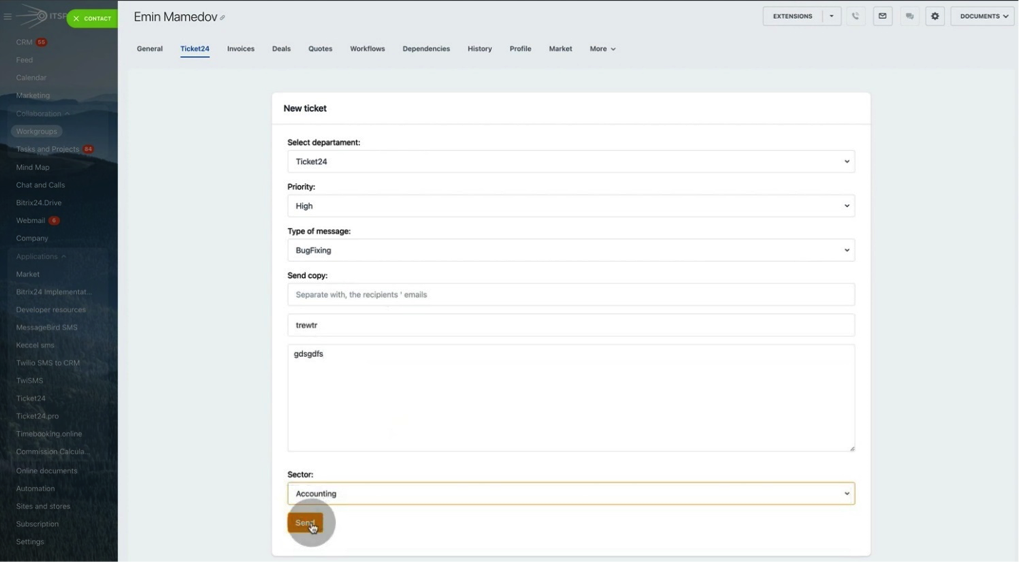
Tickets created in Pro versions can have additional parameters of Priority, Sector and Type of message.
In Pro version we also considered situations when you might be able to limit client’s access to the system. This might be relevant when client has overdue debts or his internal security has breached.
One more interesting feature of Pro version is the possibility to raise a ticket on behalf of your client. This can be helpful when your client has a limited access to the internet or has a rush and lack of time. Or this can be your way of personal touch to the clients. Anyway, managers are able to create tickets right from Client’s Contact card inside Bitrix CRM.
Last, but not least to mention is that above mentioned parameters are dynamical, i.e. at the moment you add or modify Priority, Sector or Type of message, these changes will be implemented and client can create tickets with new parameters.
We will observe these and other features below.
So, let’s start a full overview of Bitrix24 ticketing system Ticket24.pro.
1. After Pro version is installed, you will see the following page.
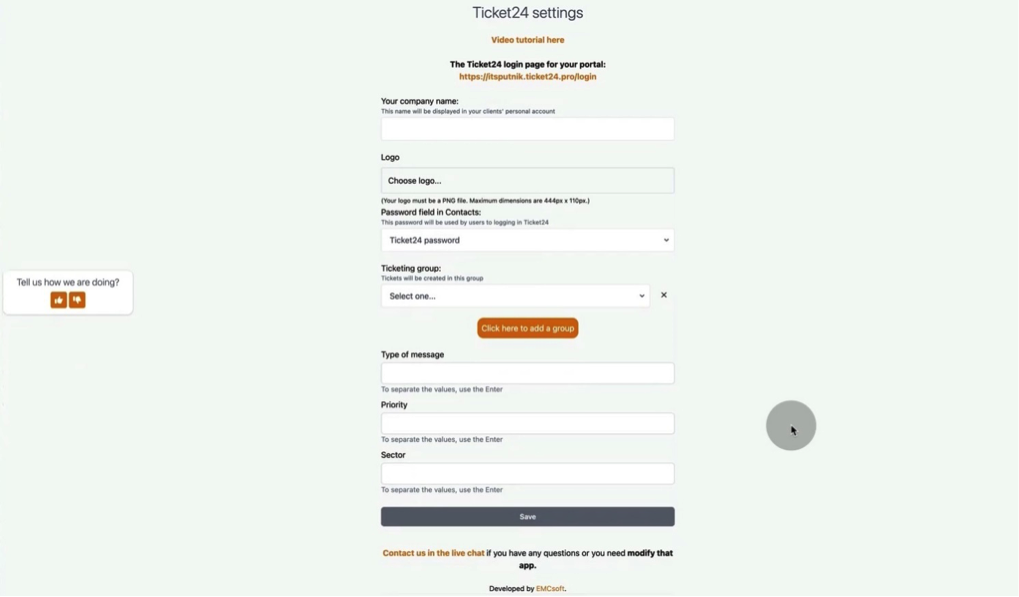
2. Start configuration with company name. In Pro version you are also able to upload company’s logo.
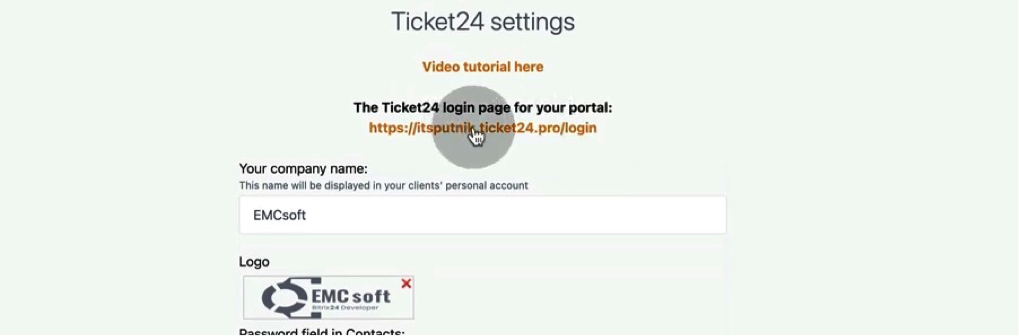
3. Logo will be shown at the main page when your clients log in.

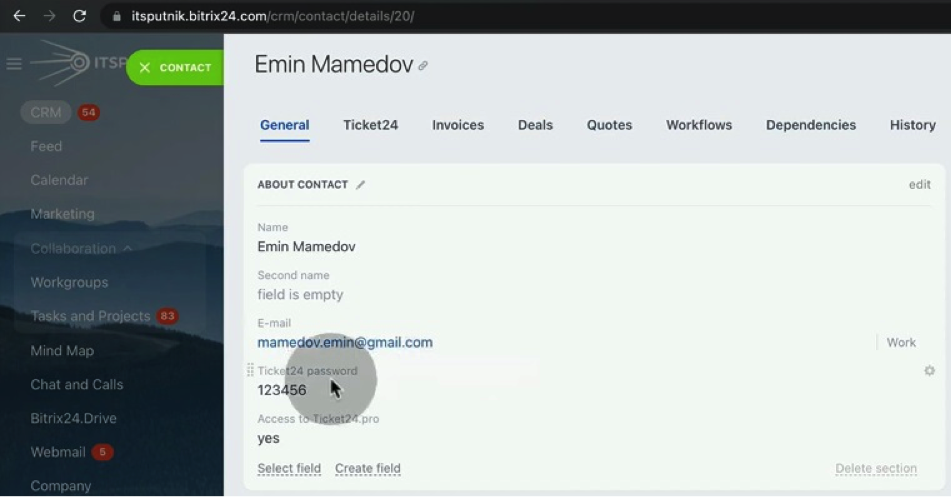
4. Next, choose a field where clients’ passwords are stored. We automatically create a field named “Ticket24 password” in Contact cards. You can choose this default field or create a new one.

5. Ticketing system will automatically generate password for a new client (password below was changed manually).
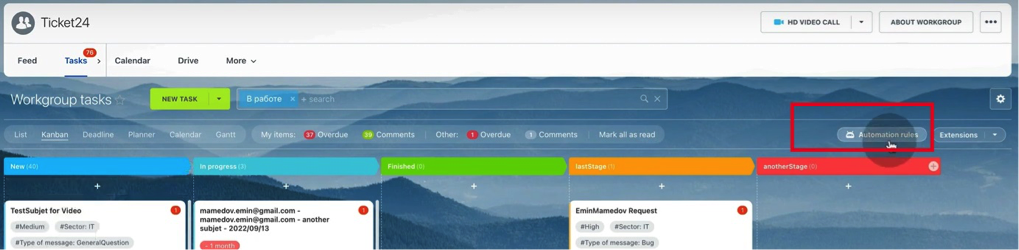
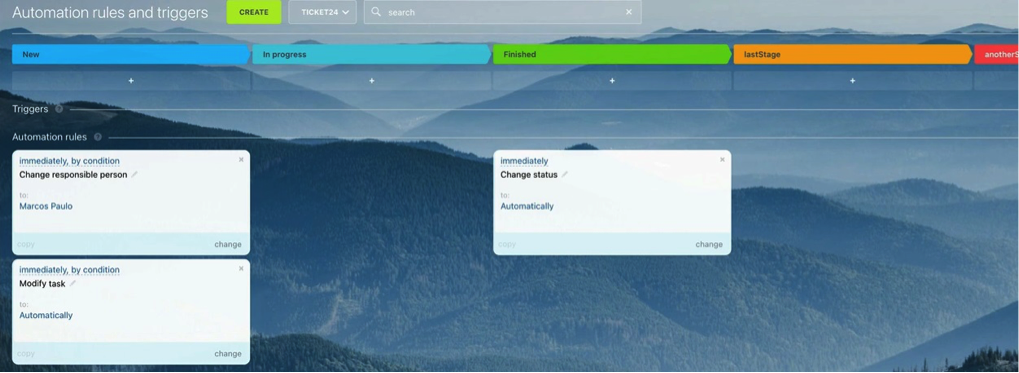
6. Then choose Ticketing group where all tickets will be collected.
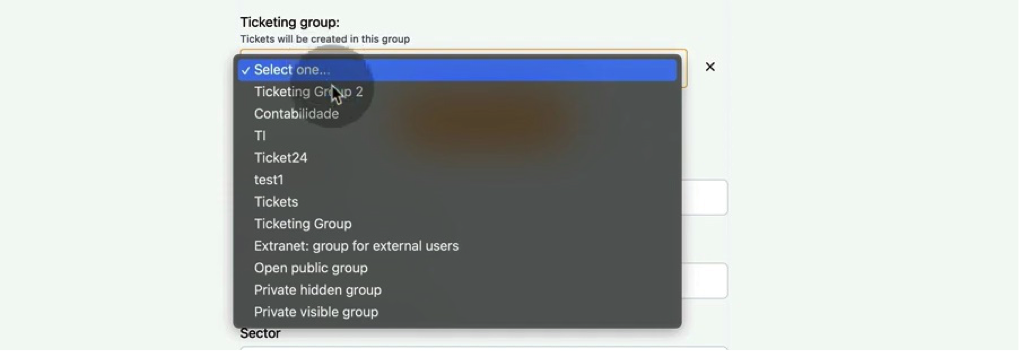
7. In Pro version you are able to create up to 10 Ticketing groups. This is useful when you have several departments and want to divide tickets between them or you want to use SLA.

8. Go through the Ticket24 login link to check how it works. Insert email and password. We remind that you need to send these credentials to your client by yourself. This process also can be automatized using automation rules.

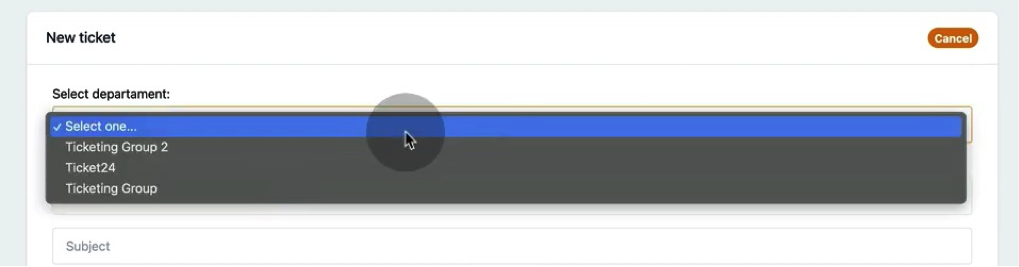
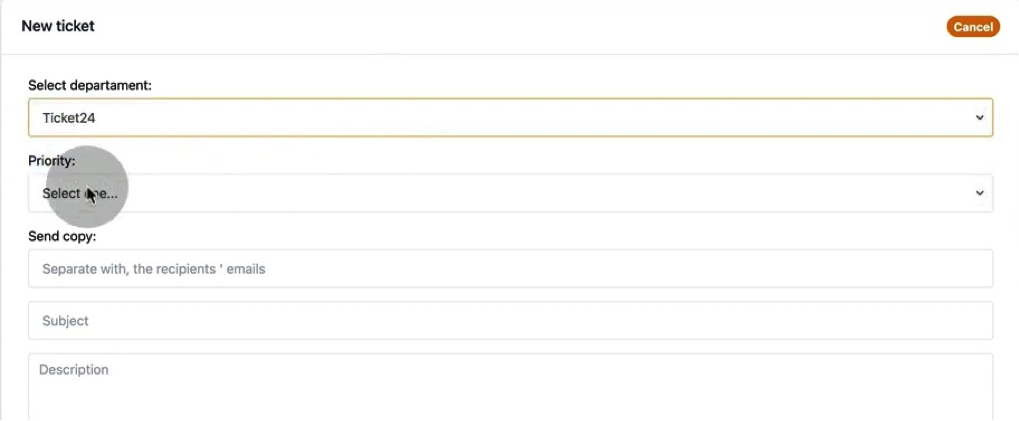
9. In Ticket24 main page click Create a ticket.

10. When you start raising a new ticket, you will see Departments which are Ticketing groups you created before.
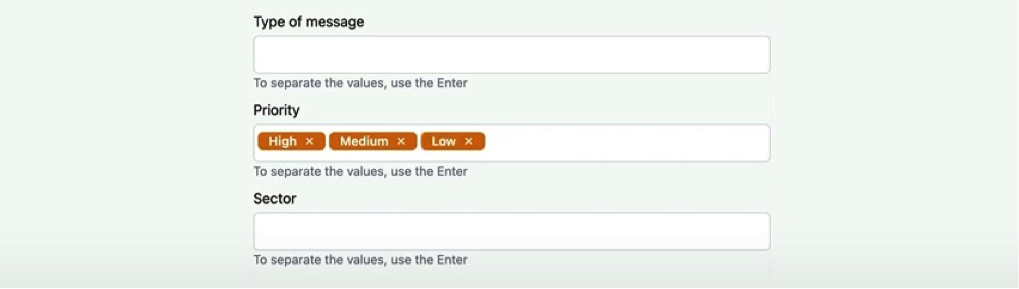
11. Going back to the settings page, we have another extended parameters: Type of message, Priority and Sector.

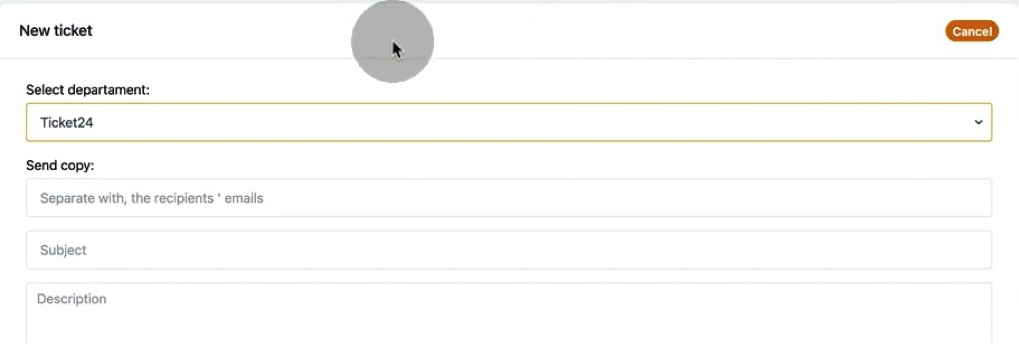
12. You can leave above mentioned parameters empty; in that case ticket creation page will look as below.
13. We created three values for Priority: high, medium and low. Further, we will be able to set up automation rules connected with these values. Once you added a item, not forget hit “Enter” to let added that item to settings.
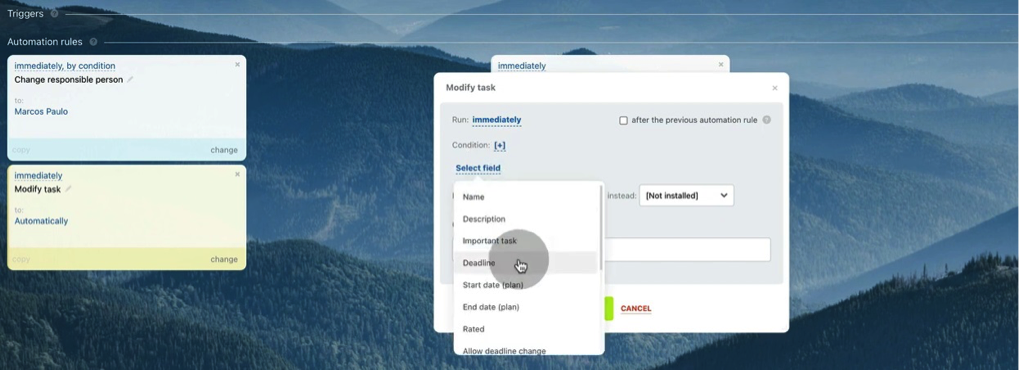
14. Once you save priority parameters, your client will be able to choose priority from drop-down list.
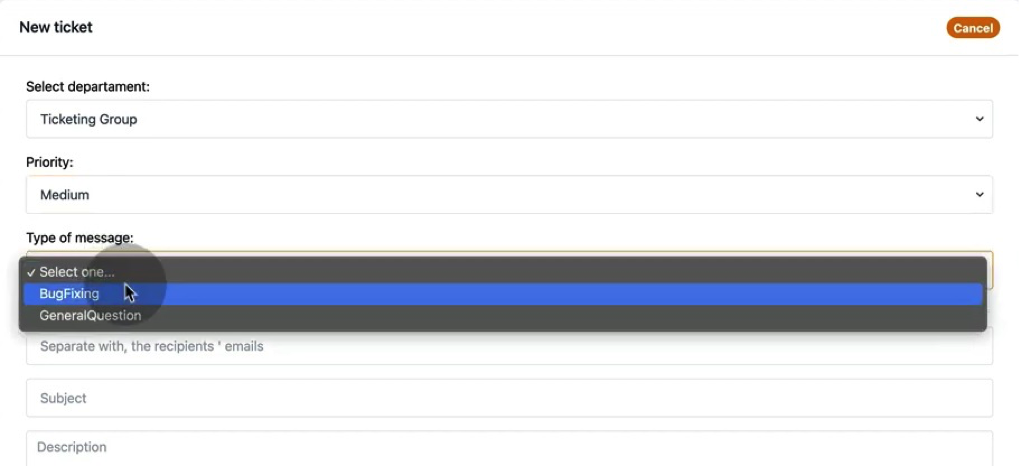
15. Next, you can add Types of messages to differentiate tickets by meaning. In our example we created Bug Fixing and General questions. But remember to leave no spaces or use underscore in the names.

16. Then your clients will be able to choose type of message.
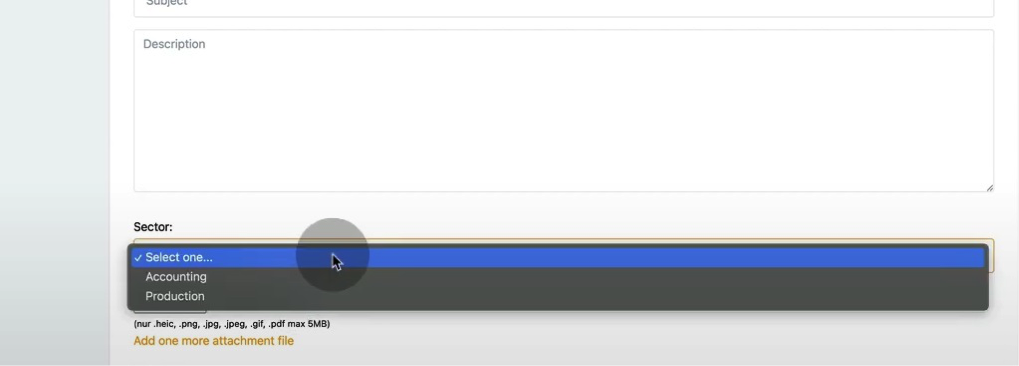
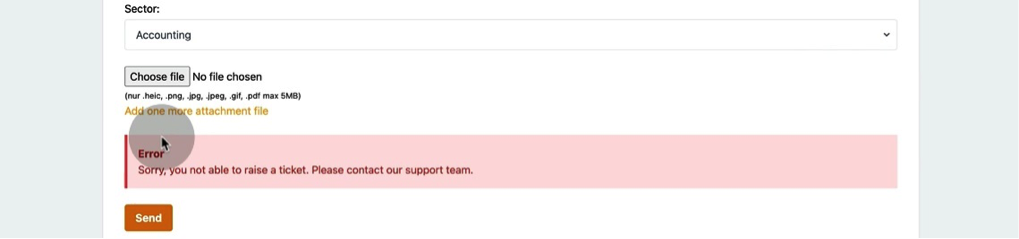
17. Next are Sectors which we can add for more detailed analysis. We put Accounting and Production as an example.
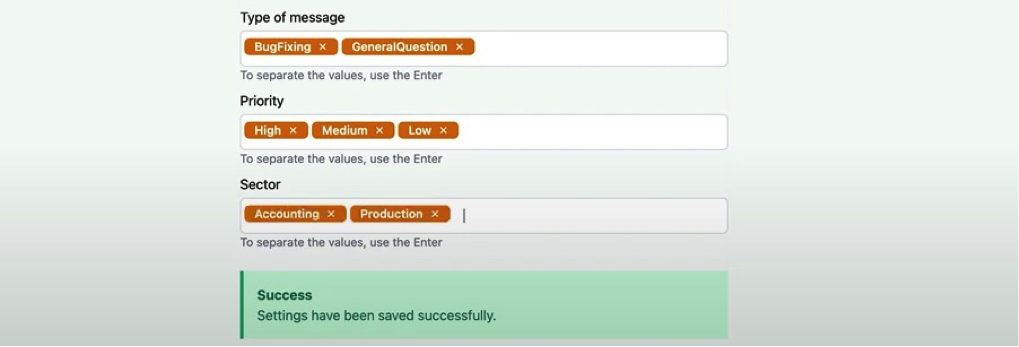
18. Clients will choose Sector under ticket description. Unlike Workgroups, Sectors allocate tickets inside one department. For example, in window installation company sales department can receive tickets with two different Sectors: private and corporate. Senior sales manager will be able to see all tickets and evaluate them differently.
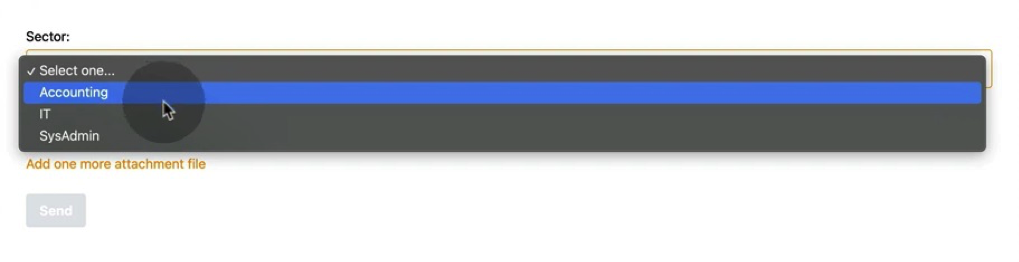
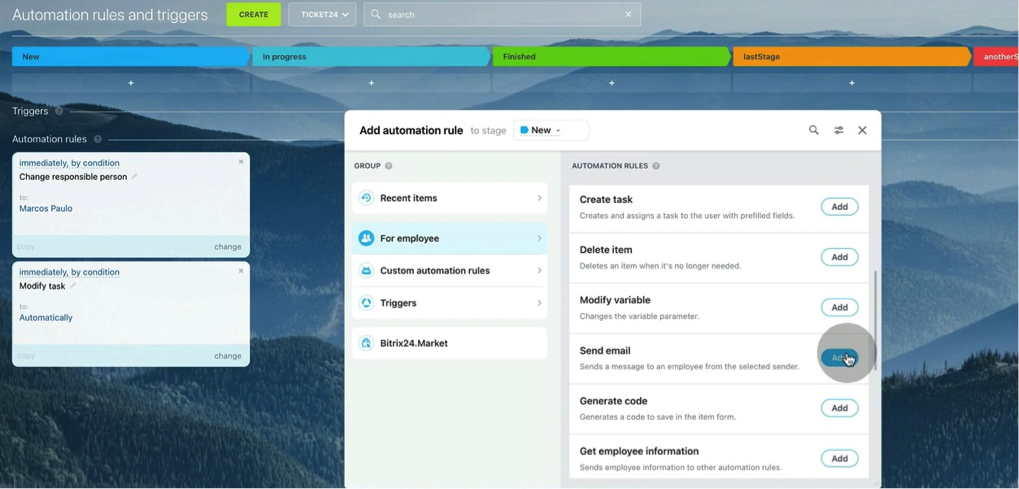
19. We remind that parameters are dynamic and all changes will be updated simultaneously. As an example, we removed Production sector and added IT and SysAdmin.

20. As soon as we save changes, our clients will see new sectors in drop-down list.
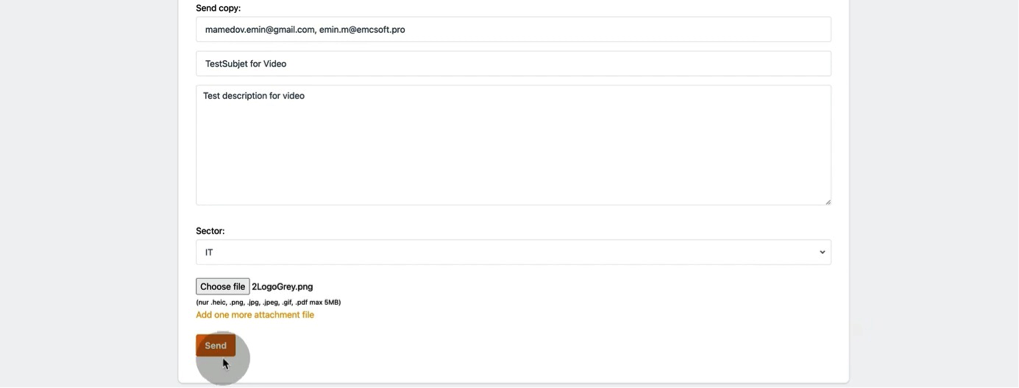
21. Going back to ticket creation process, we will see that clients can add email recipients. By default, all tickets are copied to the email which client use to log in to Ticket24 system.
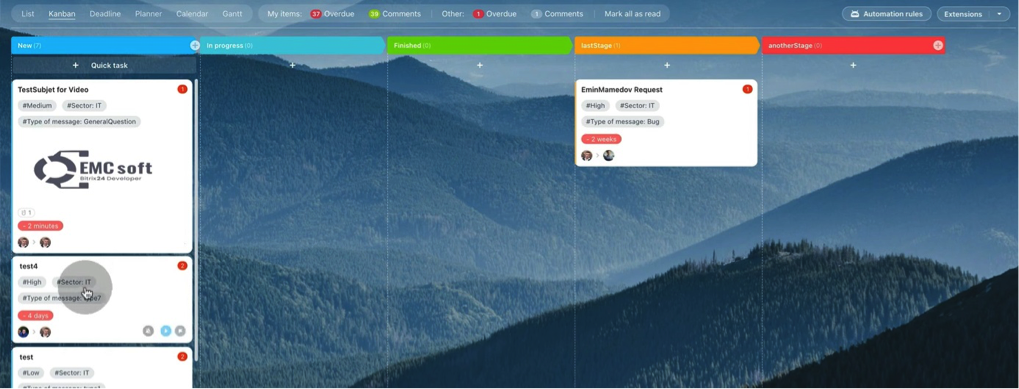
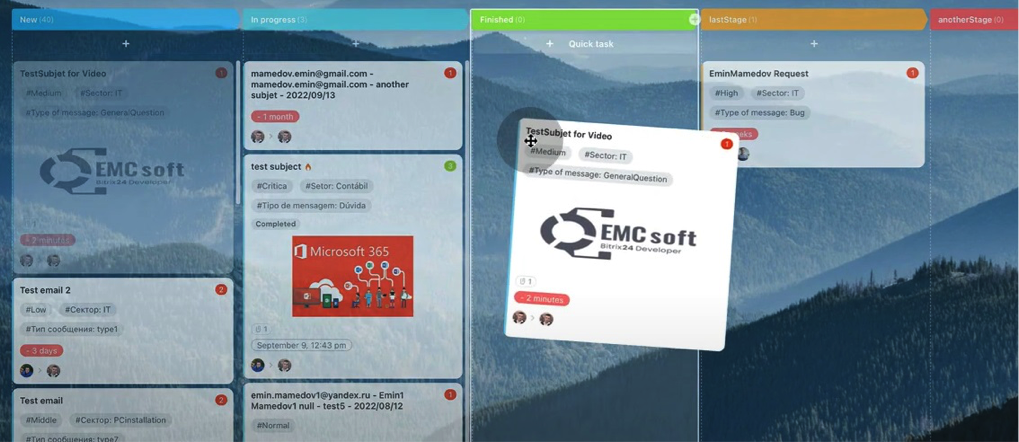
22. In Pro version clients can send a copy of the ticket to some email, dividing them by comma.

23. After, we put some title and description and attach a file.
24. If we go back to the Bitrix, we will see a notification about a new ticket.
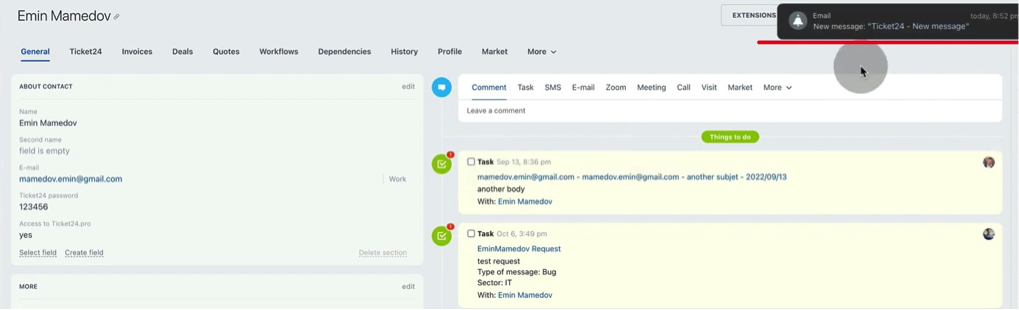
25. In Contact card that ticket will arise as a task. Newest tasks will be shown last in right side.

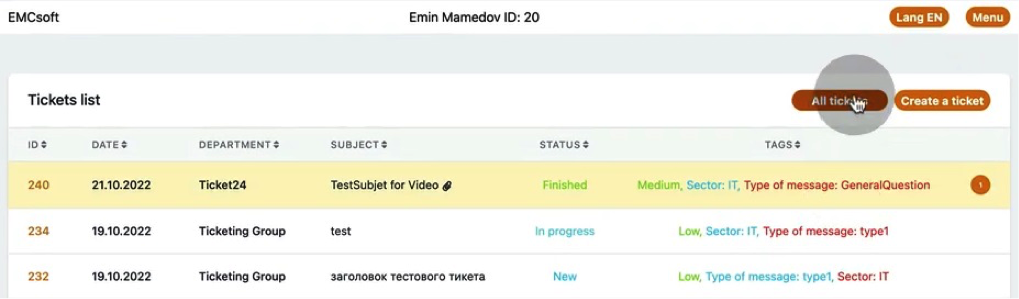
26. Inside of the task we will see description and files attached. Also, dedicated workgroup will be shown.
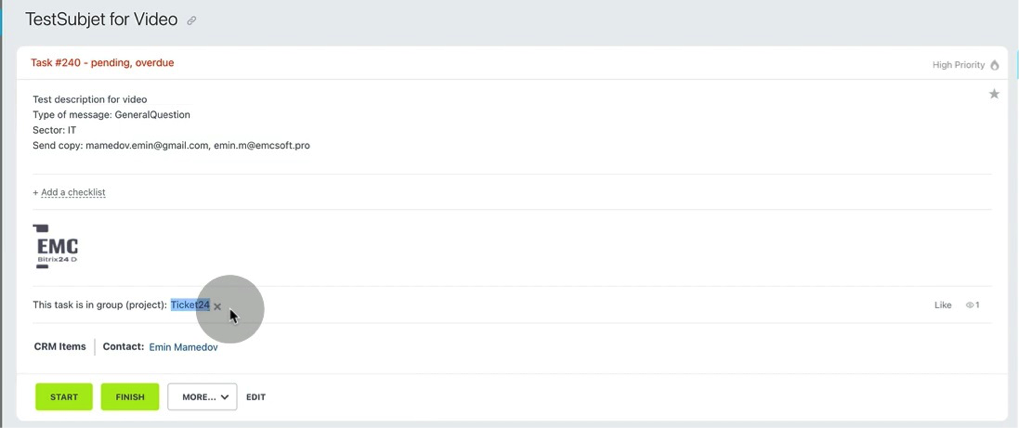
27. In this workgroup we will see all tickets of our department.
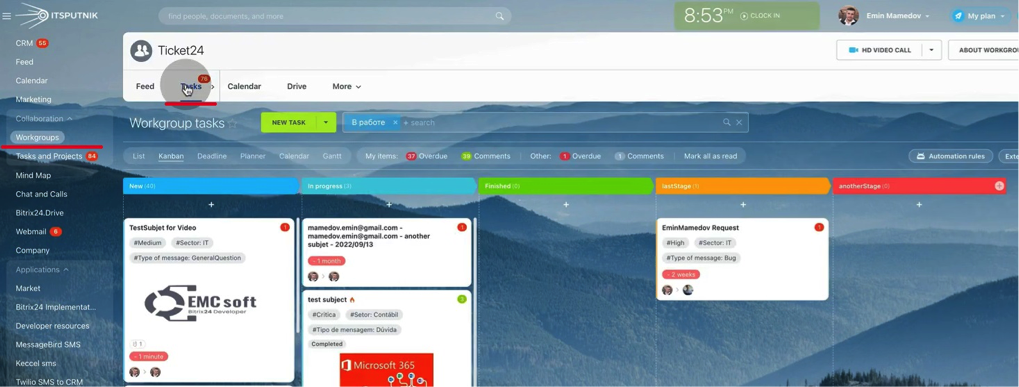
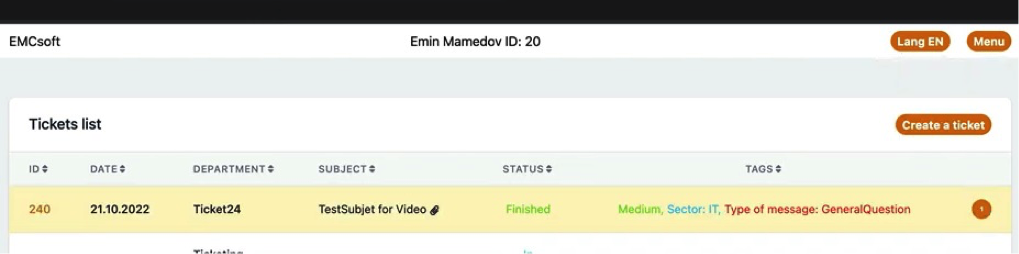
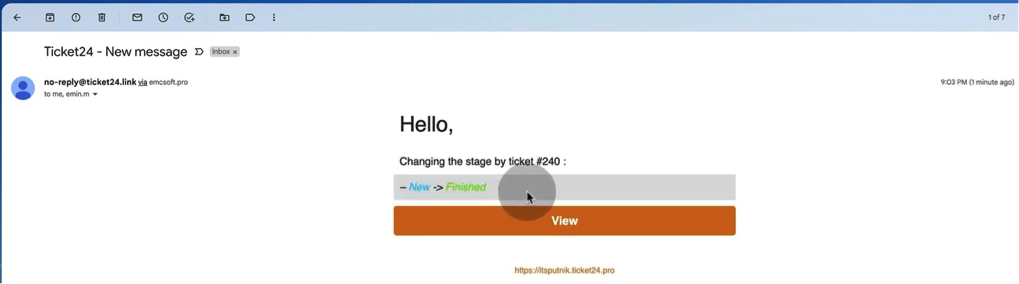
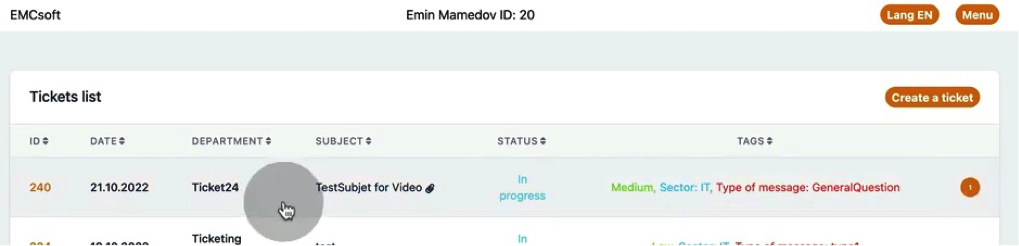
28. Each ticket has tags showing Priority, Sector and Type of message.
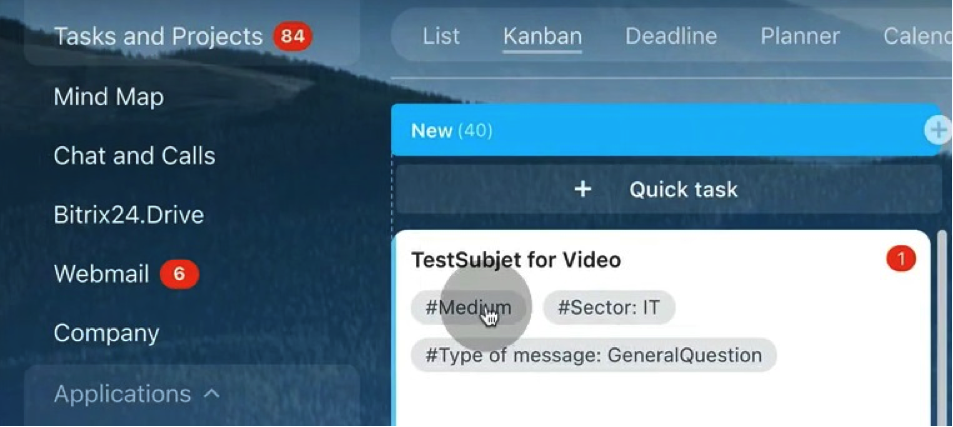
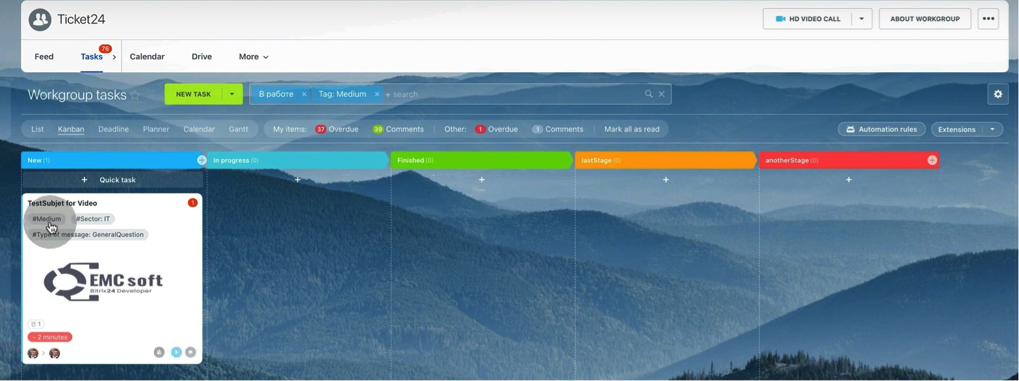
29. You can filter tasks clicking relevant tags. For example, when we click on Medium tag, we see there is only one ticket with Medium priority in this workgroup.
30. If we choose IT sector tag, we see several tasks.
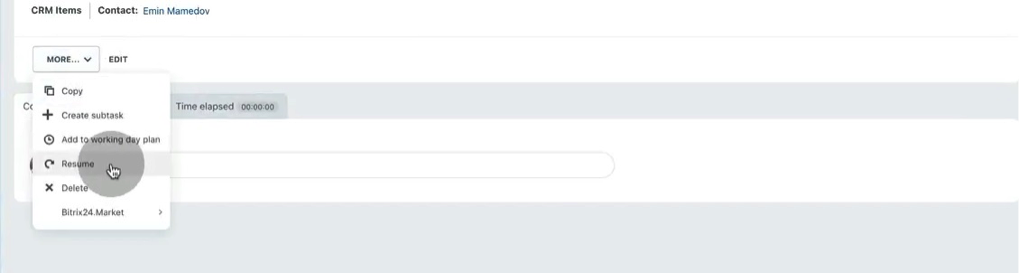
31. Let’s create an automation rule.
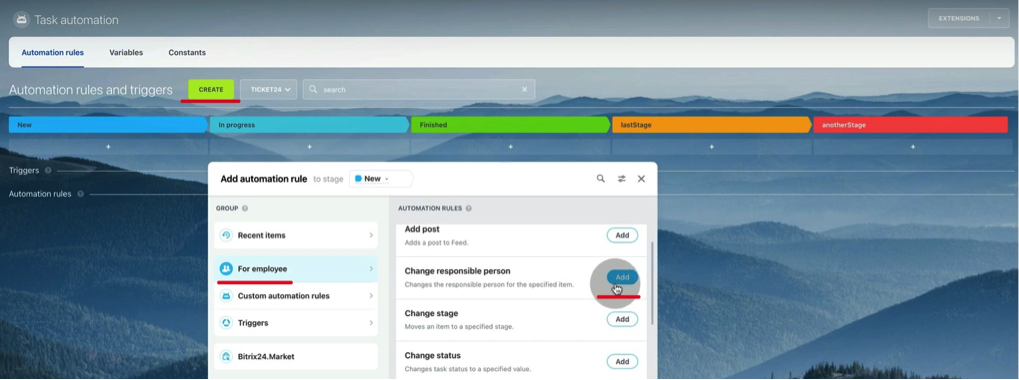
32. We will create a rule for Employee that will change responsible person from default Admin to another person in charge of IT sector tickets.
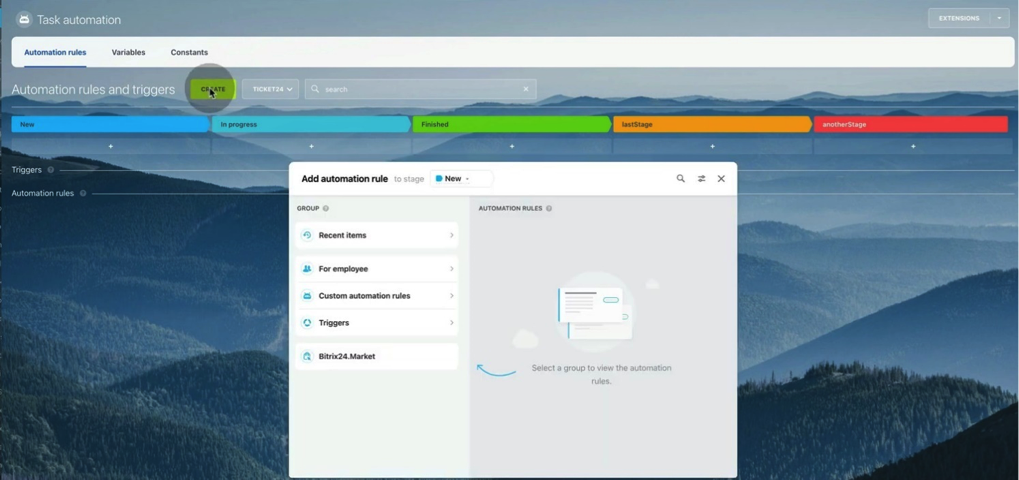
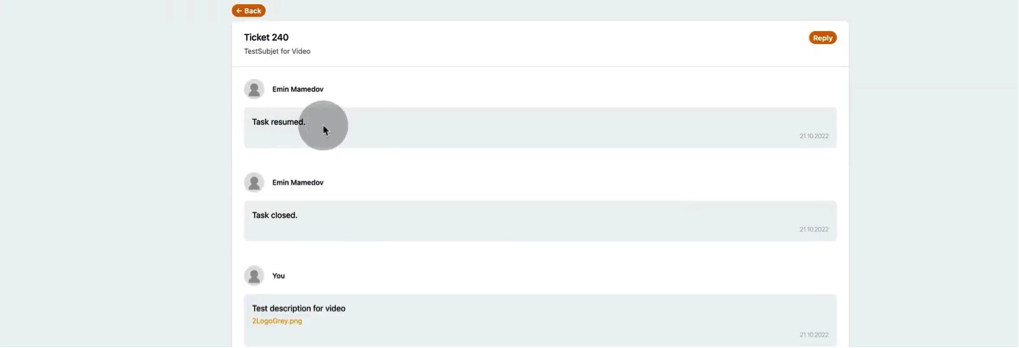
33. Click For employee – Change responsible person – Add
34. New rule will be created. Click Change in the right down corner.
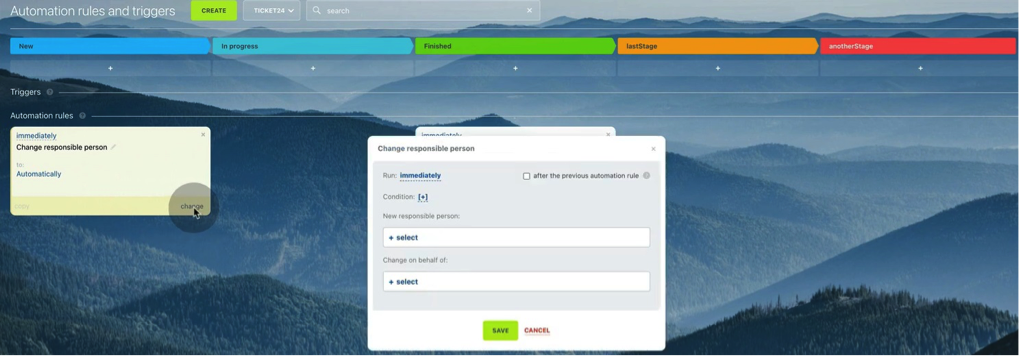
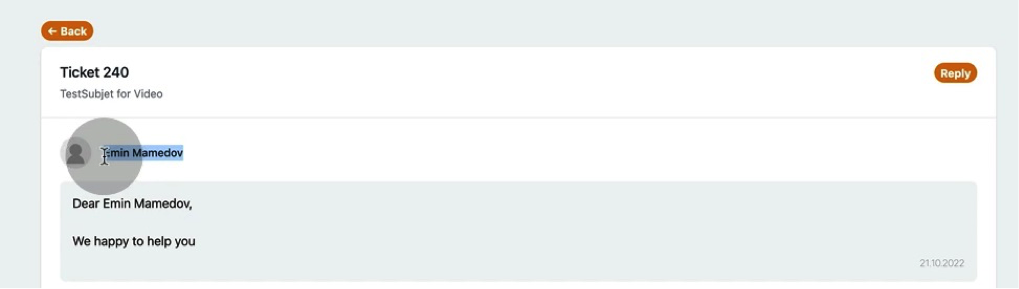
35. Here we add a condition which is identified as Tags.

36. Then we choose Equals or Contain criteria.

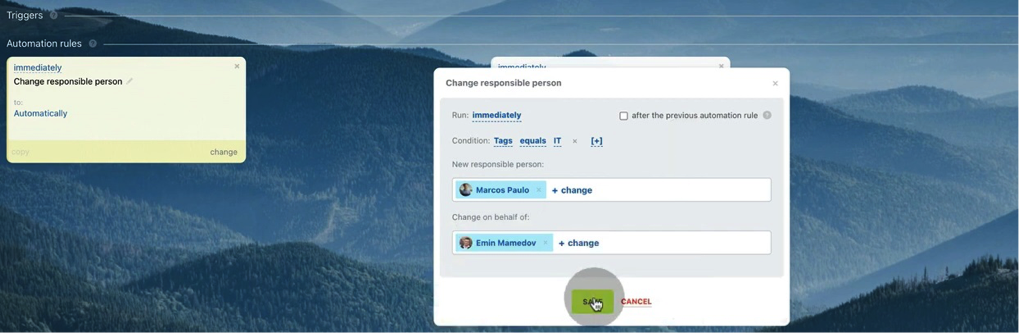
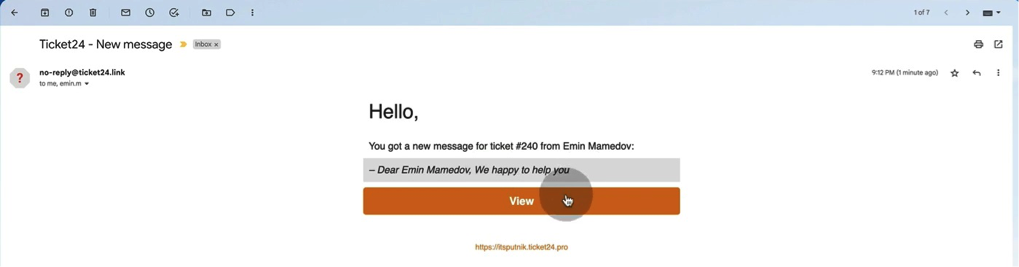
37. And type IT as a condition. This parameter should be listed in Ticket24.pro settings page.
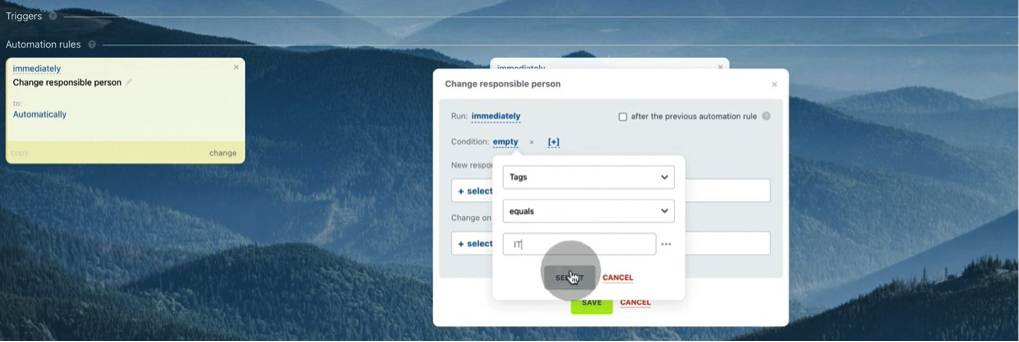
38. Then we choose responsible person who will be assigned instead of admin.
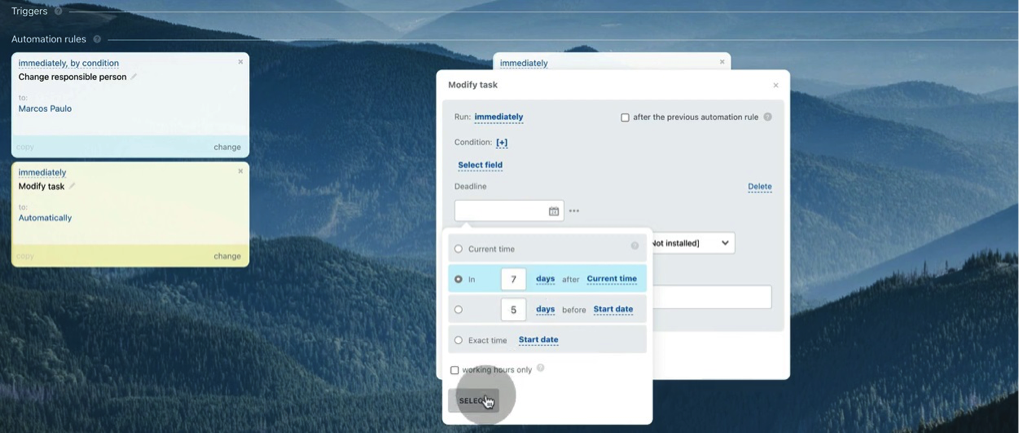
39. Let’s add one more rule that will change task deadline.
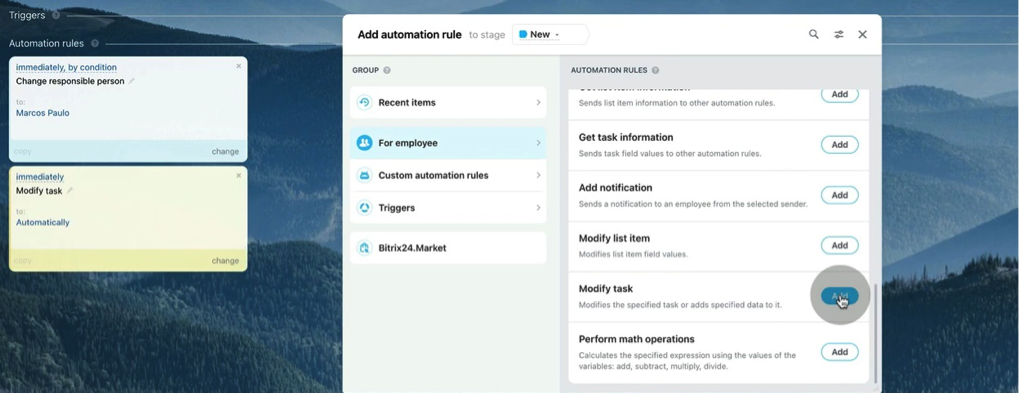
40. In Select field we need to choose Deadline parameter.
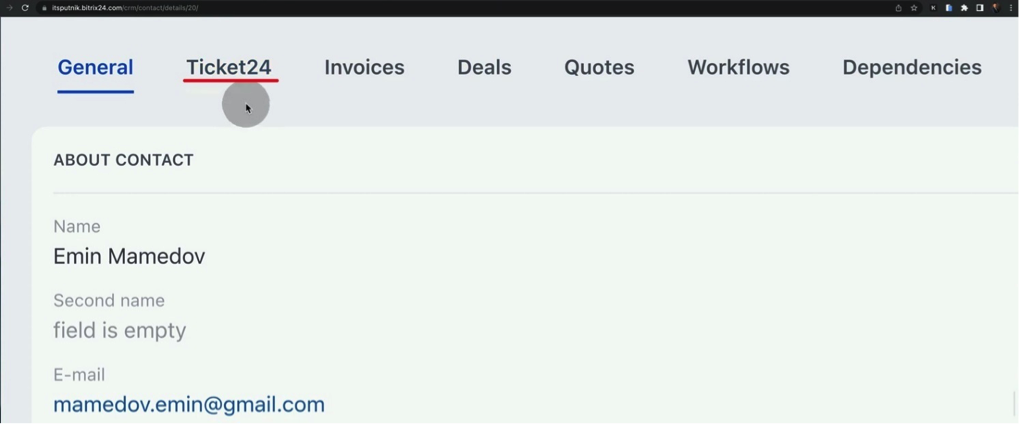
41. Then in the field emerged below we choose In 7 days. Thus, deadline will be set up as 7 days from ticket creation.
42. Then we will add a condition as Tags equals Low.
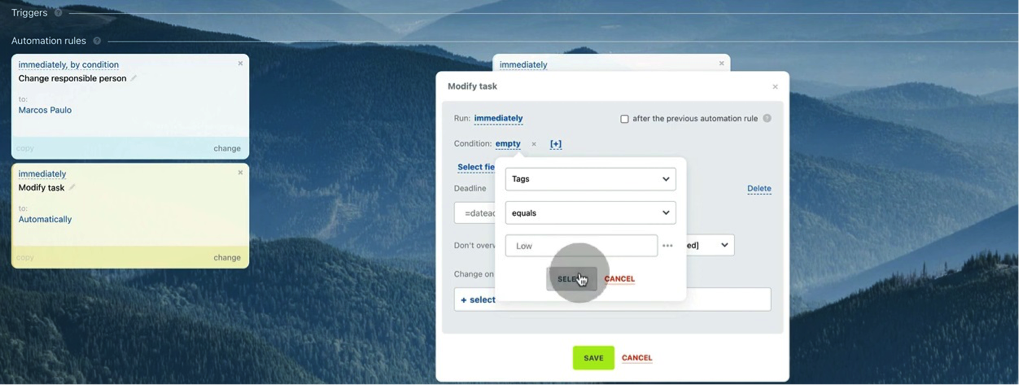
43. We created another robot which will set up a 7 days deadline for any ticket with Low priority.
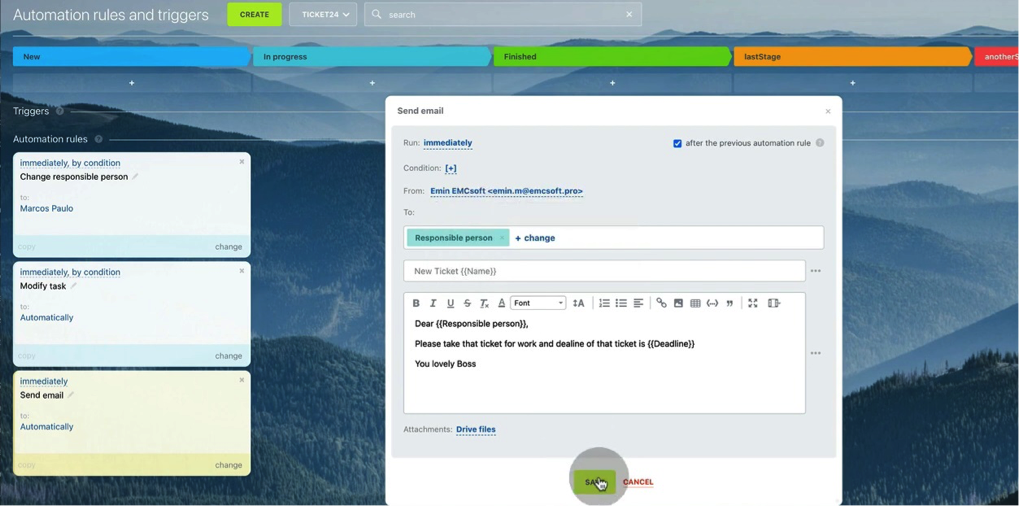
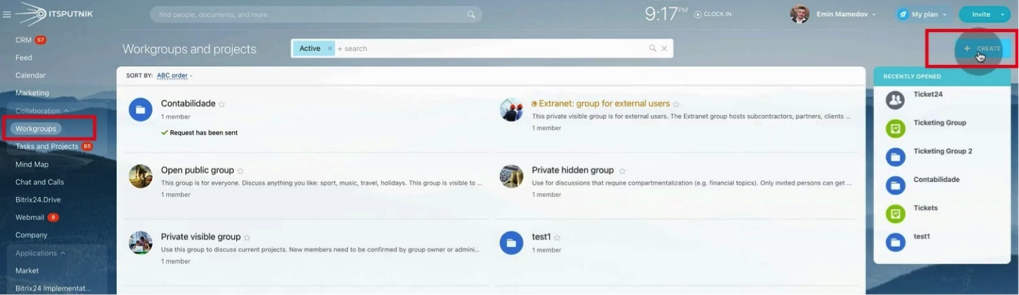
44. Let’s add one more robot which will send notification to our managers. Click Create – For Employee – Send email – Add.
45. Here we tick “after the previous automation rule” box, meaning that this robot will work after two previous automation rules.
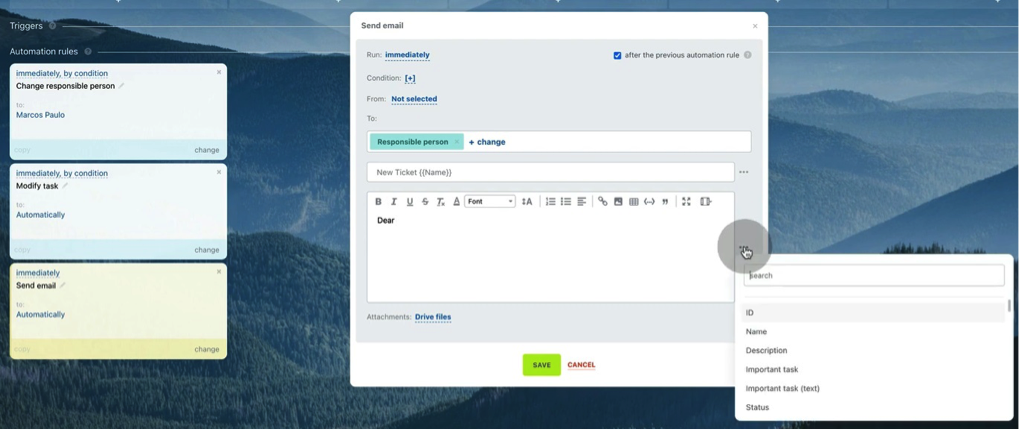
46. We construct a standard email subject, adding Responsible person, whose data will be extracted from Bitrix cards. Also, we will insert Deadline parameter.
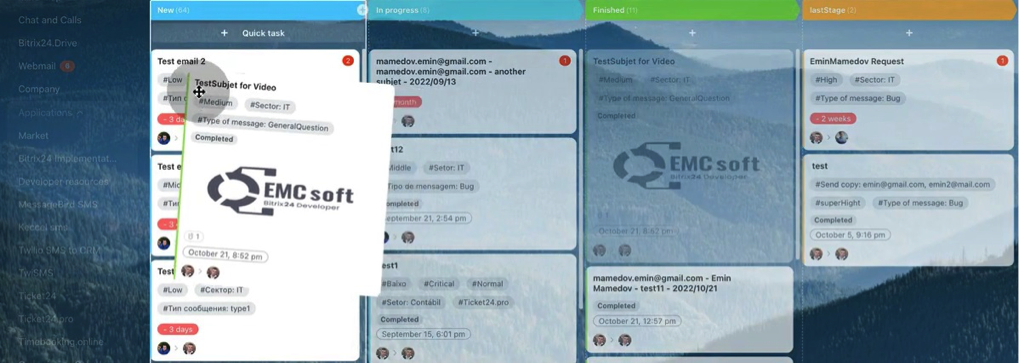
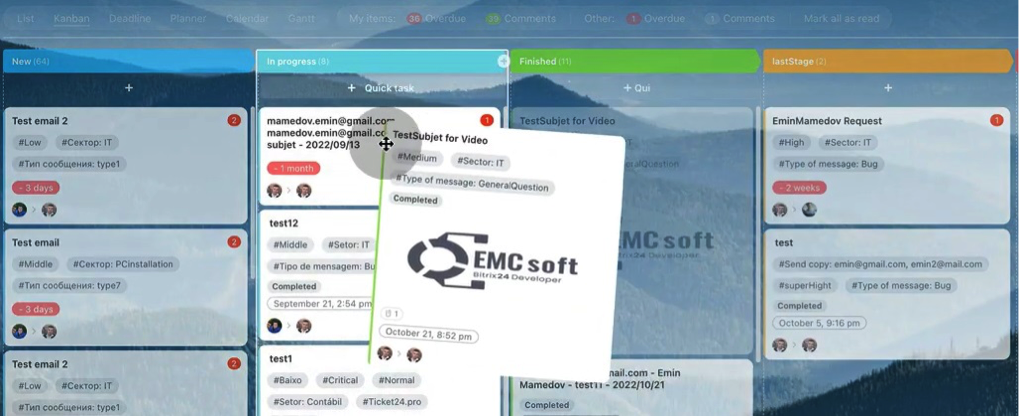
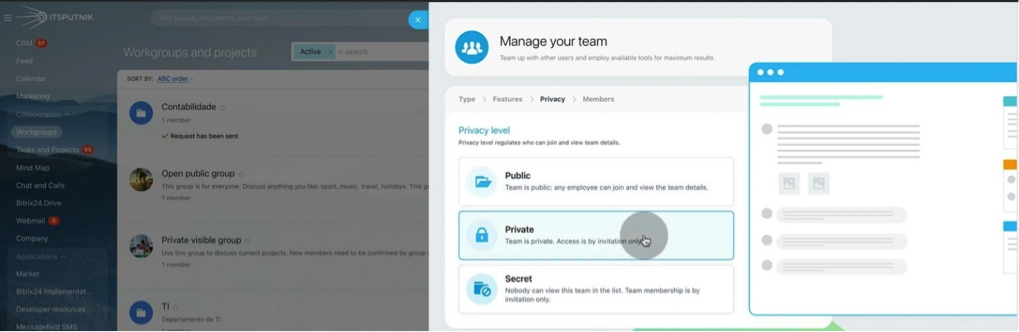
47. Coming back to workgroup, we see a Kanban view with stages. As you remember, any ticket can be moved between stages. In example below we moved ticket from New to Finished stage.
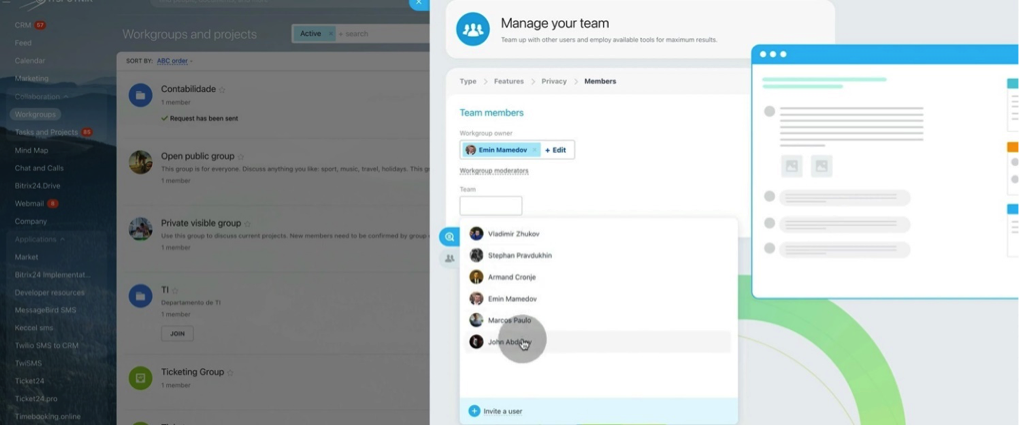
48. At the same moment our client will see that status of the ticket has changed. Also, it will be highlighted because he will receive automated message about ticket closure.
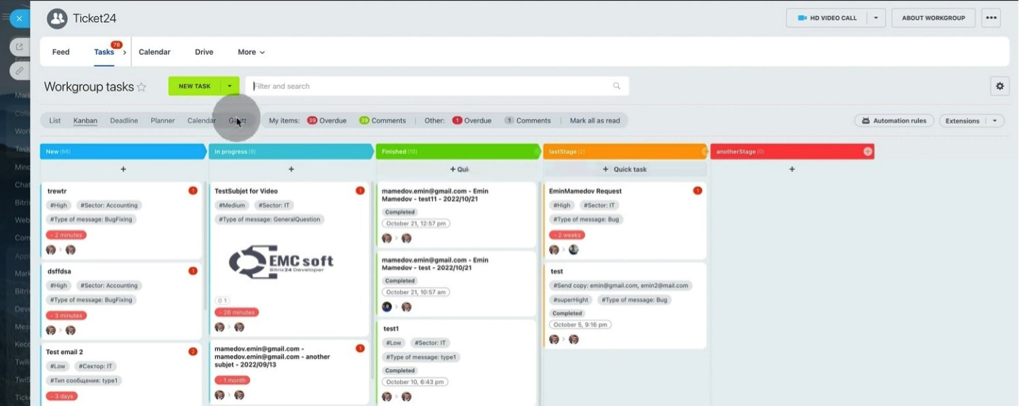
49. In Pro version clients are able to filter tickets by parameters. It is convenient when client have many tickets.

50. In example below he see that there are only one ticket with Medium priority.
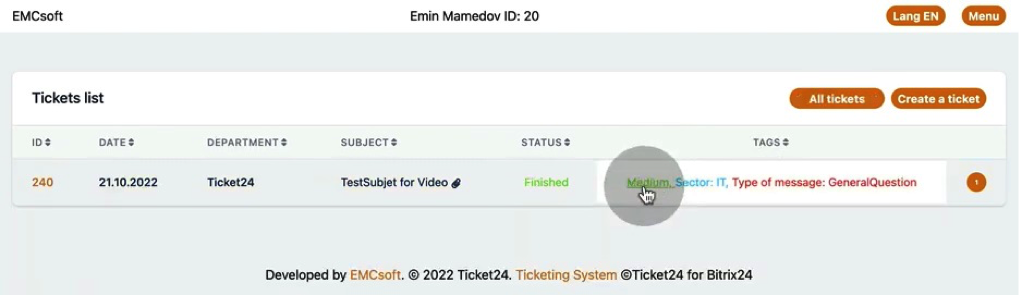
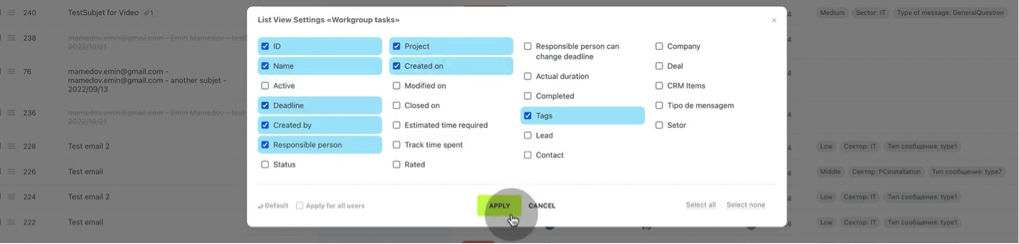
51. To see all tickets again, click All tickets button.
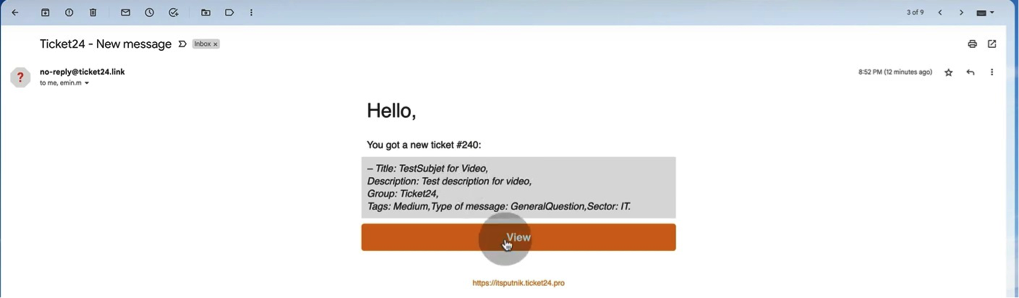
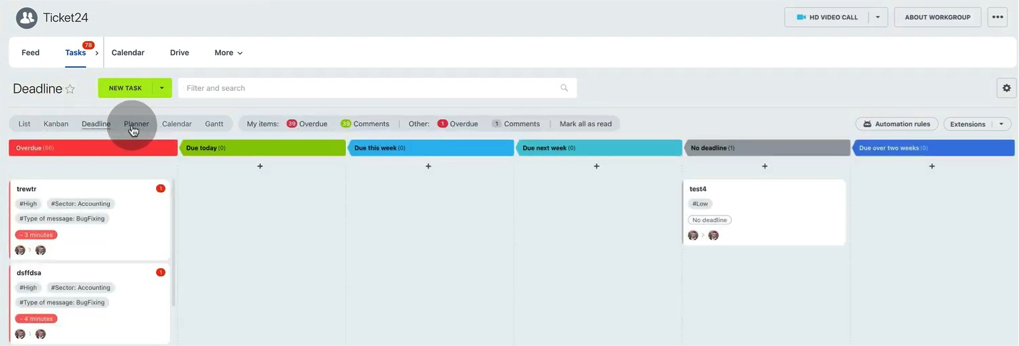
52. Let’s see email notification which our client will receive when ticket is created.
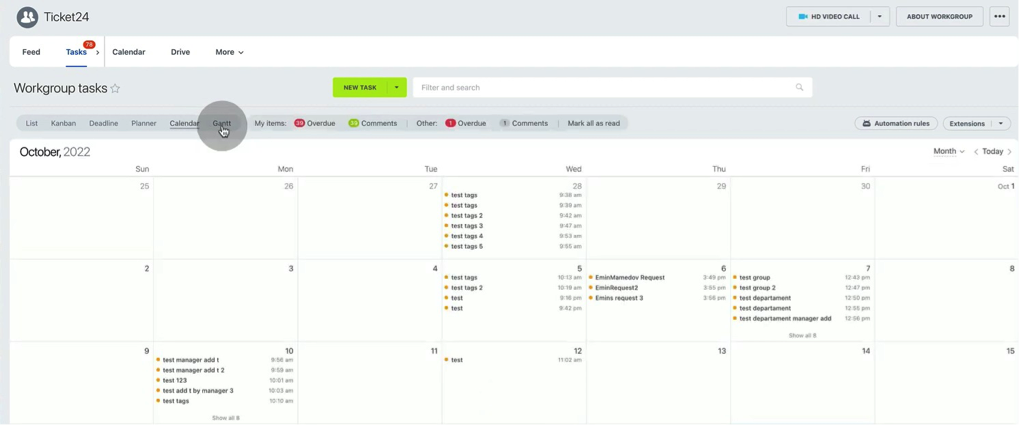
53. Similar email will come when stage is changed. In all emails there is a link to client’s account in Ticket24.pro system.
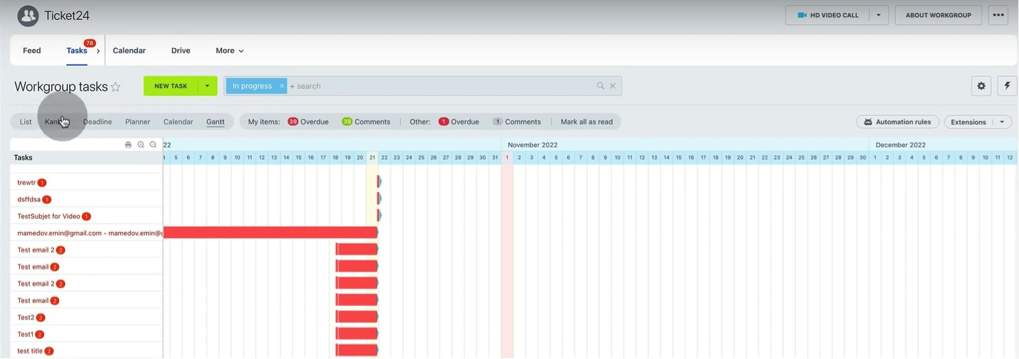
54. Coming back to workgroups, let’s see what happens if we change ticket’s stage backwards – from Finished to New.
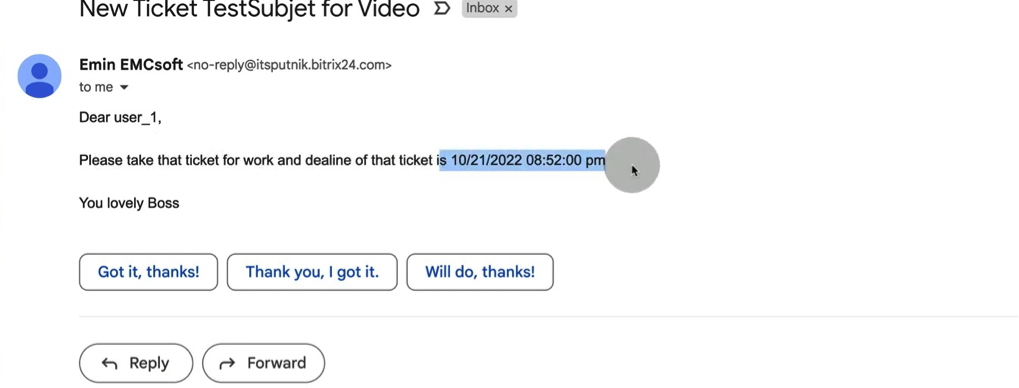
55. Responsible person will receive a notification email to take ticket for work with relevant deadline. We see that automation rule we created before is working.
56. If we change stage from Finished to In progress, we need to resume it.
57. To do so, click inside of the ticket and in More menu click Resume.
58. Our client will receive an automated message that ticket is resumed.
59. Also, our client will receive email notifications.

60. Let’s write a message to our client through ticket card in Bitrix.
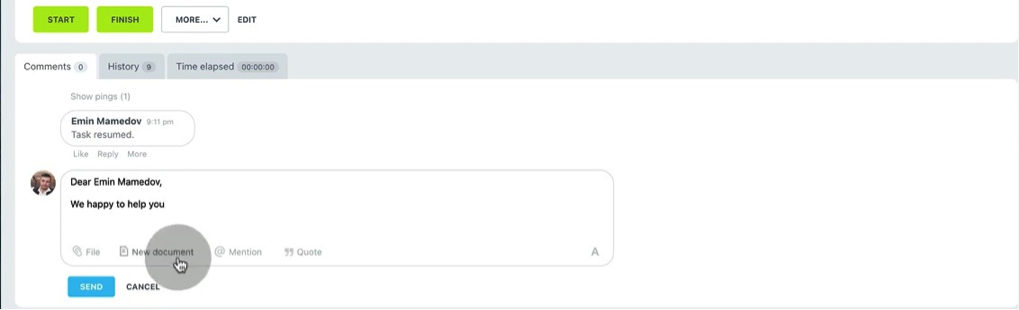
61. Client will see notification in his account.
62. This is how our message looks like in client’s account.
63. And how it looks in email notification.
64. If there is a need to restrict client’s access to the ticketing system, you are able to perform it through Contact card in Bitrix. Just untick “Access to Ticket24.pro” field.

65. Then client still can enter his account and view previous tickets, but he will not be able to send new tickets.
66. Moreover, you or your managers can raise a ticket instead of client. For such situations you have a Ticket24 menu right in the Contact card.
67. You will see ticket creation menu just the same as in the app.
68. Responsible persons will receive relevant email notifications.

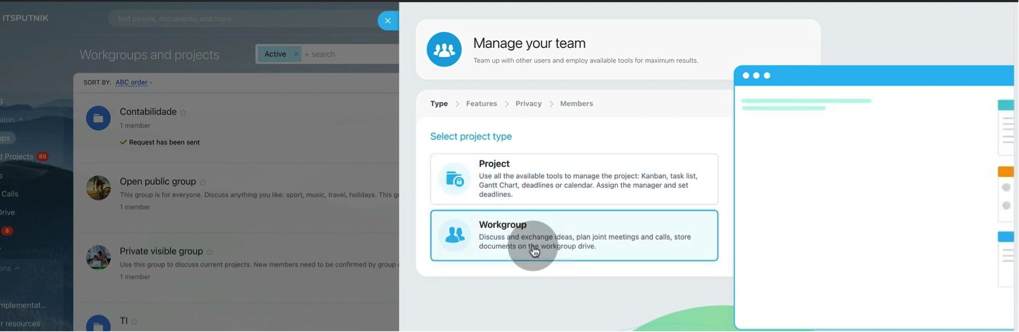
69. Let’s create a Workgroup for your tickets. To do so, go to Workgroup – Create.
70. Select Workgroup.
71. Put workgroup Name and be sure that you don’t have duplicating names. Then choose icon and also you can choose features such as Drive, Calendar, Chat and so on. In our case we have only Tasks ticked.
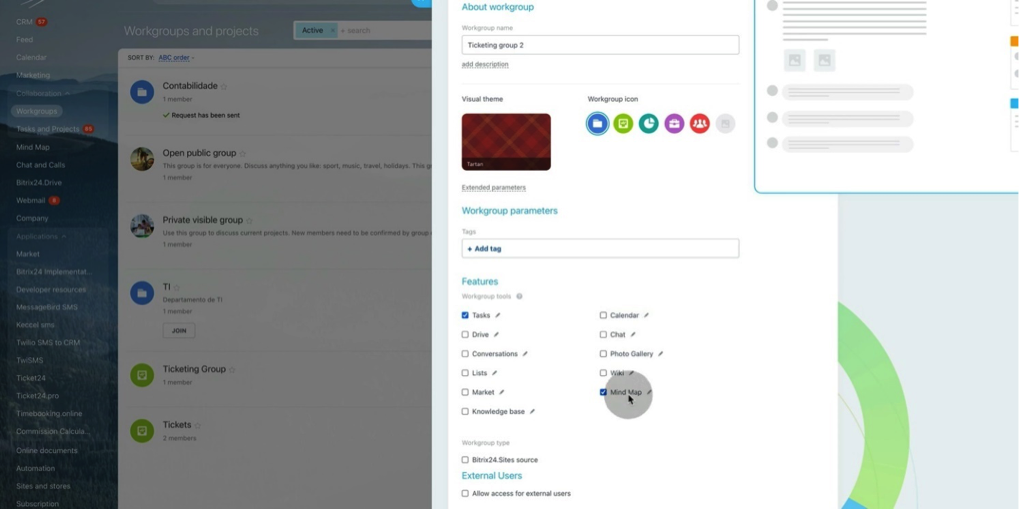
72. In privacy level choose Private.
73. Then you can add team members which will have an access to this workgroup.
74. Inside of a workgroup Tickets can be shown in Kanban view.
75. Also, you can view them as a list.
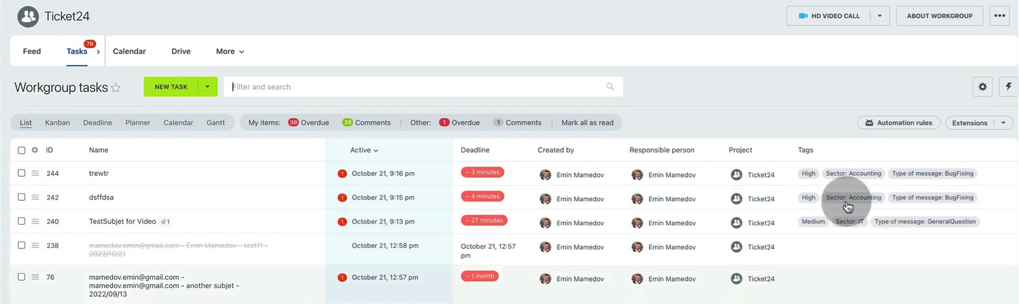
76. In View Settings you can choose various parameters by which you can sort and filter your tickets.
77. Deadline view will show tickets according to their due dates.
78. Also, tickets as tasks can be shown in calendar view.
79. And last, but not least is Gantt view where tasks are shown as a schedule with start and end dates.
That was a comprehensive and full overview of Bitrix24 ticketing system Ticket24.pro. As you can see, Pro version has an advanced functionality with detailed parameters comparing to our free app.
If you tried our free app and feel that you need more detailed analytics or you have a lot of tickets and want to filter them in personalized way, feel free to contact us. We are happy to answer your questions regarding Ticketing system and its integration to your CRM considering your business goals and requirements.
“You can also watch this video on Youtube.”