| 2269 Views | Amin

Just like every other human endeavor, a business front needs proper planning and organization to be efficient. As a business owner, when you fail to set up an effective schedule for your employees and processes, it tells on both your bottom line and your customers. In this post, we’ll show you unmistakable signs that you need to review your planning and employee schedule.
Your Employees are Working Zombies
Oftentimes, it can be so easy to miss the fine line between diligent work and frustration. When you fail to balance the scale between your employees’ personal and work lives, they begin to cross the line and lose motivation for work. Now, if your workspace schedule is flexible and does not factor in the welfare of your employees, it may well be a good time for a review.
It Has Been the Same for Years
Ideally, no workspace schedule should stay the same for more than a couple of years. For one thing, the times are constantly changing, and if your schedule isn’t following suit, you’ll end up overworking your employees or underutilizing their talents. You may have also changed your line of products or method of services, so your schedule must align with whatever changes your business experiences if it will be efficient.
Increased Absenteeism and Neglect
Have you found that your employees are absenting themselves from work more often than they used to? Or have you found that tasks assigned to individuals remain undone or incomplete? Then it is time to check your workspace schedule. There’d be something you’re missing there.
Your Employees Become Firefighters
When you, your management, or employees get to the point of always putting out unexpected fires or stopping unprecedented business disasters, then your schedule needs a reviewing or a major advancement.
Gross Overtime
Do not misunderstand this point: overtime at the workplace is not out of place. It can help your business save resources if properly planned. However, if your employees constantly stumble upon overtime notices only a few minutes to the end of their shifts, it shows that something is wrong with their schedule. This calls for a significant schedule change if your business productivity will not be negatively affected.
Customers Begin to Complain
Customer complaints happen to be the sign most employers wait to see before reviewing their work schedule. When the workplace schedule is unfavorable, employees – especially those who interact with customers – may consciously or unconsciously project how they feel into their work. These projections can present themselves as incompetence, poor customer service, and neglect.
Unfortunately, reviewing your schedule only when customers begin to lay complaints is simply administering medicine after a patient’s death. The customers who complain may leave your business with terrible feedback, and further, discourage others from patronizing your products or services.
So, always pay rapt attention to your business for signs of an inefficient schedule system.
But then, your schedule doesn’t have to be inefficient before you work on it. You can set it right from the very start of your business.
Most businesses fix their employee and process schedule using calendar systems like Google Calendar. Now, how about we show you how to integrate your calendar system with your Bitrix24 CRM for increased efficiency?
For one thing, this integration process is not outlined in the calendar system, and there are diverse unbelievable ways to accomplish it.
For one thing, this integration process is not outlined in the calendar system, and there are diverse unbelievable ways to accomplish it.
So, here you go. The illustrations below will give you a clue of how it works:
1. To integrate your Google workspace with Bitrix24, go to your Google Cloud Platform and login as an admin.
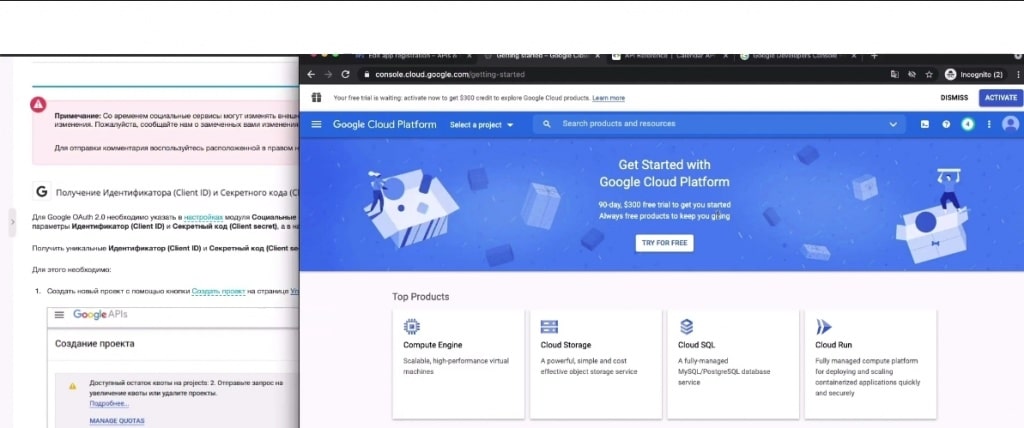
2. Navigate to ‘select a project’, and then ‘new project’ to create a new project.
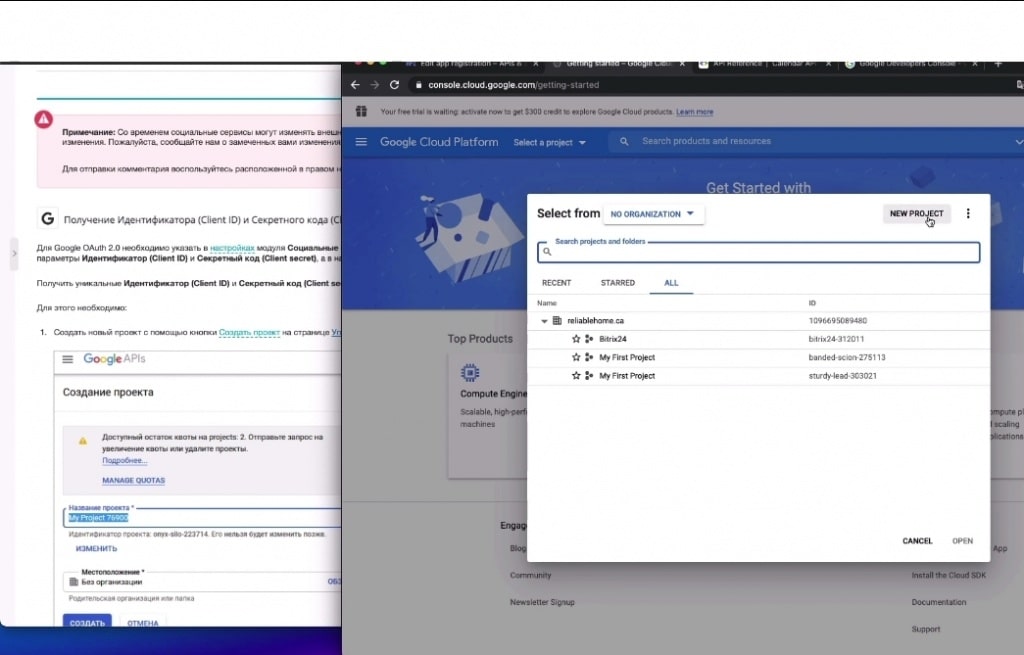
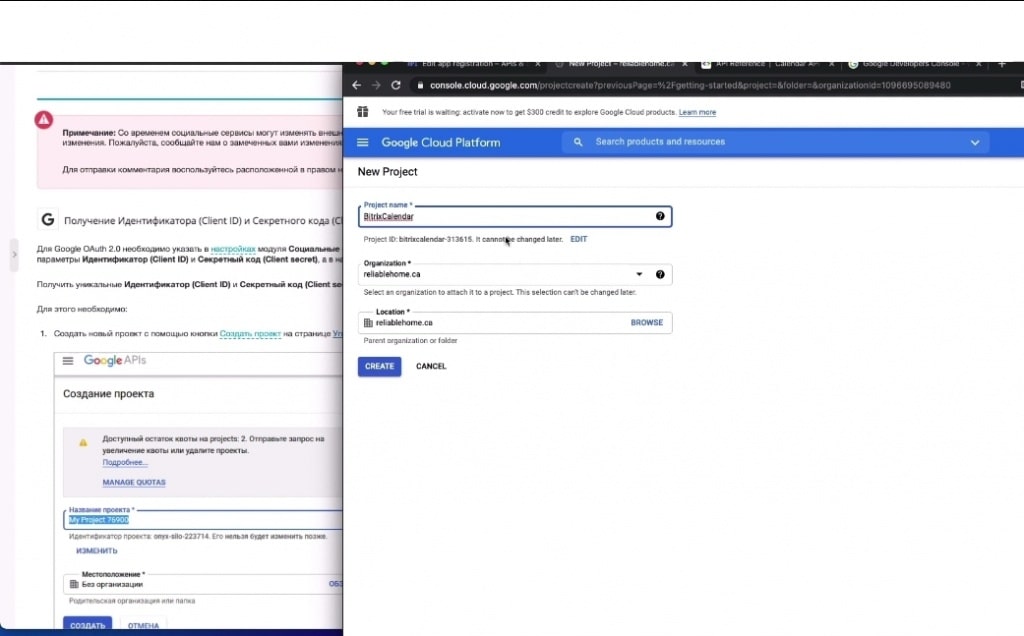
3. For this project, we name it ‘Bitrixcalendar’. You can name it whatever you want, and then create.
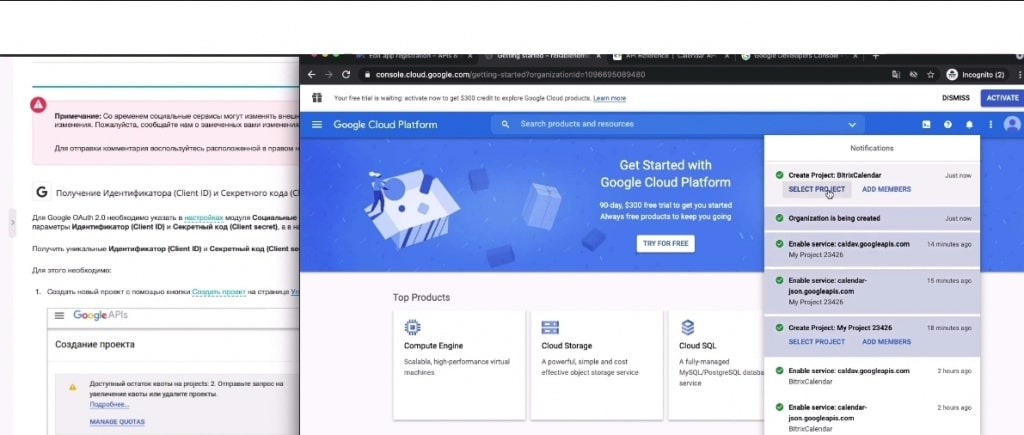
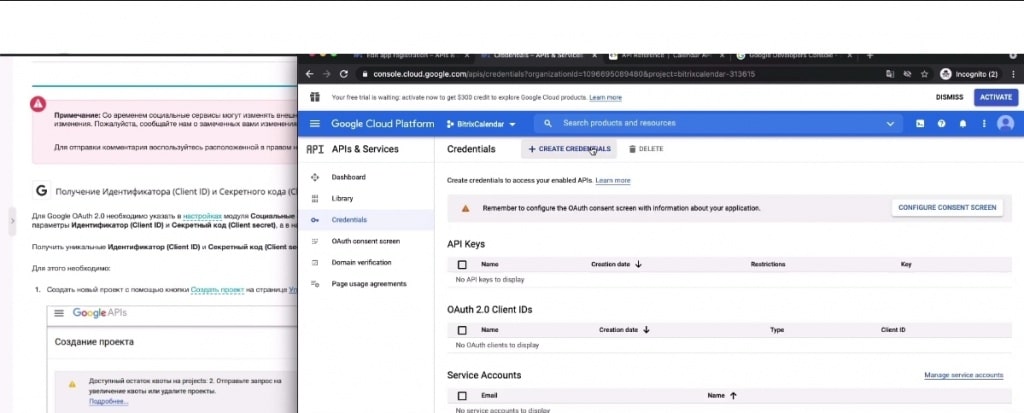
4. After creating the project, reopen it under the ‘select project’ menu, then click on API & Services from the left dropdown menu.
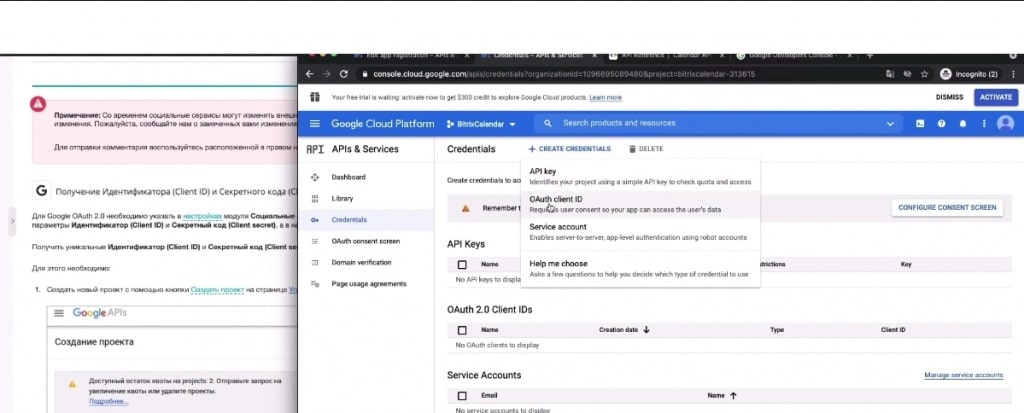
5. Under API and Services, select credentials and then create new credentials.
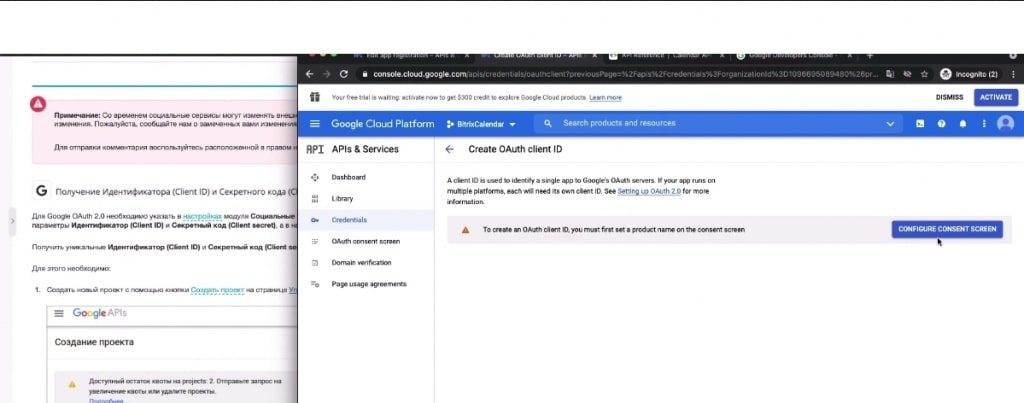
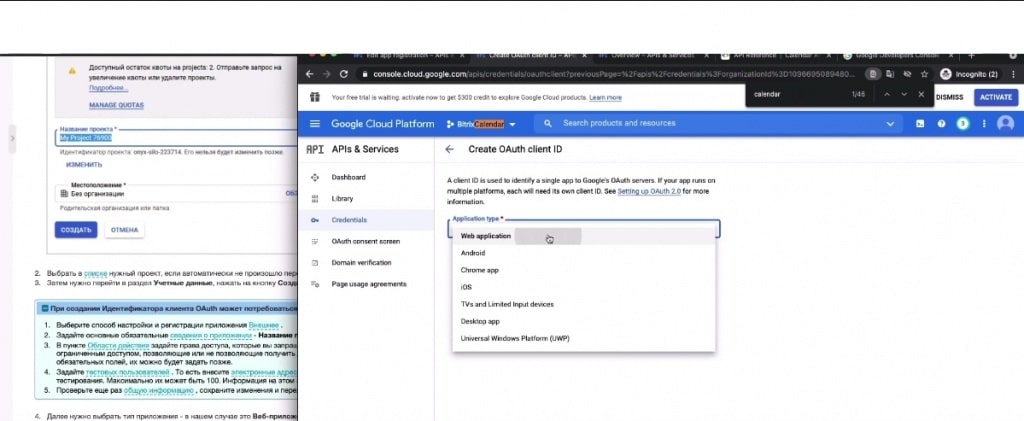
6. Under ‘create credentials’, select OAuth client ID.
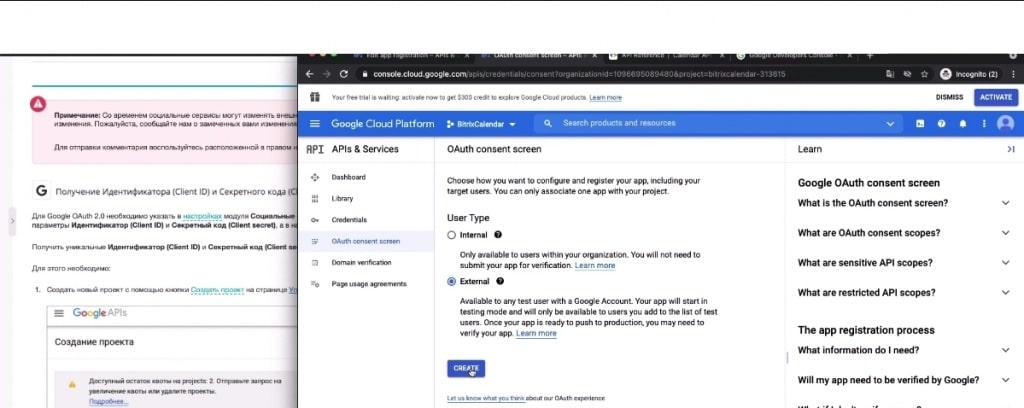
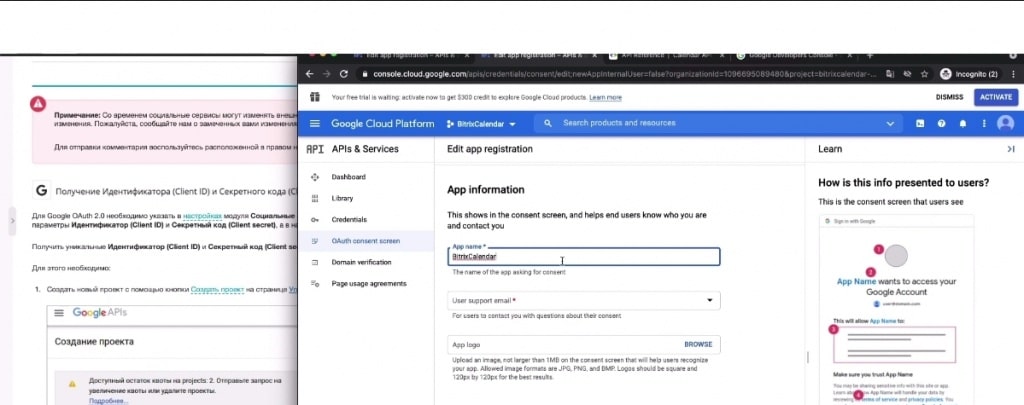
7. After selecting the ID type, click on ‘configure consent screen’.
8. Next, select ‘external’ under user type, and then ‘create’.
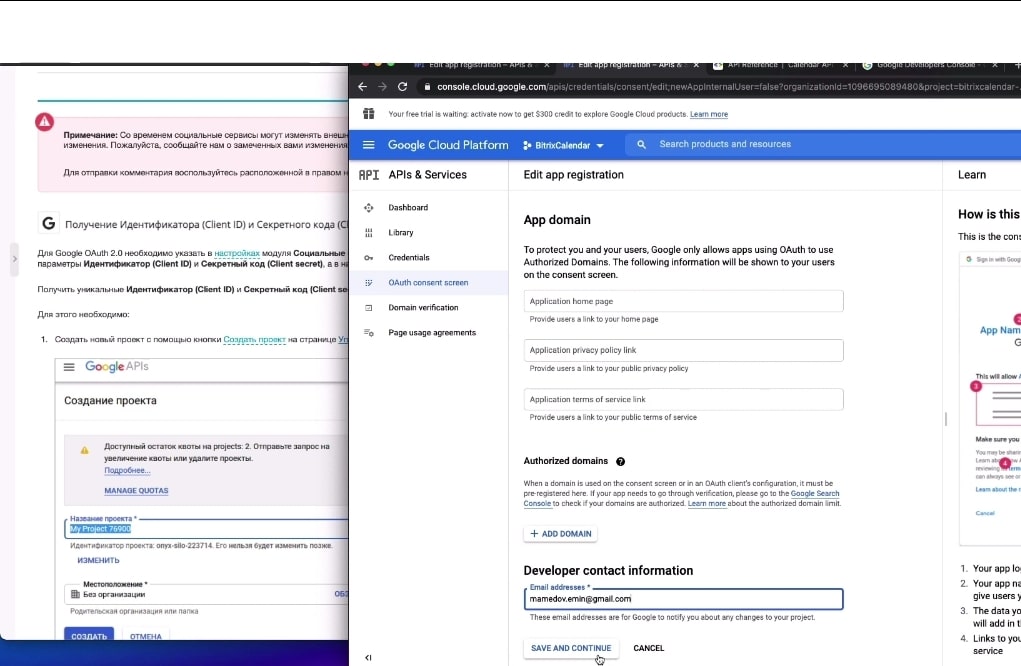
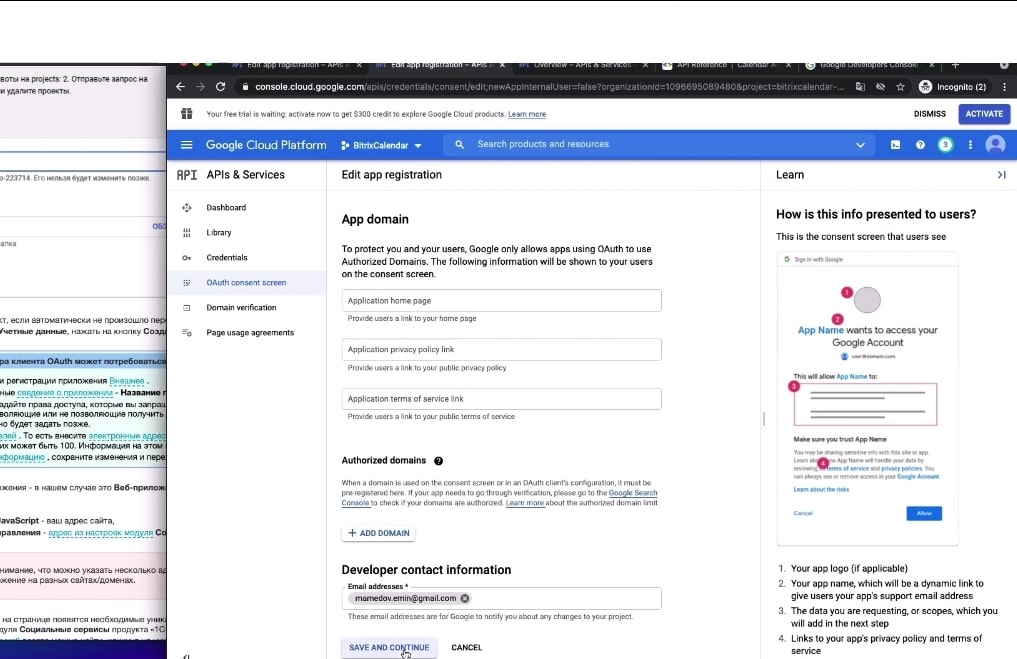
9. An app registration page comes up next. Input the app information and developer contact information, then save and continue.
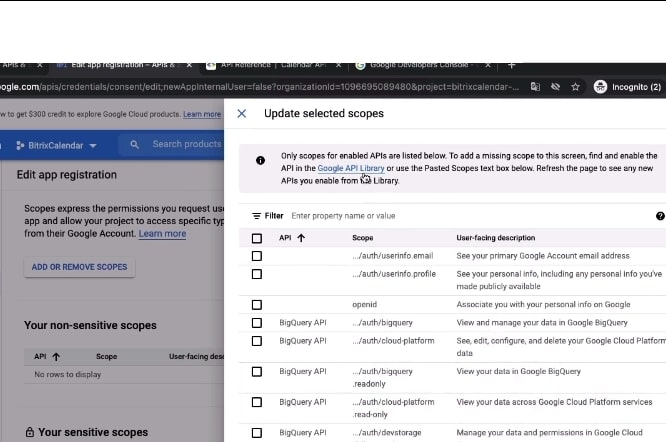
10. Very importantly, you need to ‘add or remove scopes’.
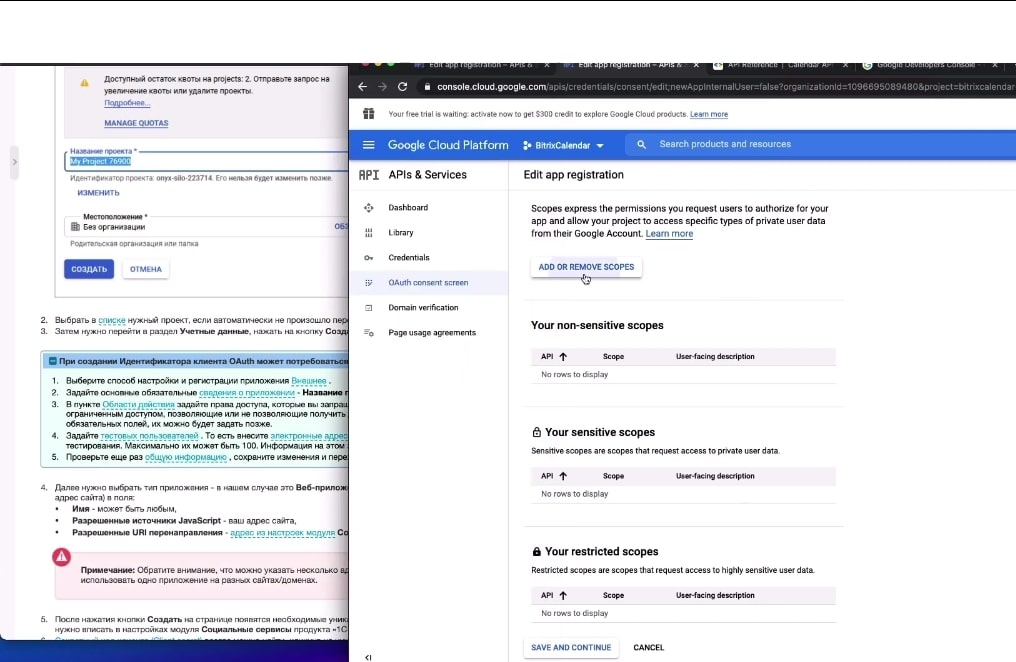
11. You’ll discover that there’s no scope you need for calendar integration in the menu that pops up by the right of the screen when you click in ‘add or remove scopes’.
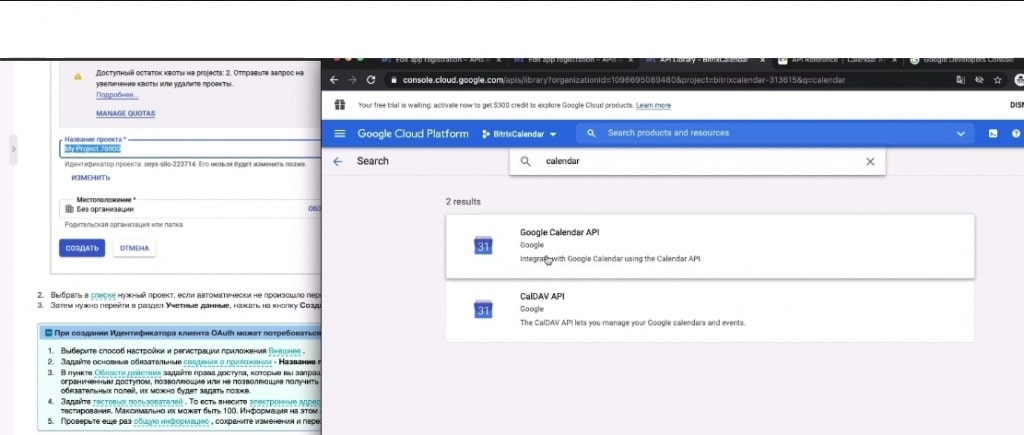
12. Therefore, click on Google API Library at the top of the page.
13. When the Google API Library loads, type and search for ‘calendar’. Click on ‘Google Calendar API’ when it appears.
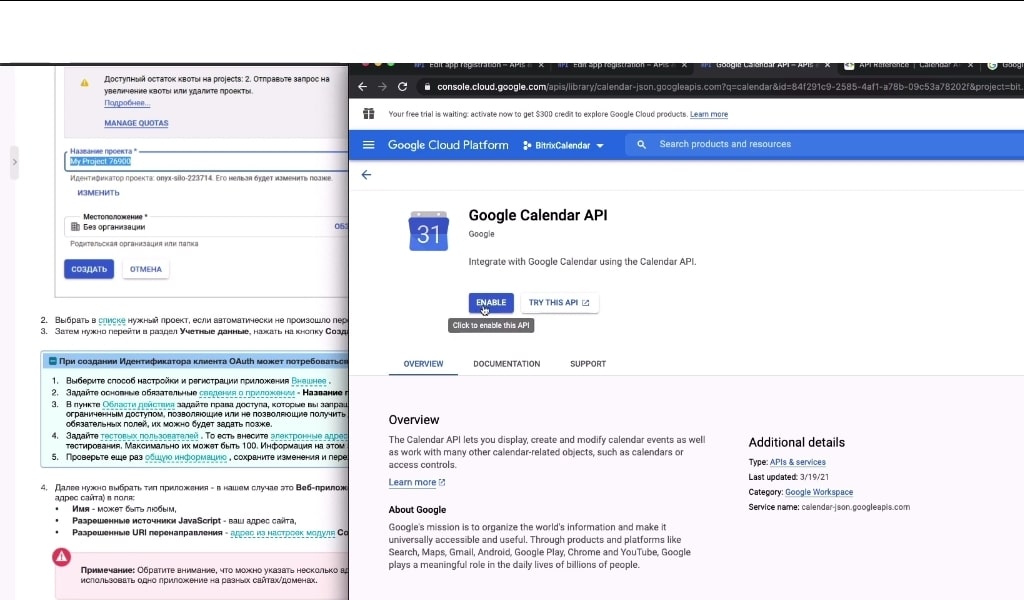
14. Next, enable Google Calendar API.
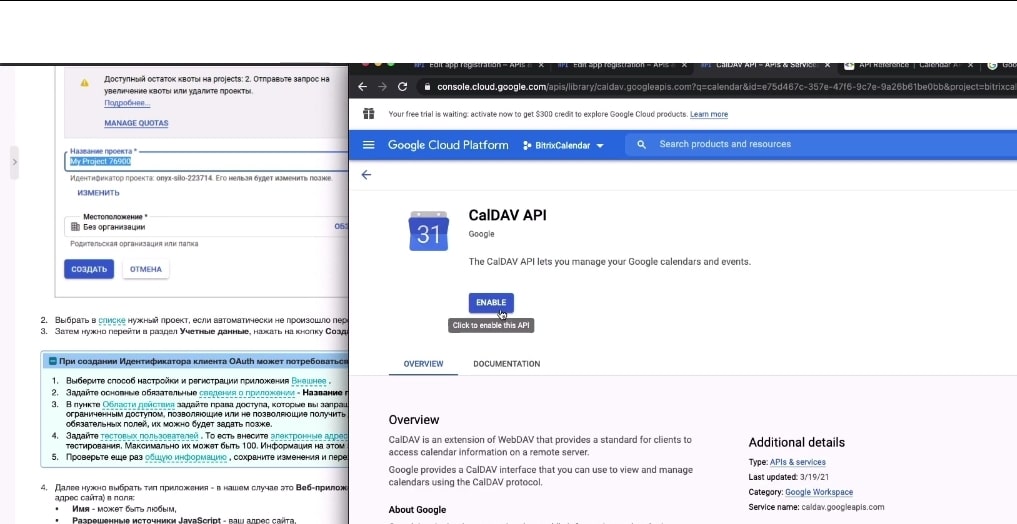
15. Also navigate back to CalDAV API, and enable it as well.
16. Afterwards, refresh the page, and then select ‘save and continue’.
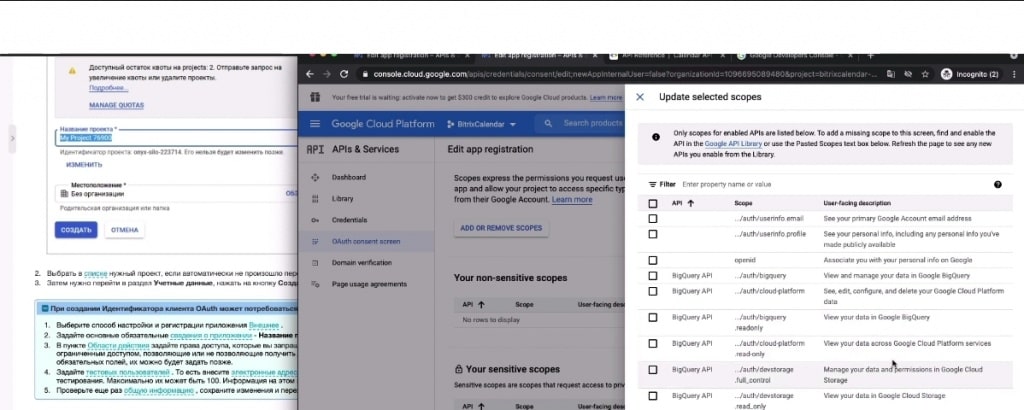
17. Select ‘add or remove scopes’ again, and then expand the scope to 100.
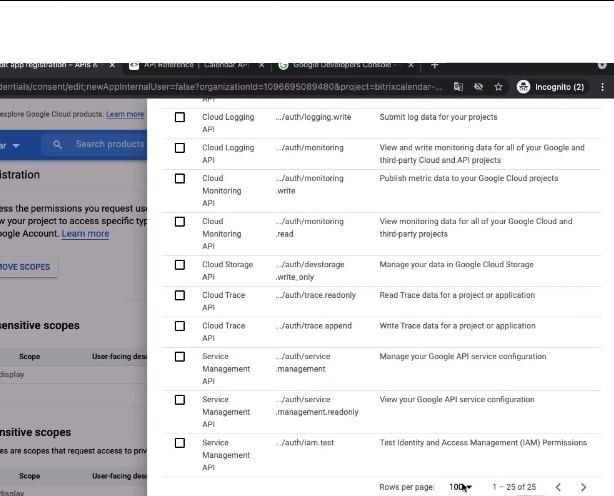
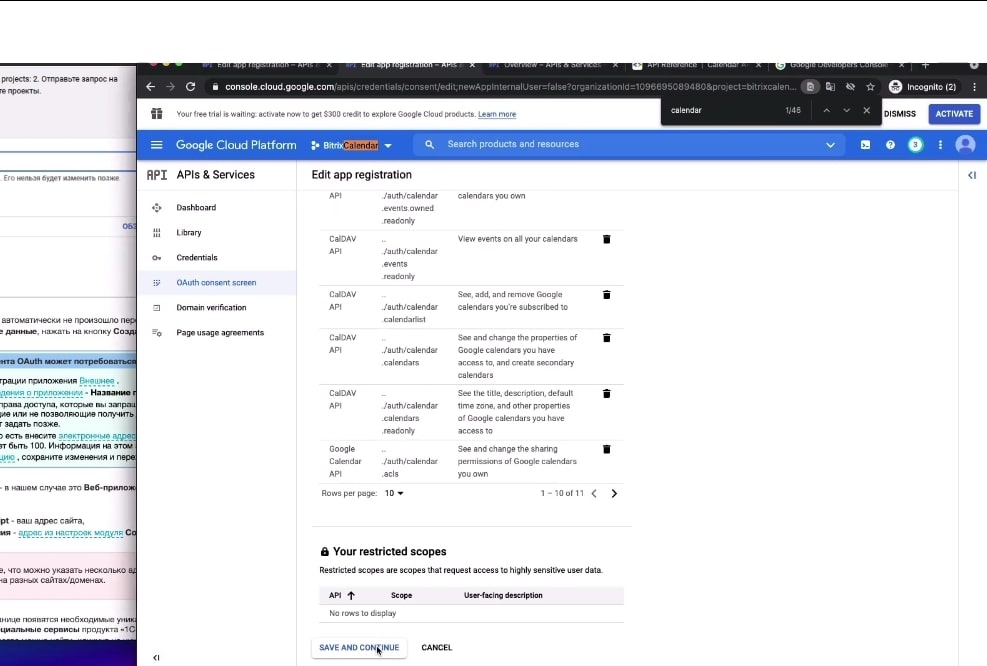
18. Under the scopes, search for ‘calendar’, select every scope that highlights calendar.
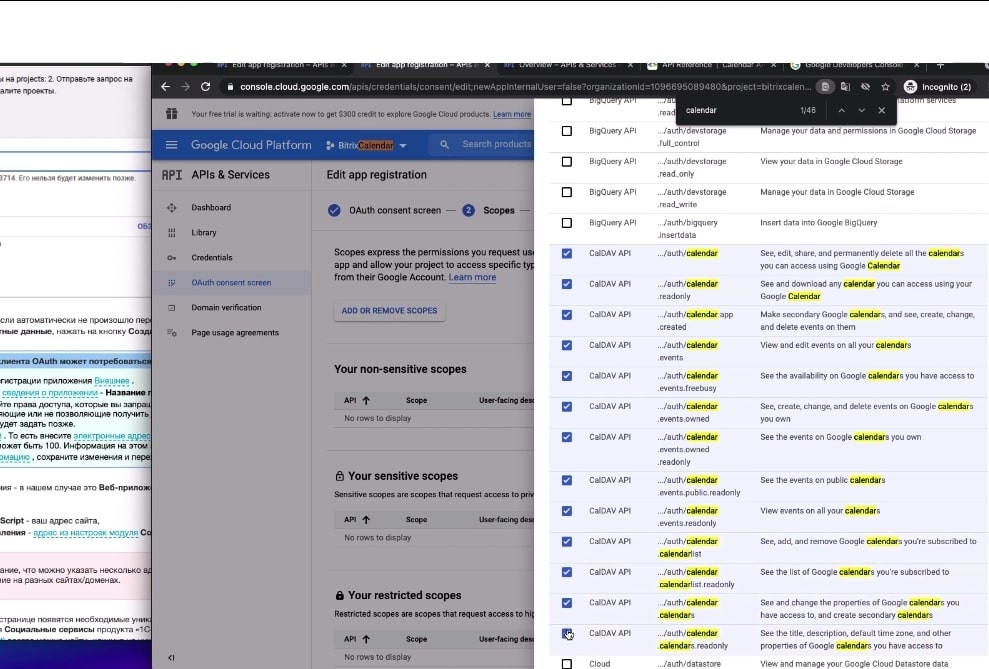
Click on ‘save and continue’, and then review the test information.
19. Return to credentials, and then OAuth Client ID.

20. Under OAuth client ID, select application type and then ‘web application’.
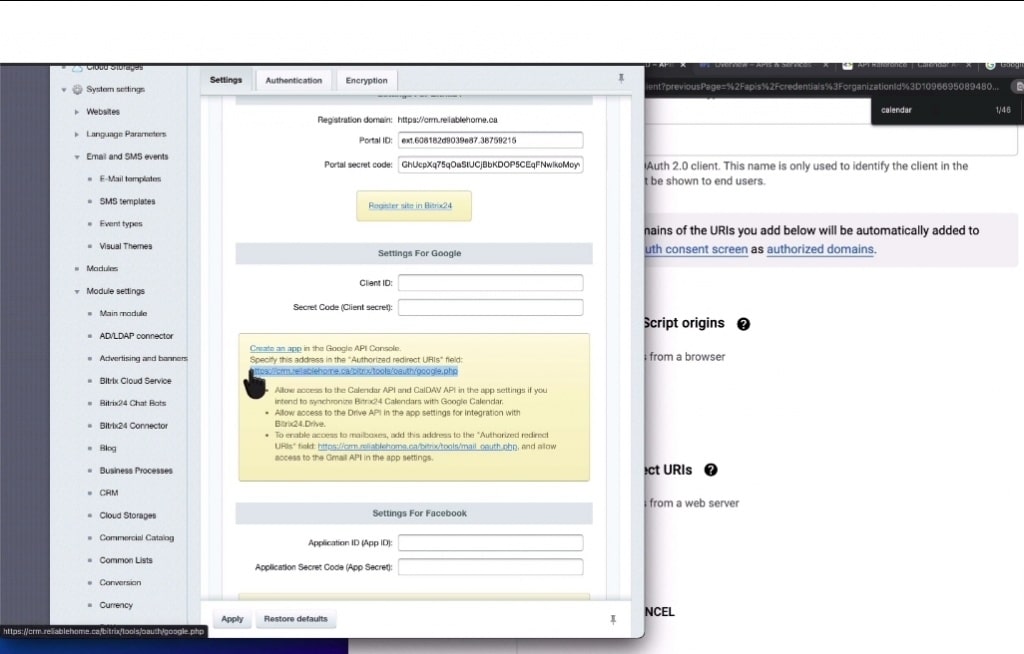
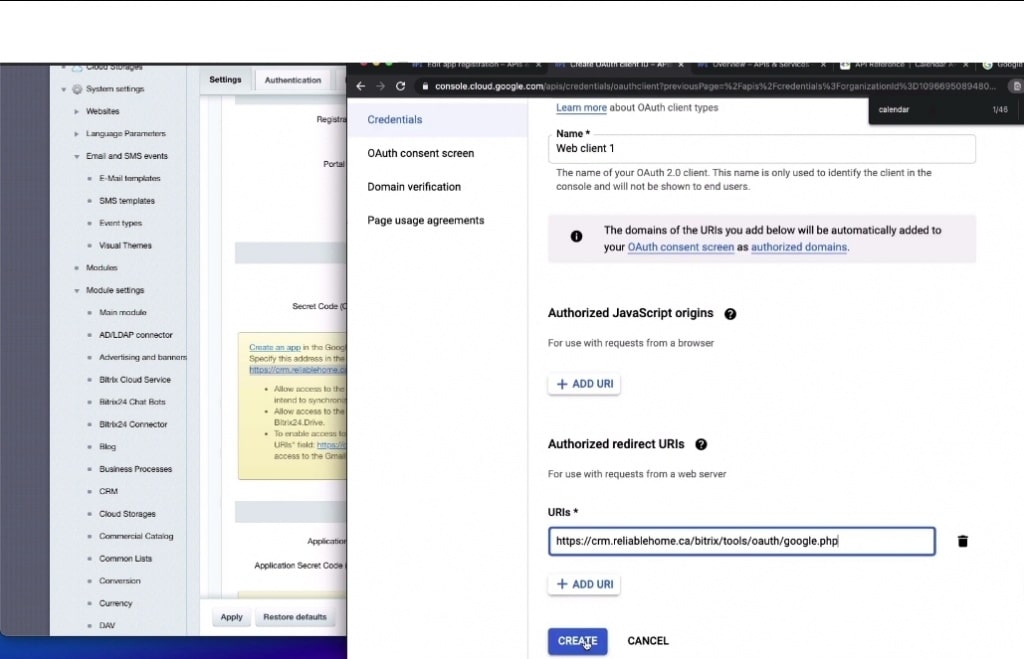
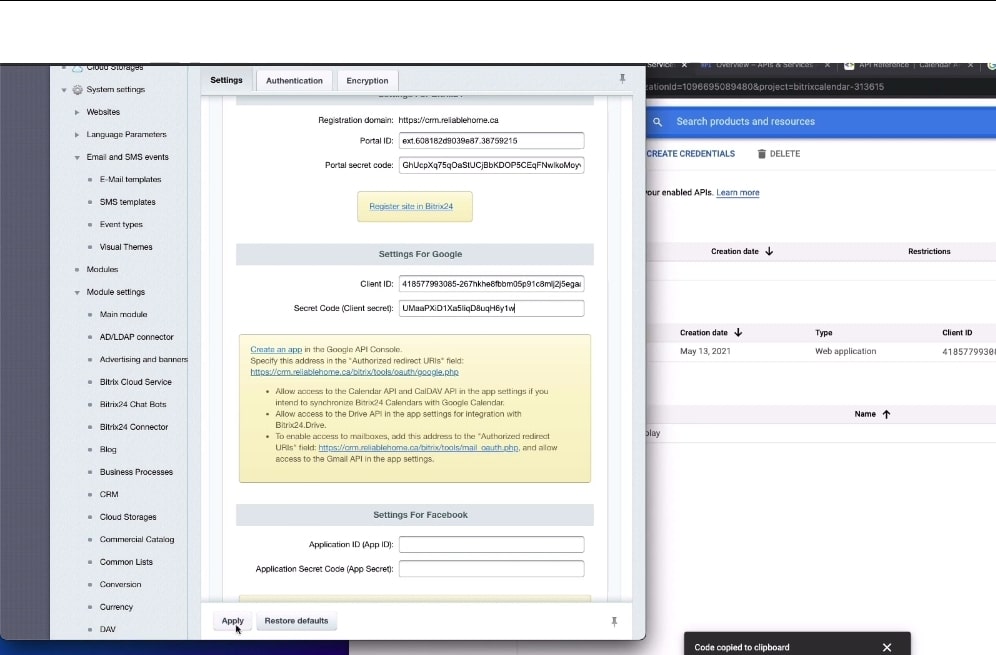
21. To add ‘Authorized redirect URLs’, navigate to your Bitrix24 settings page, select module settings, ‘social website integration’, and then ‘Settings for Google’.

22. Copy the link in the ‘settings for Google’. Paste it in the box for authorized redirect URLs in your Google cloud platform, and then click on ‘create’.
23. A pop up showing that OAuth client has been created comes up. Copy the client ID and client secret in the box, and save them somewhere.
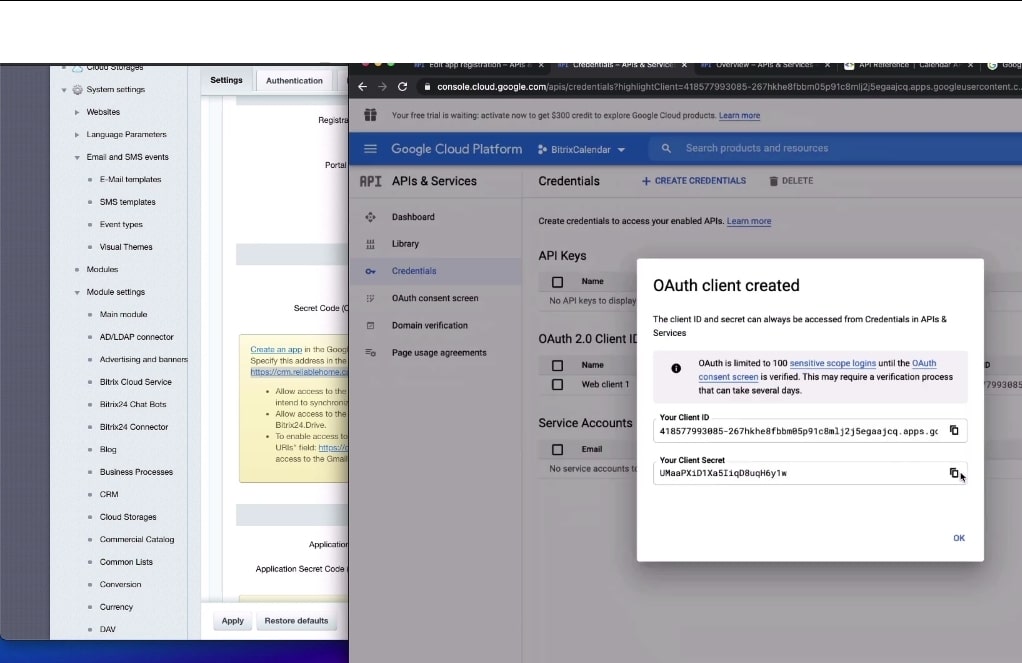
24. Now go back to the ‘Settings for Google’ page on Bitrix24. Paste the client ID and client secret in their respective slots, and apply.
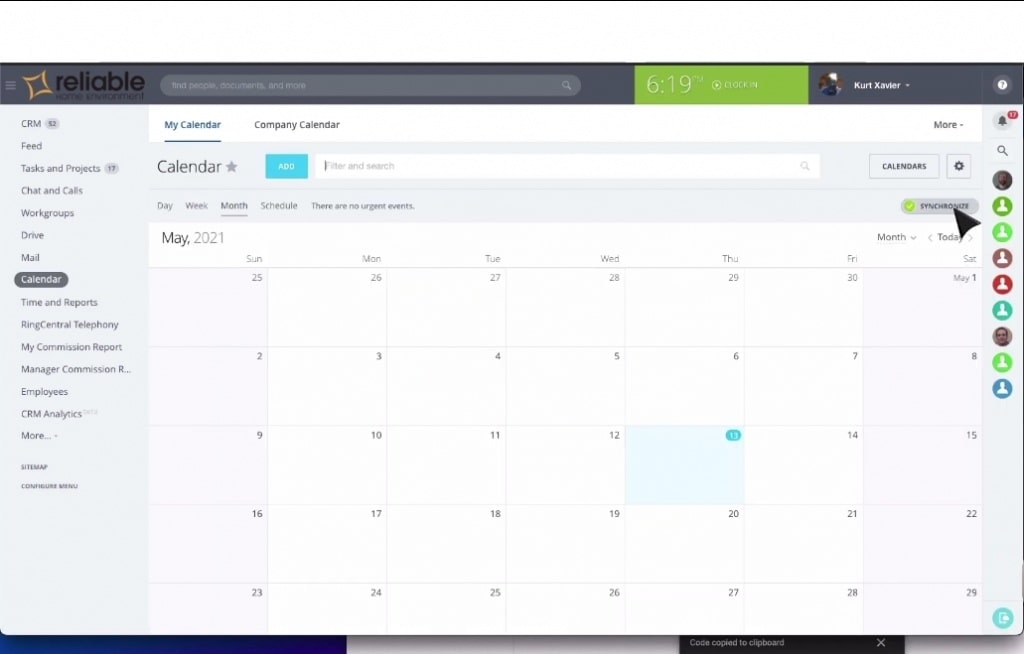
25. To test the integration, go to a user’s calendar on Bitrix24. Click on ‘Synchronize’ and then select Google Calendar and connect.
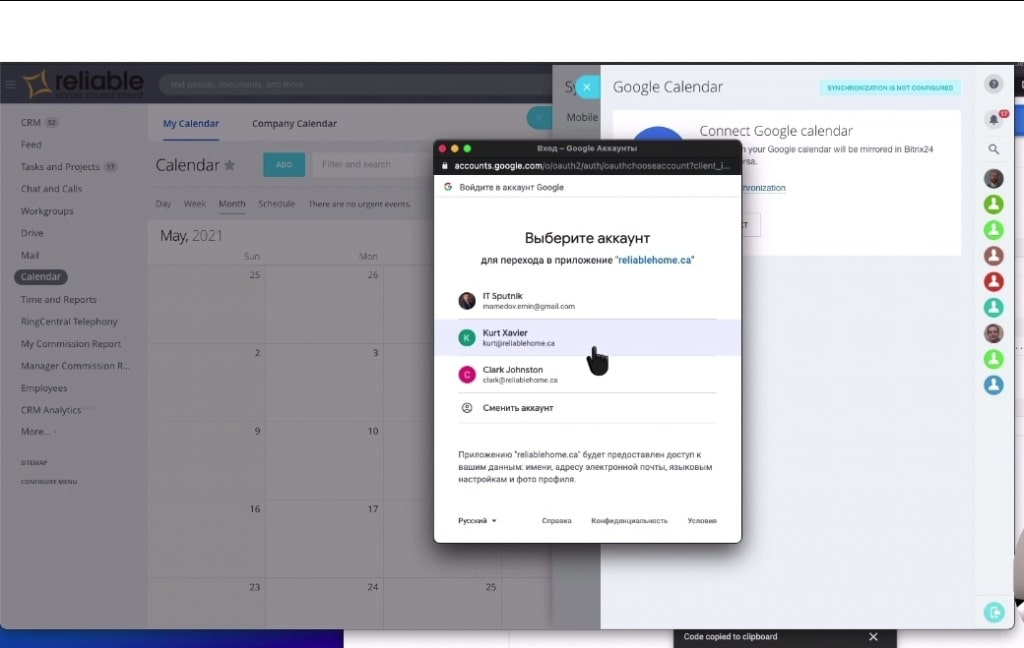
26. When you click on ‘connect’, you will need to select the login details of the user on Google Workspace.
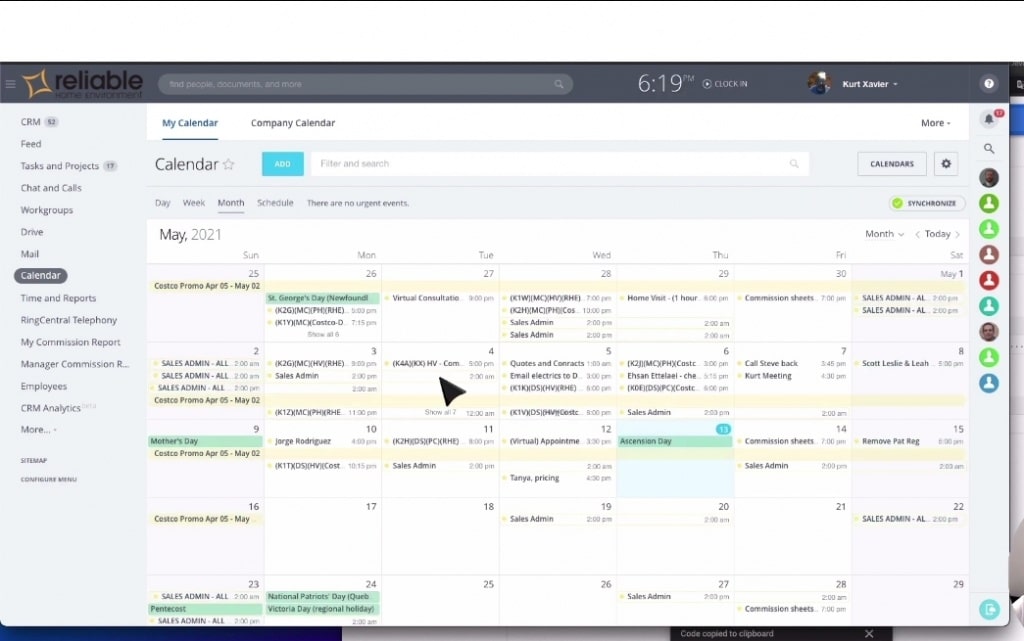
27. As soon as you login, the items on the user’s Google calendar automatically displays in Bitrix24.
If there’s any other customization or integration you’d have us do for your business, contact us today! We are only a few clicks away.
You can also watch the video below!