| 2358 Views | admin

Integrating Bitrix24 CRM forms directly with Google Analytics 4 (GA4) enables you to monitor essential user interactions like form views, field inputs, and submission events in real time—all without needing any third-party tools. GA4 offers a modern, event-driven approach to tracking, making it easier to collect behavioral data from your forms. With Bitrix24’s built-in support for GA4, connecting your form is as simple as pasting your Measurement ID into the analytics settings, eliminating the need for manual code changes.
Once the GA4 web data stream is configured, you can track key interactions such as form_start, page_view, scroll, and user_engagement directly in your GA4 dashboard. This is particularly useful for businesses that want lightweight, straightforward integration and real-time visibility into user behavior without the complexity of Google Tag Manager. While customization is limited in direct GA4 integration, it’s ideal for quick deployment and standard event tracking across your CRM forms.
If you’re looking for more flexibility and advanced tracking capabilities, integrating Bitrix24 CRM forms with Google Tag Manager (GTM) is the recommended approach. GTM acts as a centralized container for managing all your tracking codes and events, allowing you to configure triggers, define variables, and push custom events to Google Analytics 4 (GA4)—all without modifying your site’s code. You can connect GTM to Bitrix24 by inserting the Container ID in the form settings and use the Tag Assistant to preview, debug, and verify your setup.
By using GTM, you’re not limited to default events. You can create highly customized event tags—for instance, tracking when a user interacts with a specific form field, scrolls a certain distance, uploads a file, or reaches a thank-you page. This method is especially valuable for marketers and analysts who want precise control over the data they send to GA4, better segmentation, and cleaner analytics dashboards. Though it requires more setup, GTM empowers you with scalable and efficient event tracking for CRM forms and beyond.
“More Detailed Instructions are given below”
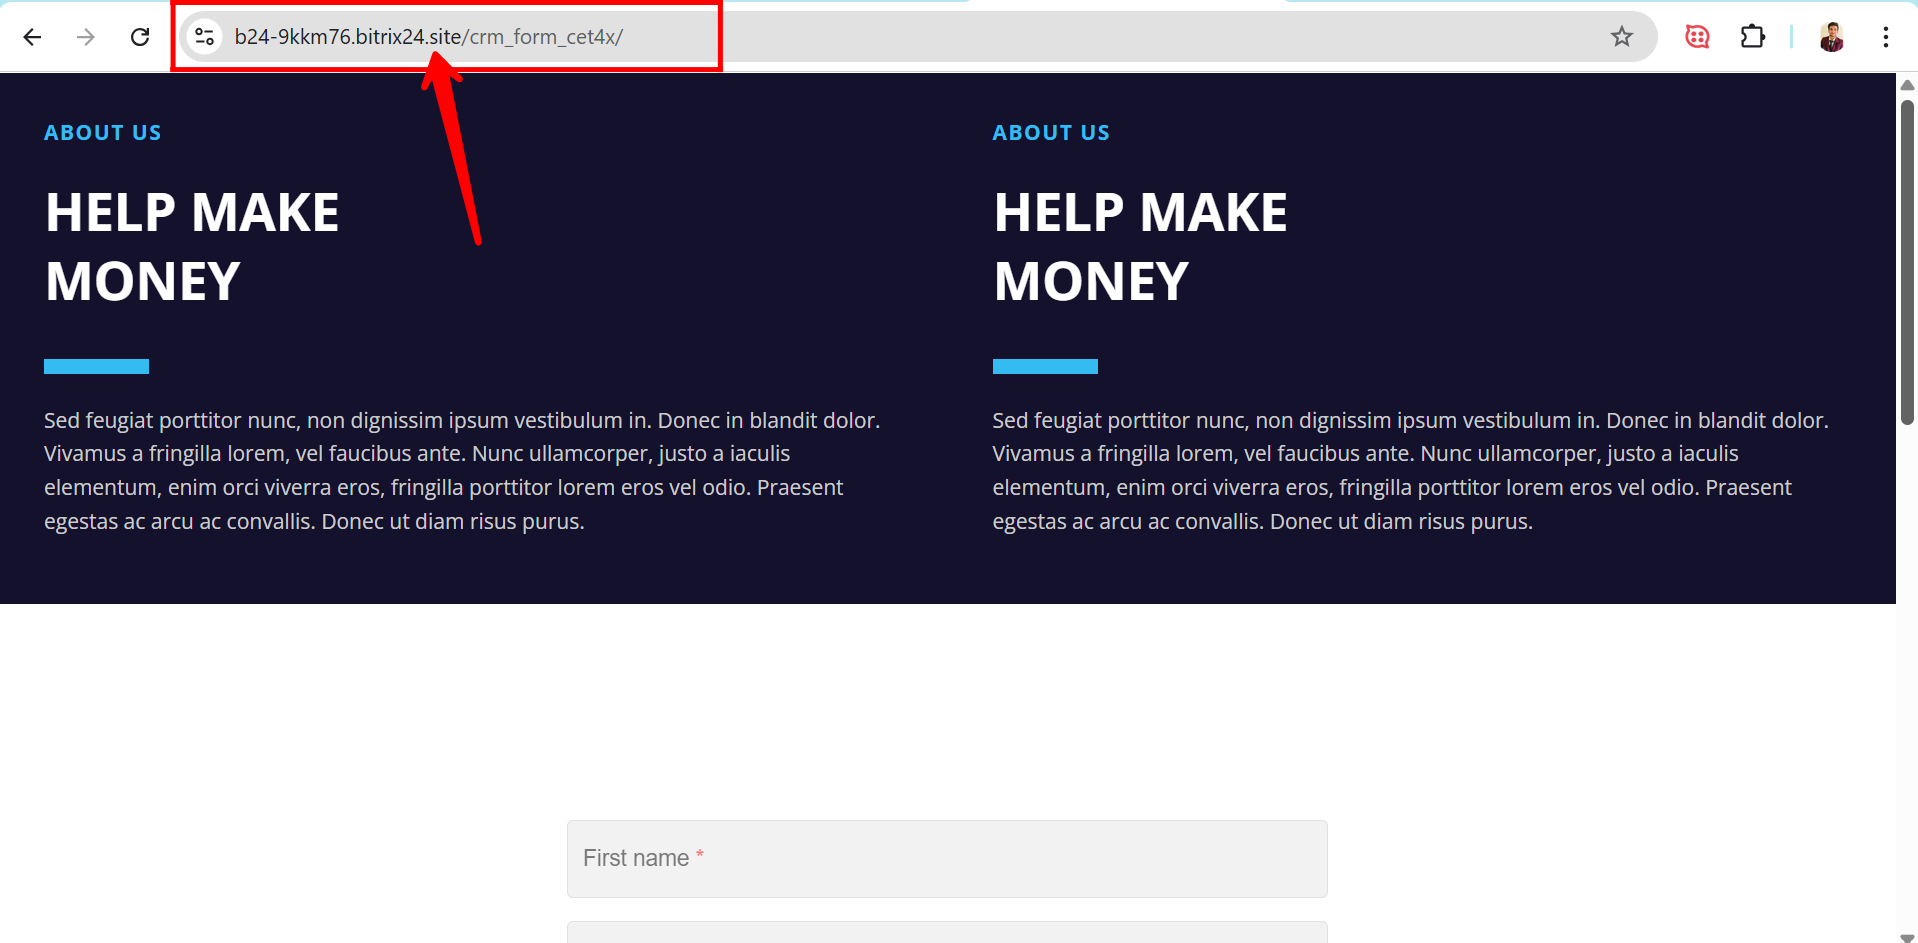
1. Here is the Bitrix24 CRM test form using a Bitrix24 domain. We will now go through the process of connecting CRM forms with Google Analytics 4 (GA4) and Google Tag Manager (GTM). Since the form creation itself is straightforward, we’ll skip that part and proceed directly to the steps for integrating it with GA4 and GTM.
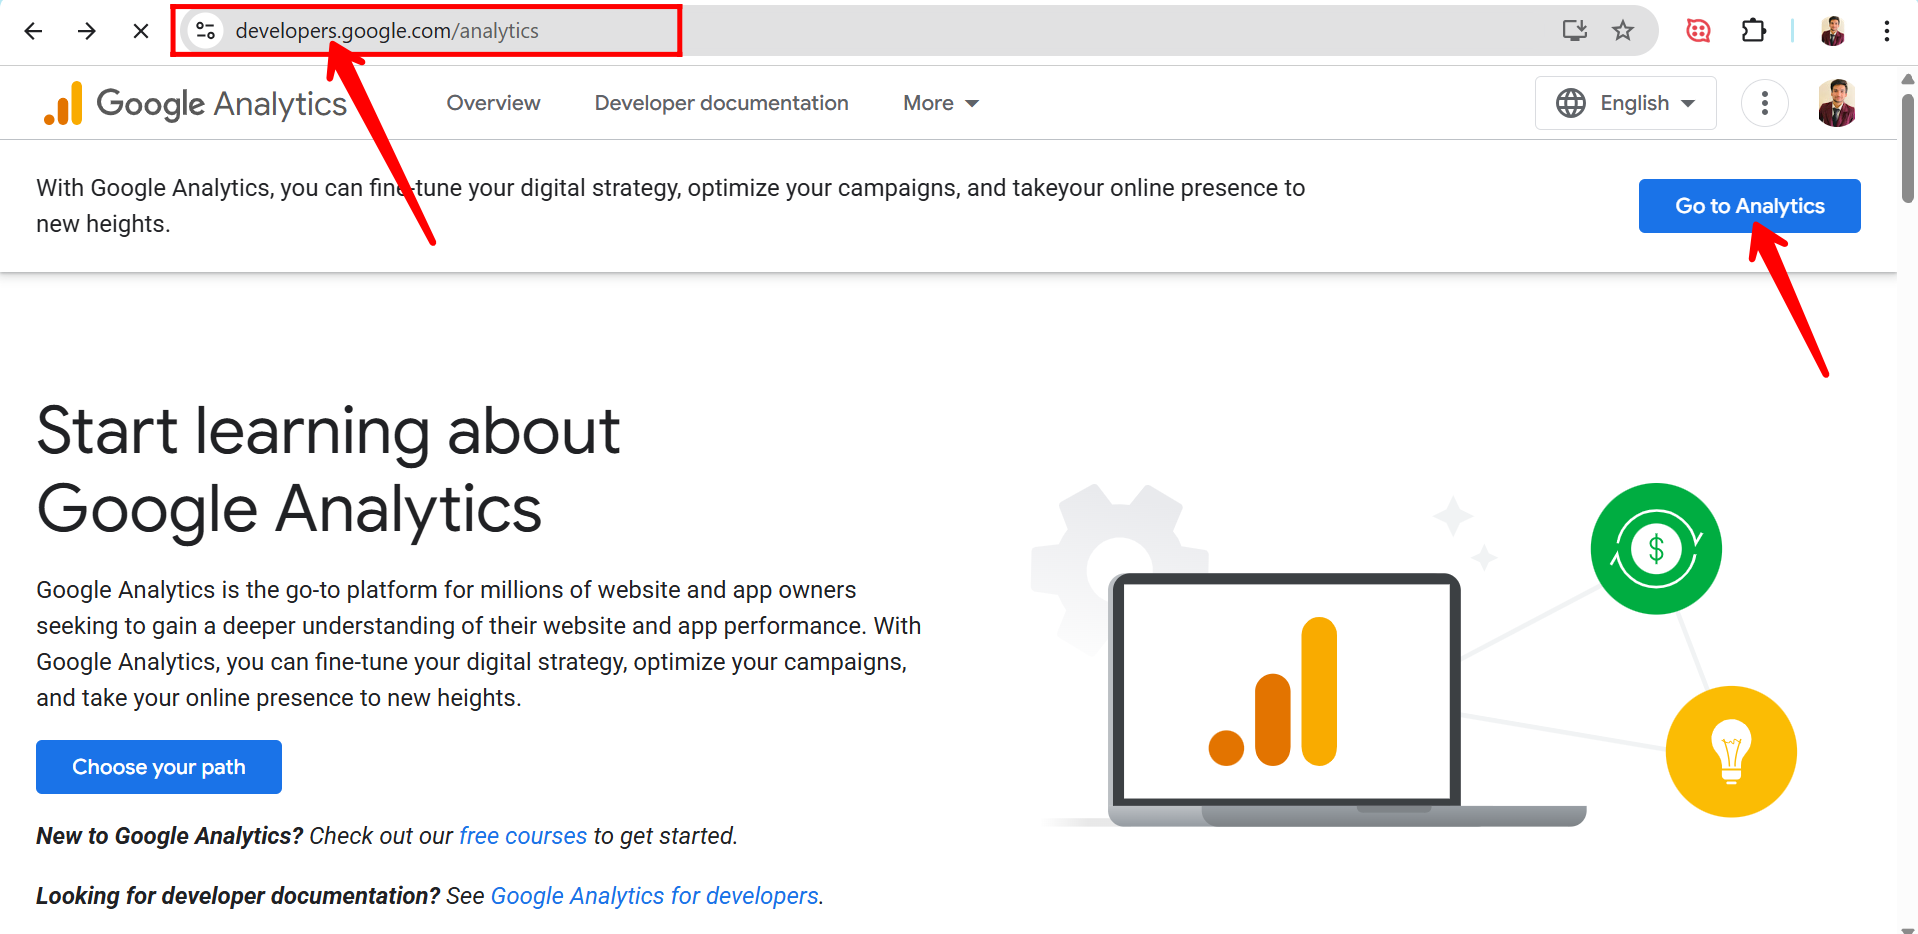
2. Visit developers.google.com/analytics, then click on “Go to Analytics” to begin setting up your Google Analytics 4 (GA4) account.
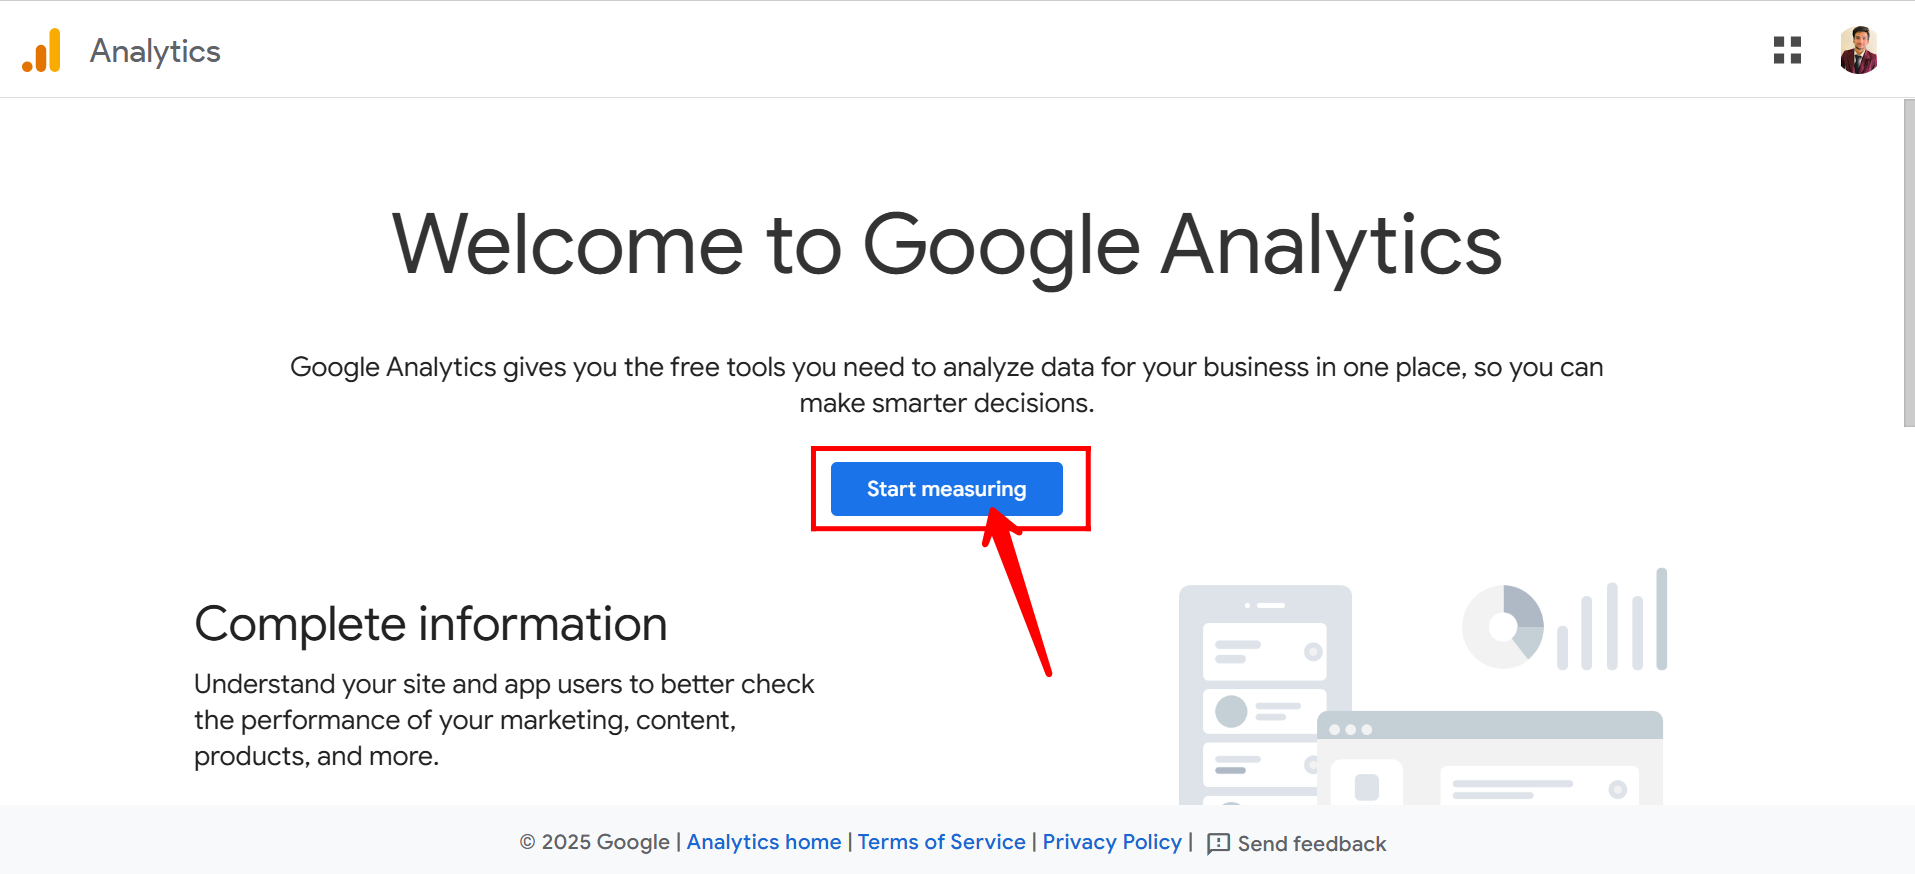
3. Next, click on “Start measuring” to begin creating your Google Analytics 4 account.
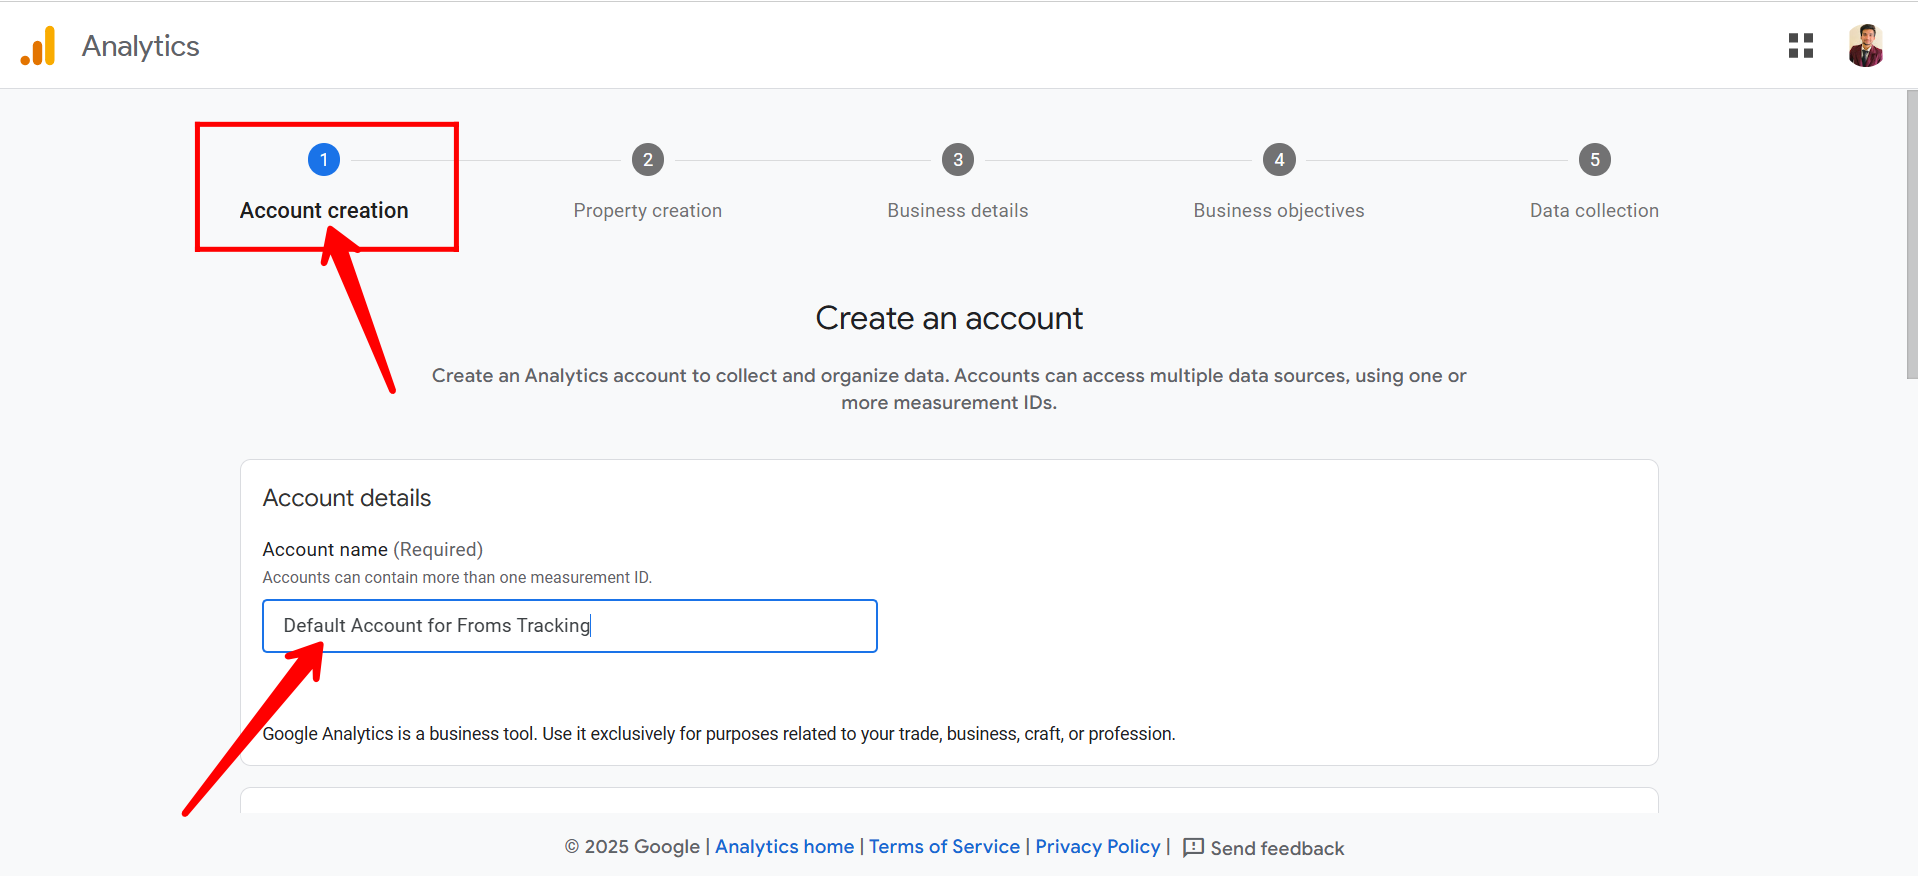
4. In the “Account Creation” step, enter your Account Name in the designated field. This name can represent your business or organization and will be used to manage your GA4 properties.
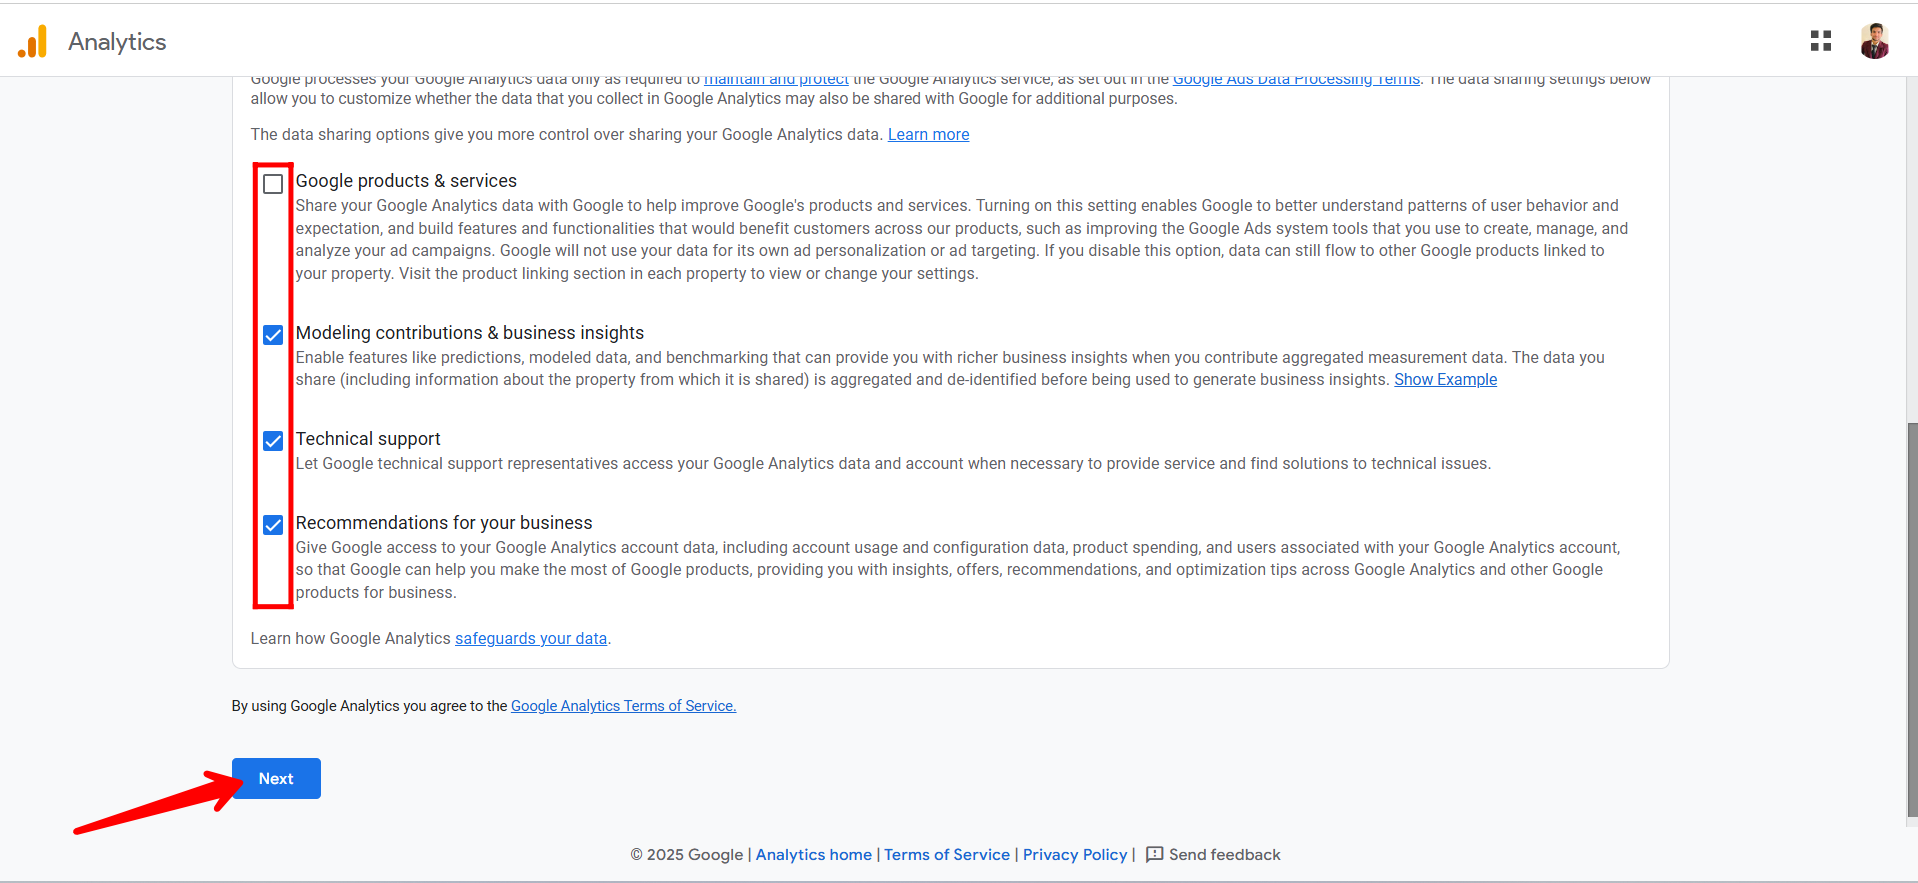
5. Check the boxes for Google Services and Products, Modeling Contributions, Technical Support, and Recommendations for your business as per your requirements, then click “Next” to proceed to the next step.
6. In the Property Creation step, enter your Property Name—this typically represents the specific website, app, or digital asset you want to track with GA4. Then, select your Time Zone and Currency, which will determine how your data is displayed in reports. Once completed, click “Next” to continue.

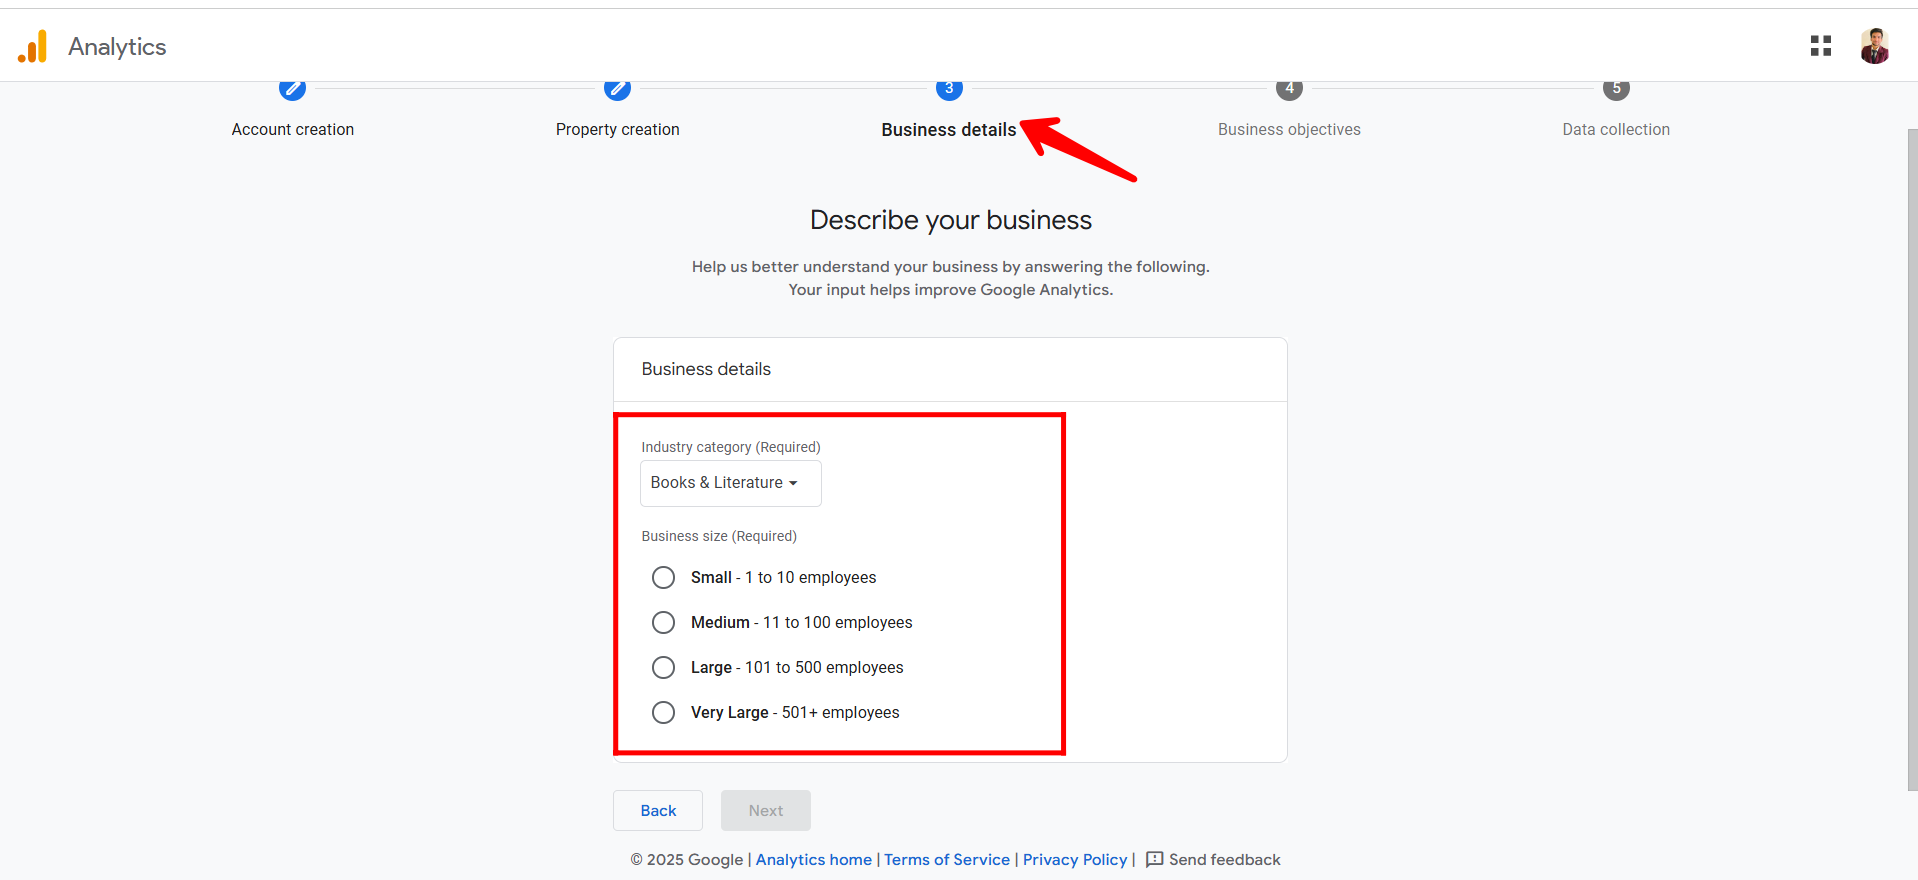
7. In the Business Details step, choose the appropriate Industry Category that best describes your business, then select your Business Size based on the number of employees or scale. After filling in these details, click “Next” to proceed.
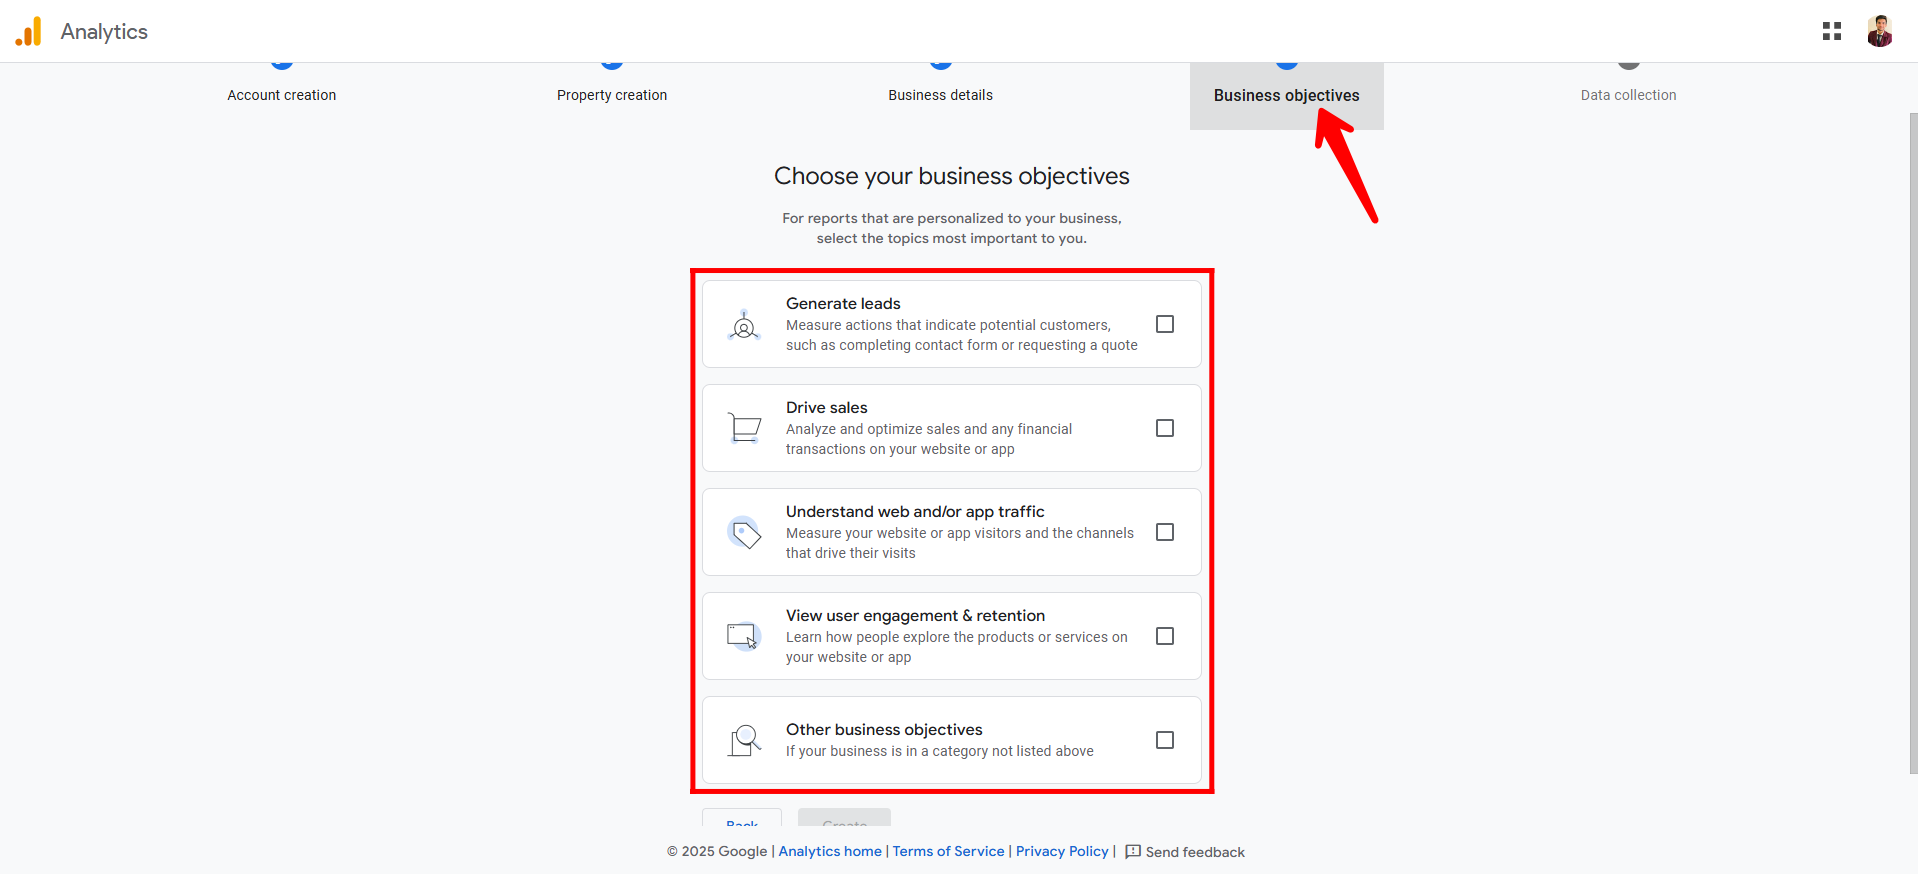
8. In the Business Objectives step, select the objective(s) that best align with your business goals. This helps Google Analytics personalize reports for your needs. Options include: Generate leads, Drive sales, Understand web and/or app traffic, View user engagement & traffic, or Other business objectives. Choose the most relevant ones, then proceed.
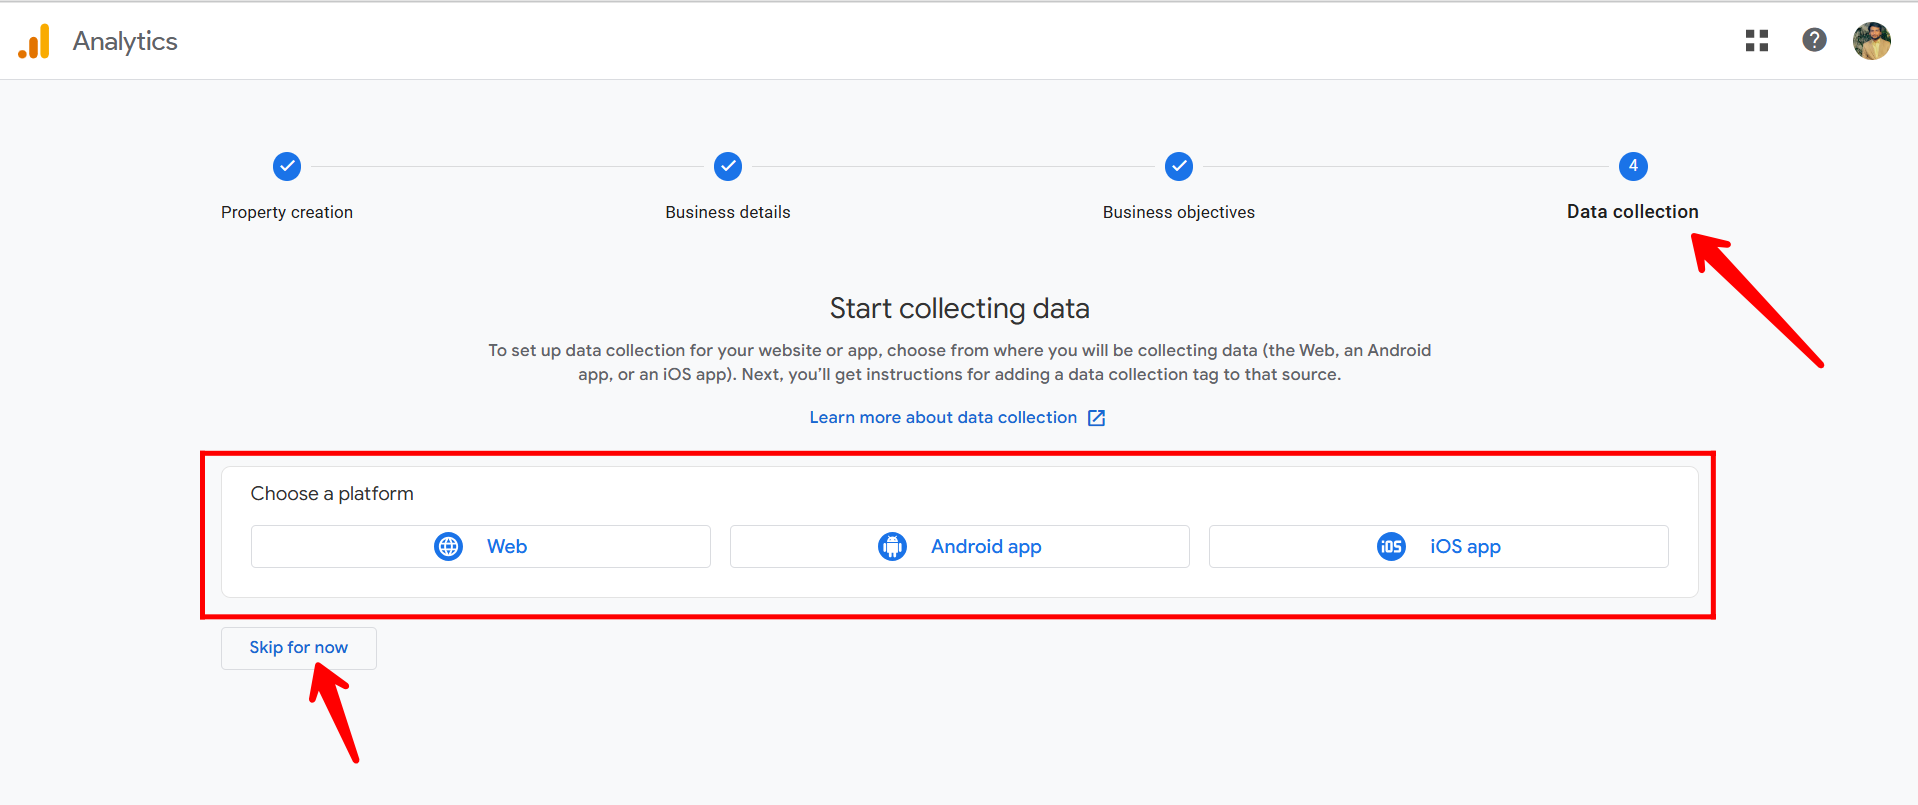
9. In the Data Collection step, select the platform you want to collect data from—options include Web, Android app, or iOS app. If you’re not ready to set this up yet, you can choose to skip this step for now and set it up later.
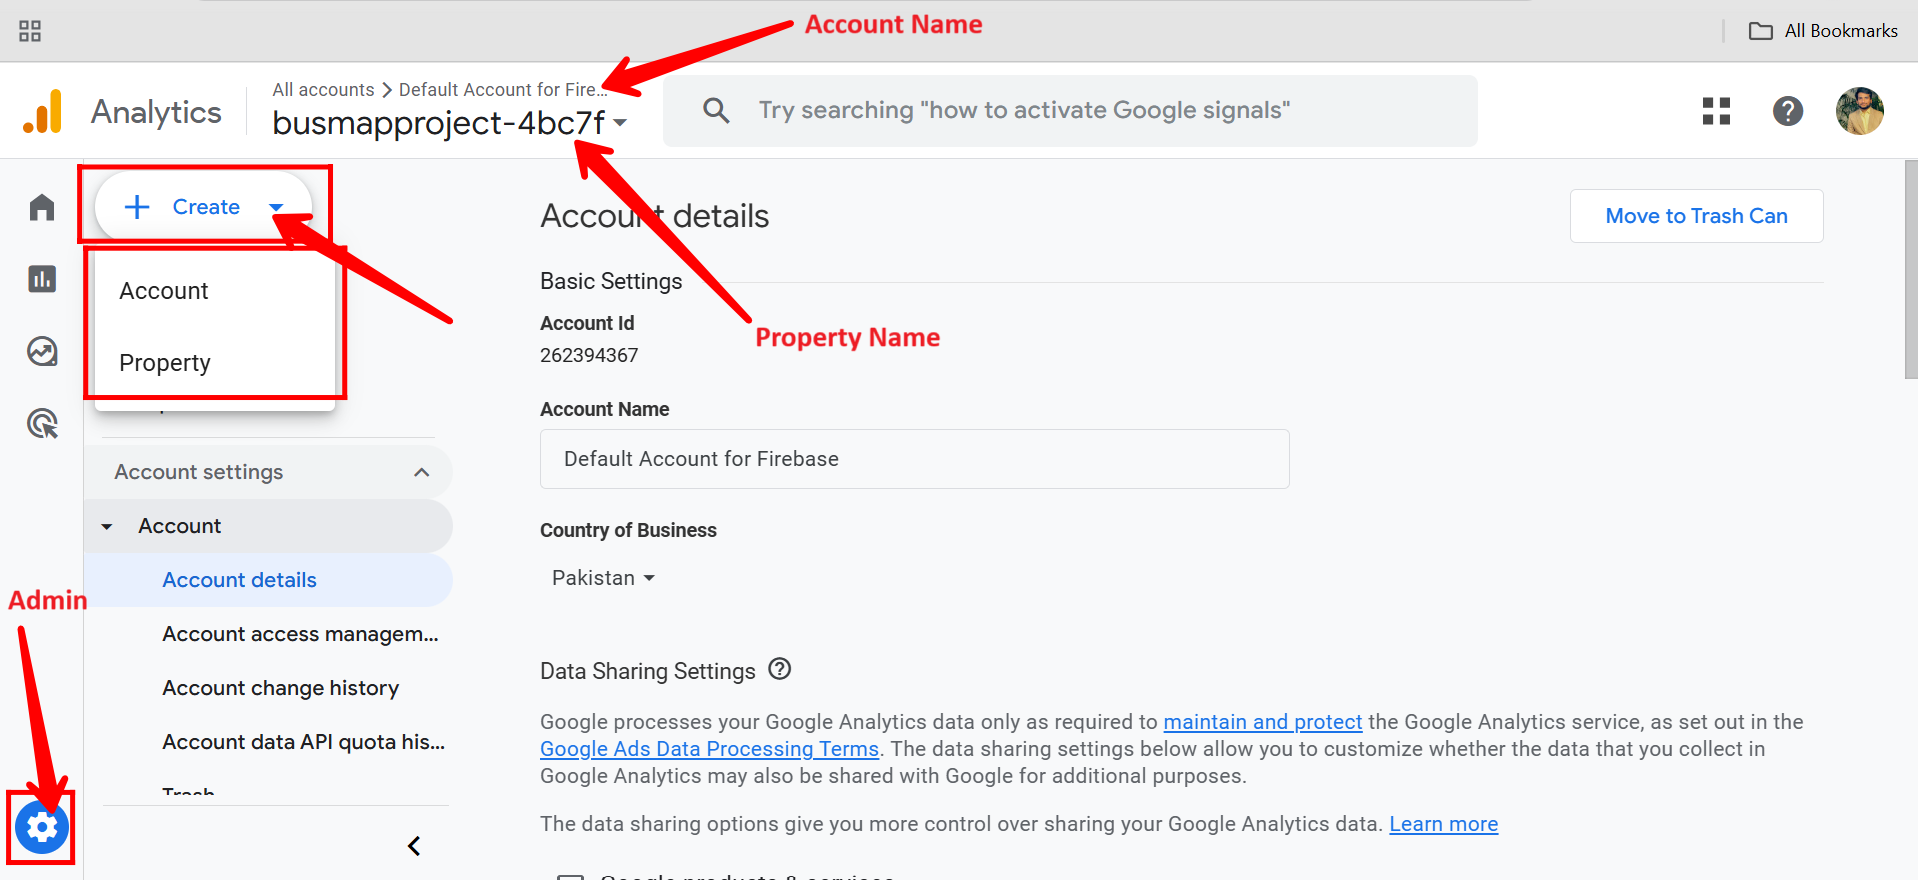
10. As shown in the screenshot/image, the Admin settings can be found in the lower-left corner of the Google Analytics interface. Here, you’ll see the Account Name and the associated Property Name. To add a new property under the same account, click the “+ Create” button. Let’s click it to explore how many properties can be created under an existing account.
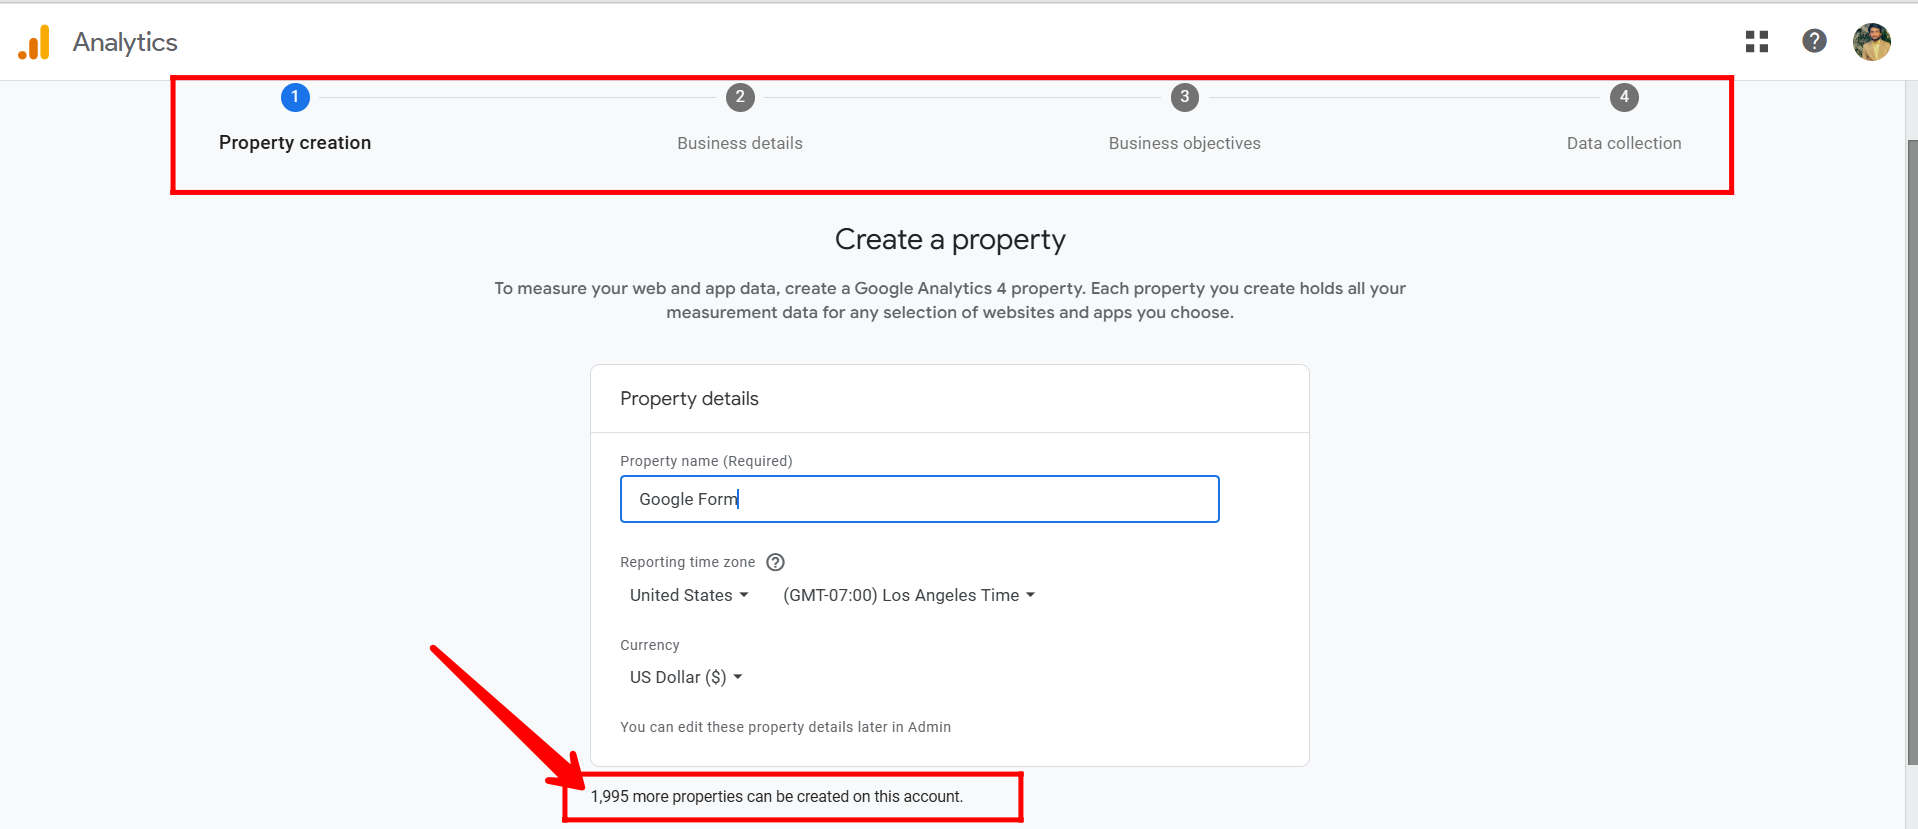
11. Here’s the same step-by-step procedure for creating a new property, including “Property Creation”, “Business Details”, “Business Objectives”, and “Data Collection”—just like we followed earlier. You can repeat these steps to add a new property under the same account. You’ll notice that up to 1,995 more properties can still be added. For now, let’s return to the previous property for testing purposes and skip this new one.
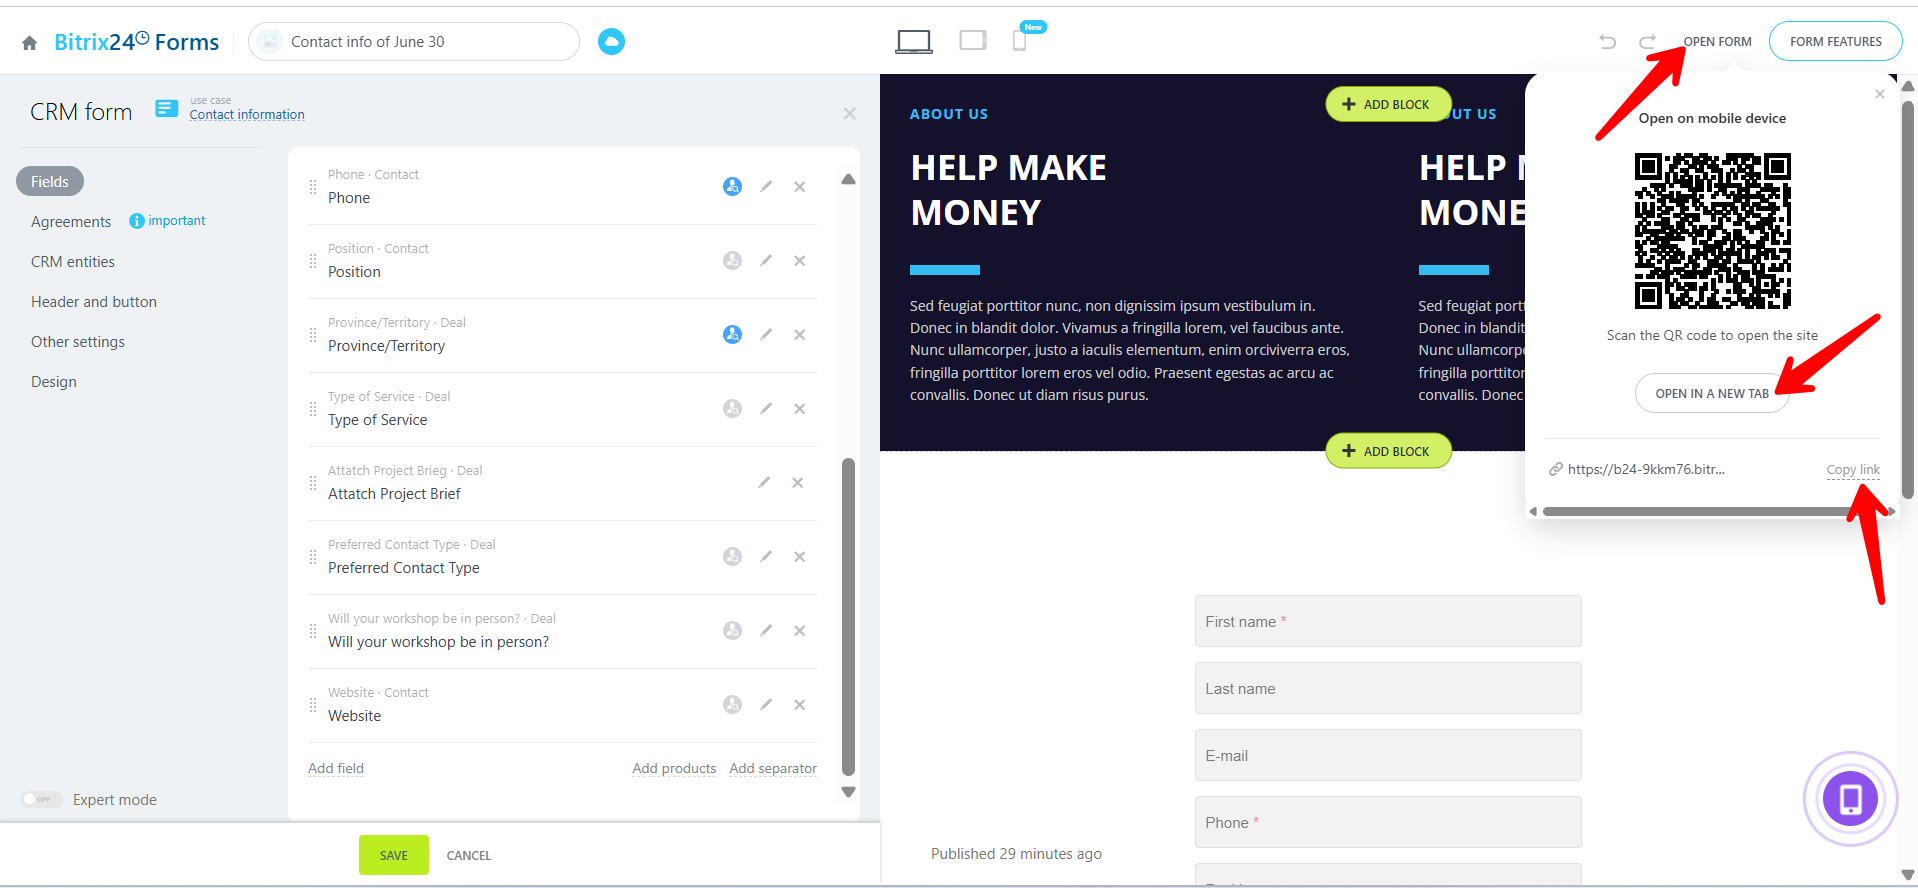
12. Go to the CRM form you previously configured, click “OPEN FORM”, and once the form opens in a new tab or window, copy the URL/link of the form from the address bar. This link will be used for further integration or testing.
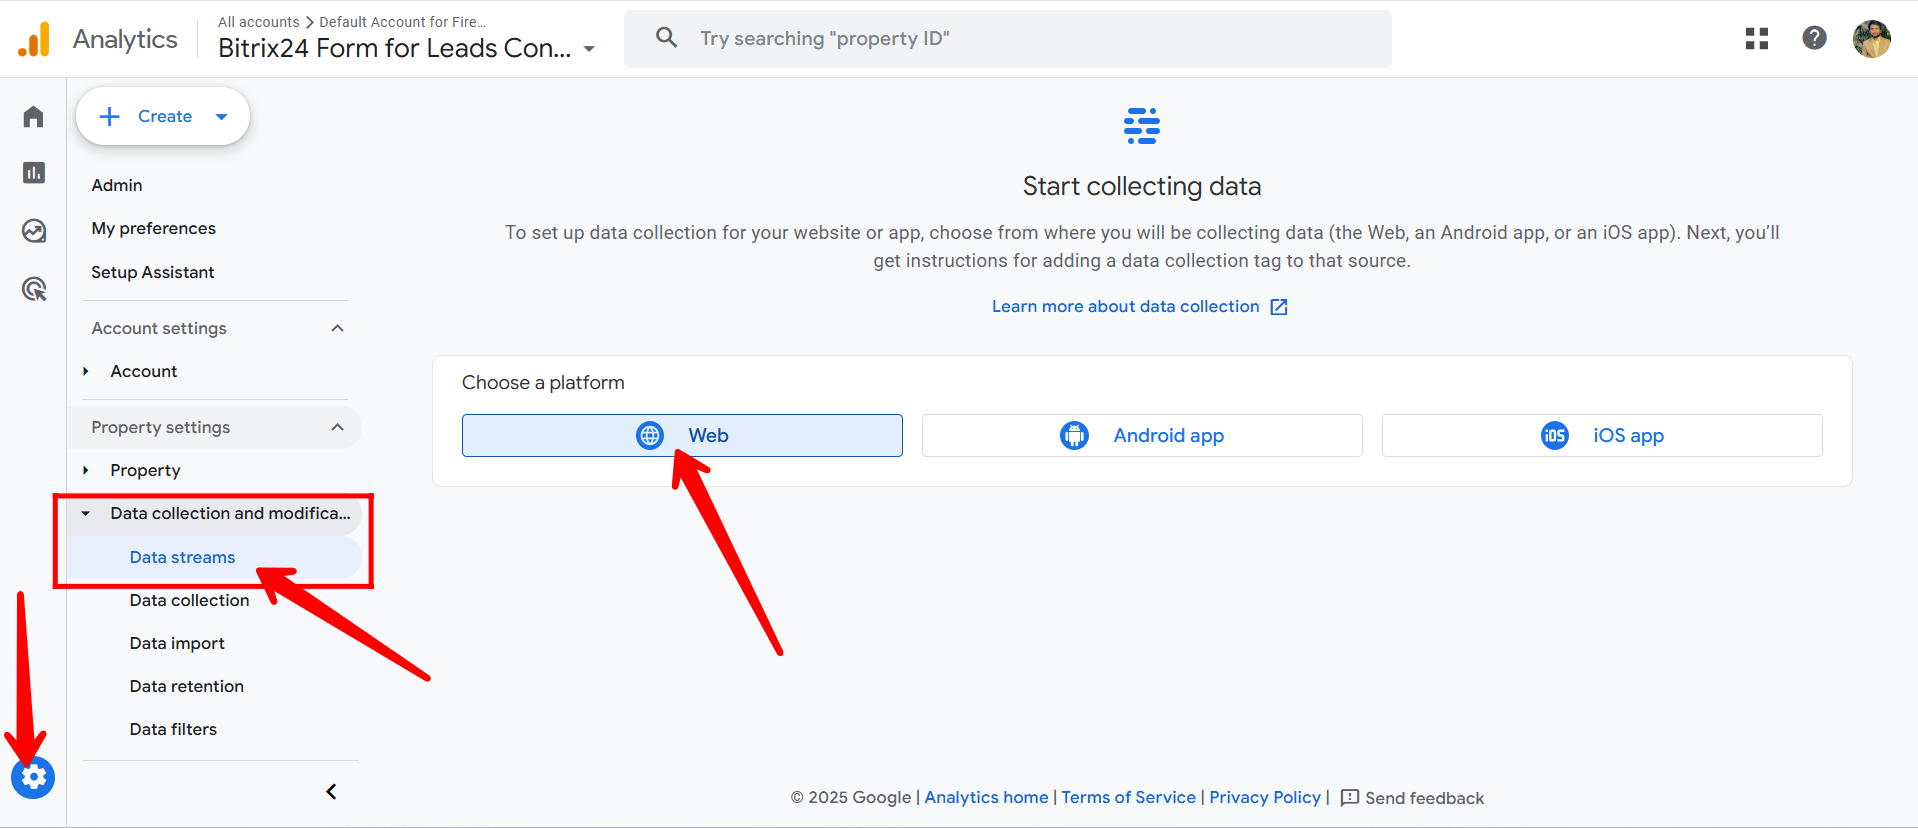
13. In the GA4 left panel, go to “Data collection and modifications” > “Data Streams.” If you skipped platform selection earlier, choose one now. For CRM forms, select Web, as it lets you enter your form’s URL and track web interactions.
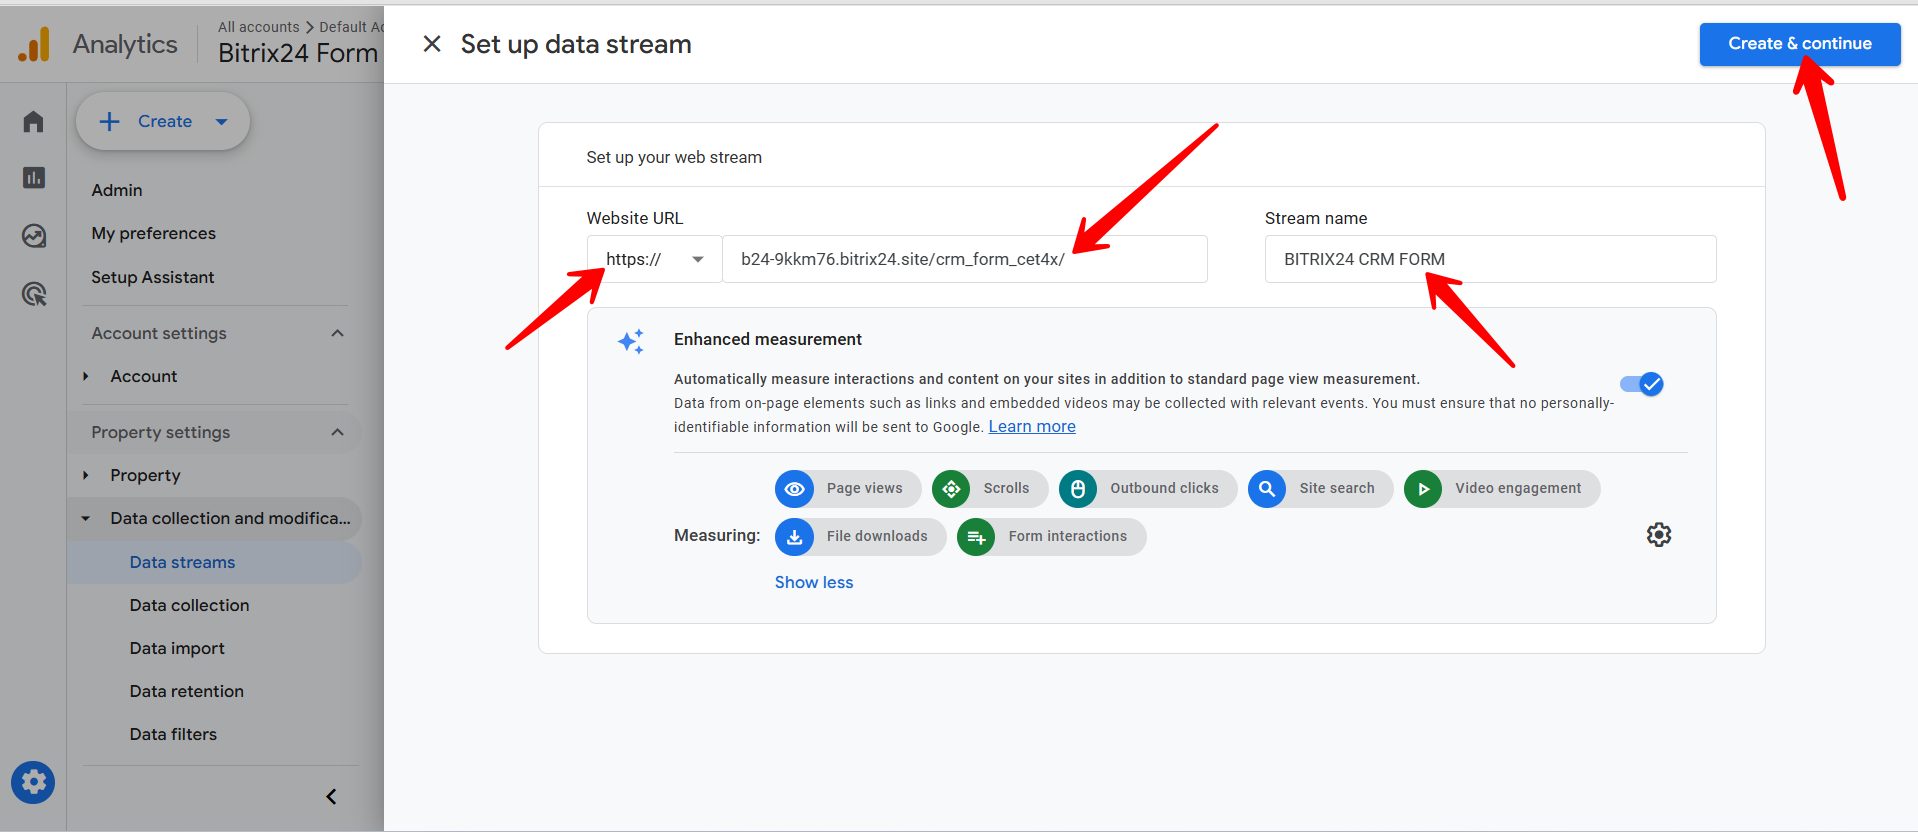
14. In the Web stream setup, enter your CRM form URL (including the protocol, e.g., https), and provide a Stream Name of your choice. You’ll also see default measurement options like page views and scrolls, which will appear in activity reports. Then, click “Create & Continue.”
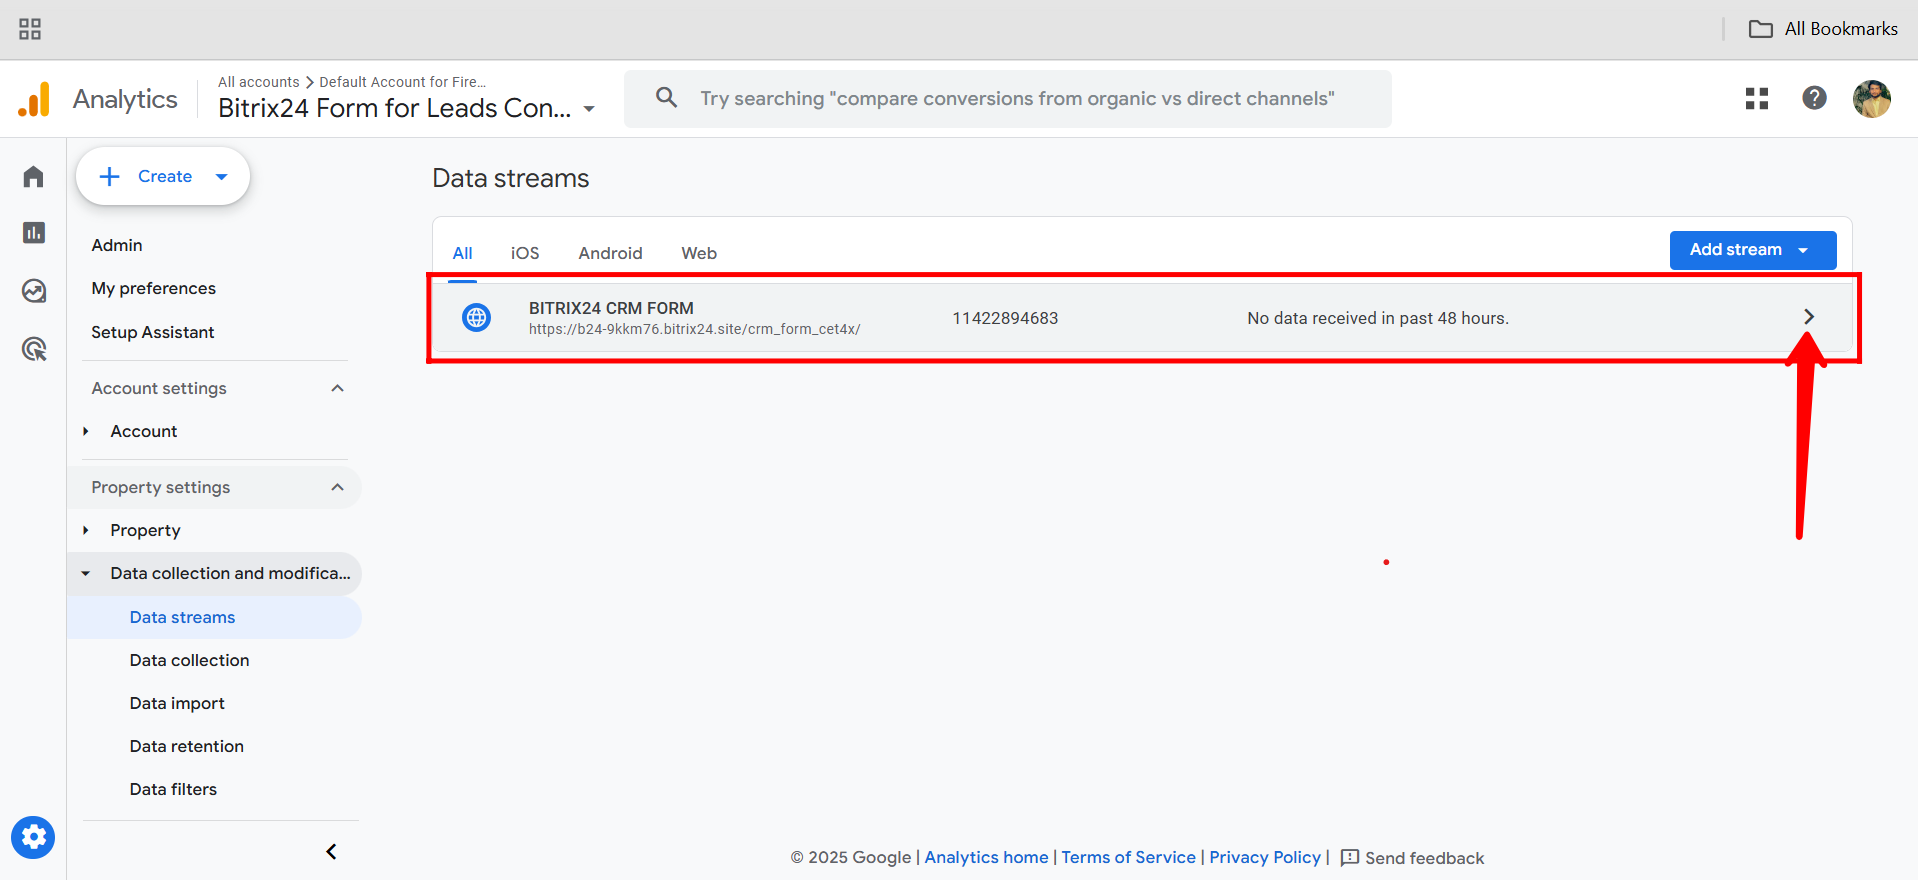
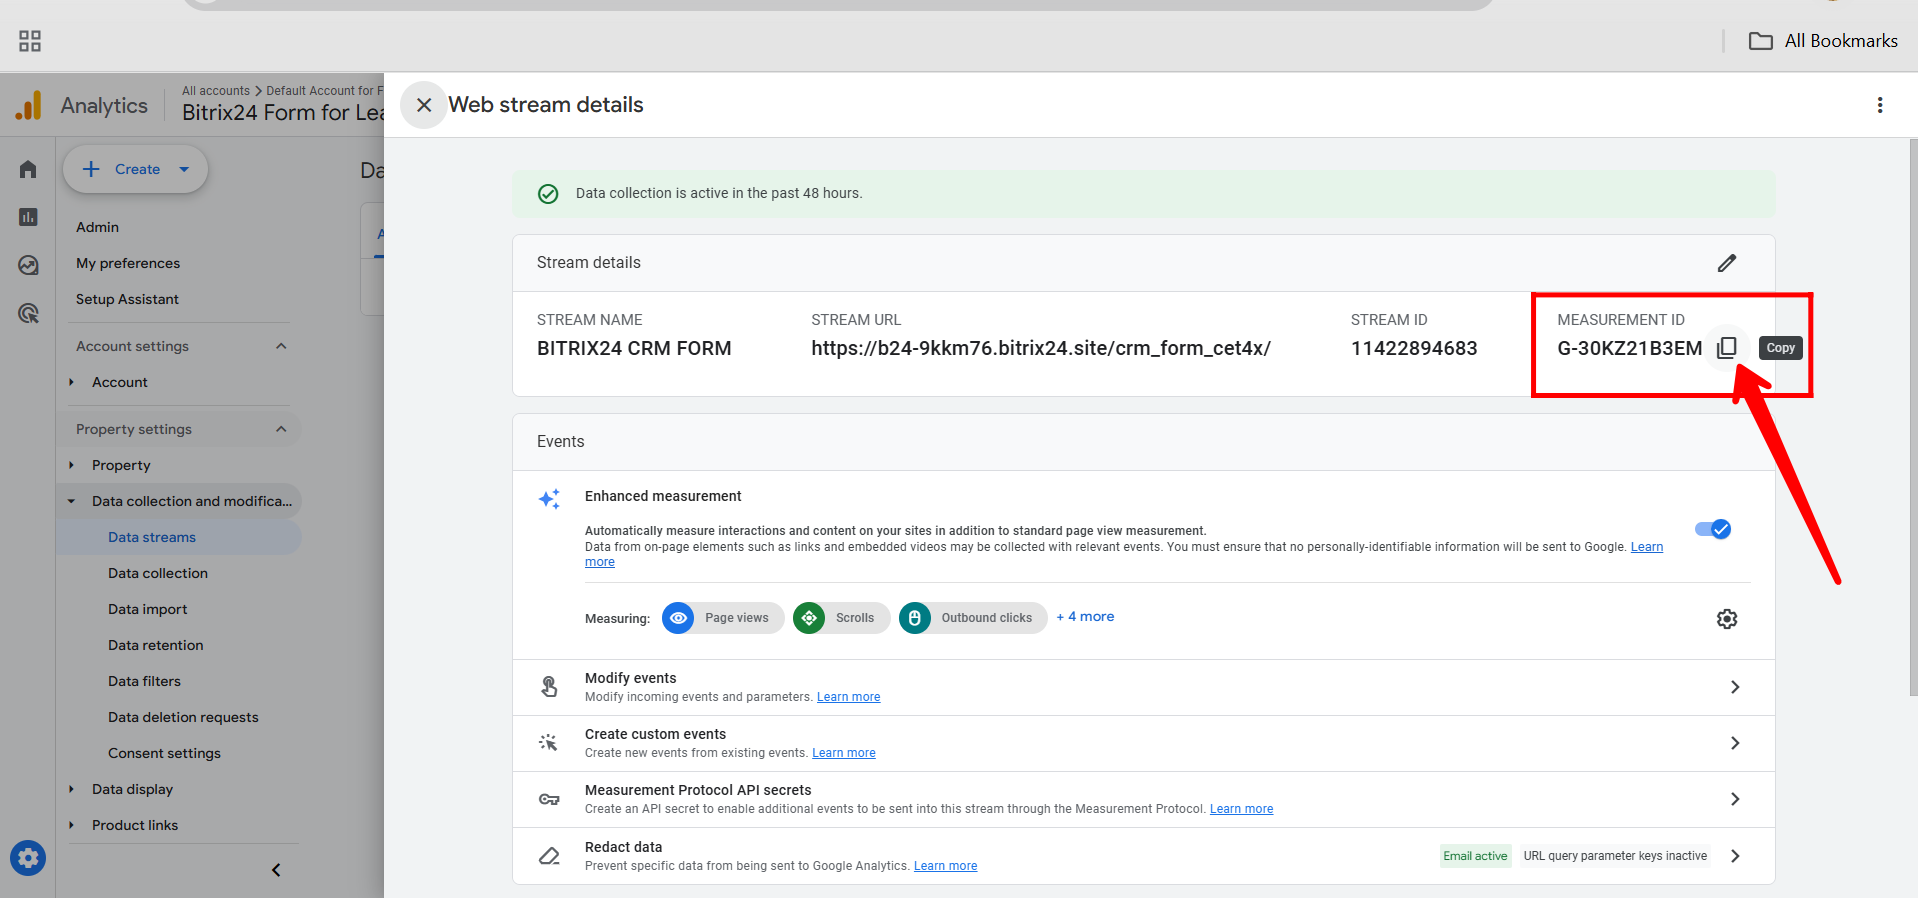
15. Now, open your configured Web data stream by clicking on it from the Data Streams list. This will display the stream details, including the Measurement ID and other configuration options needed for integration.
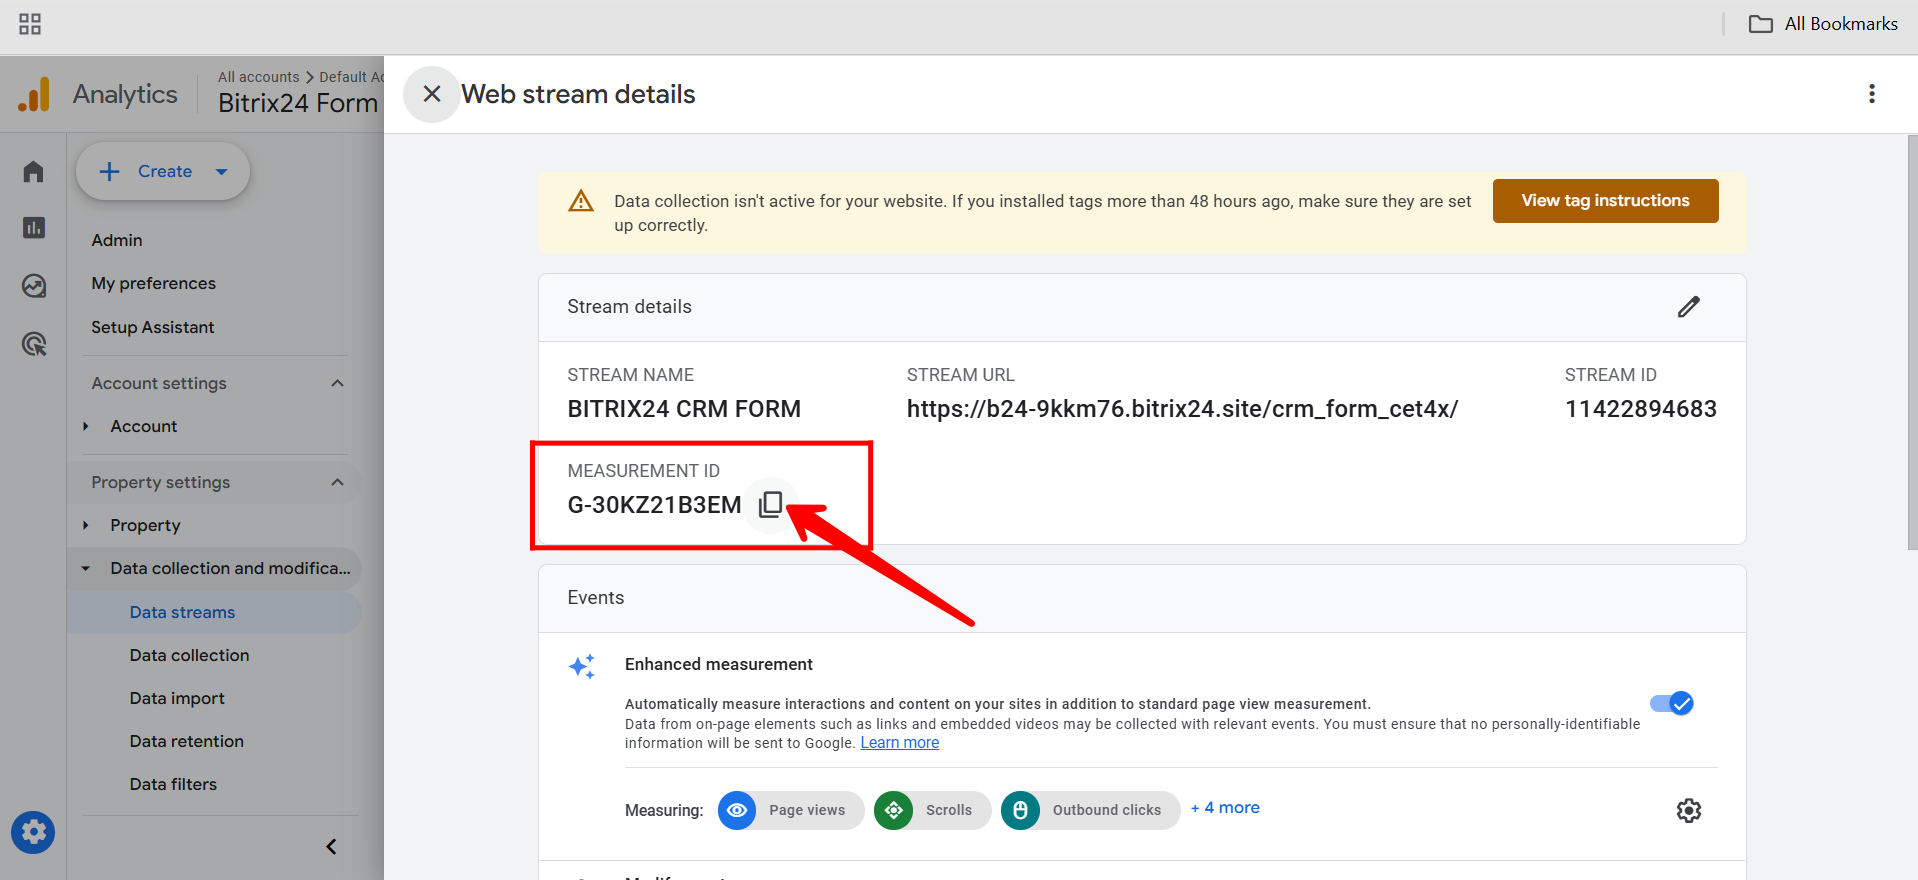
16. Copy the Measurement ID (starting with G-), which you’ll need later to connect your CRM form with Google Analytics 4 for proper tracking.
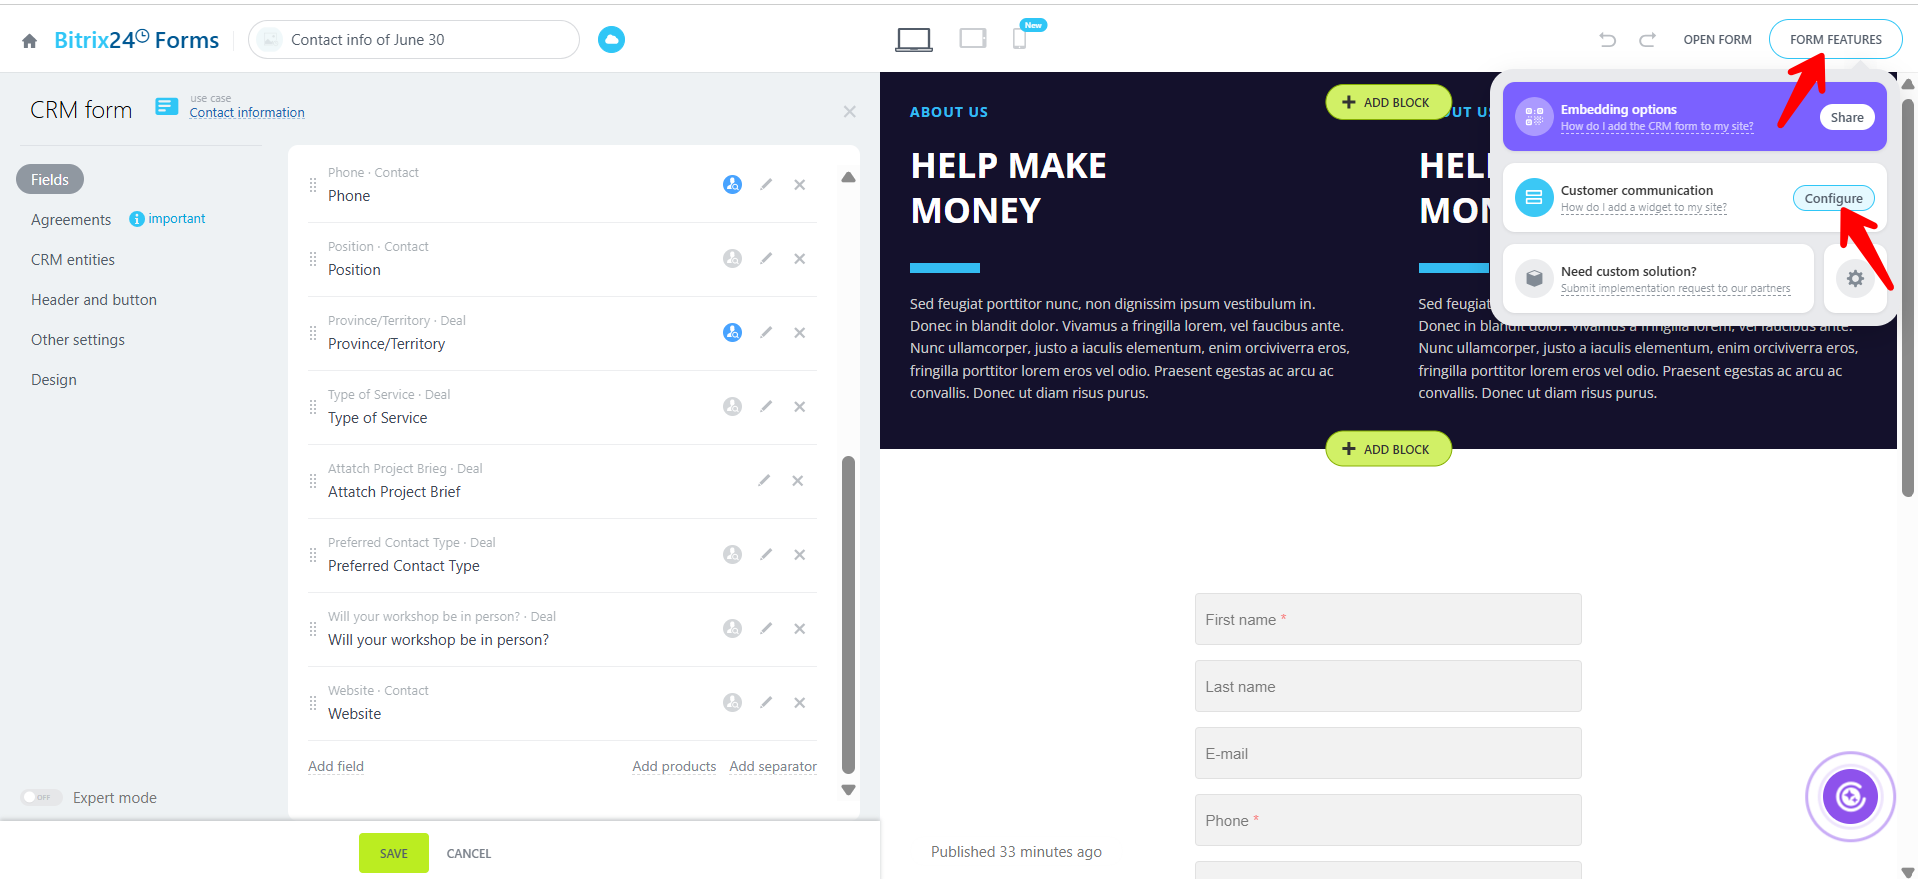
17. In your Bitrix24 form settings, navigate to “Form Features”, then click “Configure” to access integration and tracking options for your form.
18. Check the box for “Google Analytics”, then paste your Measurement ID into the Google Analytics 4 field (not the Universal Analytics field, as it’s outdated and incompatible). Finally, click “Save” to apply the changes.

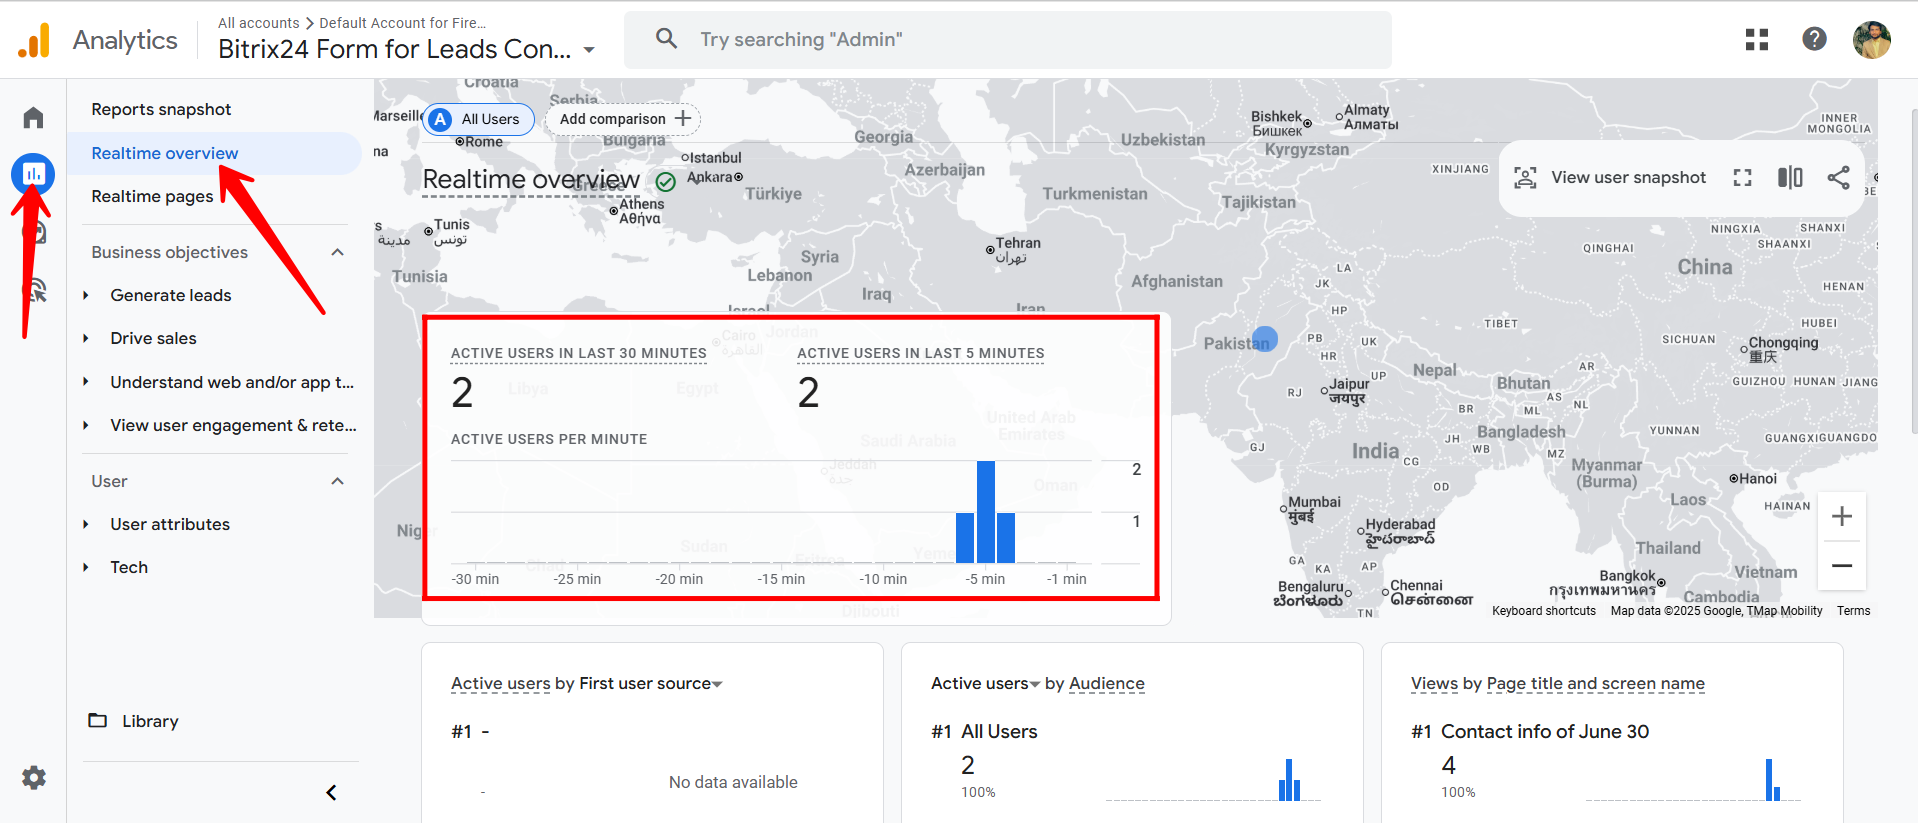
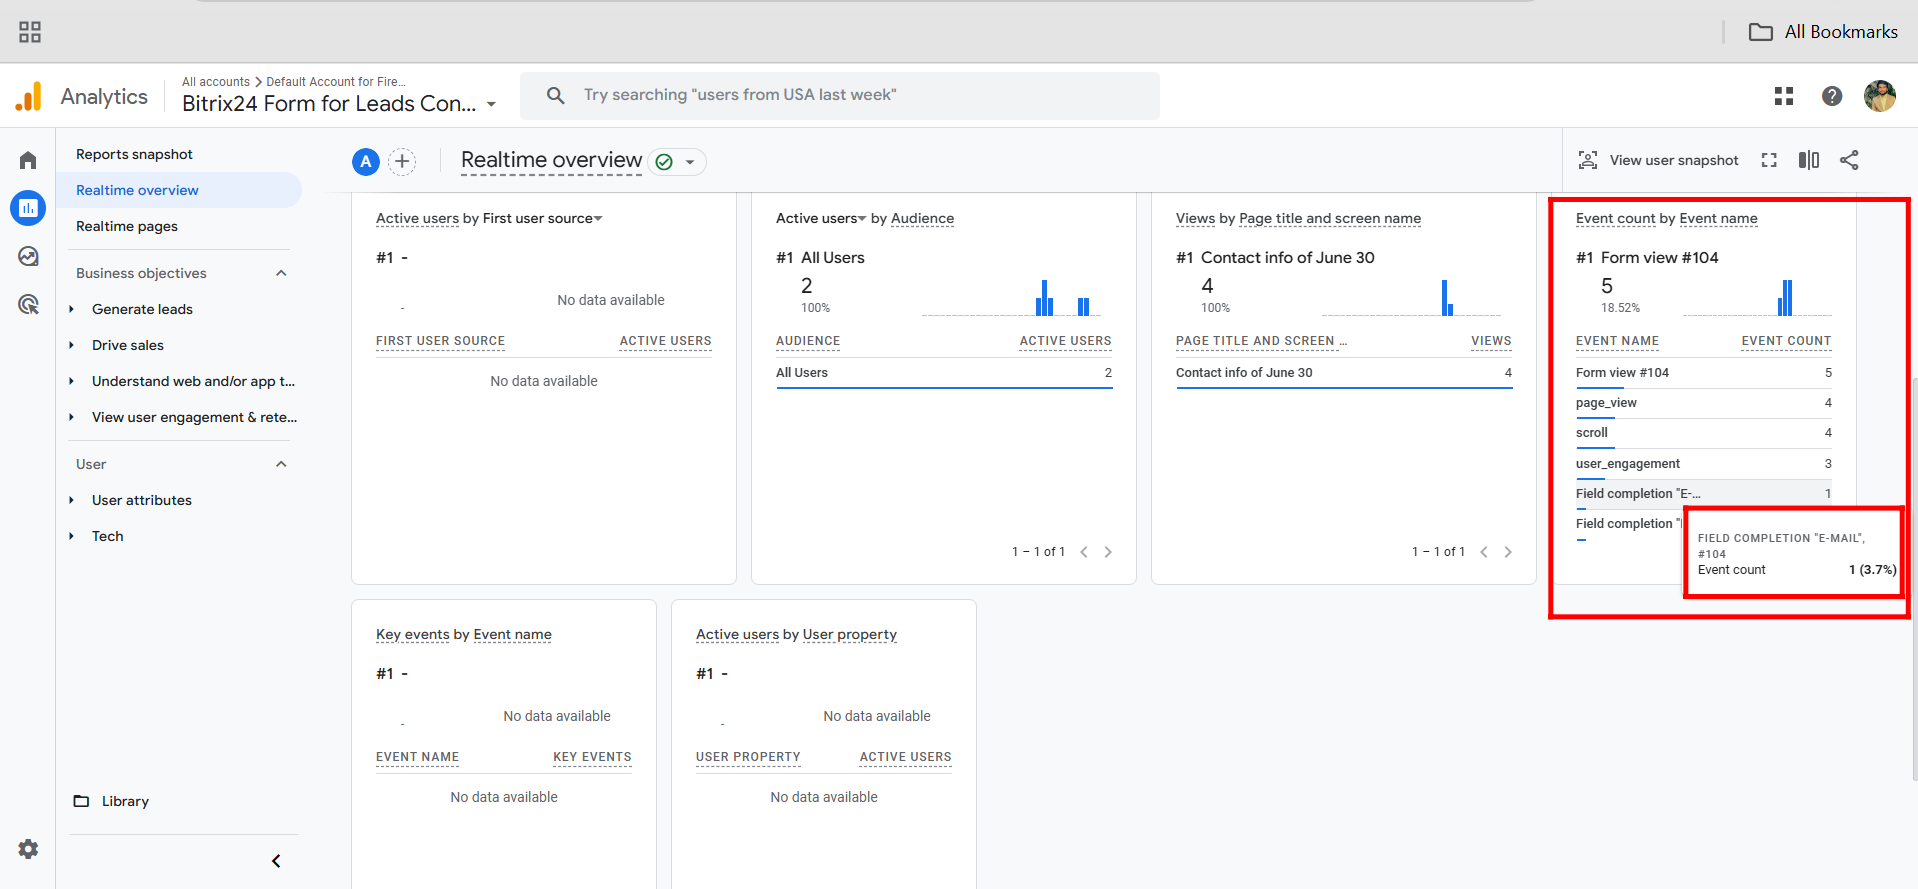
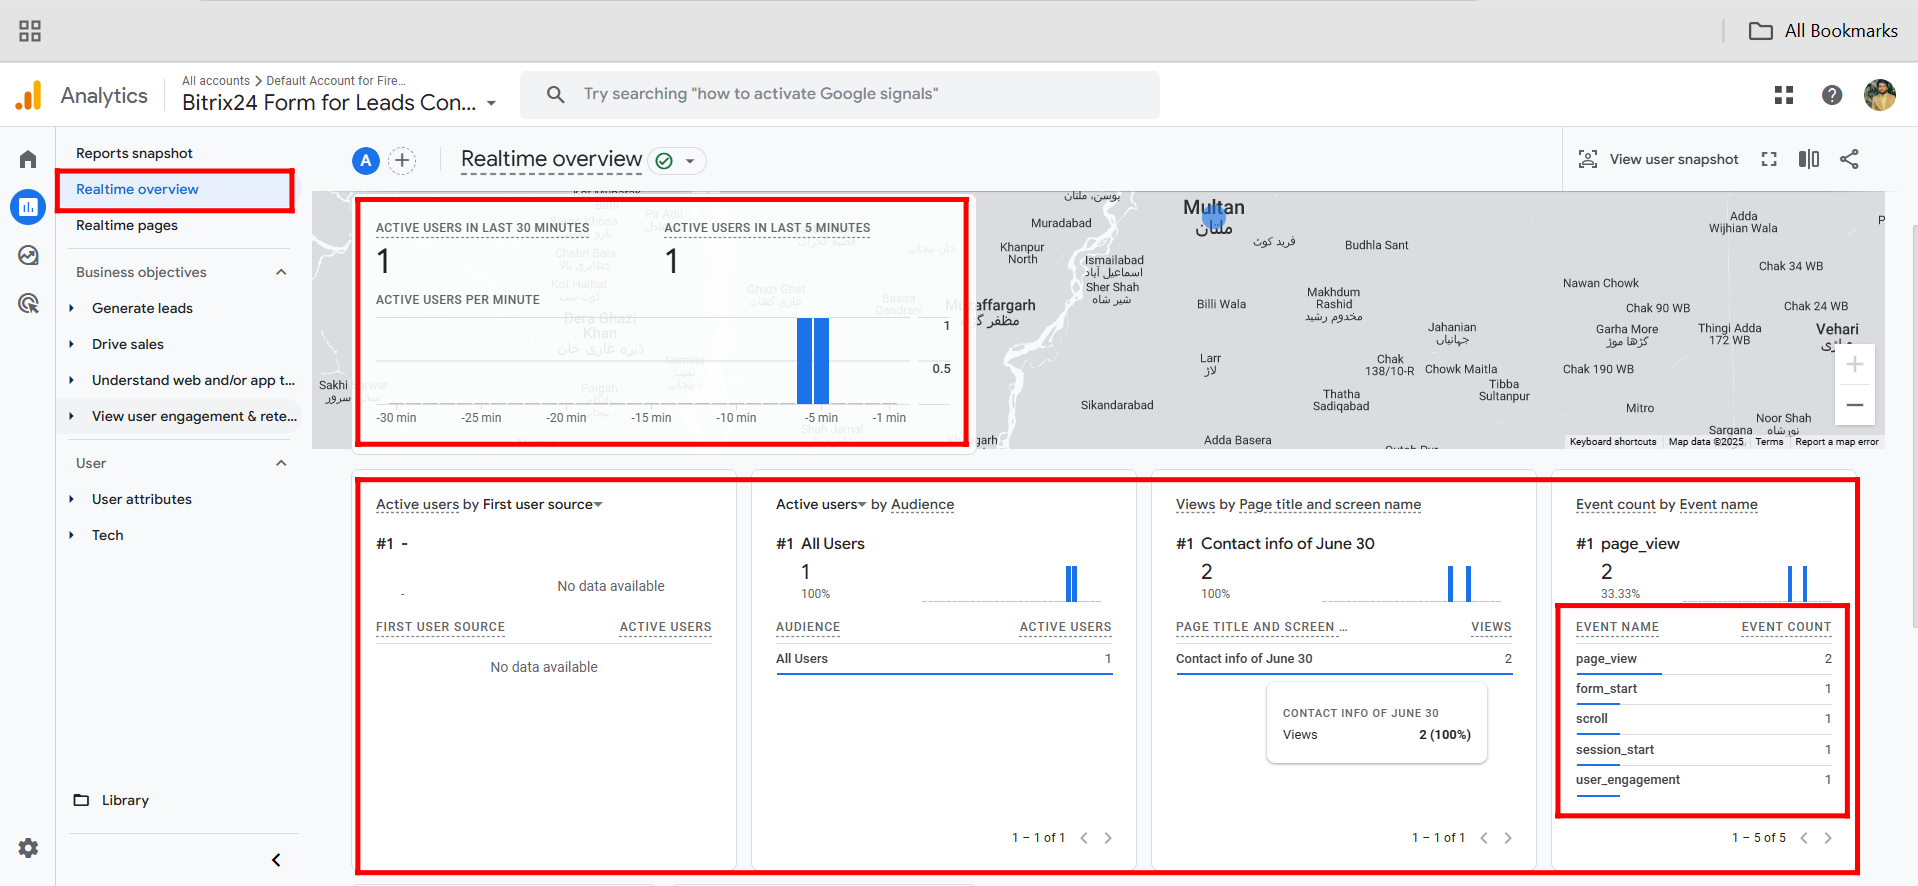
19. In the Realtime Overview under the Reports section of the Google Analytics 4 panel, you can see the exact location of users, along with the number of active users on your form in the last 30 minutes and last 5 minutes.
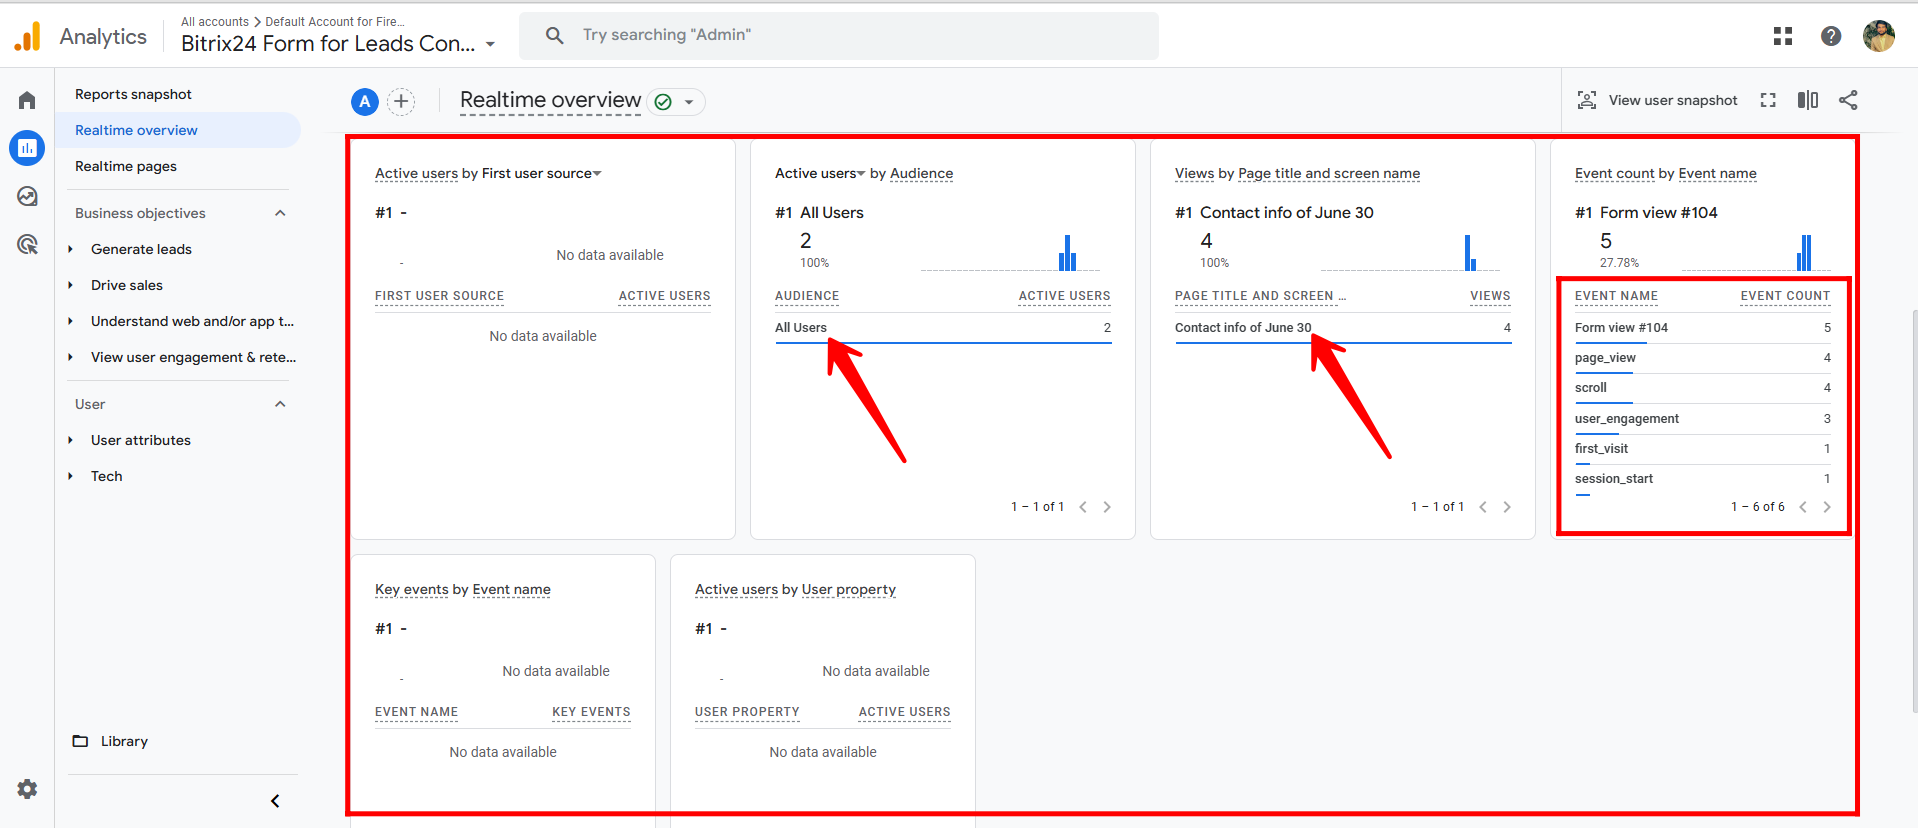
20. Additionally, you can view active users by audience, views by page title and screen name, and event counts by event name—including events like scroll, user engagement, first visit, session start, page view, and form view.
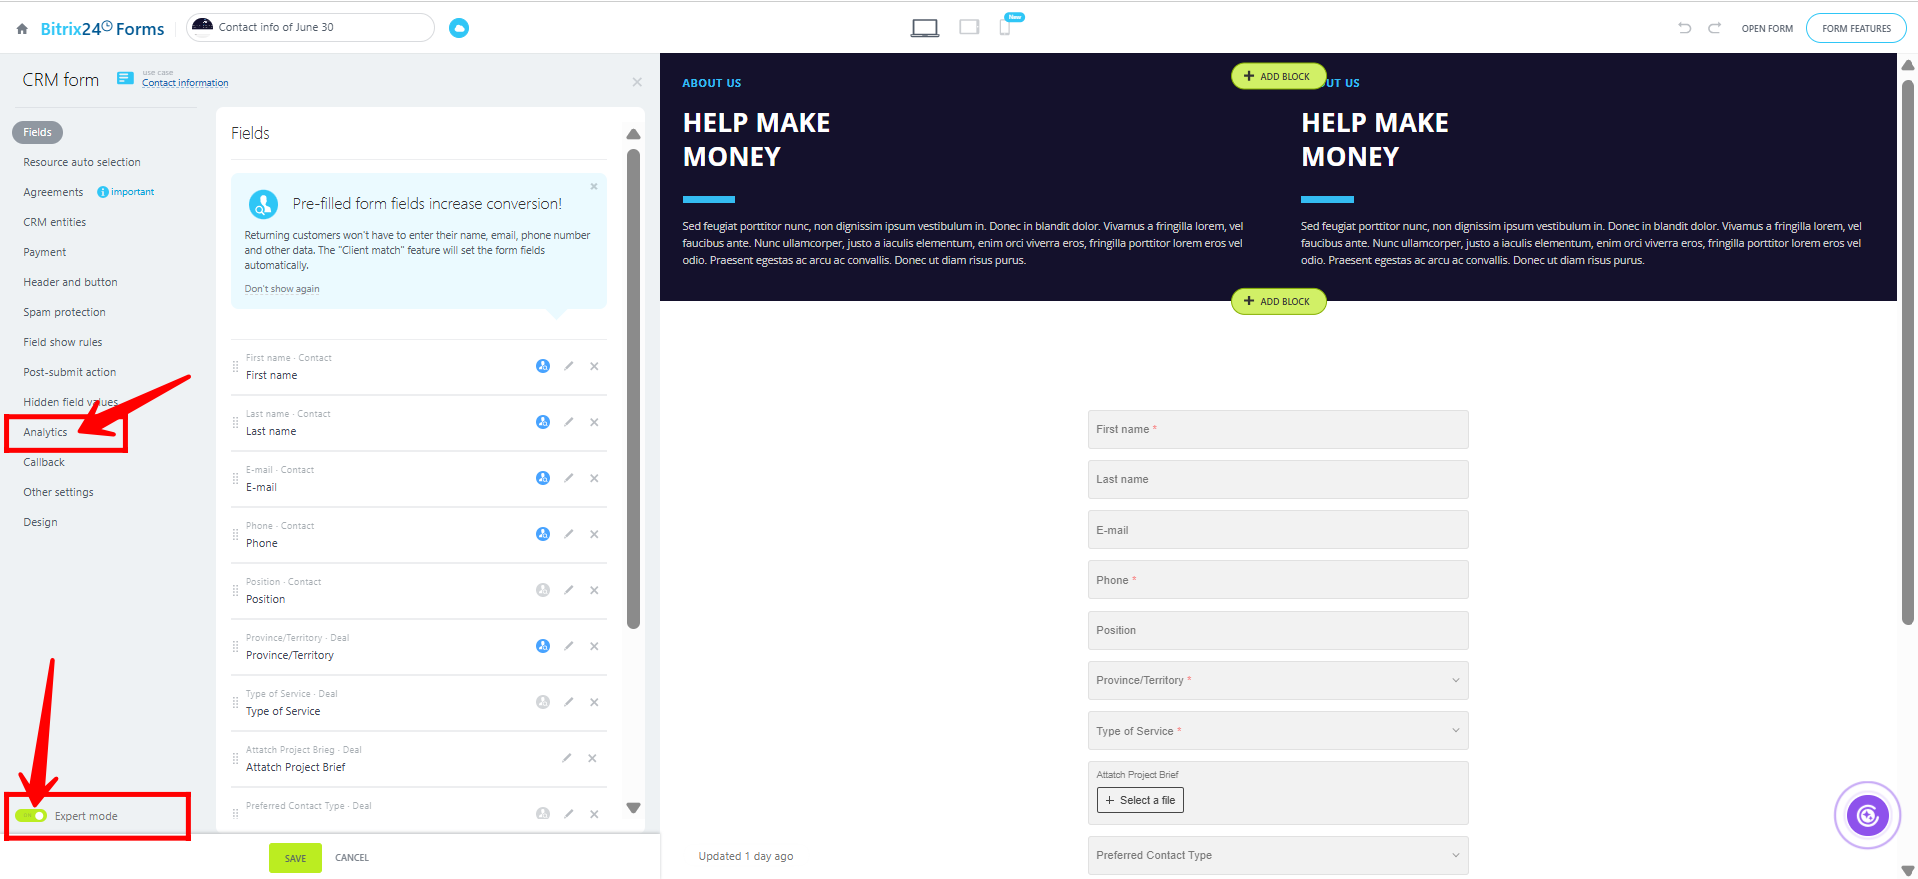
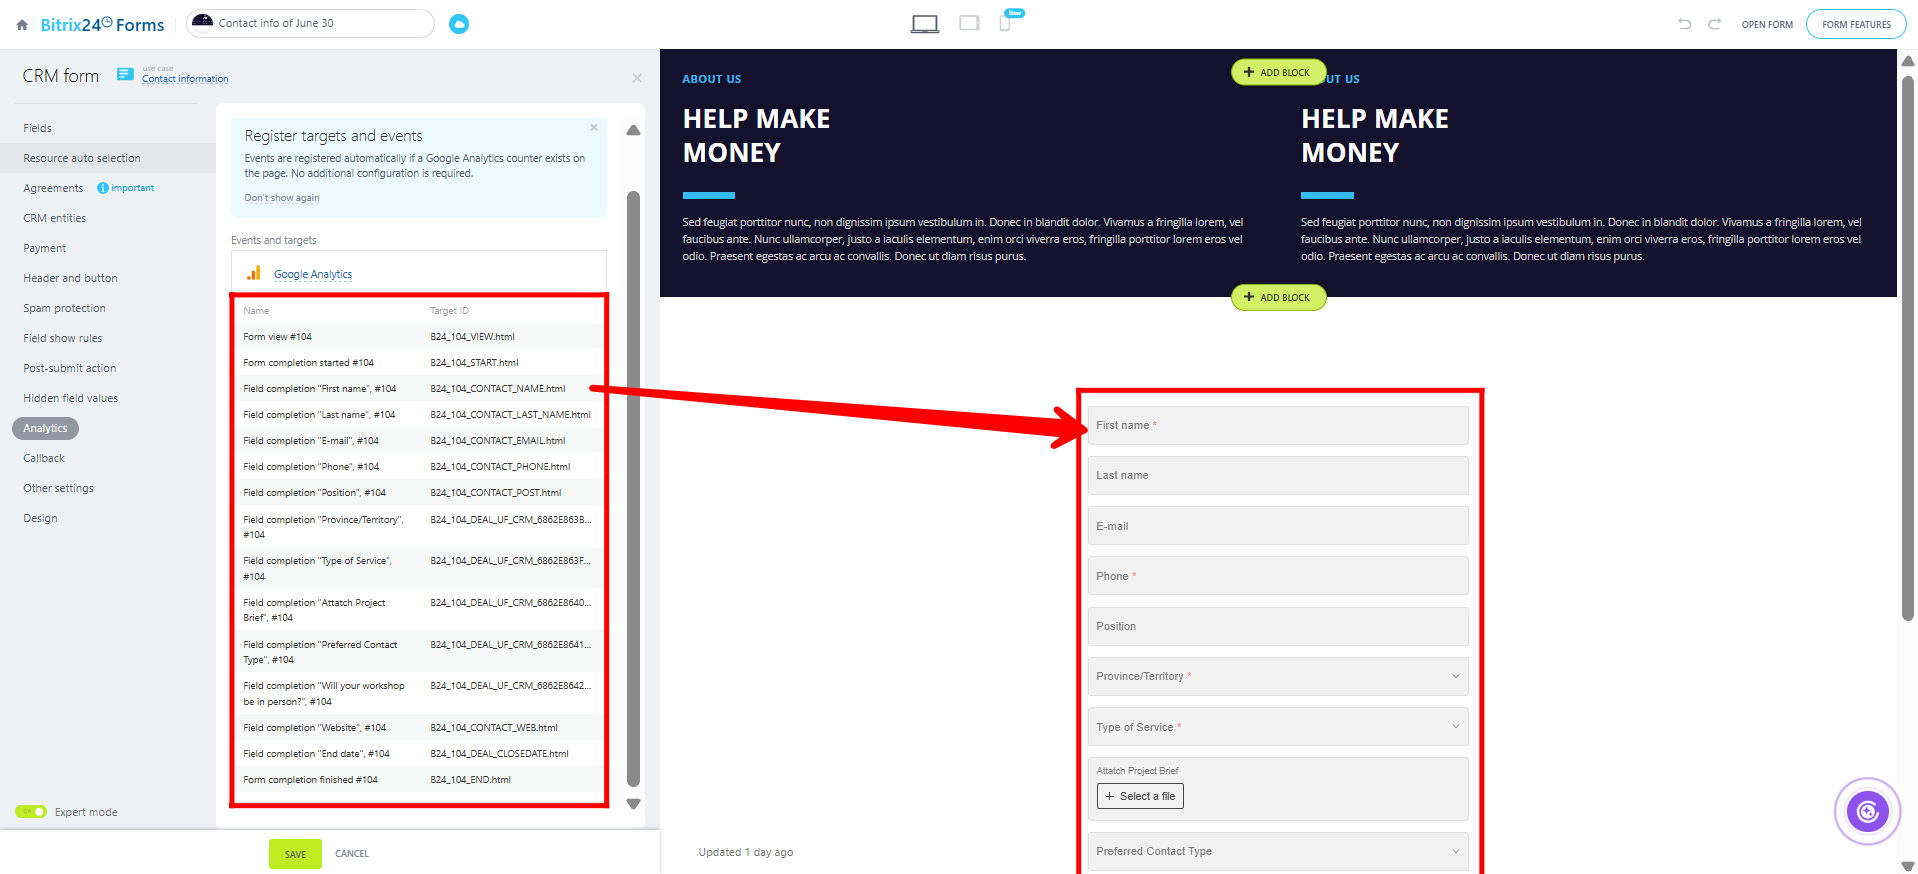
21. Enable “Expert Mode” in your Bitrix24 forms settings, then navigate to the Analytics section to access advanced tracking and integration features.
22. Then, open the Google Analytics option within the Analytics section to view the list of Target IDs, which correspond to specific form actions and events tracked in GA4.
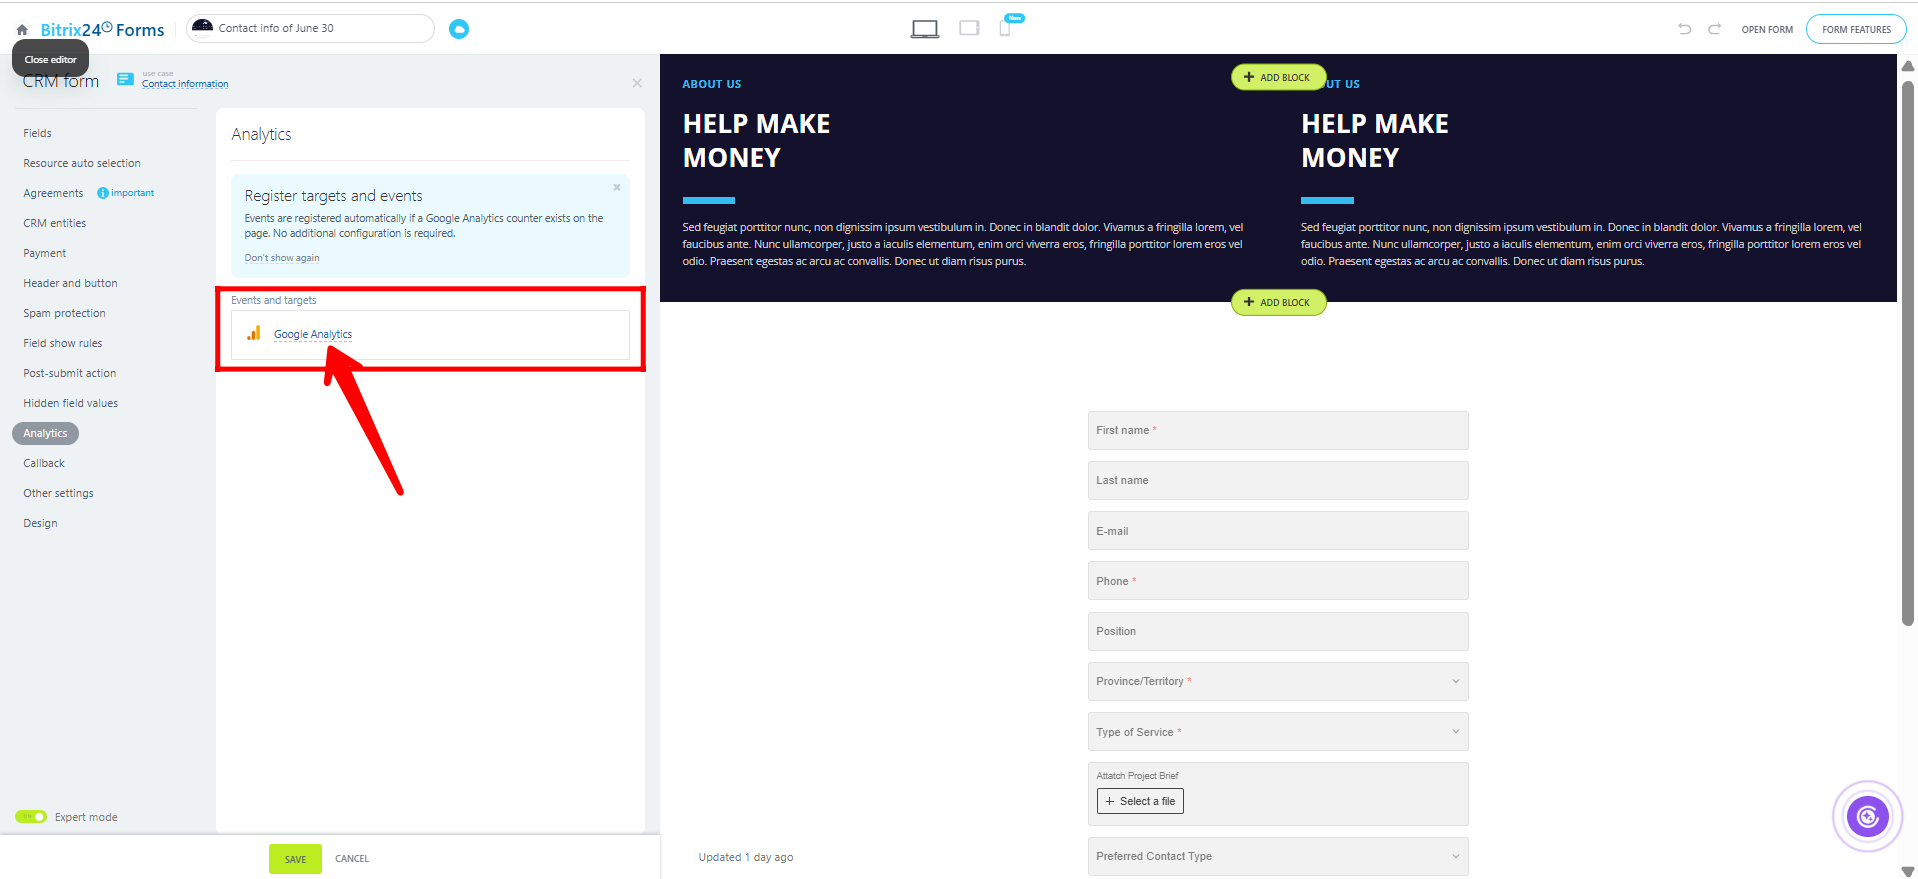
23. Now, you’ll see the field names and corresponding Target IDs automatically generated by Bitrix24 forms. These IDs act as event triggers that notify Google Analytics when specific actions occur on the form—such as a field being filled, the form being viewed, or the page being scrolled. Since Google Analytics doesn’t collect data on its own, these event IDs are essential for sending interaction data to GA4. Click “Save”.
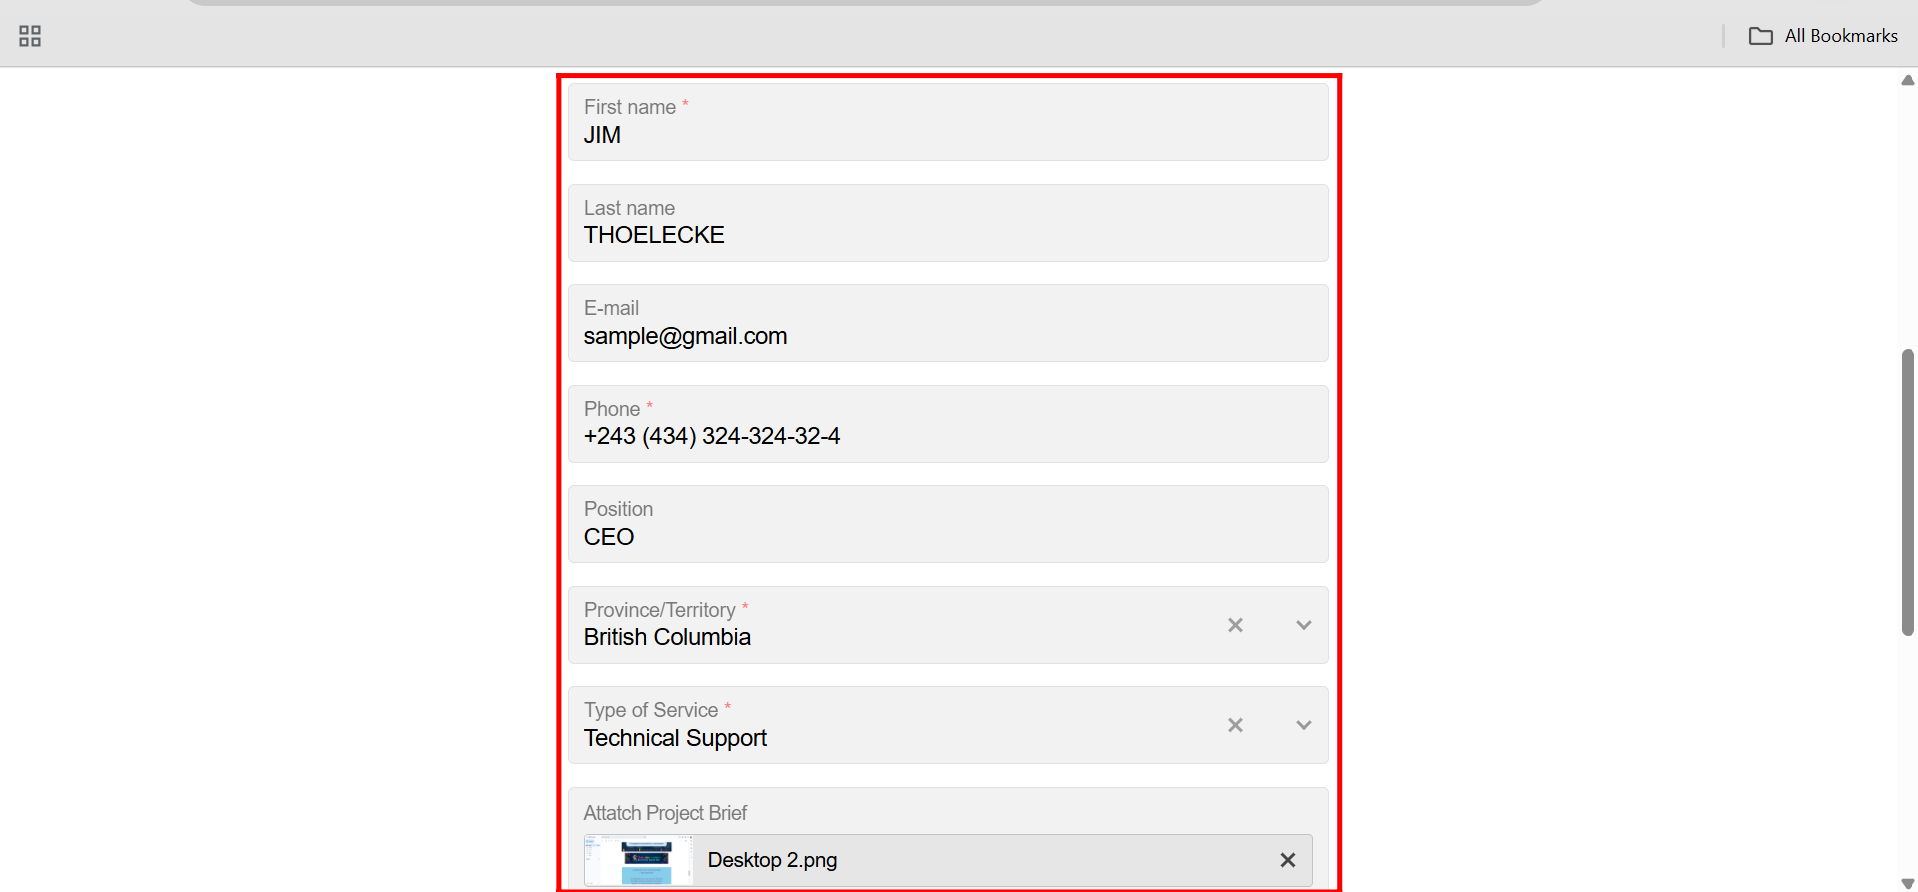
24. Open your form in a new tab, then start interacting with it—such as filling in input fields, scrolling, or viewing the page. These actions will trigger the configured events, and you’ll be able to see the corresponding real-time data appear in Google Analytics 4 under the Realtime and Events sections.
25. Go to your GA4 panel, where data updates automatically in real-time. In the “Event count by event name” section, you’ll now see additional event names—such as the field names for Email, First Name, Last Name, and others—indicating how many interactions occurred with each specific input field, tracked by their unique event names.
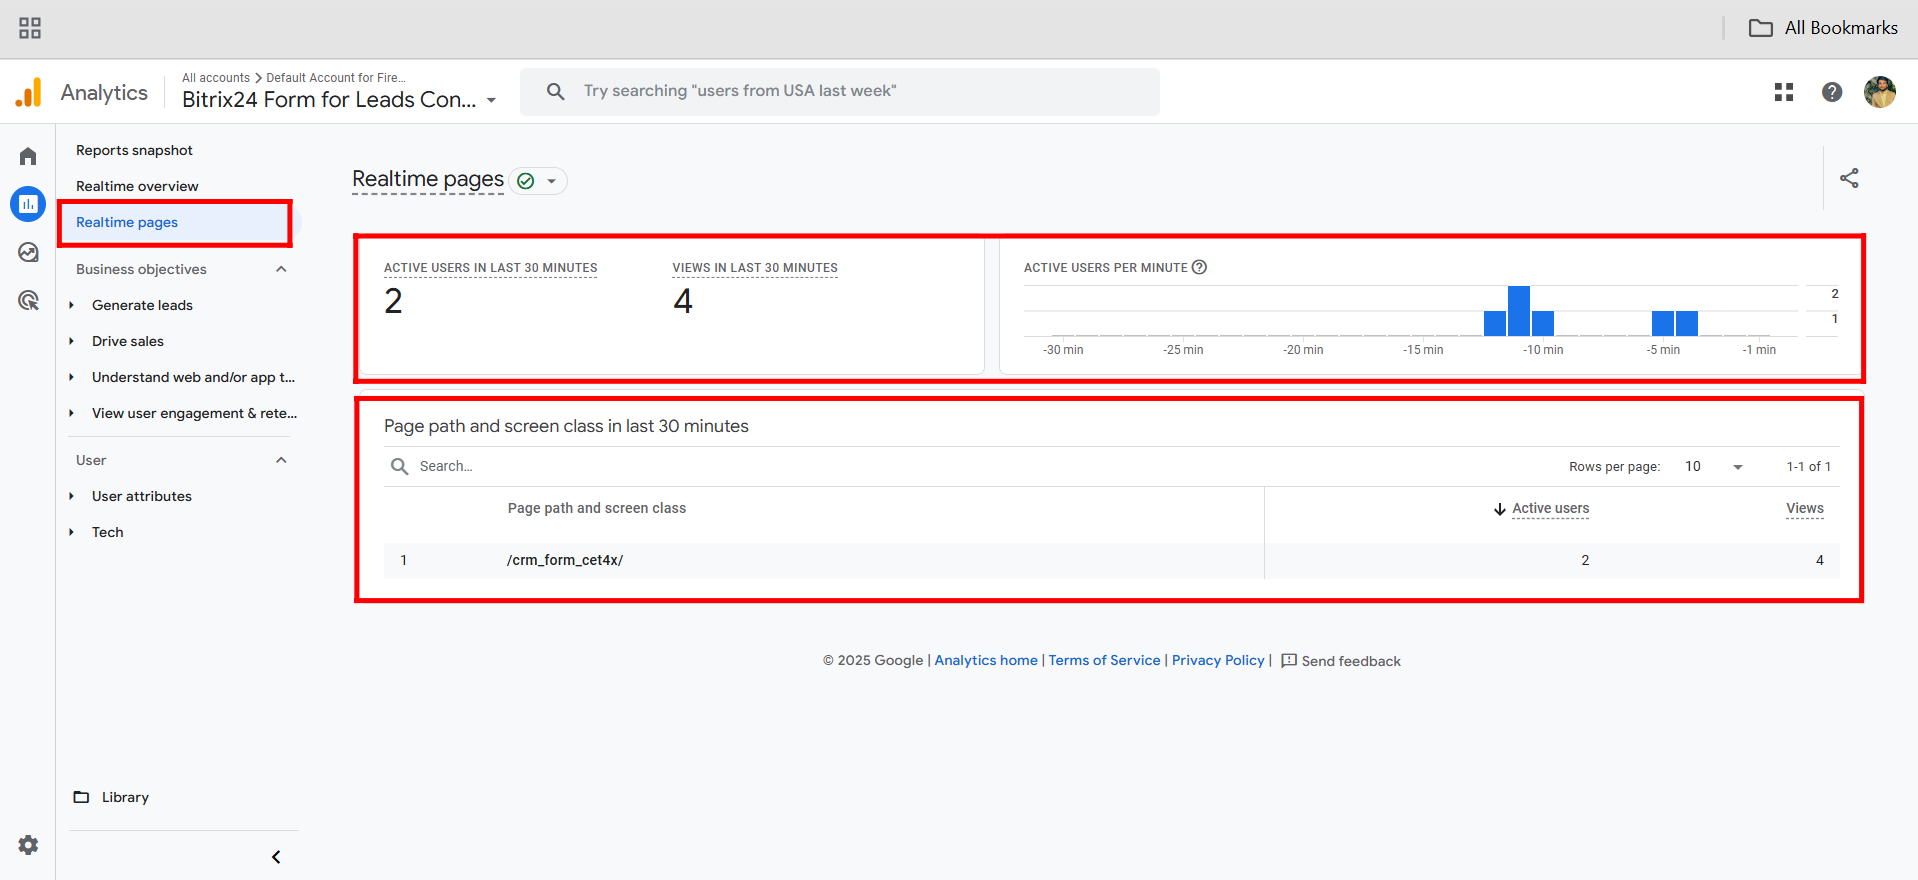
26. Go to the “Realtime Pages” section under Reports in GA4. Here, you can view the exact URLs of pages currently being accessed, along with the number of active users and real-time views per page. Since this is a test, you’ll likely see only one URL listed—the CRM form link.
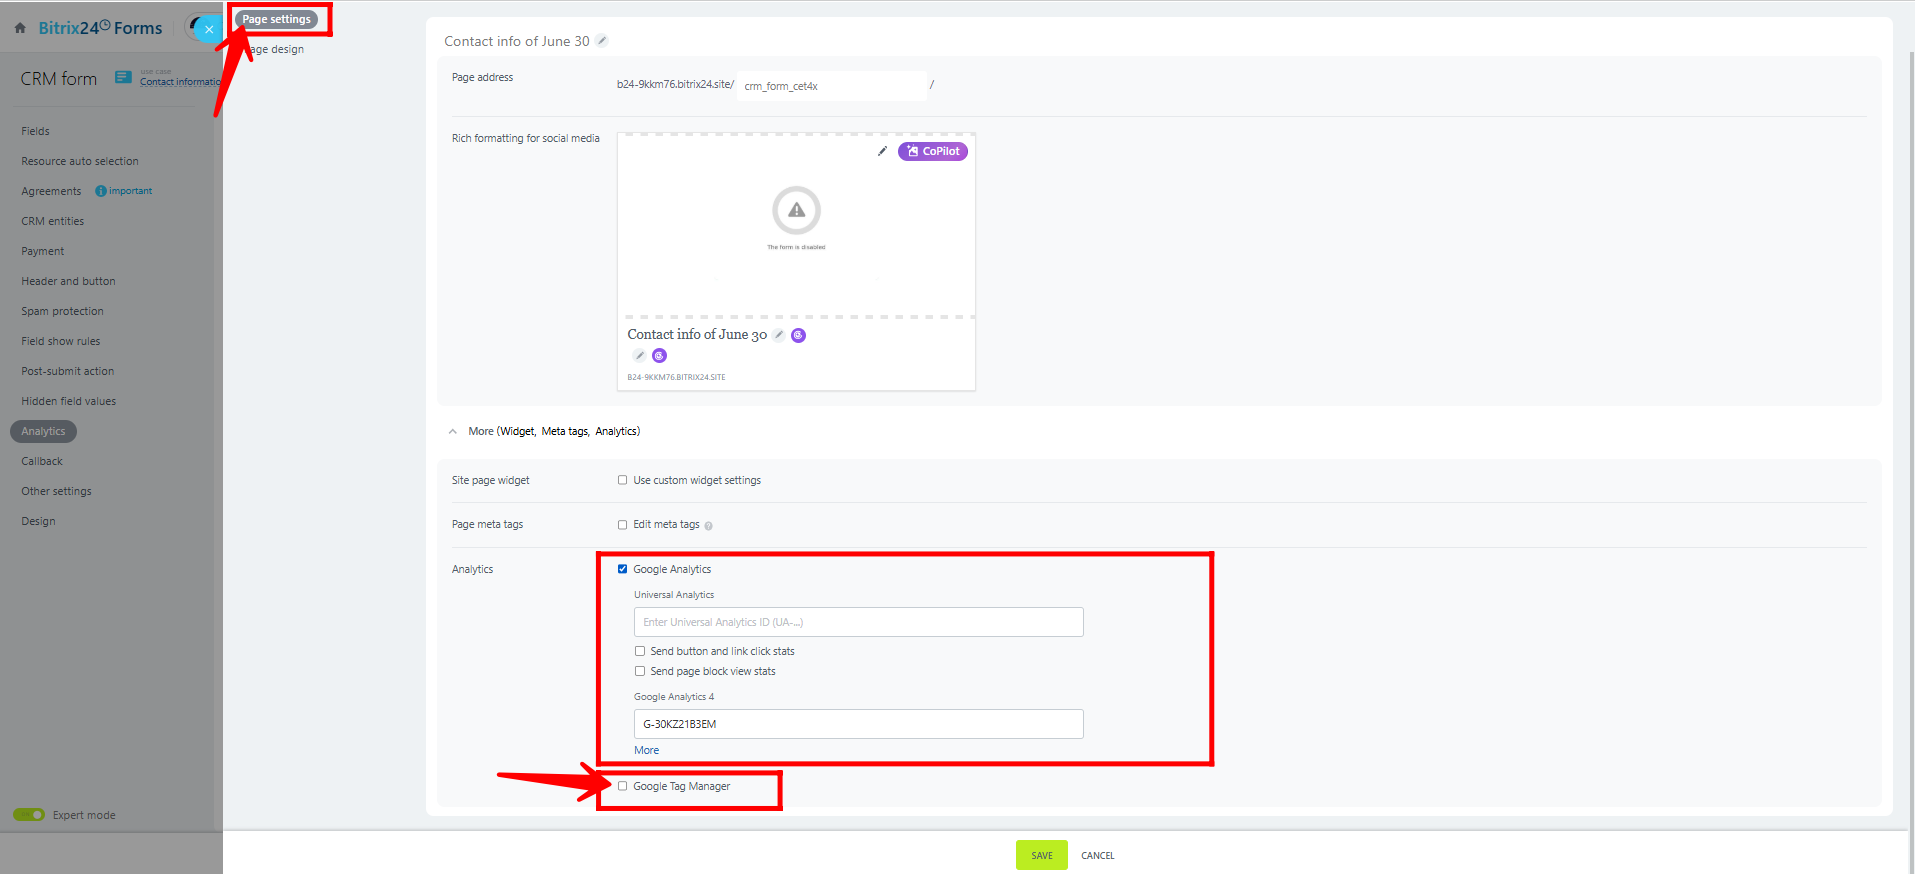
27. Go to the Page Settings in your Bitrix24 form configuration, and uncheck the Google Analytics box. Now, check the box for Google Tag Manager (GTM) to begin configuration through GTM instead. Adding this extra layer offers advantages over the standard GA4 setup—such as more flexible event tracking, easier tag management, and the ability to modify or add new tracking without changing the website code.
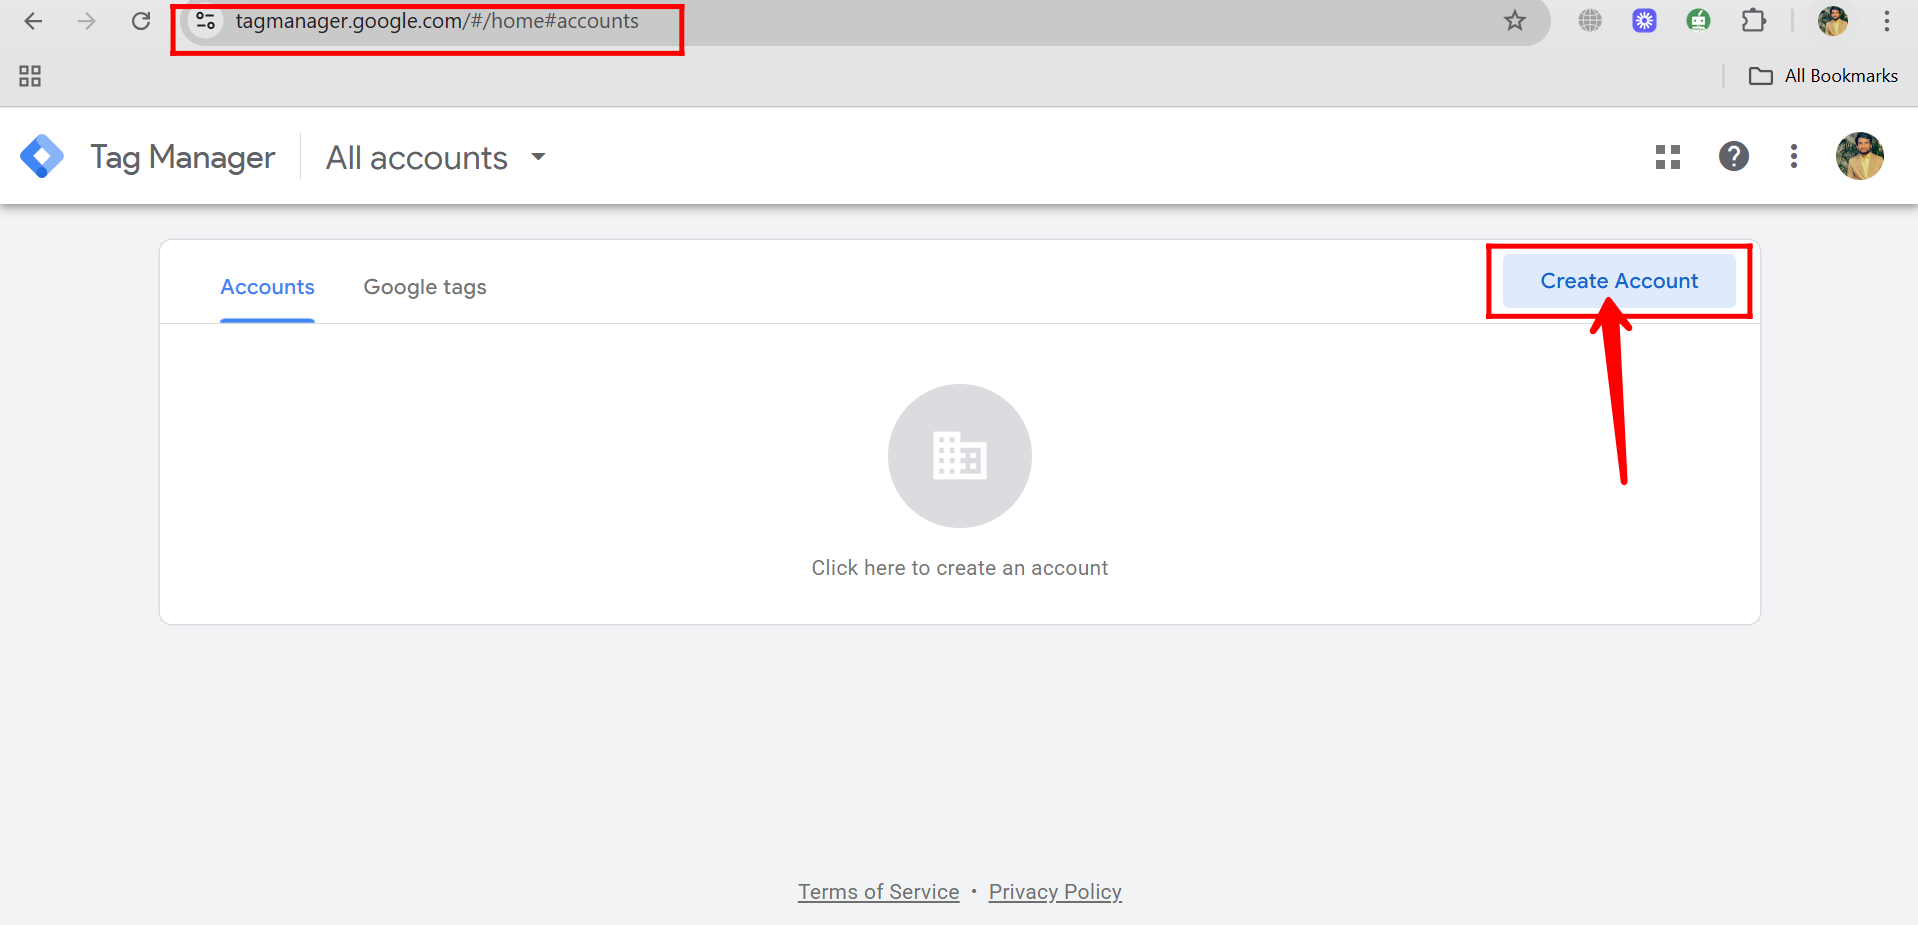
28. Go to tagmanager.google.com and click “Create Account” to begin setting up your Google Tag Manager account. This will allow you to manage tags and tracking for your website, including integration with Google Analytics 4.
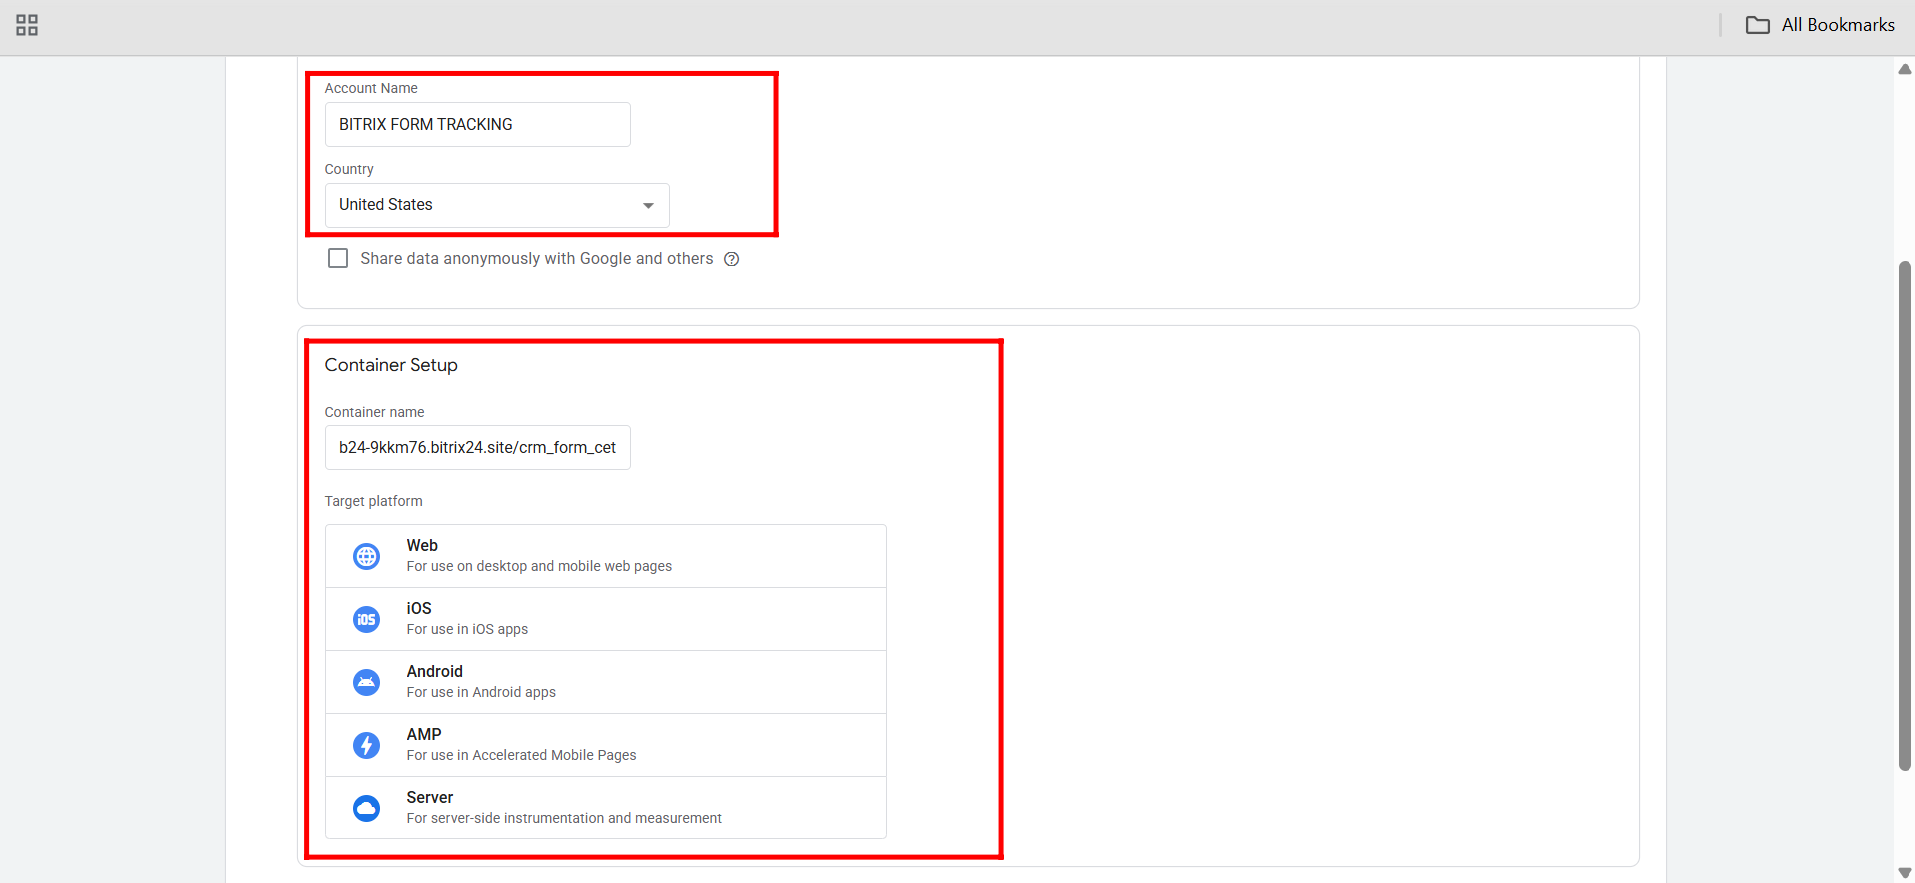
29. In the Google Tag Manager account setup, enter your Account Name (usually your company name), select your Country, and provide a Container Name (typically your website domain or project name). Then, choose Web as the target platform since you’re tracking a web-based CRM form.
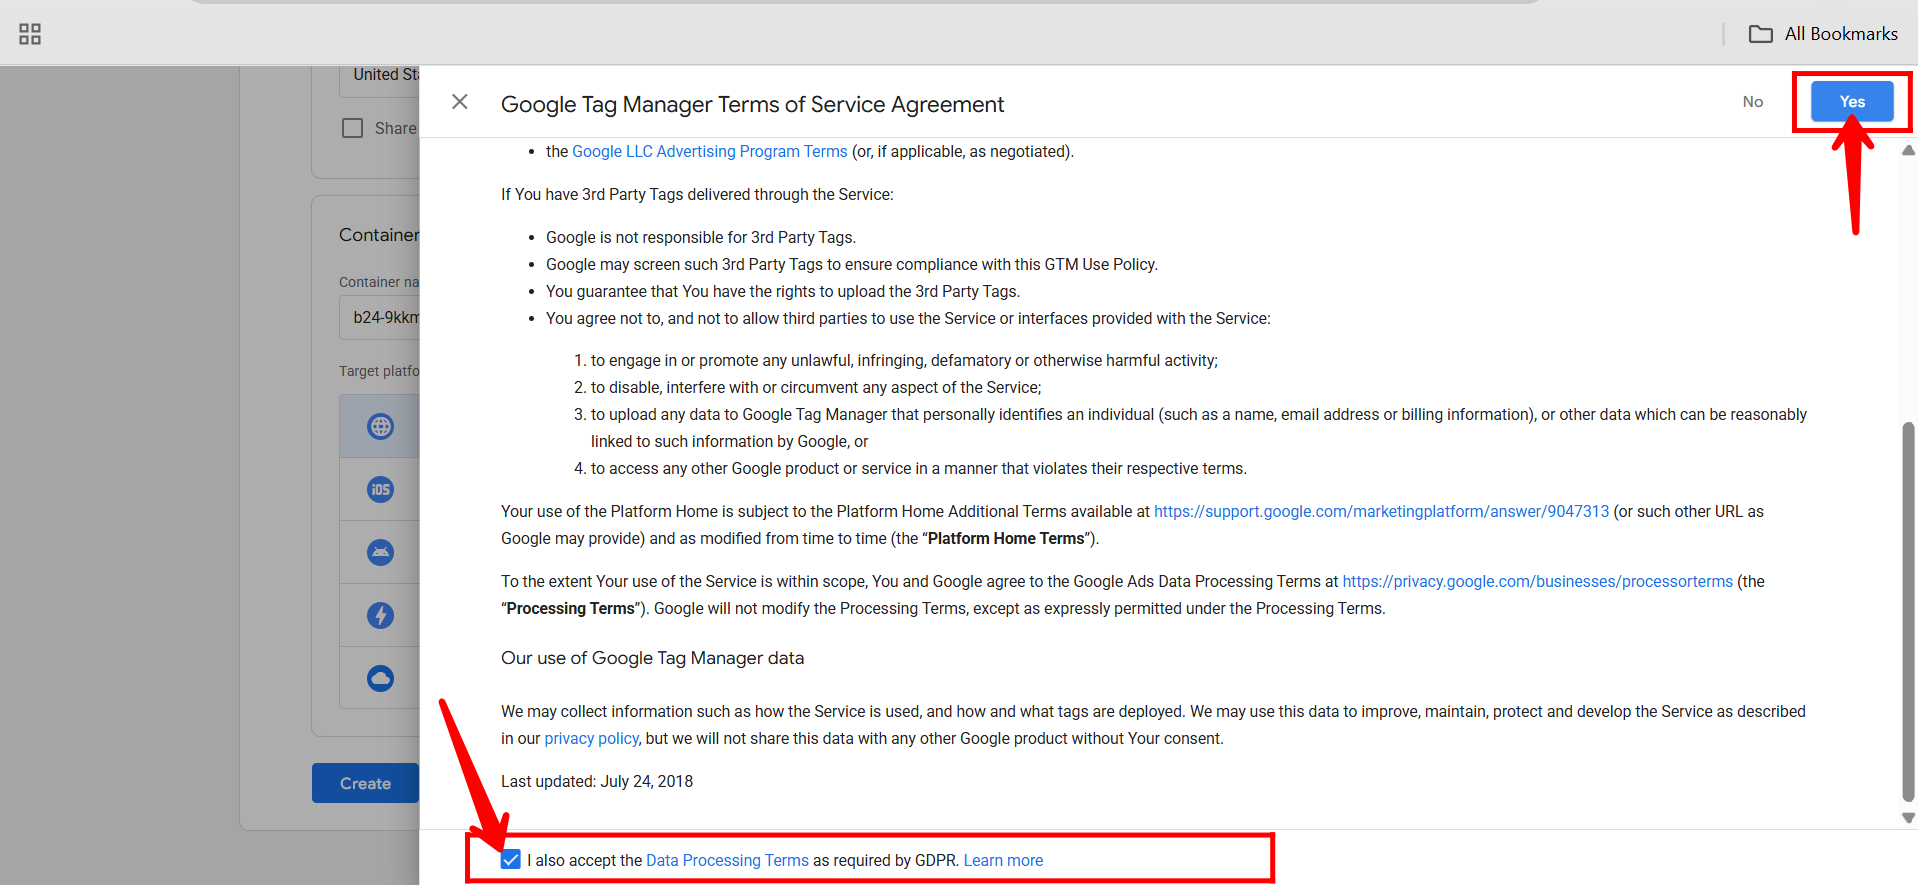
30. Accept all the data processing terms by reviewing and agreeing to them, then click “Yes” to complete the setup process.
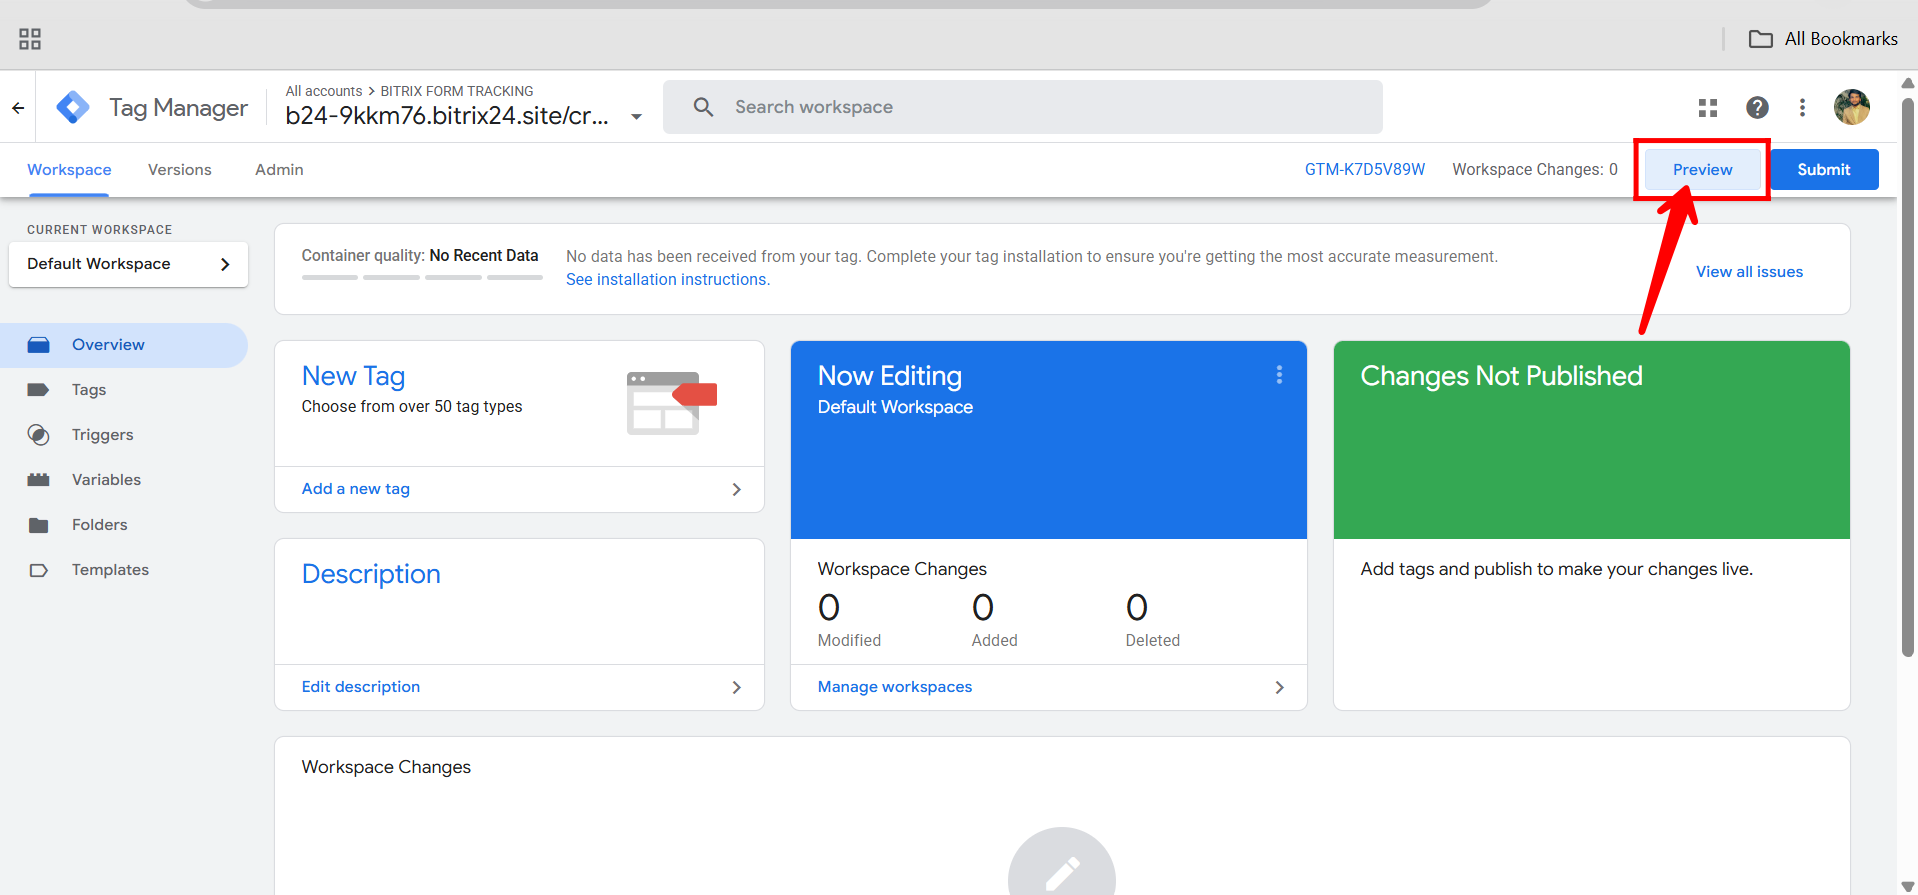
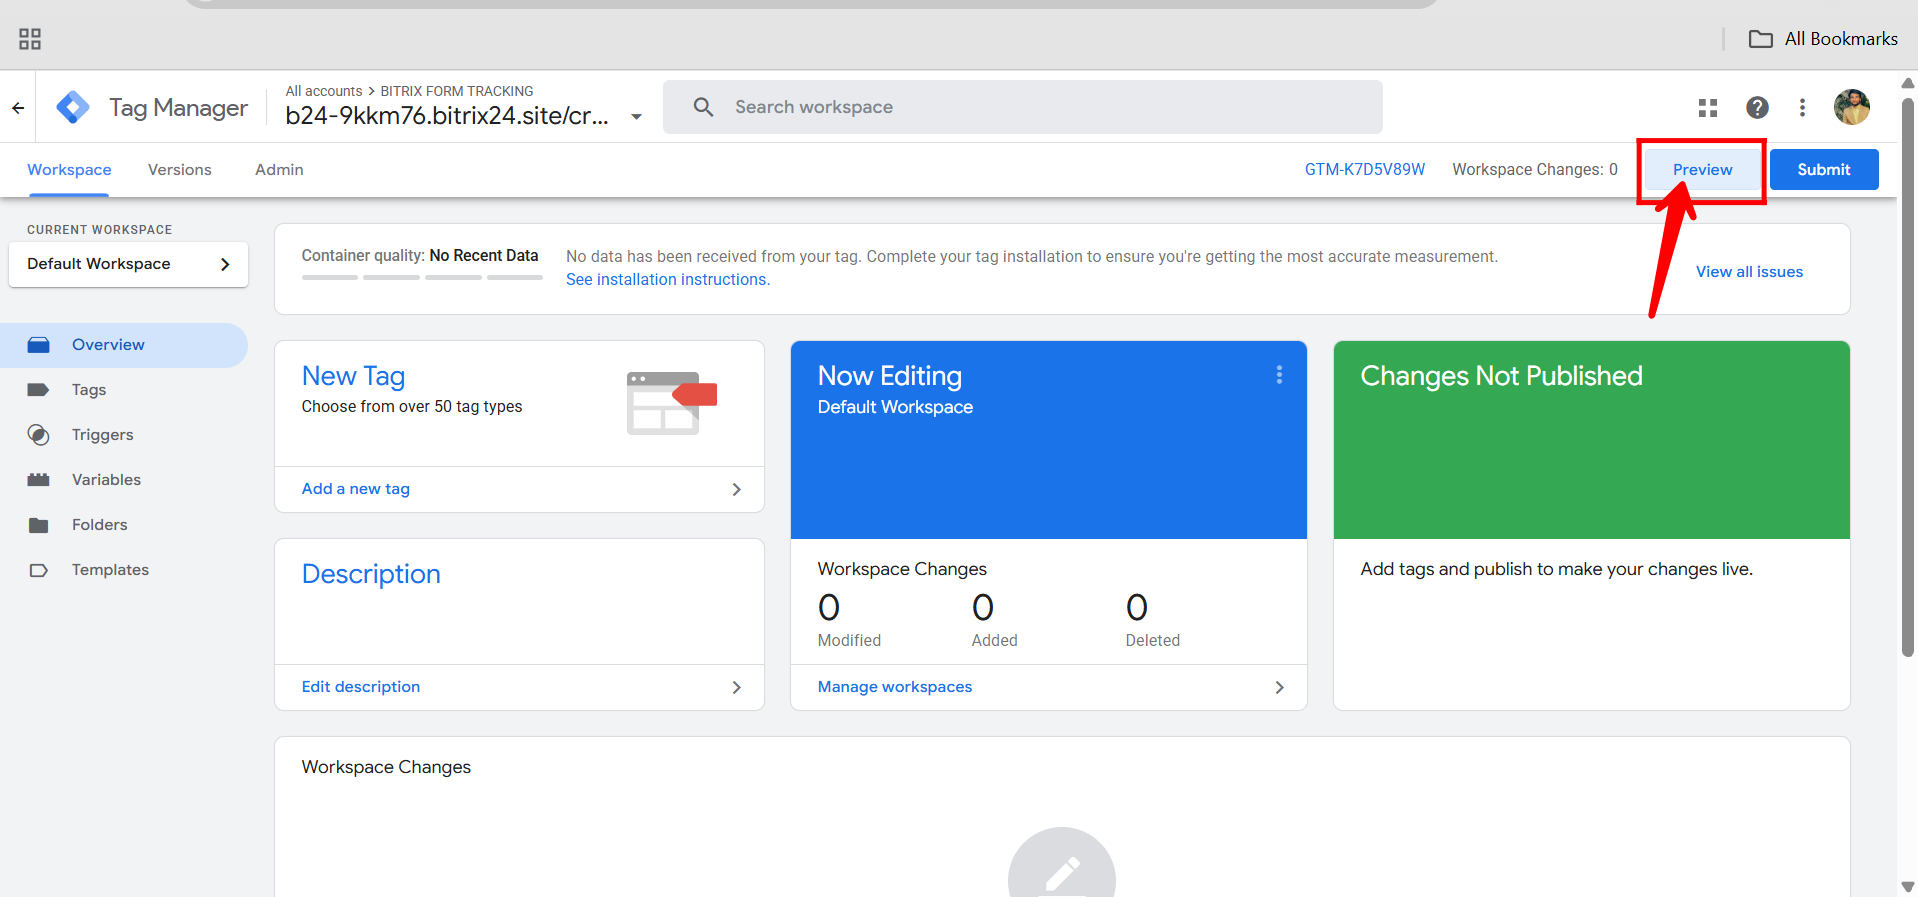
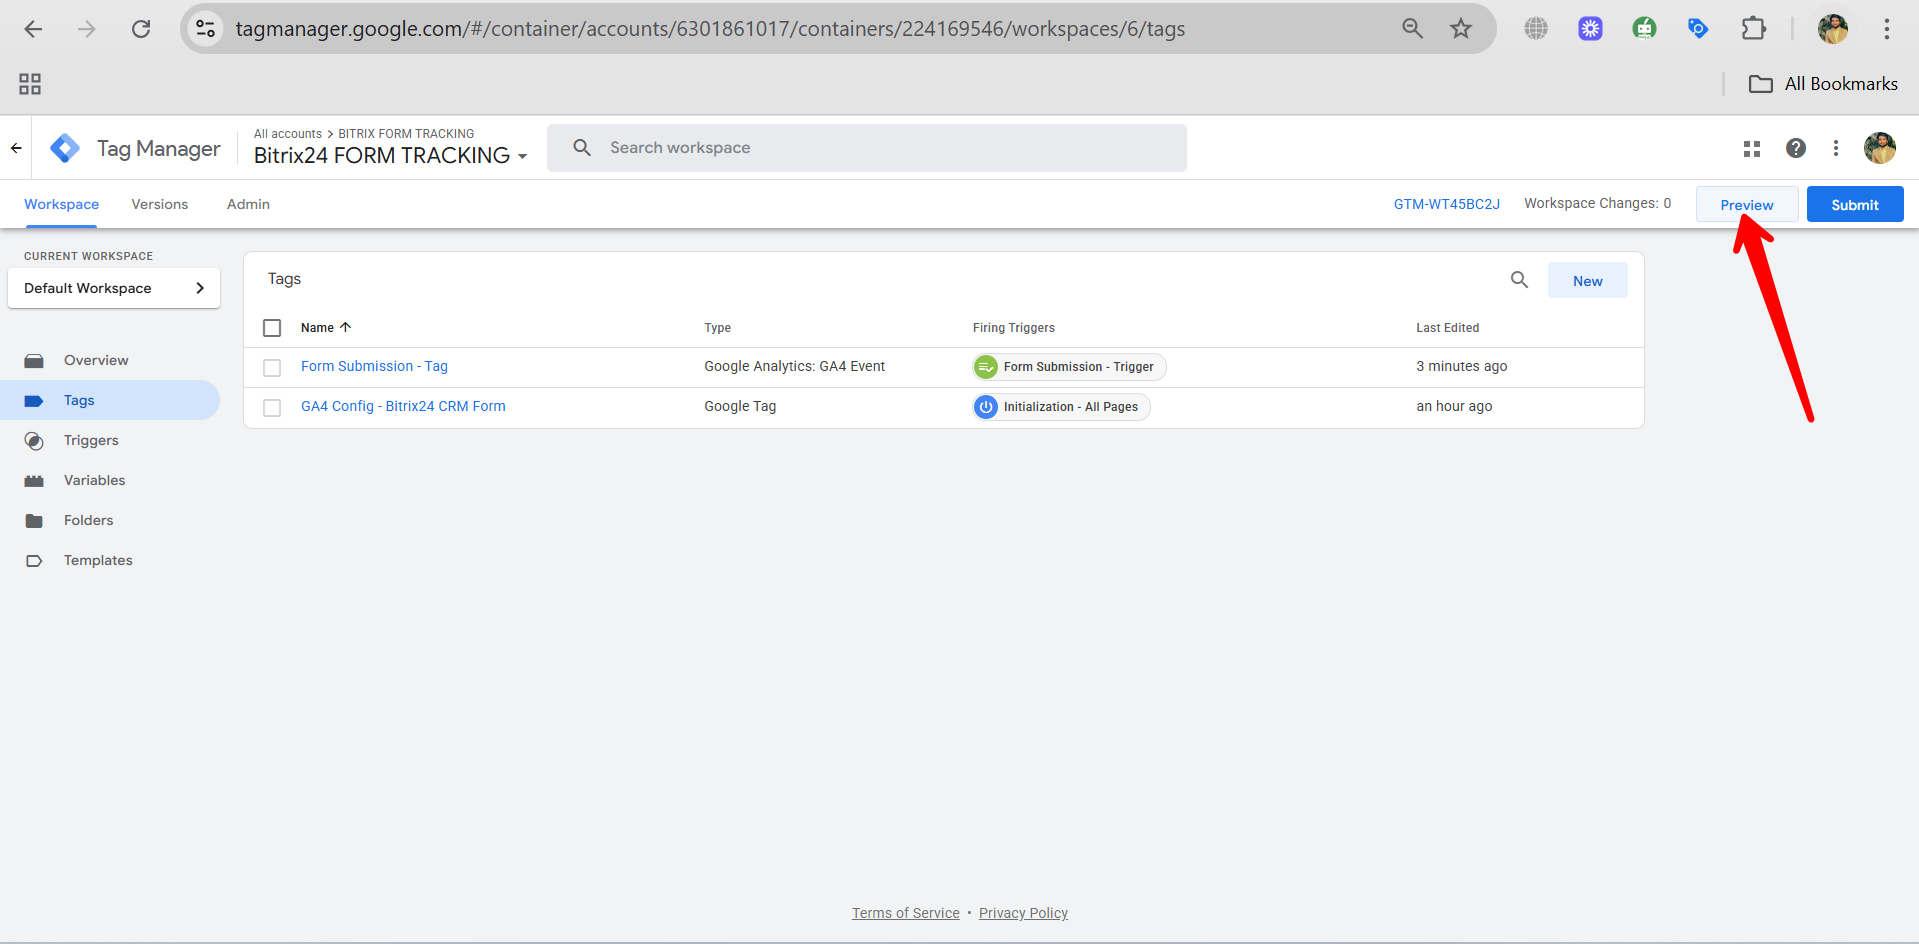
31. Once your container is set up, click “Preview” in the top-right corner of the Google Tag Manager dashboard to open Tag Assistant. This allows you to test and debug your tag configurations in real-time on your website or CRM form before publishing them.
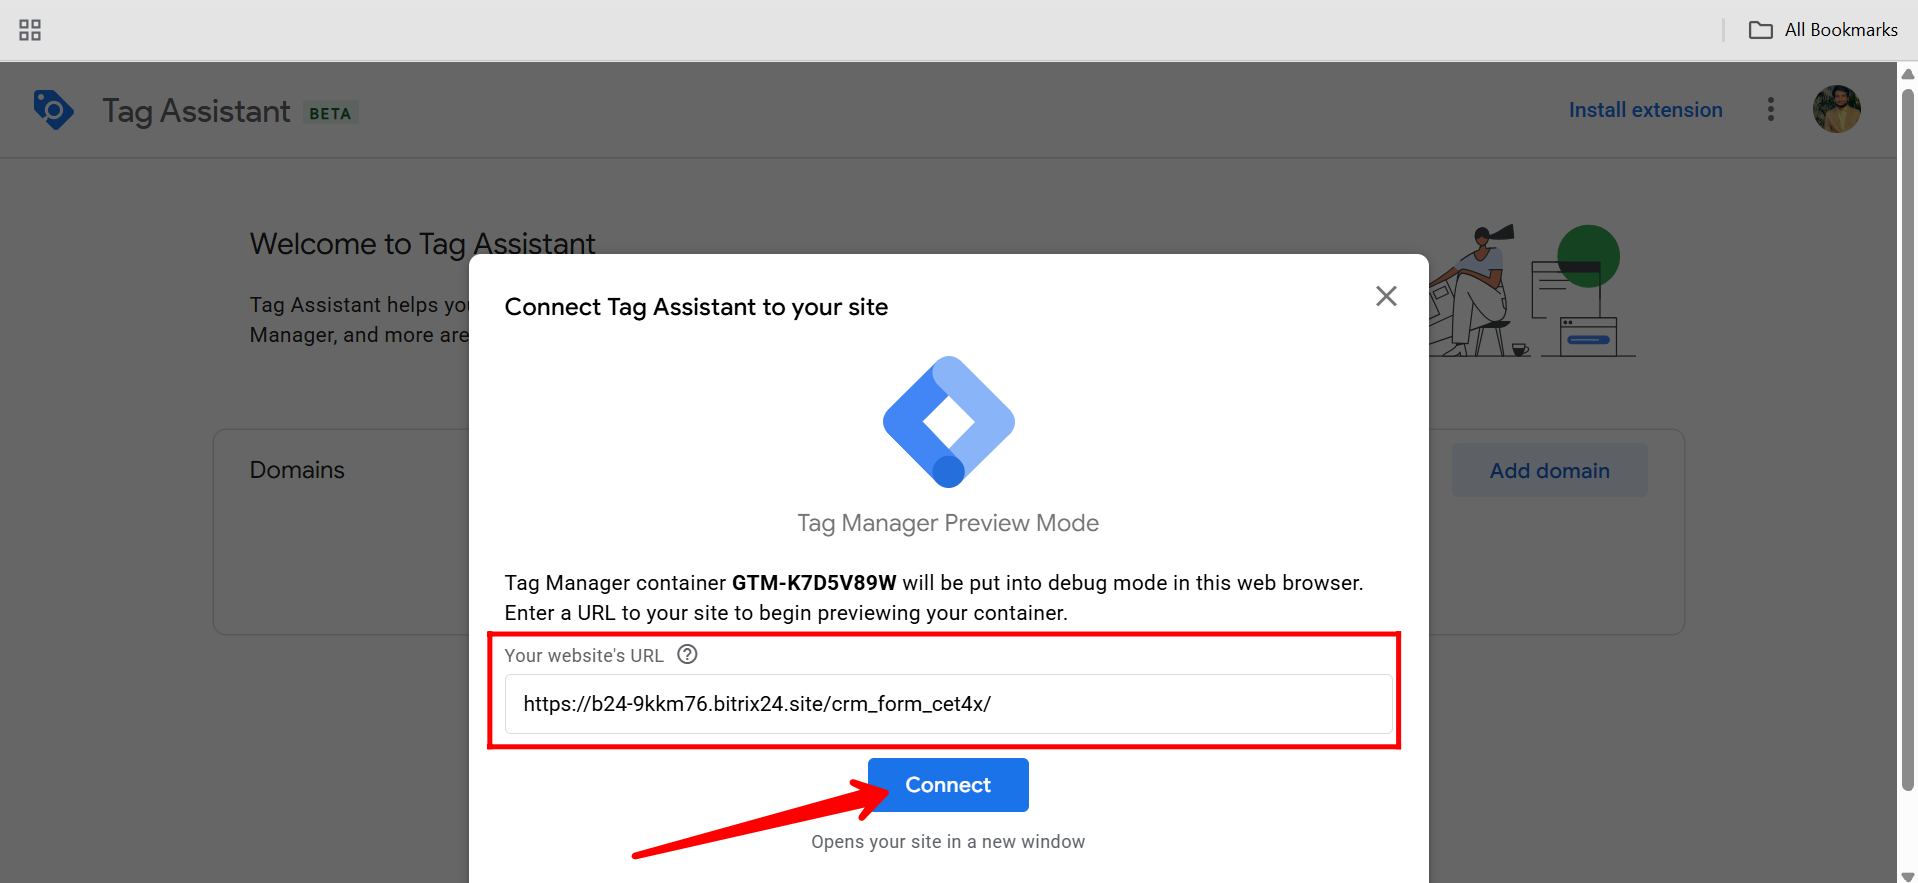
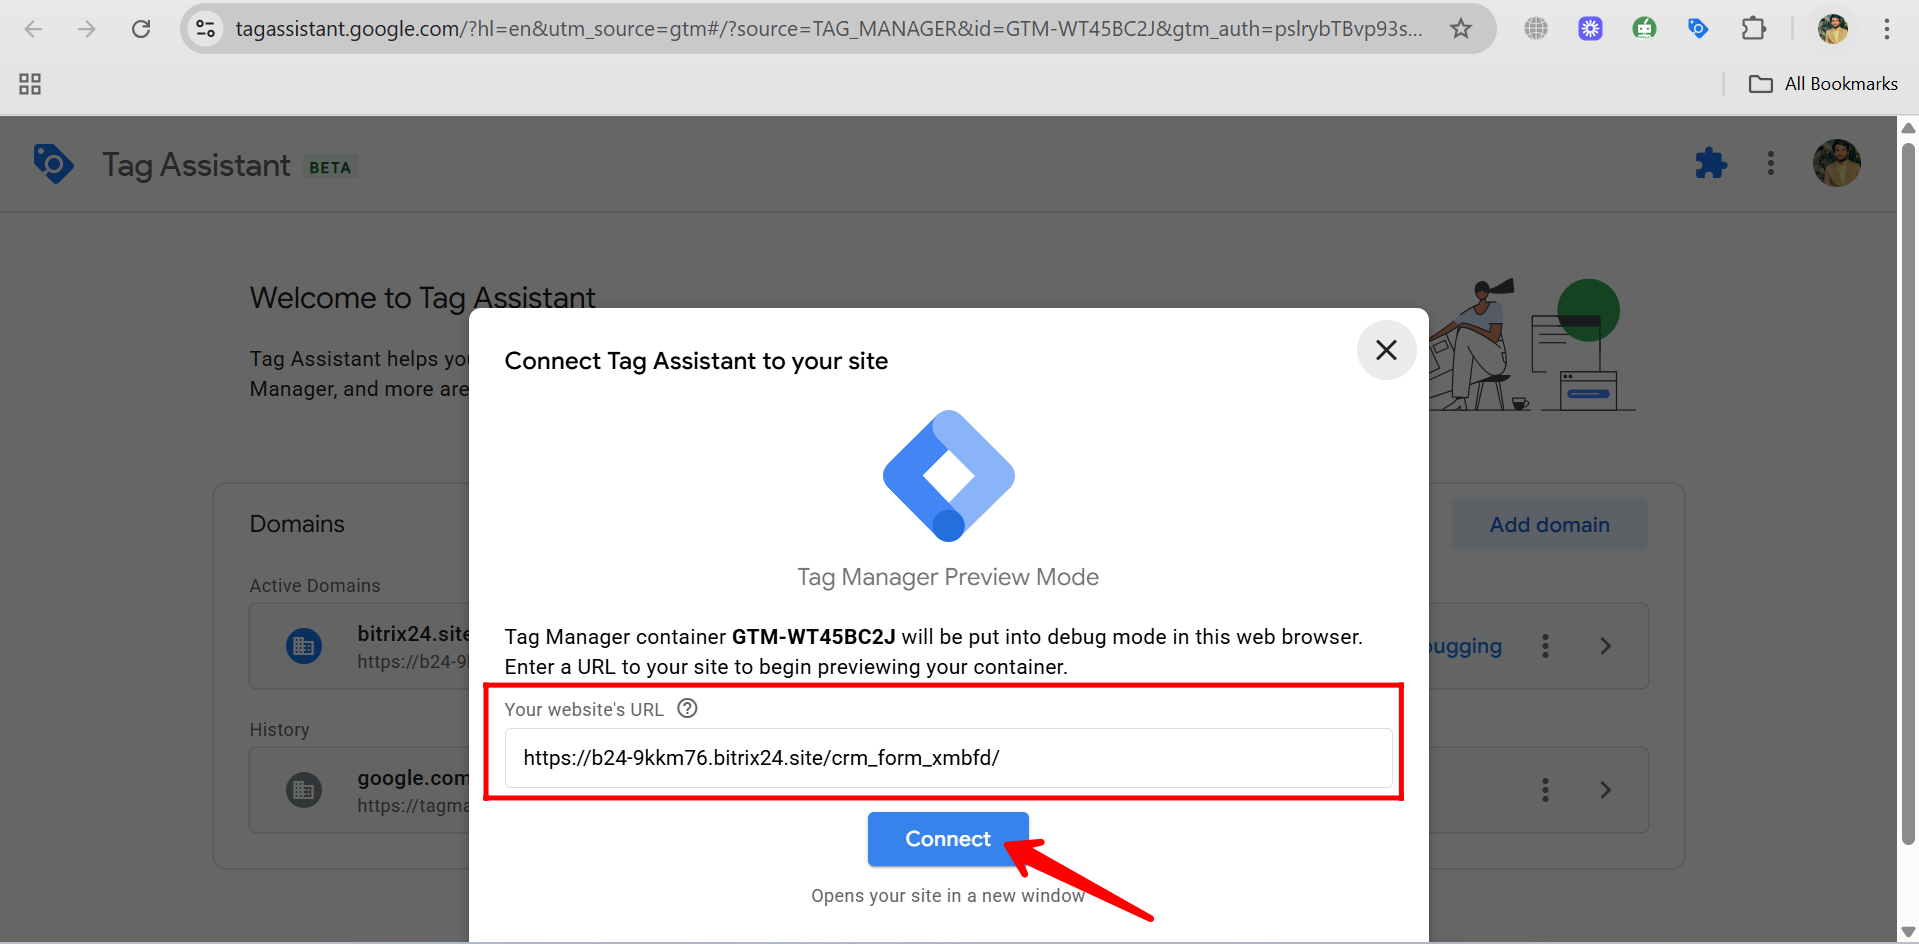
32. In the Tag Assistant preview window, enter your website’s URL (the CRM form link), then click “Connect.” This will open your site in a new tab and begin a real-time debugging session to test your GTM setup.
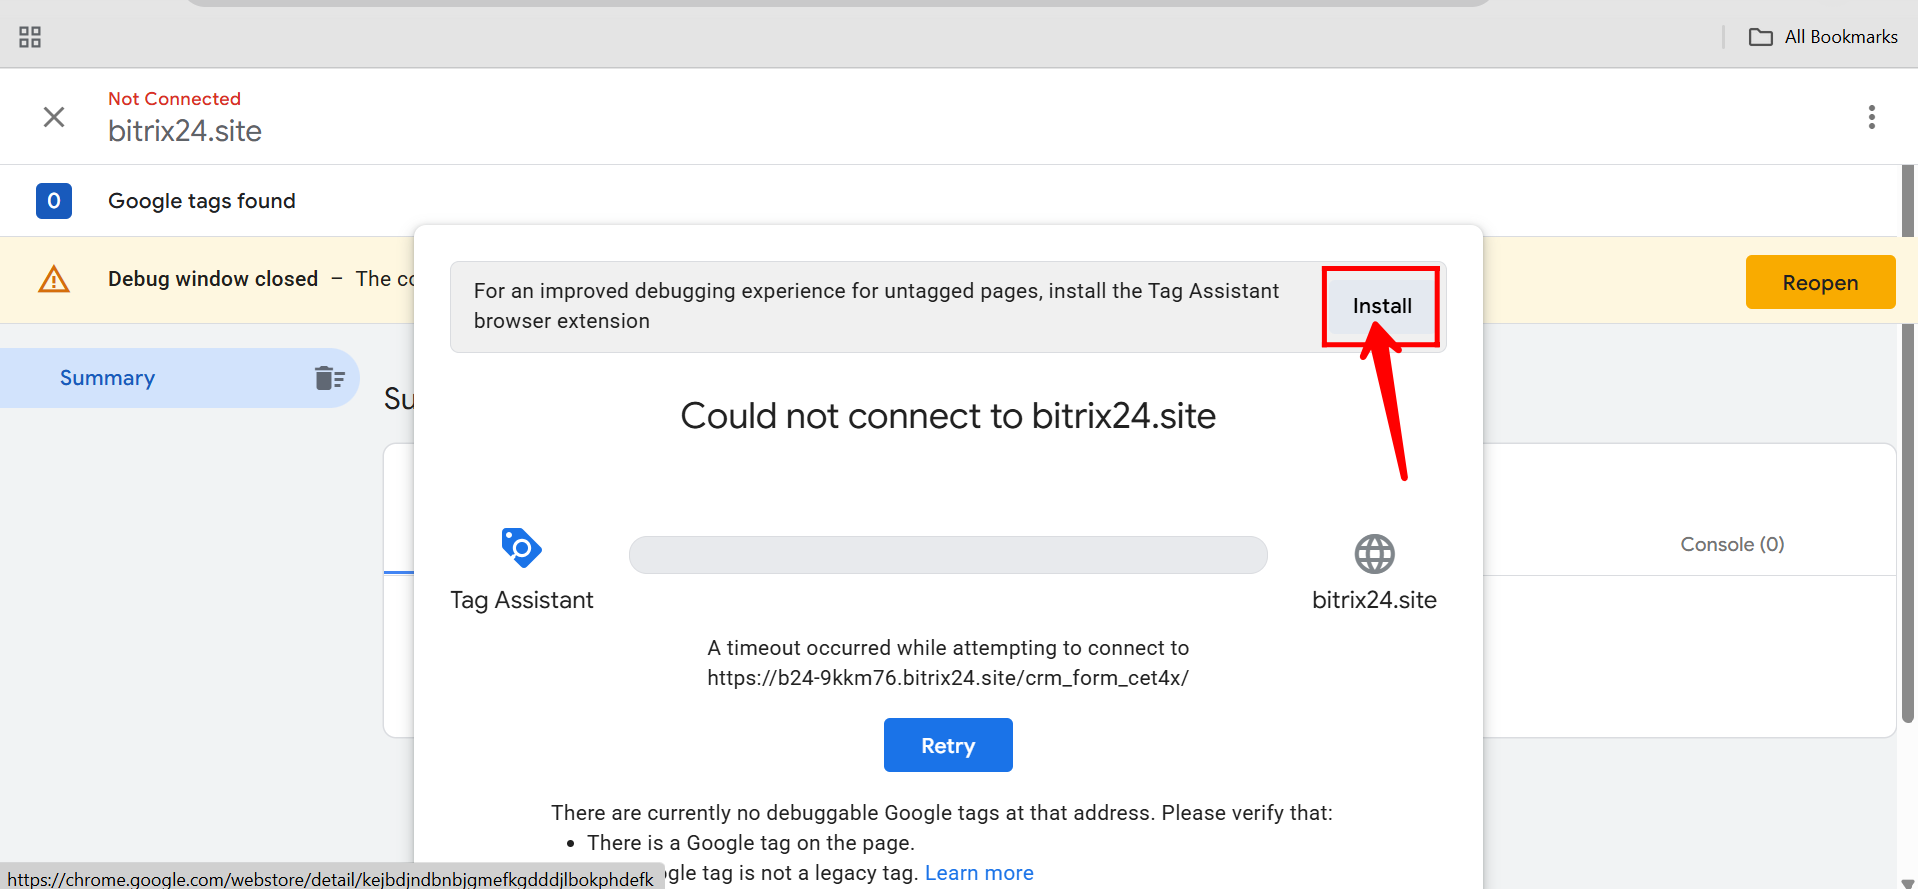
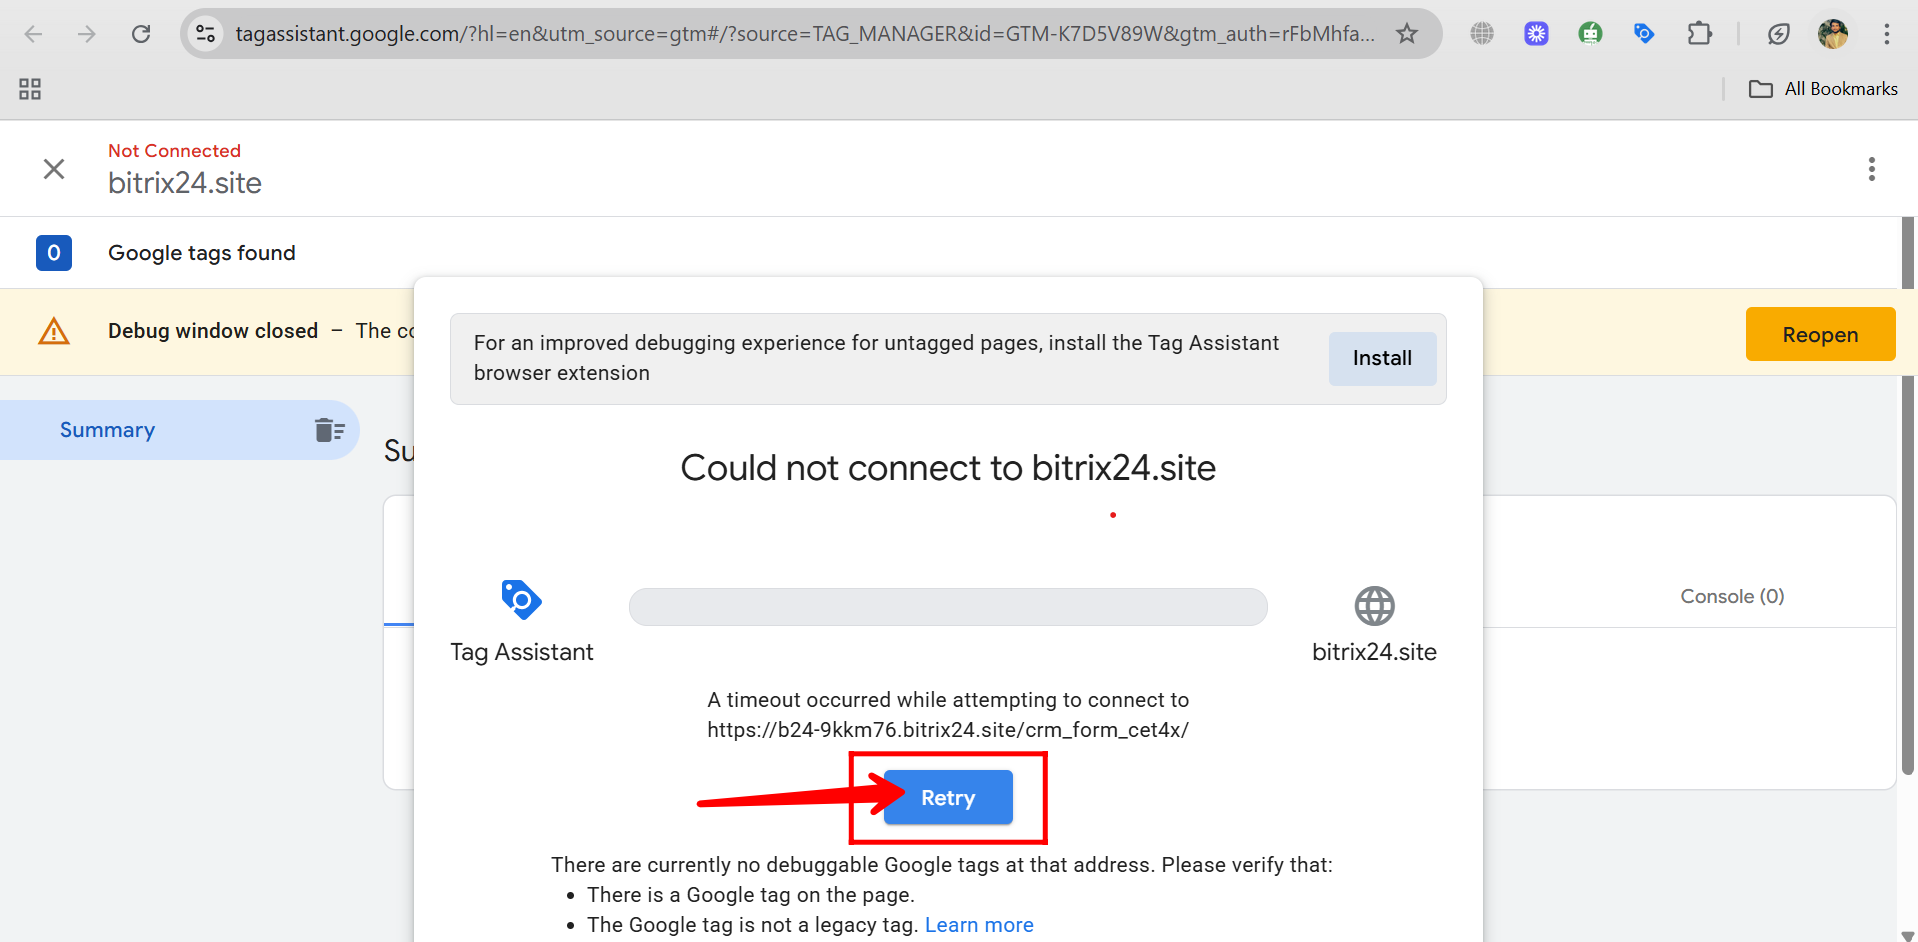
33. If you see the error “Could not connect to bitrix24.site” along with a message suggesting “For an improved debugging experience for untagged pages, install the Tag Assistant browser extension”, click “Install” to add the Tag Assistant extension to your browser. This extension helps enable real-time debugging for pages that don’t yet have GTM properly embedded.
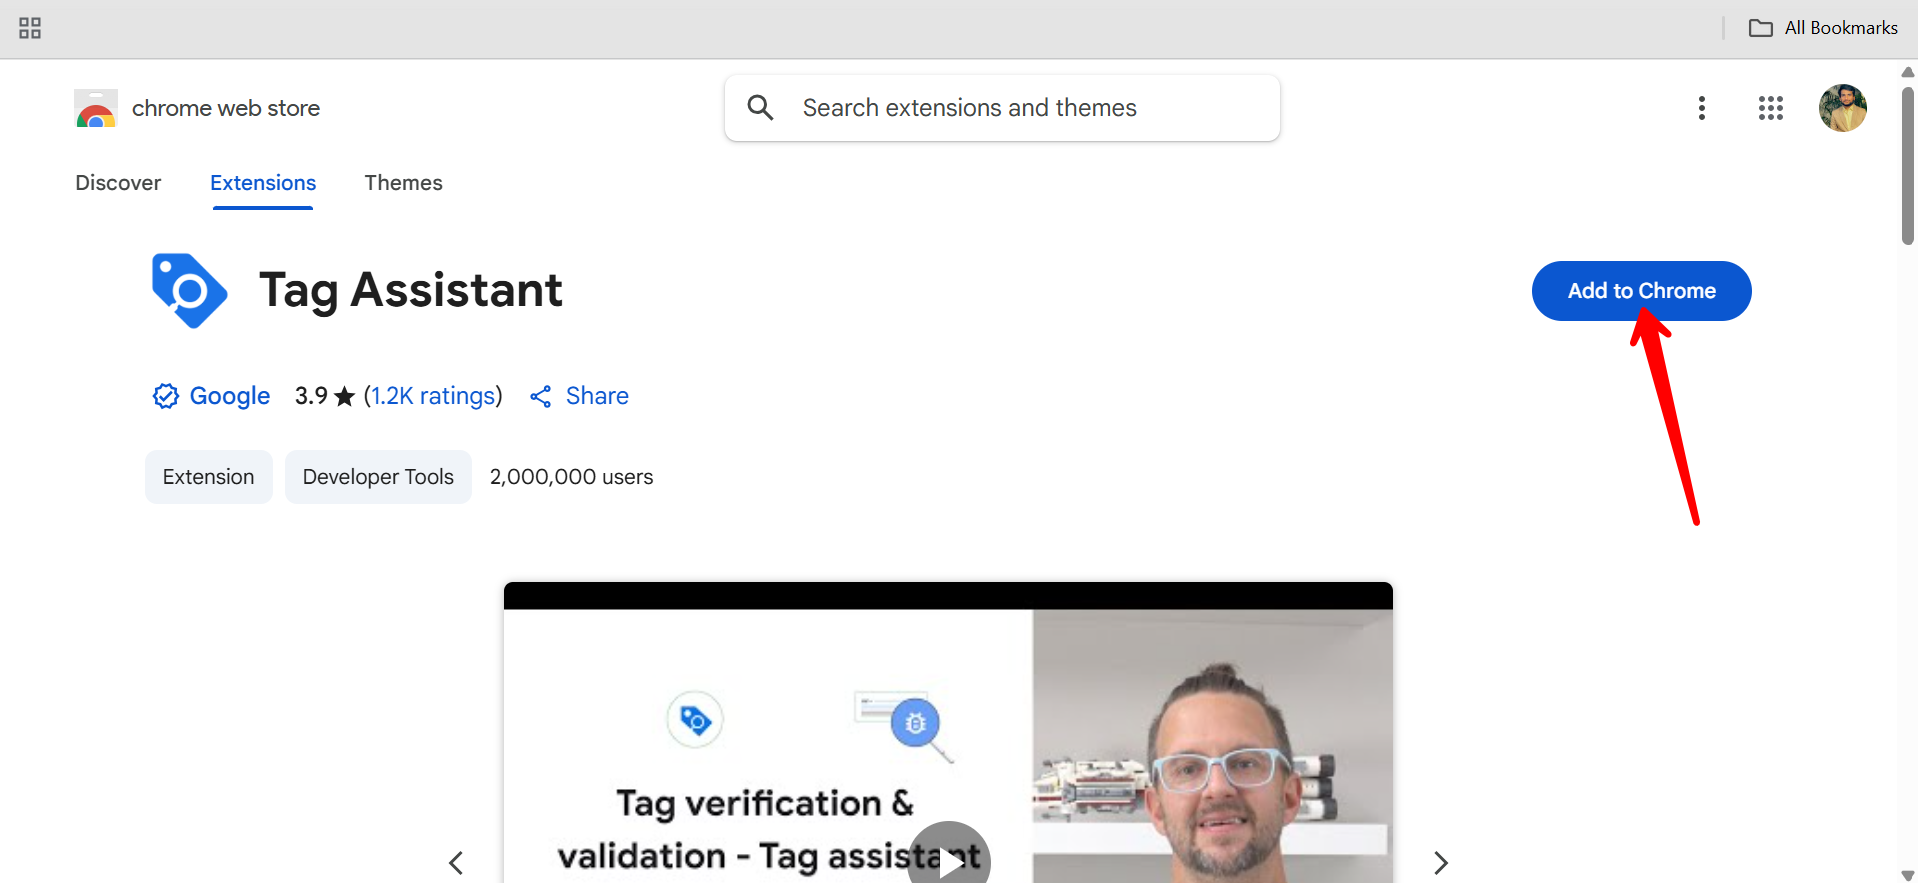
34. Click “Add to Chrome” to install the Tag Assistant browser extension. Then confirm by clicking “Add Extension” in the popup. Once installed, it will help you debug and preview GTM tags on your Bitrix24 form more effectively.
35. After installing the Tag Assistant extension, go back to the Tag Assistant preview window and click “Retry” to reconnect to your Bitrix24 form. This should now successfully initiate the debugging session.
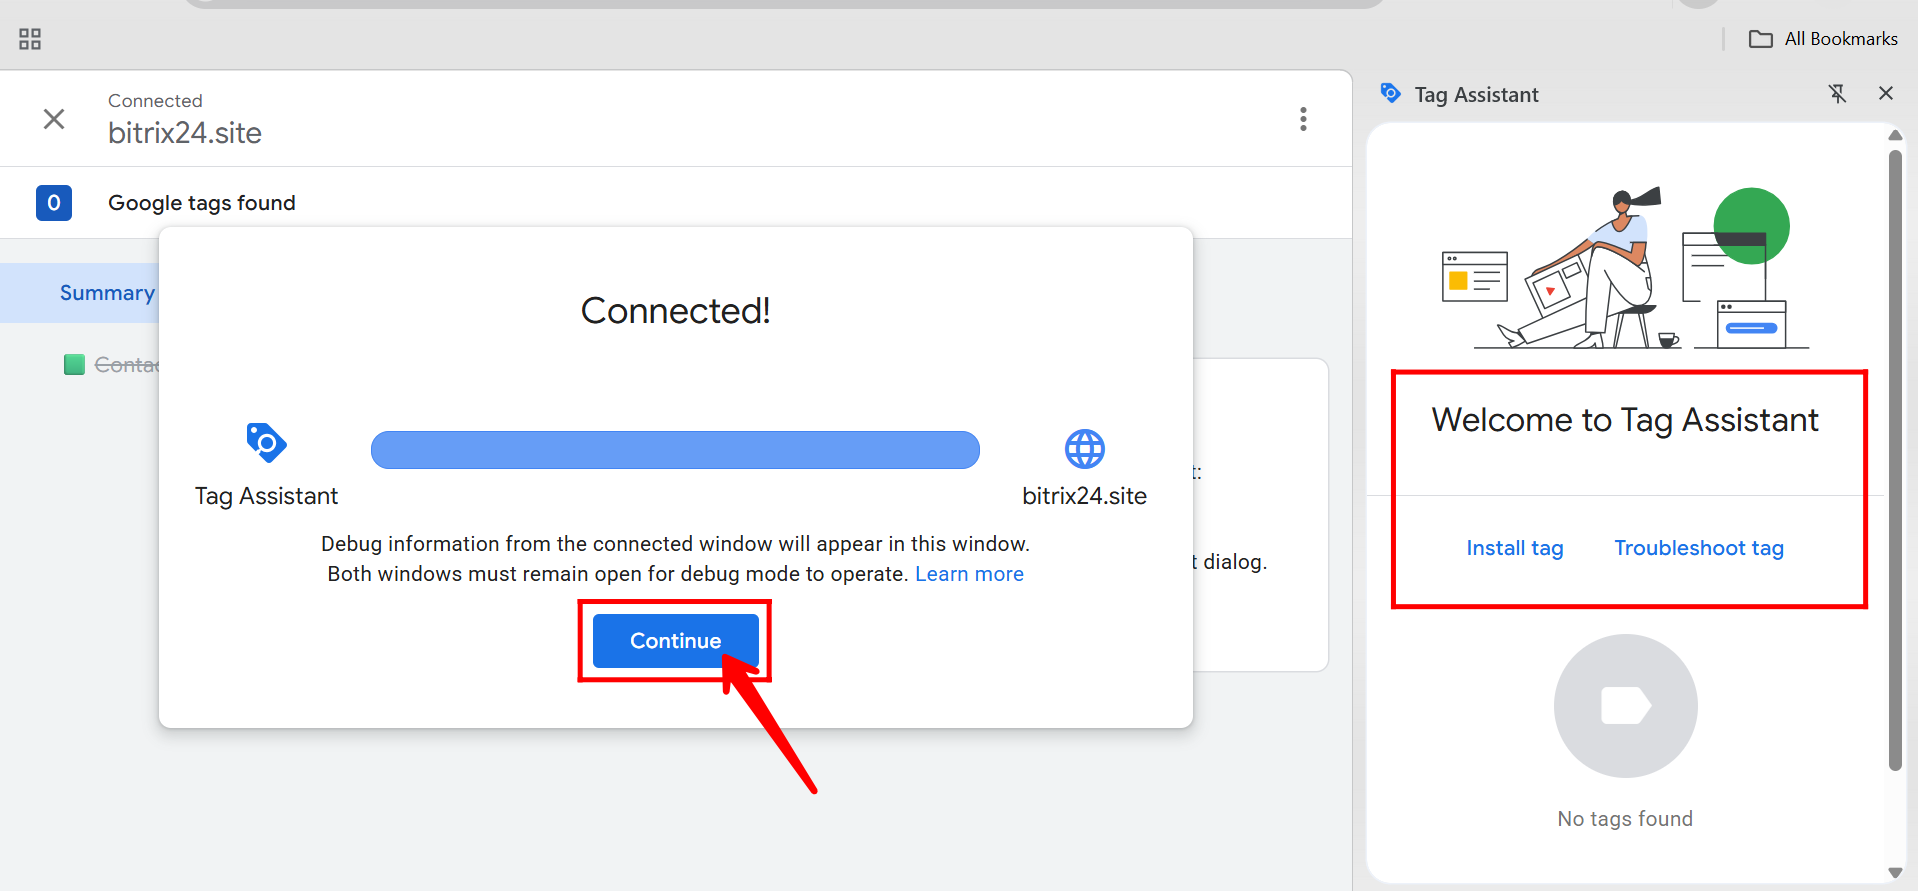
36. Once you’re successfully connected, click “Continue” in the Tag Assistant window. Make sure the Tag Assistant extension is enabled in your browser to ensure proper tracking and debugging during your session.
37. But first, return to the main Google Tag Manager dashboard and copy the GTM container ID—it starts with “GTM-”. You’ll need to paste this ID into the Bitrix24 CRM form to enable GTM tracking on the form.

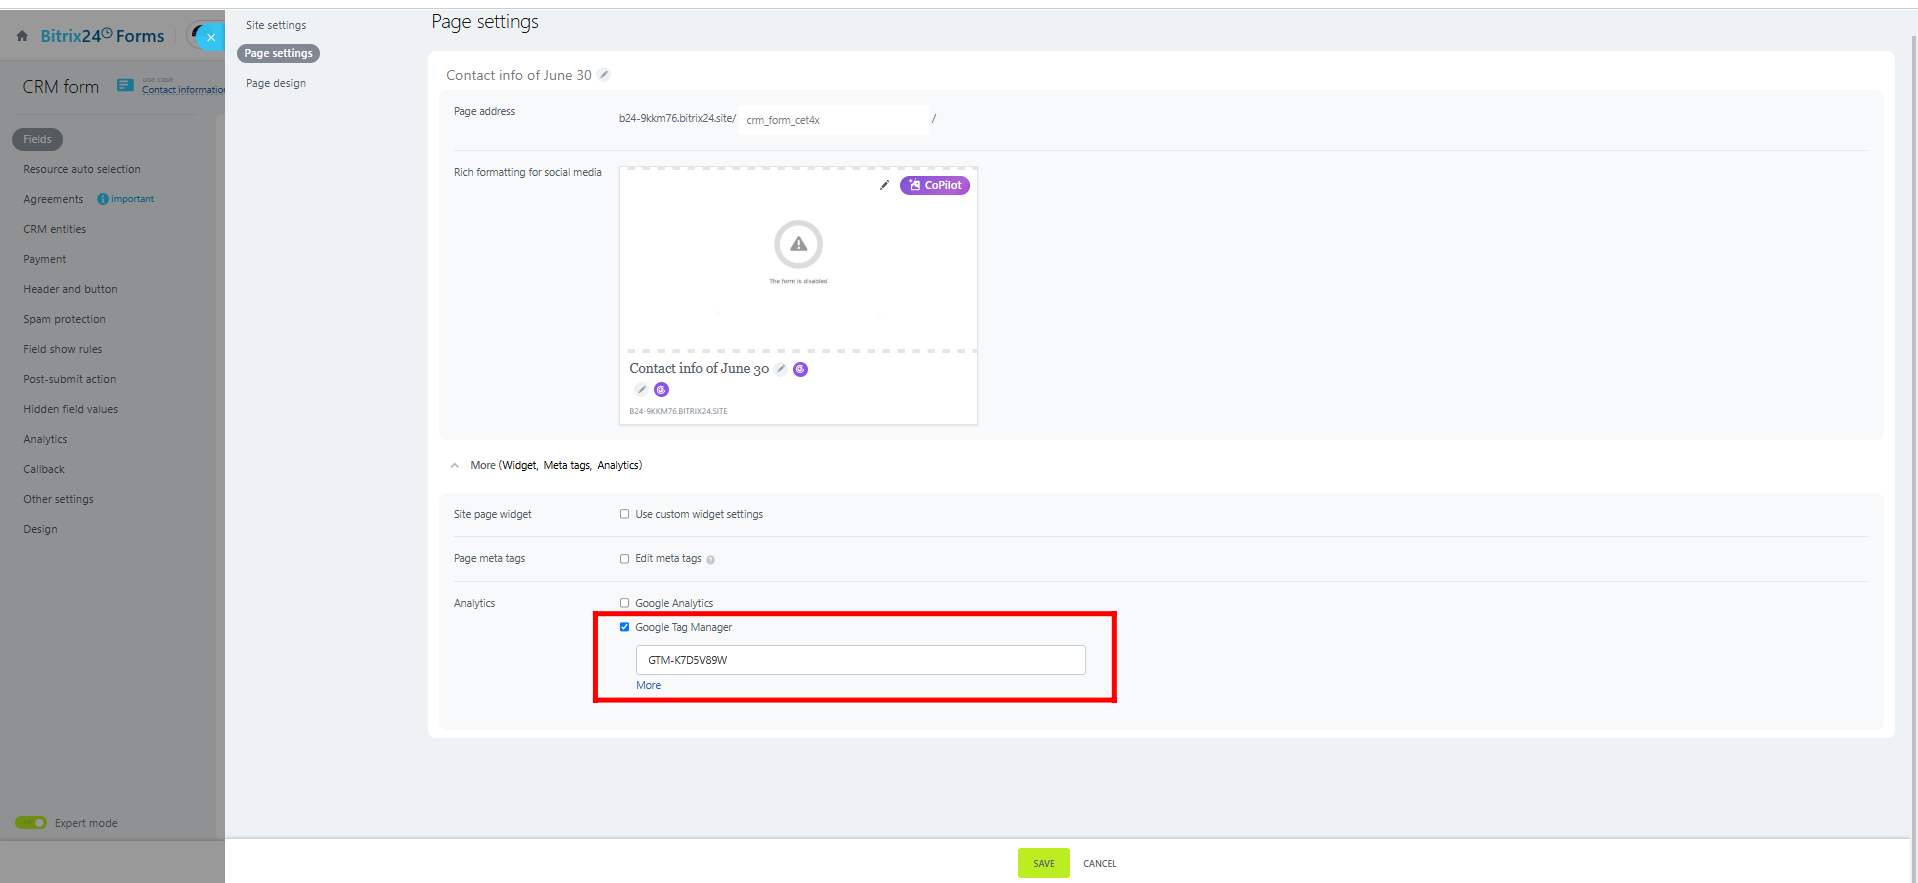
38. In your Bitrix24 CRM form configuration, enable Google Tag Manager and paste the GTM Container ID (e.g., GTM-XXXXXXX). Make sure that Google Analytics 4 is turned off, and only Google Tag Manager is enabled, to avoid duplicate or mixed data being sent to GA4 from both direct and GTM-based tracking setups. Click “Save”.
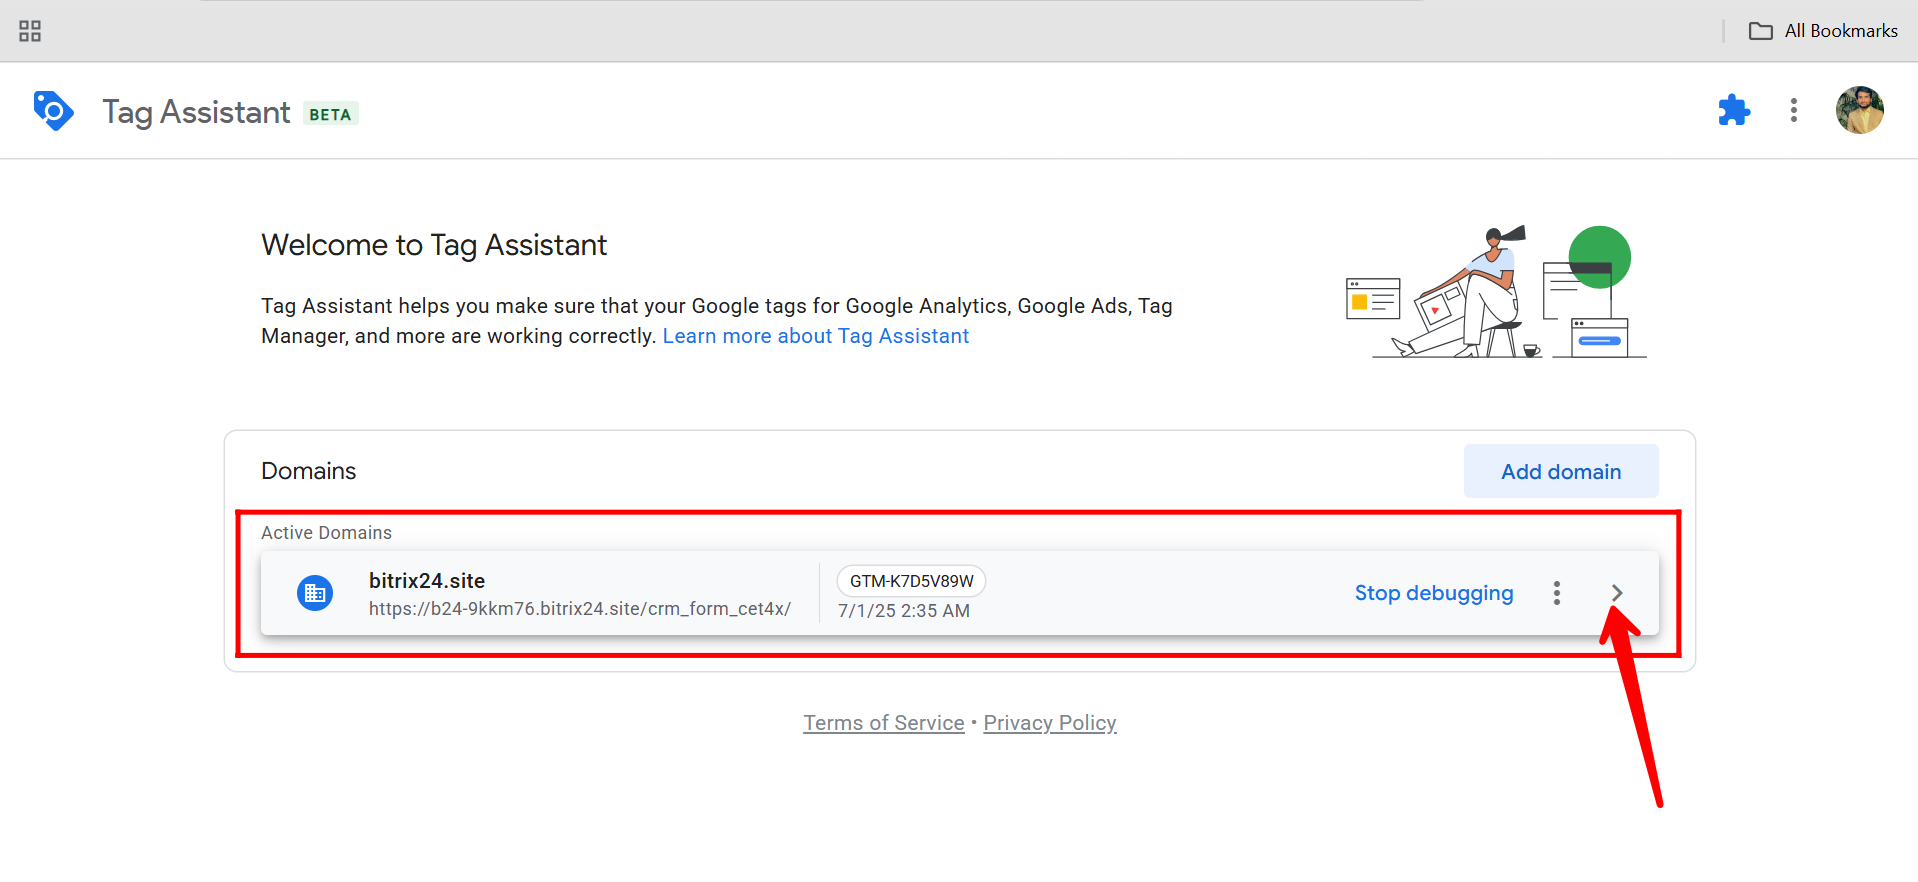
39. Go back to Google Tag Manager and click “Preview” again. This will reopen Tag Assistant, where you can view the active domain(s) your container is connected to and verify that your Bitrix24 form is properly linked and ready for tag testing.
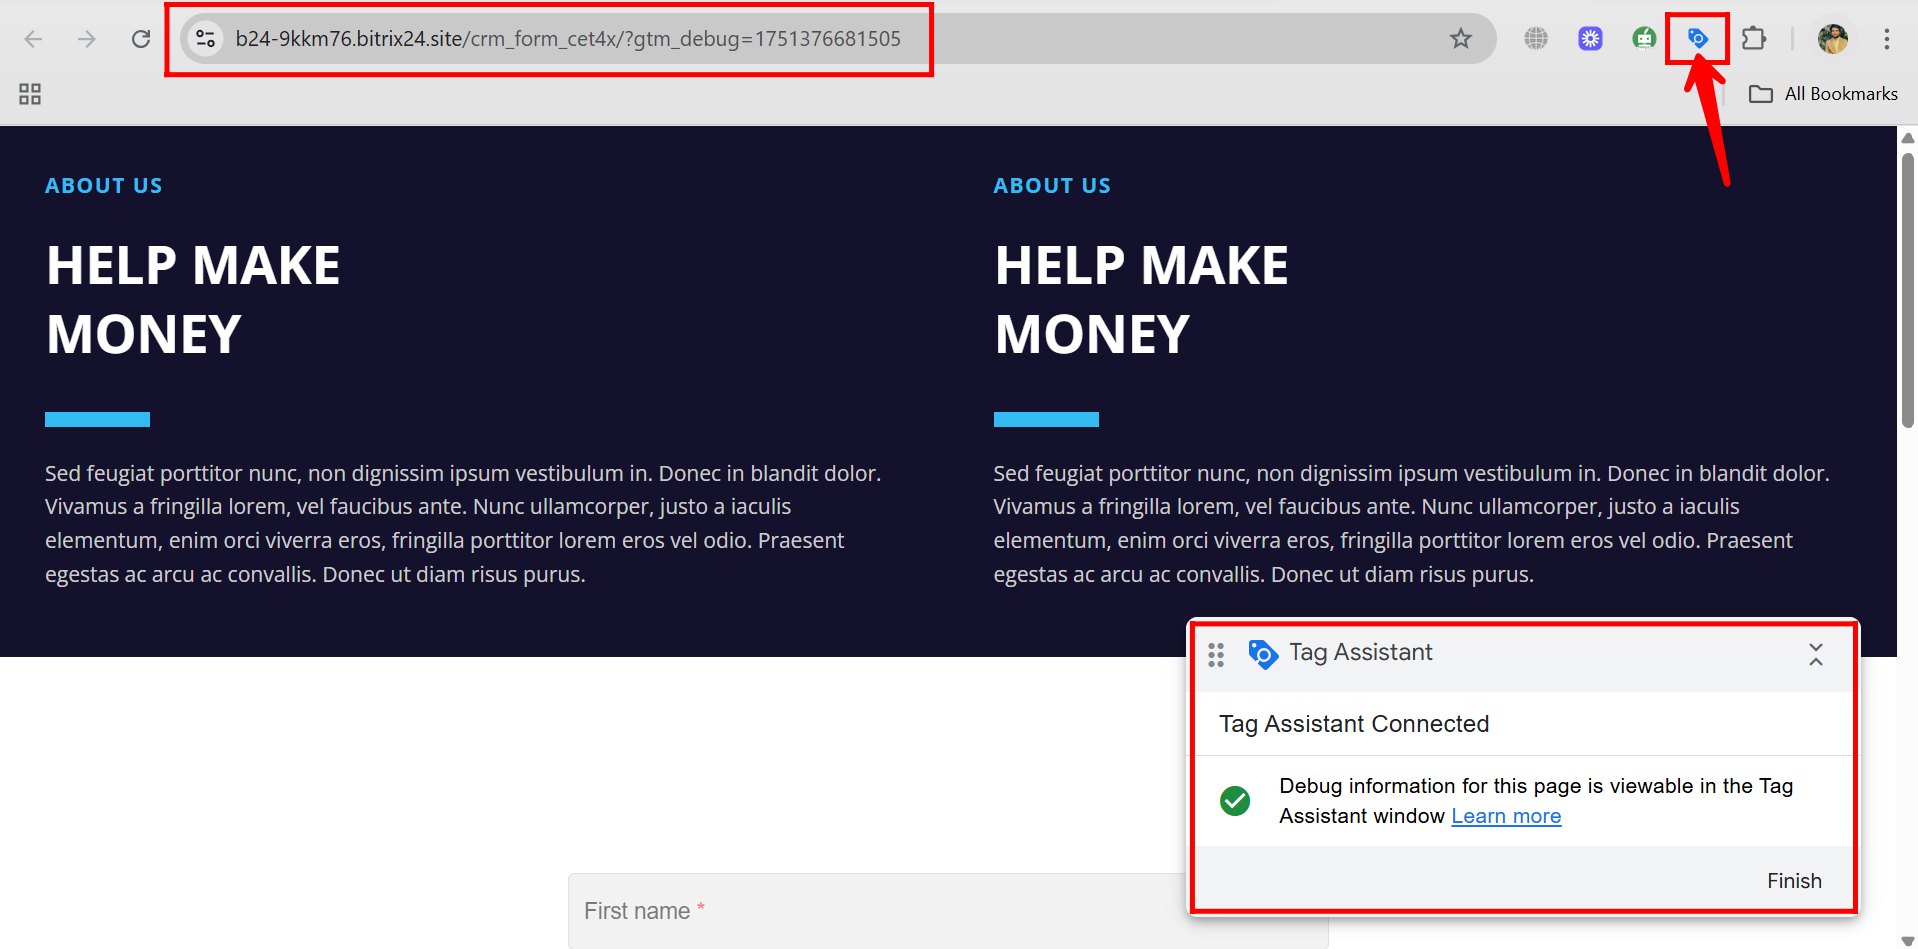
40. Now, open your configured active domain from the Tag Assistant preview panel. This will launch your Bitrix24 form in a new tab with live debugging enabled, allowing you to test and monitor tag activity in real time.
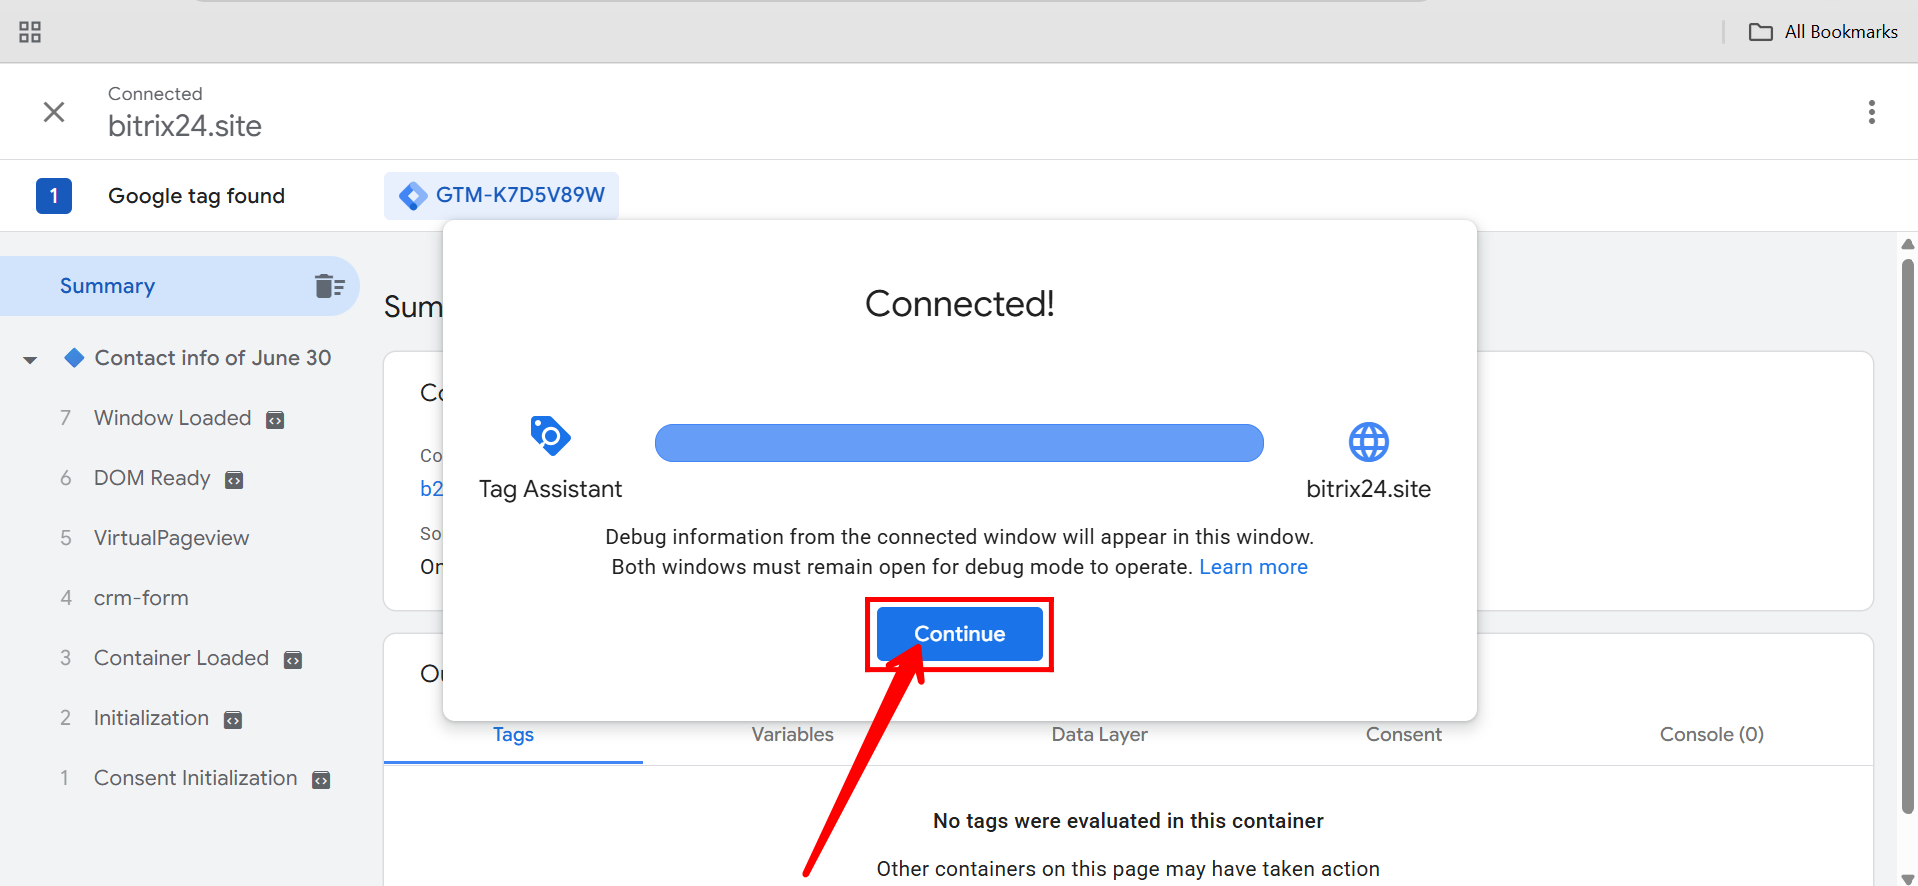
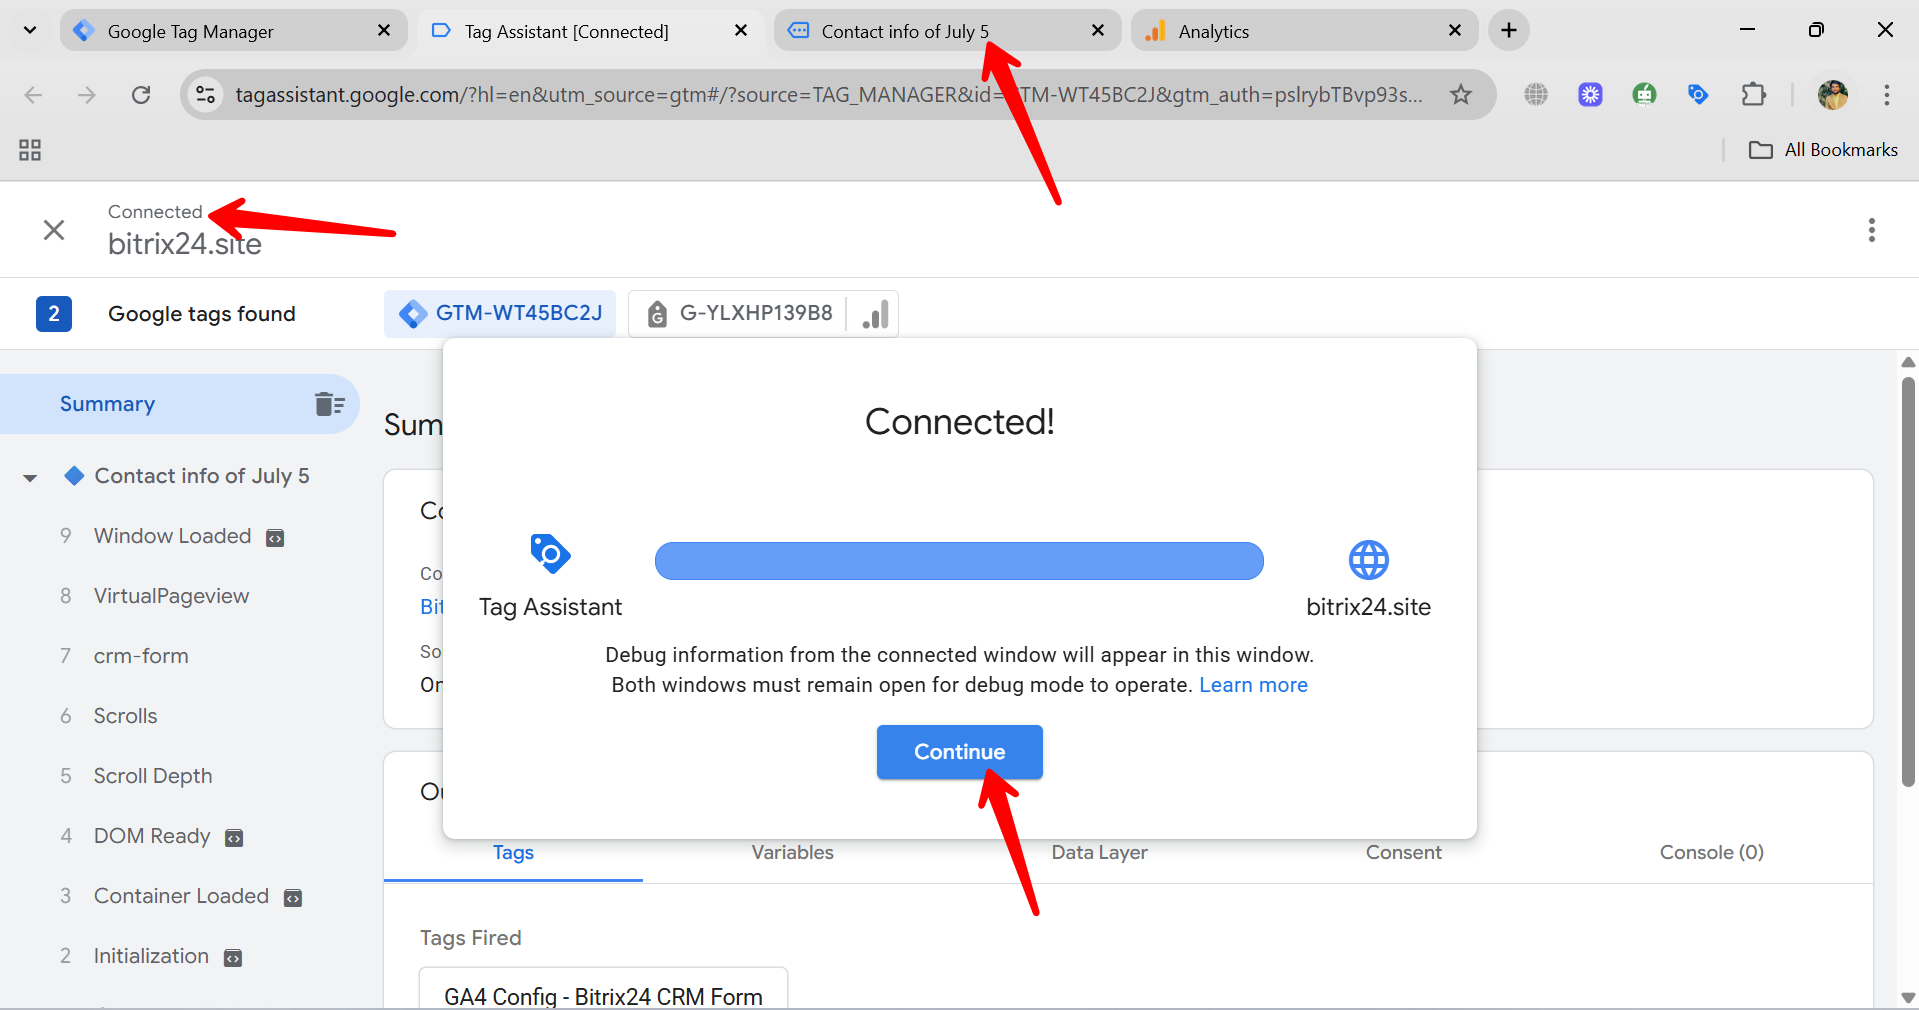
41. You’ve received the “Connected” prompt—click “Continue” to enter the Tag Assistant debugging workspace, where you can monitor real-time data and verify that your tags are firing correctly on the Bitrix24 form.
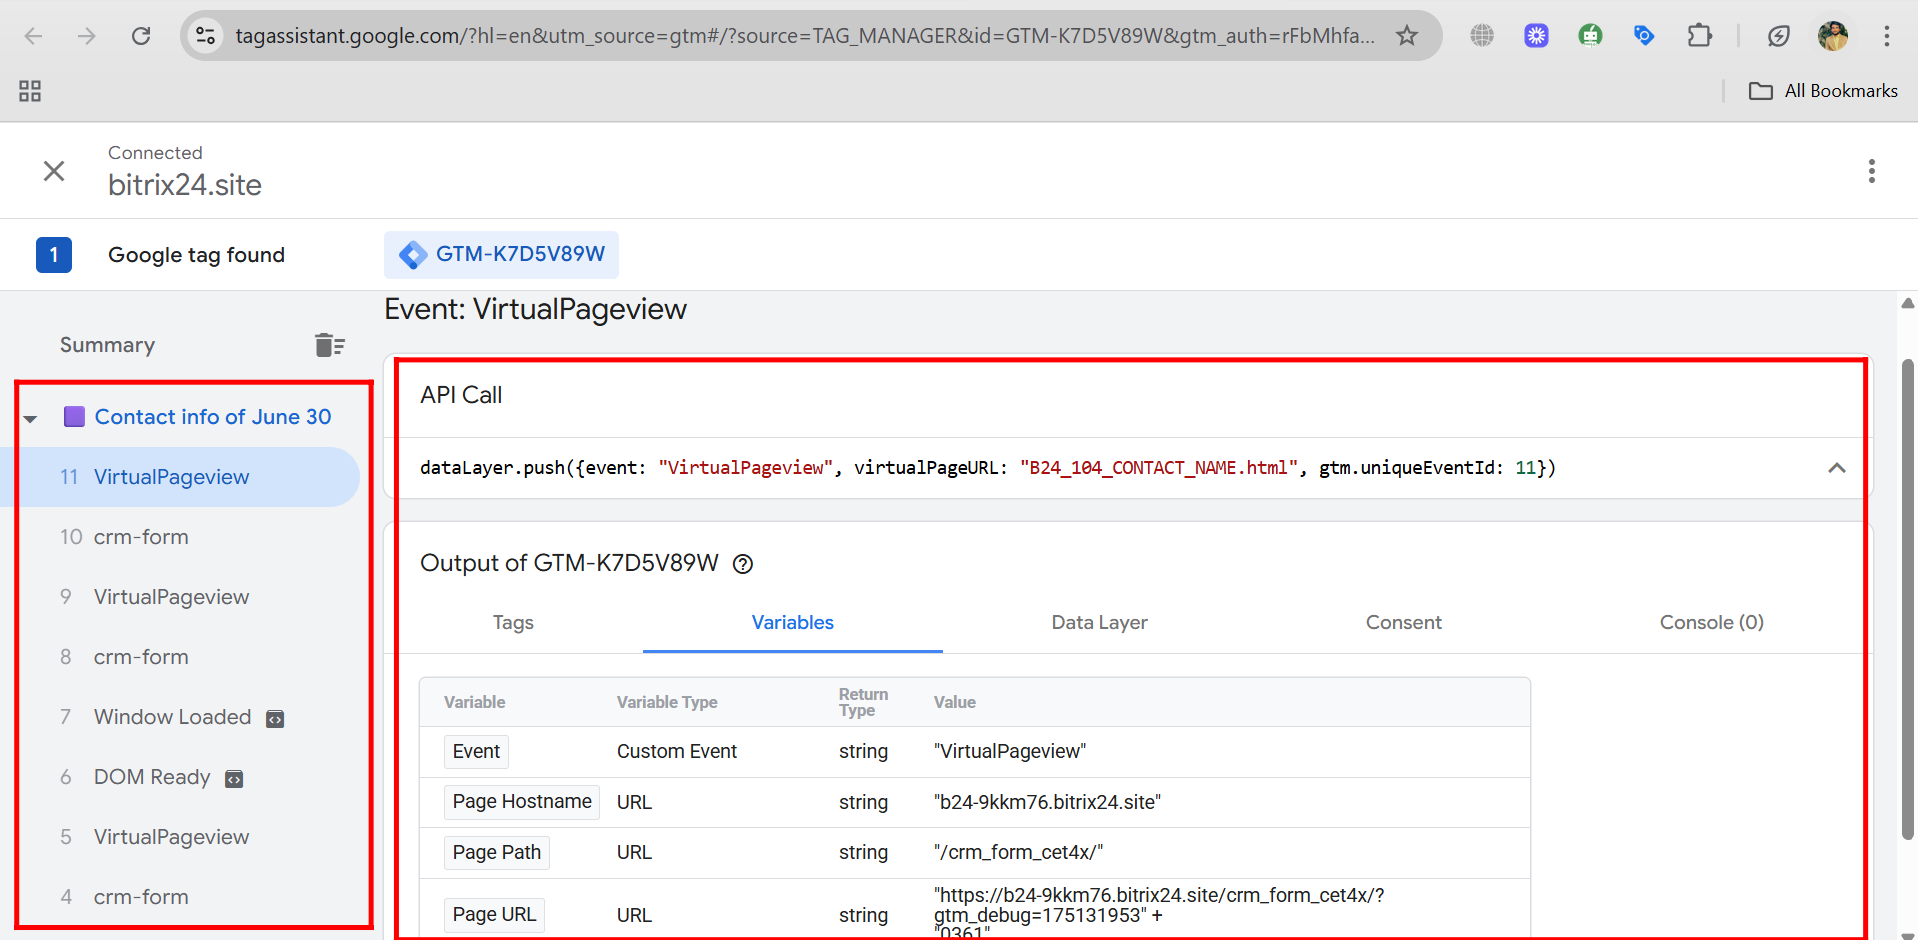
42. In the Tag Assistant side panel, under Summary, you’ll see events like DOM Ready, VirtualPageview, crm-form, and Window Loaded. For testing, select VirtualPageview to inspect the API call output, including ID, variables, tags, dataLayer, consent, and more.
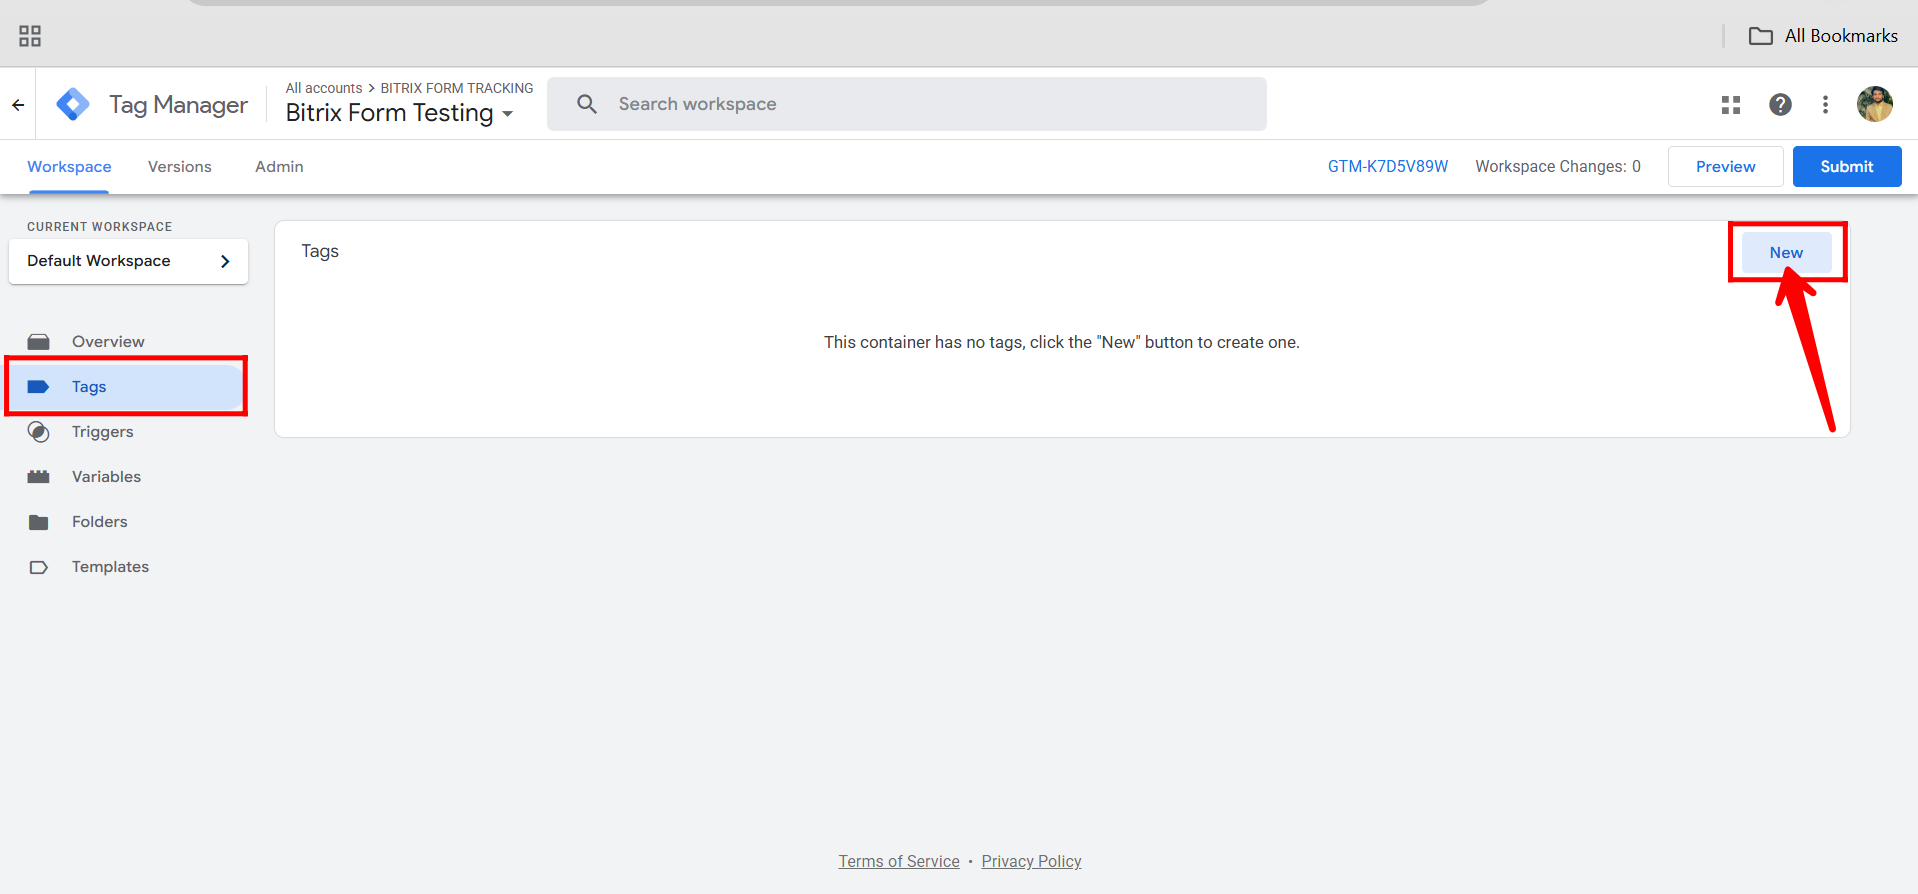
43. Go to the Tags section in Google Tag Manager, click “New”, and start setting up a new tag for Google Analytics 4.
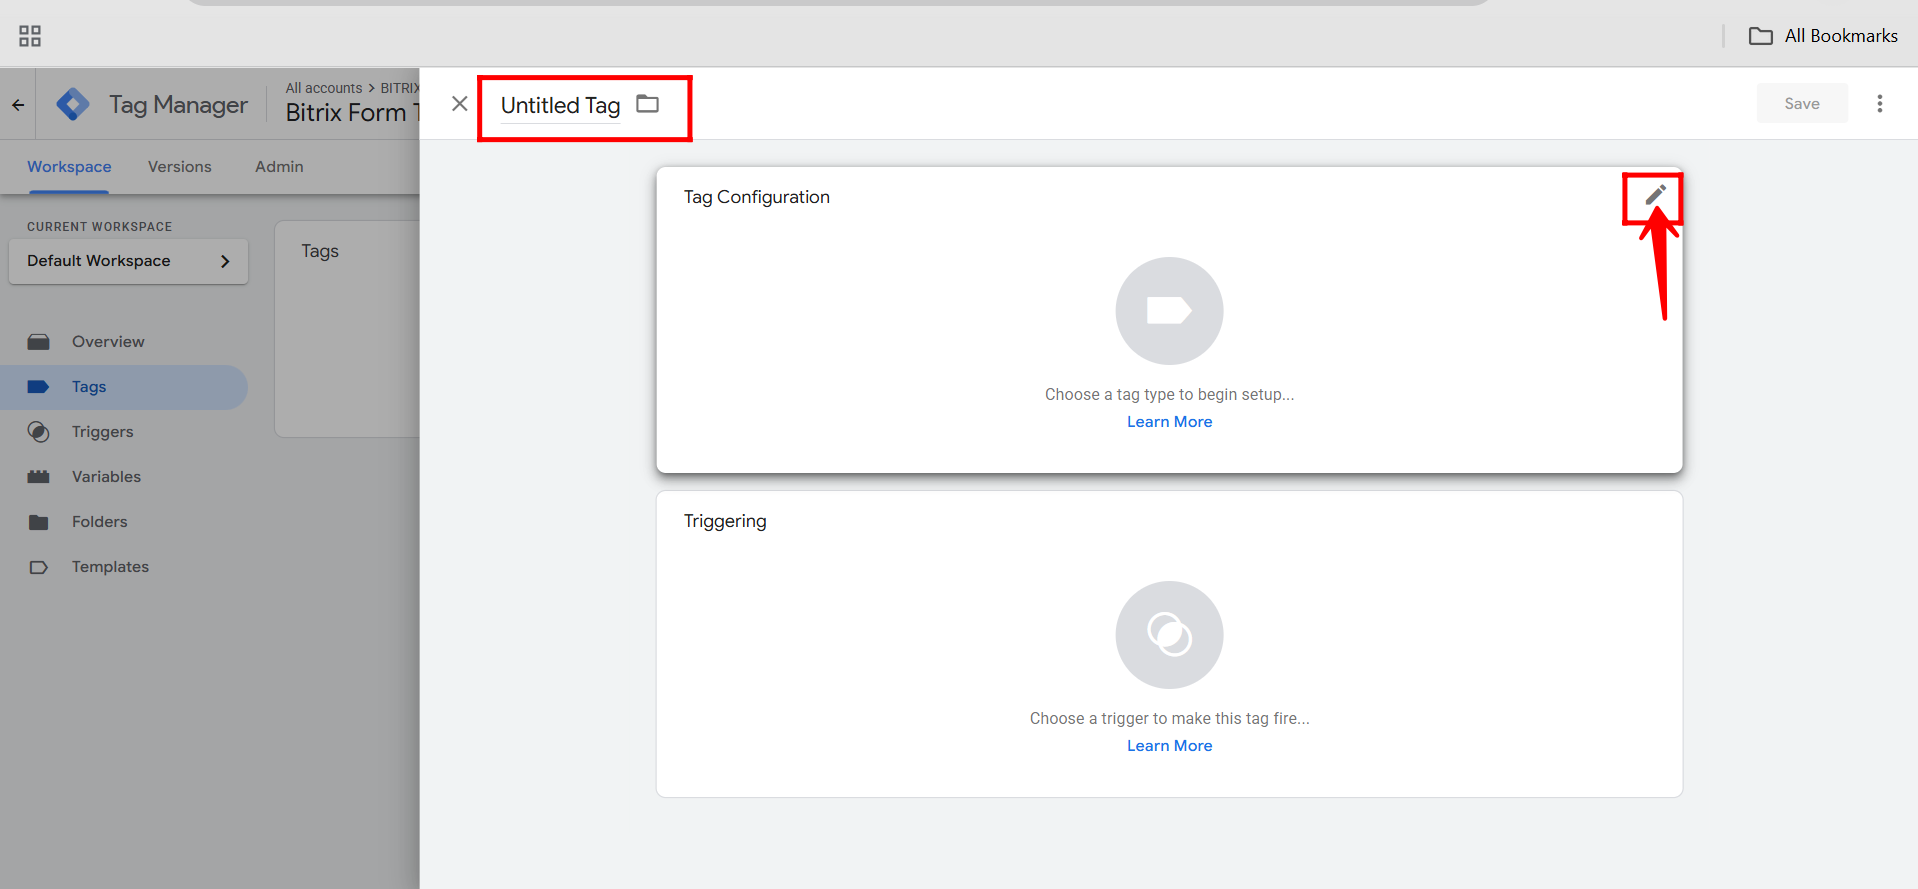
44. Rename your tag for easy identification (e.g., GA4 – Form Interaction) and click the pencil icon in the Tag Configuration box to begin editing the tag setup.
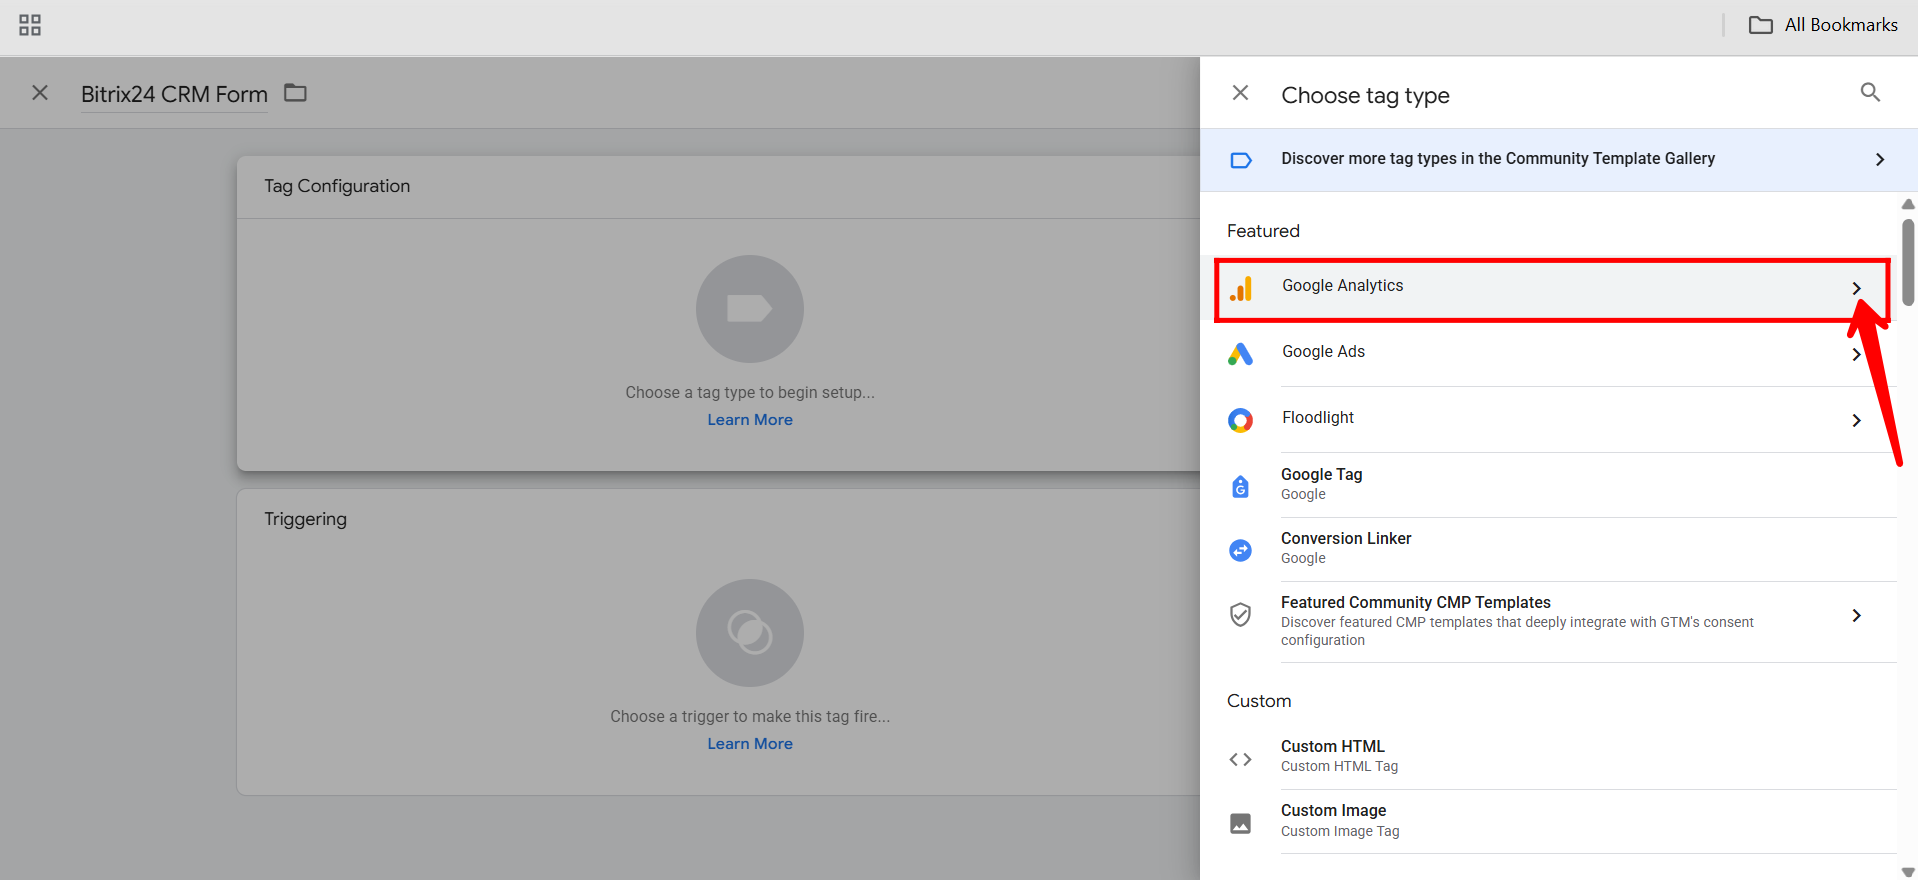
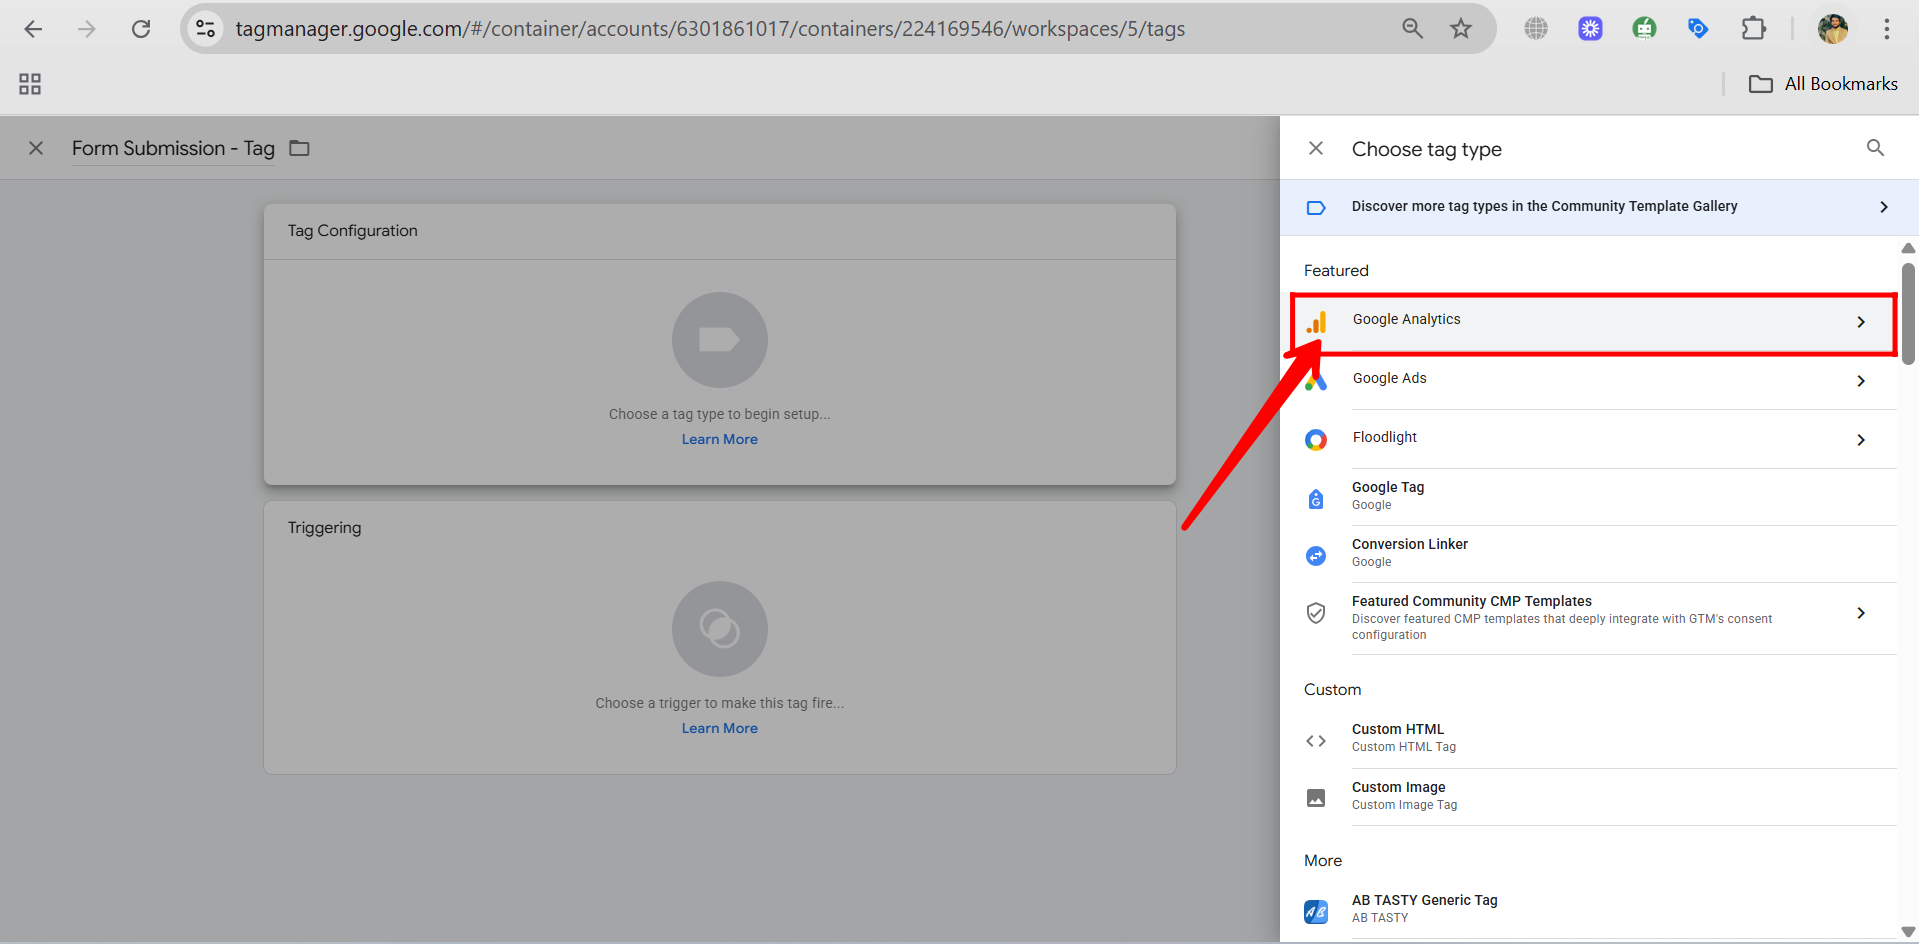
45. In the Tag Configuration panel, click to choose a Tag Type, then select Google Analytics from the list of available options.
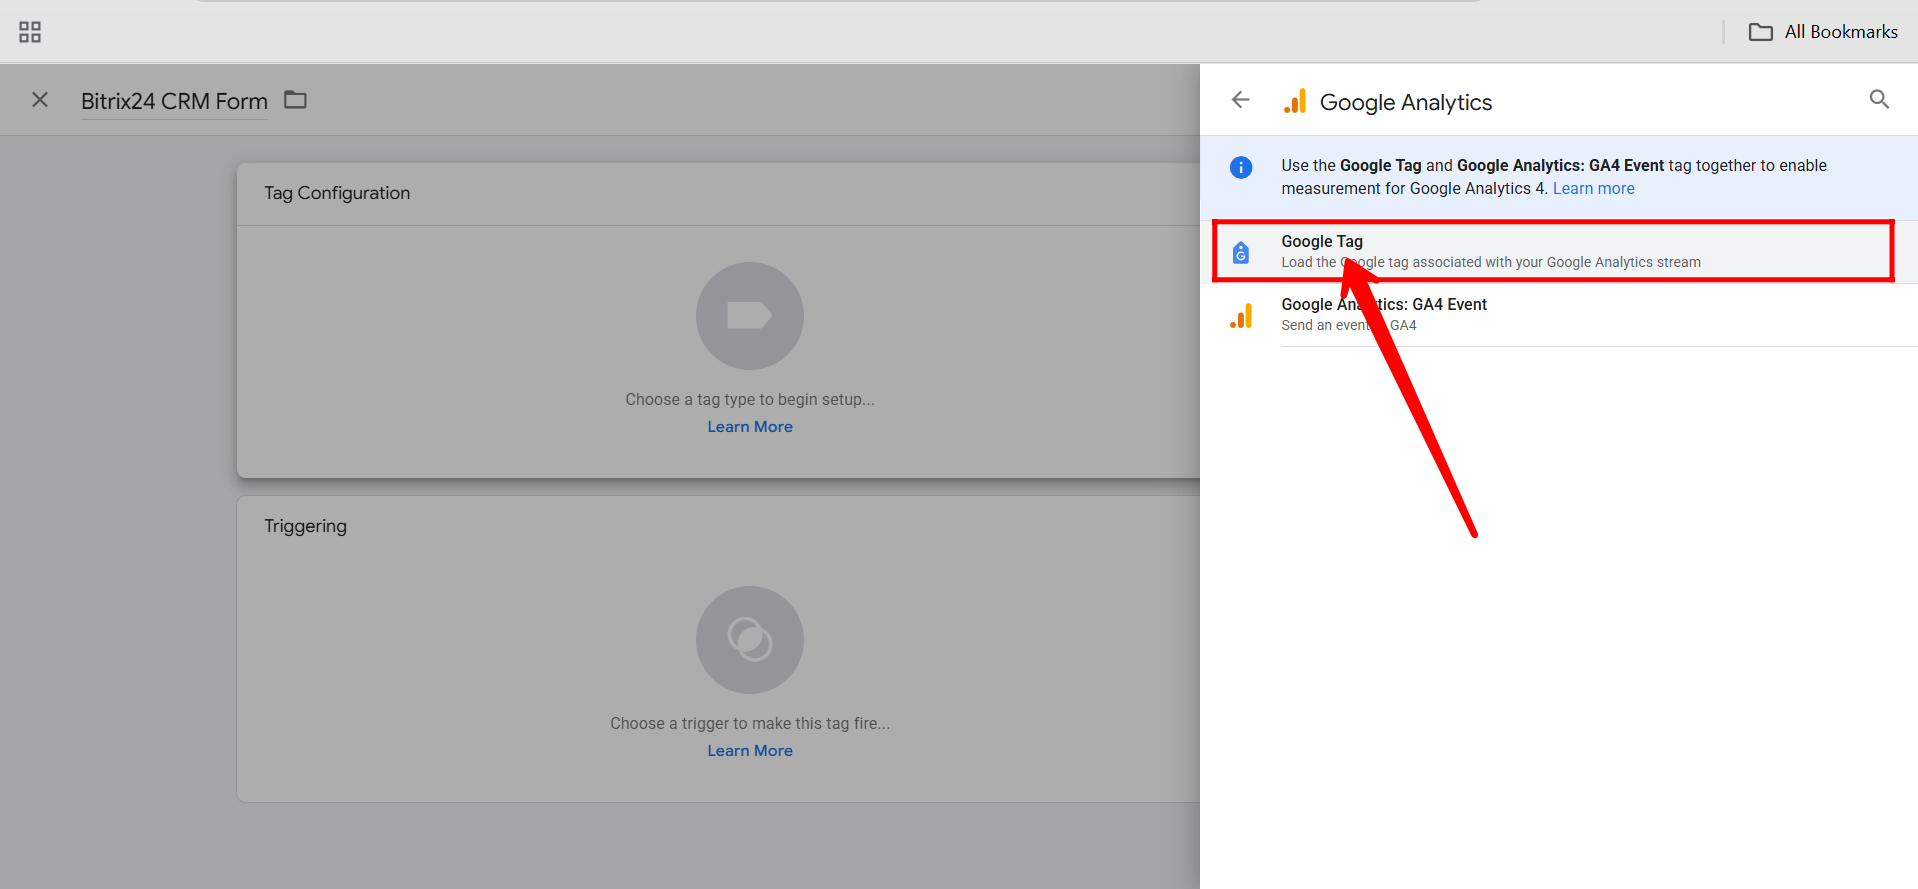
46. Next, from the list of tag types, select “Google Tag” (not “Google Analytics: GA4 Event”), as this allows you to set up and manage your GA4 configuration tag more flexibly.
47. Go back to your Google Analytics panel, navigate to “Data Streams”, and open your configured Web data stream to access details like the Measurement ID needed for your GTM tag setup.
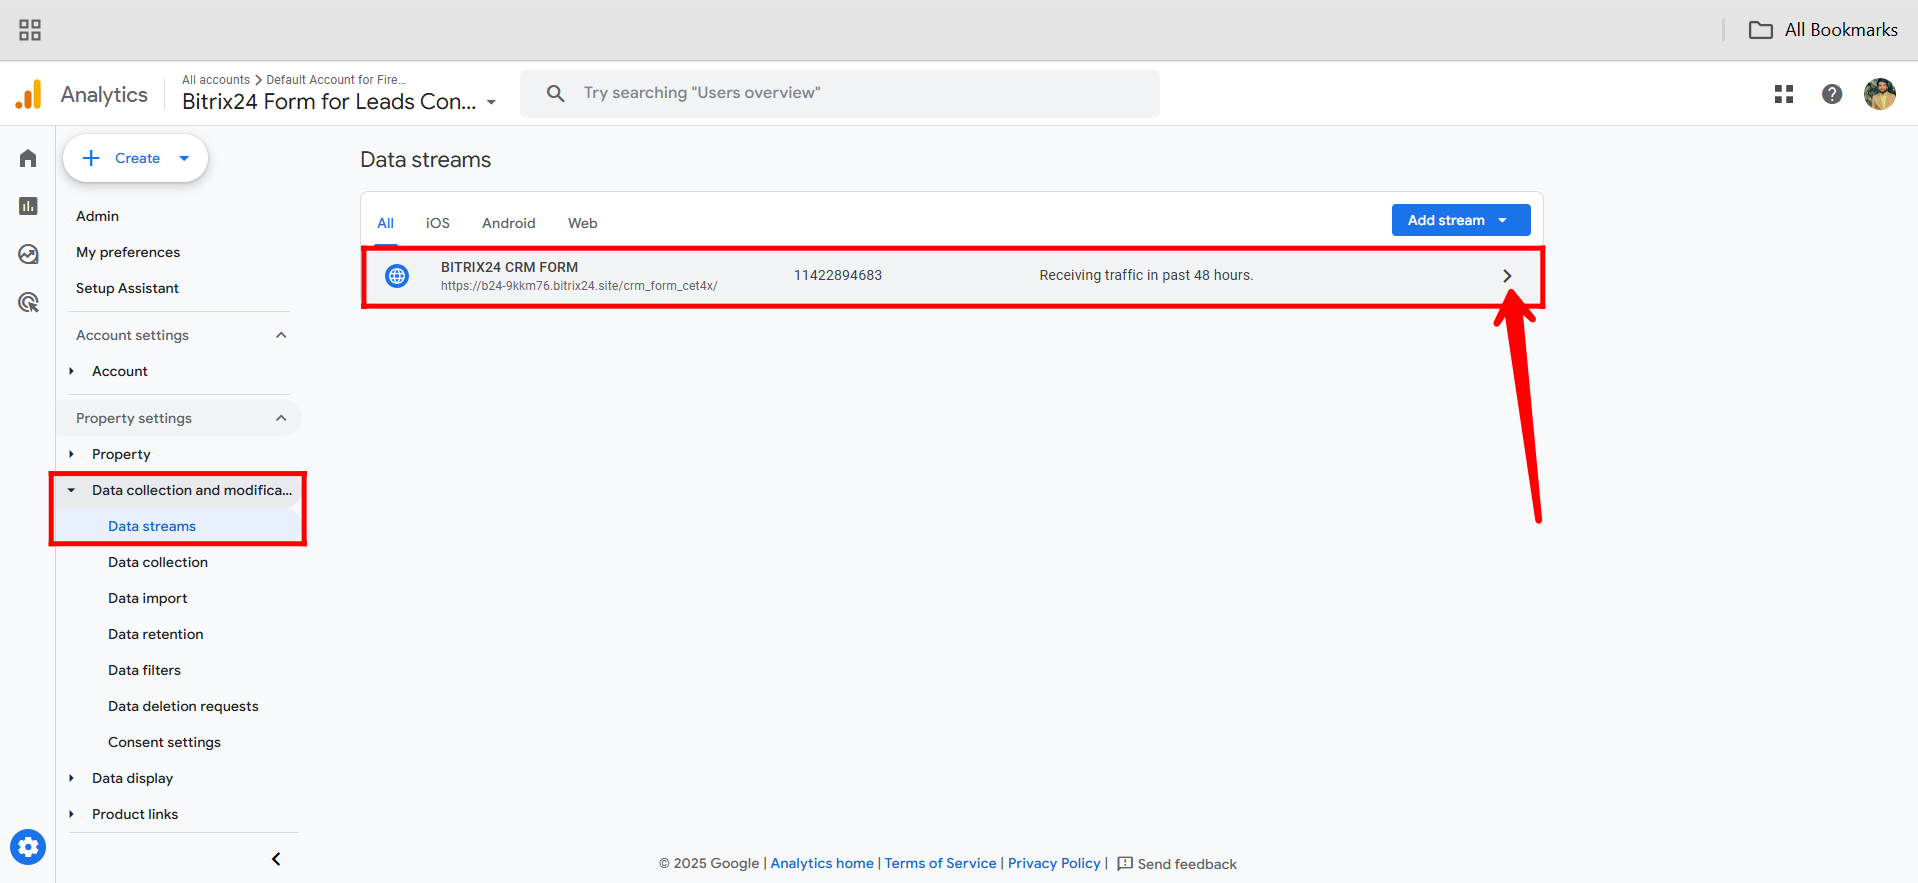
48. Copy the Measurement ID (starting with G-) from your configured Web data stream in Google Analytics. You’ll use this ID to link your GA4 property with the tag in Google Tag Manager.
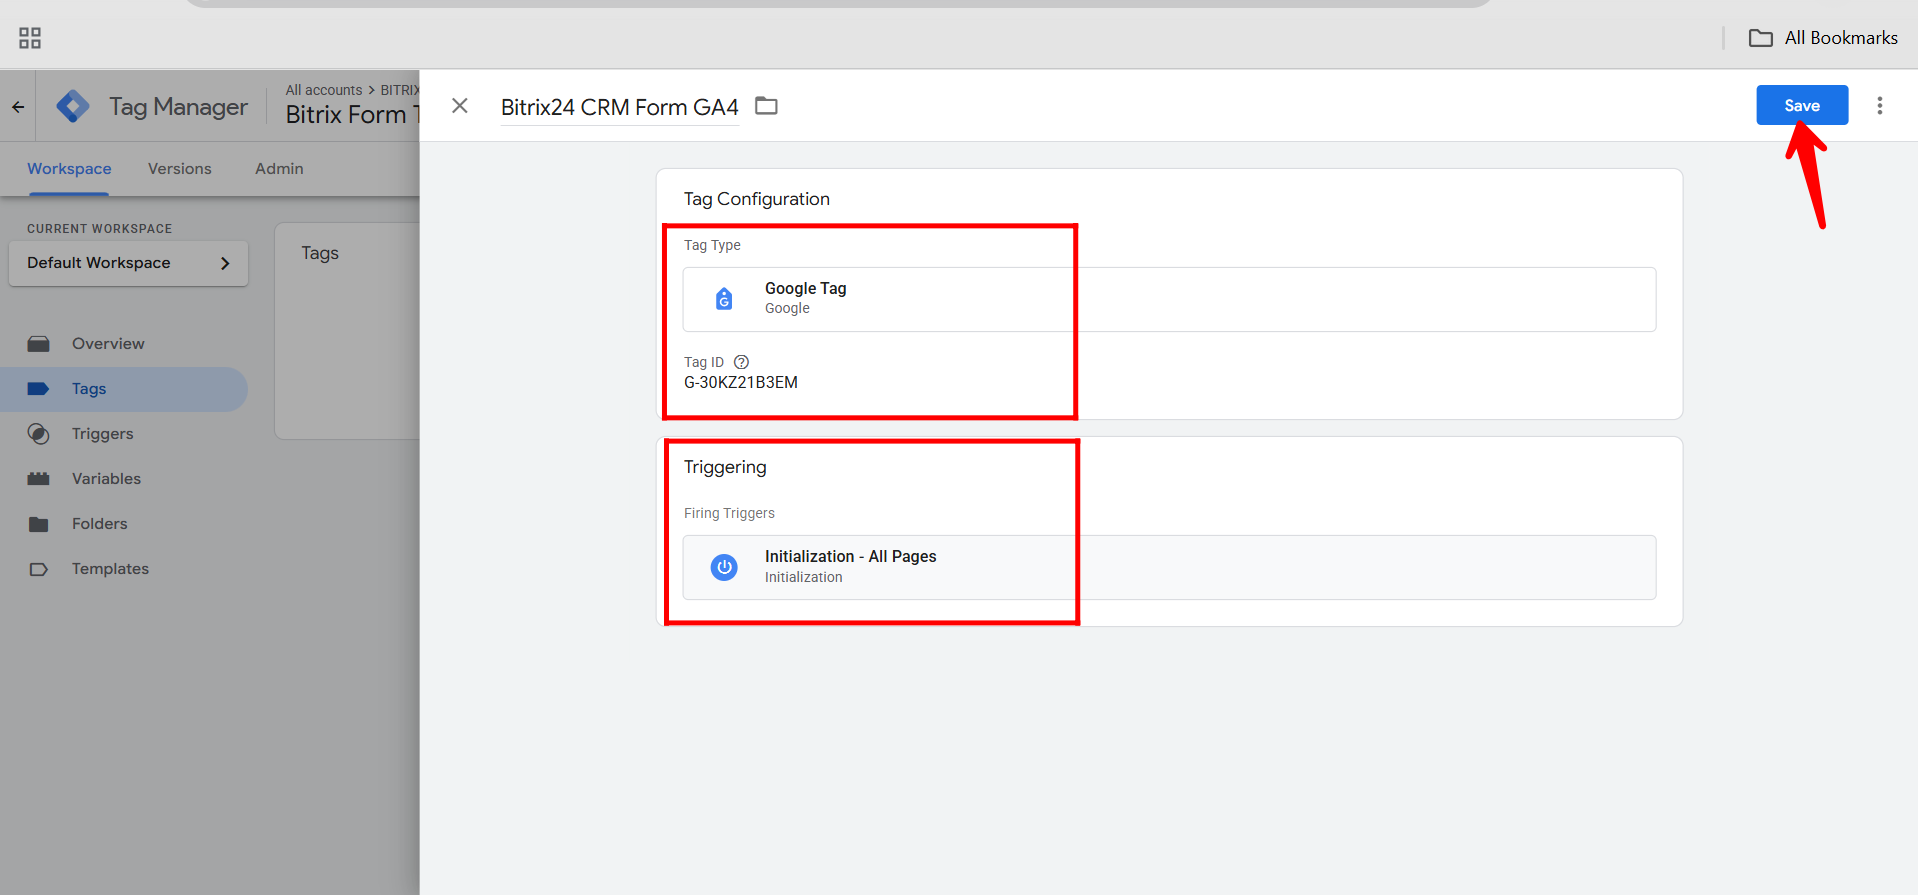
49. In the Tag Configuration panel of Google Tag Manager, paste your Measurement ID (from GA4) into the Tag ID field. This links your GTM tag to your Google Analytics 4 property.

50. You’ll notice that the triggering is set to fire on all pages during initialization. This means the tag will activate as soon as any page loads. Click “Save” to apply the configuration.
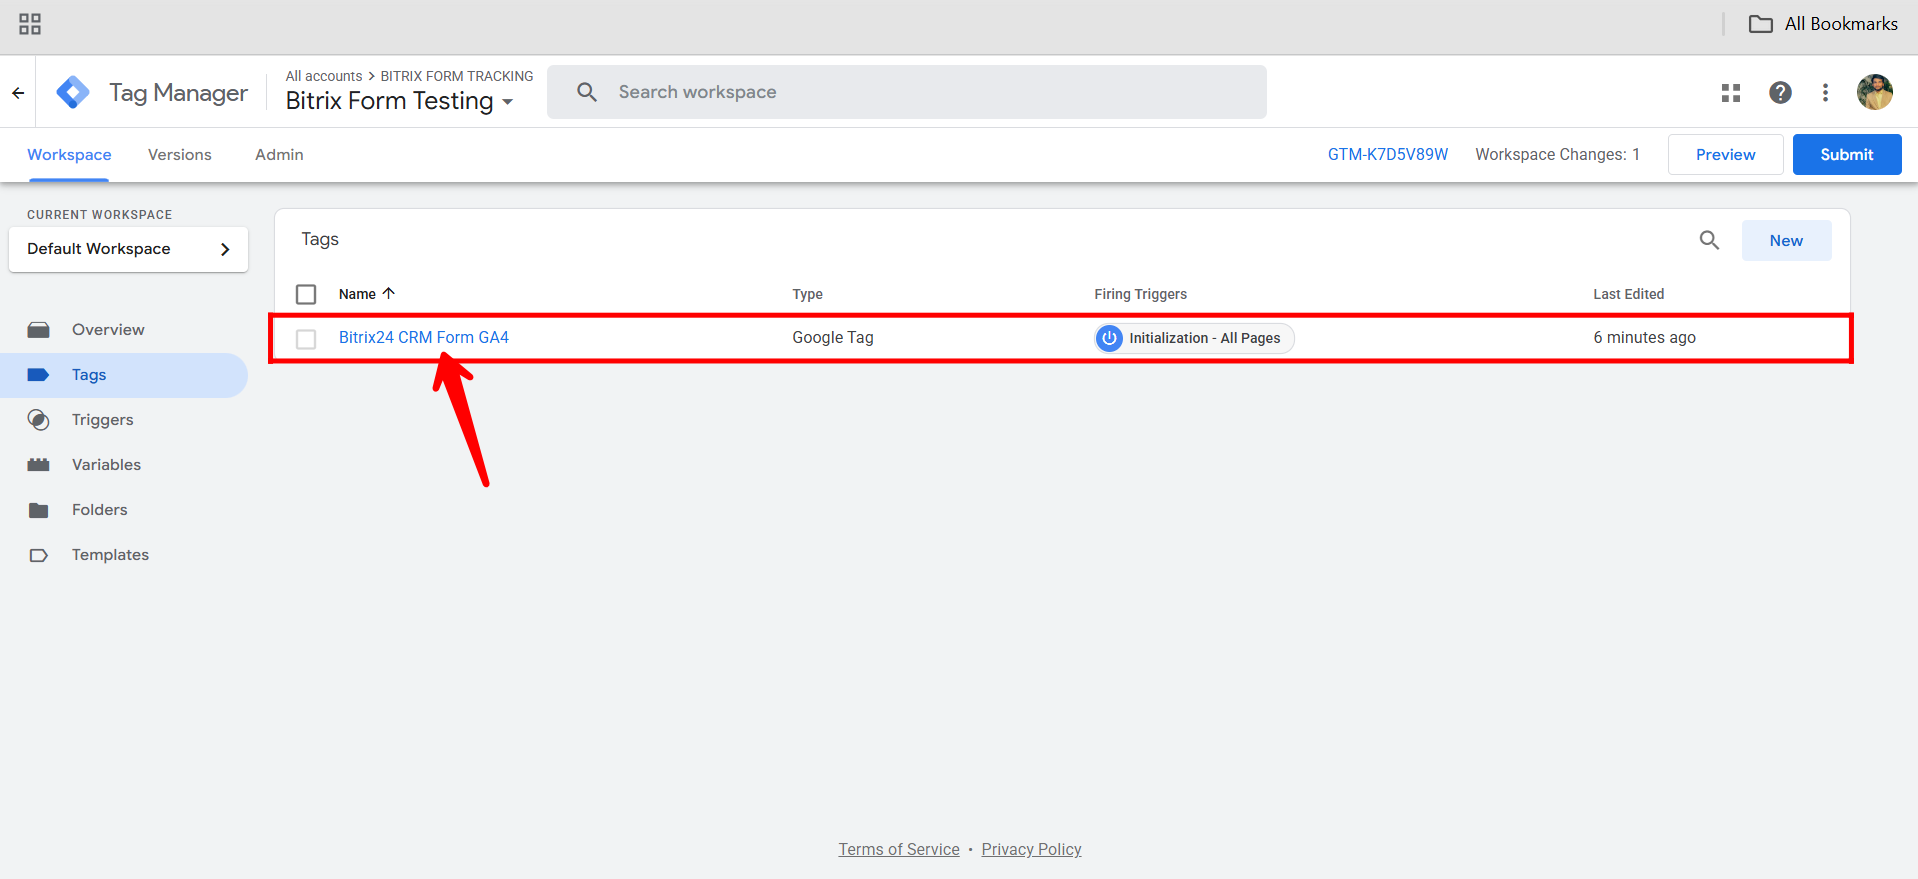
51. Now, open the newly configured GTM tag from your tag list to review its settings—ensure the Measurement ID is correct and that the trigger is set properly (e.g., to fire on all pages or specific events as needed). This confirms the tag is ready for testing or publishing.
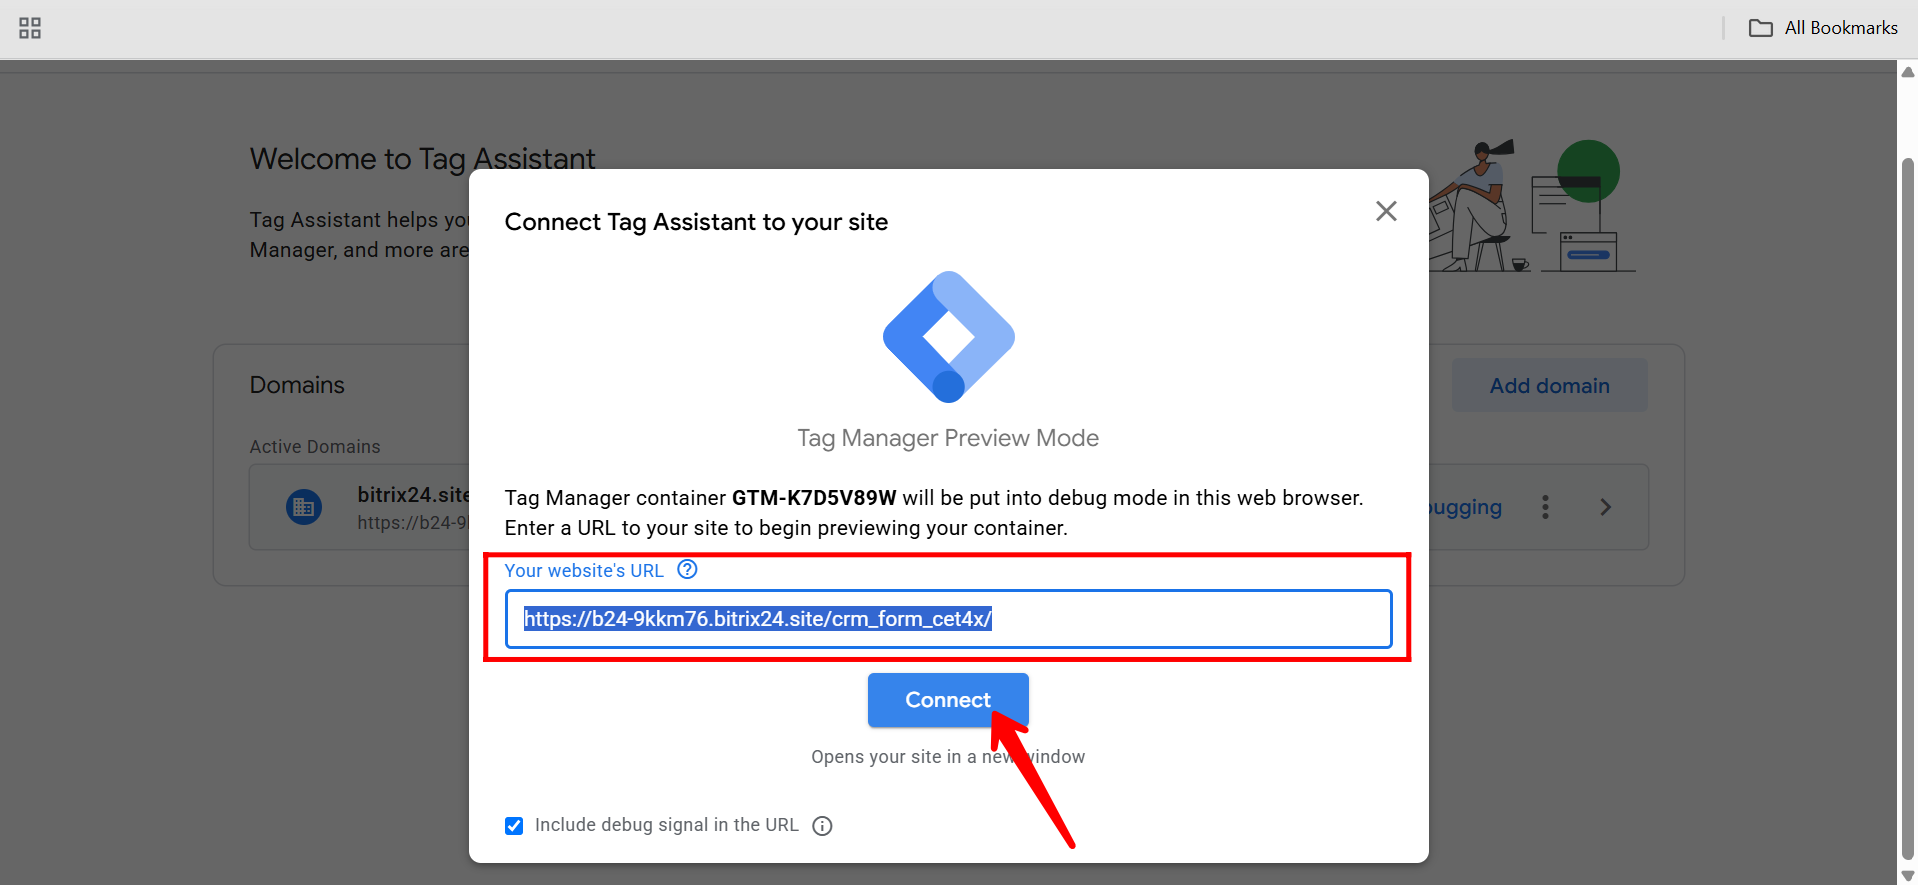
52. The website URL (CRM form URL) will be automatically filled in the Tag Assistant preview. Simply click “Connect” to reinitiate the debugging session and test your newly configured GTM tag.
53. Open the form in a new tab to confirm the connection. You’ll see a Tag Assistant extension prompt or alert indicating that Tag Assistant is connected, confirming the debugging session is active and your GTM tags are being tracked.
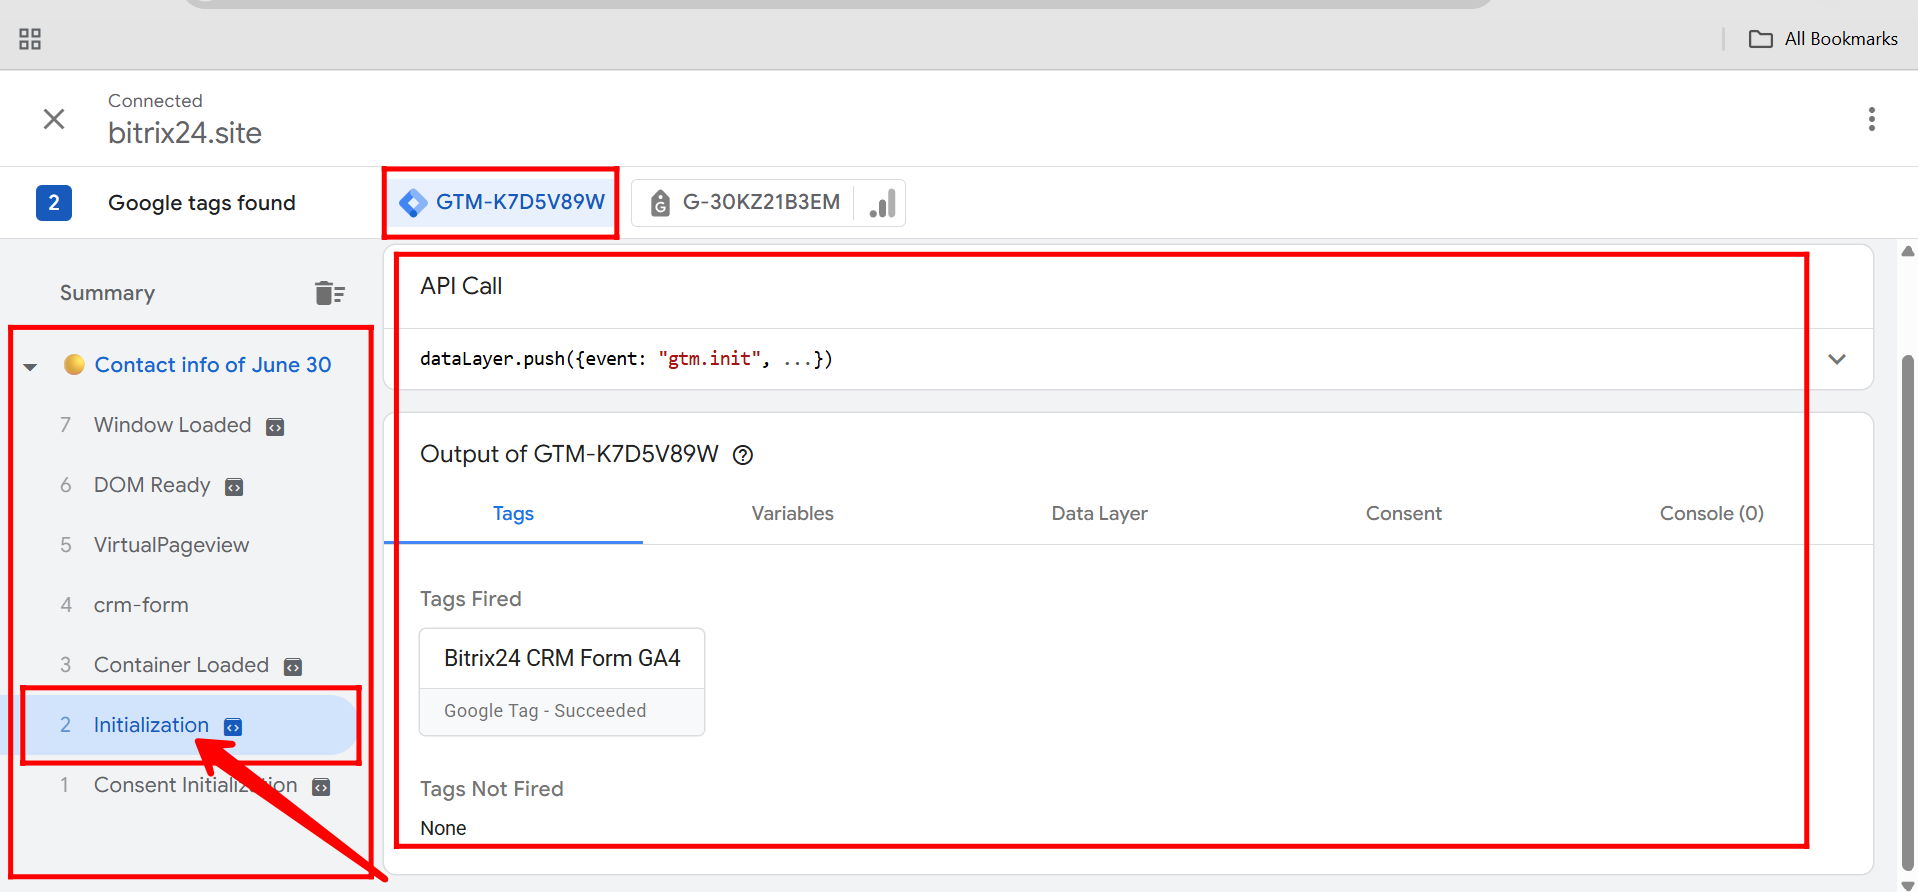
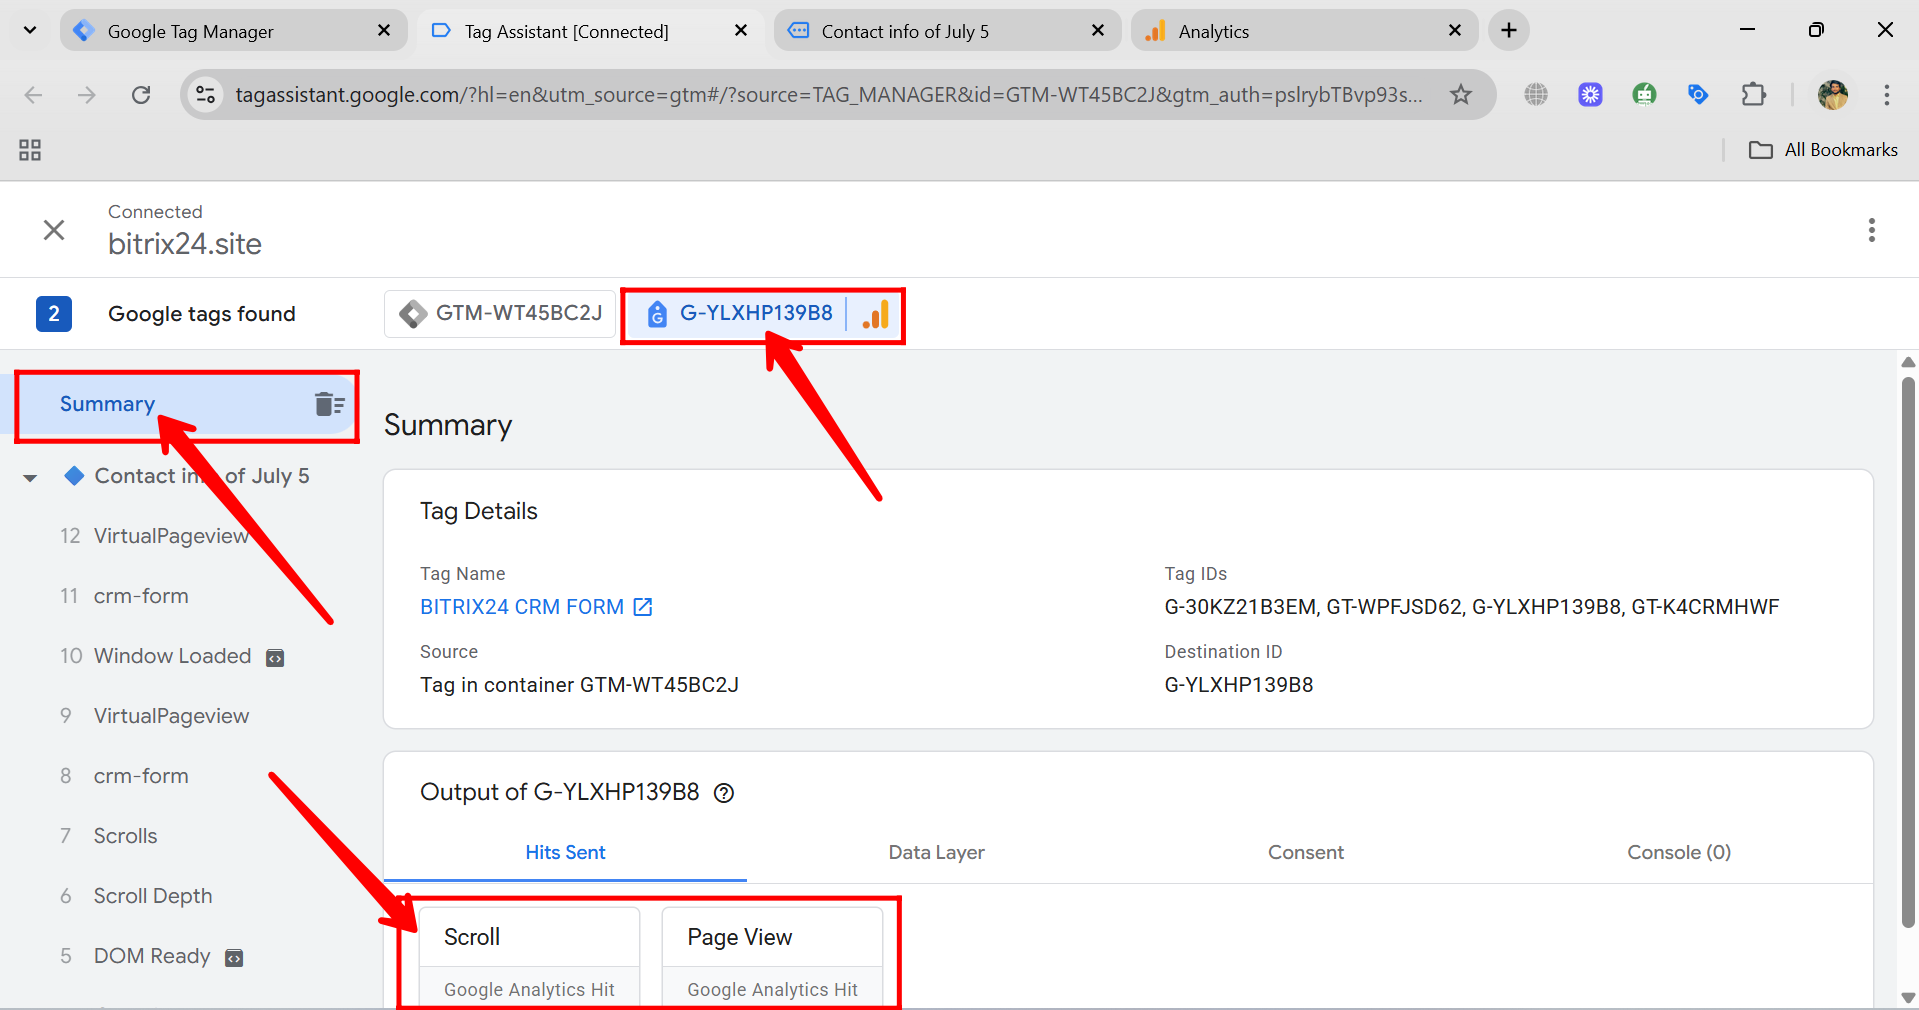
54. In the GTM Tag Assistant summary, go to the Initialization section—you’ll see that your GA4 tag has fired successfully. This confirms that the tag is working, and you can now also view the incoming data in your Google Analytics 4 dashboard.
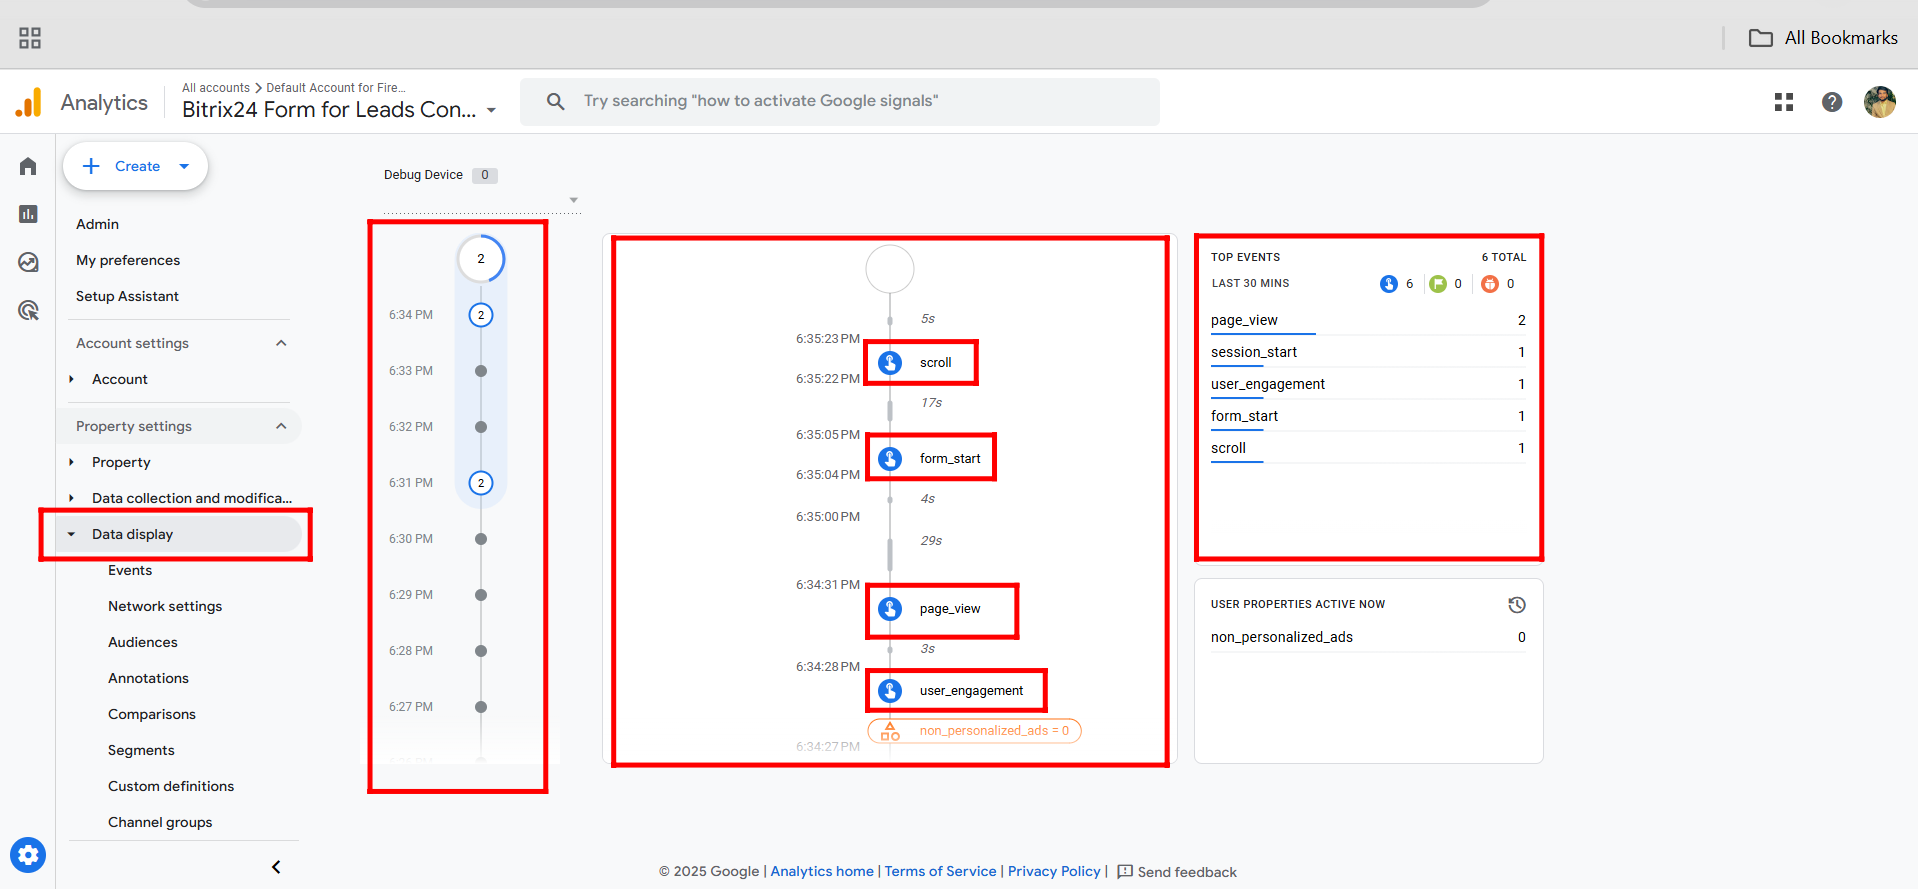
55. Now, in Google Analytics 4, go to the Realtime data display section to view live data from the newly configured form. You’ll see events like scroll, form_start, page_view, and user_engagement, along with their timestamps in seconds. Make sure to open and interact with the form in another tab so these events are triggered and appear in real time.
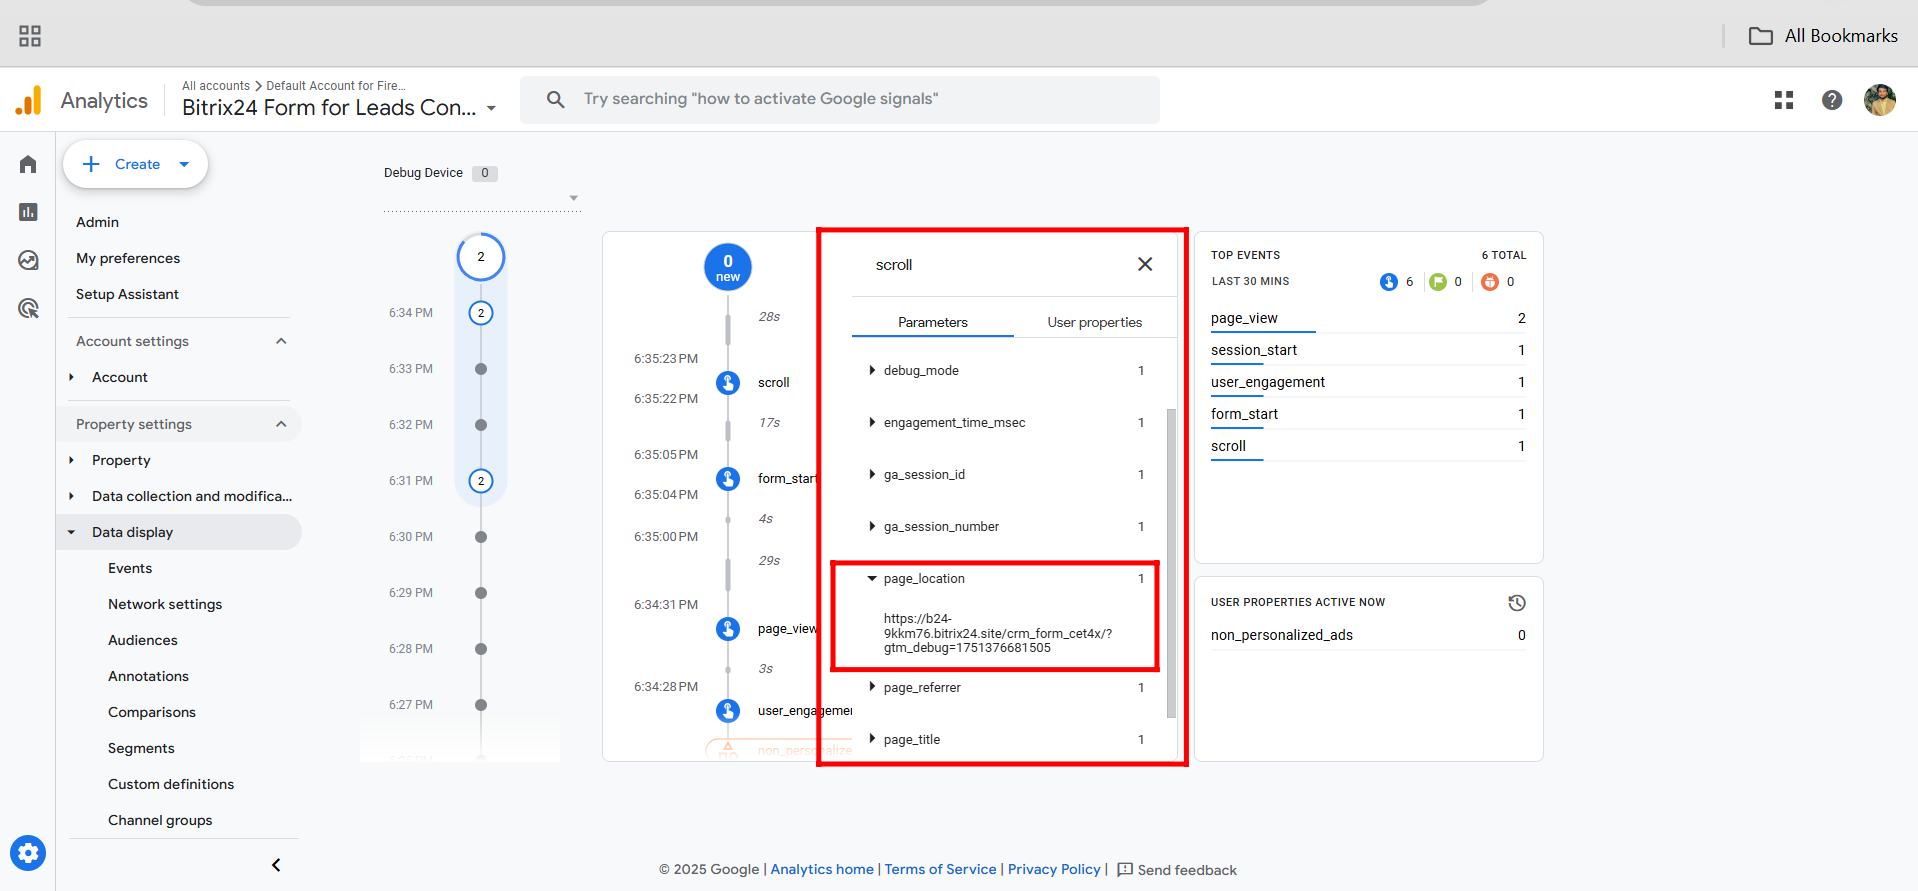
56. You can even click on individual events like scroll or others in GA4 to analyze detailed parameters within each event. These include page_location, page_referrer, page_title, ga_session_number, ga_session_id, debugmode, and more—providing deeper insights into user interactions on your form.
57. Similarly, in the Realtime Overview section of GA4, you can view the user map location and event names by event count. However, this time you’ll only see around 5 to 6 default events in both the overview and data display sections. That’s because we added an extra layer using Google Tag Manager, and unlike the standard GA4 setup, Bitrix24 does not automatically create Target IDs for each input field or form section when using GTM. This is why GTM is valuable—it offers flexibility to manually add custom tags and triggers, which we’ll discuss in the upcoming steps. In contrast, with standard GA4 integration, Bitrix24’s Expert Mode handled event tagging automatically.
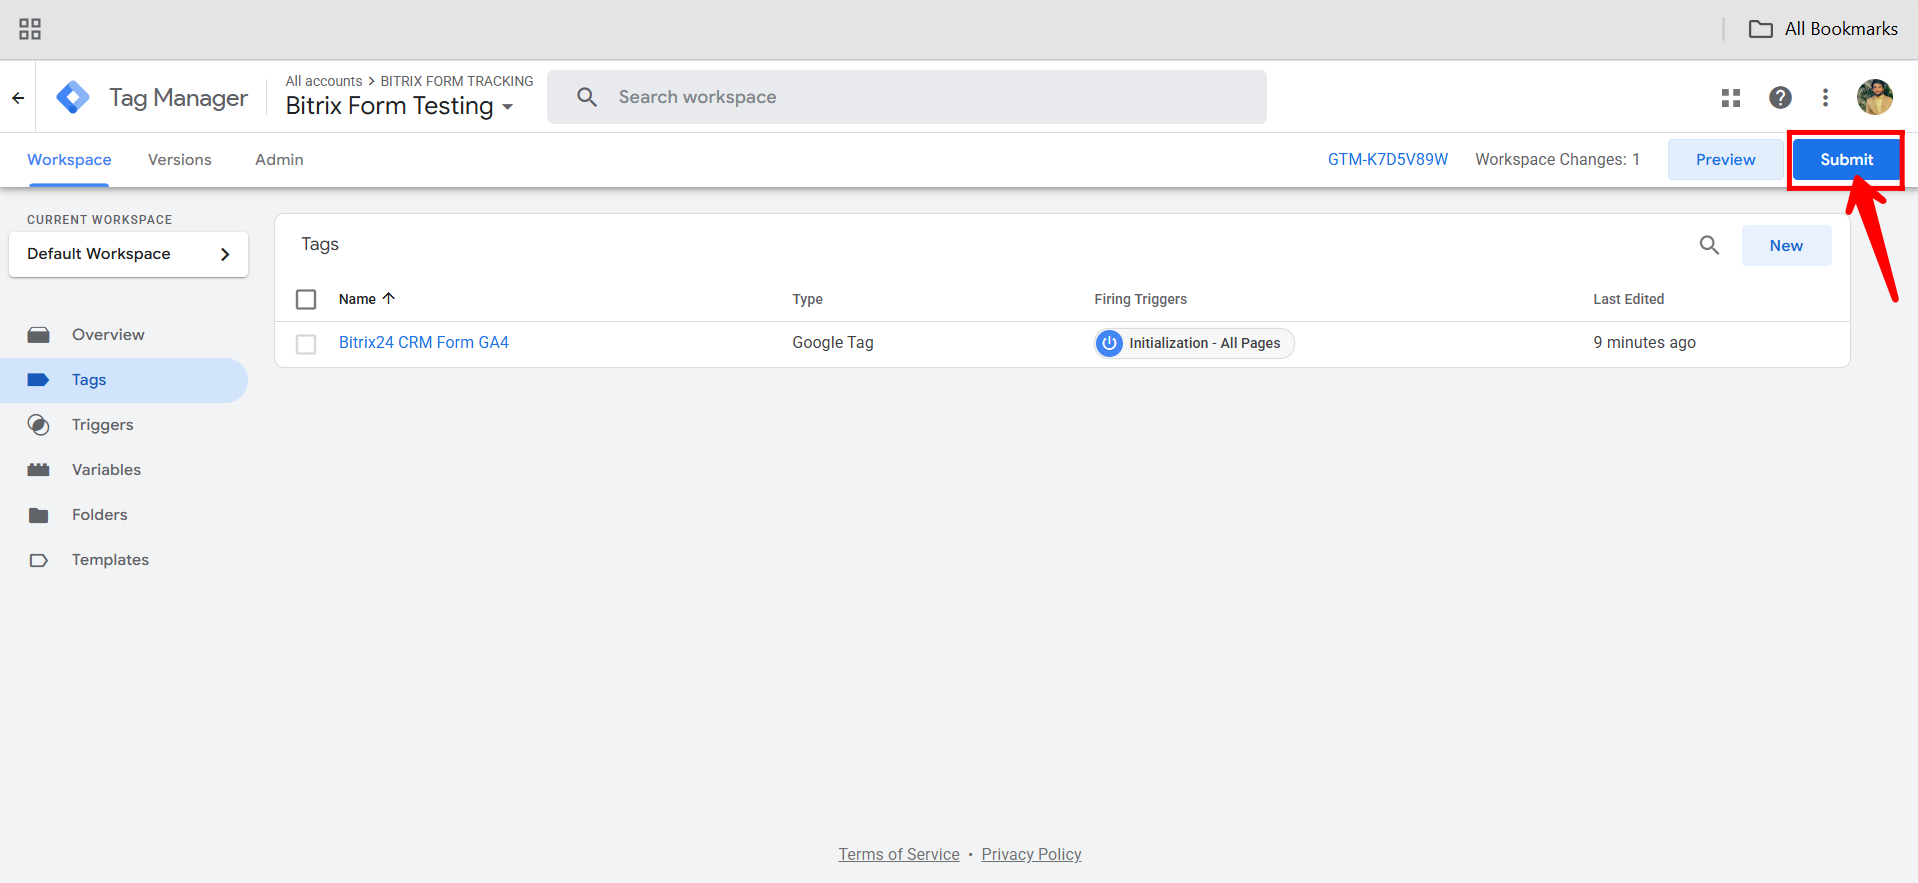
58. Now, go back to Google Tag Manager and click the “Submit” button in the top right corner to publish your changes.
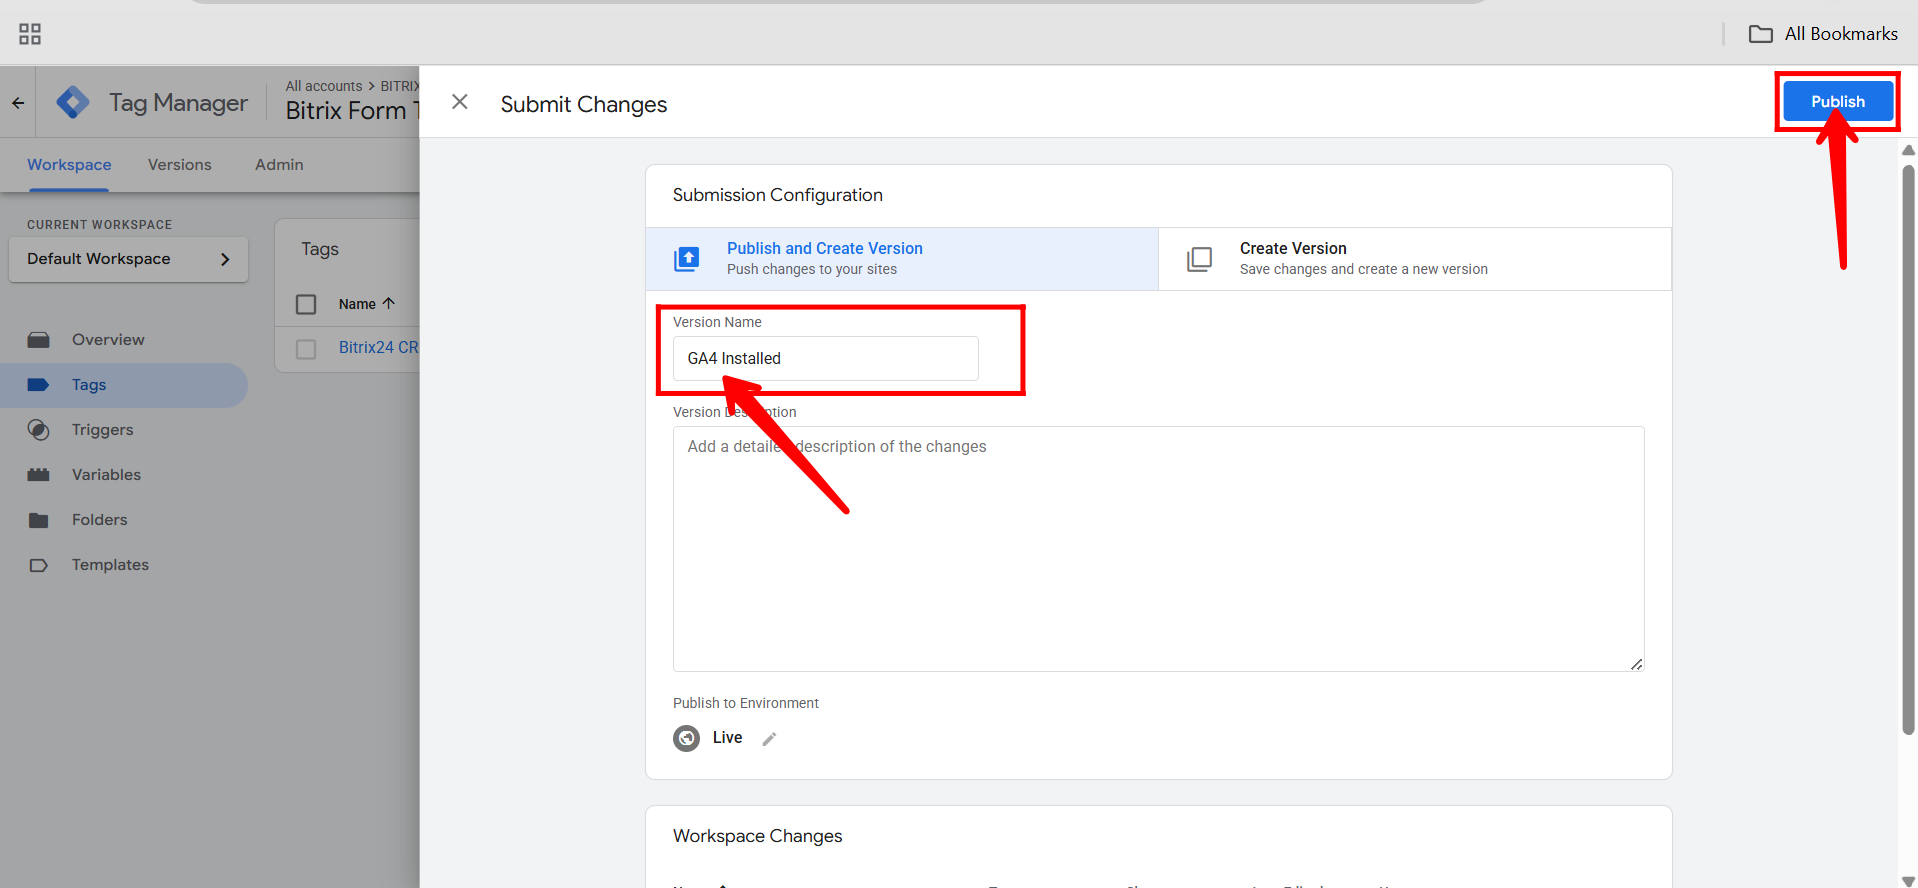
59. In the submission window, enter a Version Name (e.g., GA4 Form Tracking) and optionally add a Description of the setup. Then click “Publish” to make the GA4 tag live and start tracking form interactions via GTM.
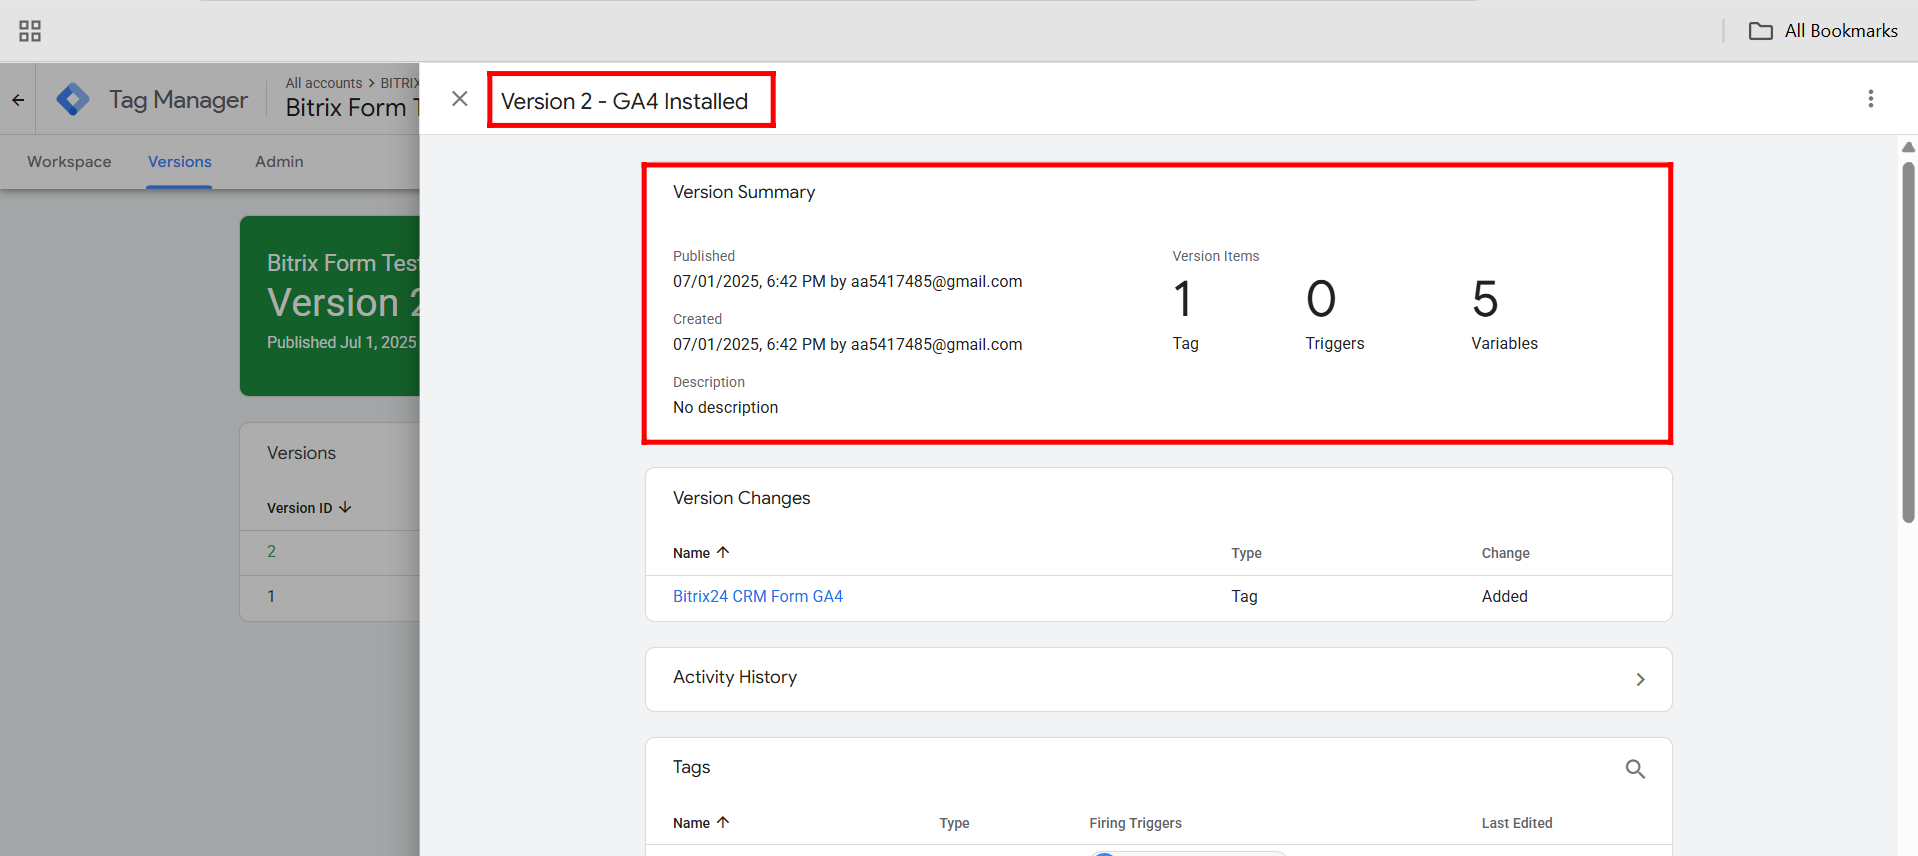
60. Now, you can view the Version Changes in Google Tag Manager, including the Activity History, list of Tags, and the Version Summary, which shows the number of tags, triggers, and variables configured in the current published version. This helps you keep track of what was added or modified in each update.
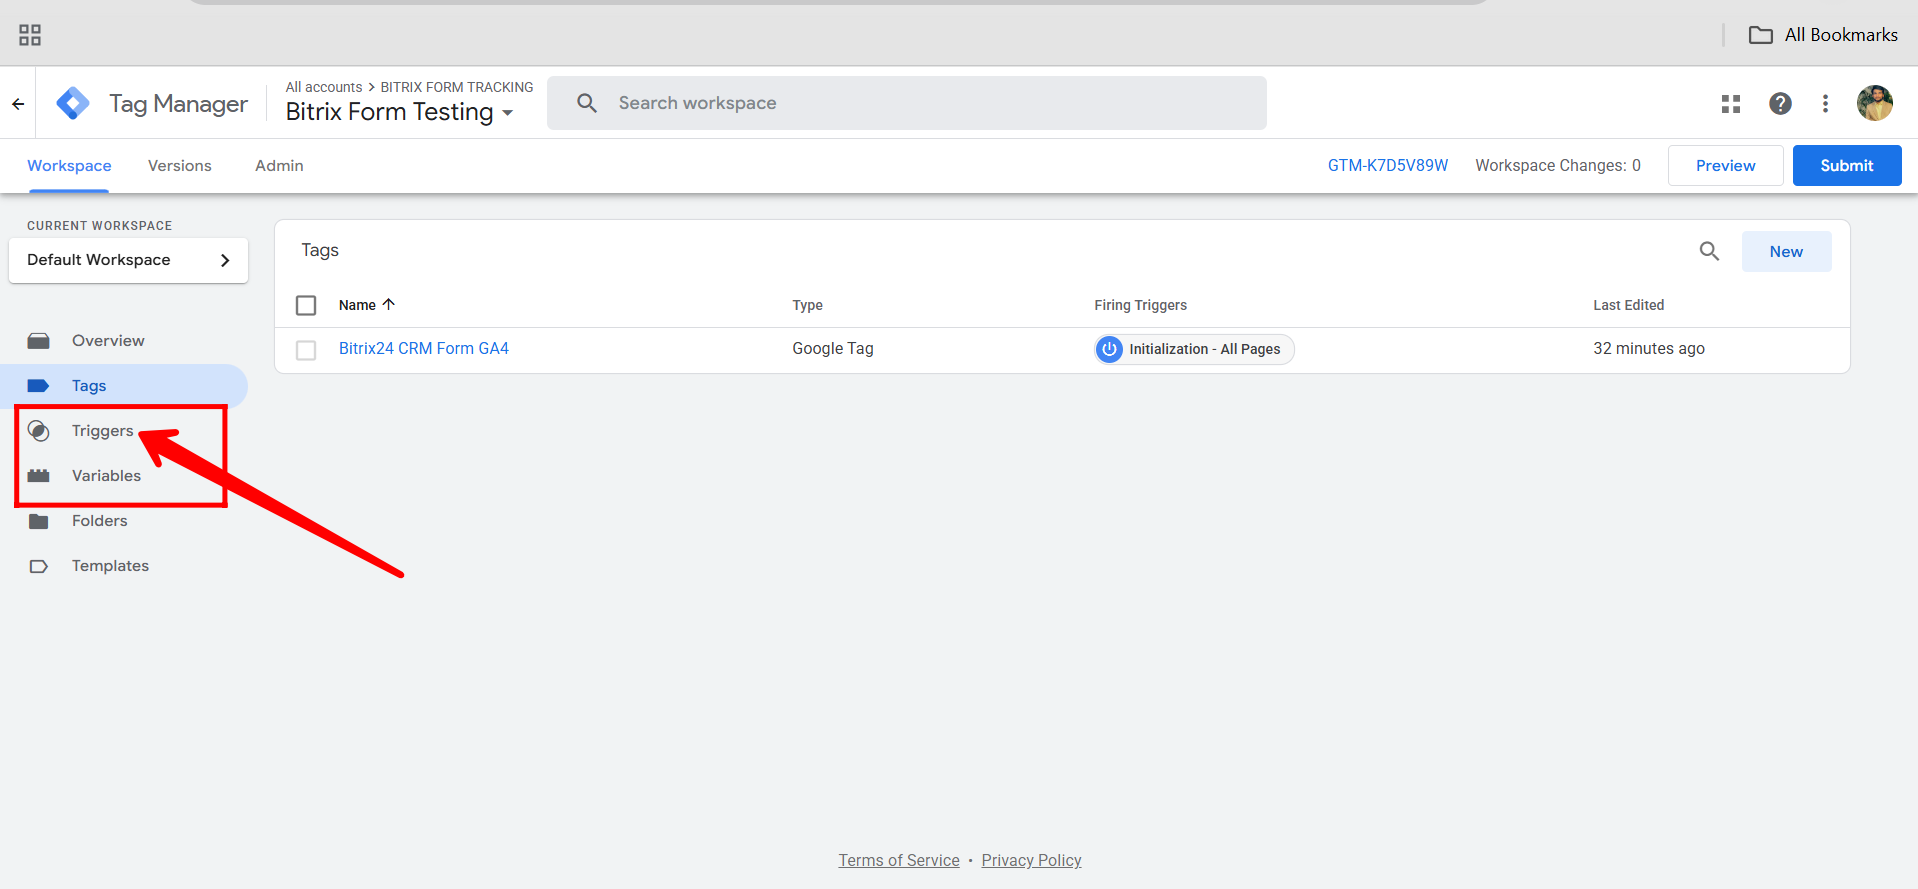
61. You can customize your tracking by adding triggers and variables of your choice in Google Tag Manager. Let’s start by going to the “Triggers” section in the GTM dashboard.
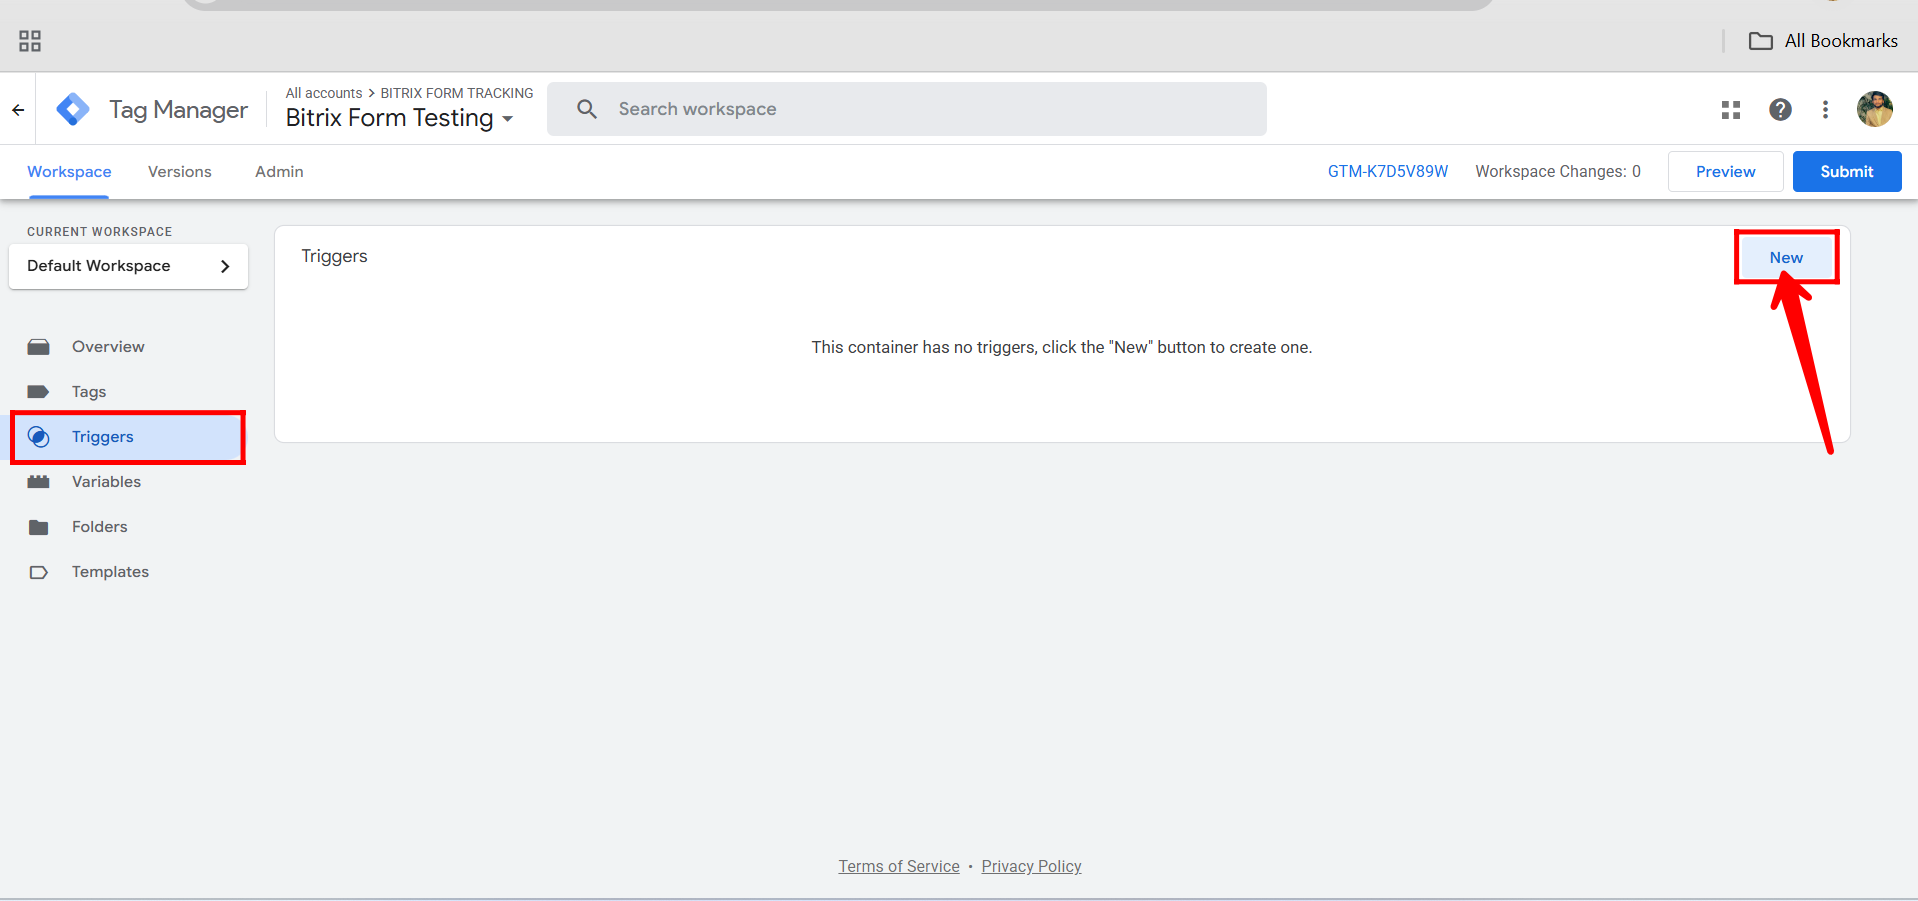
62. Click “New” to create a trigger, where you can define when your tags should fire.
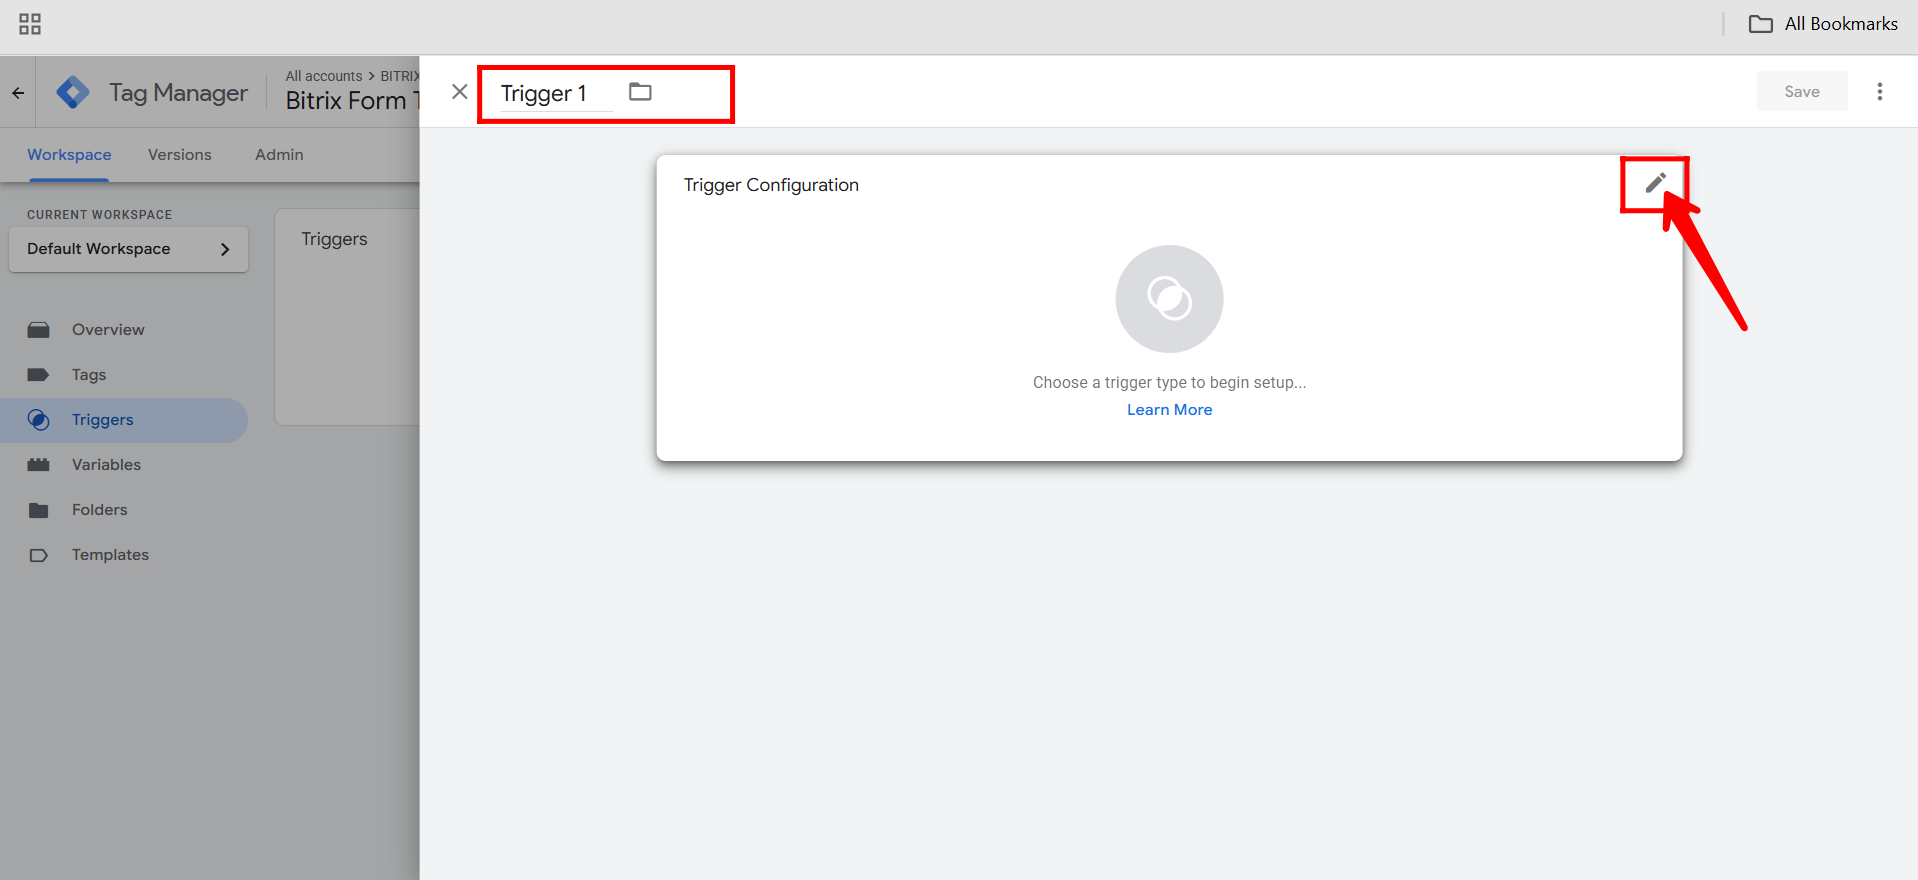
63. Rename your trigger (e.g., Form Submission Trigger) for easy identification, then click the pencil icon in the Trigger Configuration box to begin setting up the trigger conditions.
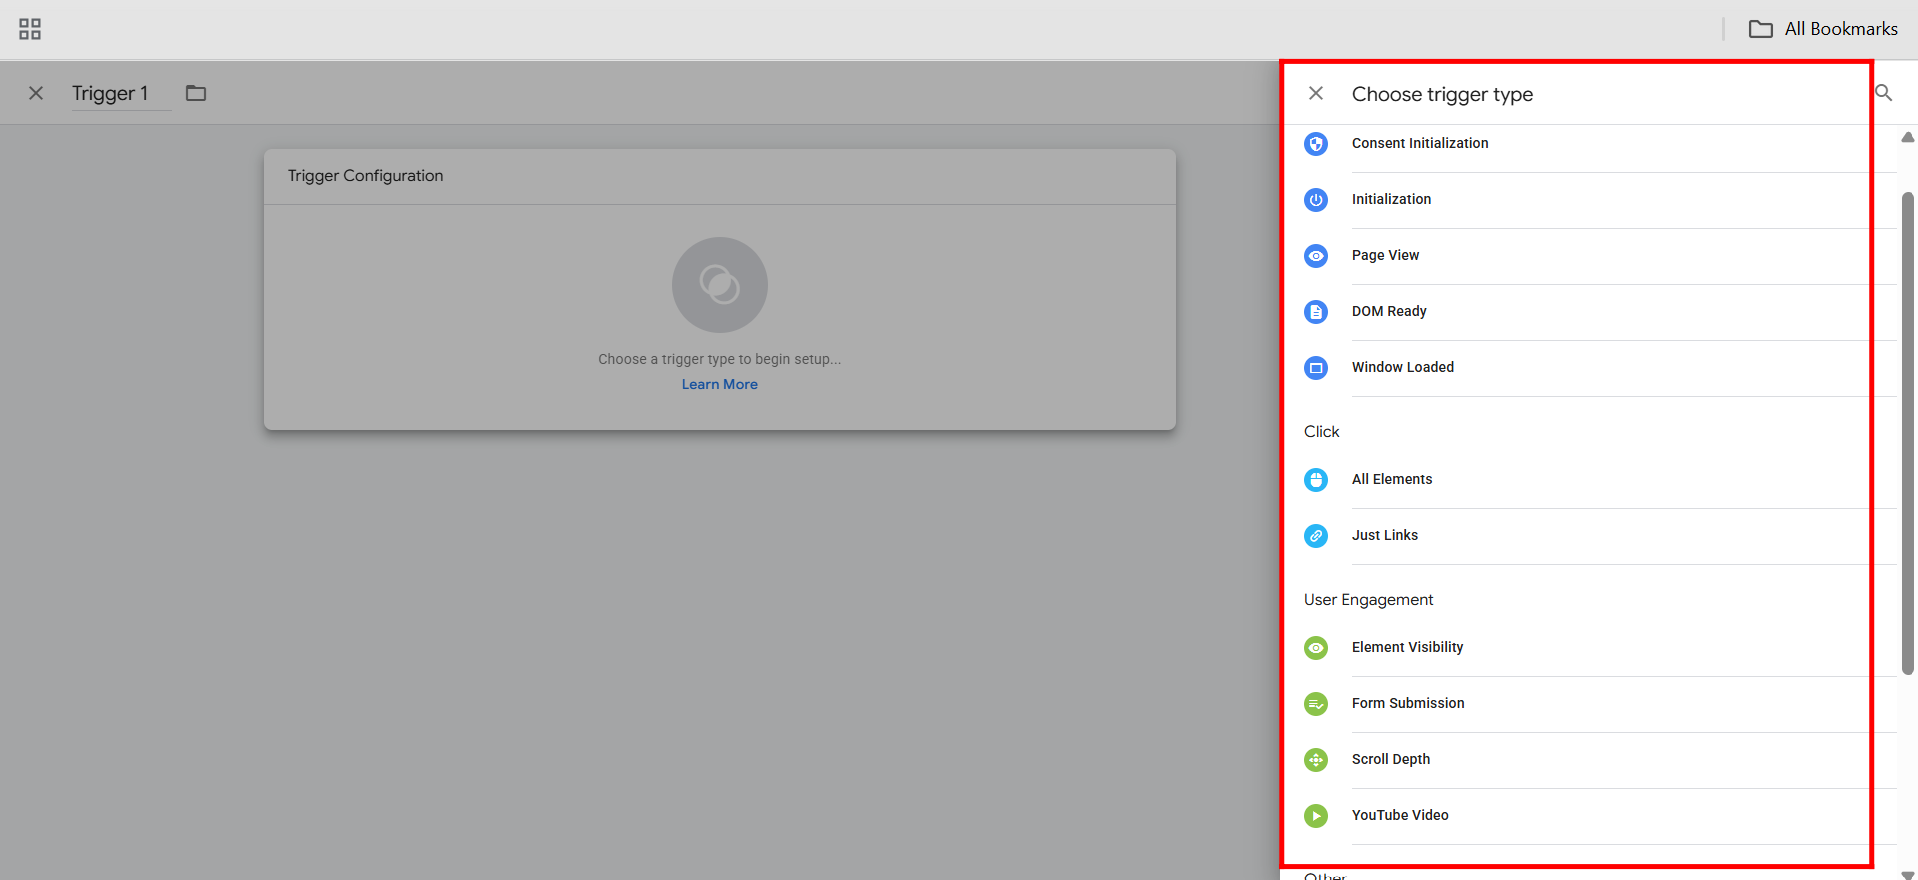
64. In the Trigger Configuration panel, you can choose from various trigger types depending on what interaction you want to track. Common options include: Page View (fires when a page loads), Click – All Elements (fires on any click), Click – Just Links (fires only when a link is clicked), Form Submission (triggers when a form is submitted), Scroll Depth (tracks how far users scroll), Timer (fires after a specified time on a page), Custom Event (for manually pushed events), and Element Visibility (triggers when a specific element becomes visible on screen). Select the one that best fits your tracking goal.
65. Go to the Variables section in Google Tag Manager. You can either add new custom variables or configure the built-in variables by clicking “Configure”.

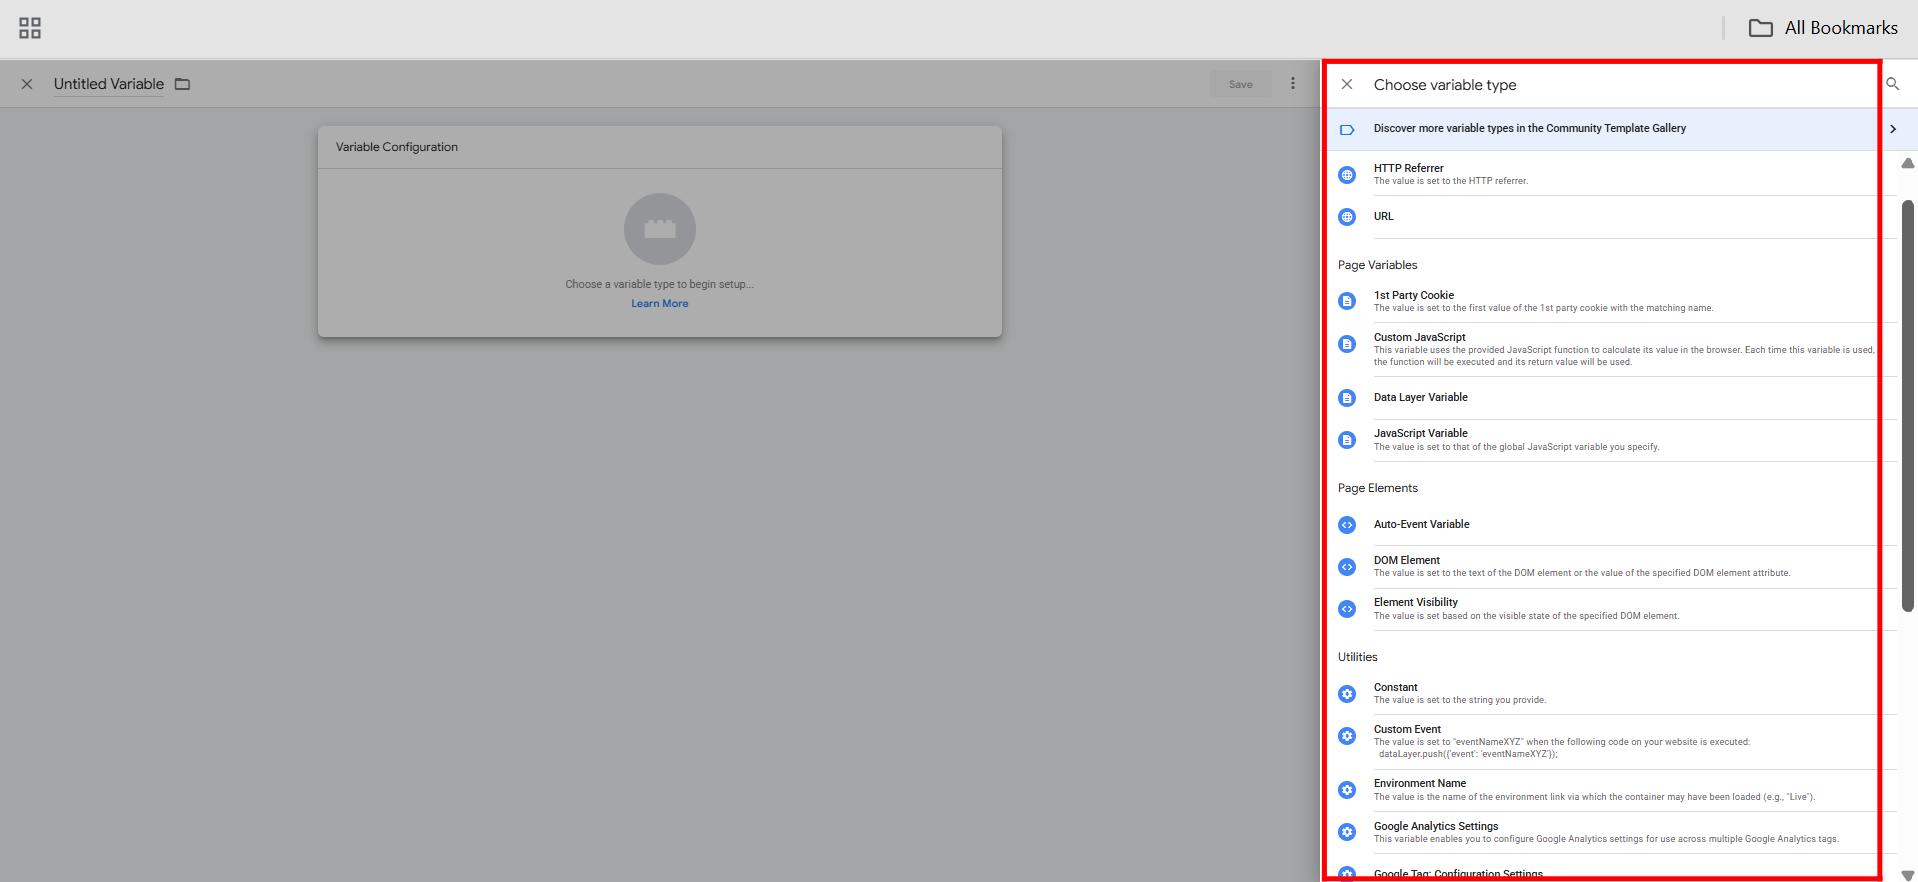
66. To add new variables, click “New” in the Variables section, then choose a Variable Type based on your needs. You can select from categories like Page Variables (e.g., Page URL, Referrer), Page Elements (e.g., DOM Element, Element Attribute), Utilities (e.g., Lookup Table, Regex Table), Data Layer Variables, and more. Choose the type that aligns with the data you want to capture and use in your tags or triggers.
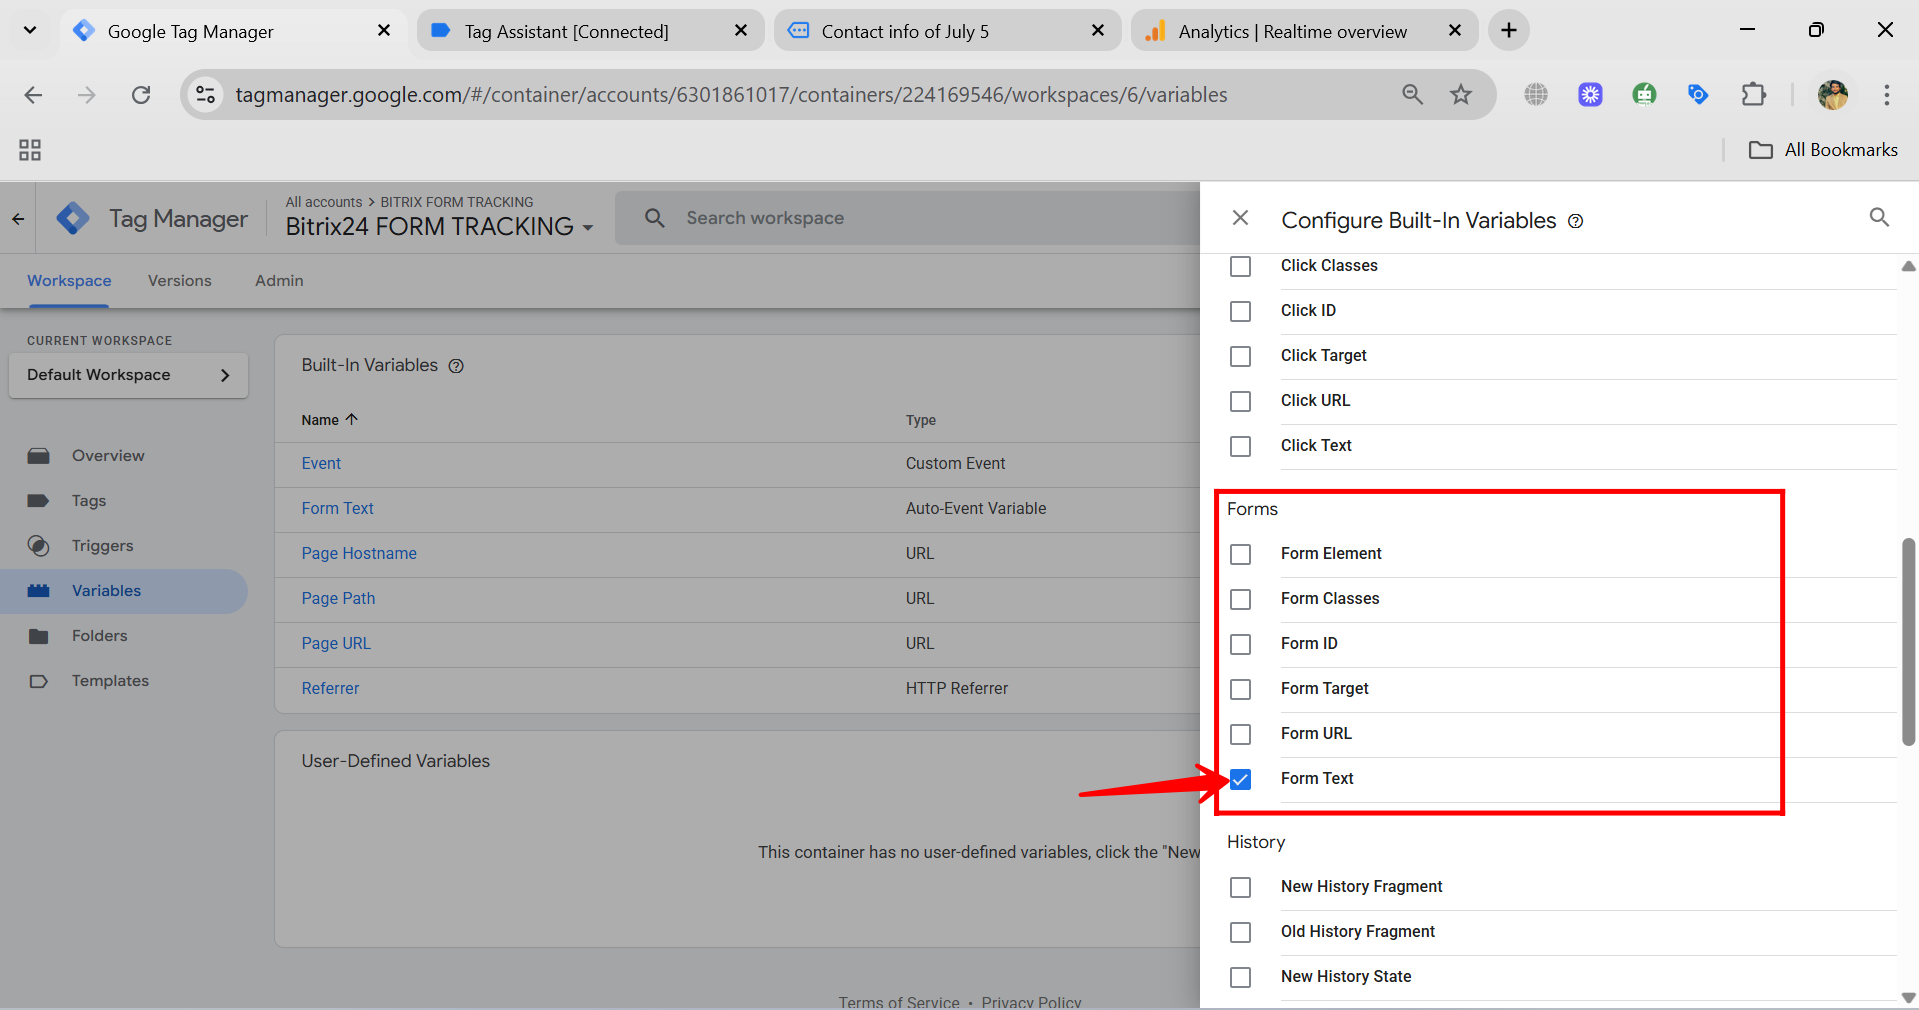
67. Now it’s time to create a flexible new tag to send an event to GA4. First, go to the Variables section in GTM and click Configure. Here, you’ll turn on the built-in variables, which help your tags and triggers communicate with each other during tracking.

68. We’re working with a form we want to track, so let’s start by enabling all built-in form-related variables in Google Tag Manager. Check all form options — including Form Element, Form Classes, Form ID, Form Target, Form URL, and Form Text. This is especially helpful if you’re not a developer, since you may not know exactly which attribute to track. By turning them all on, we can first capture everything, and later narrow it down by adding specific conditions to target the exact form interactions we care about.

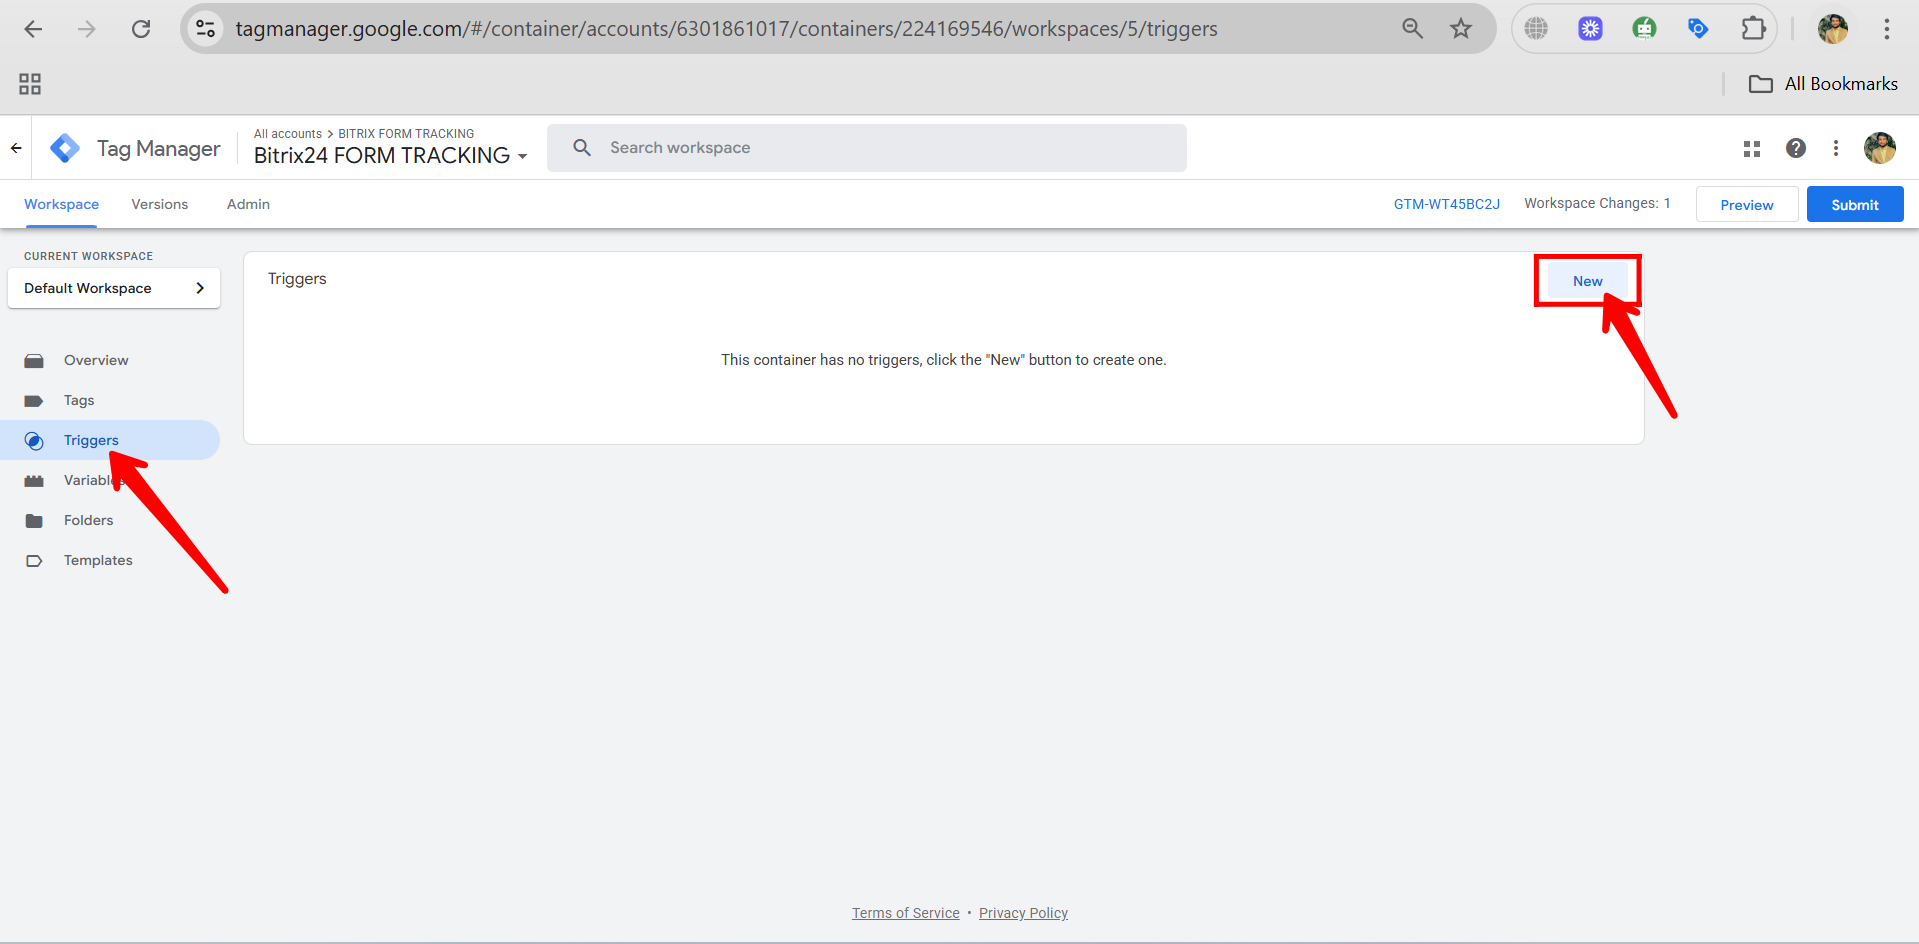
69. Now, go to the Triggers section in GTM and click “New” to start creating a new trigger for your form tracking setup.
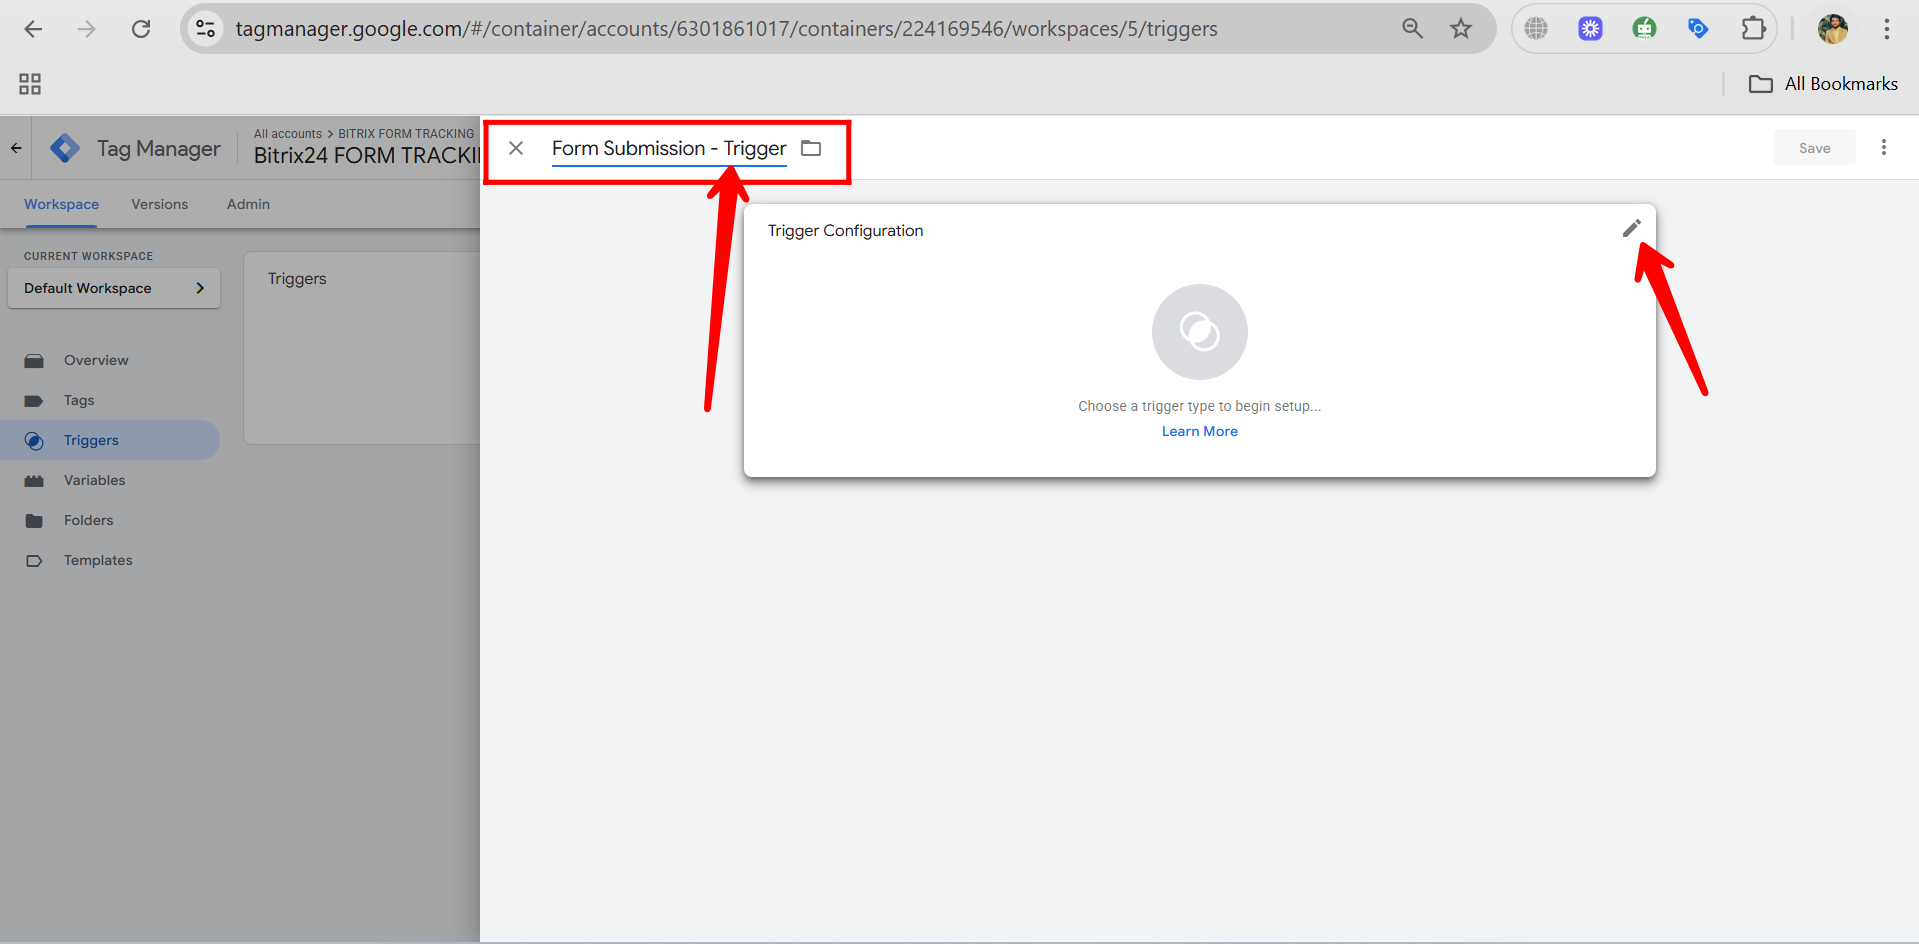
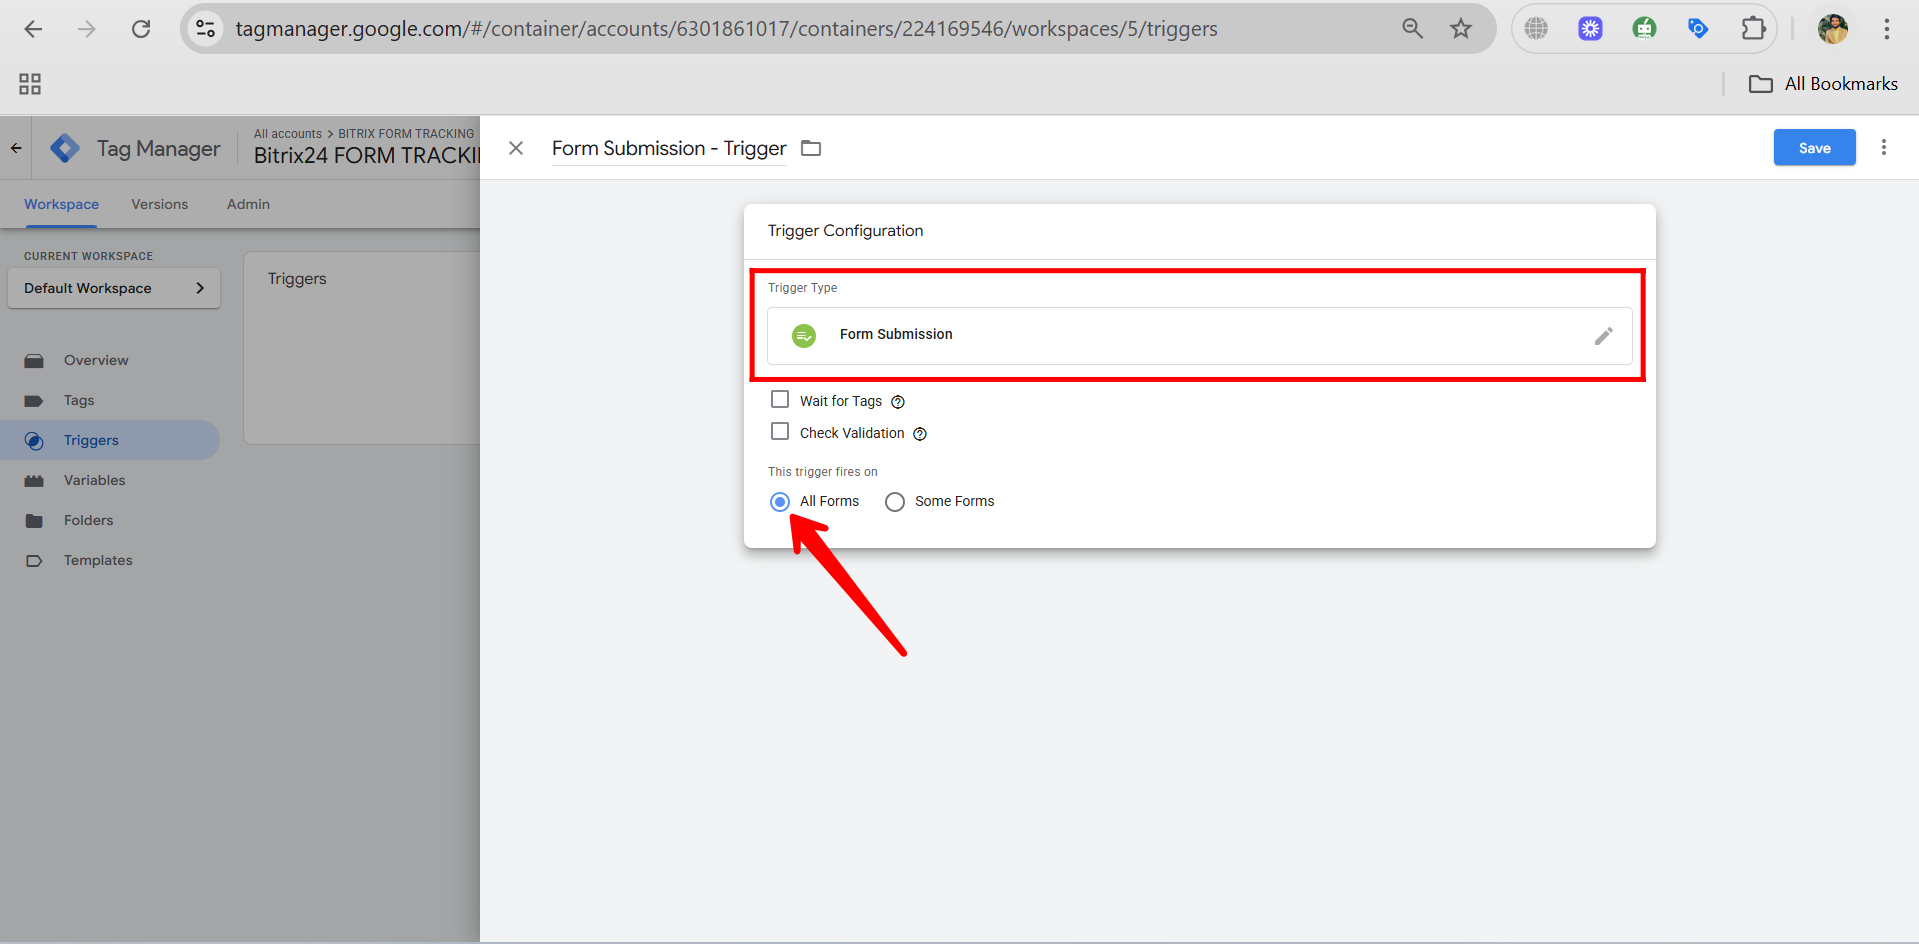
70. Give your trigger a name, such as “Form Submission – Trigger”, then click the pencil/edit icon to open the trigger configuration panel and begin setting it up.
71. In the trigger configuration panel, select the trigger type as “Form Submission”, which you’ll find under the User Engagement category.
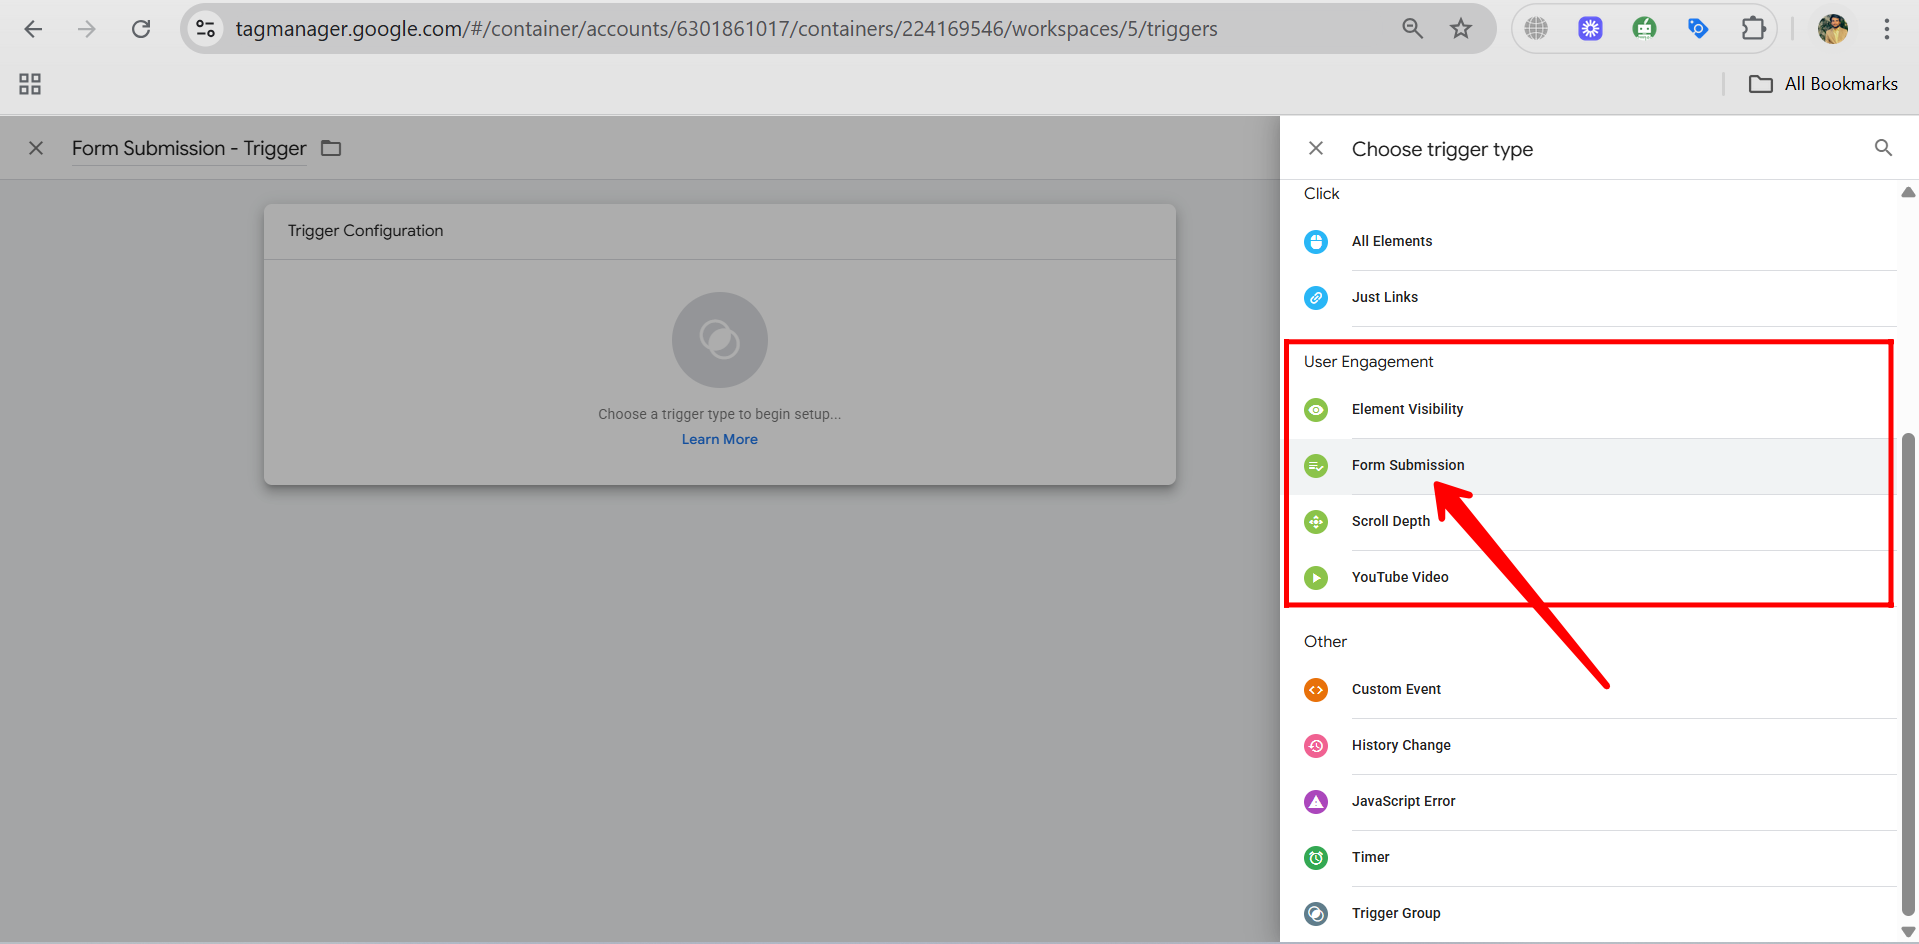
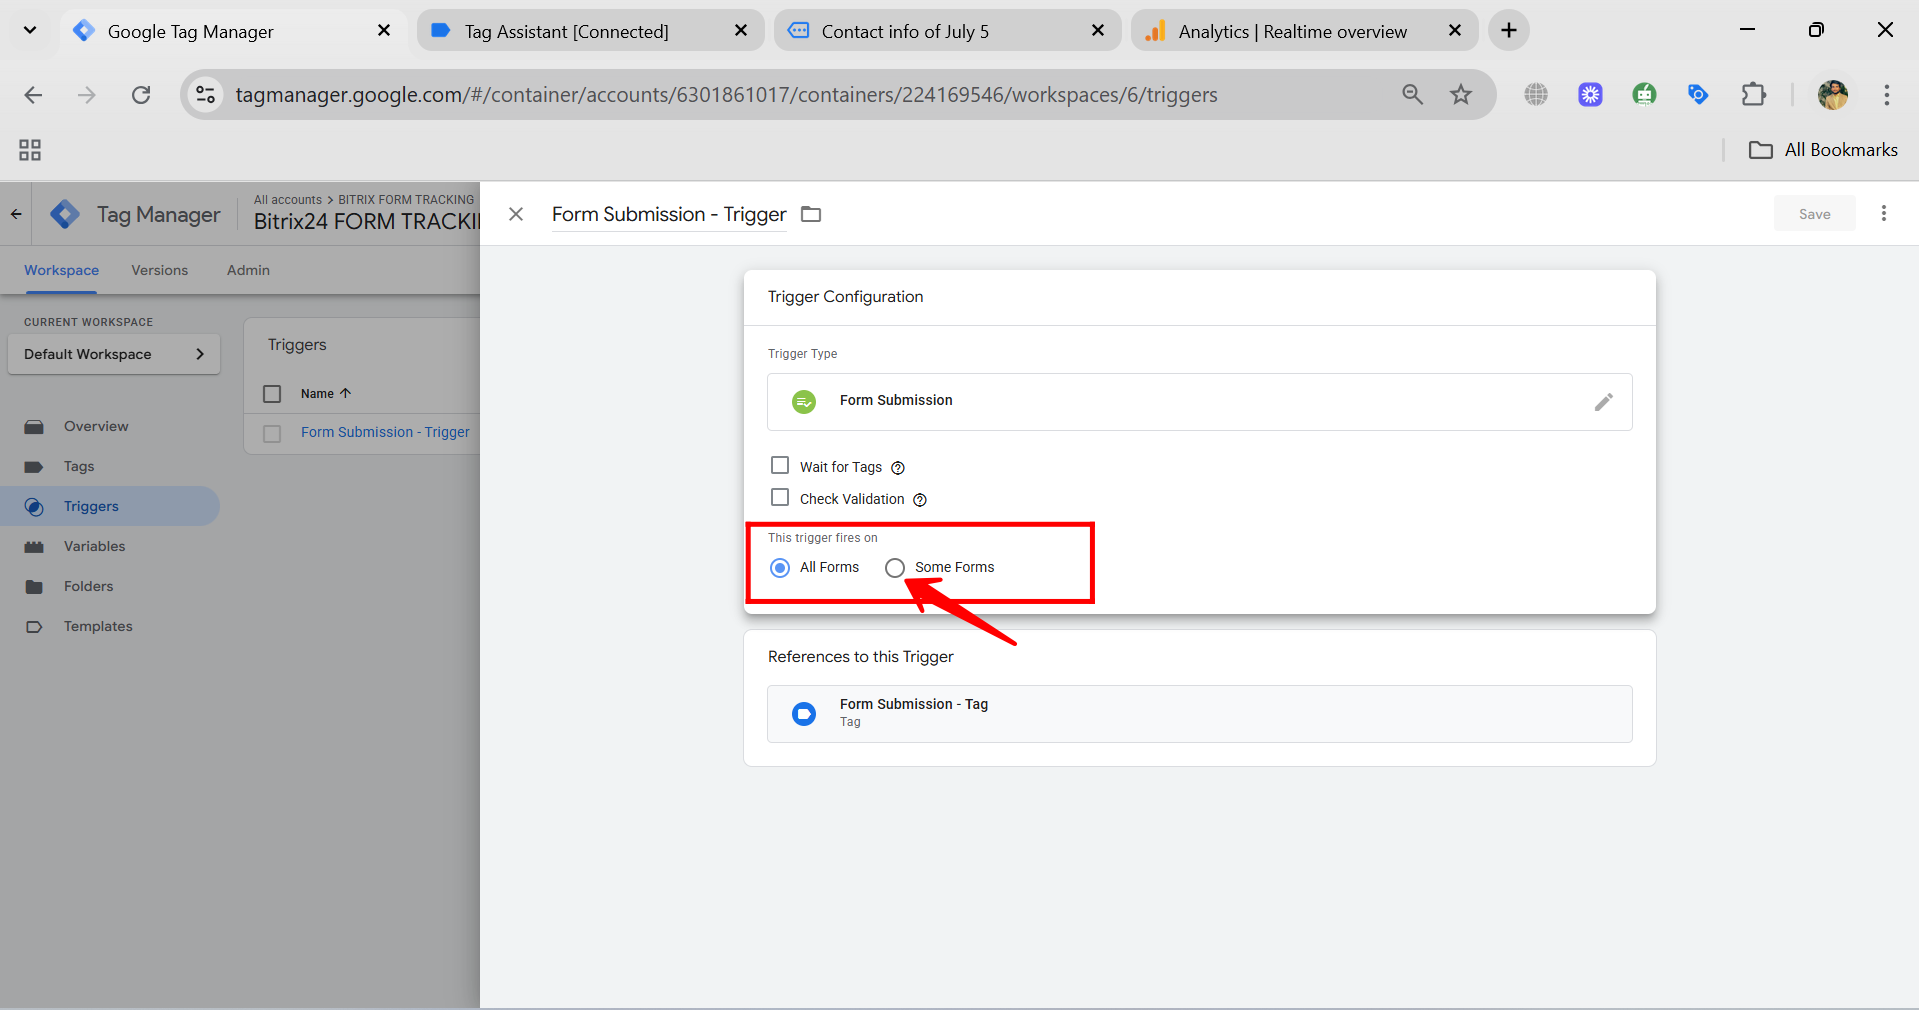
72. Choose “Form Submission” as the trigger type, and set it to fire on “All Forms” for now. This ensures the trigger captures every form submission on the site. Although you may currently have only one form for testing, this approach is helpful—especially for larger websites with multiple forms—so you can later refine the trigger by adding specific conditions to target a particular form.
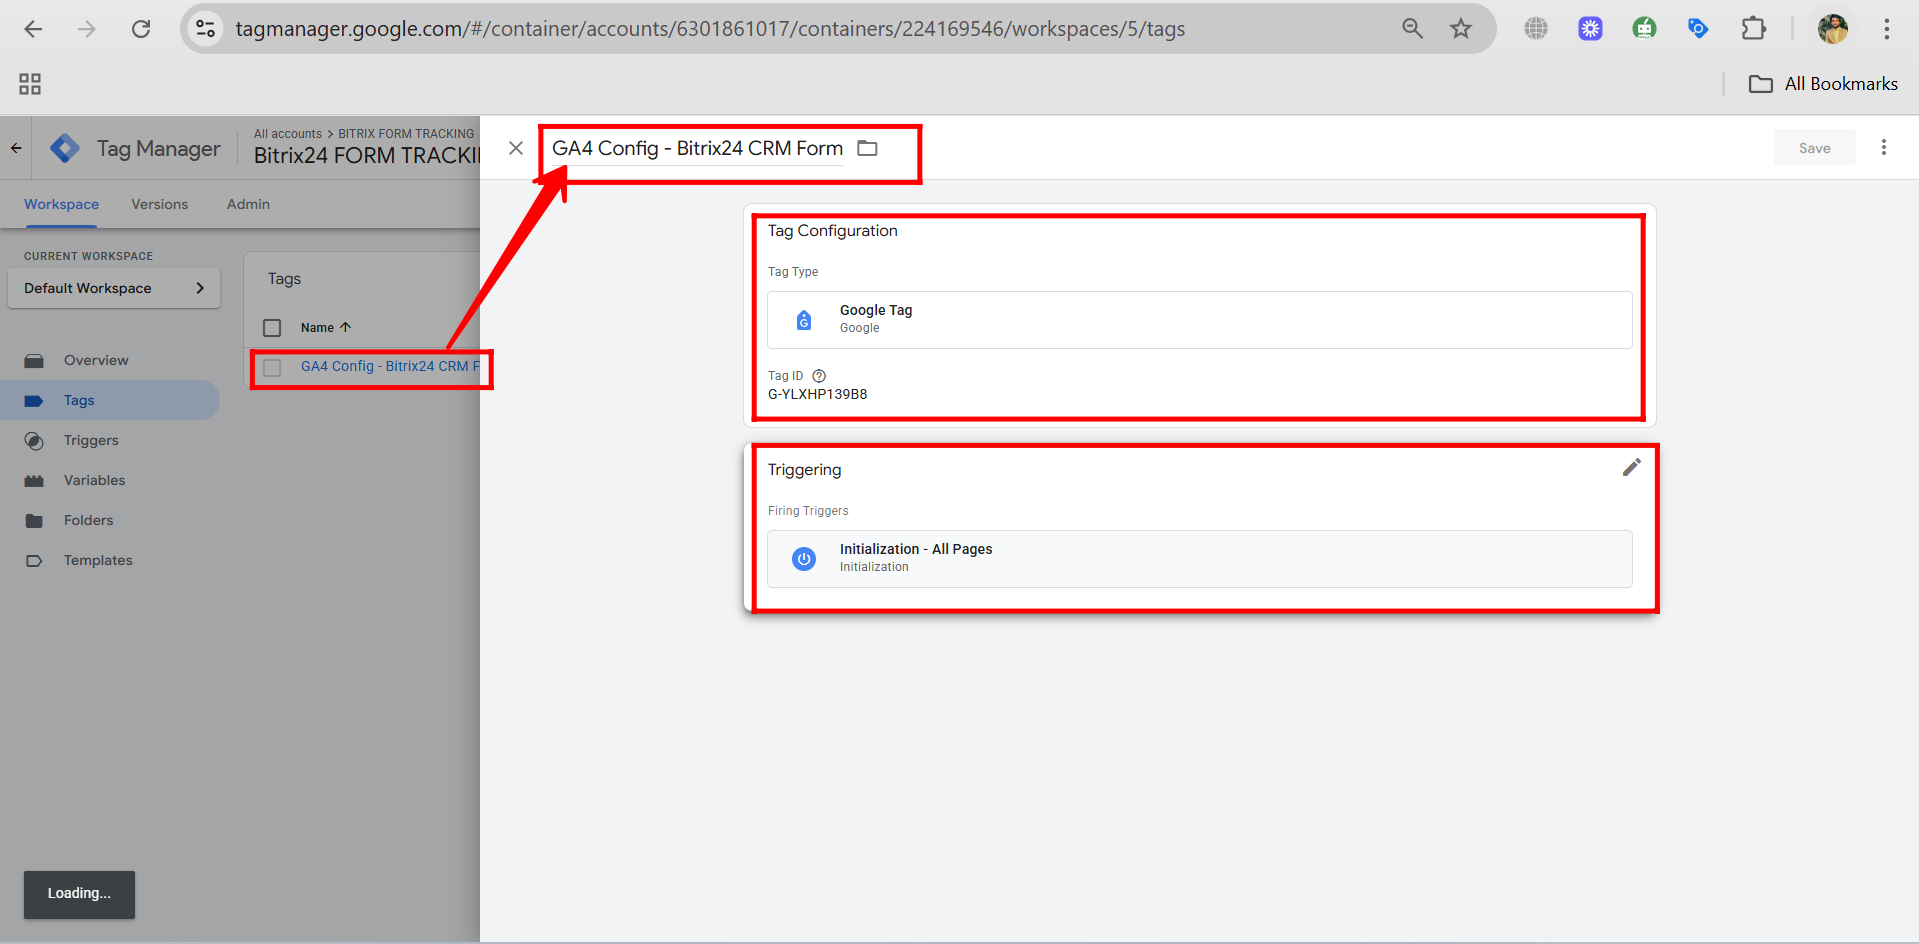
73. As you can see, we’ve already created a tag named “GA4 Config – Bitrix24 CRM Form” with the tag type “Google Tag”, where we added the Measurement ID from the GA4 web stream. This tag is set to fire on the “Initialization – All Pages” trigger, ensuring the GA4 script loads as early as possible across the site. Now, in the next step, we’ll create a new tag specifically for tracking a custom event, such as a form submission or field interaction.
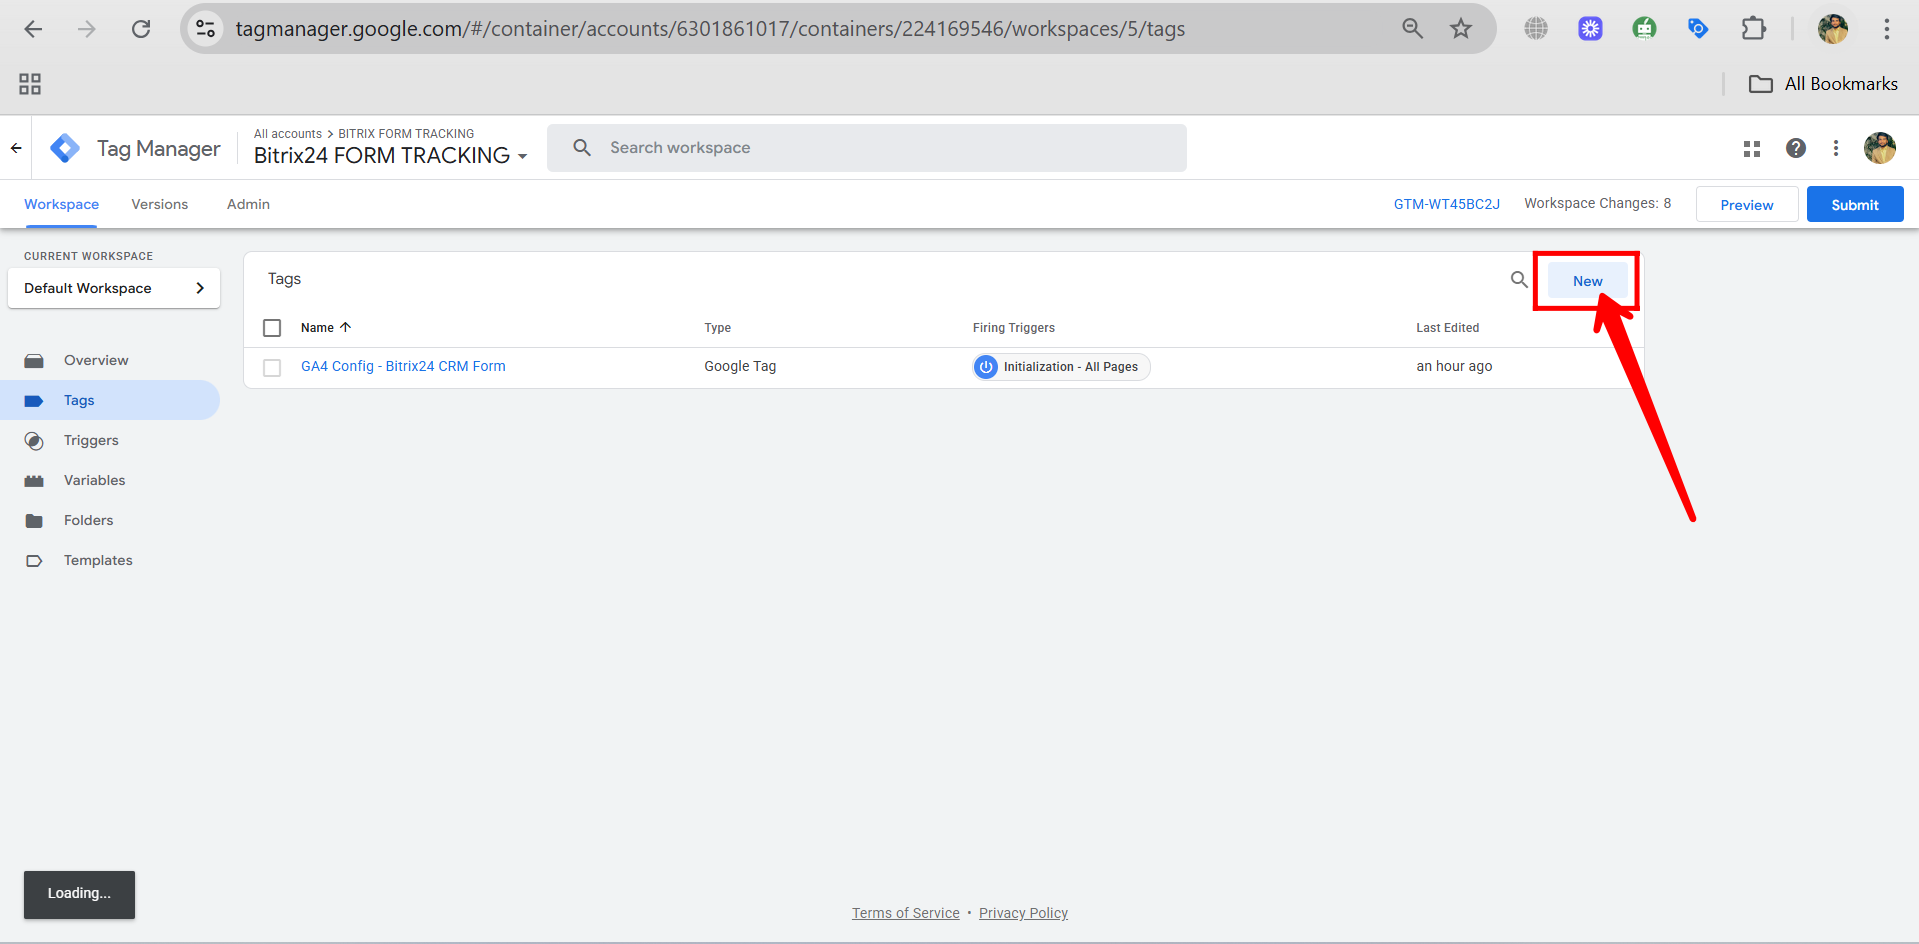
74. Click “New” to create a new tag for tracking your specific event.
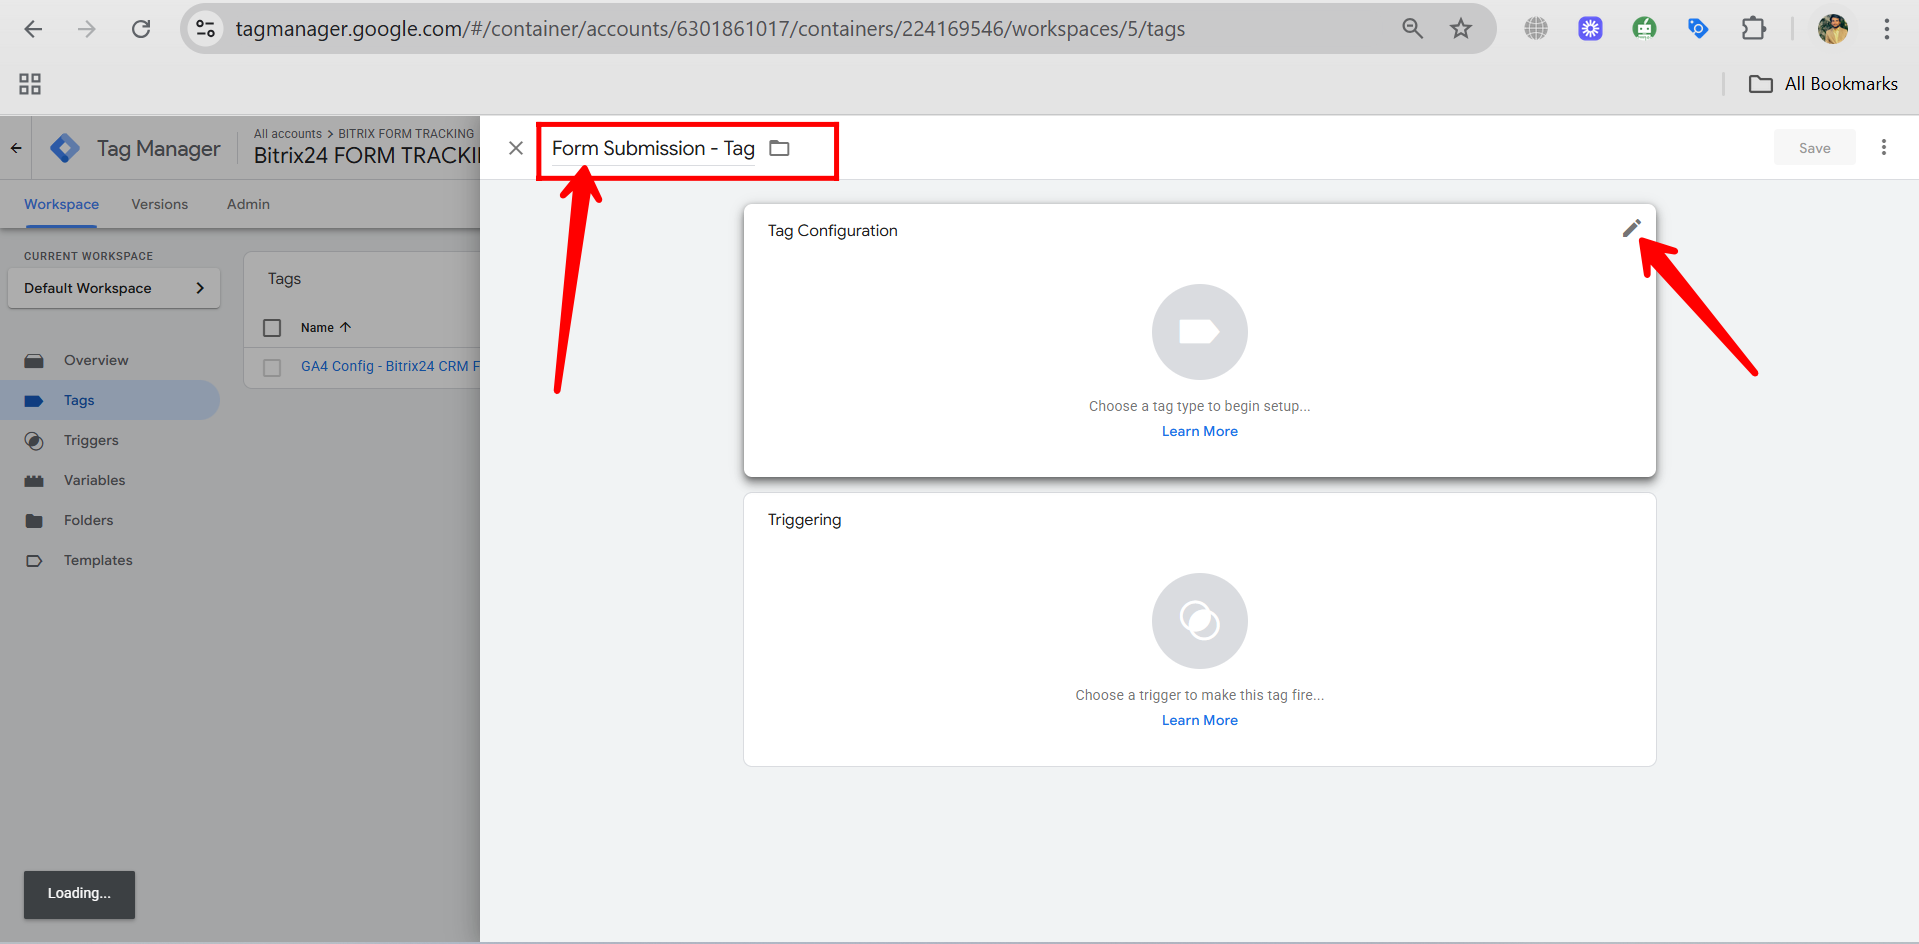
75. Rename the tag to something like “Form Submission – Tag”, then click the pencil/edit icon to open the tag configuration and begin setting up the event details.
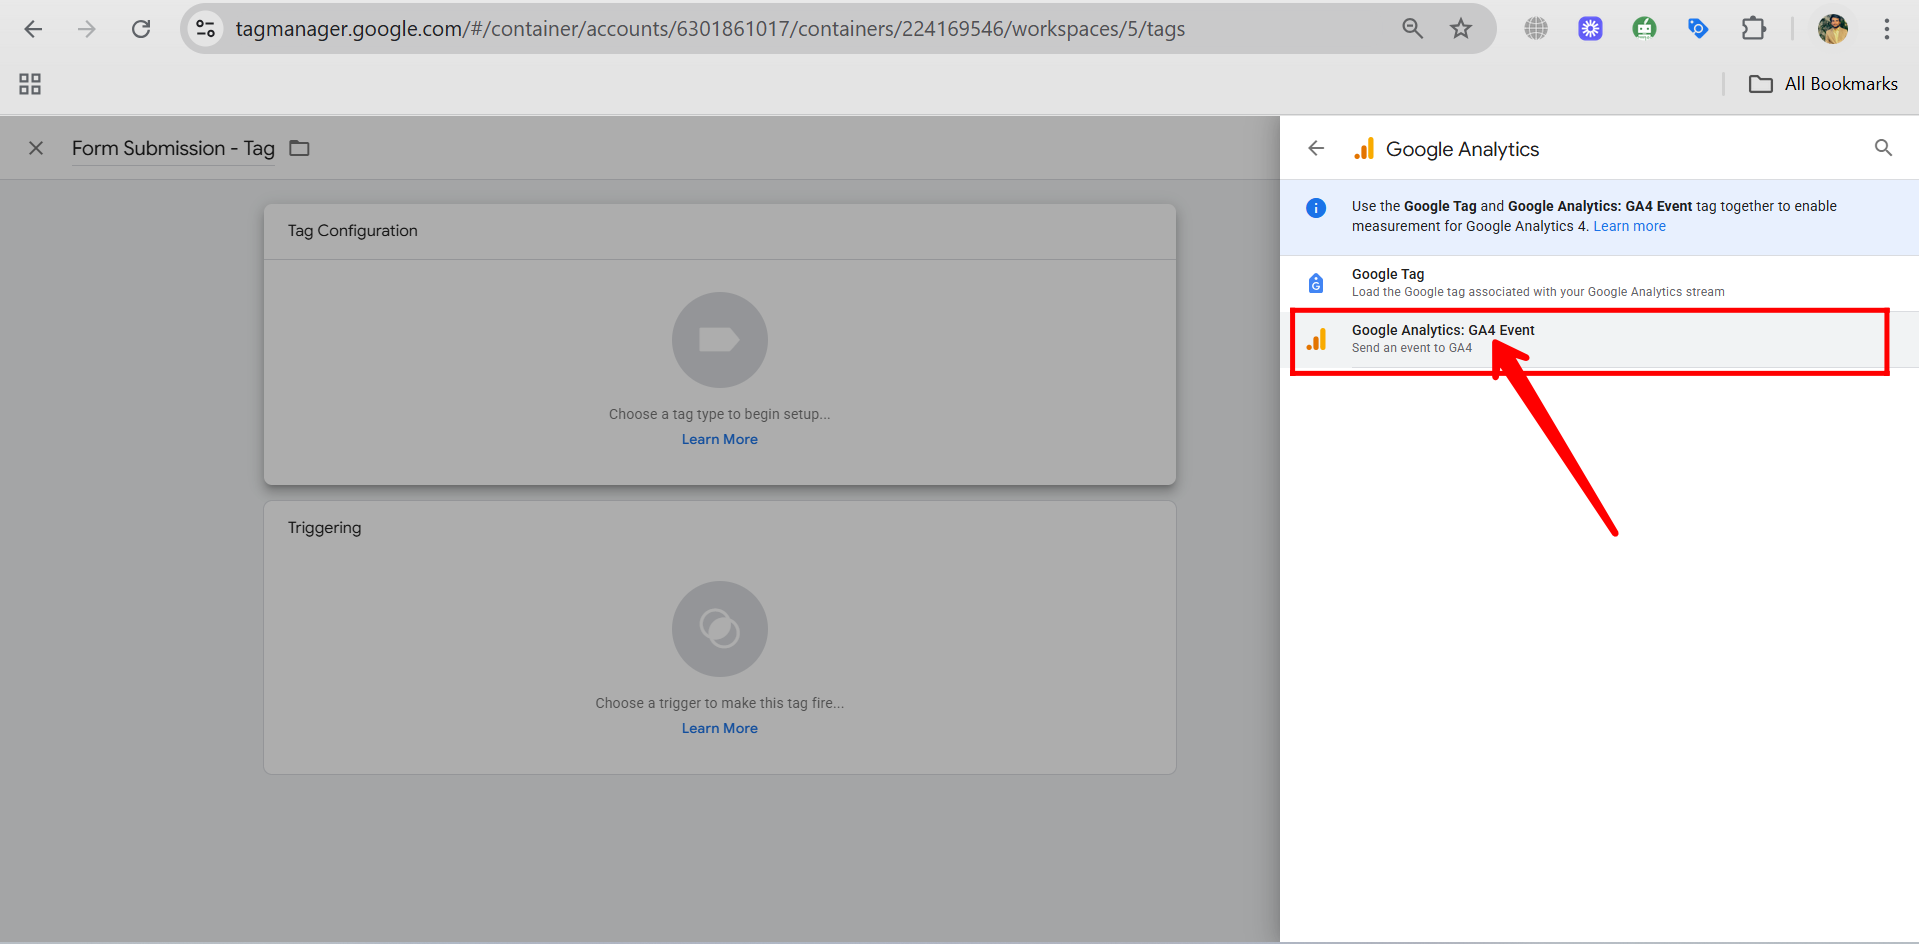
76. In the tag configuration panel, choose the tag type as “Google Analytics: GA4 Event” to set up an event that will be sent to your GA4 property.
77. This time, under the “Google Analytics” section, make sure to choose “Google Analytics: GA4 Event” instead of “Google Tag,” since we’re now creating a specific event tag that will send custom interaction data (like form submission) to your GA4 property.
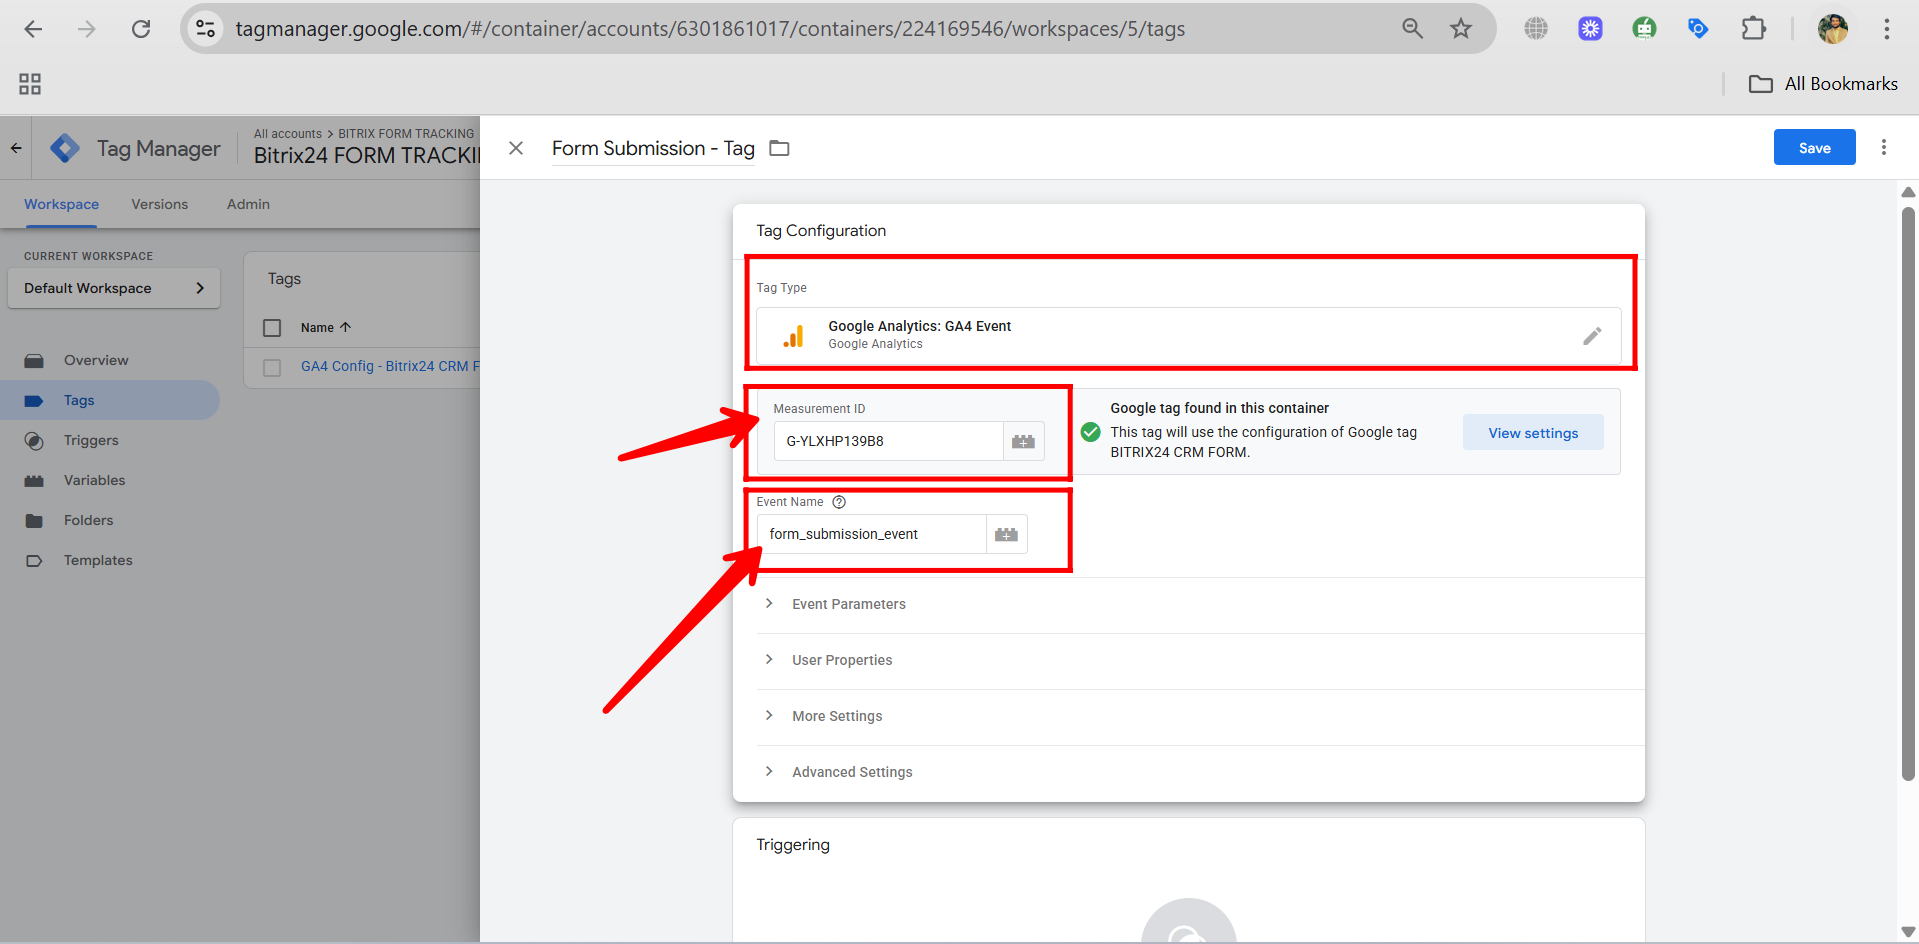
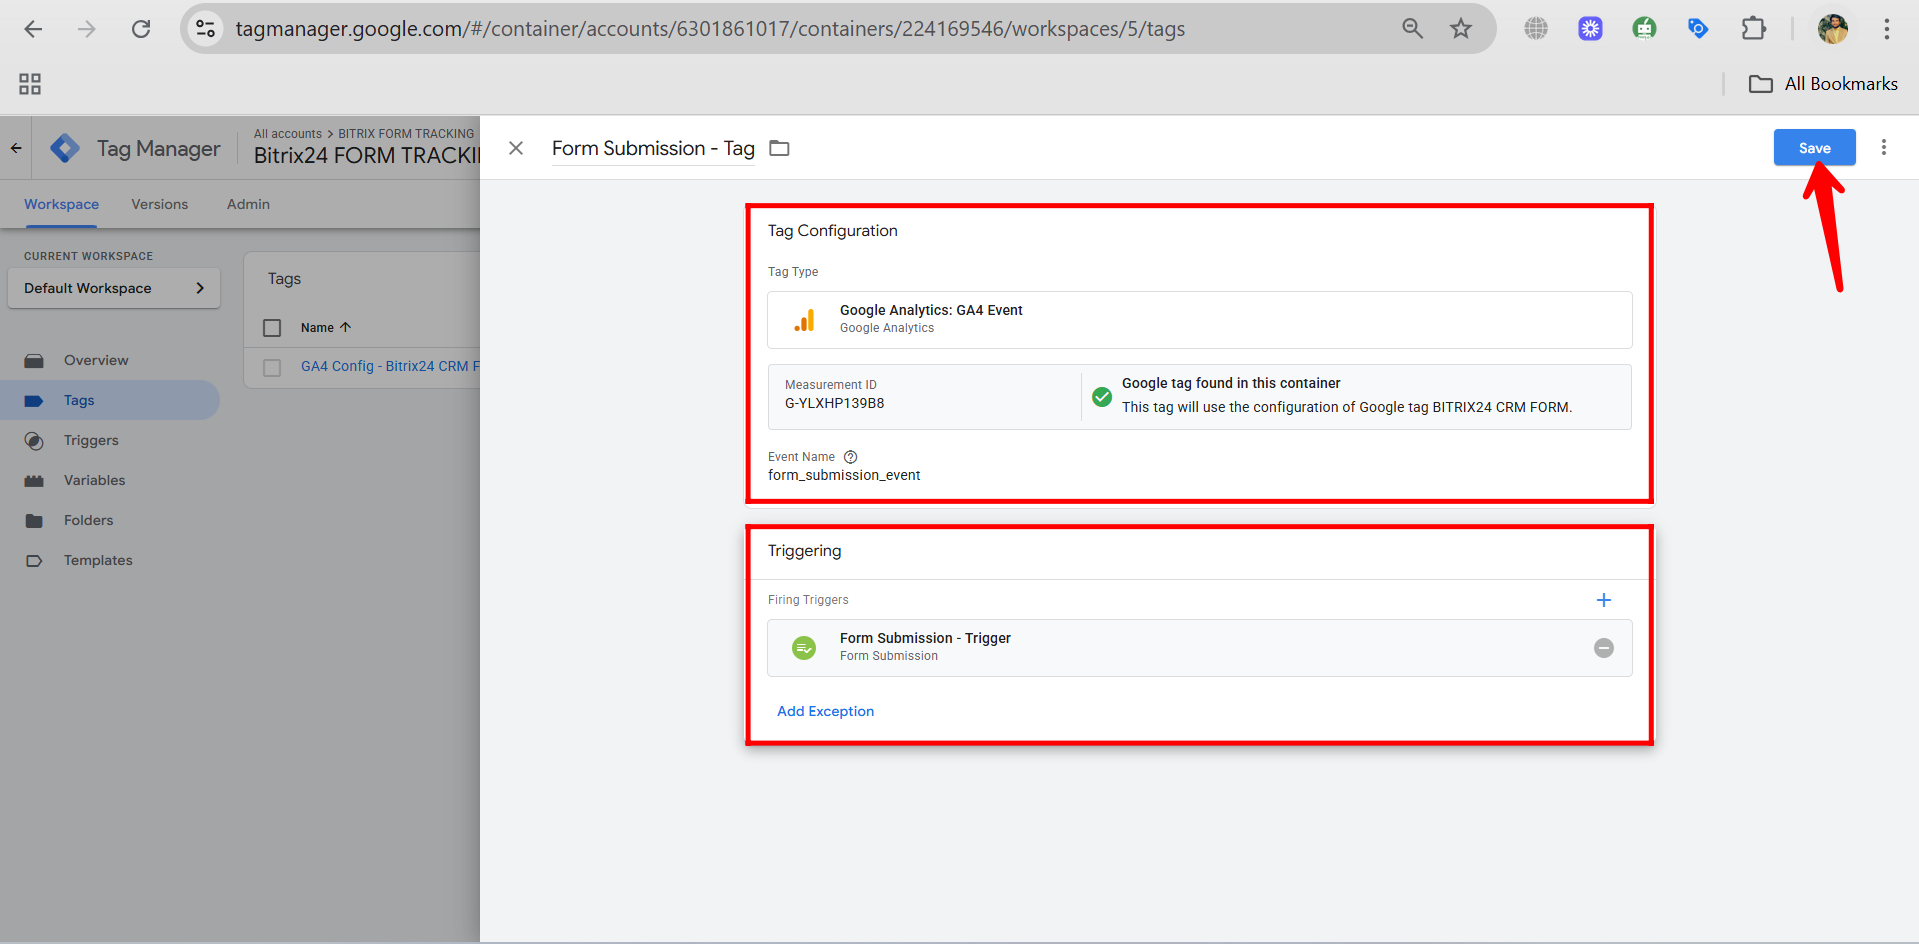
78. In the GA4 Event Tag configuration, add the same Measurement ID from the web stream in GA4. For the Event Name, enter “form_submission_event” to track form submissions. This event name will appear in GA4 whenever a form submission is triggered on the site.
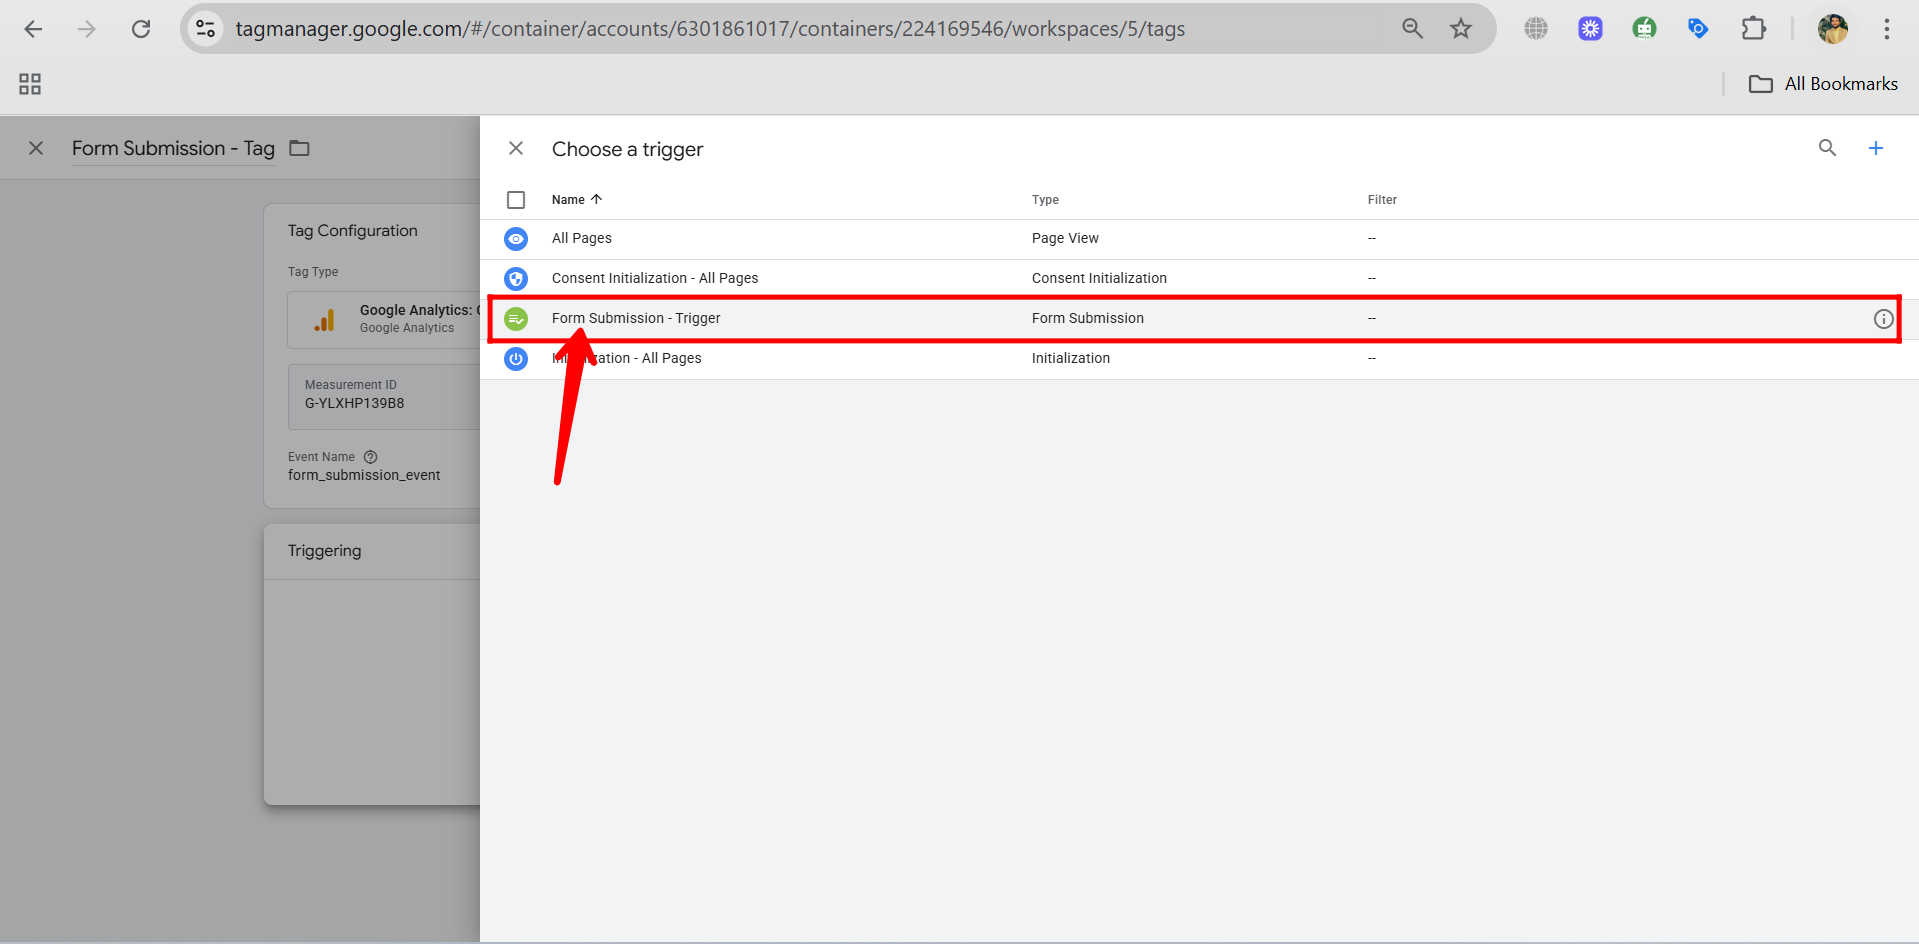
79. Now, click the edit (pencil) icon in the Triggering section to choose when this tag should fire. You’ll select the appropriate trigger—in this case, the one we previously created for form submissions.
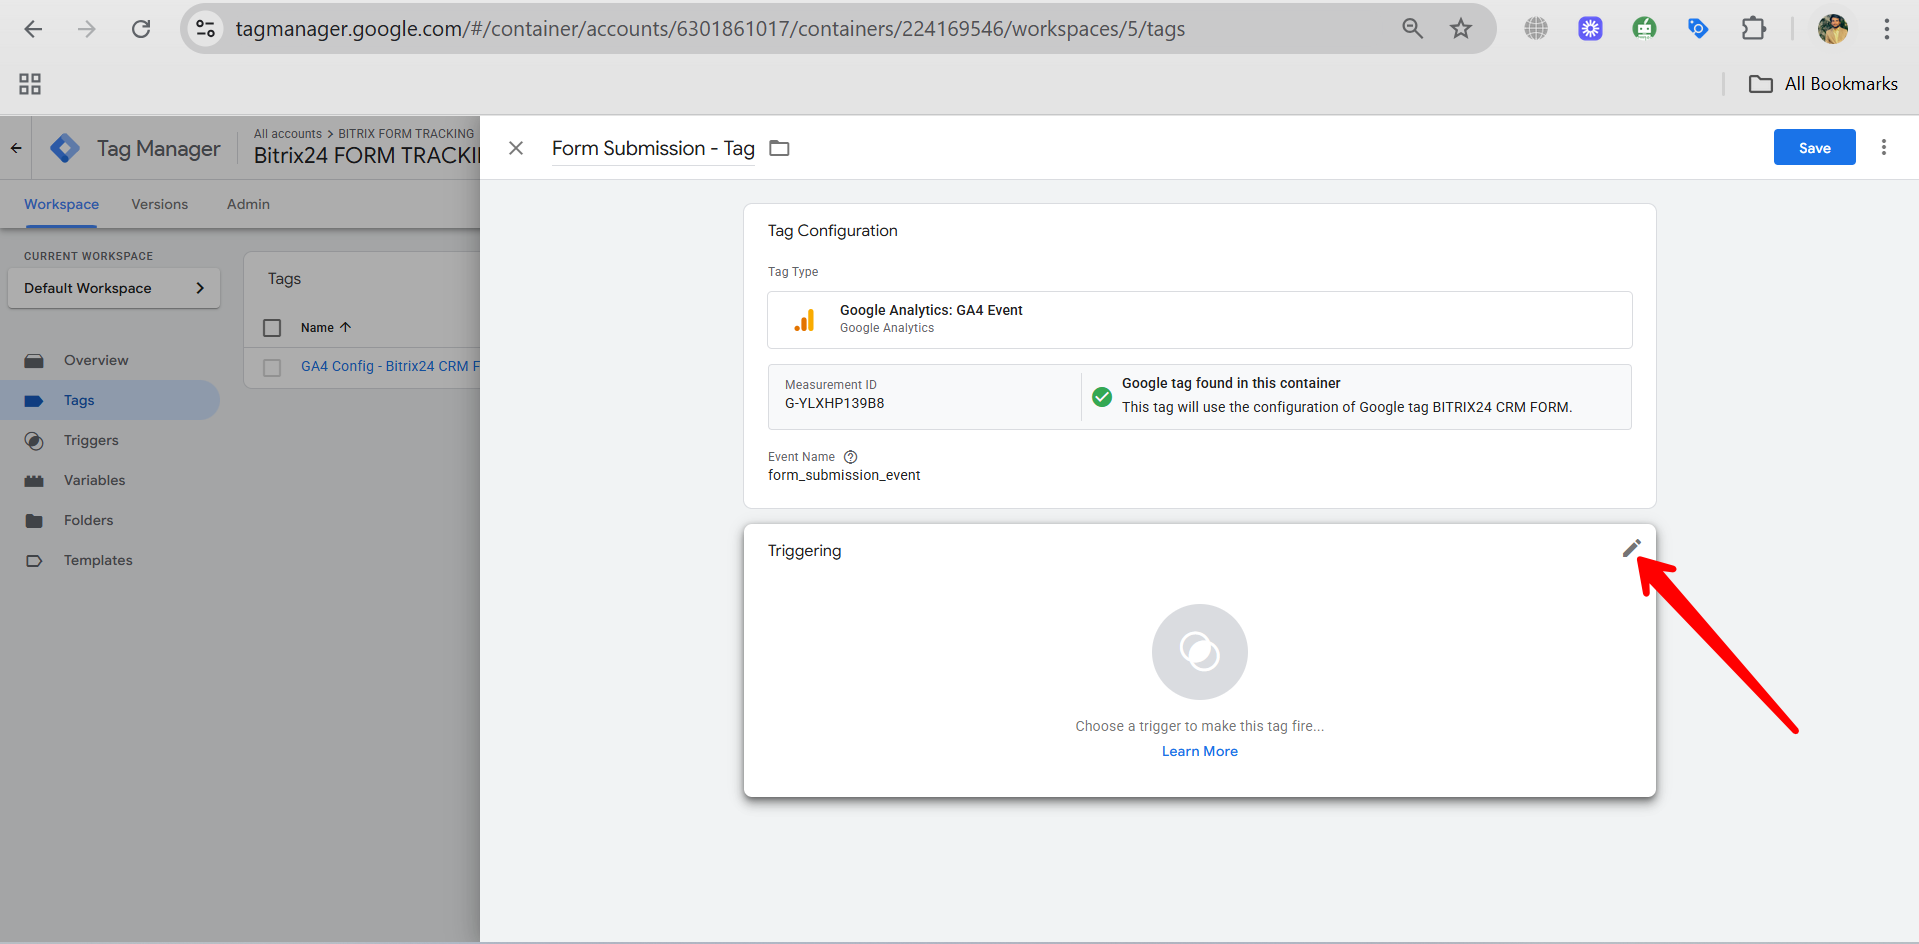
80. Now, click the edit (pencil) icon in the Triggering section to choose when this tag should fire. You’ll select the appropriate trigger—in this case, the one we previously created for form submissions.
81. After selecting the trigger, click Save to finish creating your GA4 event tag for form submissions.
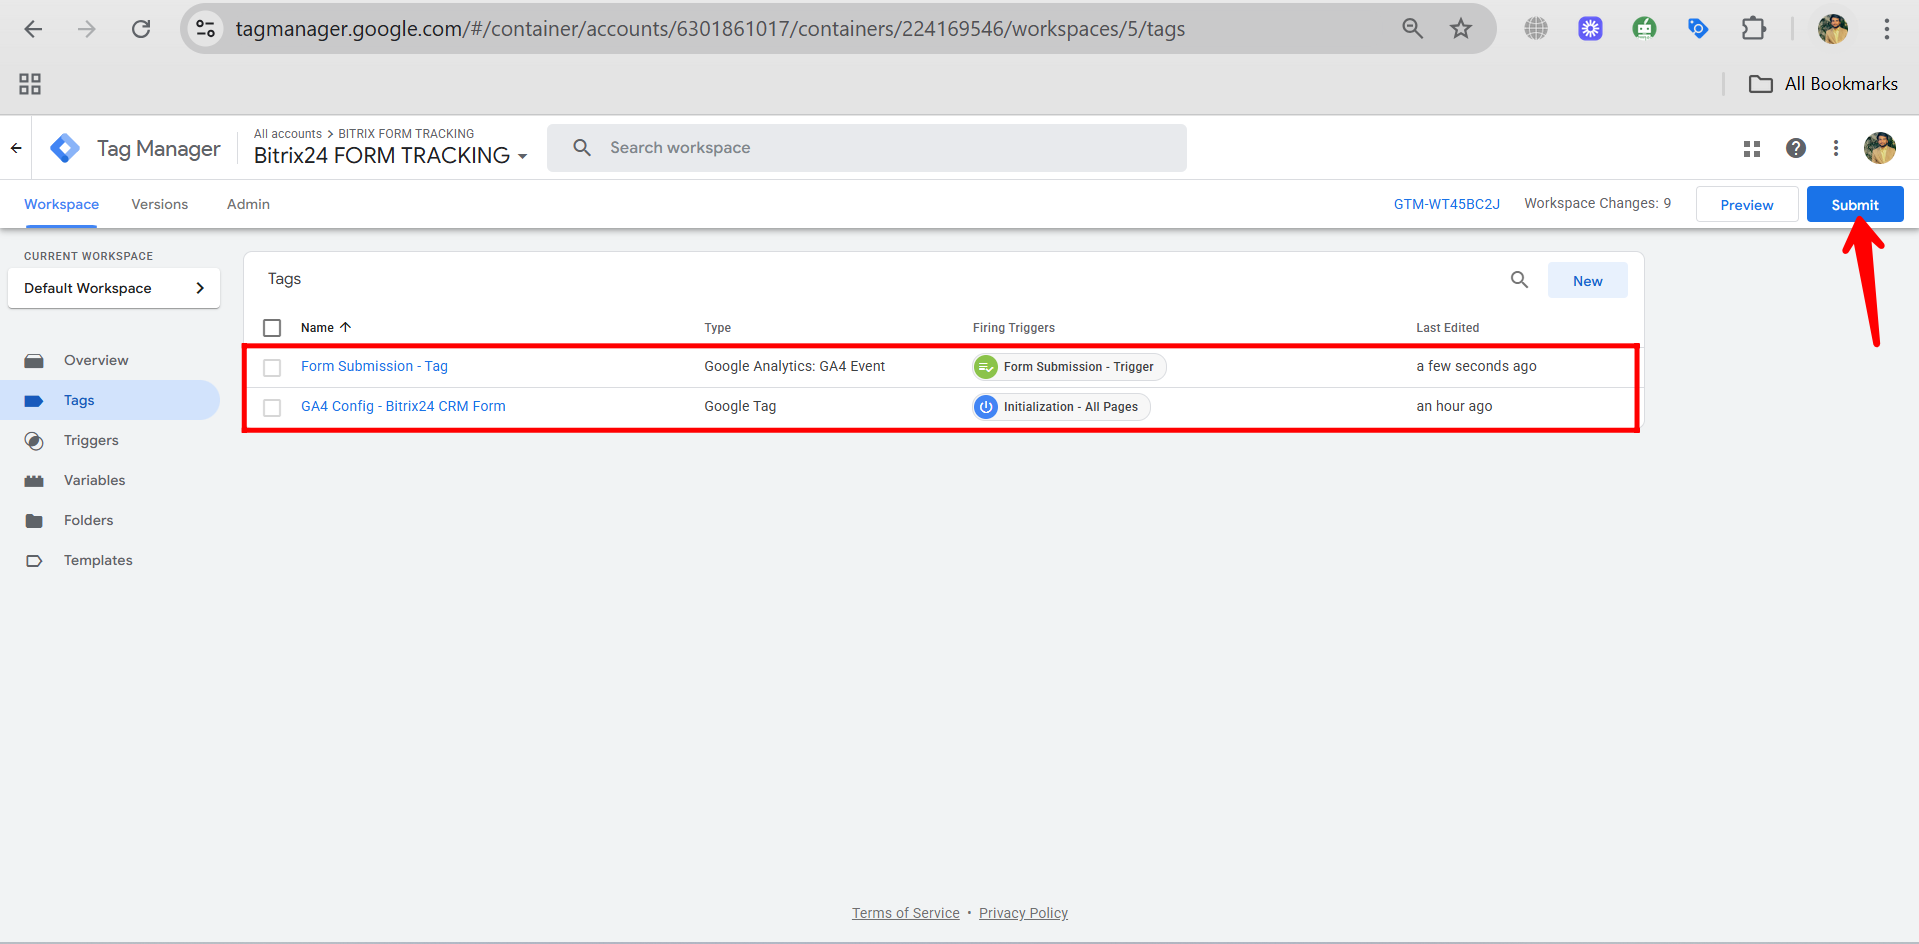
82. Now click Submit in Google Tag Manager to publish all your changes — including the new tag, trigger, and enabled variables — so they go live and start tracking on your site.
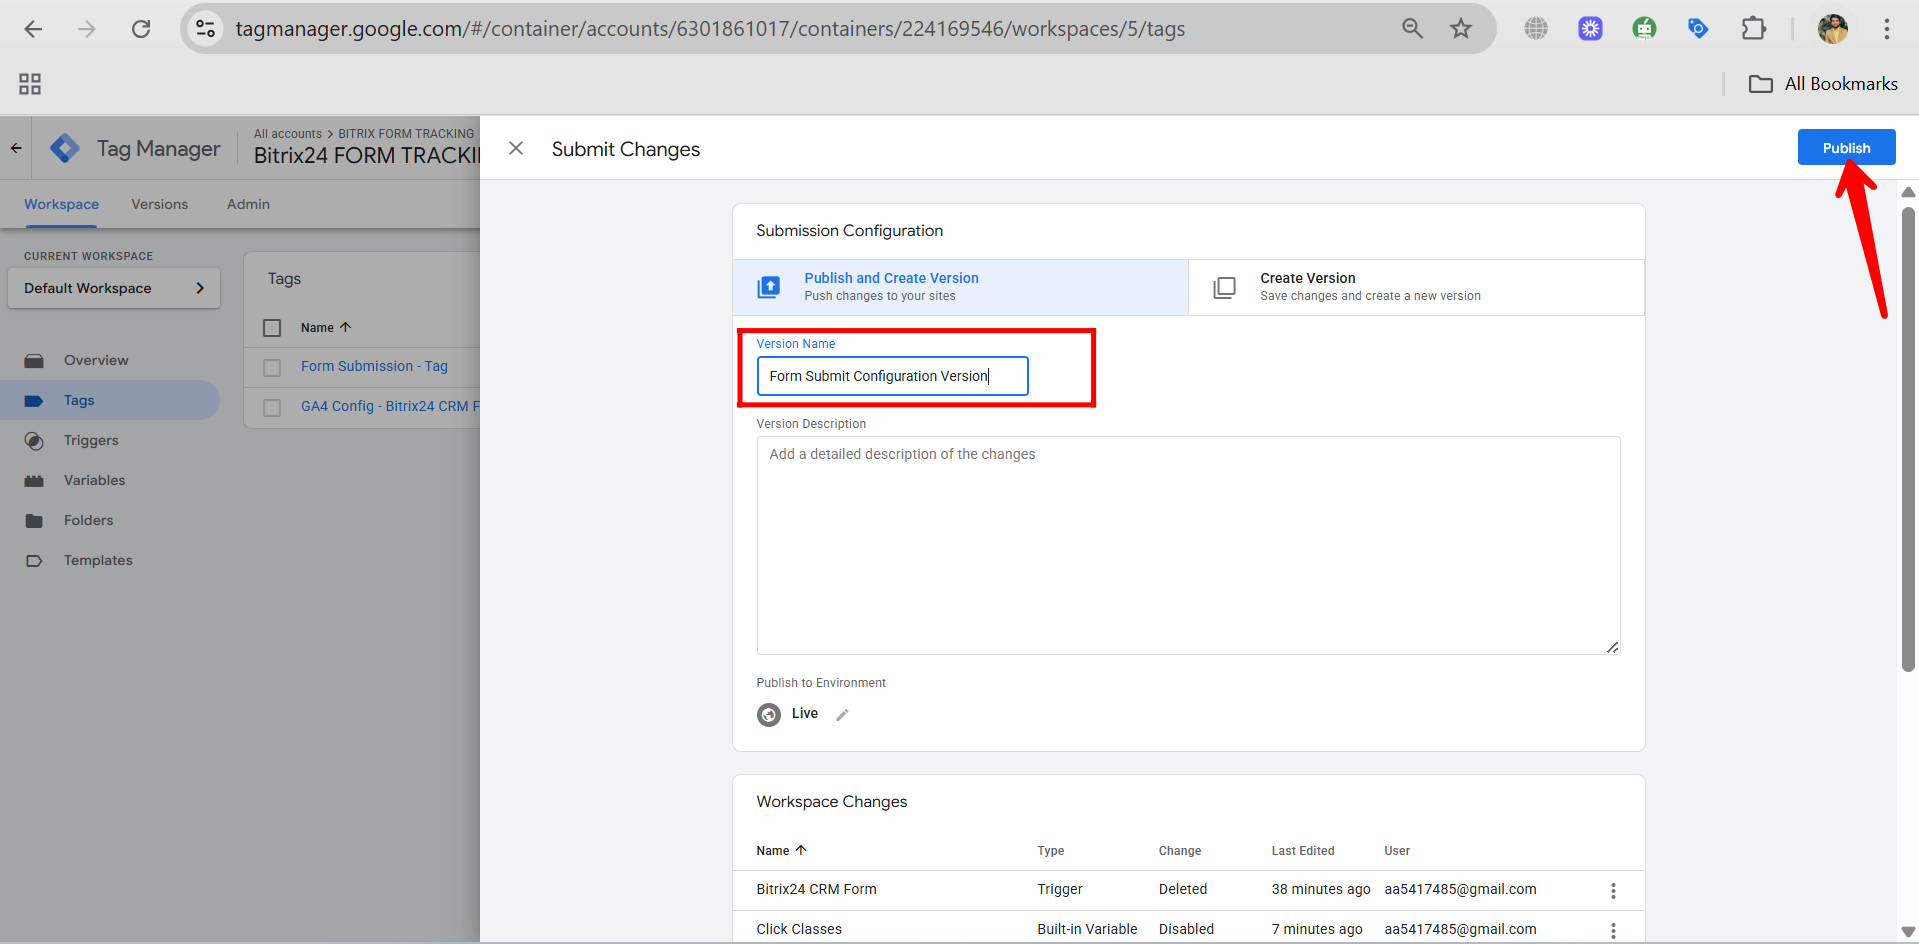
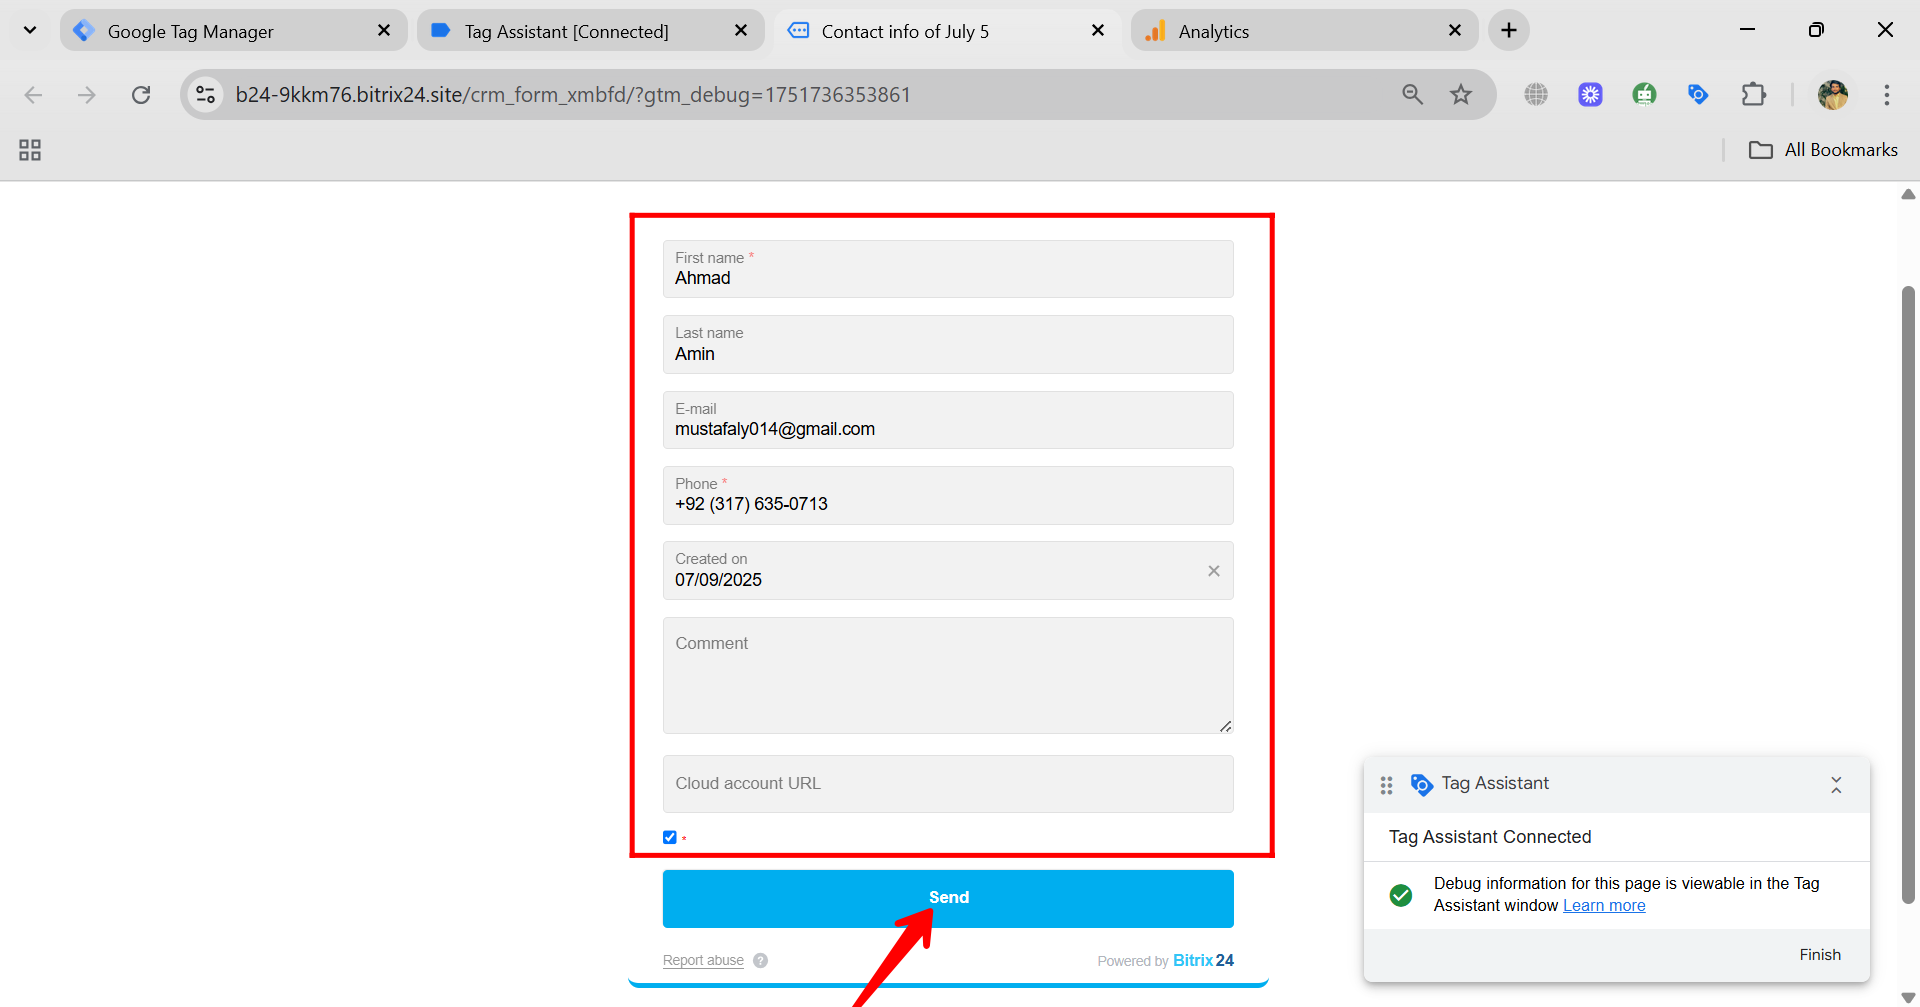
83. Add a version name (e.g., “Form Submission Event Setup or Form Submit Configuration Version”) and optionally a version description (e.g., “Added form submission trigger and GA4 event tag”), then click Publish to apply the changes to your live GTM container.
84. After publishing, click Preview in Google Tag Manager to open Tag Assistant and test whether your new form submission event is firing correctly on the live site.
85. In the Tag Assistant preview window, enter your website URL (the URL where your CRM form is hosted), then click Connect to start debugging and testing your GTM setup.
86. Your form will open in a new tab, and you’ll see a “Connected” status in the top-left corner of the Tag Assistant panel. This confirms that the preview mode is working correctly. Click Continue to begin monitoring activity on the form.
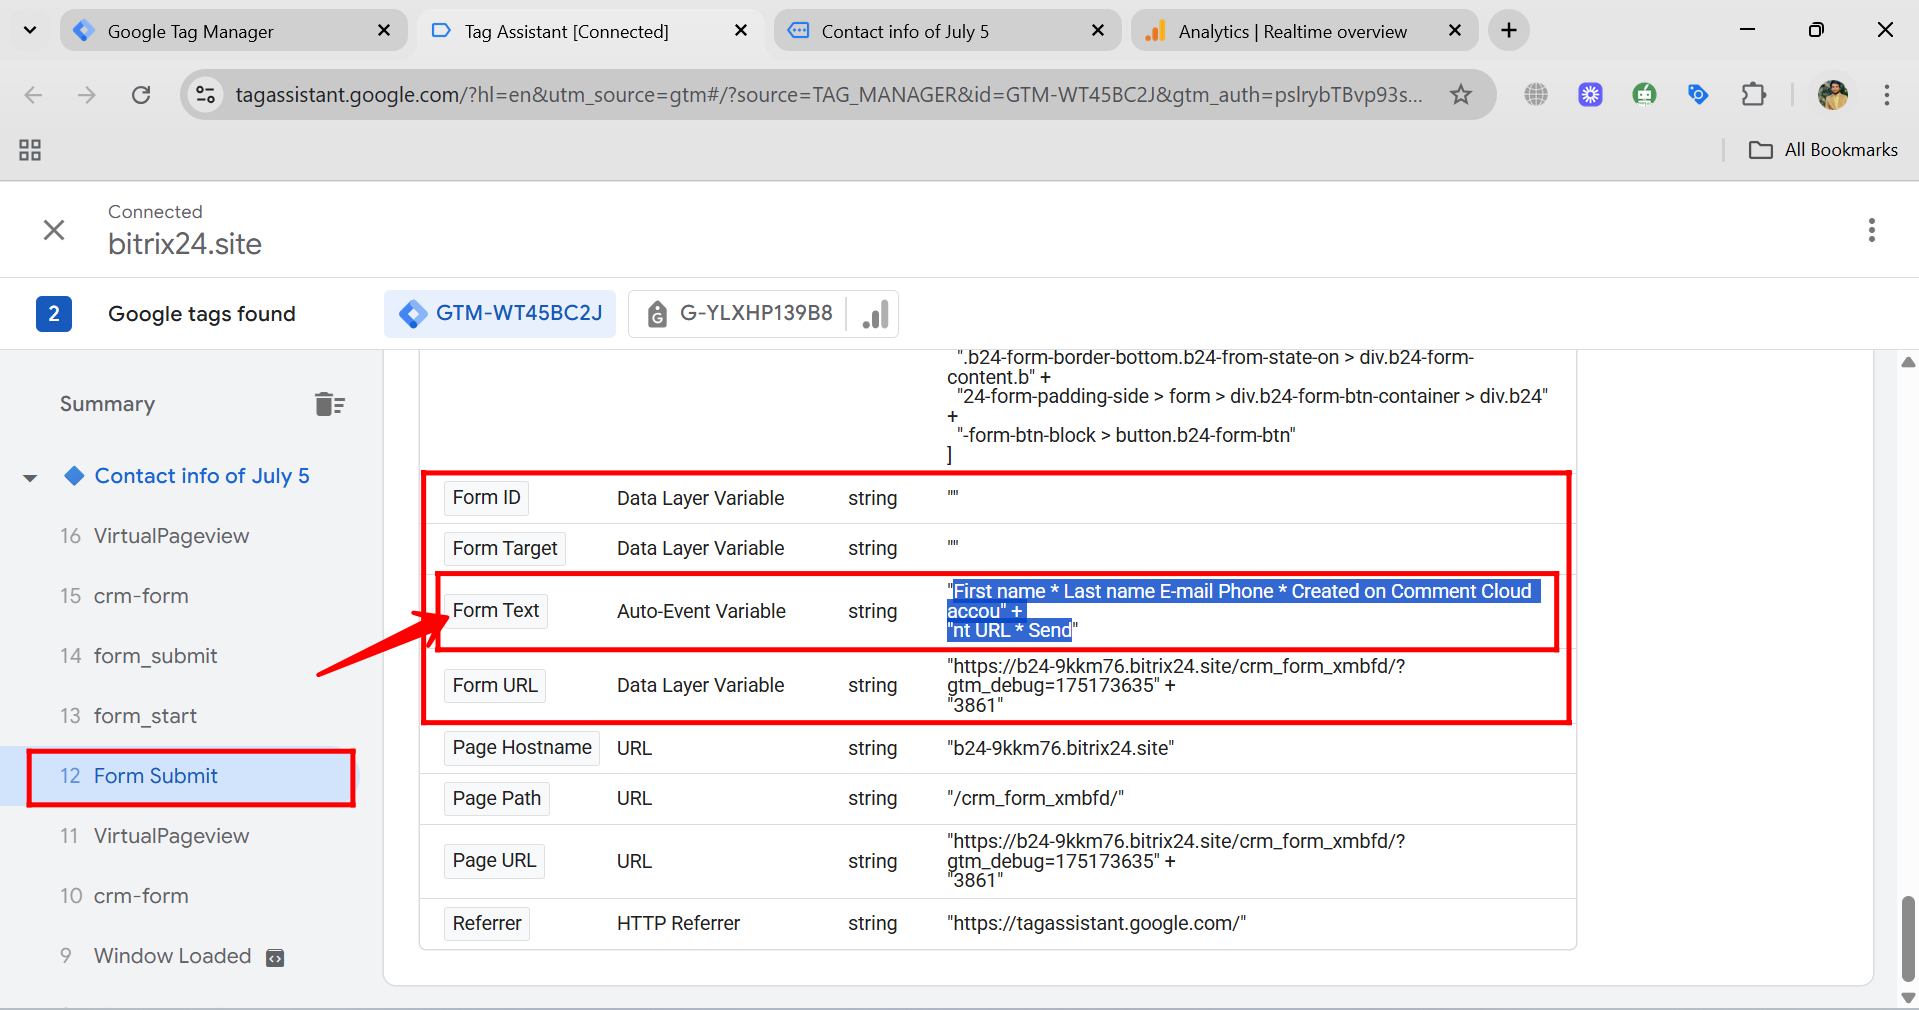
87. In the Tag Assistant window, first click on your Analytics Measurement ID to expand its details. As your form page loads in the connected tab, you’ll notice that the summary currently shows only default hits like scroll and page_view events — these are standard GA4 events that fire automatically. Custom events like form submission will appear once the user interacts with the form and the configured trigger is activated.
88. Now switch to the tab where your form is open (the one connected through Tag Assistant), fill in the required fields, and click the Send or Submit button to complete the form submission. This action will trigger your custom GTM tag if everything is set up correctly.
89. Go back to the Tag Assistant window, open the section showing your GA4 Measurement ID, and look under the Summary tab. You’ll now see the custom event “form_submission_event” listed. When you click on it, you should see a status like “Hit sent successfully”, confirming that the event was triggered and sent to Google Analytics 4 as expected.
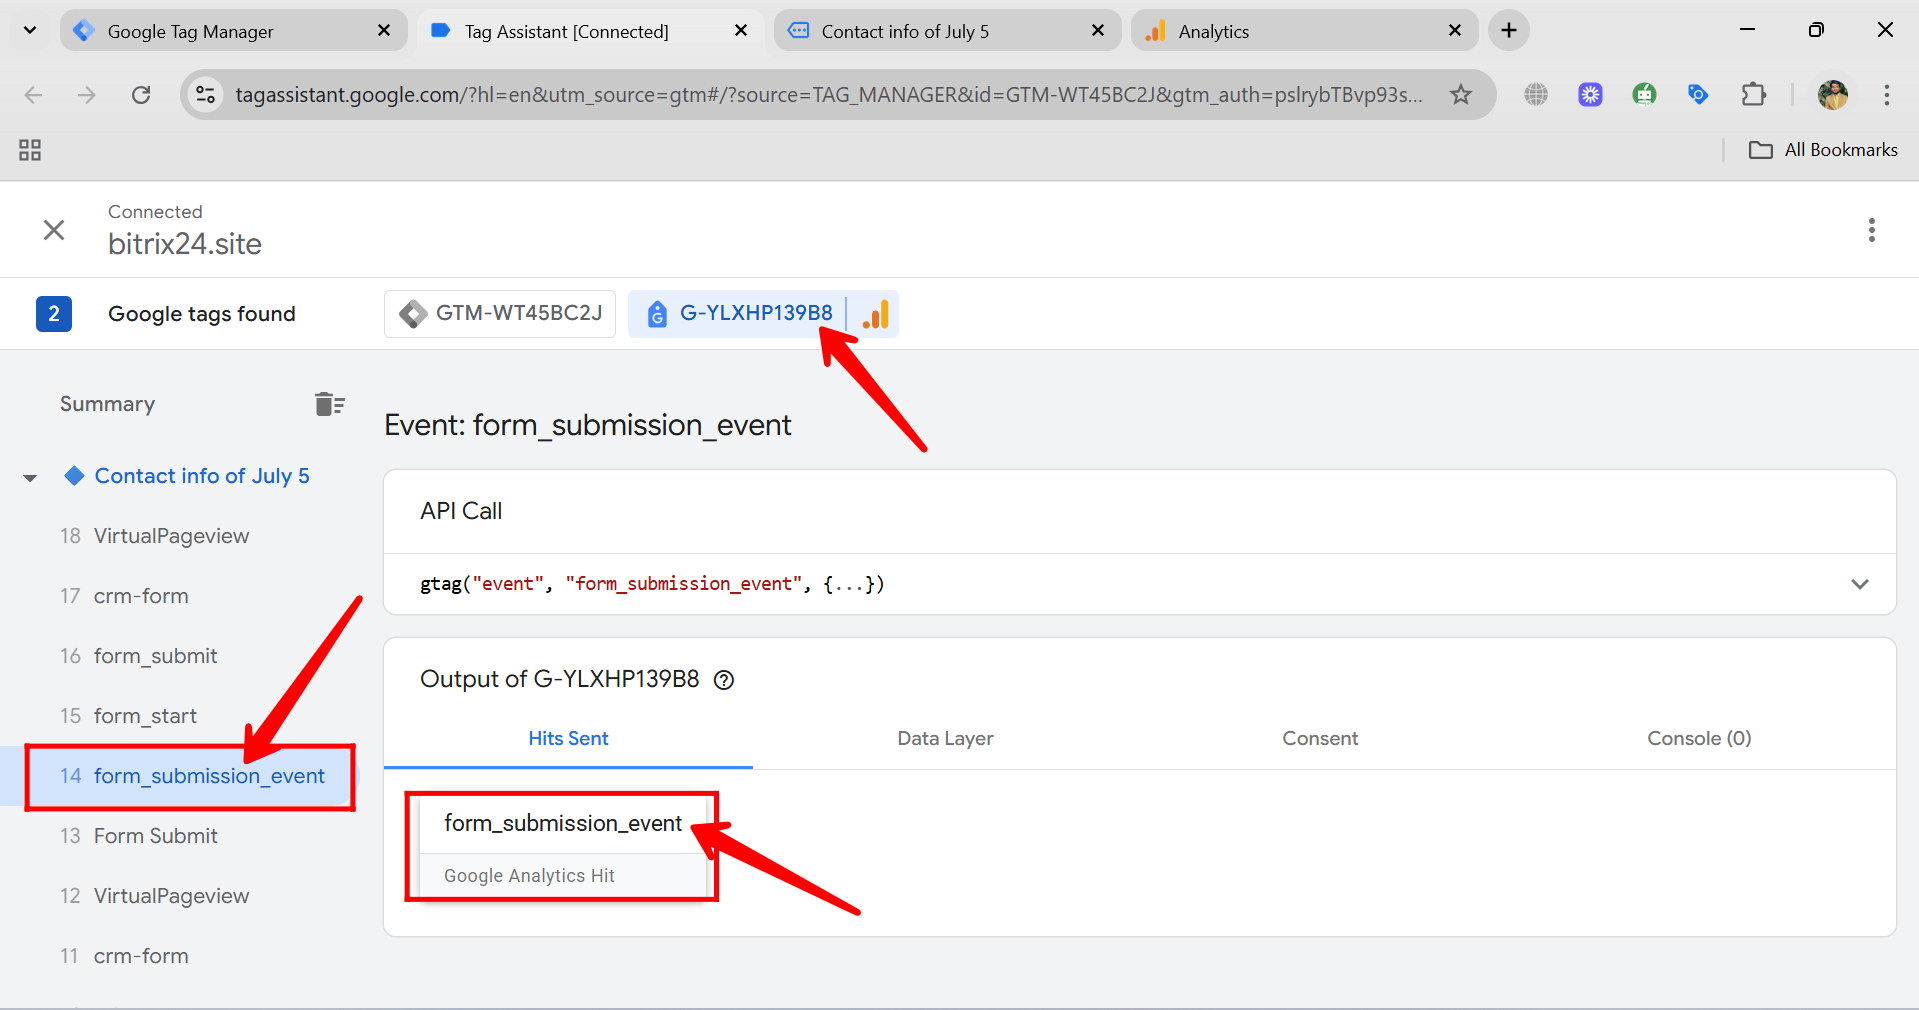
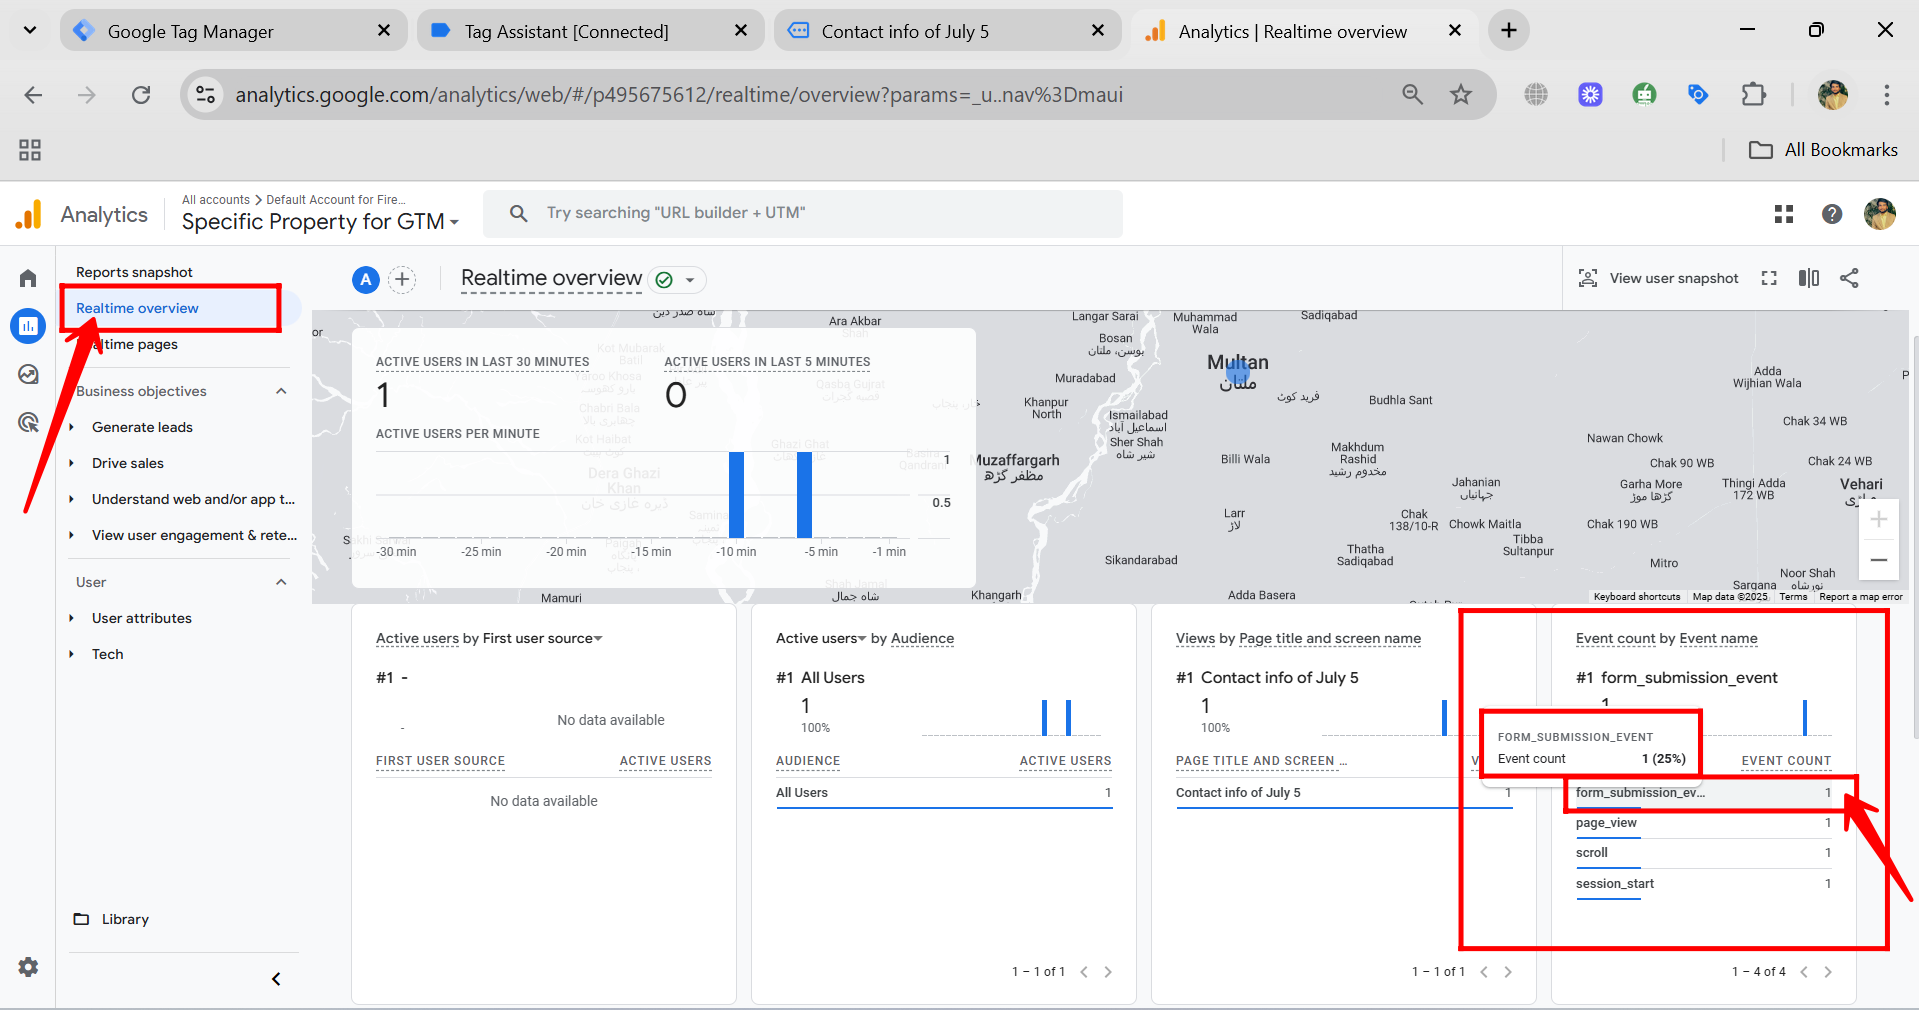
90. Now, go to Google Analytics 4 in another tab. Under Reports → Realtime overview, you’ll see your current user activity. In the “Event count by Event name” section, look for your custom event “form_submission_event” listed alongside default events like scroll, user_engagement, and page_view. You should see an event count of 1, confirming that your custom form submission event has been successfully tracked in GA4.
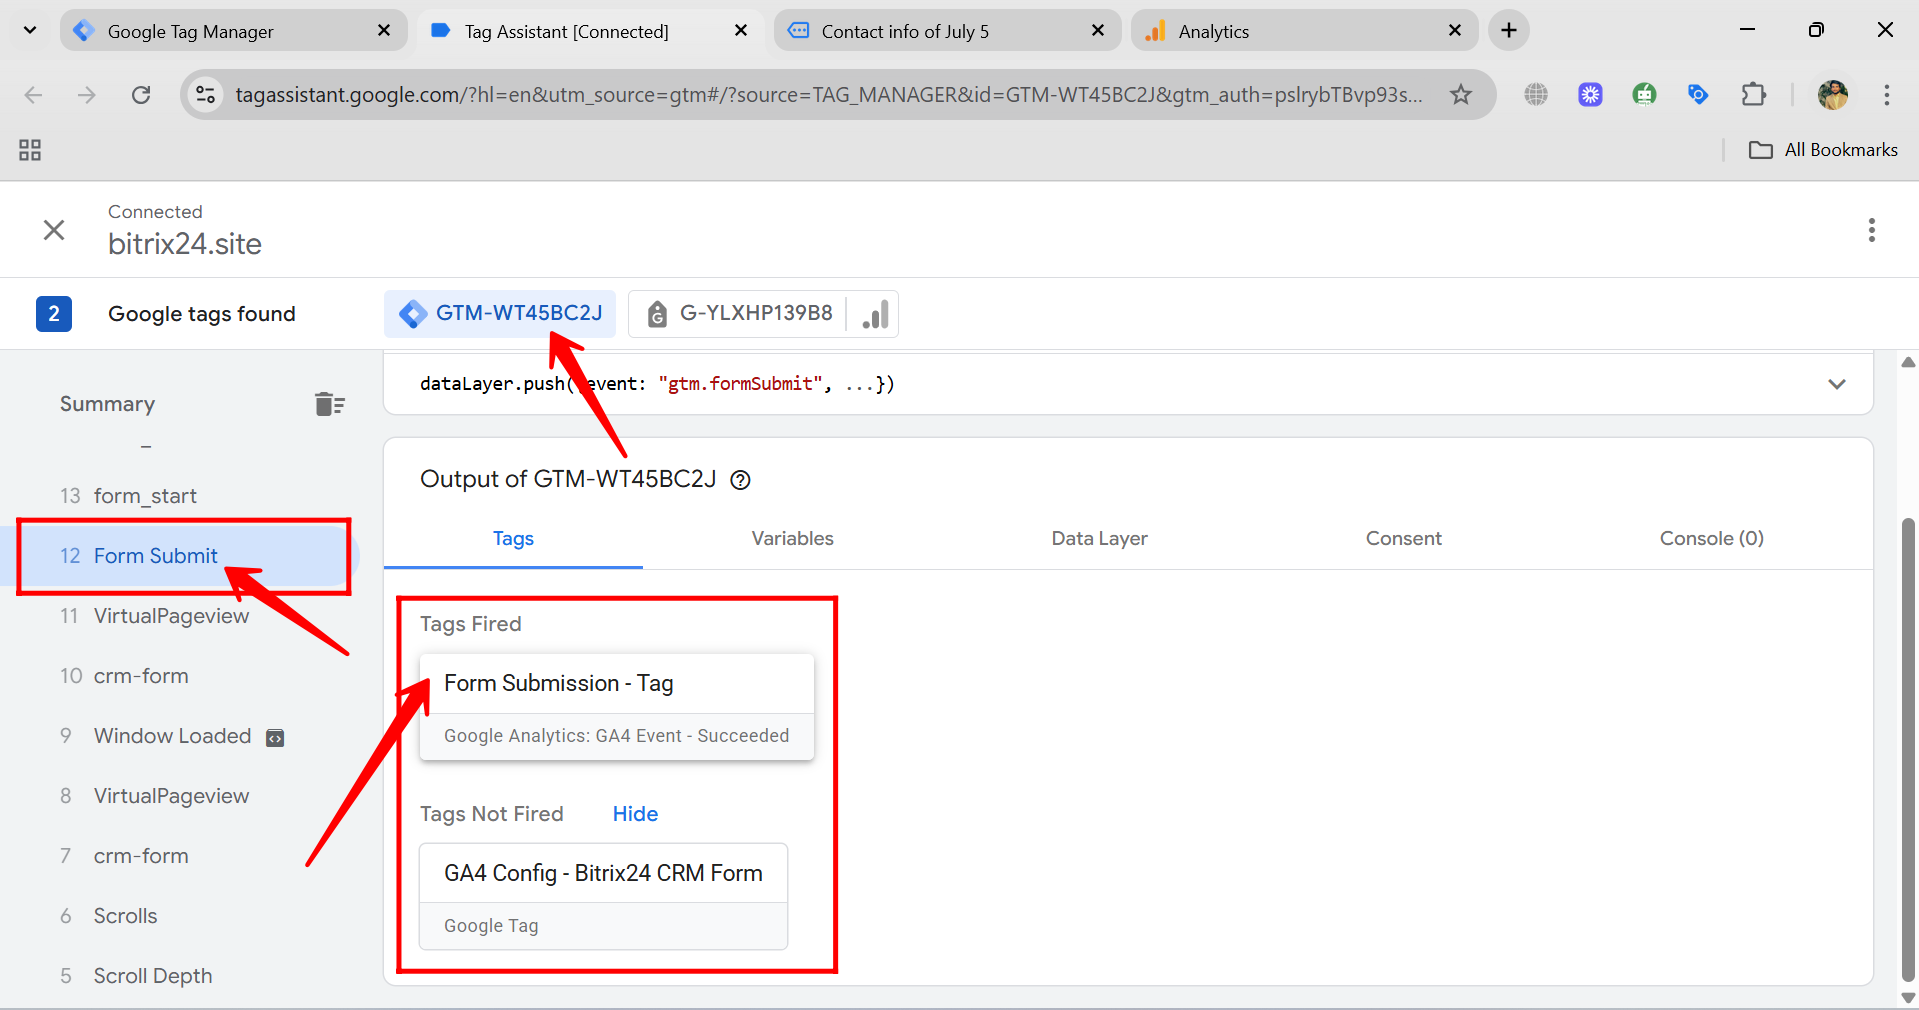
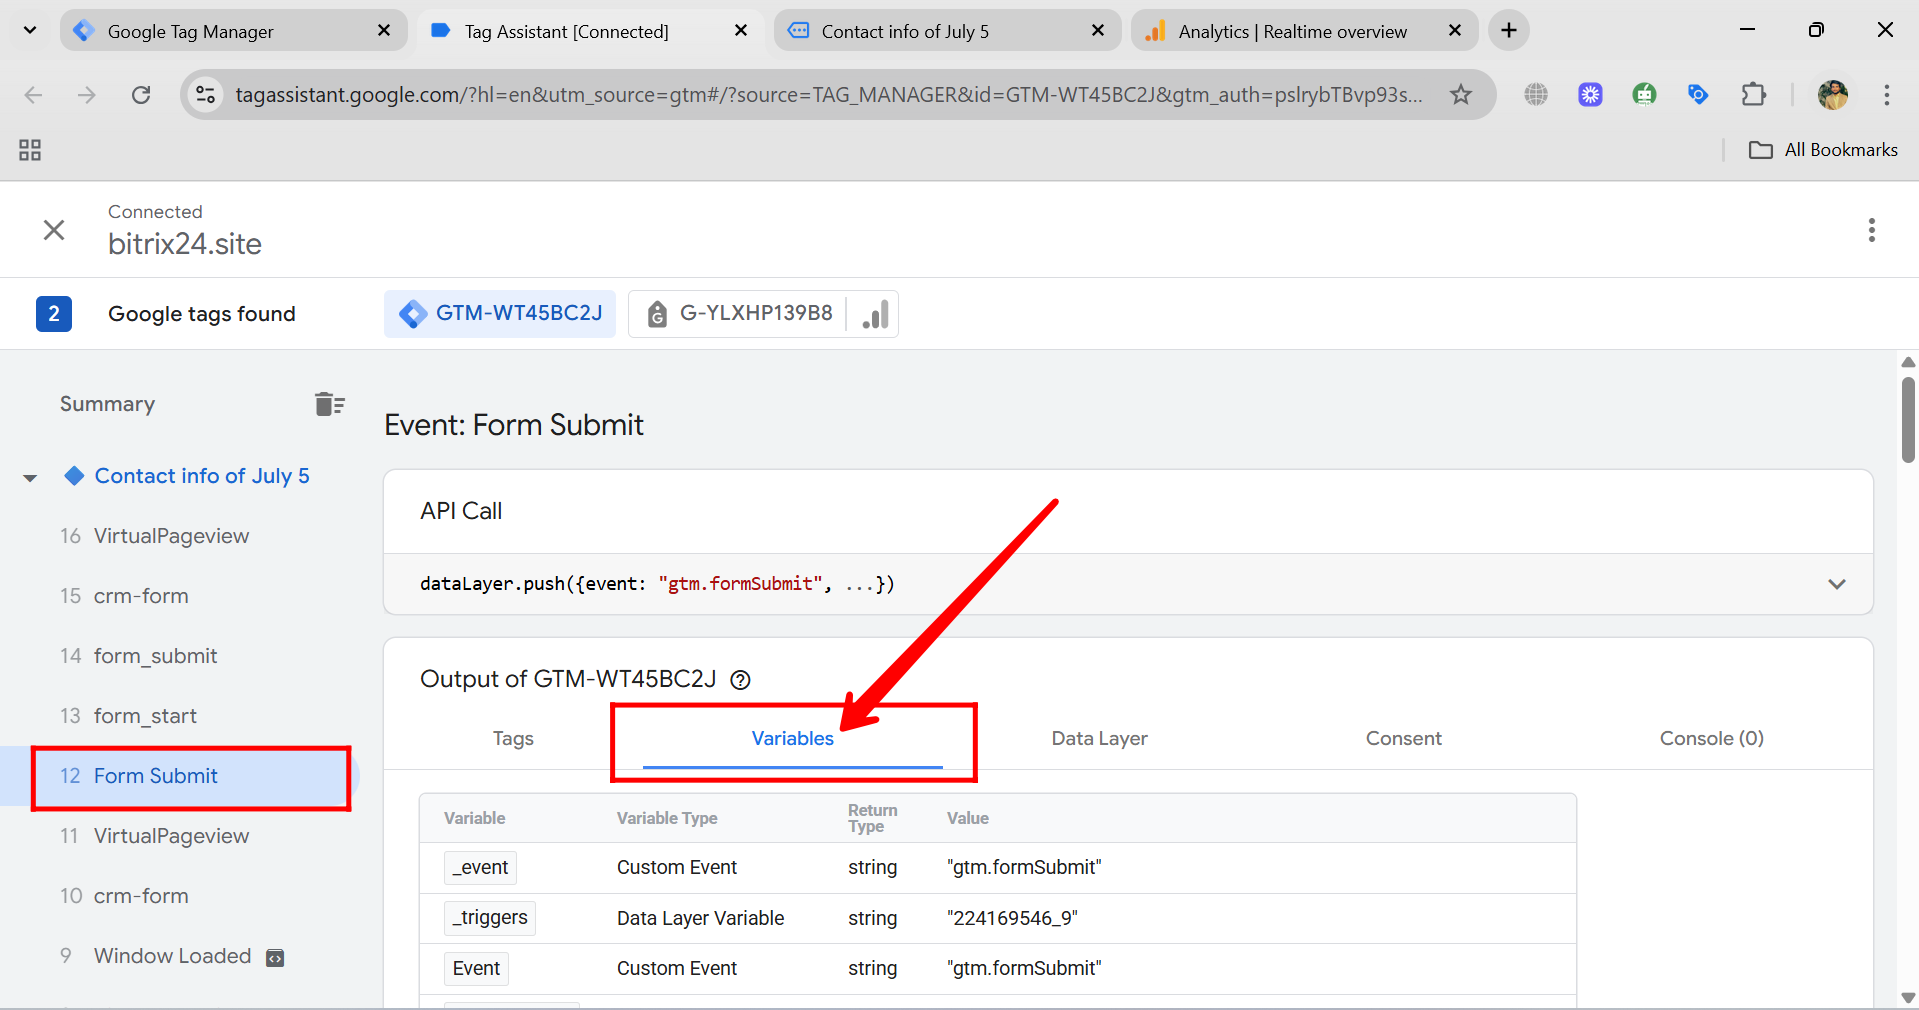
91. In the Tag Assistant panel, switch from the GA4 Measurement ID view to your GTM Container ID (e.g., GTM-XXXXXXX). Under the Summary, locate and click on the “Form Submit” event. This will show you whether your custom GA4 event tag fired when the form was submitted. You can also review the trigger conditions, variable values, and whether the tag fired or did not fire, helping you verify if everything is working as intended. In the Tags section, you’ll see that the tag named “Form Submission – Tag” has fired successfully.
92. In the Variables section of the Form Submit event within Tag Assistant, scroll down to review all the form-related variables. Here, you’ll find details such as Form ID, Form Classes, Form URL, and Form Text, which help identify the specific conditions that triggered this form submission. These values allow you to fine-tune your trigger later by targeting only this particular form instead of firing on all forms.
93. You can now view the details of all the form-related variables in the Variables section. To narrow down your trigger to a specific form, you can use any of these—such as Form ID, Form Classes, or Form Text. In this case, we’re using Form Text to uniquely identify the form. Simply copy the entire Form Text string (without the double quotes), and you’ll use it to create a more specific trigger condition.
94. Go to the Triggers section in GTM and open the previously created trigger named “Form Submission – Trigger” to begin editing its settings. This is where you’ll refine the trigger to fire only on a specific form based on the condition you just identified.

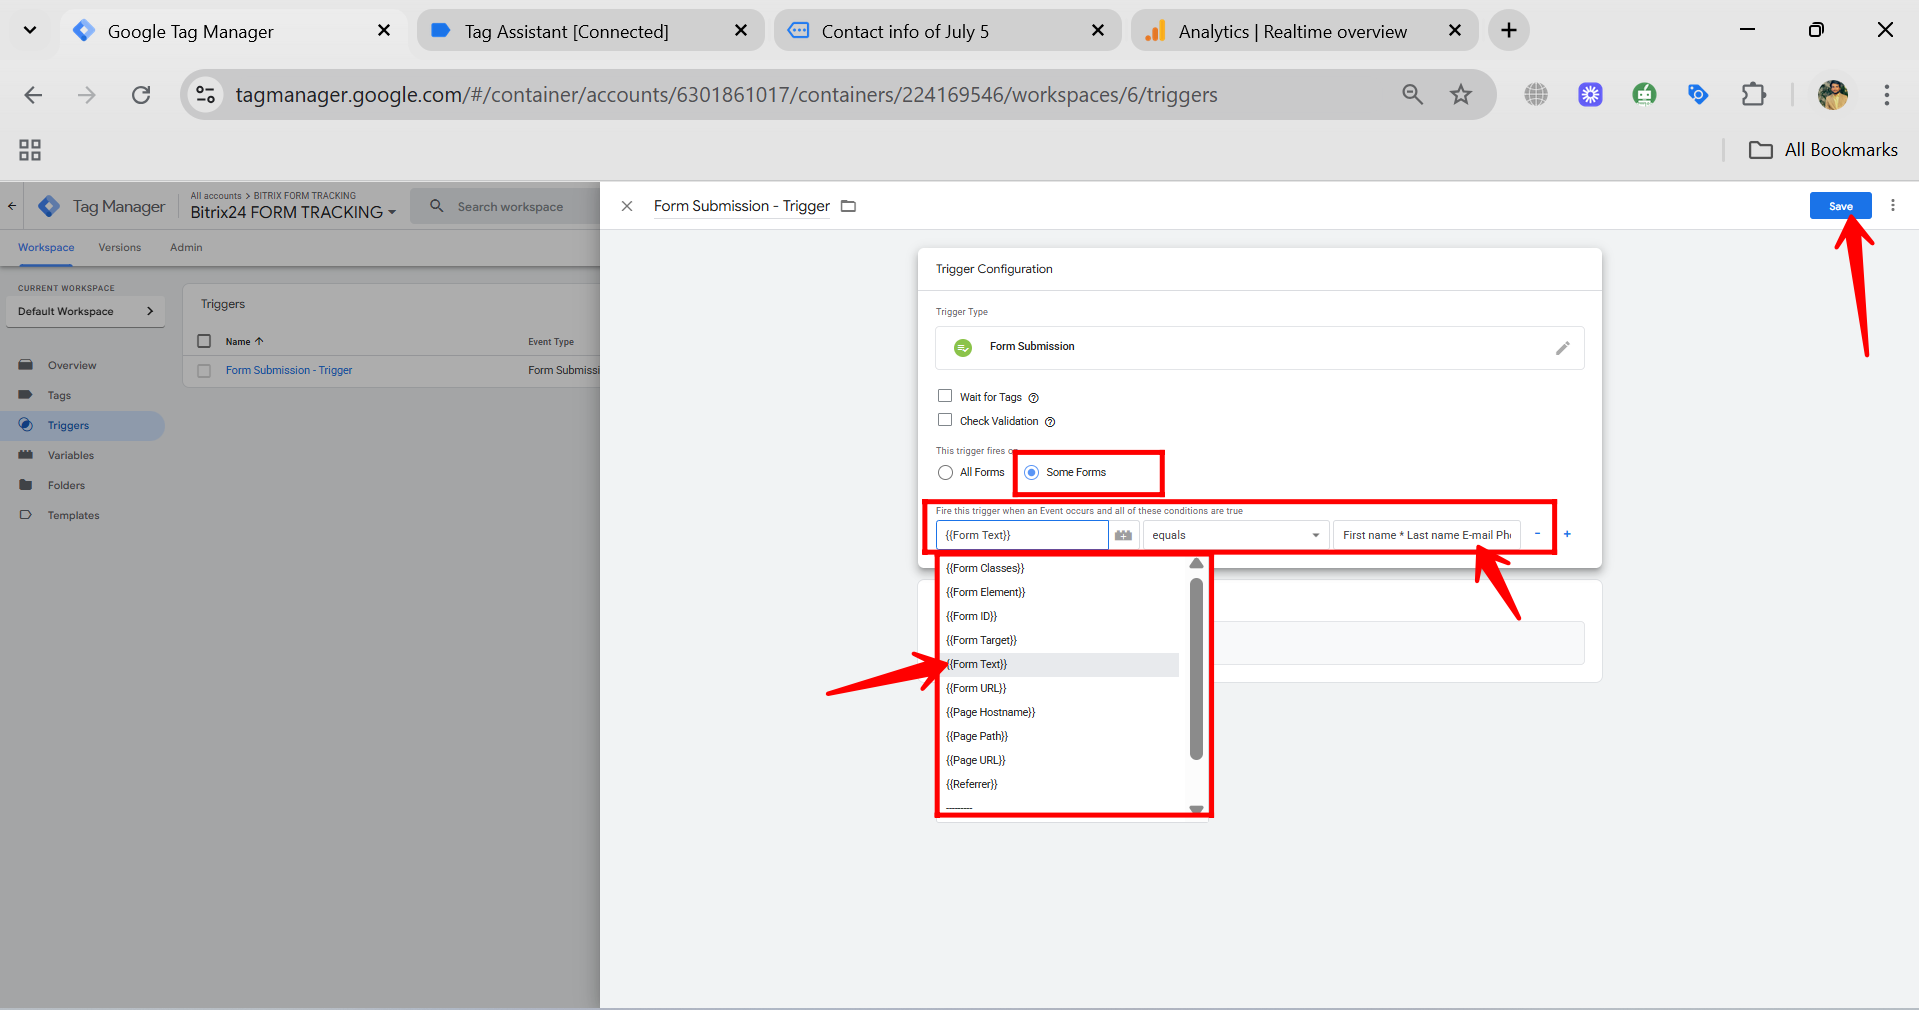
95. In the trigger settings, change the firing condition from “All Forms” to “Some Forms”. This allows the trigger to fire only when certain conditions are met.
96. Now, add the condition:
{{Form Text}} equals [Form Text you copied]
This ensures that the trigger only fires when that specific form is submitted. It’s especially useful for larger websites with multiple forms, as each form typically has a unique Form Text value. By matching this condition, you prevent the tag from firing on unrelated forms.
97. Go to the Variables section in GTM, and under Built-in Variables Configuration, uncheck the form-related variables you’re not using — such as Form Element, Form Classes, Form ID, Form Target, and Form URL — since you’re only using Form Text to identify your form. After cleaning up the unused variables, click Submit again in GTM to publish your updated container changes.
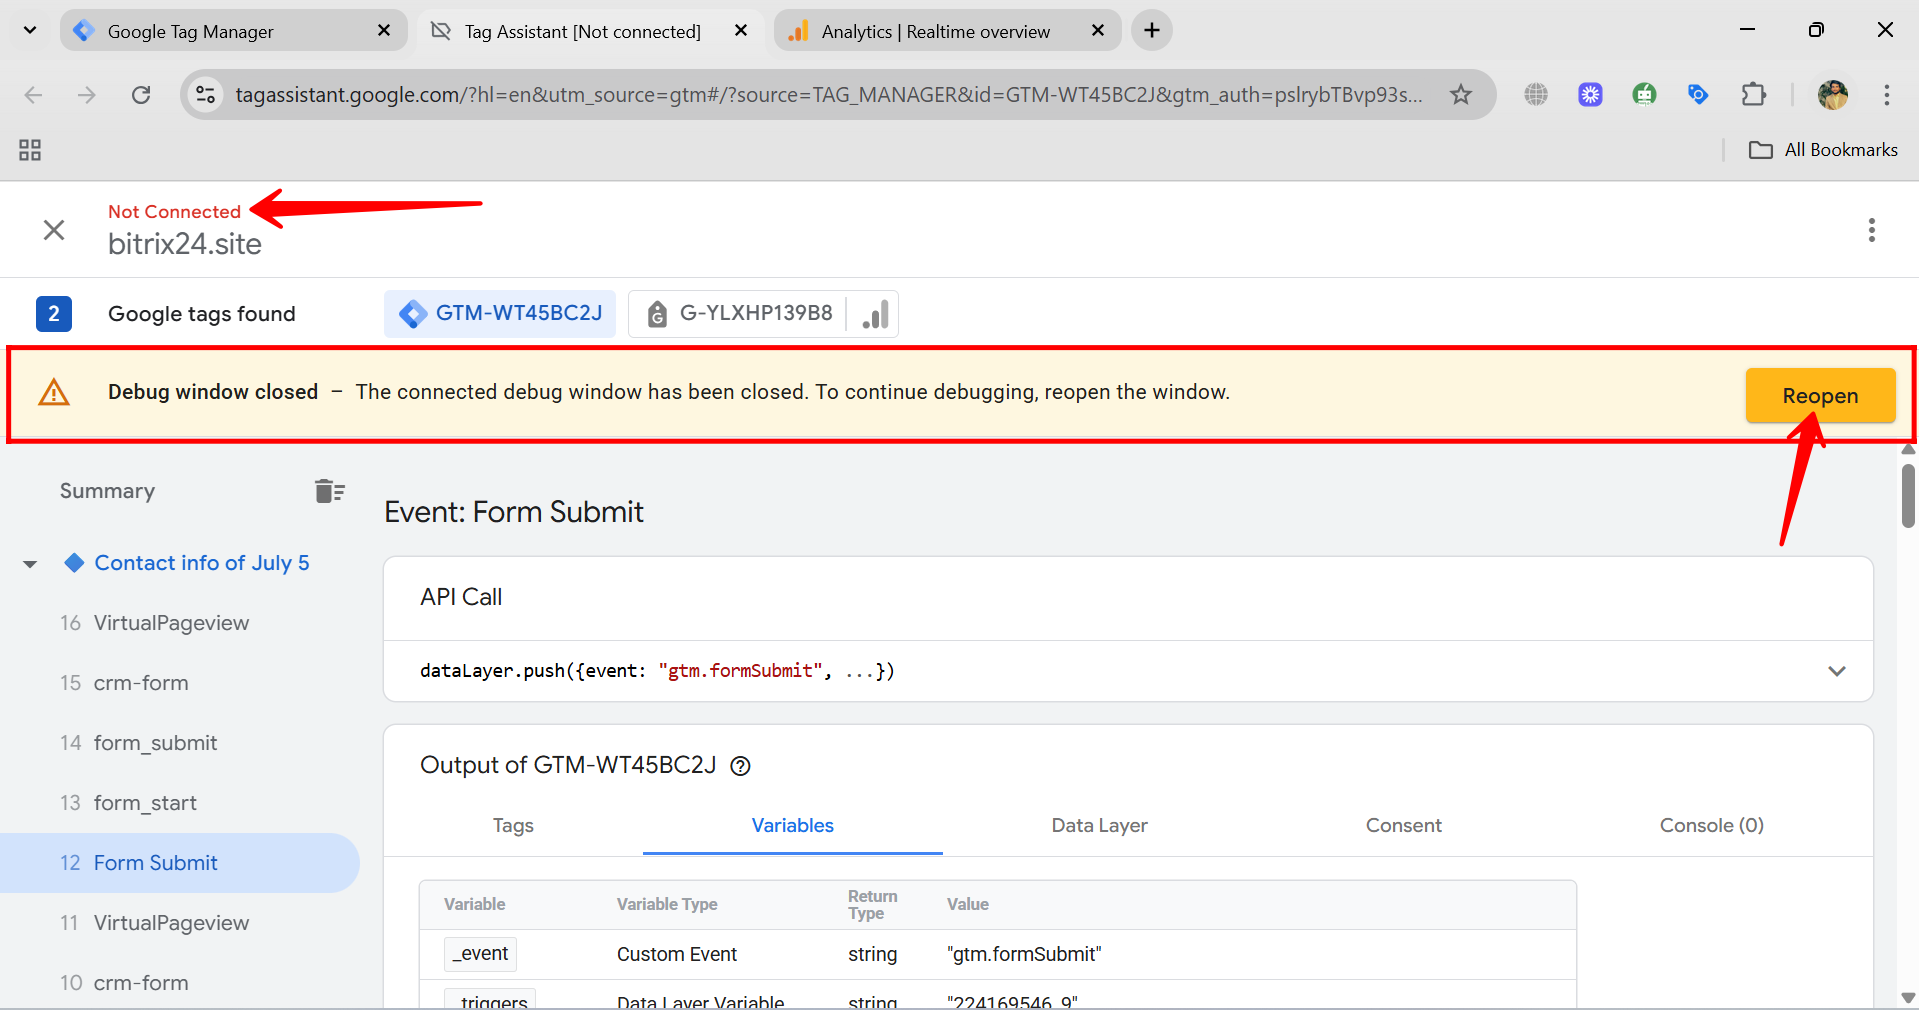
98. After adding the specific condition to your trigger, close the form tab. You’ll notice that the Tag Assistant debugging panel shows the connection as disconnected. To start testing again with your updated setup, simply click “Reconnect” or “Reopen” in the Tag Assistant panel — this will reopen the form in a new tab and restart the debugging session with your latest configuration.
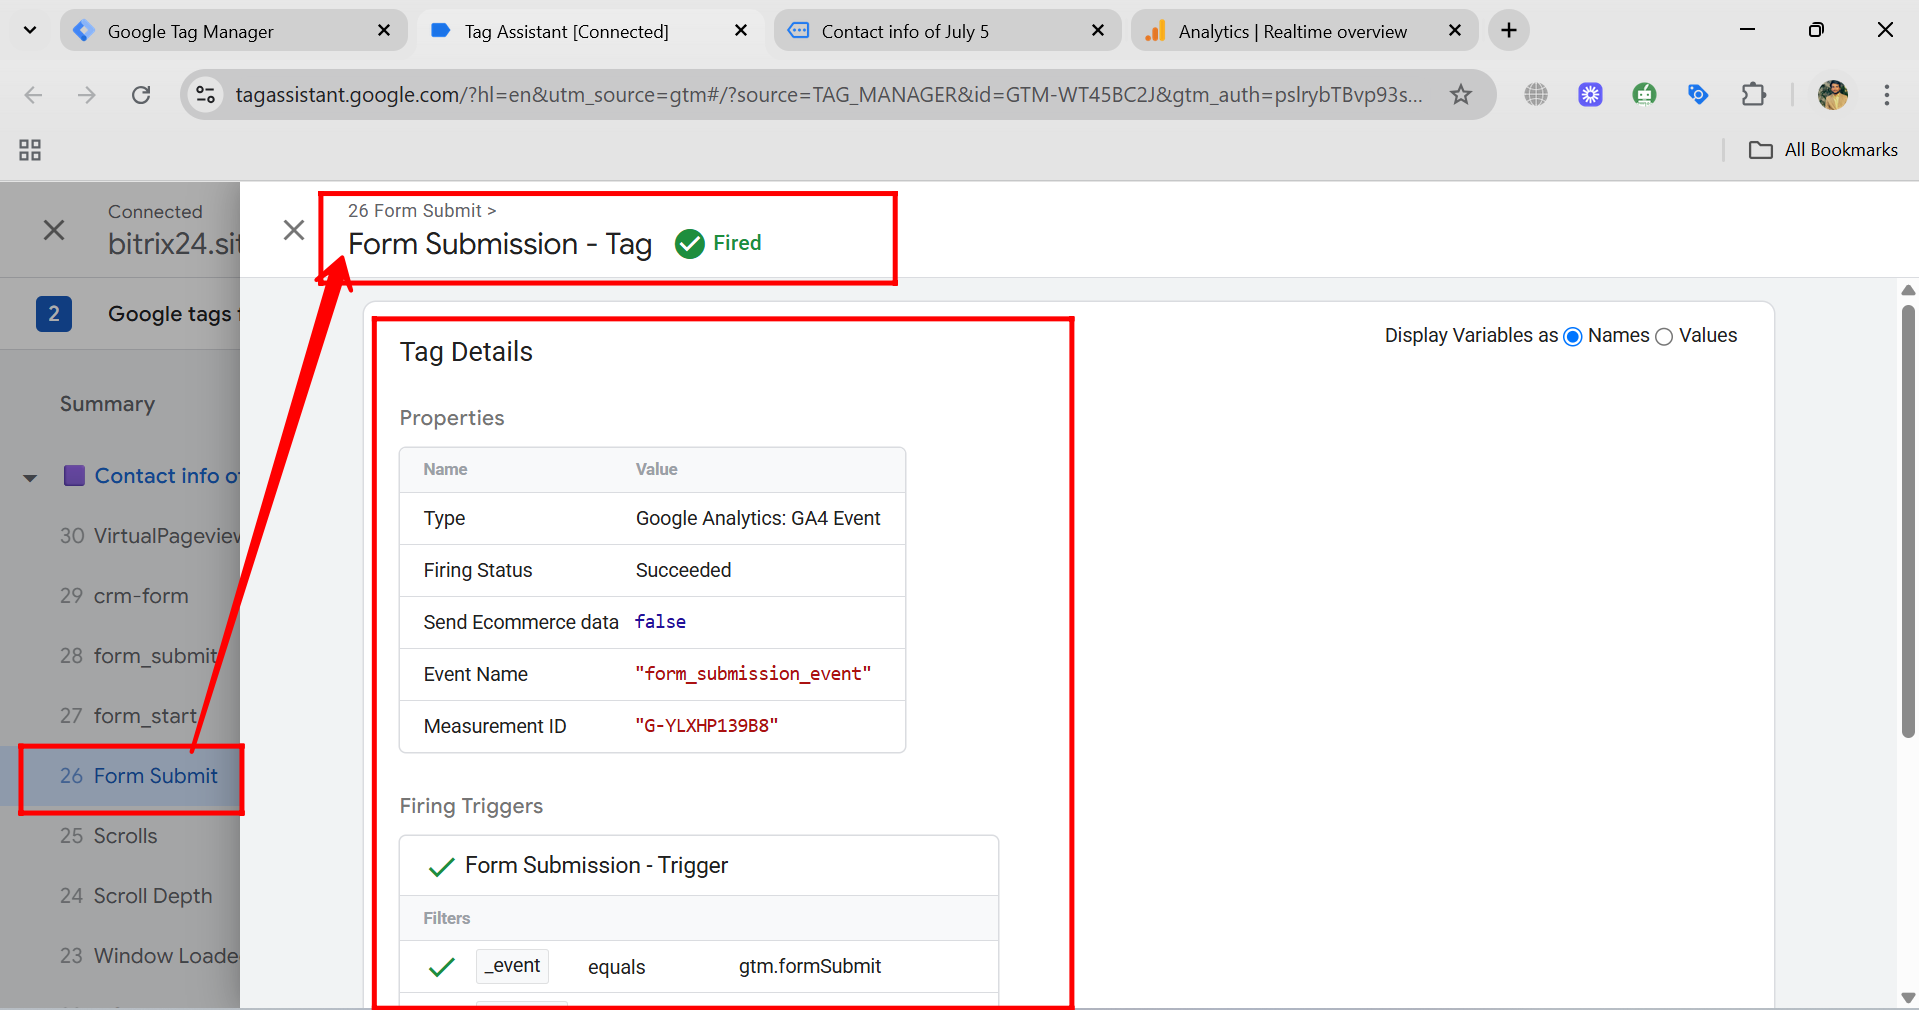
99. Go to the Form Submit event again under your GTM ID in the Tag Assistant debugging panel. Here, you’ll see that the tag “Form Submission – Tag” has successfully fired. You can click on it to view all the details, including the event name, parameters sent to GA4, and confirmation that the trigger condition using Form Text was correctly met.
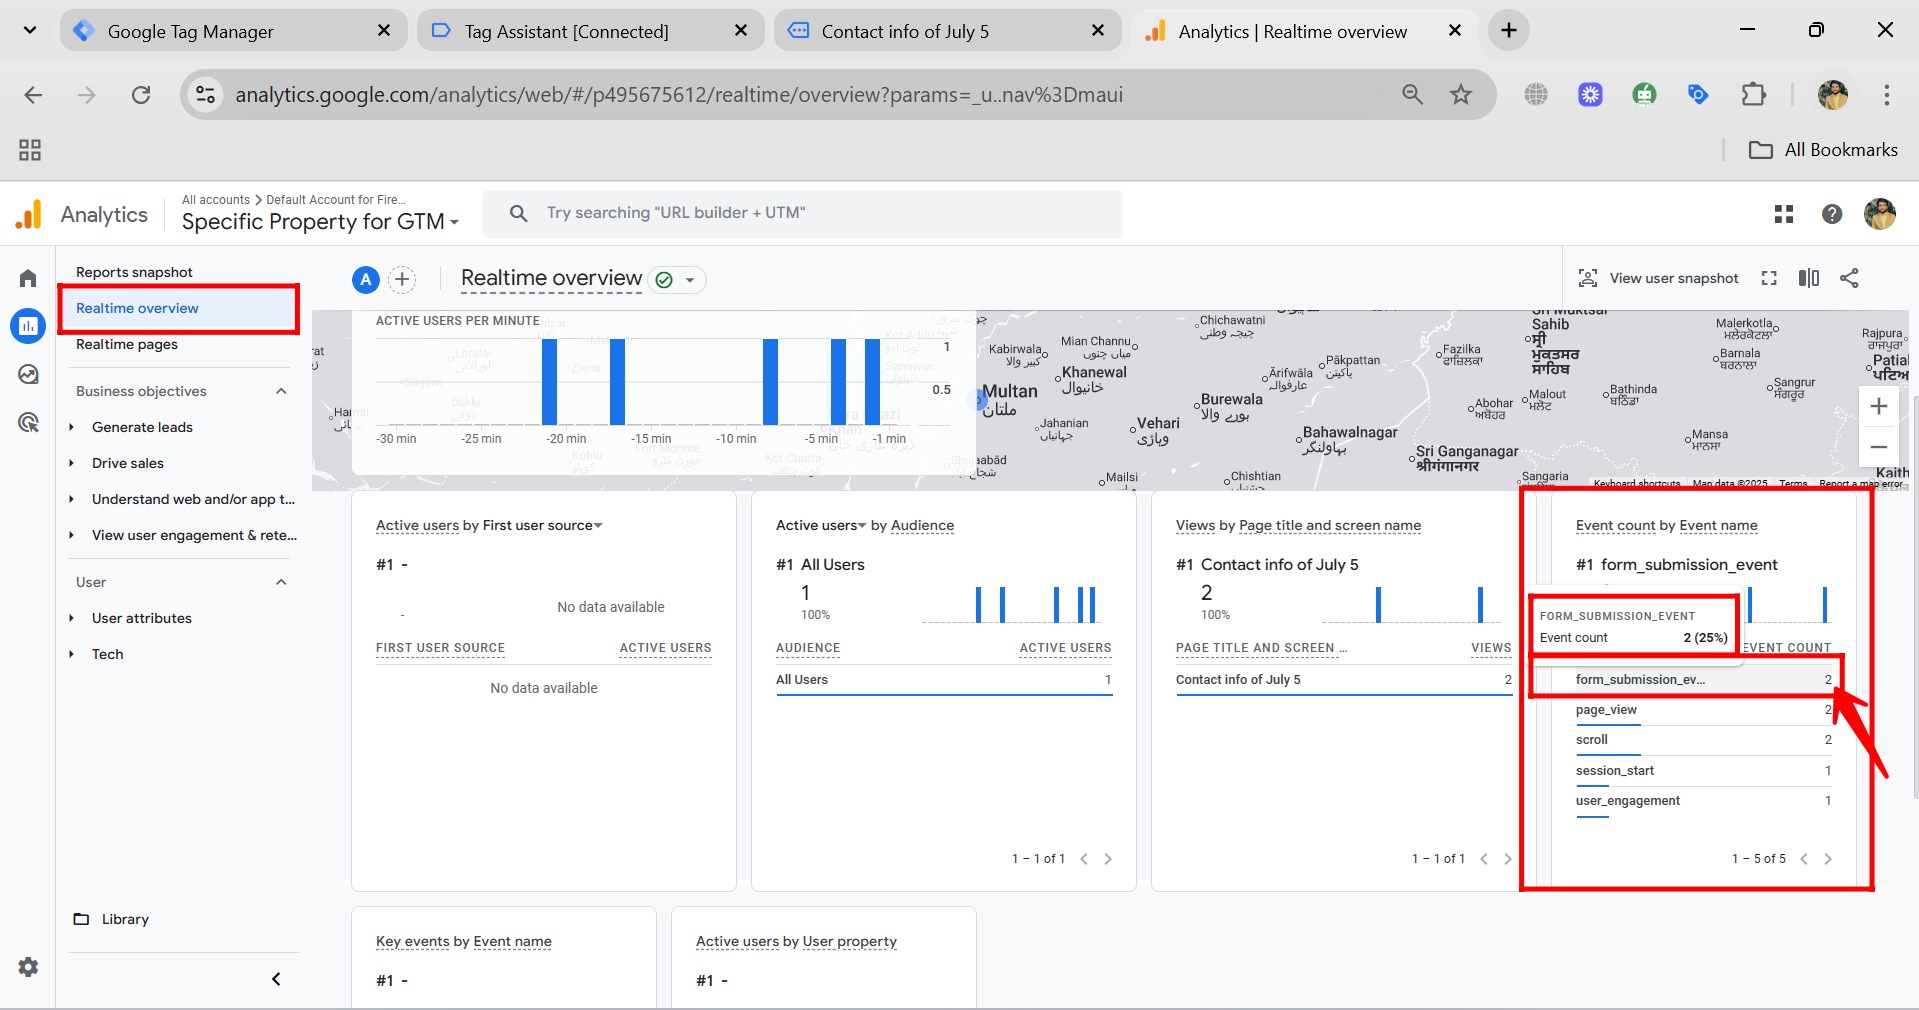
100. Now, go to the Realtime Overview in your Google Analytics 4 dashboard. You’ll see that the event count for “form_submission_event” has been updated to 2, indicating that the form submission event was successfully triggered a second time — this confirms your refined trigger based on Form Text is working as expected.
“You can also watch this video on Youtube”