| 2280 Views | admin

In this article, we will provide a complete guide to using the Booking module in Bitrix24, a recently introduced feature designed to simplify the management of resources and appointments. The Booking system allows businesses to efficiently organize employees, assets, and other resources through a centralized interface for scheduling, tracking, and confirming bookings. This guide will walk you through the entire process, from creating resources and setting up schedules to configuring customer-facing booking forms. By the end, you will have a clear understanding of how to manage resources and appointments effectively within Bitrix24.
We begin by looking at the process of setting up resources, including primary resources such as employees or technicians, and auxiliary resources like meeting rooms, vehicles, or other assets. You will learn how to define resource availability, set default booking durations, and configure notifications and reminders for both customers and booking agents. The guide explains the differences between primary and auxiliary resources and how they can be used together to manage more complex scheduling situations.
Next, we explore the booking calendar interface, showing how to create bookings directly, manage situations where multiple bookings occur at the same time, and check the current status of each resource. You will also see how to attach contacts, deals, and notes to each booking, keeping all related information connected within Bitrix24’s CRM system. Visual indicators, like the battery icon, help provide a quick overview of resource usage and availability, making it easier to plan appointments and allocate resources appropriately.
Finally, we cover customer-facing booking forms, which allow clients to book resources online. You will learn how to configure form fields, control which time slots are shown, handle duplicate contacts, and link bookings to CRM entities. The guide also shows how clients can either select specific technicians or view all available resources, and how booking confirmations can be added to external calendars like Google Calendar.
Through step-by-step instructions and examples, this article will help you understand and use the Bitrix24 Booking system for managing appointments and resources efficiently.
“Detailed Instructions are given below”
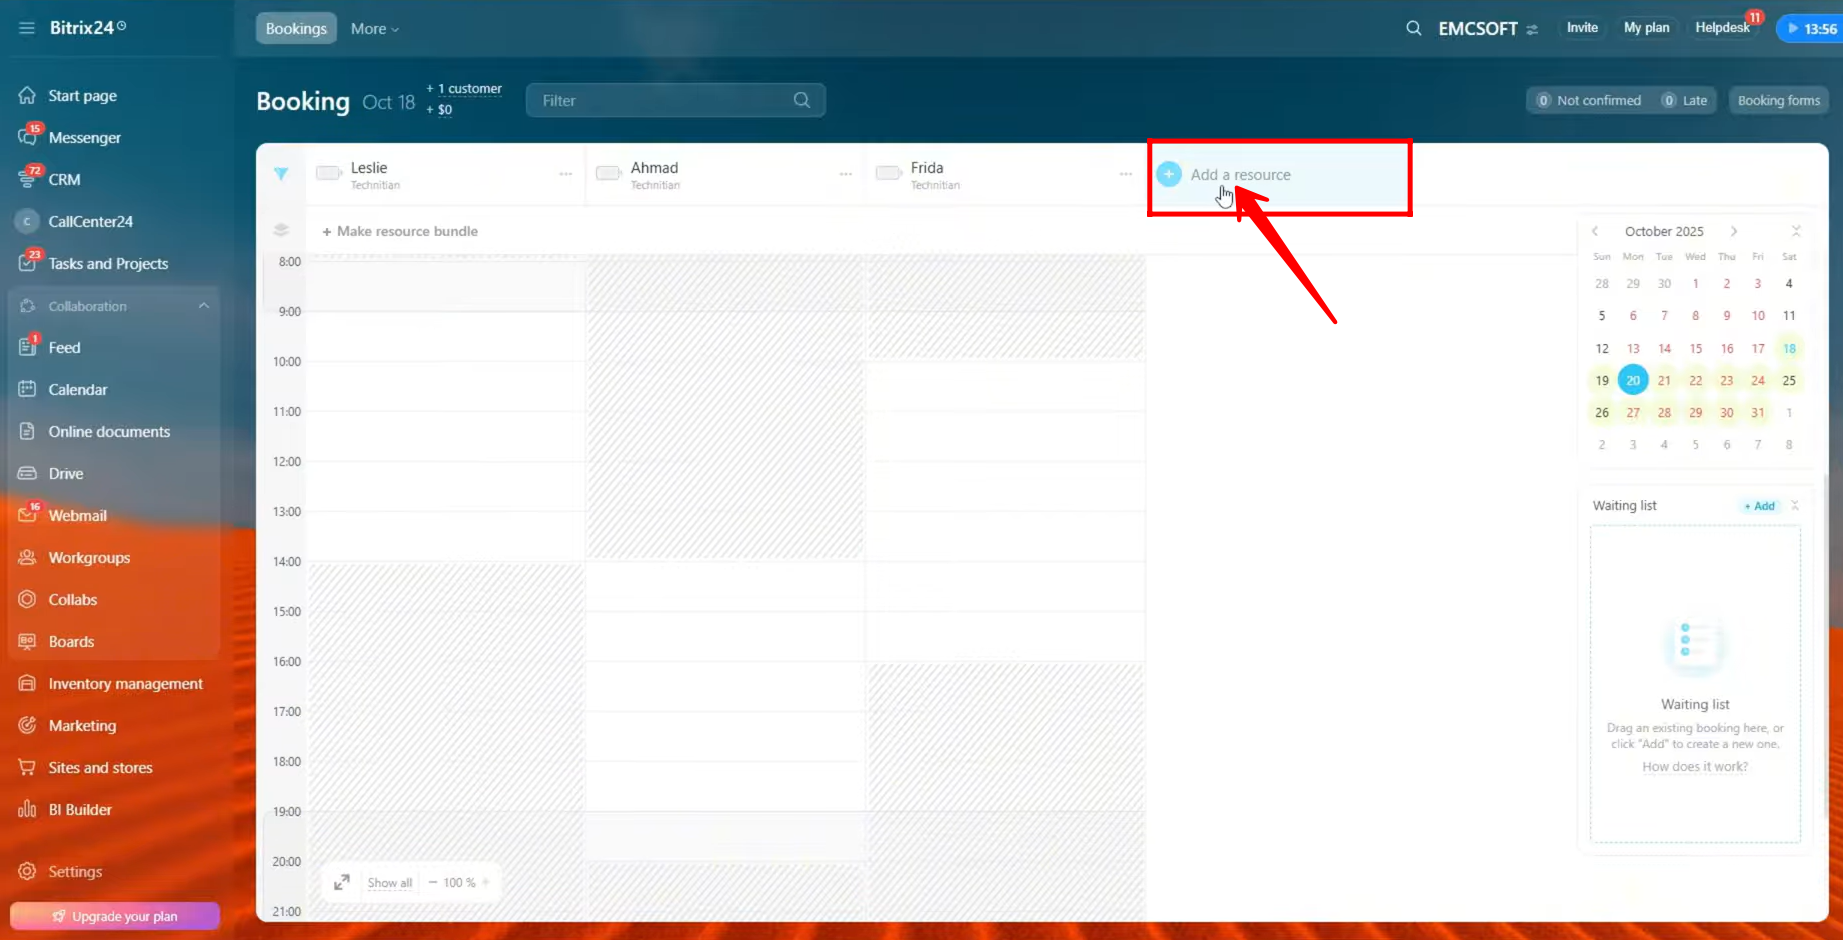
1. Go to the Booking module from the left-hand panel in your Bitrix24 portal, or simply search for “Booking” using the search bar. This module is one of the newest features in Bitrix24 and is currently under active development, so some functions and interface elements may still be evolving.

2. In the Booking interface, you can use the small calendar on the right side to filter bookings by specific dates and view the availability of resources during those times. Additionally, you can configure a waiting list for customers who wish to book a resource at fully reserved time slots.
To add a new resource, click on “Add a Resource.” These resources can represent agents, employees, or other company assets, depending on your business workflows and operational requirements. This flexibility allows the booking system to adapt to various scenarios within your organization.

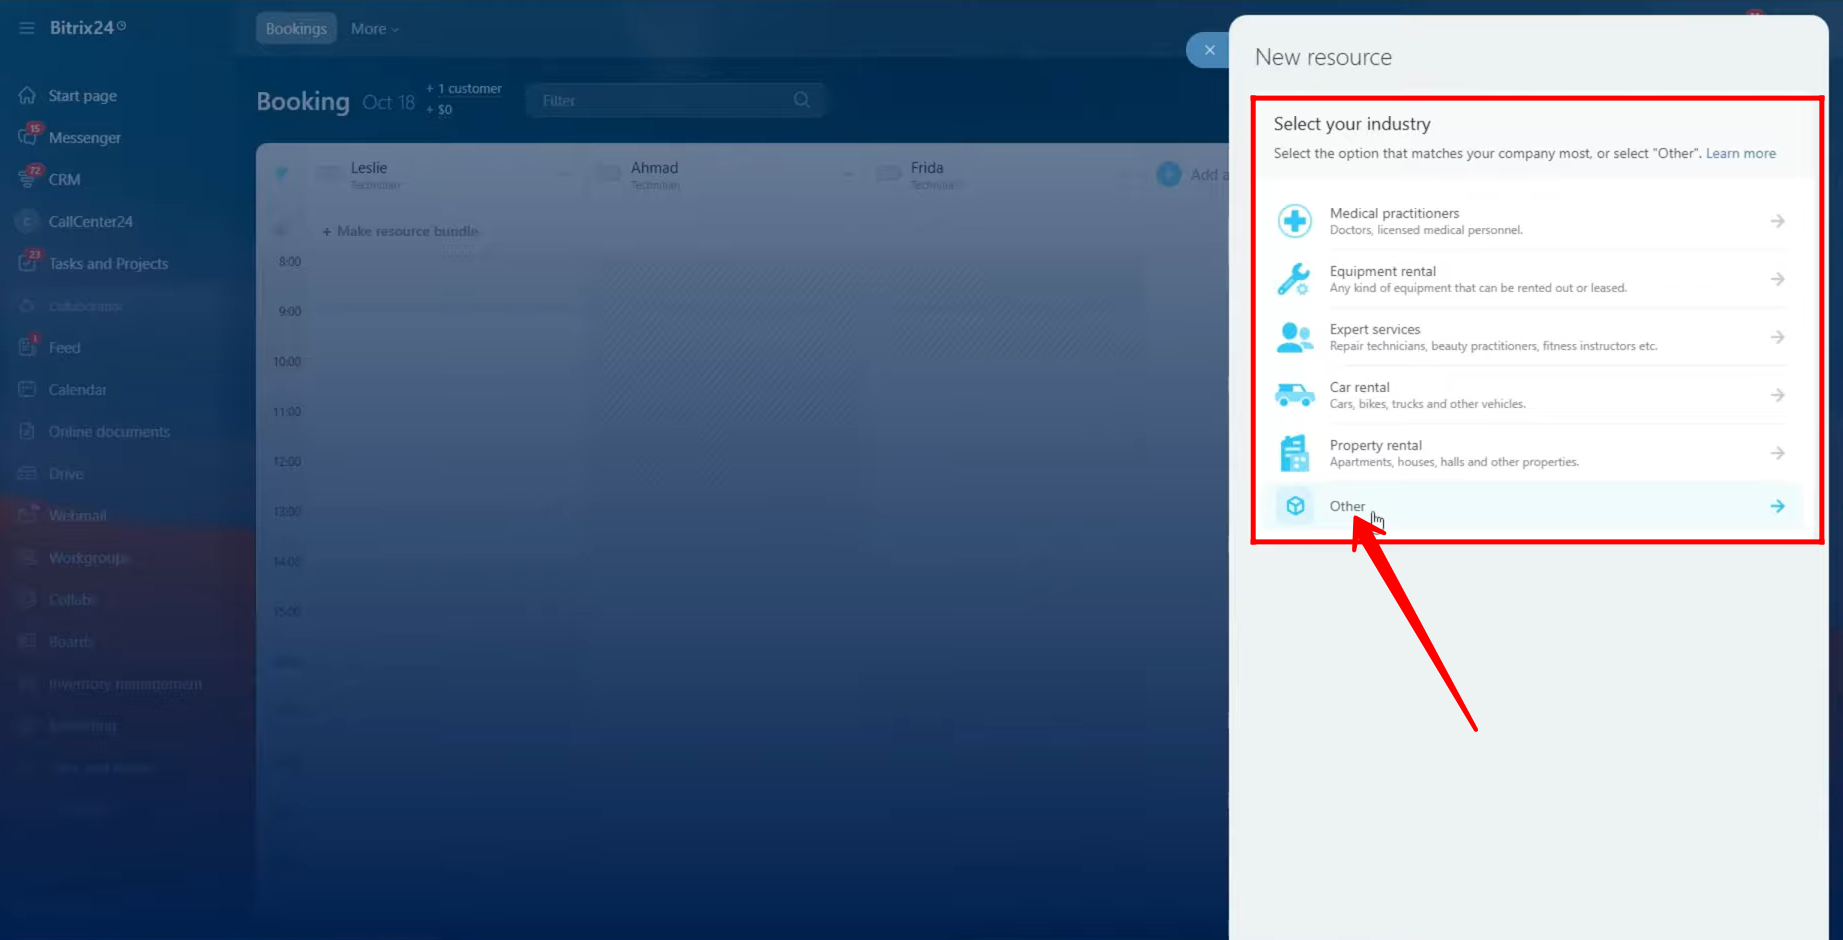
3. First, select your industry type from the available options: Medical Practitioners, Equipment Rental, Expert Services, Car Rental, Property Rental, or Other.
For this example, we will choose “Expert Services” as the industry category.

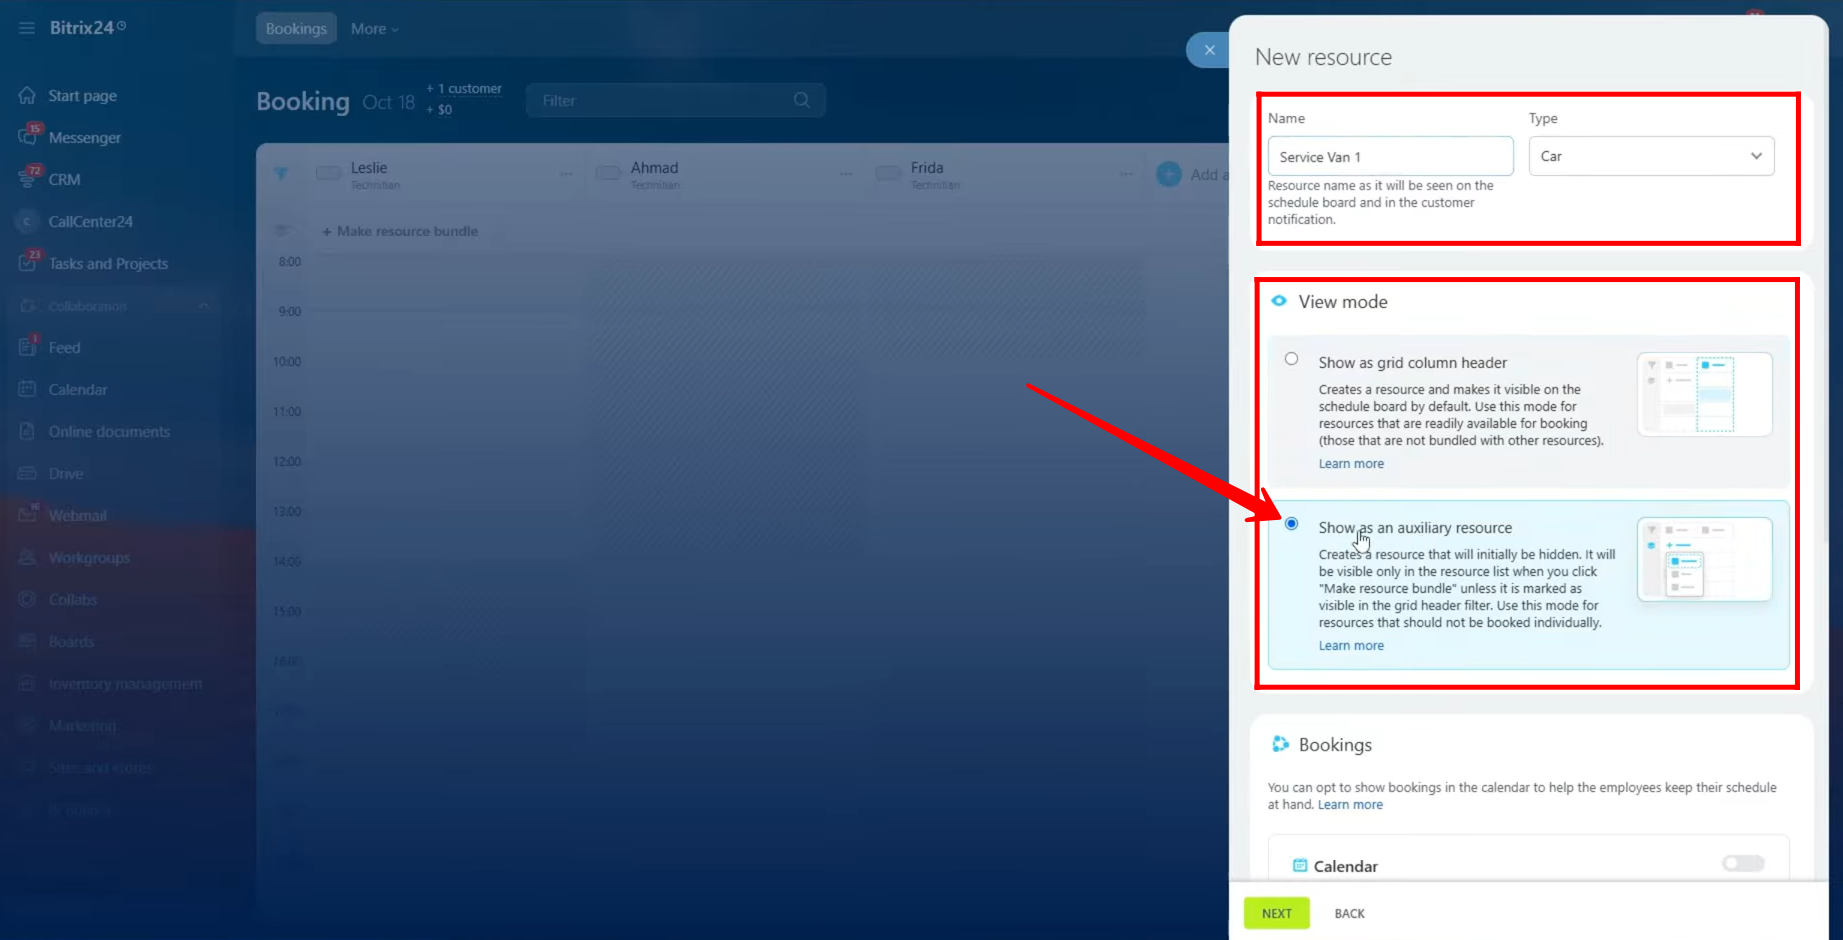
4. Enter the name of the resource and specify its type—for example, a technician, plumber, or any other category relevant to your business. You can also create and configure a new type directly from this section if needed.
Next, select the “View Mode.” For now, choose “Show as grid column header.” We will configure the option “Select as an auxiliary resource” later.
To understand the difference:
- A grid column header resource refers to a primary resource that can be booked directly—typically an employee or service provider.
- An auxiliary resource usually represents a company asset, such as a meeting room, vehicle, or property. It often depends on a primary (grid column header) resource being booked first but can also be booked independently if required.

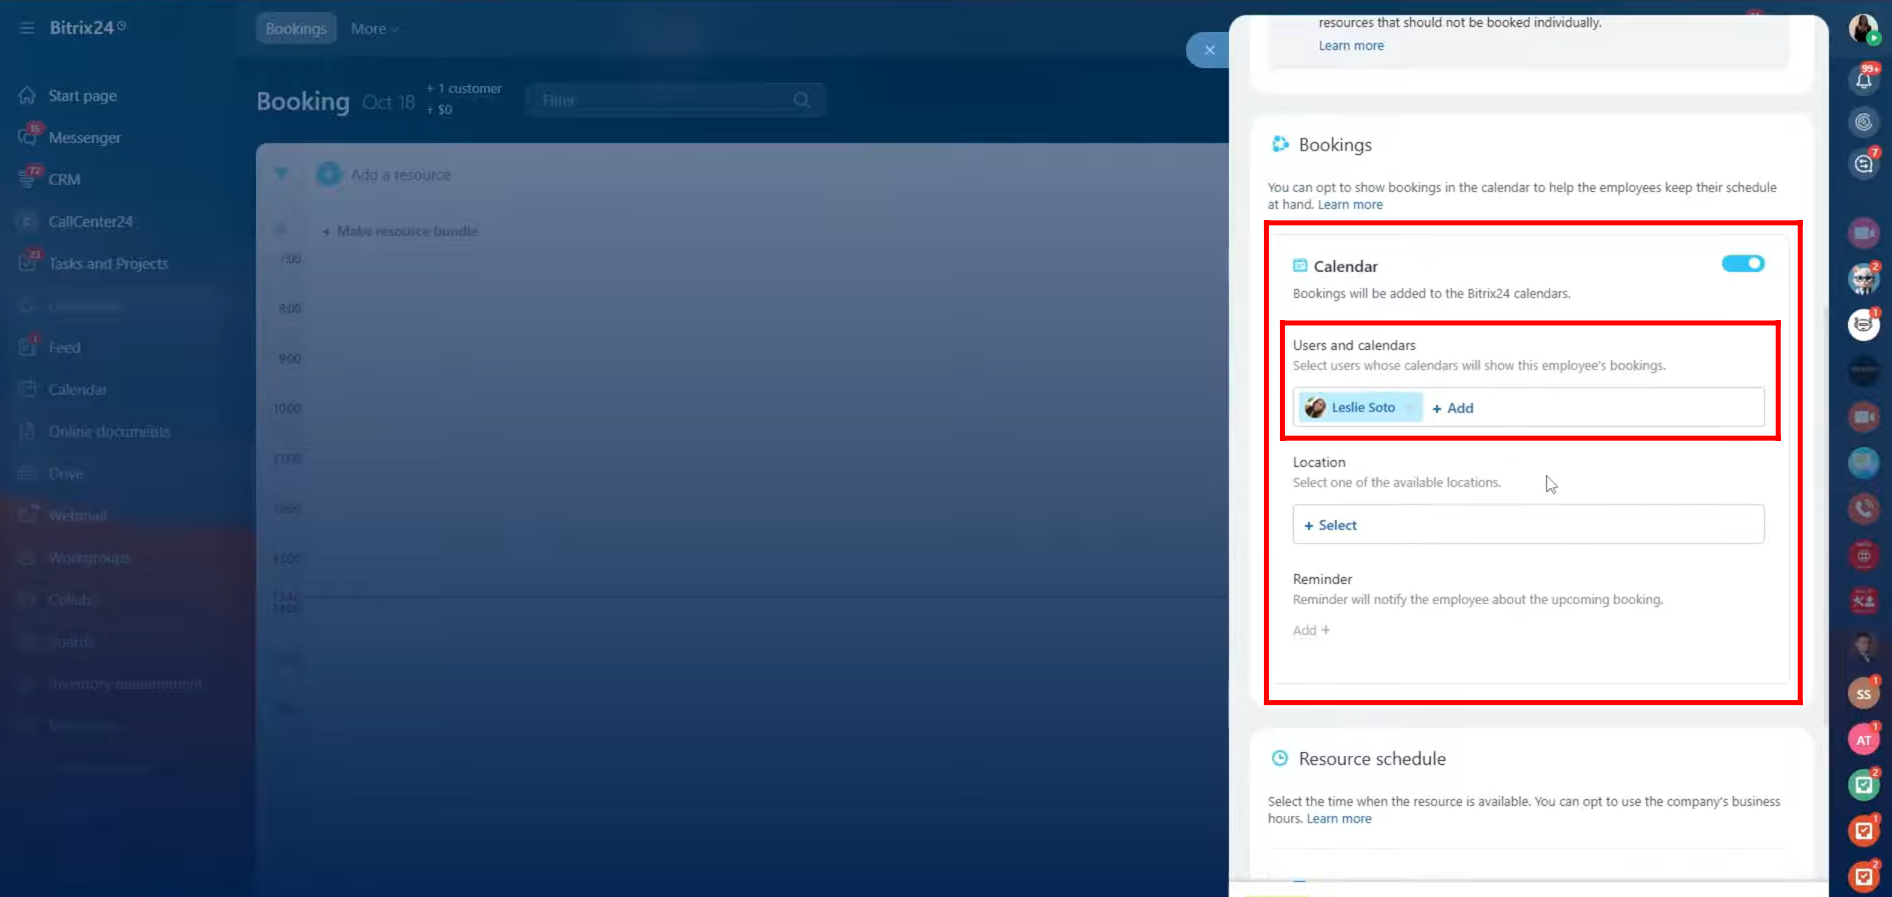
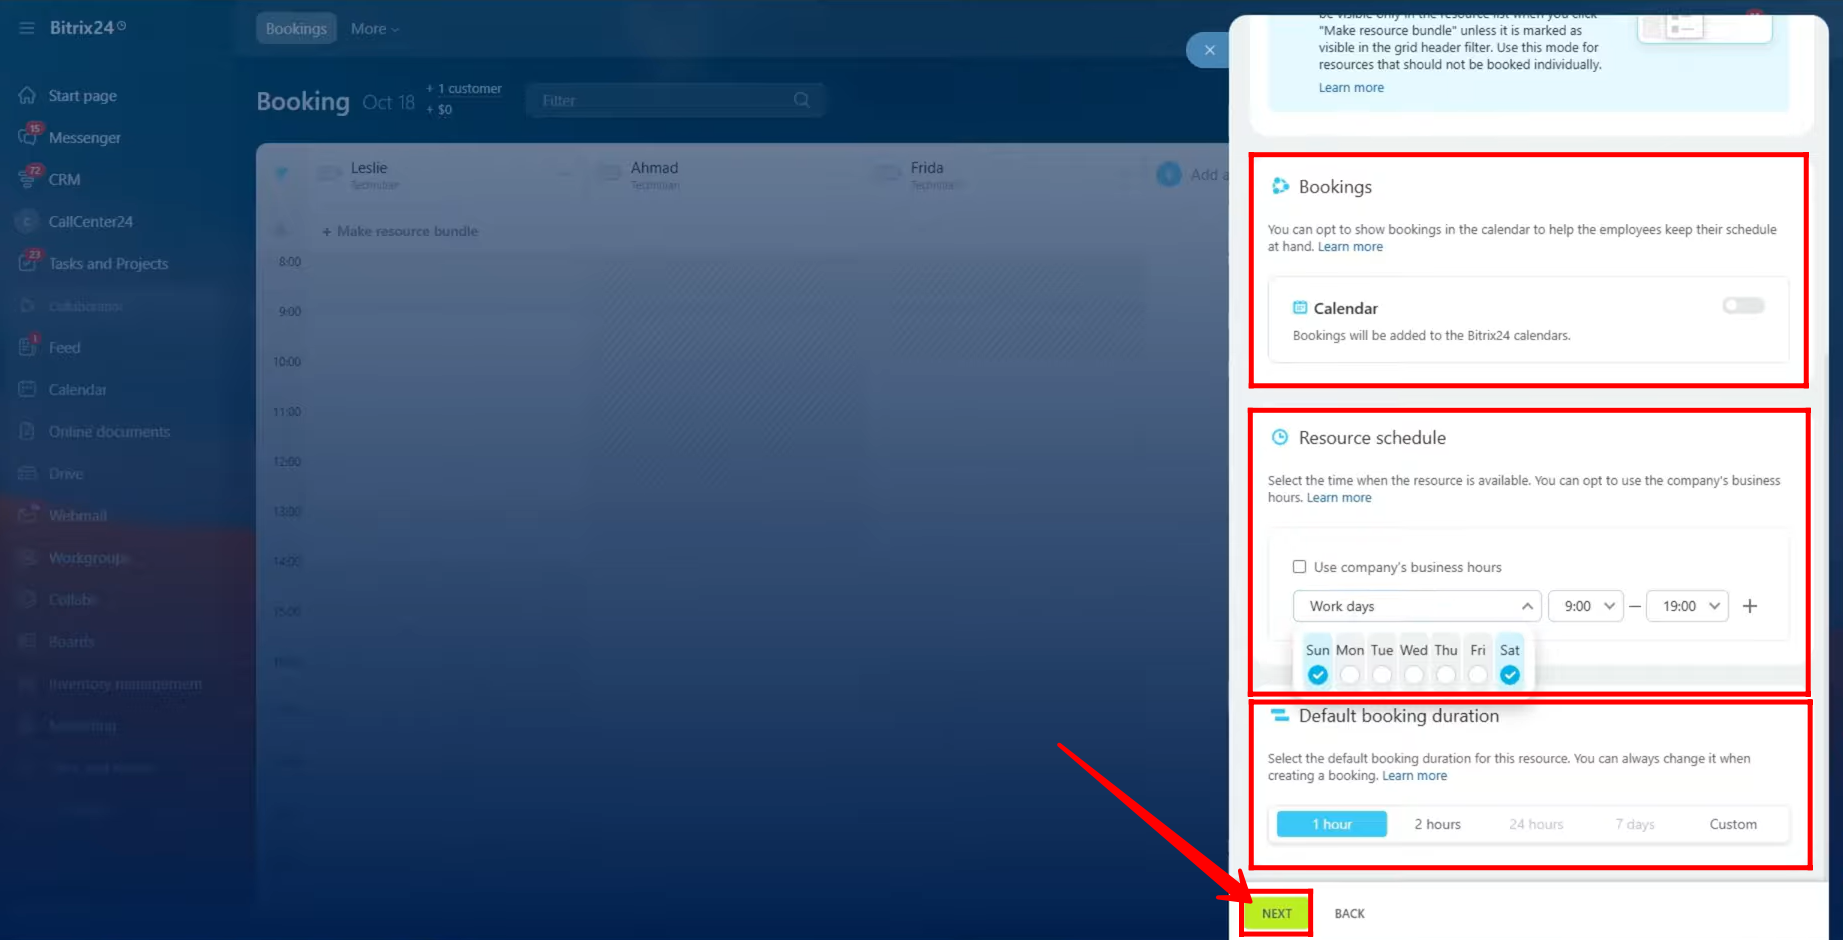
5. In the Bookings section, you can choose to add a user’s calendar to display that employee’s scheduled bookings and availability.
Additionally, you have the option to add a location for the booking and set up reminders if needed. These fields are optional but can help provide more clarity and organization for both staff and clients.
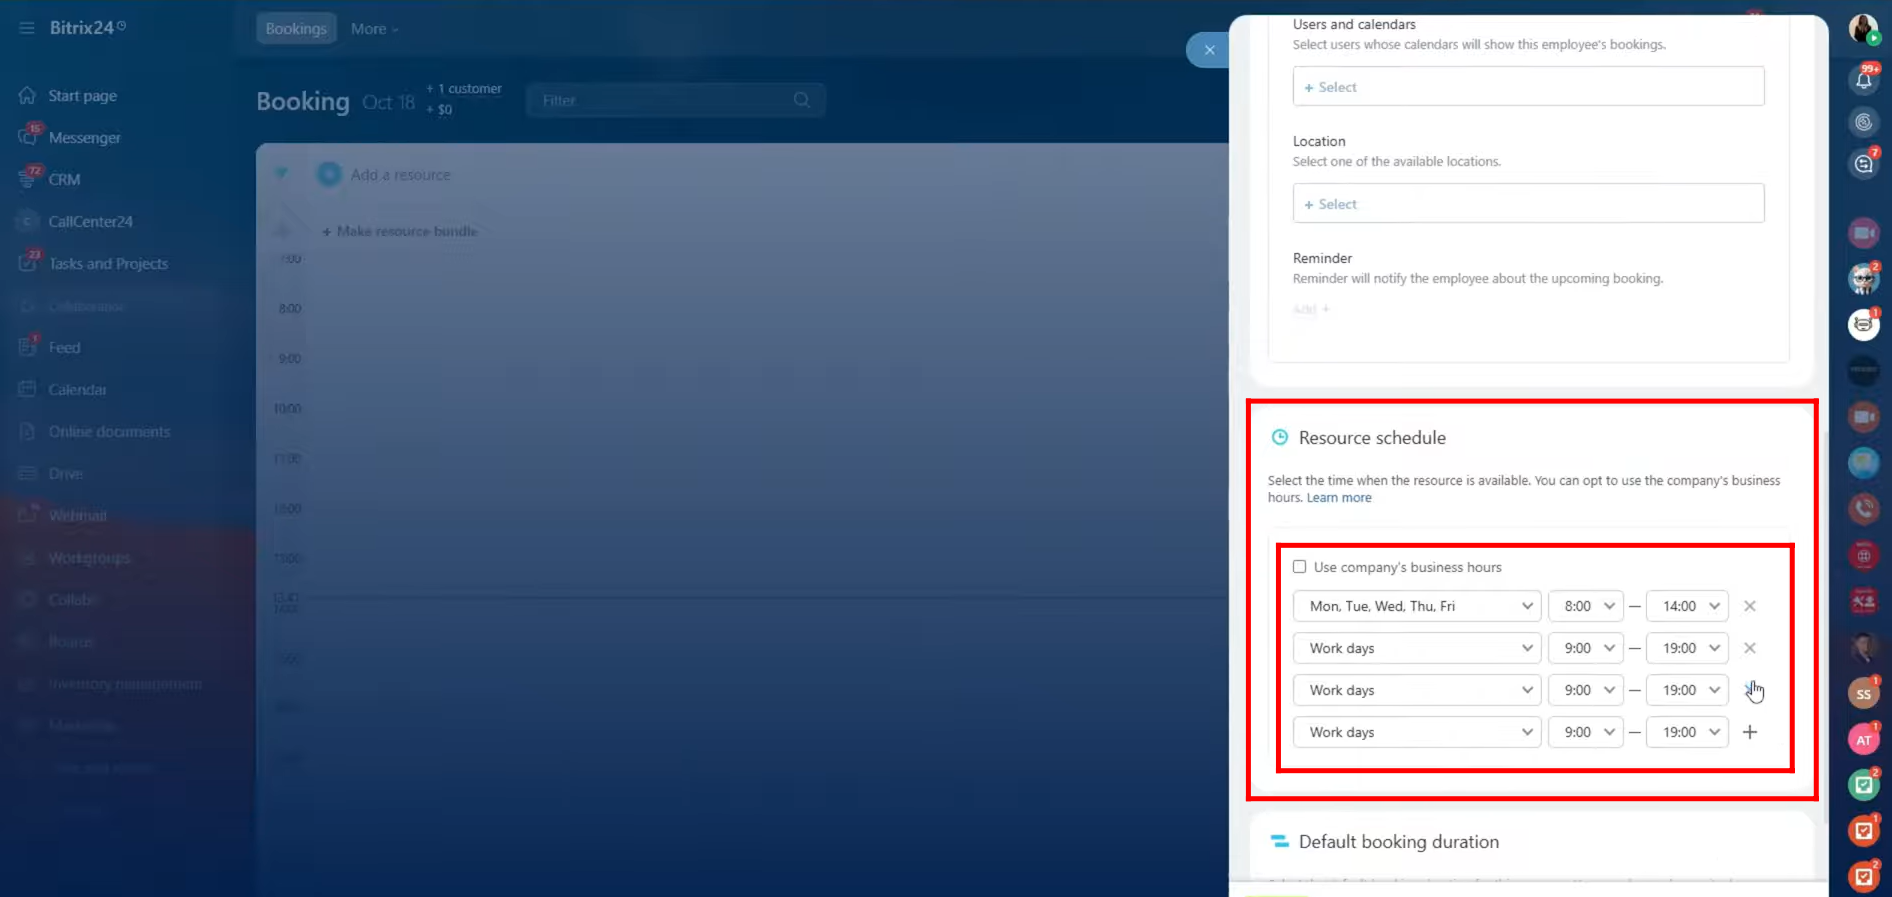
6. In the Resource Schedule section, you can either use your company’s standard business hours to automatically define when a resource is available, or manually configure specific availability times.
For example, you might set the resource to be available Monday to Friday from 8:00 AM to 4:00 PM, and on Saturday from 12:00 PM to 4:00 PM. This flexibility allows you to align each resource’s schedule with real working hours or service times.
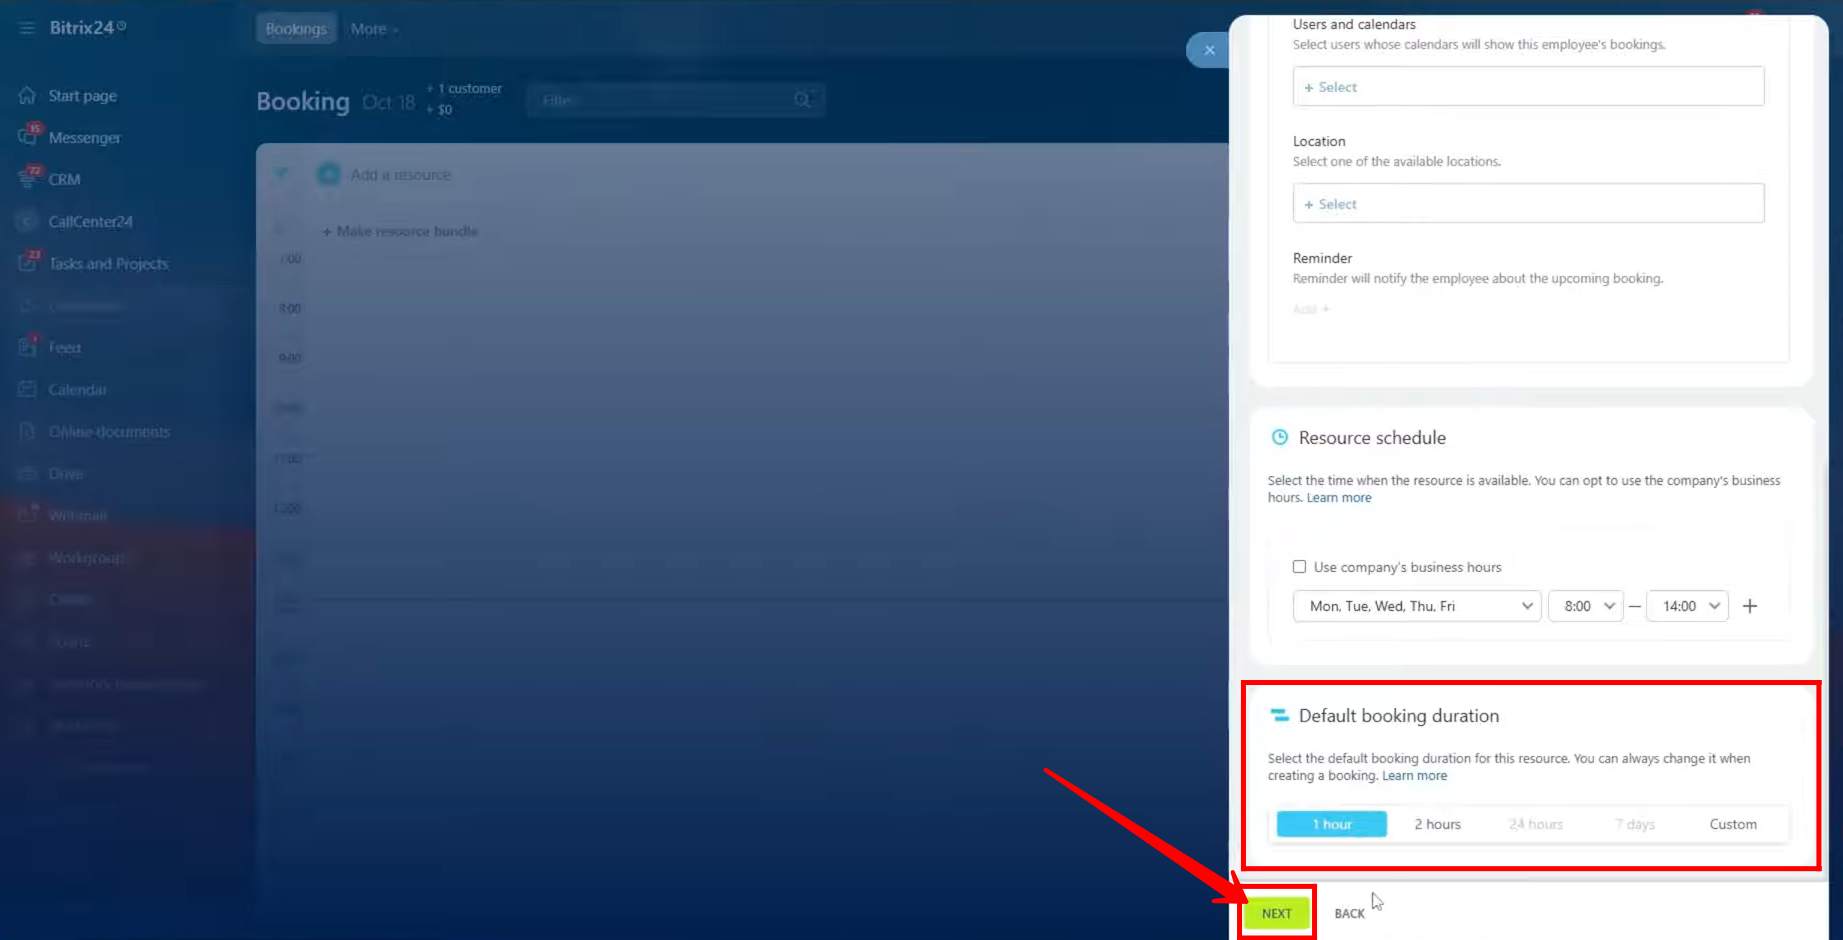
7. Here, you can set the default booking duration according to your needs — for example, 1 hour, 2 hours, or a custom time. Once you’ve selected the preferred duration, click Next to continue.
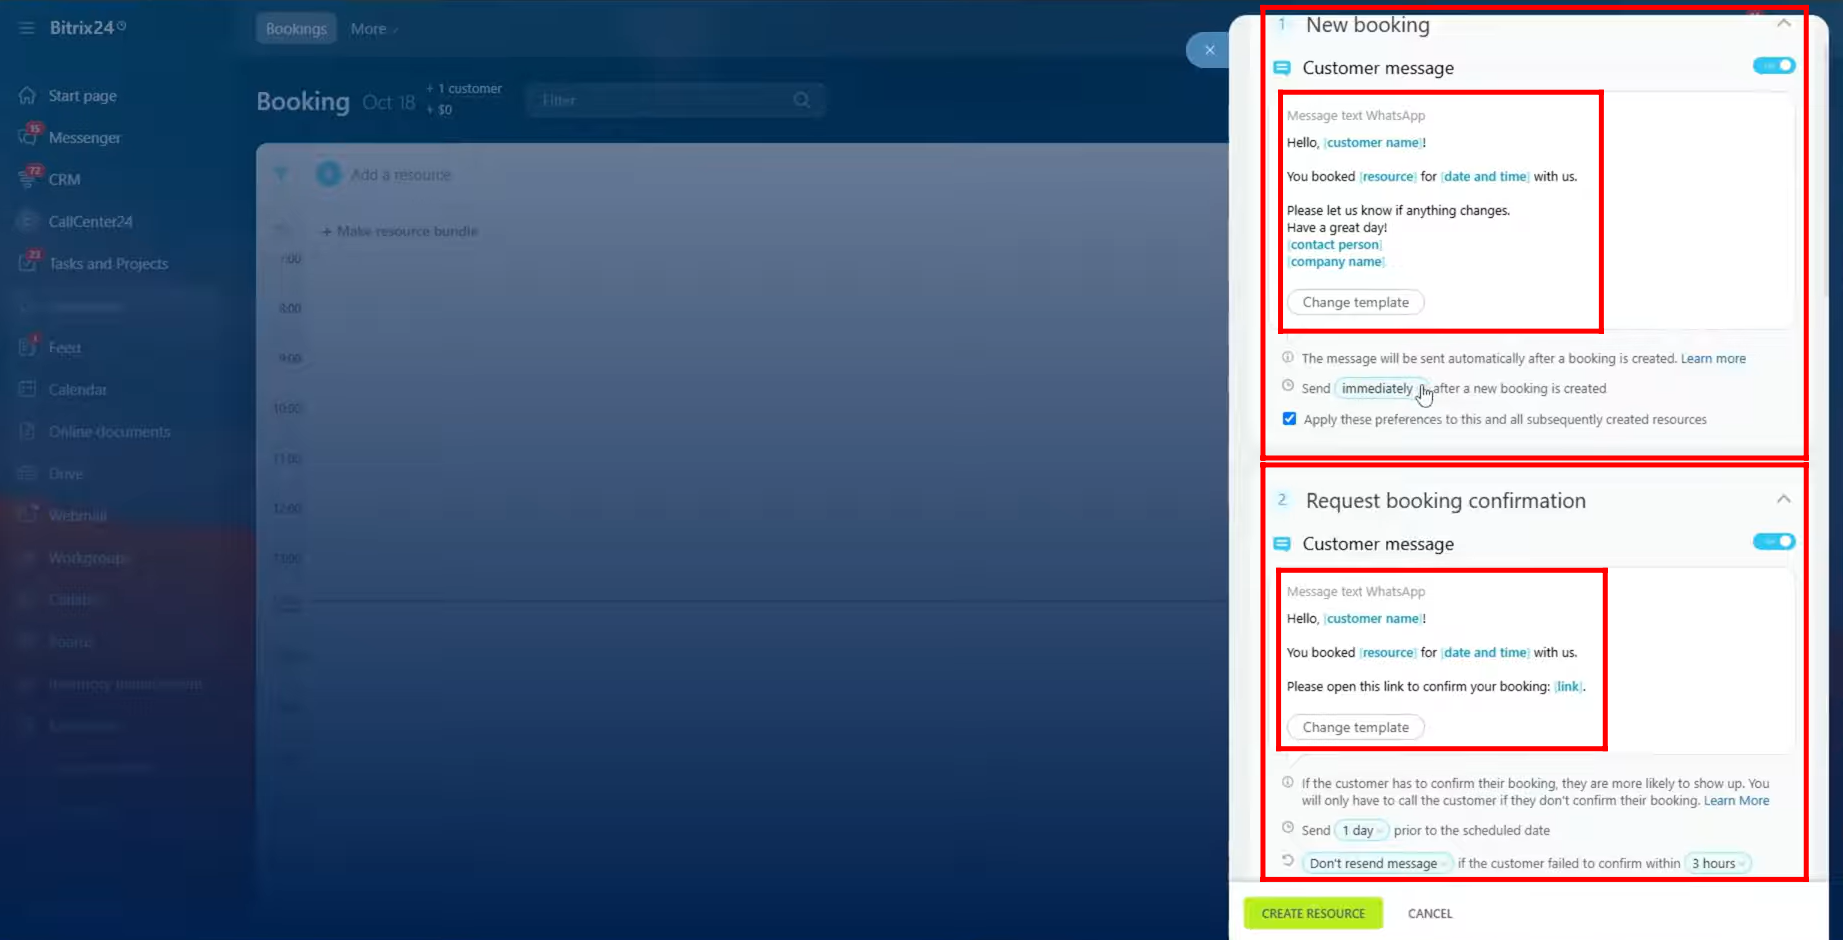
8. You can set up a dynamic customer message that will be sent once a booking is created. You can choose whether this message should be sent immediately or at a later time, and decide if the same timing preferences should be applied to other bookings as well.
Additionally, you can configure a booking confirmation message to request confirmation from the customer. In this example, we’ve set the message to be sent one day before the scheduled booking time, and configured it not to resend if the customer fails to confirm within three hours (this duration can be adjusted as needed).
These messages can be sent using the available templates—currently, there are two templates, but more will be added in future updates.
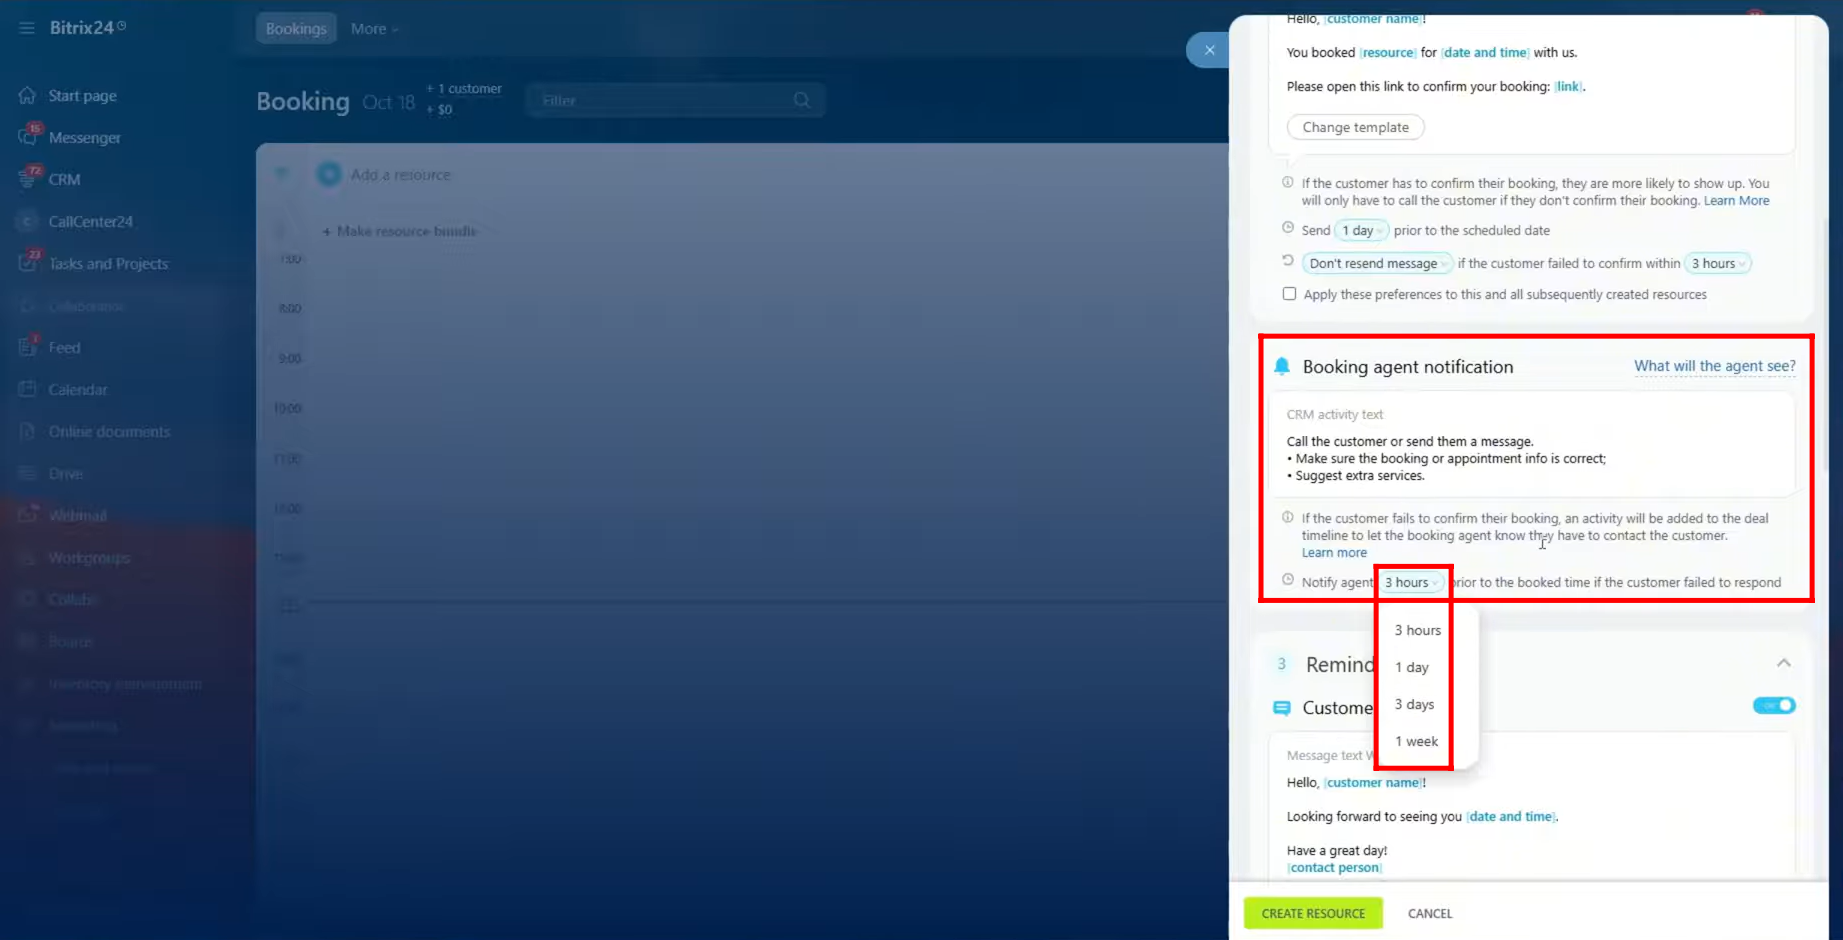
9. In the Booking Agent Notification section, you can configure how the system alerts the agent when a customer fails to confirm their booking. In such cases, an activity is automatically added to the deal timeline, notifying the booking agent to follow up with the customer.
You can also view the CRM activity text that will appear in the timeline and set when the agent should be notified before the booking time if the customer does not respond. This helps ensure that no unconfirmed bookings are overlooked.
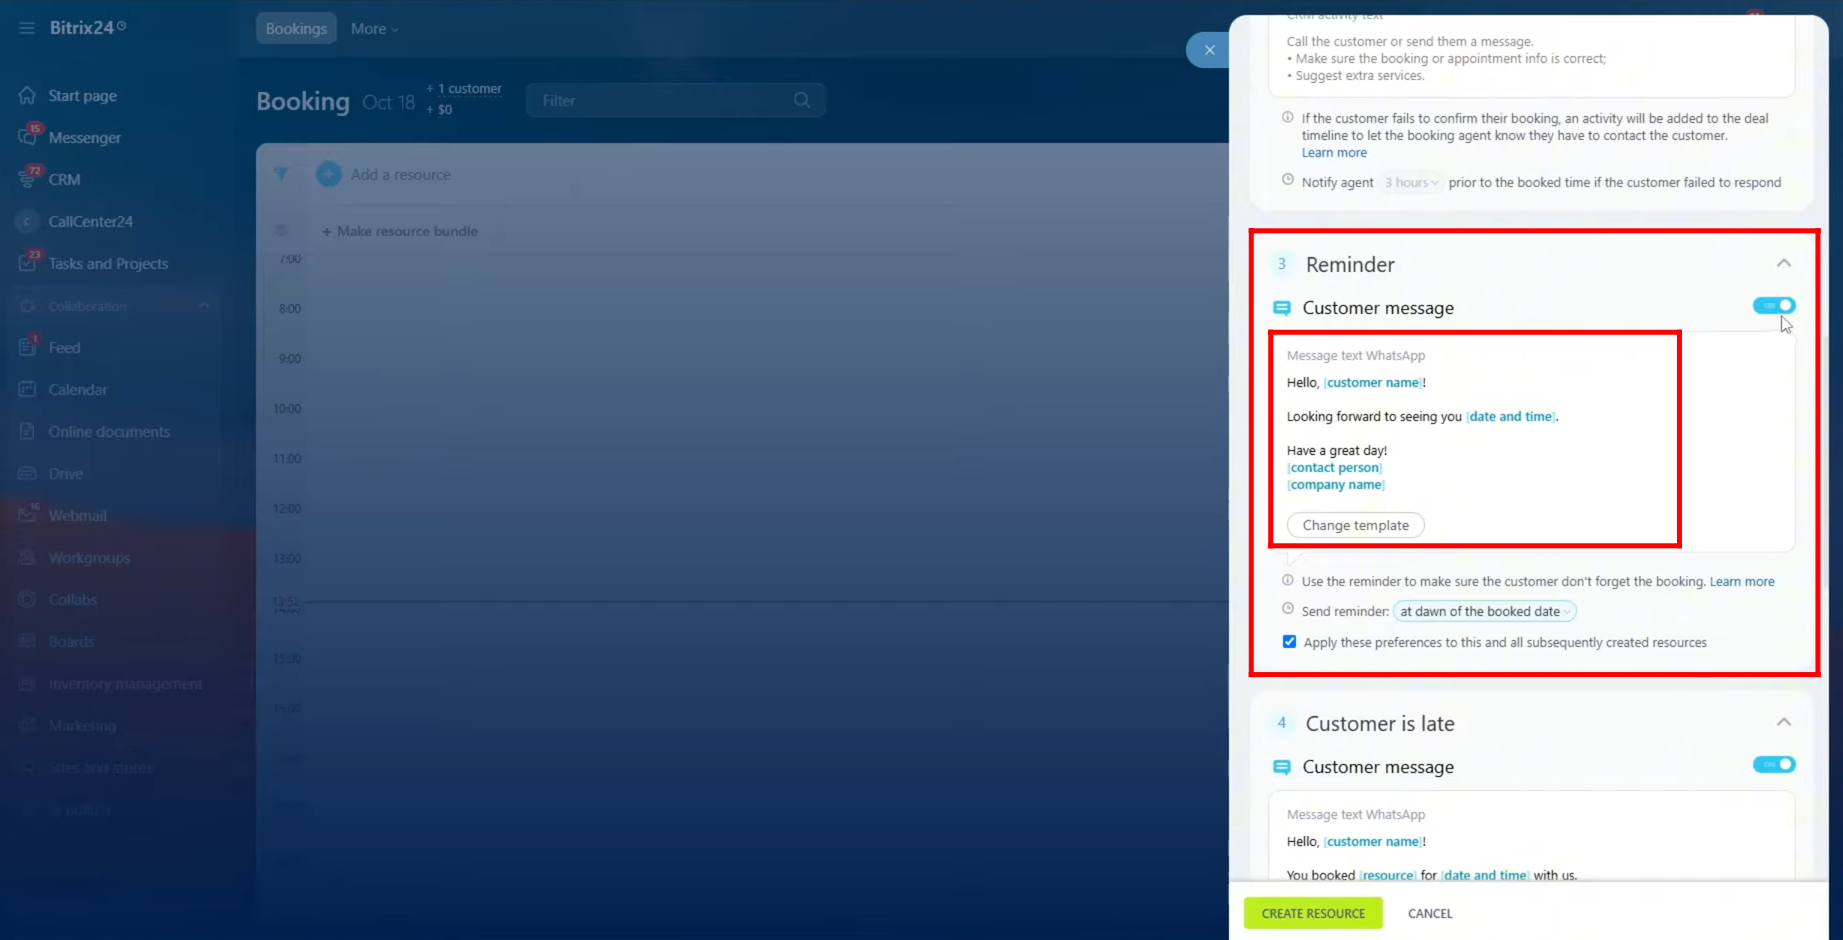
10. In the Reminder section, you can configure a dynamic message to ensure the customer doesn’t forget their booking. You can choose from available templates and set when the reminder should be sent.
In this example, we’ve configured the reminder to be sent early in the morning (at dawn) on the day of the booking, though this time can be adjusted as needed.
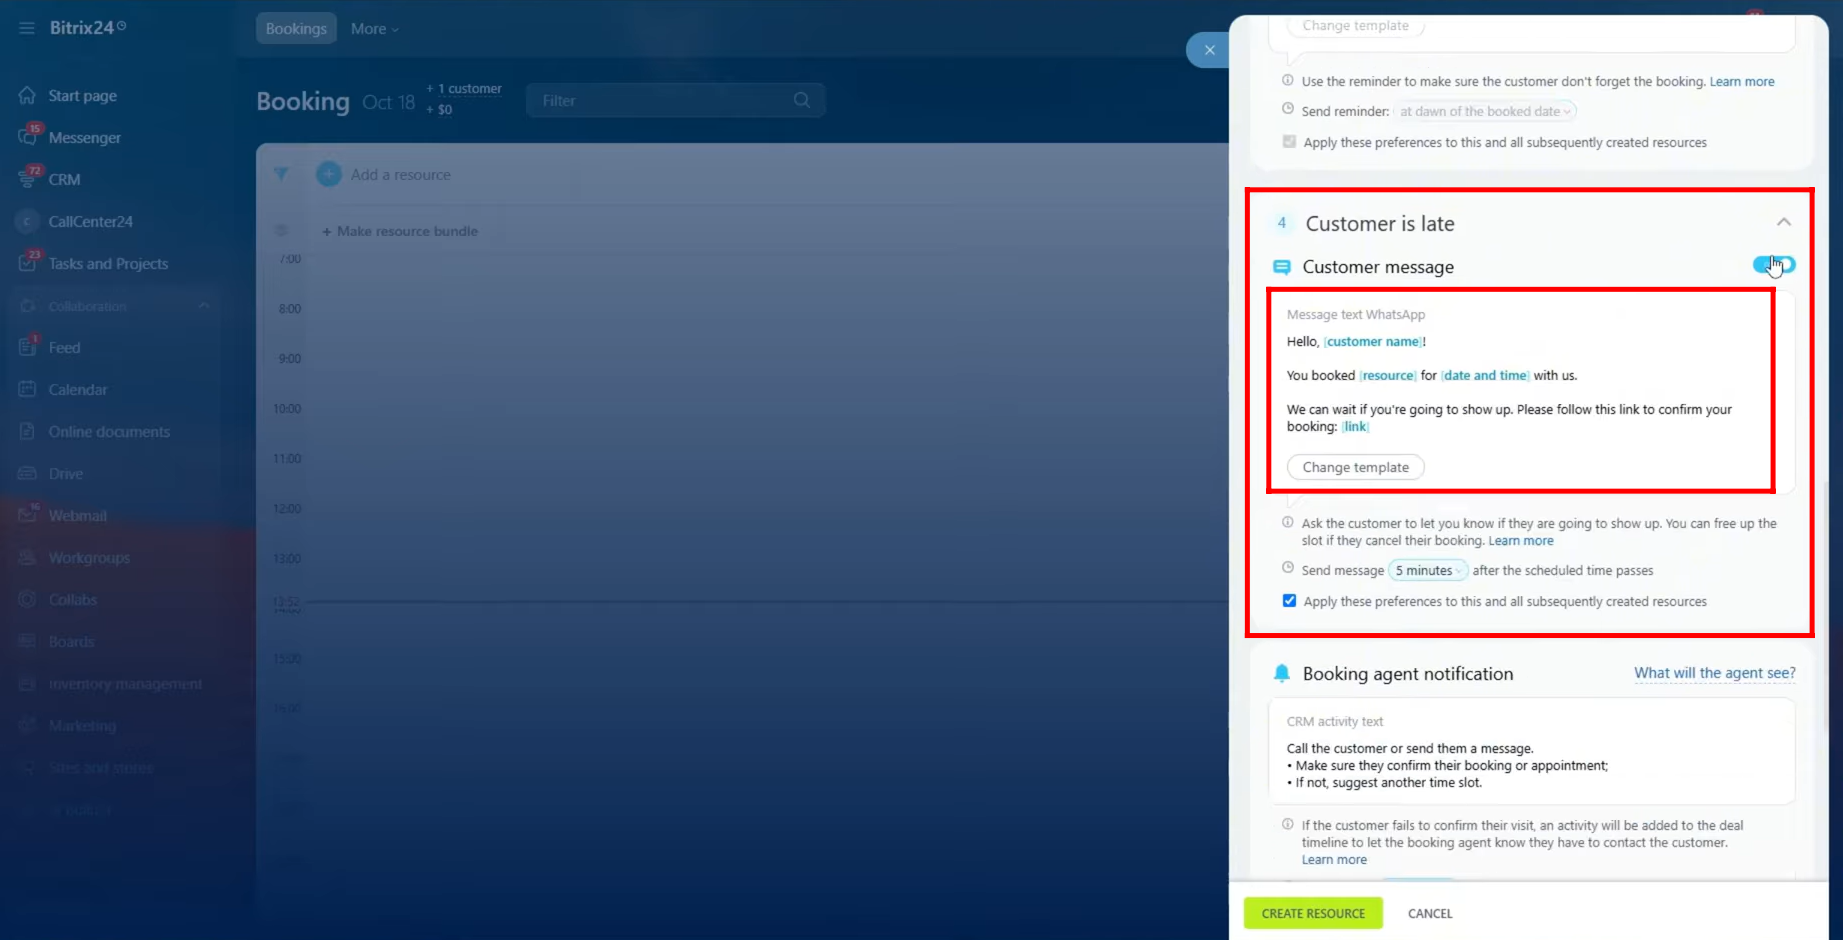
11. In the “Customer is Late” section, you can set up a message for customers or select one from the available templates. This message can ask the customer to confirm whether they still plan to arrive, allowing you to free up the time slot if they decide to cancel.
You can also configure when this message should be sent, specifically to trigger after a set period has passed following the scheduled booking time.
12. In the “Booking Agent Notification” section, you can view the CRM activity text that will appear in the deal timeline. If a customer fails to confirm their visit, an activity will automatically be added to notify the booking agent that they need to contact the customer. You can also set the time interval after the scheduled booking time when the system should notify the agent.
The Customer Feedback section configuration is not yet available and will be introduced in a future update.
Once all configurations are complete, click “Create Resource” to finalize the setup.

13. In the Booking Calendar view, you can see that a column grid has been created for each technician or resource. The available time slots are shown as normal boxes, allowing you to book the resource directly from the calendar. Time slots that are not available are displayed with dashes, indicating that the resource cannot be booked during those times.
14. To save time and display more resources in a single calendar view, we have added two additional resources. These new resources behave in the same way as the first one: available time slots can be booked directly, while unavailable times are marked with dashes, clearly indicating when the resources cannot be scheduled.

15. When you have multiple resources in the booking interface, you can click the filter icon to control which resource grids are displayed. You can filter by resource type or use the search function to select specific resources to show or hide, making it easier to focus on the ones you need.

16. To create an auxiliary resource, click on “Add a Resource”. Unlike a primary resource, you will not select the grid column header mode for this type of resource.
17. Select the industry for the auxiliary resource. For testing purposes, we will choose “Other” for now.
18. Enter the name of the resource and select its type—for example, van, car, room, or any other category you want to create.
In the View Mode, choose “Show as an auxiliary resource.”
19. Next, perform the same configurations as you did for a primary resource:
- Set the booking calendar visibility for the auxiliary resource.
- Configure the resource’s schedule, specifying availability times for each day.
- Set the default booking duration and click Next.
- Configure all relevant customer and agent messages, including reminders, late notifications, and confirmations.
Once all settings are completed, you can create the auxiliary resource.
20. By default, auxiliary resources do not appear in the grid column header view like primary resources. However, they can be displayed by applying the filter to show them. Once visible, they behave the same way as other resources, with dashes indicating unavailable times and normal boxes for available booking slots.

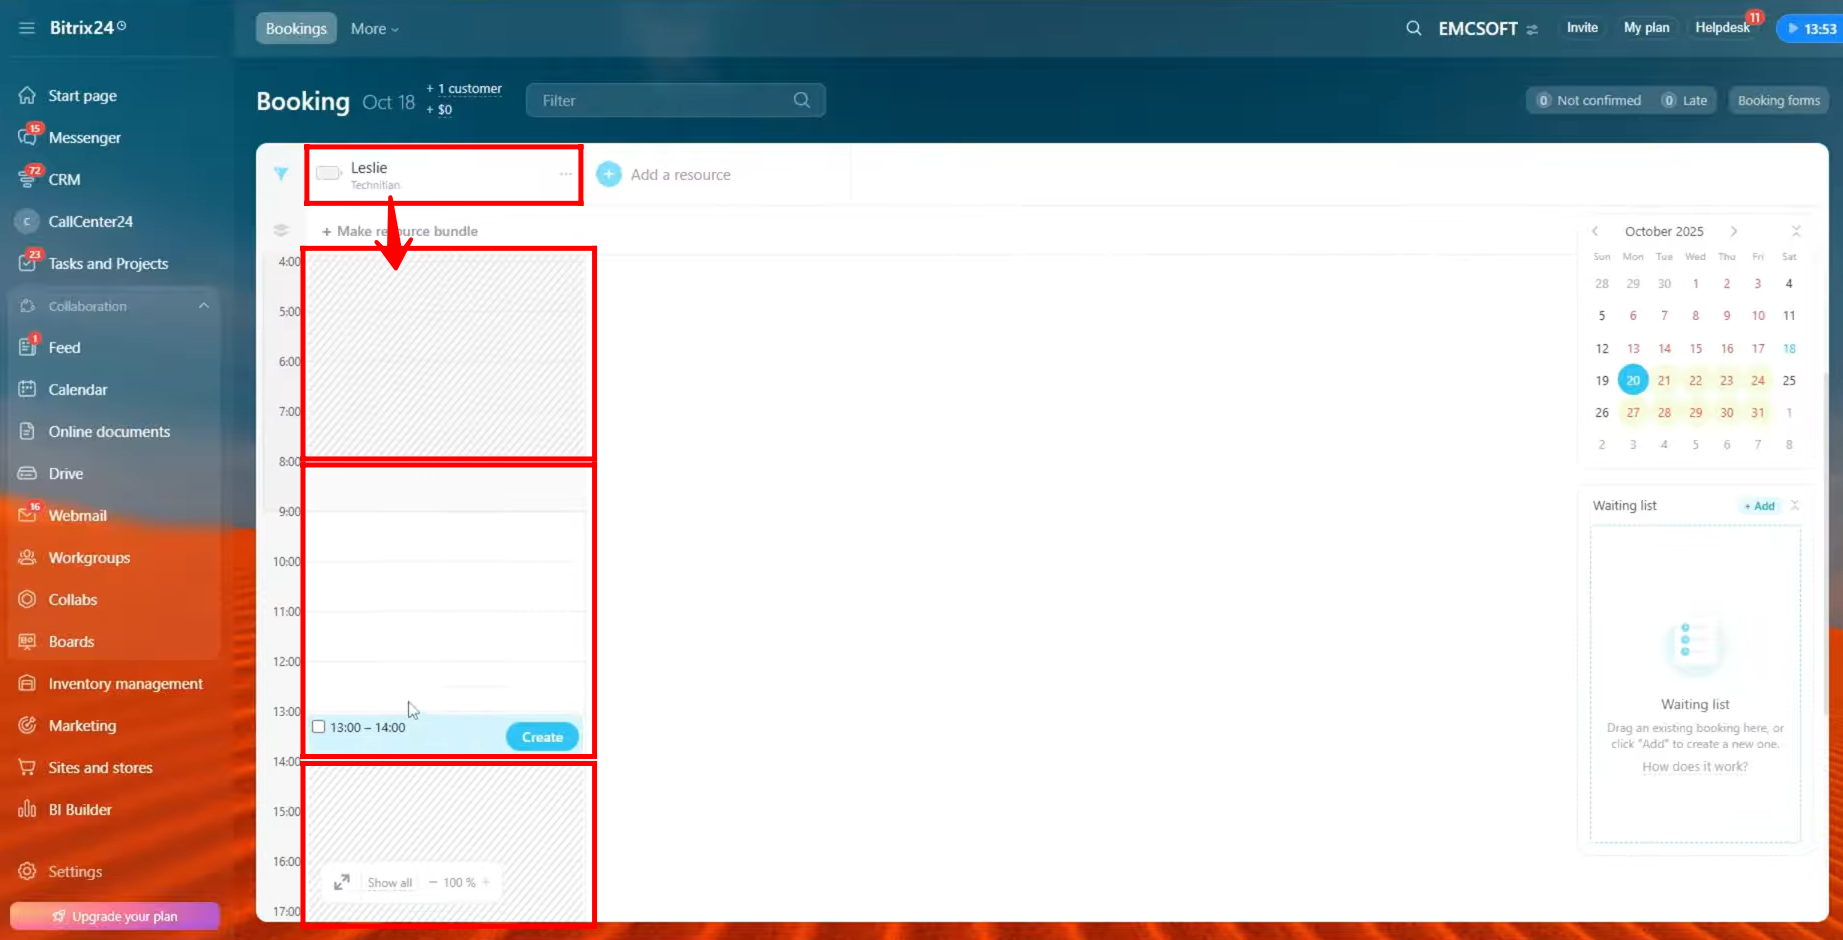
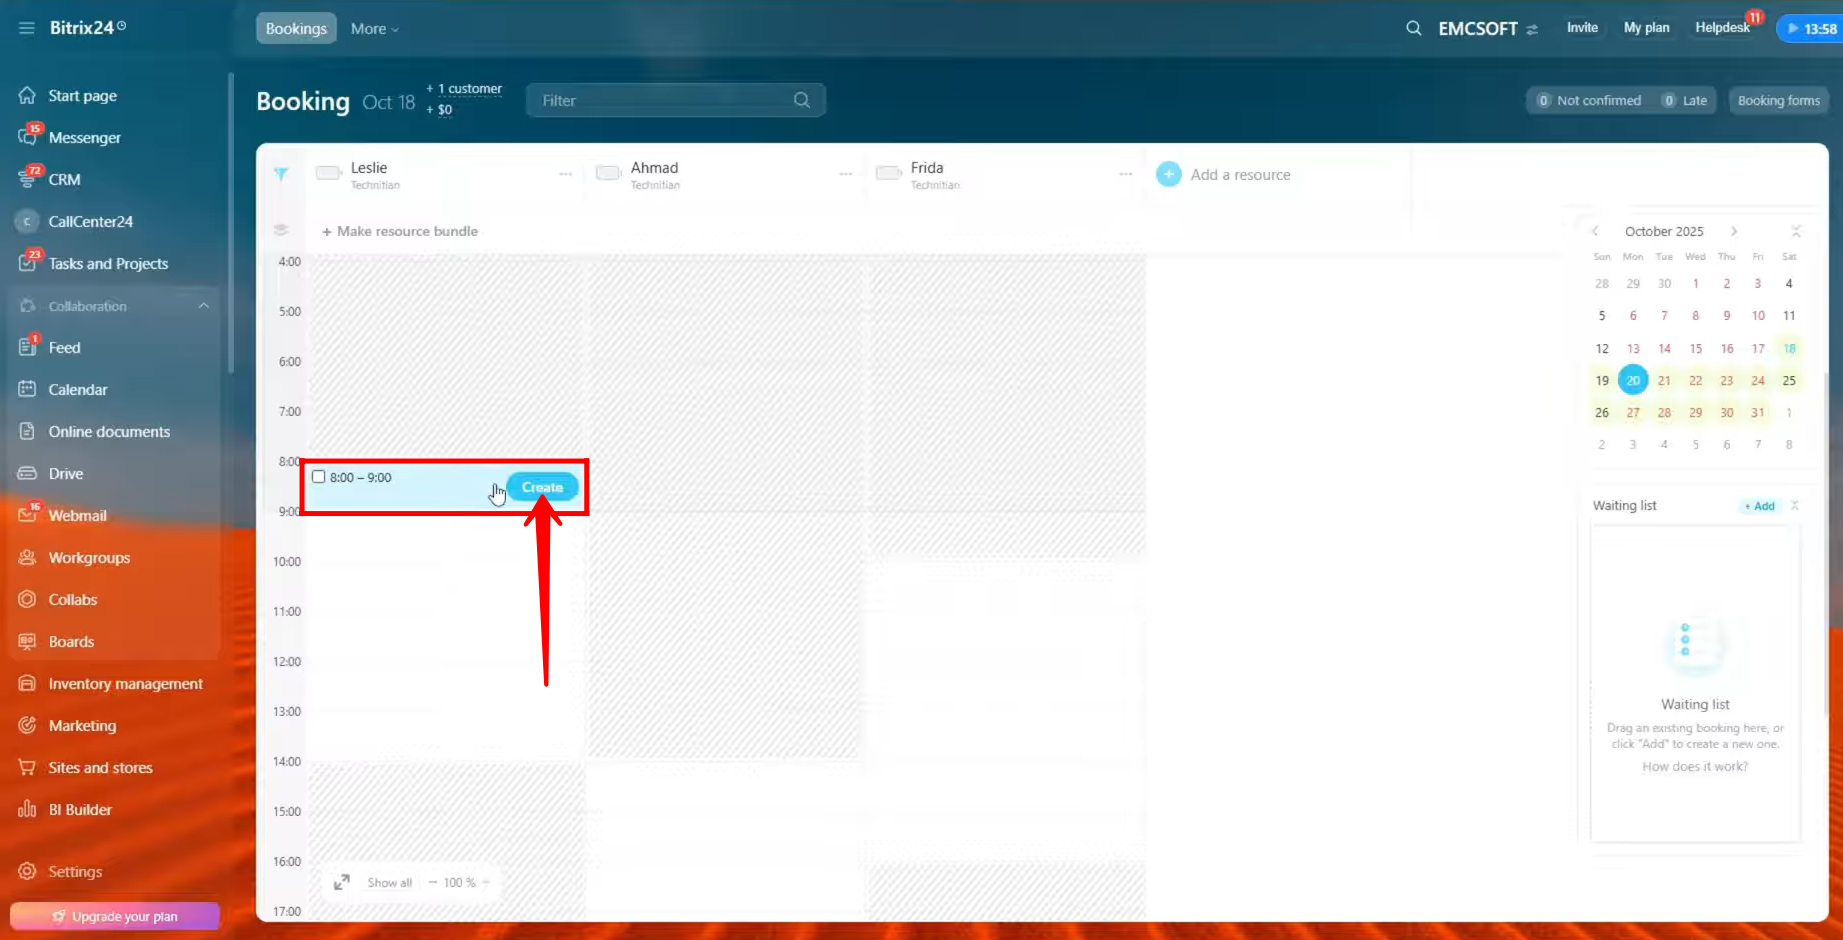
21. Now, you can book a resource directly from the booking interface. When you hover over an available time slot for a resource, a “Create” button will appear, showing the booking duration, allowing you to schedule the resource immediately.
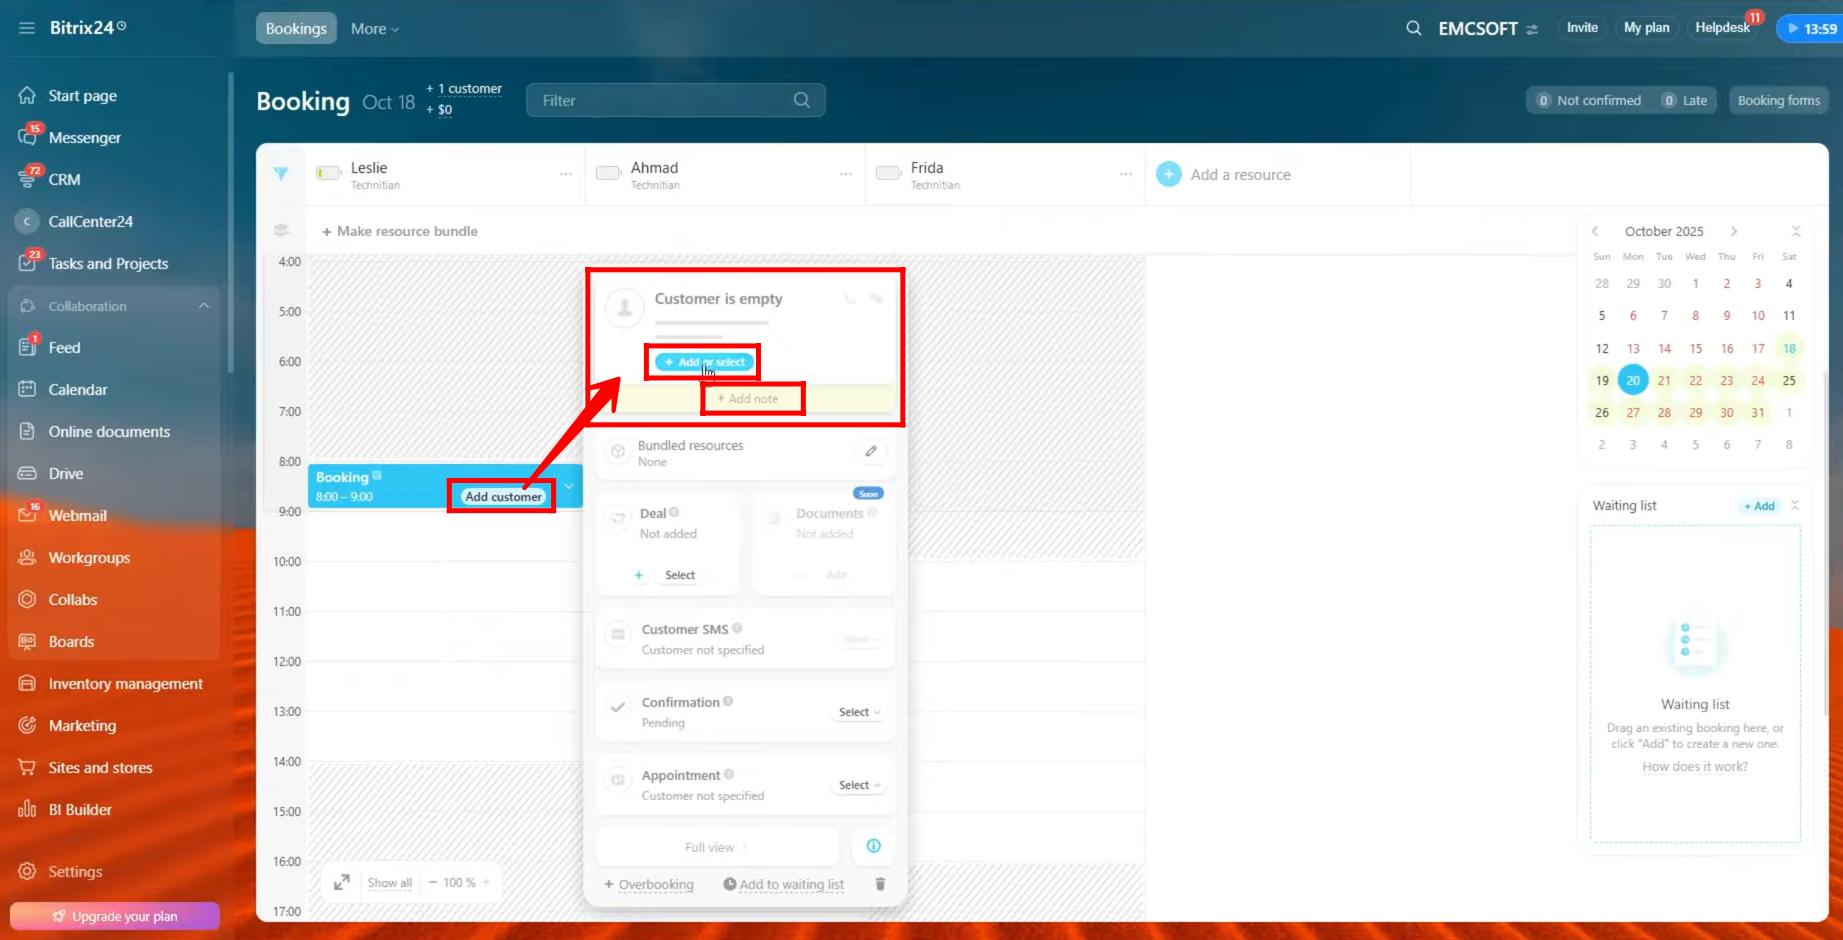
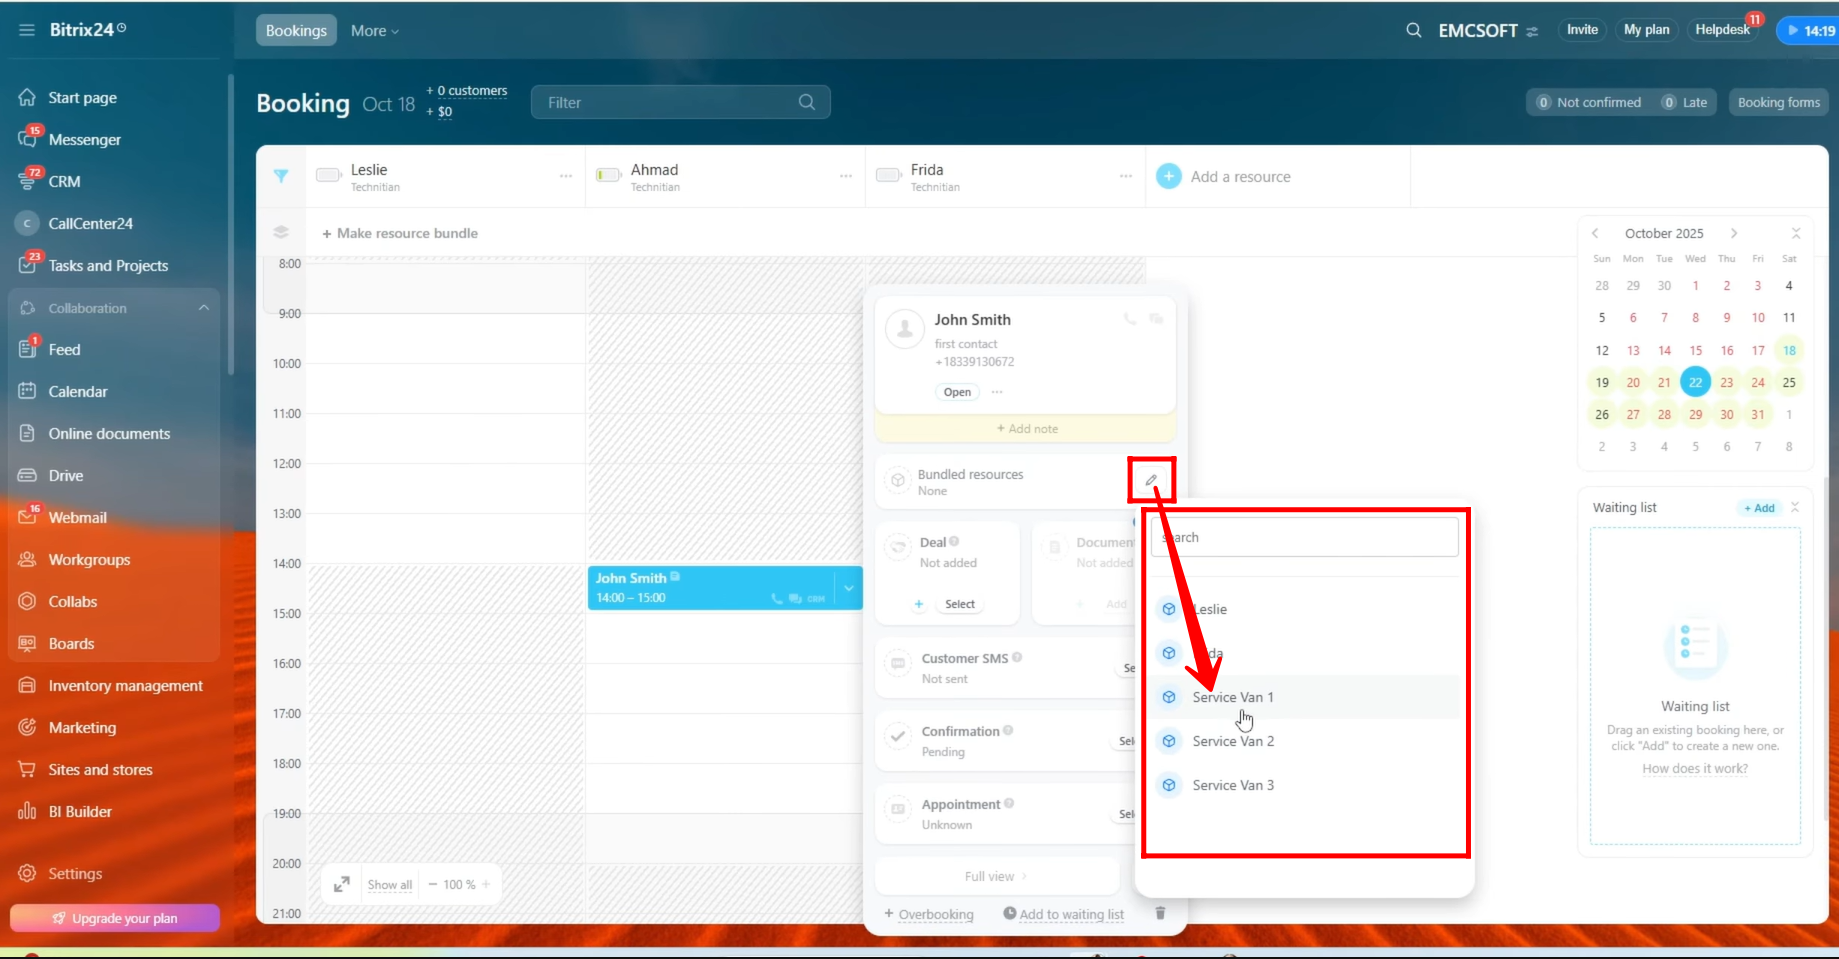
22. After creating a booking, you will see the option to “Create a Customer.” Click on it to attach a contact to the booking. You can also add notes just below the contact details to include any additional information relevant to the booking.
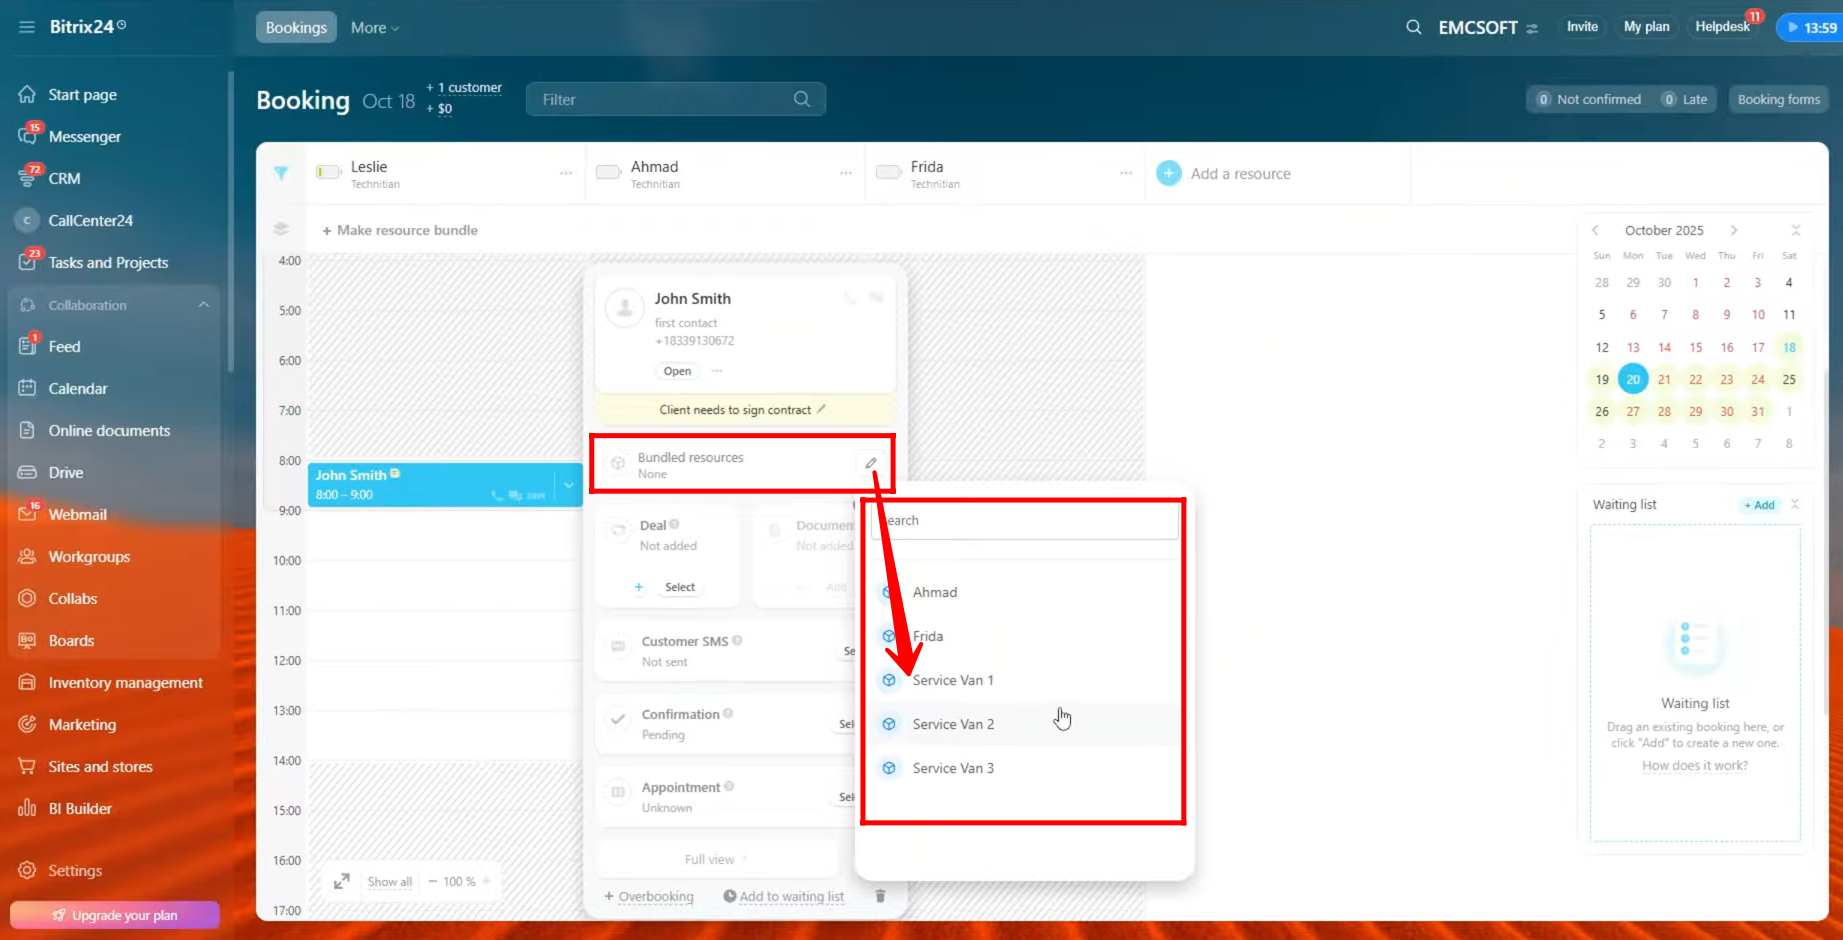
23. You also have the option to bundle additional resources with the booked resource. You can select an auxiliary resource to attach to the booking, allowing multiple resources to be reserved together for the same appointment or task.
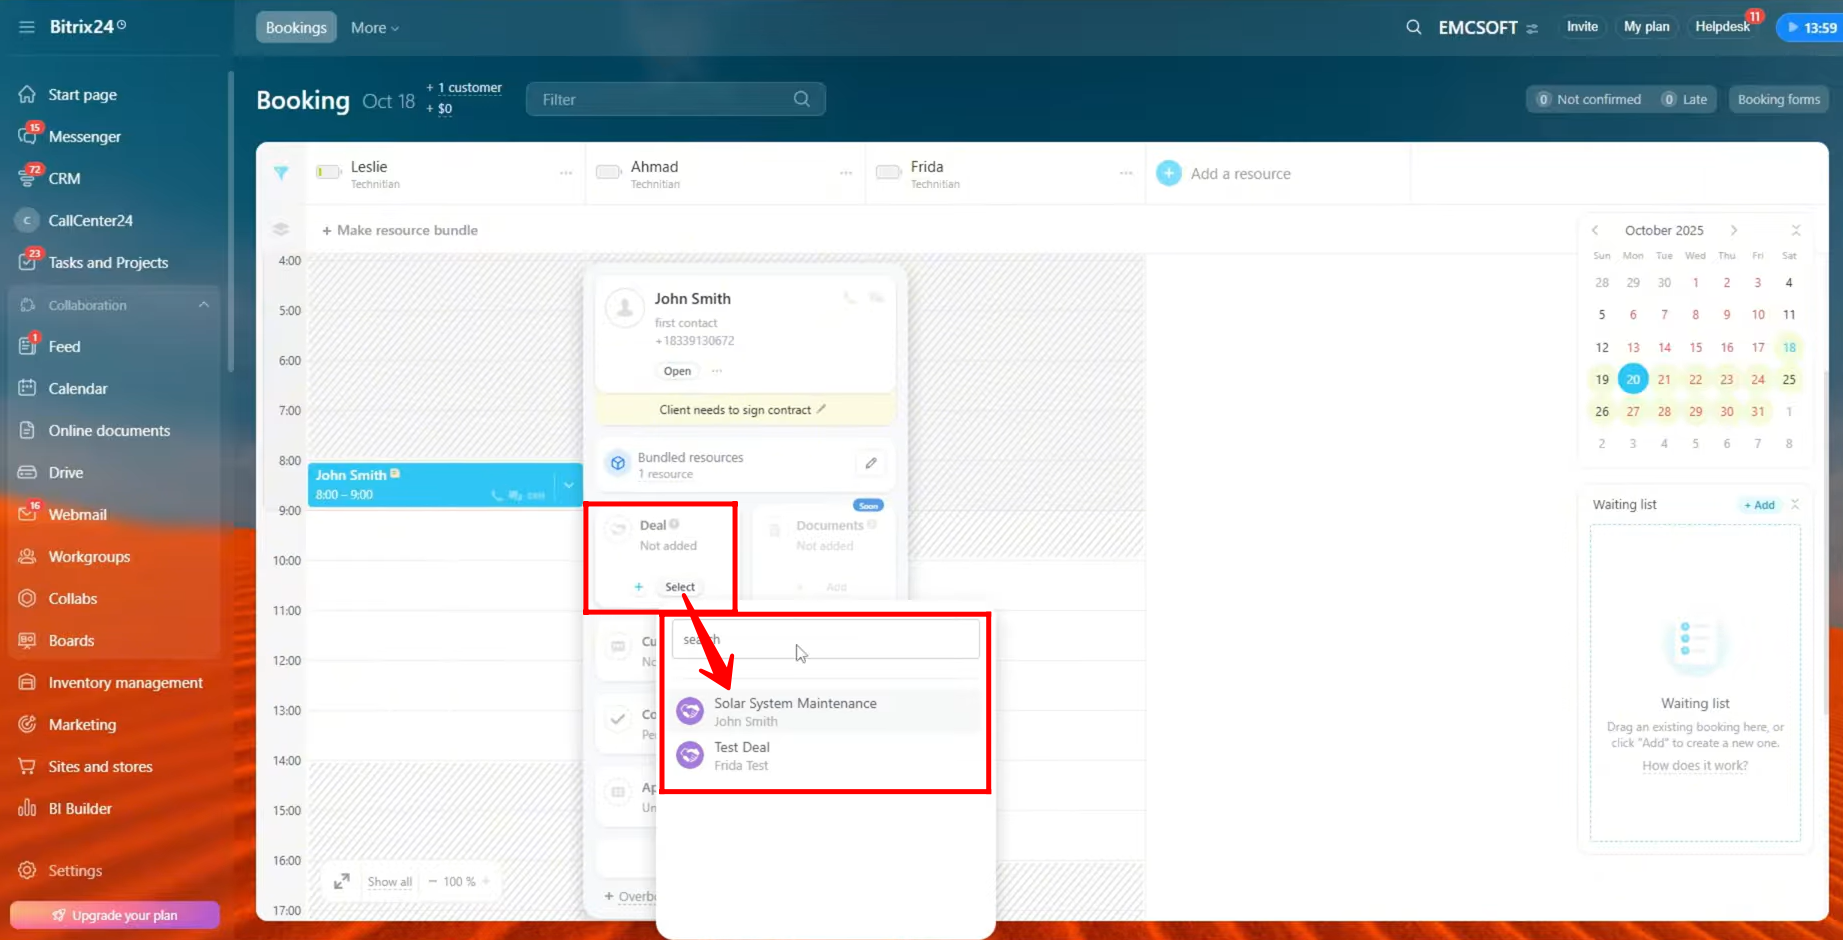
24. You can also attach a deal to the booked resource, linking it directly within your CRM. Additionally, you have the option to upload documents for future reference, ensuring all relevant information is stored with the booking.
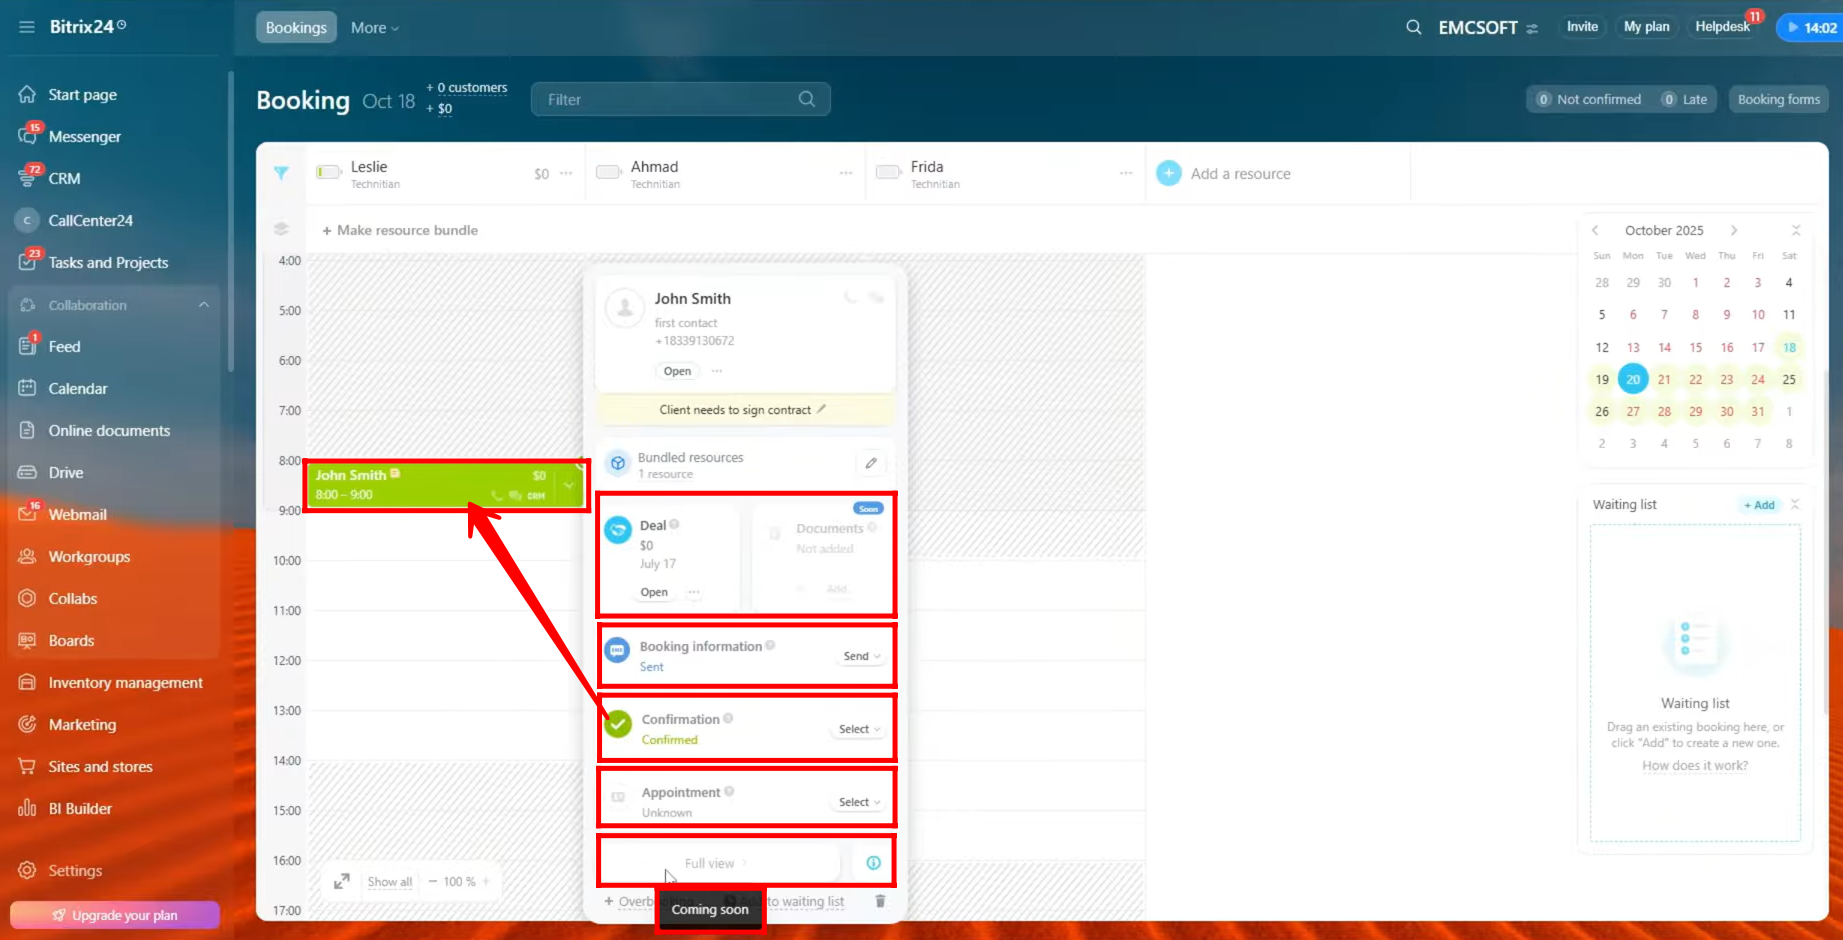
25. You can send the booking information directly to the contact from this interface. There is also an option to mark the booking as confirmed—for testing, we have marked it as confirmed, which changes the booking card color from blue to green.
Additionally, you can mark the appointment status as Visited, No Show, or Unknown. The full booking view with more options will be available in a future update.
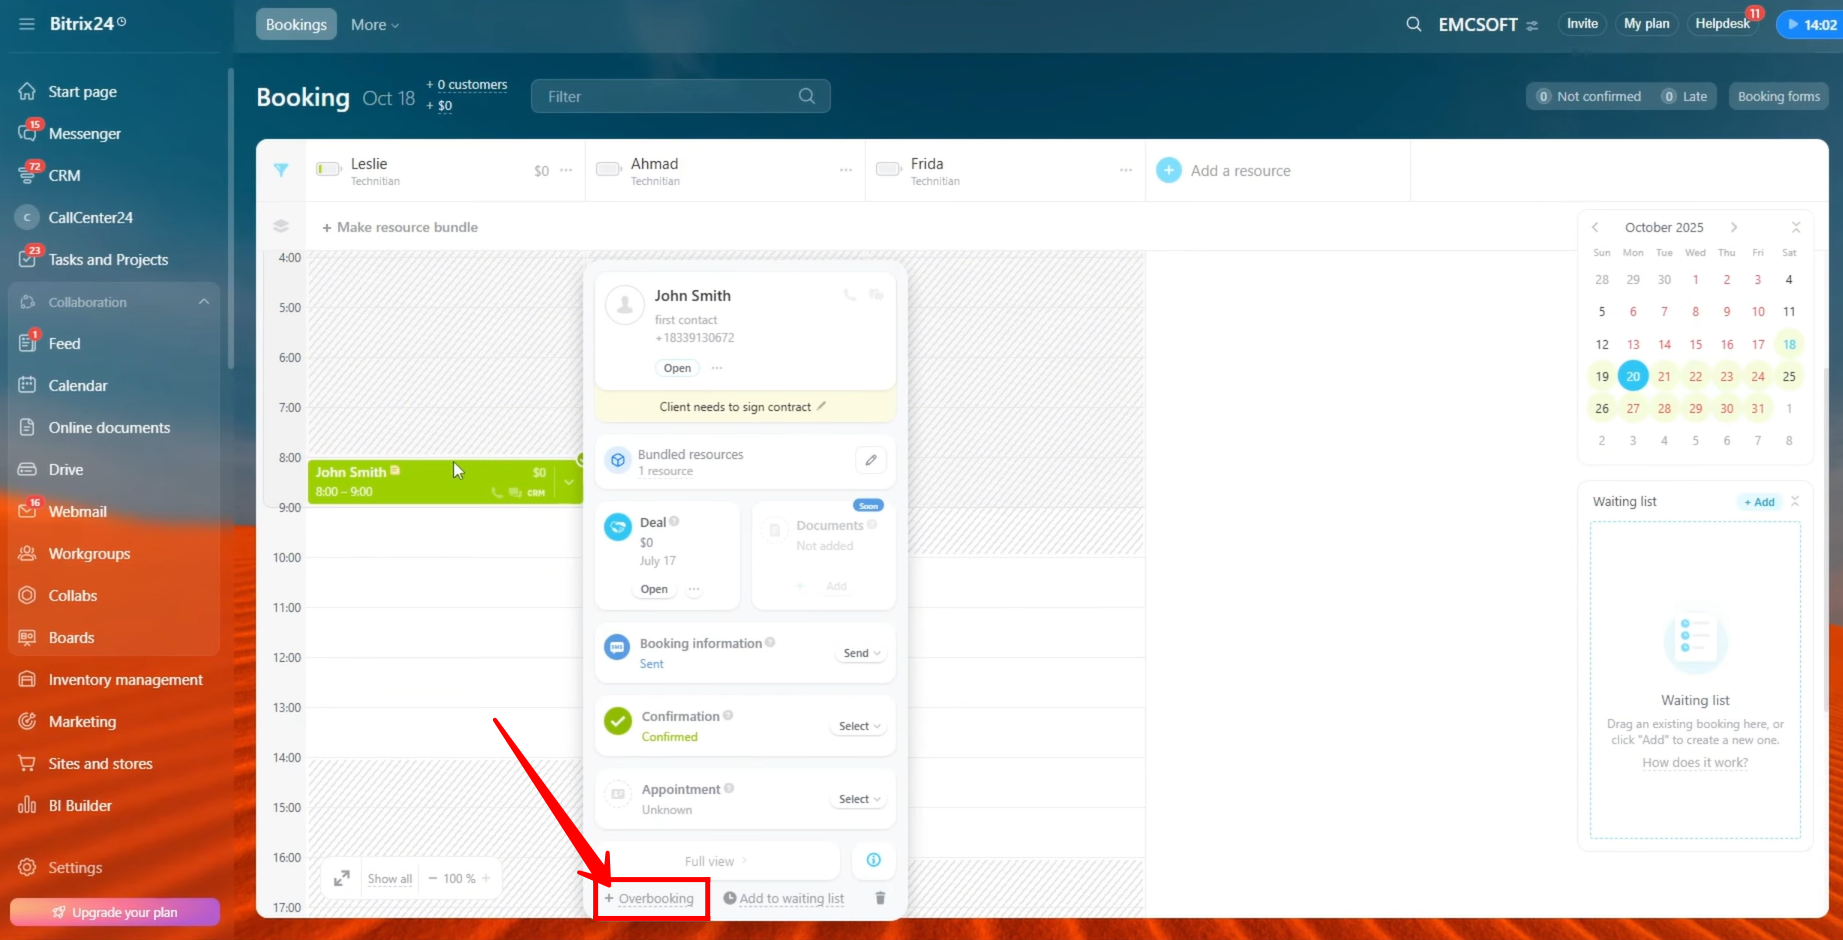
26. By clicking the “+ Overbooking” option, you can schedule more than one booking for the same time slot. This allows multiple bookings to be created within the same duration—for example, two bookings within a one-hour period—if your workflow or business process permits it.
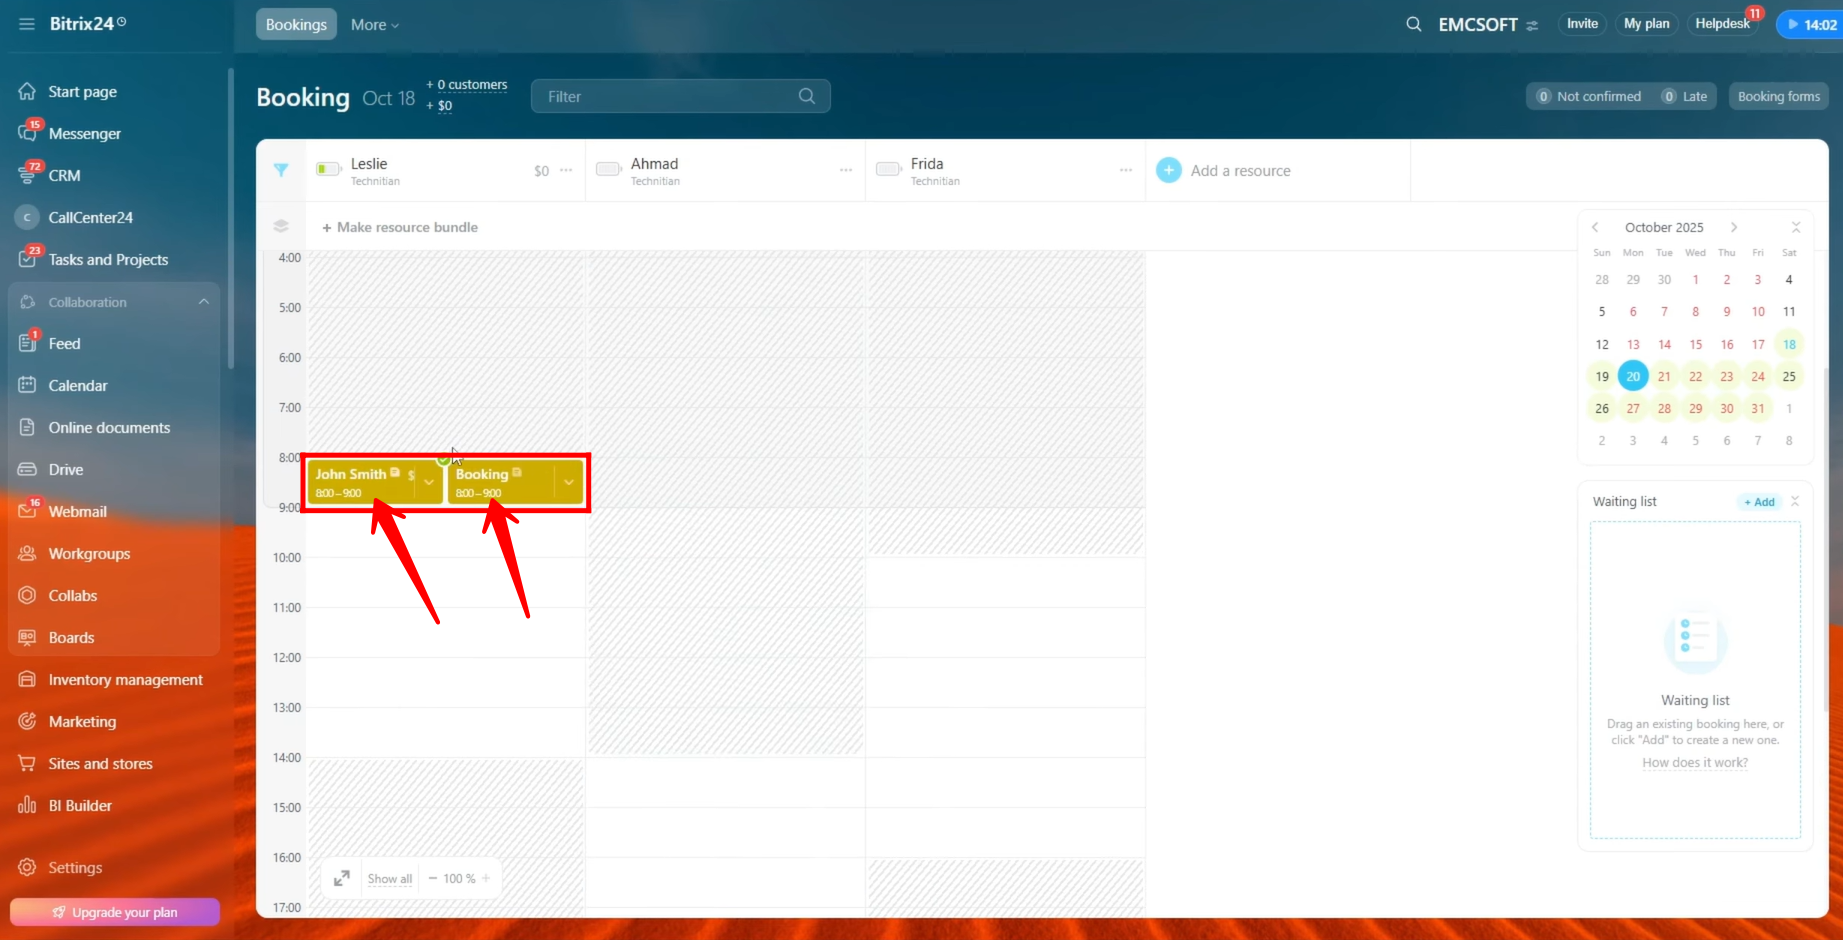
27. Here, you can see two bookings scheduled in the same time slot, highlighted in yellow. Each booking can be individually configured — for example, by attaching a deal, linking a contact, or adding other details — depending on your specific workflow or process requirements.
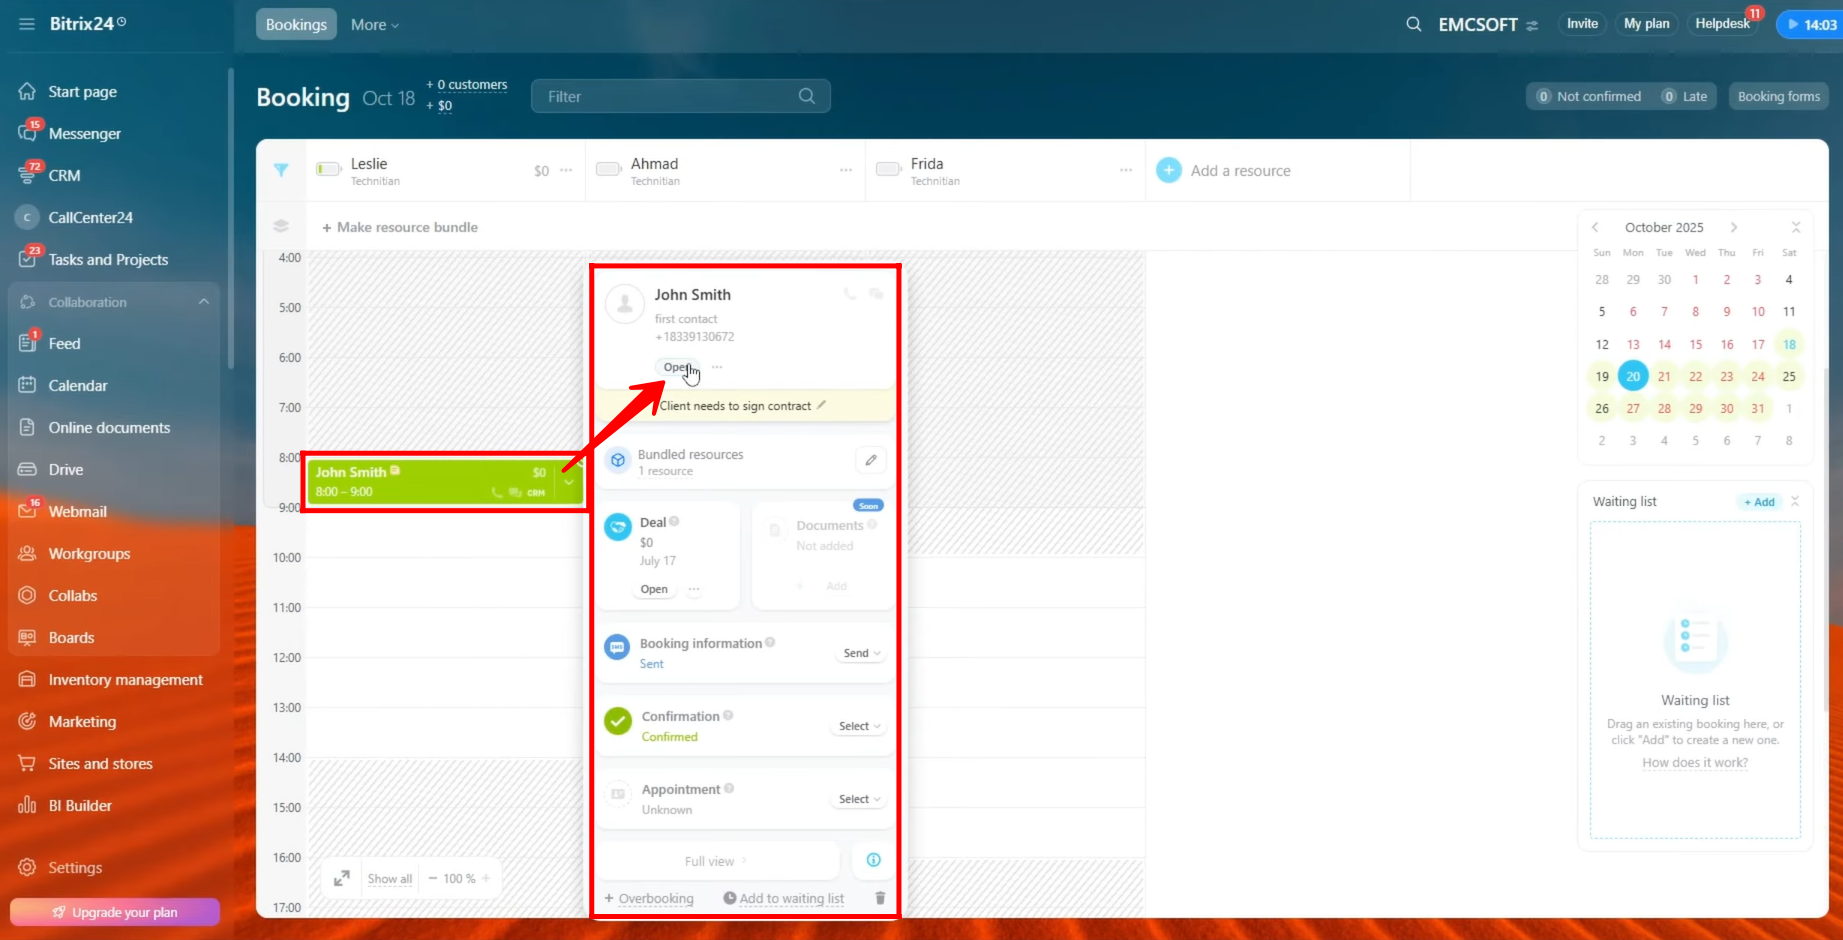
28. For now, we’ll keep the setup limited to one booking per time slot. Next, let’s open the contact that is attached to this booking to view or manage their details.
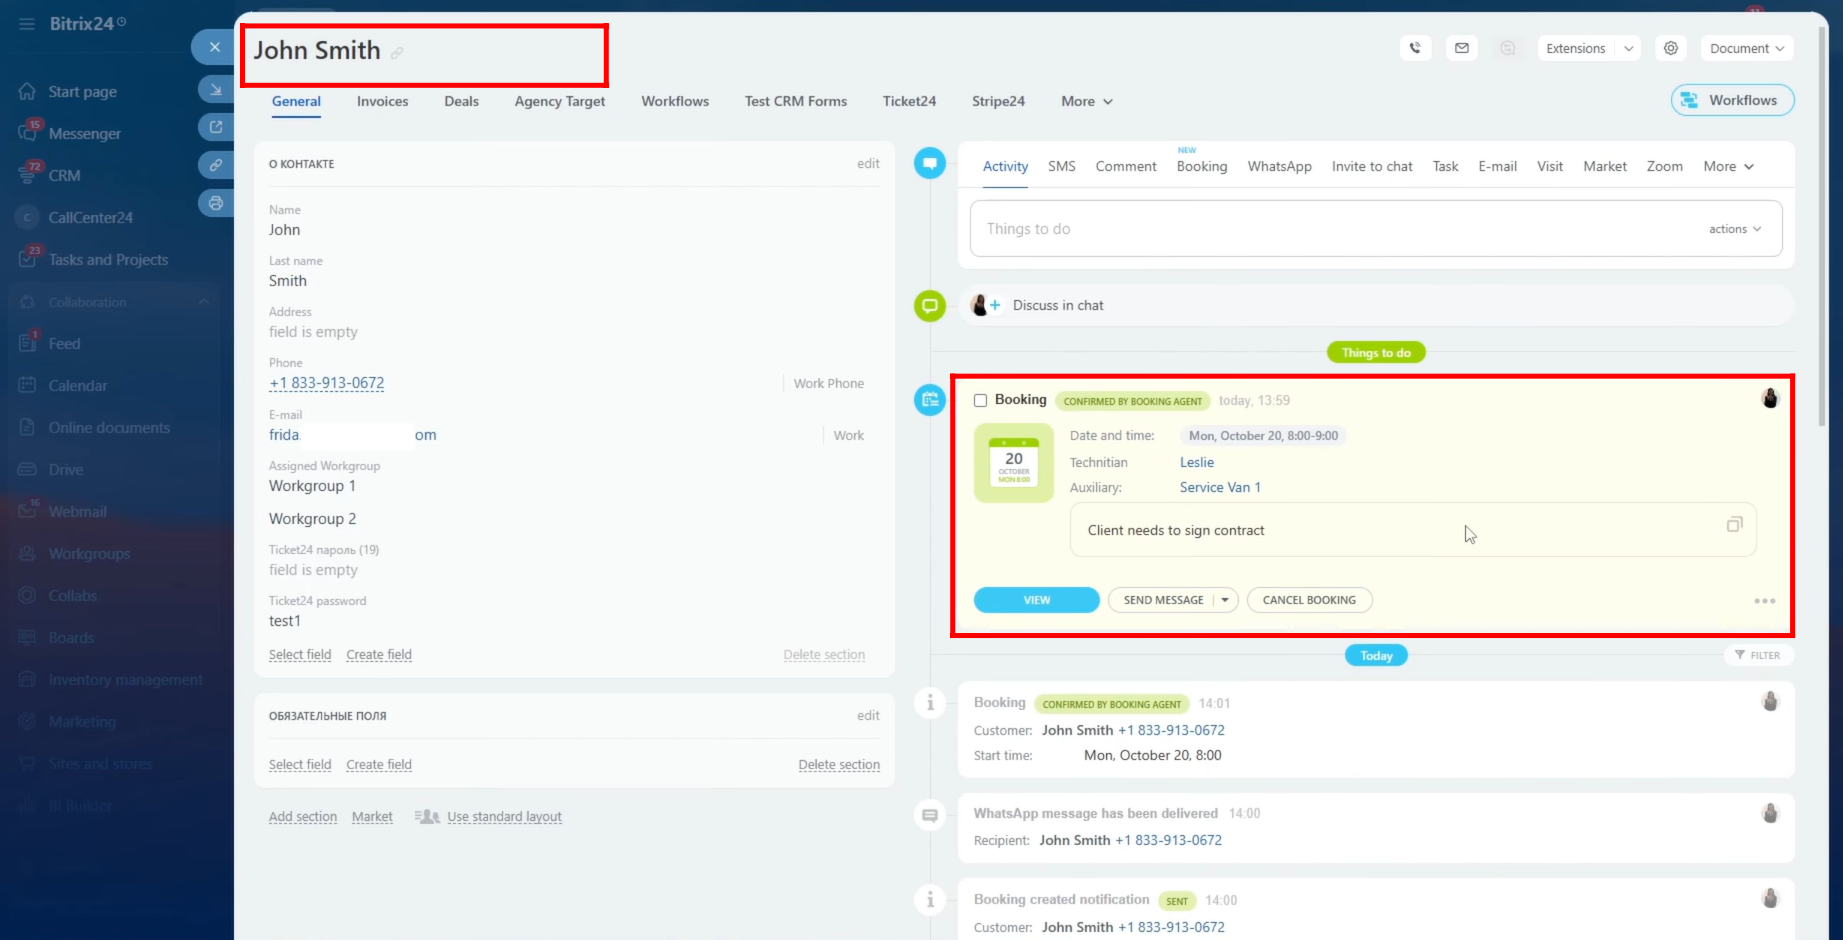
29. Within the contact card, you can see that a booking activity has been added to the activity timeline. From here, you can view the booking details directly, providing quick access to related information without leaving the contact’s profile.
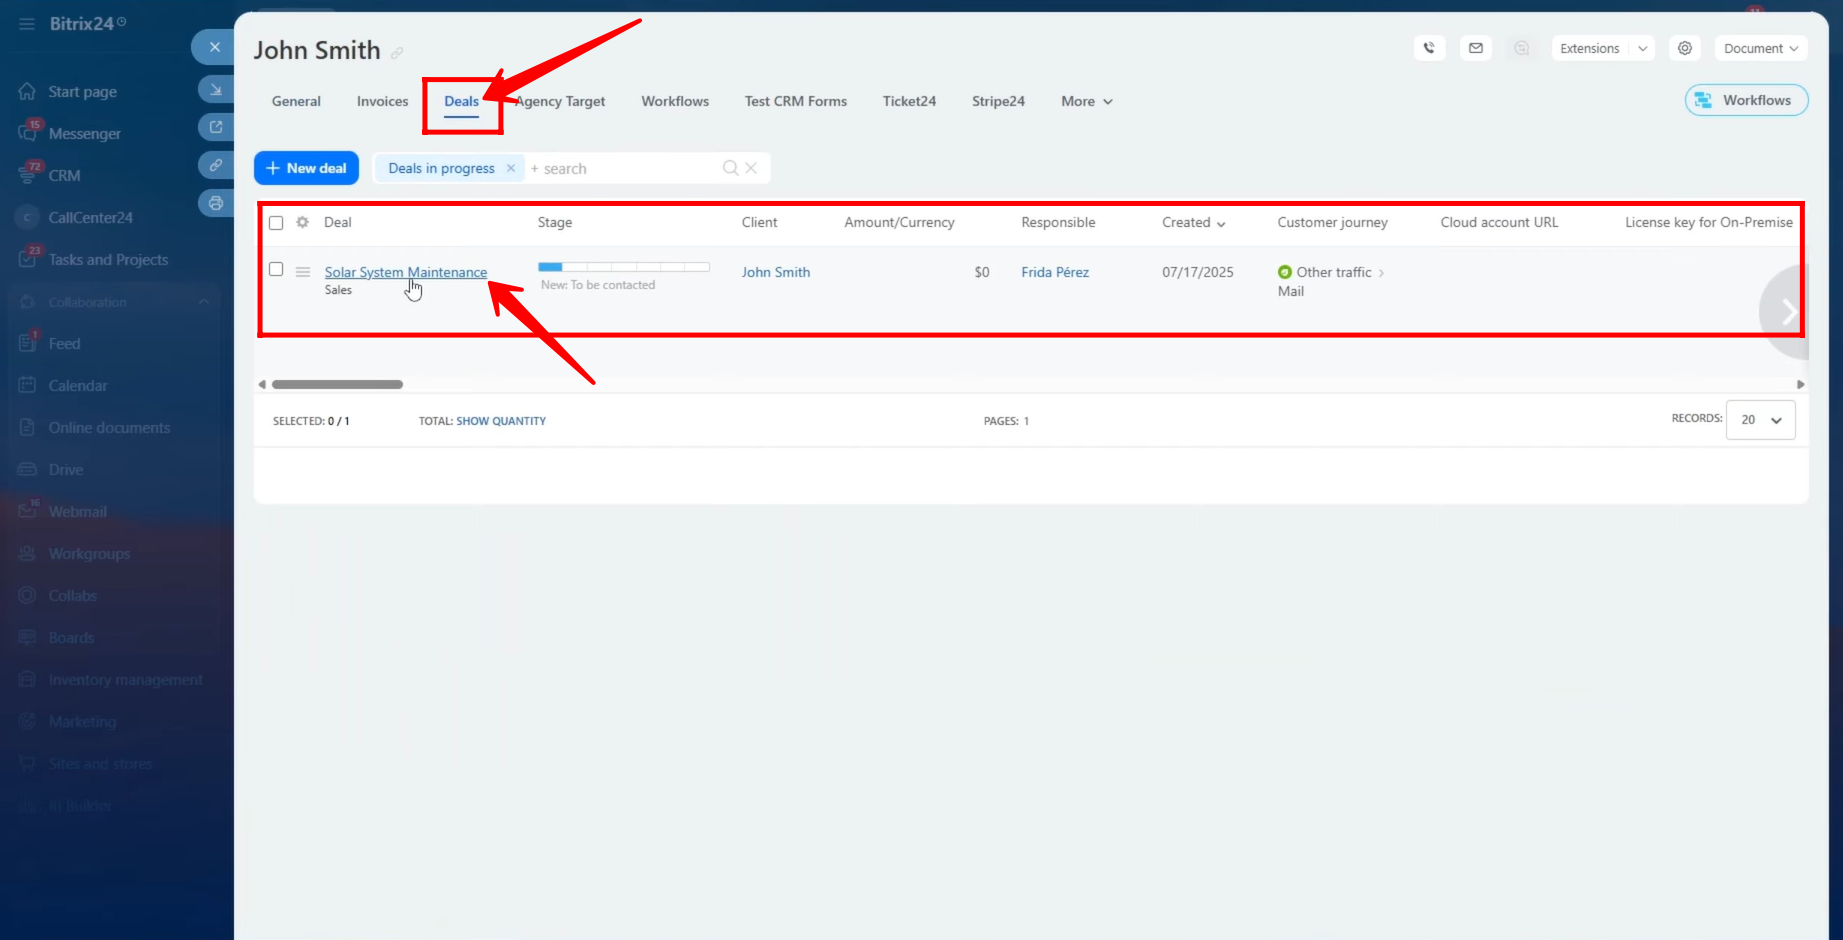
30. Go to the “Deals” tab within the contact card, and you’ll find the deal listed that was previously linked to the booking. Click on the deal to open and view its details.
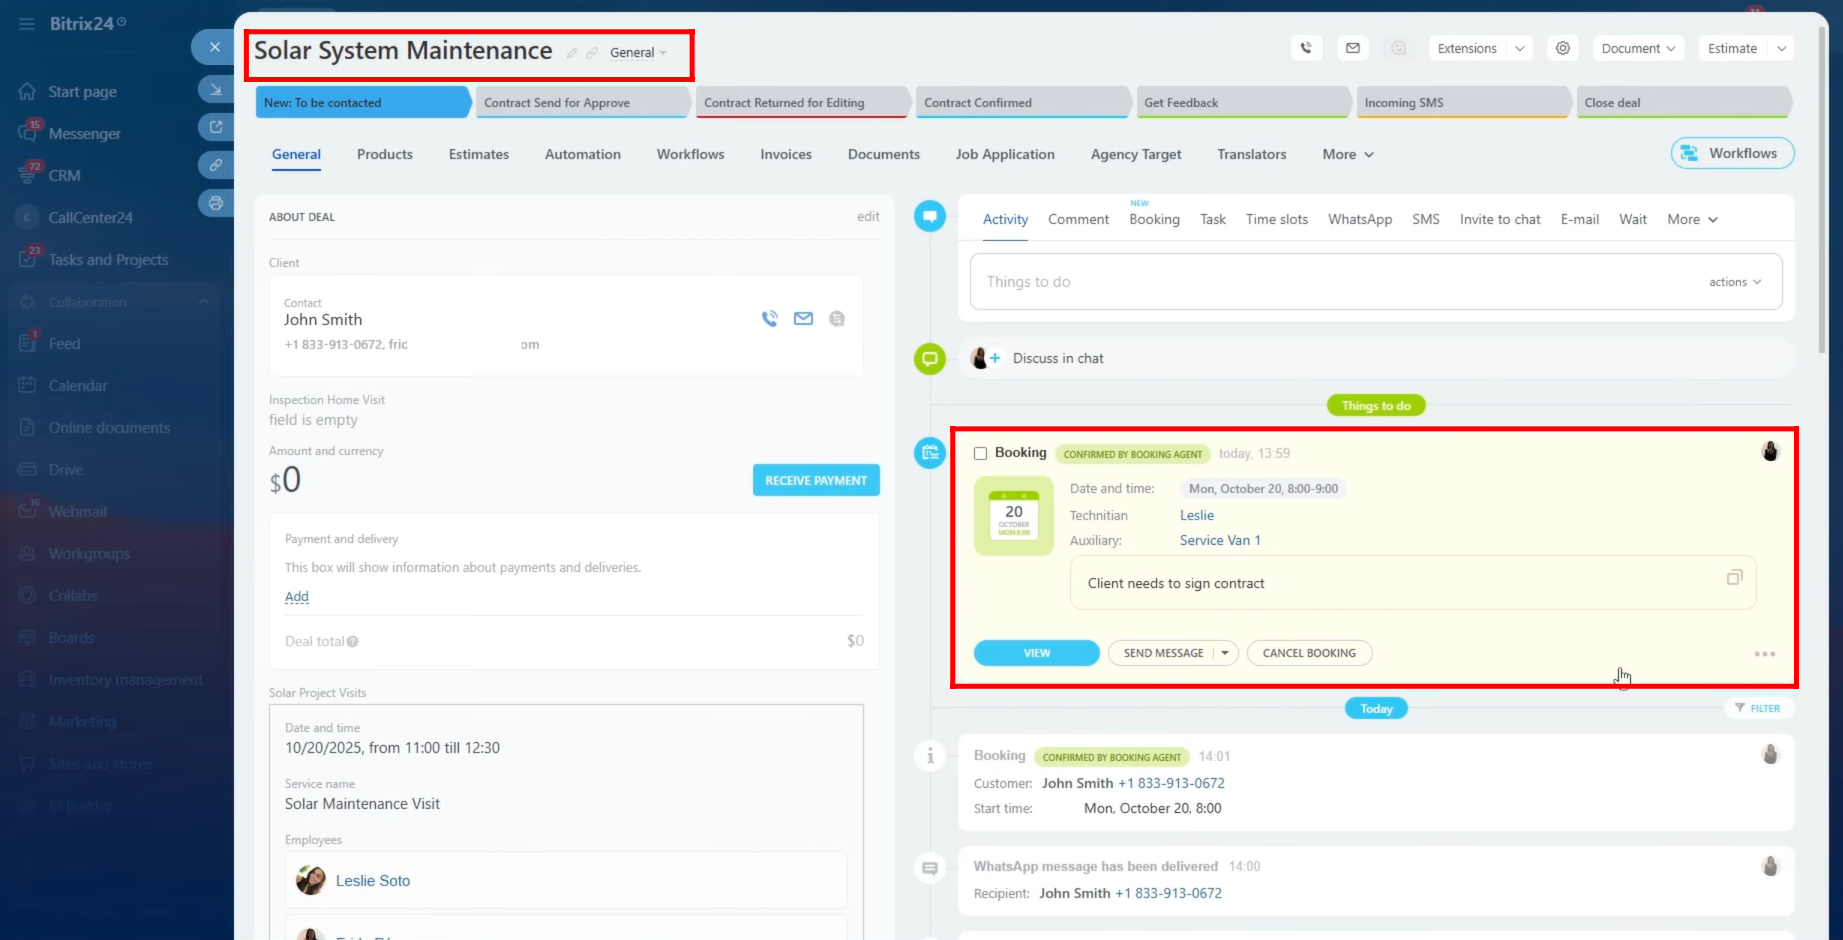
31. Within the deal card, you’ll find the booking activity listed in the activity timeline as well. From here, you can view or edit the booking details directly, ensuring that all related information is easily accessible from within the deal.
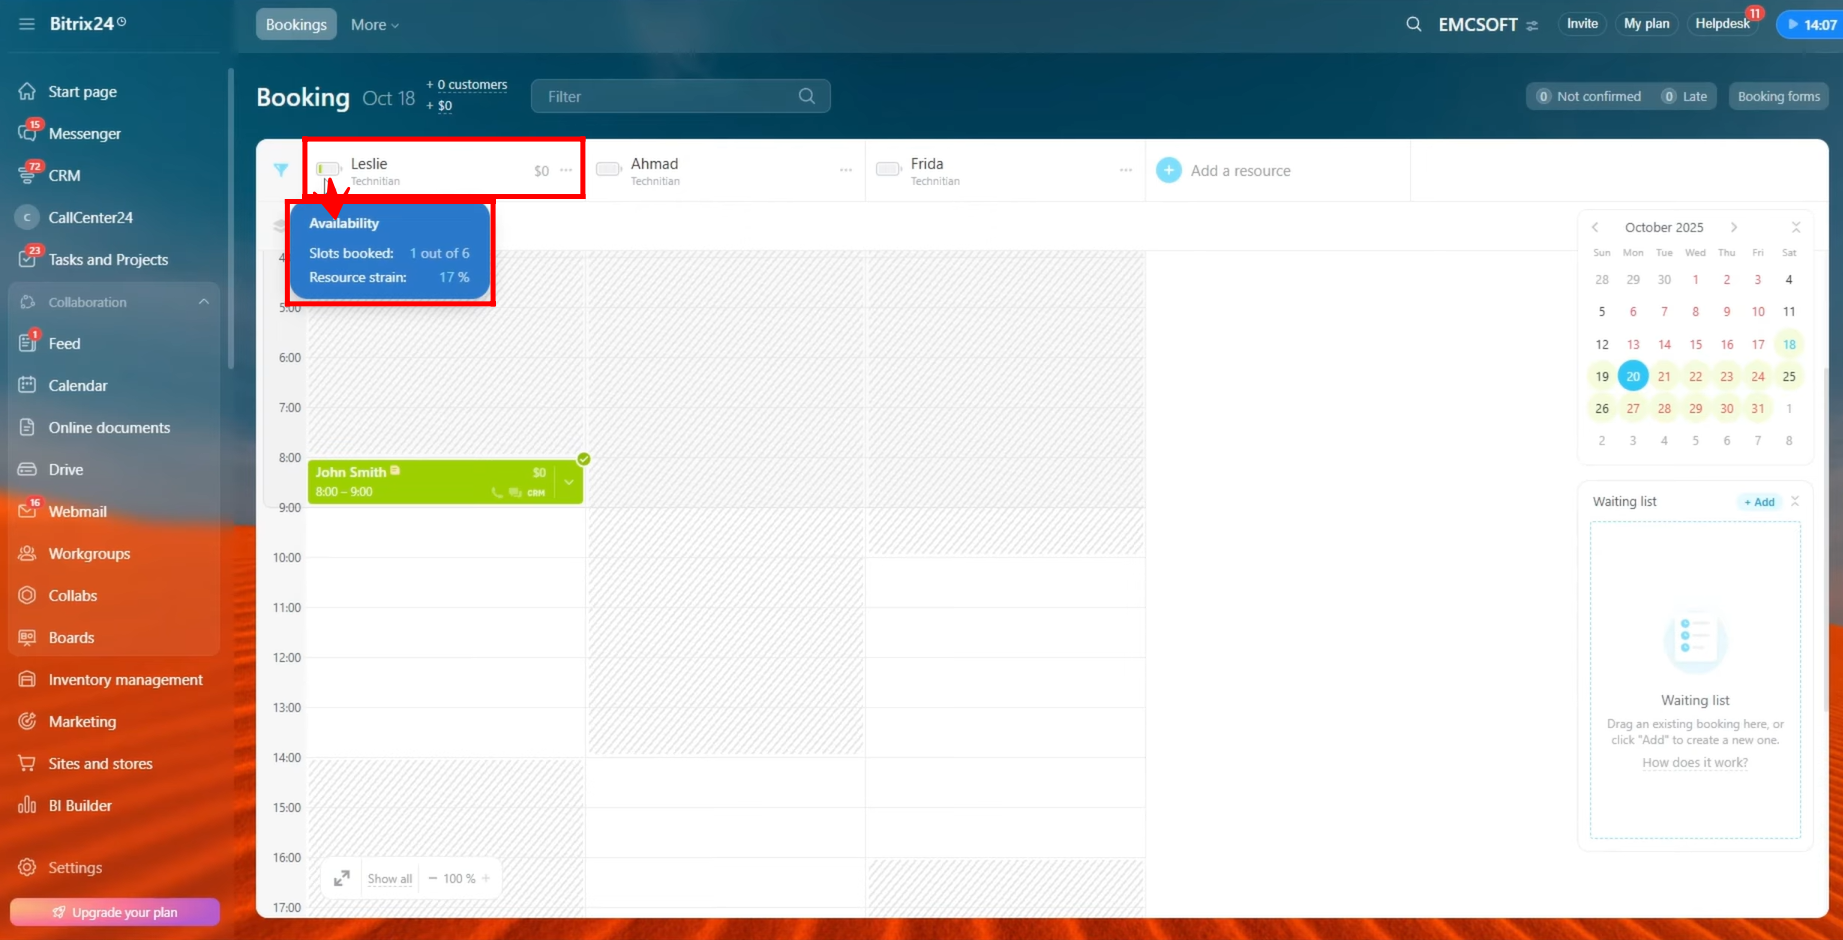
32. Within the Booking Calendar interface, you’ll notice a battery icon next to each resource’s name. This icon visually indicates the resource’s booking load for the selected date — showing how many time slots are booked and how many are still available.
For example:
Slots booked: 1 out of 6
Resource strain: 17% (displayed as battery cells or bars)
This helps you quickly assess each resource’s availability and workload at a glance.
33. You can create booking forms to link your resources and allow external clients to book them easily.
To set this up, click on “Booking Forms” in the top-right corner of the interface, then click the “+ Add” button to configure a new form.
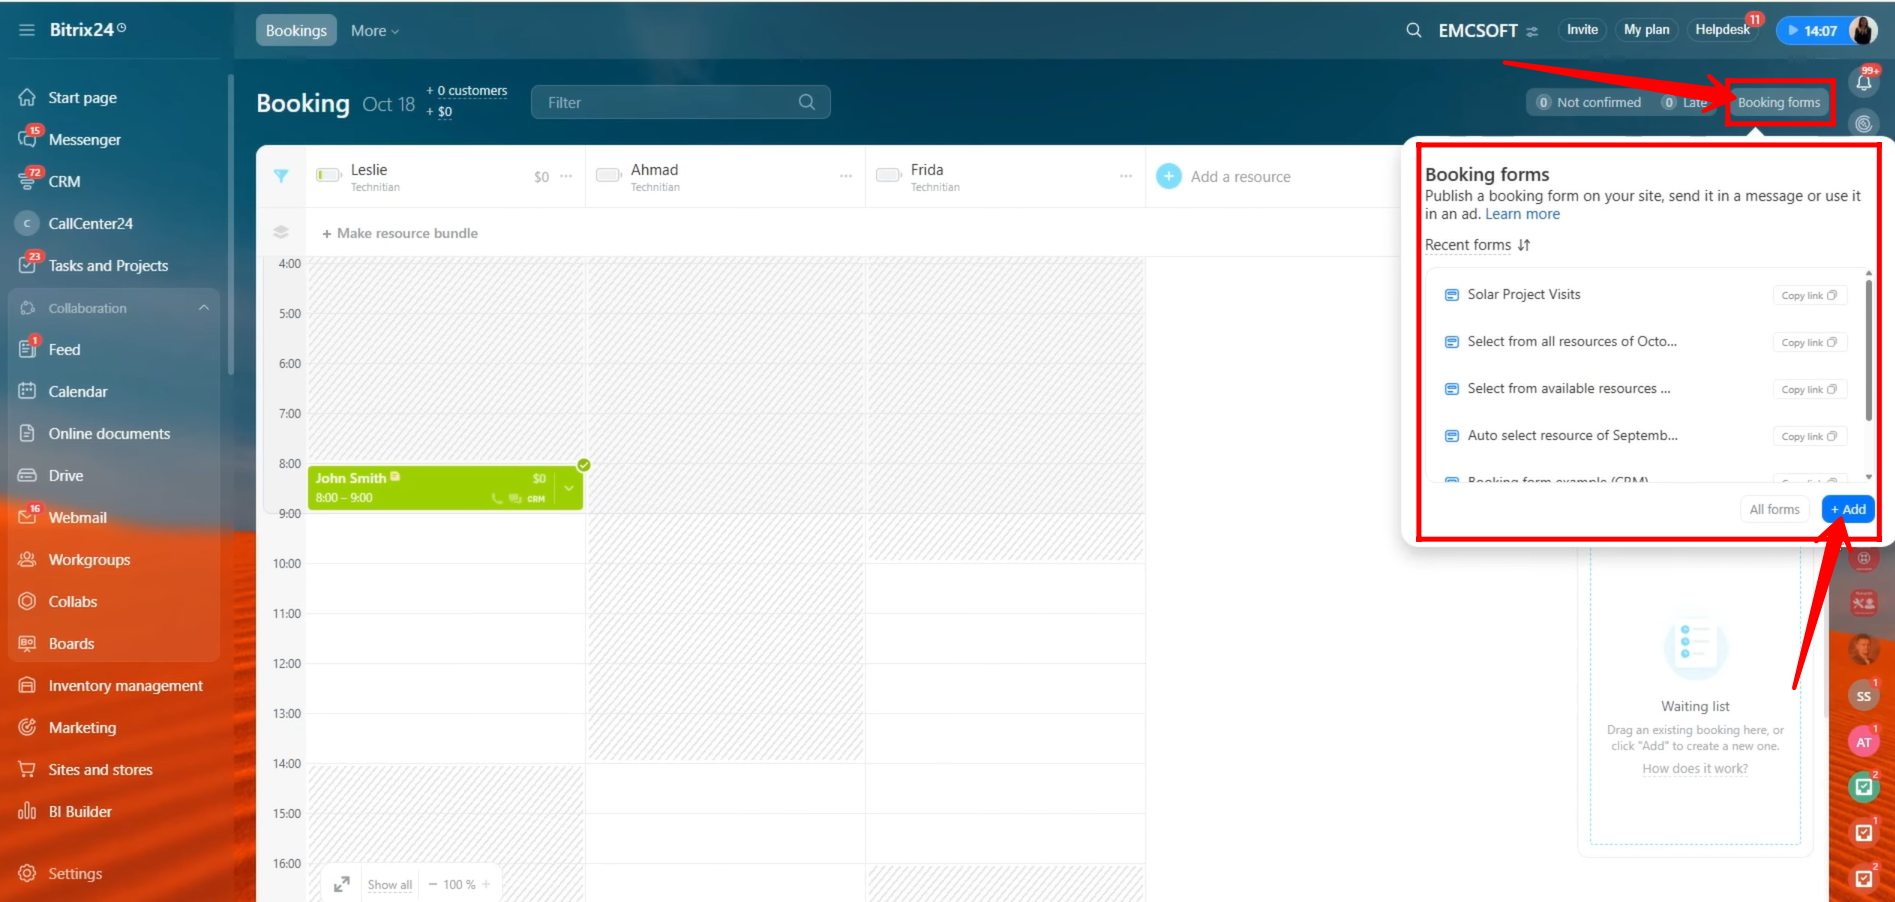
34. You can choose from three types of booking forms to configure:
- Auto-select resource
- Select from available resources
- Select from all resources
For this example, we will use the “Select from all resources” type of booking form.

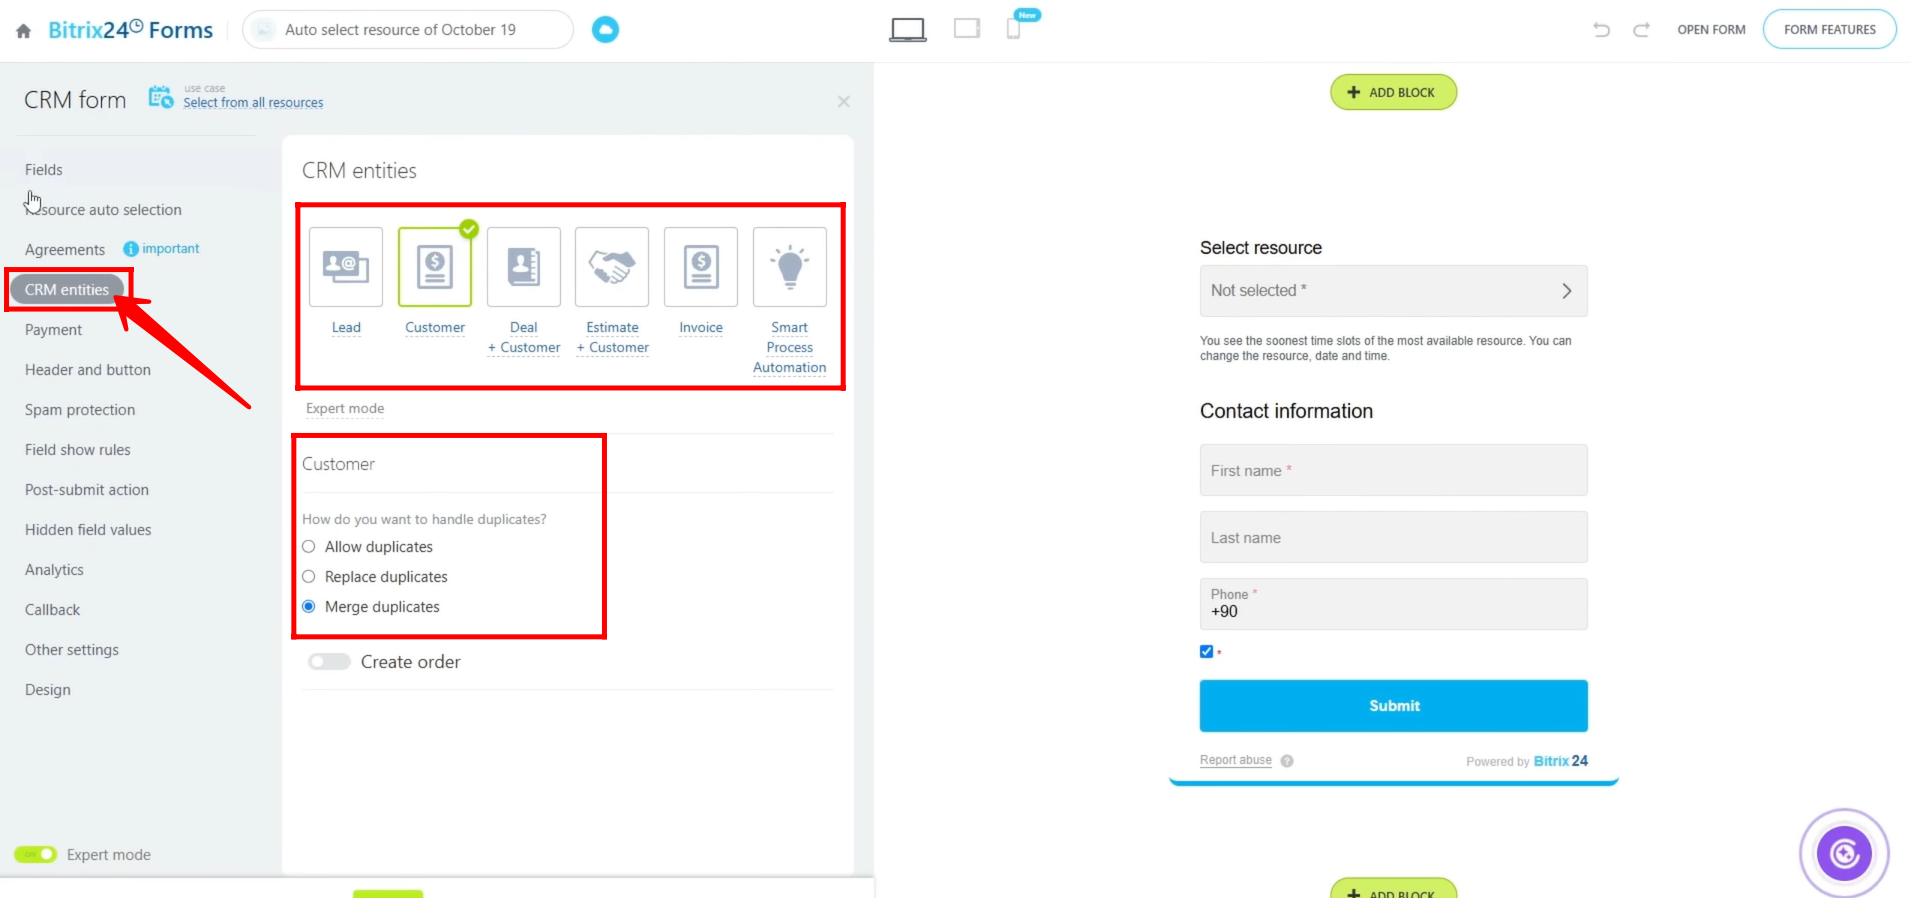
35. Go to the “CRM Entities” tab and link a specific entity—such as Lead, Customer, Deal + Customer, Estimate + Customer, Invoice, or Smart Process Automation—with the booking form. For this example, we are linking the form to the Customer entity.
In Expert Mode, you can specify how customers submitting the form should be handled. You can choose how to deal with duplicates:
- Replace Duplicates
- Merge Duplicates
- Allow Duplicates
Additionally, you can decide whether to create an order automatically when the form is submitted.
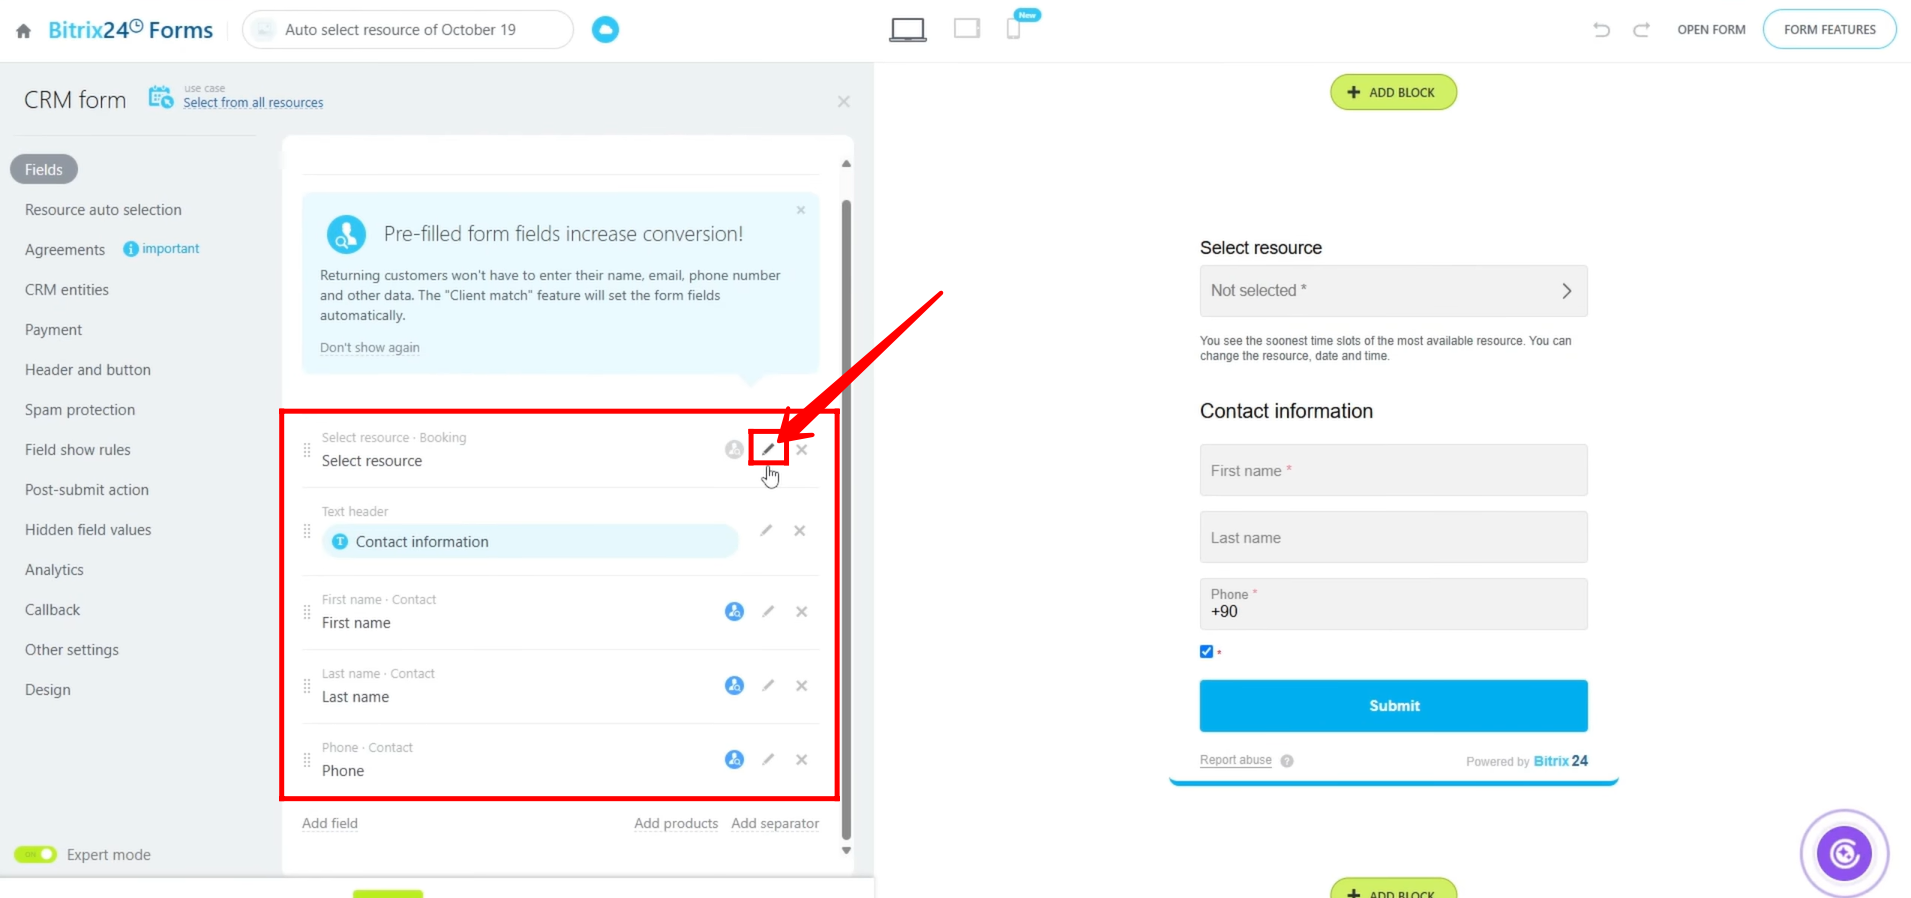
36. Go to the “Fields” tab. By default, the “Select Resource” field from the Booking entity is added. Click the pencil icon to configure this field and add the resources that customers can choose from when submitting the form.
From the Contact entity, the fields First Name, Last Name, and Phone are also included to capture basic customer information.
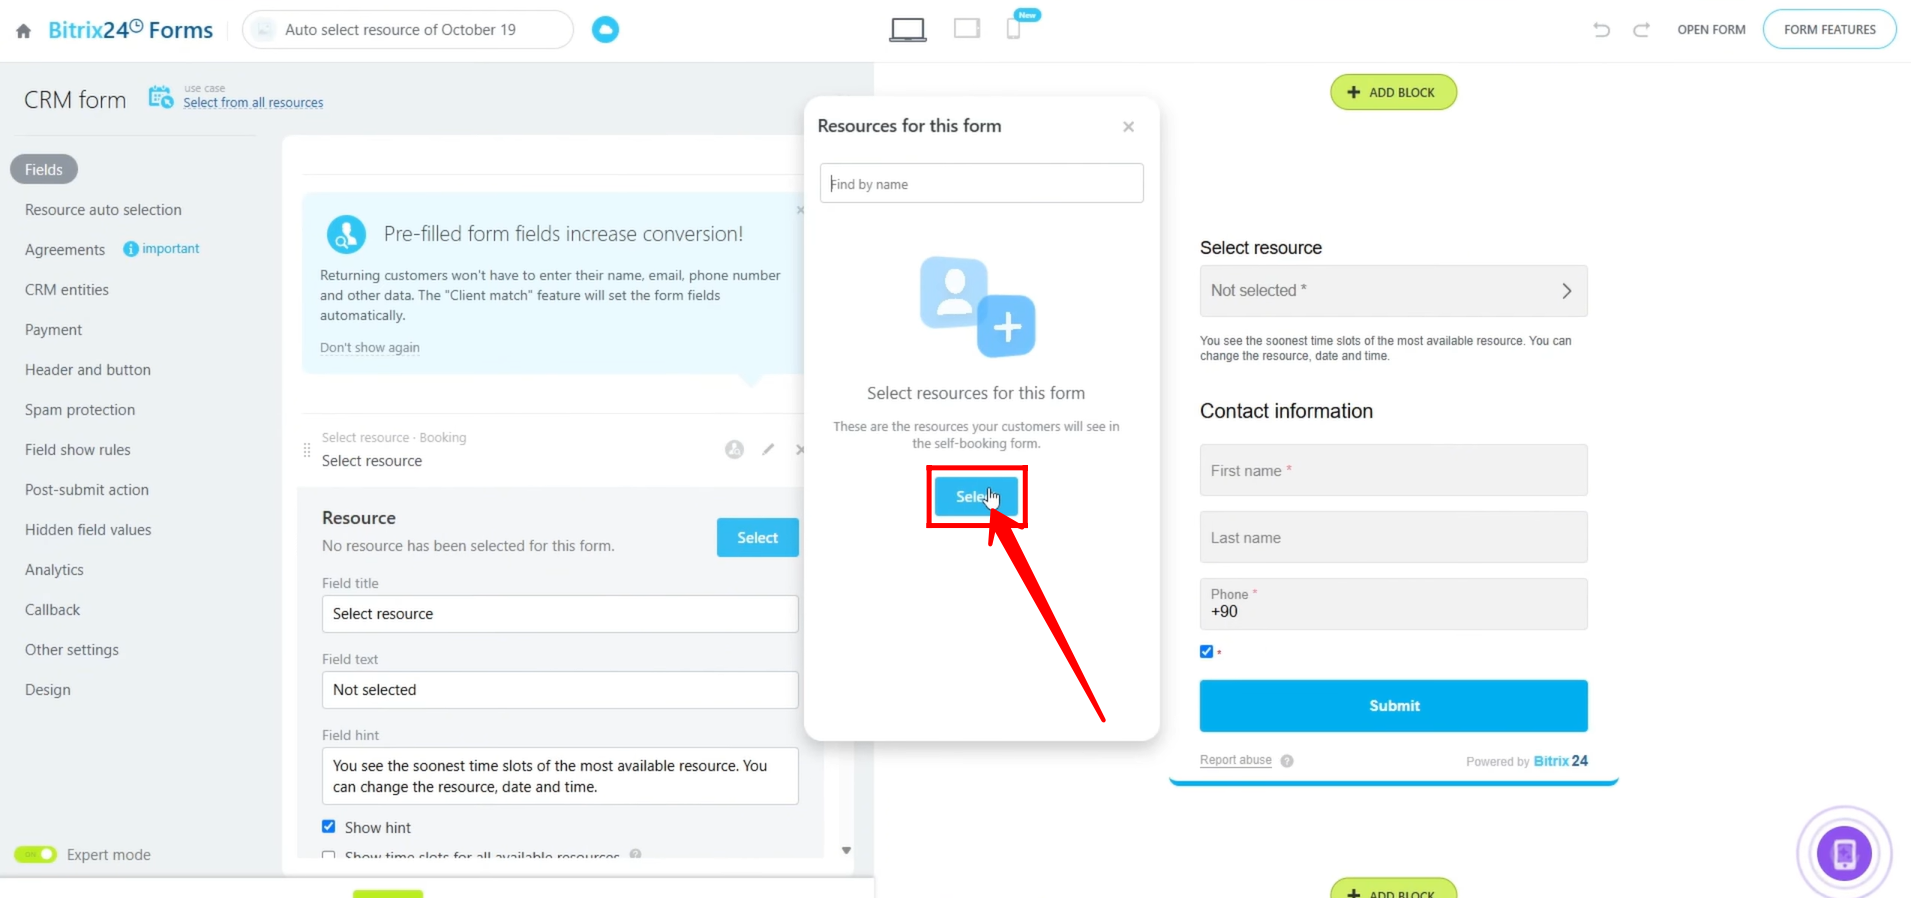
37. Click “Select” to choose and add the resources you want to include in the “Select Resource” field, allowing customers to pick from these options when submitting the booking form.
38. As you can see, three primary resources have been selected to include in the field. Auxiliary resources can also be added to this field, depending on your workflow and booking requirements.

39. In the field editing mode, you can configure several options:
- Field Title – the name displayed for the field.
- Field Text – the main text shown to the user.
- Field Hint – additional guidance for the user, with an option to show or hide the hint.
For example, we are currently editing the “Select Resource” field, which is titled “Booking Appointments (Choose a Technician)”. You can also choose whether to display time slots for all available resources within this field.
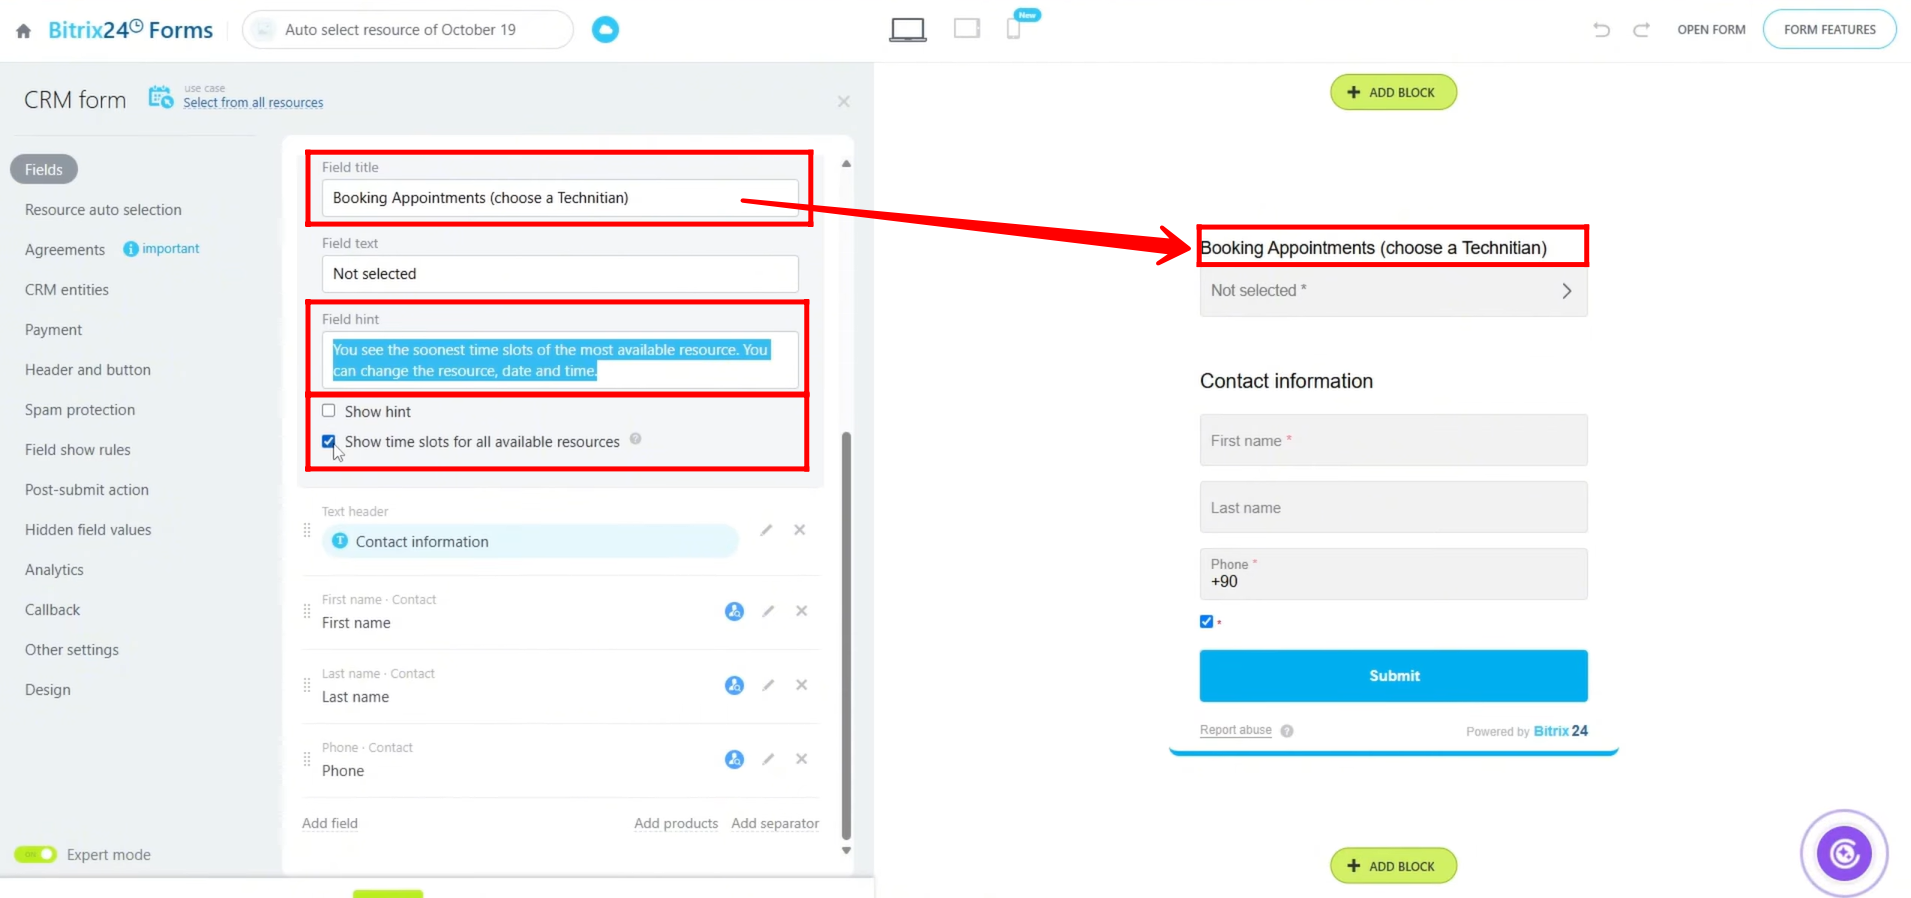
40. Let’s deselect the option “Show time slots for all available resources” and then open the form. This will allow us to observe how the form behaves without displaying all time slots for every resource, showing only the relevant options for the customer to choose from.

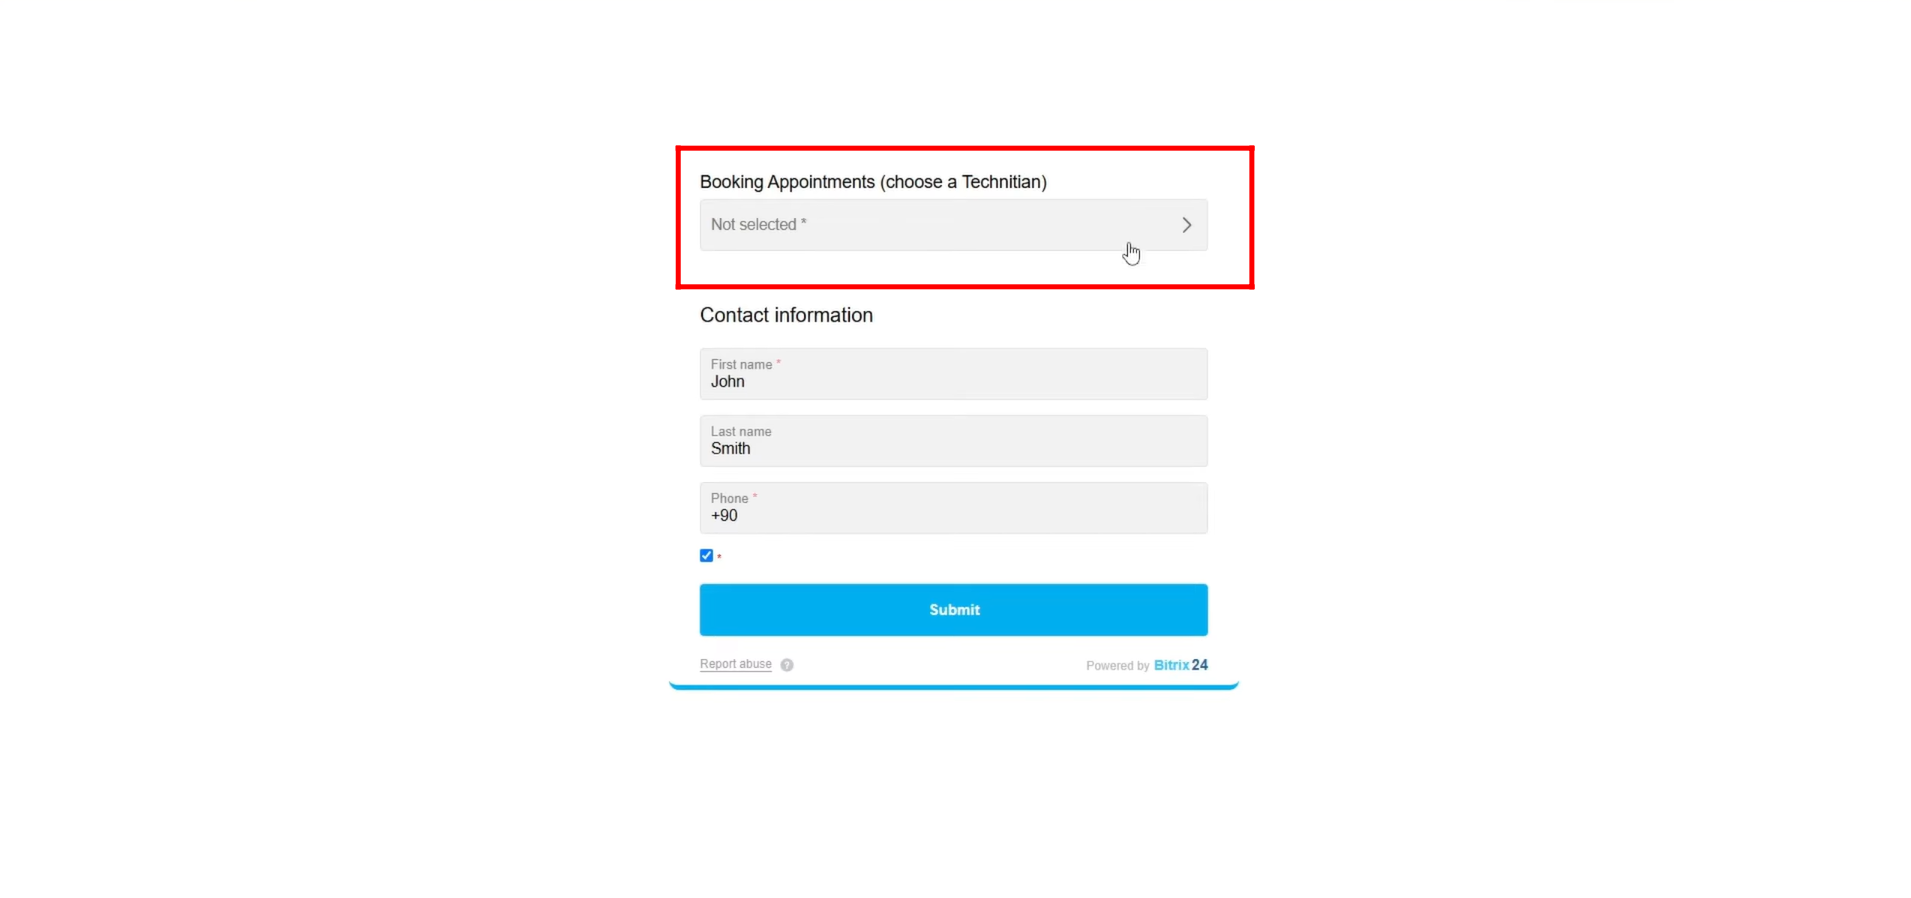
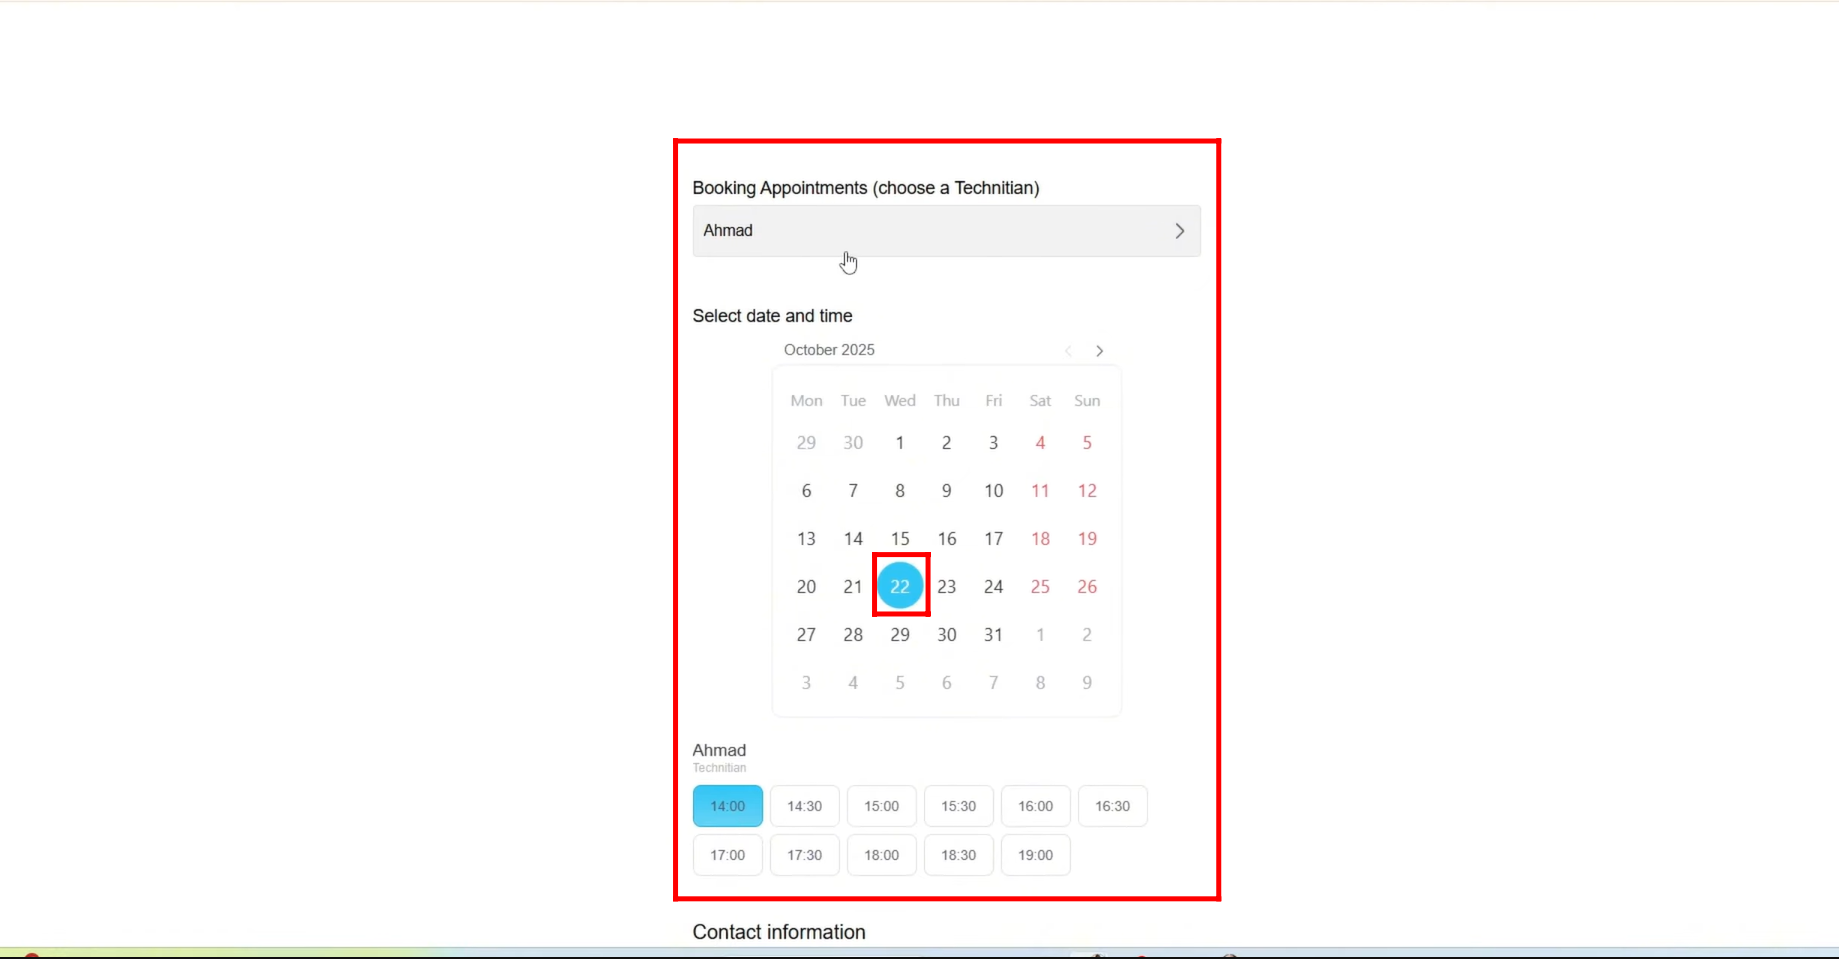
41. The form will display all the fields, but the calendar for selecting a date and time will not appear until a technician is selected from the field. By default, no technician is pre-selected, so the customer must first choose one to see the available booking slots.
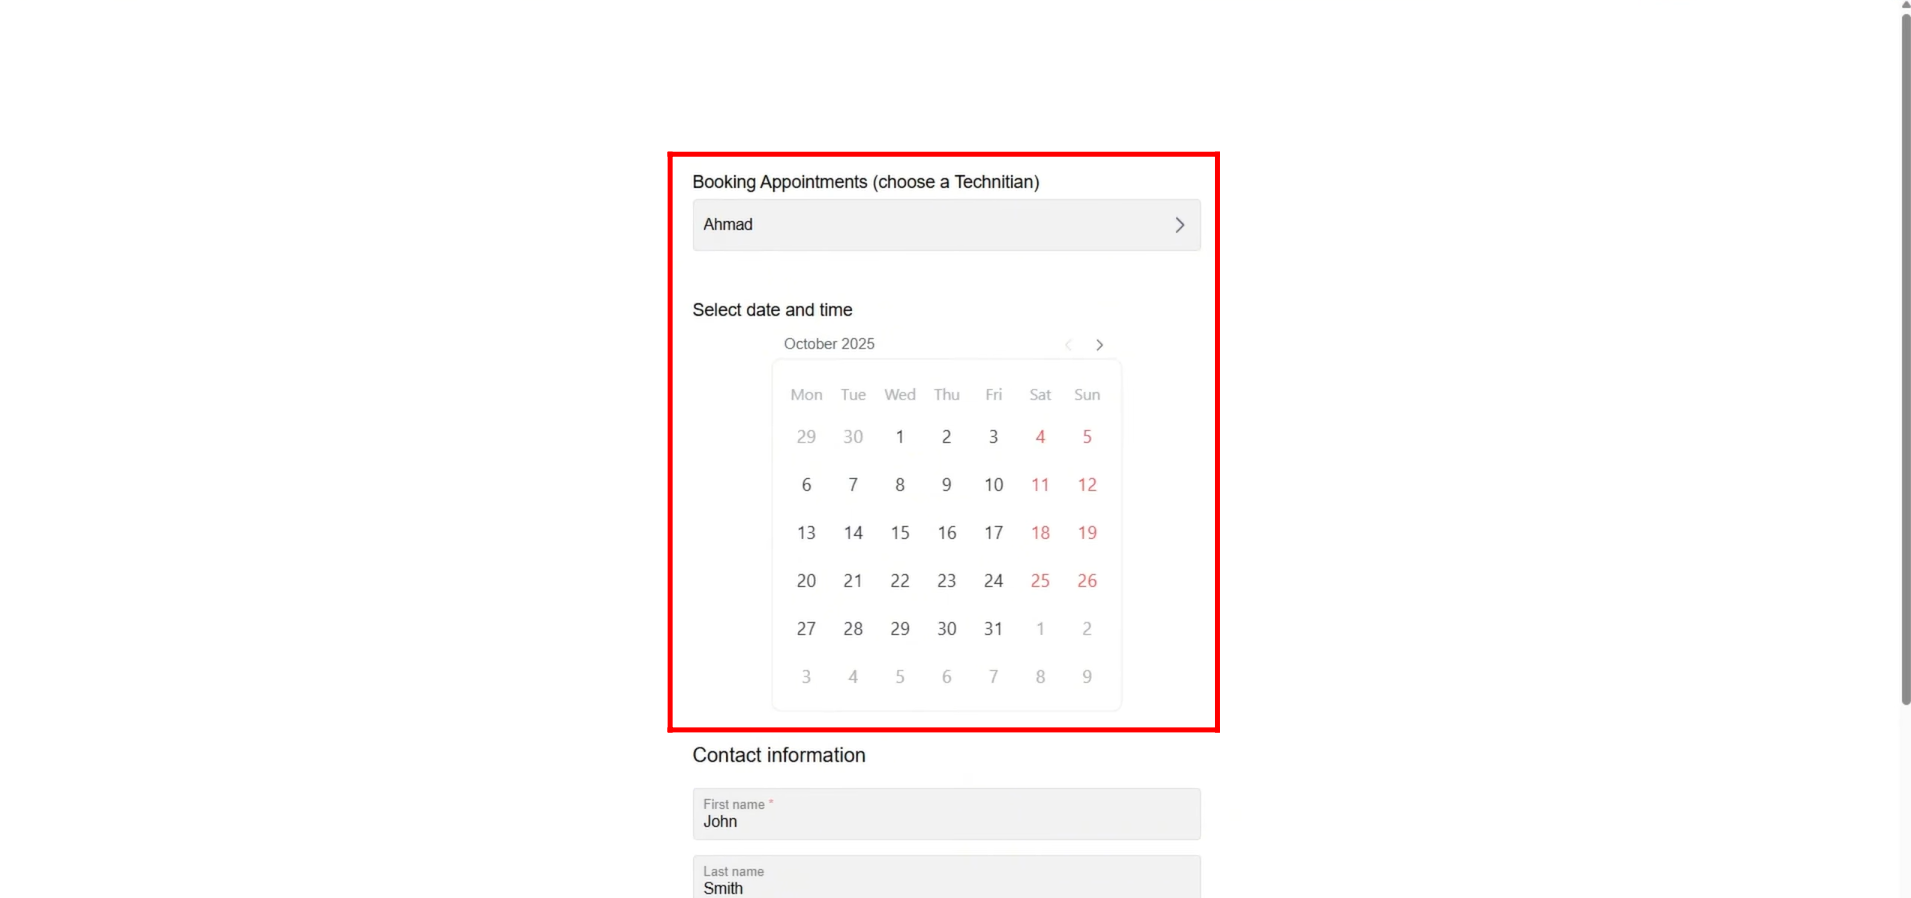
42. Now, after selecting a technician in the field, the calendar will appear. You can then choose a date, and the available time slots for that technician on the selected date will be displayed. The customer can pick a suitable slot and submit the form to book the resource.
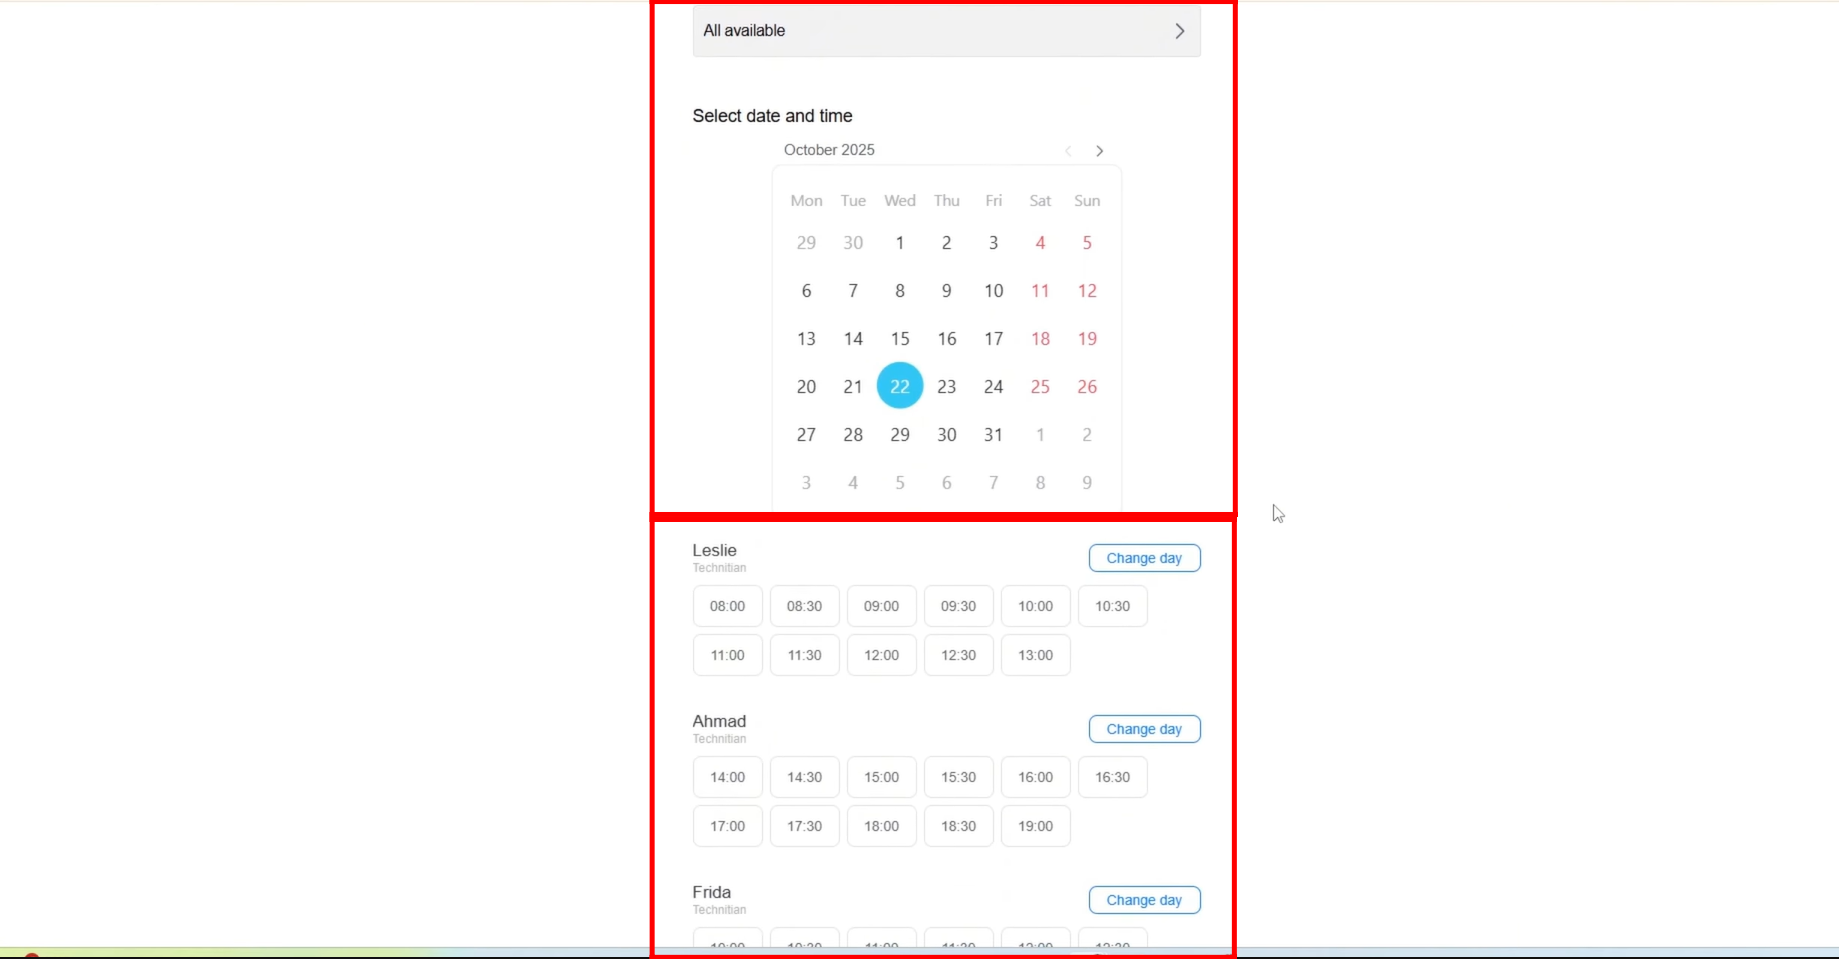
43. Now, go back to the field editing settings and select the option “Show time slots for all available resources.” Then, open the form to see how this change affects the booking interface.

44. Now, with “Show time slots for all available resources” enabled, you do not need to select a technician from the field first. The calendar will appear with the default date selected, displaying all available time slots for every resource on that date.
You can choose a different date if desired, and the form will show all technicians’ available slots for that day. Alternatively, you can still select a specific technician in the field to filter the slots to only that technician. Once you pick a slot, you can submit the form to book the resource.
45. Here, a technician has been selected in the field, and a specific date has been chosen. As a result, the form now displays only the available time slots for that technician on the selected date.
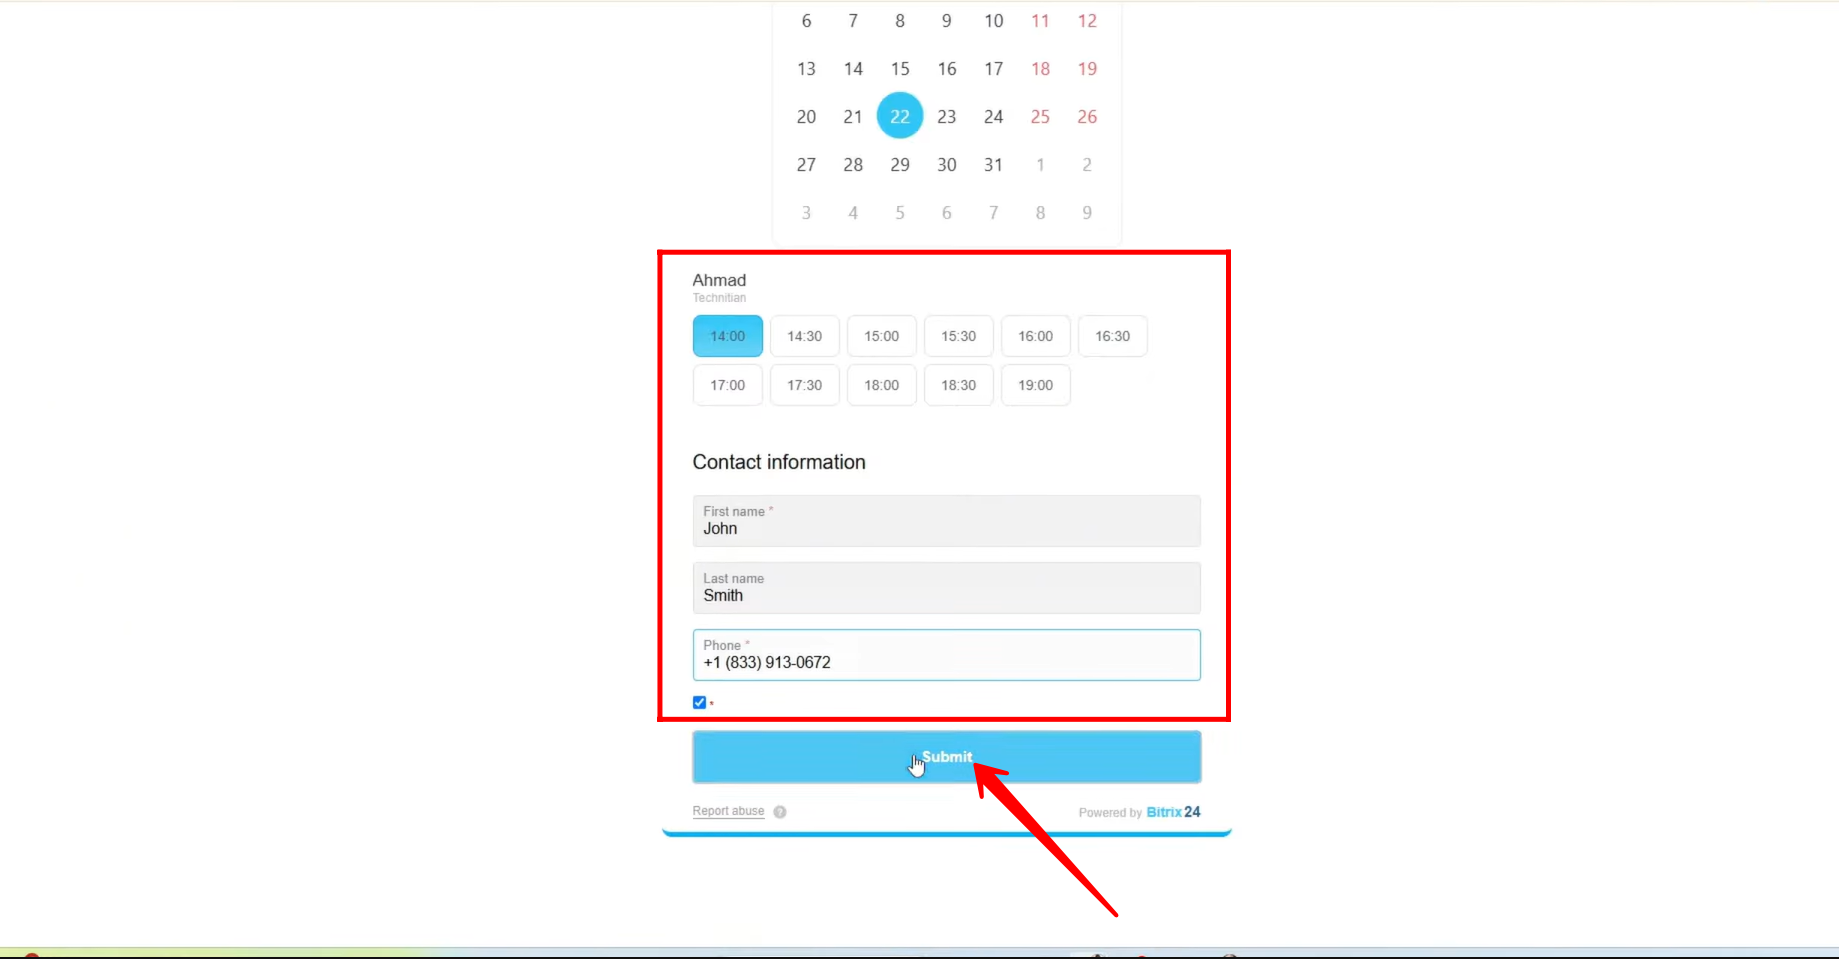
46. One of the available slots for the selected technician/resource has been chosen, and the basic contact fields have been filled out. The form is now ready, and you can submit it to complete the booking.
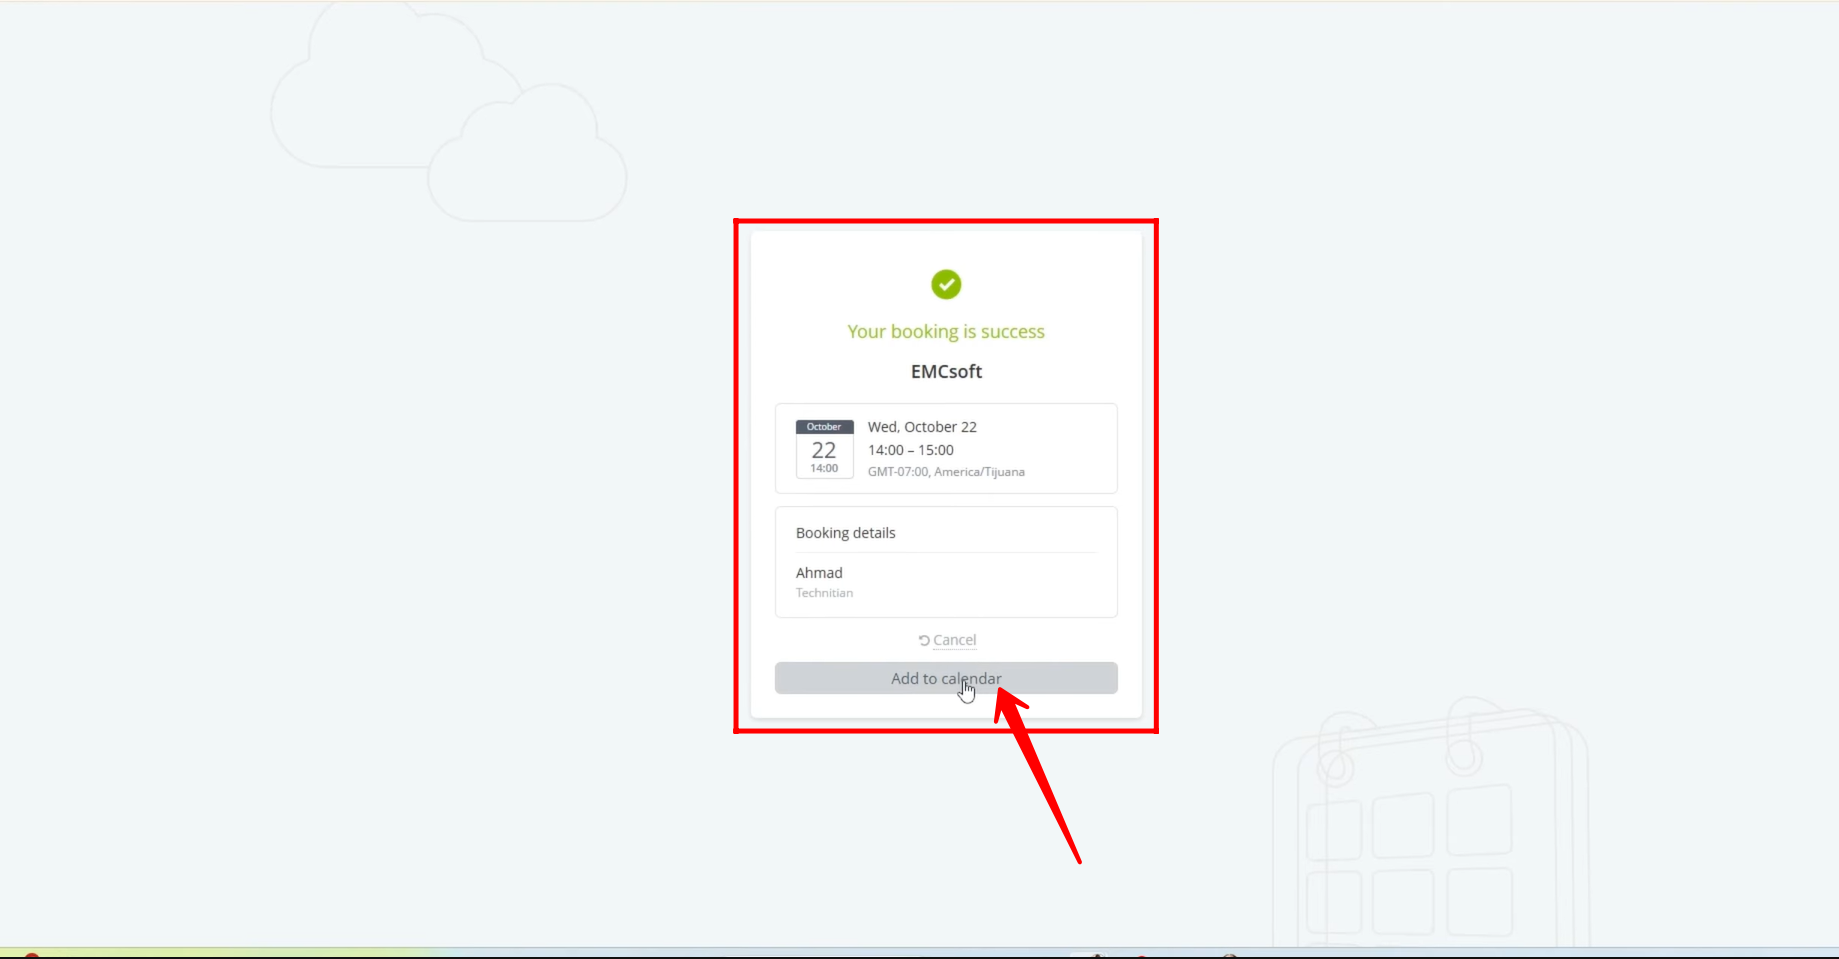
47. After the customer submits the booking form or books a resource, they will receive a “Your booking is successful” confirmation. They can click on “Add to Calendar” to download a booking file, which can then be imported into any external calendar, such as Google Calendar, to reserve the slot there as well.
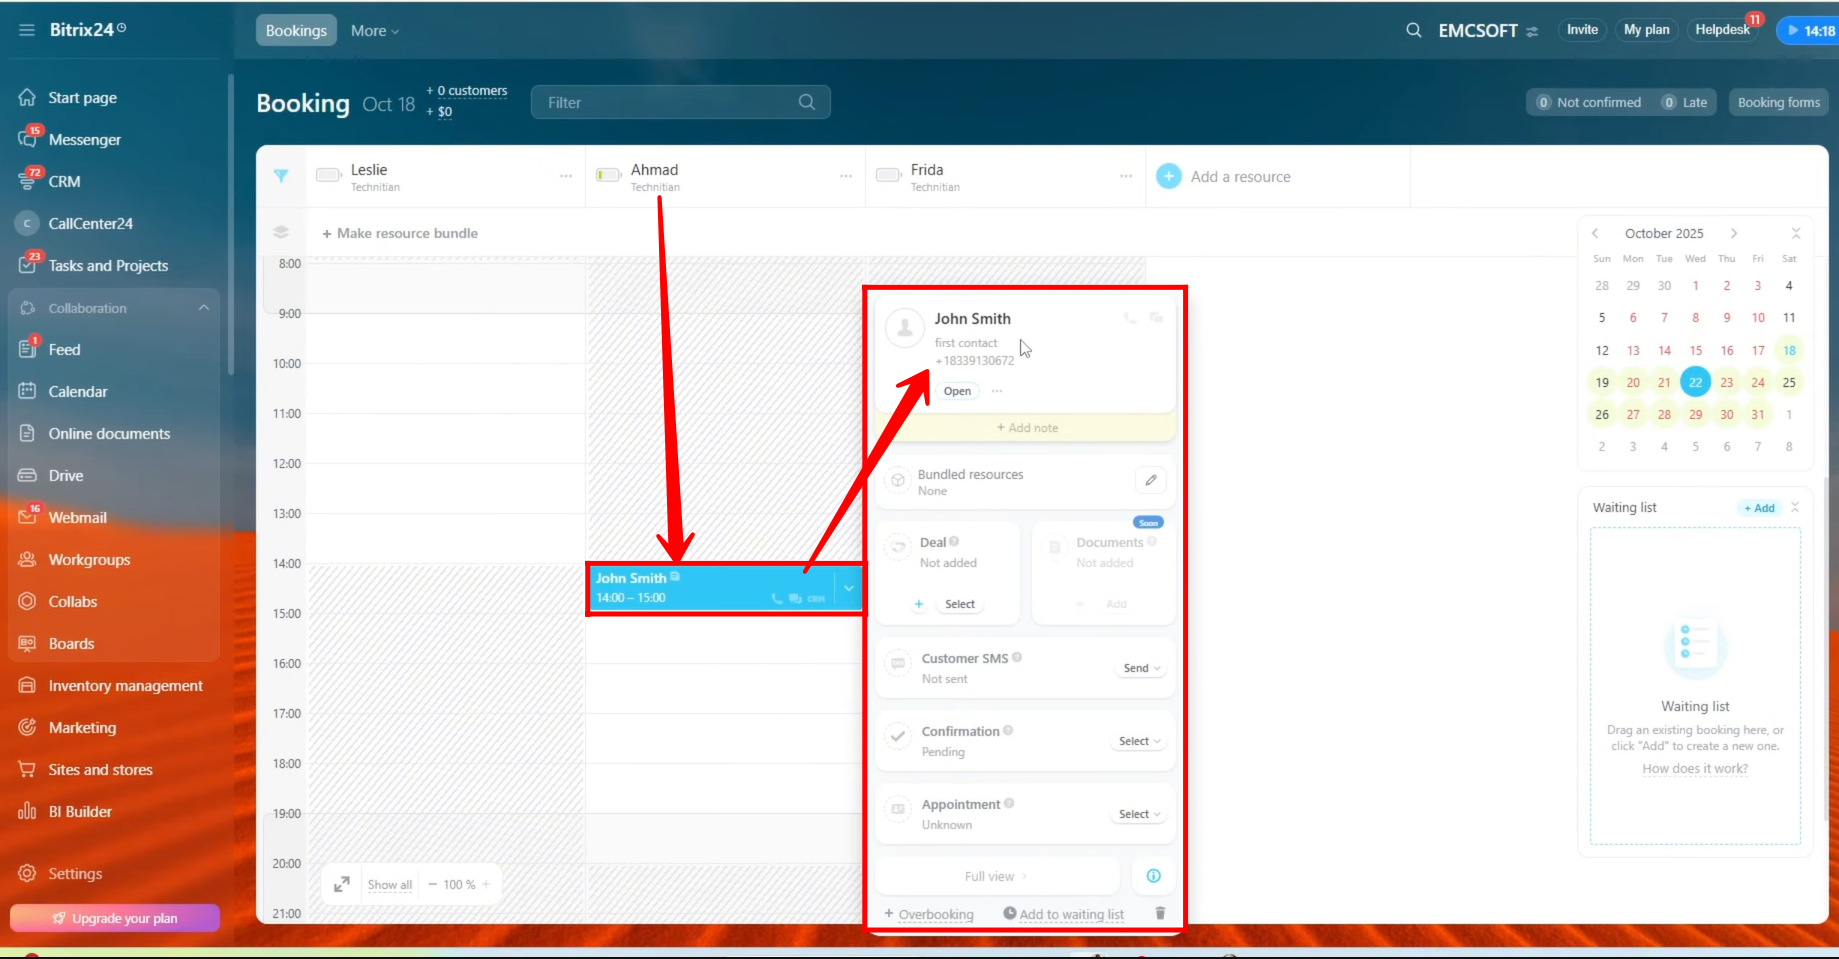
48. Go back to the Booking Interface, and you’ll see that the resource is now booked at the selected time. Click on the booking to view its details, and you can see that the contact submitted through the form is attached. If the contact already exists in Bitrix24, it will be merged as a duplicate based on the system’s duplicate handling settings.
49. Here, you can click on the edit icon to bundle this booking with another resource, such as an auxiliary resource, allowing multiple resources to be booked together for the same appointment.
50. Click on the three dots next to the resource name to edit the visibility settings of the resource on users’ calendars. This allows you to control who can see the resource and its availability.
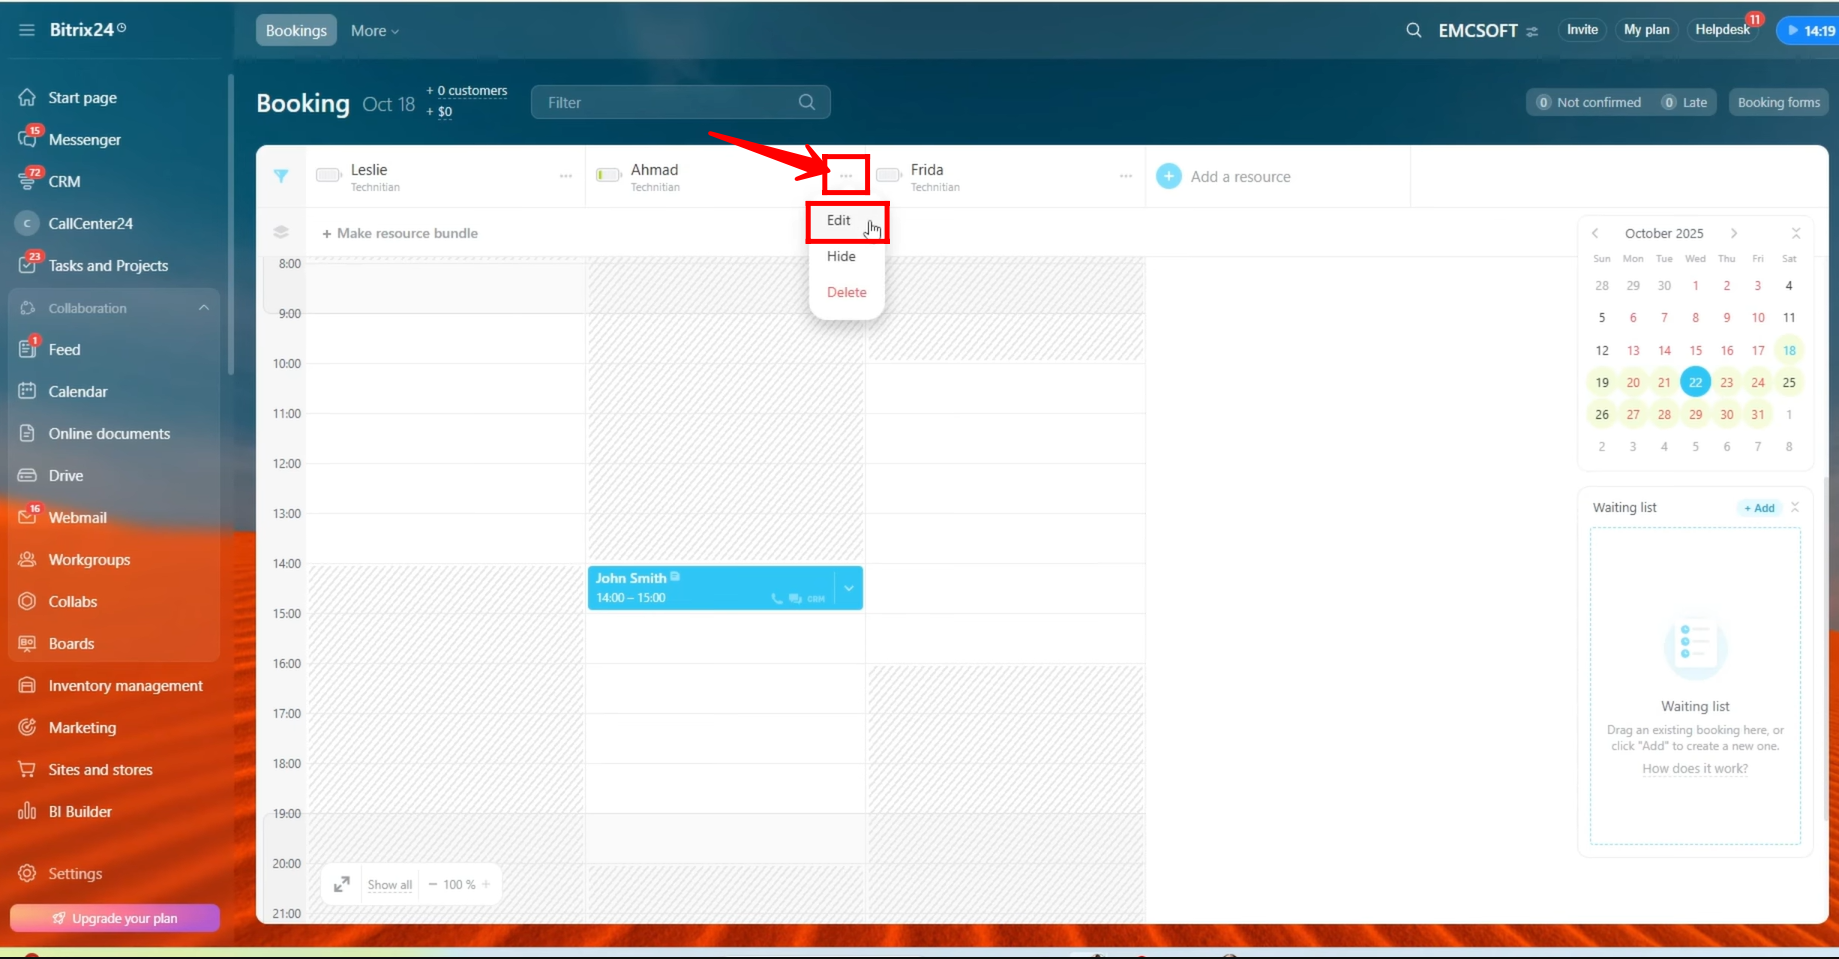
51. Here, you can see that we have selected a user’s calendar to display the bookings of the chosen employee whose details are currently being edited. This allows the selected user to view the employee’s scheduled bookings directly in their calendar.

52. Go to the native “Calendar” option in Bitrix24 (not the Booking module). Here, the user can view multiple employees’ bookings, with each employee’s schedule shown in different color variations. This is possible because the user has access to view the bookings of multiple employees.
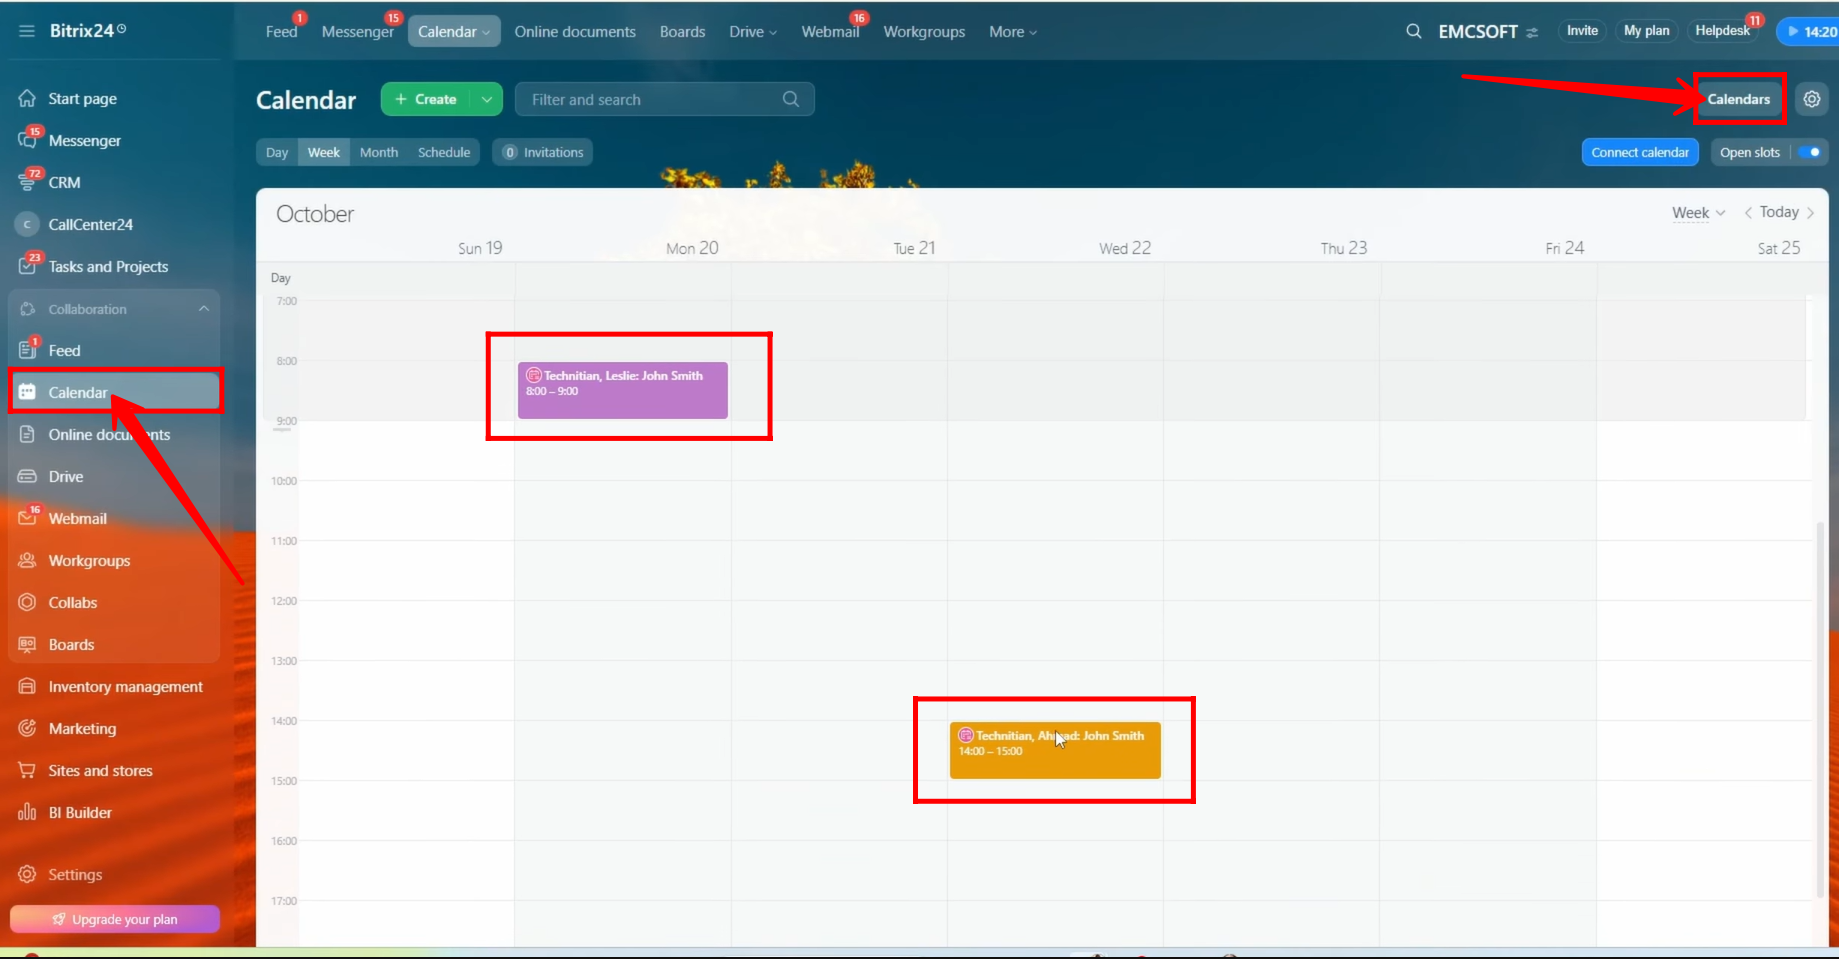
53. By clicking on a booking, the user can view the details of the booked resource, including:
- Event Source: Booking
- Customer Details
- Resources involved (whether primary, auxiliary, or both)
- Attendees
- Date and Time of the booking
This provides a complete overview of the appointment directly from the calendar.

“You can also watch video on Youtube”