| 820 Views | admin

The Product Catalog and Inventory Management section in Bitrix24 allows organizations to efficiently manage products, services, sections, SKUs, stock details, taxes, and product-related CRM workflows from a centralized system. By properly structuring sections and product variations, businesses can organize inventory in a scalable way while maintaining detailed information for each product variation, including stock availability, images, custom fields, and SKU properties.
This article explains how to create and manage sections, products, custom product properties, SKU variations, taxes, and permissions within the Bitrix24 Product Catalog. You will also learn how different SKU property types such as List and Dictionary can be configured and used to manage product variants more effectively, including visual variations like colors and patterns, as well as text-based identifiers such as dimensions or manufacturers.
Additionally, this guide demonstrates how products and product variations interact with CRM entities such as Leads, Deals, Estimates, and Invoices. You will learn how linked products are automatically transferred between CRM entities during conversions and document generation processes, helping maintain consistency throughout the sales workflow.
The article also covers advanced configurations such as tax management, access permissions, product filters, SKU property management, and custom property creation. These configurations help businesses customize their inventory system according to operational requirements while ensuring products, pricing, stock information, and taxation rules are managed accurately across the CRM environment.
“Detailed Instructions are given below”
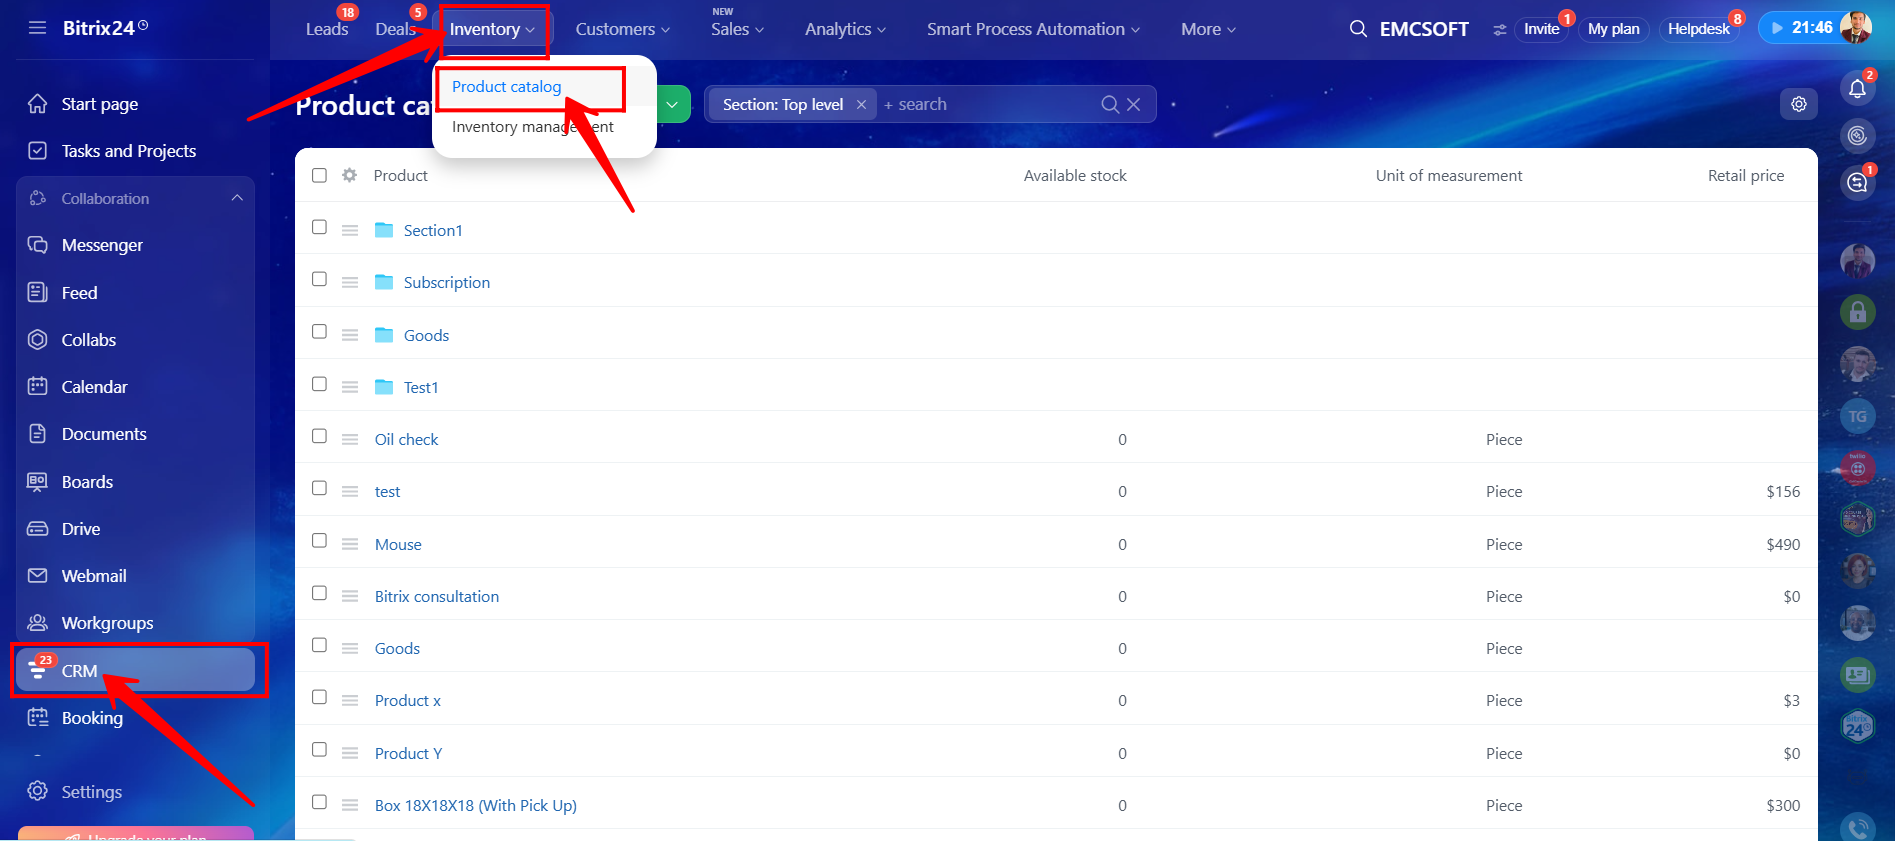
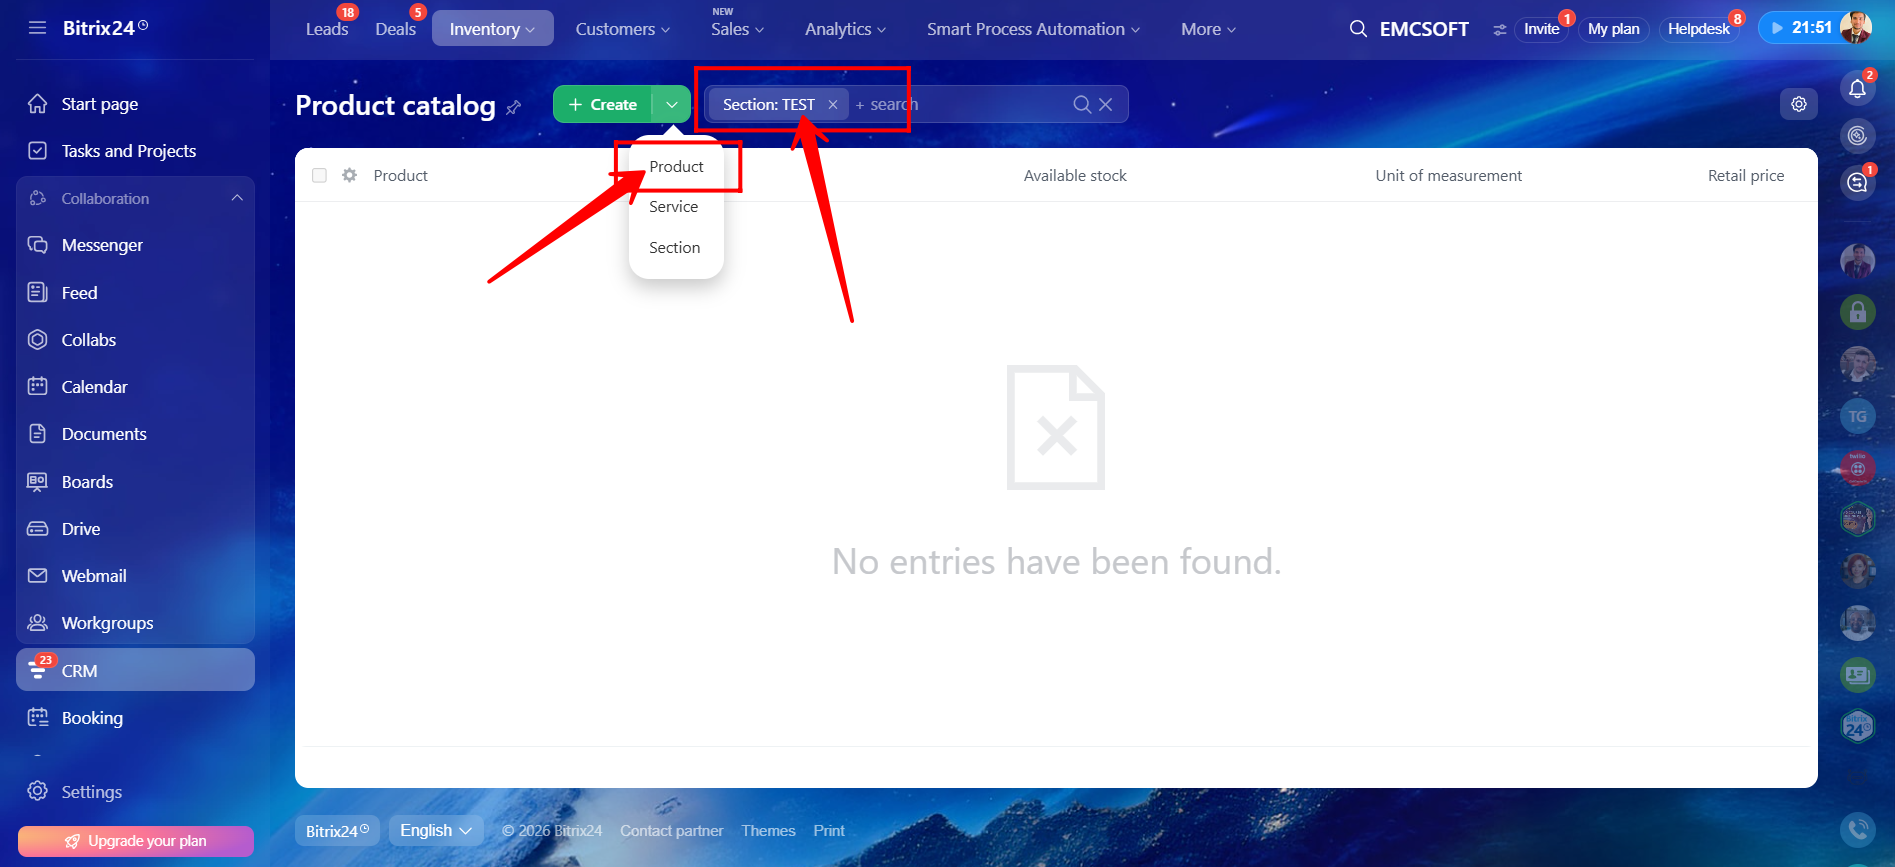
1. Navigate to CRM. Then move to the Inventory option and click Product Catalog.
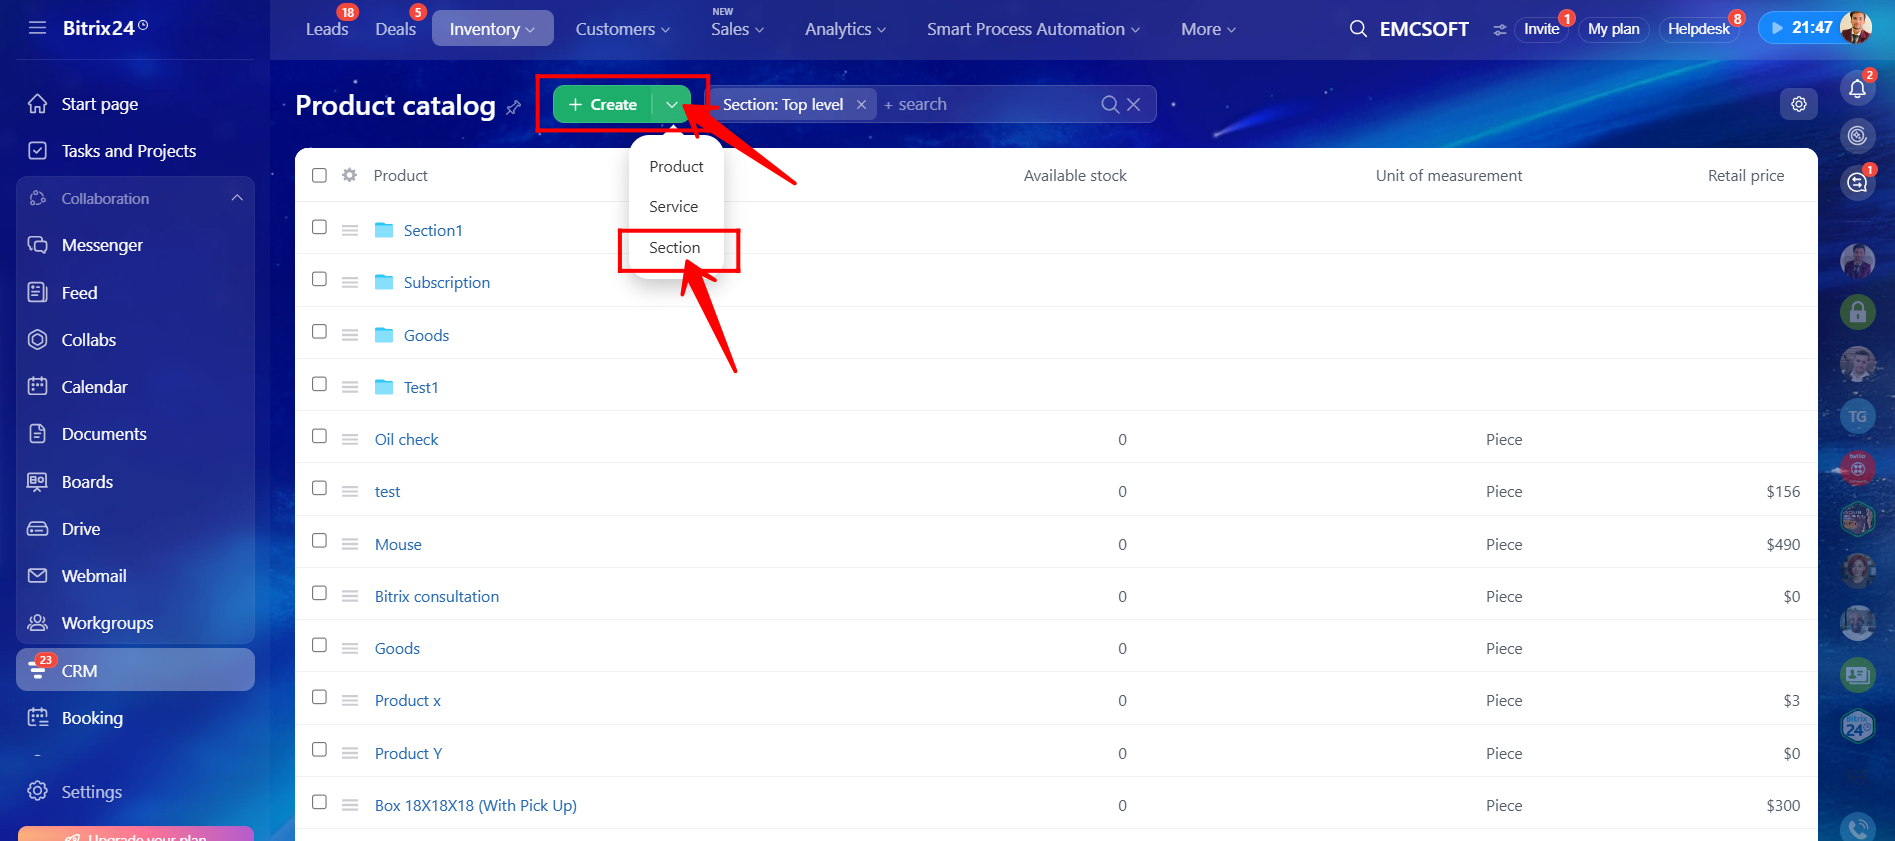
2. Here, you can create different types of entities depending on your requirements, such as a Product, Service, or Section. In this example, we will create a Section.
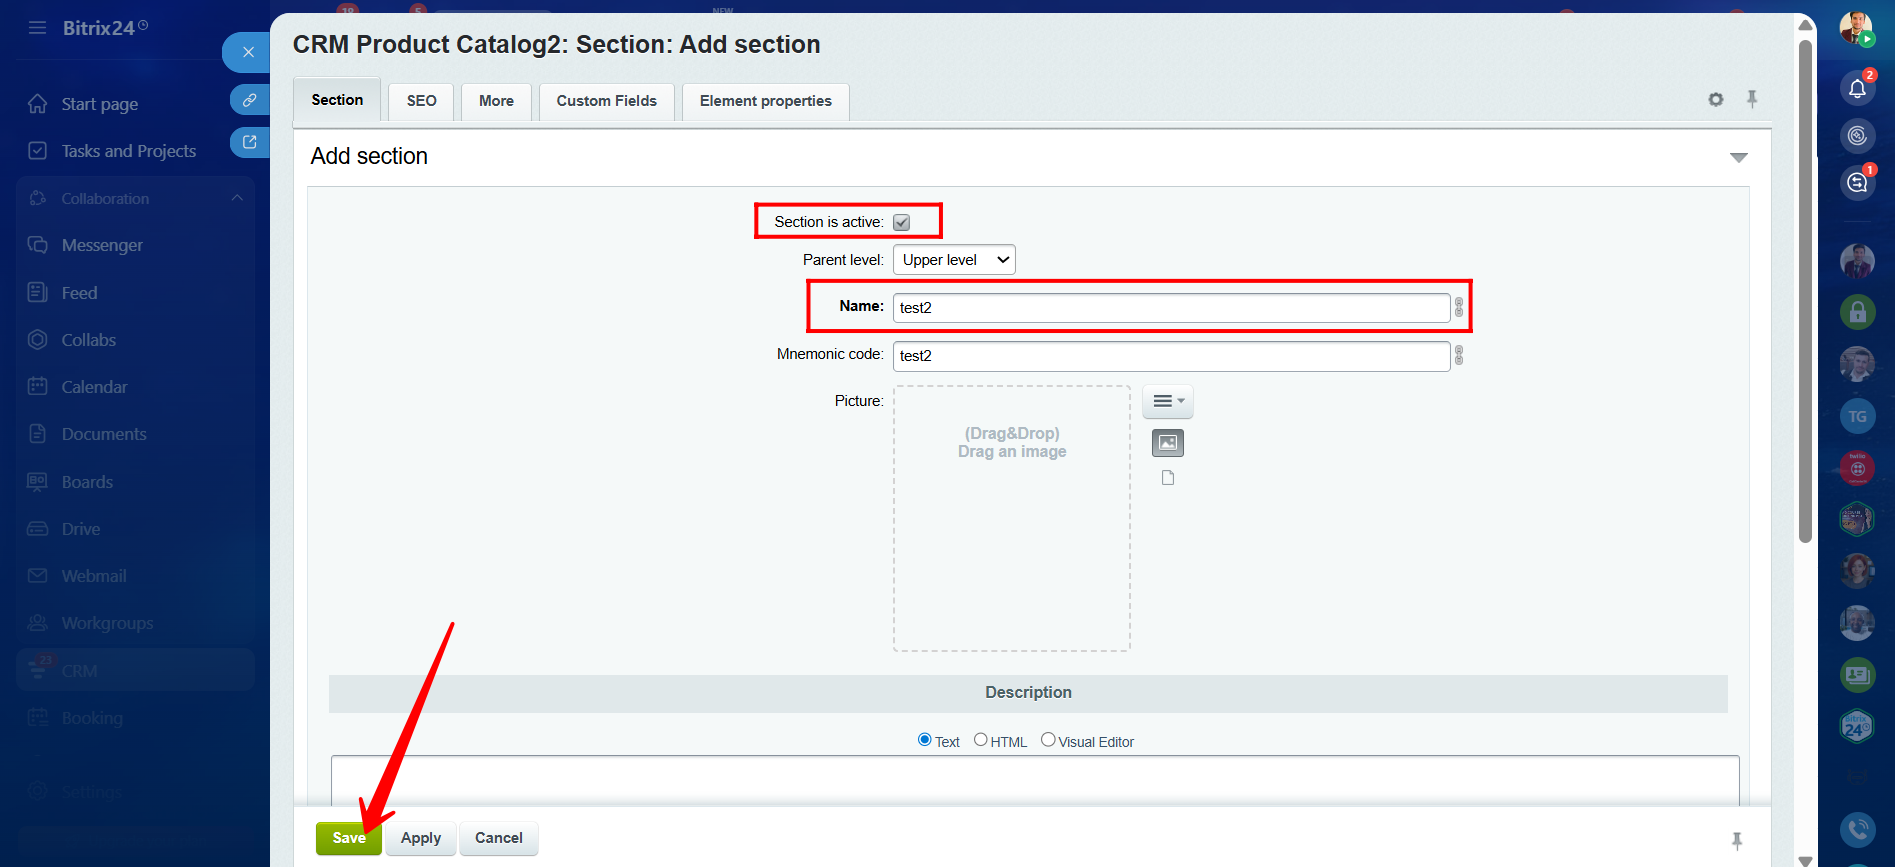
3. While creating the section, make sure to mark it as Active so it can be accessed within inventory management areas. Select the appropriate parent level and enter the section name. You may also upload a specific image or logo for the section. Additionally, you can configure SEO fields, create custom fields specifically for products within this section, and define element properties. After completing the configuration, click Save.
4. The section named TEST has now been created. Currently, we are at the top level of the section hierarchy. The parent level simply determines whether the section is created at the highest level or inside another section.
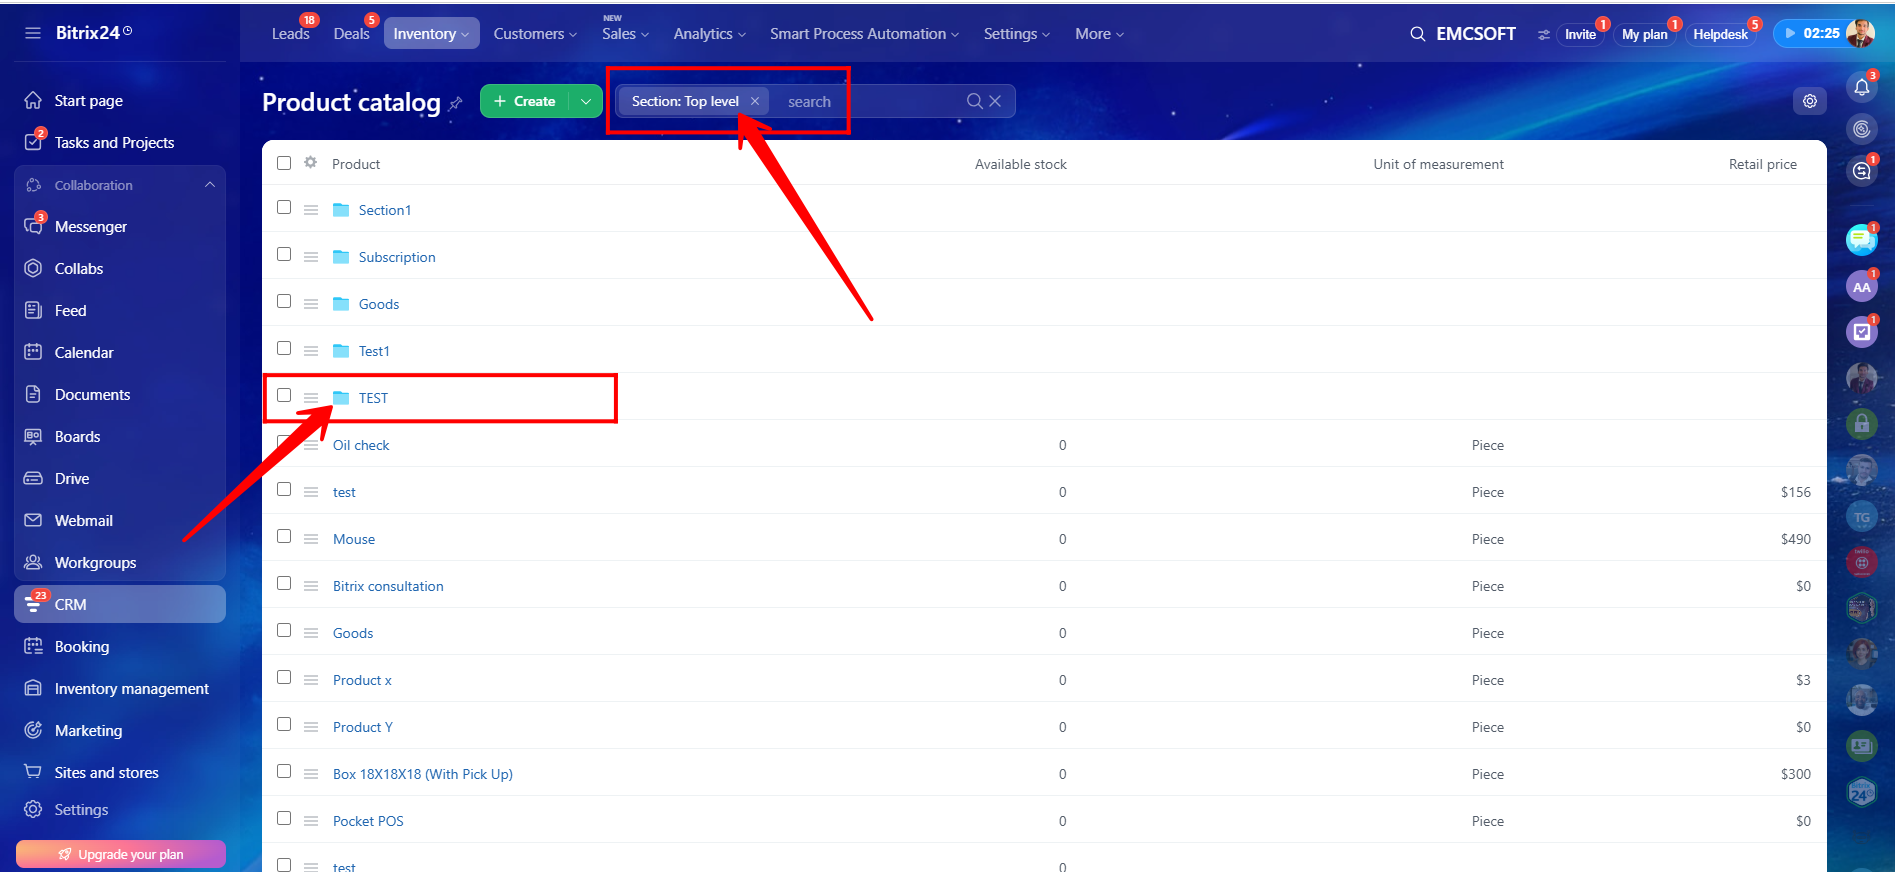
5. As you can see, after navigating into the section, the filter now displays Section: TEST. Within this section, you can create a Product, Service, or another Section. In this example, we will create a product inside the section. Typically, sections are used to organize products and services into dedicated folders so that different types of items remain properly separated and structured.
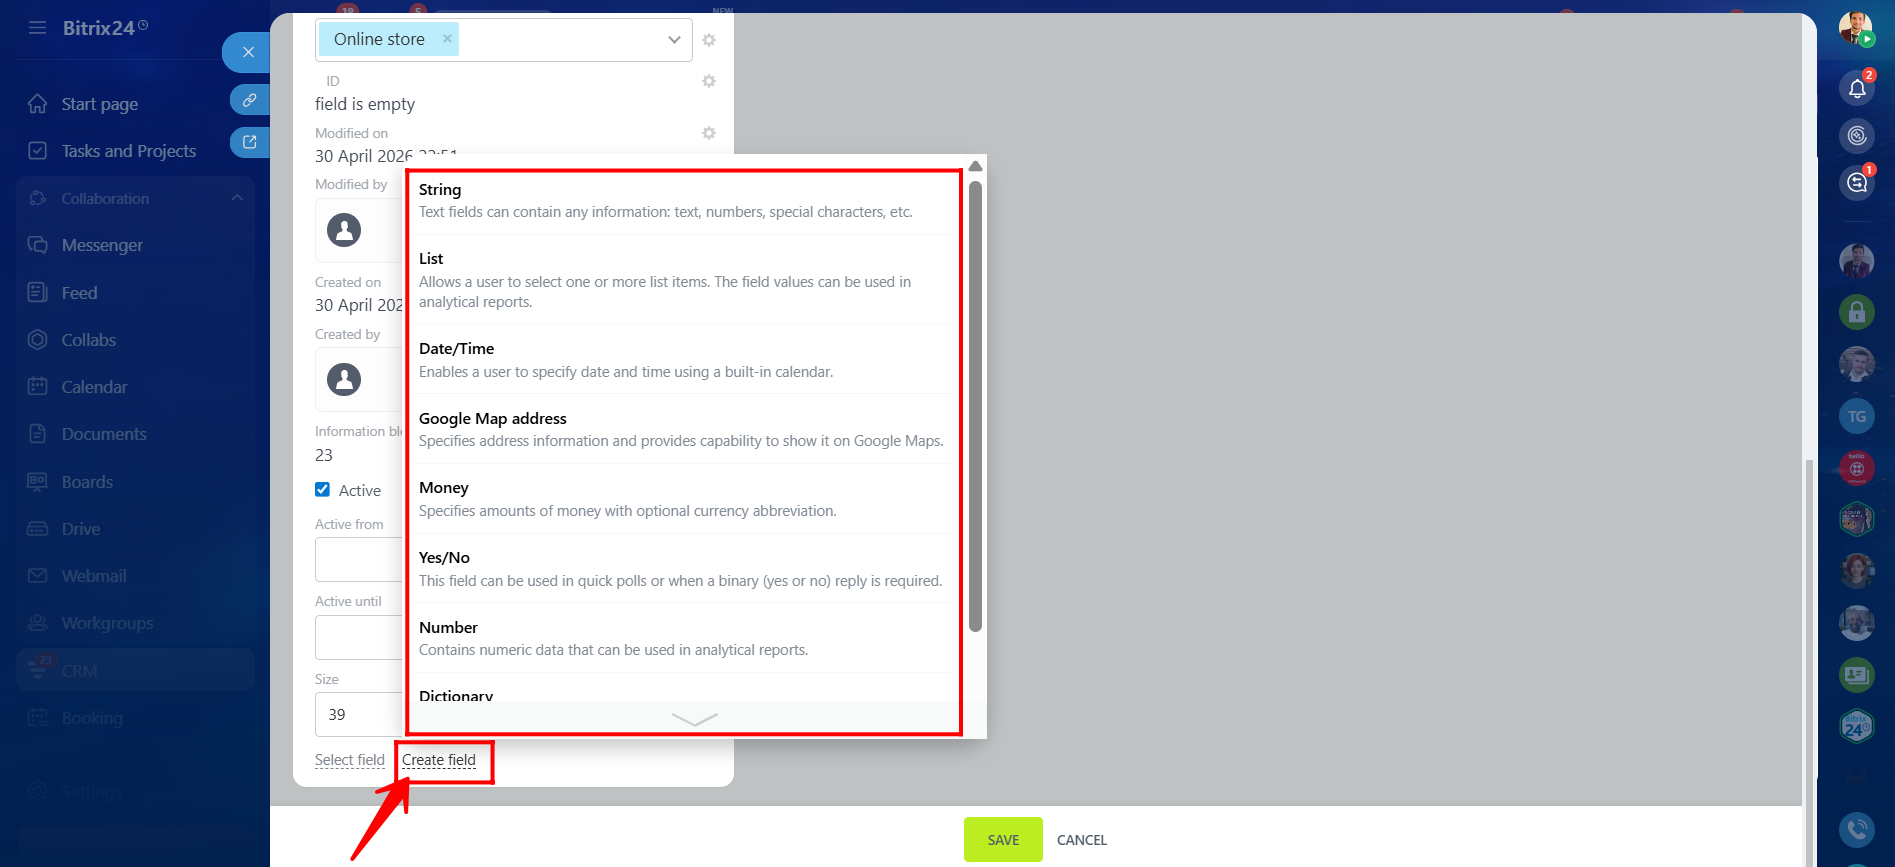
6. During the creation of a product, you can also define new custom fields inside the product details, similar to other CRM entities. Click Create Field and add predefined custom field types such as String, List, Date/Time, Money, etc.
7. To delete custom fields from the Products section, navigate to Settings → CRM Settings.
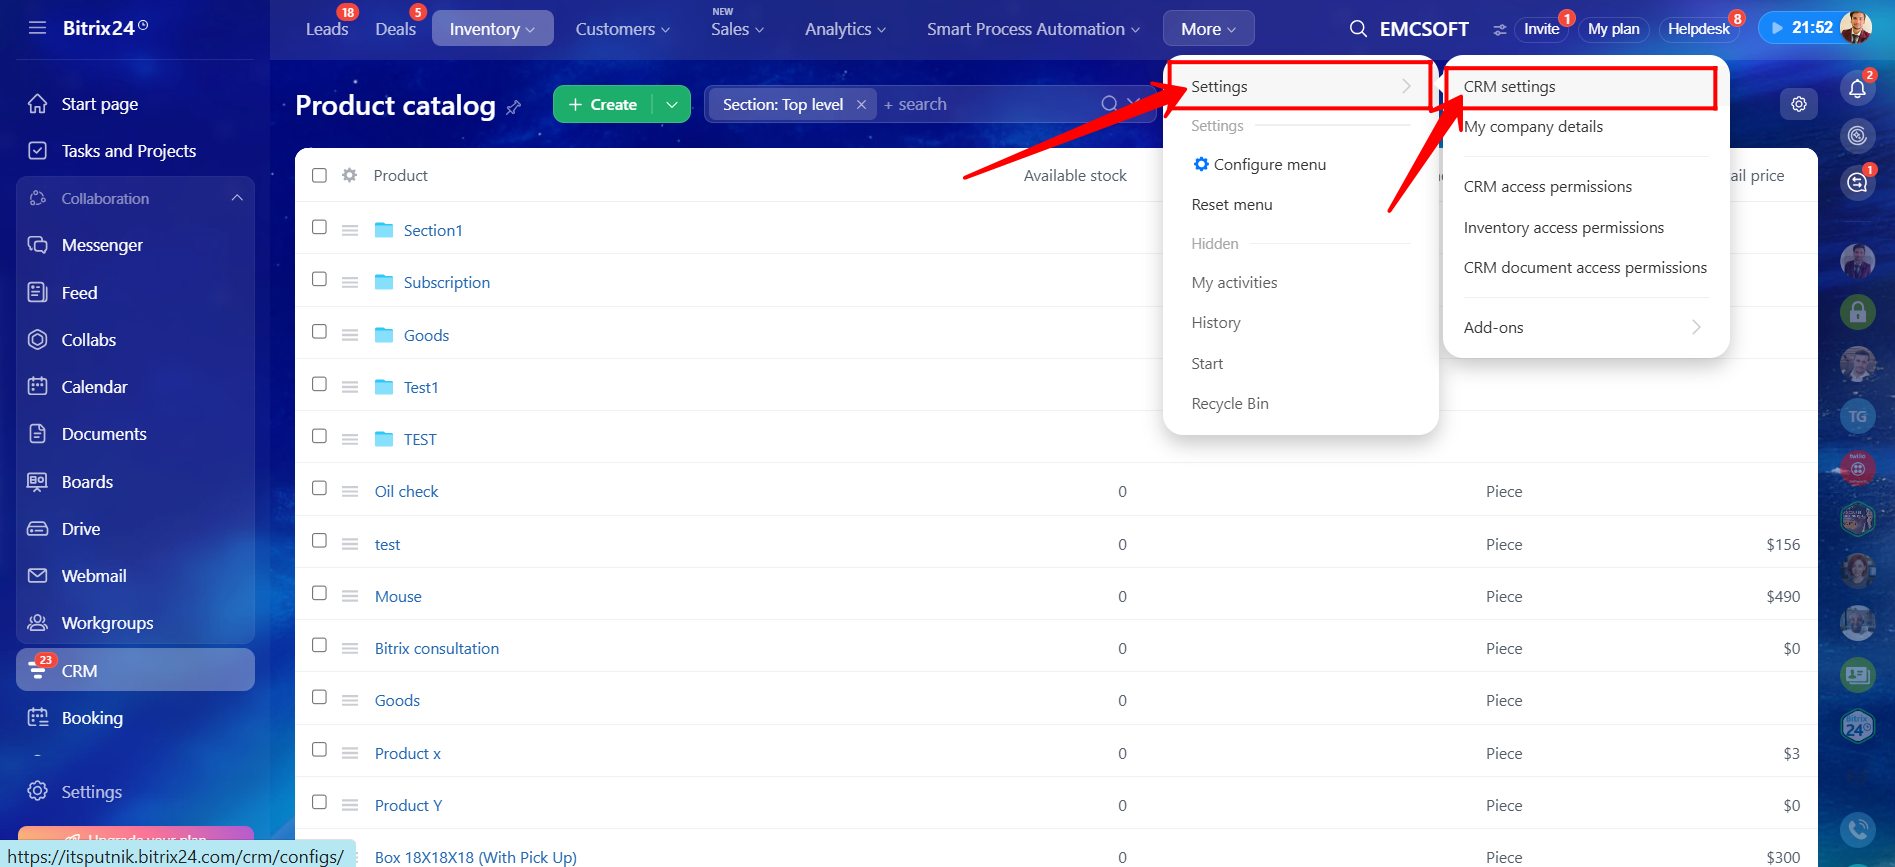
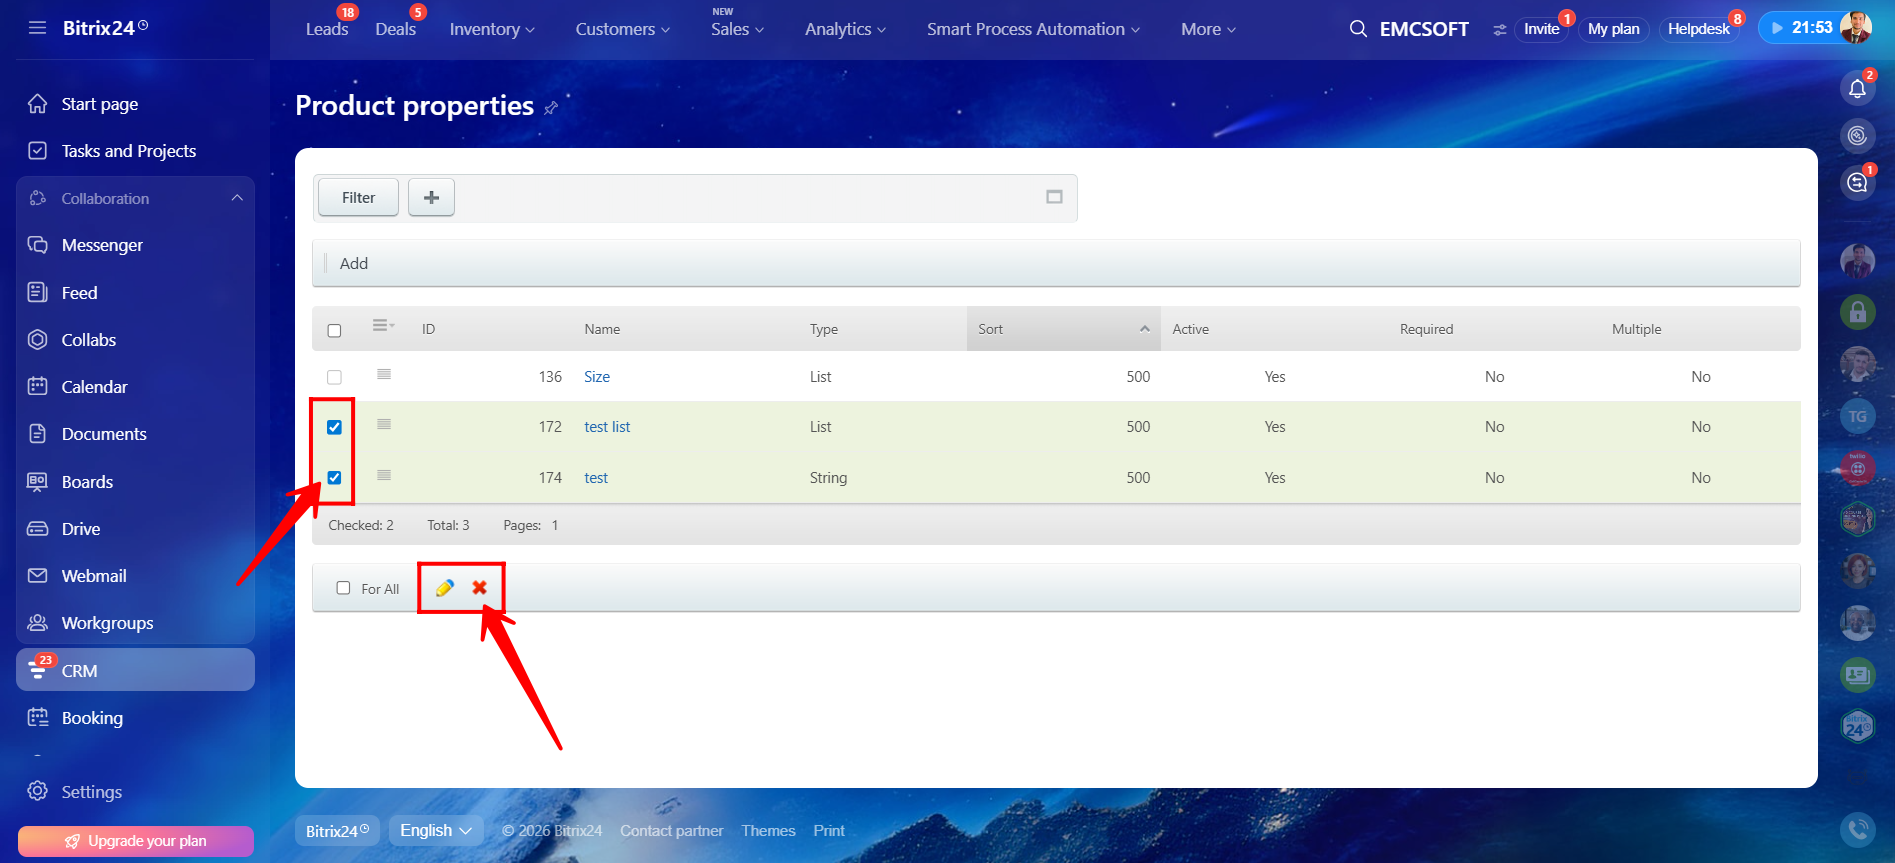
8. Open the Product Properties section.

9. Select the custom field you would like to edit or delete. Click the X (cross) icon to delete the field or click the Pencil icon to edit it.
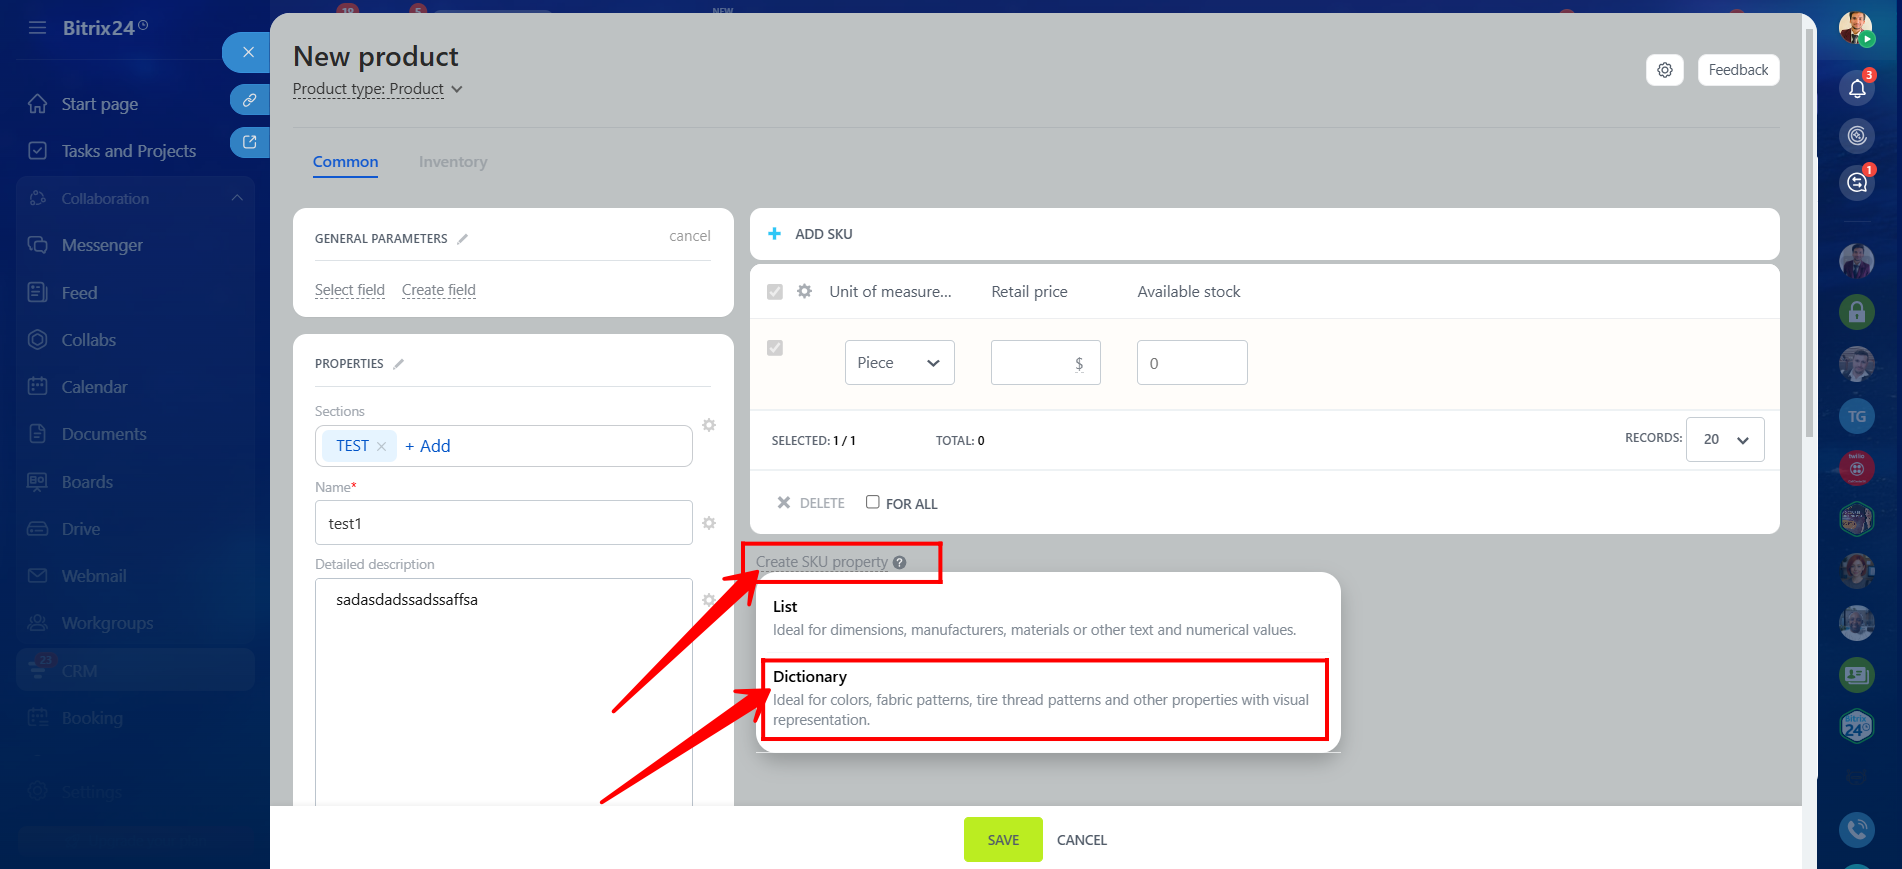
10. During product creation, you can click Create SKU Property to create SKU-related properties of type List or Dictionary. We will first create a SKU property of type Dictionary.
- List type is ideal for dimensions, manufacturers, materials, or other text and numerical values.
- Dictionary type is ideal for colors, fabric patterns, tire tread patterns, and other visually represented properties.
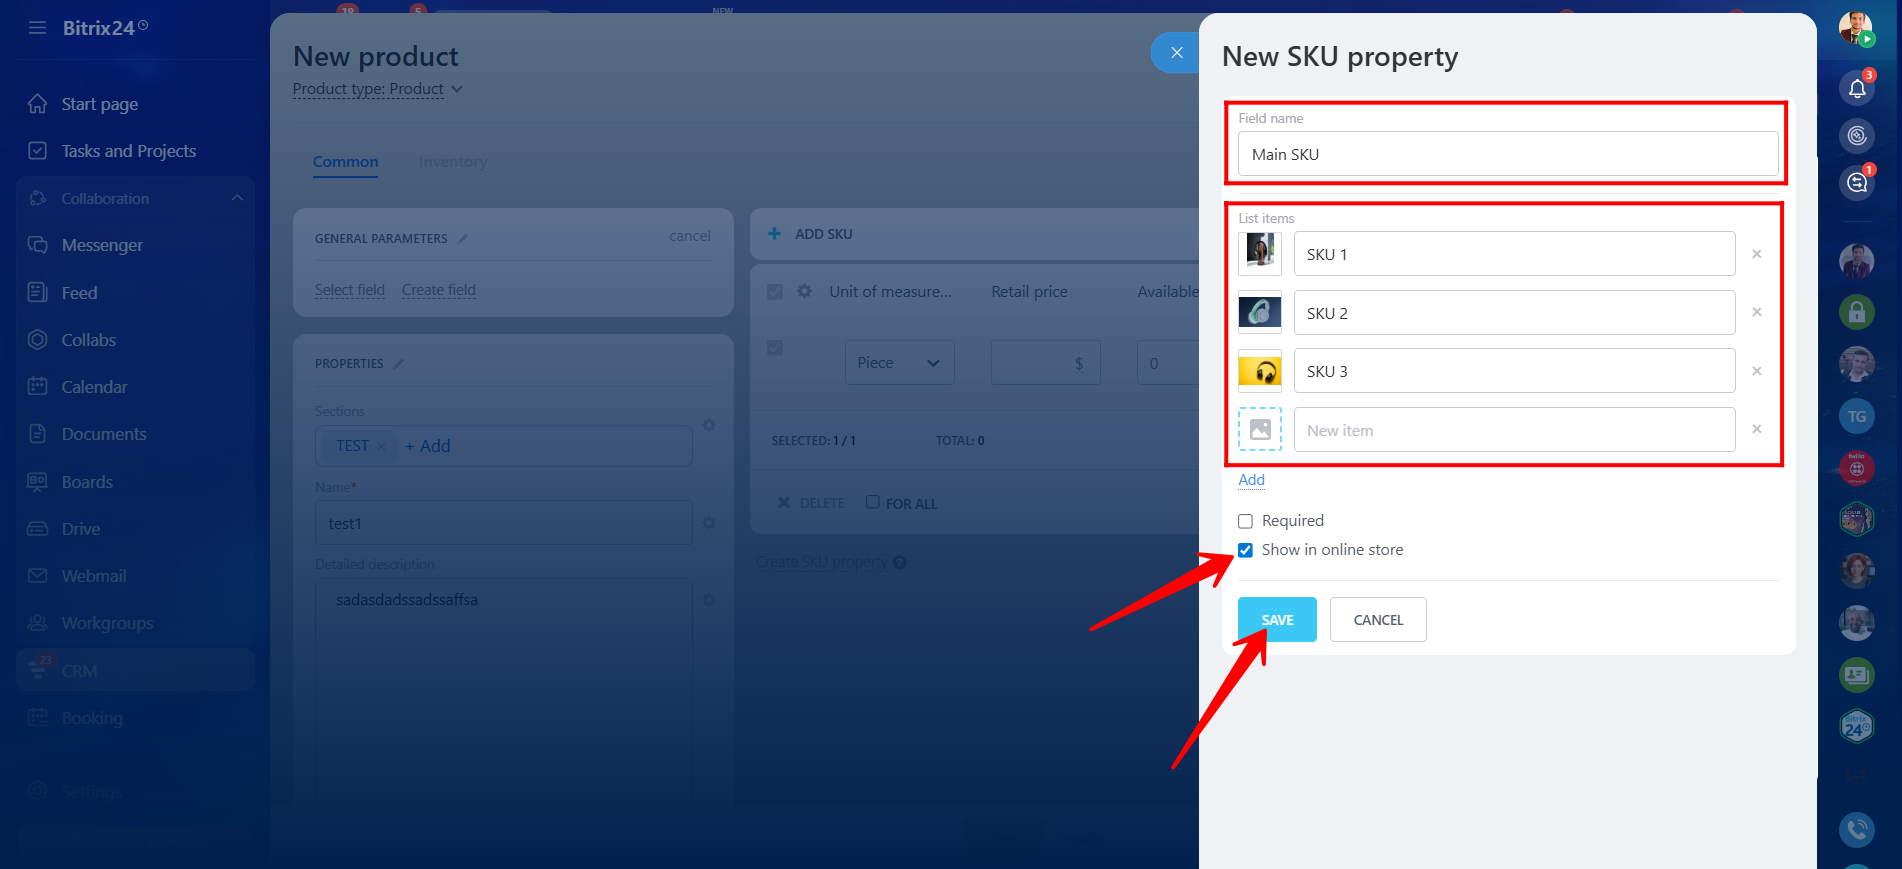
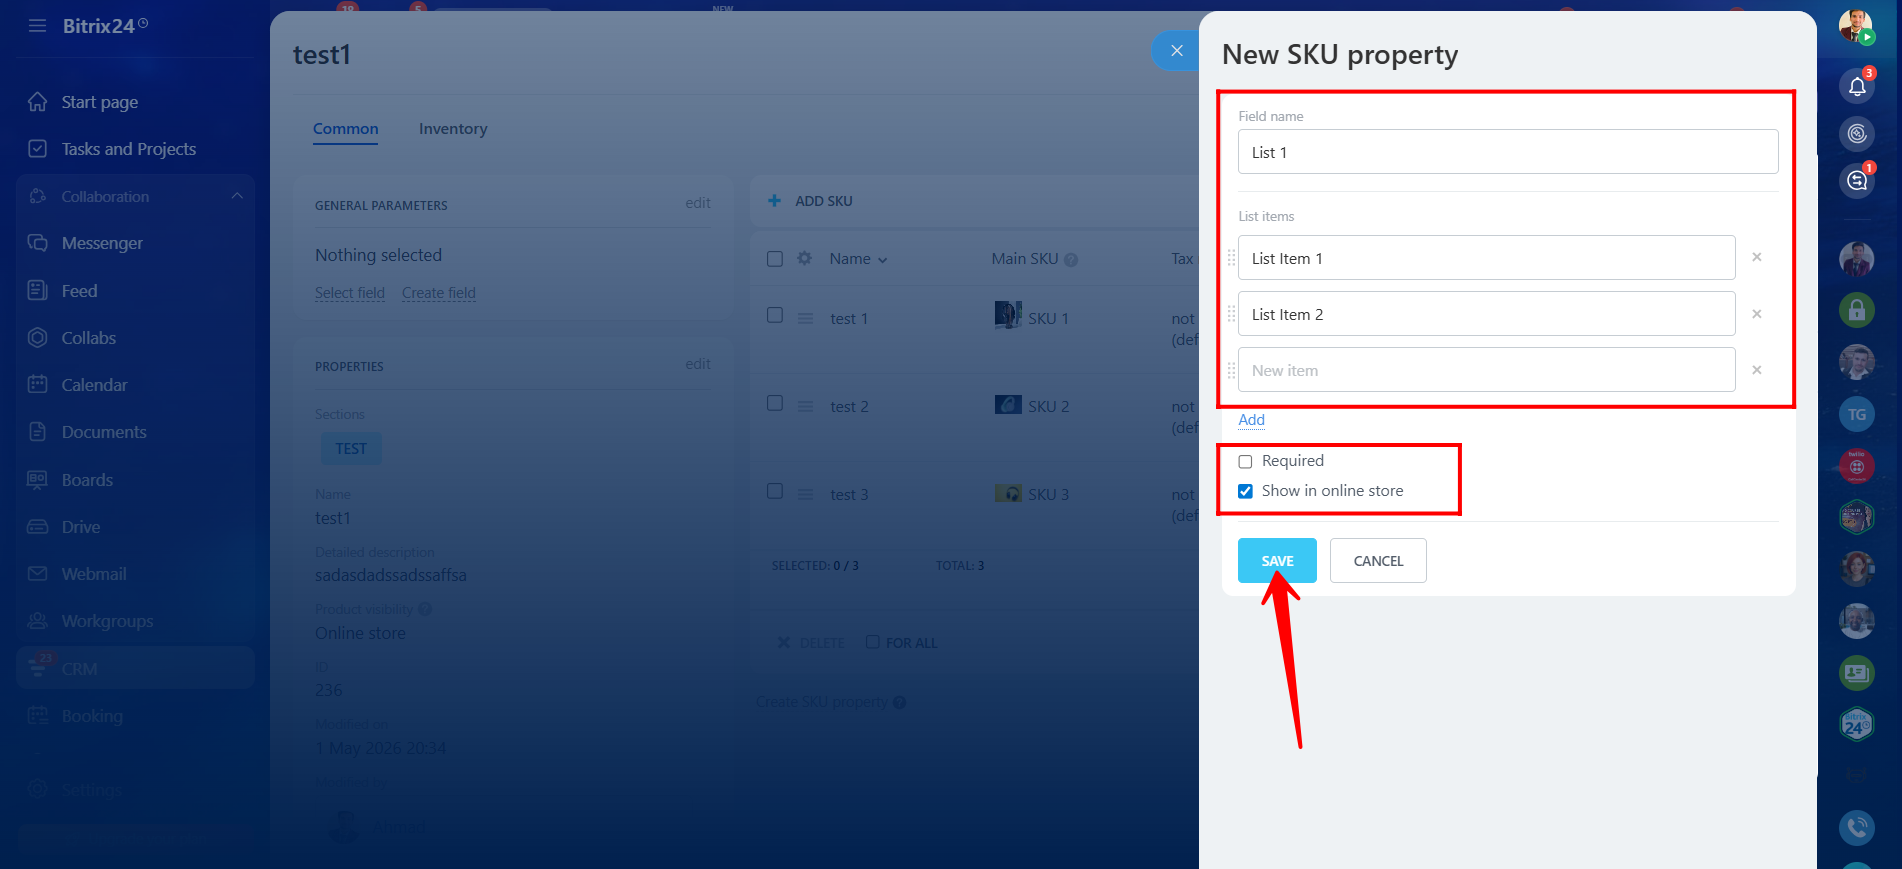
11. Enter the field name. In the List Items section, upload a visual/image for the item and define the item name(s). You can mark the field as Required and enable Show in Online Store to make the field available in product details.
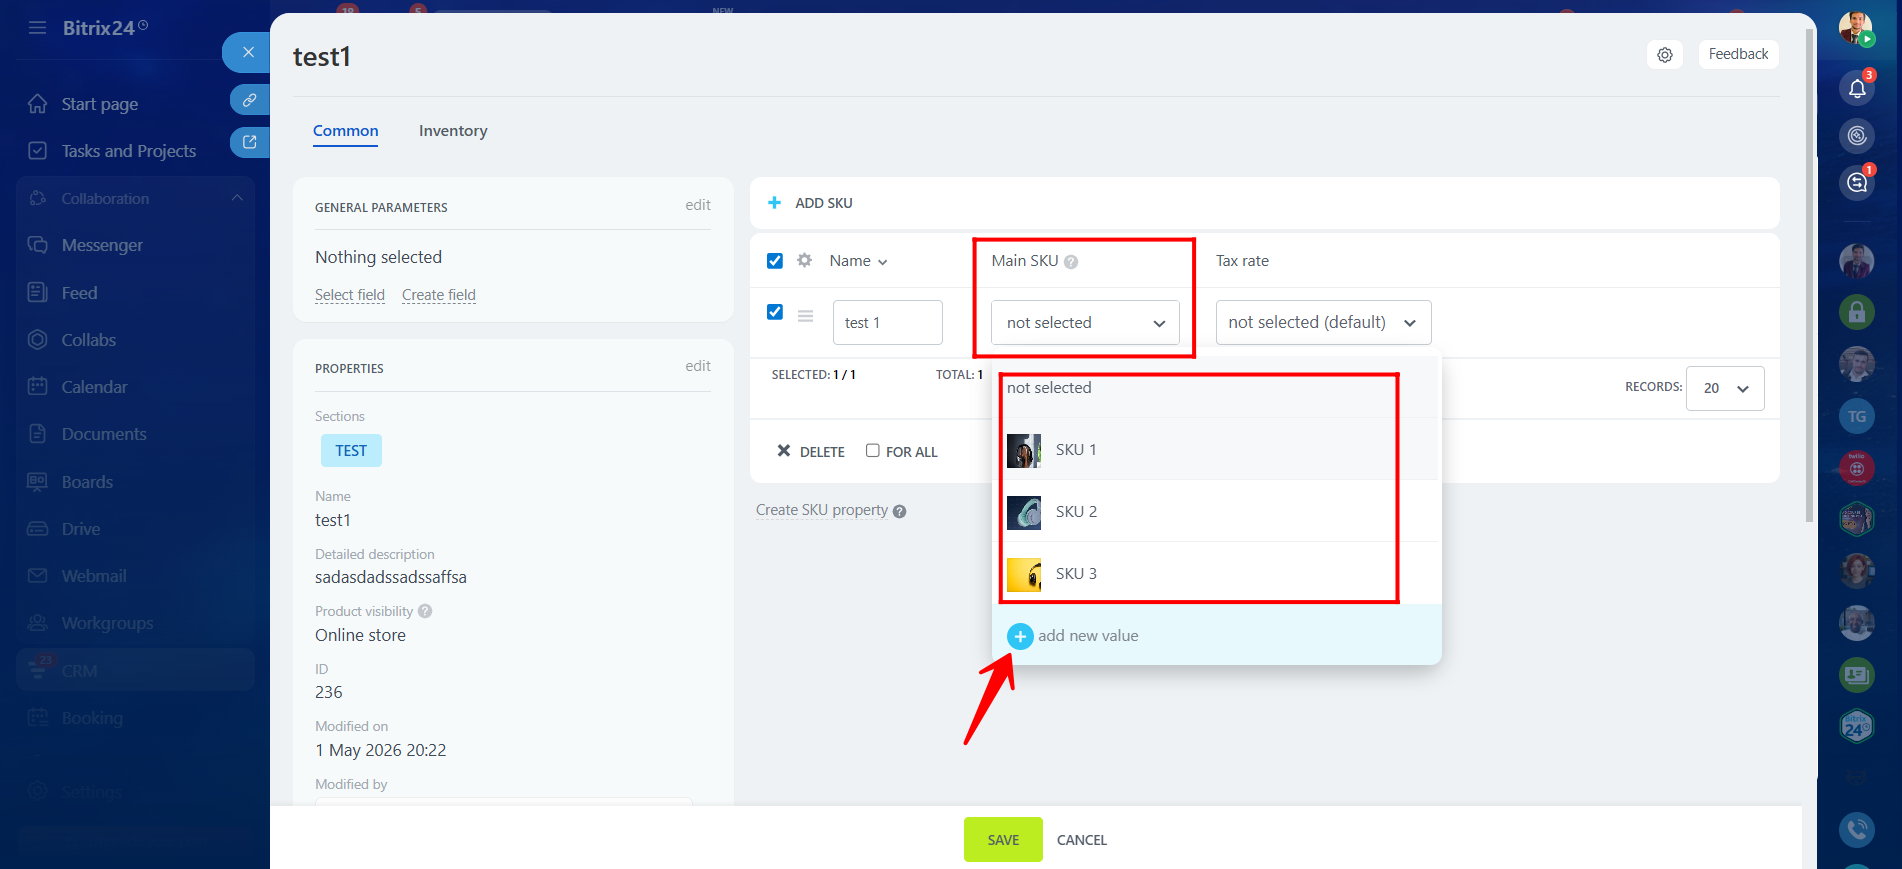
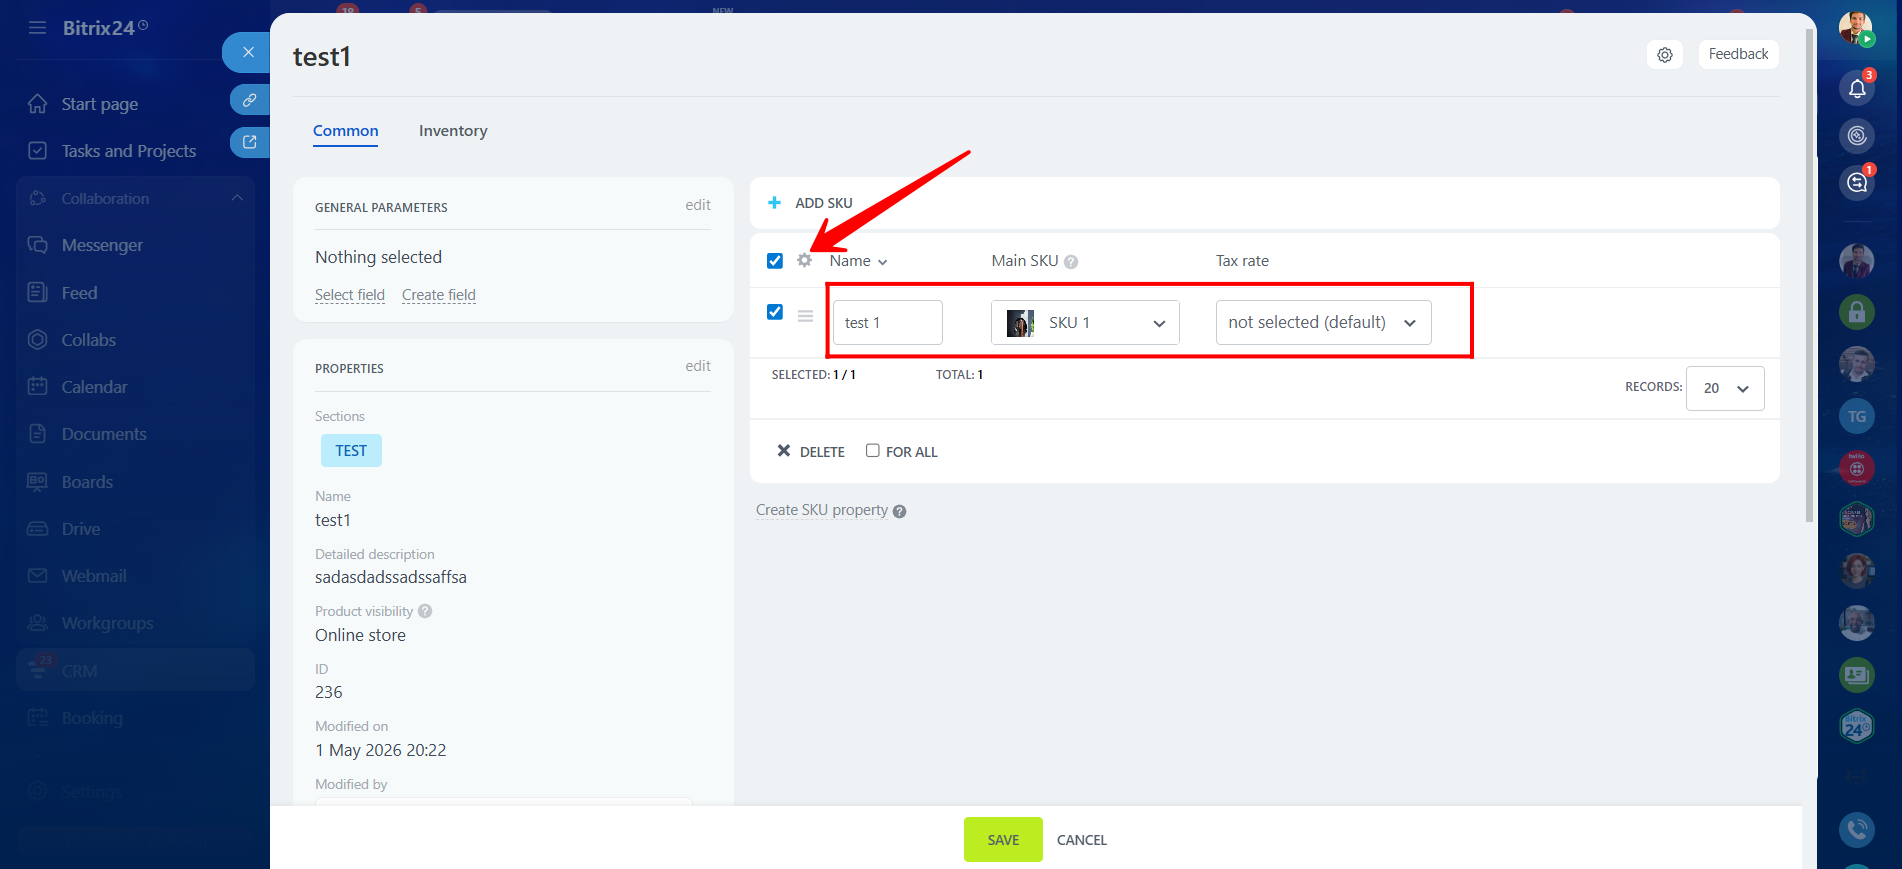
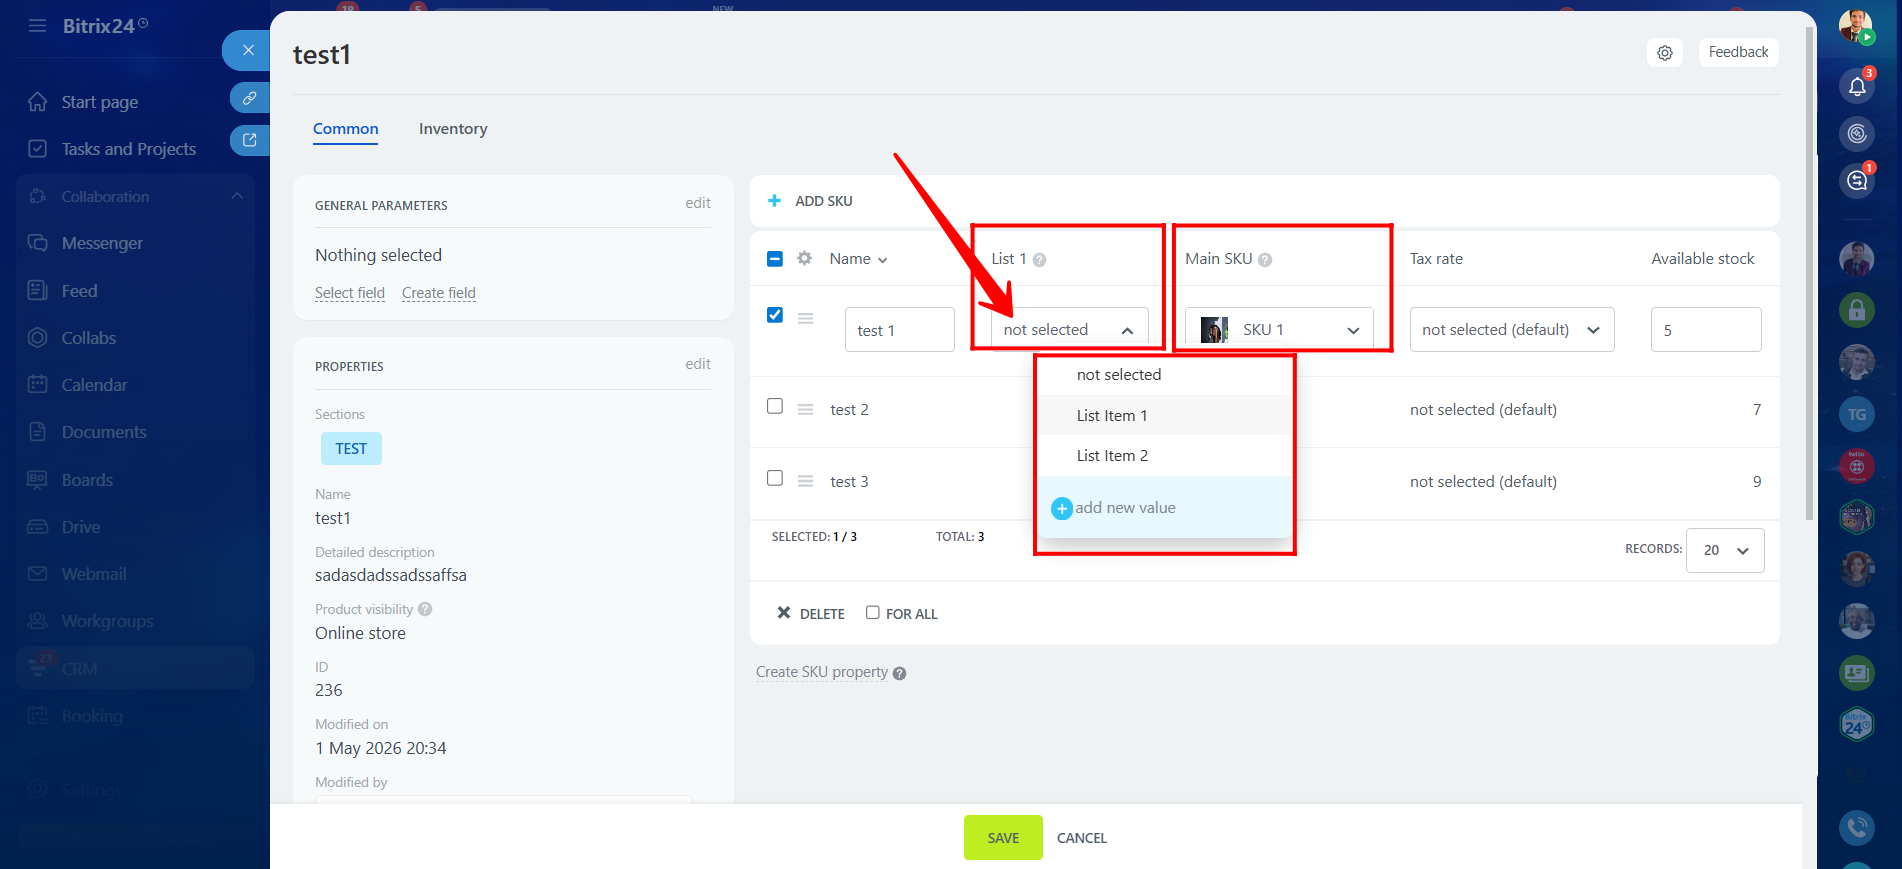
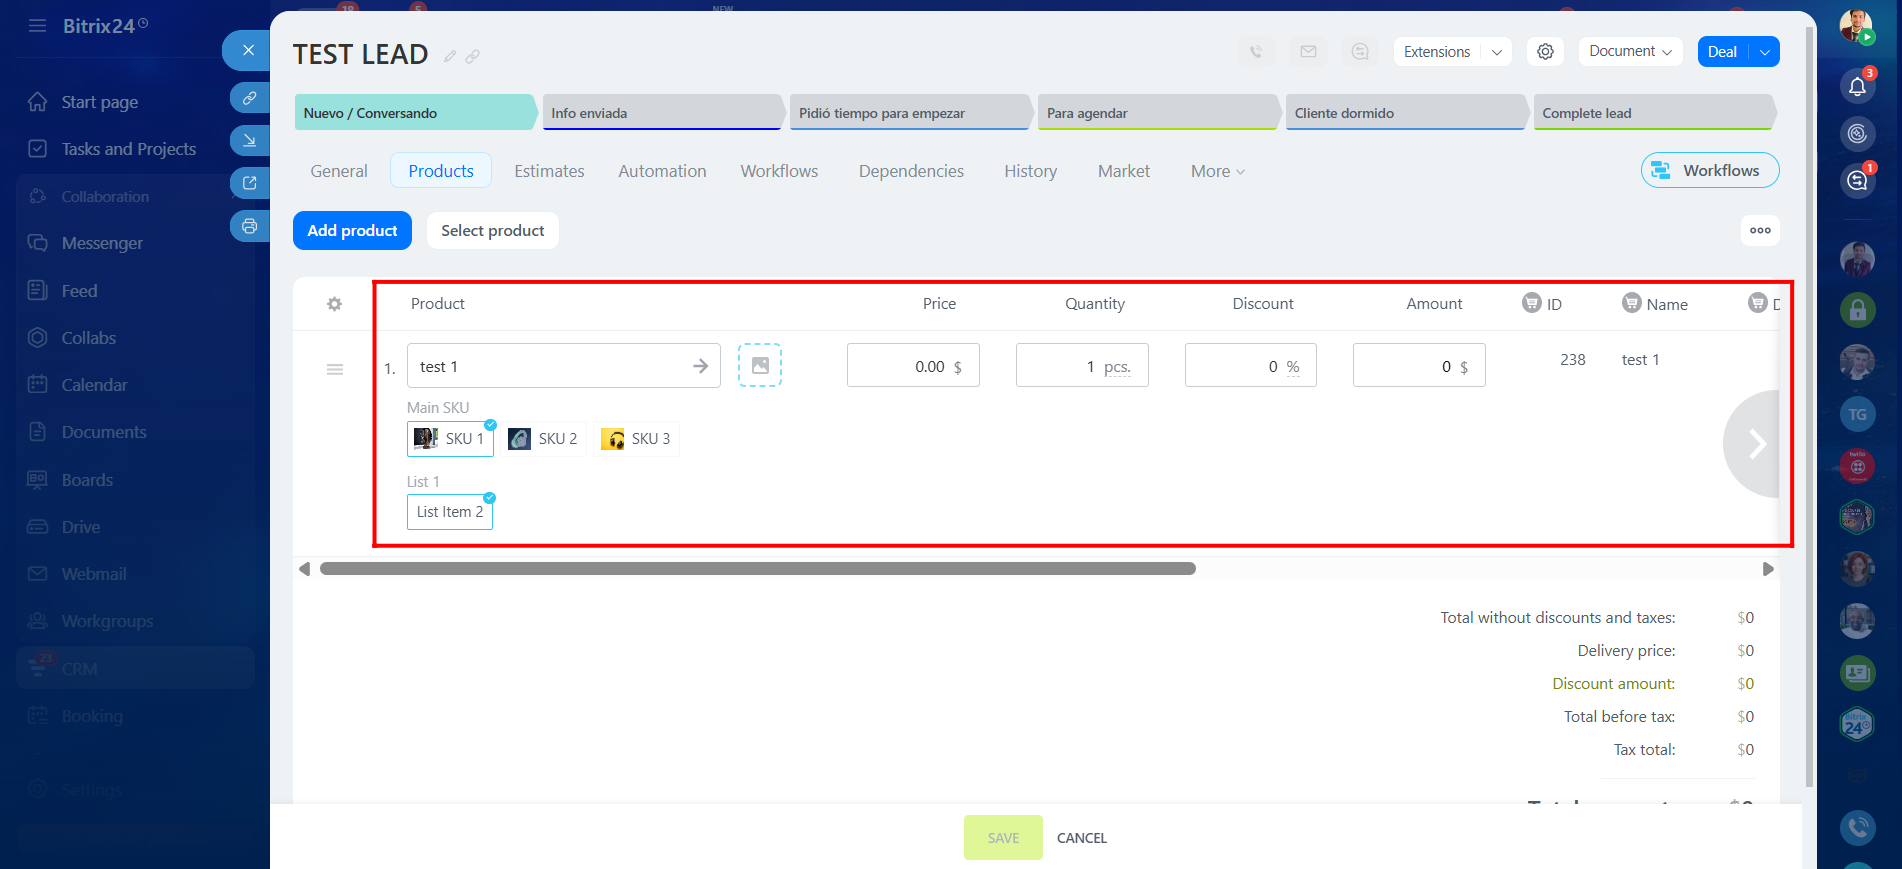
12. We added the product name and selected the dictionary-type field value to associate with this specific product variation. In this example, the variation is named test 1 under the Name column.
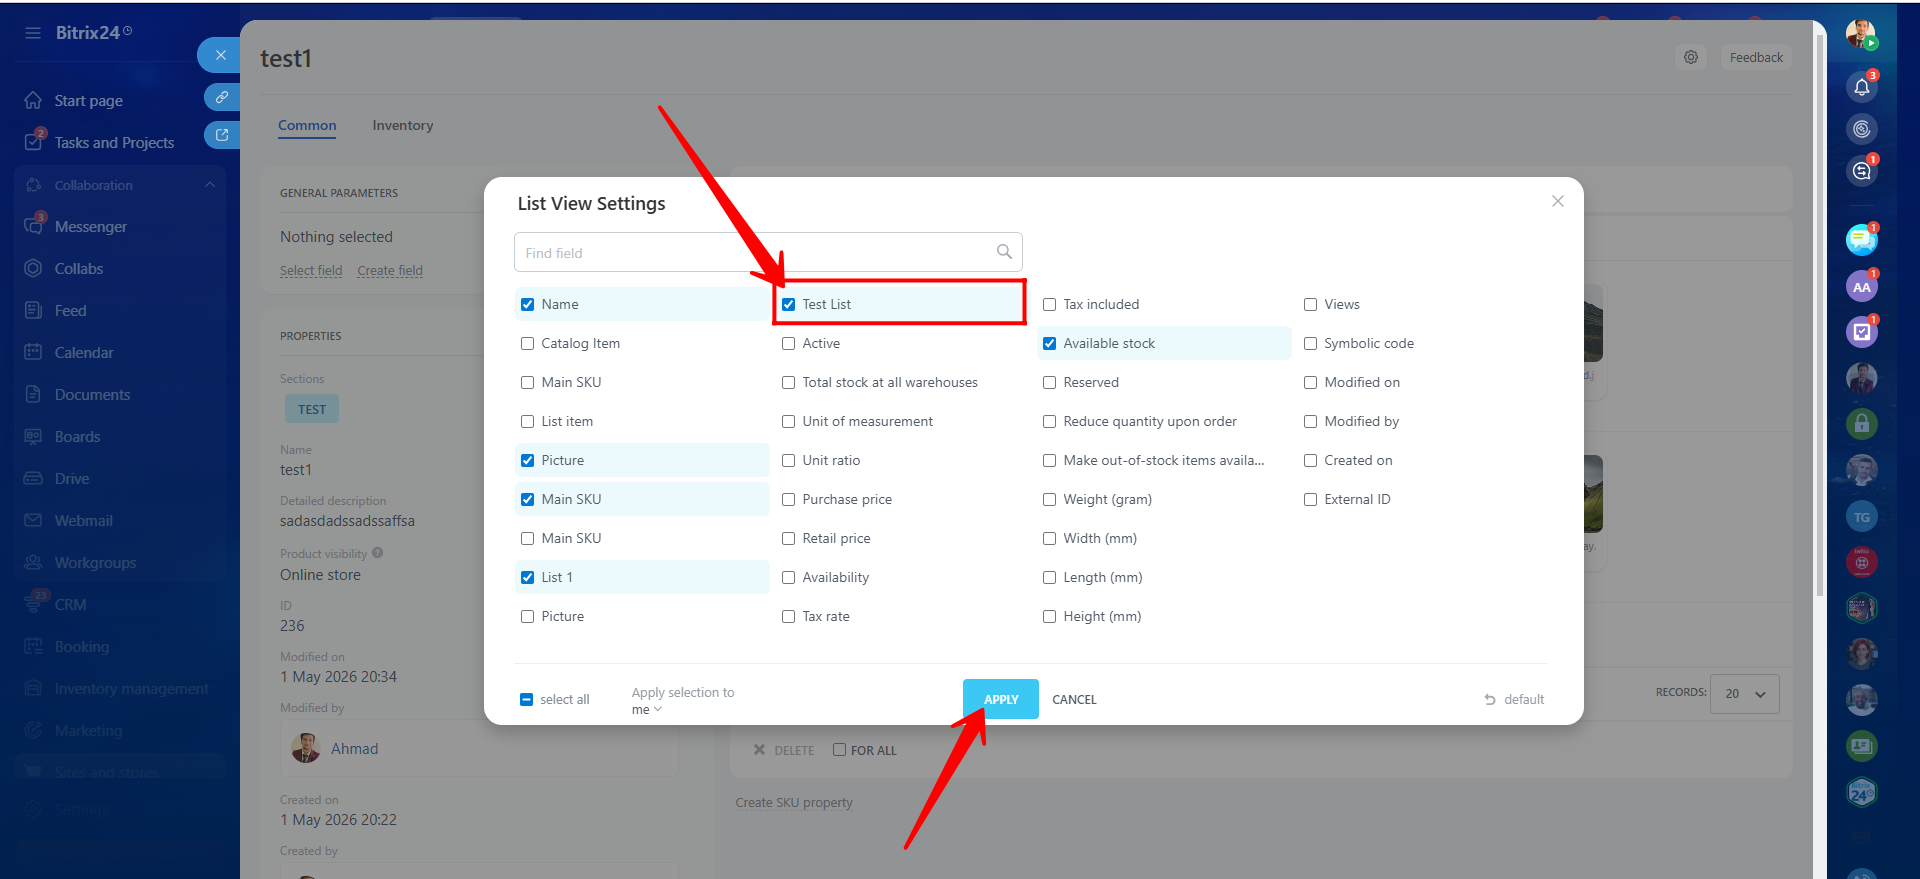
13. To display or select additional columns/fields for product variations, click the Gear icon to manage hidden and visible fields.
14. Select the fields that should appear within the product variation details.
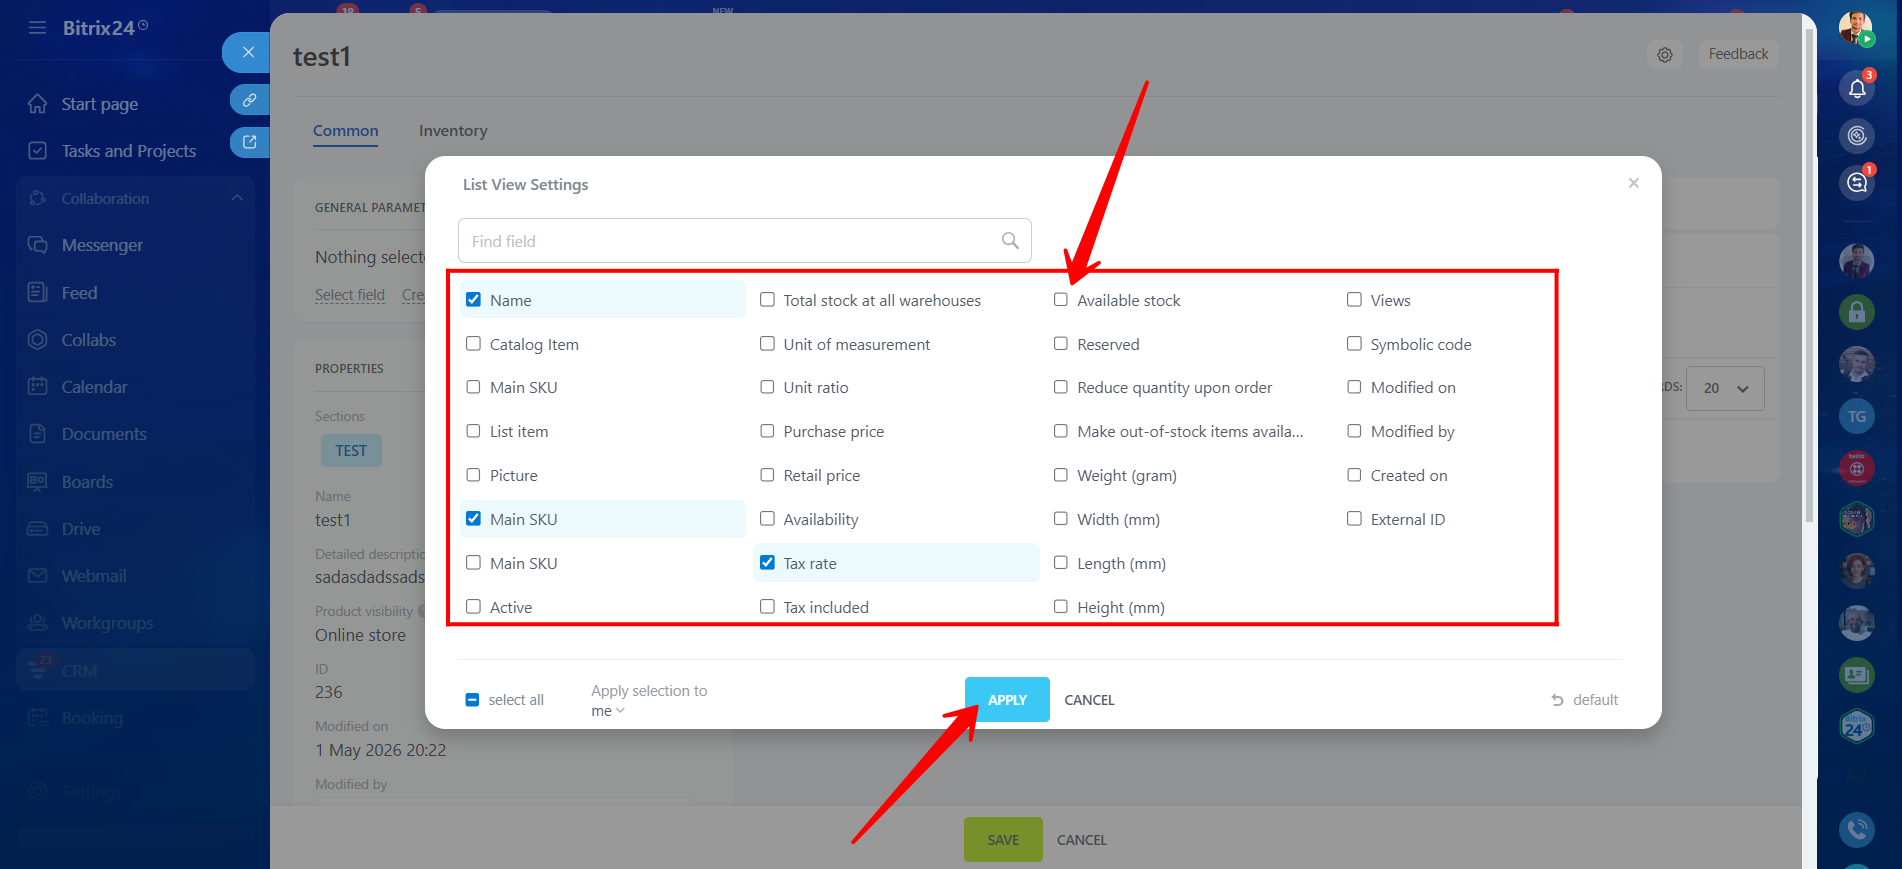
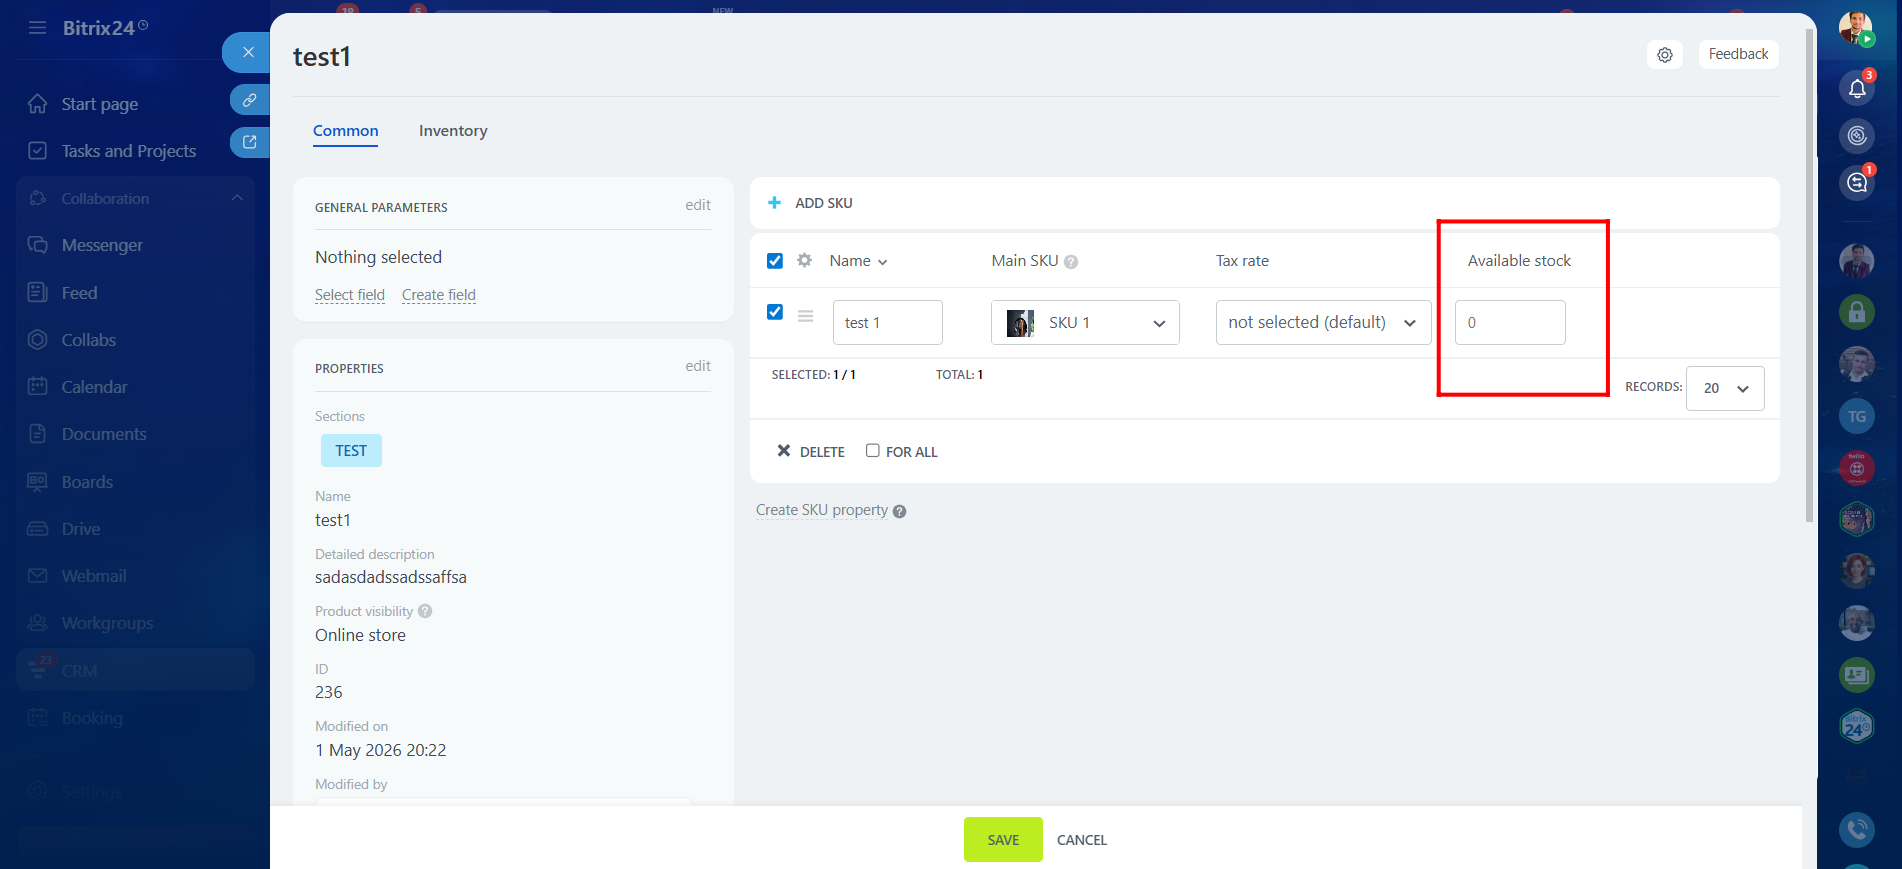
15. In this example, we selected the field Available Stock to display within the variation details.
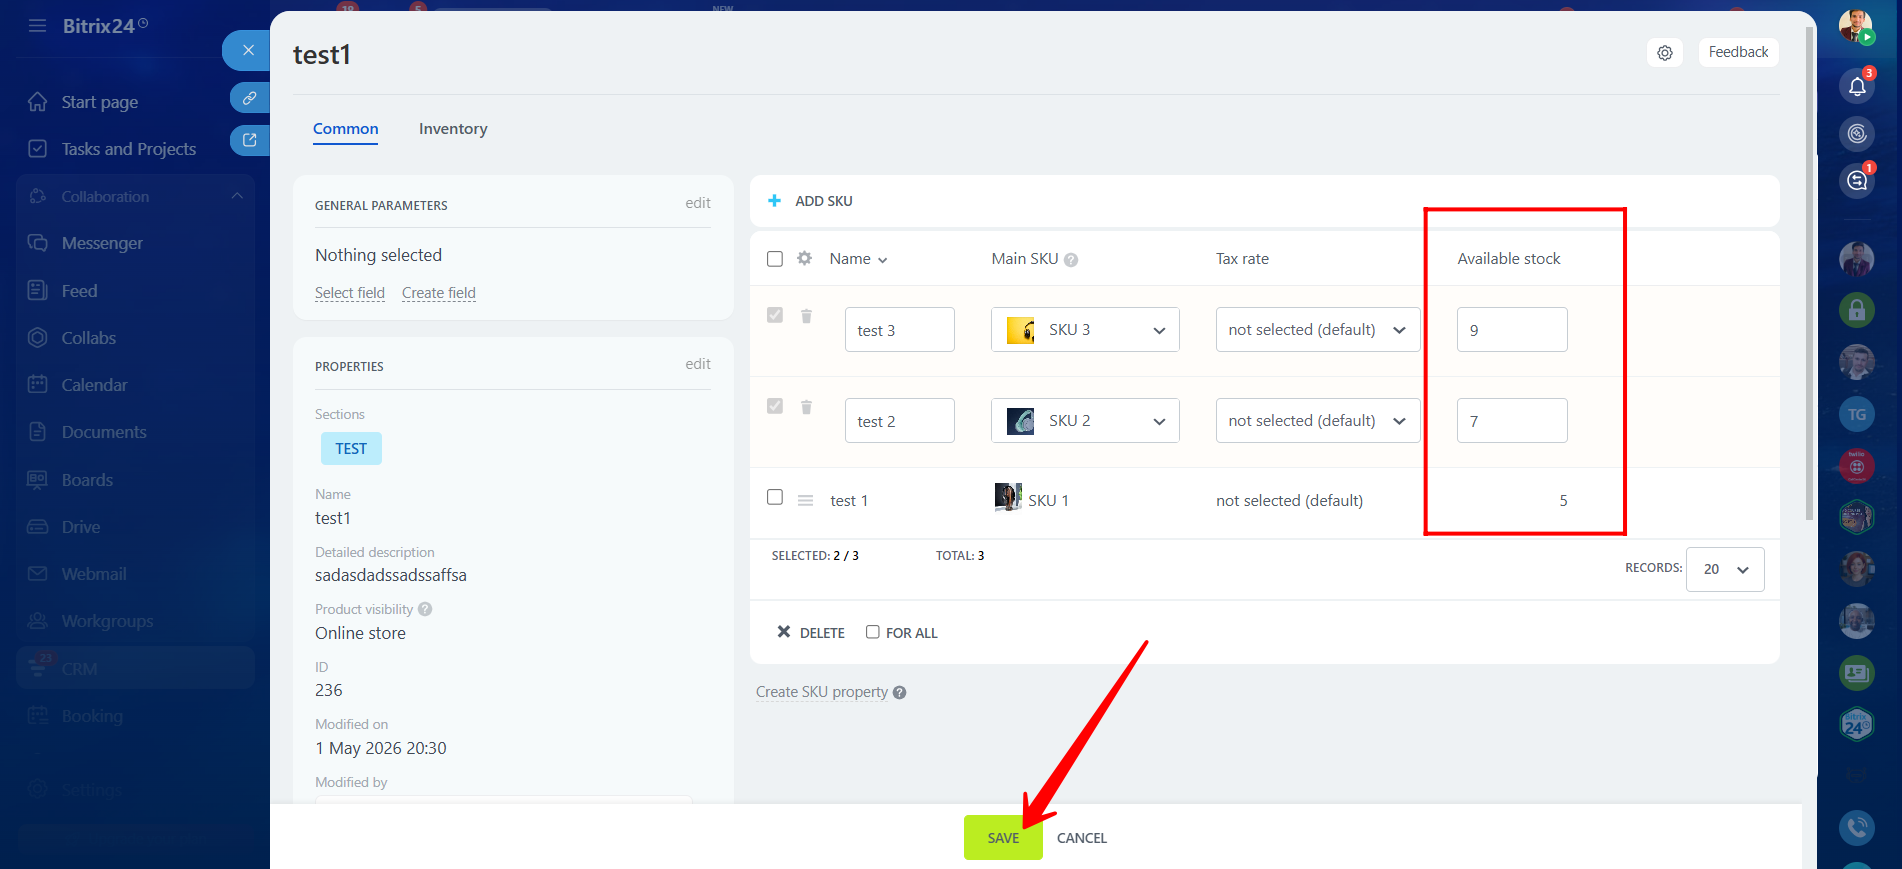
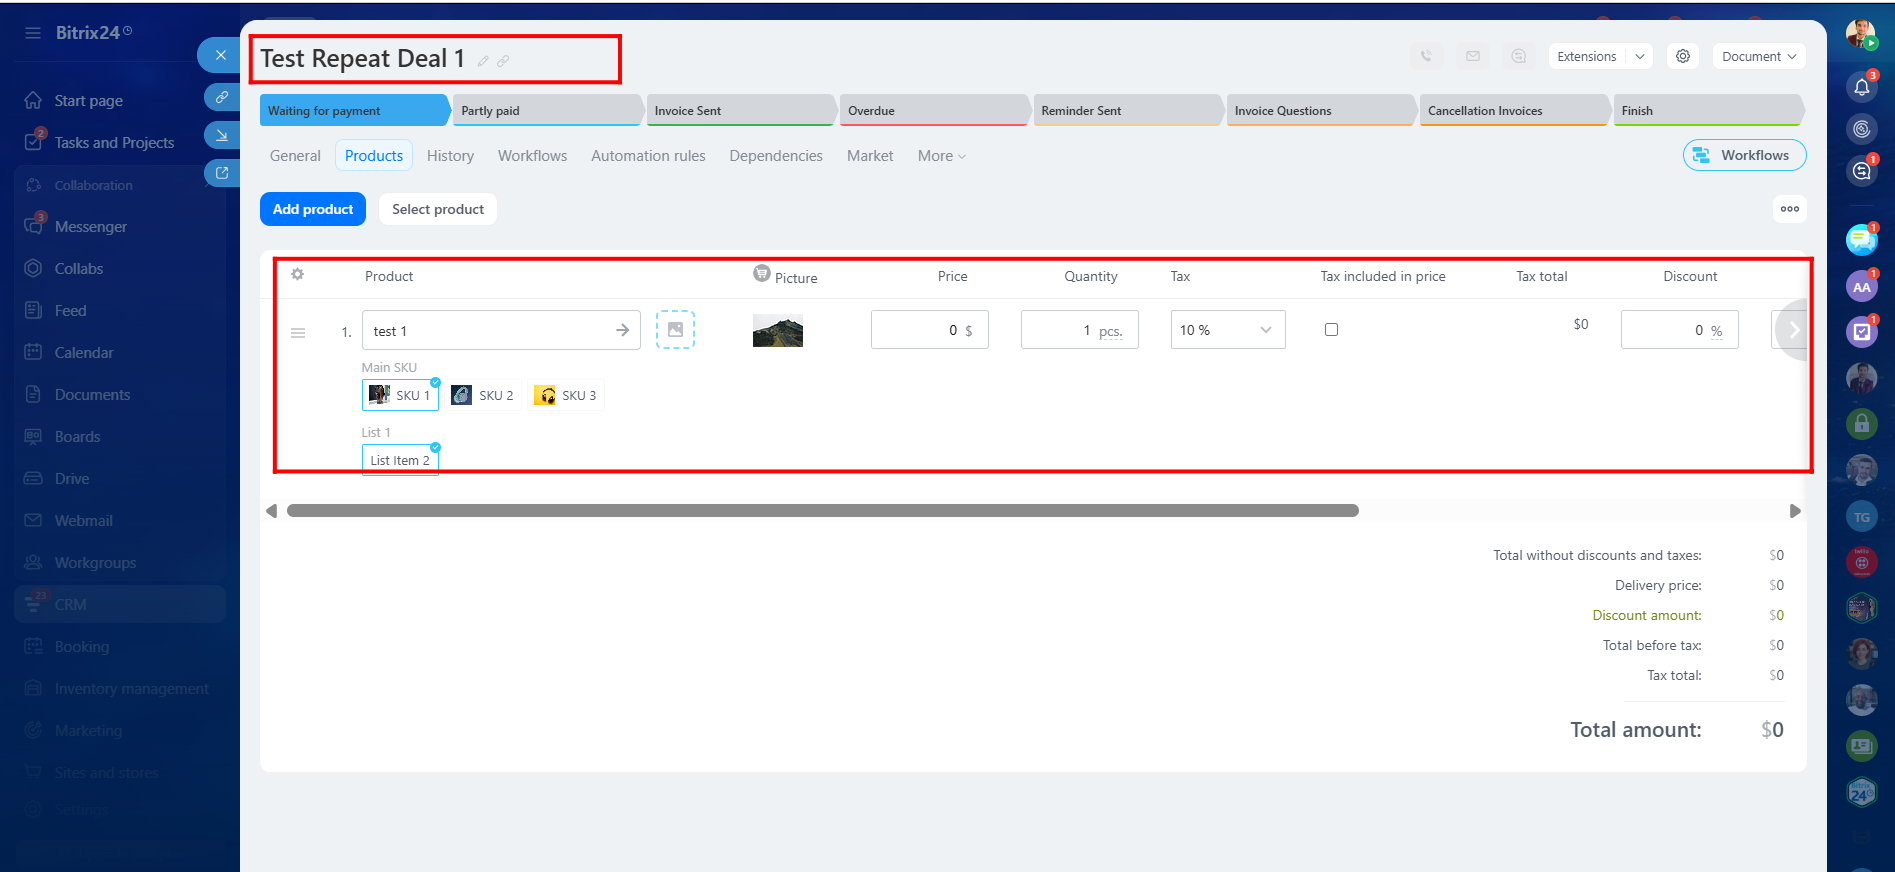
16. We created three product variations named test 1, test 2, and test 3. Each variation was assigned different dictionary item values (used as SKUs) along with different stock quantities. After completing the configuration, do not forget to click Save.
17. Now, we will create another SKU property of type List, which can be used as a SKU or unique identifier such as dimensions, manufacturer codes, materials, numerical values, or other text-based information.

18. Enter the field name and add the list item values according to your requirements. Unlike Dictionary-type properties, images or visuals cannot be added here. Enable Show in Online Store and mark the field as Required if needed. Then click Save.
19. You can now see that both List and Dictionary type SKU properties are available to select within the product variation details.
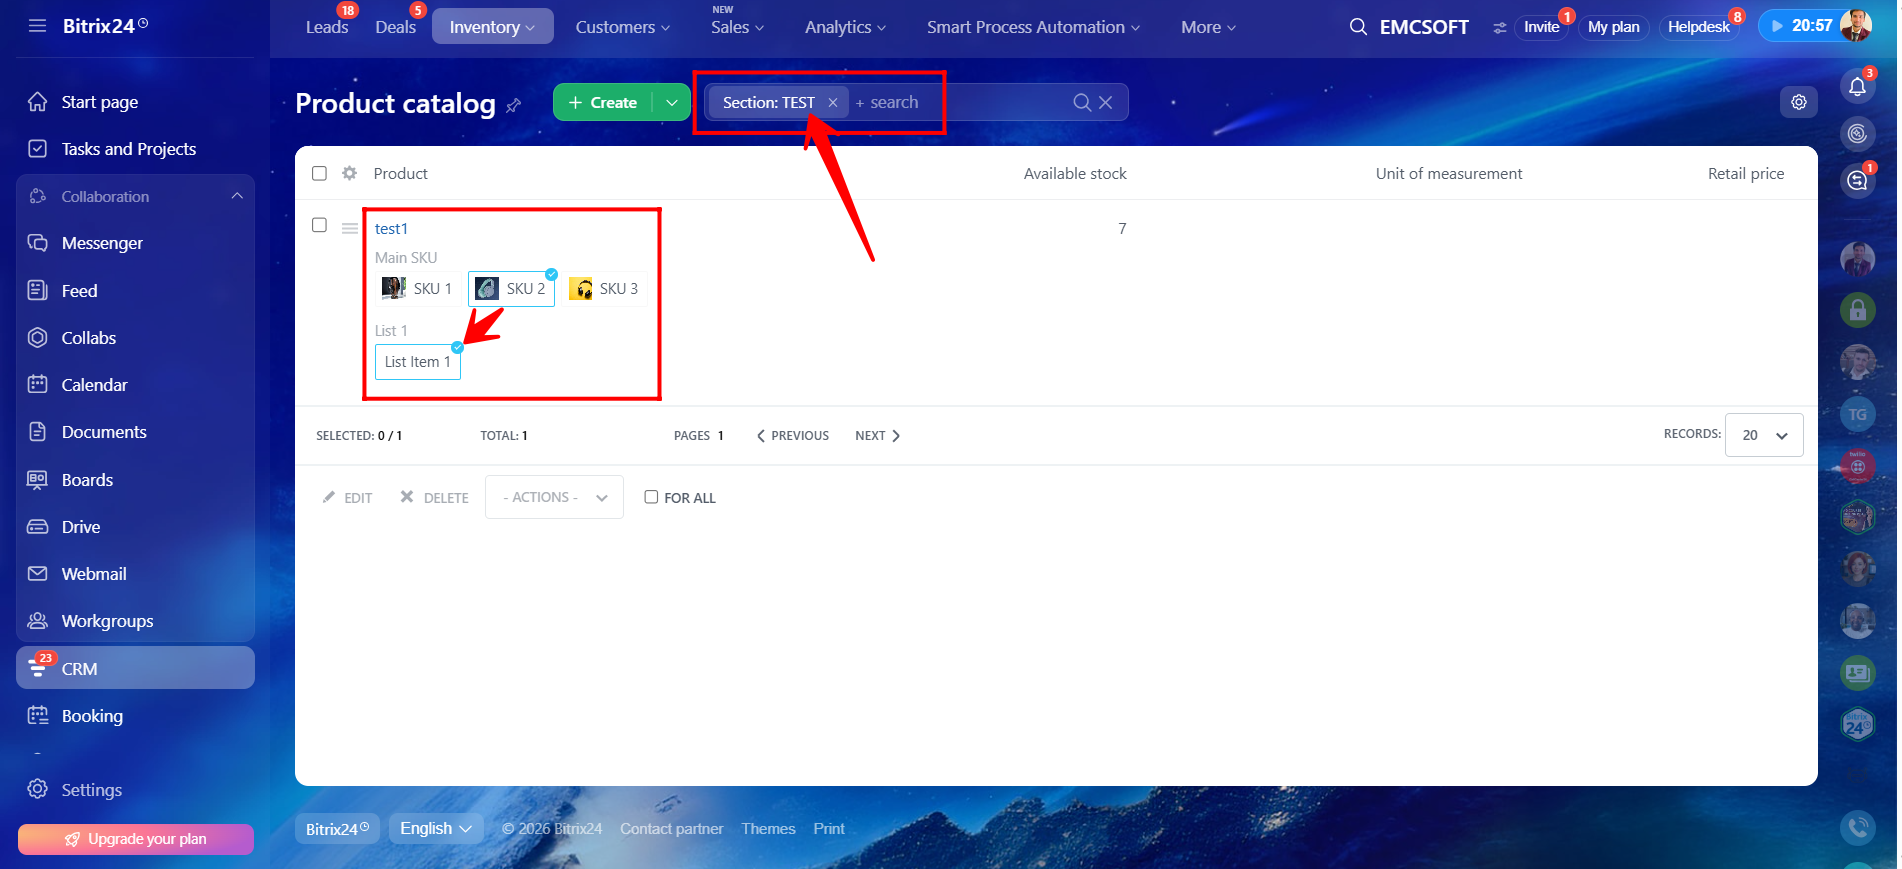
20. Return to the section and open the product. You will notice that when a specific Dictionary-type variation is selected, the related List-type SKU property assigned earlier is displayed only for that selected variation.
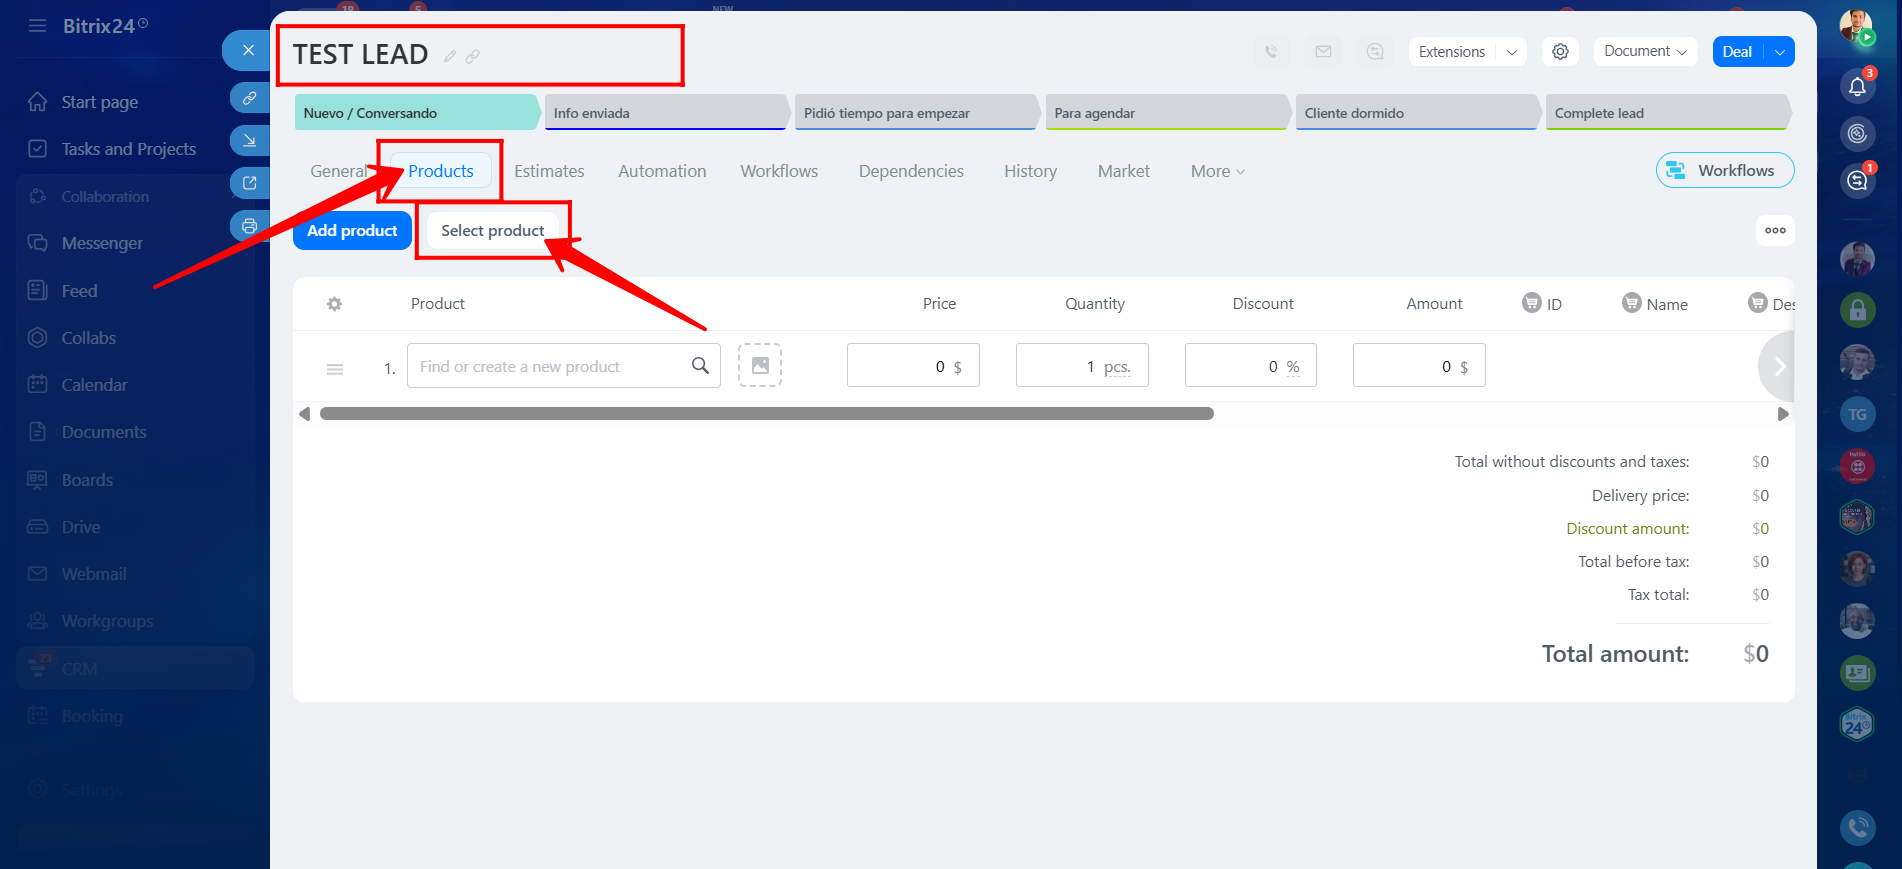
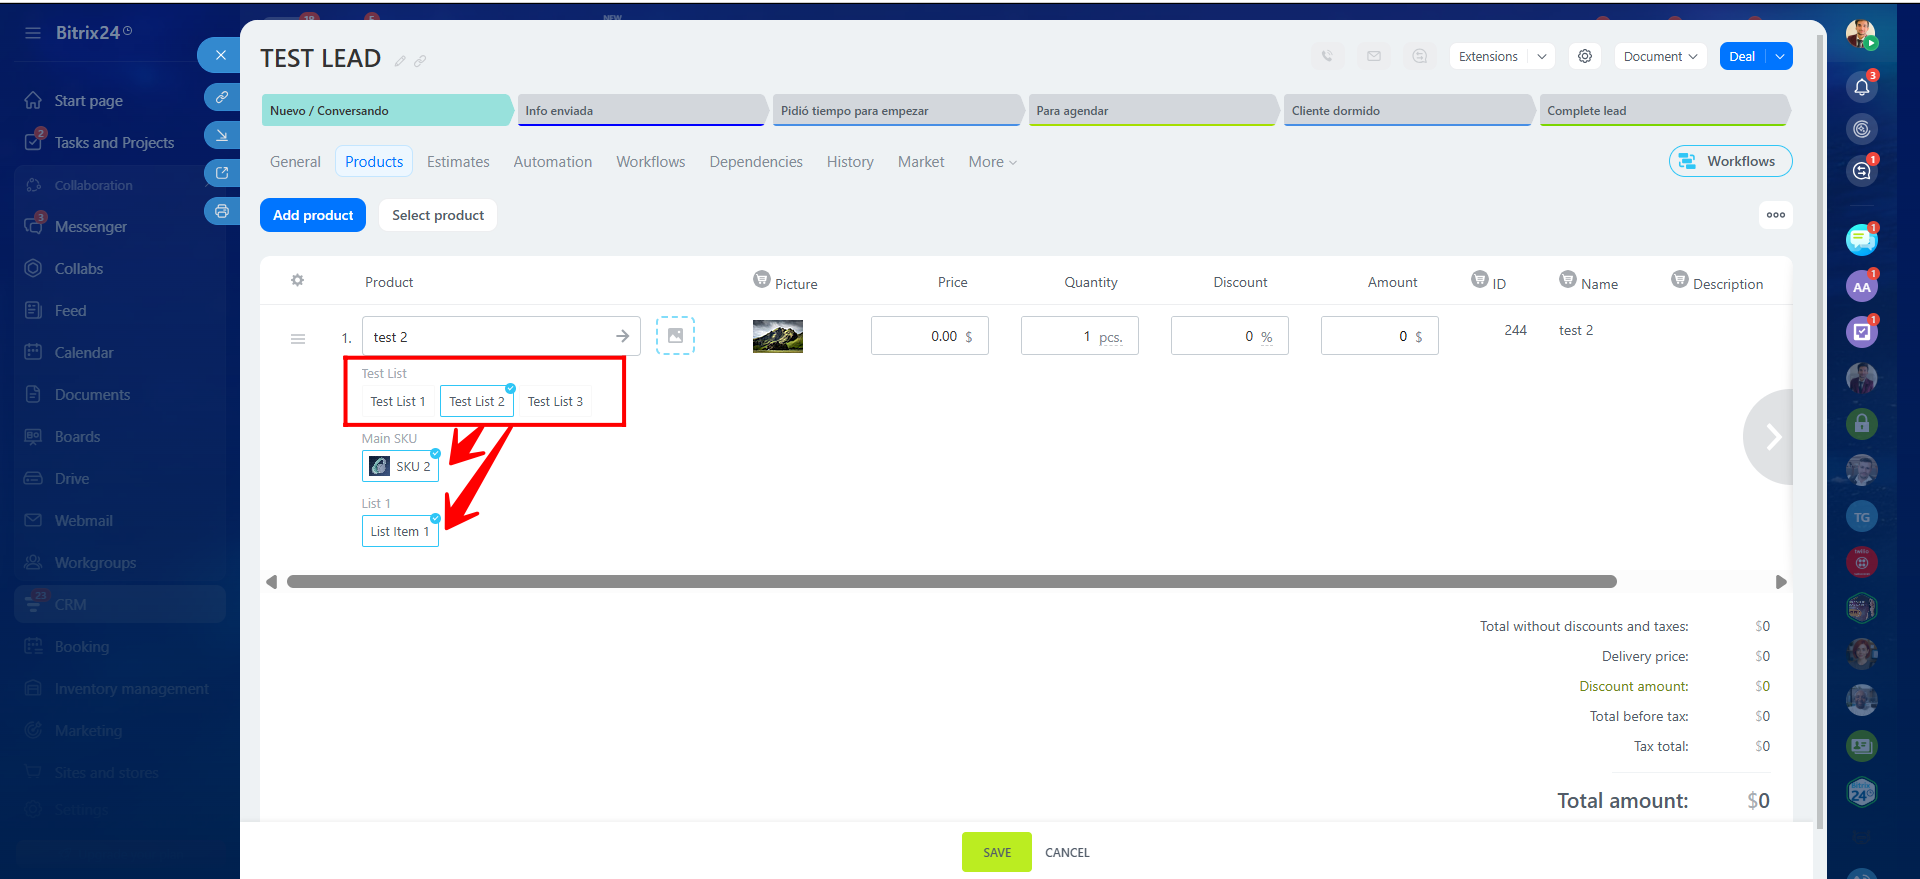
21. Create a test lead to verify the configuration by linking the newly created product to the lead. Open the Products tab within the lead and click Select Product.
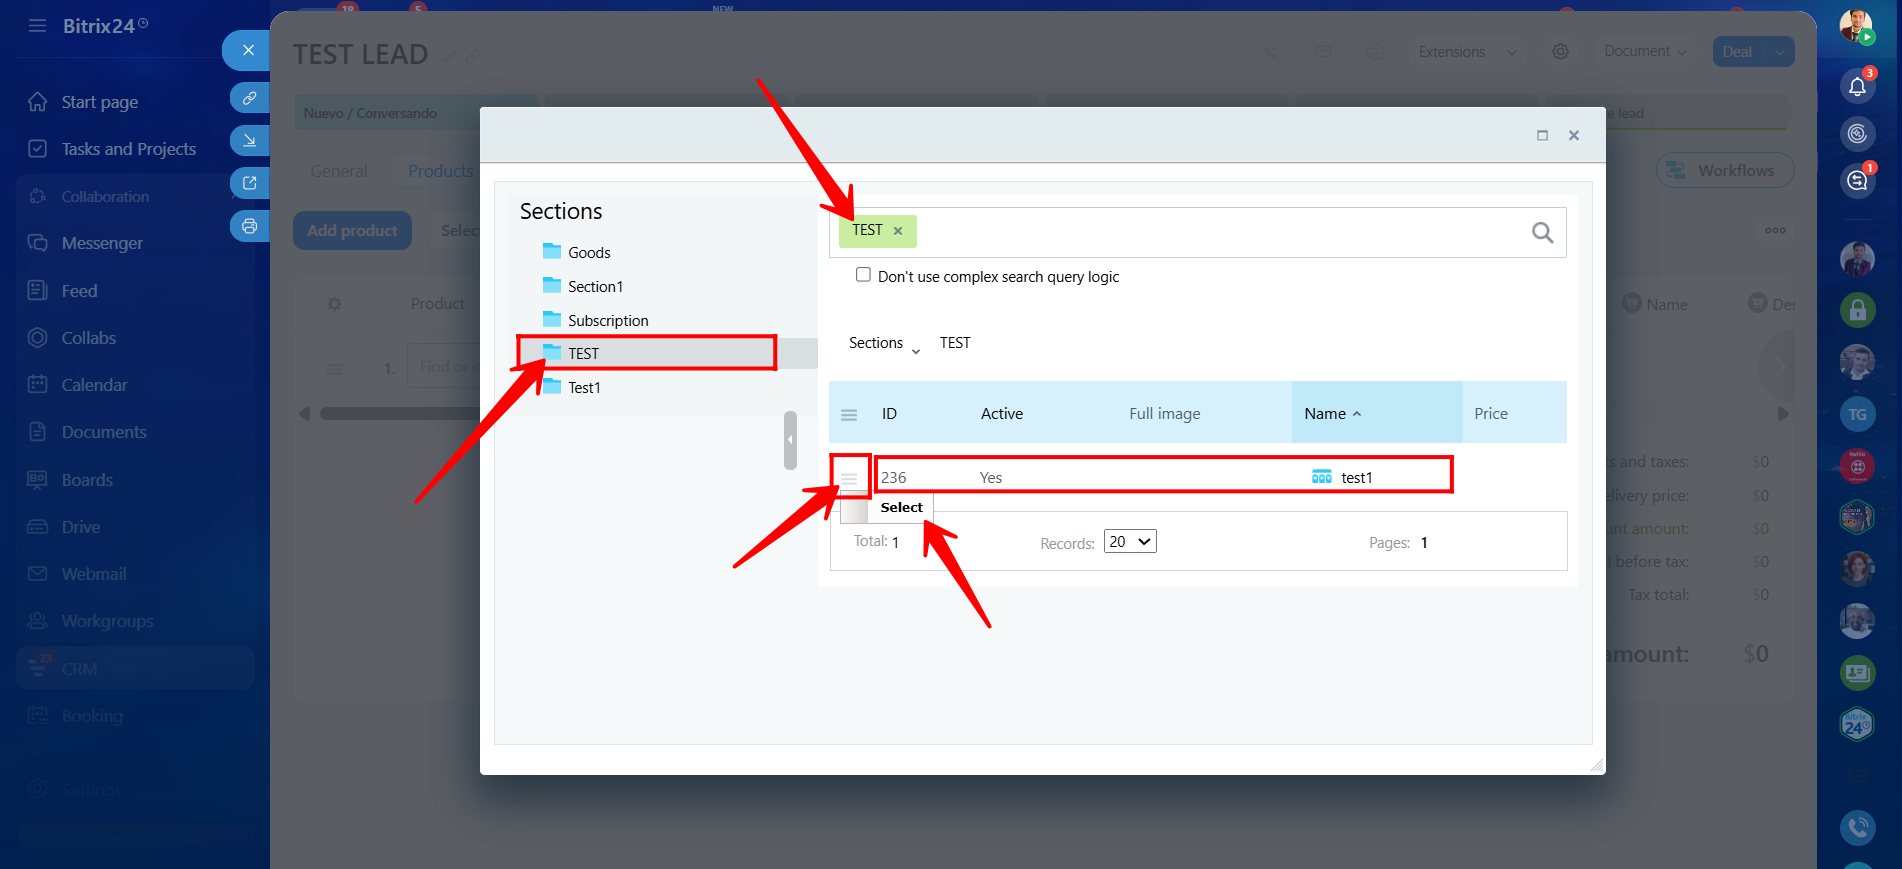
22. Select the section created earlier, and then choose the product from that section to link it with the lead.
23. After selecting the product, choose the required product variation/SKU and save the lead. You will notice that selecting a Dictionary-type SKU automatically displays the related List-type SKU property associated with that variation.
24. To further explore SKU properties and create additional custom property types, navigate to Sites and Stores → Settings → Commercial Catalog → SKU Properties.
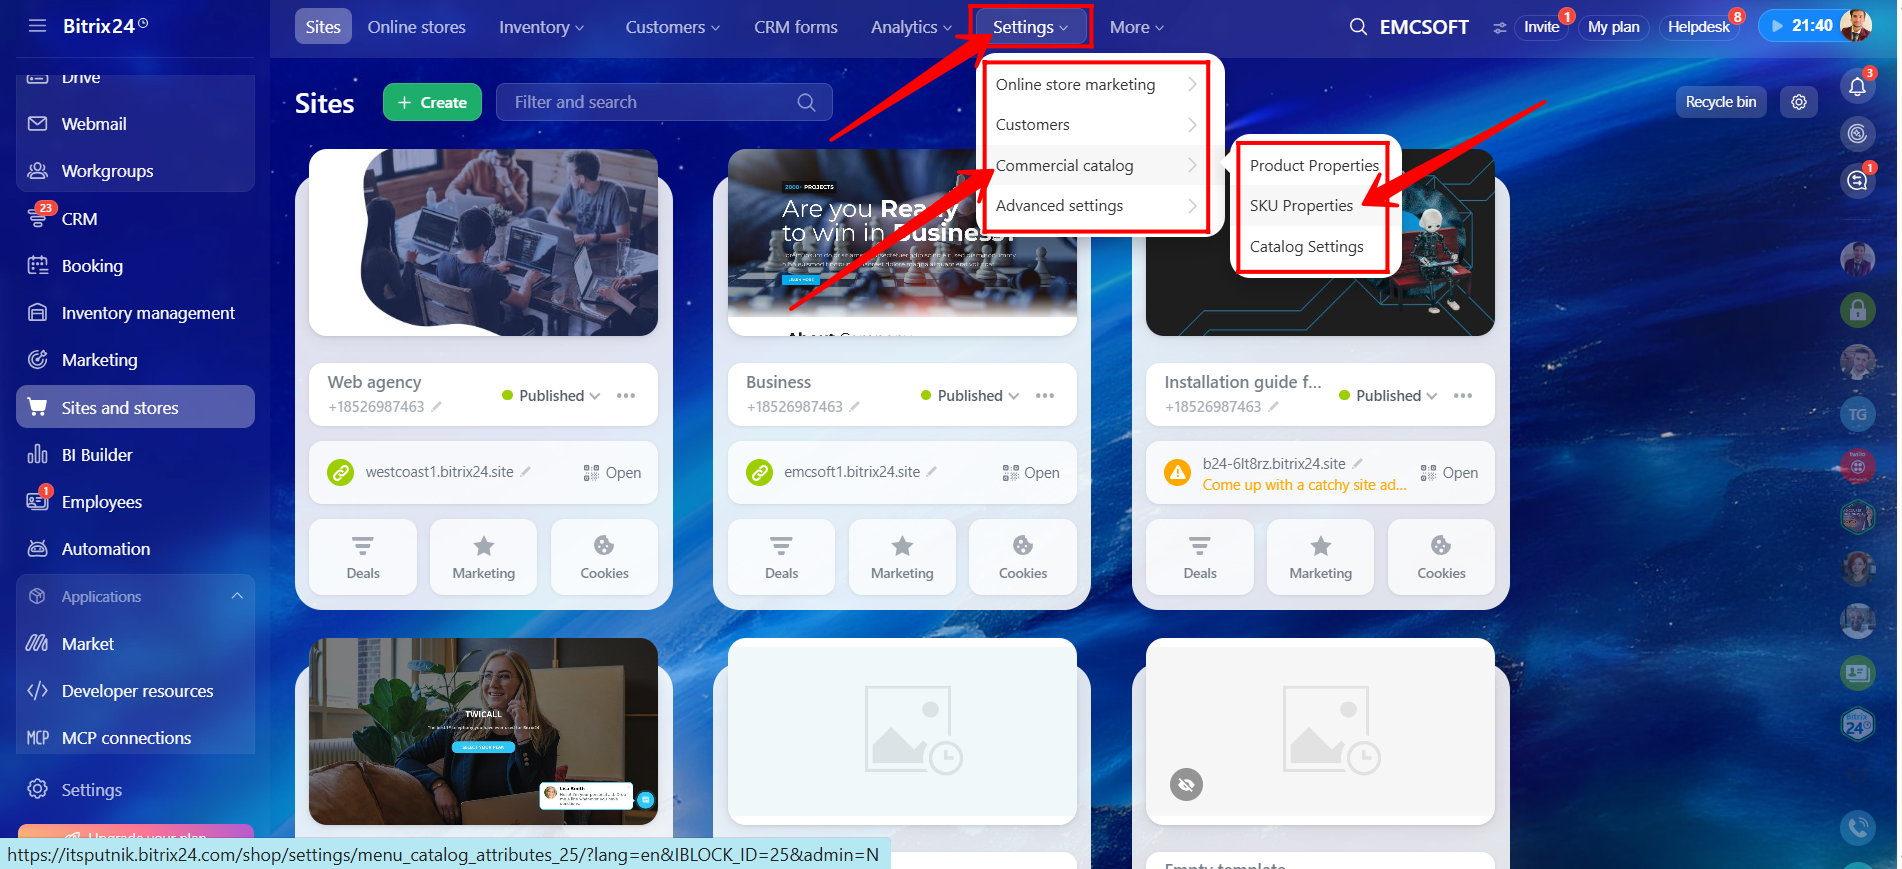
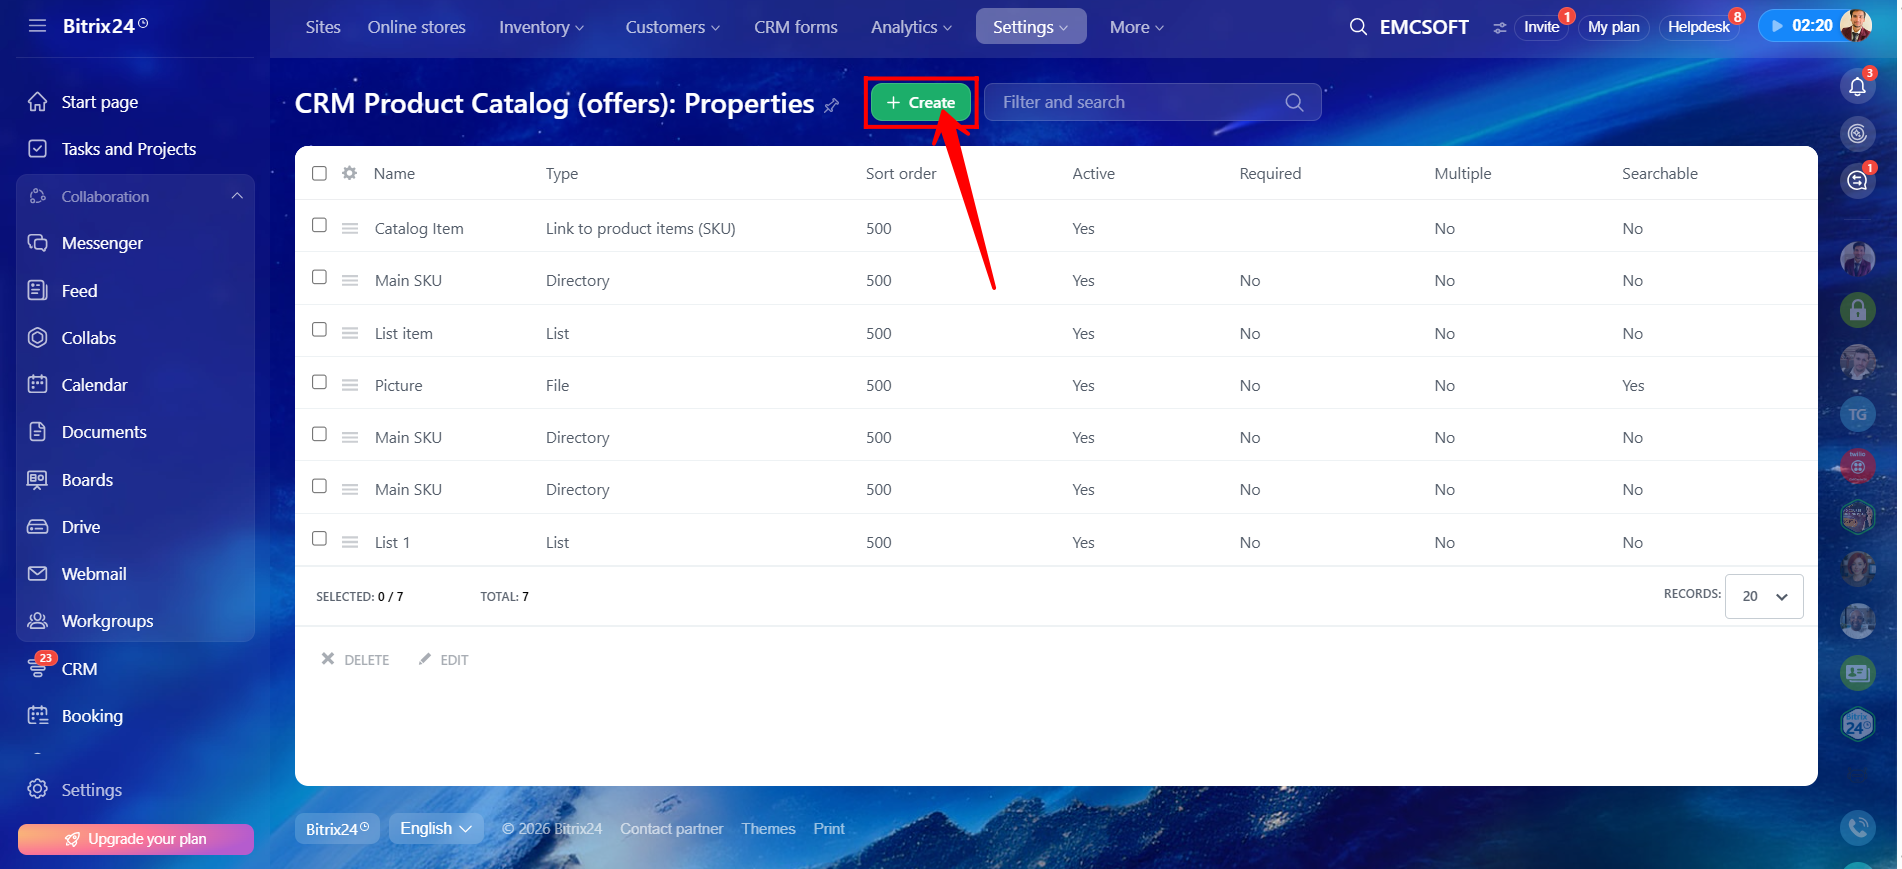
25. Click + Create.
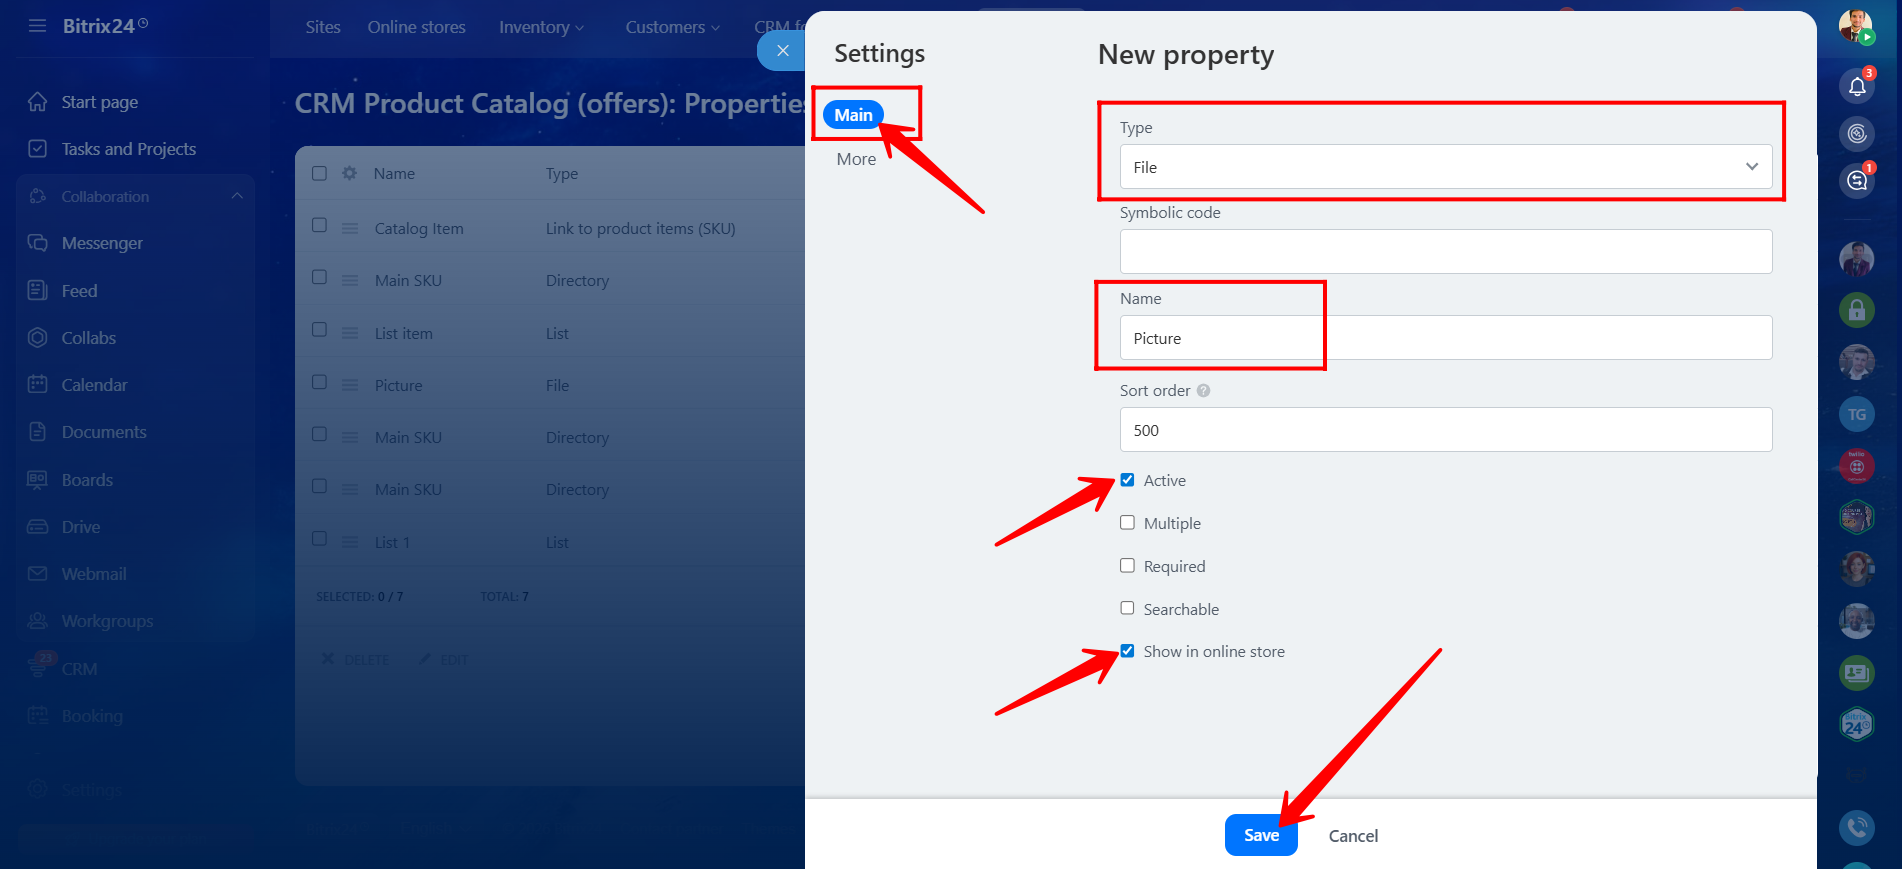
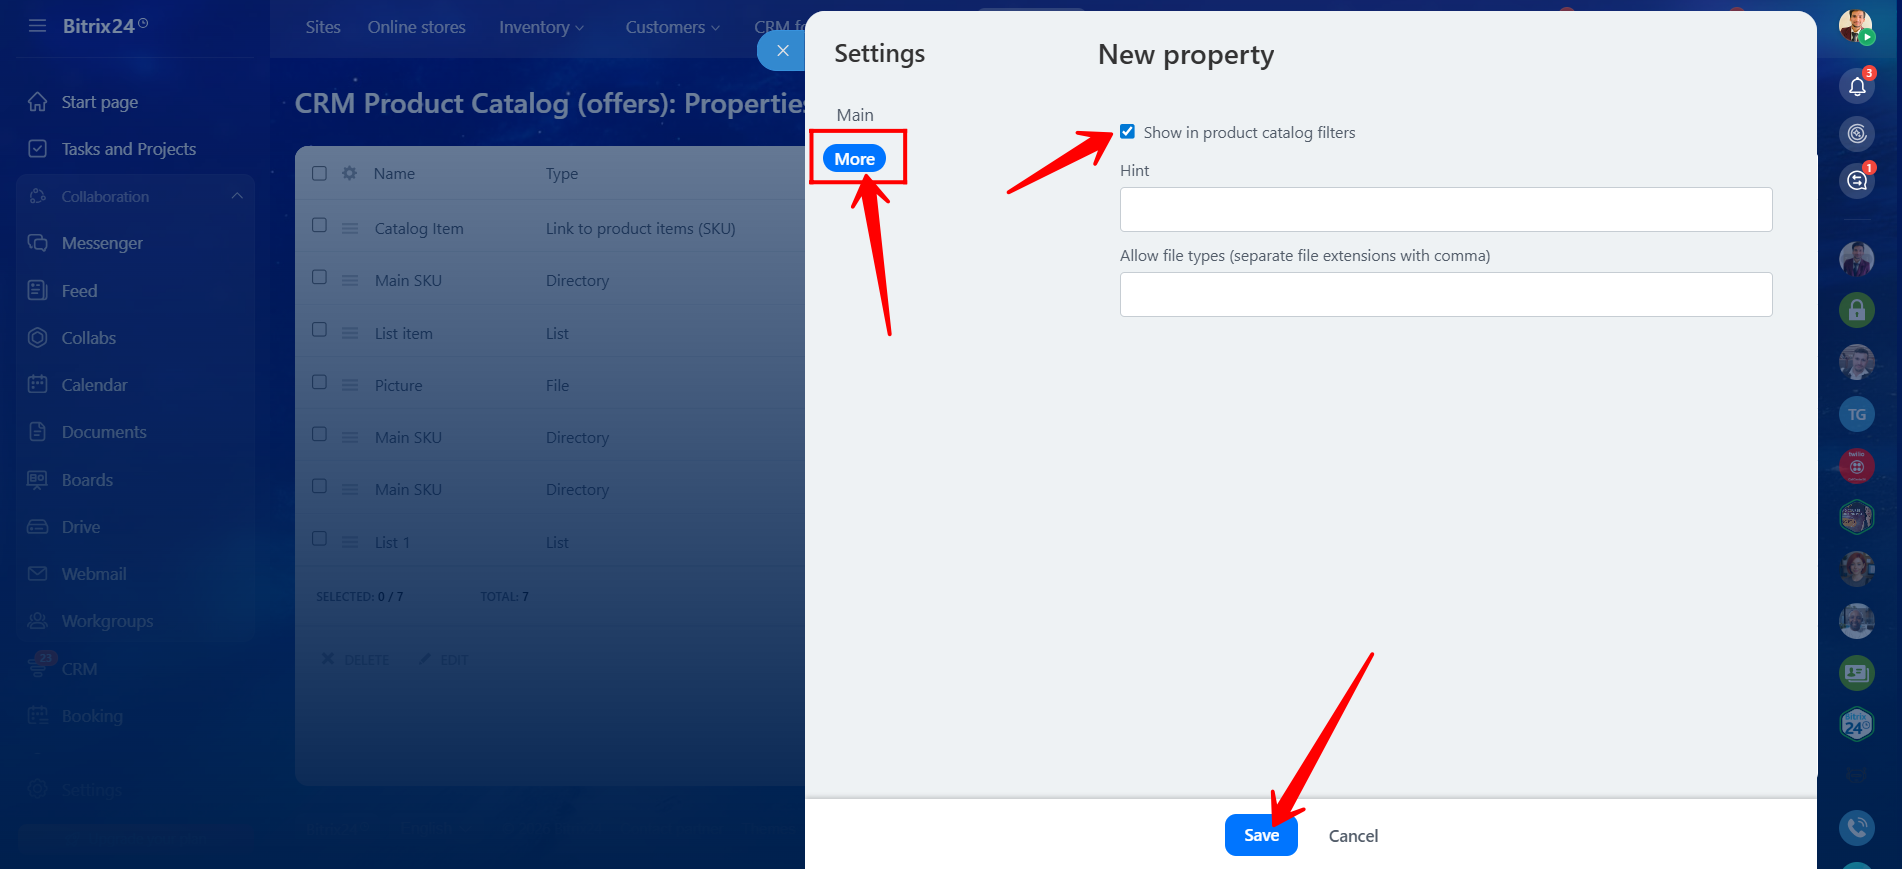
26. In the Main section of the property configuration, select the property type. In this example, we will create a property for uploading product images, so we selected the type File and named it Picture. Always mark the property as Active and Show in Online Store so it becomes available in product details.
27. In the More section of the property configuration, enable Show in Product Catalog Filters to allow filtering products by this property. You can also add a property hint and allow multiple file extensions by separating them with commas.
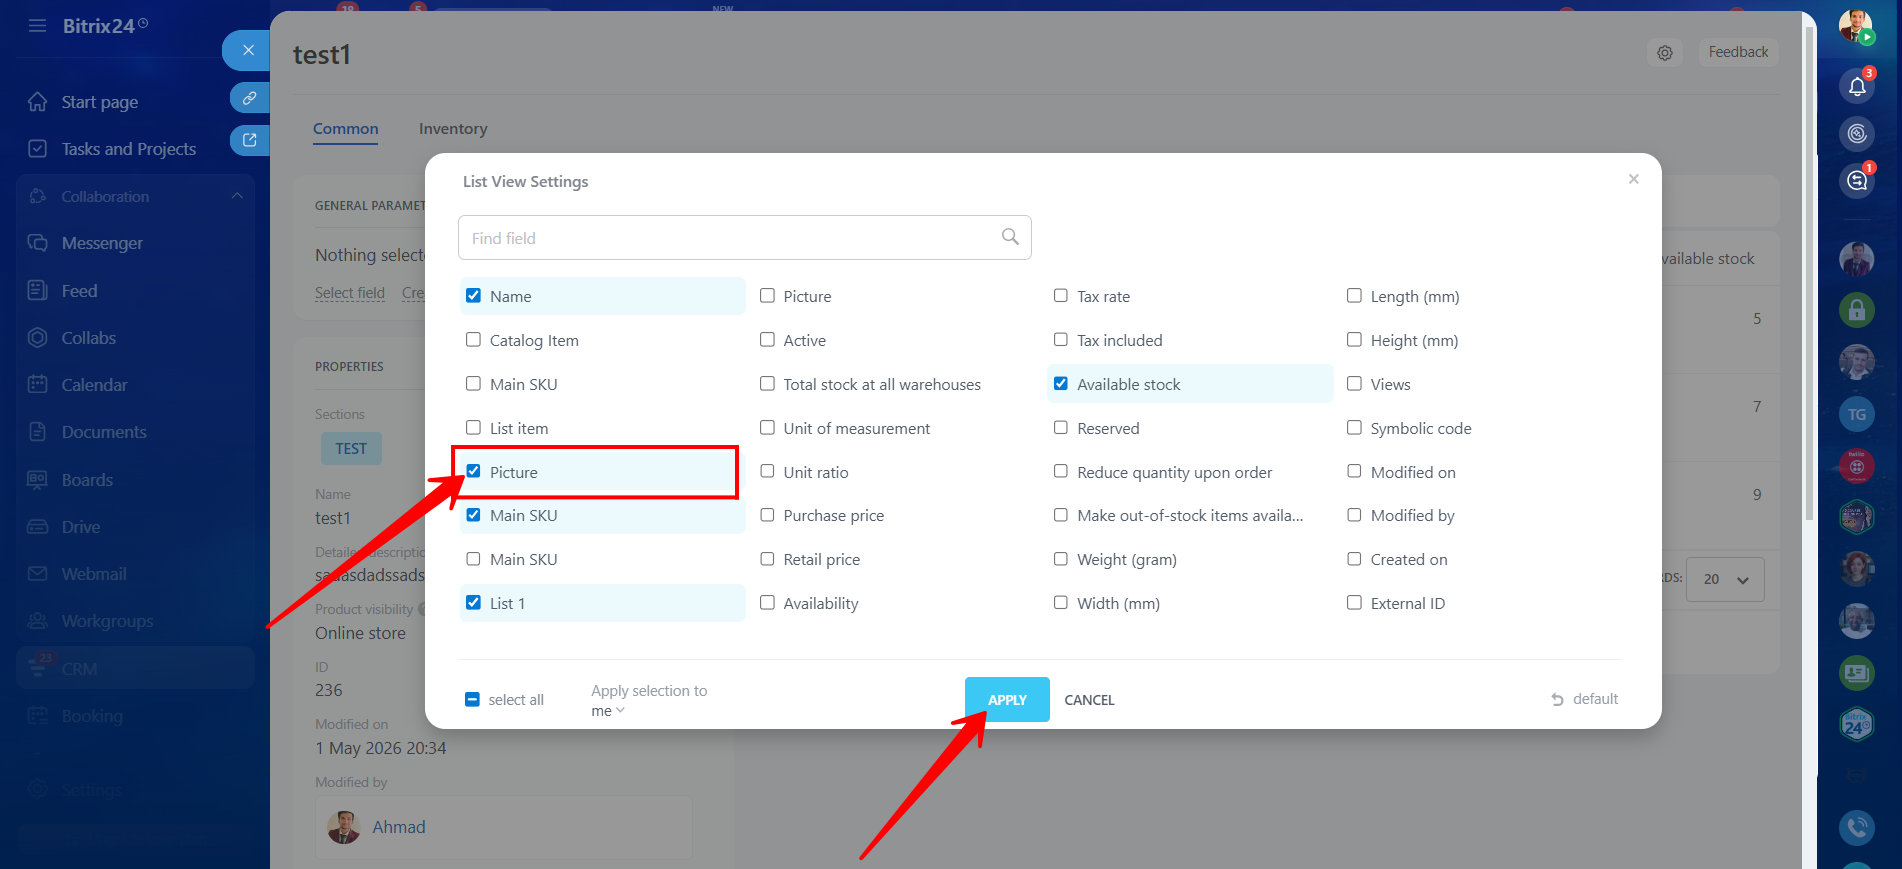
28. Open the product details within the section and ensure that the Picture property field is selected to appear within the product variation details. After selecting the required fields/properties, click Apply.
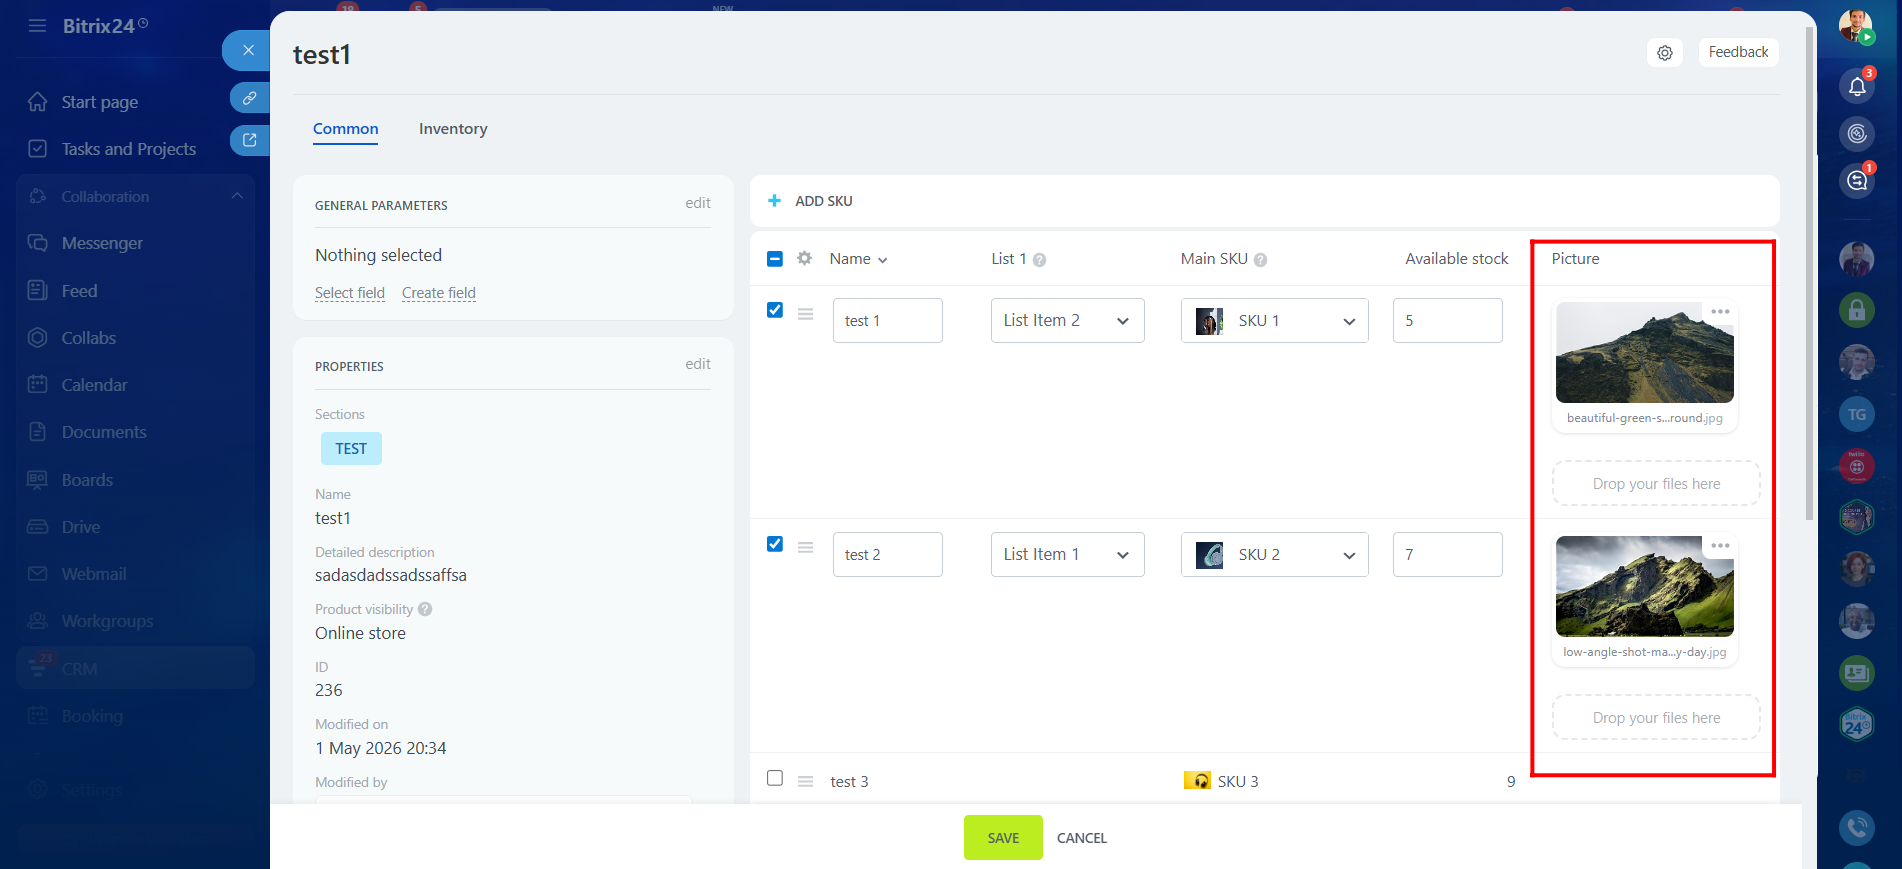
29. Upload the image for each product variation individually. After uploading the images, save the changes.
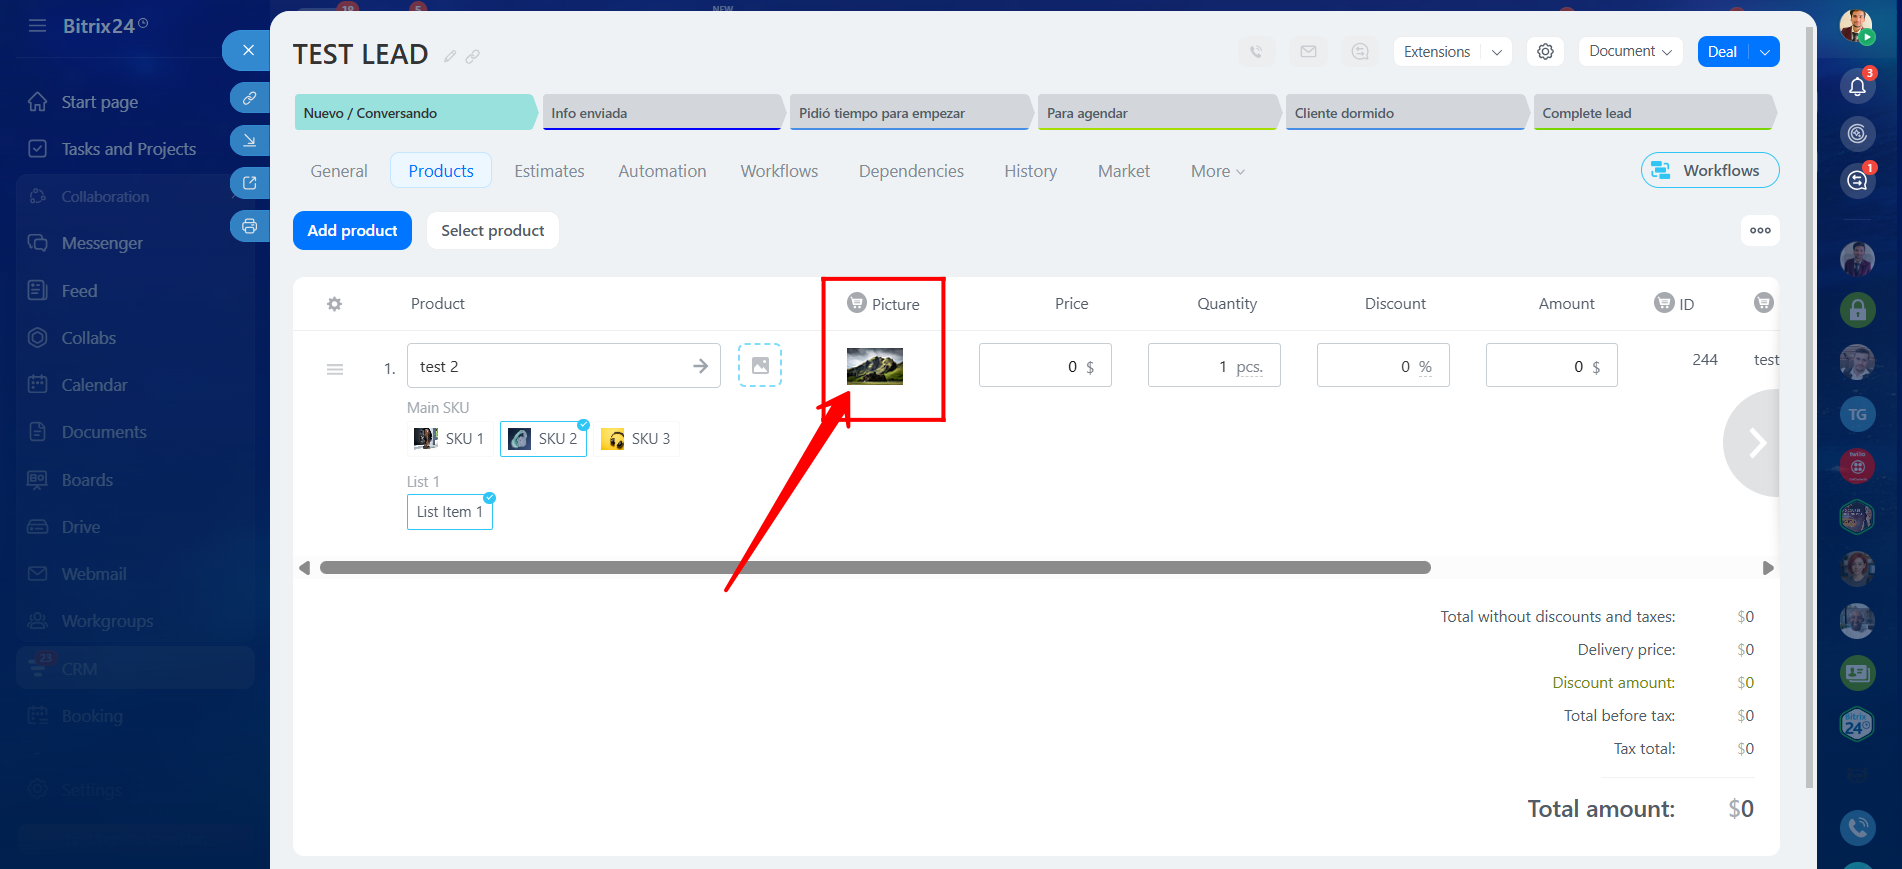
30. Return to the lead and open the Products tab. You will now see that each selected product variation displays only its corresponding image. When you change the variation selection, the related List-type SKU value, image, stock quantity, and other predefined details configured earlier are updated automatically.
31. We are now creating another SKU property field of type List for testing purposes. Make sure it is marked as Active and Show in Online Store, then click Save.
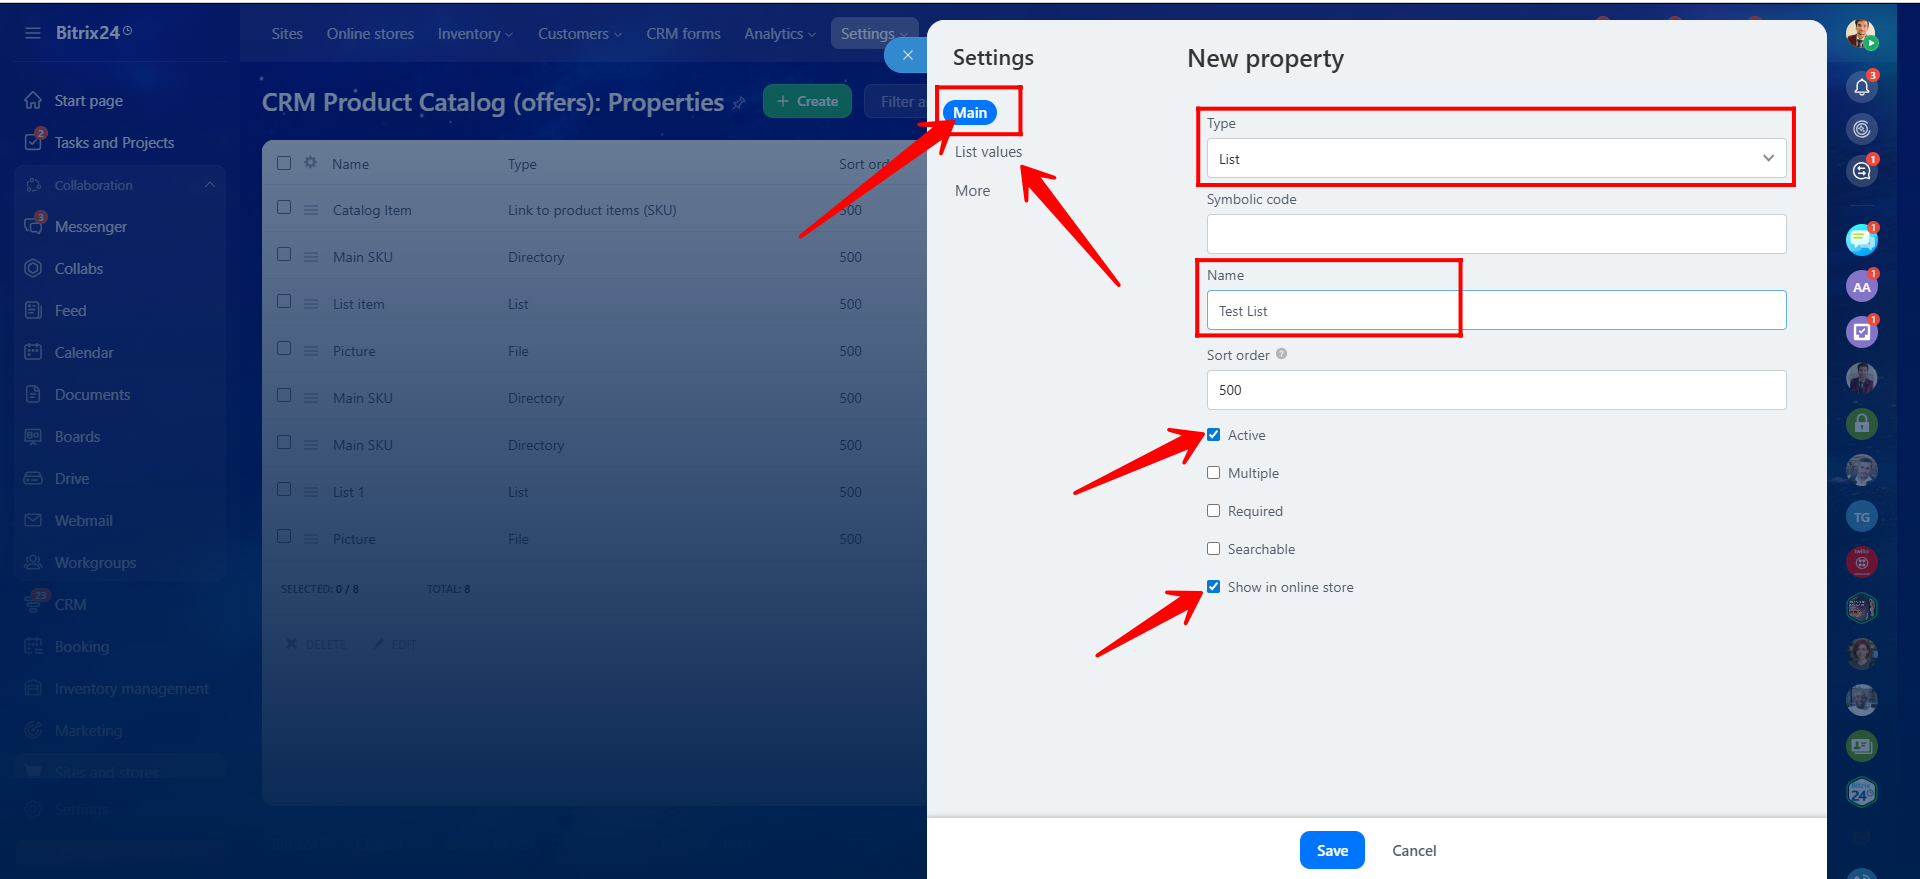
32. Edit this newly created List-type SKU property to add list values, then click Save.
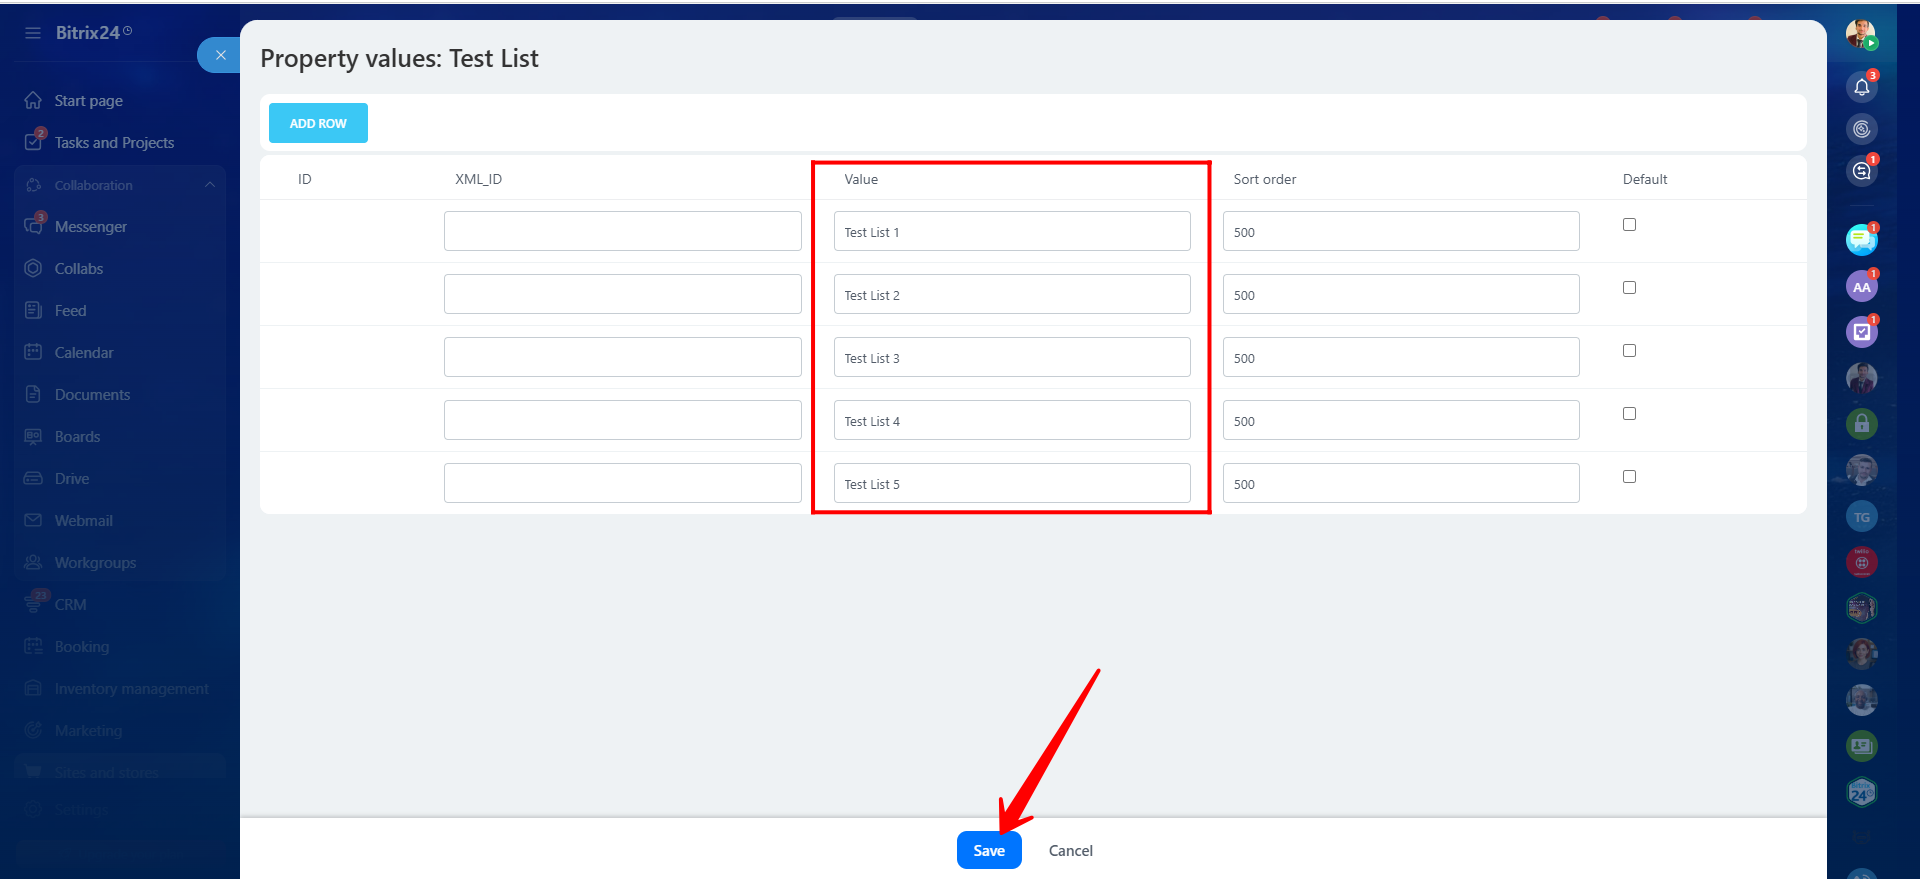
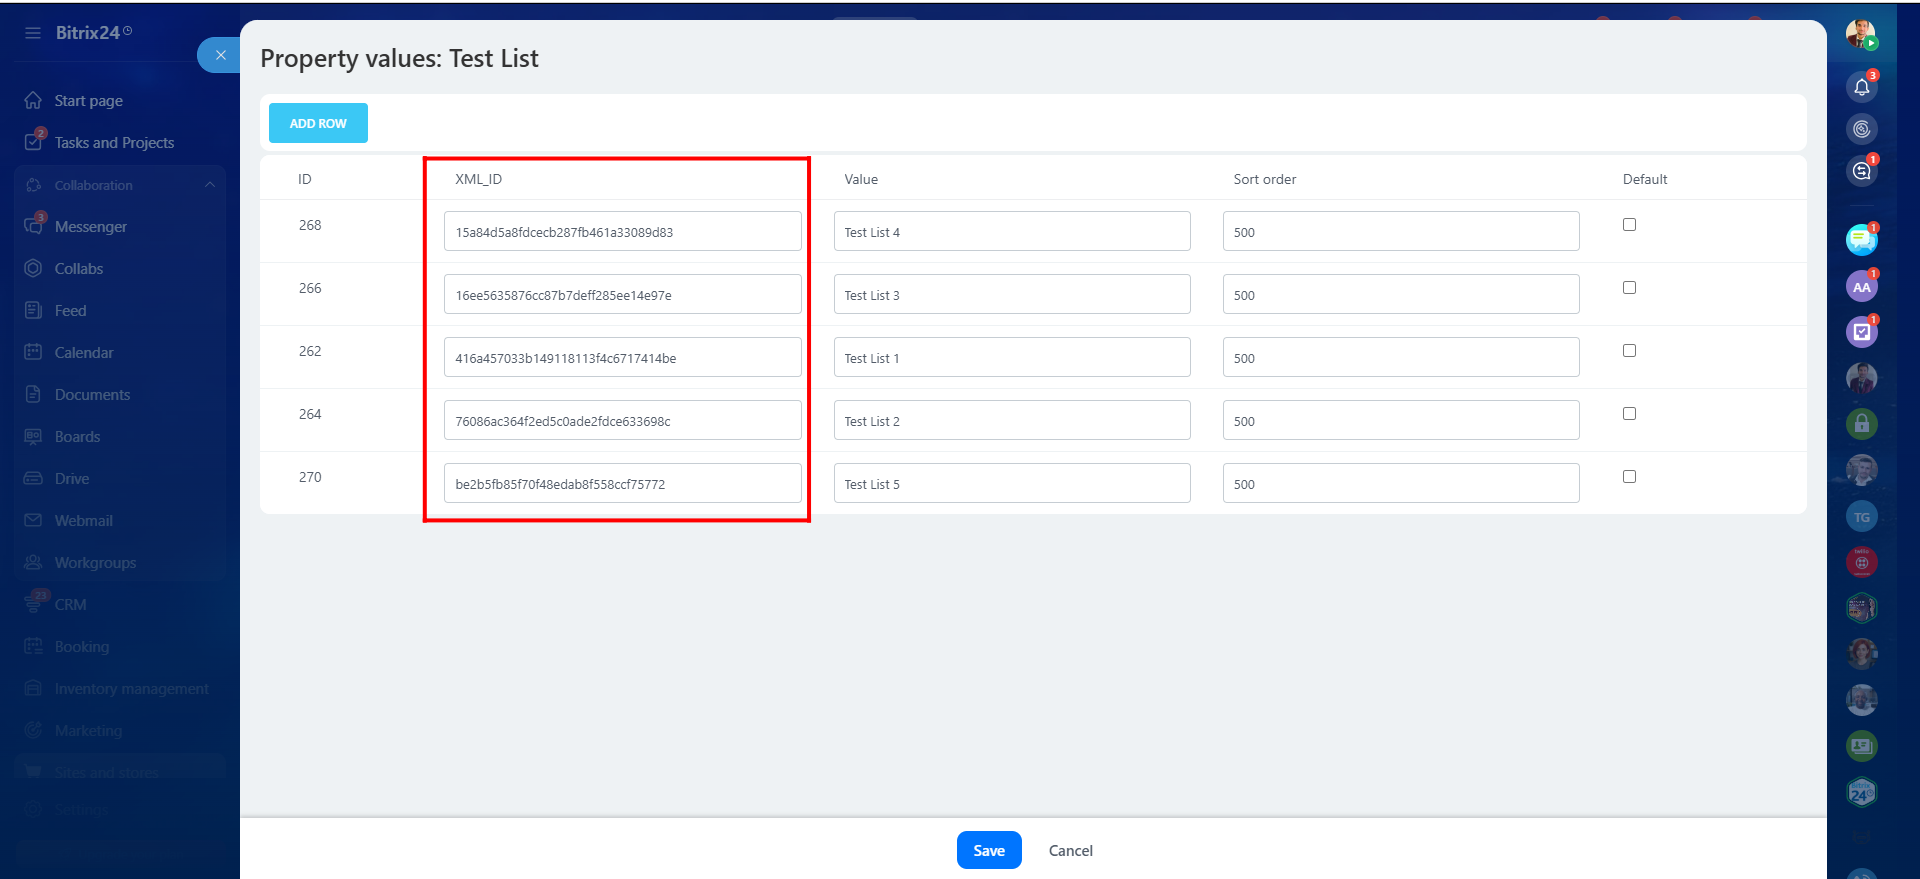
33. Each list value will automatically receive an XML_ID, which is useful for CRM references. You may also set any list value as the default option. After adding all list values, click Save.
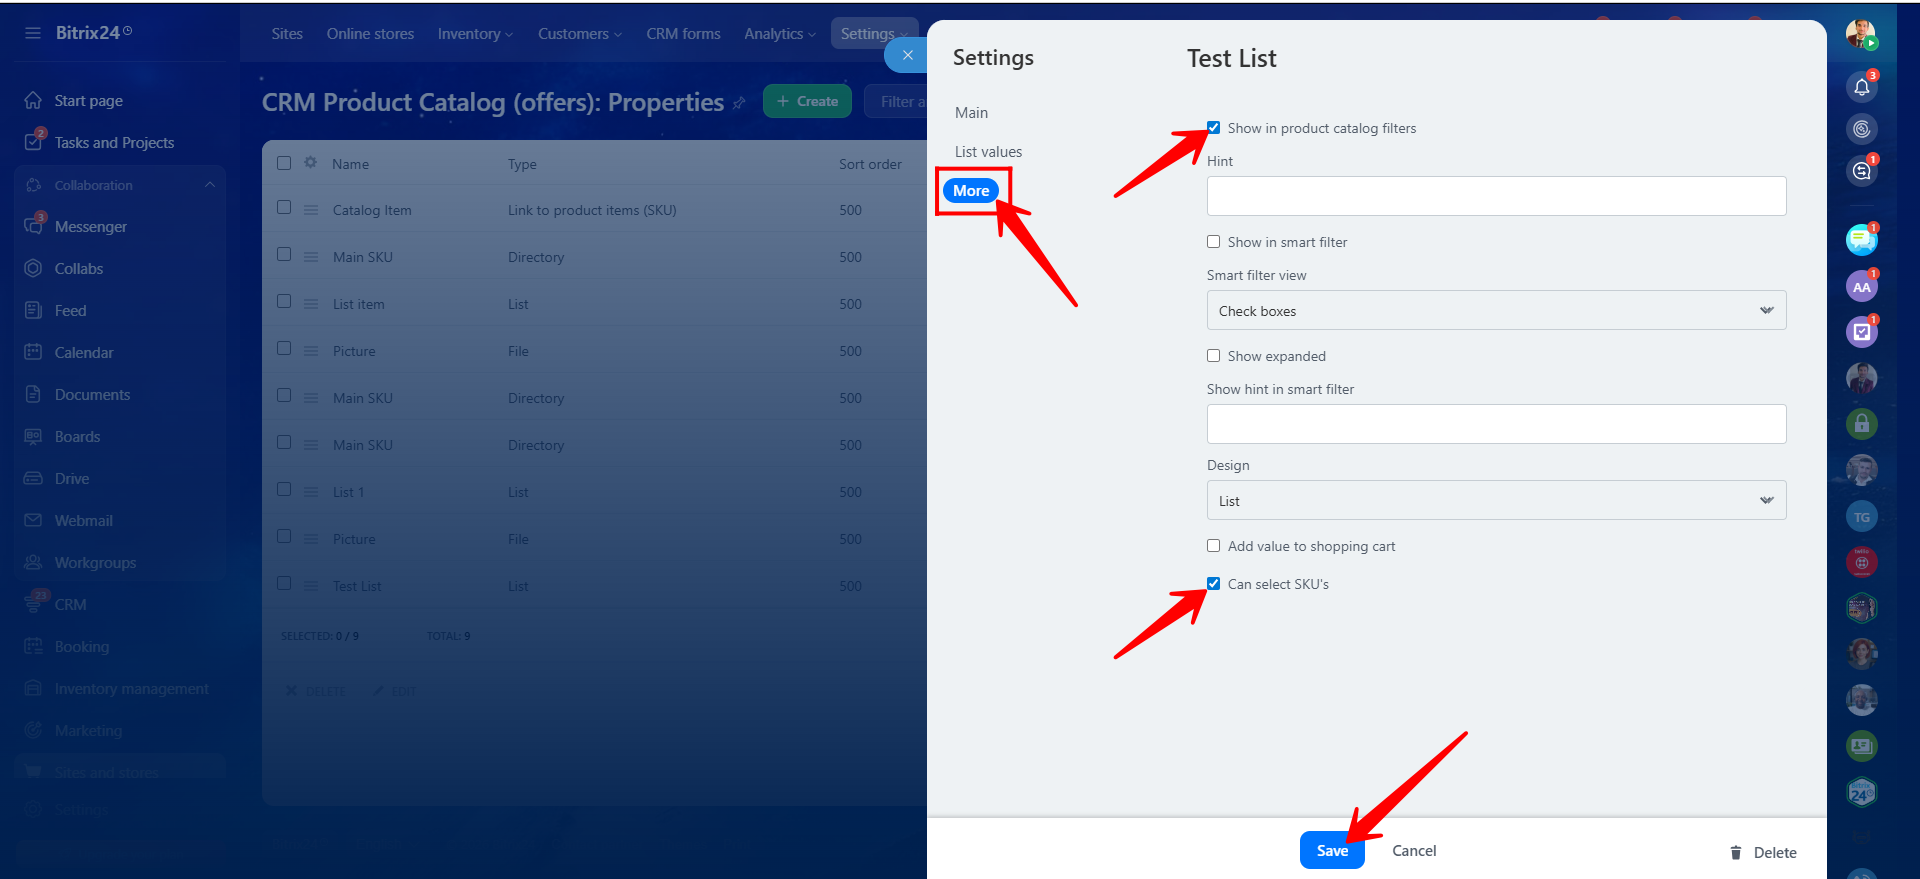
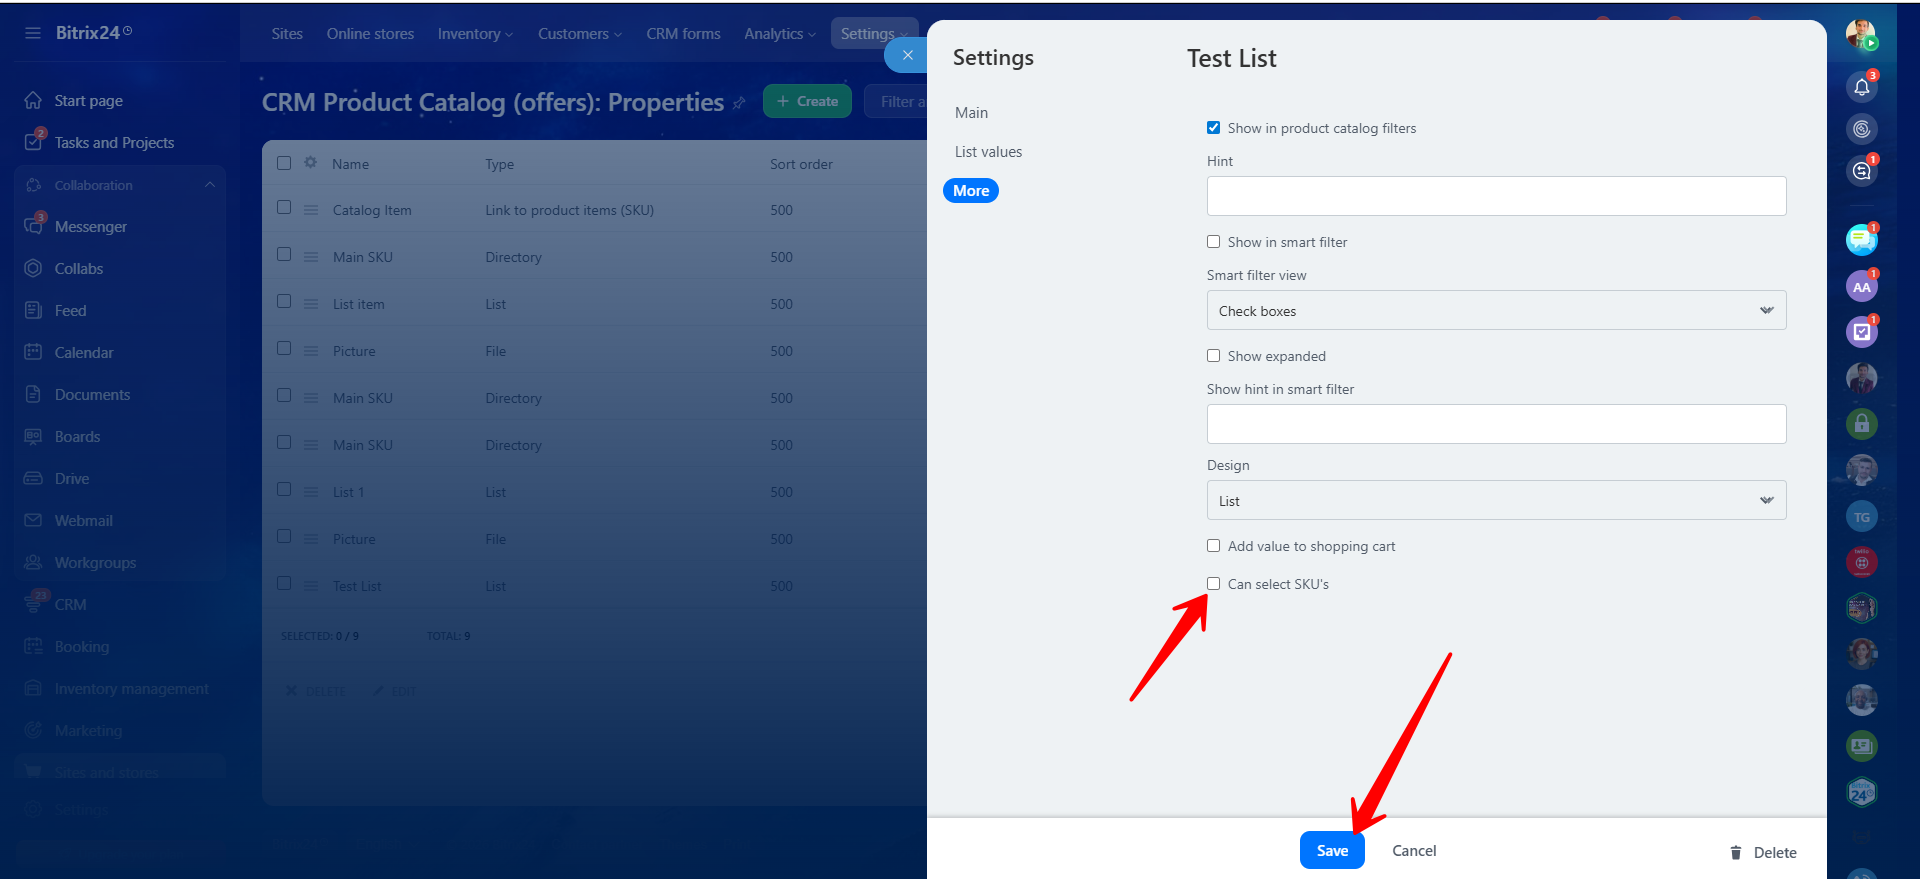
34. In the More section of the SKU property, enable Show in Product Catalog Filters if needed. You may also enable the checkbox Can Select SKU’s. Its purpose will be explained in the following steps. Click Save.
35. To display this SKU property within product variation details, enable it as a visible column in the variation details area.
36. We selected values from this List-type SKU property for each product variation. Click Save after completing the selections.

37. Return to the lead and explore the product variation selection. You will notice that the newly created List-type property has now become the primary SKU selector, and the previously configured Dictionary-type and List-type SKU properties are displayed according to the selected value.
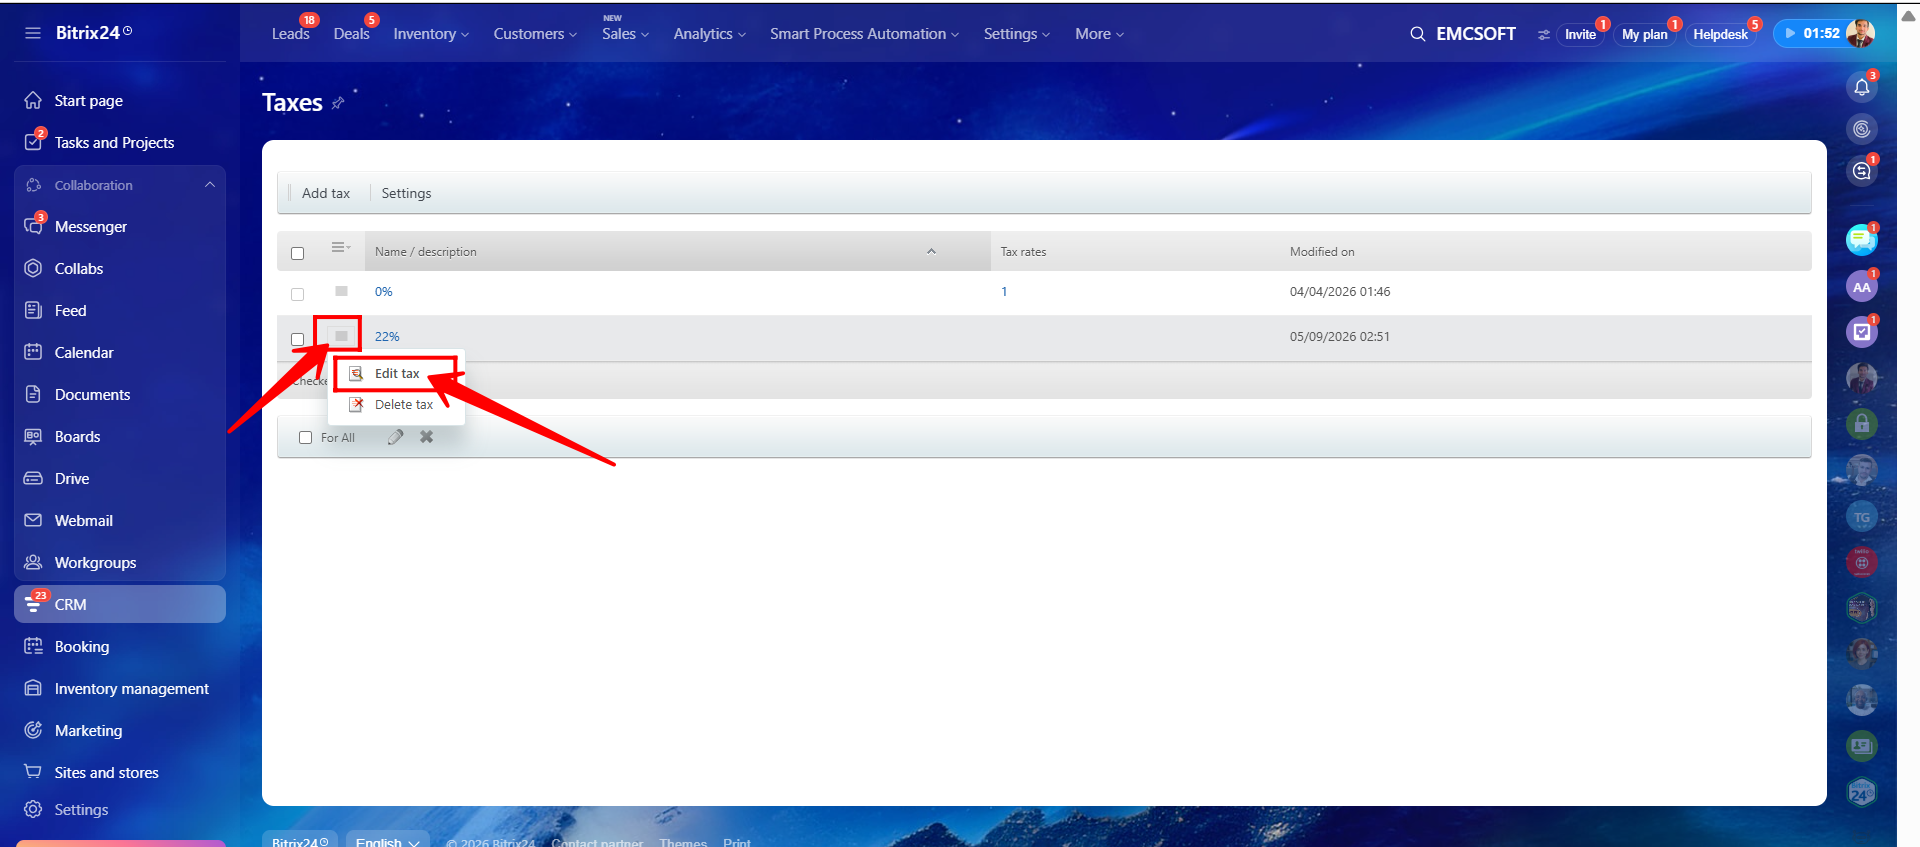
38. If you disable the option Can Select SKU’s for the newly created List-type property in Settings → Commercial Catalog → SKU Properties, that property will no longer appear as the primary SKU selector. Instead, the earlier Dictionary-type SKU property will again become the primary selector.
Within the product details editor, only List and Dictionary SKU properties can be created directly (as explained in Step 10). These properties also appear within Settings → Commercial Catalog → SKU Properties, where you can create additional SKU property types beyond just List and Dictionary.
39. As shown now, the Dictionary-type SKU property has again become the primary variation selector because we disabled the SKU selection capability for the new List-type property.

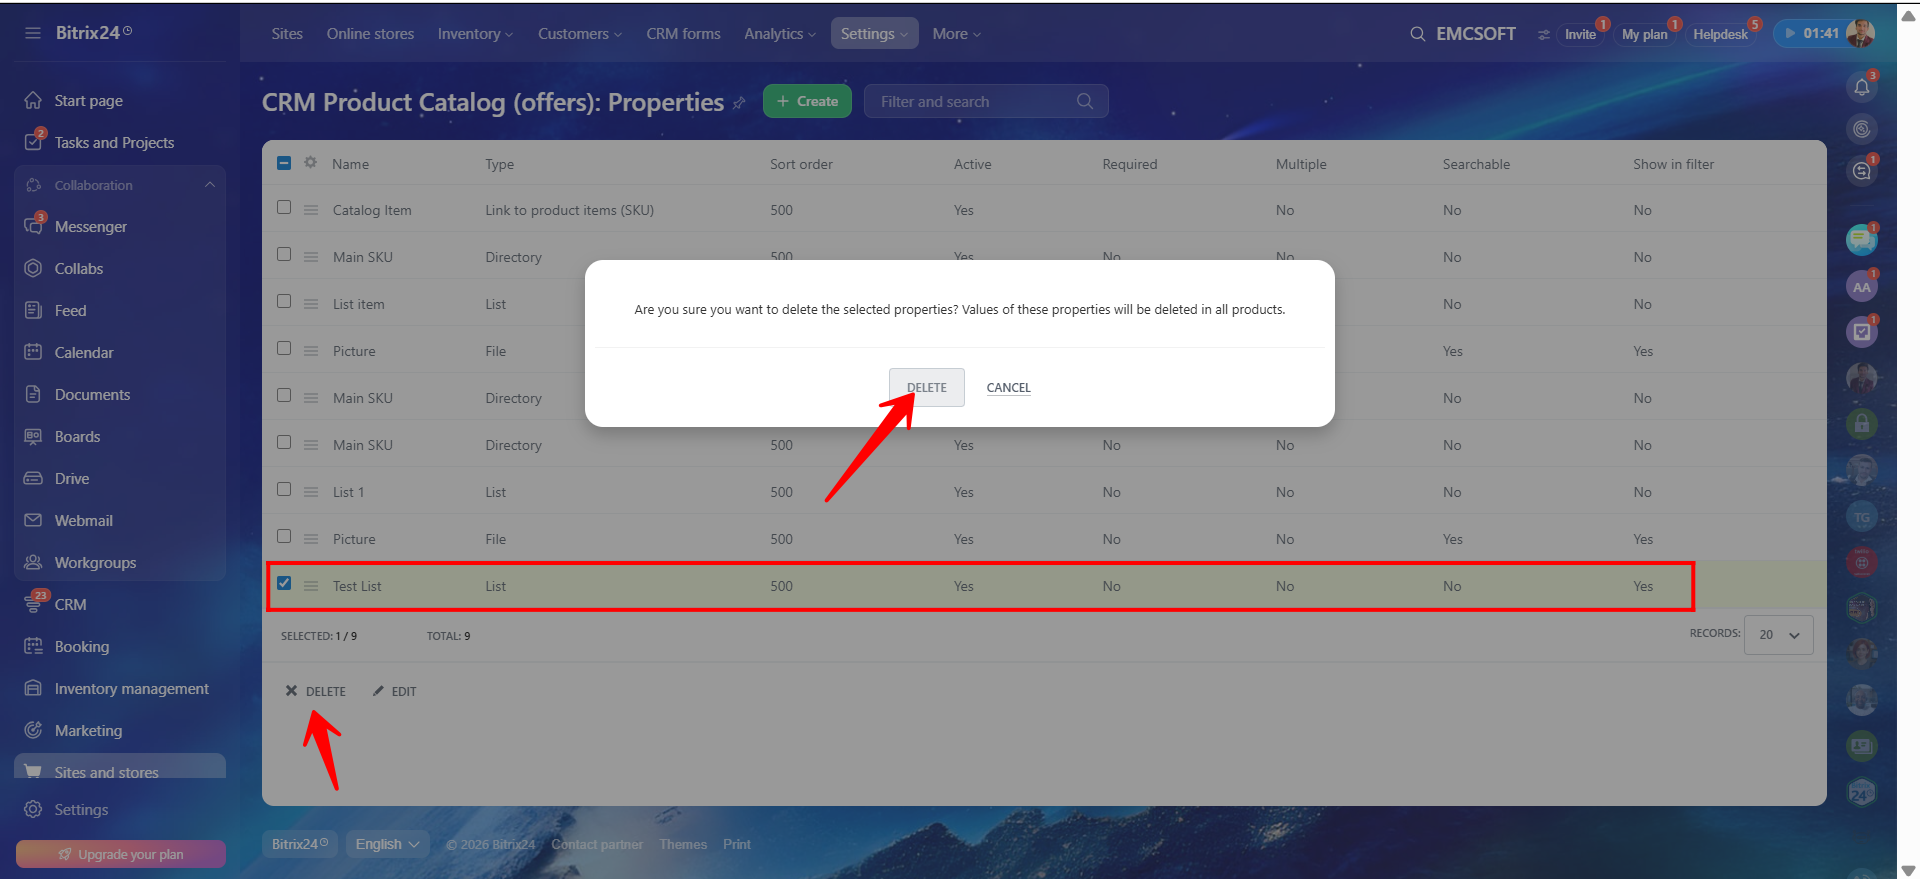
40. Any property can also be deleted later if it is no longer required.
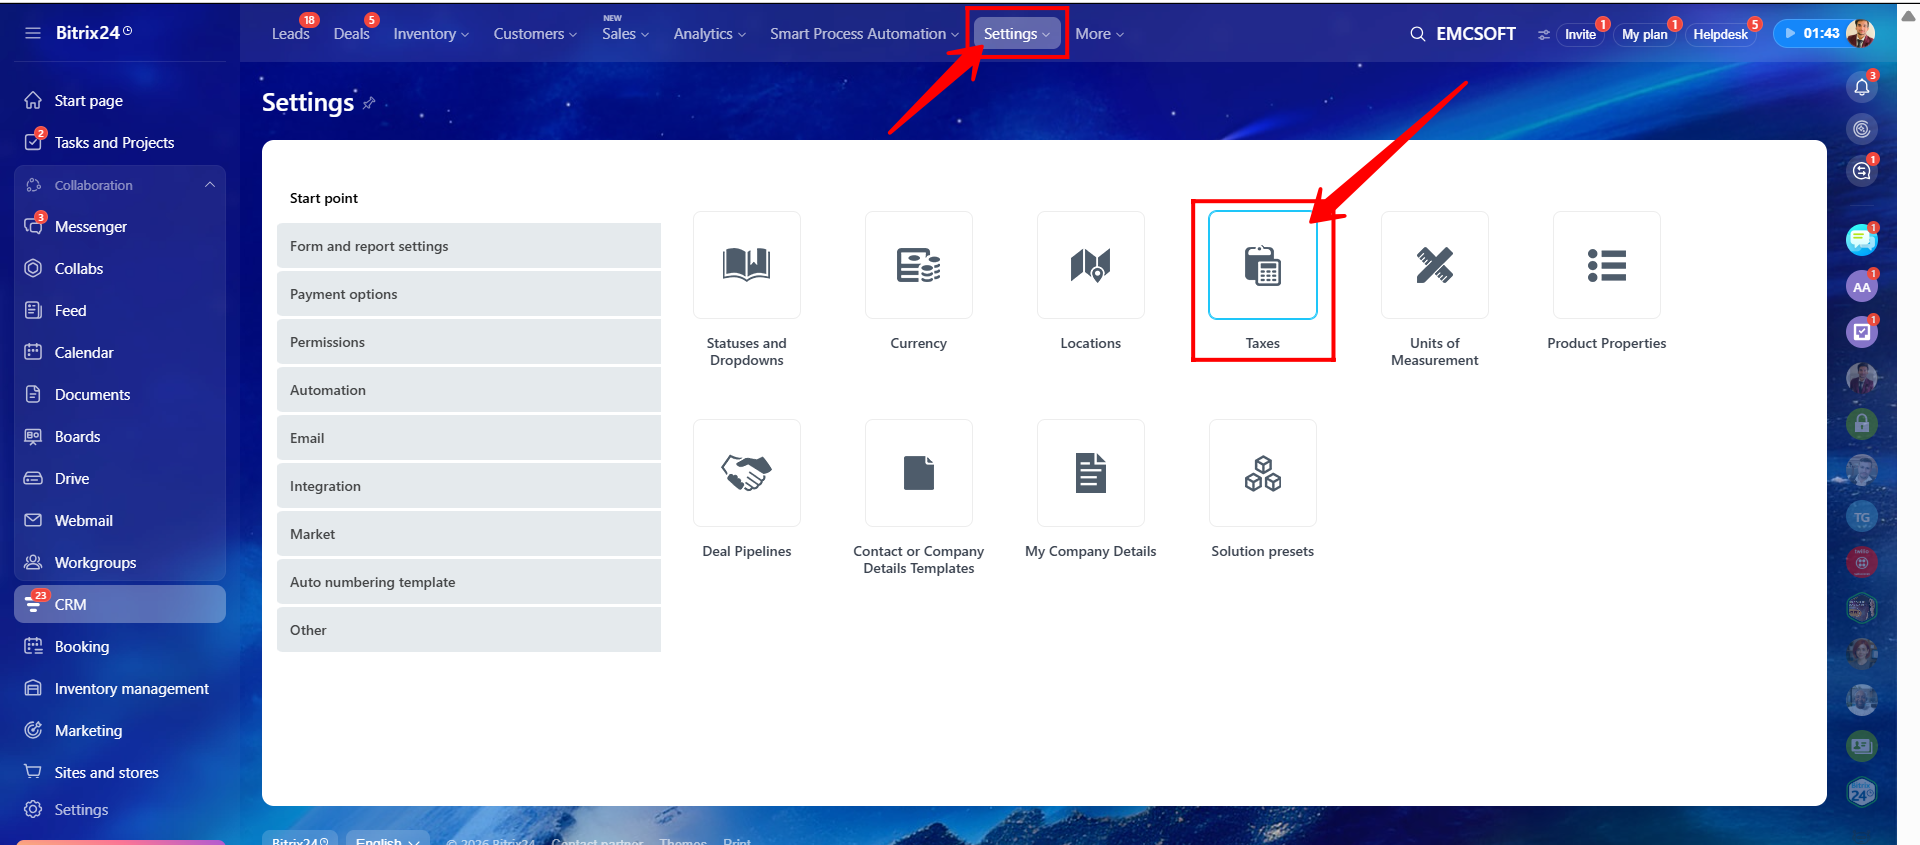
41. Now let’s learn how to configure Taxes in CRM. Navigate to CRM → Settings → CRM Settings → Taxes.
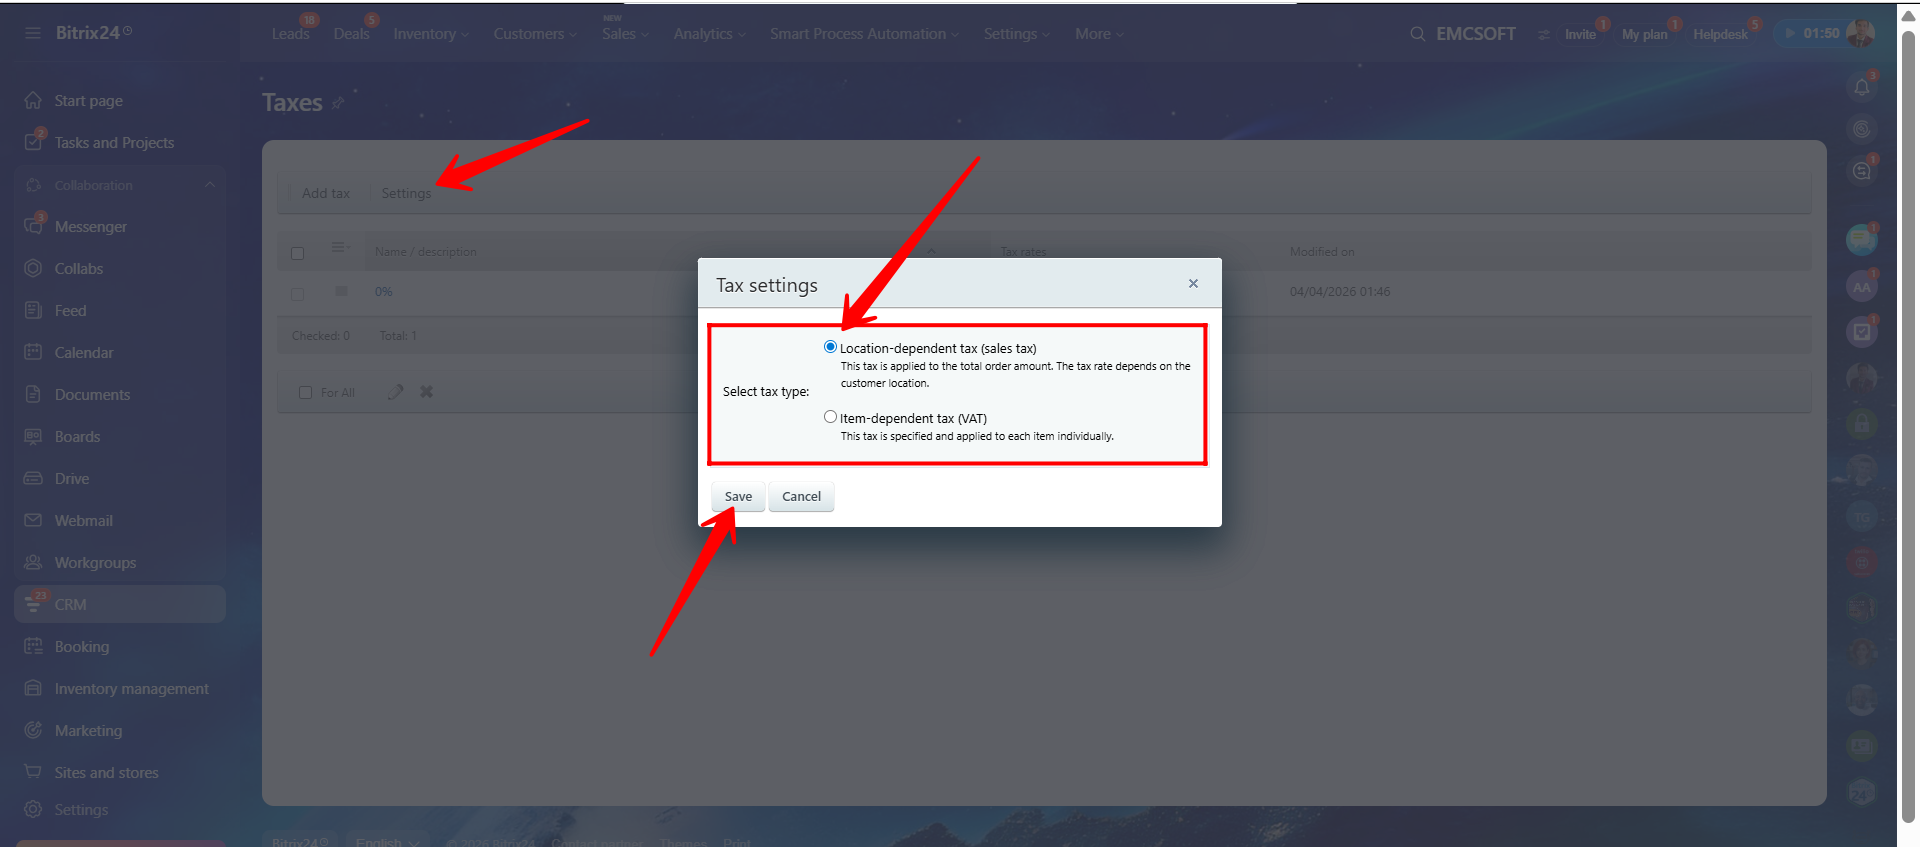
42. Select the appropriate tax configuration type according to your business requirements:
- Location-dependent tax (Sales Tax): Applied to the total order amount based on customer location.
- Item-dependent tax (VAT): Applied individually to each product item.
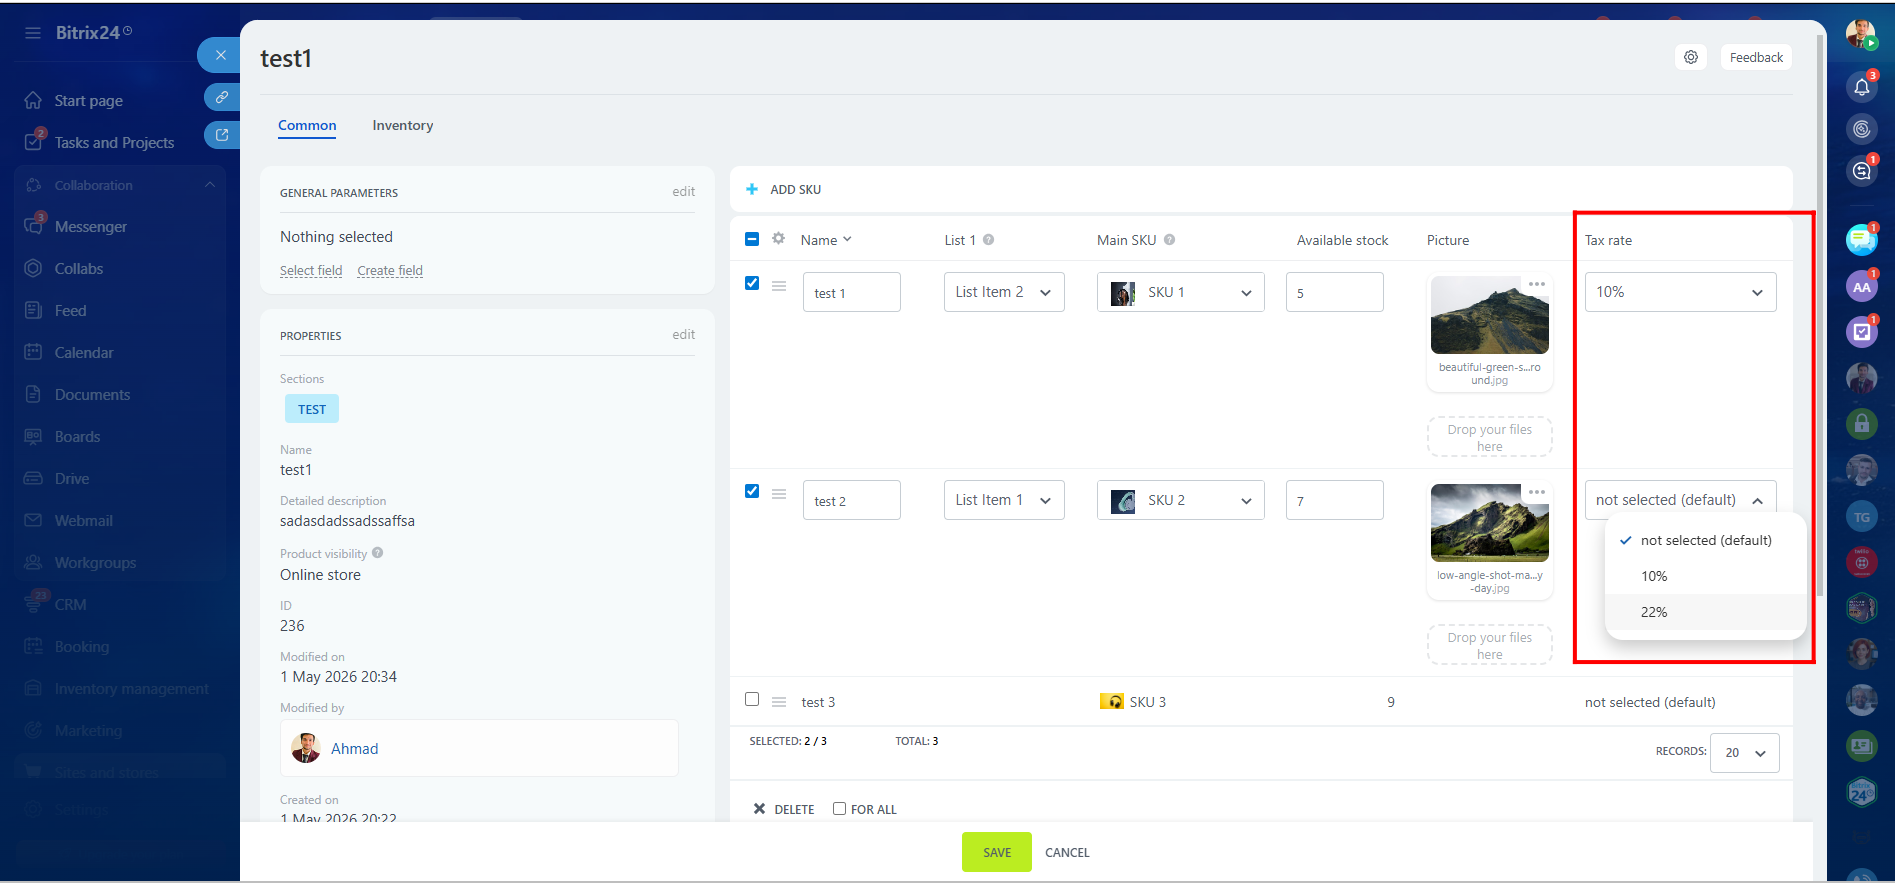
In this example, we will create a Location-dependent tax (Sales Tax).
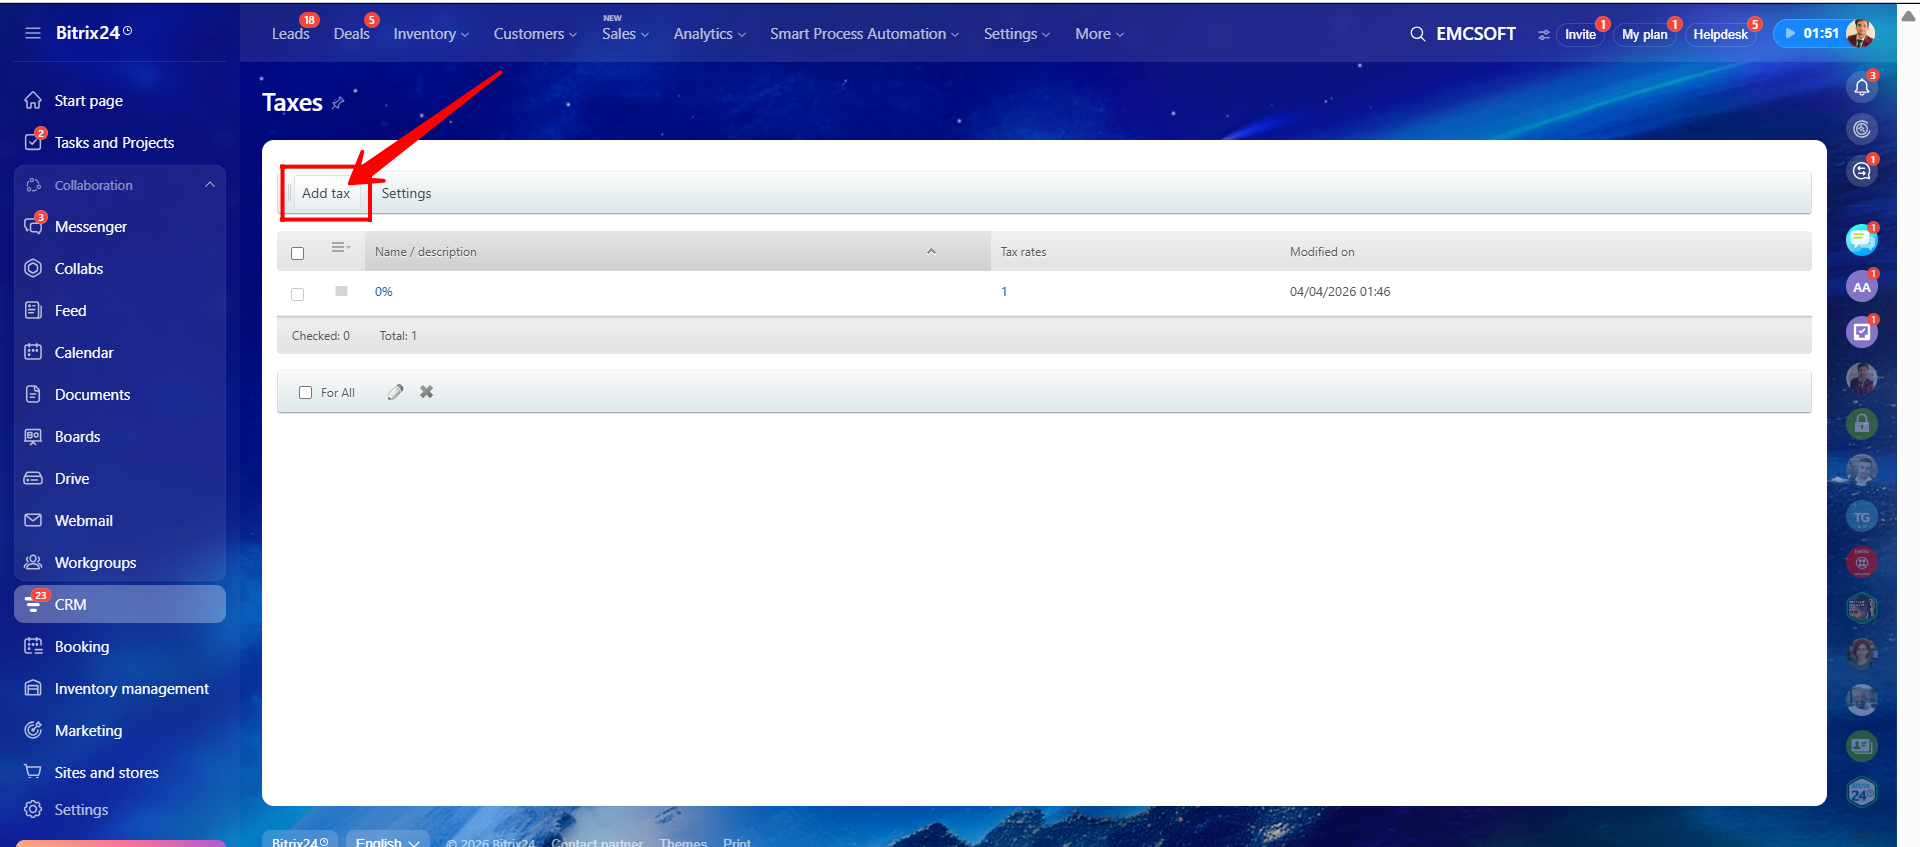
43. Click Add Tax.
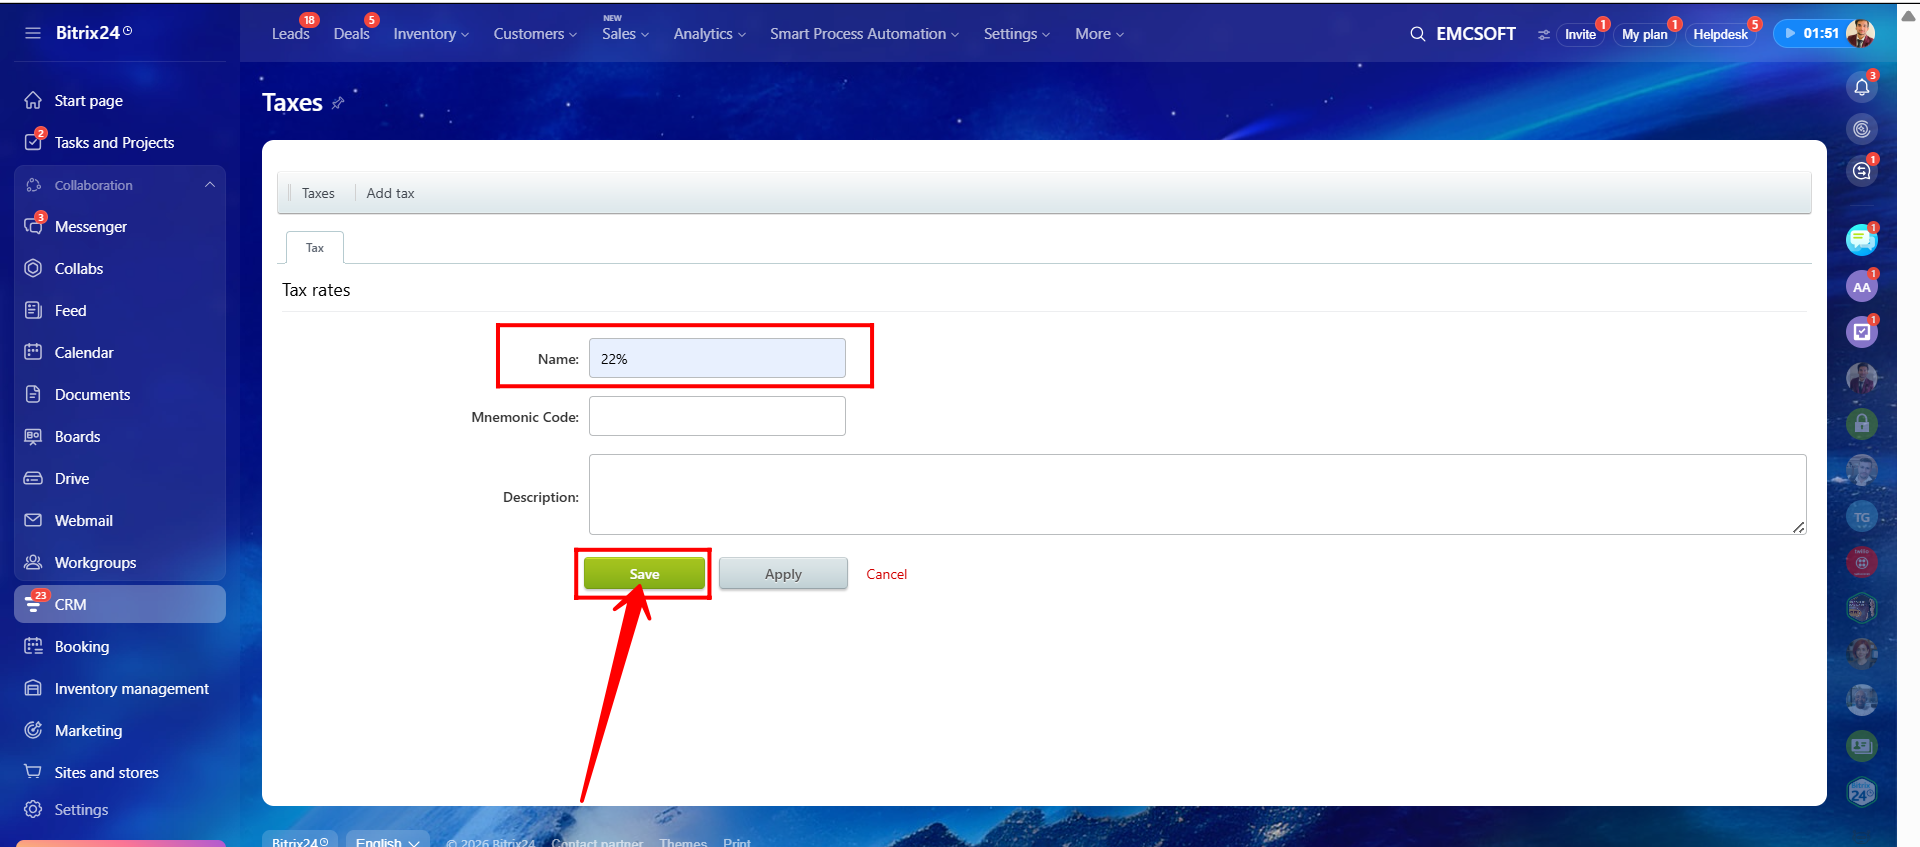
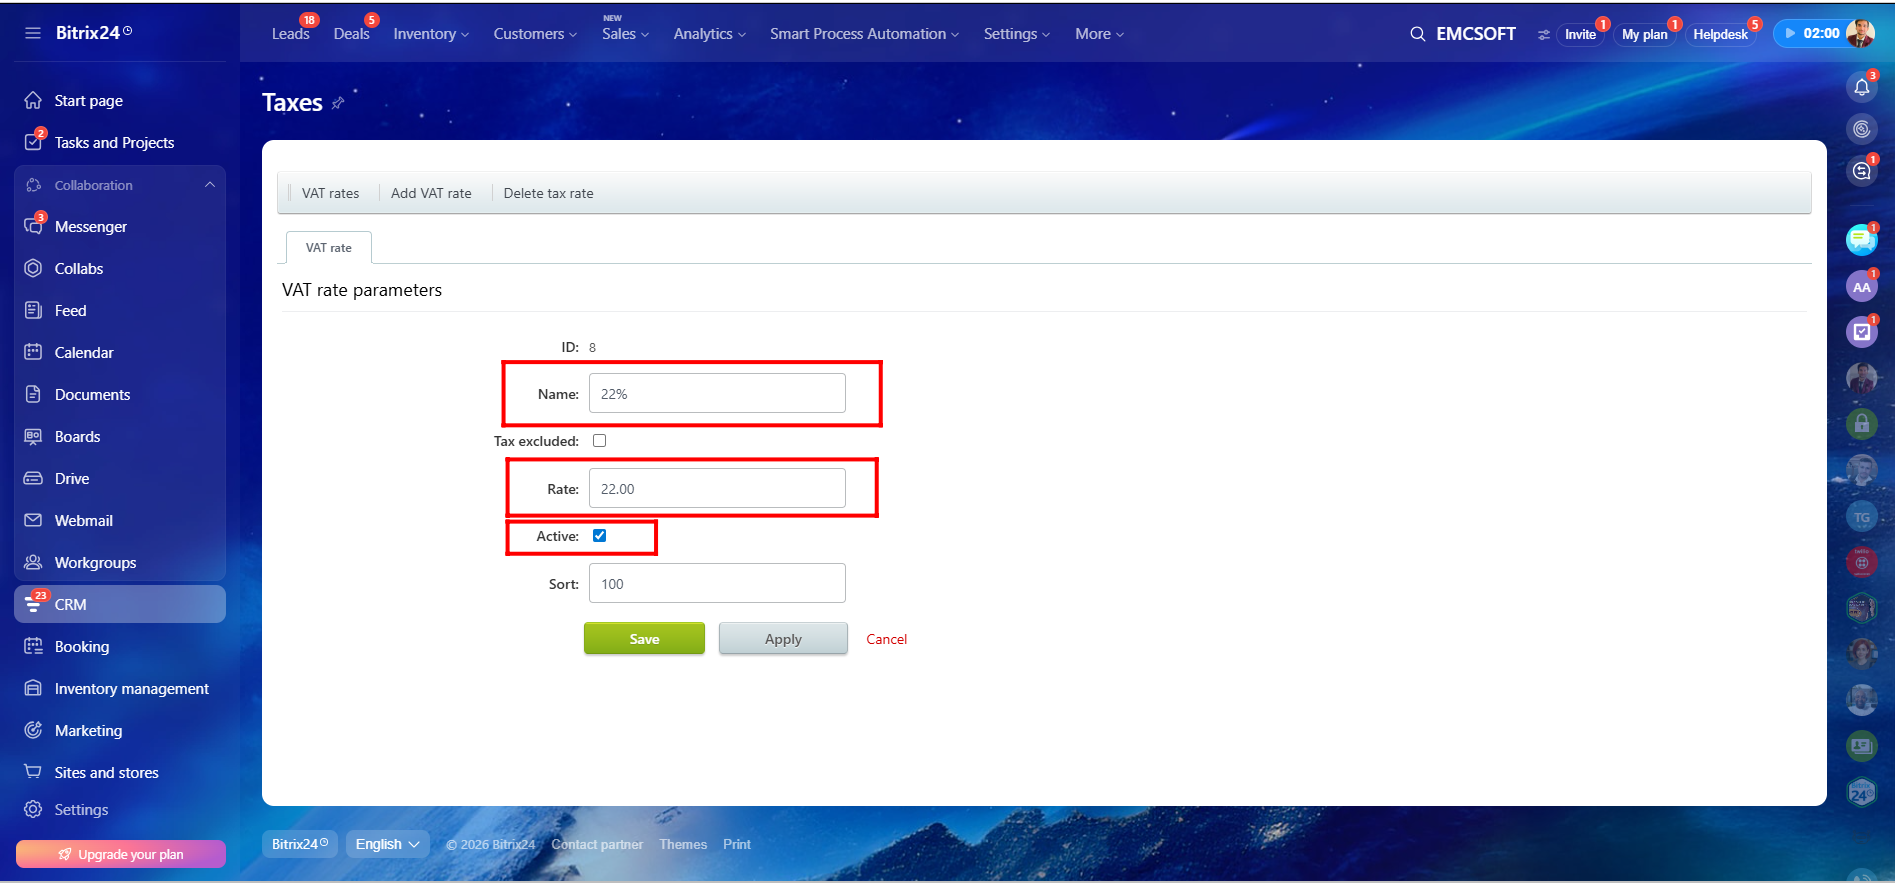
44. Enter a name for the tax. In this example, we created a tax named 22%. Click Save.
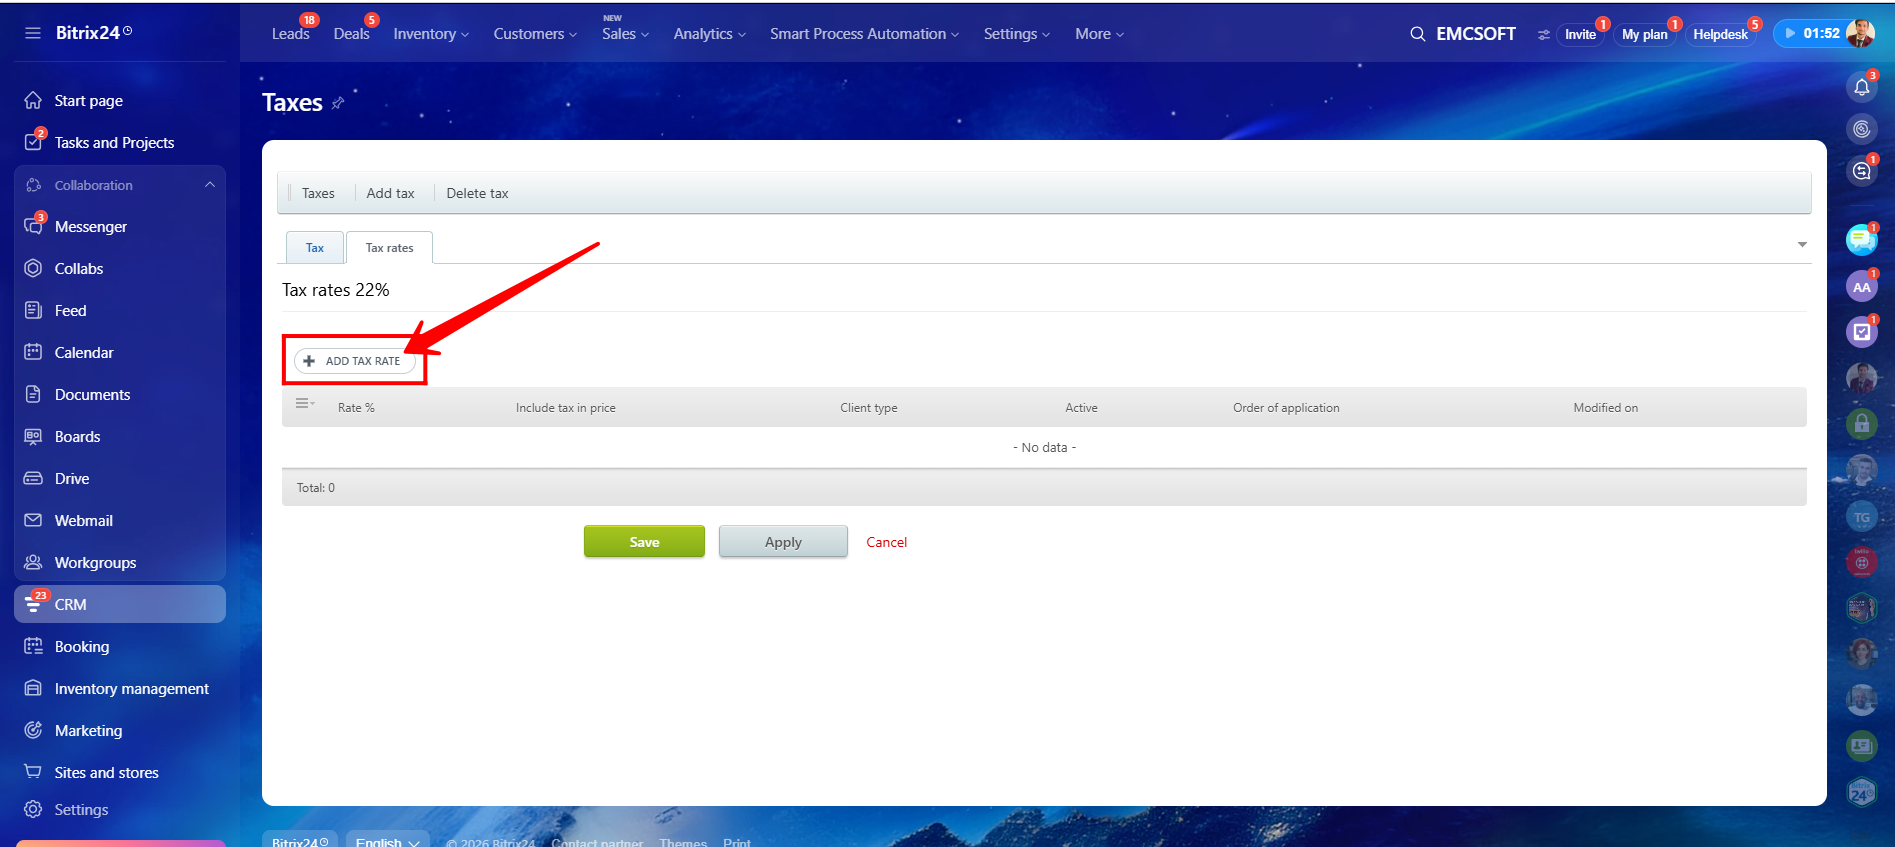
45. After saving the tax, open it again for editing.
46. Click Add Tax Rate to configure tax rates for specific locations.
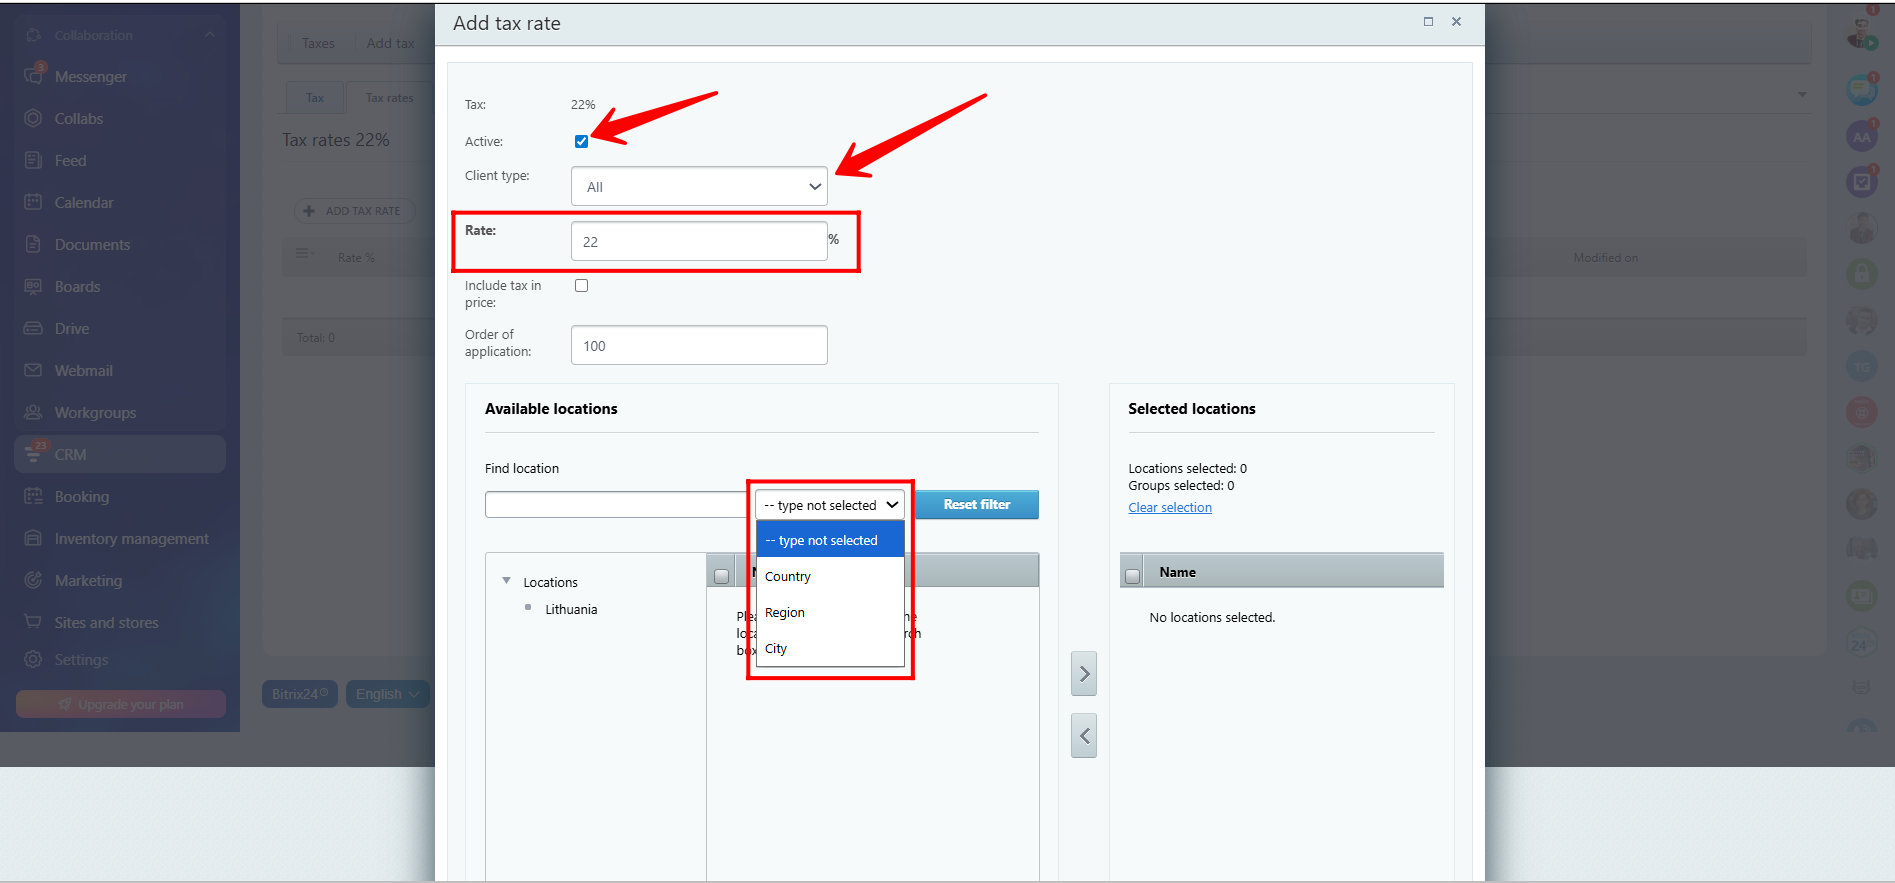
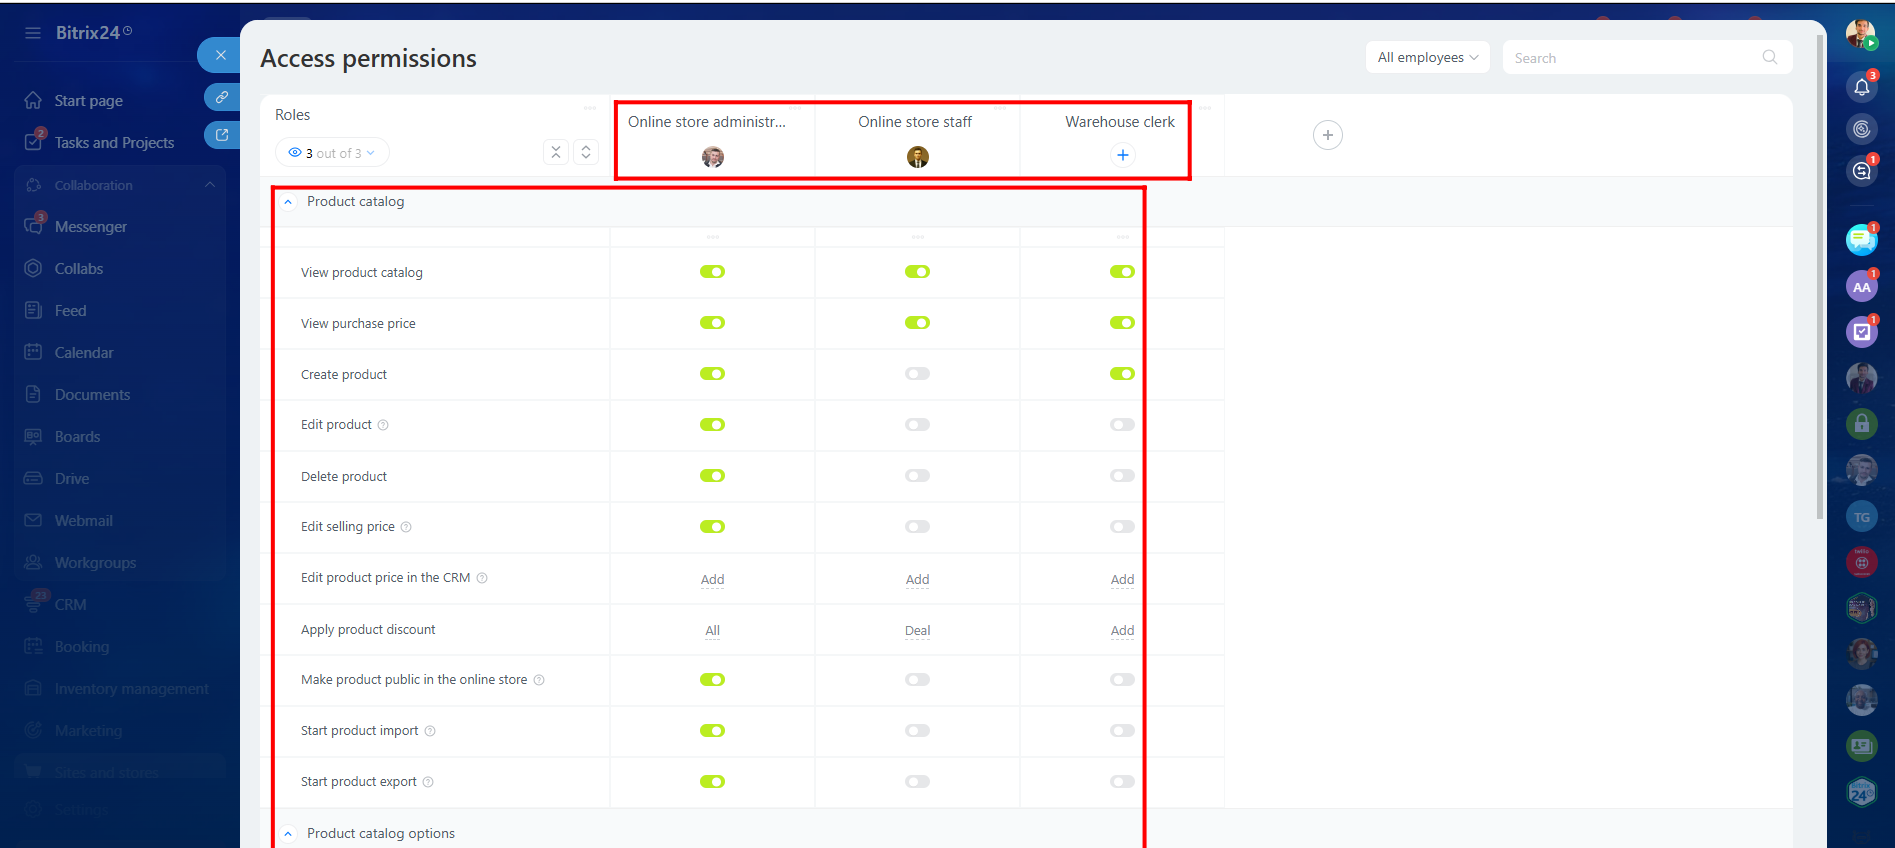
47. Enter the tax percentage. In this example, we entered 22. Mark the tax rate as Active. You may also select the client types to whom this tax applies. Optionally enable Include Tax in Price. In the location section, you can choose location type such as Country, Region, or City.
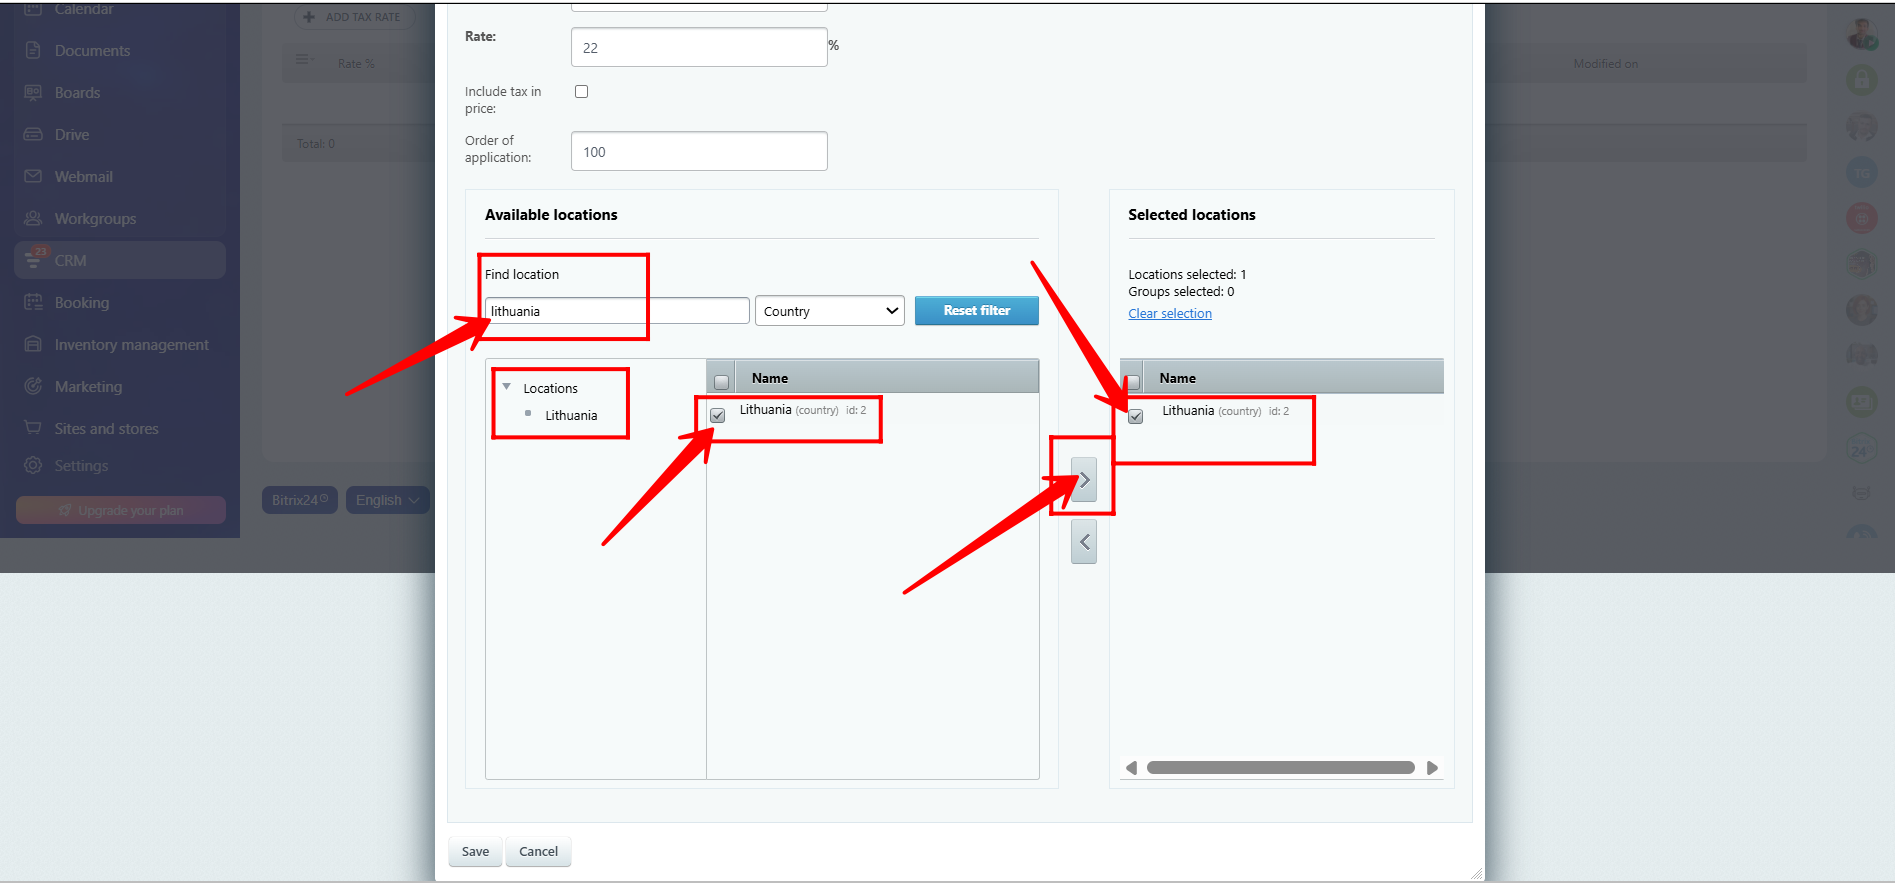
48. We selected Country as the location type and searched for Lithuania. After moving the country into the selected locations area, click Save.
49. You may add multiple tax rates for different locations within the same tax entity if required. After completing the configuration, click Save.
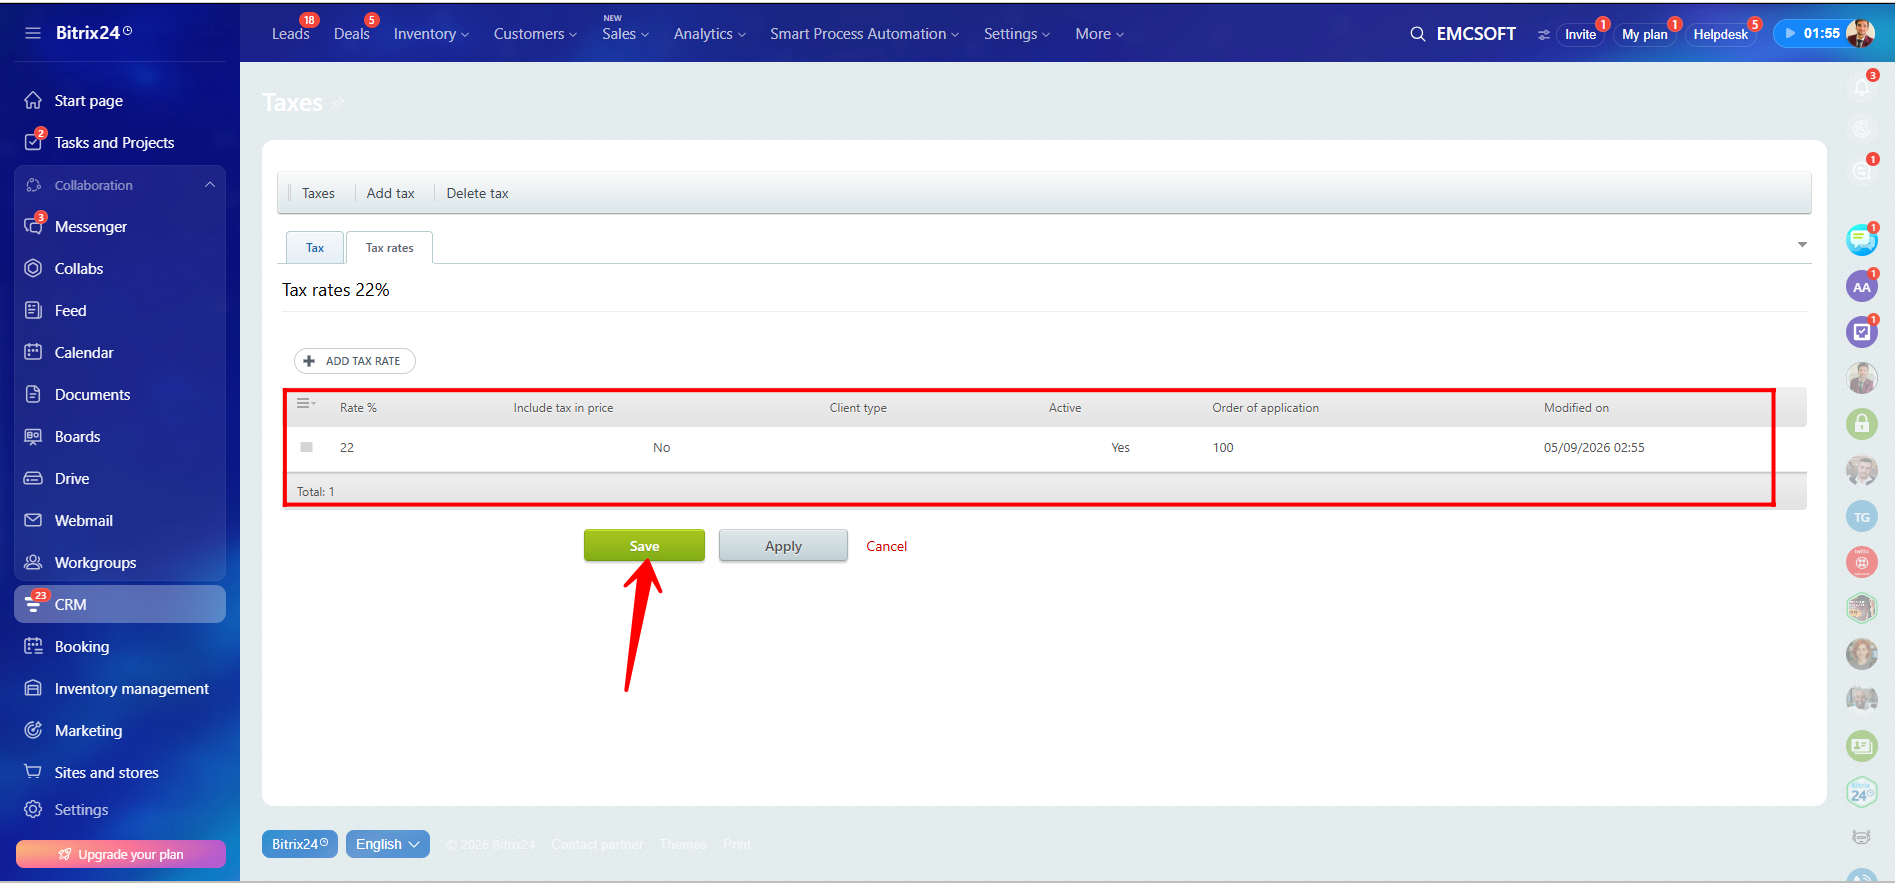
50. Now return to the Taxes settings and select Item-dependent tax (VAT). Click Save.
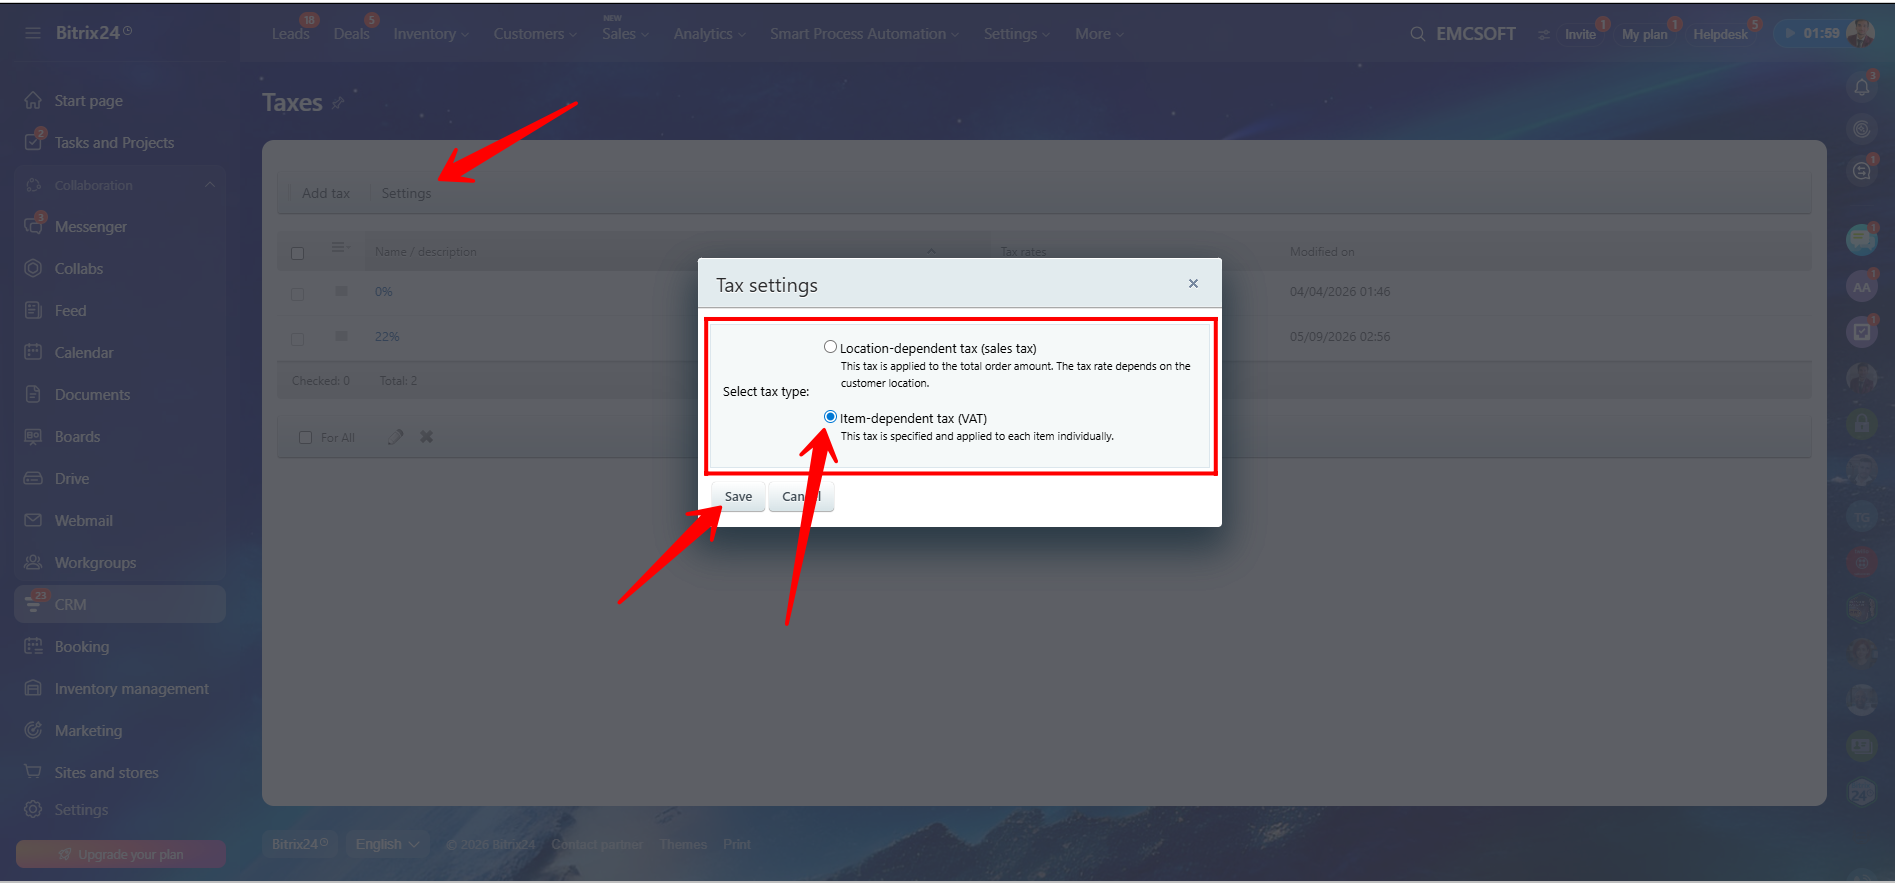
51. Add a new tax, define the tax rate, mark it as Active, and click Save. In this example, we created a 10% VAT tax rate.

52. We successfully created a new Item-dependent tax (VAT) rate with a tax percentage of 22%.
53. To display tax rates within product details, click the Settings icon and enable the field Tax Rate.
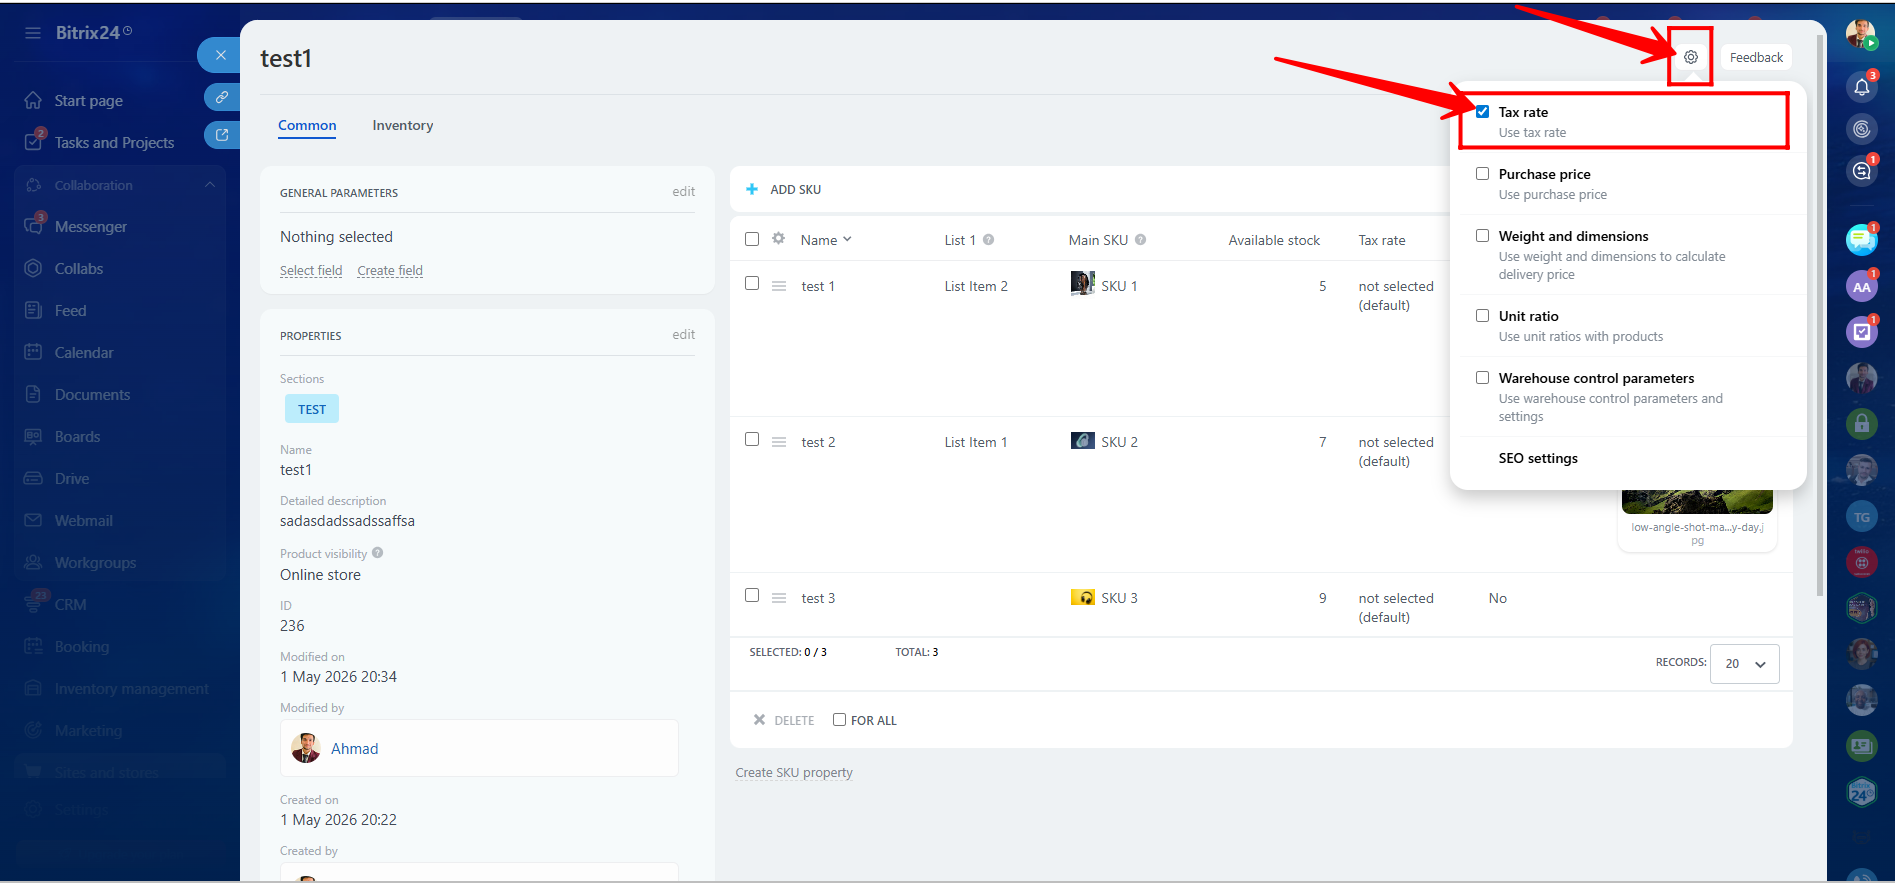
54. Make sure the Tax Rate field is selected as a visible column within product variation details.

55. Assign the required Item-dependent tax to each product variation. After selecting the tax rates, click Save.
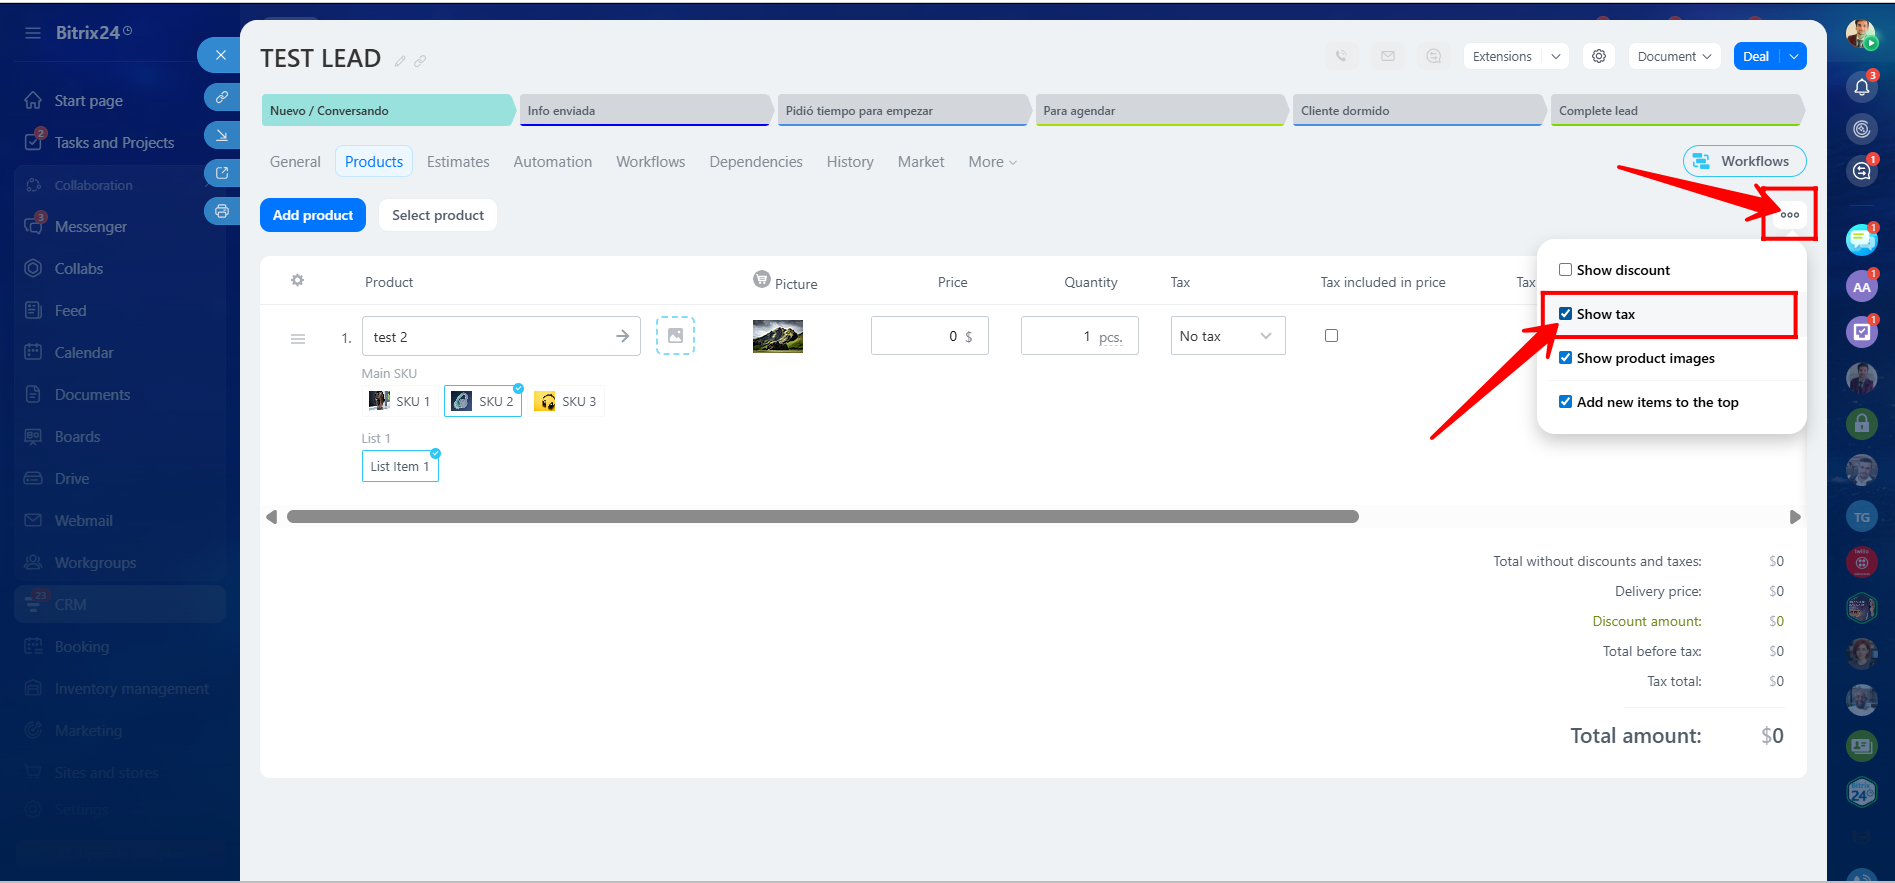
56. Inside the Products section within an entity such as a Lead, make sure to enable the checkbox Show Tax as well.
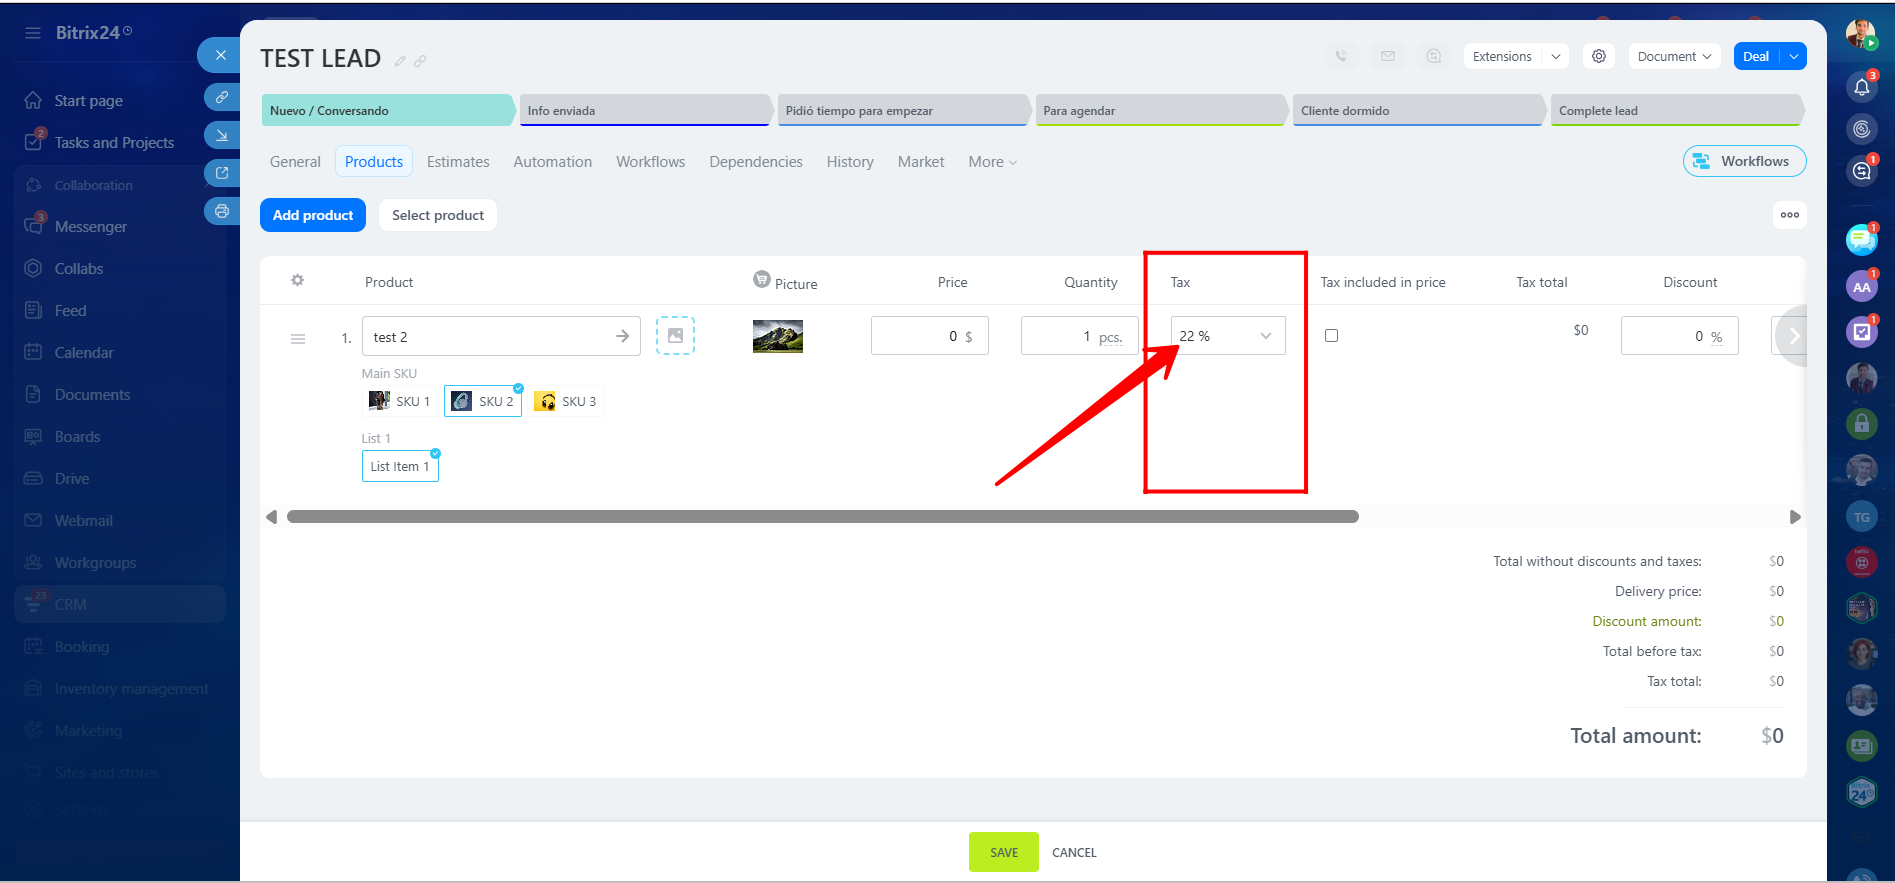
57. You can now see that the selected product variation automatically displays its predefined tax rate.
58. To configure permissions for accessing Product Catalog details, navigate to Sites and Stores → Settings → Advanced Settings → Access Permissions.
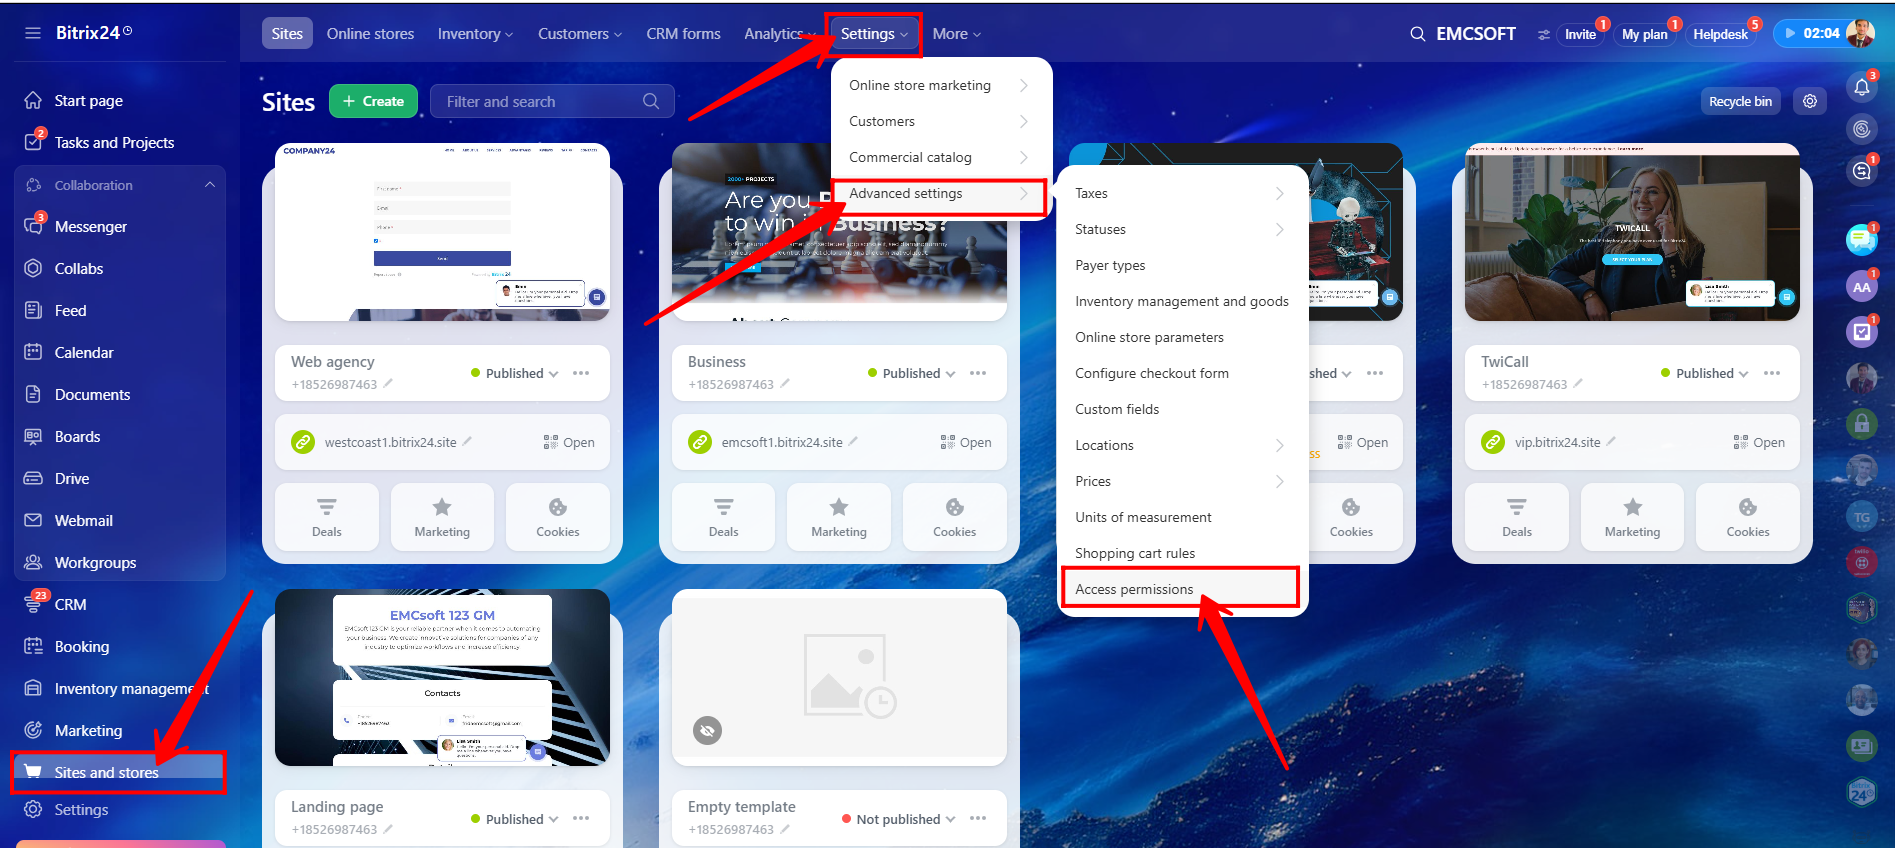
59. Here, you can create roles, assign users/employees to those roles, and configure permissions such as:
- View Product Catalog
- View Purchase Price
- View Product Price
- Create Product
- Edit Product
- Delete Product
and many more.
60. When Leads are converted into Estimates (note: Leads cannot be converted directly into Invoices; only Deals can), the selected products from the Lead are automatically copied into the generated Estimate.
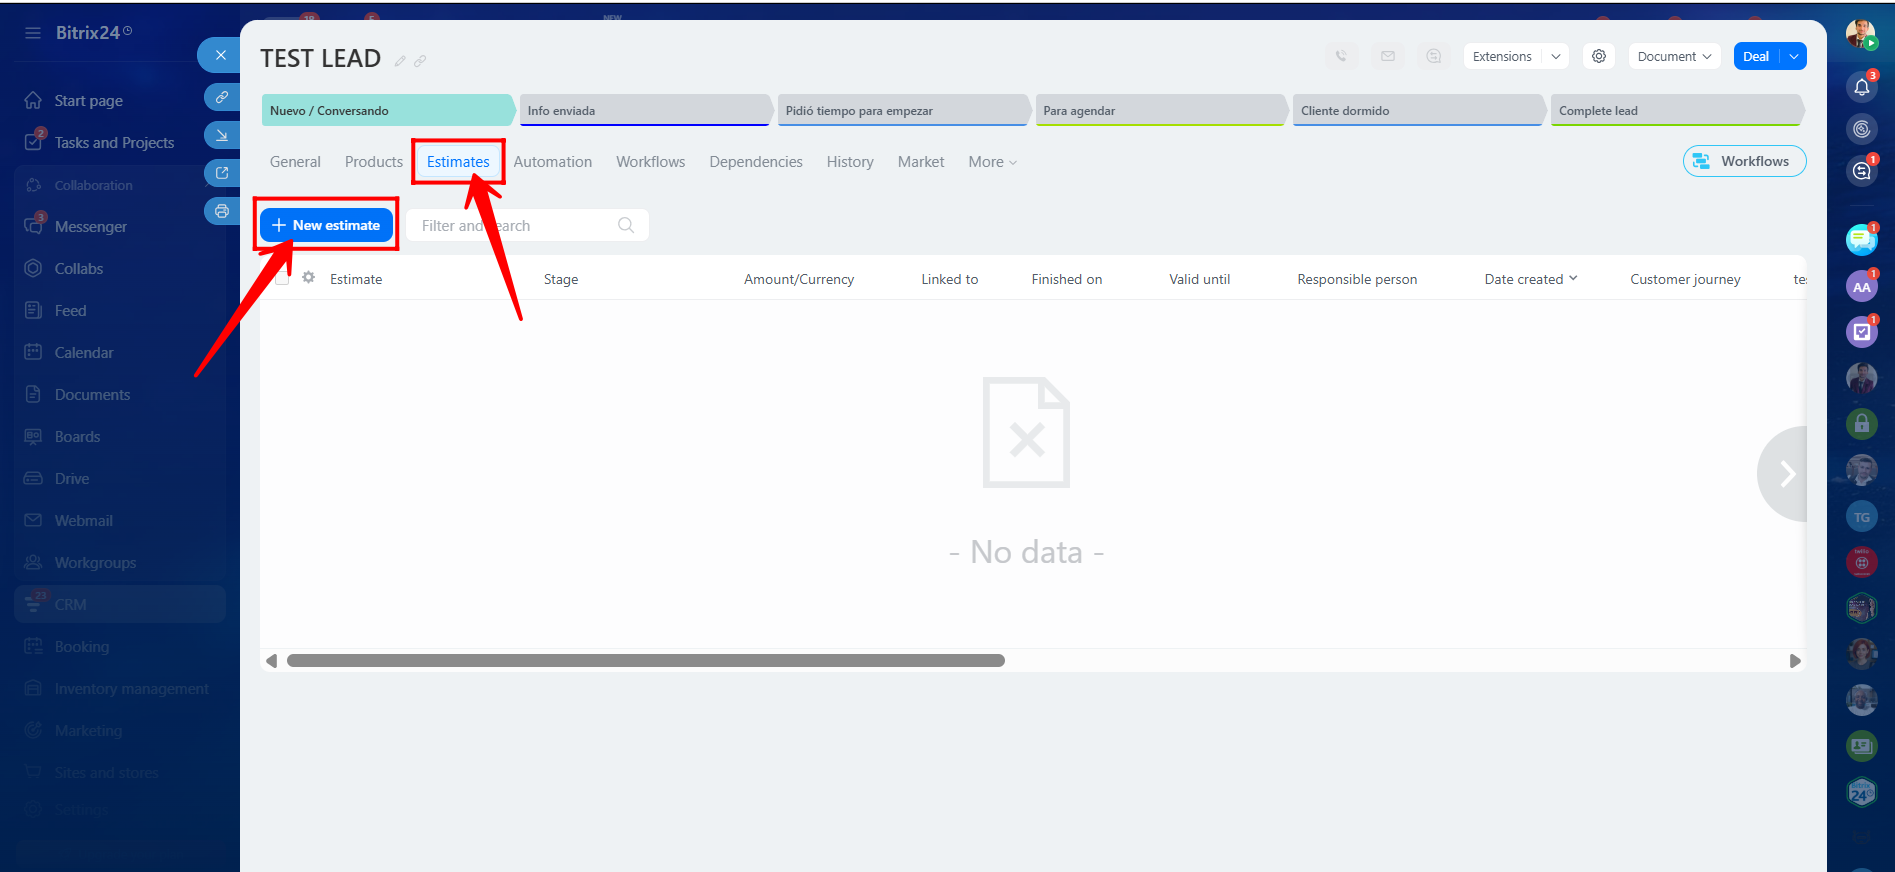
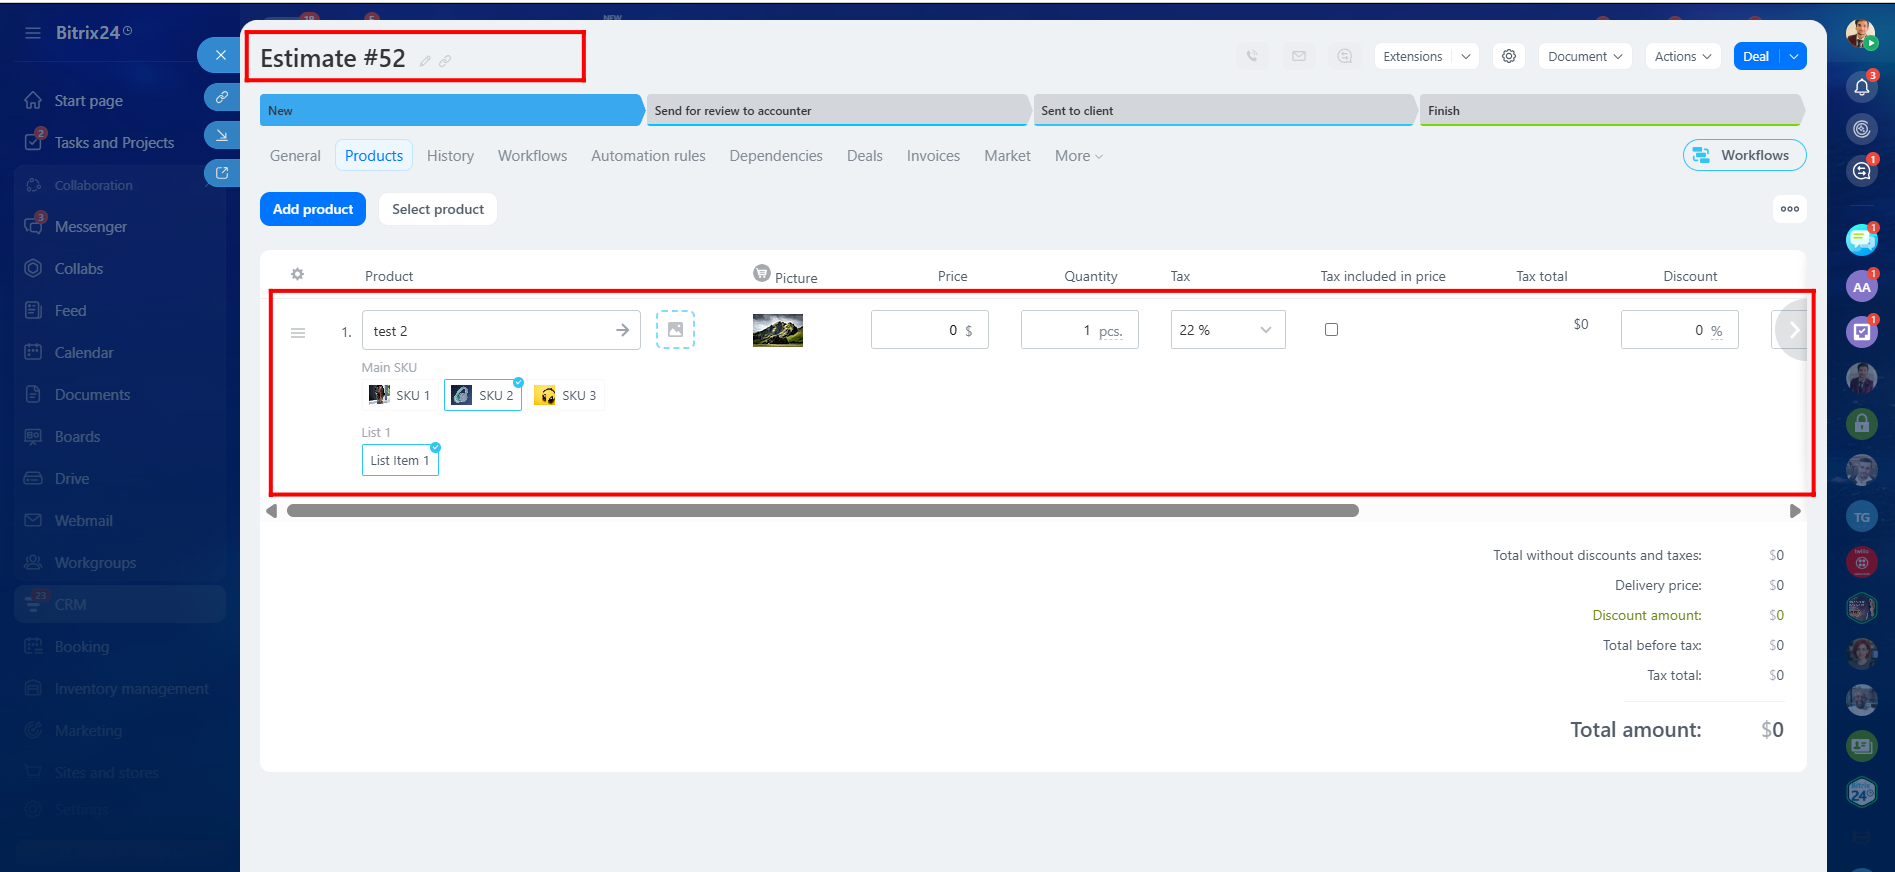
61. As shown, a new Estimate was created from the Lead, and the selected product variation was copied successfully into the Estimate.
62. To create an Invoice from a Deal, open the Invoices tab within the Deal and click + Create Invoice.
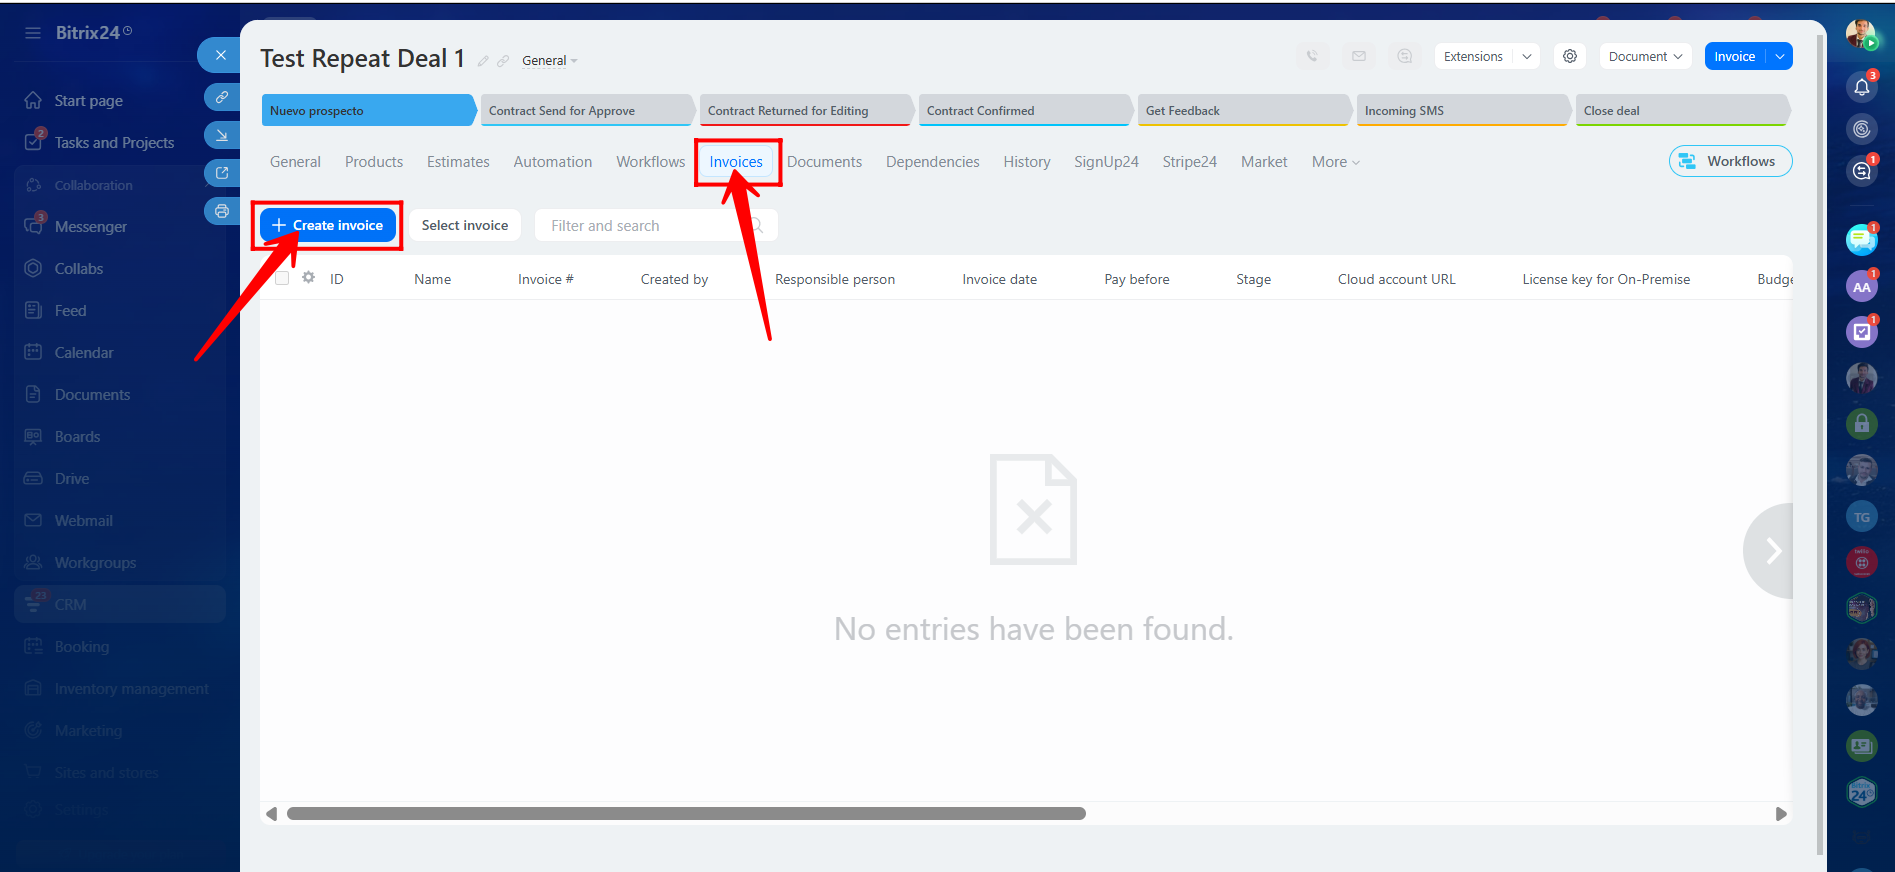
63. Please note that any custom fields previously created for the Deal entity will also be copied into the Invoice. Click Continue to generate the Invoice.
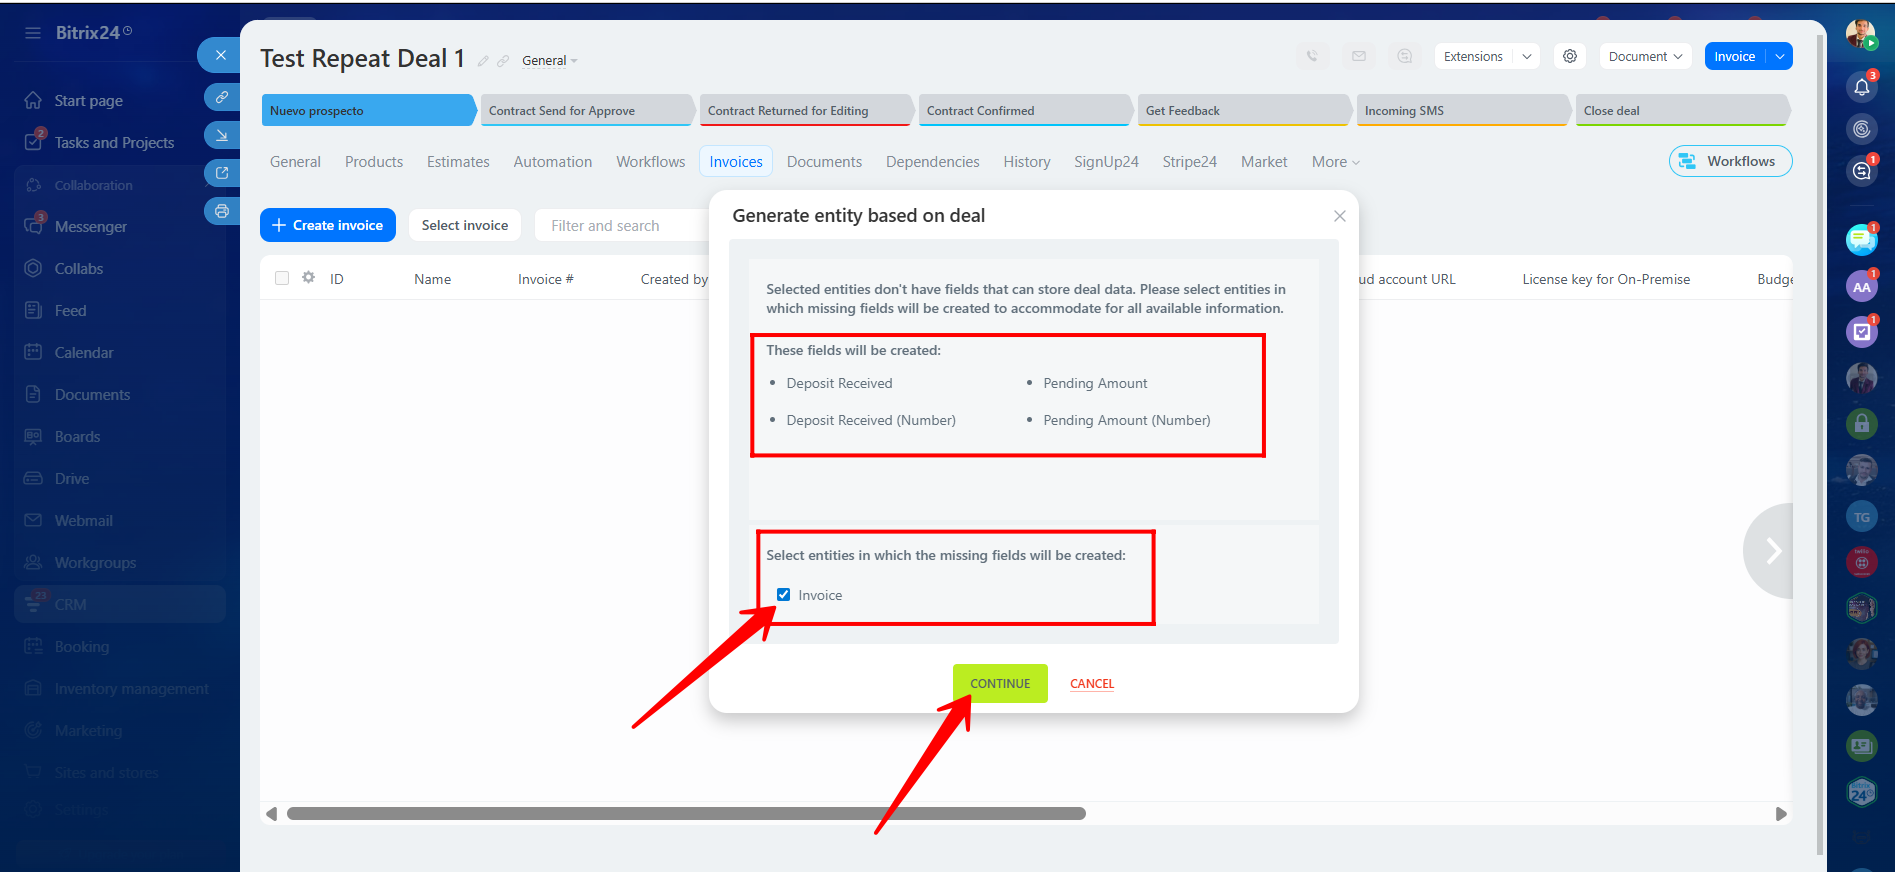
64. The Invoice has now been created successfully, and the selected product variation from the Deal has automatically been copied into the Invoice’s Products section.
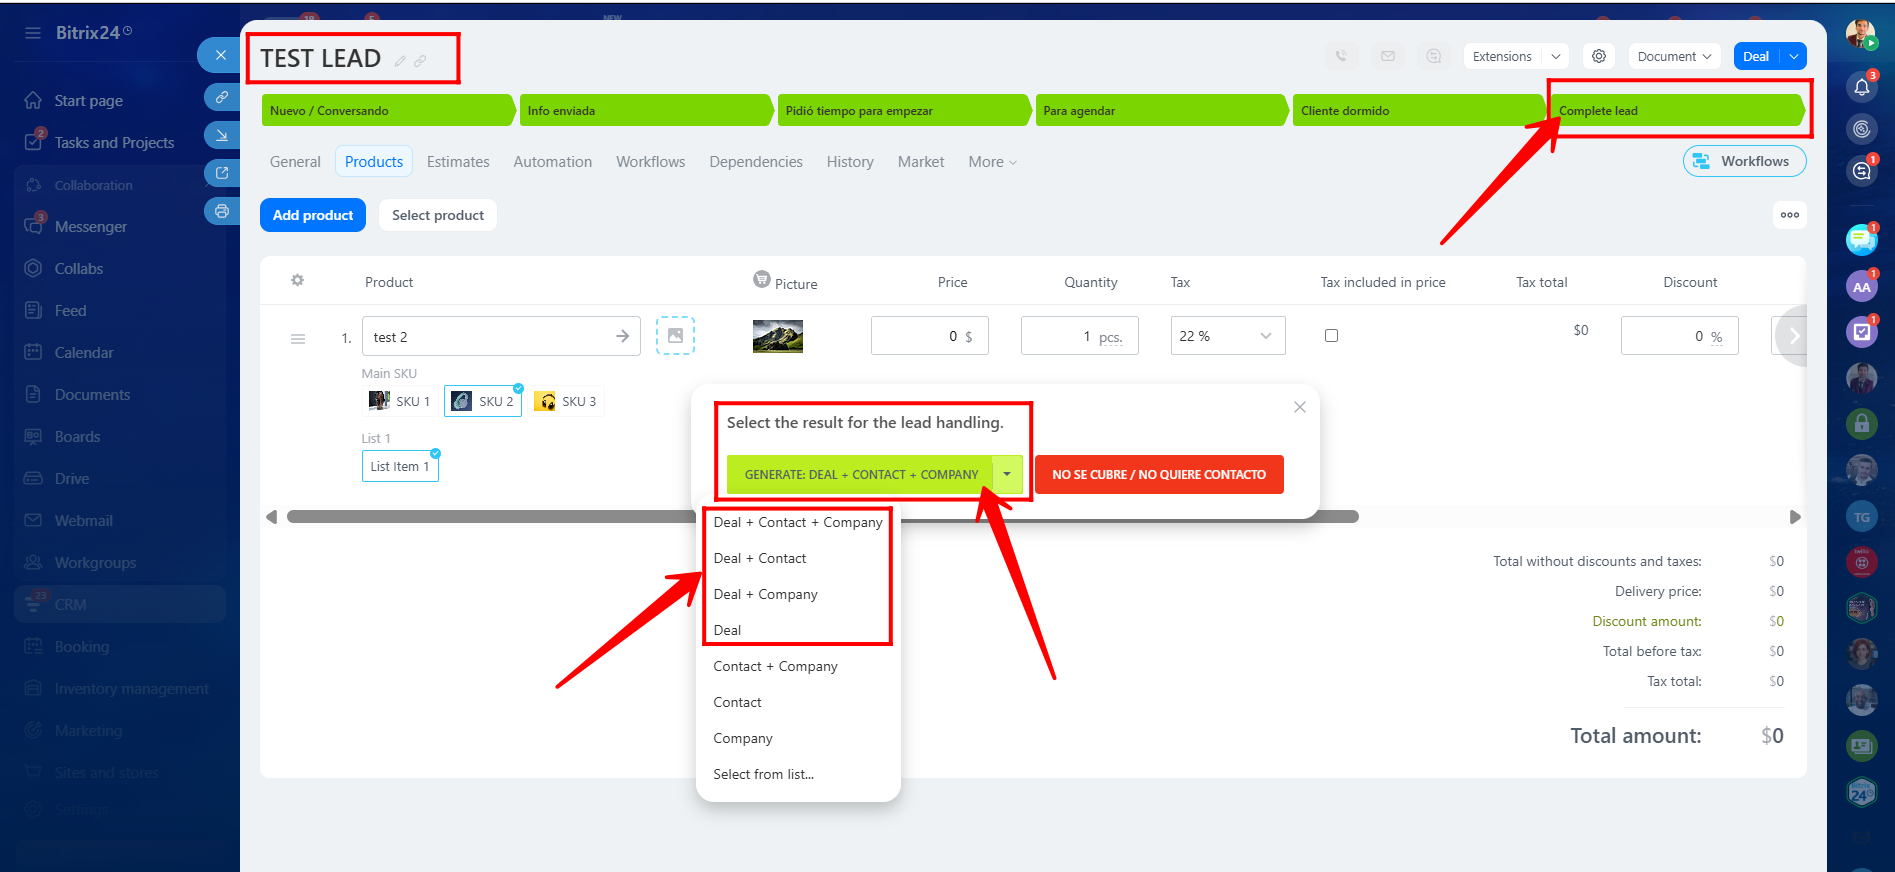
65. To create a Deal from a Lead, you must first mark the Lead as Complete Lead. You will then see several conversion options such as:
- Deal + Contact + Company
- Deal + Contact
- Deal + Company
- Deal
- Contact + Company
- Contact
- Company
Please note that products from the Lead are copied only when one of the first four Deal-related options is selected, because Contacts and Companies do not support linked products by default.
“You can also watch video on Youtube”