| 1915 Views | admin

In CRM forms, not all fields need to show all the time. You can make forms smarter by showing or hiding certain fields based on what a user selects. This is done using Field Show Rules.
These rules help keep your forms clean, user-friendly, and personalized. For example, if someone selects “Yes” for making a payment, then a new field can appear asking them to upload the receipt. This way, your form only shows what’s needed at the right time.
Why Use Field Show Rules?
- Keep forms short and simple
- Show only relevant fields
- Avoid confusing users with too many options
- Collect more accurate information
Types of Field Show Rules
There are three main types of field show rules in CRM forms, each designed for specific workflow needs:
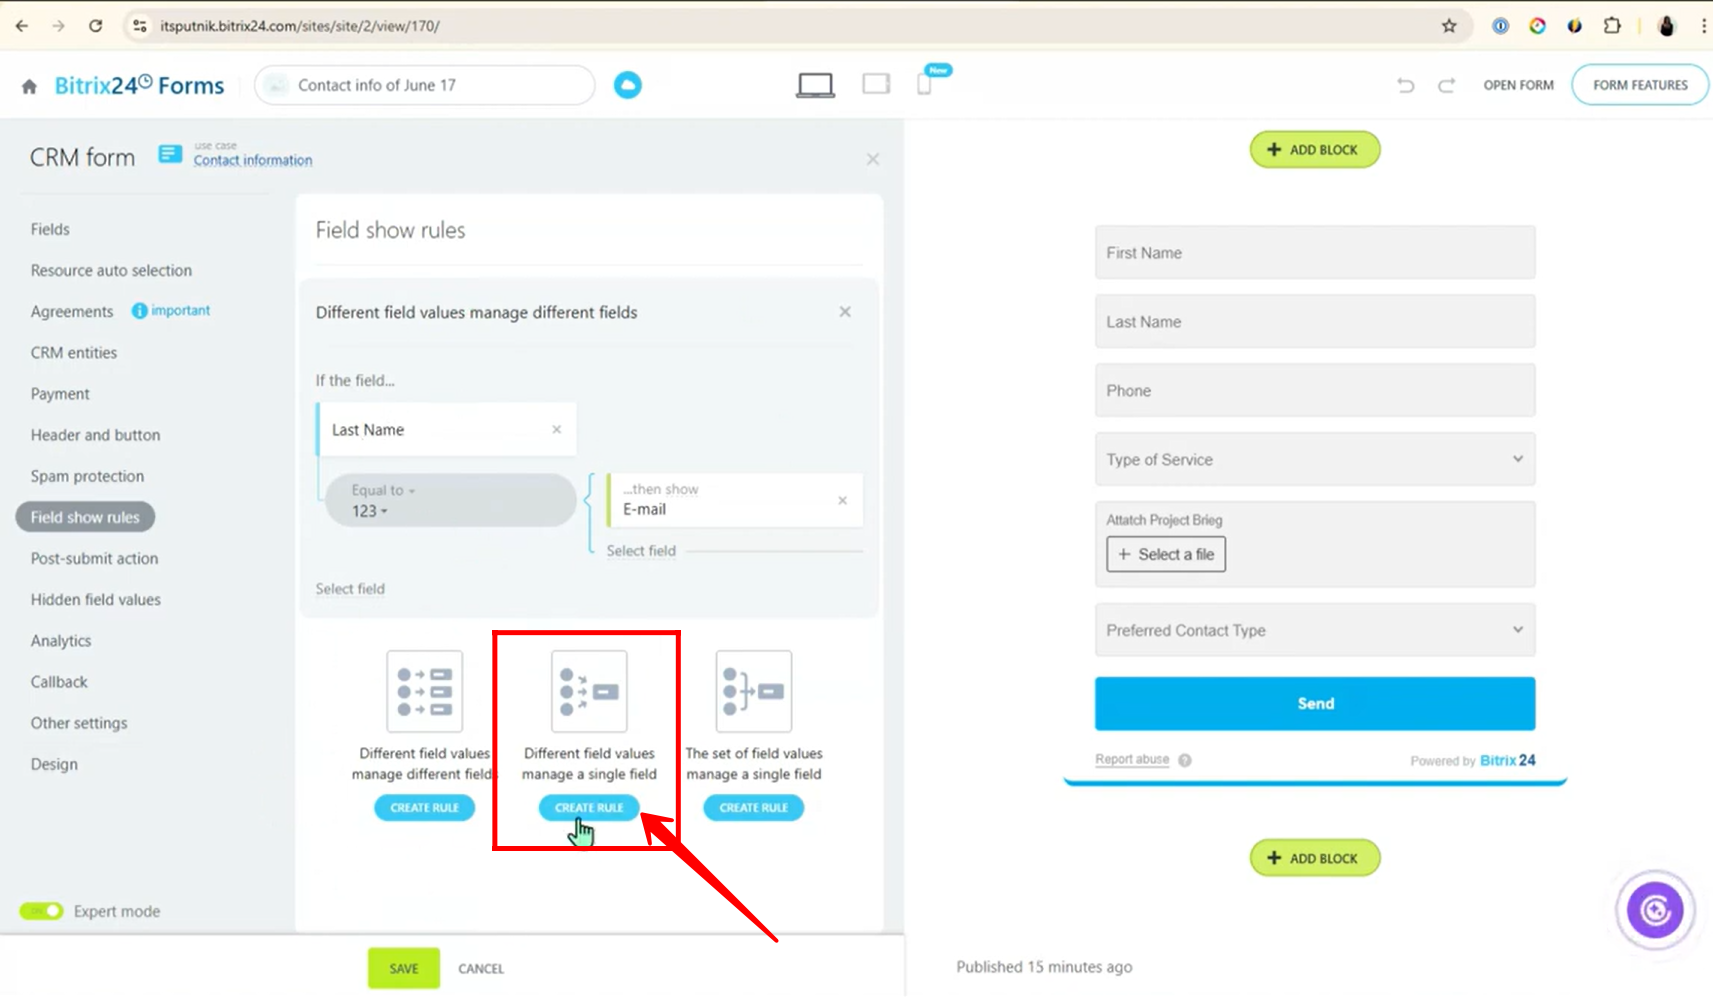
i. Different field values manage different fields
Example: If “Payment Done” is checked, show the “Payment Receipt” field.
If “Country” is “United States”, show “State”; if “Country” is “Canada”, show “Province/Territory”.
ii. Different field values manage a single field
Example: If “Type of Service” is “Website” or “Support”, show the “Attach Project Brief” field.
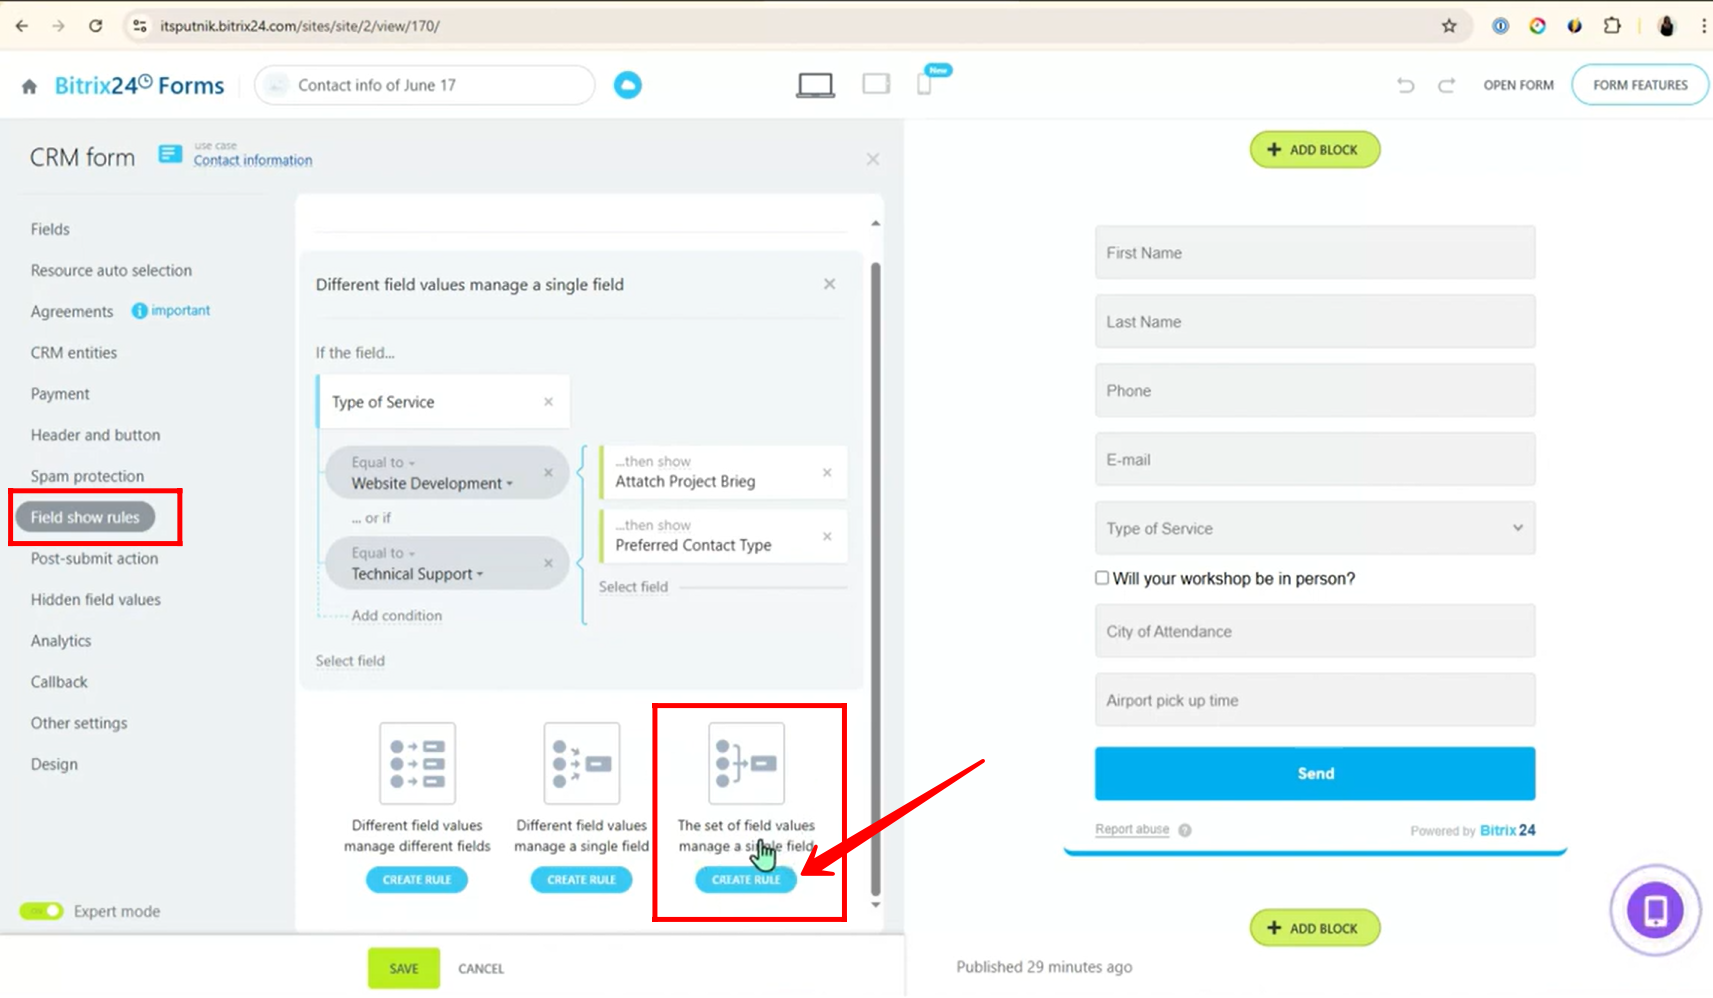
iii. The set of field values manage a single field
Example: If “Workshop in Person” is checked and “City” equals “Miami”, show the “Airport Pickup Time” field.
How It Works – Simple Steps
- Create your custom fields in CRM settings (like dropdowns, checkboxes, file uploads).
- Choose the field rule type that fits your need.
- Set the conditions (like “If Payment Done = Yes”).
- Choose which field to show or hide when the condition is met.
- Test your form to make sure rules work as expected.
Conclusion
Field Show Rules are powerful tools to create smart, dynamic CRM forms. By following simple steps and using the right rule types, you can make your forms look cleaner, work better, and feel more professional.
Detailed Instructions are given below
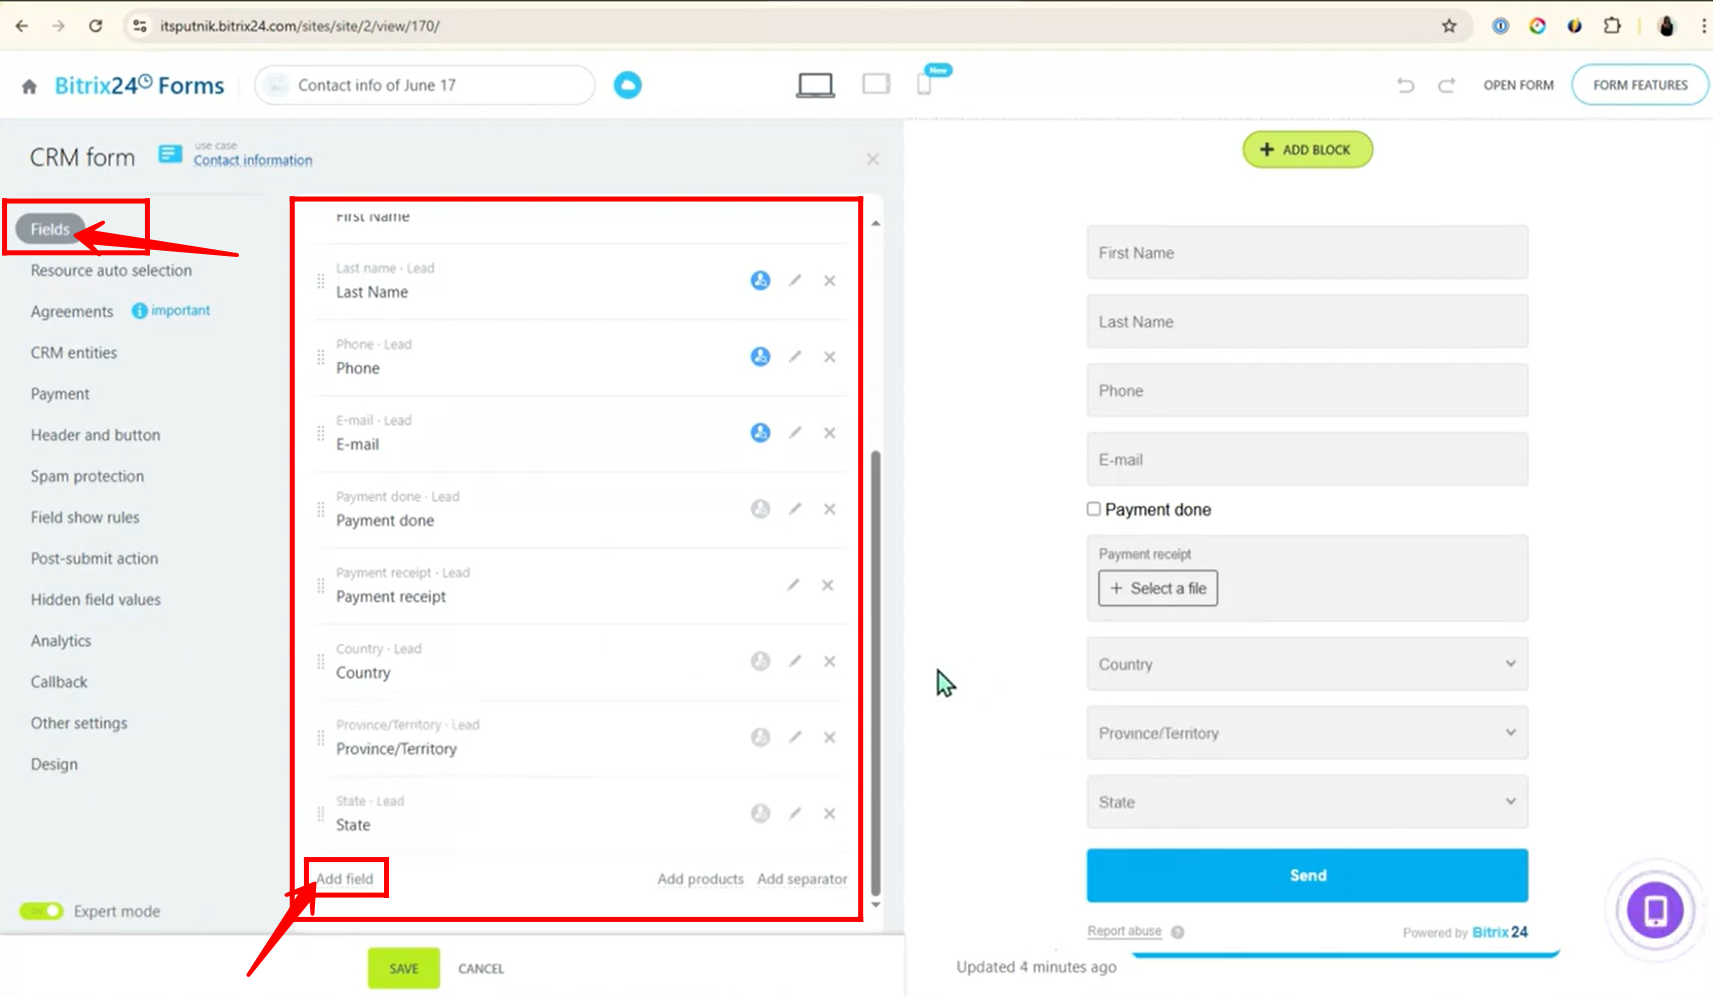
1. In the CRM Form settings, go to the “Fields” tab. Click “Add Field” to insert the fields you want to include in your form.
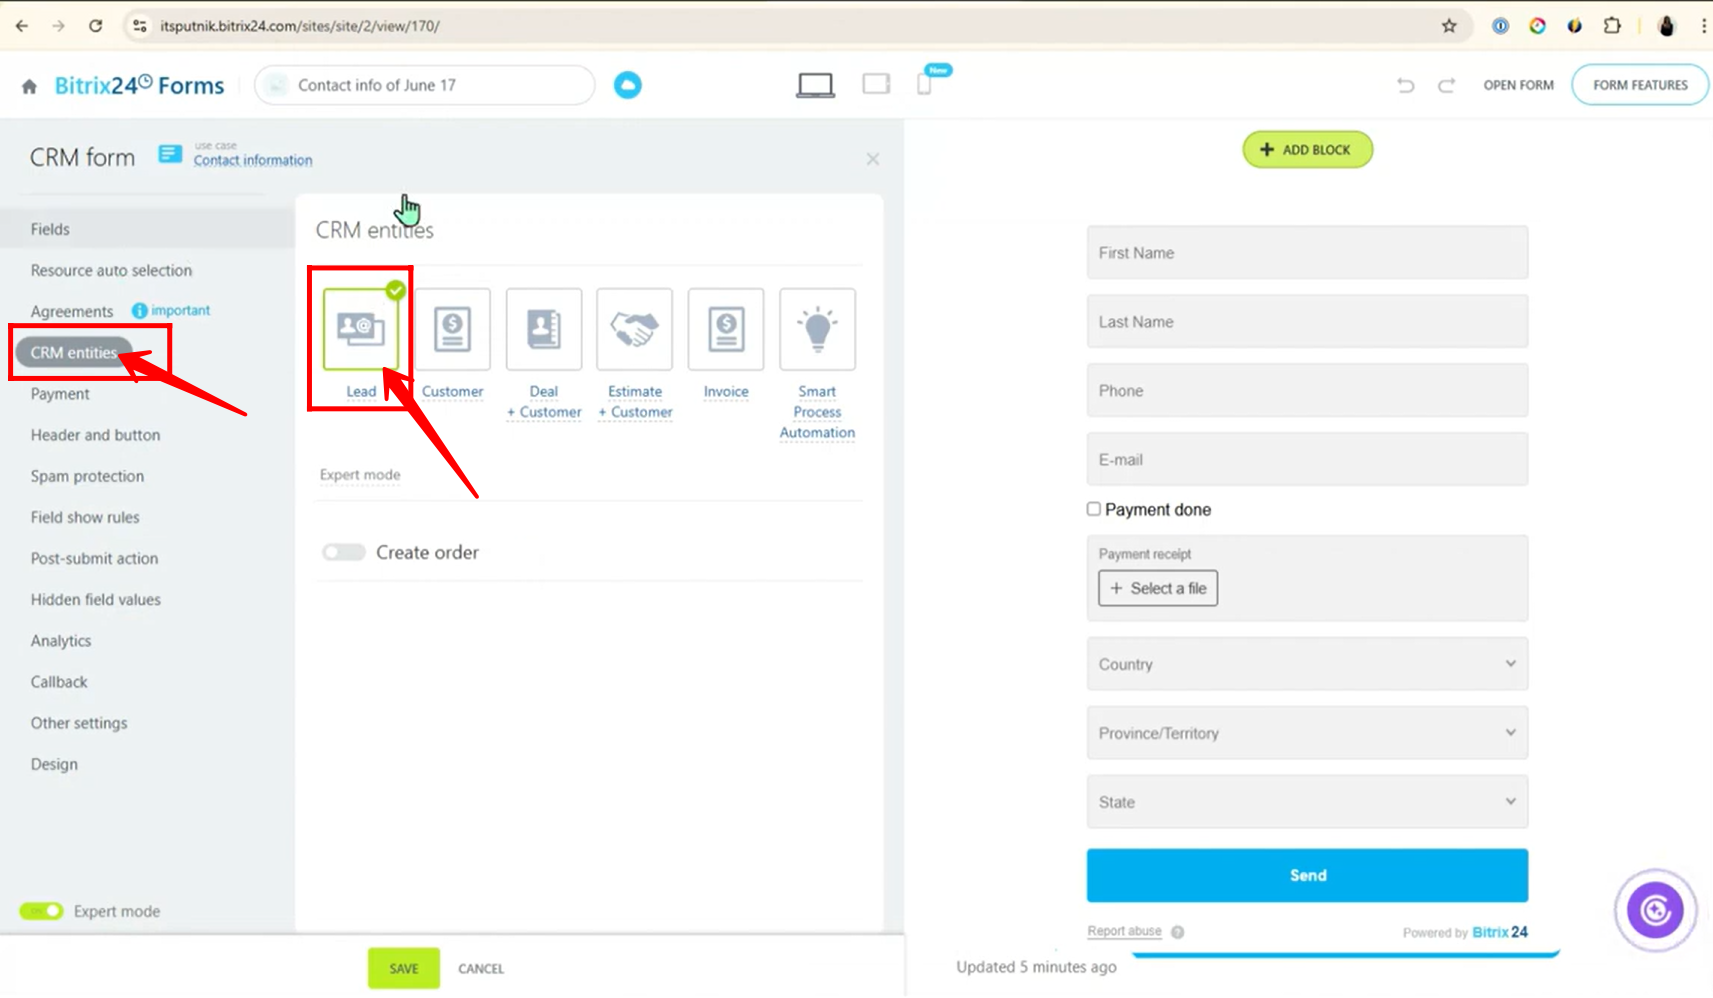
2. Navigate to the “CRM Entities” tab and select the appropriate entity for your form. Options include “Lead”, “Customer”, “Deal + Customer”, “Estimate + Customer”, “Invoice”, or “Smart Process Automation”. For this example, the “Lead” entity is selected.
3. You can also add custom fields to the selected entity. To do this, go to “CRM Settings”, then click on “Form and Report Settings”, and navigate to the “Custom Fields” section.
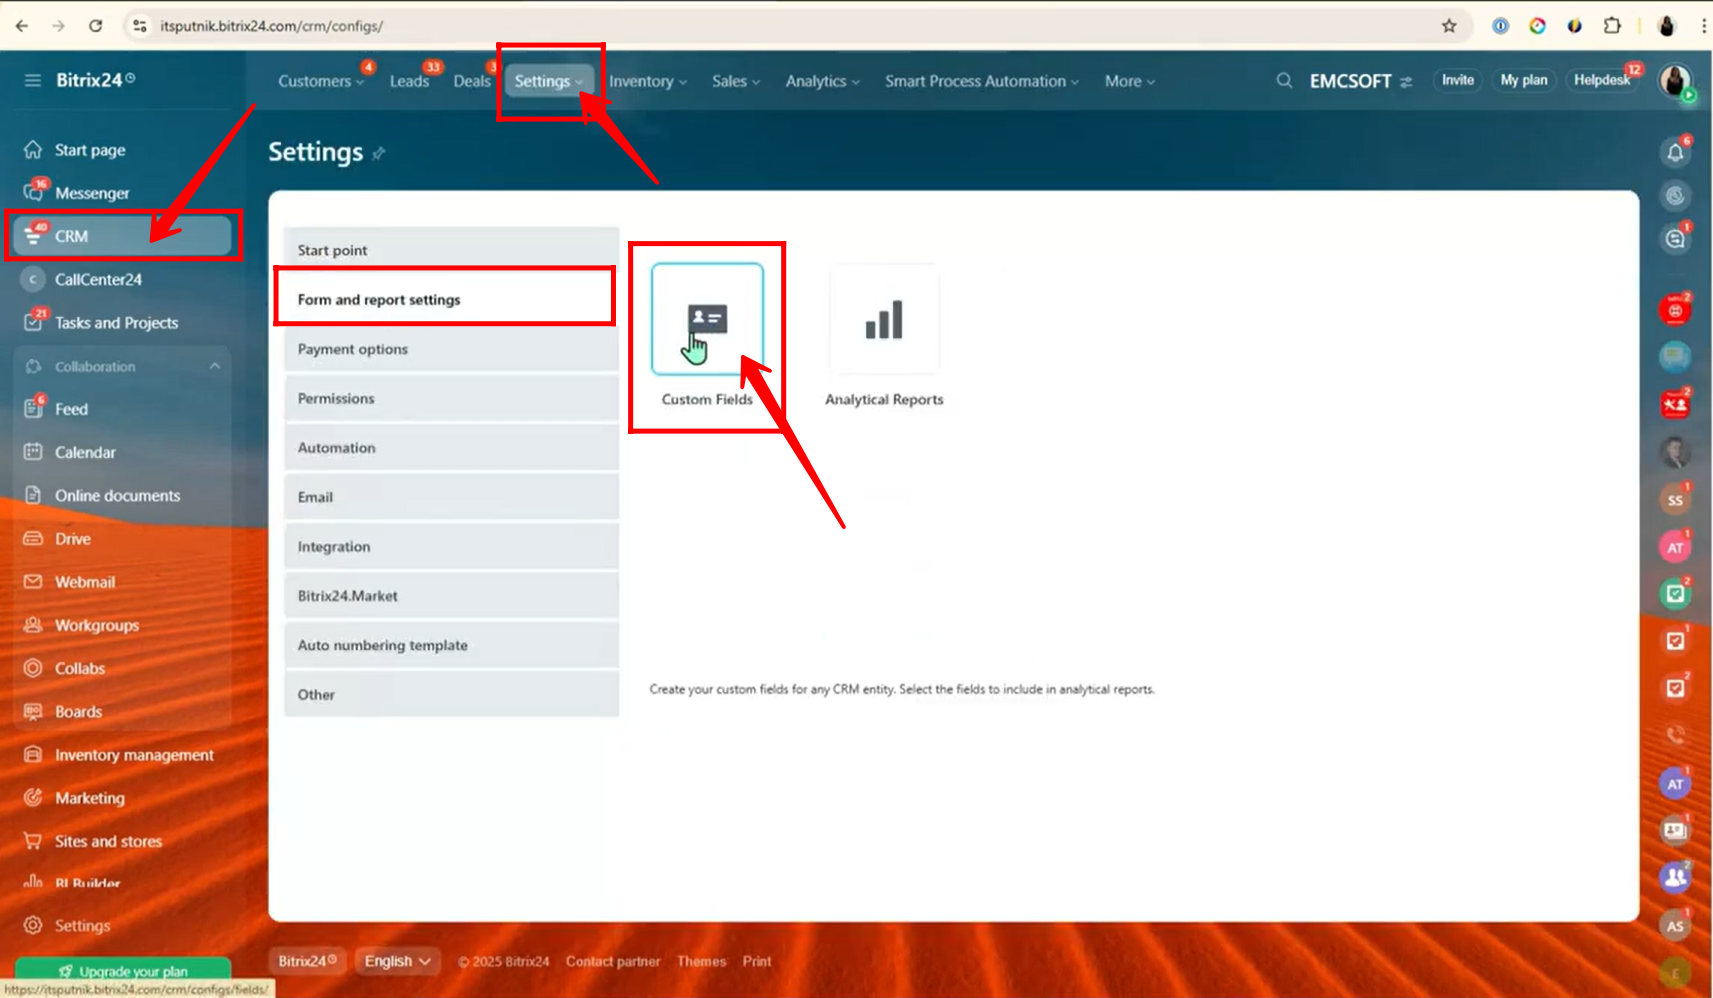
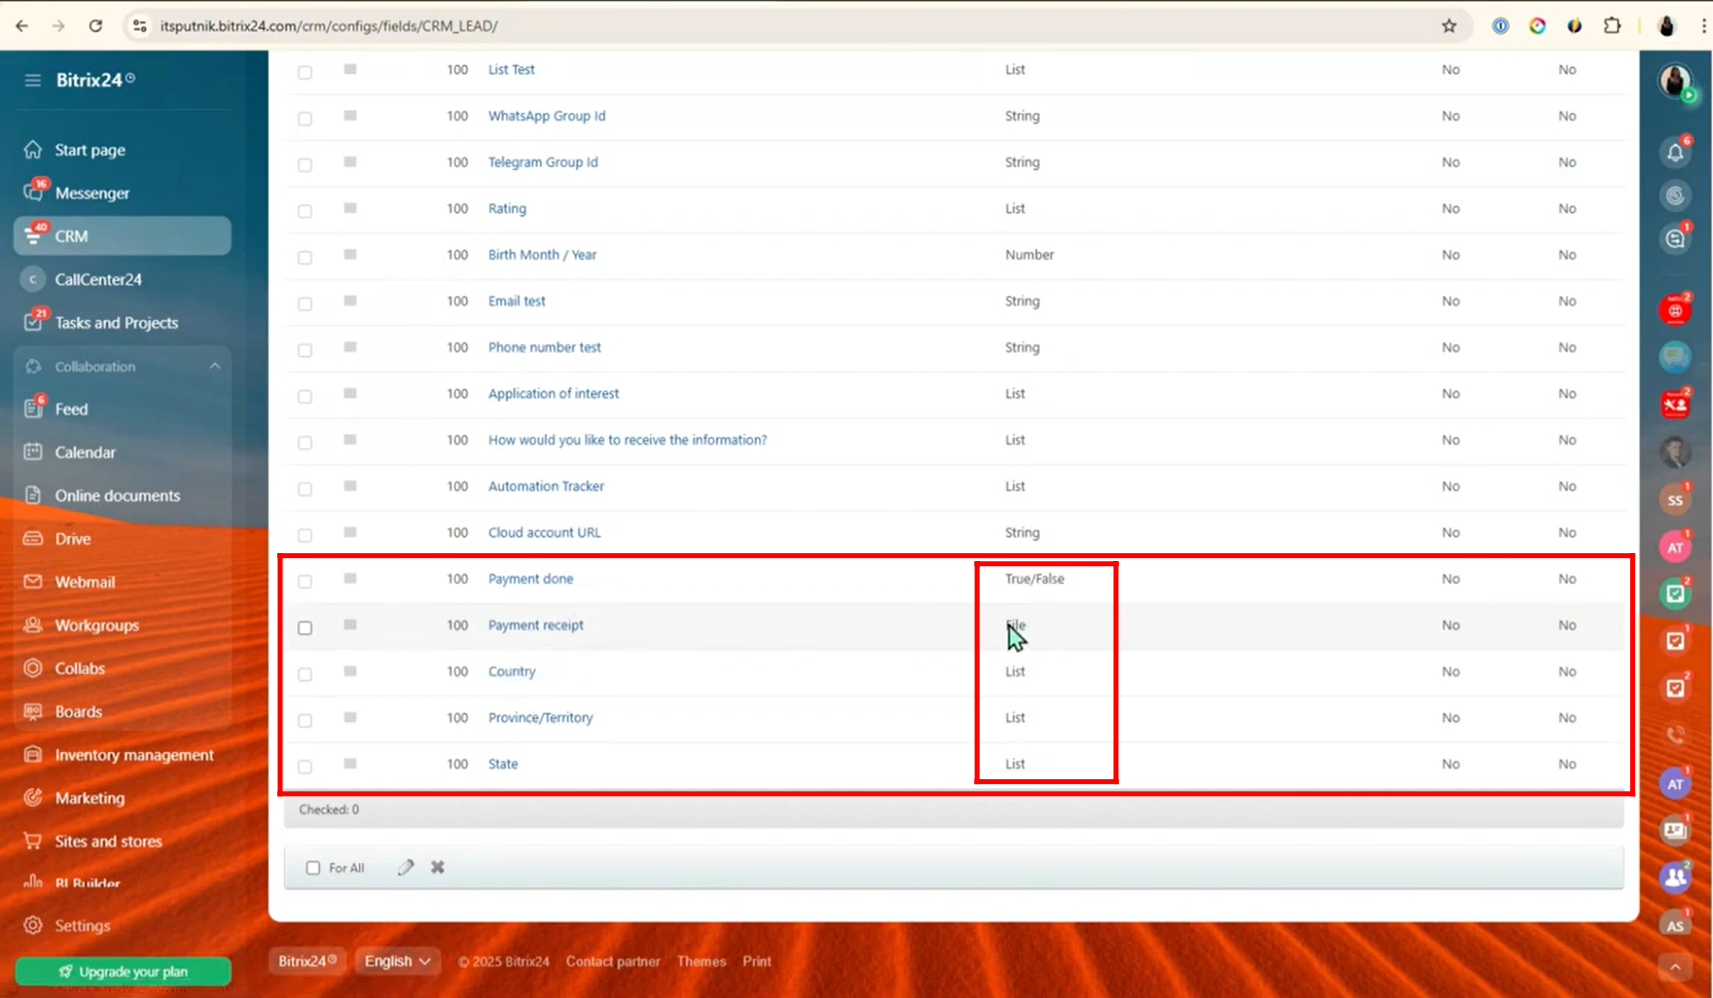
4. In the Lead section, you can either click “Add Field” to create a new field or click “Fields” to view the existing ones. For now, click on “Fields” to see the fields that are already being used in your forms.
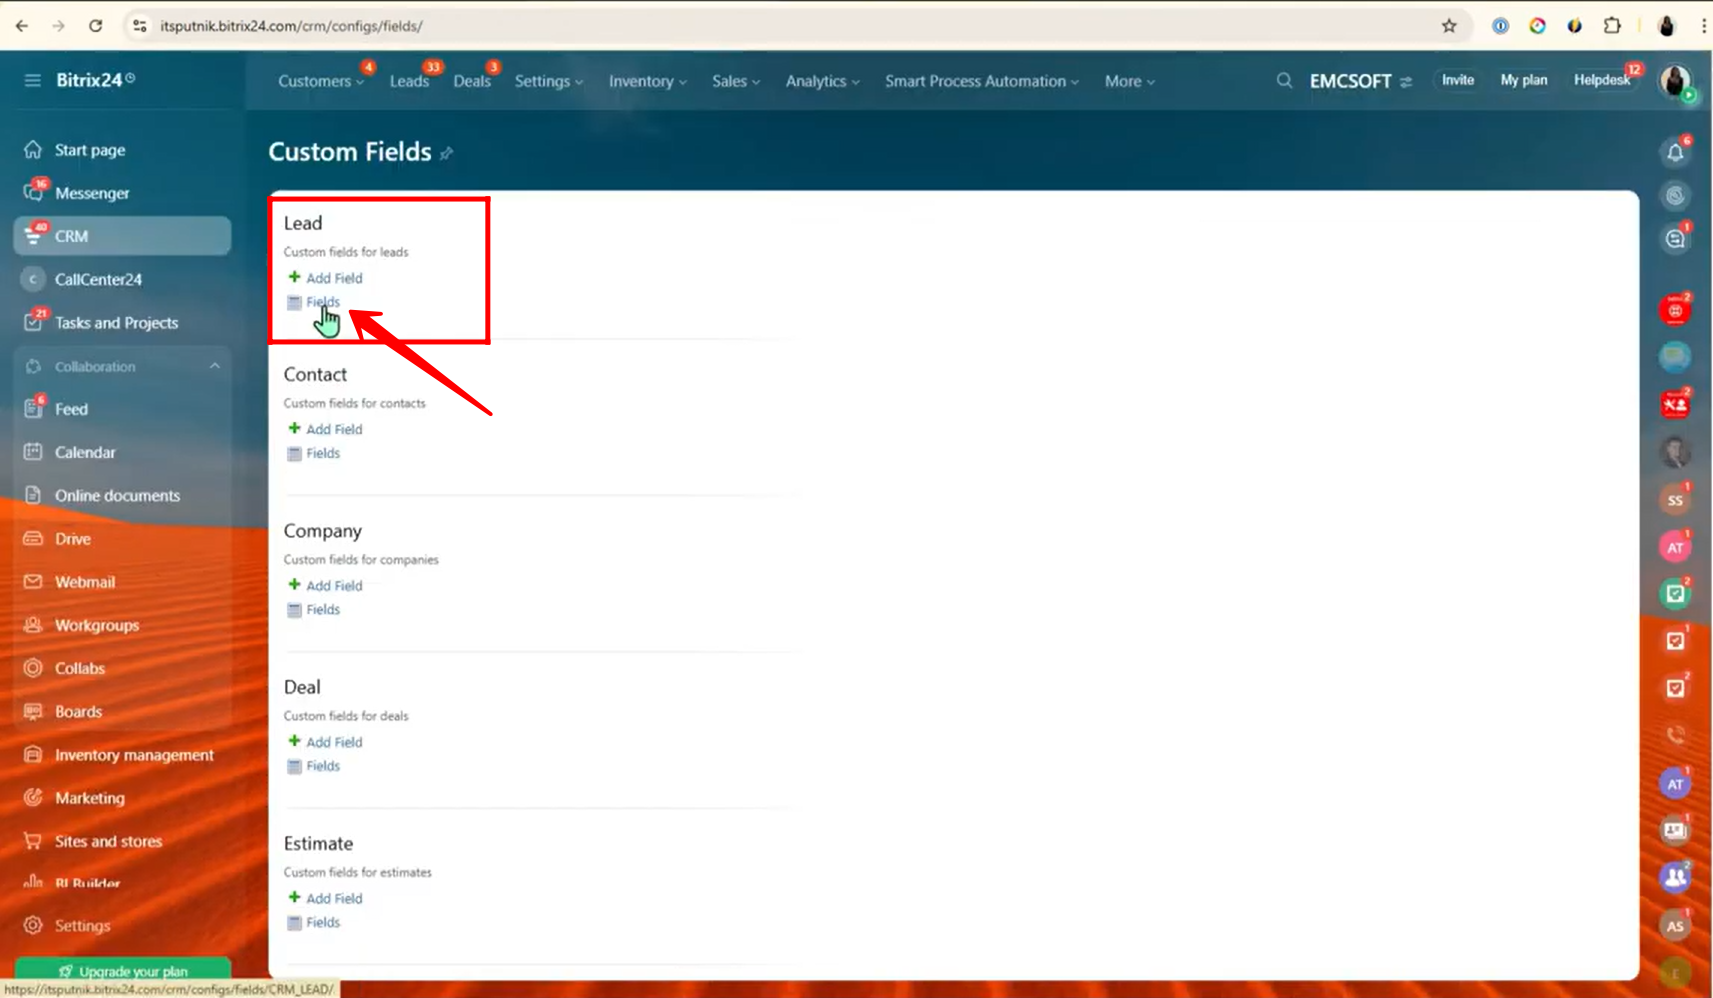
5. Here, you can see the fields that are used in the form to trigger the rules. These include:
- Payment Done (True/False)
- Payment Receipt (File)
- Country (List)
- Province/Territory (List)
- State (List)
You can use these or similar fields based on your own workflow and business needs.
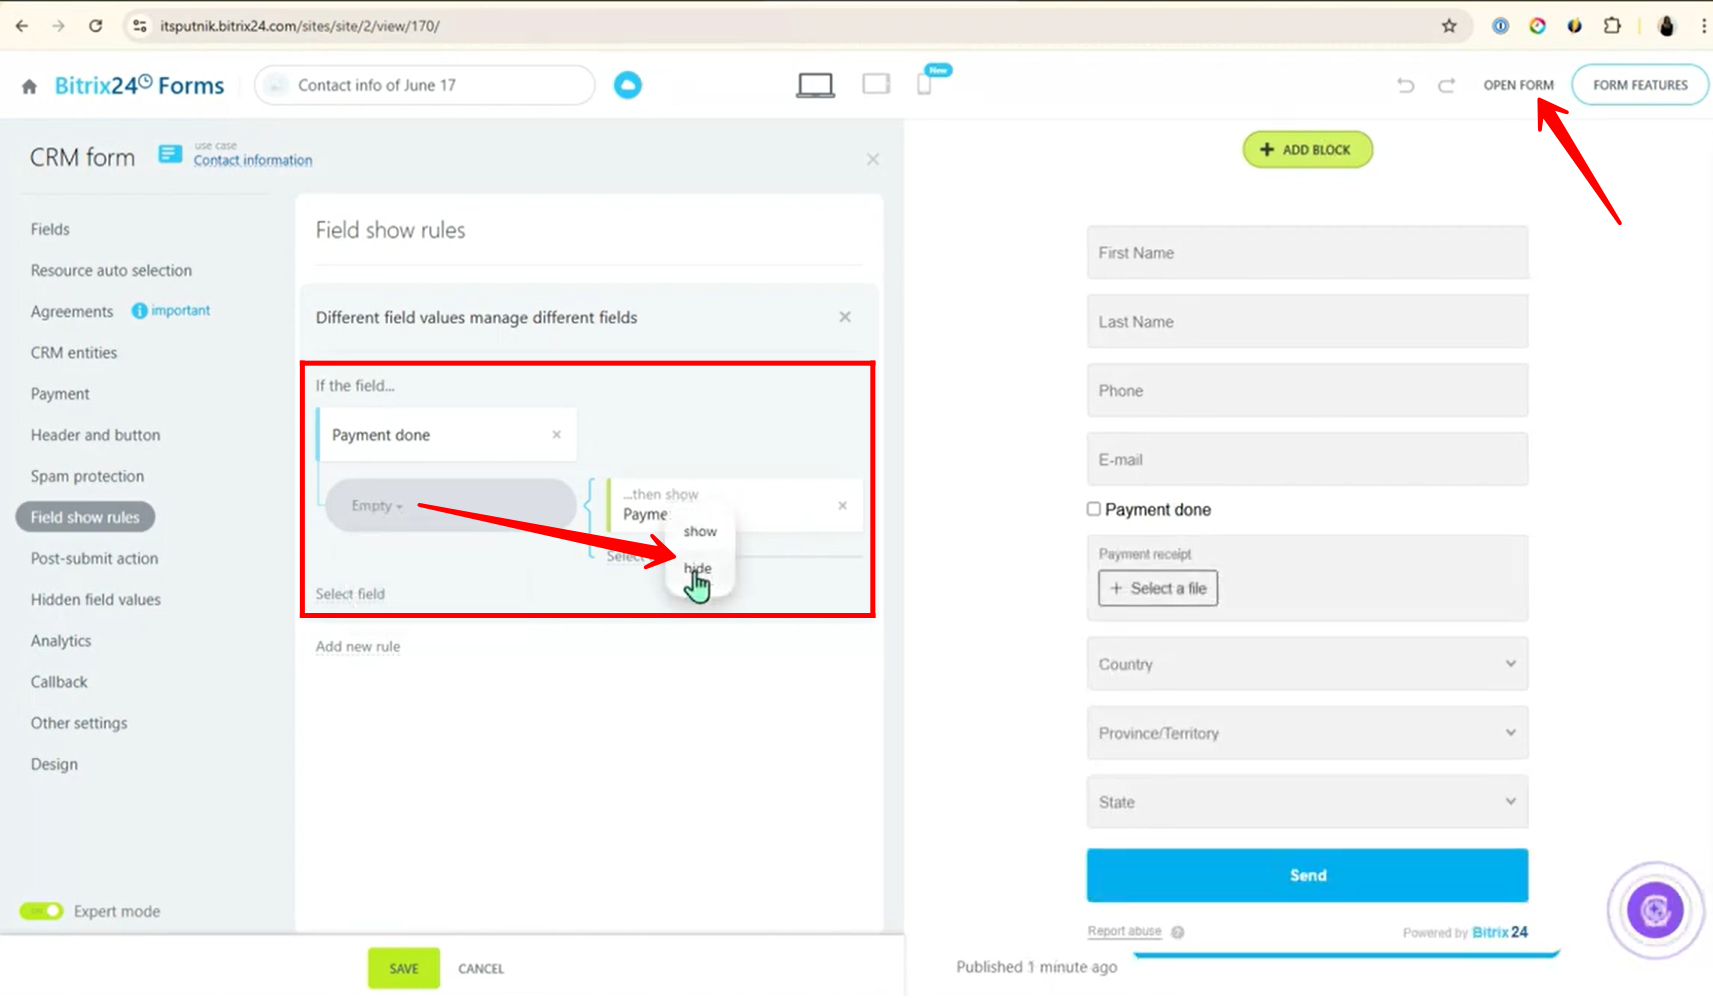
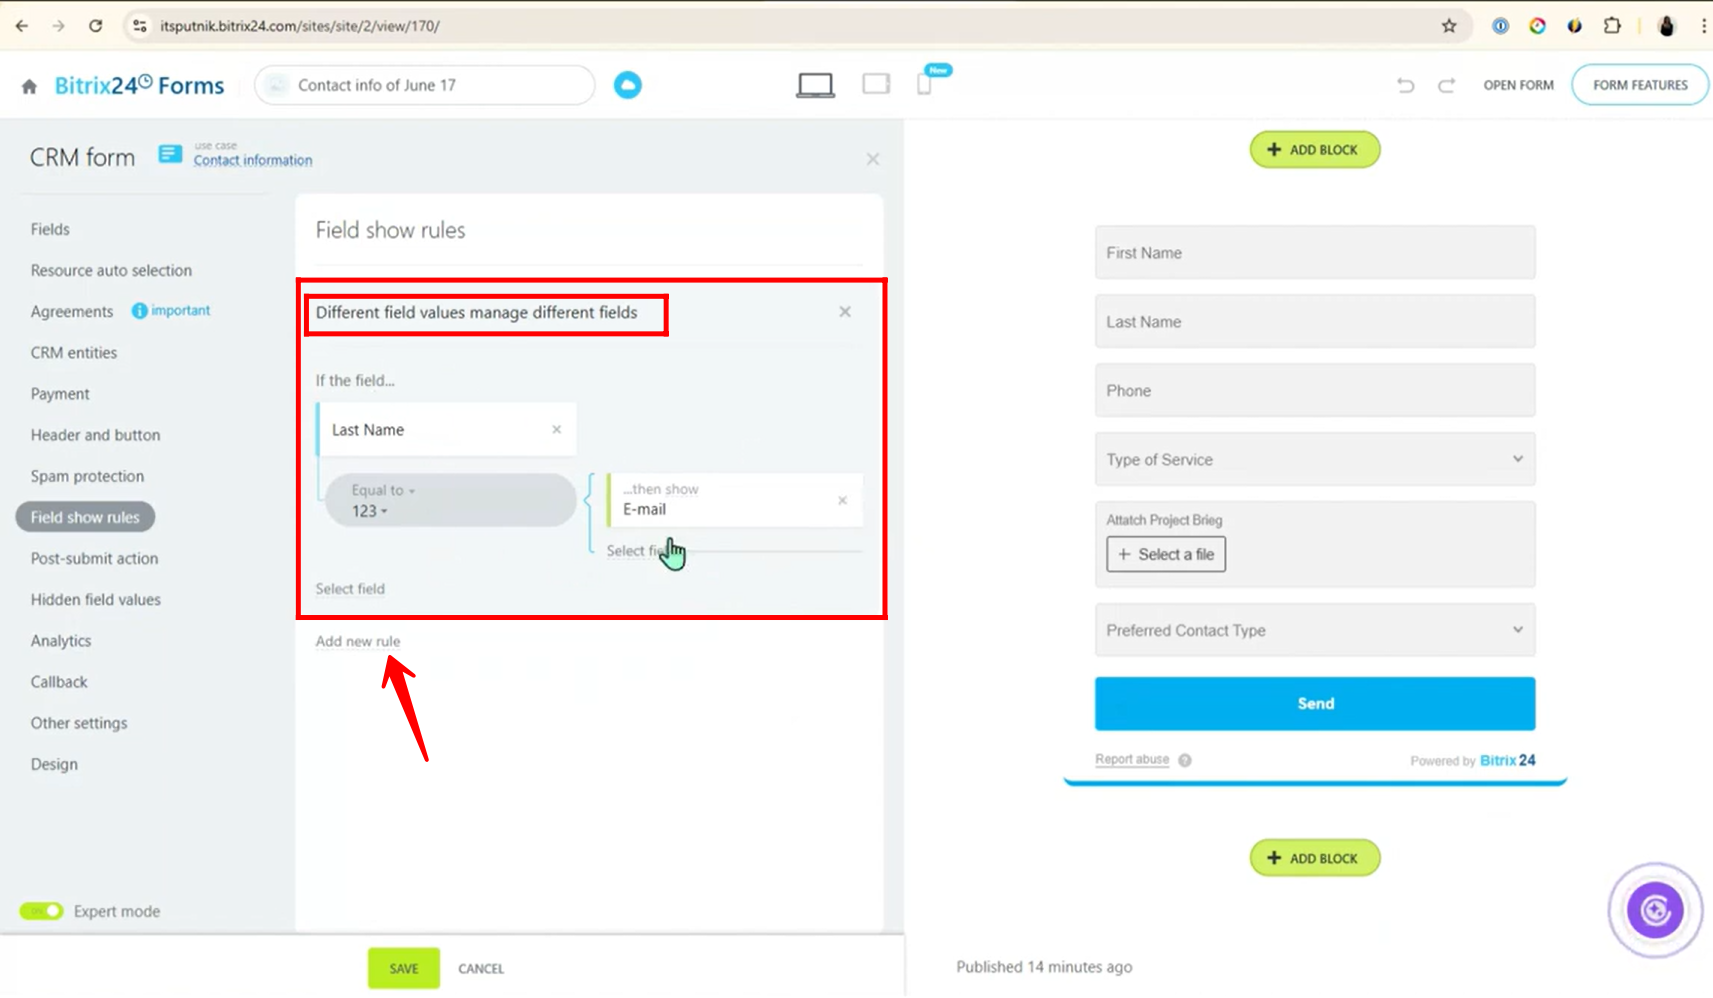
6. Go back to the CRM Form settings, and open the “Field Show Rules” tab. Here, create your first rule titled: “Different field values manage different fields” — this rule will control the visibility of fields based on the values selected in other fields.
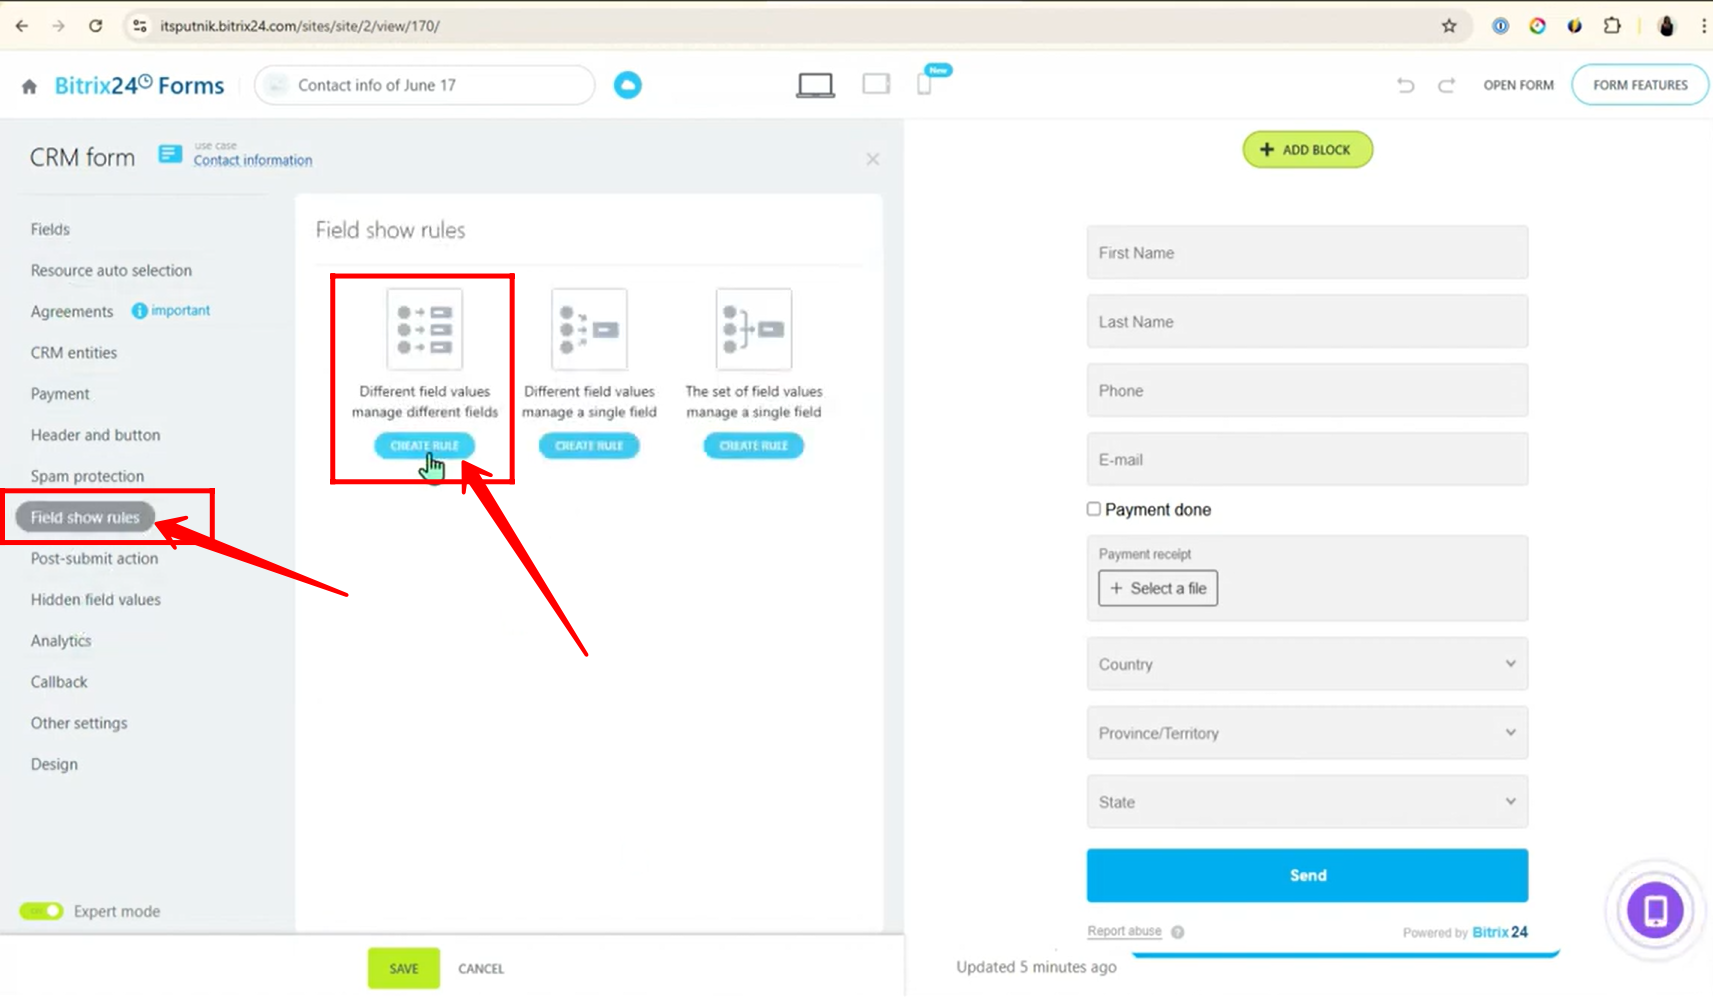
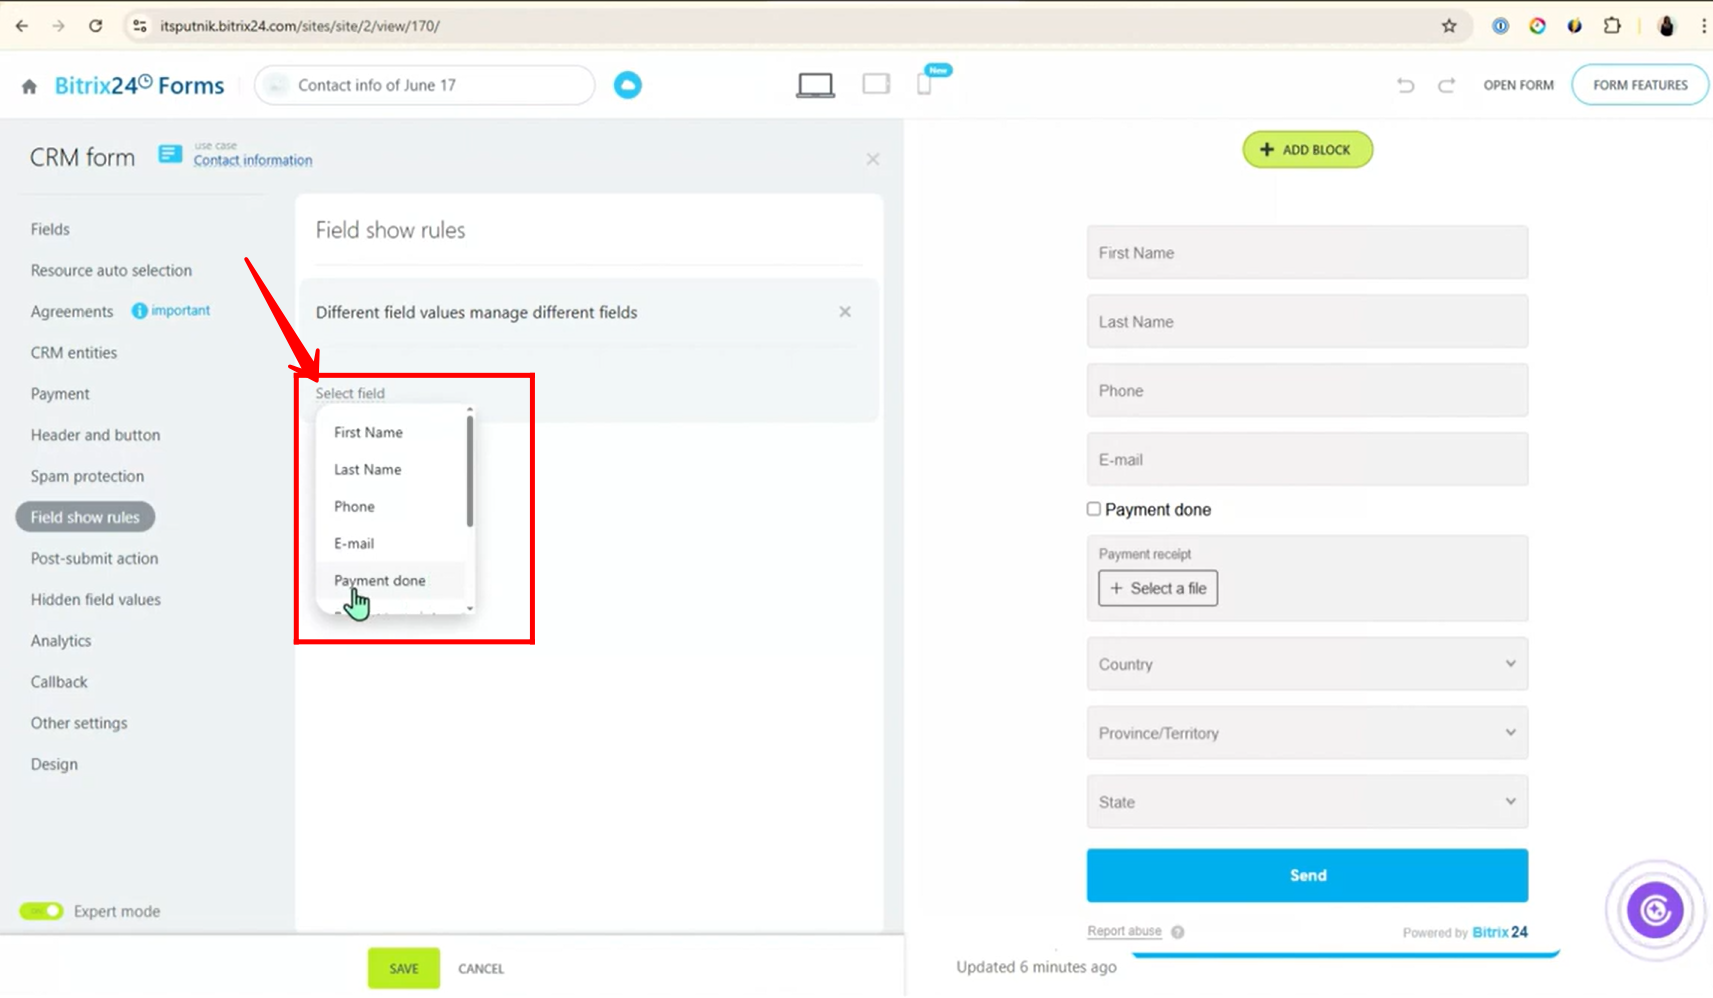
7. Click on “Select Field” and choose the field “Payment Done”.
This field will act as the condition for your rule, determining which other fields are shown based on whether the payment has been marked as done or not.
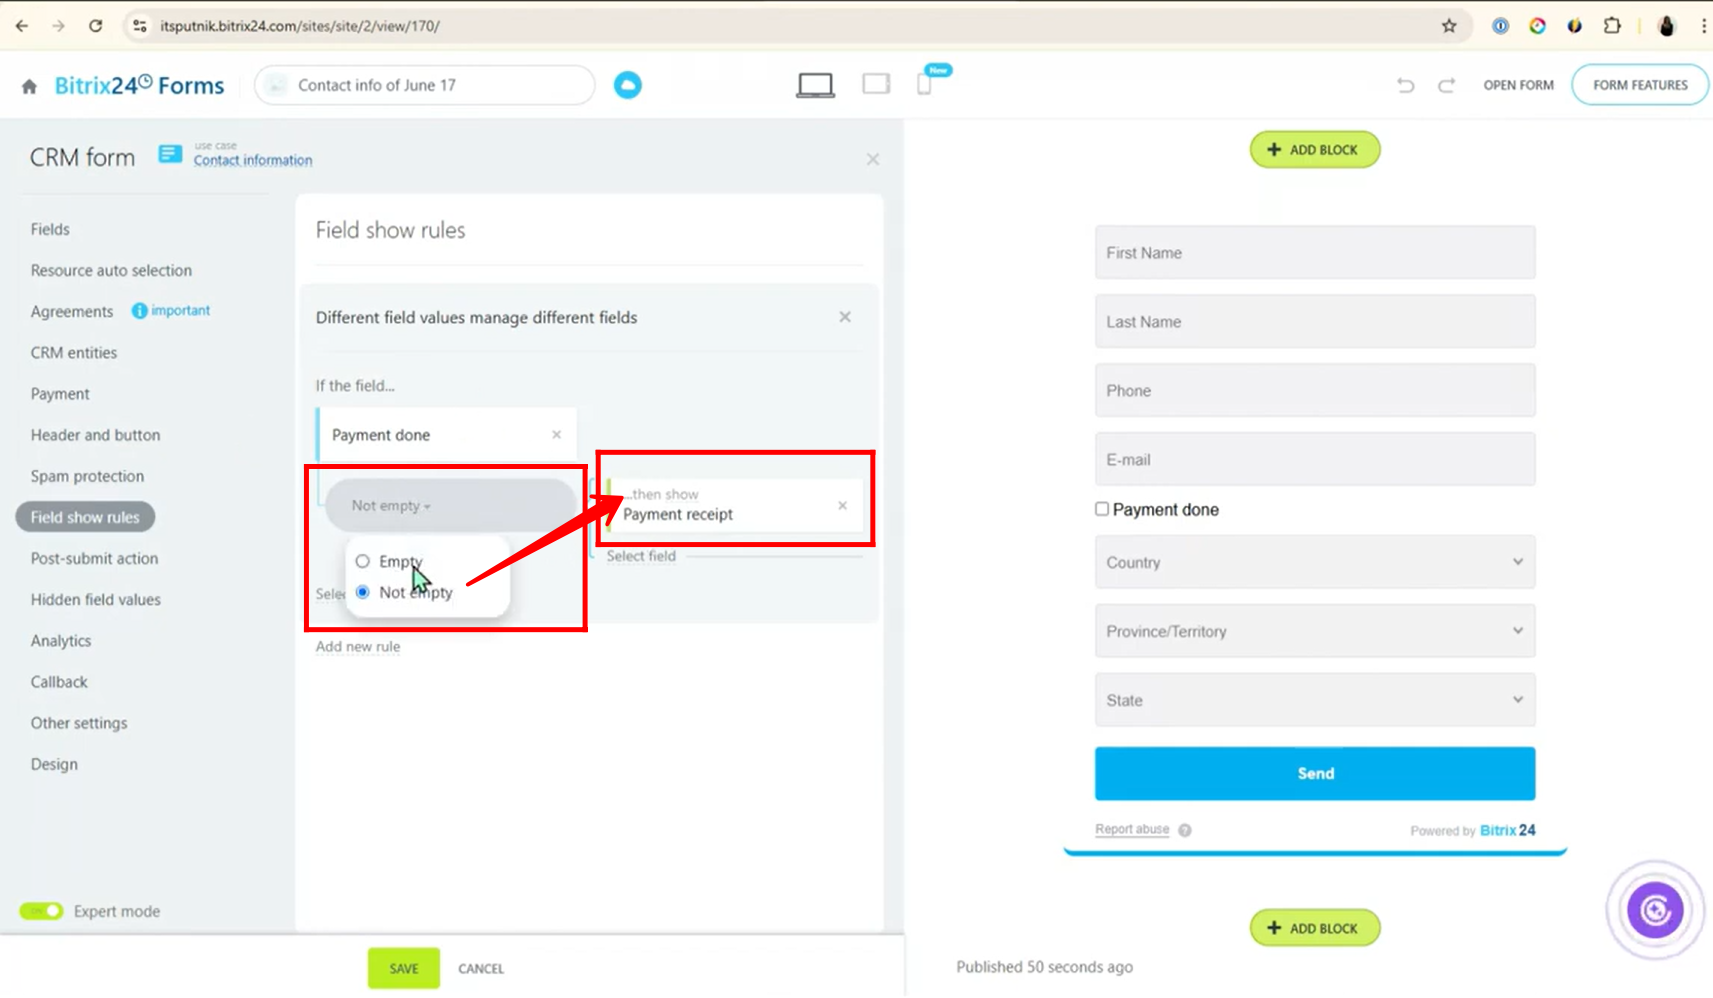
8. Set the condition:
If “Payment Done” is not empty, then show the field “Payment Receipt”. This means the “Payment Receipt” field will only appear when a value (True/False) is selected for “Payment Done”.
9. You can also add the vice versa condition for better control.
Set the condition:
If “Payment Done” is empty, then hide the “Payment Receipt” field. This ensures the field only appears when needed and remains hidden otherwise. Now, open the form to preview how it works.
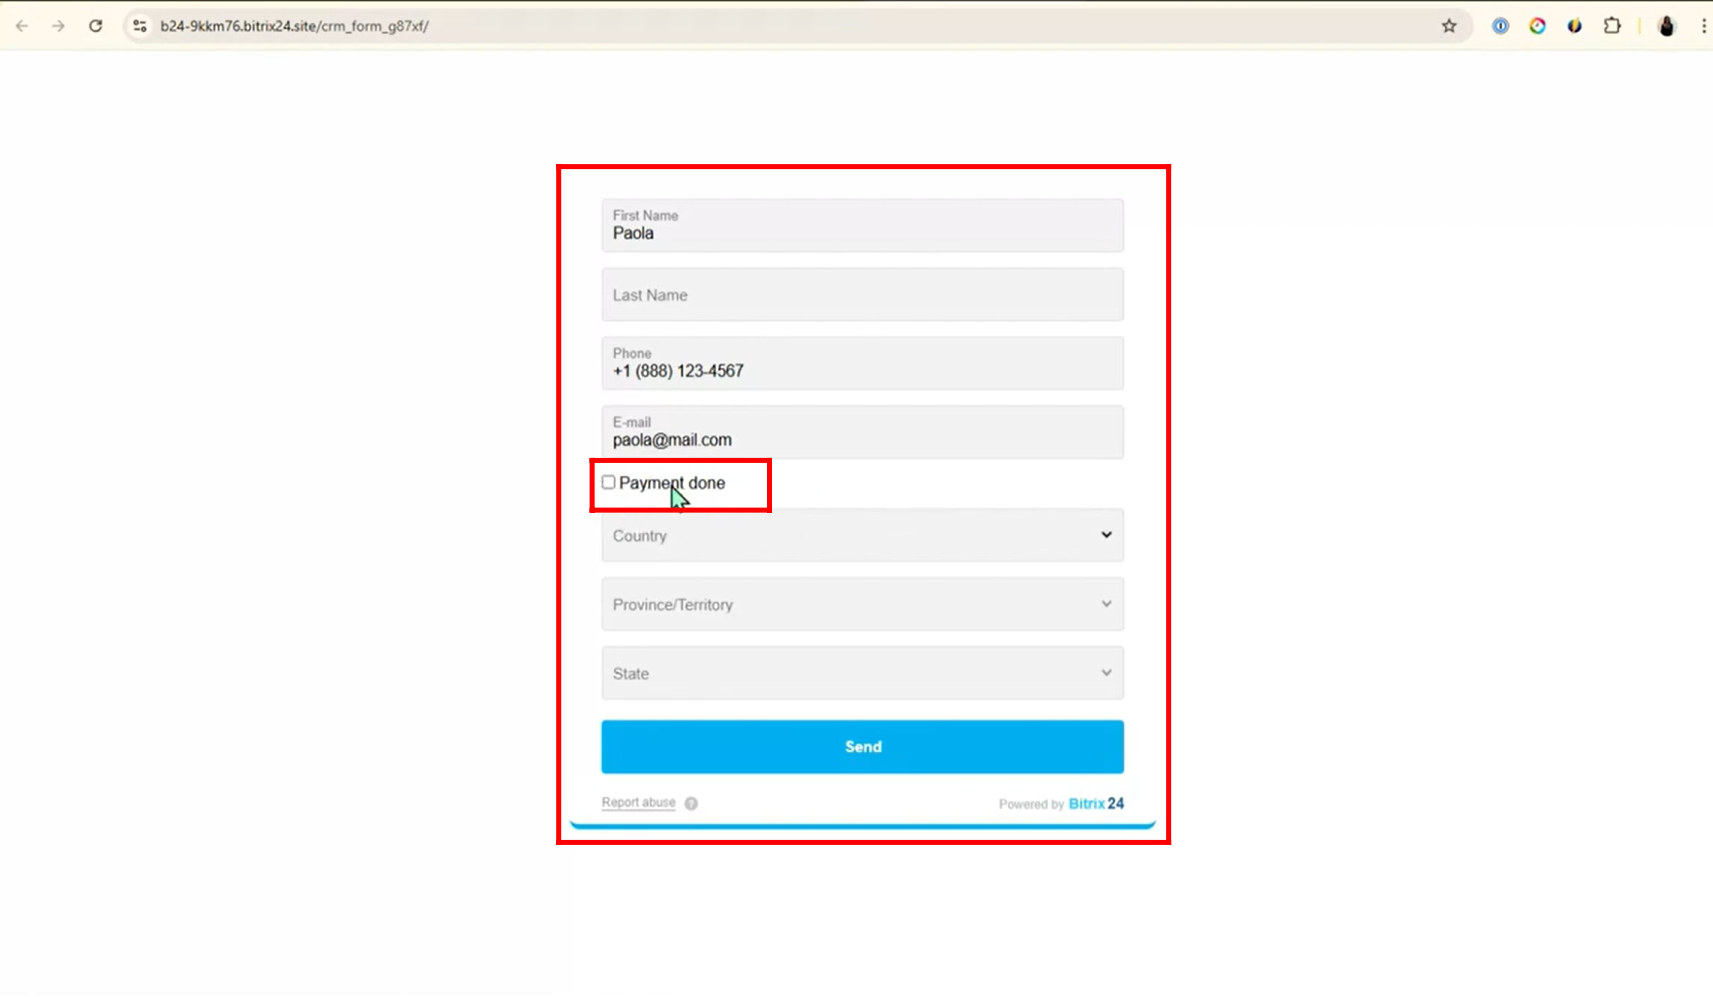
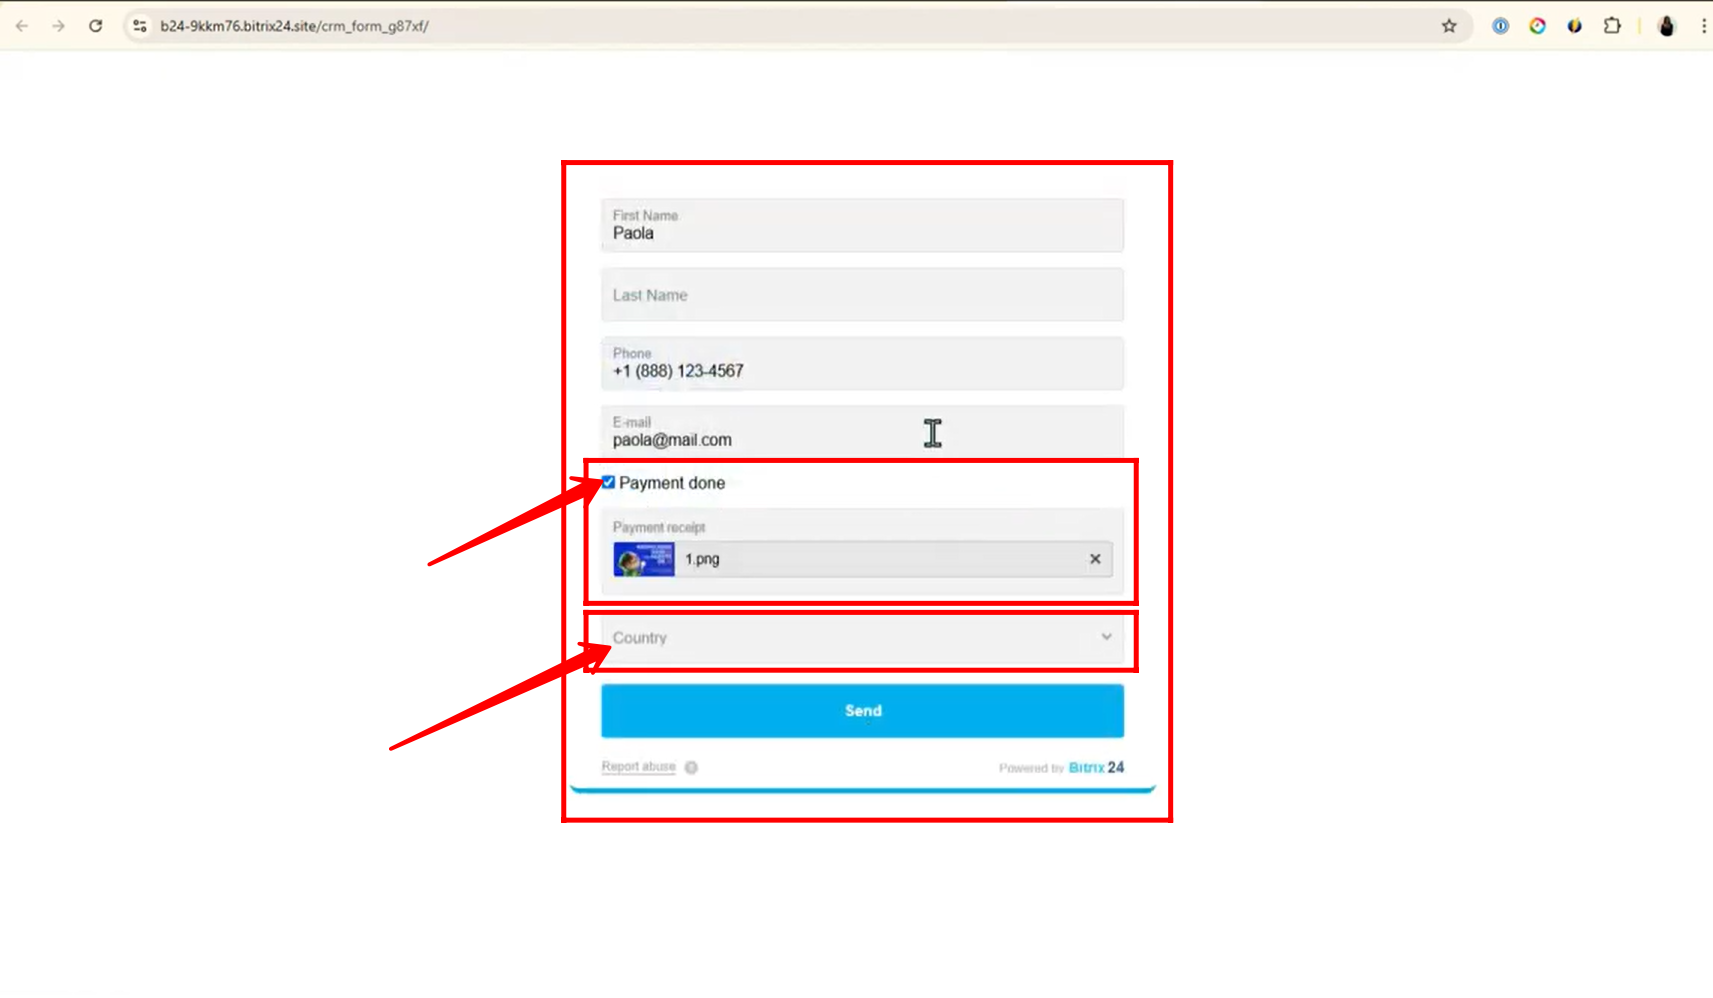
10. In the form preview, you won’t see the “Payment Receipt” field initially, because by default, the “Payment Done” checkbox is unchecked — meaning the condition to show the receipt field hasn’t been met yet.
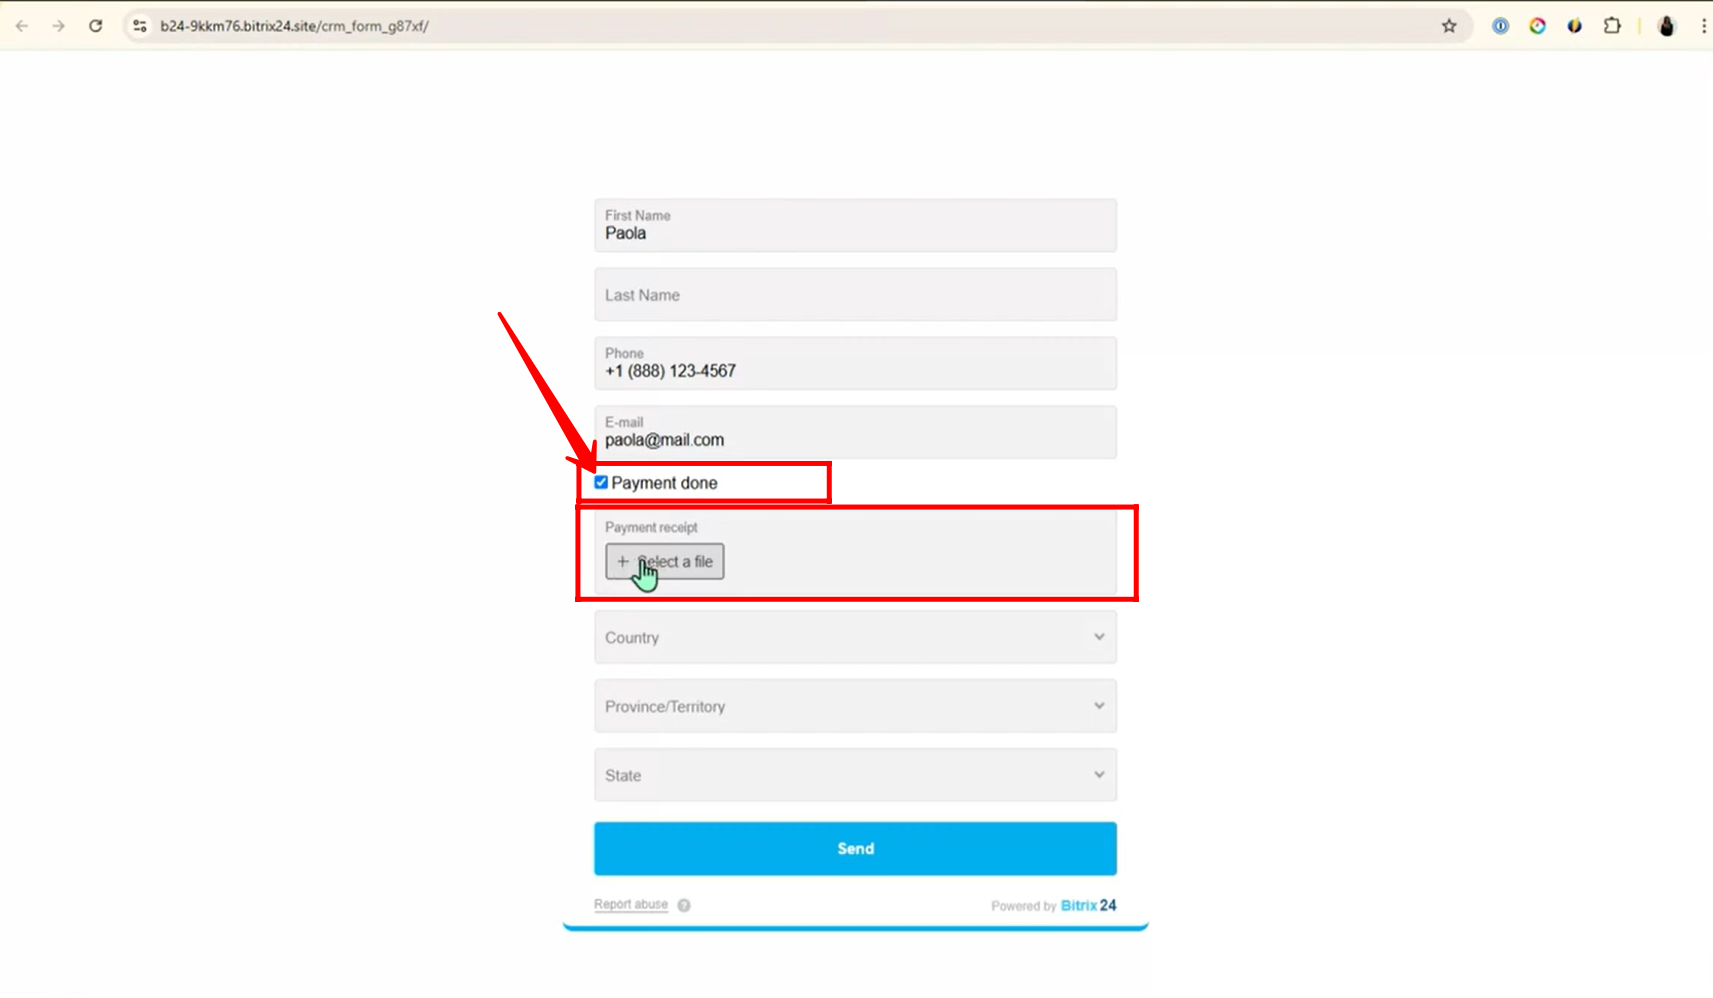
11. Now, when you check the “Payment Done” checkbox, the “Payment Receipt” field becomes visible, allowing you to upload a file as proof of payment.
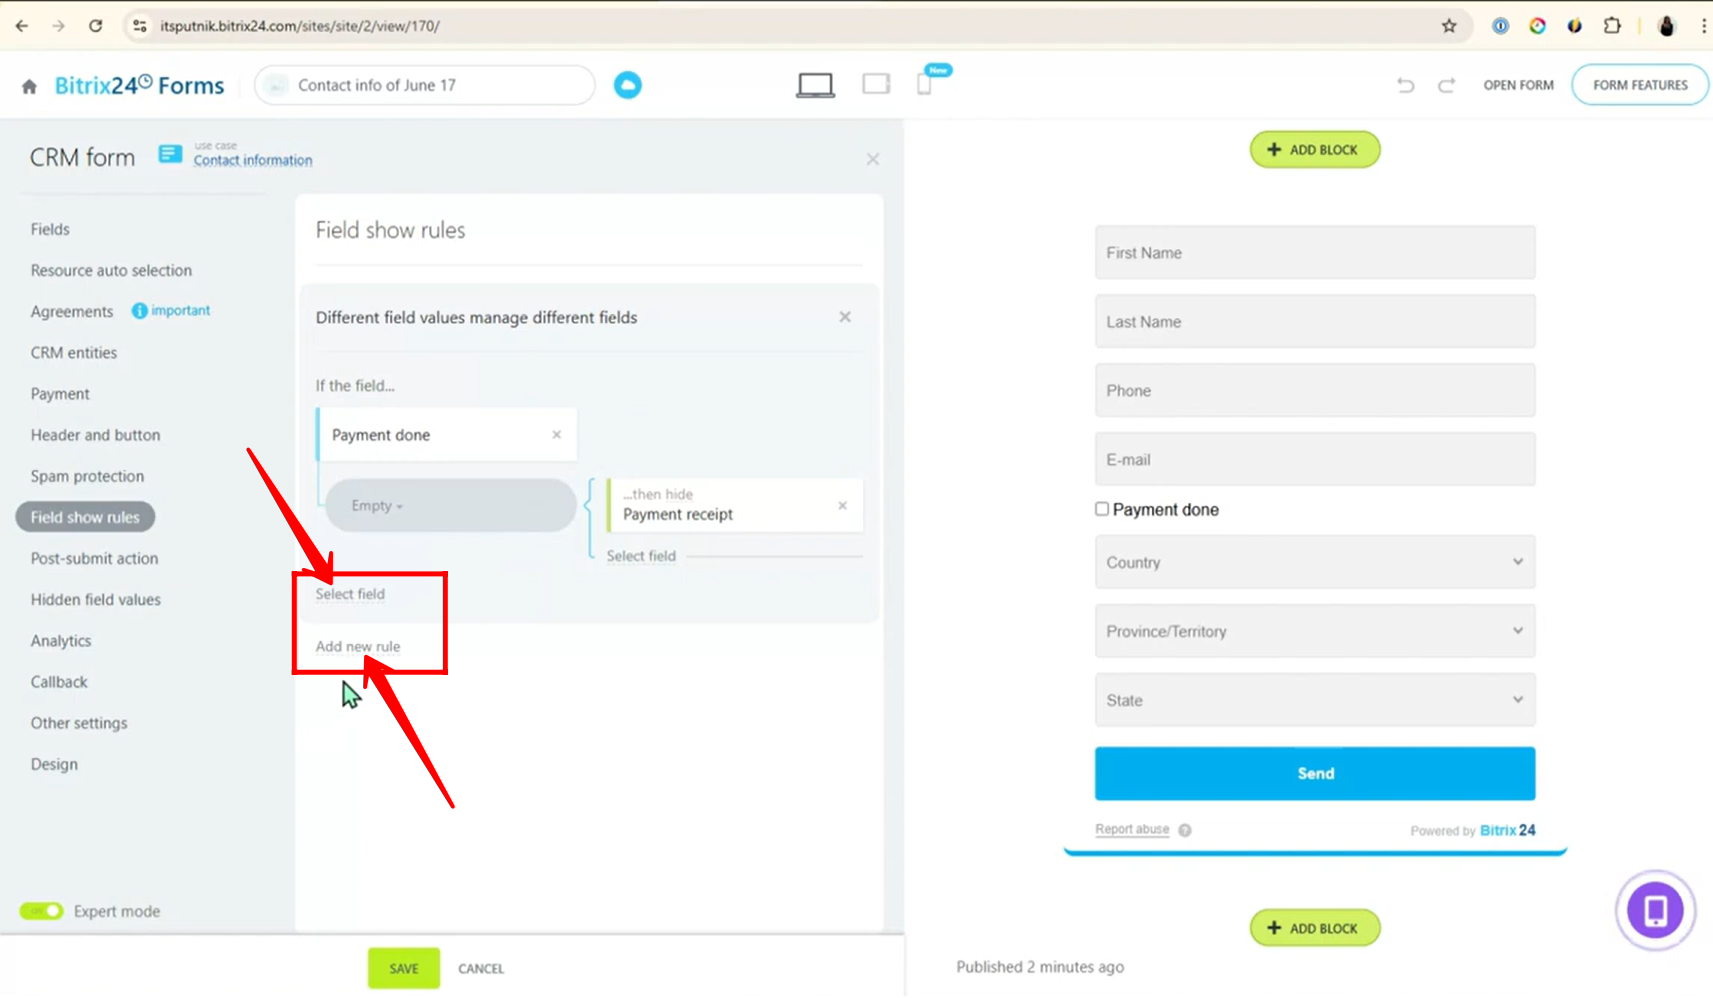
12. In the conditions configuration under a rule, you have two options:
Or click “Add New Rule” to create a separate rule with its own conditions — both can work simultaneously within the form.
Click “Select Field” to add a new condition under the same rule, allowing multiple conditions to control one rule.
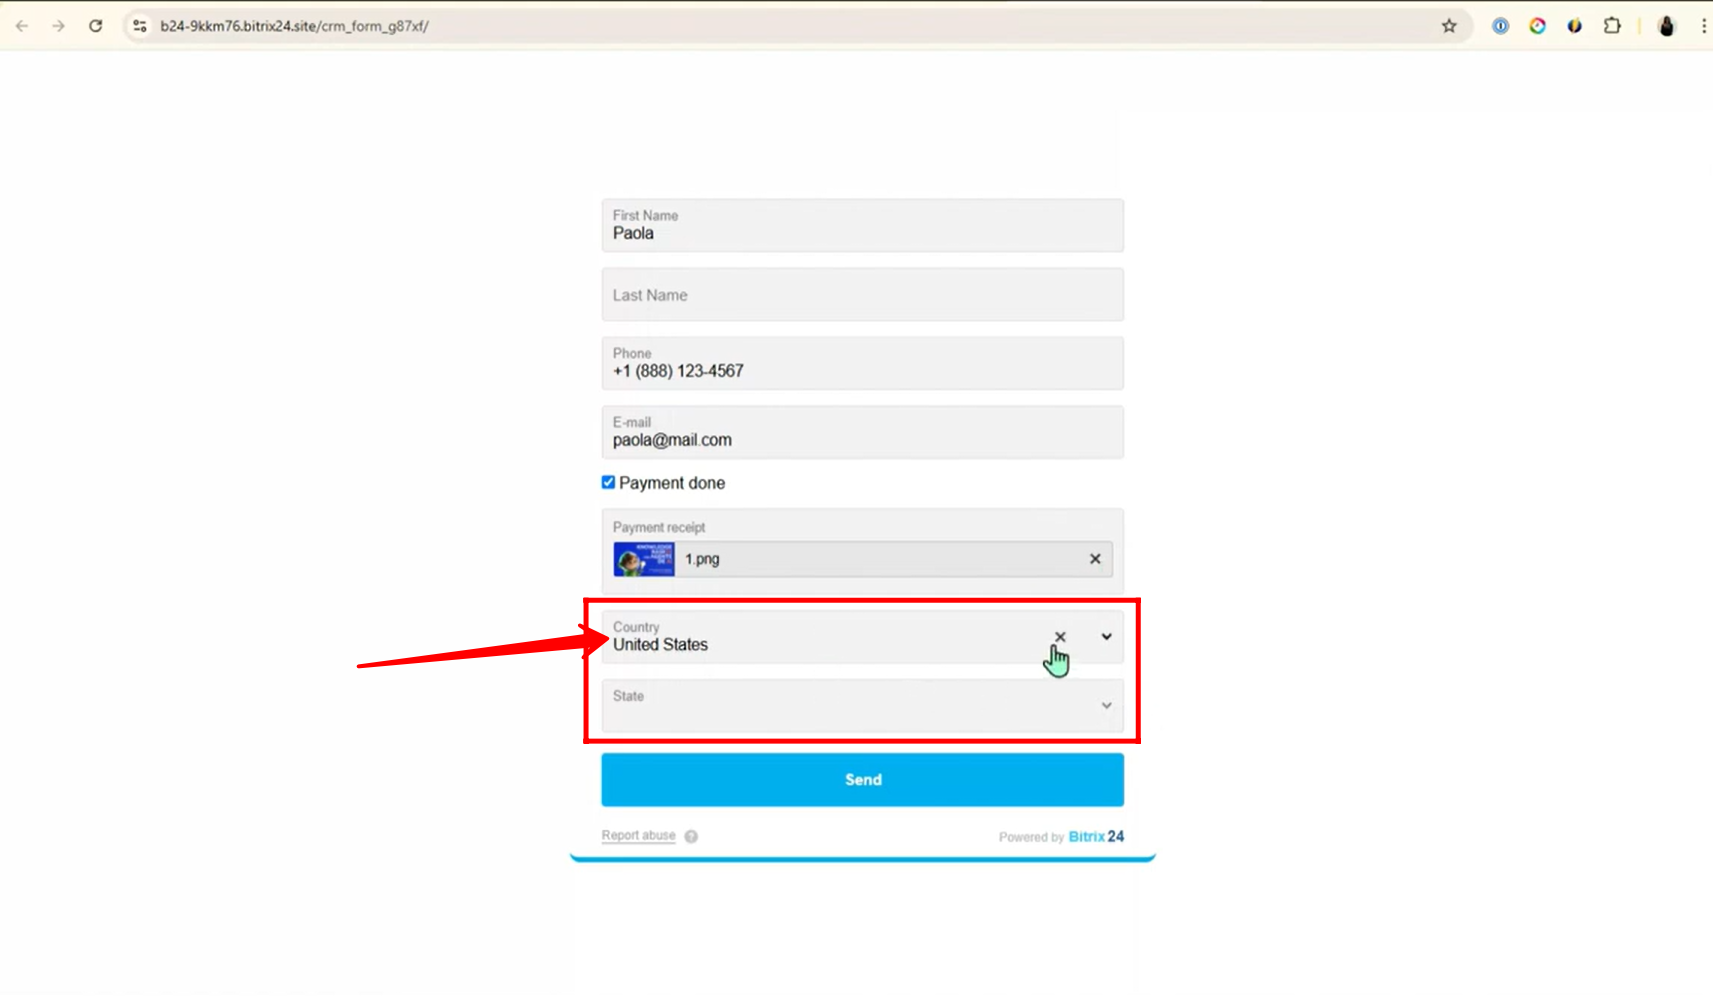
13. For now, let’s add a new field to create another condition under the same first rule. Click “Select Field”, then choose “Country” from the list. This condition will work together with the existing “Payment Done” condition within the same rule.
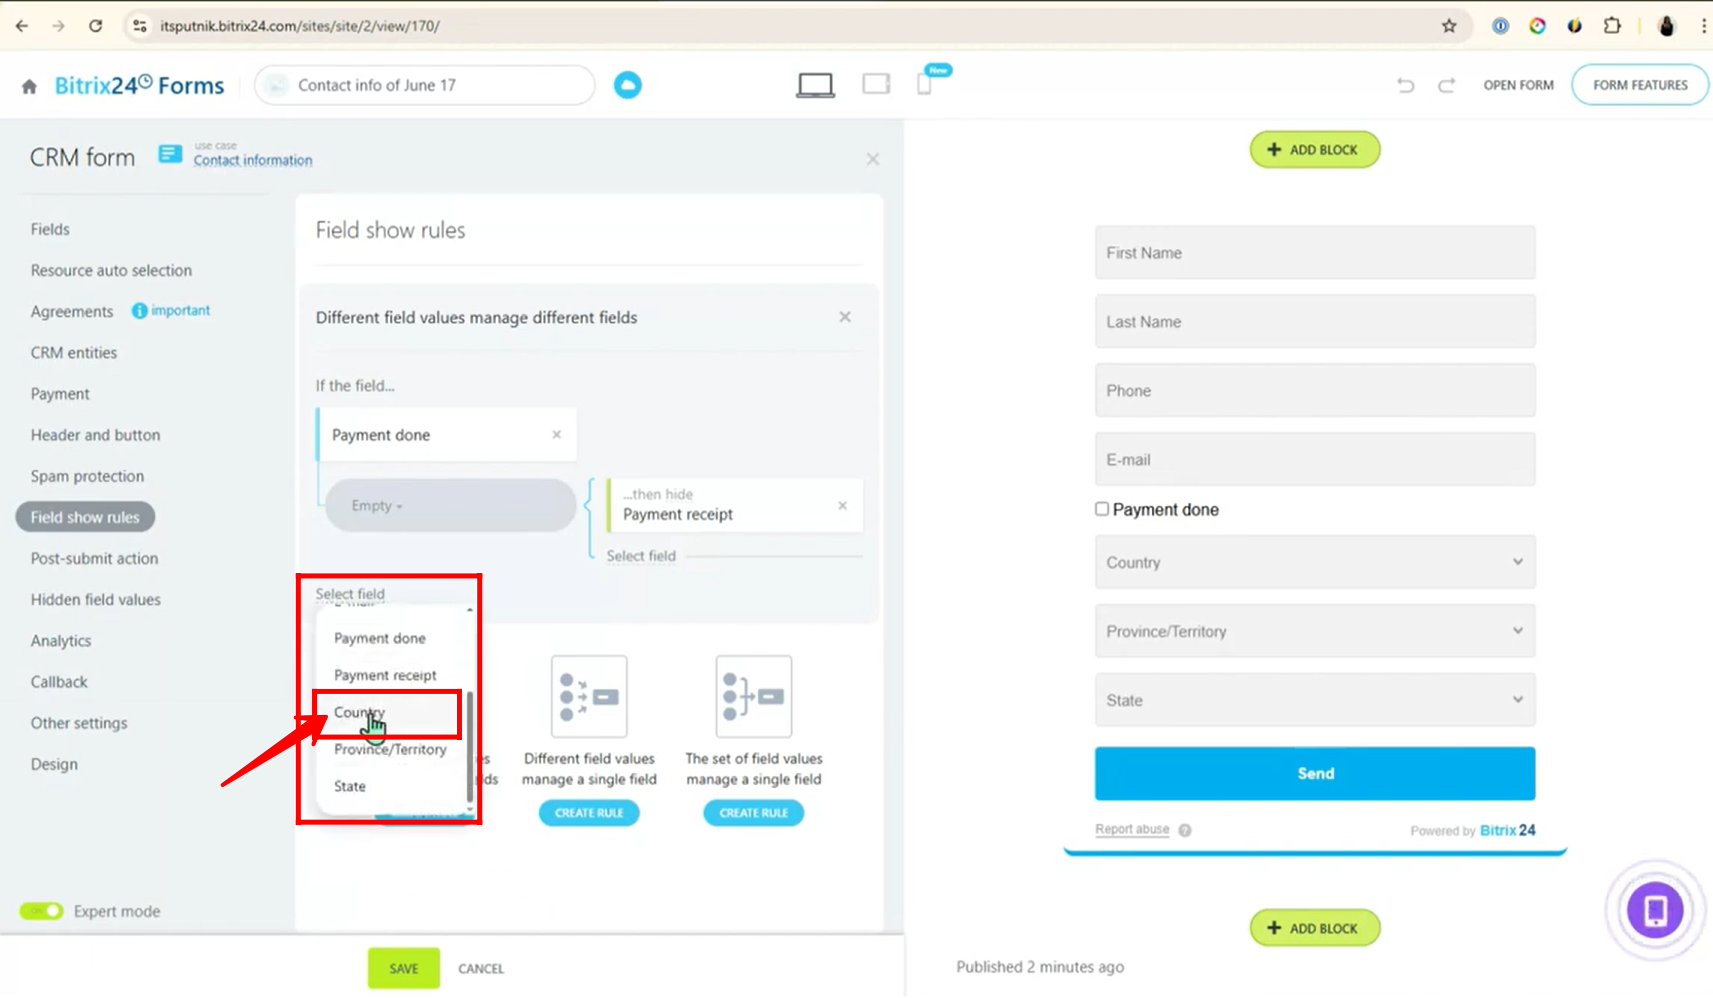
14. Now, set the condition:
If Country equals “United States”, then show the field “State”. This means the “State” field will only appear when the user selects “United States” as the country.
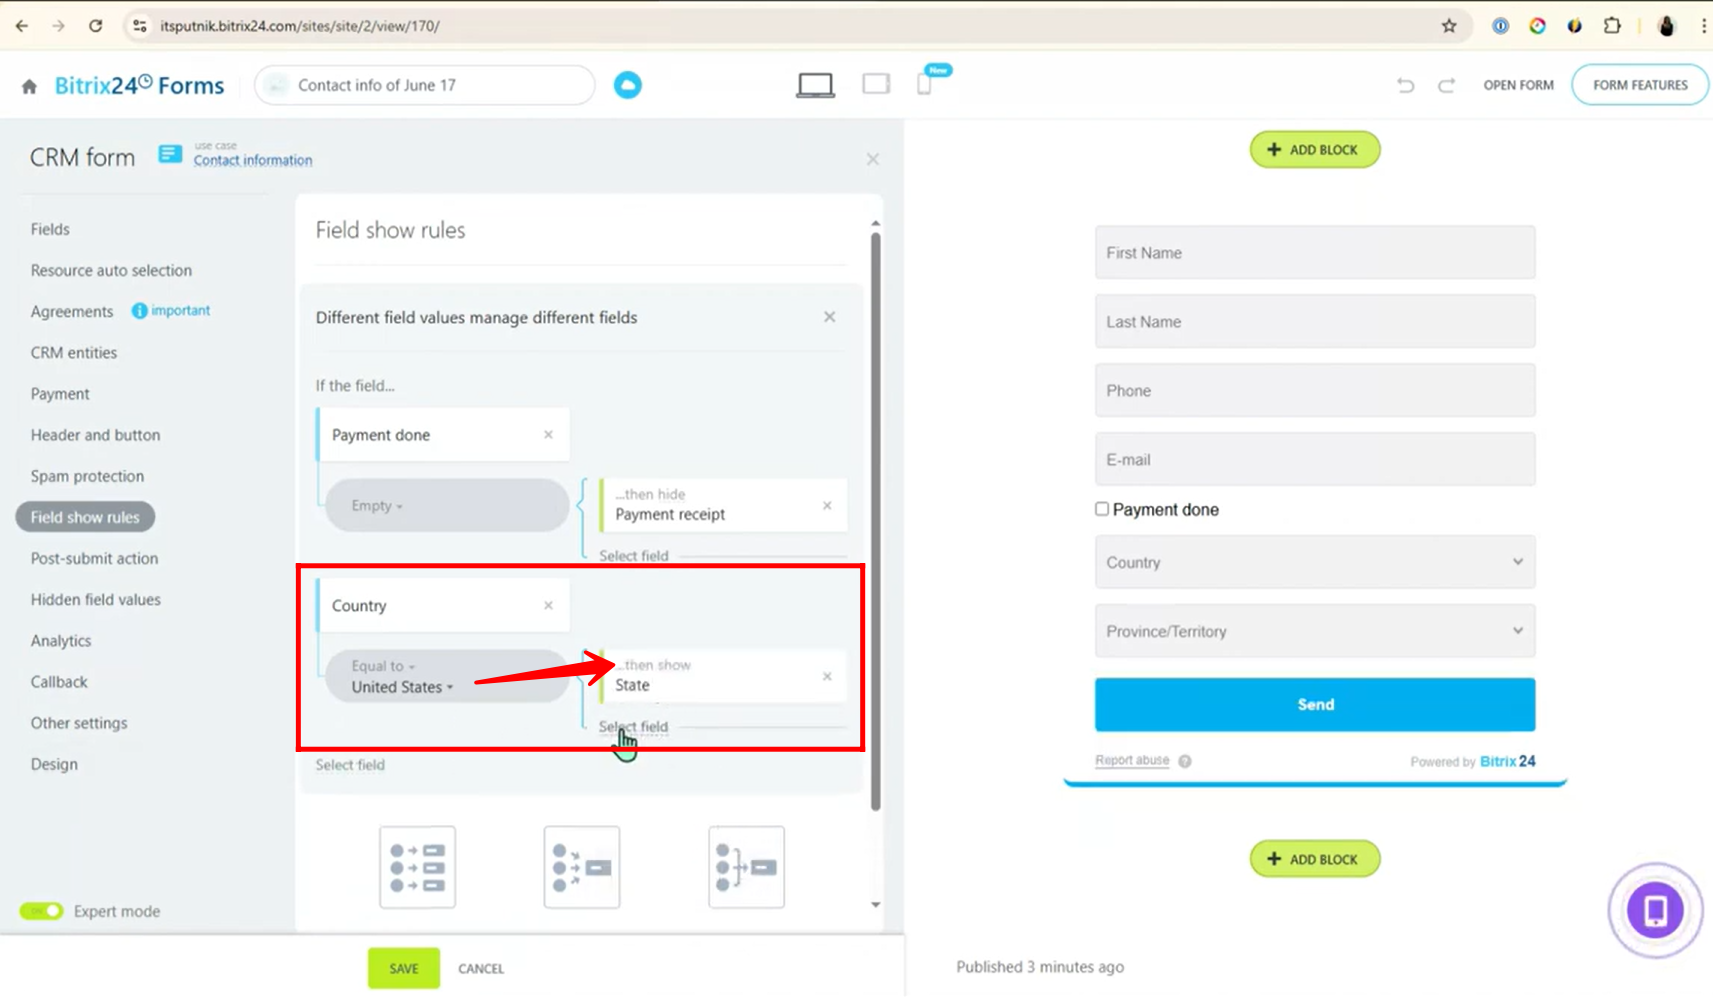
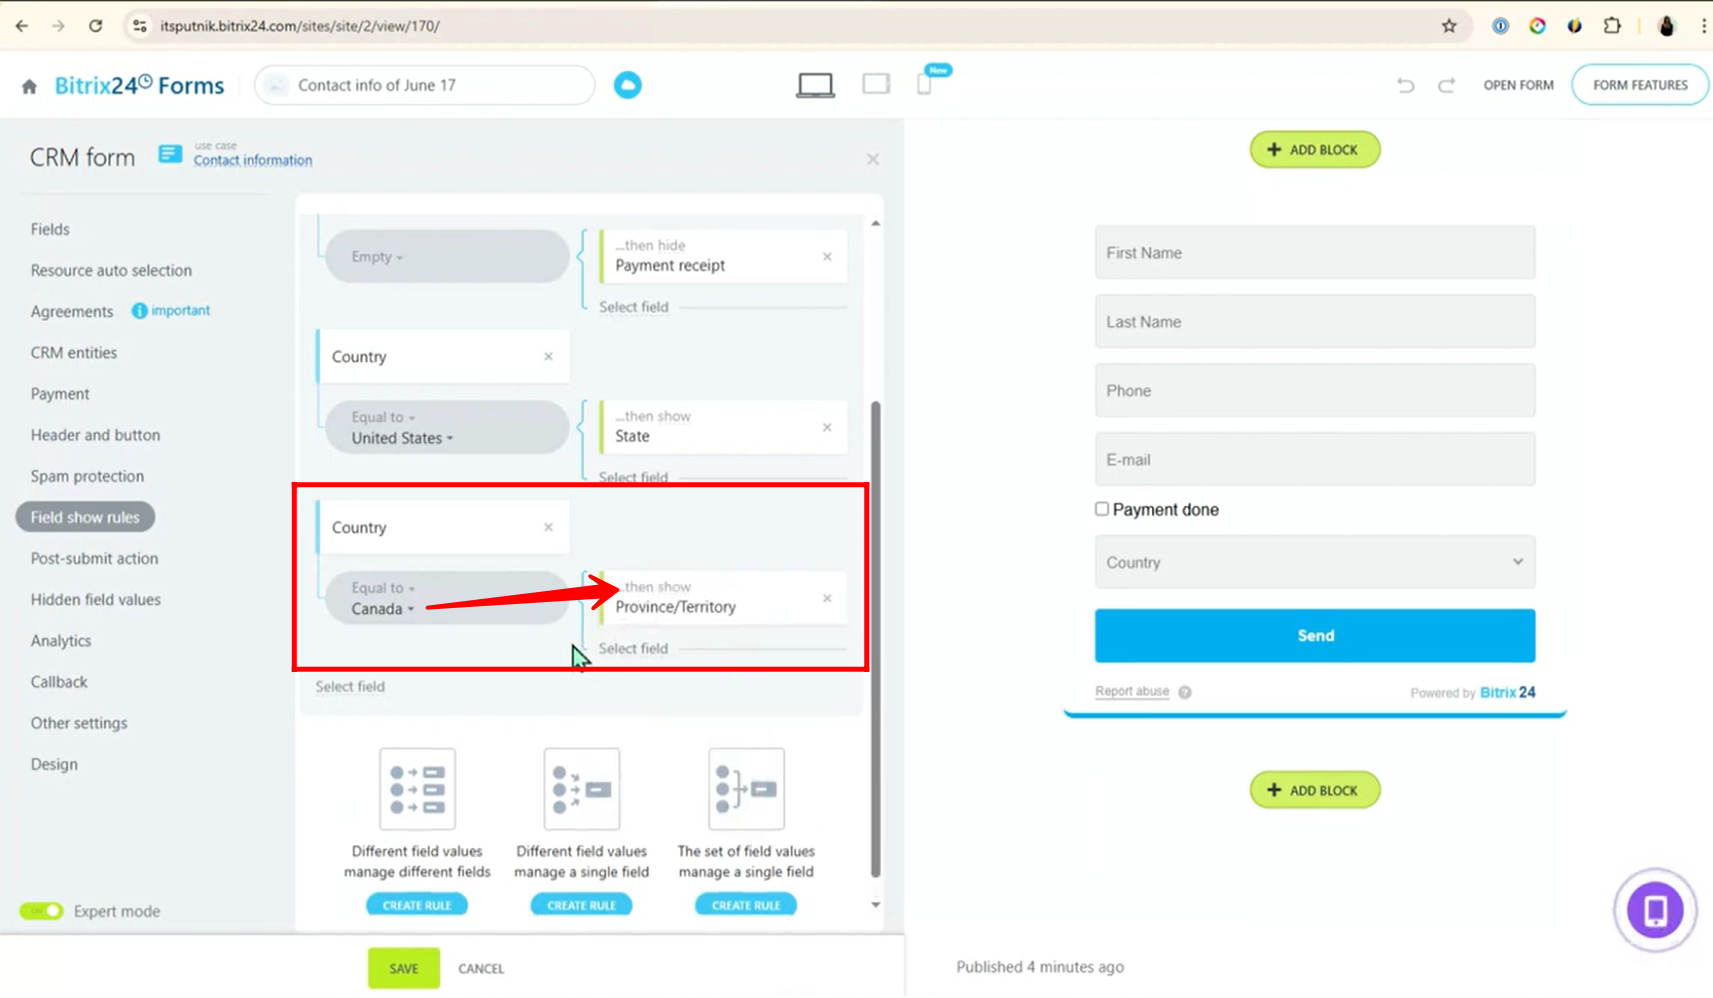
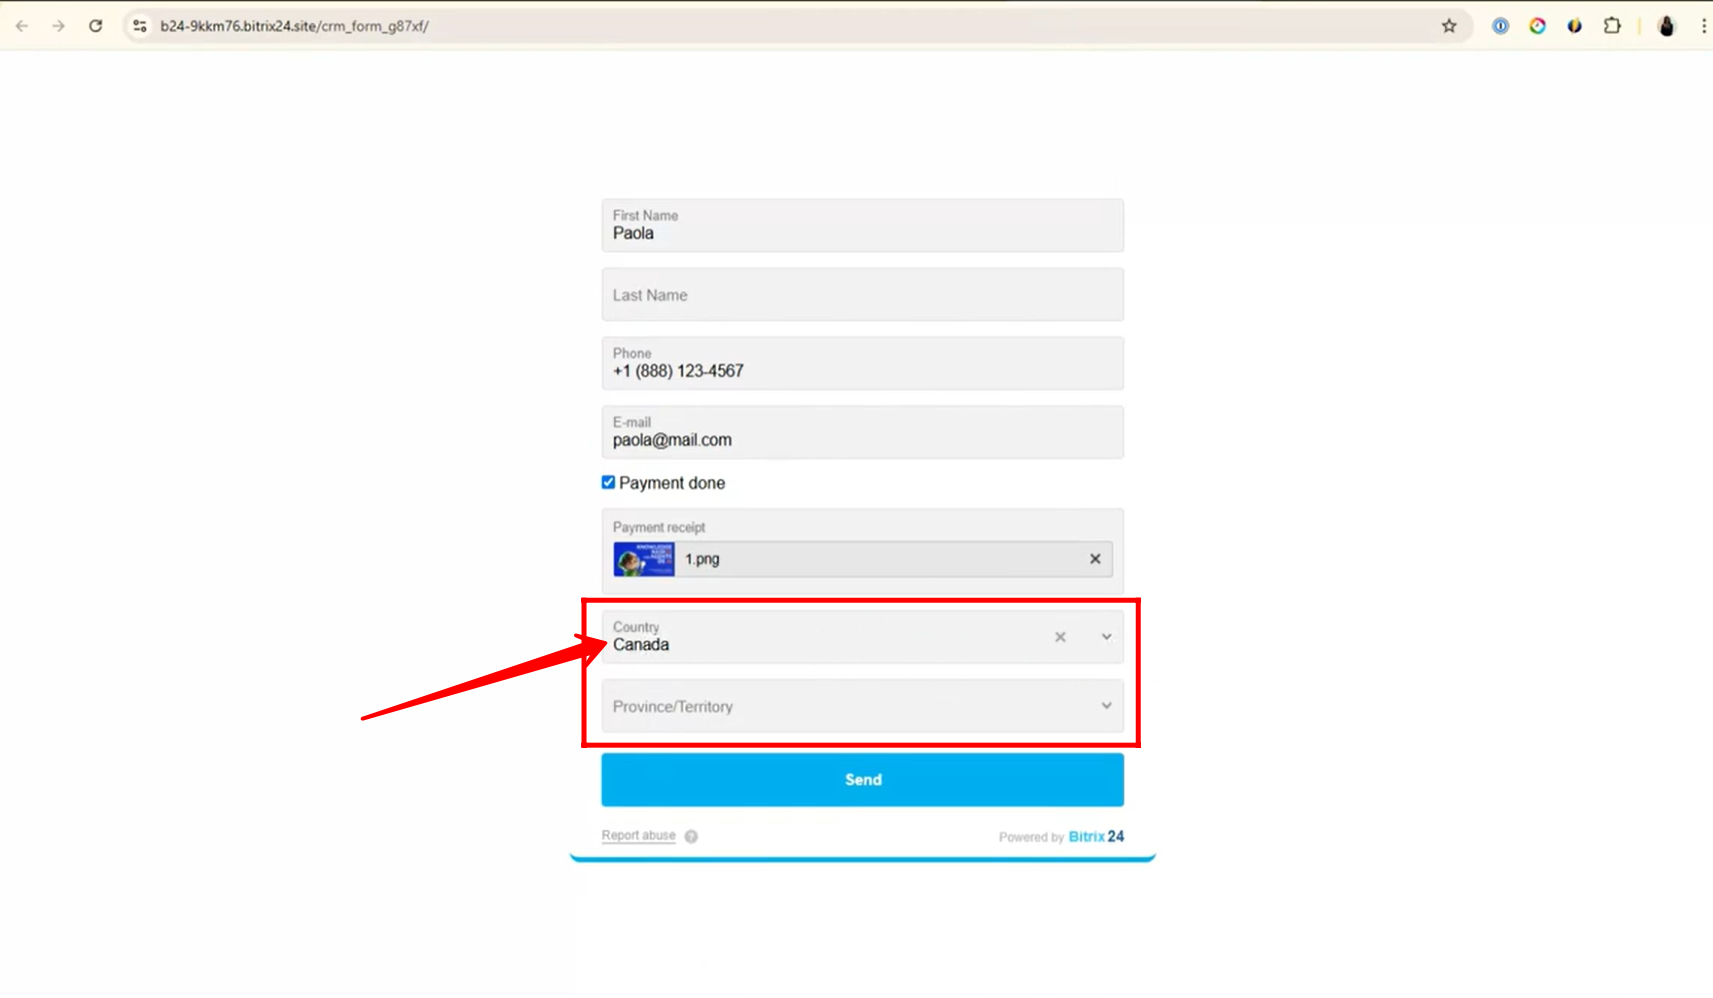
15. Another condition is now added using the “Country” field:
When Country equals “Canada”, then show the “Province/Territory” field. This ensures that users see either the “State” or “Province/Territory” field based on their selected country.
16. Open the form — you’ll notice:
- “Payment Done” is checked, so the “Payment Receipt” field is visible.
- However, since the “Country” field is empty by default, neither the “State” nor “Province/Territory” fields are currently visible.
17. Now, when the Country field is set to “United States”, the “State” field becomes visible — as per the condition configured in the field show rules.
18. Similarly, when the Country field is set to “Canada”, the “Province/Territory” field is displayed — based on the rule you previously configured.
19. To configure a new rule, you can either reuse existing fields or create new fields for a different use case.
In this example:
- Navigate to the “Fields” tab in CRM form settings
- Click “Add field” to create new fields
- The fields used in the previous rule are now removed
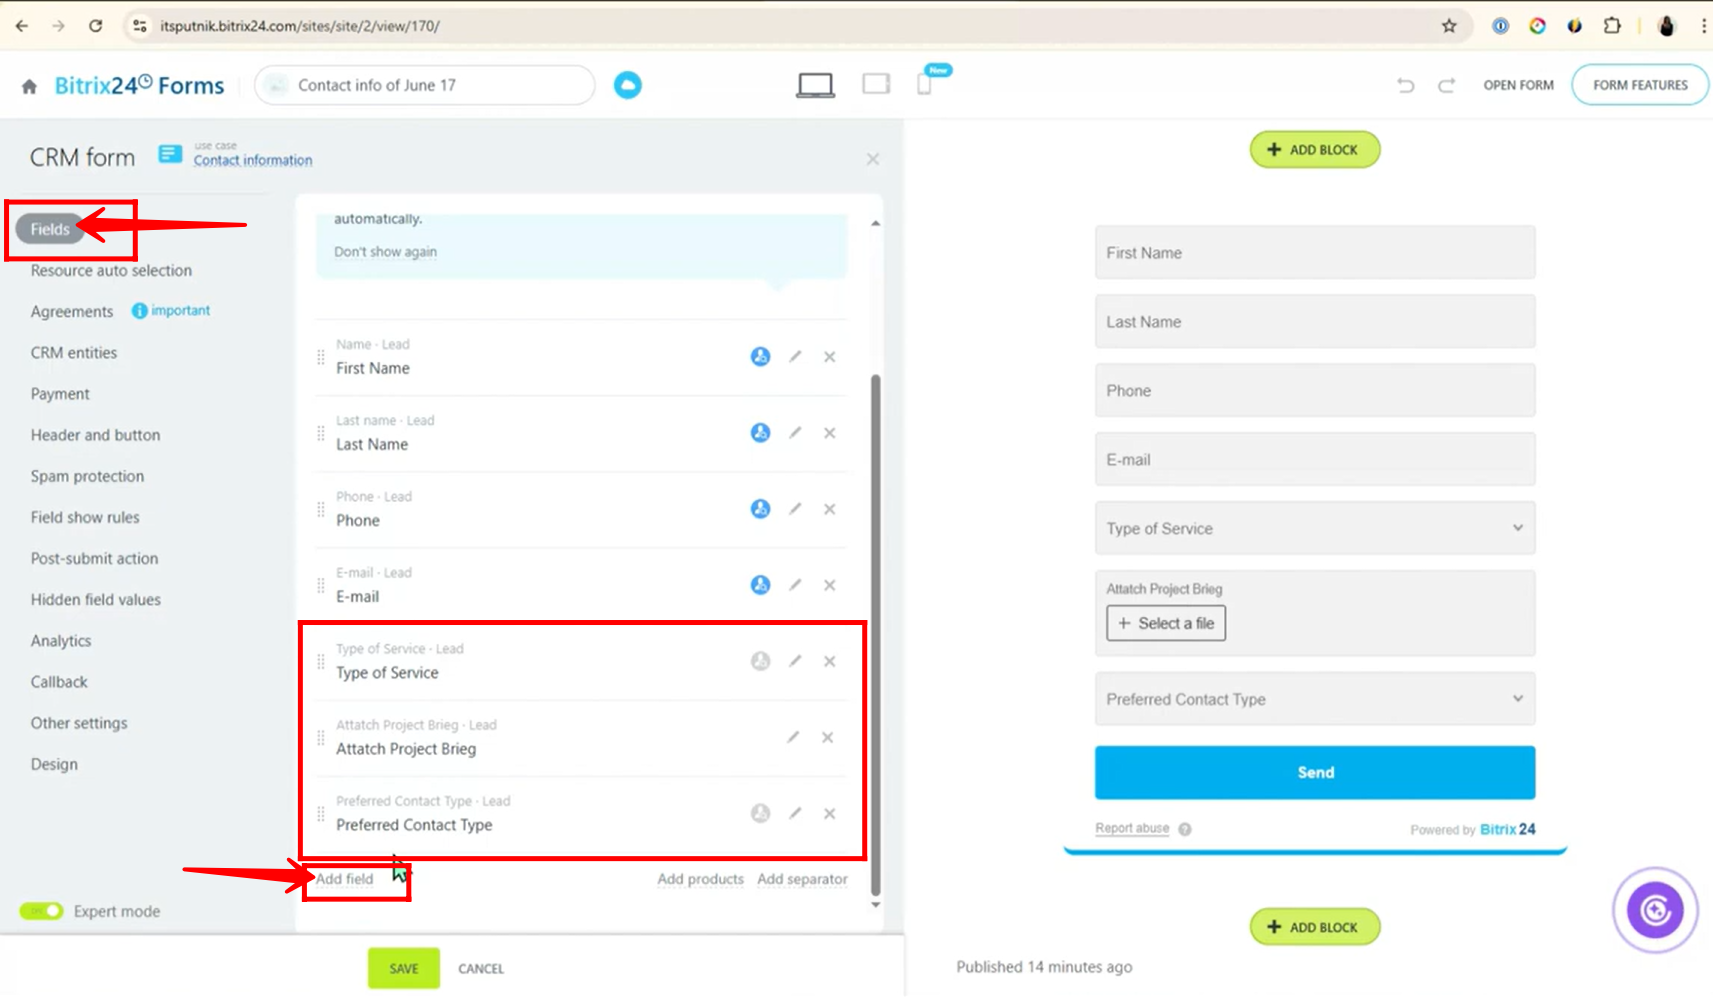
Now, along with the default fields (First Name, Last Name, Phone, Email), the following new fields are added:
- Preferred Contact Type
- Type of Service
- Attach Project Brief
20. You can now see that the first condition has been applied successfully. To continue configuring dynamic behavior, you can simply click “Add new rule” within the same form. This allows you to define additional logic and make the form respond to different user inputs simultaneously.
21. Click “Create Rule” and choose the option “Different field values manage a single field” — this allows you to control the visibility or behavior of one specific field based on multiple different input values from other fields.
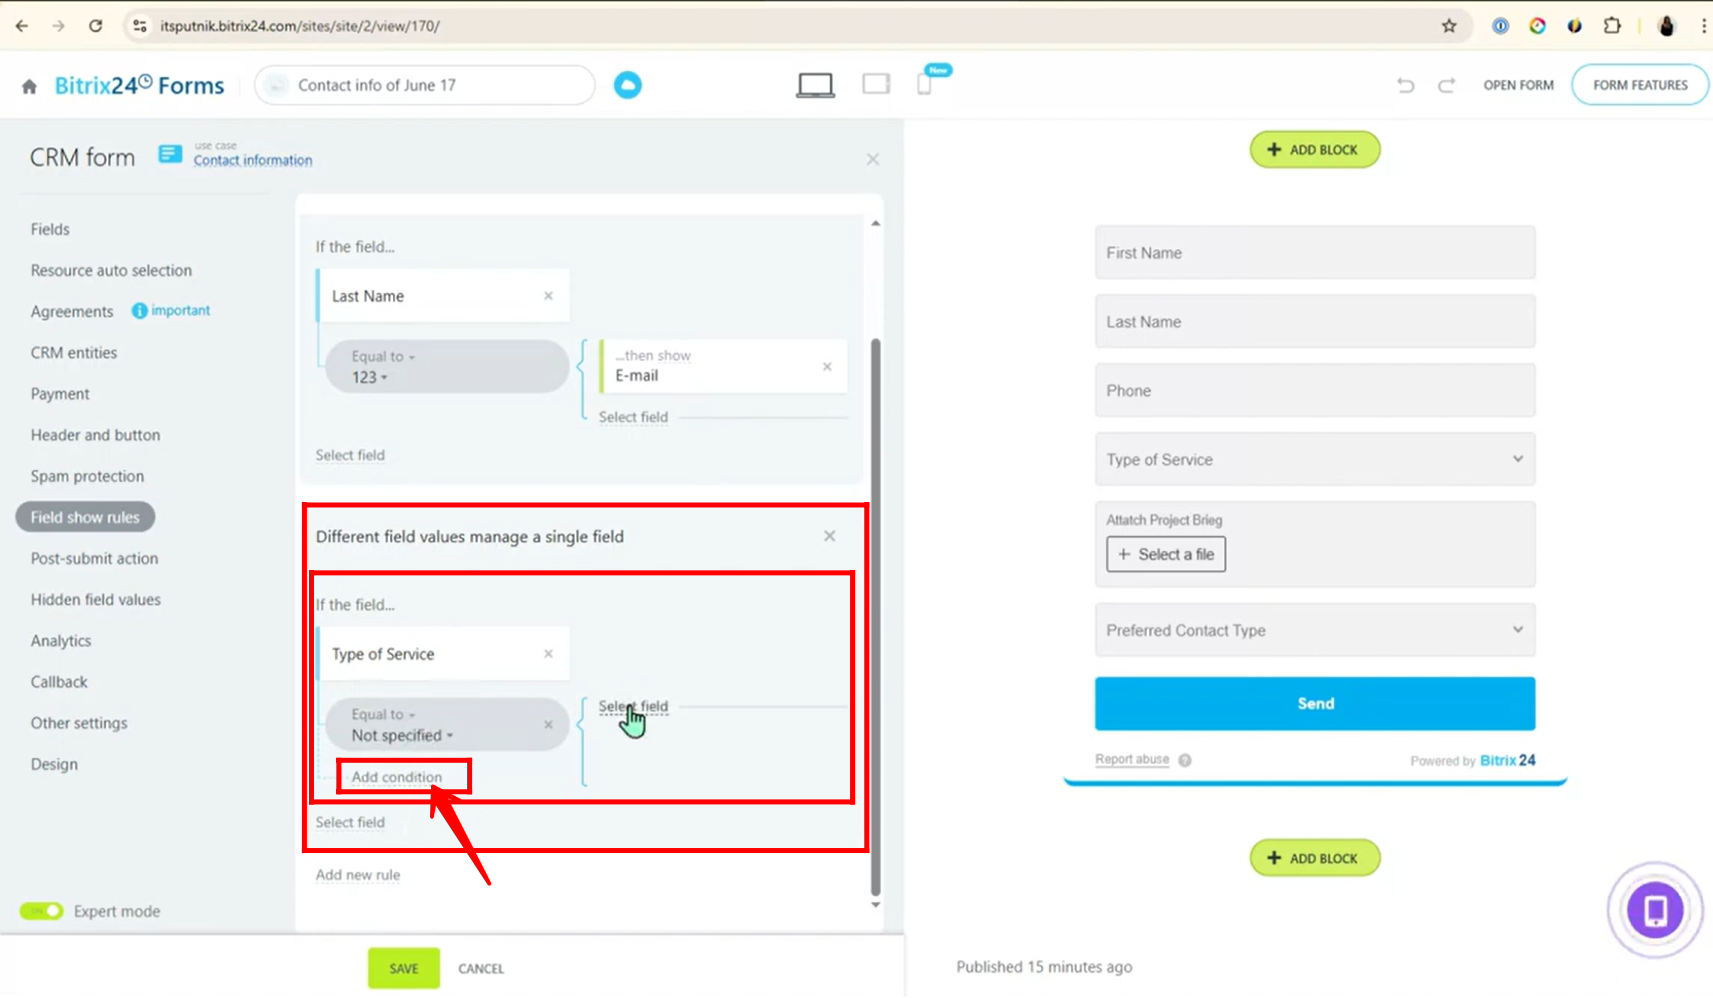
22. In the rule “Different field values manage a single field” configuration:
- Select the field “Type of Service”.
- This rule differs from the first one because multiple values of “Type of Service” can control the visibility of a single target field.
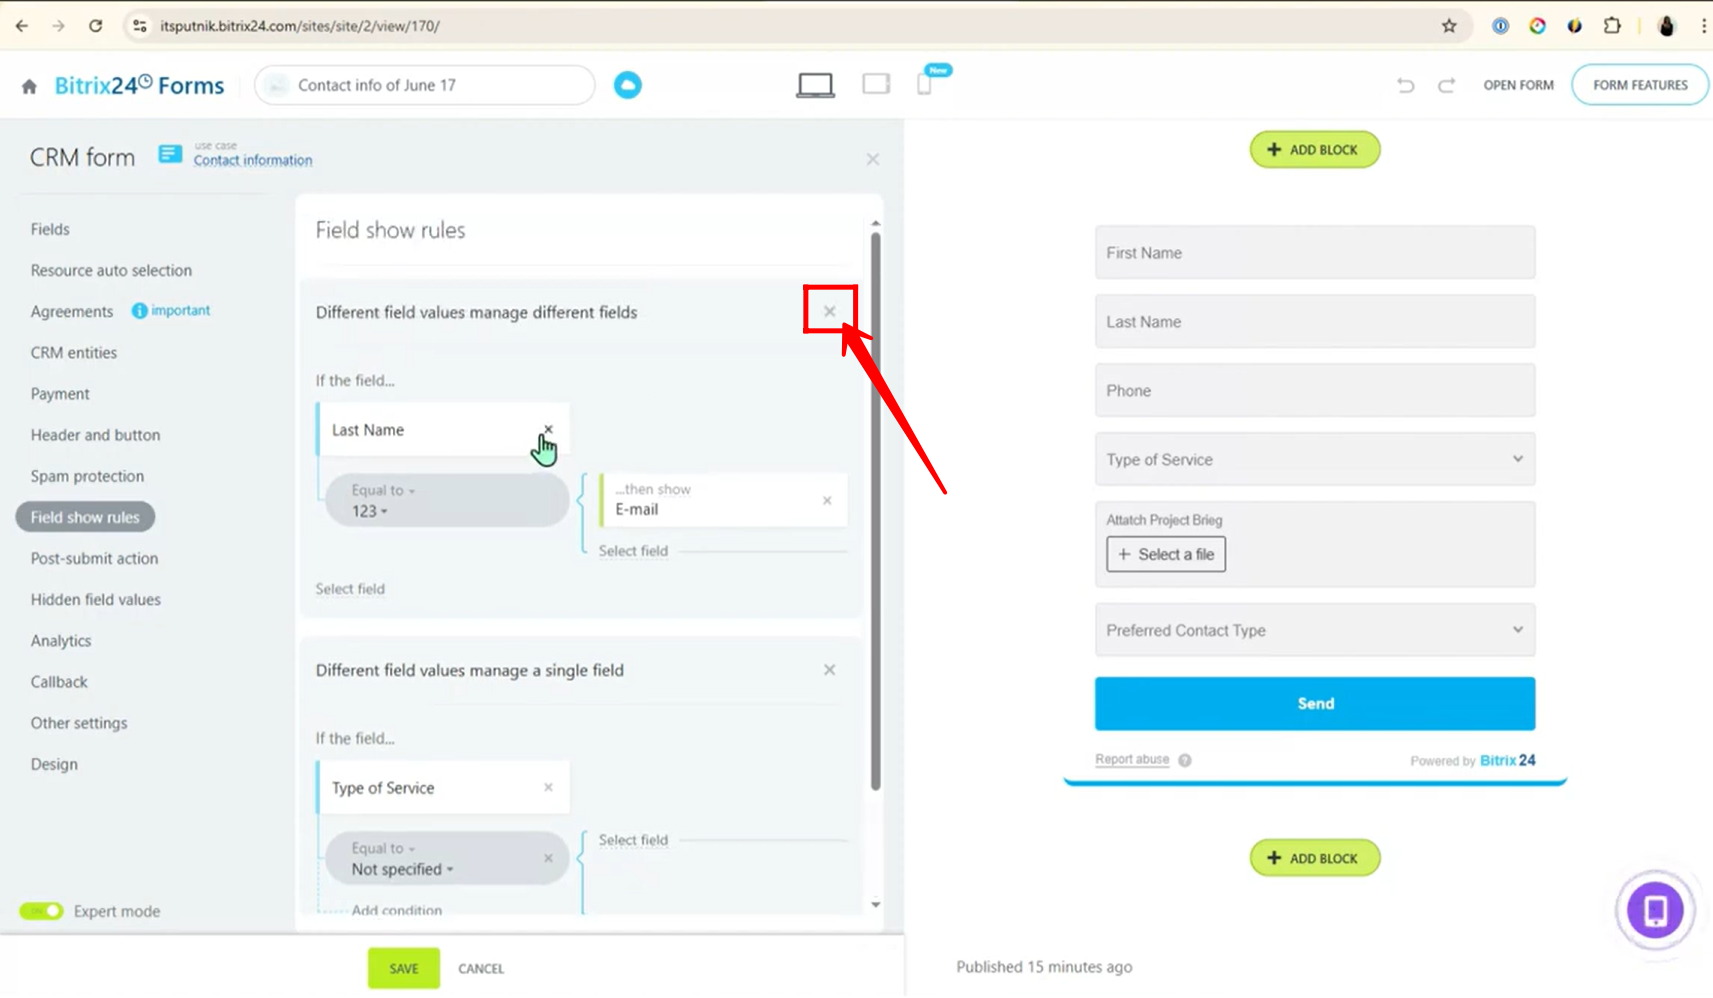
23. To avoid confusion, remove the first rule configurations and keep only the current rule setup.
24. In the “Different field values manage a single field” rule configuration, the condition is set so that if Type of Service equals “Website Development” or “Technical Support”, then the fields “Attach Project Brief” and “Preferred Contact Type” are shown—open the form to see this behavior in action.
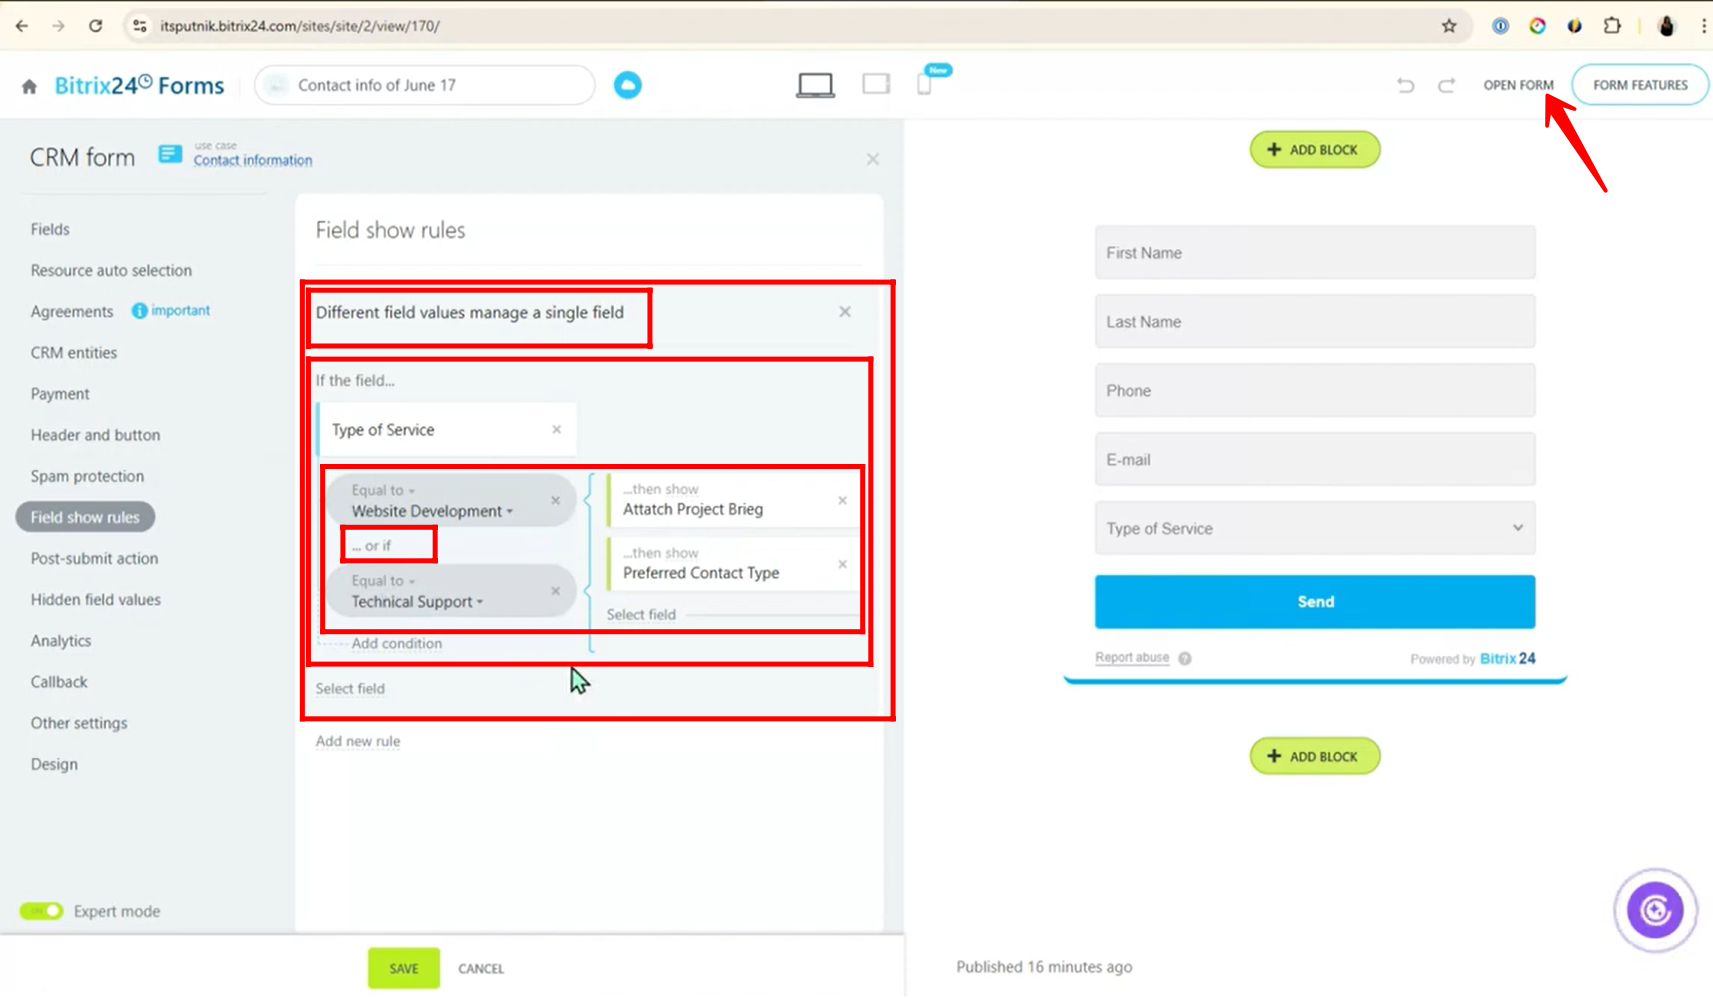
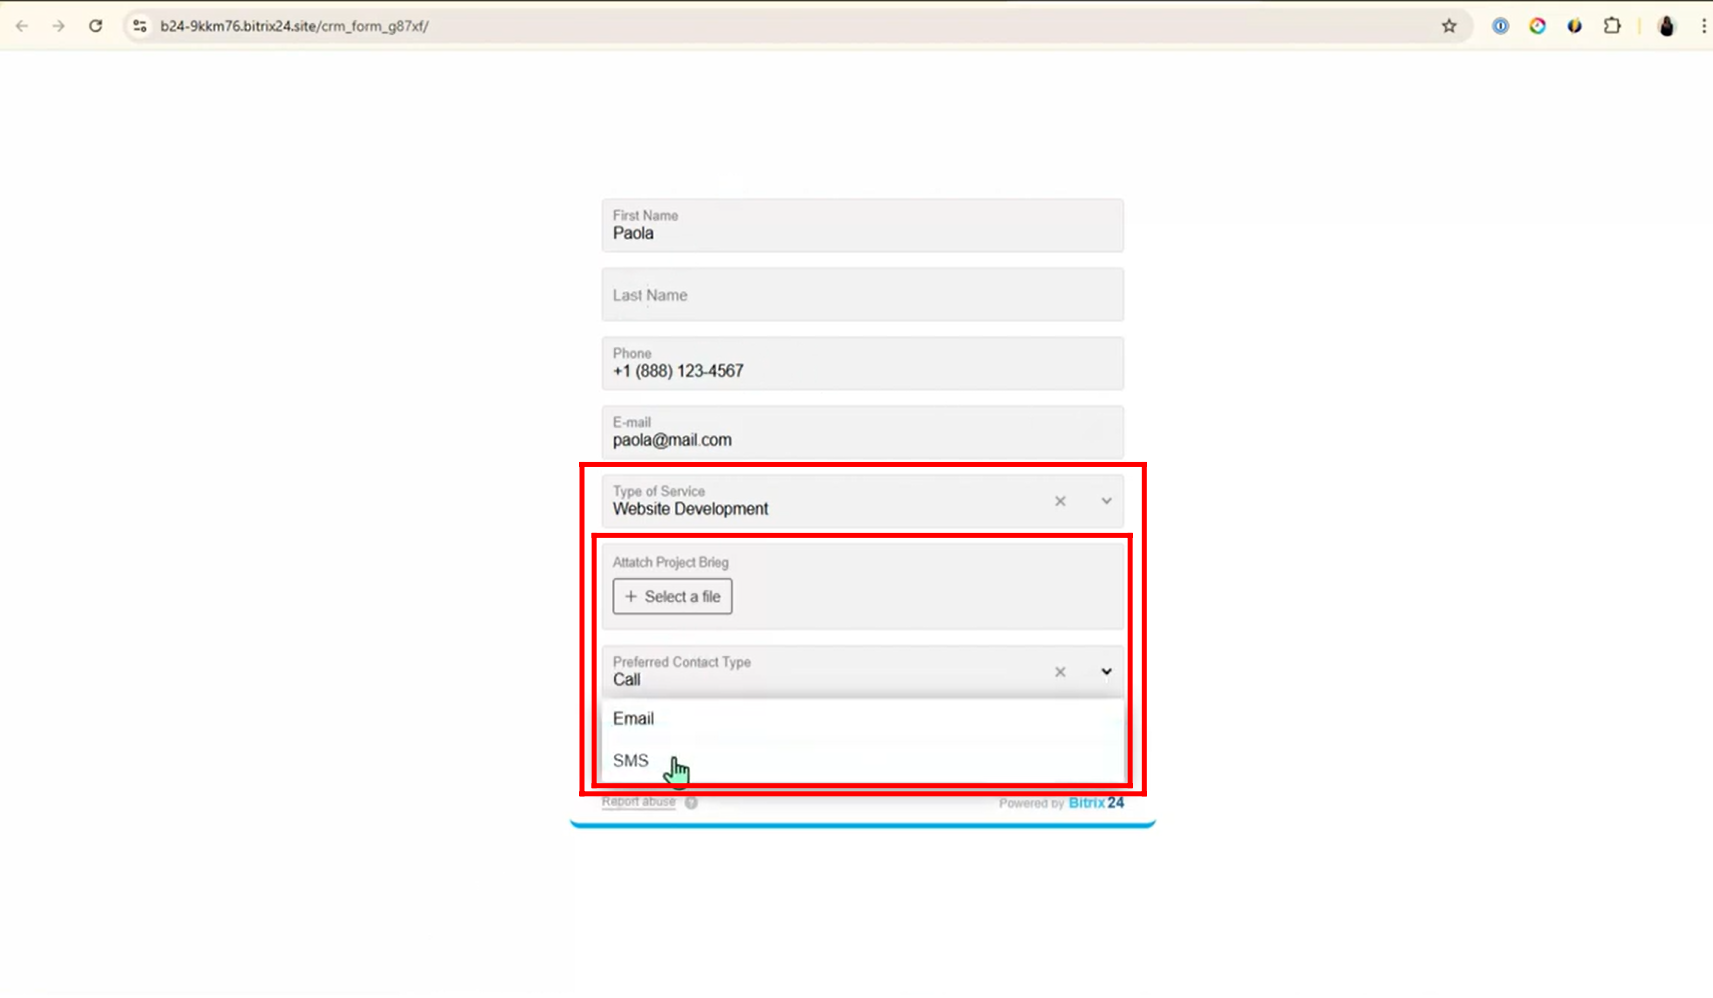
25. By default, the Type of Service field is empty — once you select an option like “Website Development” or “Technical Support” from the dropdown, the fields “Attach Project Brief” and “Preferred Contact Type” will appear accordingly.
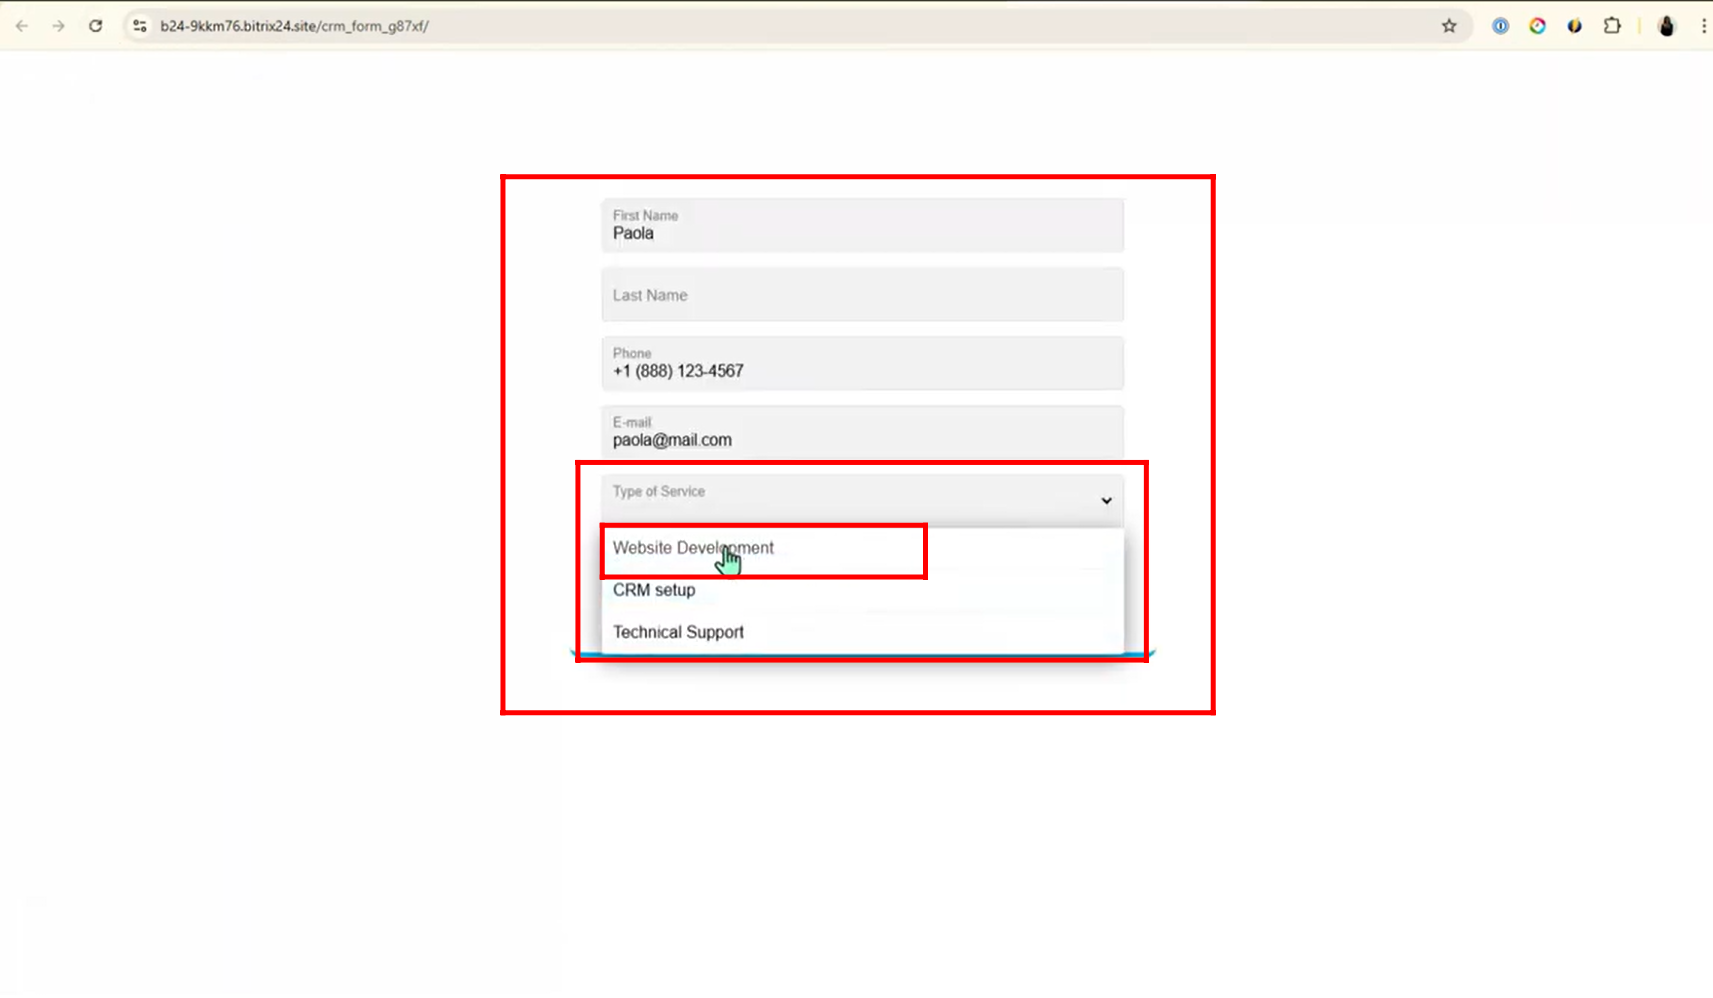
26. When Type of Service is set to “Website Development”, both fields — “Attach Project Brief” and “Preferred Contact Type” — are displayed as configured in the rule.
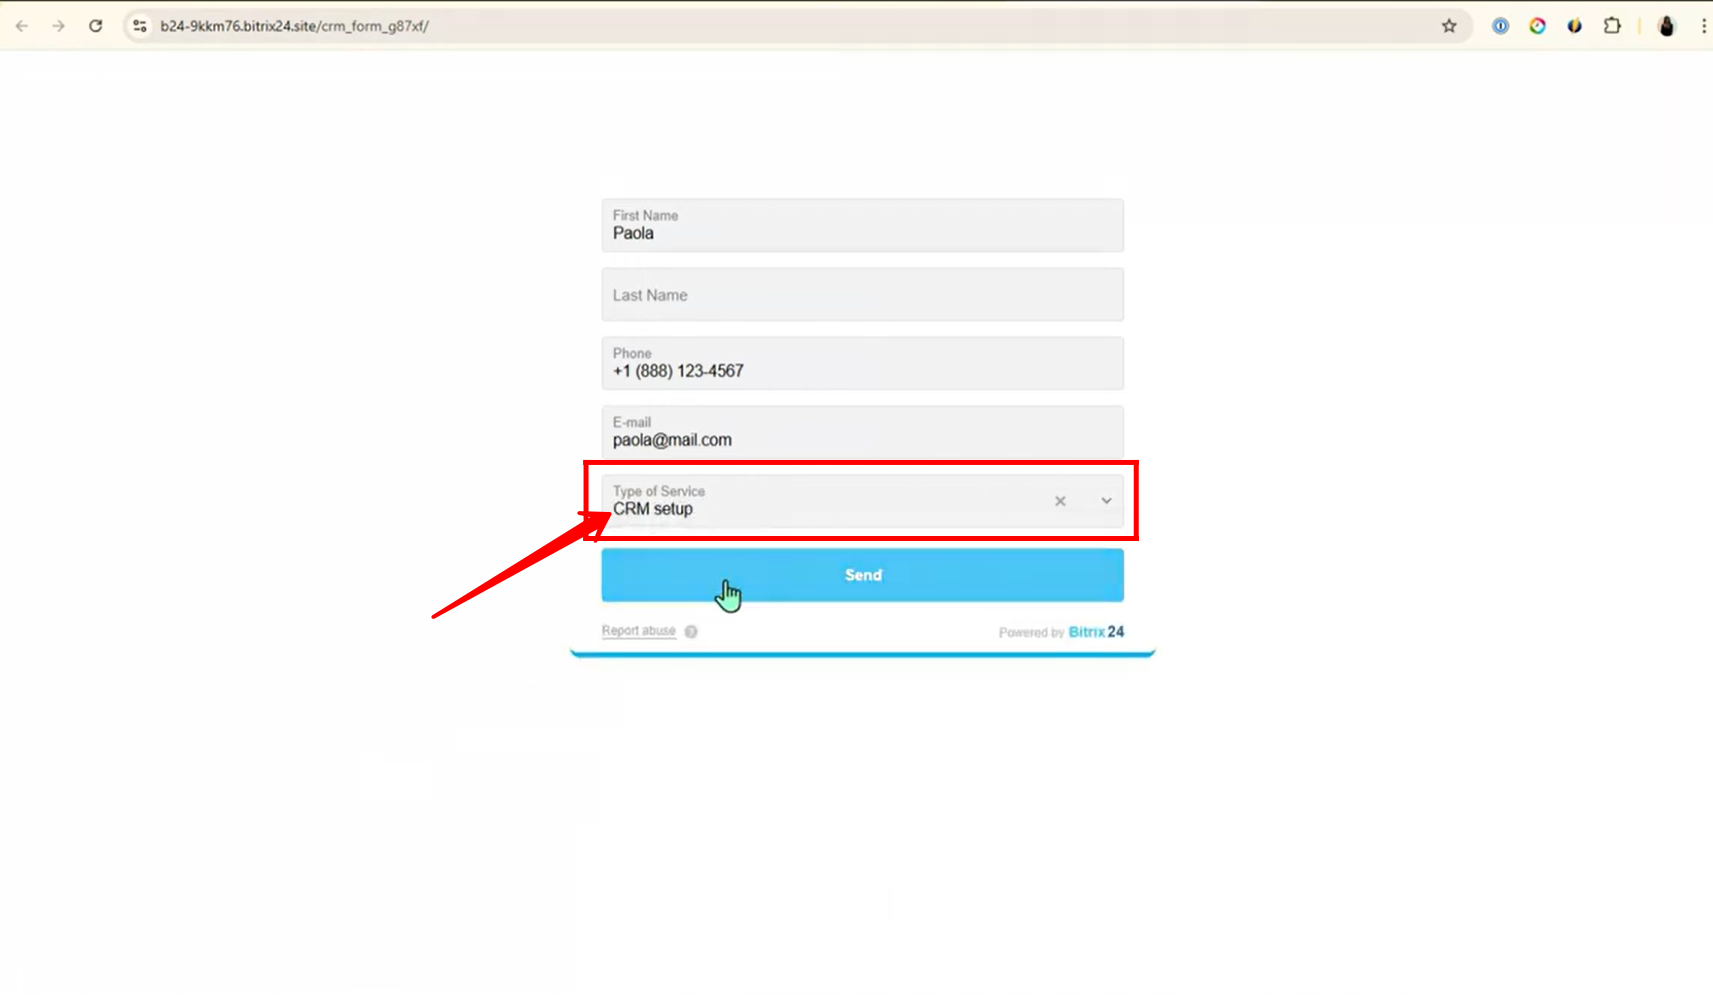
27. When Type of Service is set to “CRM Setup”, no additional fields are displayed, as per the rule configuration that only targets “Website Development” and “Technical Support”.
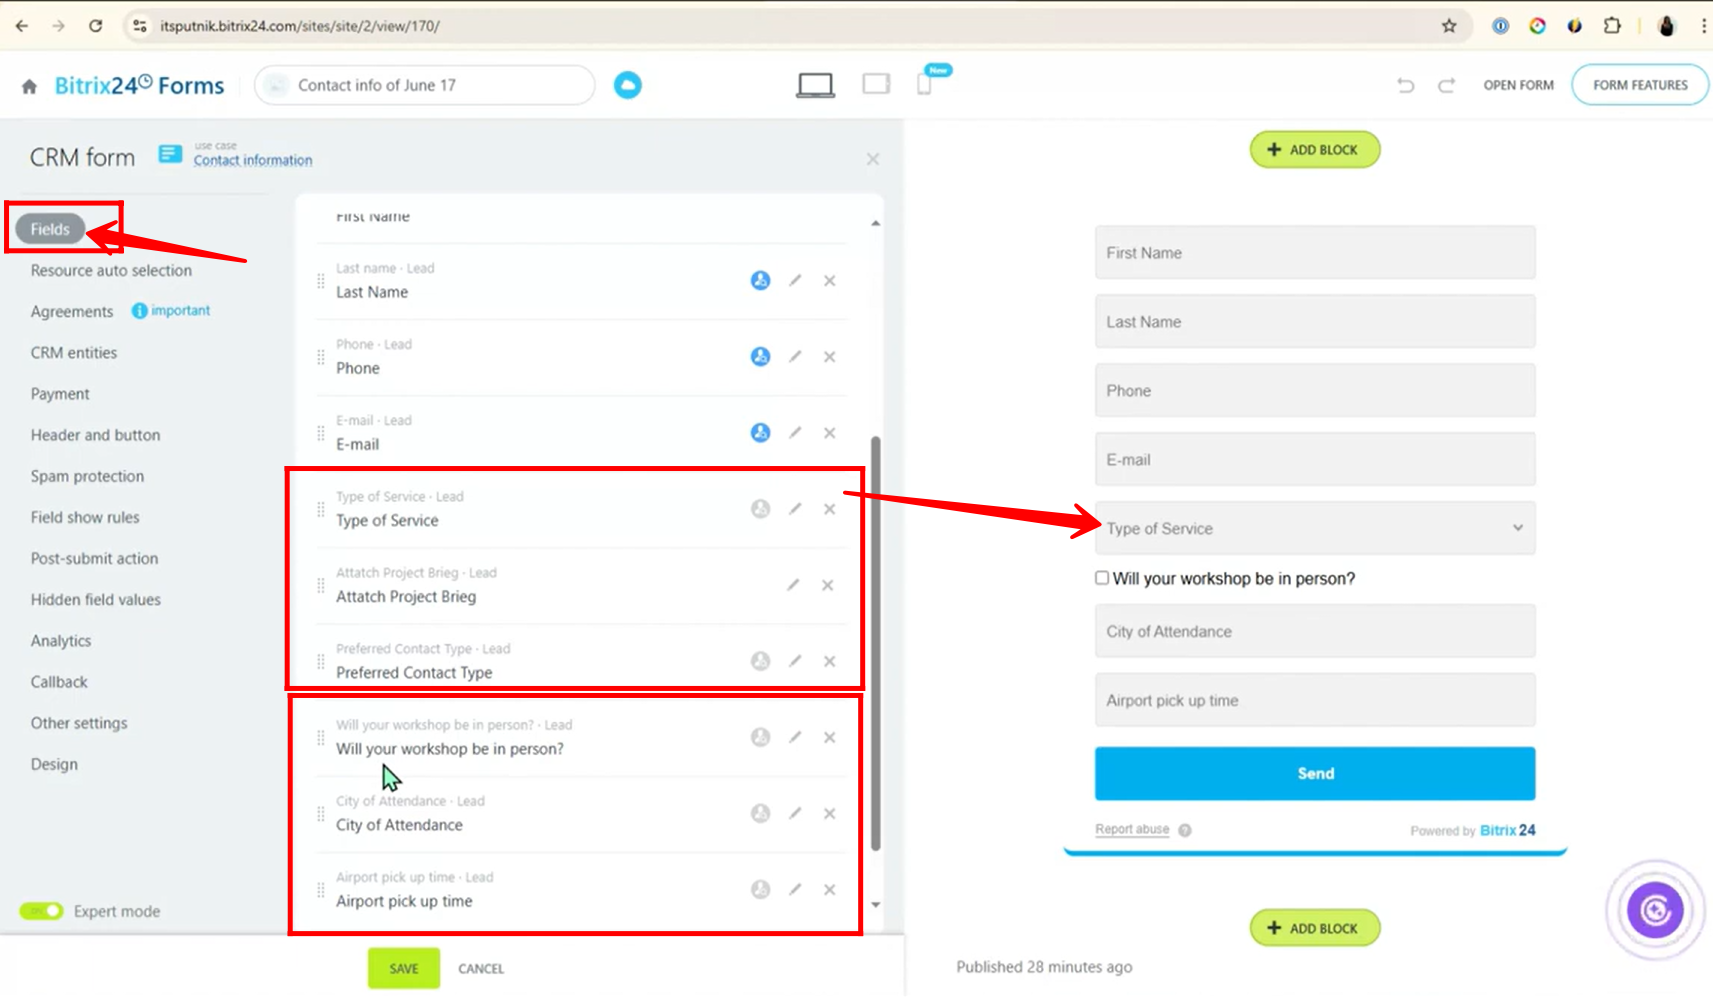
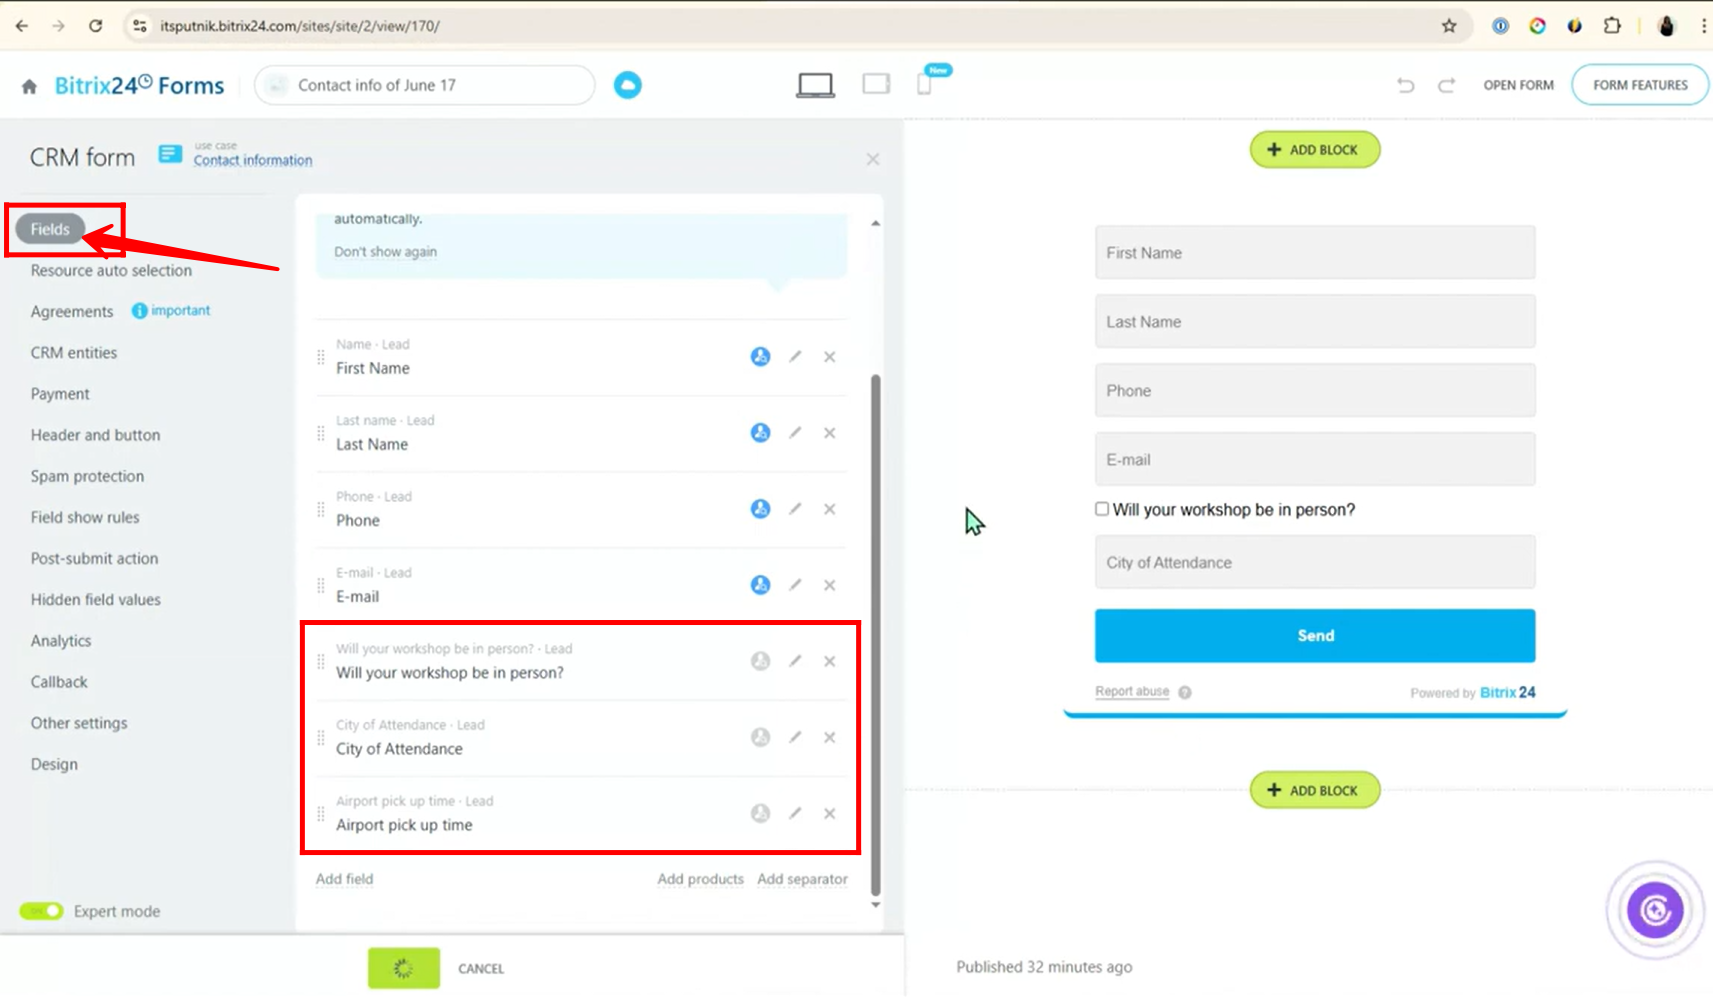
28. In the Fields tab, new fields have been added for the third rule configuration:
- Will your workshop be in person? (Checkbox)
- City of Attendance
- Airport Pick-up Time (Date and Time)
These fields will be used to set up a new rule based on in-person workshop attendance.
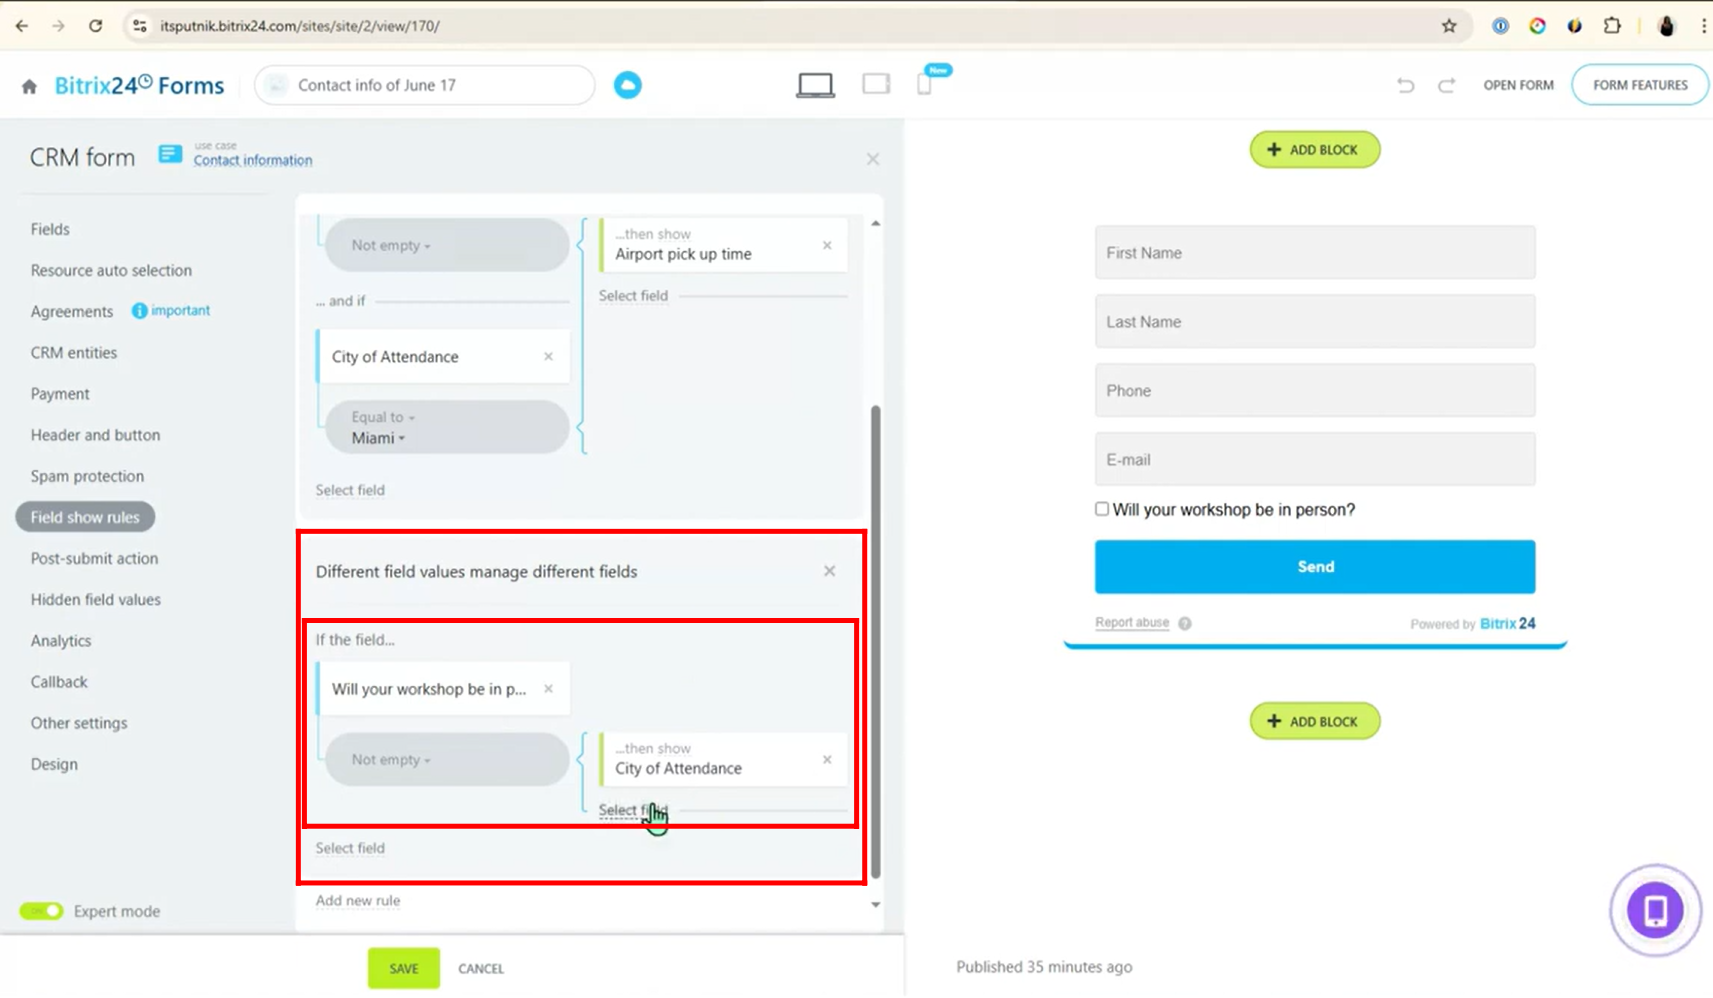
29. In the Field Show Rules tab, click “Create Rule” and select the option “The set of field values manage a single field”. This rule type allows you to show or hide a specific field based on a combination of multiple field values.
30. To avoid confusion during the learning stage, remove the previous rule configurations. Now, the current active rule is based on two fields: “Will your workshop be in person?” and “City of Attendance”. When both conditions are met, the “Airport pick up time” field is shown accordingly.
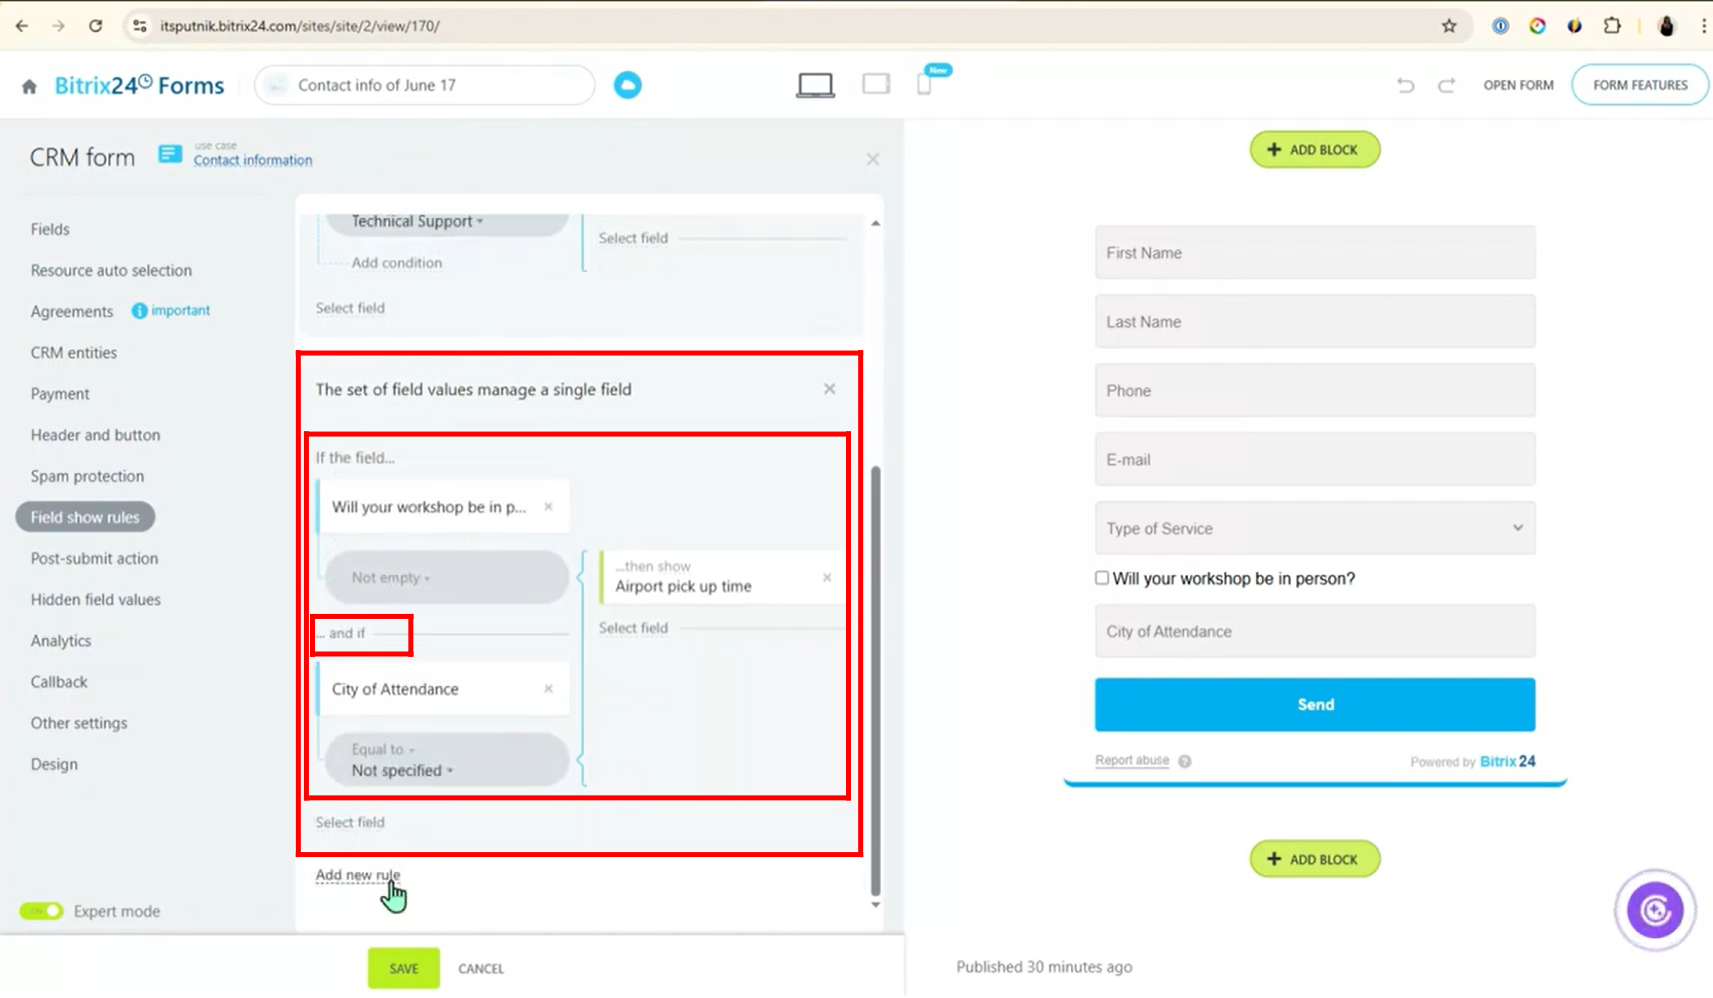
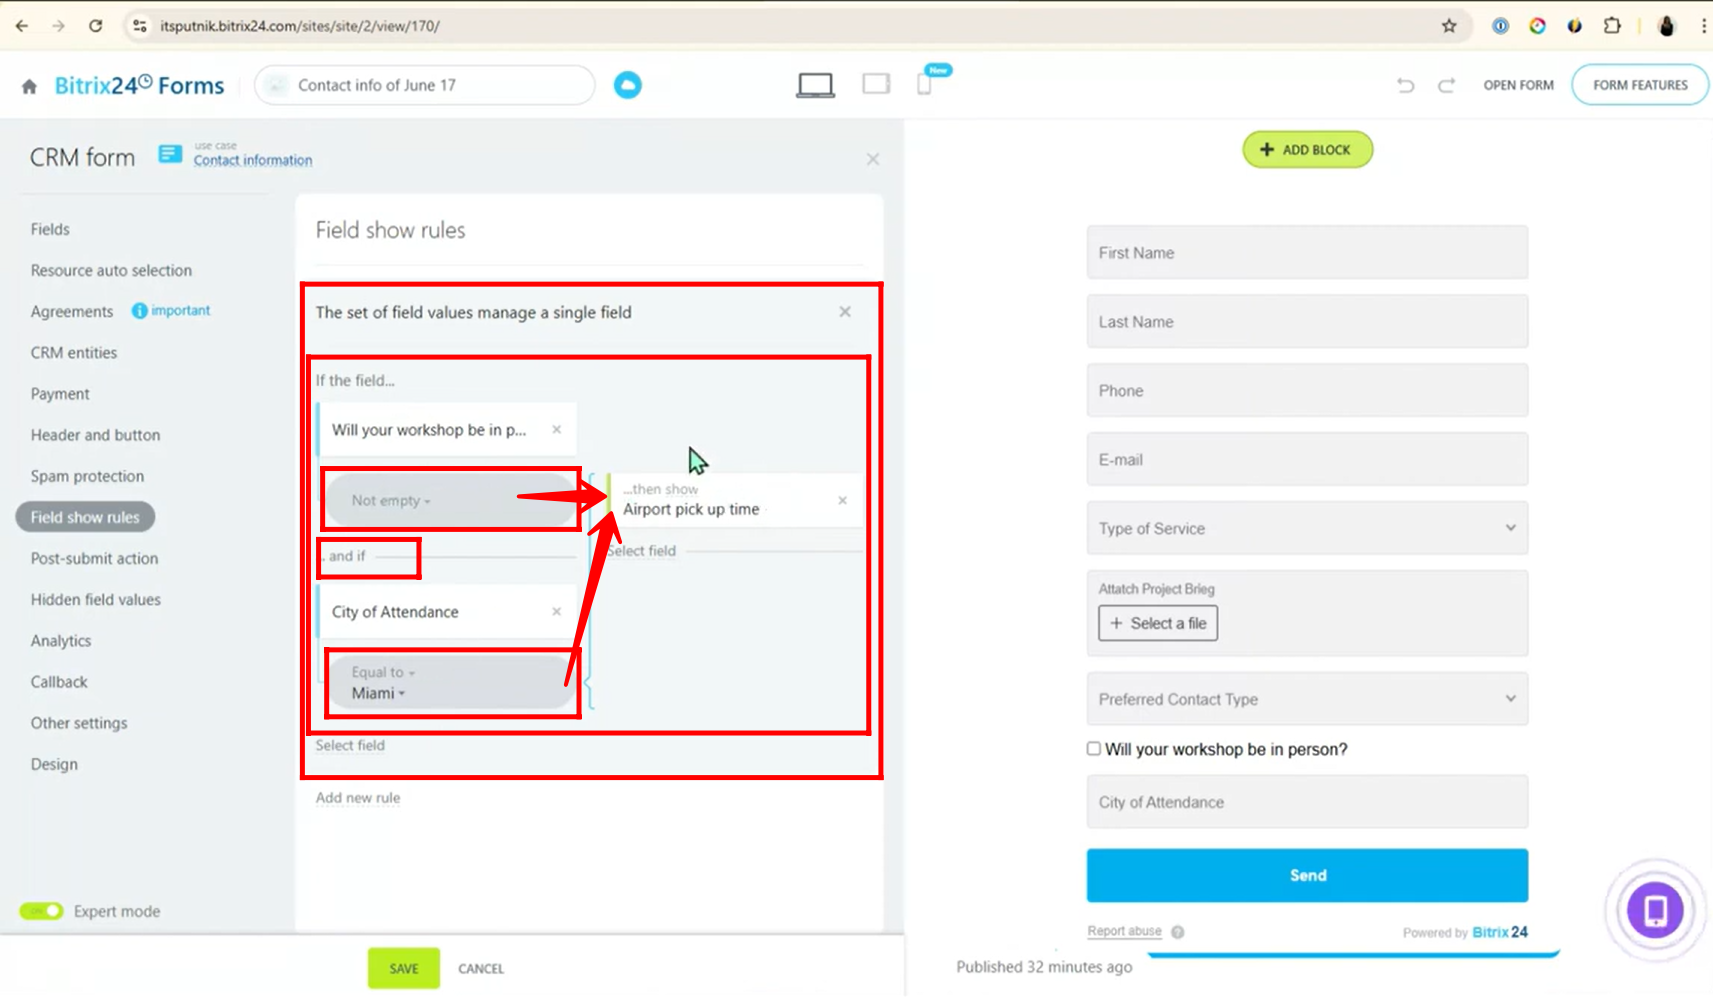
31. The condition is applied as follows:
If the “Will your workshop be in person?” field is not empty, and the “City of Attendance” is equal to “Miami”, then the “Airport pick up time” field will be shown.
32. Make sure to remove the fields used in previous use cases to avoid confusion and keep the learning stage clear and focused on the current configuration only.
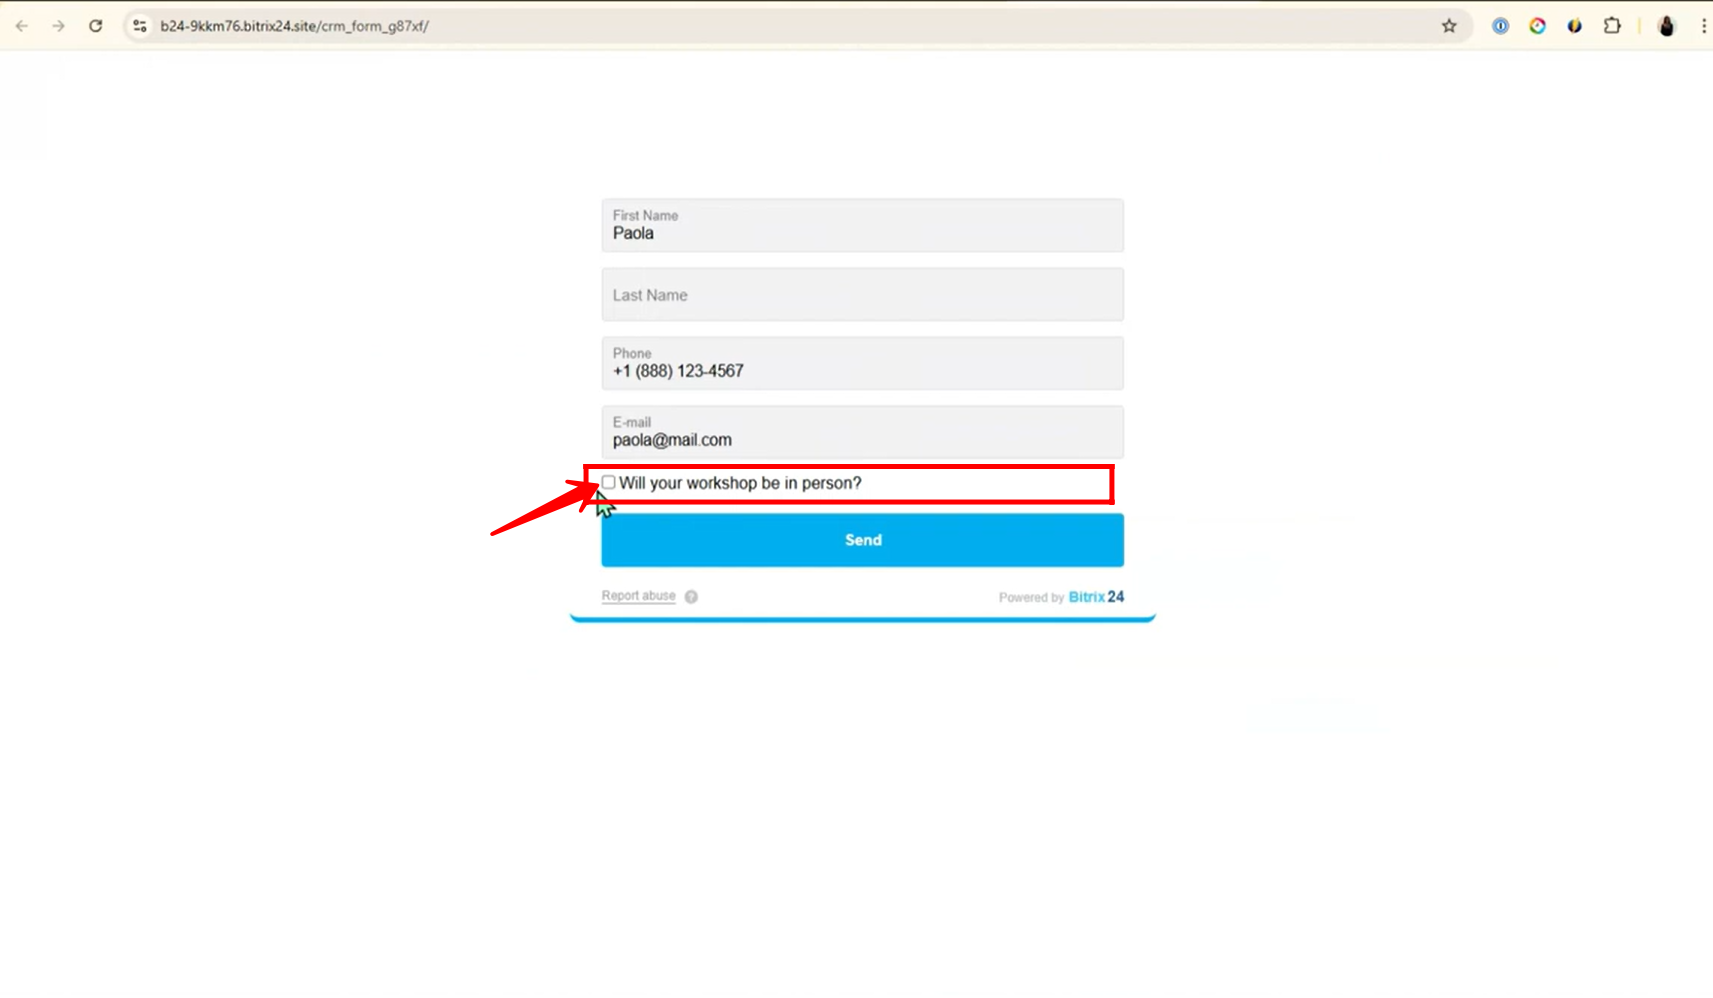
33. Open the form, and you’ll notice that the “Will your workshop be in person?” checkbox is unchecked and the “City of Attendance” field is currently empty.
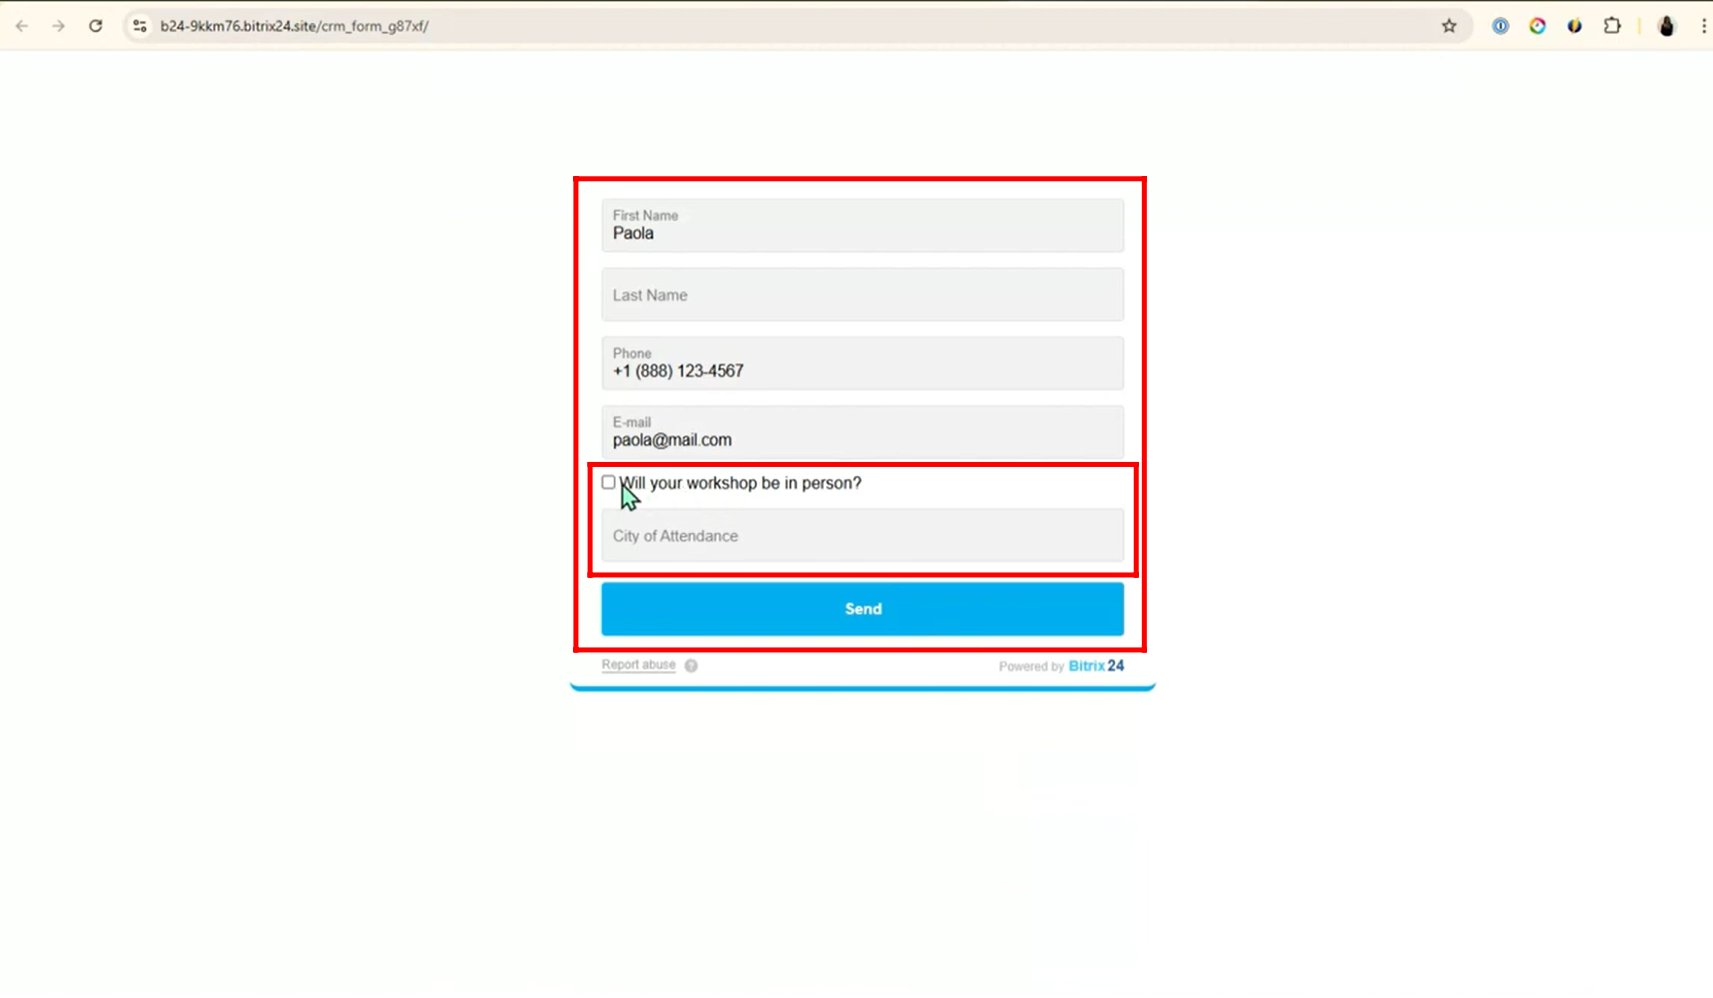
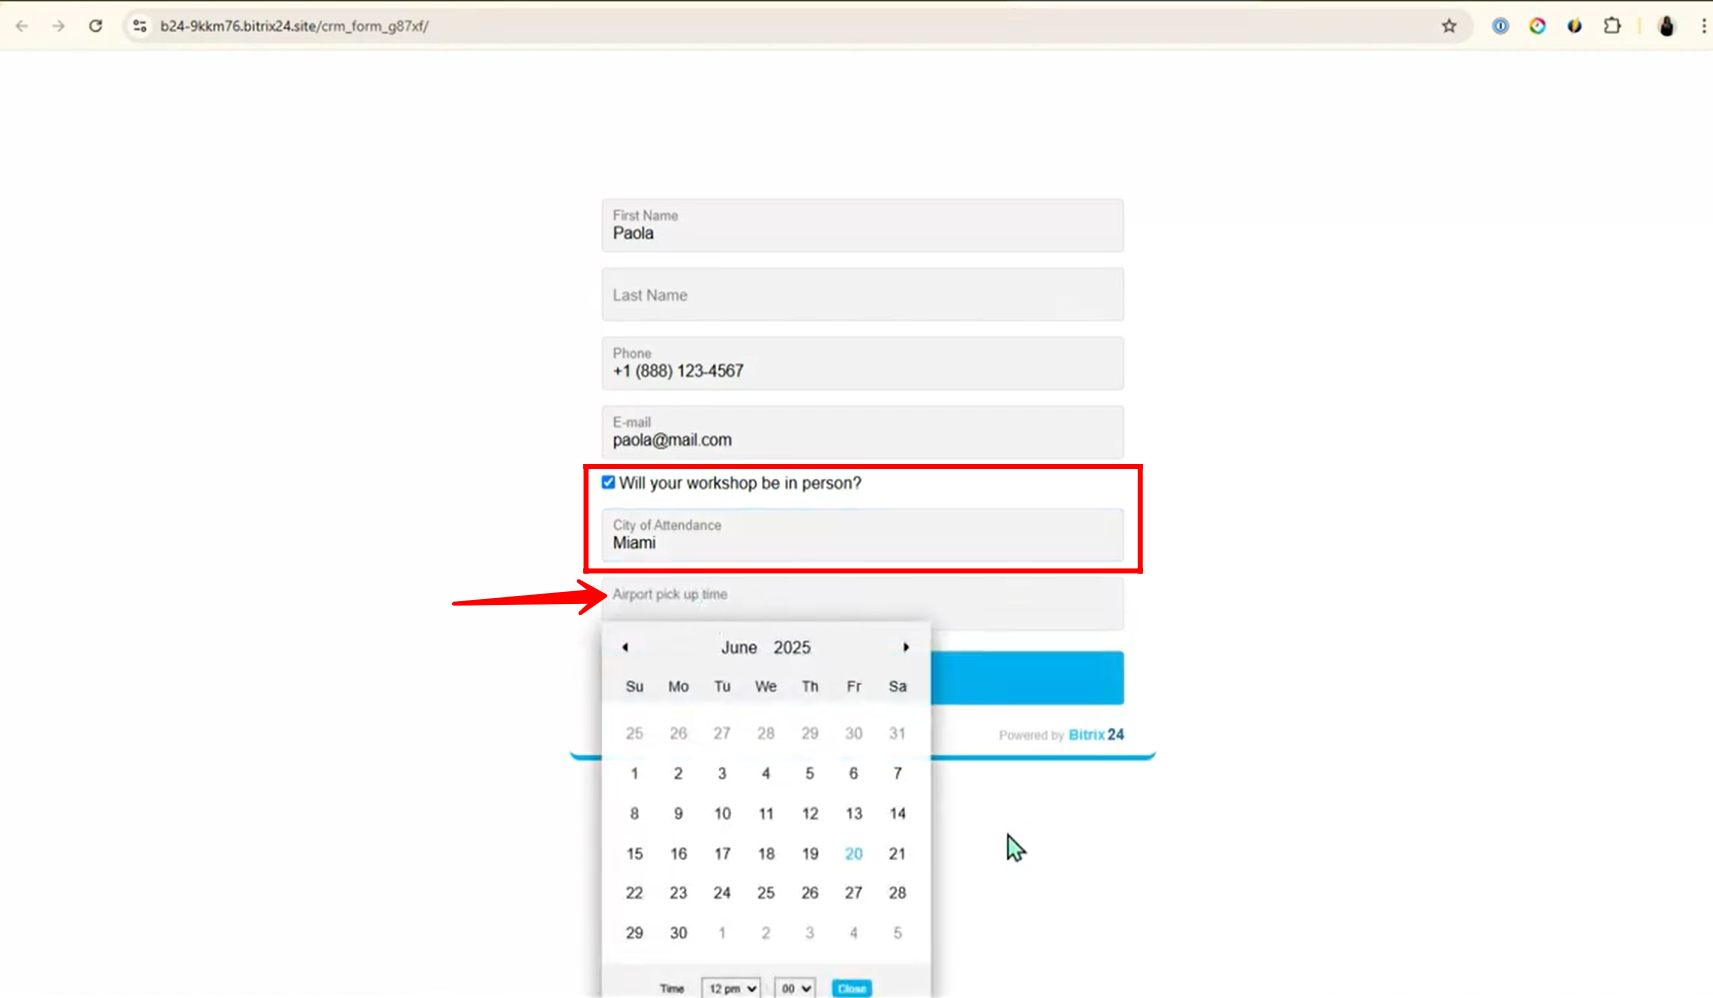
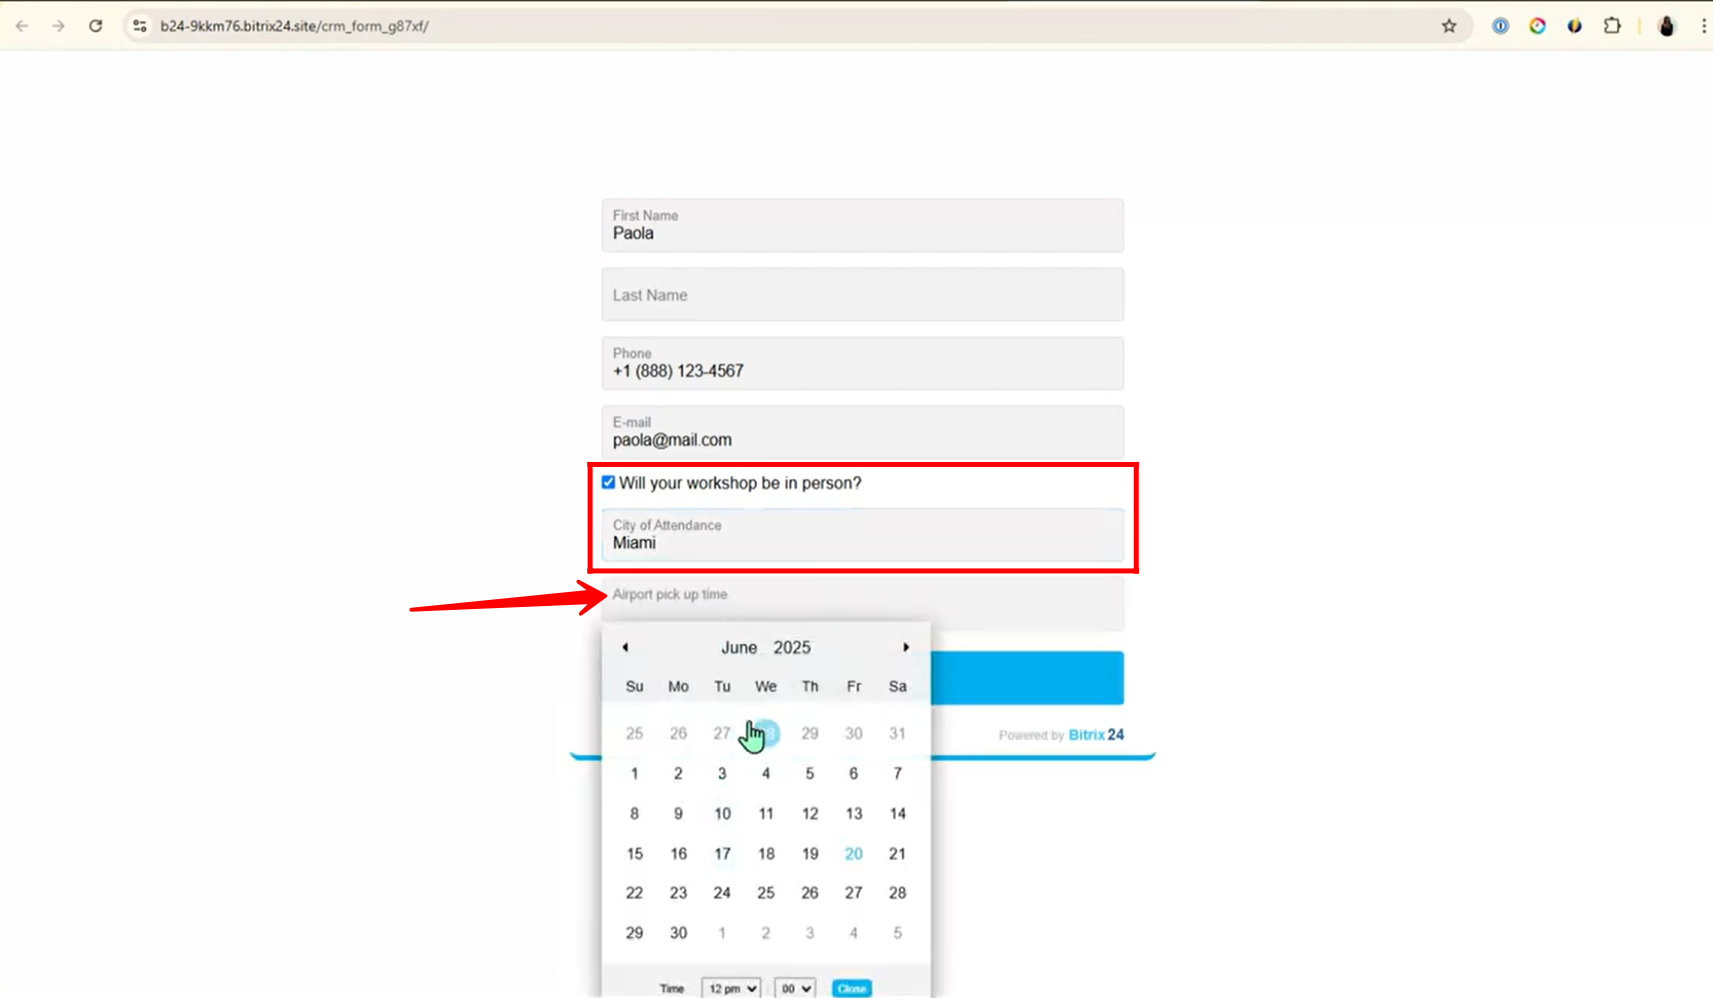
34. Check the “Will your workshop be in person?” checkbox and enter “Miami” in the “City of Attendance” field — you will then see the “Airport pick up time” field appear to select a date and time.
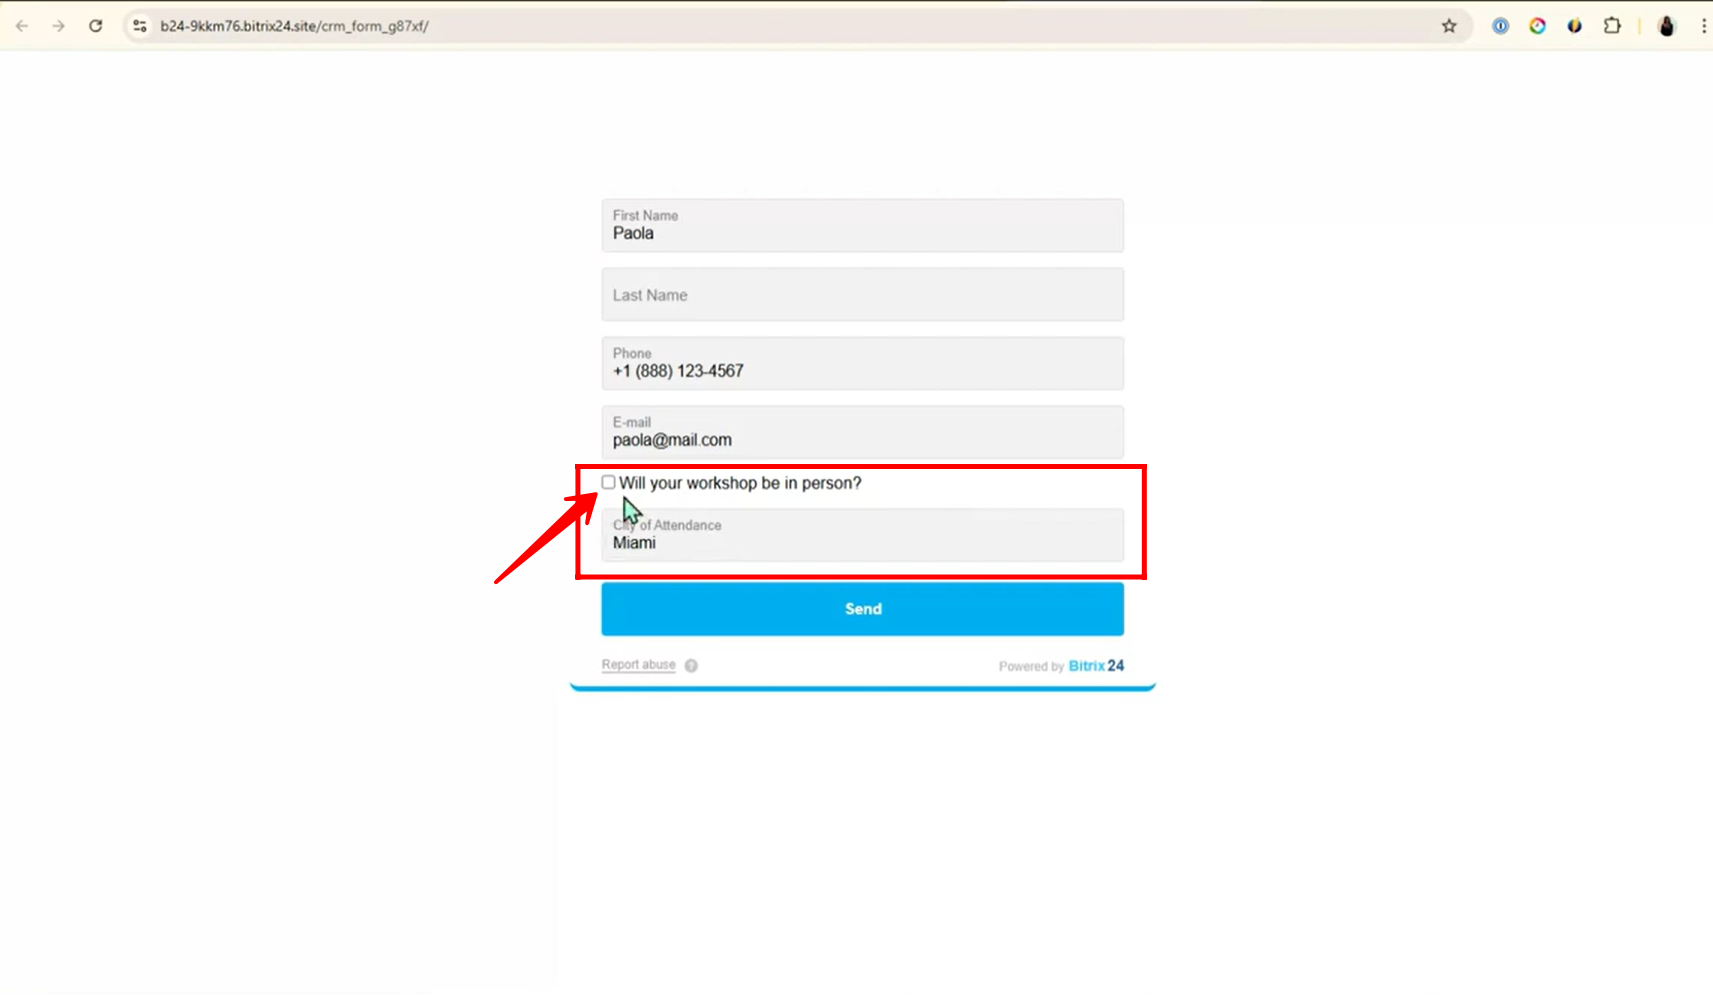
35. Even though “Miami” is entered in the “City of Attendance” field, the “Airport pick up time” field is not shown because the checkbox “Will your workshop be in person?” is unchecked. Both conditions must be satisfied for the airport pickup field to appear.
36. You can now enhance the form logic by adding a new rule:
“Different field values manage different fields”.
In this rule:
- When “Will your workshop be in person?” is not empty (i.e., checked)
→ then show the field “City of Attendance”.
This layered configuration improves user experience by progressively showing relevant fields only when needed.
37. When you open the form now, only the default fields (First Name, Last Name, Phone, Email) and “Will your workshop be in person?” (unchecked) are visible. The other fields remain hidden until the checkbox is checked, ensuring a clean and user-friendly experience.
38. When the checkbox “Will your workshop be in person?” is checked, the “City of Attendance” field appears. However, since “Detroit” is entered instead of “Miami”, the “Airport pick up time” field remains hidden — because both conditions (checkbox checked and city equals “Miami”) must be met for it to show.

39. Now that the checkbox “Will your workshop be in person?” is checked and “Miami” is entered in the “City of Attendance” field, both conditions are satisfied — so the “Airport pick up time” field is successfully displayed.
“You can also watch this video on Youtube”