| 1793 Views | admin

The Booking (Calendar, CRM, and Open Slots) feature in Bitrix24 is a powerful and integrated scheduling system designed to streamline how meetings, appointments, and resource allocations are managed within an organization. It brings together the functionality of the Calendar, CRM, and automated booking tools to help both internal teams and external clients coordinate time efficiently. Whether you are arranging internal meetings, scheduling client appointments, or managing shared resources, Bitrix24 provides a centralized platform to handle it all with ease and transparency.
Through the Calendar module, users can schedule internal meetings, invite attendees, attach CRM items (such as deals or contacts), and even include files or media related to the meeting. Attendees can accept or decline invitations directly through email, and organizers are notified in real time. The system intelligently detects overlapping schedules, helping teams plan meetings without conflicts while maintaining a clear view of everyone’s availability.
For external appointments, the Open Slots feature allows employees to share their availability with clients through a simple link. Clients can choose a time that suits them from predefined slots, automatically booking the meeting without back-and-forth communication. Each confirmed booking instantly appears in the organizer’s calendar, complete with client details and a meeting link, ensuring both parties stay synchronized.
Additionally, Bitrix24’s Book a Resource function enables companies to manage not only employee availability but also physical assets like meeting rooms, service vehicles, or equipment. This ensures that resources and personnel are efficiently assigned to customer appointments or projects directly from the CRM. Overall, this feature bridges internal coordination and external communication, providing a smooth, all-in-one solution for scheduling, resource allocation, and client interaction.
“Detailed Instructions are given below”
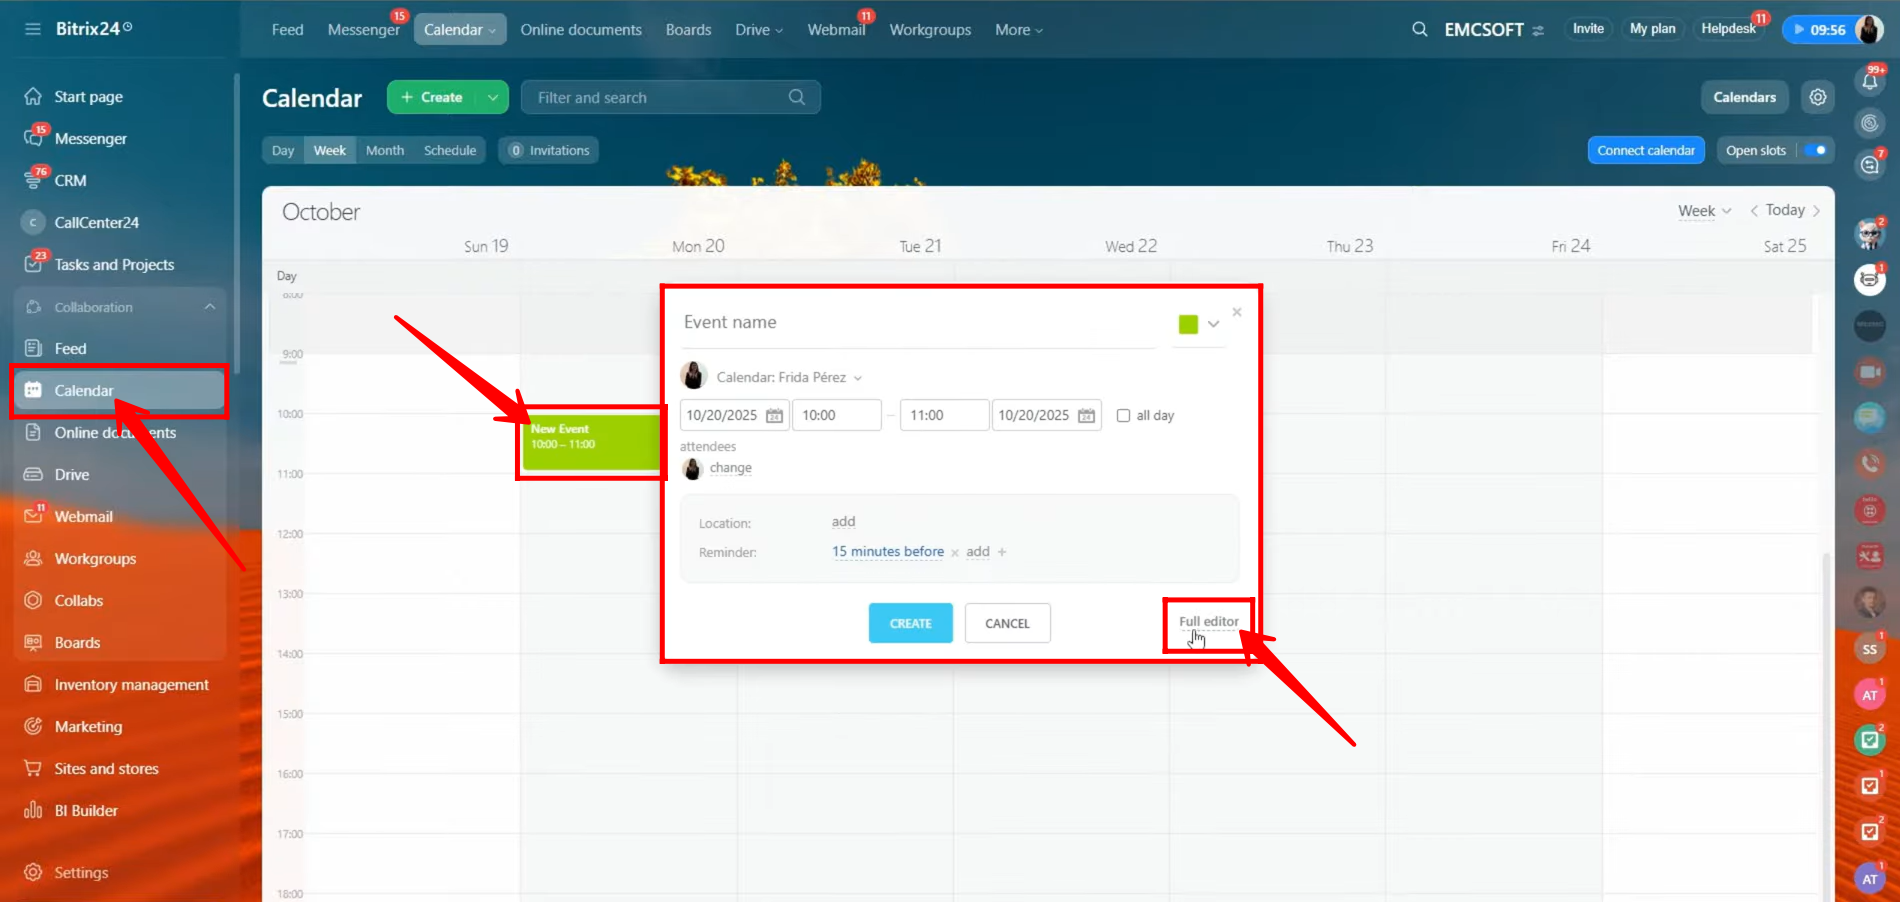
1. To schedule an internal meeting, navigate to the “Calendar” section from the left panel. Click on the available time slot for the desired date, and a quick editing box will appear to enter meeting details. To access all configuration options, click on “Full Editor” to open the complete event setup window.
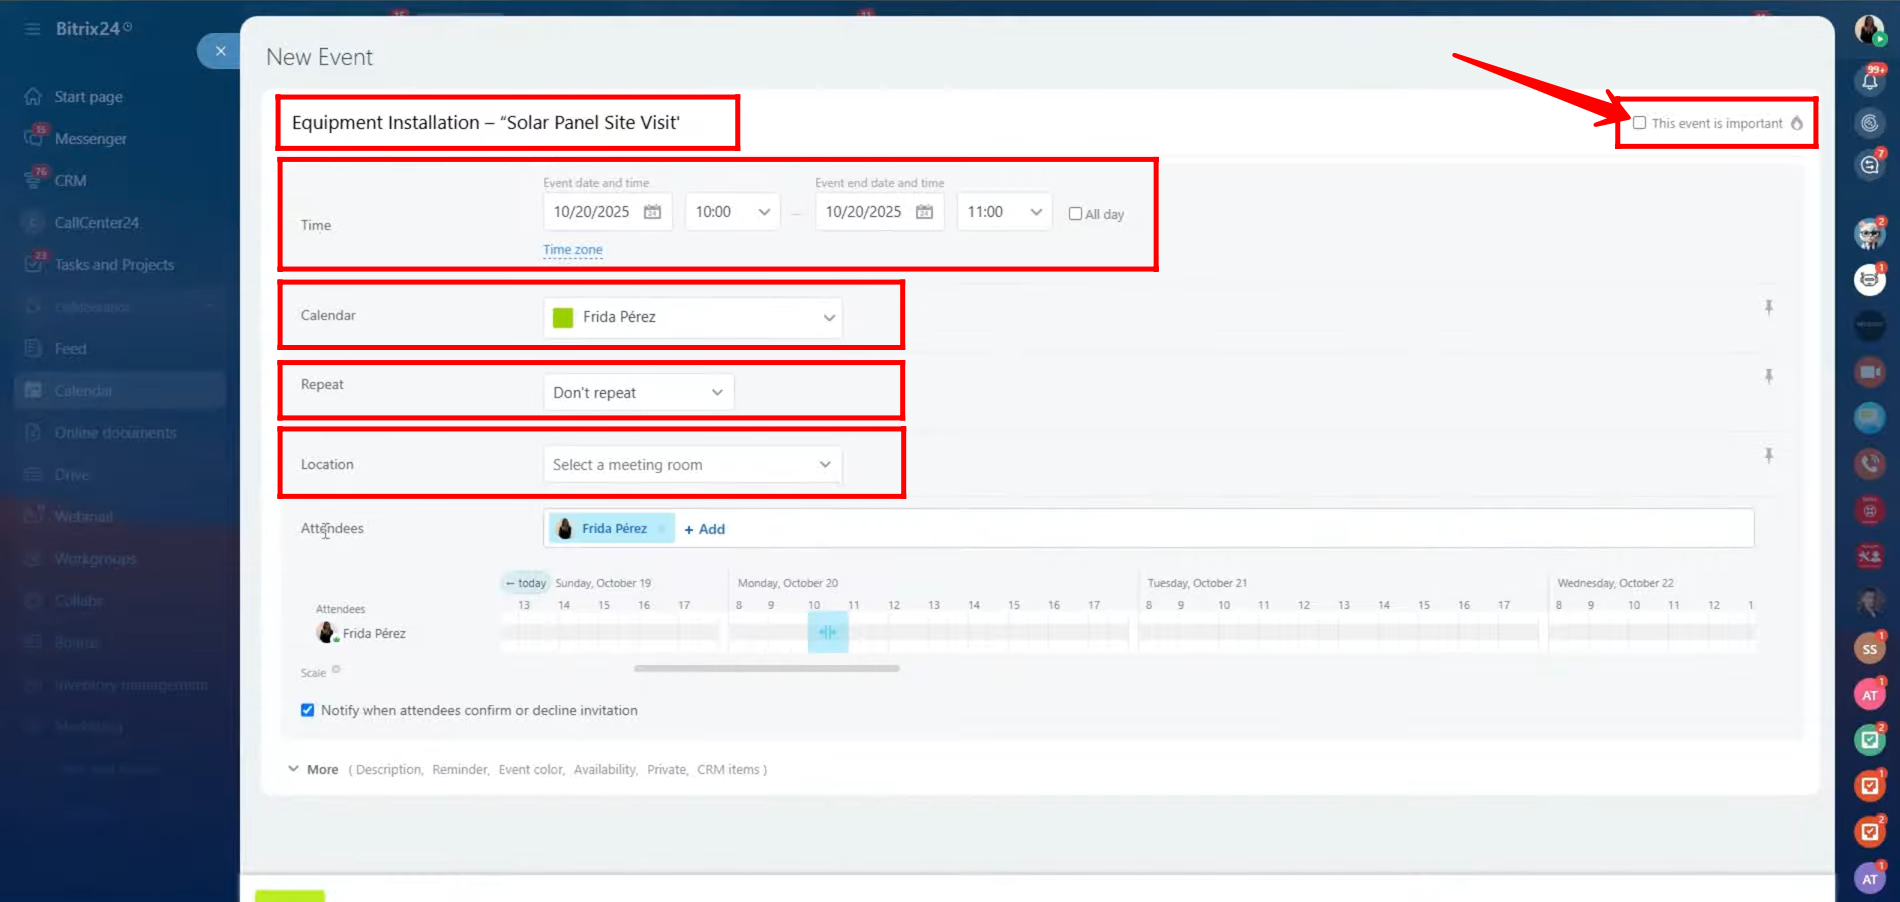
2. In the detailed editing panel, enter the desired event name and specify the start and end time along with the event date (you can also enable the “All Day” option if needed). You may check the box to mark the event as important. Select the calendar to associate the event with — it can belong to any employee within the company structure. If the meeting is recurring, configure the repetition settings to define whether it repeats daily, weekly, or at a custom interval. Additionally, you can specify a location where the meeting will take place, whether it’s a physical venue within the company or a virtual setting.
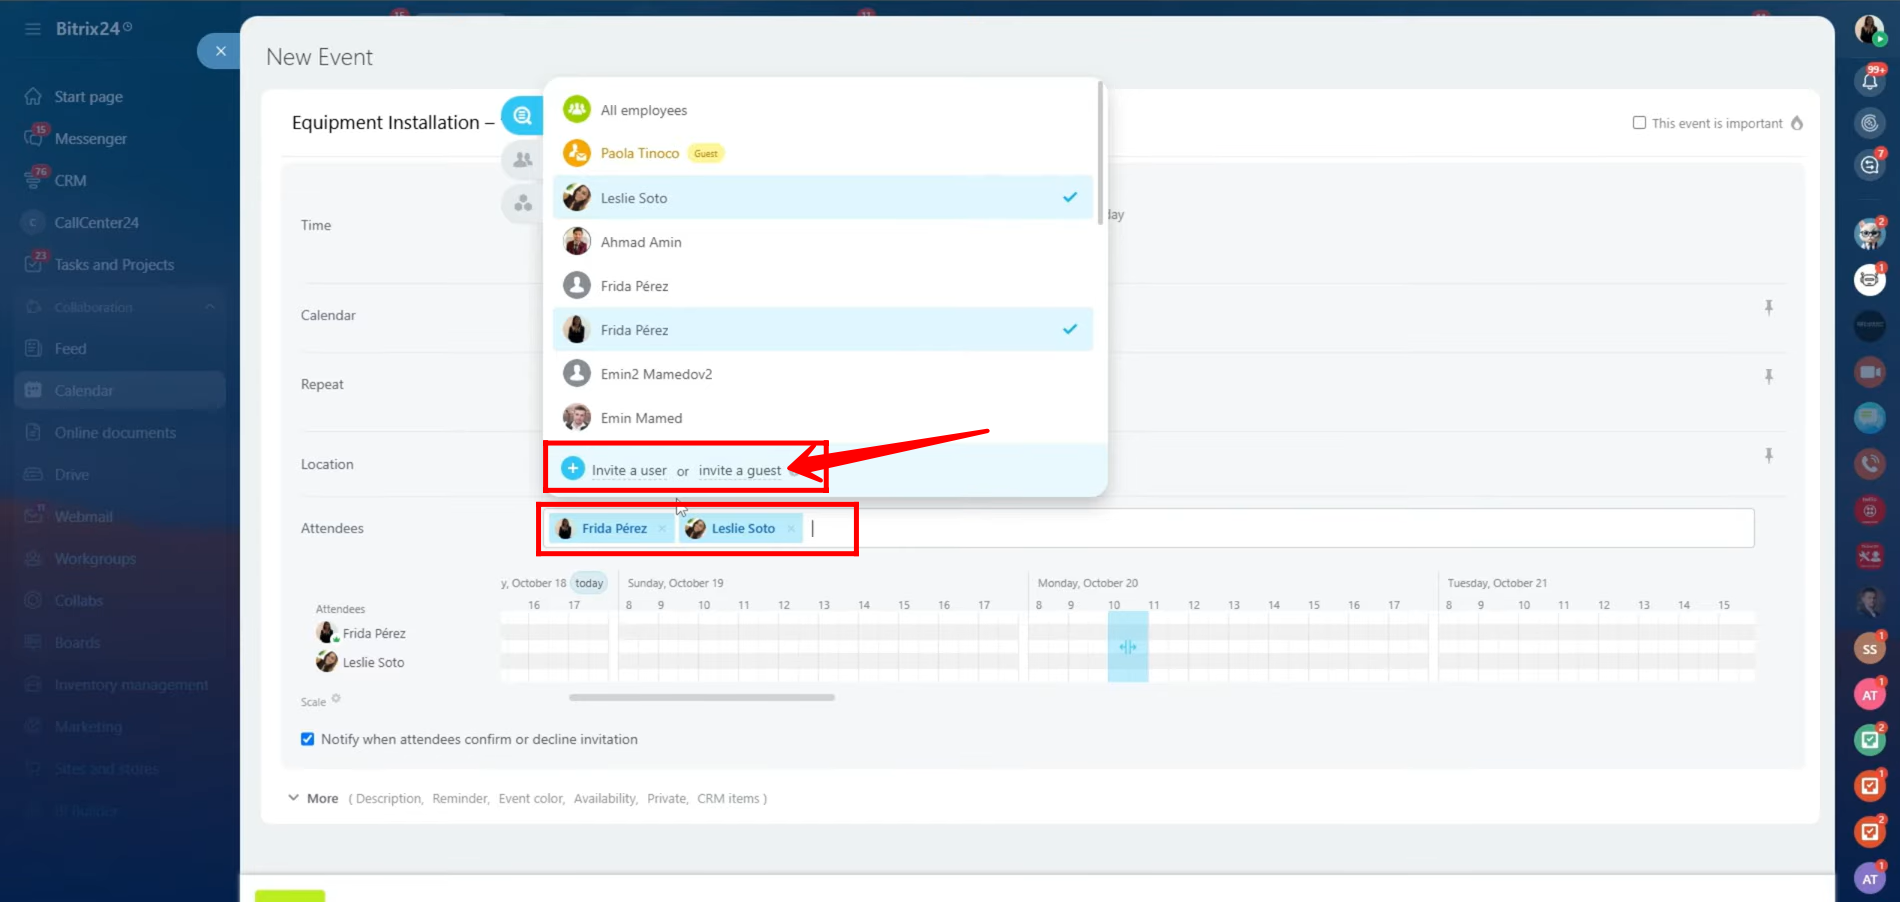
3. Select the attendees for the event so they receive notifications about it. You can choose specific employees, select all employees at once, or invite external participants. To include someone outside your organization, click “Invite a guest”.
4. In the Send invitation by email panel, enter the email address, first name, and last name of the person you wish to invite. You can add multiple guests at once by filling in their details in separate fields. Once all information is entered, click the “Invite” button to send the invitations. Each invited guest will receive an email notification with the event details and a link to join or view the meeting.

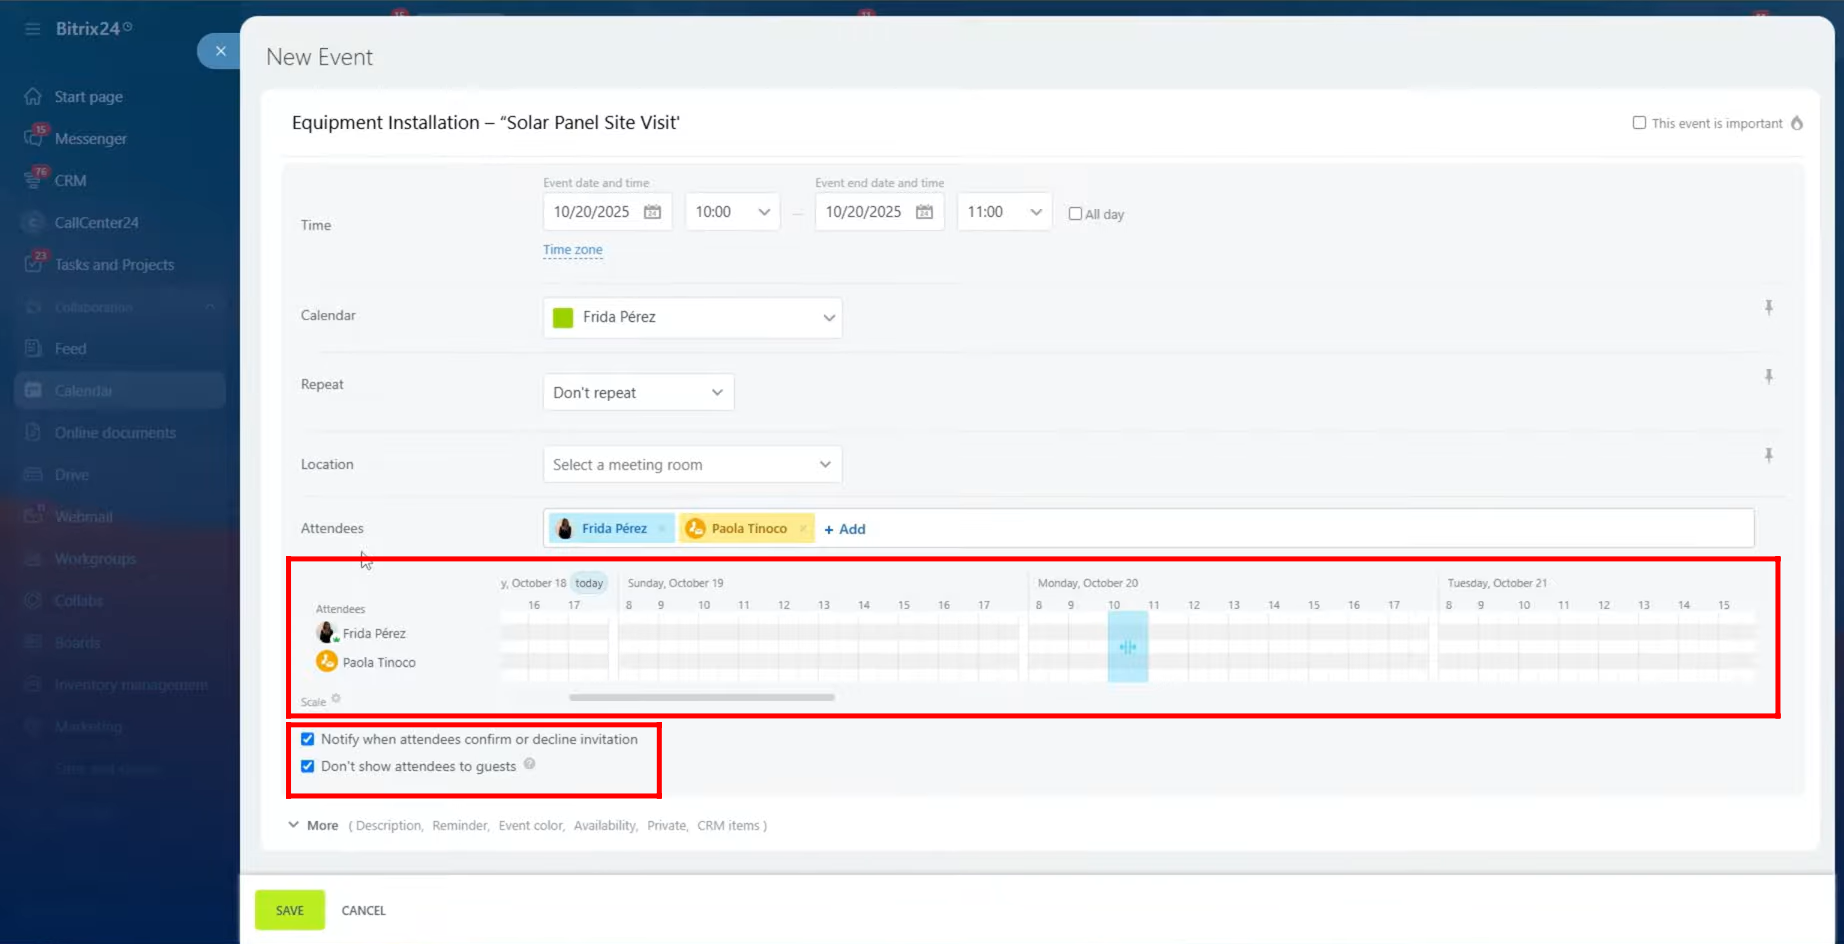
5. You can now view the time lapse of all added attendees along with the fixed event time. If the availability of both attendees overlaps, the unavailable time slots will appear in red, while the available ones remain blue. You can also enable the checkbox to receive notifications when attendees accept or decline the invitation. Additionally, there’s an option to hide the attendee list from guests by checking the respective box, ensuring privacy for internal participants.
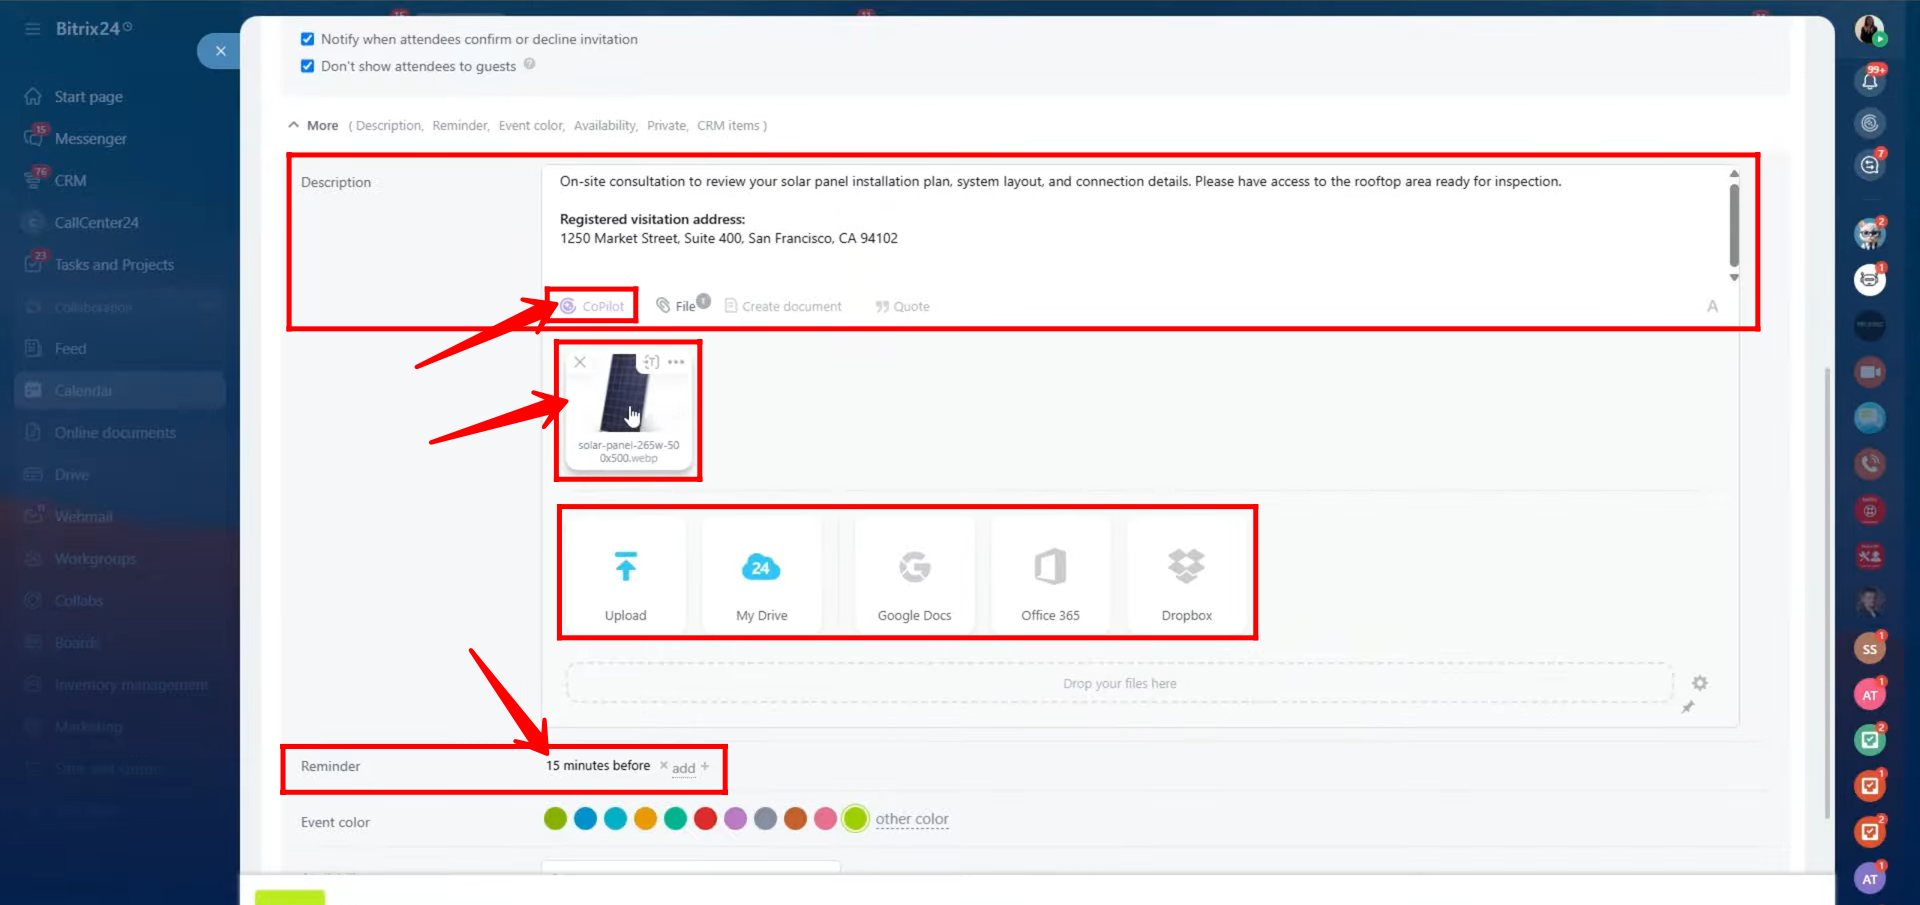
6. Click the “More” option for advanced configurations. Here, you can add a detailed description of the event and attach media such as pictures or files from various sources including your local device, Google Drive, Office 365, or Dropbox. You can also take assistance from Copilot to generate text or images for your event description. Additionally, set a reminder time to ensure timely notifications — for instance, you can set it to remind you 15 minutes before the event starts.
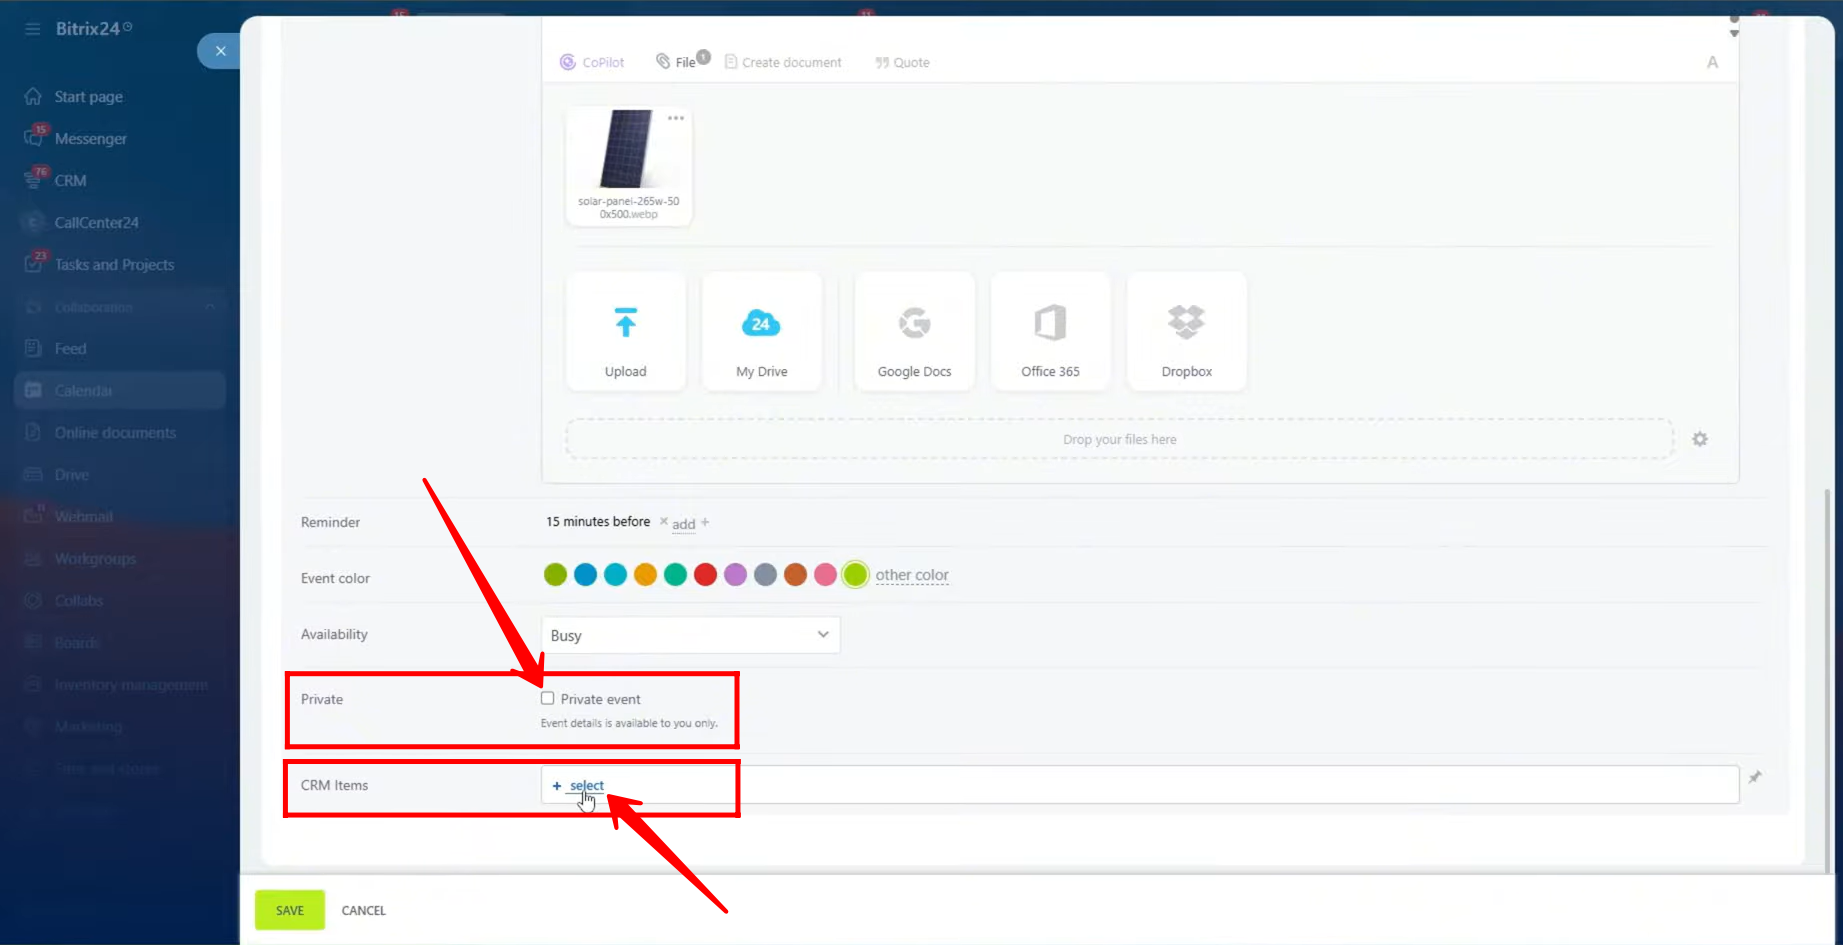
7. You can also choose to make the event private, ensuring that the event details are only visible to you. Additionally, you have the option to link a CRM item — such as a deal, lead, or contact — to this event. This helps maintain a direct connection between your meeting and the relevant CRM record, keeping your workflow organized and all related information easily accessible.
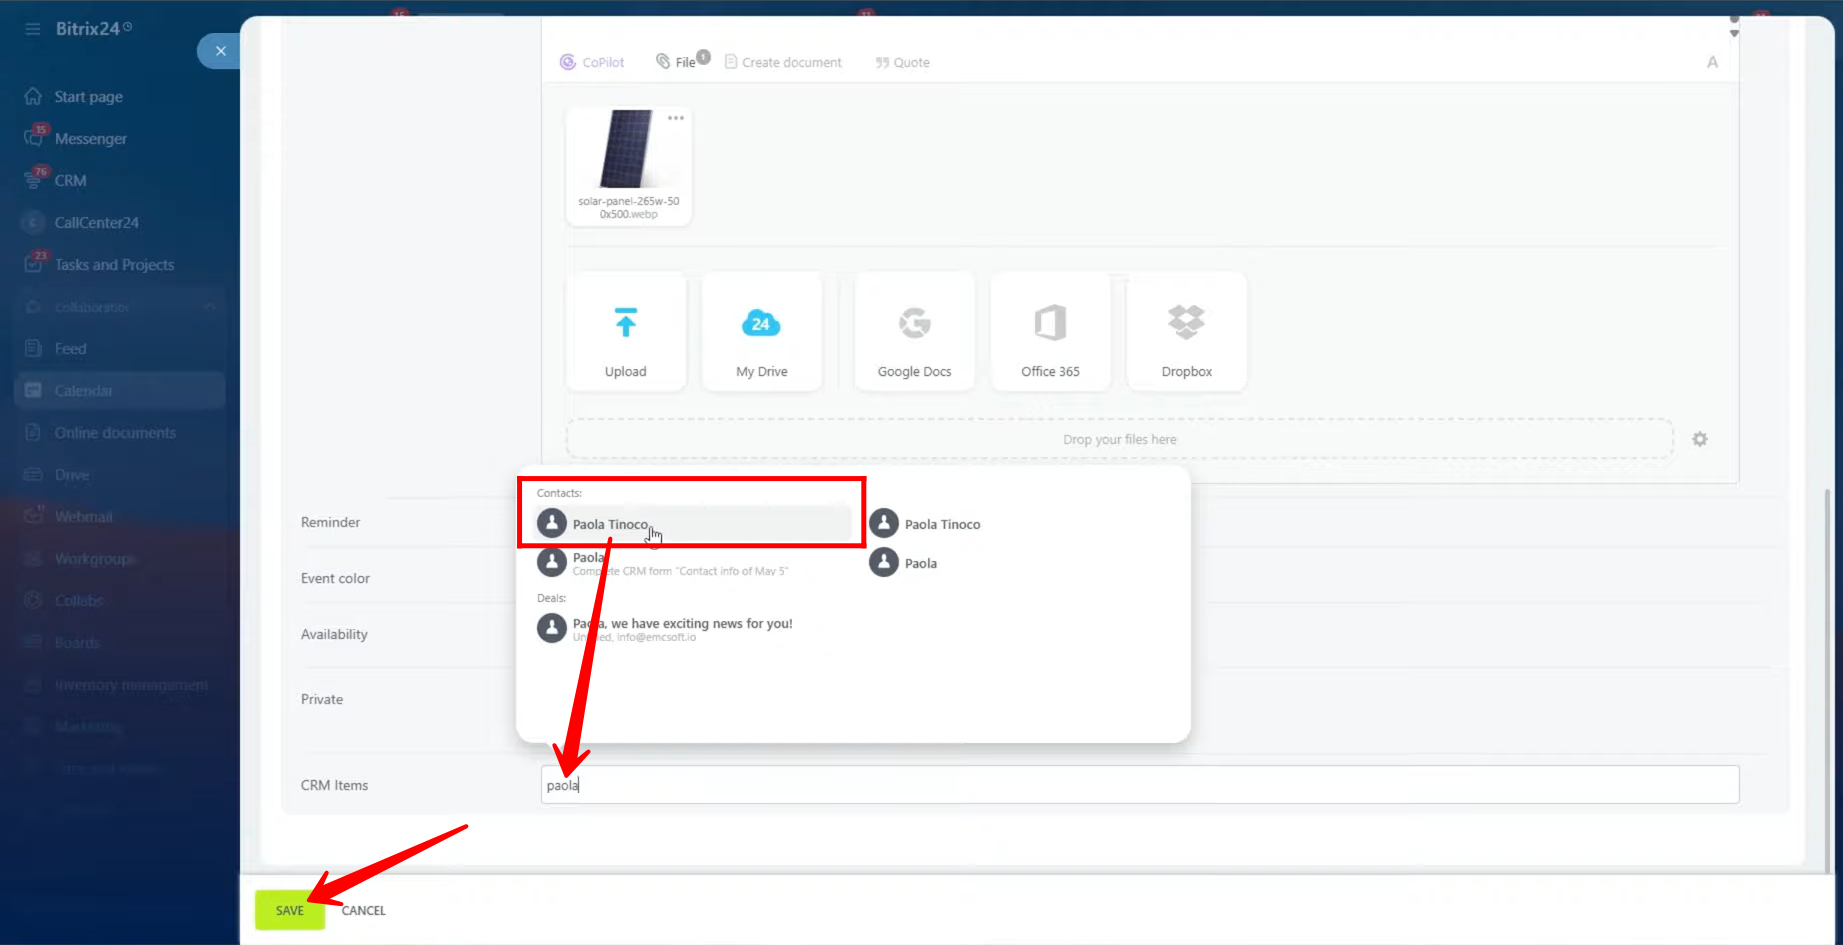
8. In this example, a contact (CRM item) is being linked to the event to keep the meeting associated with a specific client record. Once all necessary modifications are made — including event details, attendees, reminders, and CRM connections — click “Save” to apply the changes and finalize the event setup.
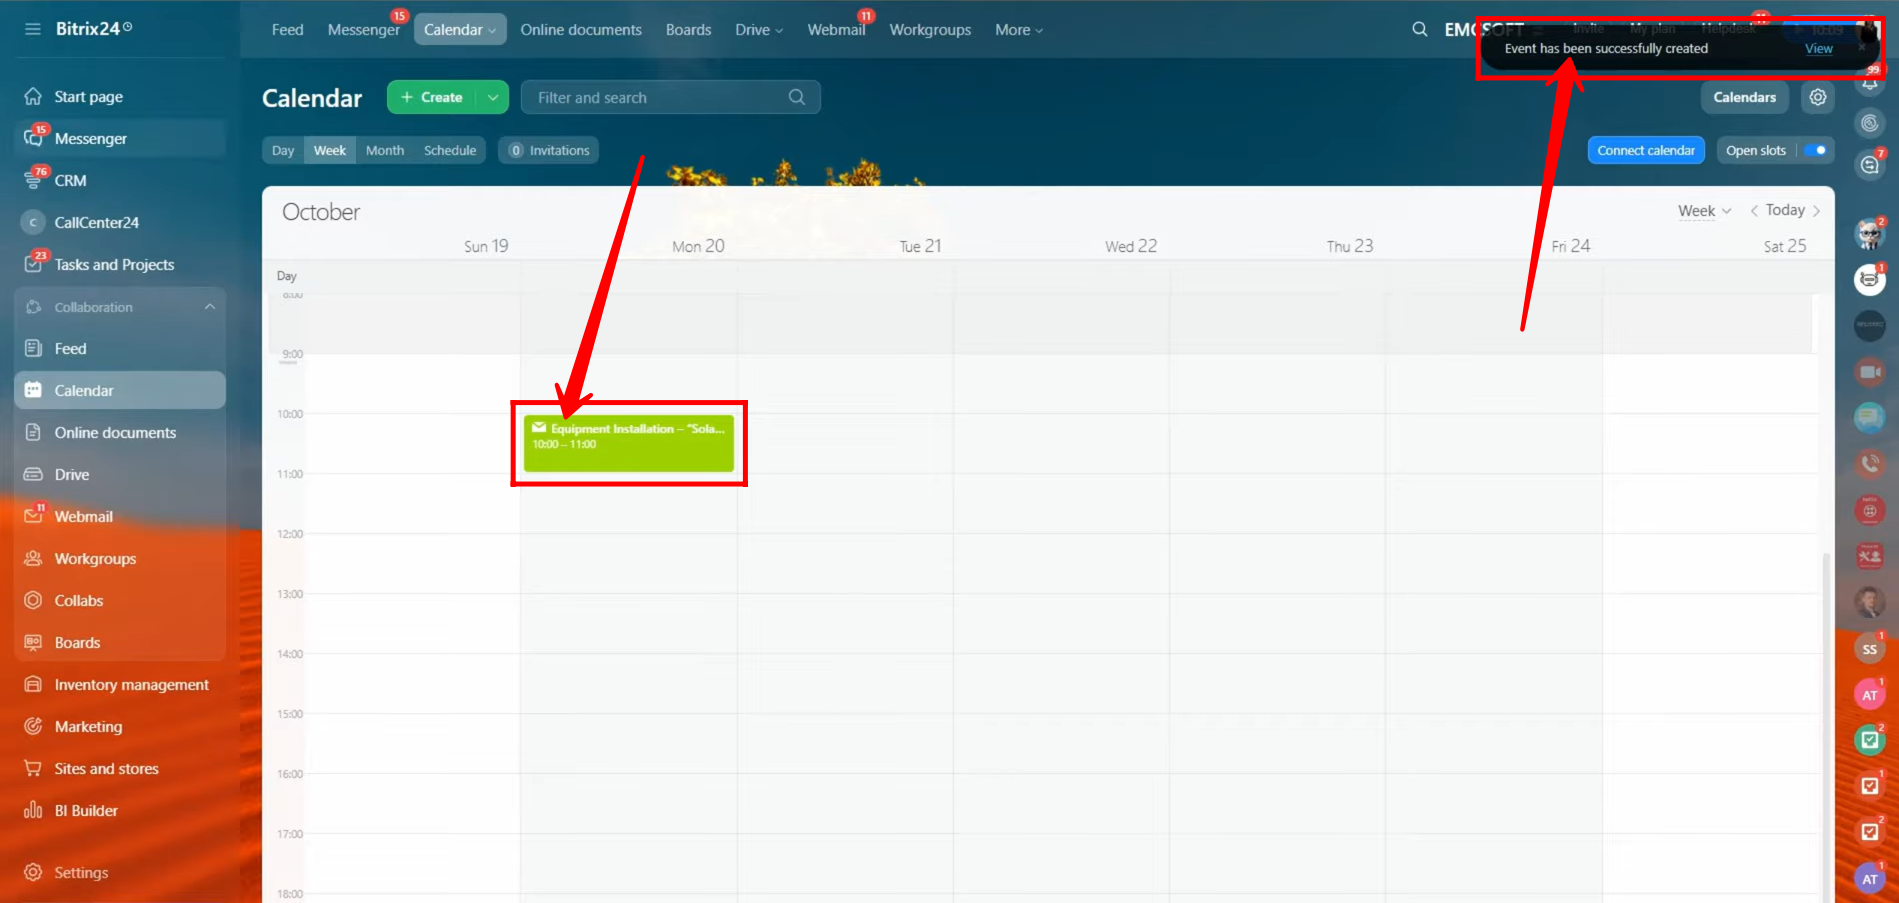
9. After saving, you’ll receive a notification confirming that the event has been created successfully. The scheduled meeting will now appear directly on your calendar, displayed within the specific date and time slot you selected. This allows you to visually track your event alongside other scheduled activities in your Bitrix24 workspace.
10. On the attendees’ or guests’ side, they will receive an email invitation containing all the meeting details. The email will include the event name, date, time, and organizer information. To access full details, they can click on the “View Meeting Details” button within the email.
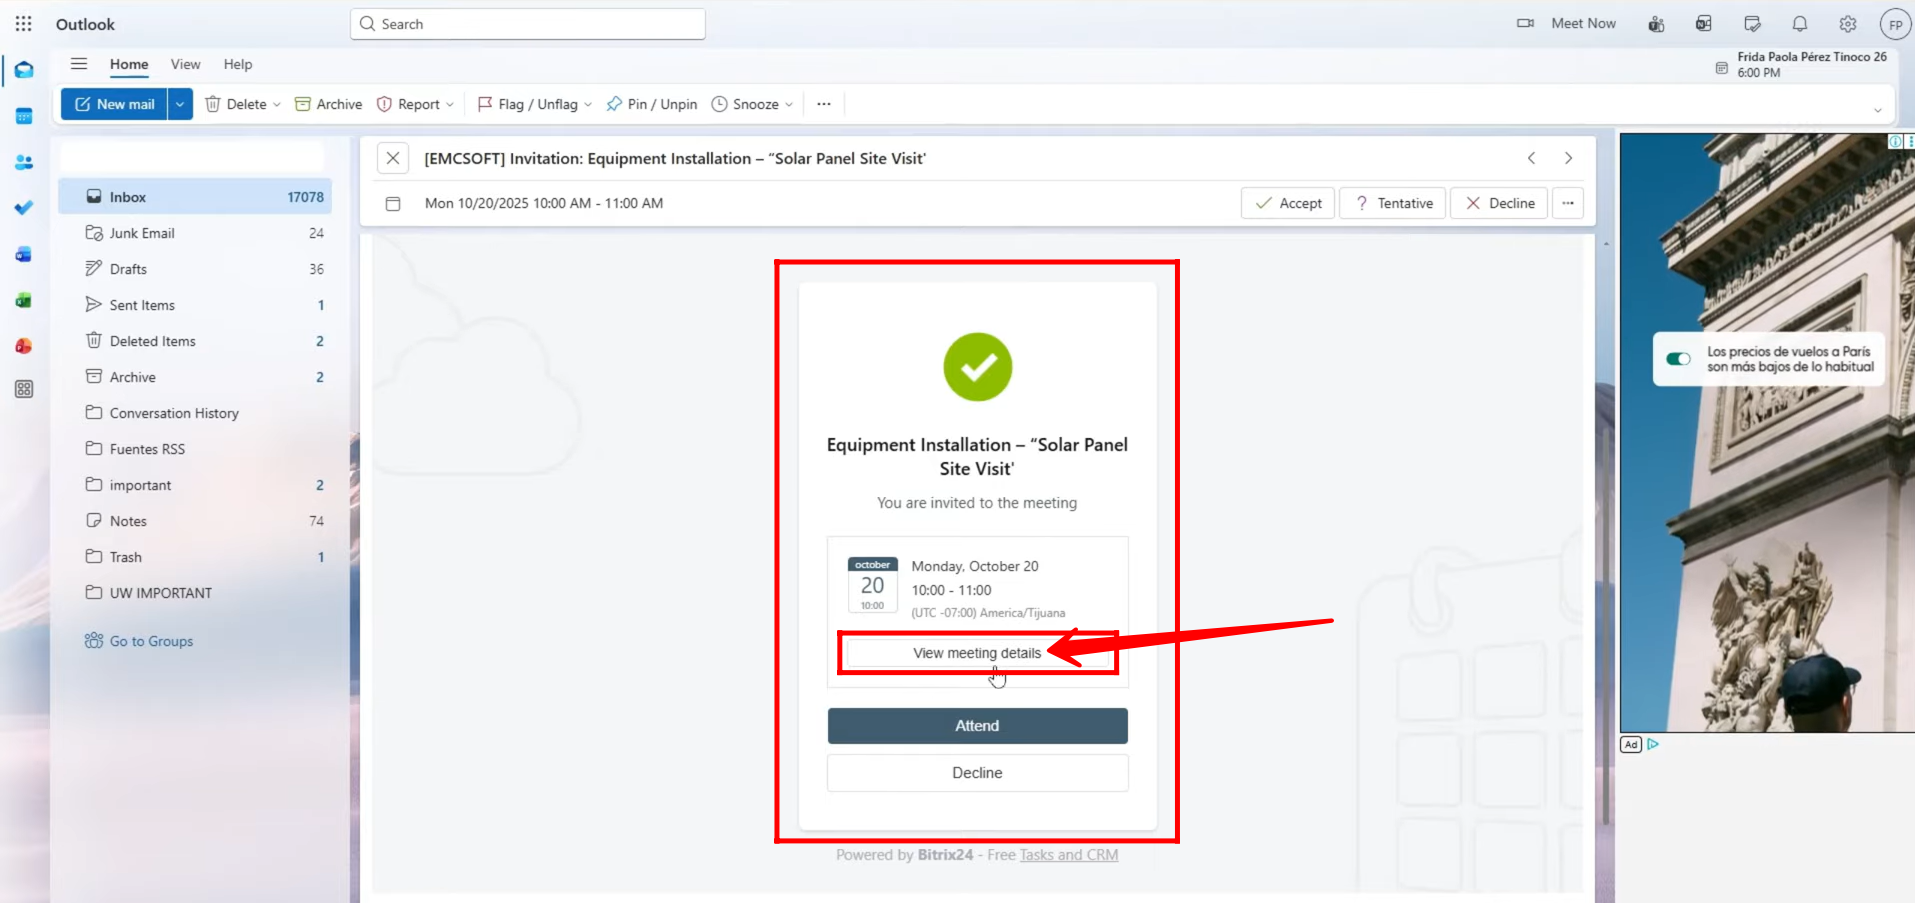
11. After clicking “View Meeting Details,” you’ll be redirected to the event page, where all information about the meeting is clearly displayed — including the event title, date and time, organizer name, location, description, and any attached media. At the bottom of this page, you’ll find the options to respond to the invitation. Click “Accept” to confirm your attendance.

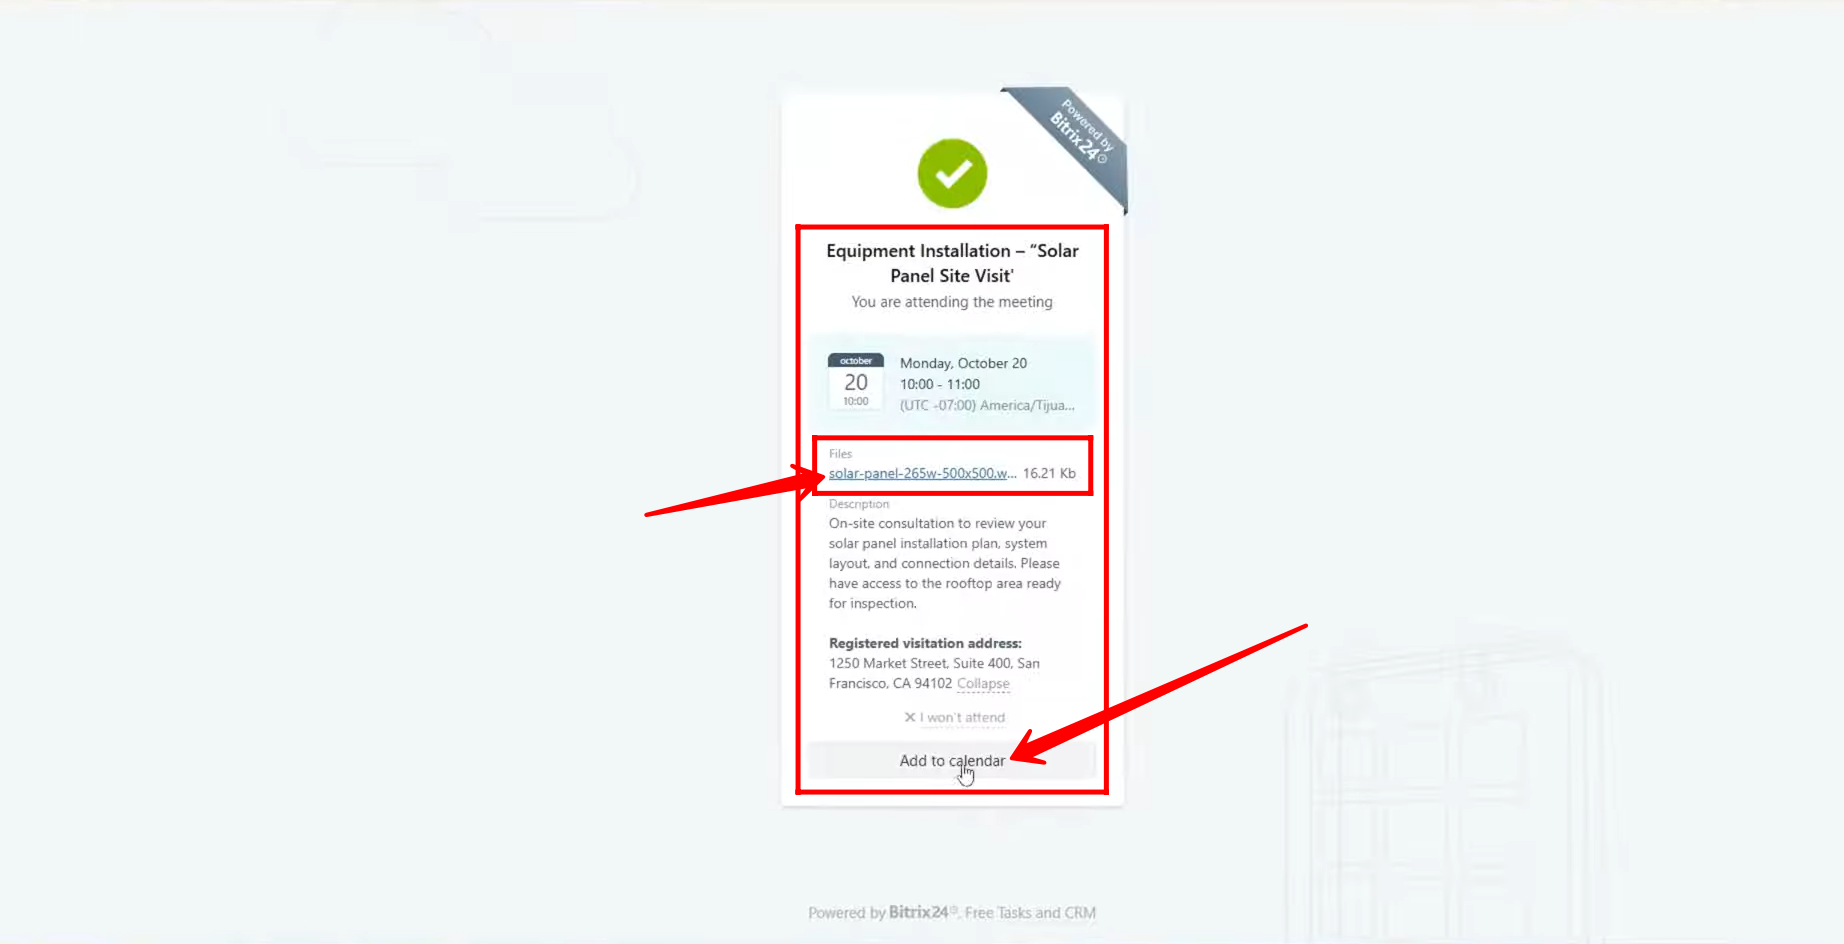
12. After accepting the invitation, attendees will see the “Add to Calendar” option, allowing them to conveniently add the meeting to their personal or work calendar (Google, Outlook, or other supported platforms). This ensures they receive reminders and do not miss the event.
Additionally, if the organizer attached any media files (such as images, documents, or presentations) to the event invitation, attendees can click on these attachments to open and view them in a separate browser tab for full access and review before the meeting.
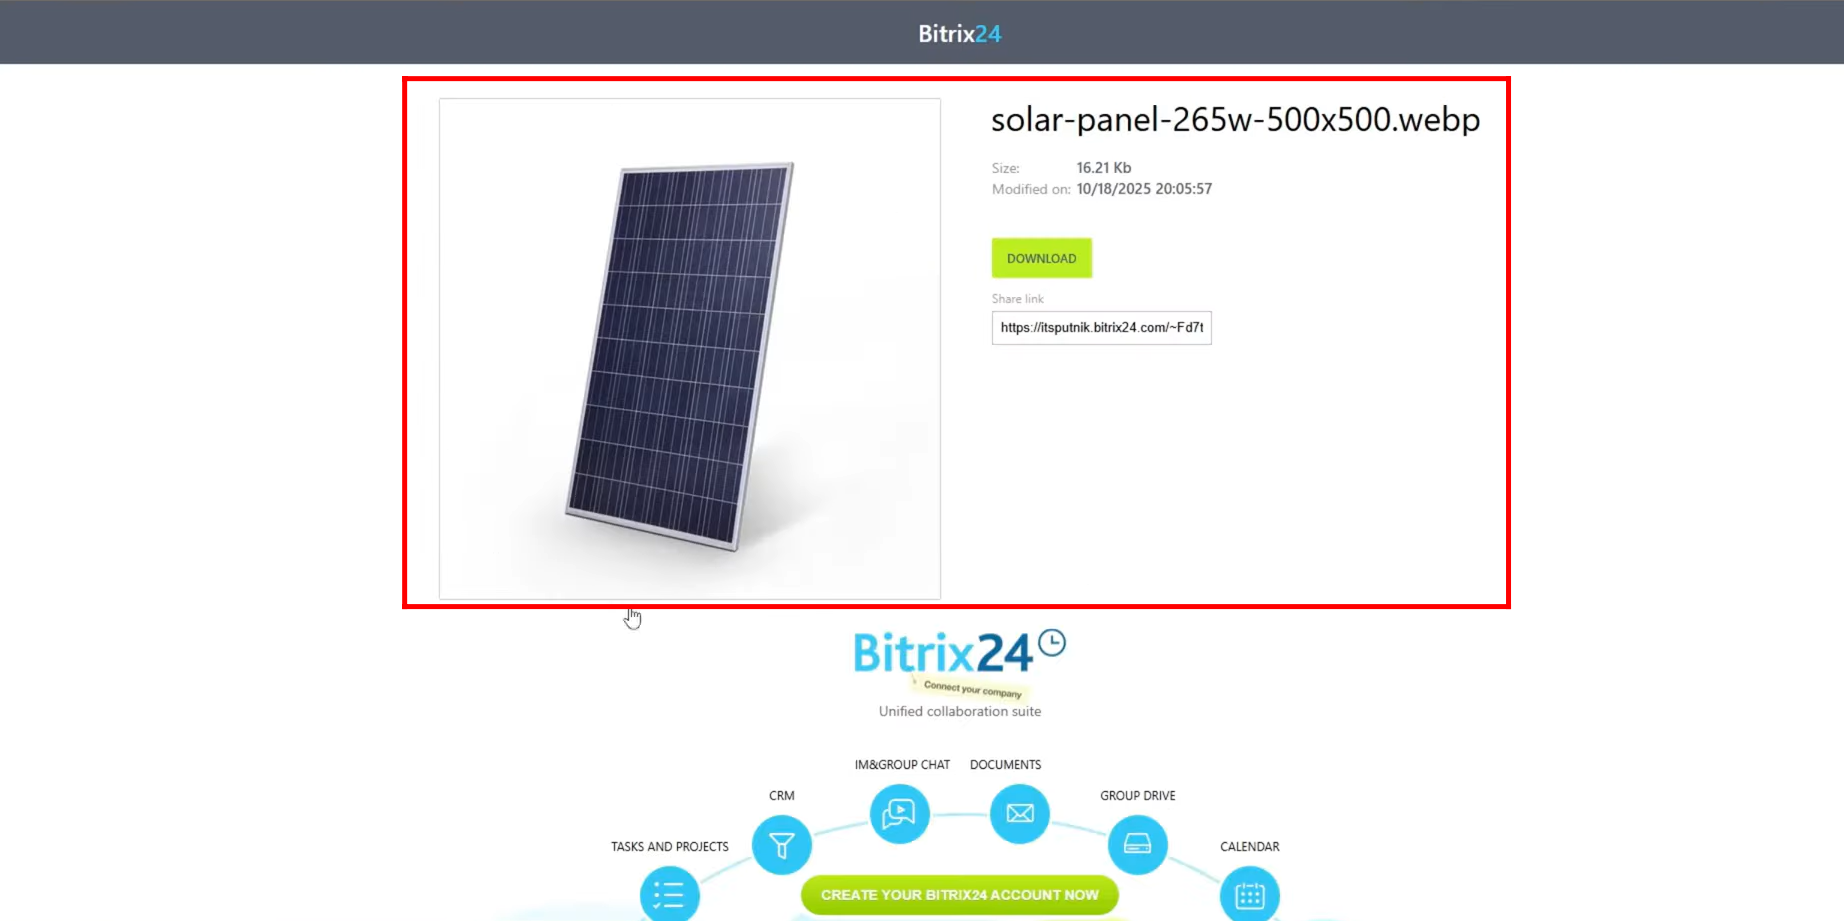
13. In this separate tab, the attendee can view the attached image in full size for better clarity and detail. They also have the option to download the image directly to their device for reference or use during the meeting.
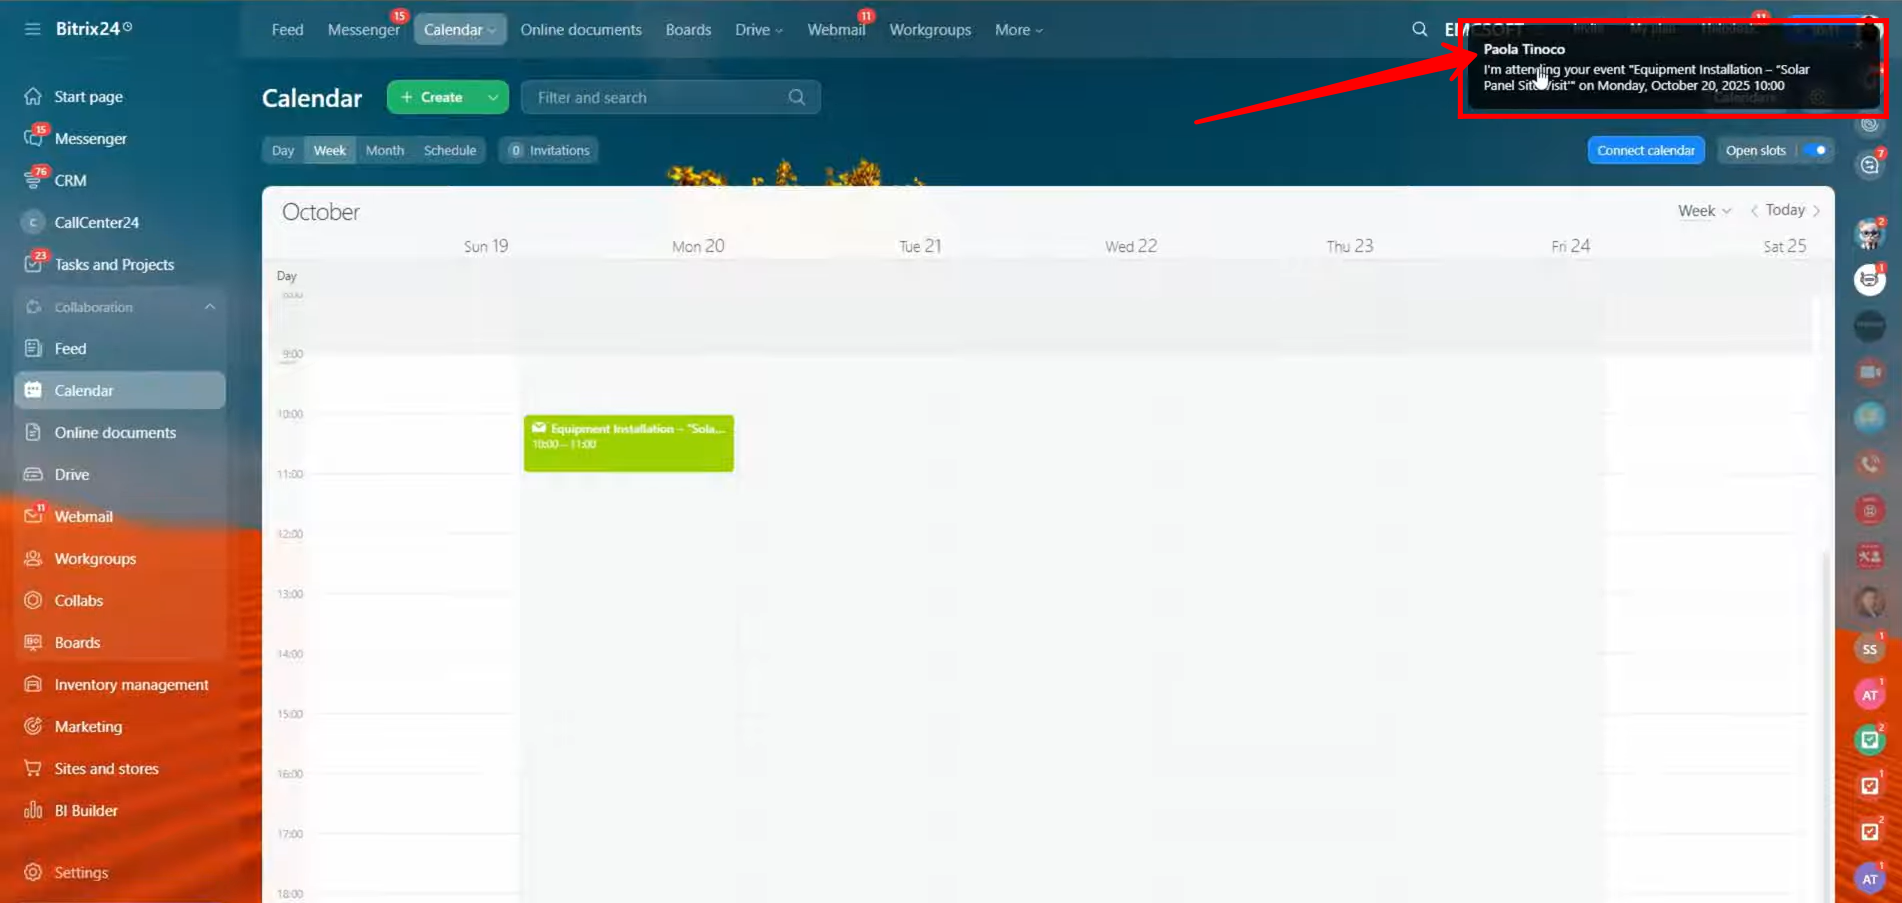
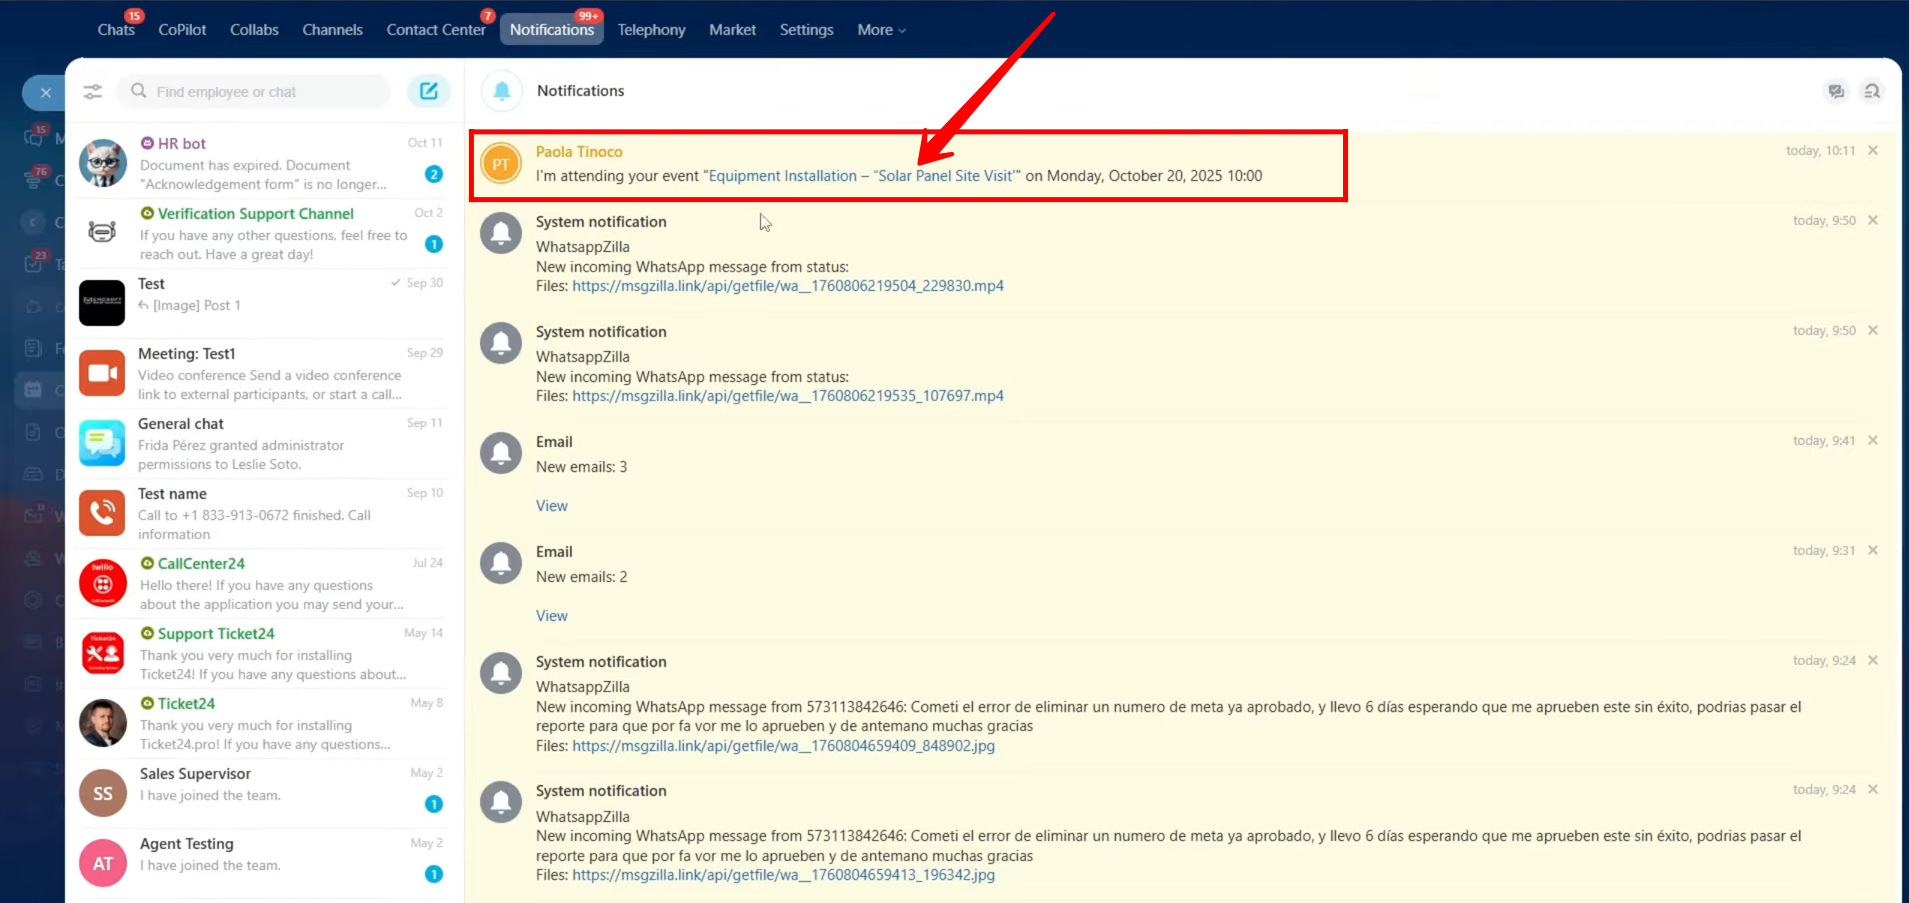
14. Meanwhile, the organizer who created the event will receive a notification confirming that the attendee has accepted the invitation. This helps the organizer keep track of participants’ responses in real time and ensures that all invited members or guests have acknowledged and confirmed their attendance before the meeting takes place.
15. Go to “Notifications” and click on the event notification to open and view its details again.
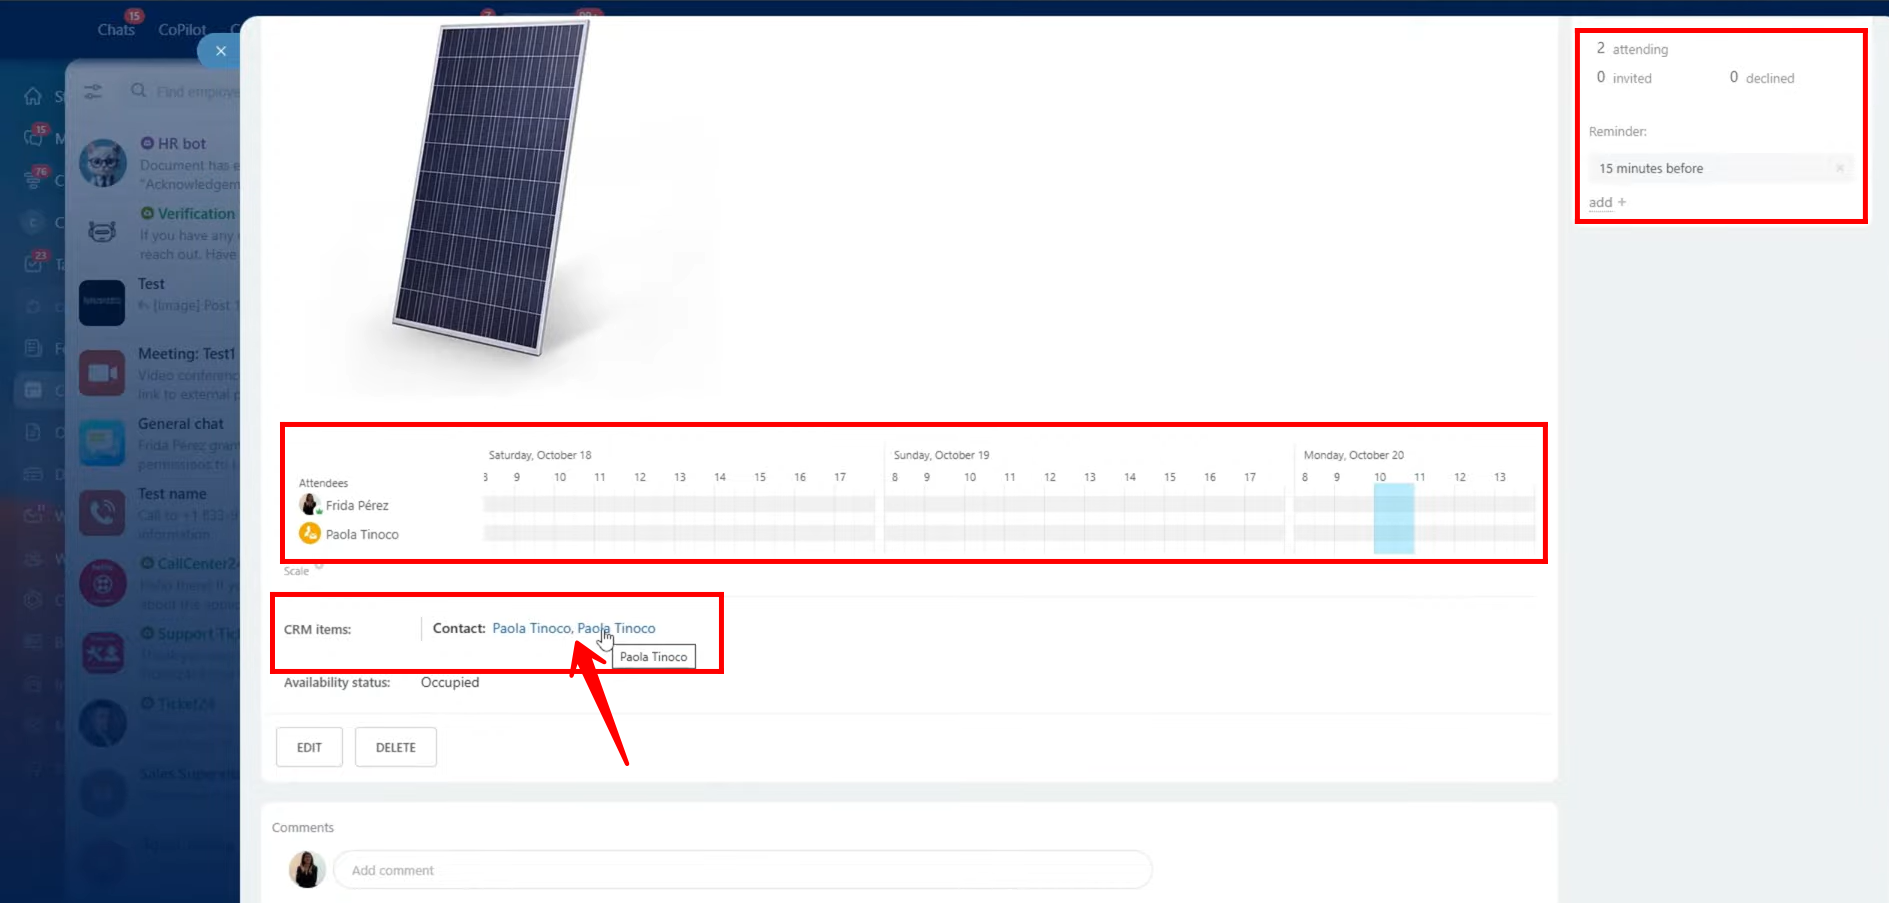
16. Here, you can see the updated list of participants, showing which attendees have accepted, declined, or not yet responded. You can also review how the time availabilities of attendees overlap — any conflicts will be clearly indicated.
If needed, you can still edit the event details. Once updated, attendees will automatically receive an email notification about the changes.
Additionally, you can view the connected CRM item (such as a deal, lead, or contact) linked to the event — simply click on it to open and review the related CRM record.
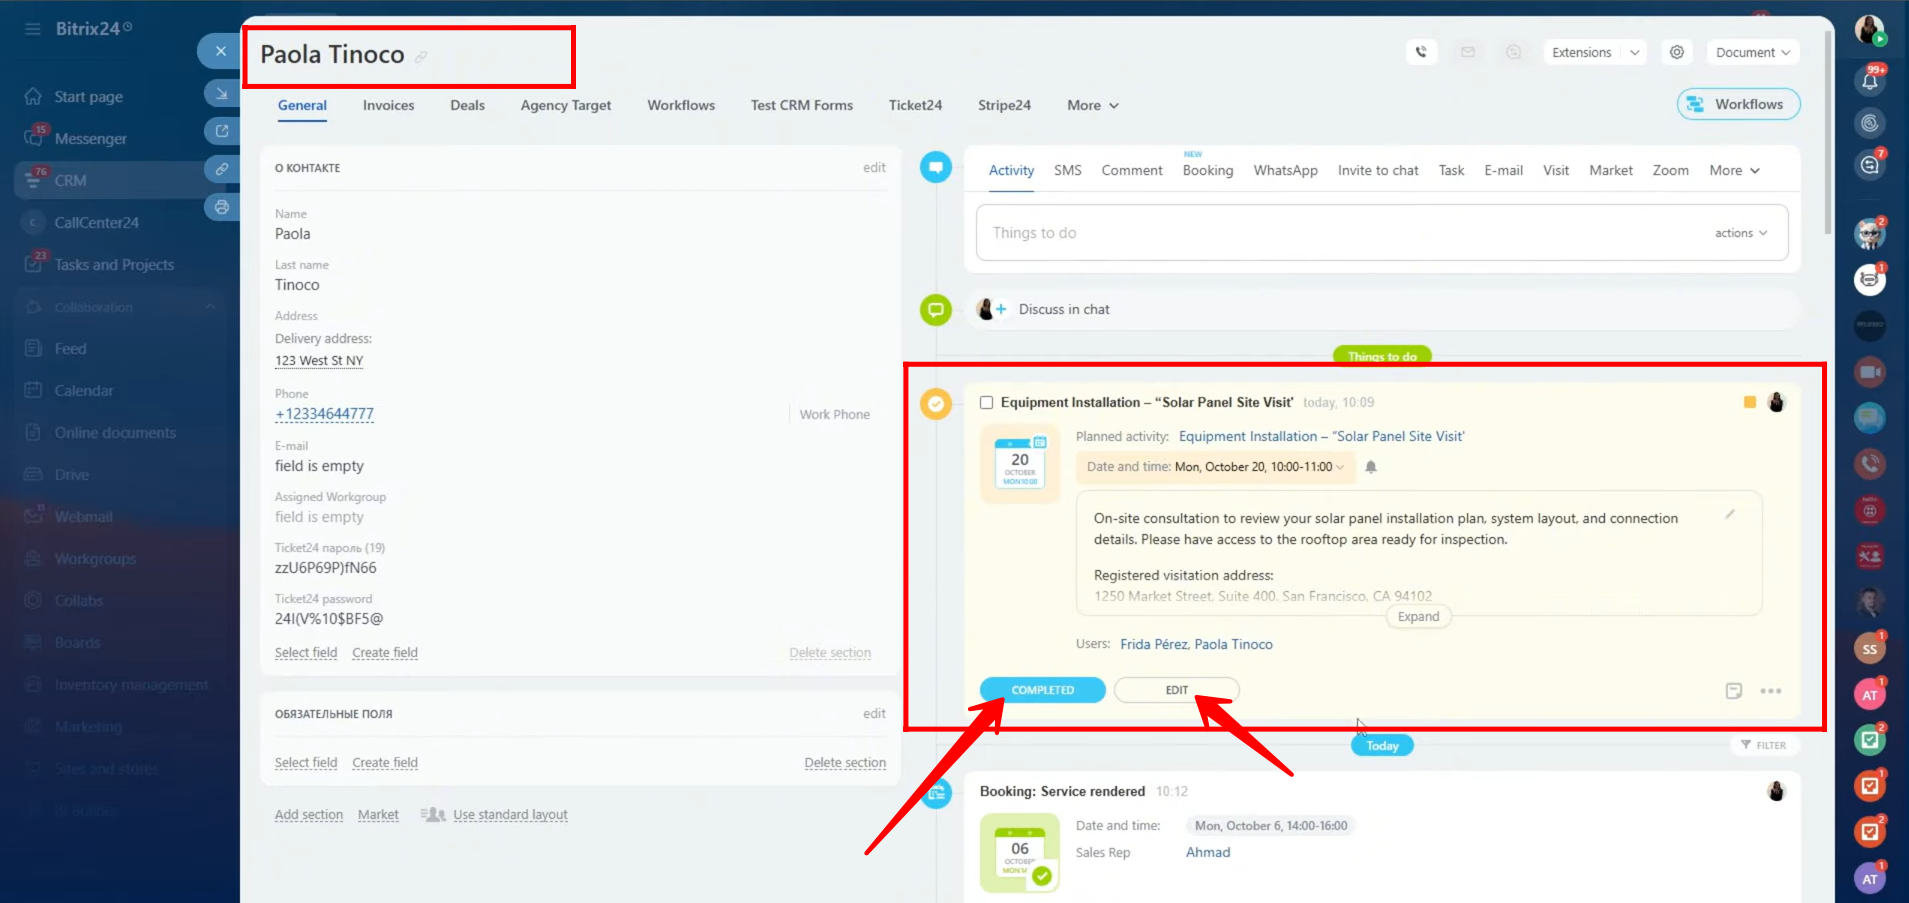
17. Since the CRM item (contact) was attached to the event, opening the contact card will show the event automatically listed in the activity timeline. From this timeline, you can view all event details, edit the event if any updates are needed, or mark it as completed once the meeting has taken place.
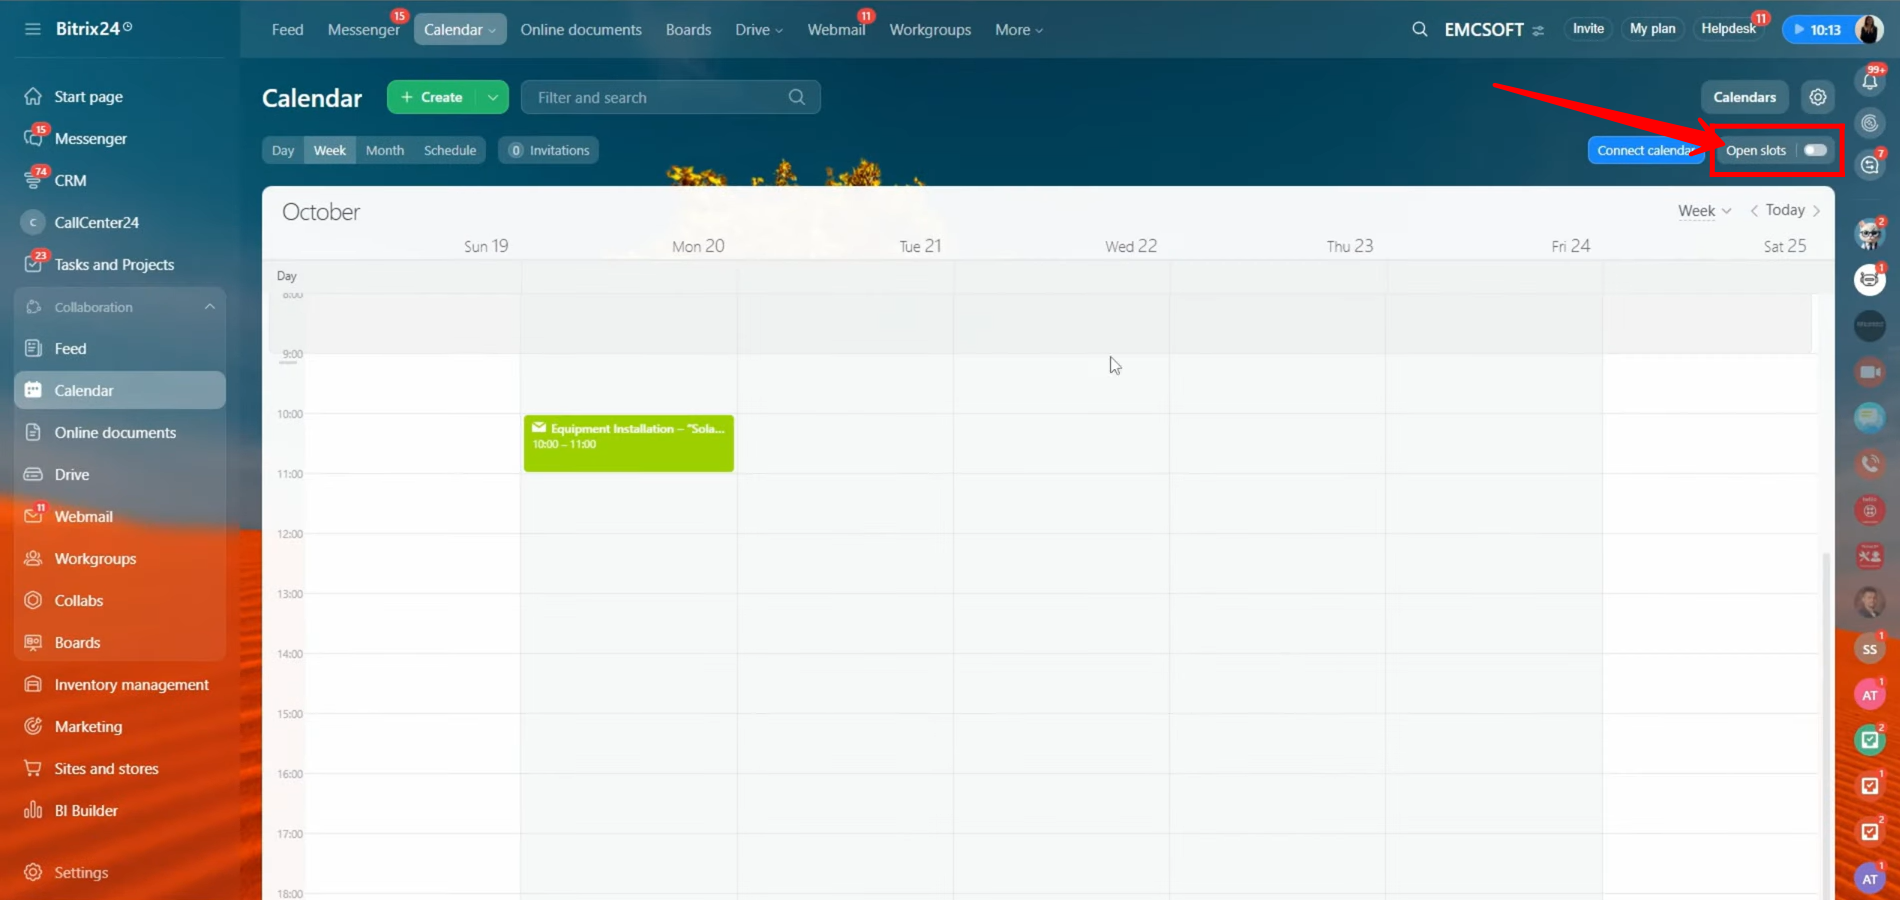
18. Now, let’s explore another way to share your calendar with external clients, allowing them to book available time slots on their own.
To begin, turn on the “Open Slots” toggle within your calendar window. This feature enables you to define and share your available time periods for meetings or consultations.
19. You can now create a test meeting to verify how the open slots feature works. While setting it up, you can also add your colleagues to the shared calendar so they can be part of the available slots as well.
Additionally, you can customize the date and time of each slot according to your availability.

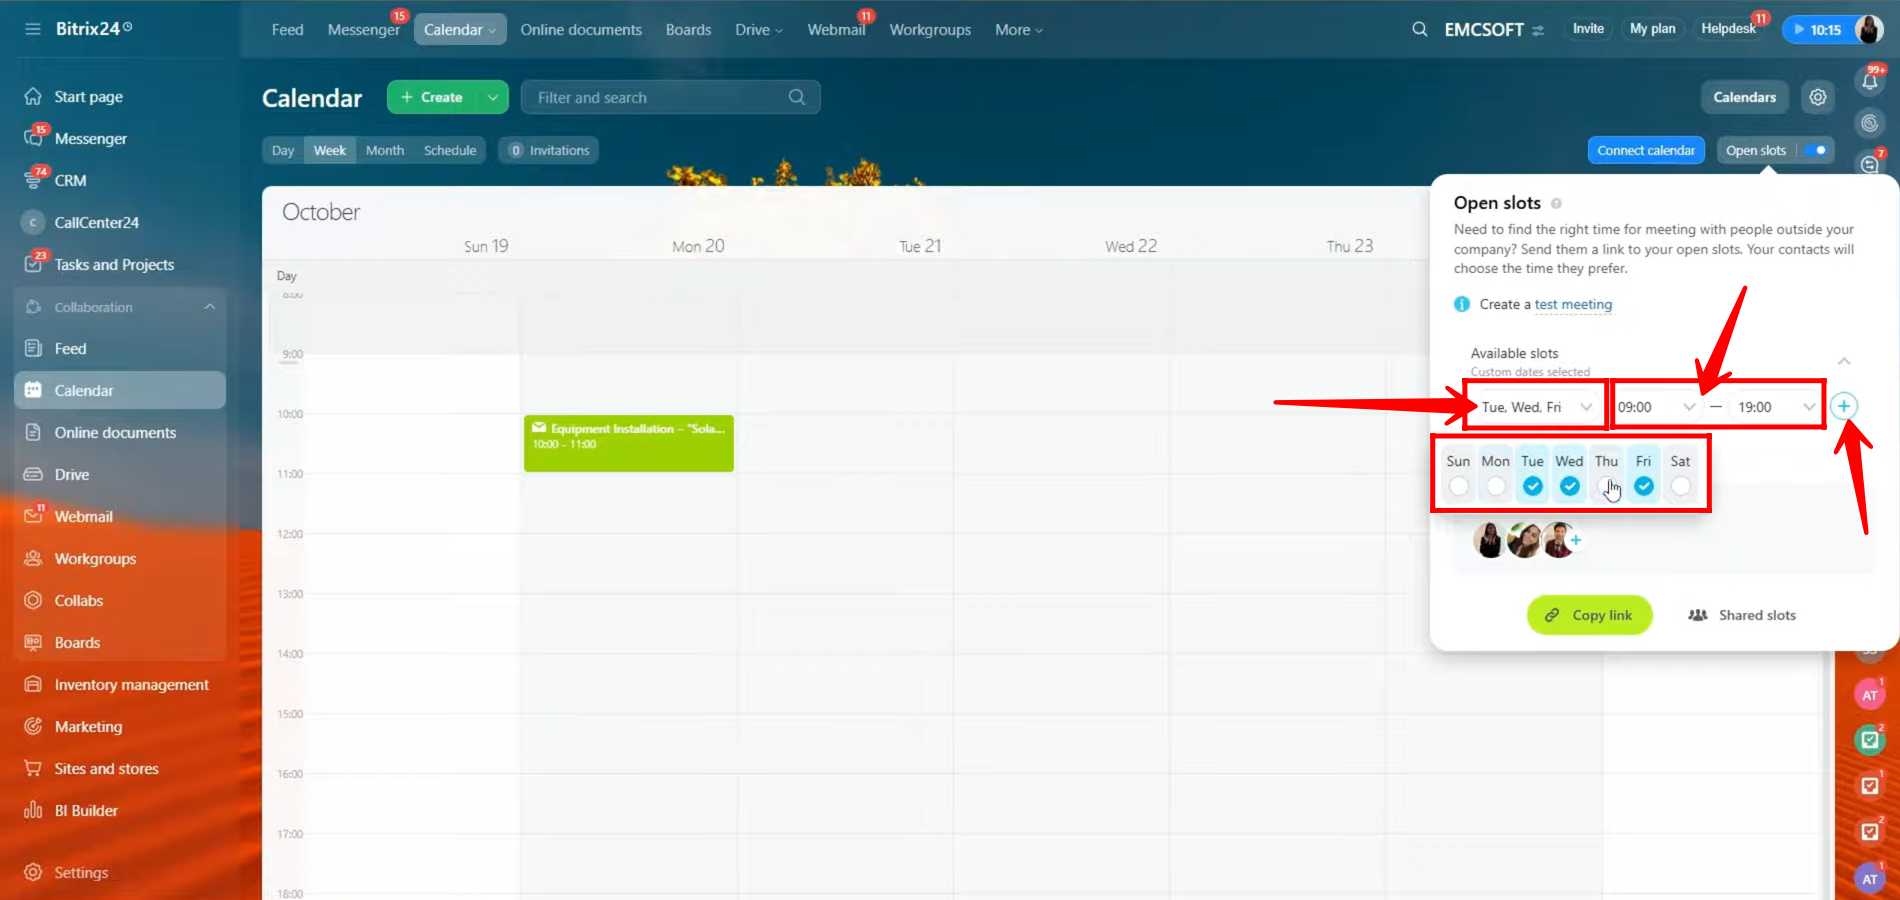
20. Here, you can select the weekdays of your choice when you want to make yourself available for meetings — at least one day must be selected to proceed.
Once the days are chosen, you can set the start and end time for those days (or for a single selected day). This defines the availability window during which clients or colleagues can book a meeting with you through open slots.
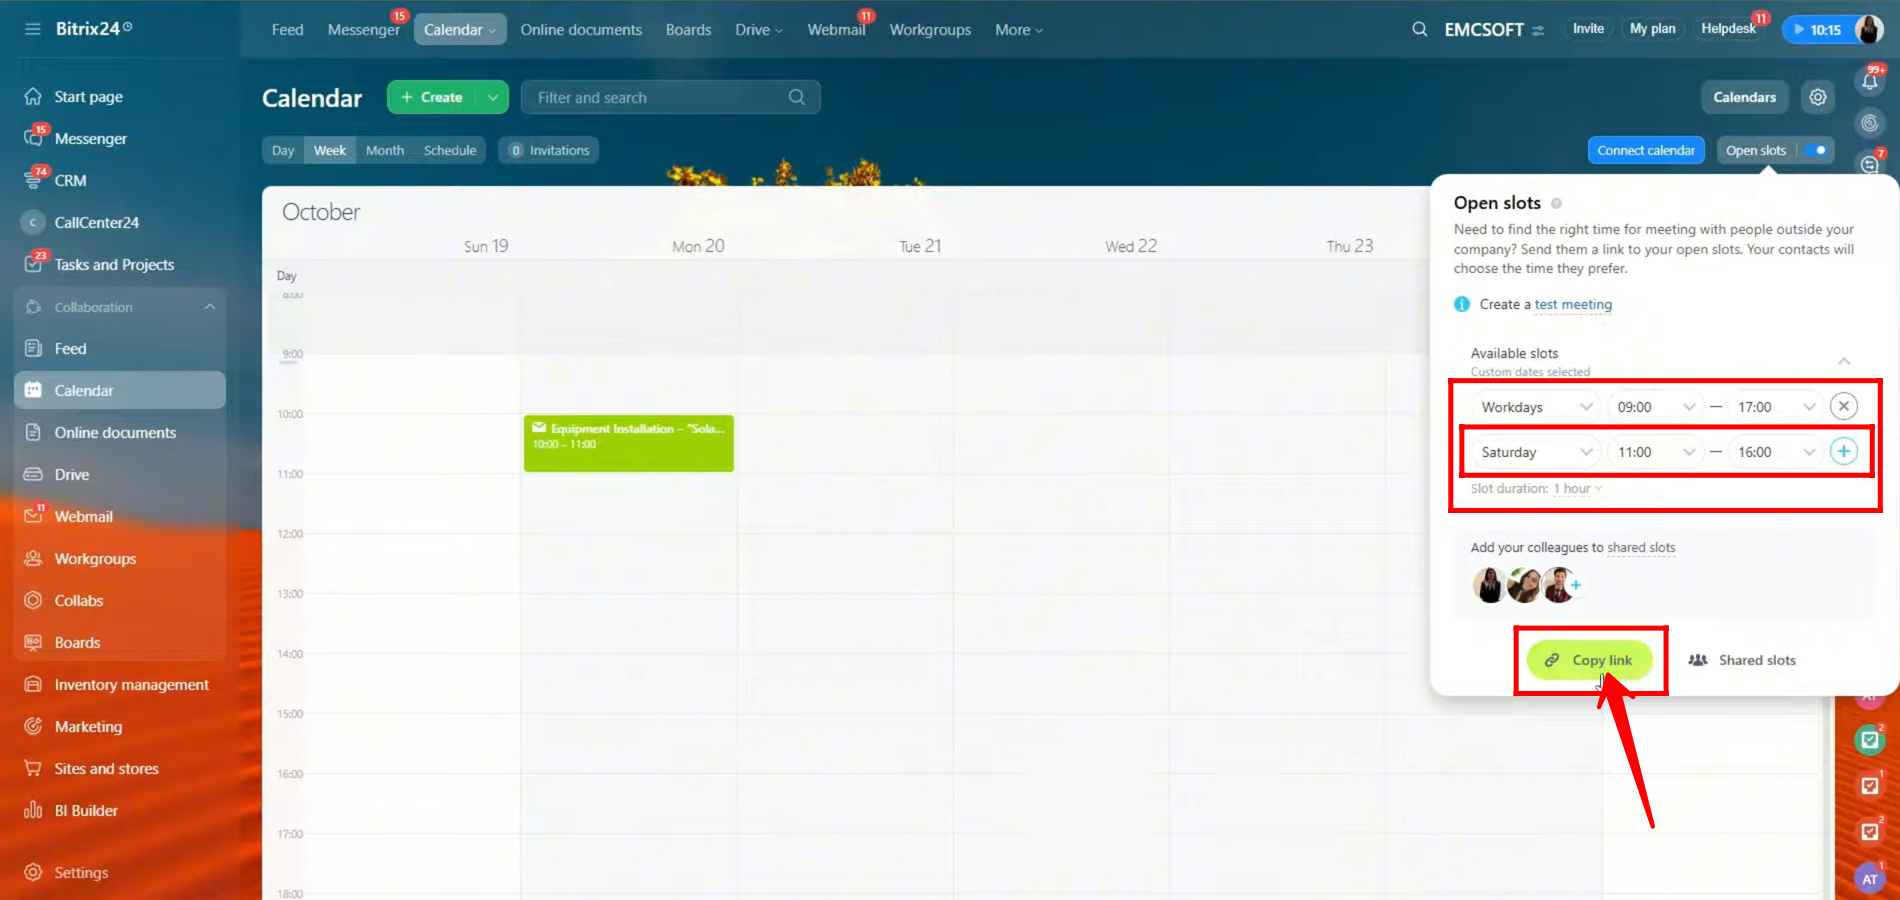
21. Here, you can see that for workdays (Monday to Friday), the availability time is set from 9:00 AM to 5:00 PM, while for Saturday, the availability is configured from 11:00 AM to 4:00 PM. Once your schedule is finalized, you can copy the link of the open slots and share it with your clients, allowing them to book a meeting directly within your available time frames.
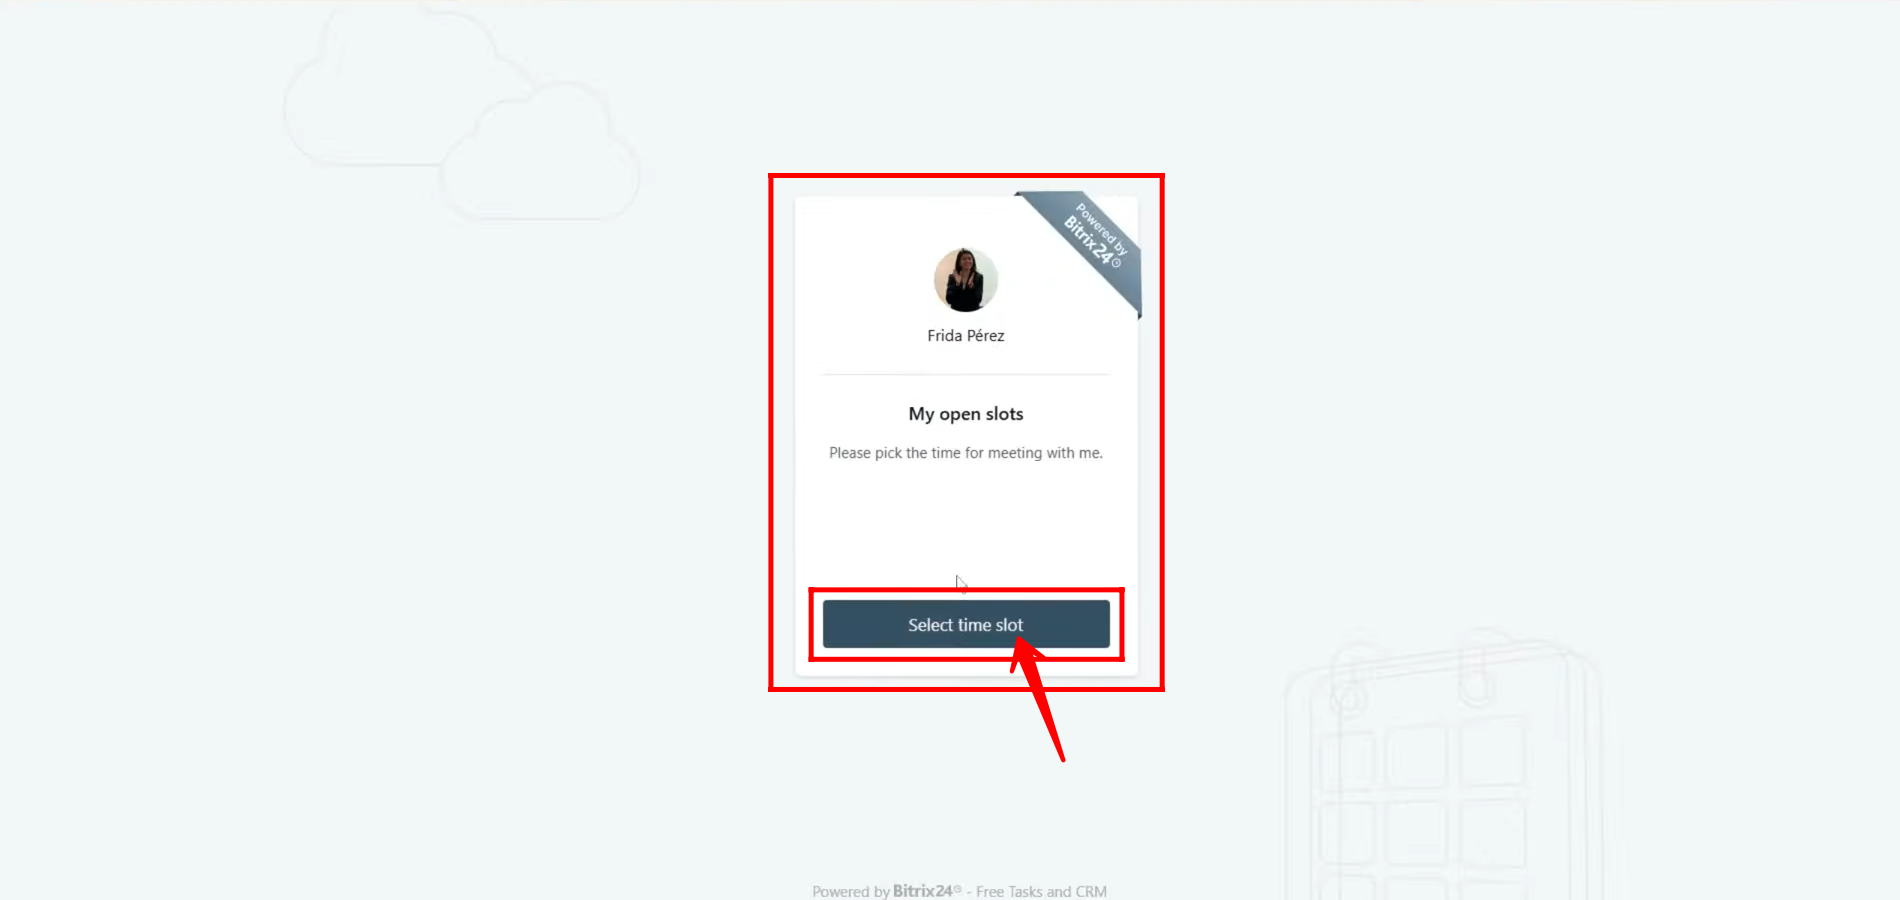
22. Once the client opens the Open Slots link, they will see a window prompting them to select a time slot.
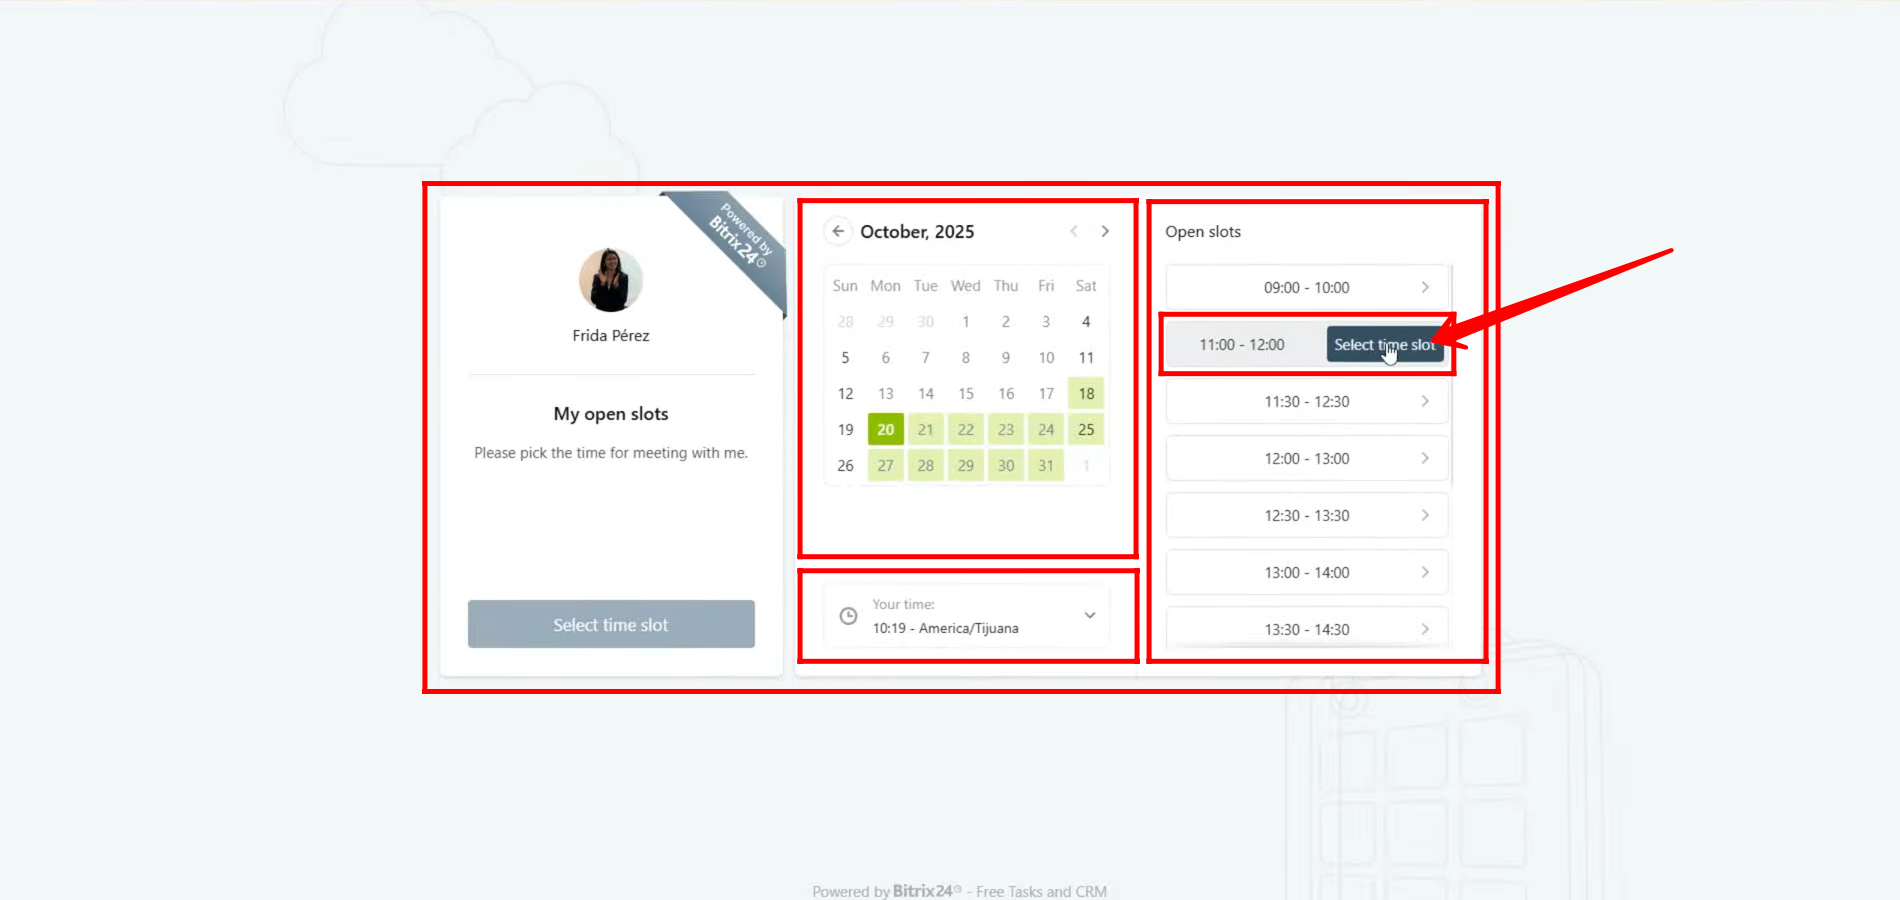
23. After clicking “Select time slot”, a calendar will pop up, allowing the client to choose an available date. Once the date is selected, the available time slots for that day will appear.
Note: The client will see all available times in their own local timezone, based on the time settings of the device they are using to access the link. This ensures accurate scheduling across different regions and time zones.
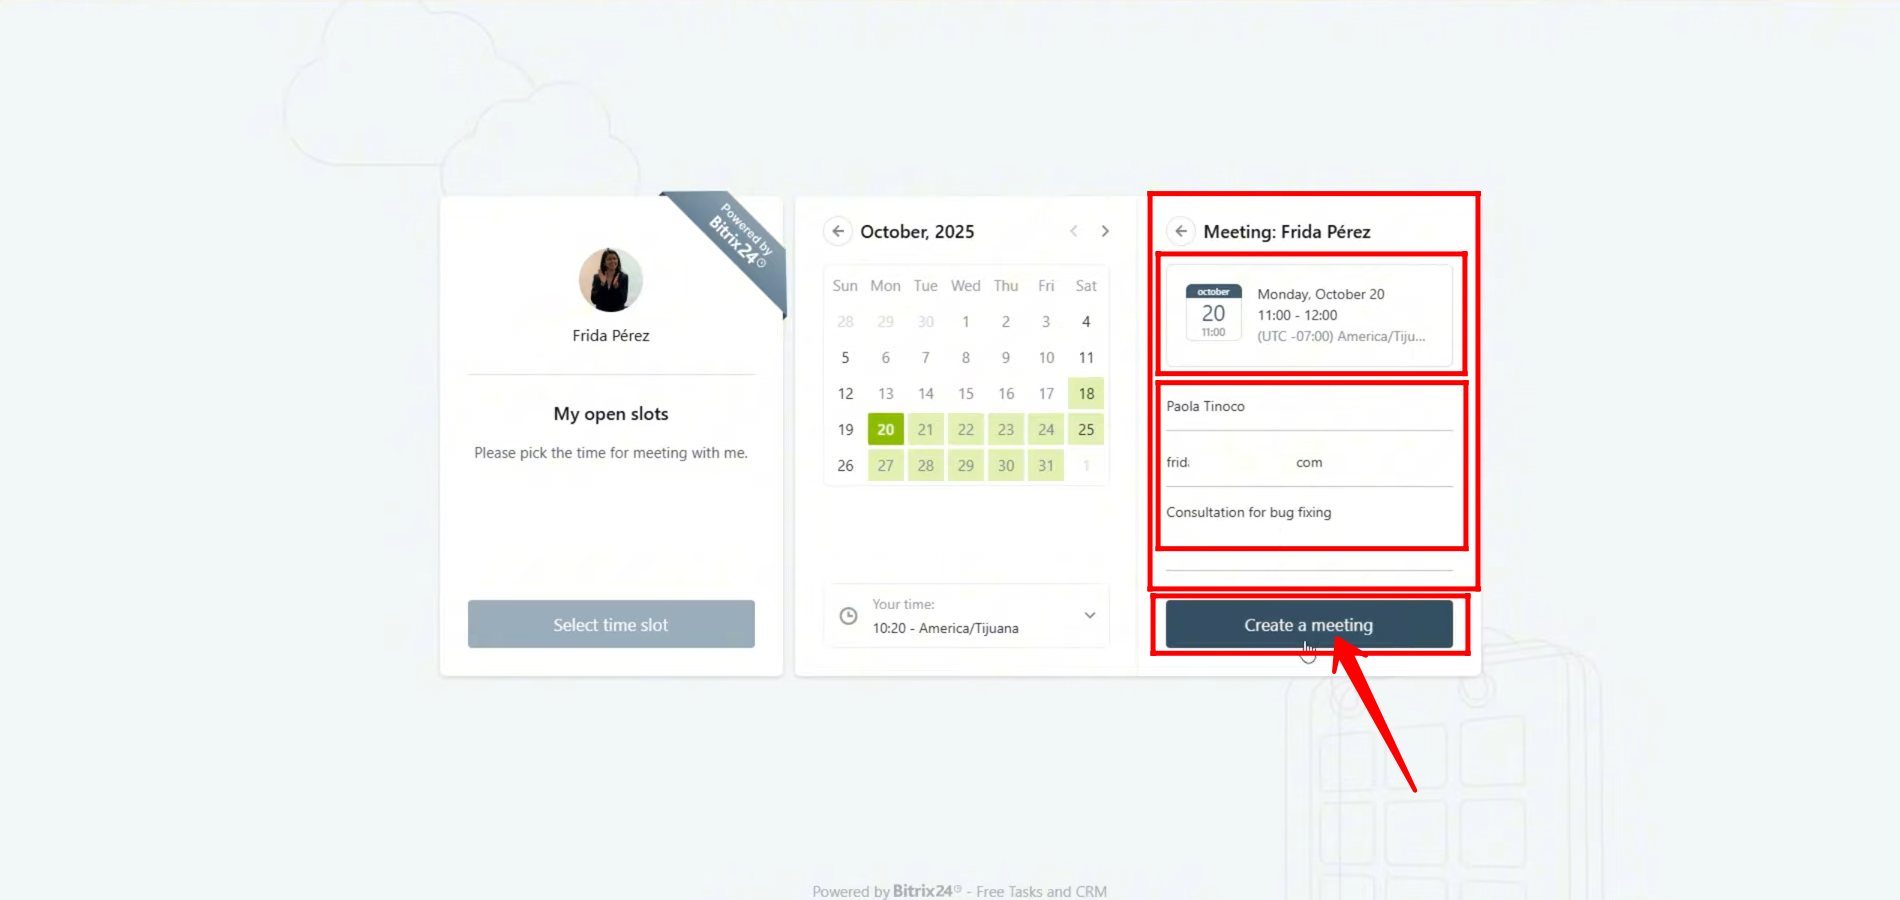
24. After selecting the desired date and time for the meeting, the client will be prompted to fill out a short form with their details. They’ll need to provide their First Name, Last Name, Email Address, and a brief Description — explaining what they would like to discuss or the purpose of the meeting.
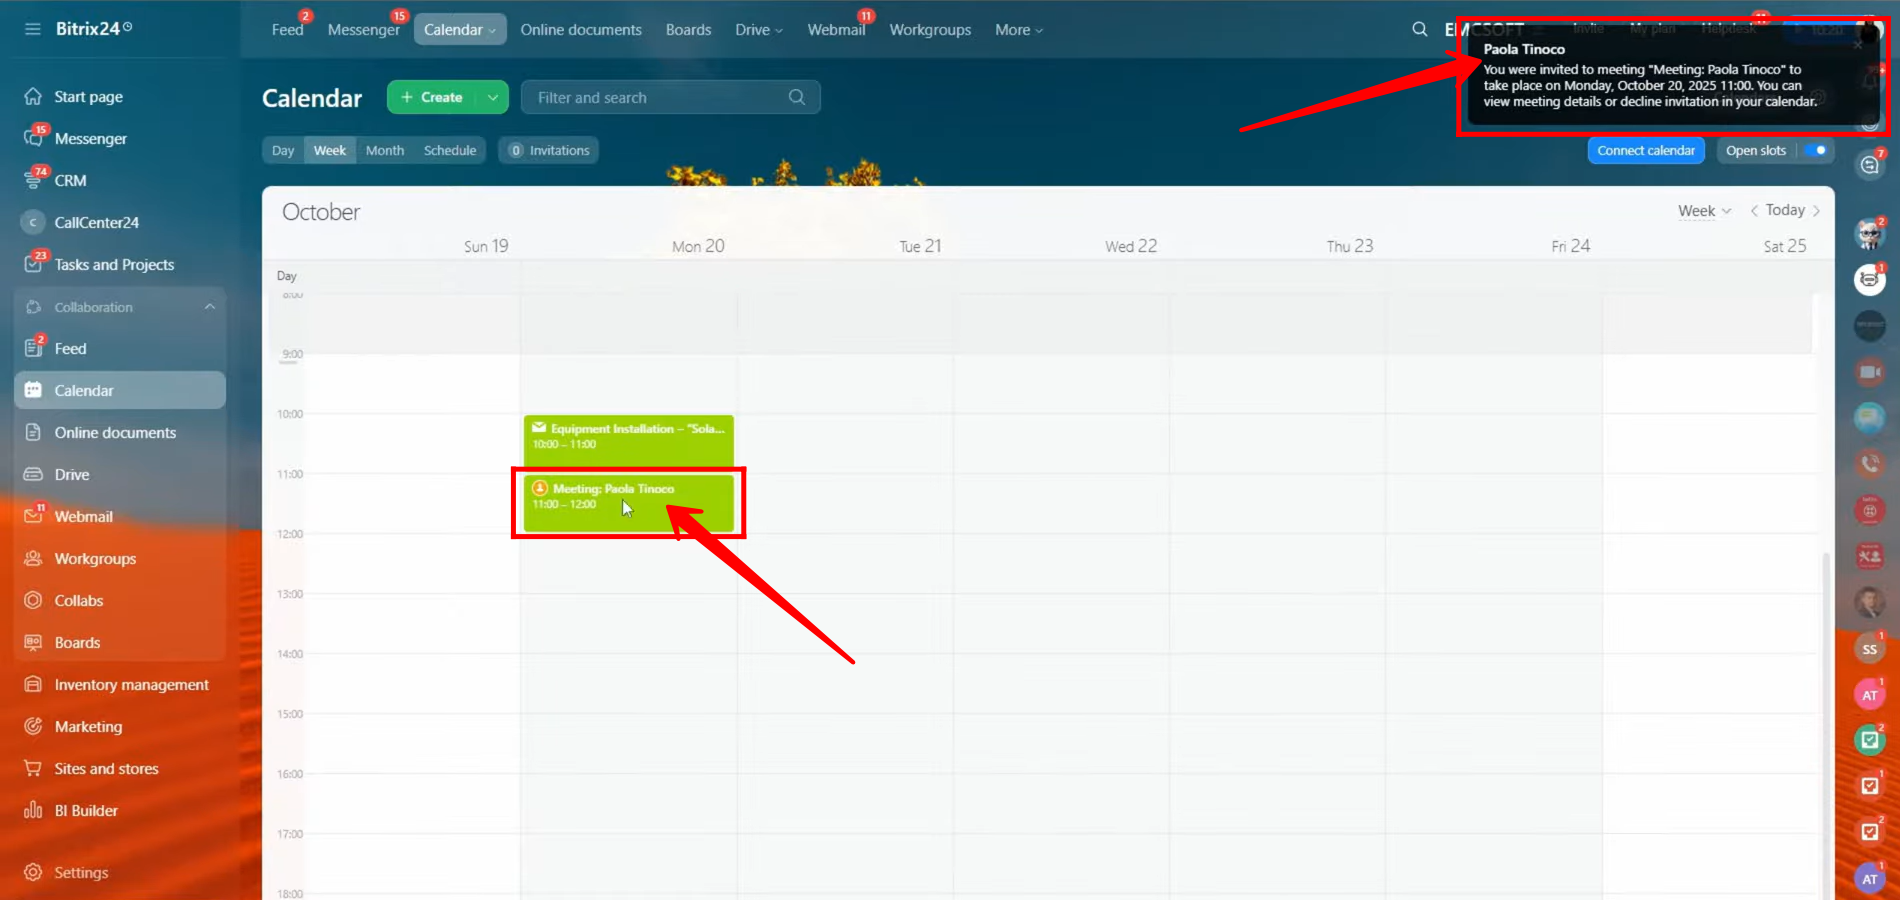
25. Once the client successfully books a meeting with the slot owner, the owner will immediately receive a notification indicating that someone has scheduled a meeting. The client’s name will also appear in the notification (if it was entered correctly).
At the same time, the booked slot will automatically be added to the owner’s calendar, appearing in the corresponding date and time box that was selected by the client. Simply click on the event box in the calendar to view all the meeting details.
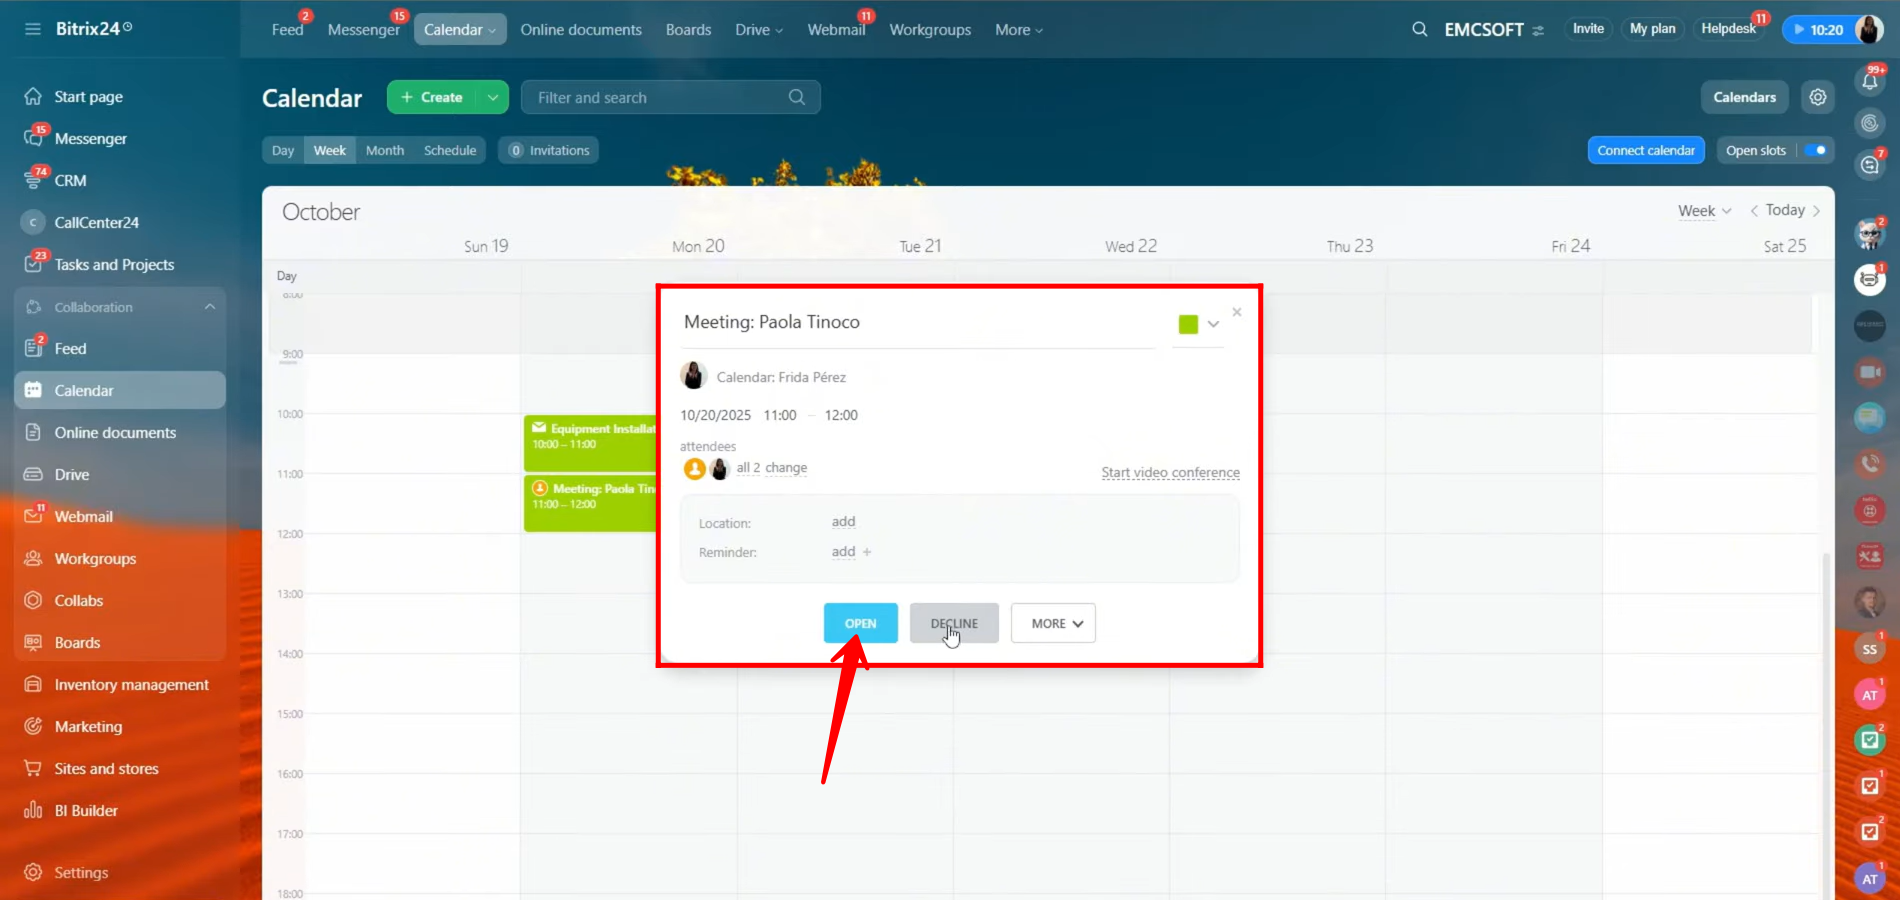
26. Here, you can either decline the meeting request if the proposed time doesn’t suit you, or open it to view the complete meeting details. Click “Open” to access the full information about the scheduled meeting.
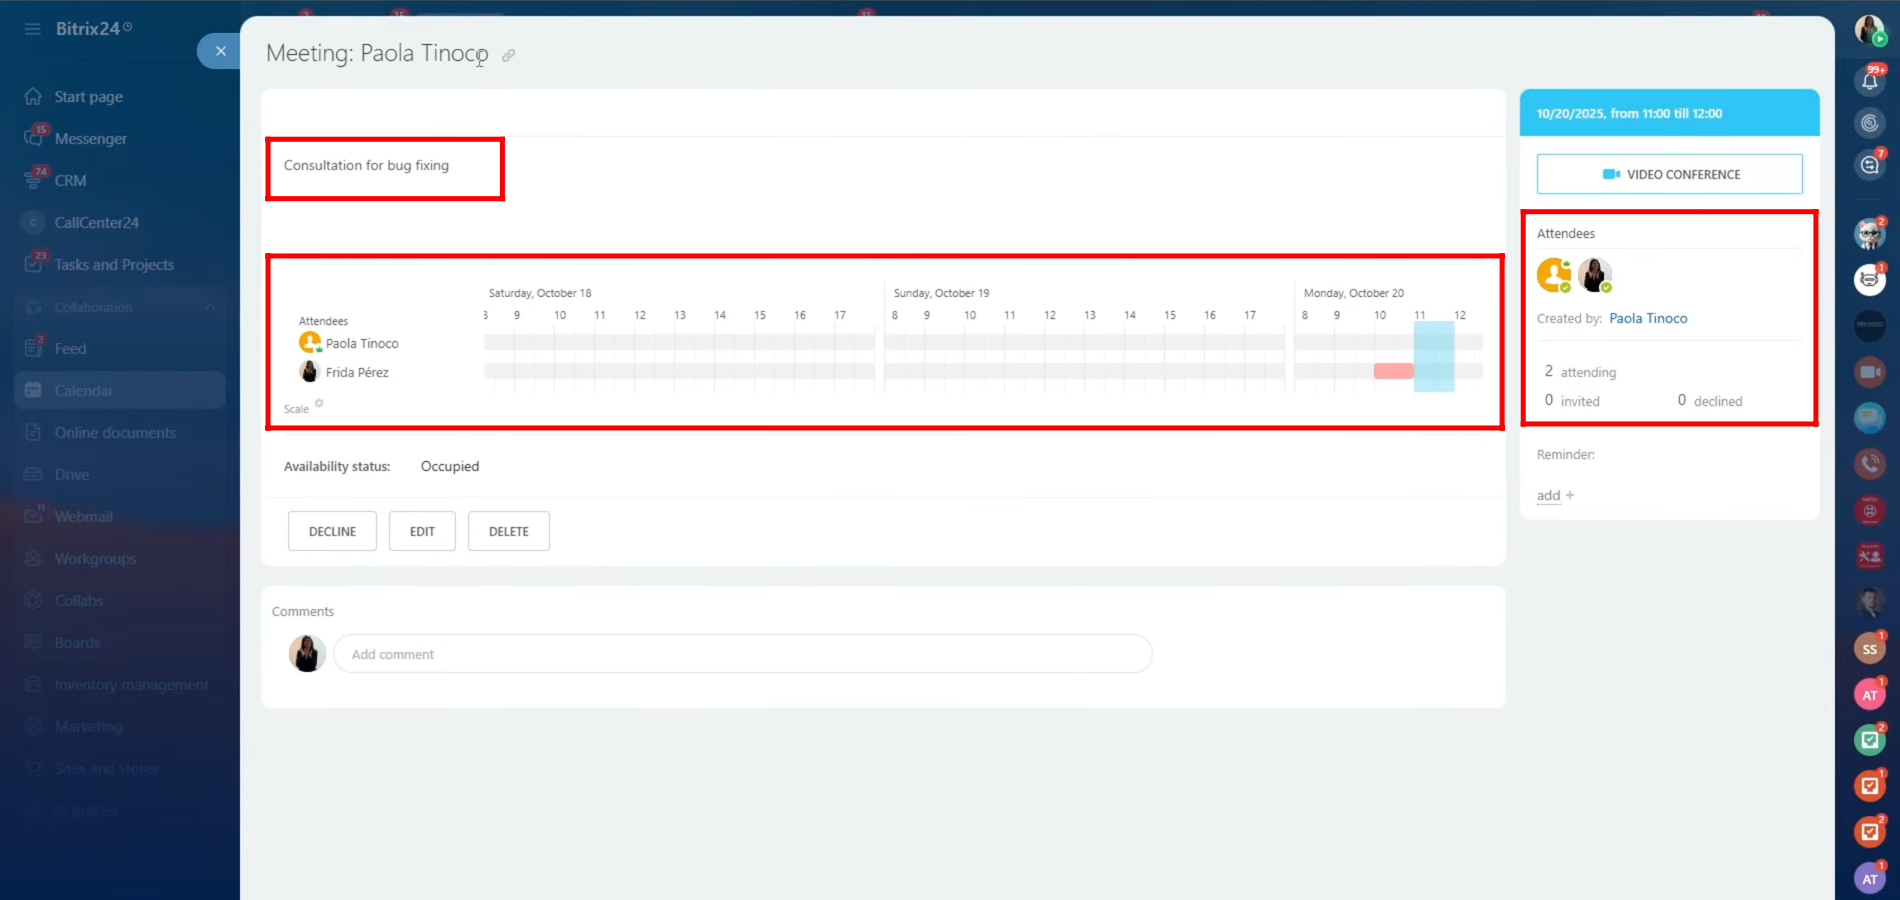
27. Here, you can easily view the client’s name, along with the time availability timeline showing both your schedule and theirs. You can also see the description or message provided by the client while booking the meeting. As the calendar owner, you have full control — you can edit, decline, or delete the meeting details as needed.
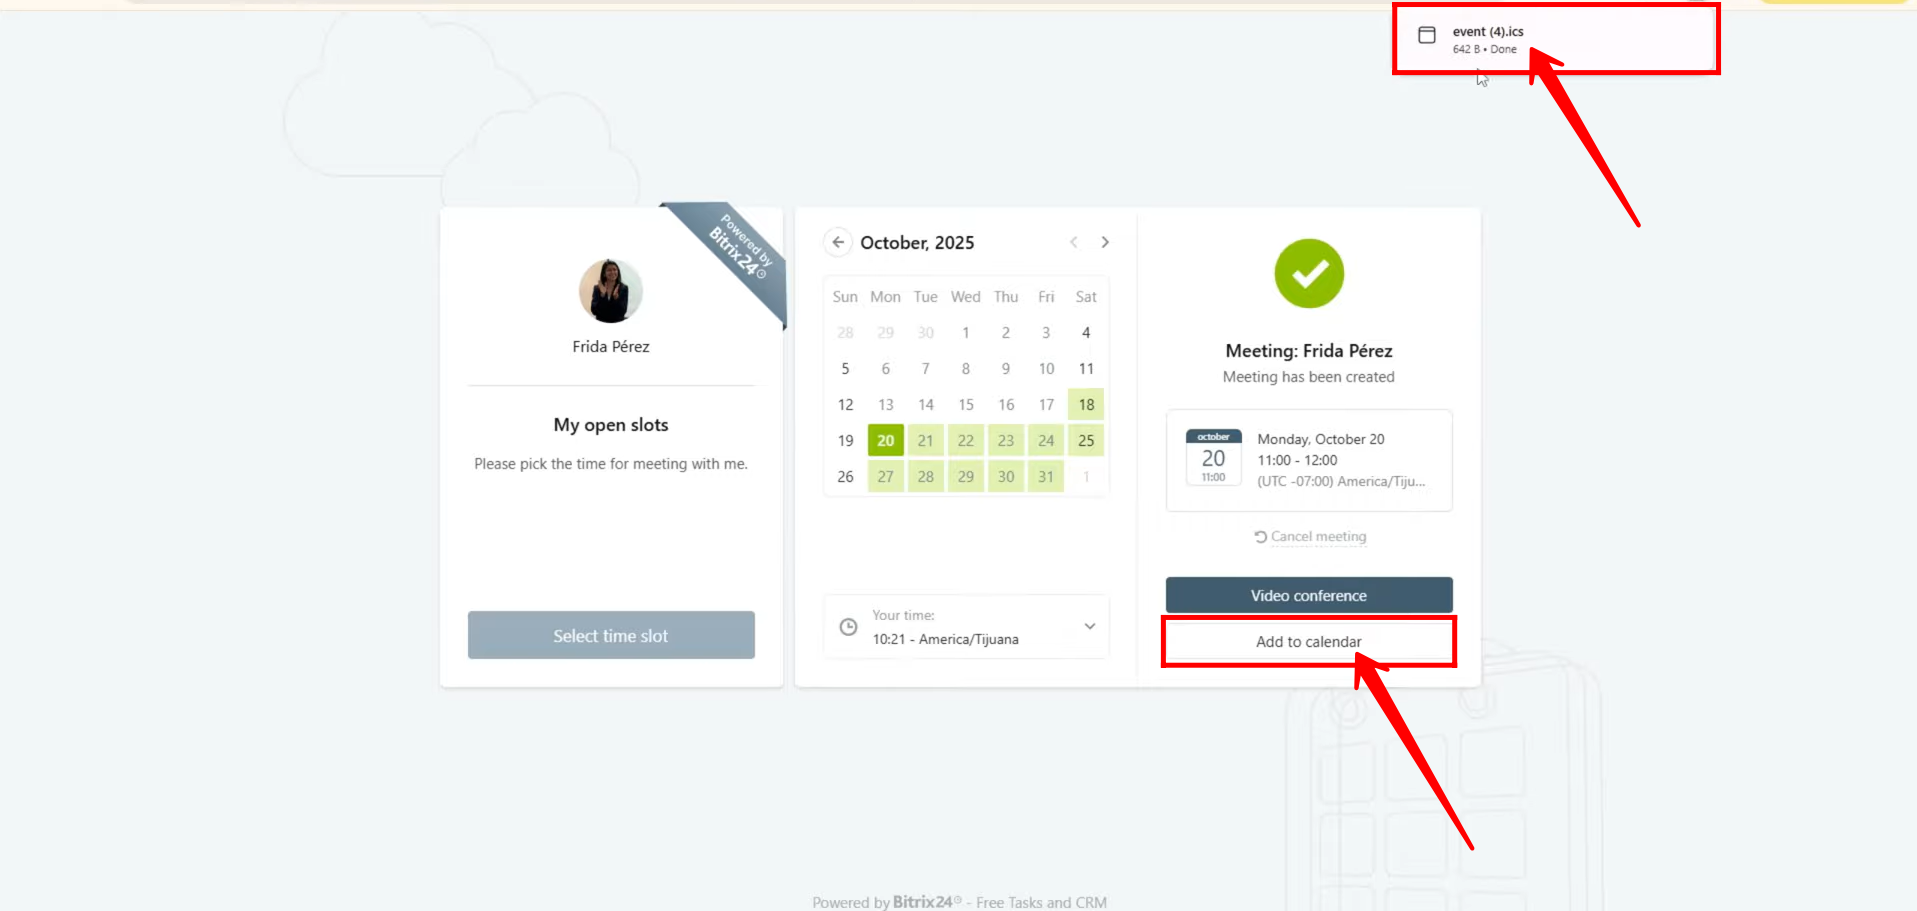
28. When the client books a meeting, they will receive an option to add the meeting to their own calendar. A file with the .ics extension will be automatically downloaded. This file can be easily imported into their preferred calendar application — such as Google Calendar, Outlook, or Apple Calendar — allowing them to block the scheduled time on their personal calendar as well.
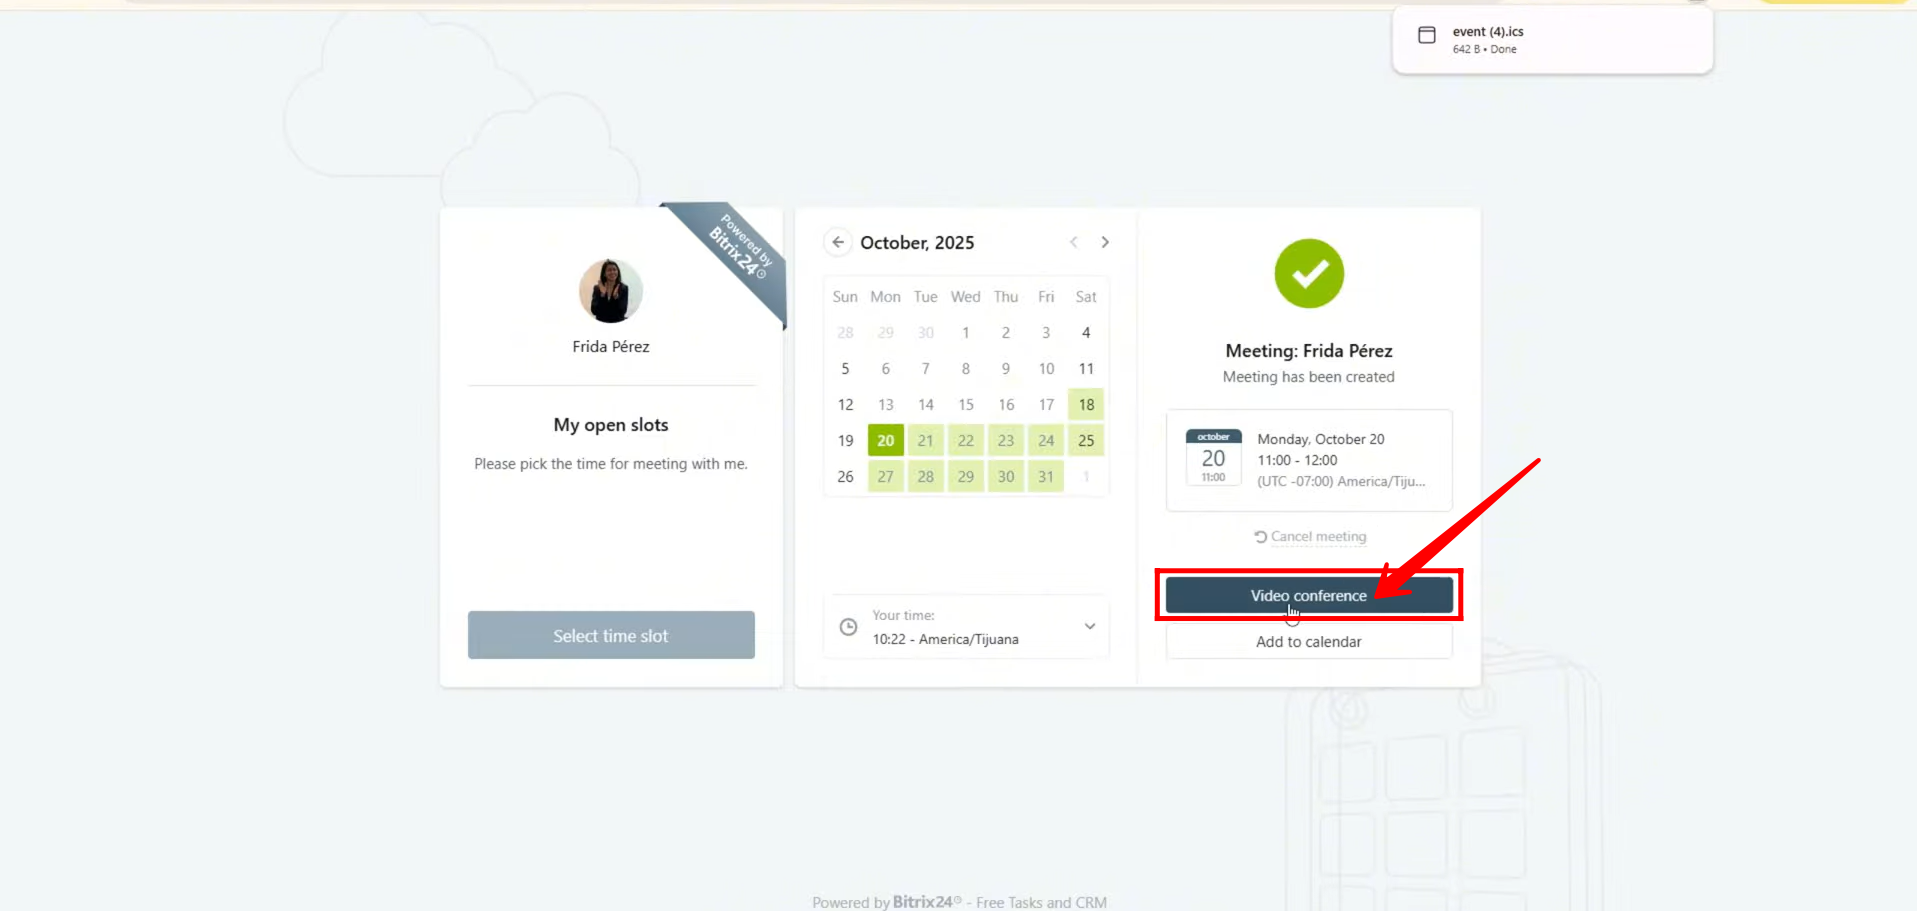
29. The client will also see a “Video Conference” button — which serves as the direct link to the scheduled meeting. Since this is a test scenario, we can preview the process: by clicking on the “Video Conference” button, the client will be redirected to the Bitrix24 video conference window, where the meeting will take place at the scheduled time.
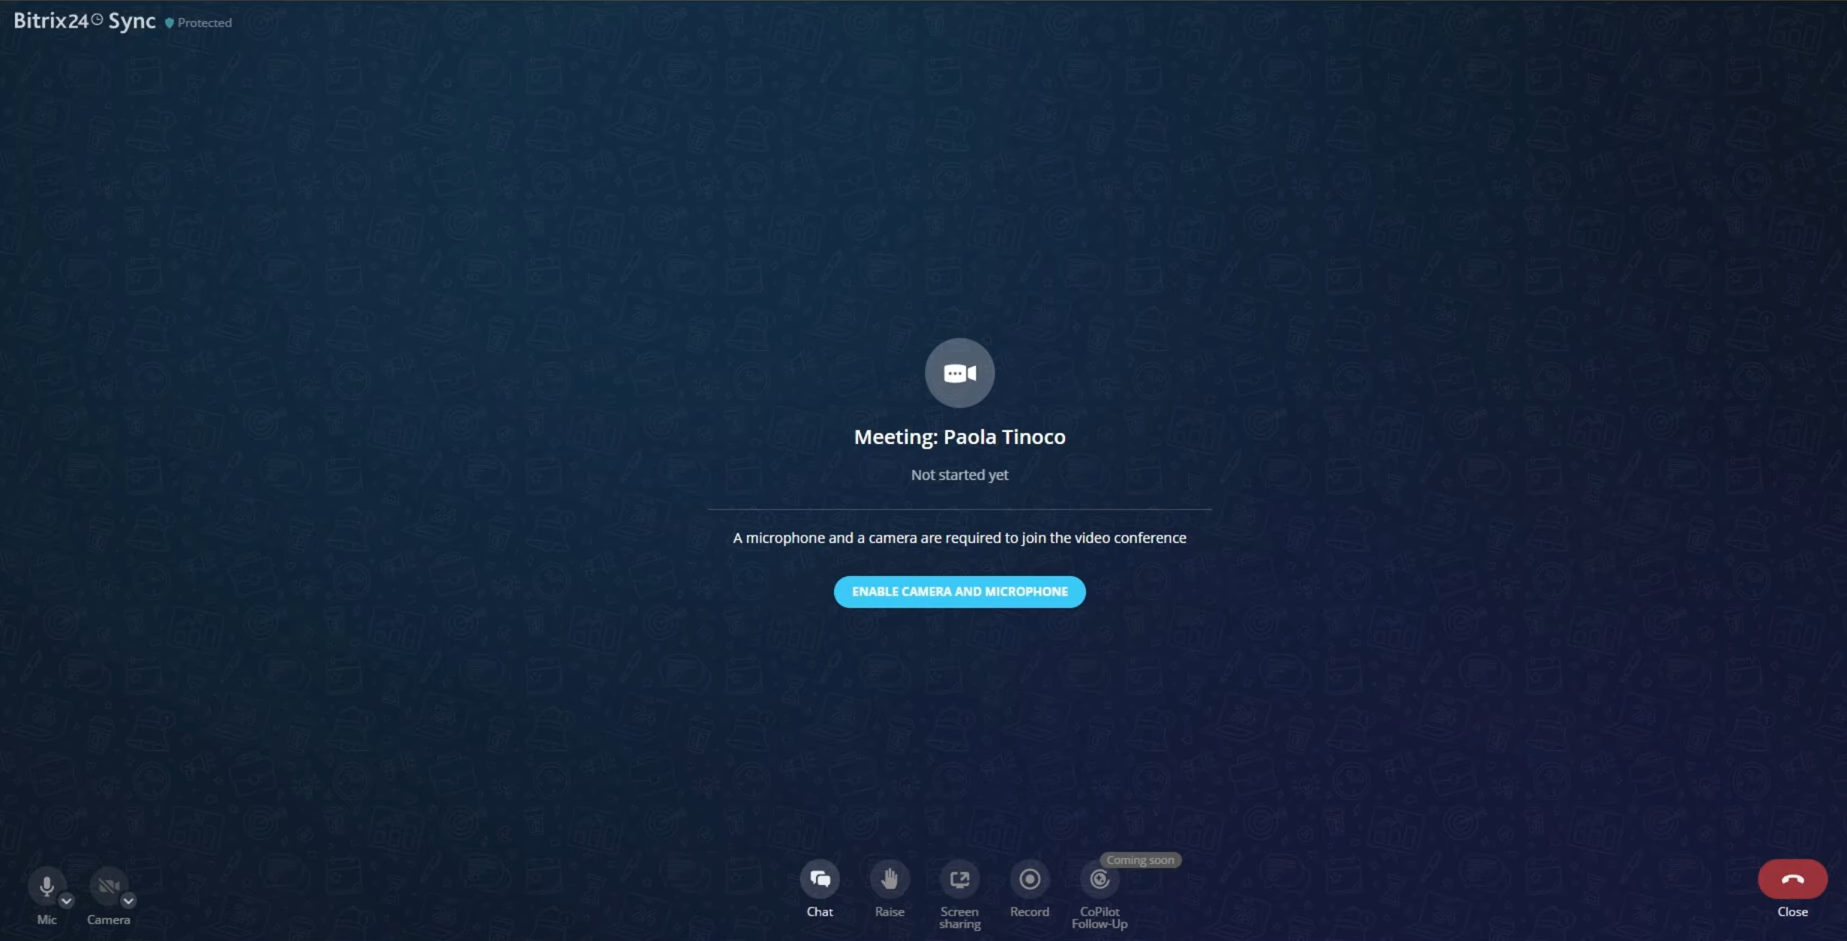
30. The client can also save the video conference link on their side for easy access later. Additionally, they’ll receive an email containing all meeting details, including the link, so there’s no need to worry about losing it.
After opening the video conference link, the meeting window will appear — displaying the familiar interface with microphone, camera, and call end buttons, just as any standard meeting setup.
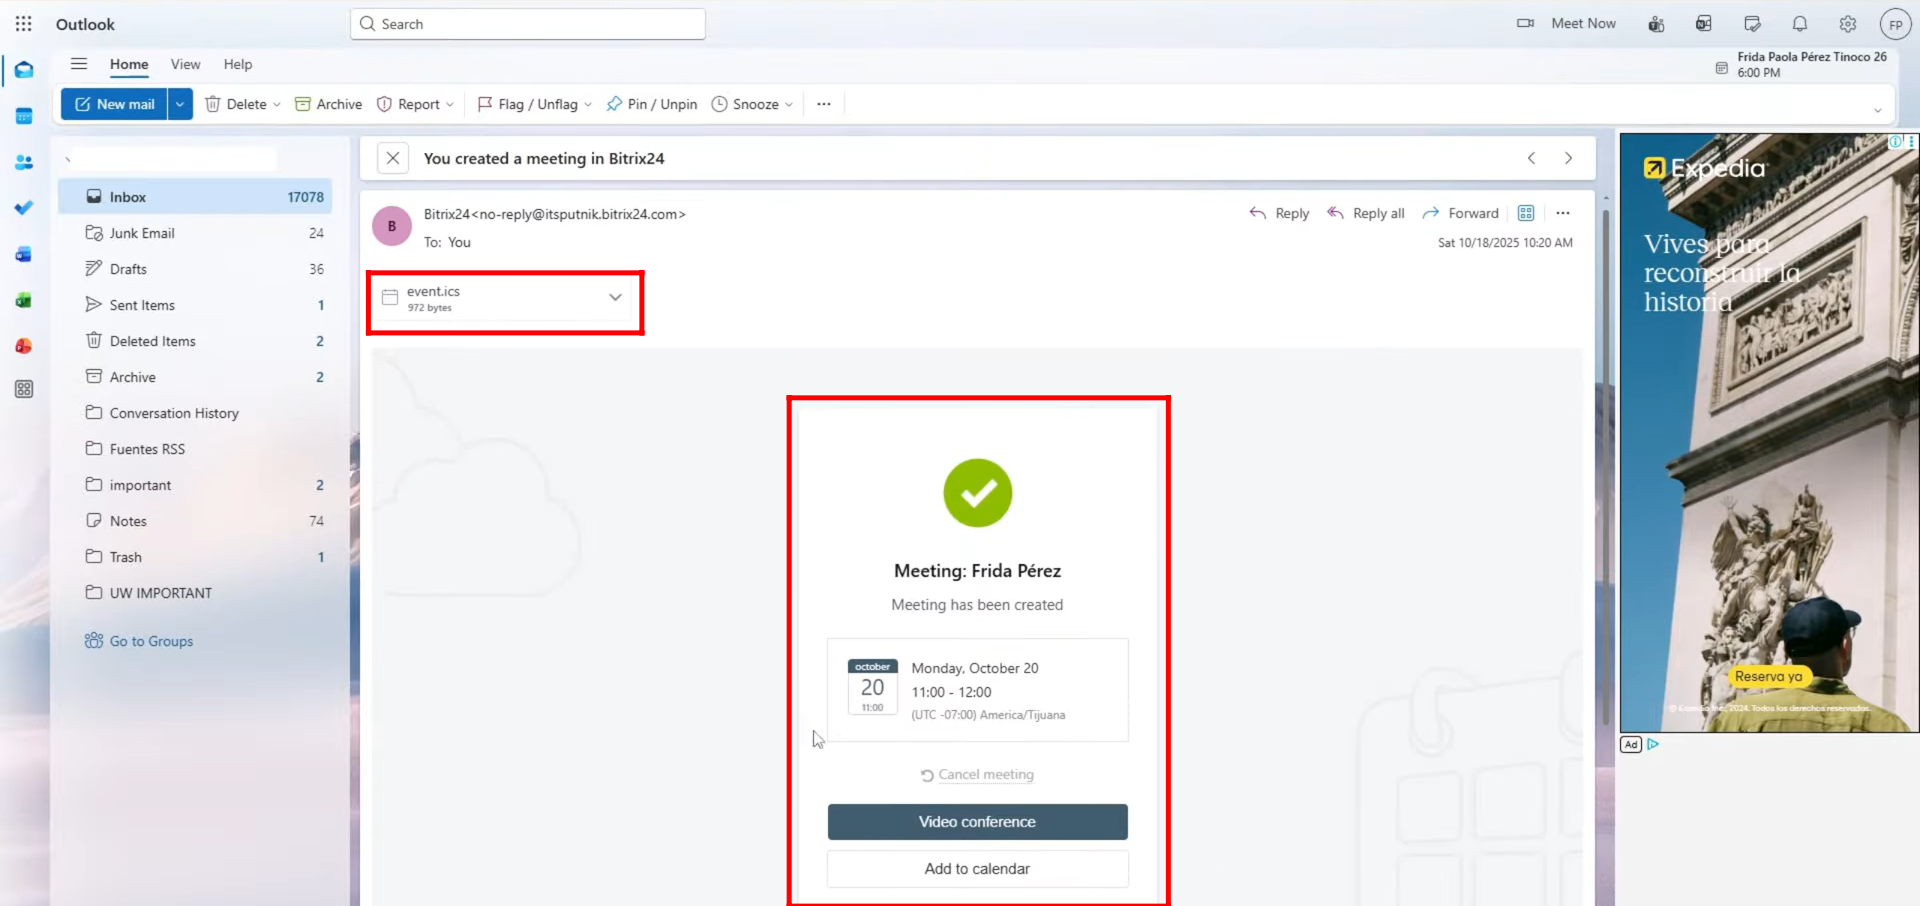
31. The client will also receive an email containing all meeting details, including the video conference link, date, time, and an ICS file to easily add the event to their personal calendar.
32. Now, let’s look at the third method for booking meetings.
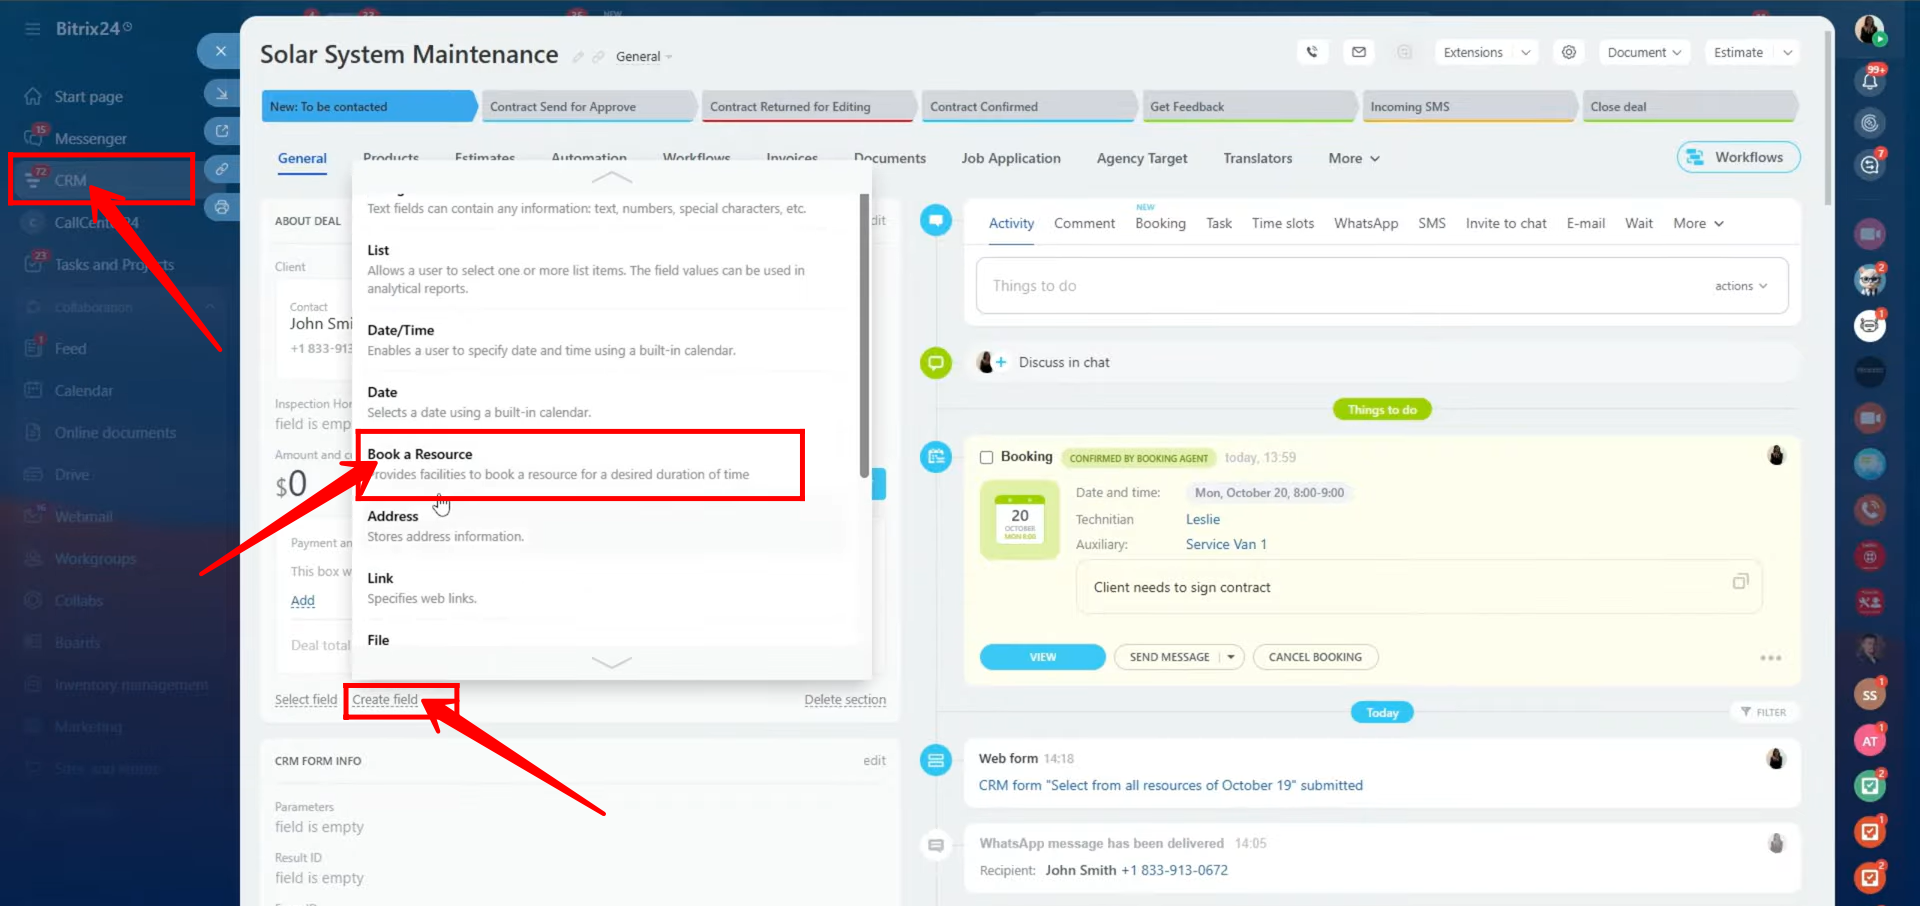
Go to “CRM” and open any CRM item — this can be a Contact, Company, Lead, or Deal. For this example, a test deal named “Solar System Maintenance” has been created.
Next, create a new custom field of type “Book a Resource” to allow clients or team members to schedule meetings or reserve resources directly within the deal.
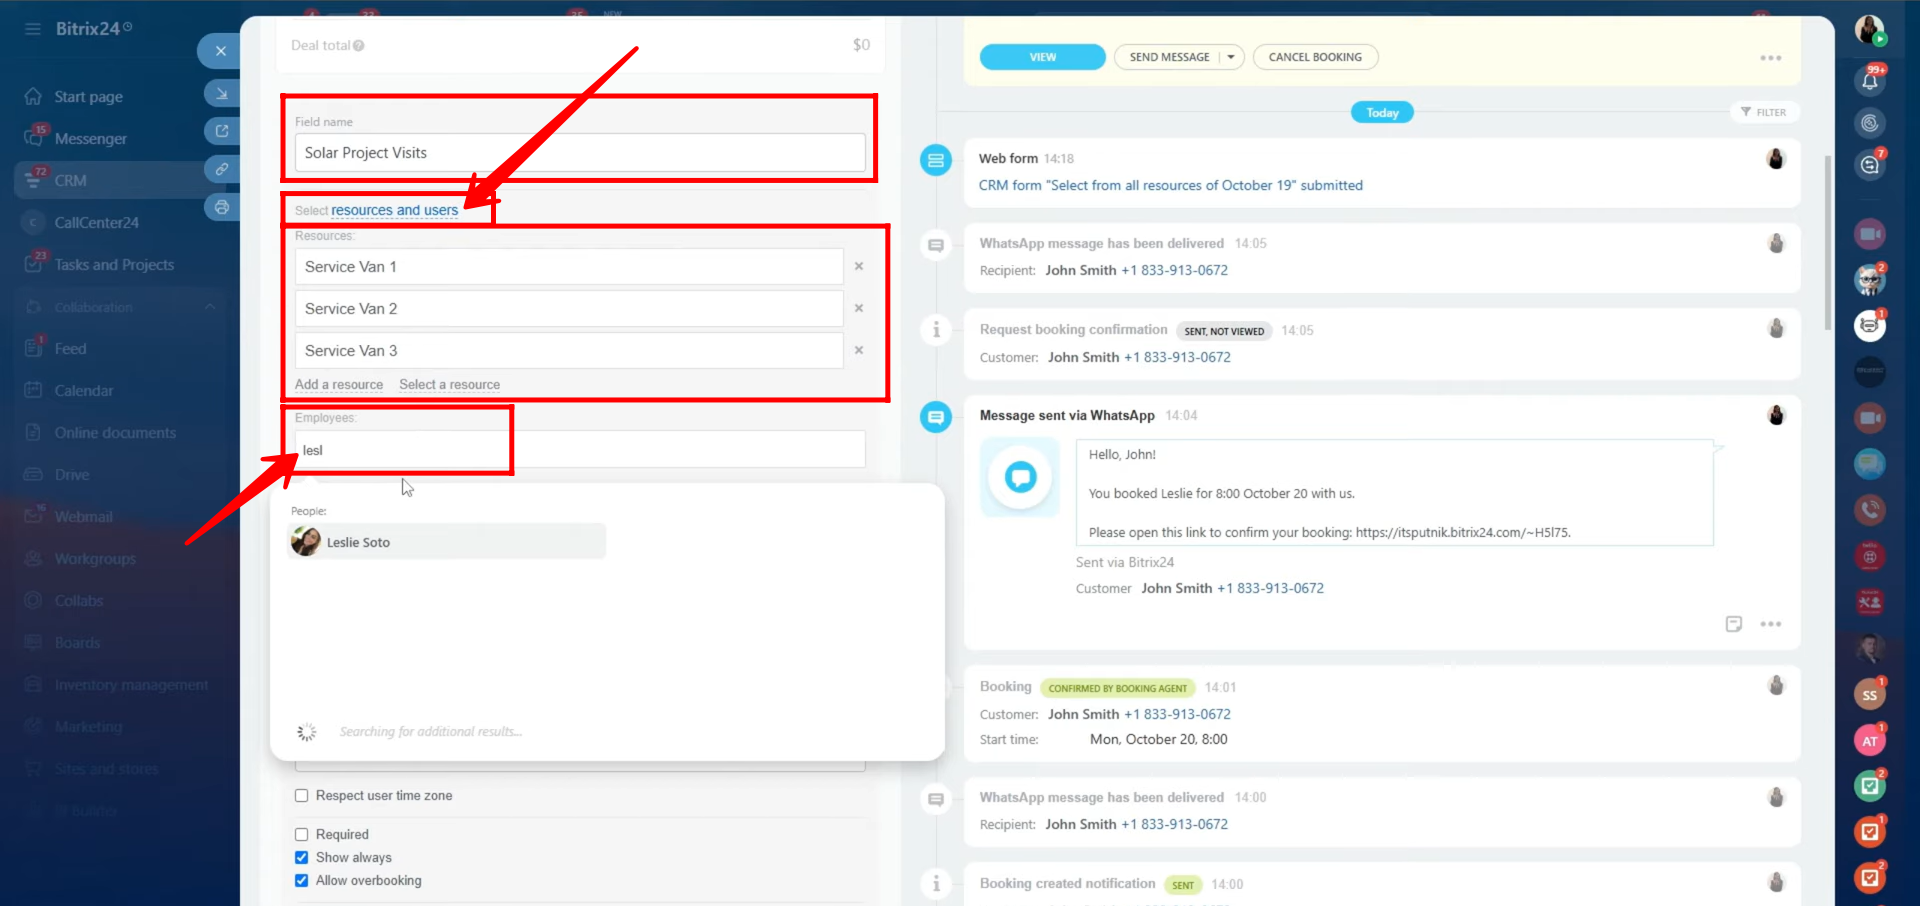
33. Add a field name for your new booking field. You’ll then see options allowing you to configure what can be booked — either resources and users together, only resources, or only users (employees).
In this example, both resources and users are configured simultaneously, depending on the scenario.
The resources added are “Service Van 1,” “Service Van 2,” and “Service Van 3,” while the employees are also selected to be booked alongside the resources.
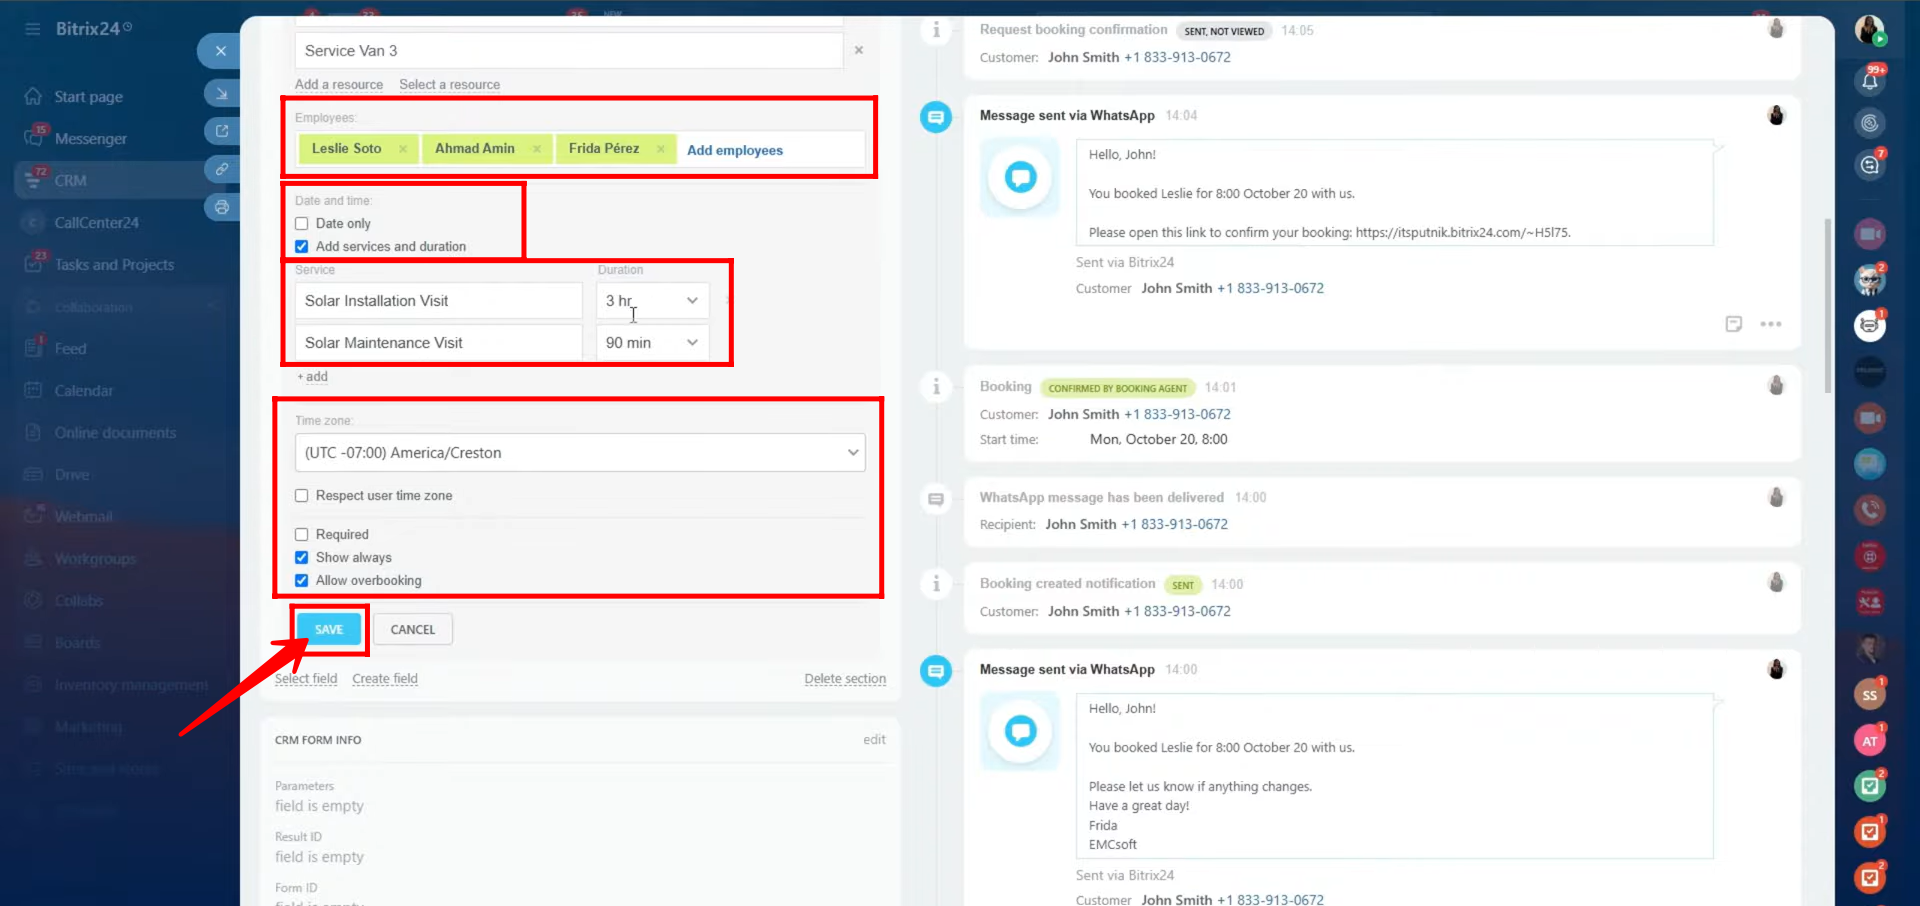
34. In the Book a Resource field configuration, you’ll see two main checkbox options — “Only date” and “Add services and duration.”
For this example, the “Add services and duration” option is selected.
The following services are configured:
- Service: Solar Installation Visit — Duration: 3 hours
- Service: Solar Maintenance Visit — Duration: 90 minutes
(You can add multiple services as needed.)
Next, select the time zone, and decide whether to respect the time zone by checking the respective box.
Additional checkboxes include:
- Required
- Show always
- Allow overbooking
(Check these based on your specific requirements.)
After completing all configurations, click Save to apply the settings.
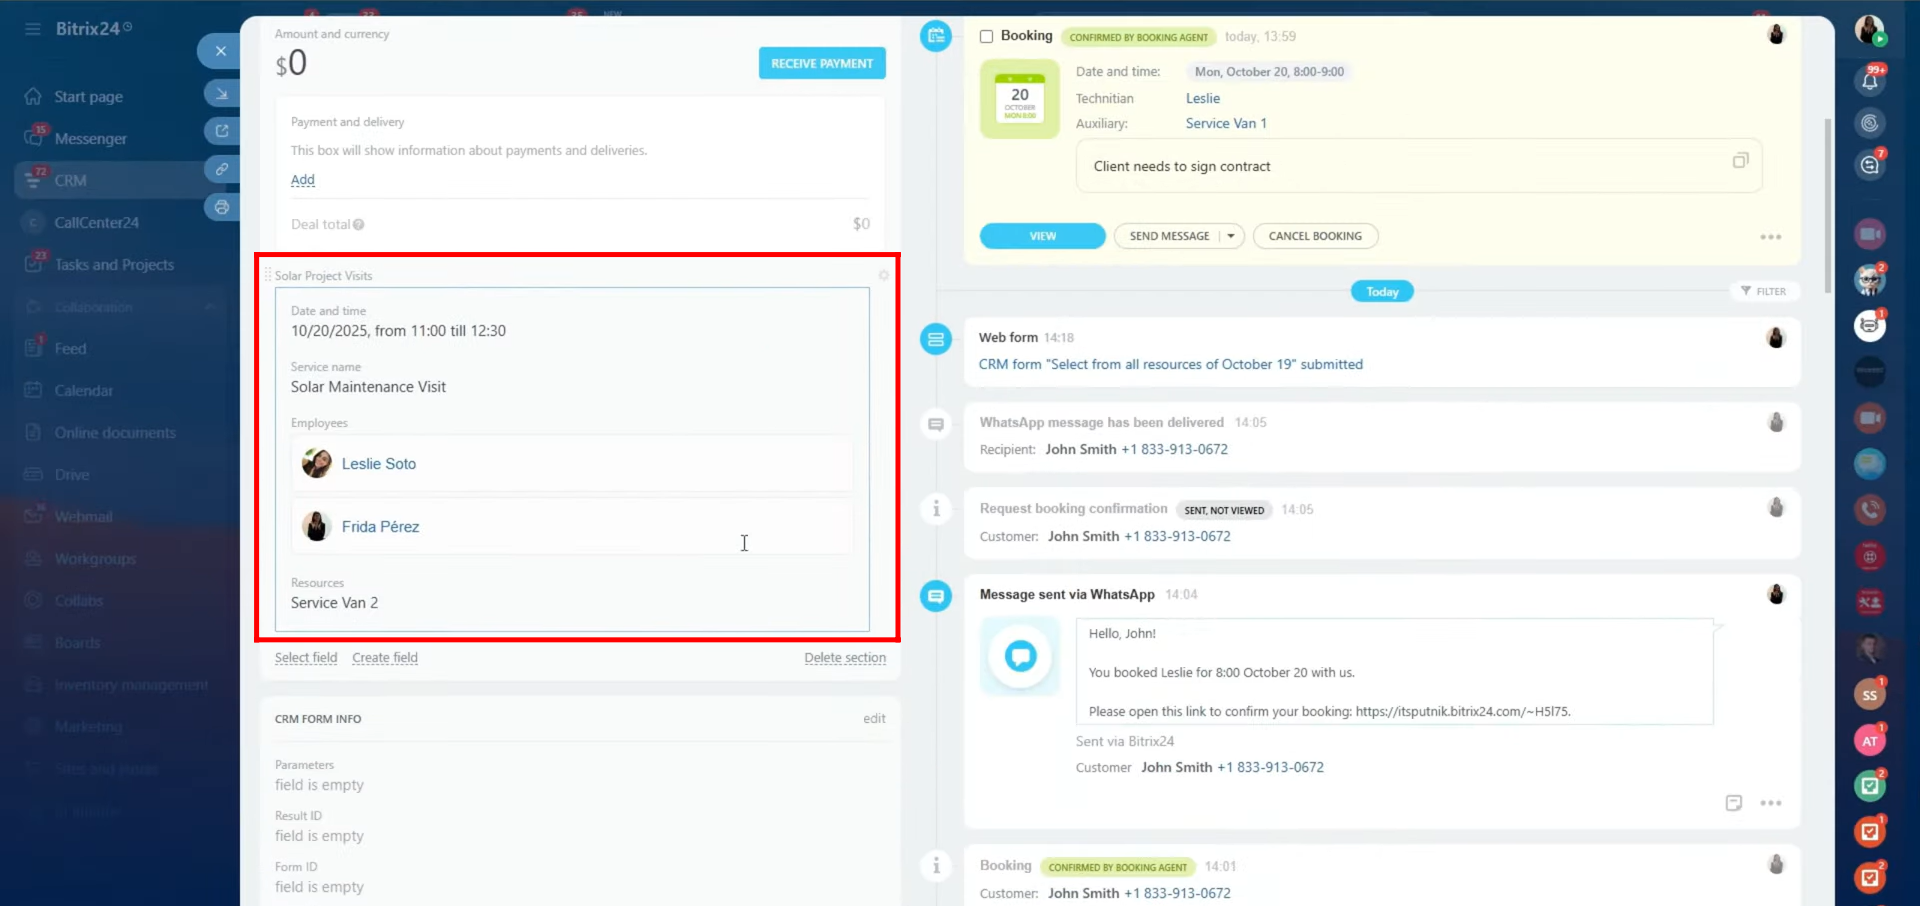
35. Now, you can see that the “Resource to Book” field named “Solar Project Visits” has been successfully configured with all the specified details, including the selected services, durations, assigned resources, and employees.
36. Within the entity (in this case, the deal), you can edit the field to assign resources and employees as needed. The date, time, and duration will be automatically adjusted based on the selected service. The employee availability and service duration will synchronize accordingly within the timeline to ensure accurate scheduling.
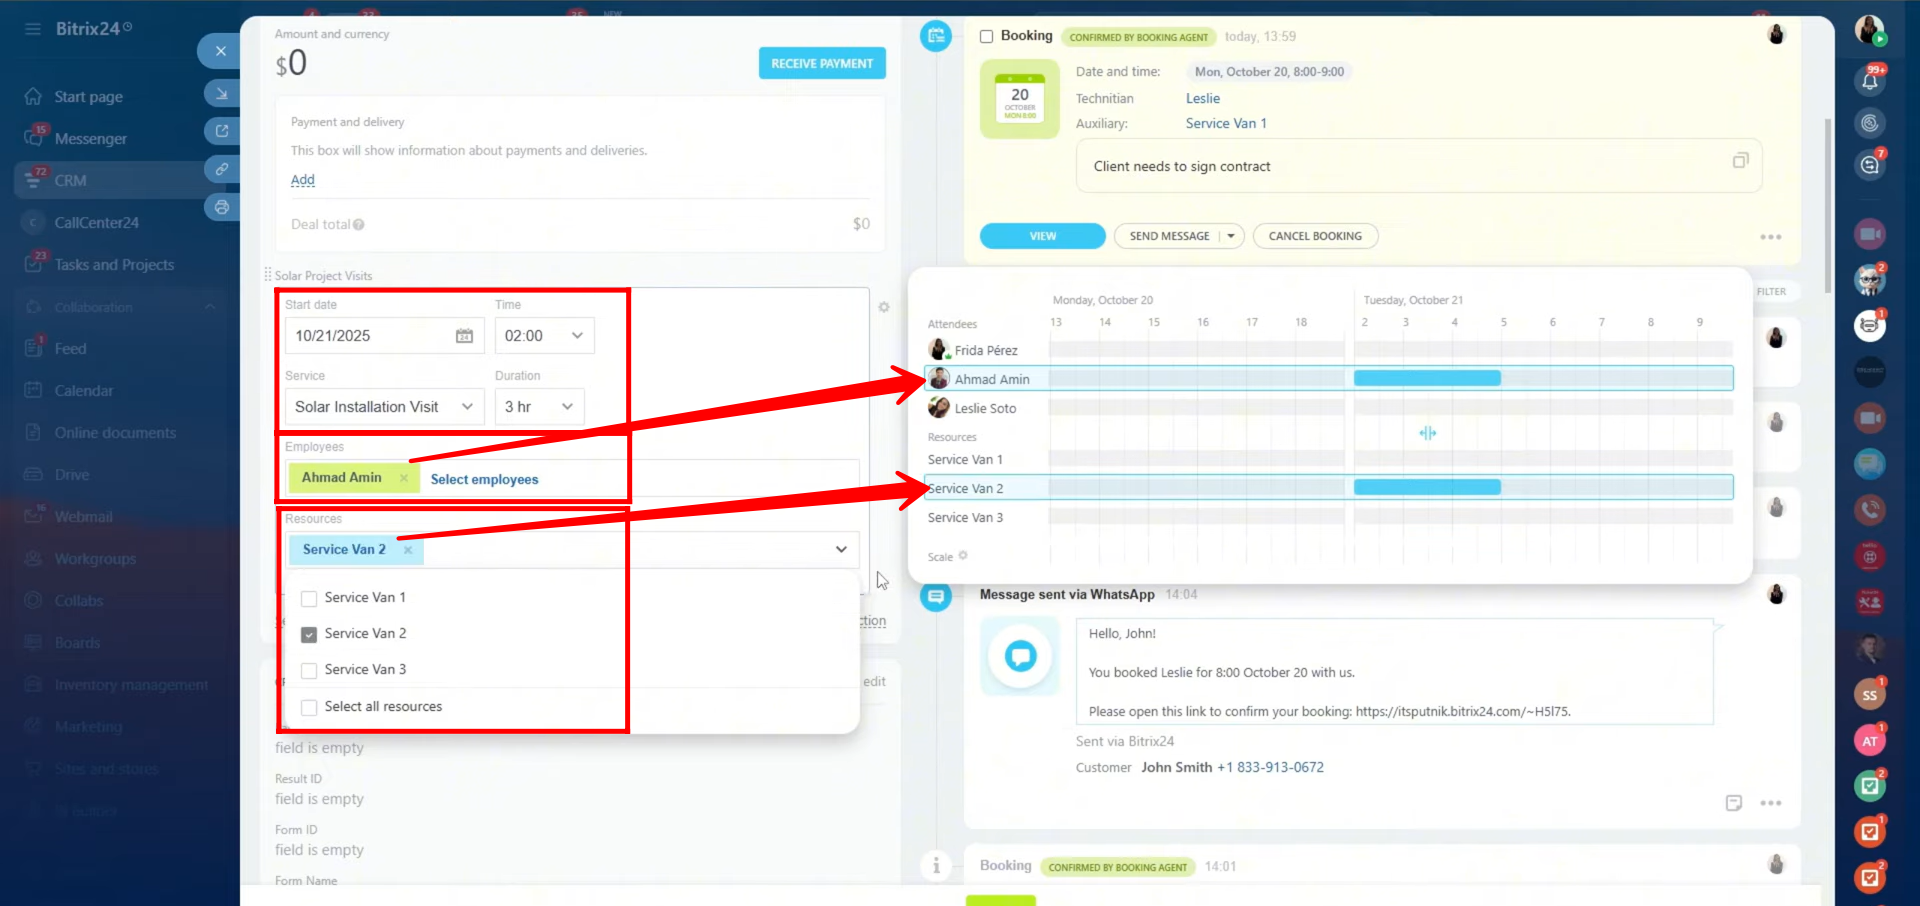
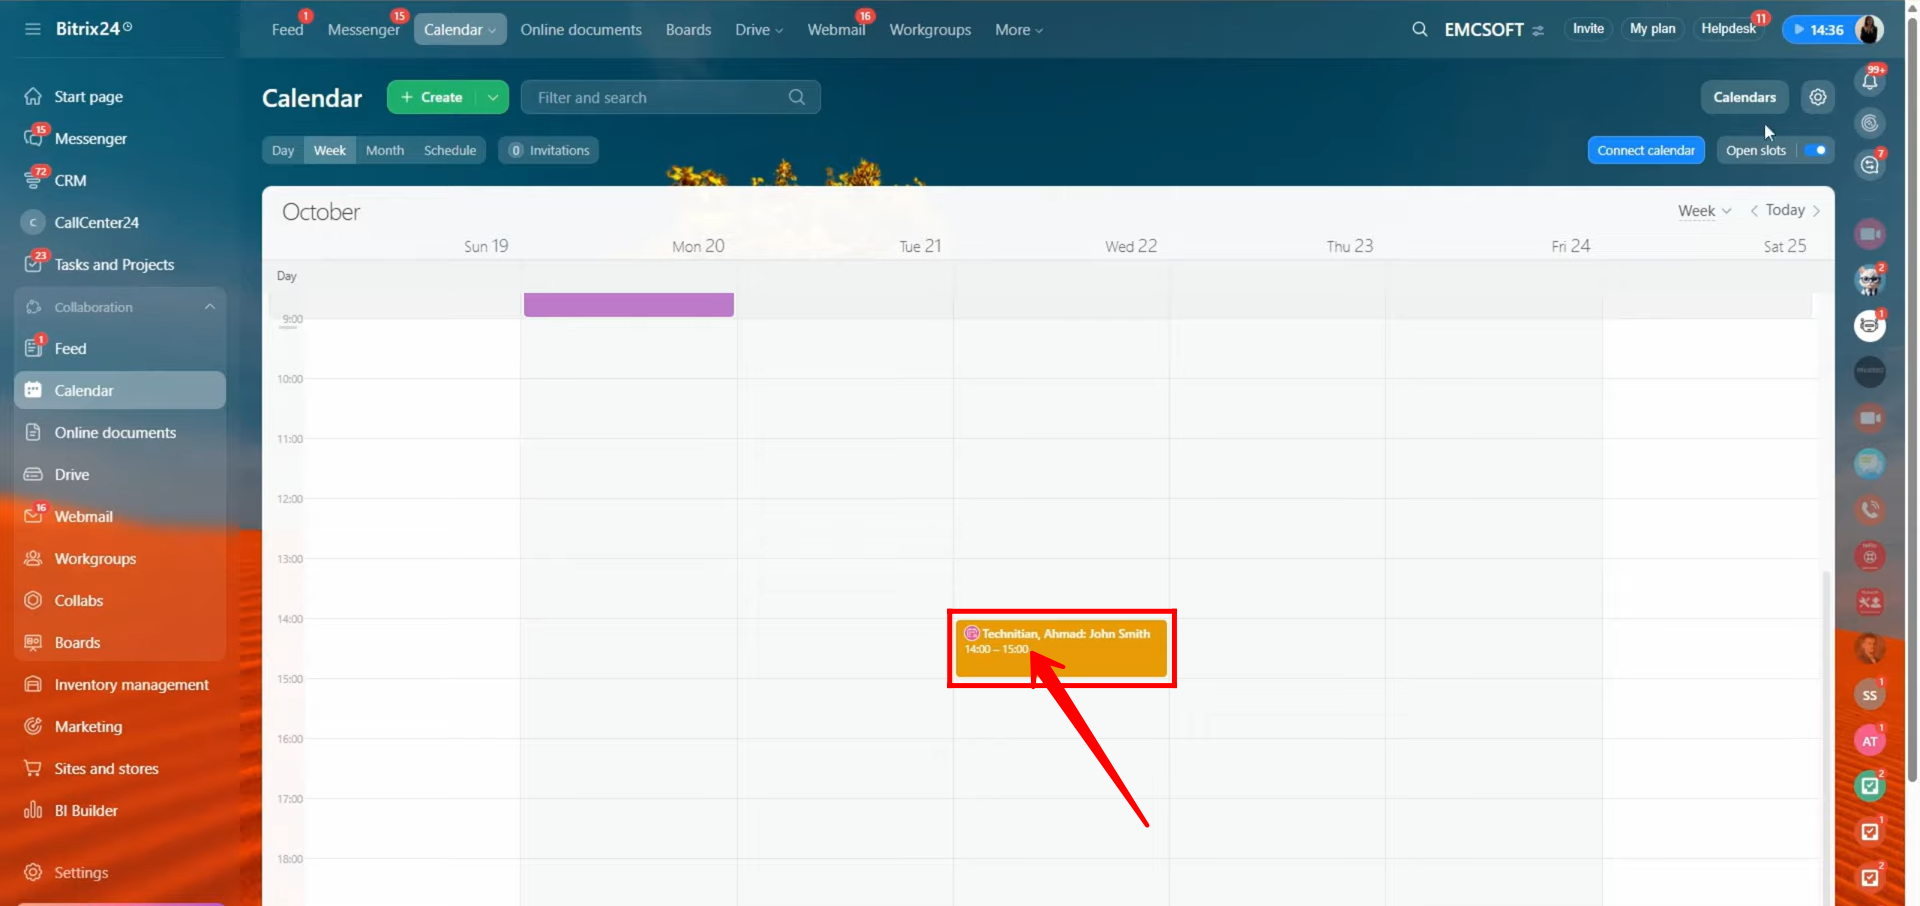
37. After booking a resource along with the respective employee, the selected time slot will automatically appear as booked on that employee’s calendar. This ensures the scheduled time is reserved and prevents any overlapping bookings or availability conflicts.
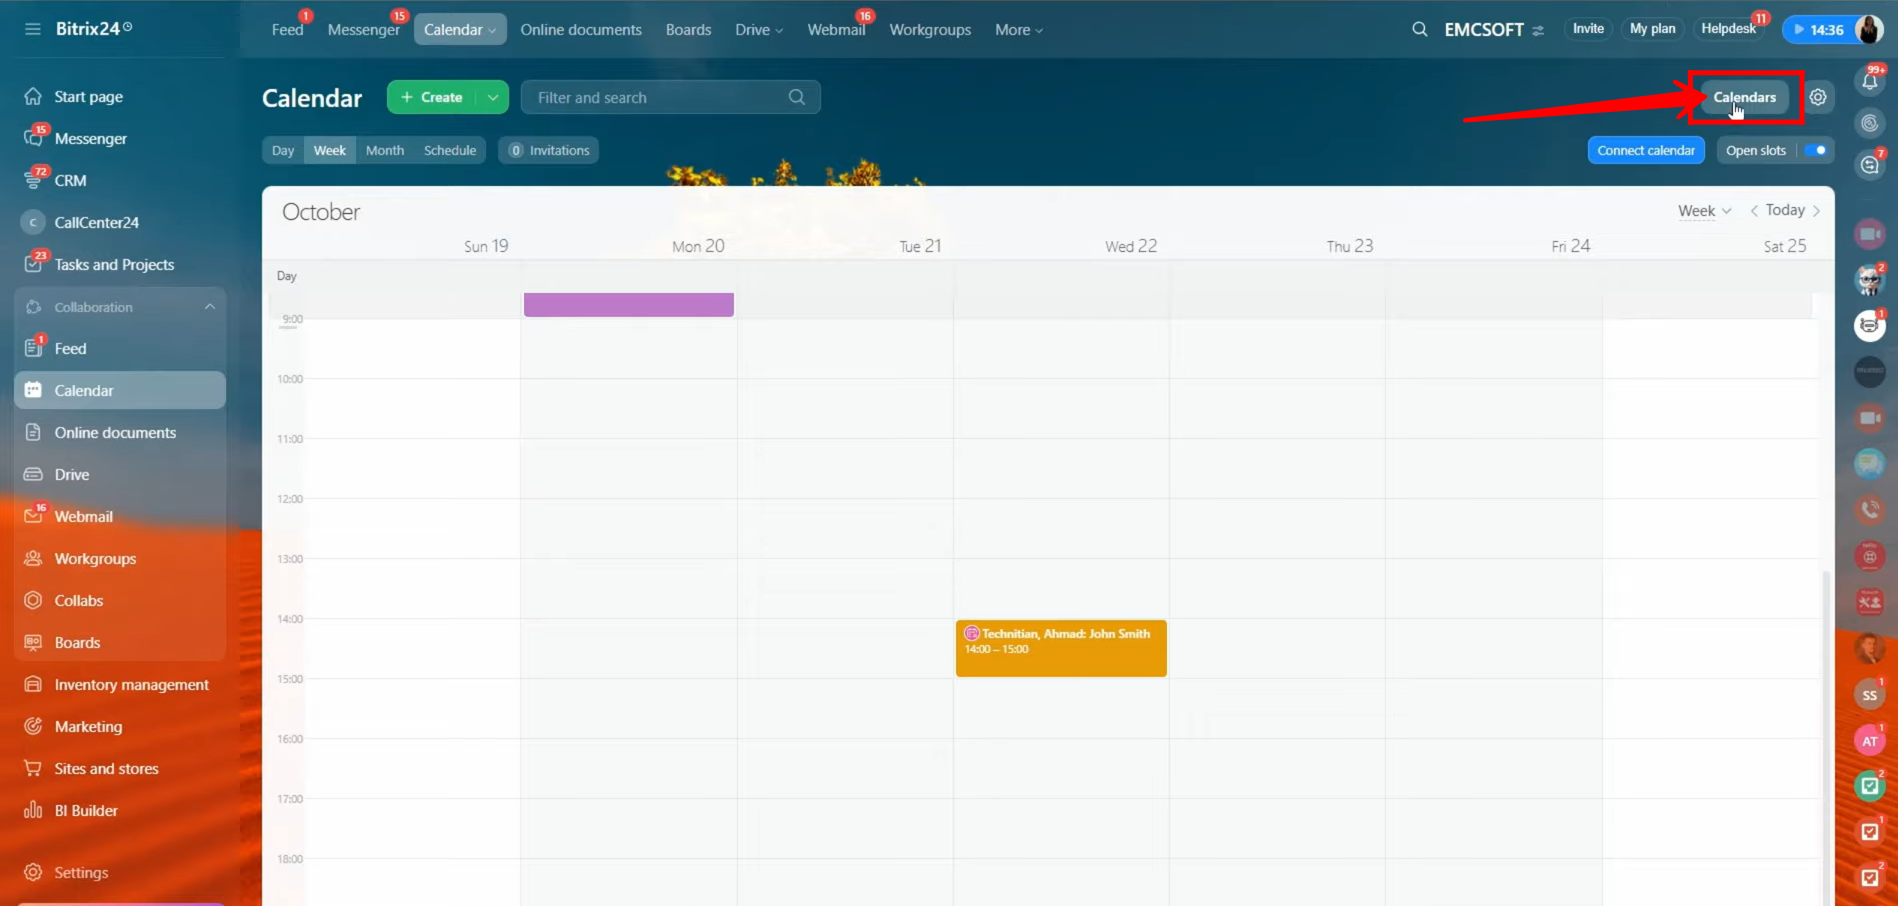
38. Go to the “Calendars” option located at the top-right corner of the window to view and manage multiple calendars simultaneously. Here, you can select different employees’ calendars (if you have access) to see their booked slots, each highlighted in different colors for clarity. This allows you to easily identify which time slots are occupied and by whom—all within the same calendar view.
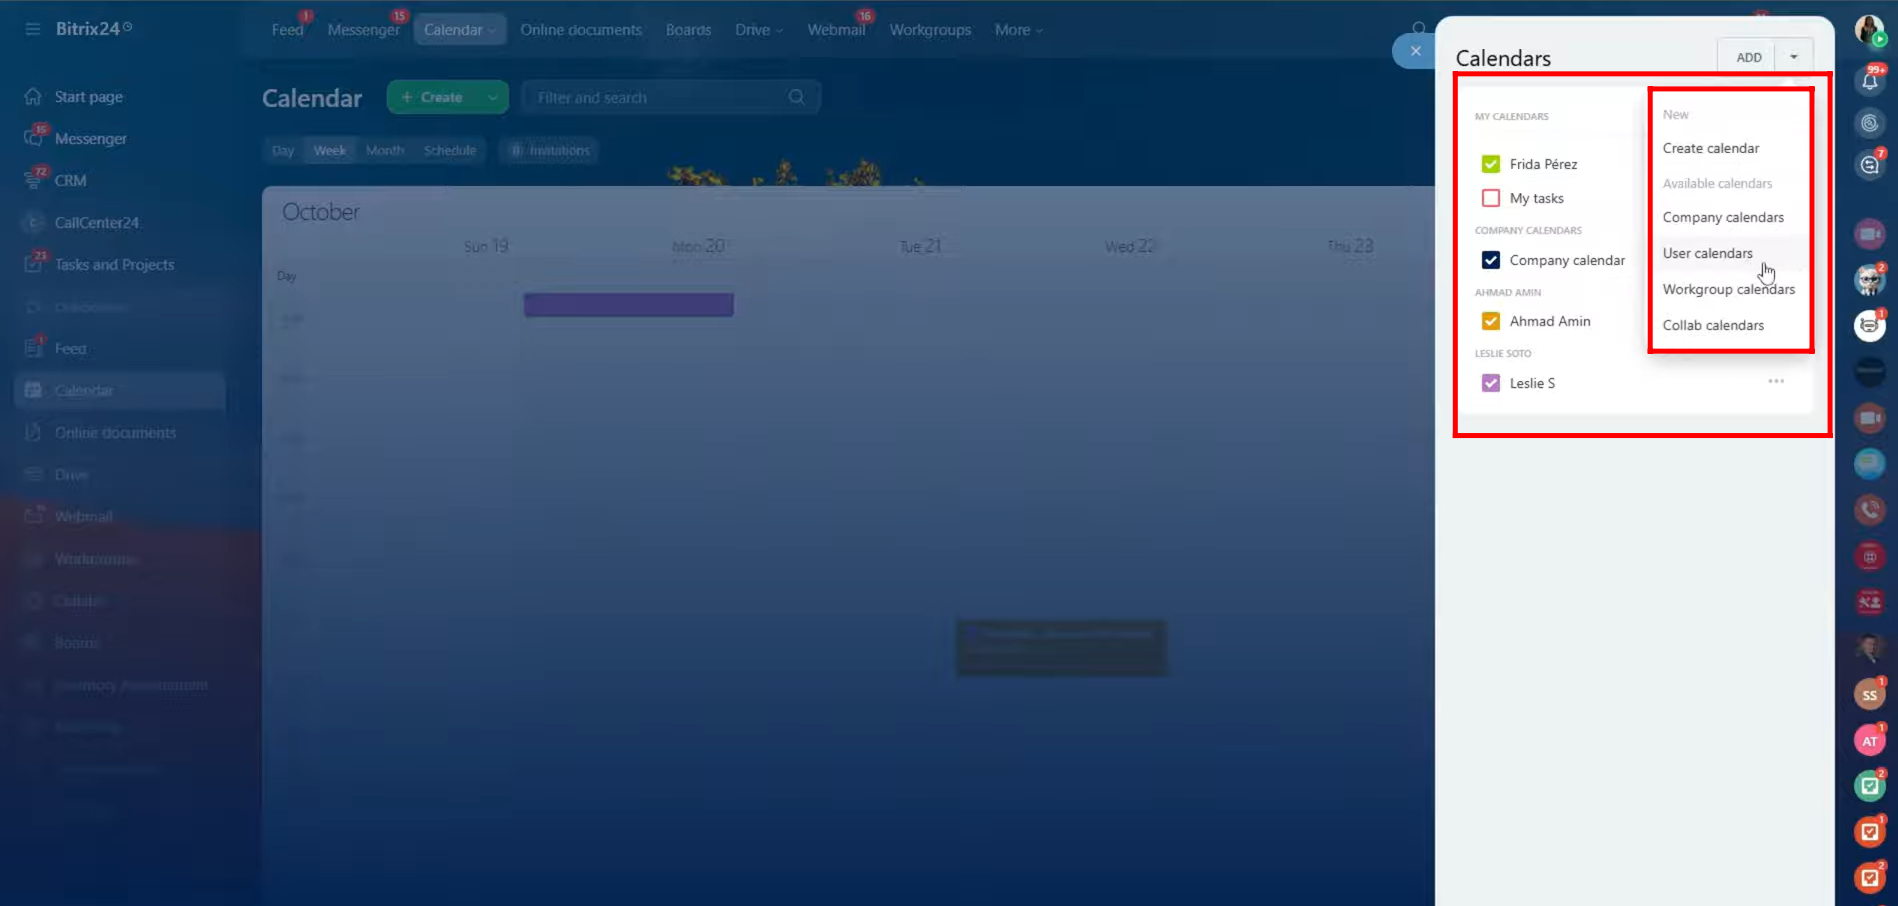
39. As you can see, you have the option to view various calendars — your personal tasks, user calendars, company-wide bookings, workgroup calendars, and collaborative calendars — or even create a new one. However, please note that you’ll only be able to view bookings or events in calendars to which you have access permissions.
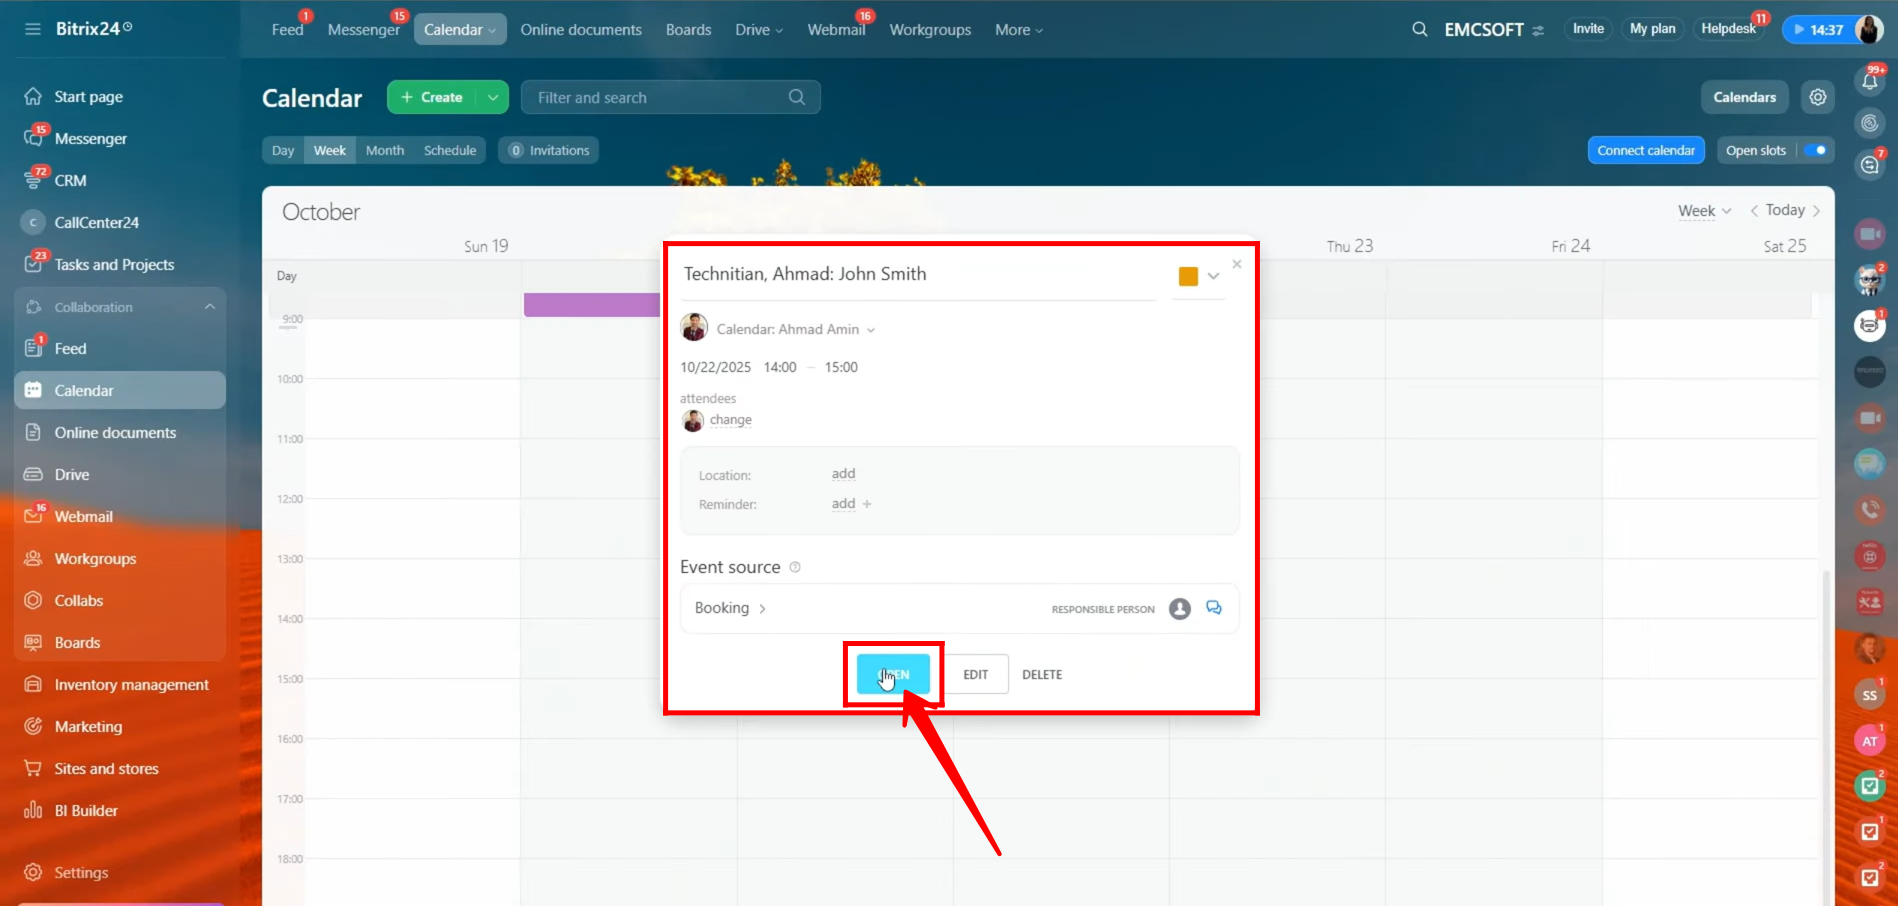
40. After clicking the booked slot in the calendar, you can see a summary of the booking details. To view all information in detail, click “Open”.
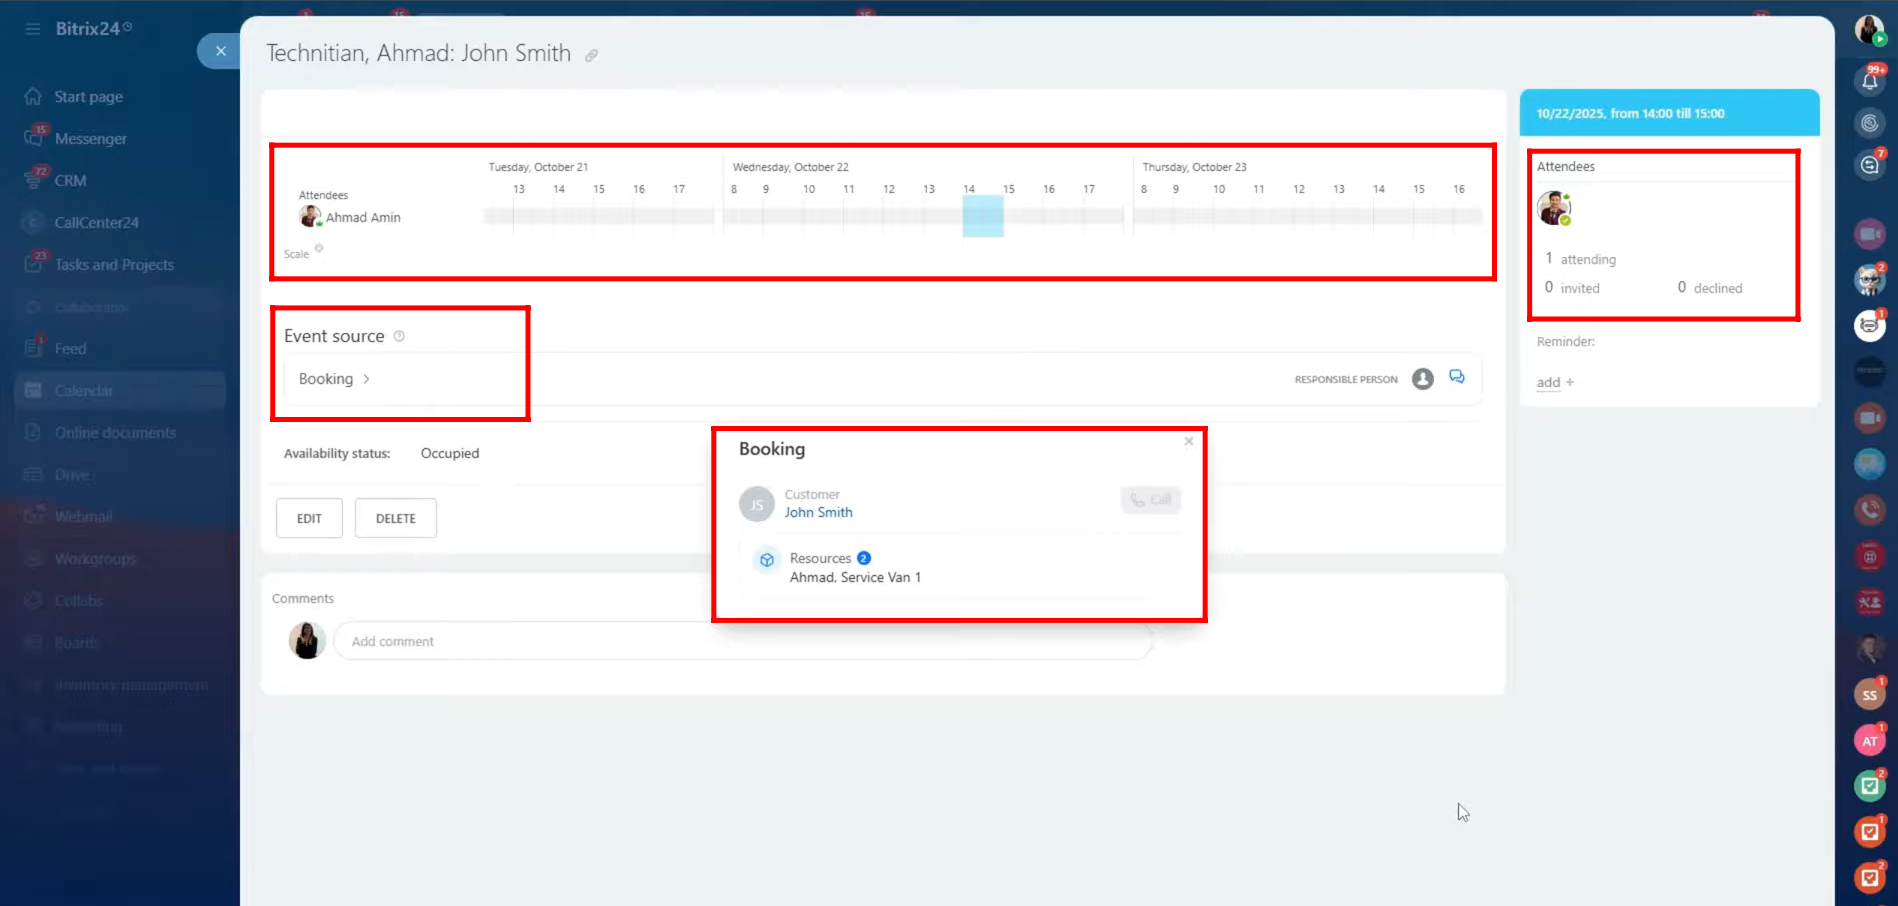
41. Here, you can view complete booking details — including the assigned employee (attendee), booked time slot, and the service selected, with the duration automatically adjusted based on the service configuration. The event source is shown as Booking; by clicking on it, you can see the customer’s name along with the resources booked (both employee and service). The calendar owner also has the option to edit or delete the booking directly from this window.
“You can also watch video on Youtube”