| 1560 Views | admin

The article on Bitrix24 CRM Forms: Payment and Delivery explains how to set up forms for product sales, order management, and payment collection. It guides users through creating new forms, selecting the type of sales form, and automatically generating fields such as customer contact details and product selection. Users can test these forms by filling out the fields and submitting them to see the entire process in action.
The article also covers the payment configuration options within forms. Multiple payment methods are available, including Stripe24, Stripe, PayPal, and bank transfers. It highlights Stripe24 as a flexible option that allows full customization and integration within Bitrix24. Users can enable payment acceptance, test the checkout process, and confirm that payments are reflected in the deal details.
Additionally, the guide explains how to manage order delivery forms. It details how delivery-related information, such as addresses and desired delivery dates, is saved to the appropriate entities in Bitrix24. The article also shows how these forms can be configured to combine payment and delivery, providing a single workflow for both processes.
Finally, the article introduces the Stripe24 application in Bitrix24, including installation, configuration, and webhook setup. It also provides resources for non-technical users, such as a dedicated guide and a demo request option, ensuring that everyone can successfully integrate Stripe24 and manage payments effectively through CRM forms.
“Detailed Instructions are given below”
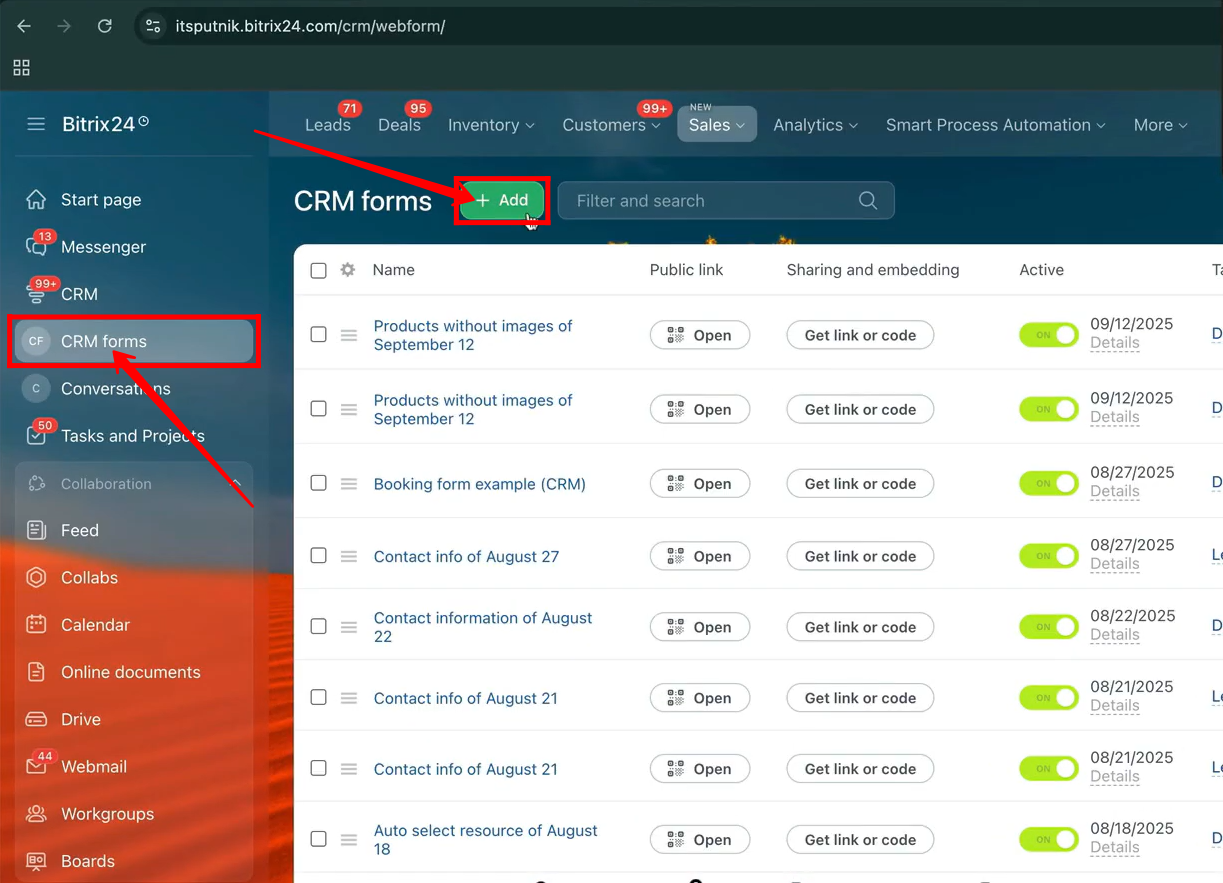
1. Navigate to CRM Forms from the side panel and click on + Add to create and configure a new form.
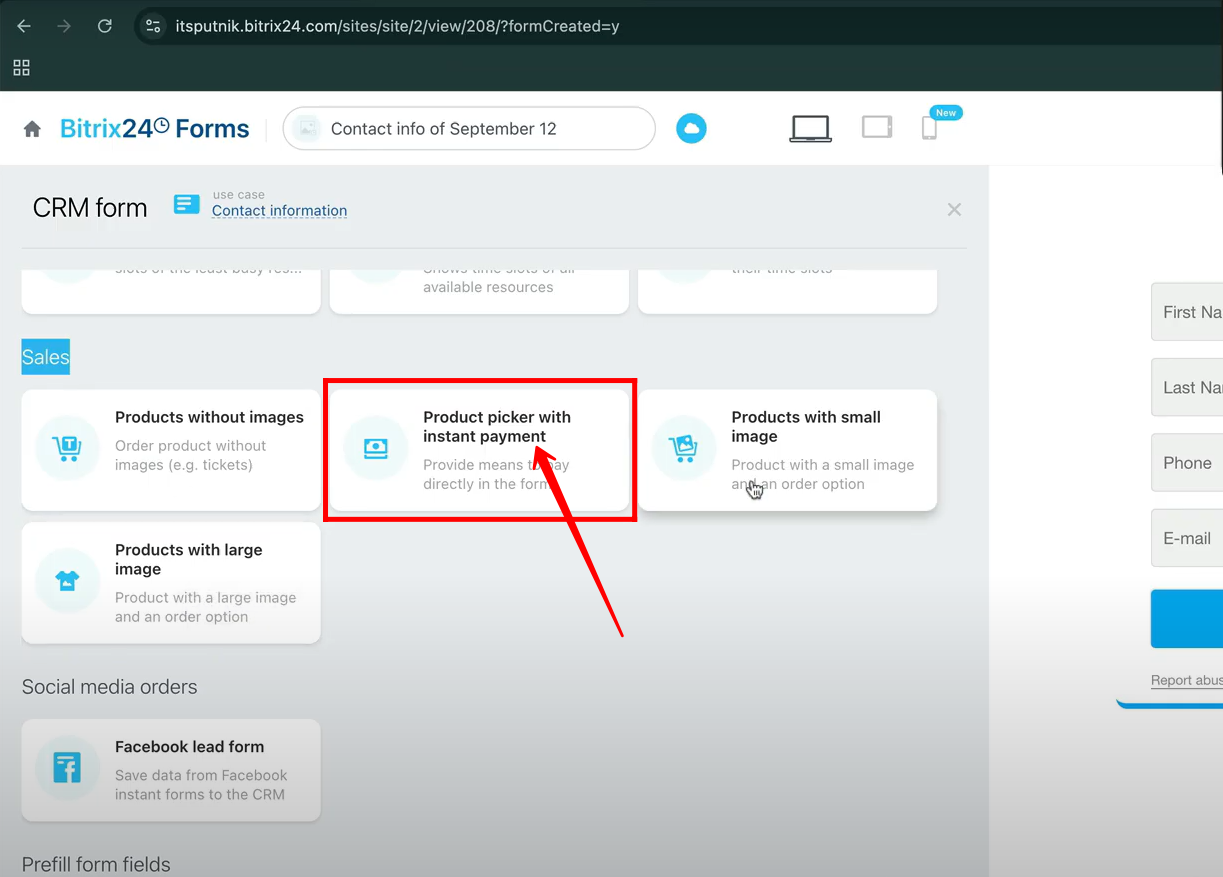
2. In the CRM Forms creation window, go to the Sales section and select Product Picker with Instant Payment.
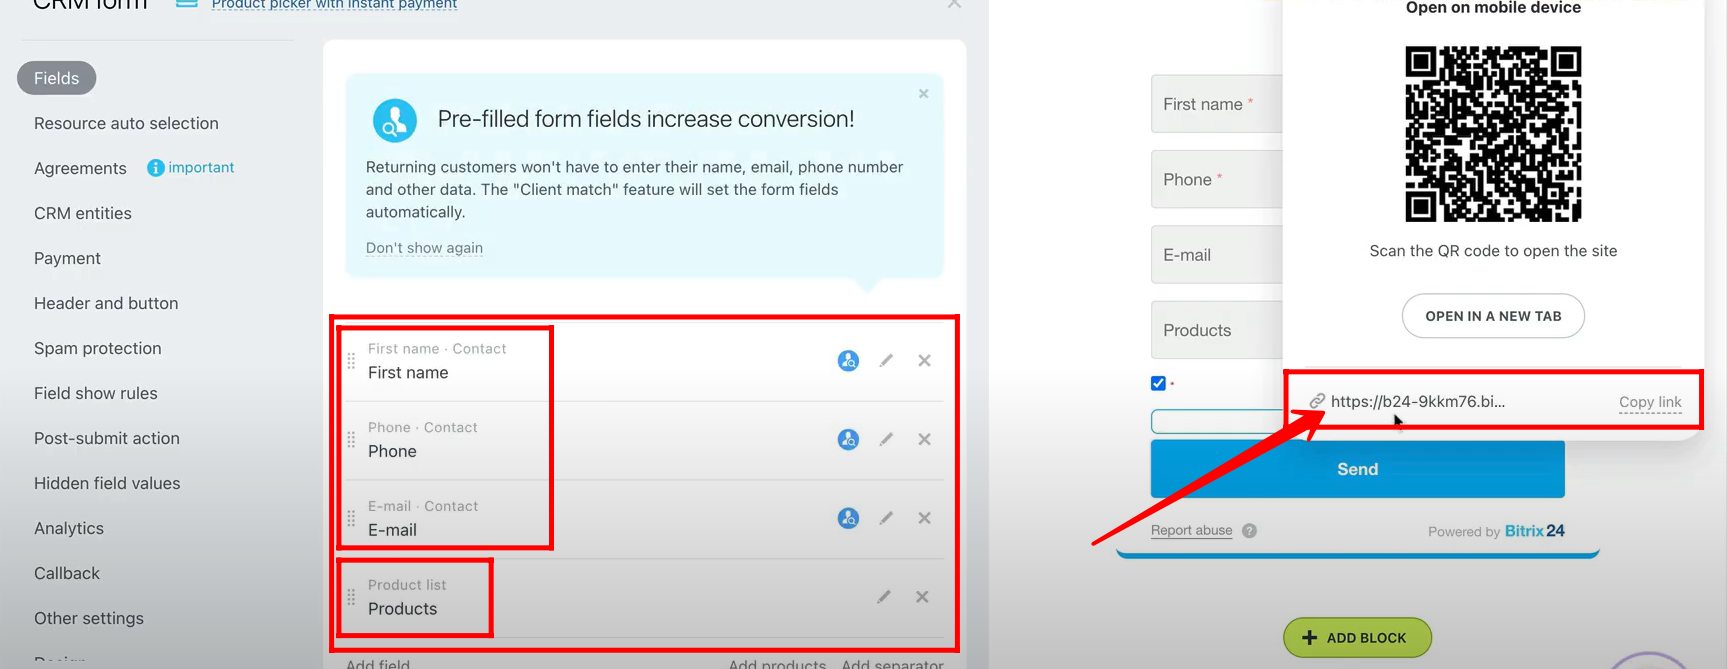
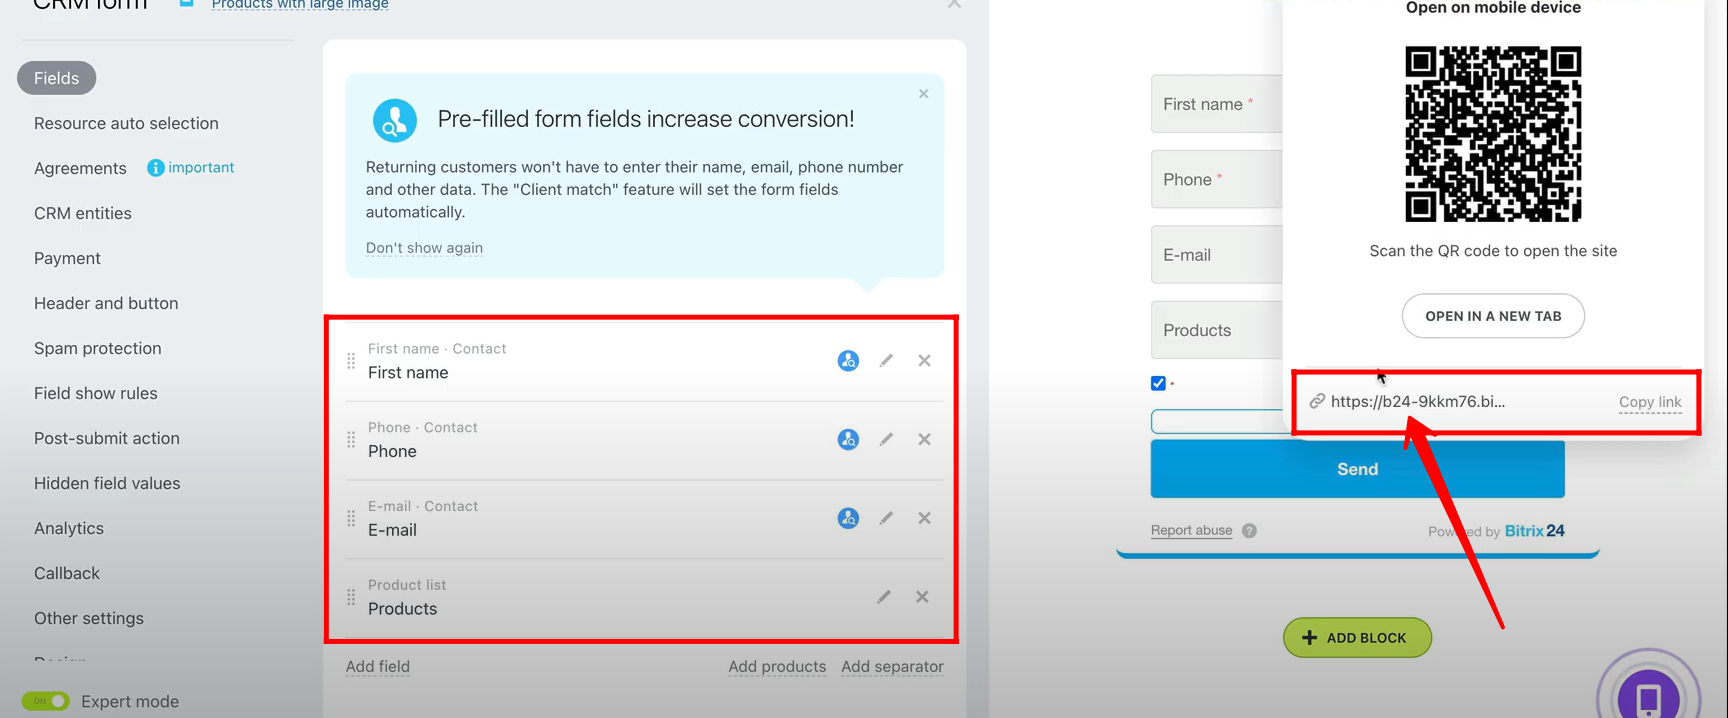
3. You will notice that the form already includes default fields such as First Name, Last Name, and Email (from the Contact entity), along with the Products field (from the Product List entity). Open the form to test and review these pre-configured fields.
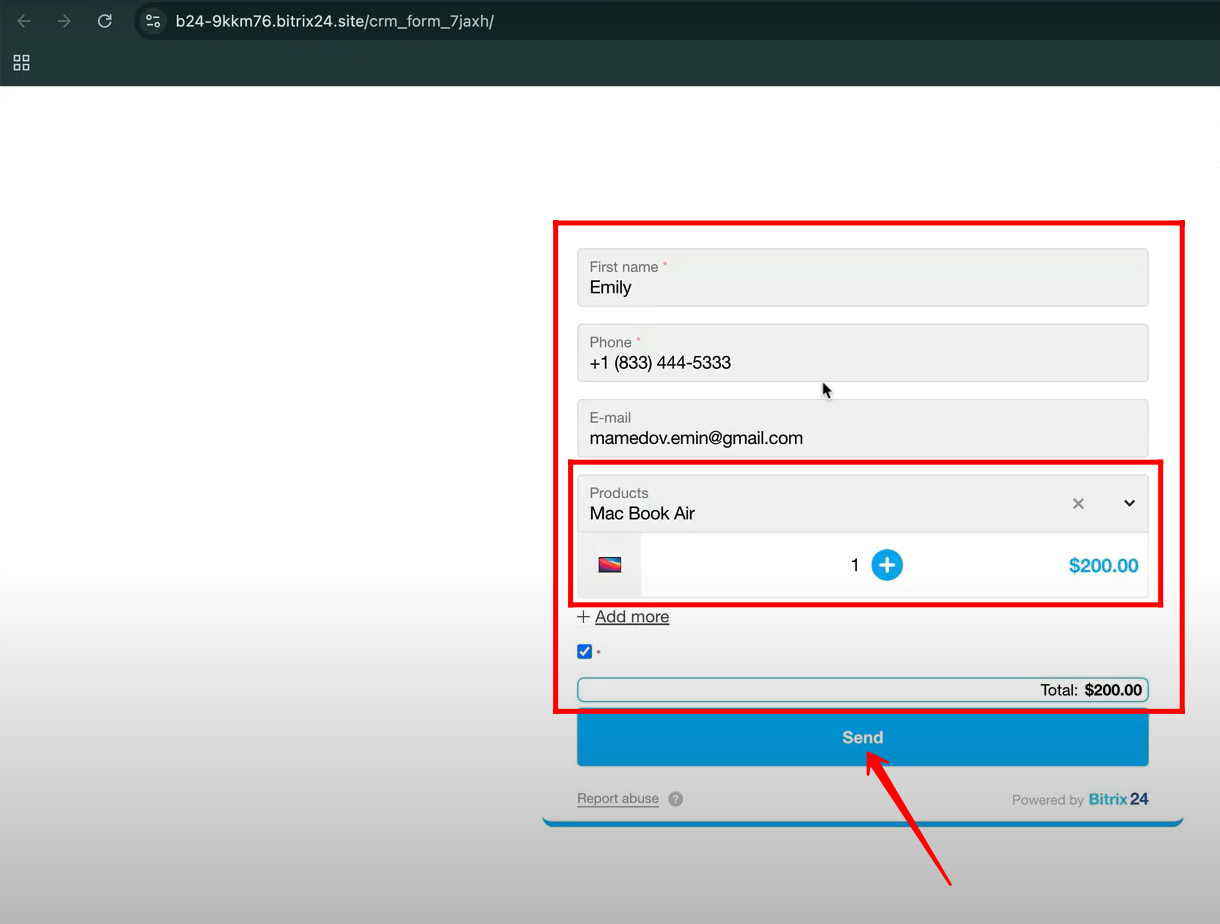
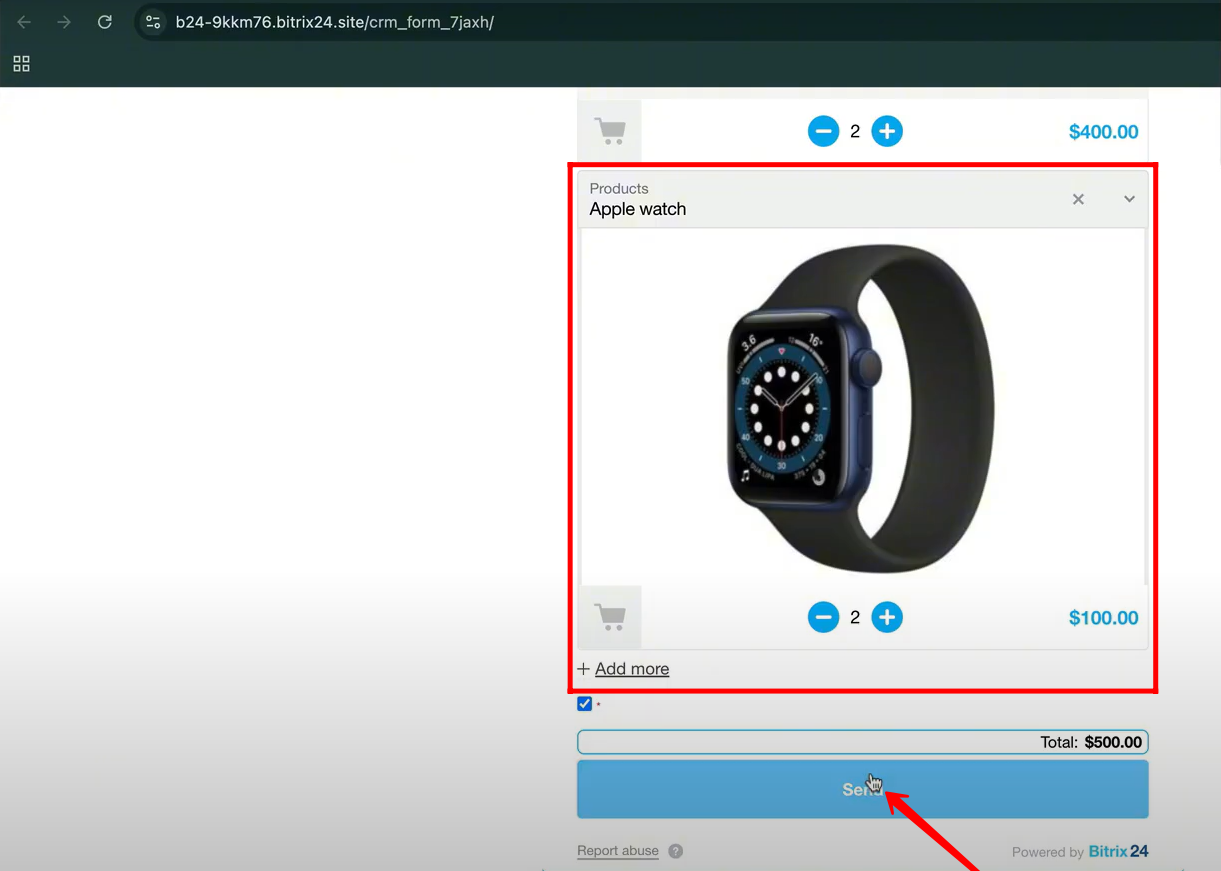
4. All the fields in the form are now filled, and in the Products field, a product has been selected (you can also add multiple items or increase the quantity of a single product, and the total price will be calculated automatically). Once everything is set, click the Send button to submit the form.
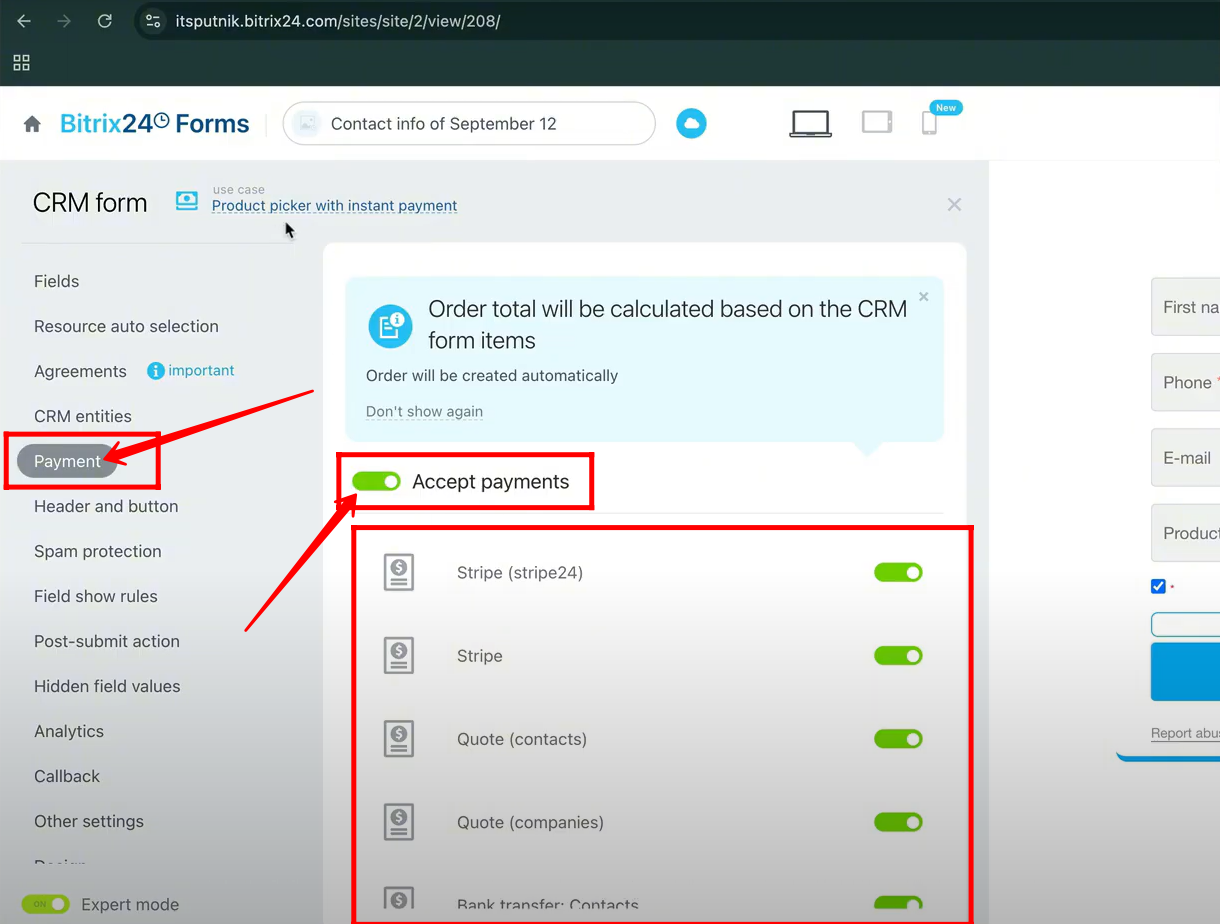
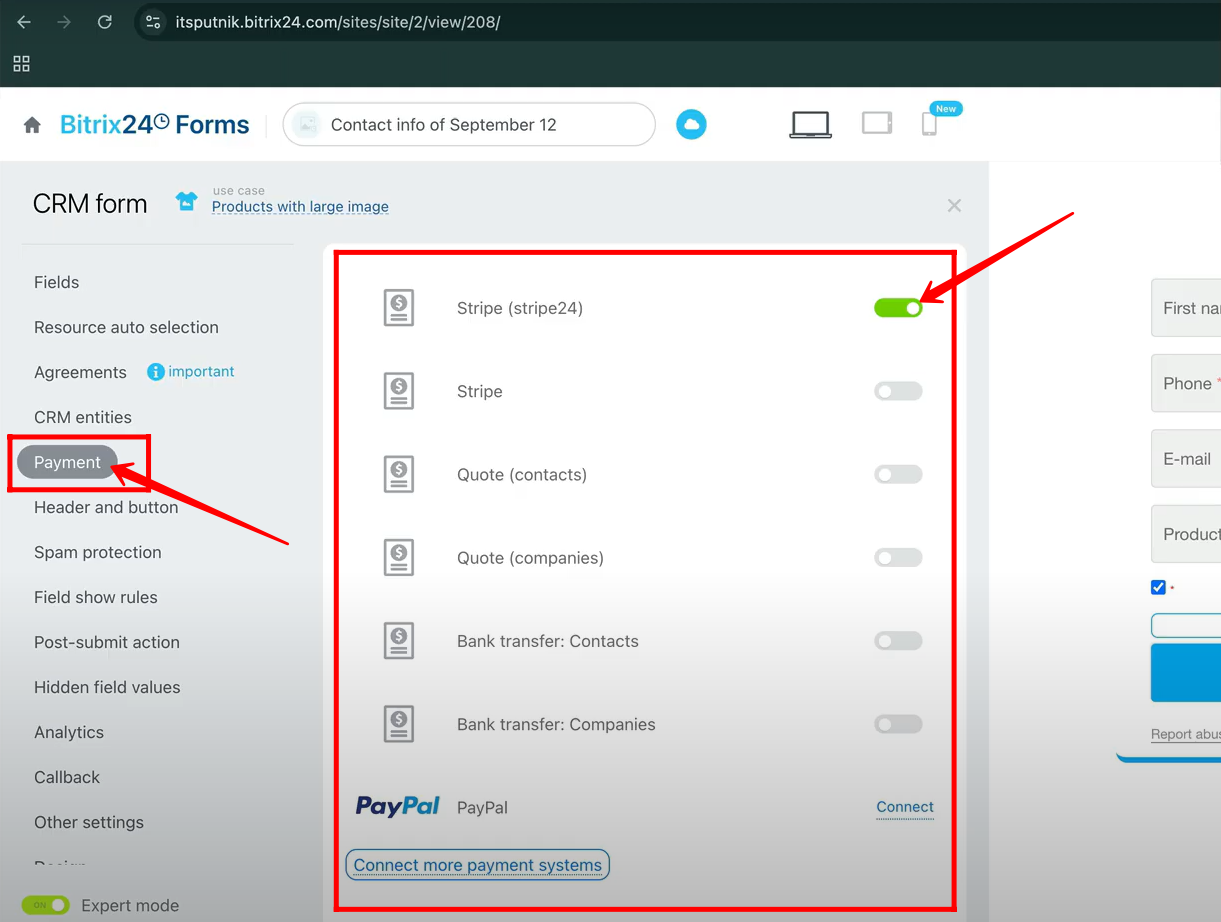
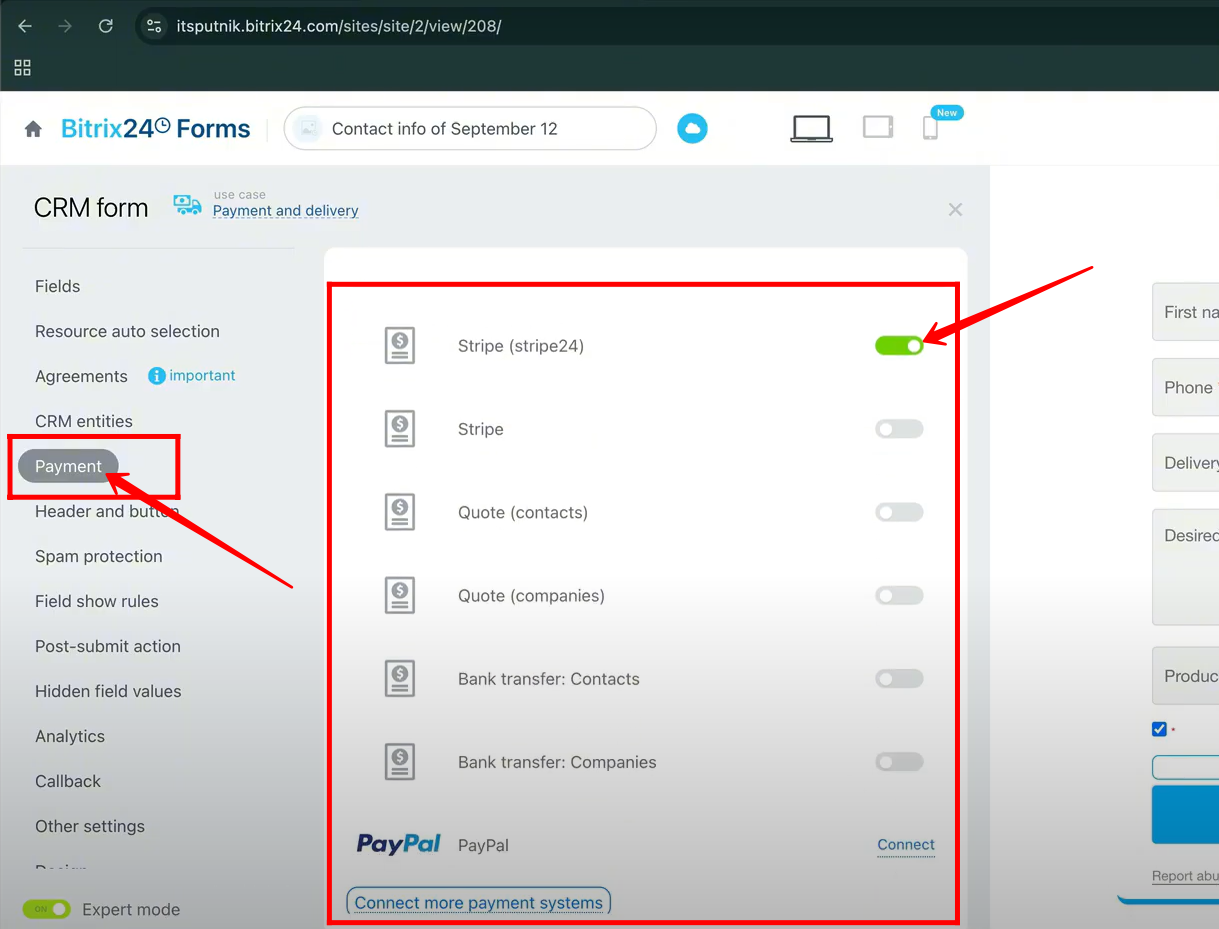
5. In the form’s configuration panel, go to the Payment section where you’ll notice that the Accept Payments option is enabled by default. Here, you can choose from several payment methods such as Stripe24, Stripe, Bank Transfer, Quote (Contacts), Quote (Companies), or even connect PayPal to receive payments. For best results, it is recommended to enable only Stripe24, as it offers greater flexibility and can be customized to fit a variety of requirements within Bitrix24.
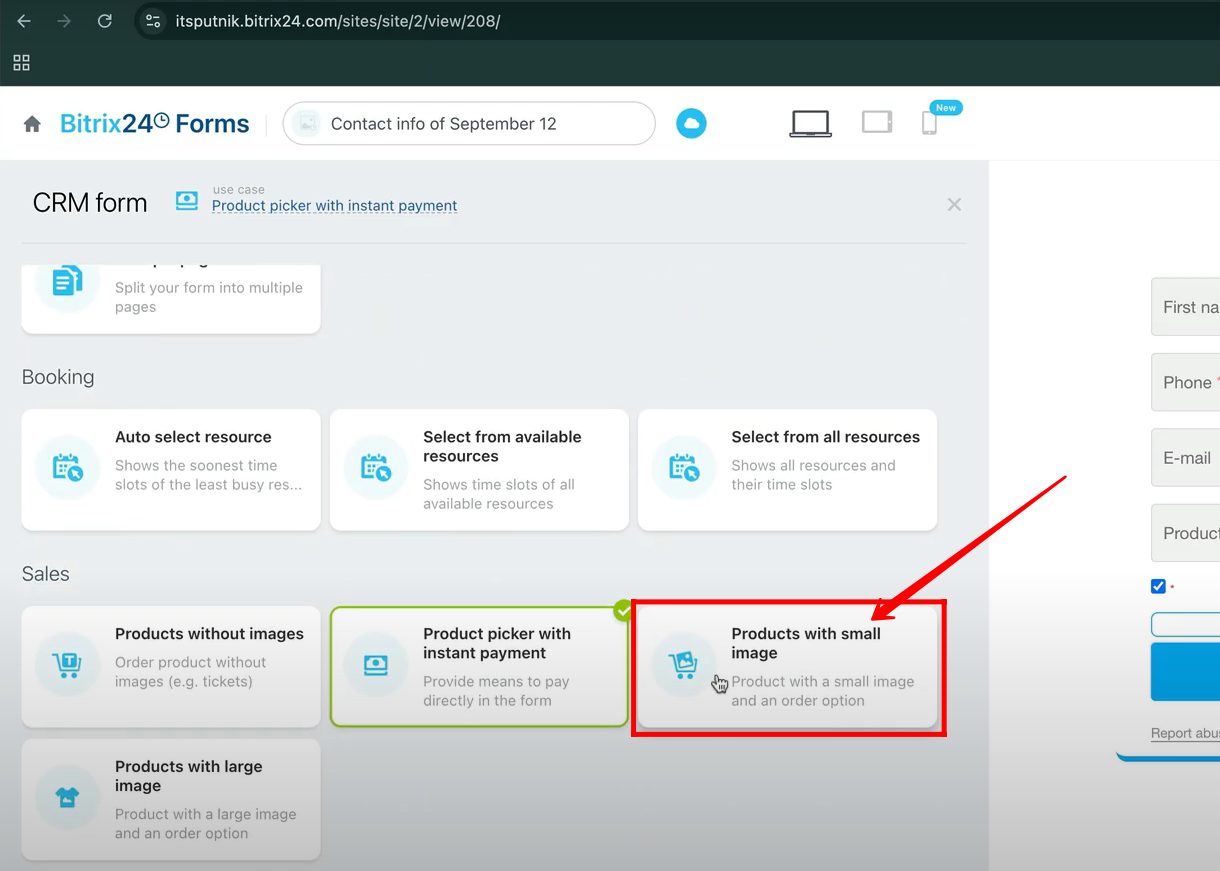
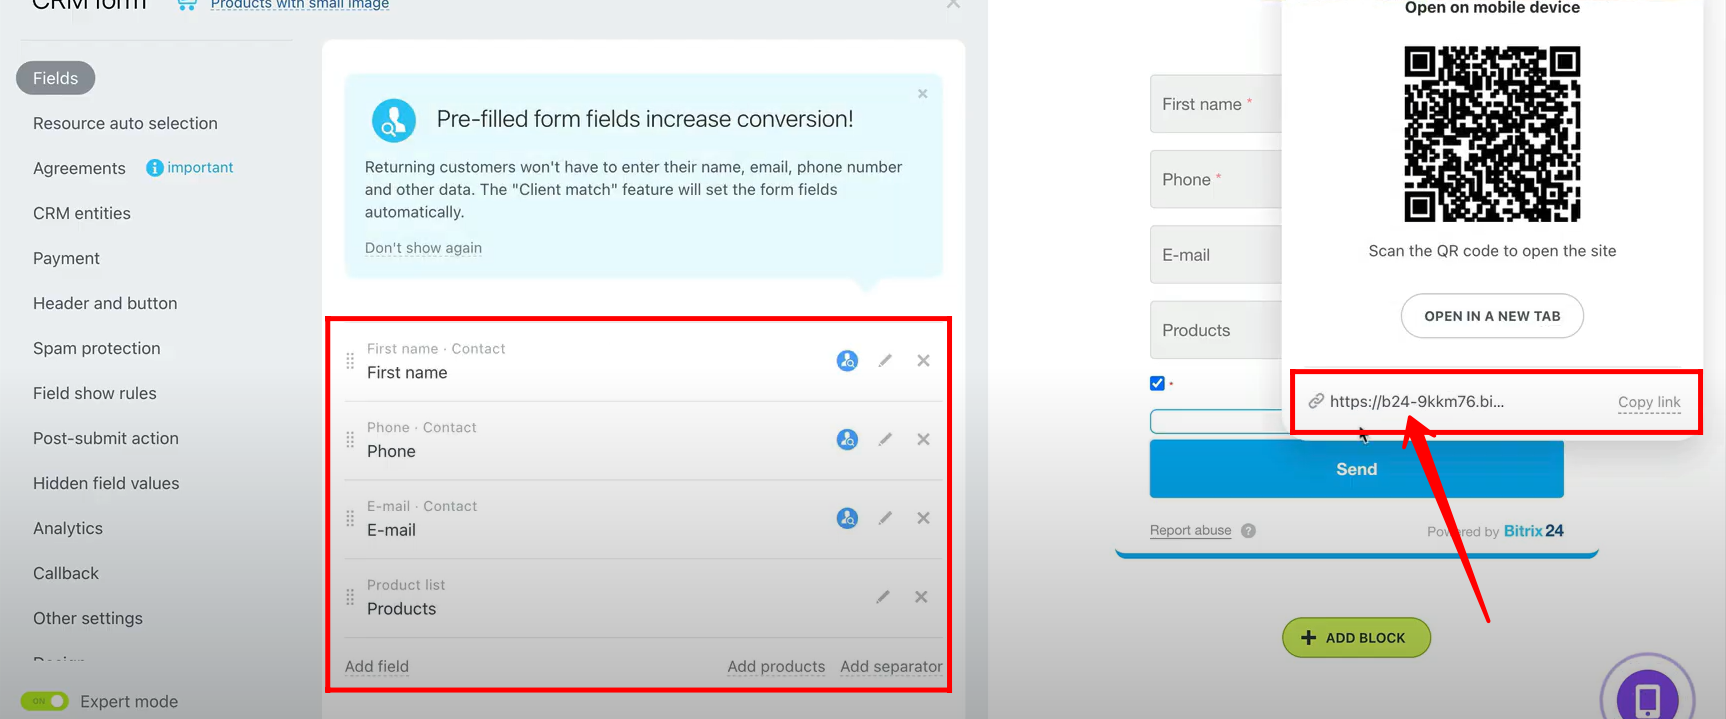
6. Now, return to the Sales section within the form type selection panel and choose the Products with Small Image option.
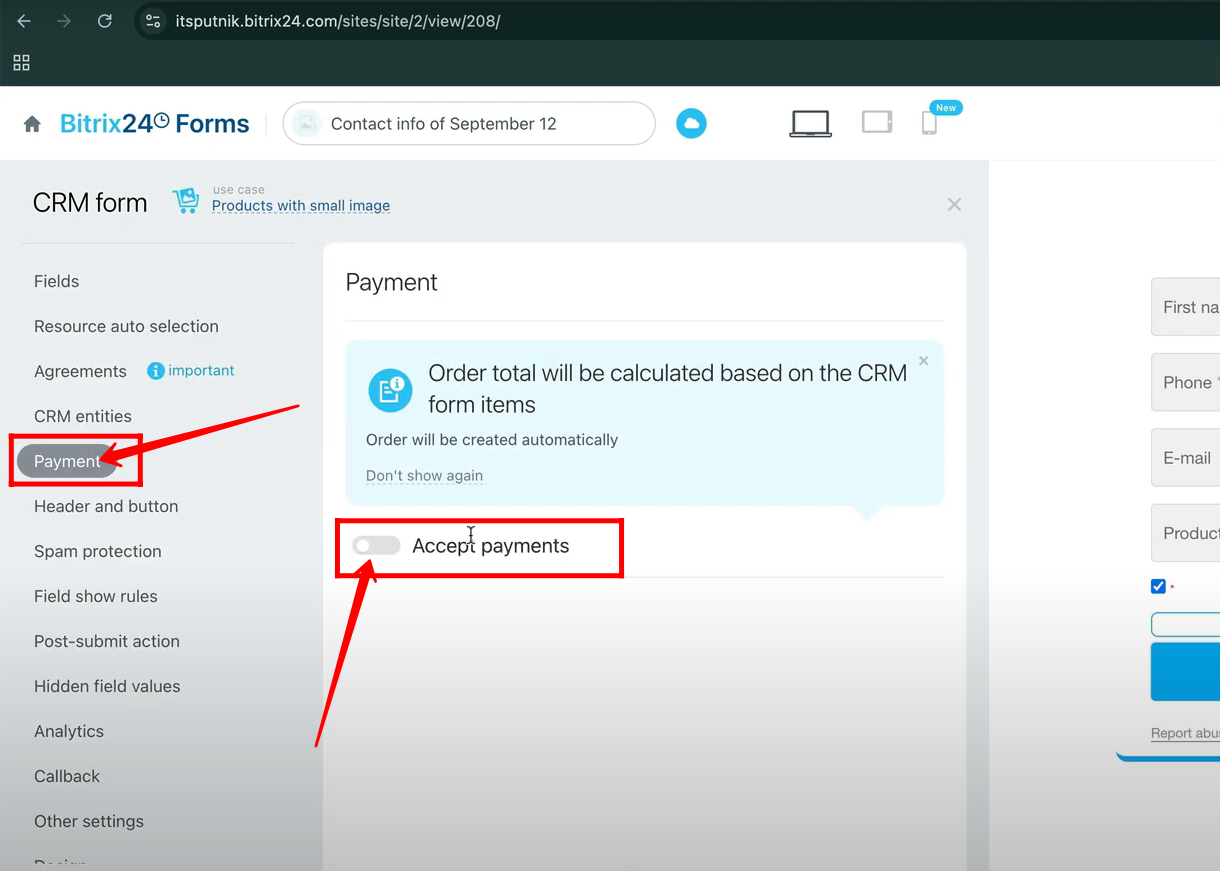
7. The key difference from the previous form type is that the Accept Payments option is not enabled by default. To allow payments, you need to open the Payment settings in the form configuration panel and manually enable this option, as it will remain disabled unless you activate it yourself.
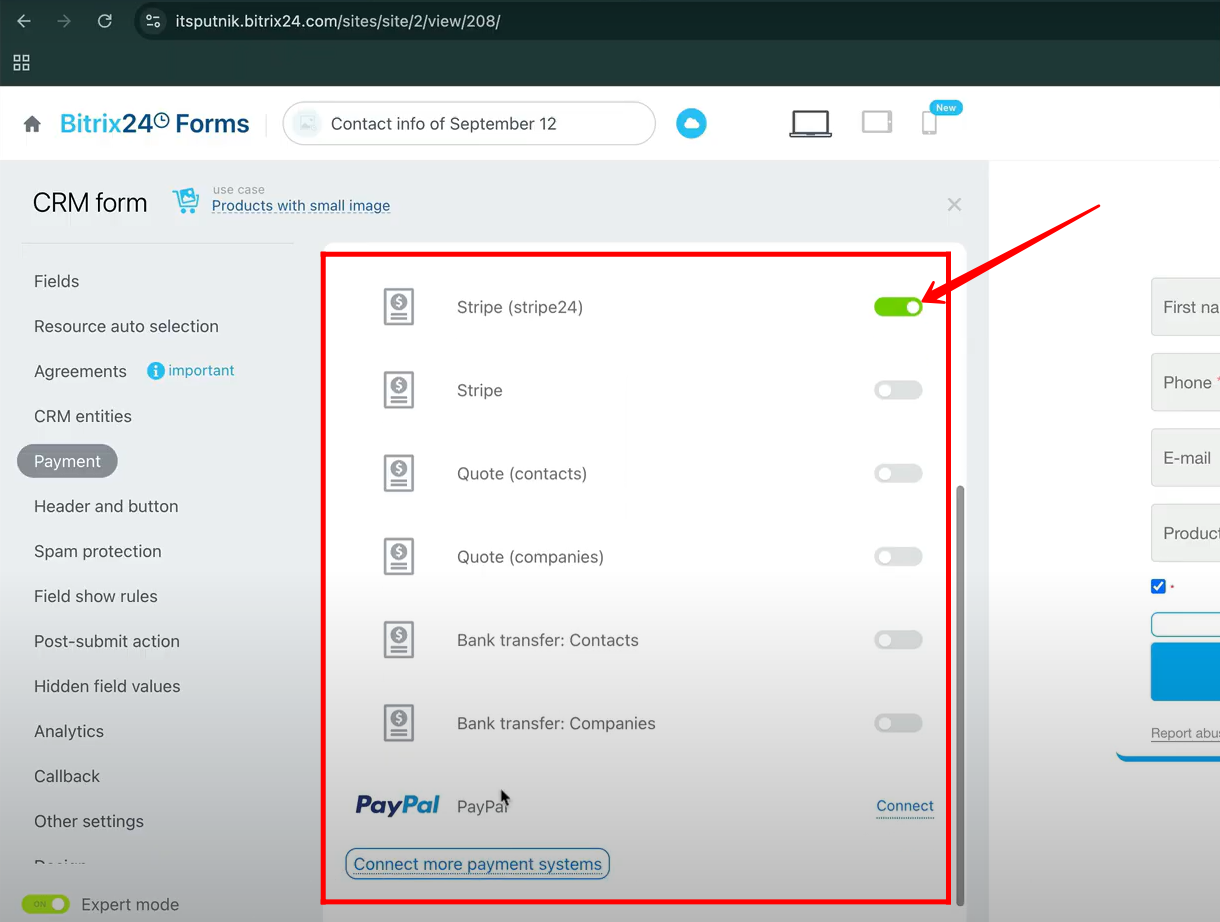
8. For testing purposes, the Stripe24 option was enabled to allow payment acceptance within this form.
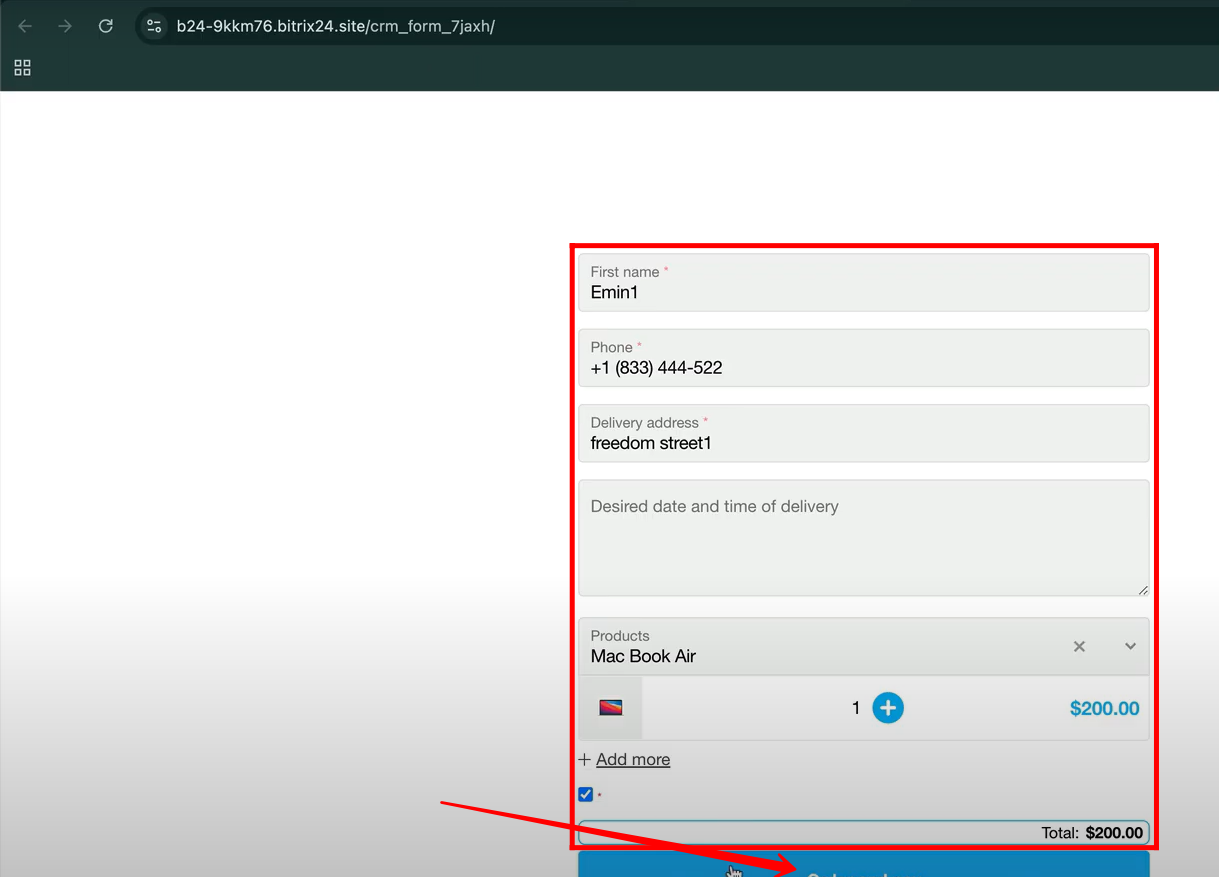
9. In this form type, the same default fields—First Name, Last Name, Email, and Products—are automatically configured. Open the form to review and test its functionality.
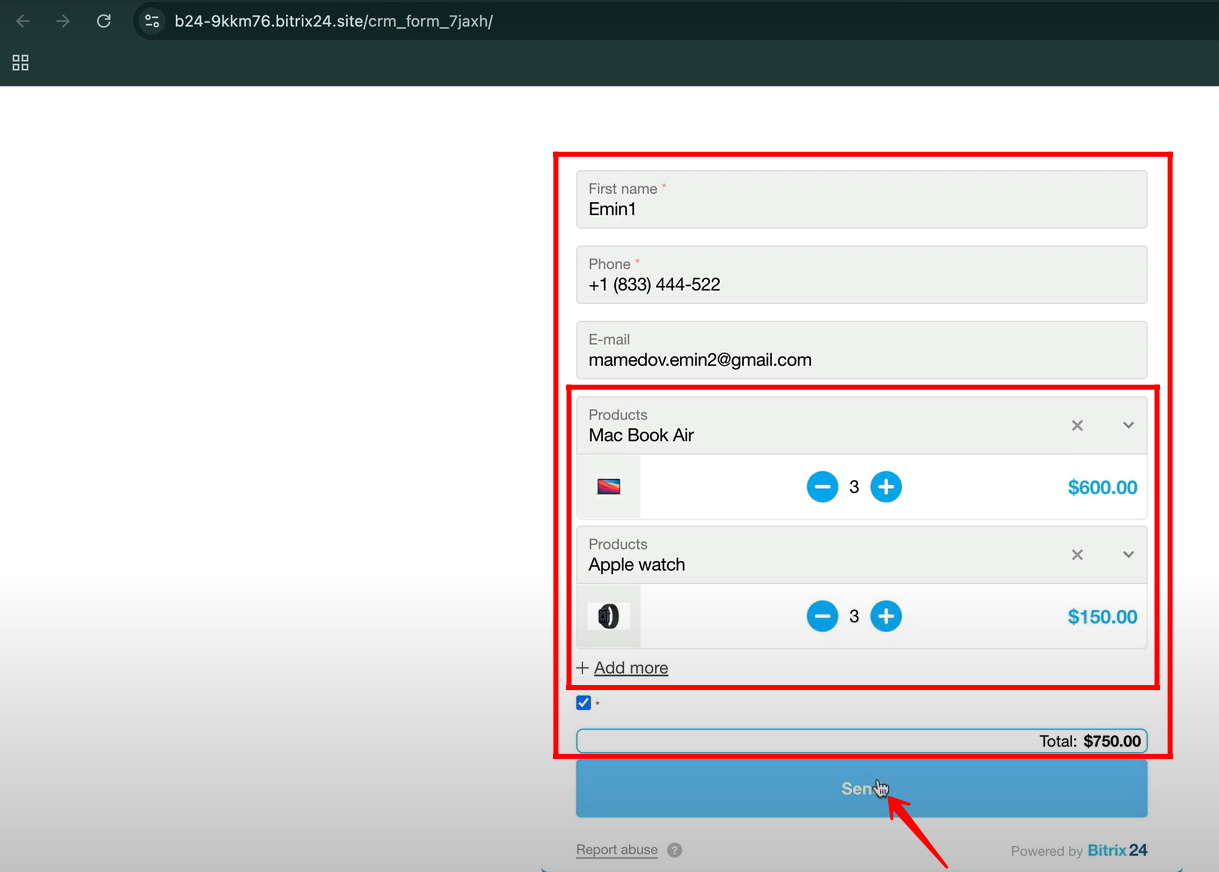
10. Here, you can see that all the required fields are filled and the selected products are displayed with images as a preview, similar to the previous Instant Payment form type. The total amount is calculated automatically, and you can click Send to submit the form.
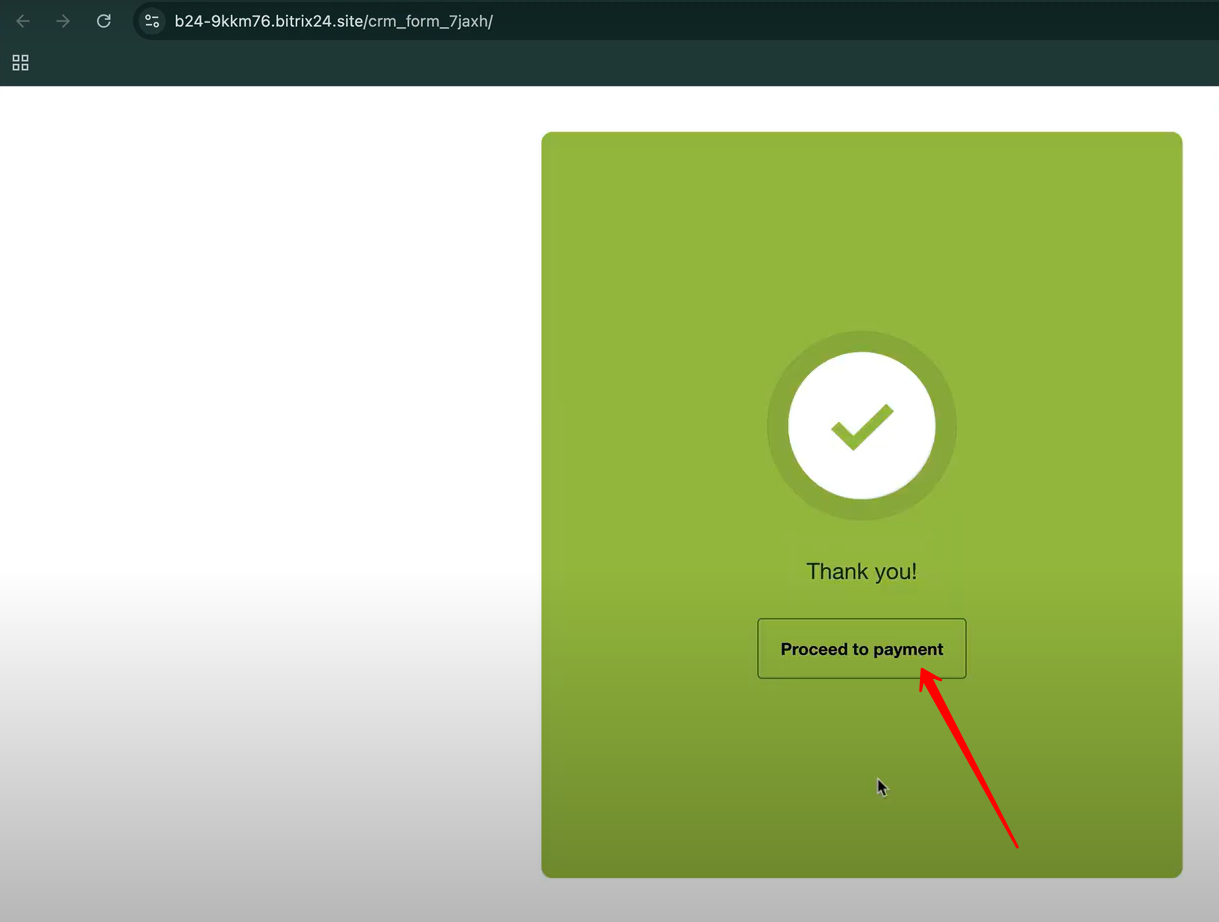
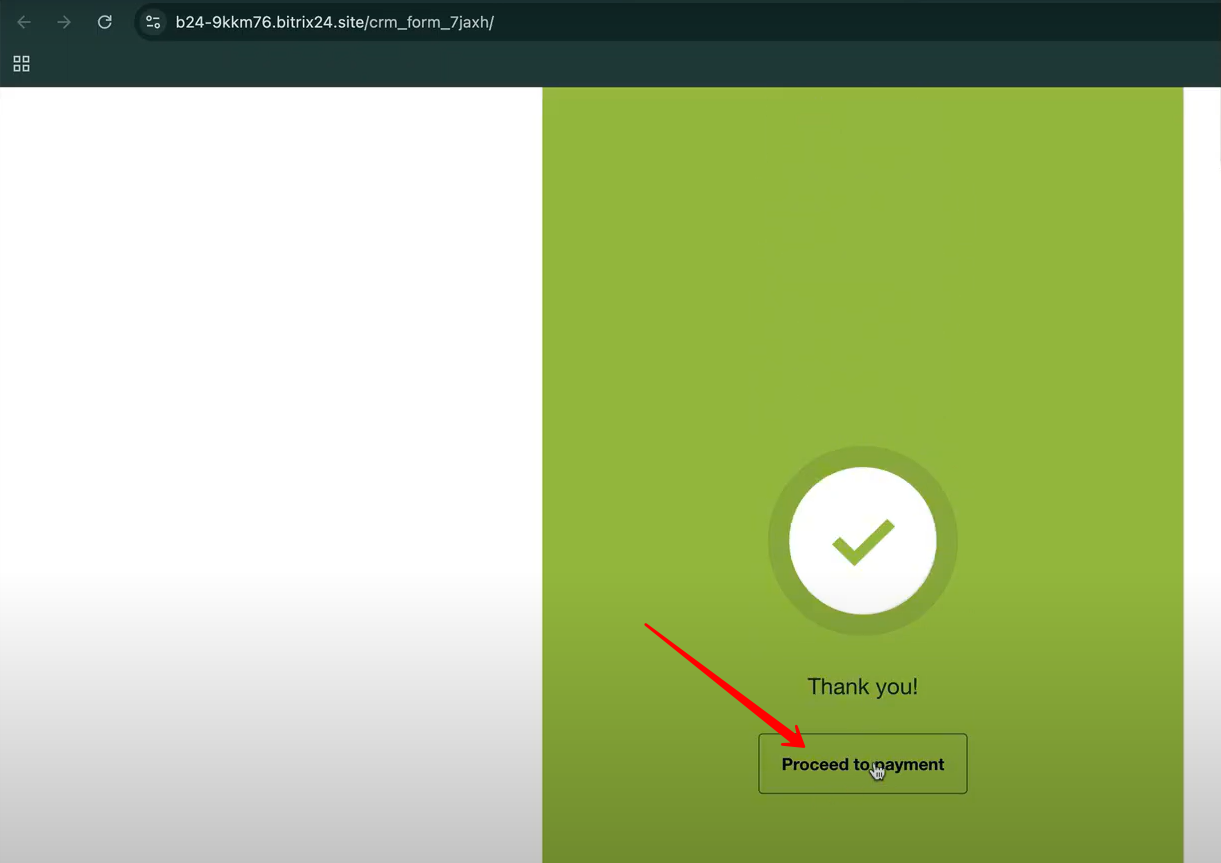
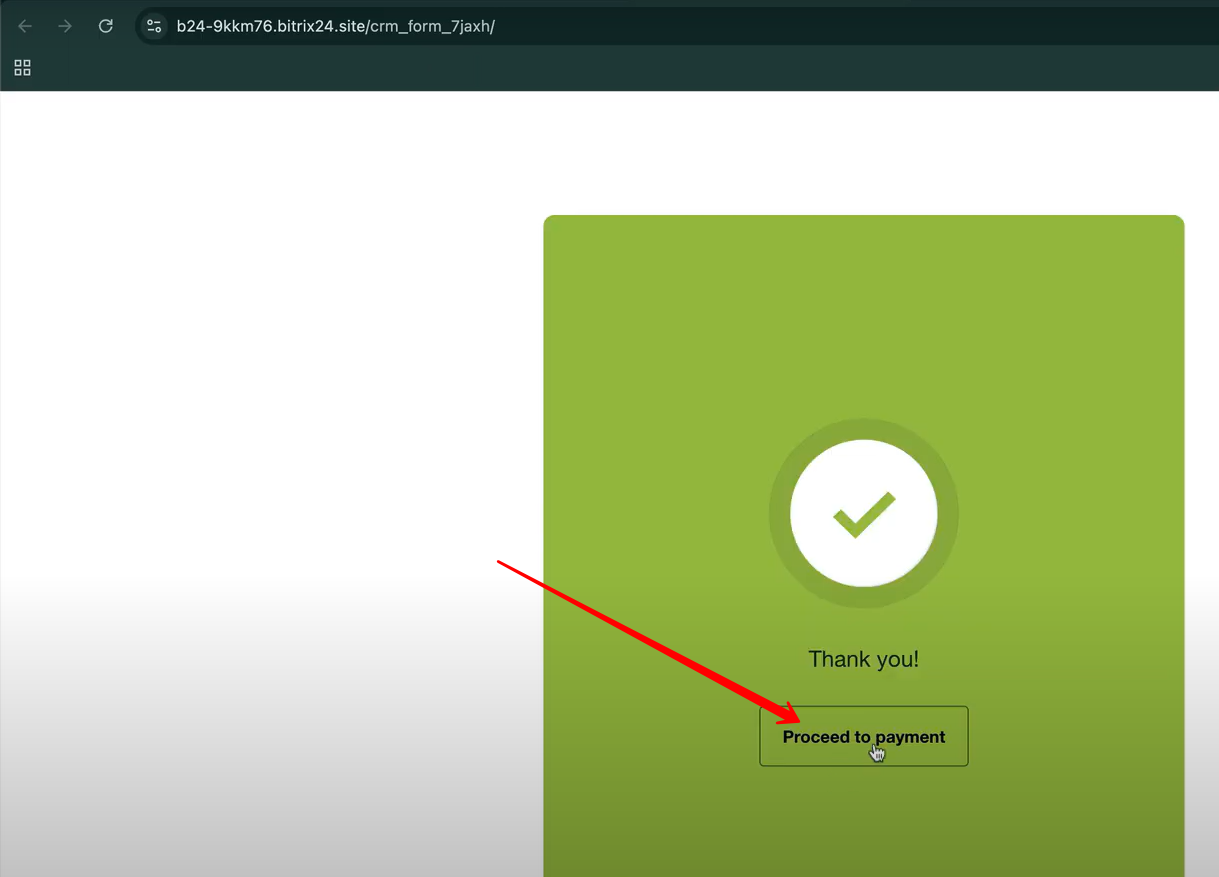
11. After submitting the form, a Thank You page appears confirming the successful submission. To complete the purchase, click Proceed to Payment to pay for the products that were selected during the form submission.
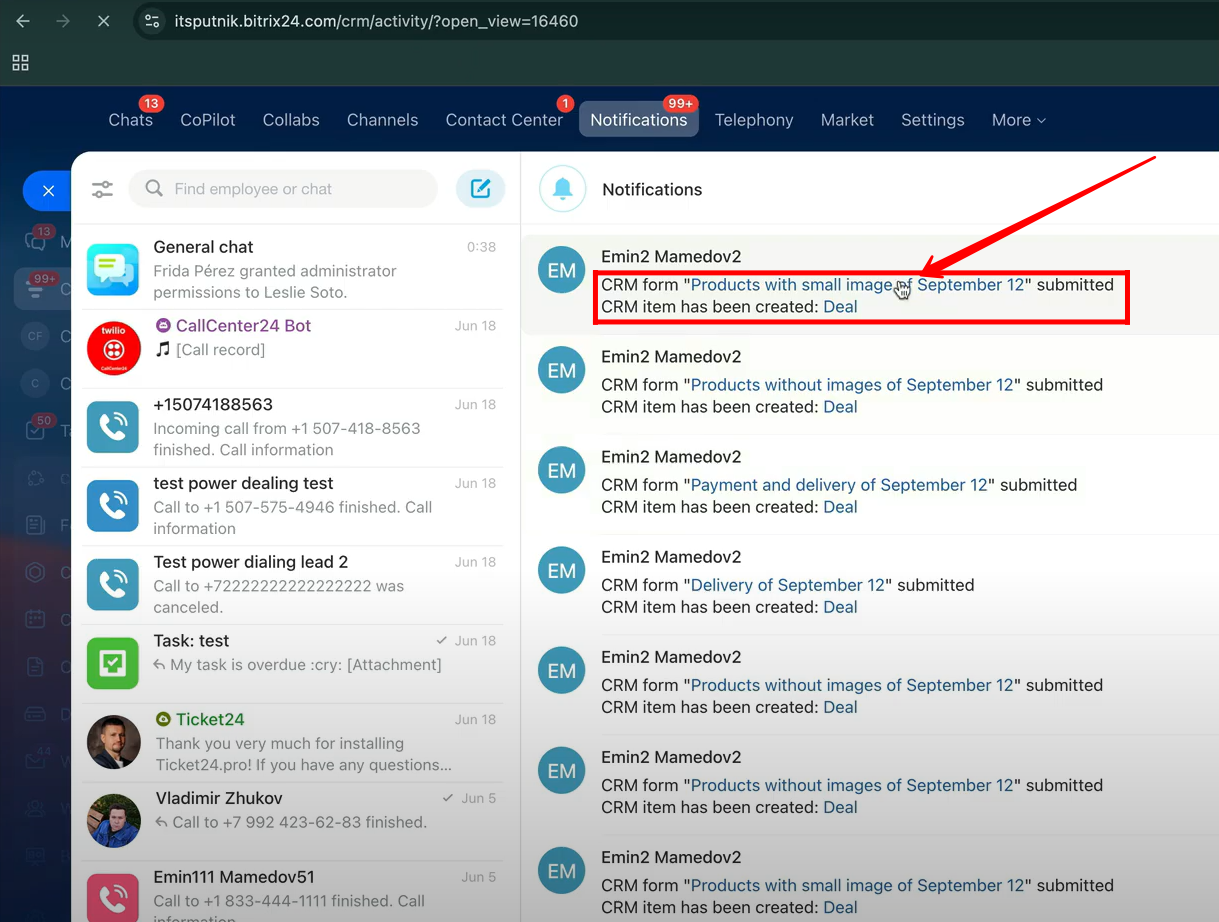
12. When a specific form is submitted, you will receive a notification indicating the form name that was submitted. In this example, a new Deal has been created as the connected CRM entity. Open the deal to review the details captured from the submitted form.
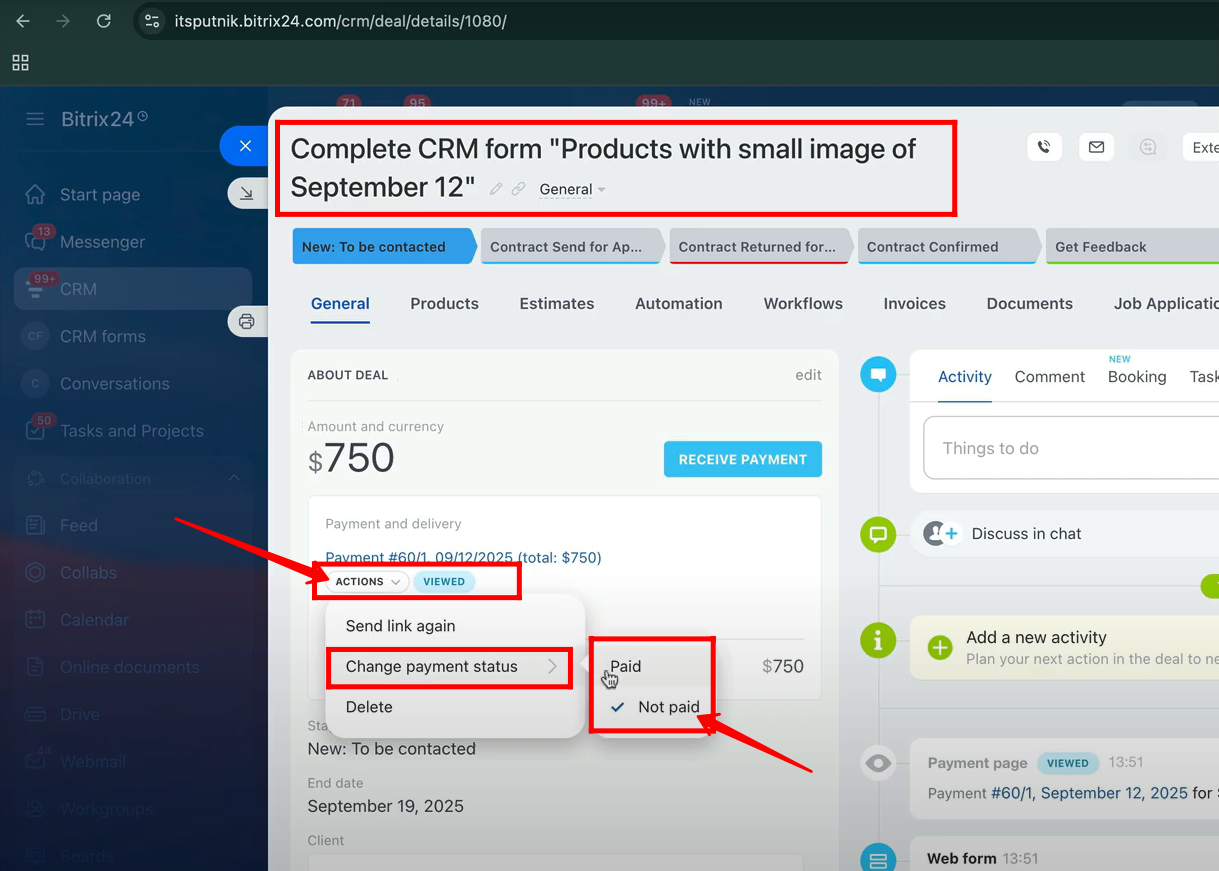
13. Inside the deal details, you can view the payment information, where a “viewed” badge confirms that the client has checked the payment details. Open the Actions dropdown and select Change Payment Status to manage the payment record. Here, you will notice the current status is set to Not Paid, and if needed, you can manually update it to Paid once the payment has been confirmed.
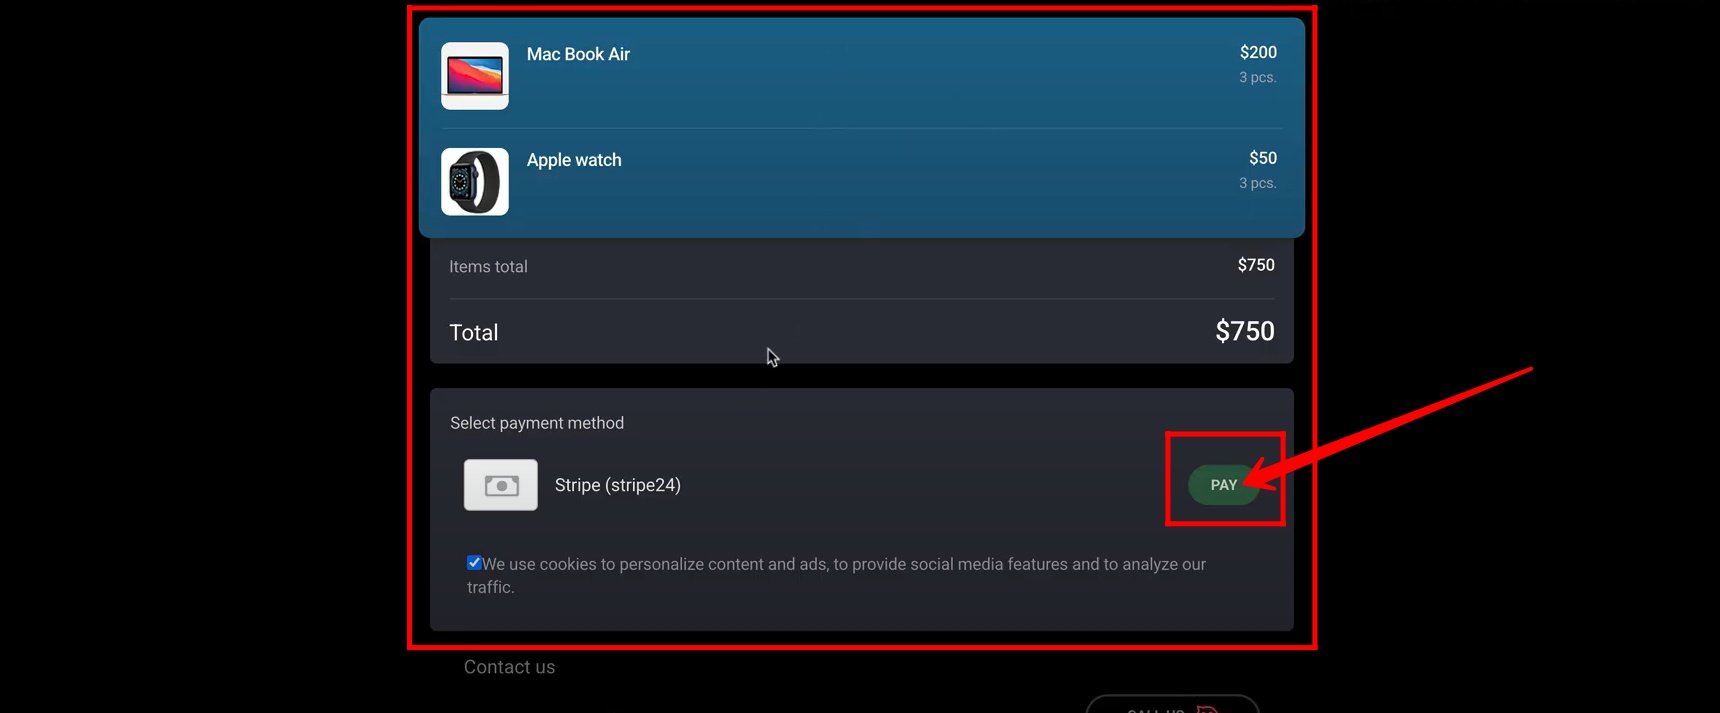
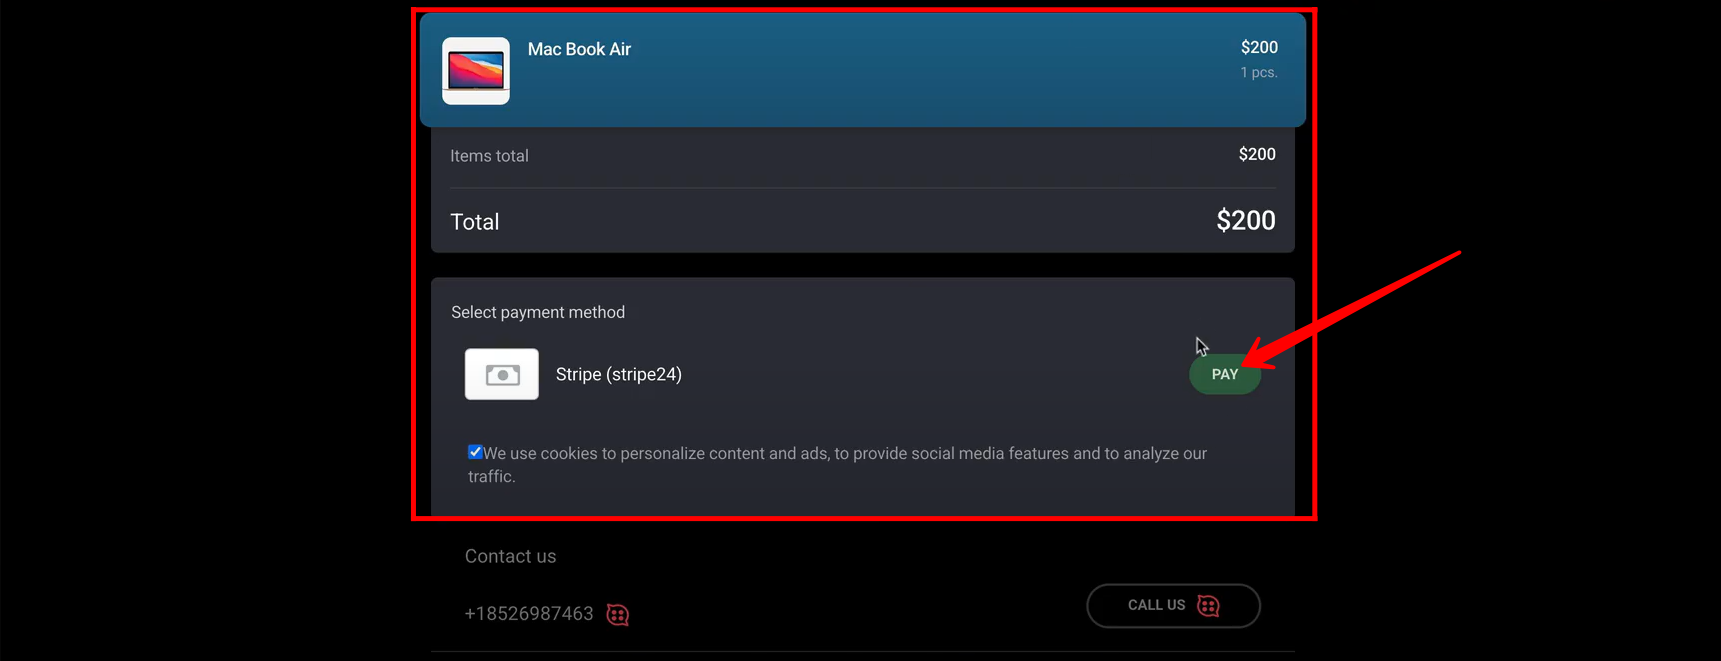
14. Return to the checkout page to process the payment for the products selected during the form submission. For testing, simply click the Pay button to complete the transaction and simulate a successful purchase.
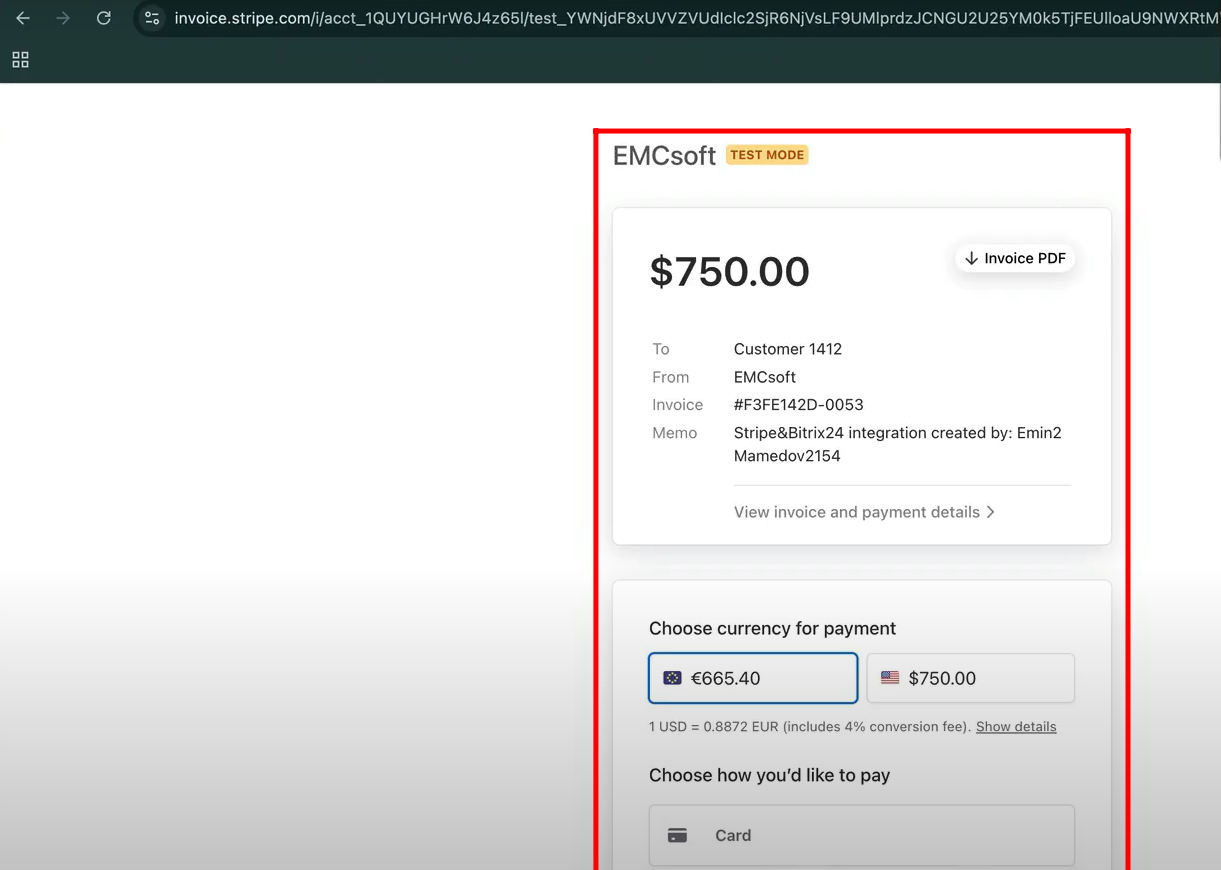
15. On the Stripe24 Test Mode payment page, you can enter test card details to simulate a transaction and even download the invoice once the payment is processed. This page can be fully customized to match your branding and preferences, allowing you to enhance the payment experience and add additional features—showcasing the flexibility and power of the Stripe24 payment method.
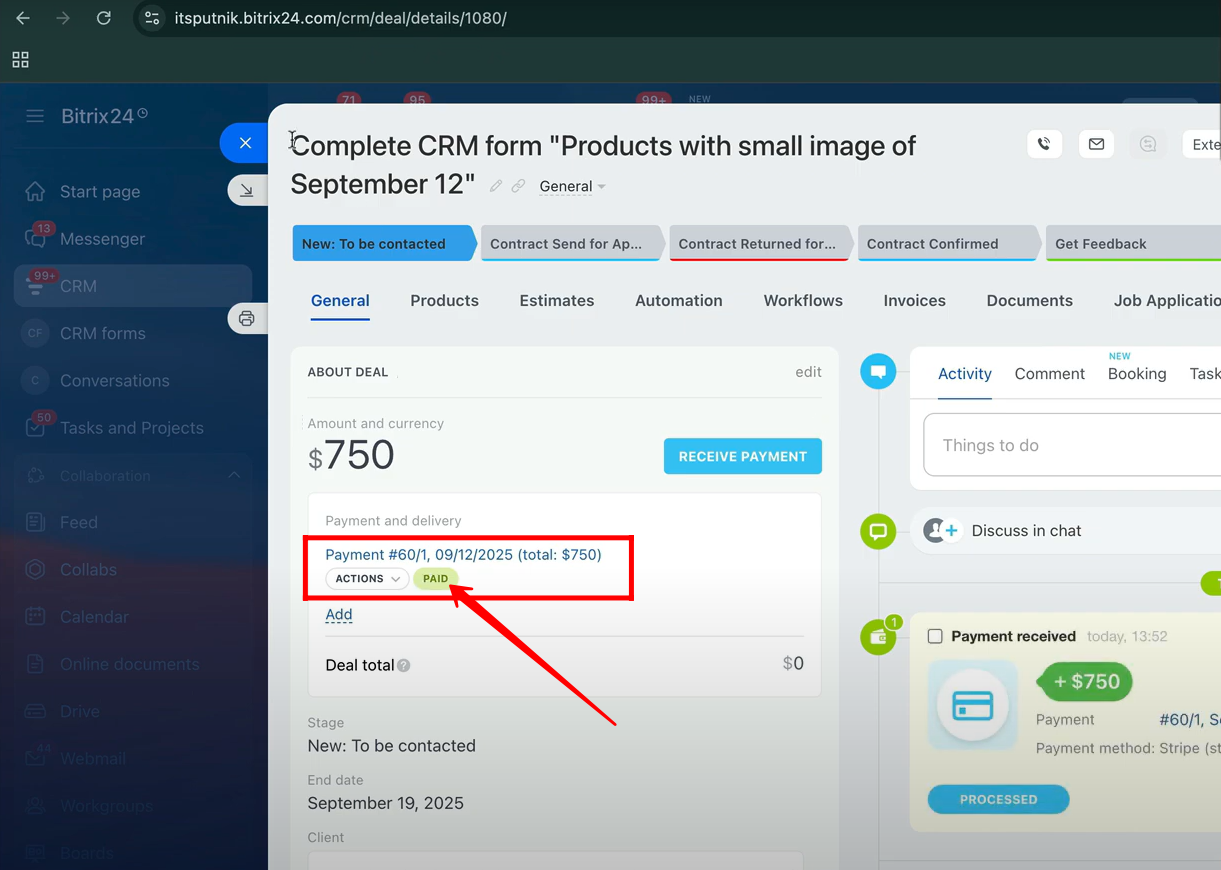
16. After completing the payment, return to the deal in Bitrix24, and you will notice that the payment status has automatically updated to Paid. Open the deal to verify the updated status along with the payment details for confirmation.
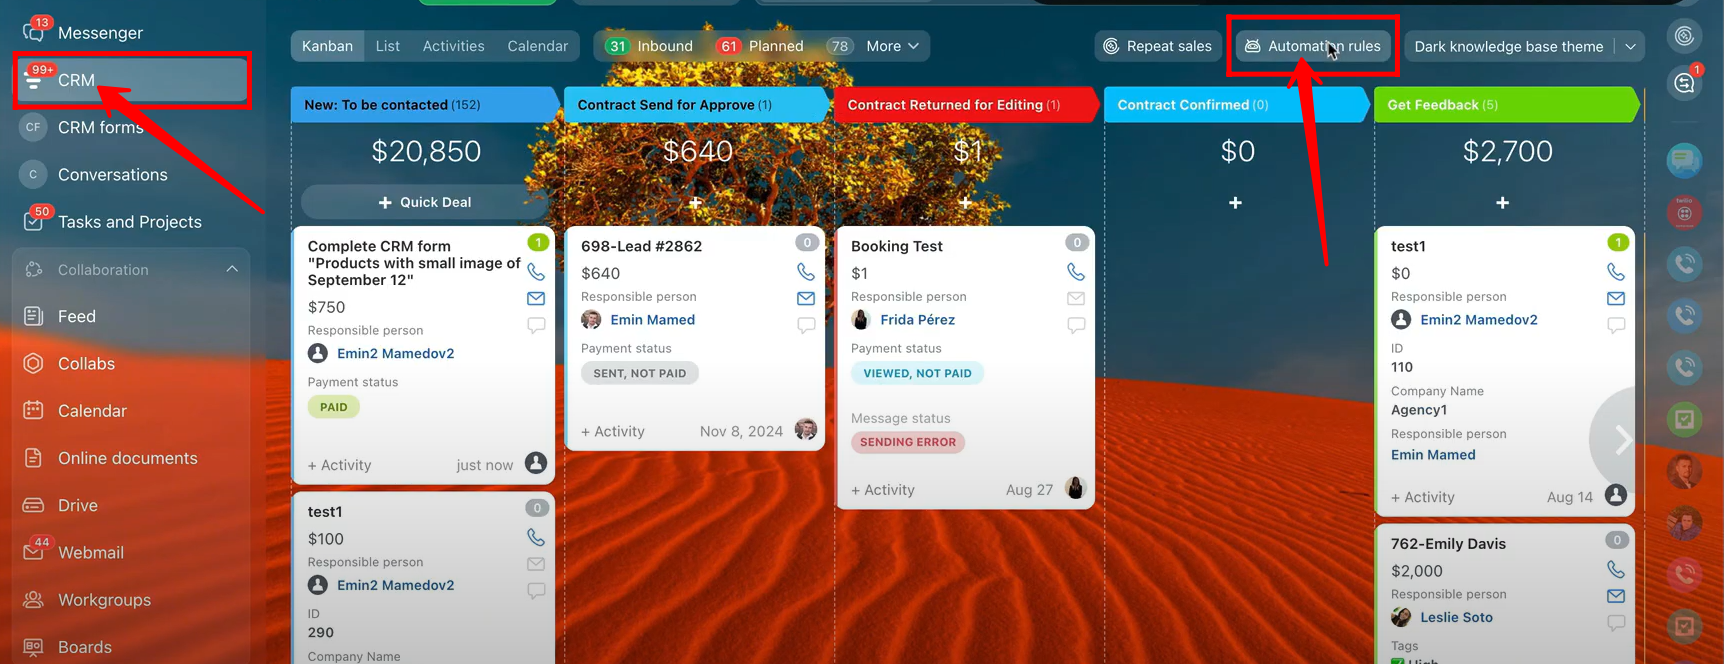
17. To track payment status and trigger follow-up actions, navigate to CRM → Deals → Automation Rules. Here, you can configure rules to automatically perform actions—such as sending notifications, updating fields, or starting tasks—whenever the payment status changes.
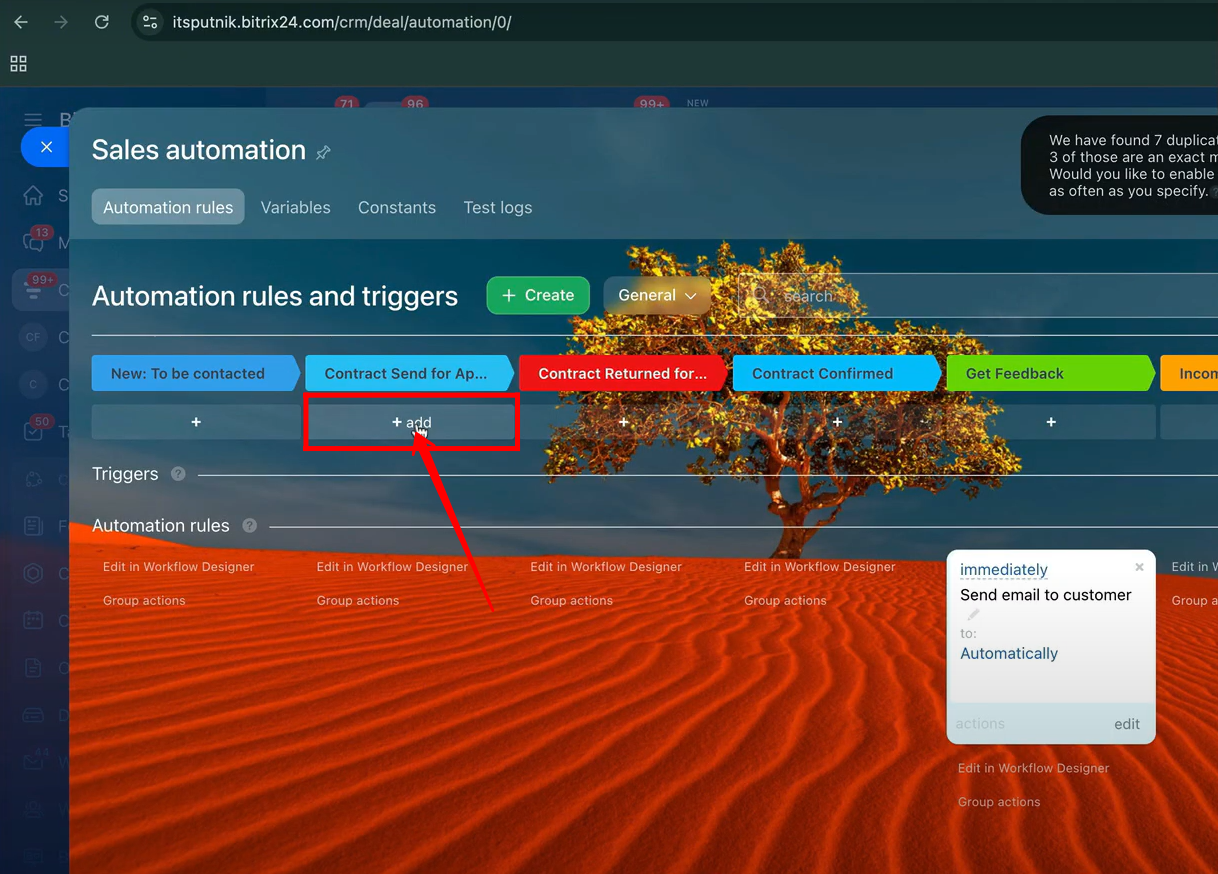
18. Next, click the “+ Add” button under the stage where you want to include an automation rule. This allows you to create a new rule that will automatically execute actions based on payment status or other deal updates within that stage.
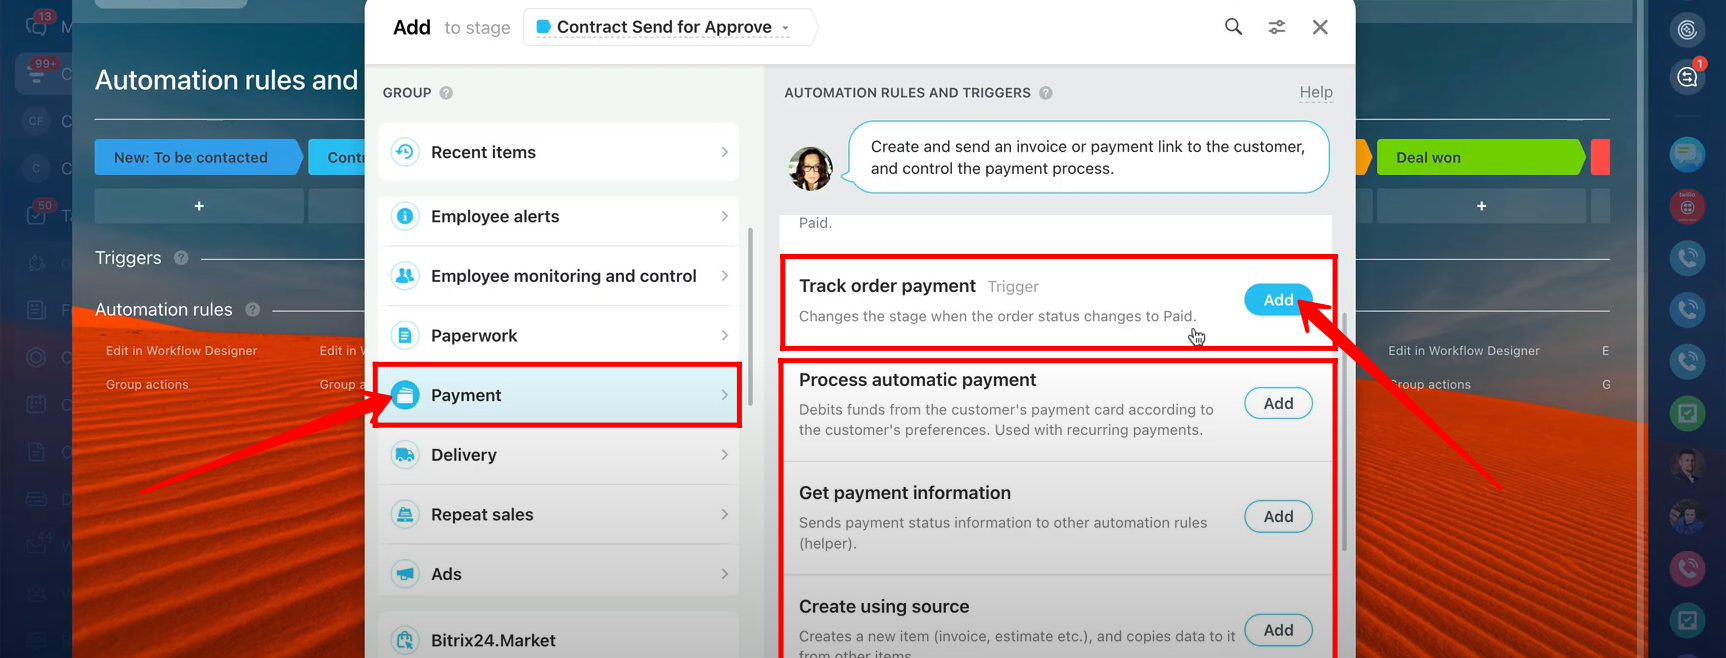
19. Navigate to the Payment section, where you’ll find a variety of triggers and rules available for configuration. Among them is a trigger that automatically moves the deal to a different stage when the payment status changes. Additional rules and triggers can also be set up here to further automate deal processes, ensuring actions like notifications, status updates, or follow-ups happen instantly after a payment event.
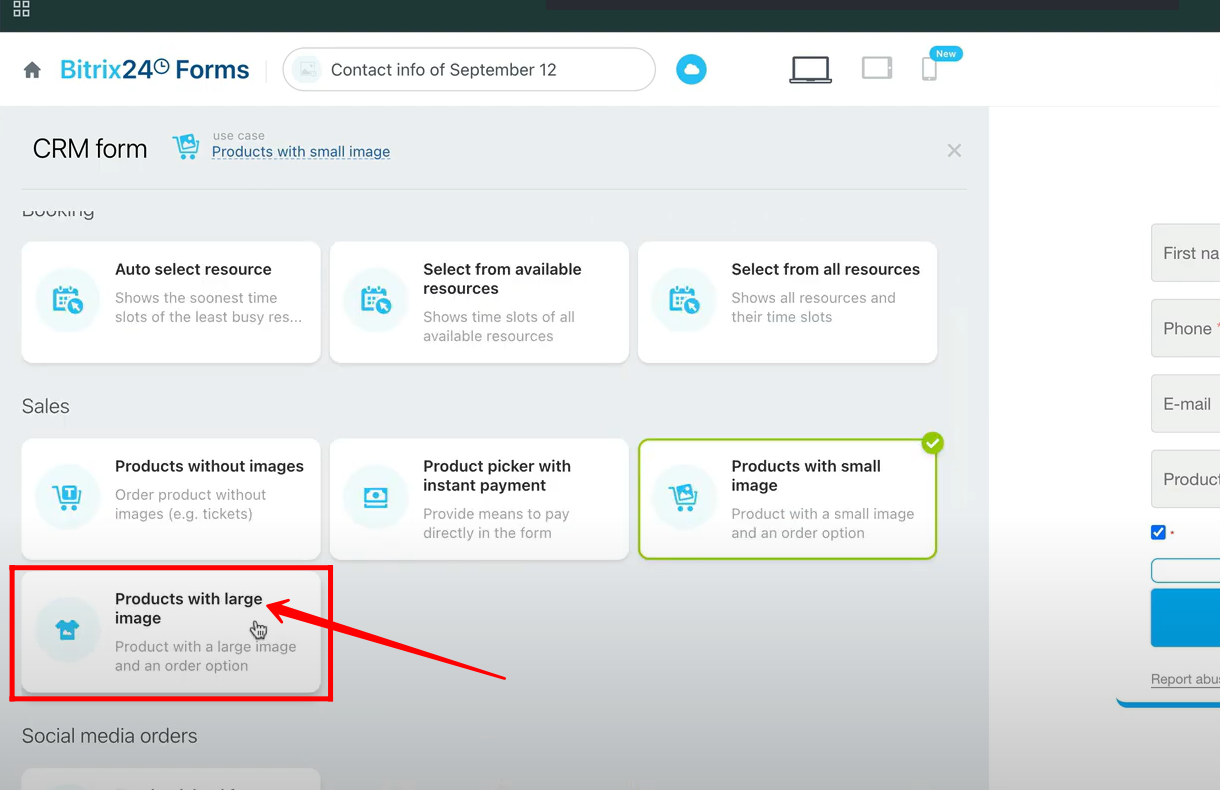
20. For testing, go to the Sales section of the form type options and select Products with large image to create a new form of this type.
21. The same default fields—First Name, Last Name, and Email from the contact entity, along with the Products field—are automatically available in this form type. Open the form to test it. The key difference from the previous form types is that the product images will appear in a larger size when products are selected during form submission.
22. Fill in all the required fields in the form, and you’ll notice that the selected products are displayed with large images for a clearer preview. As before, the total price will be calculated automatically based on the selected items. Once everything is complete, click “Send” to submit the form.
23. To enable payment collection for this form type, go to the Payment option in the form settings and manually turn on the Accept Payments feature. It is recommended to enable only Stripe24, as it offers greater flexibility and customization options for Bitrix24. However, you can also connect PayPal if needed.
24. After submitting the form, a Thank You page will appear. On this page, click the Proceed to Payment button to move to the checkout and complete the payment process for the selected products.
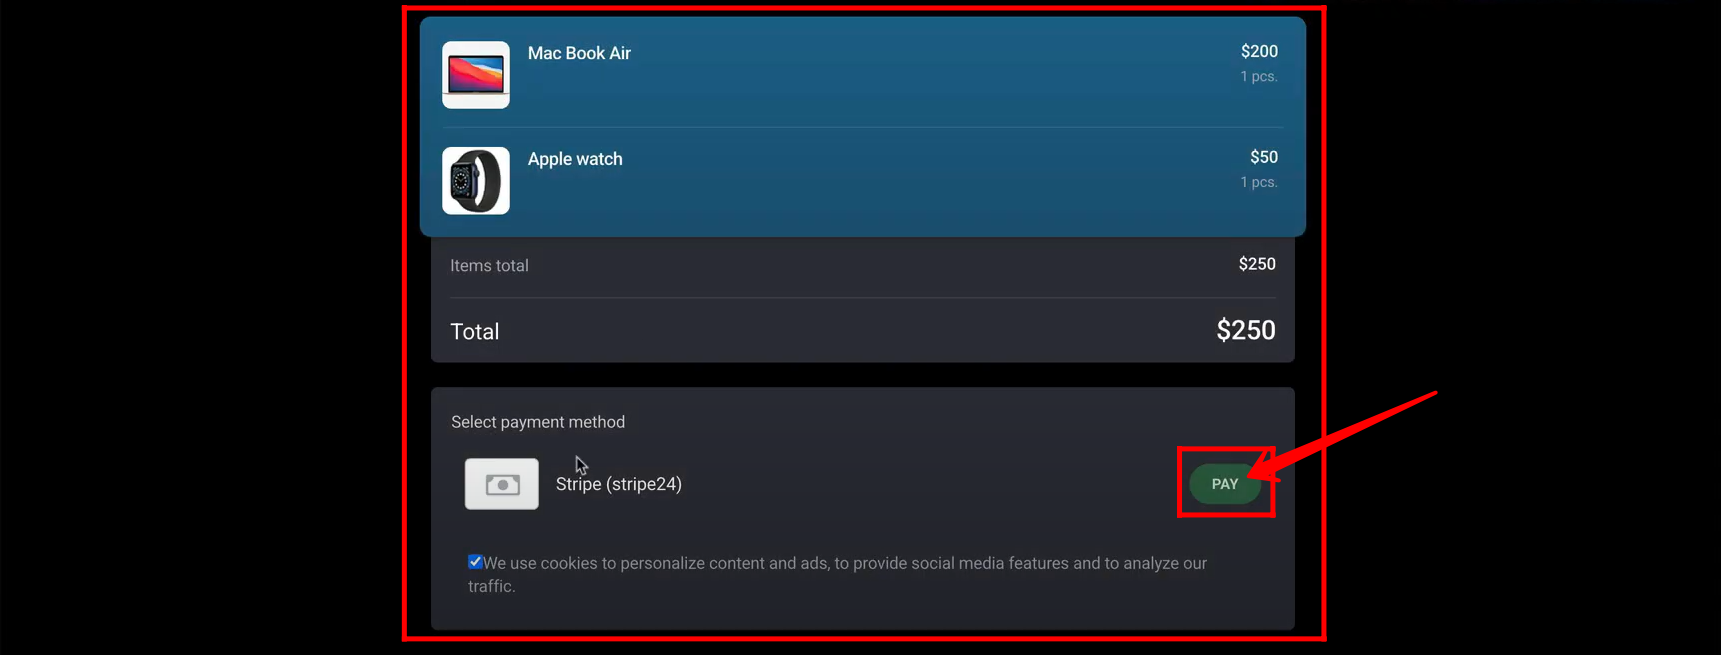
25. On the checkout page, you will see a summary of the selected products along with the total amount to be paid. Click the Pay button to continue and enter your card details for completing the payment.
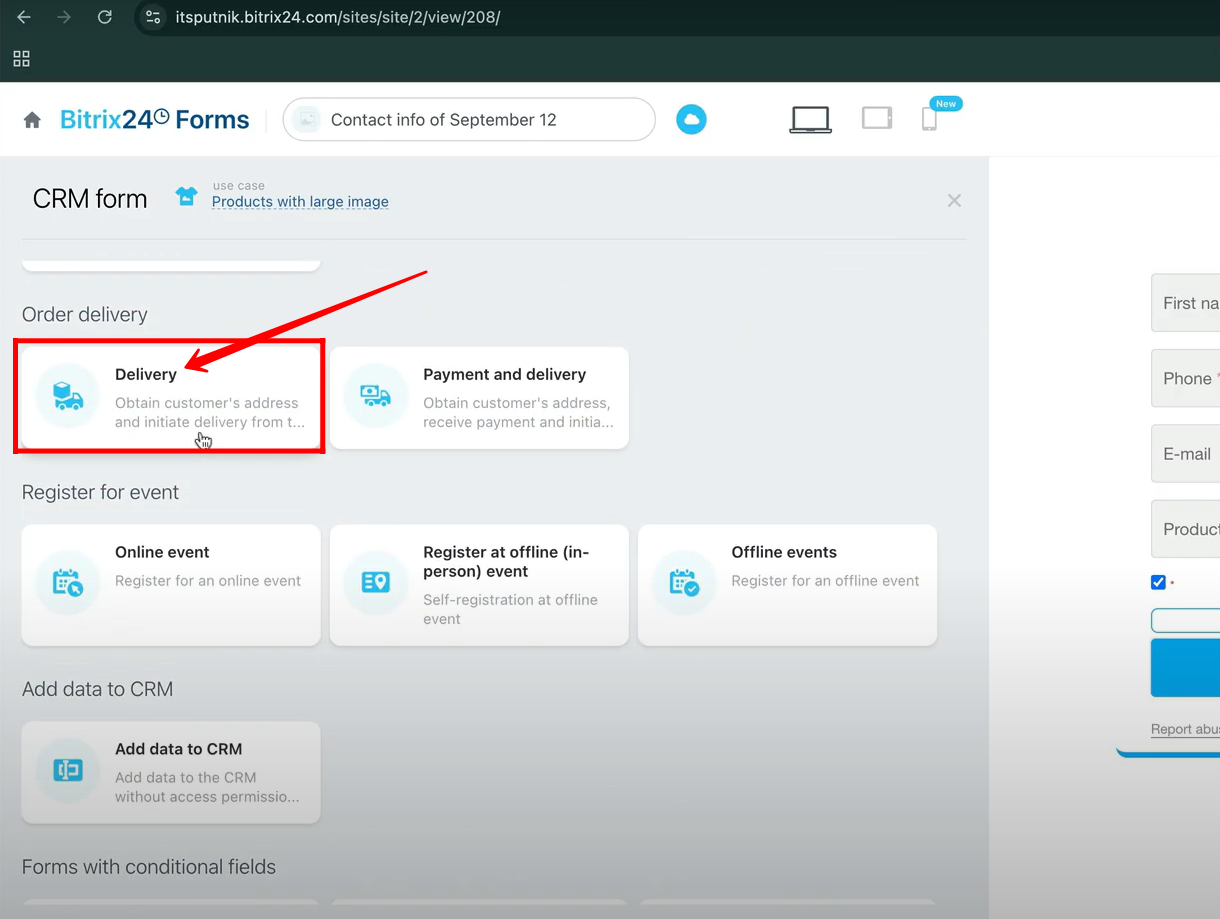
26. Next, go to the Order Delivery section and click the Delivery card to create a new form for managing product delivery details.
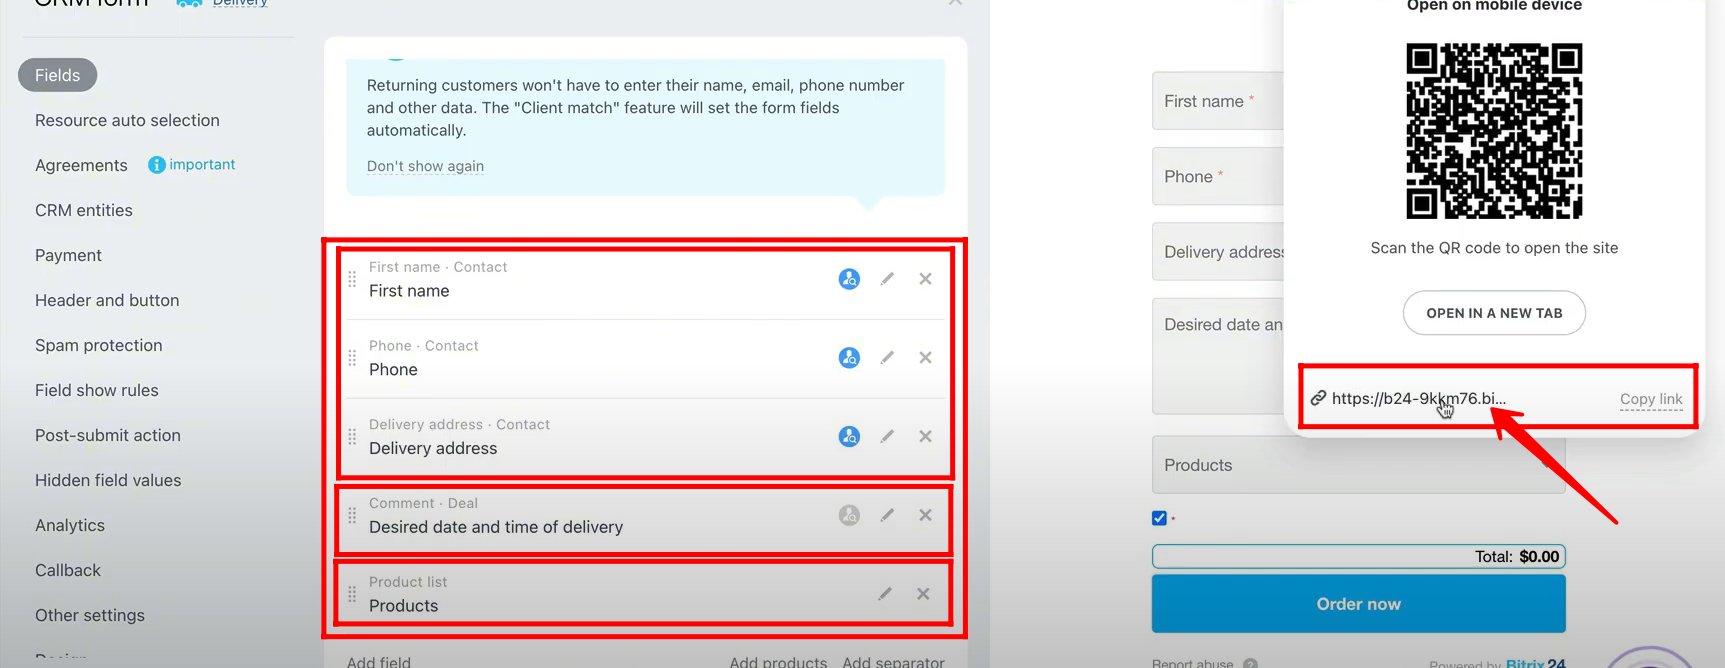
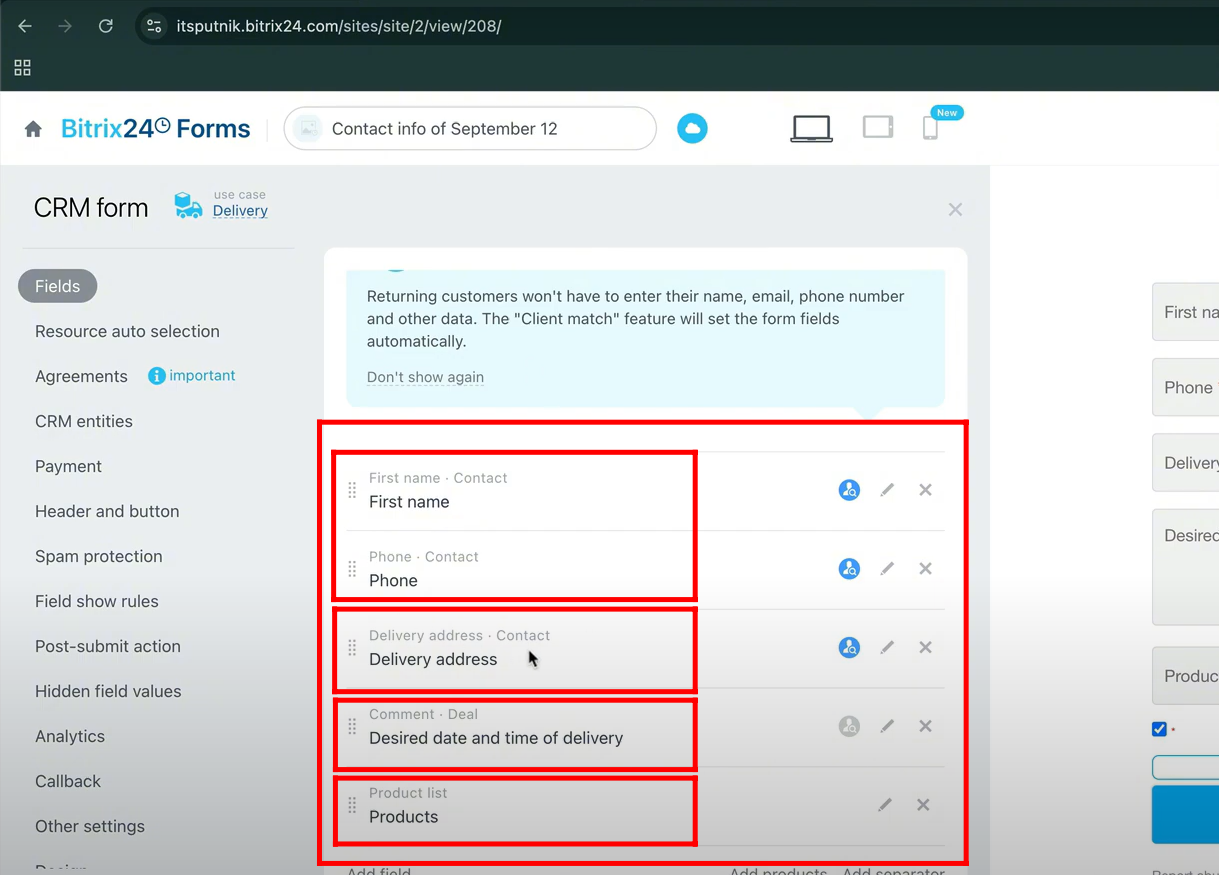
27. By default, the form will include the following fields: First Name, Last Name, and Delivery Address from the Contact entity, along with Desired Date and Time of Delivery from the Deal entity and a Products field. Open the form to test its functionality.
28. Fill in all the required details in the form and click the Order Now button to submit your order.

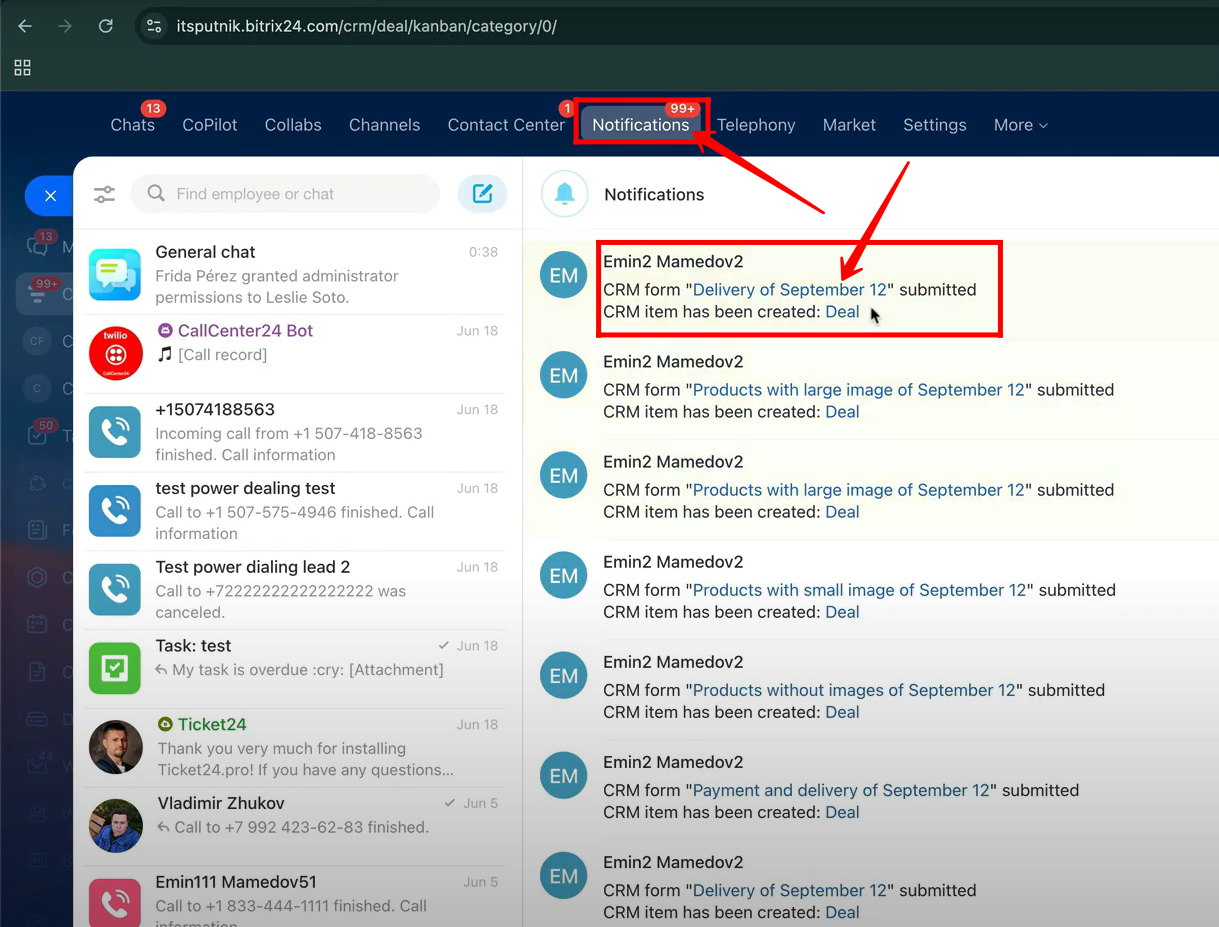
29. Go to Notifications, where you will see a confirmation that the form has been submitted and a new deal has been created. Click on the deal to open and review its details.
30. Open the form configuration panel again, and note that the Delivery Address field will be stored in the Contact entity, while the Desired Date and Time of Delivery field will be saved as a comment within the deal details.
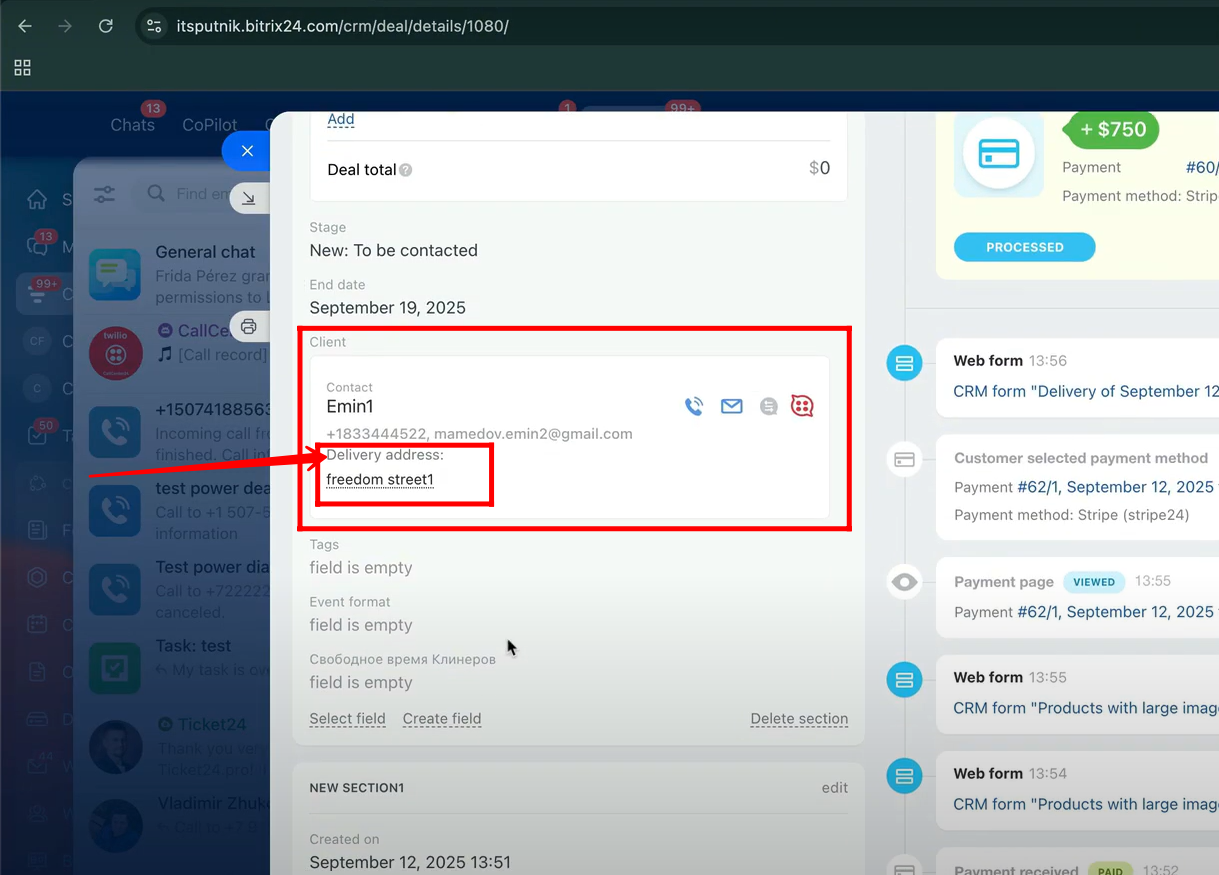
31. Open the deal created after the form submission, and you will see the Delivery Address field value displayed under the Client/Contact section. To view more details, open the linked Contact entity.
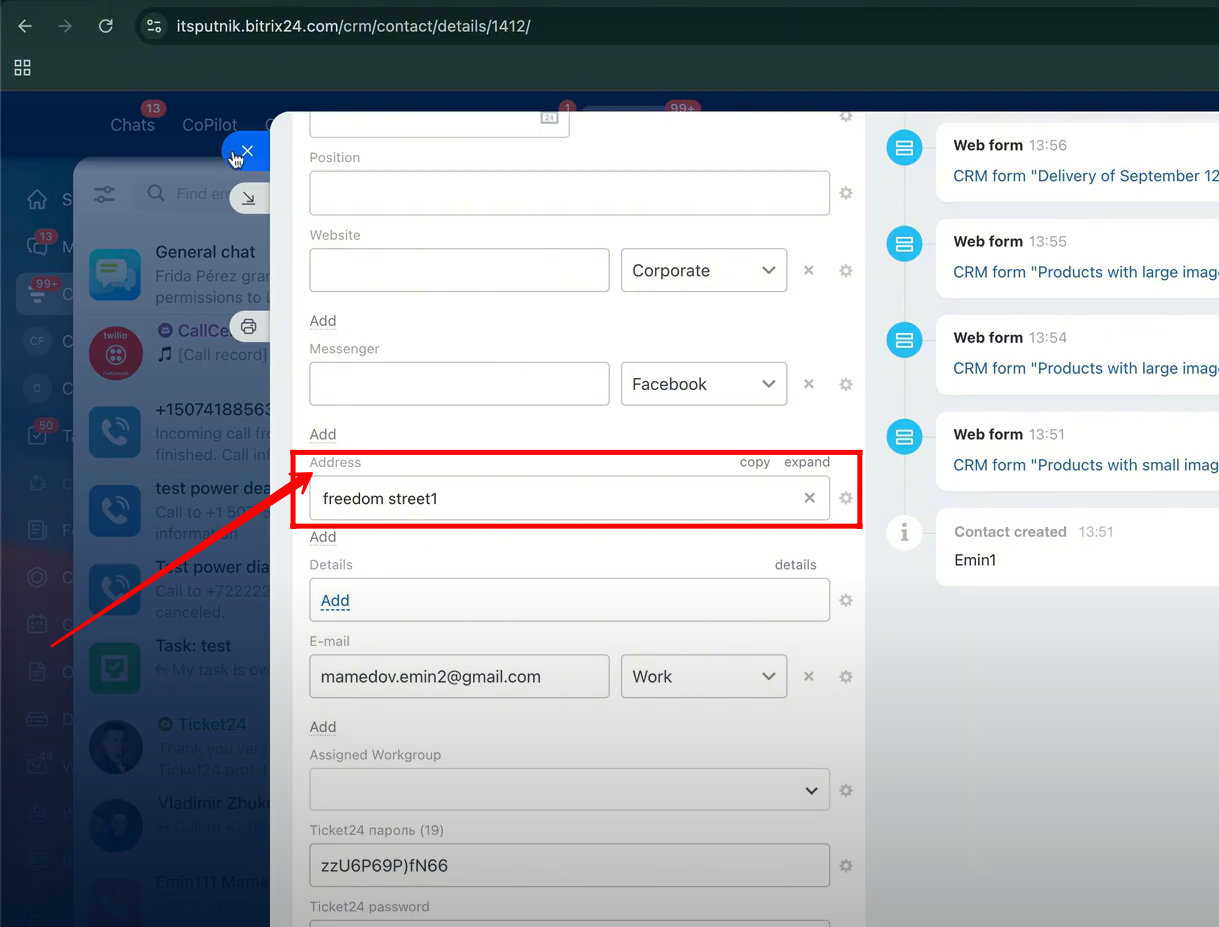
32. Within the contact entity details, the Address field is populated with the delivery address, as this field is linked to the contact entity.
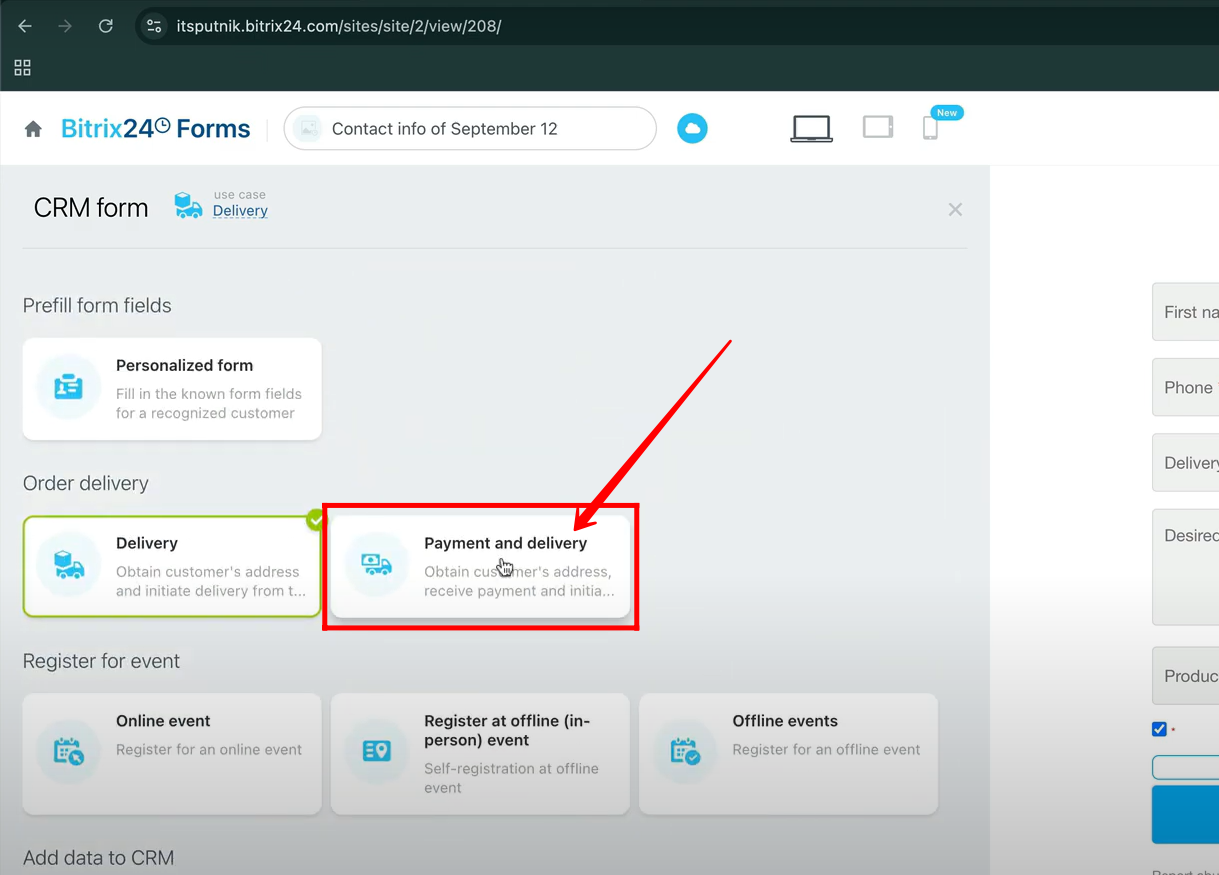
33. To create a new type of form for testing, navigate to the Order Delivery section and select the Payment and Delivery card.
34. Along with collecting delivery details, you can now accept payments as well. Go to the Payment section in the form settings and enable the Stripe24 payment option to receive payments. If needed, you can also connect PayPal as an additional payment method.
35. Now, open the form, complete all required fields with the necessary details, and click Send/Order to submit the form. After submission, proceed to the payment page to complete the payment for the selected products or services.
36. After submitting the form, you will be redirected to a Thank You page. From there, click the Proceed to Payment button to move to the checkout page and finalize your payment.
37. On the checkout page, you will see the list of selected products along with the total amount to be paid. Click the Pay button to continue with the payment process.
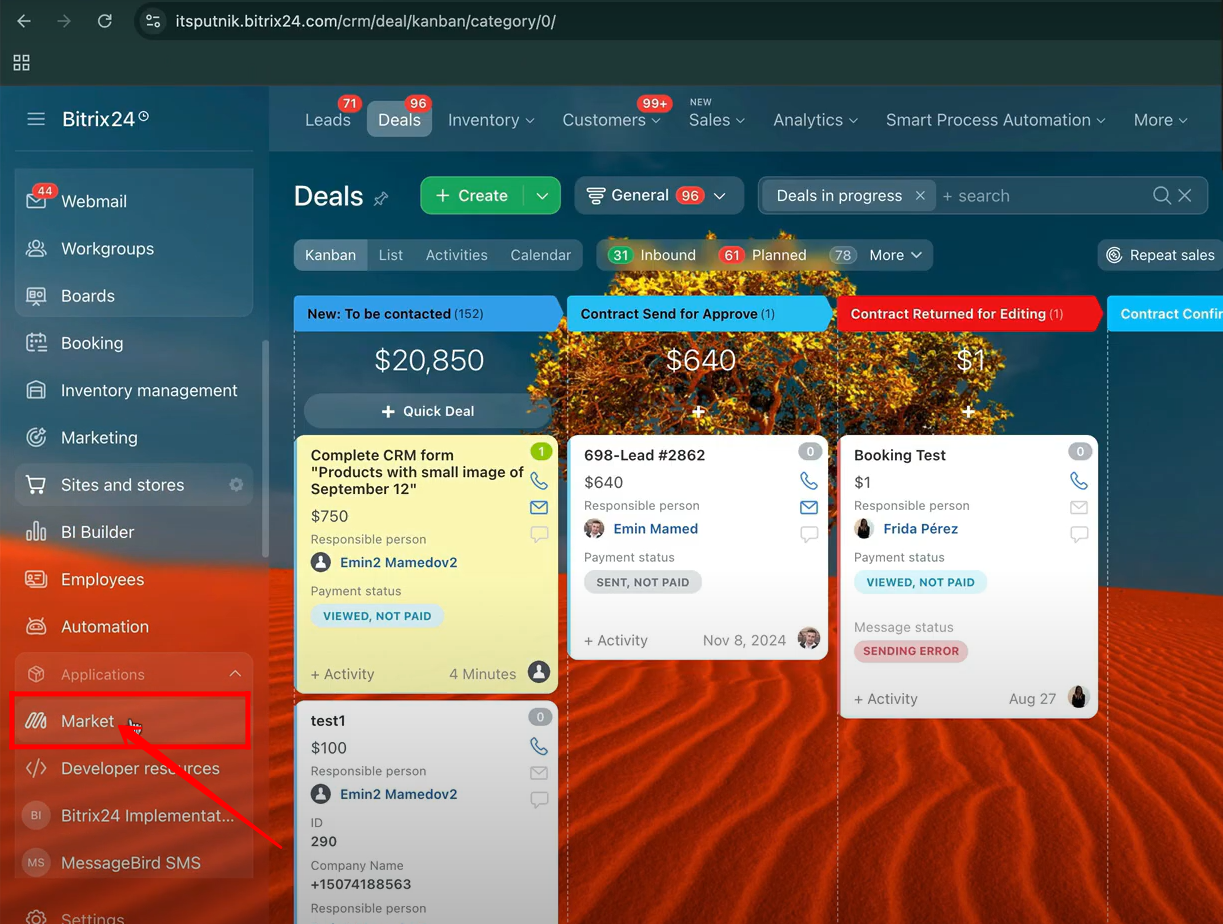
38. To install the Stripe24 application in Bitrix24, go to the Market section from the left-side panel.
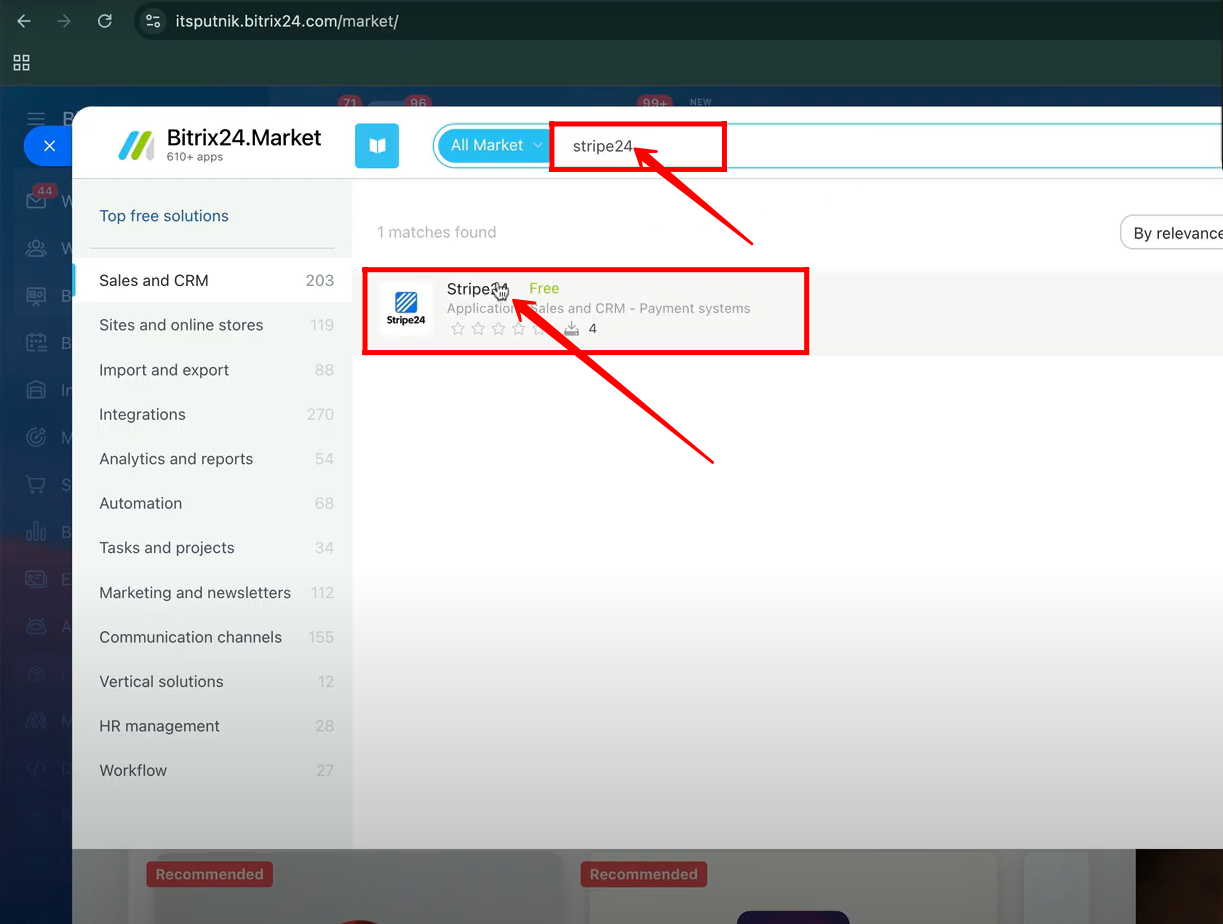
39. In the Market section, type Stripe24 in the search bar, then click on the Stripe24 application from the results to open its installation page.
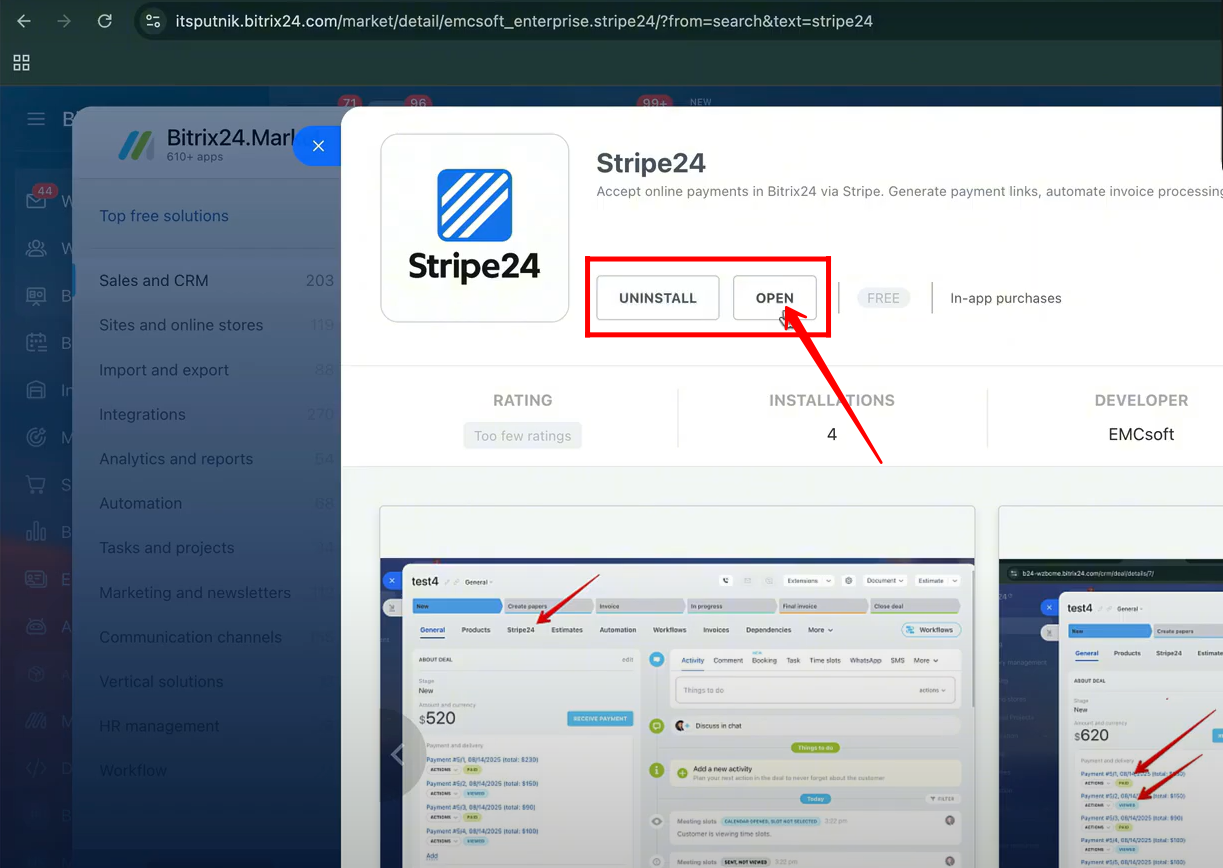
40. On the Stripe24 application page, you will see the Install button to add the app to your Bitrix24. Since the app is already installed in this case, simply click the Open button to access its configuration settings.
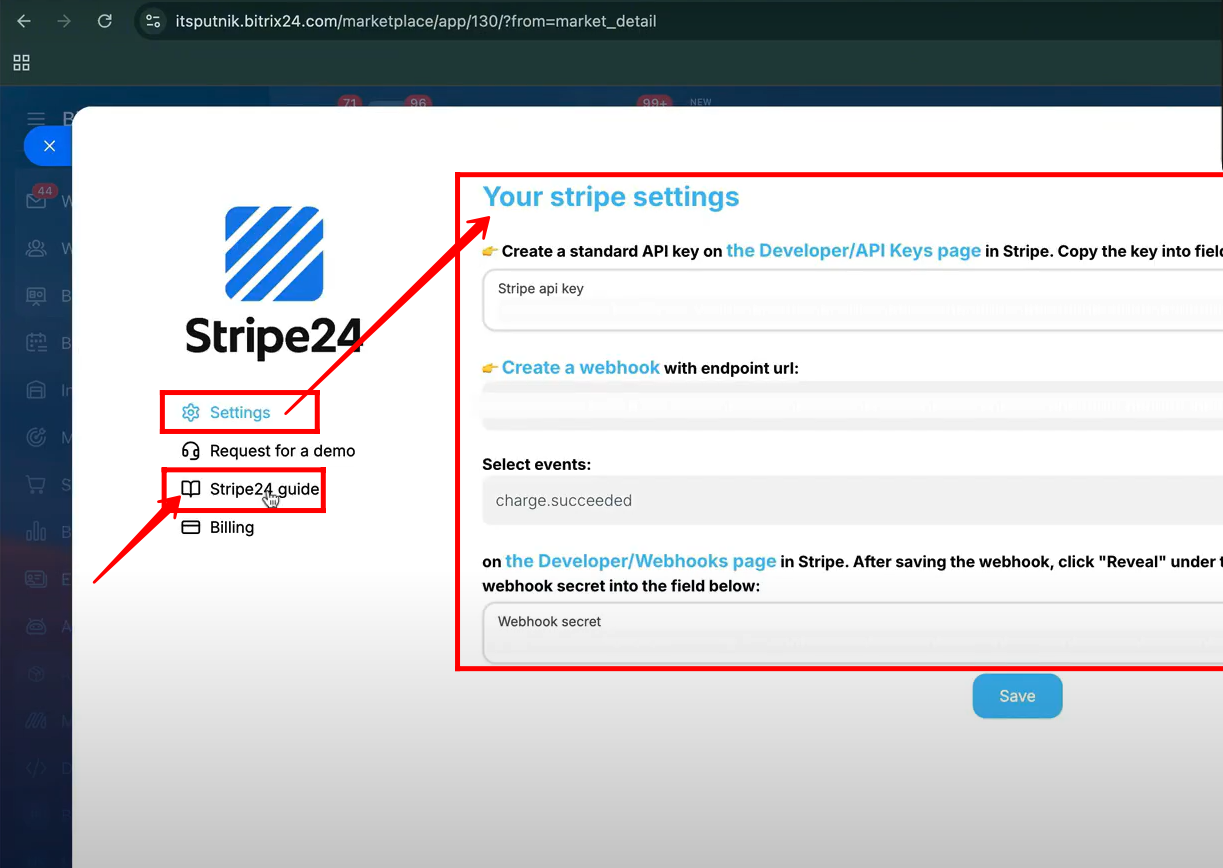
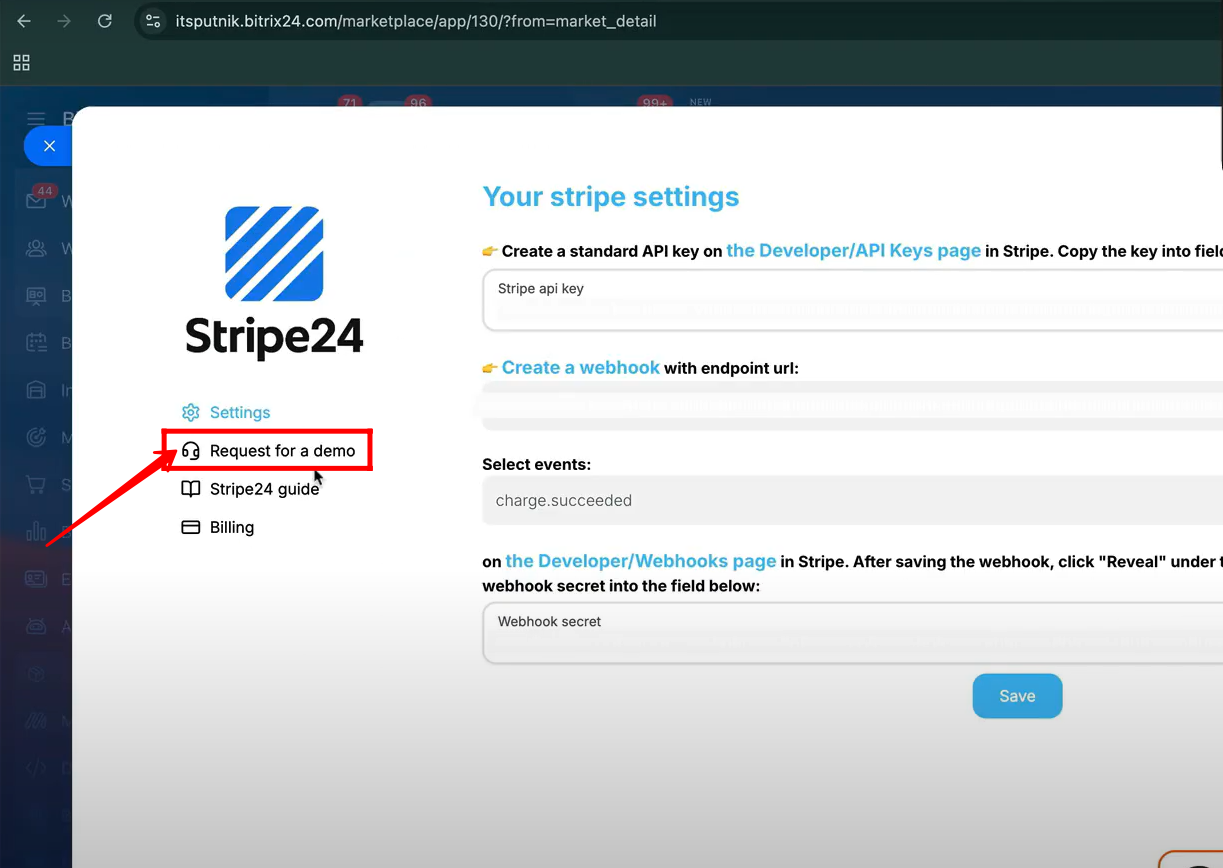
41. Inside the Stripe24 configuration panel, under the Settings section, you will find options to add your Stripe API key, enter the webhook secret, choose specific events, and create a webhook using the provided endpoint URL before saving the setup. If you are not familiar with these technical steps or with Stripe integration in general, it’s best to refer to the Stripe24 Guide, which provides detailed instructions for completing the entire configuration process.
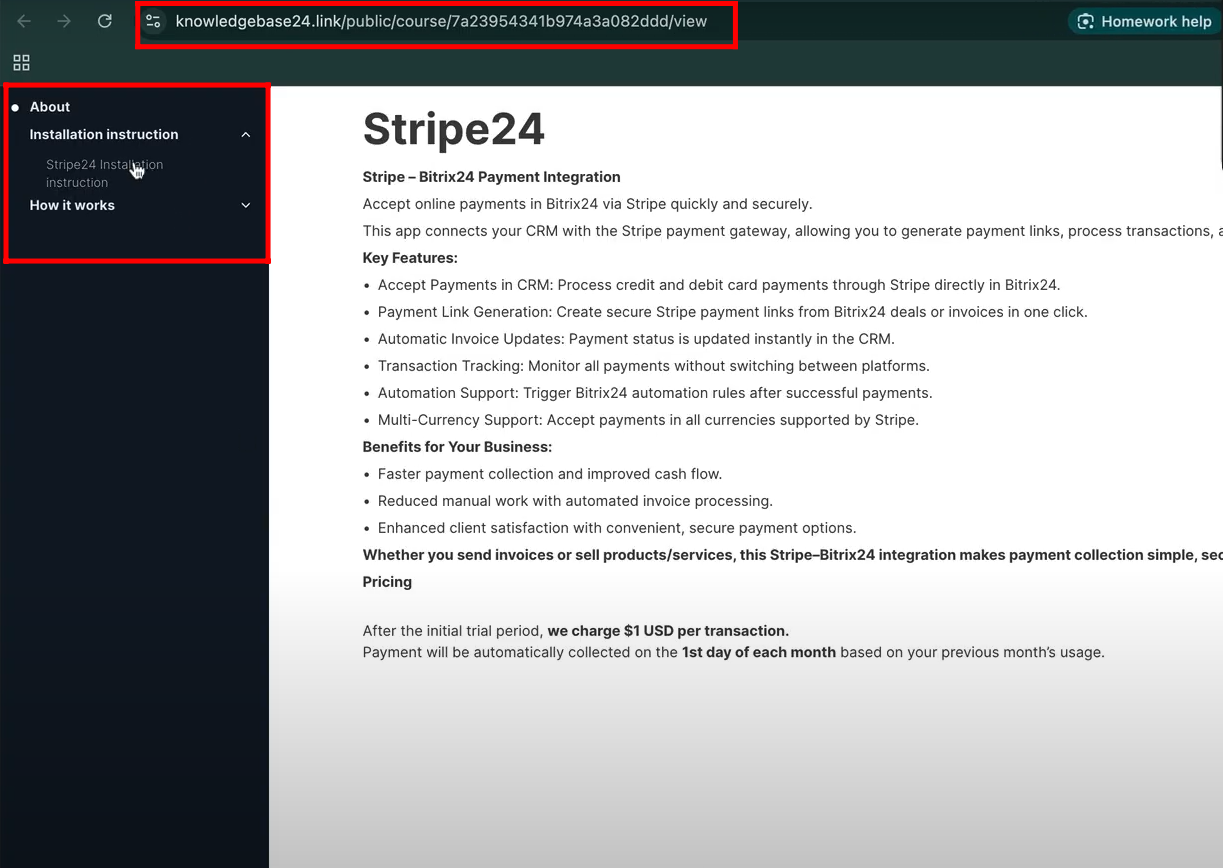
42. After clicking on the Stripe24 Guide, a new tab will open containing dedicated instructions and articles organized into modules such as About, Installation Instructions, and How It Works. Each module provides detailed guidance to help you understand the application, set it up properly, and manage payment processes within Bitrix24.
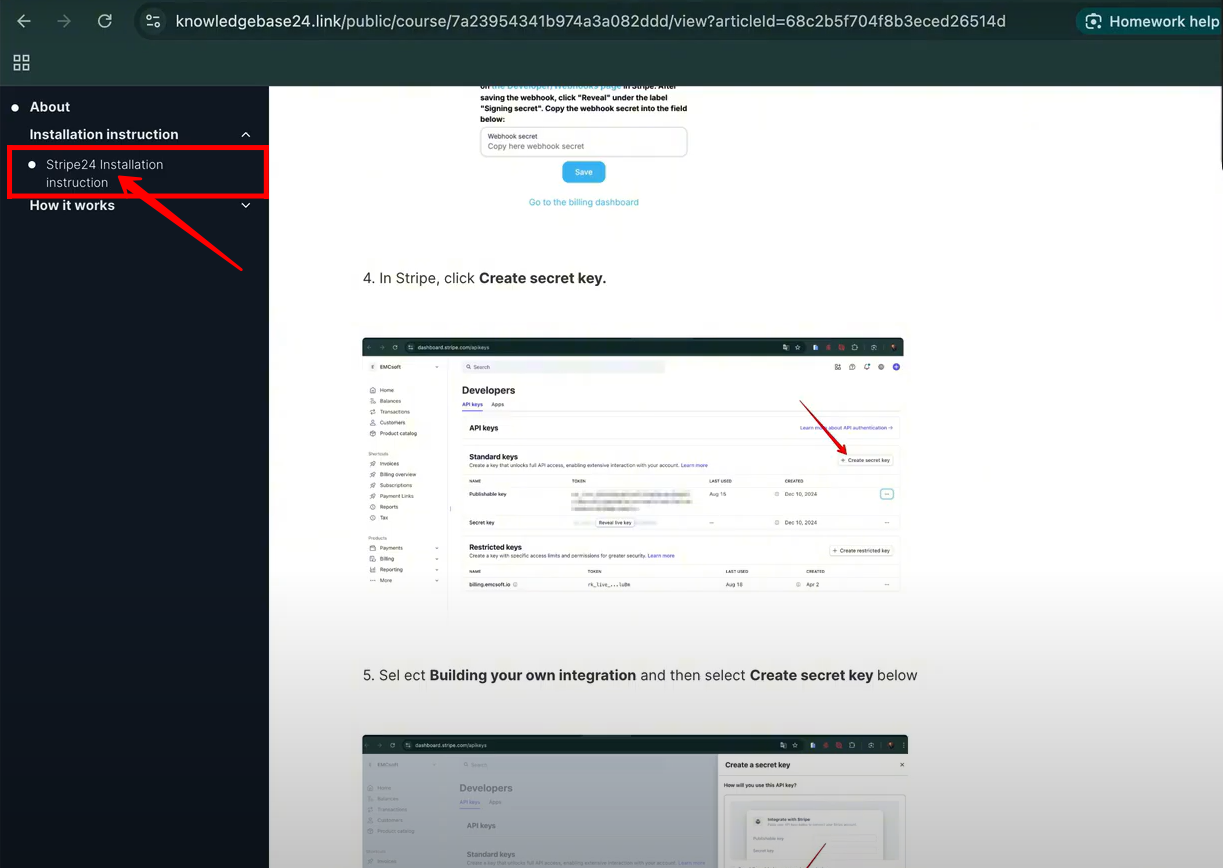
43. Open the Stripe24 Installation Instructions article to access detailed, step-by-step guidance for configuring the Stripe24 application within Bitrix24. This article walks you through all the necessary setup steps to ensure the payment system works correctly in your portal.
44. If you would like a full walkthrough and a live demonstration, go to “Request for a Demo” in the Stripe24 configuration panel. You can schedule a meeting with us, and we will guide you through the entire process step by step.
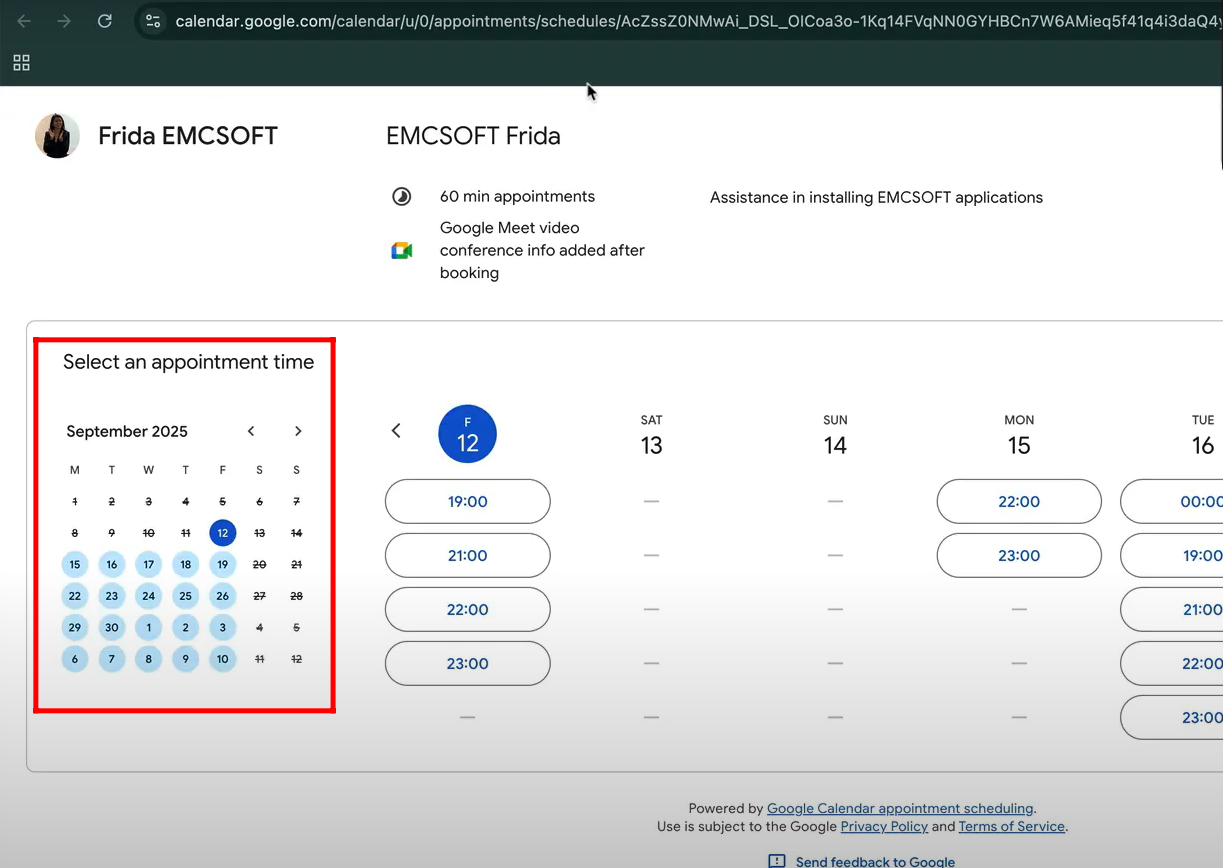
45. After clicking “Request for a Demo”, you will be redirected to the Google Calendar of our representative, Frida. Please select a convenient date and time for the meeting. During the session, she will guide you through the entire process step by step.
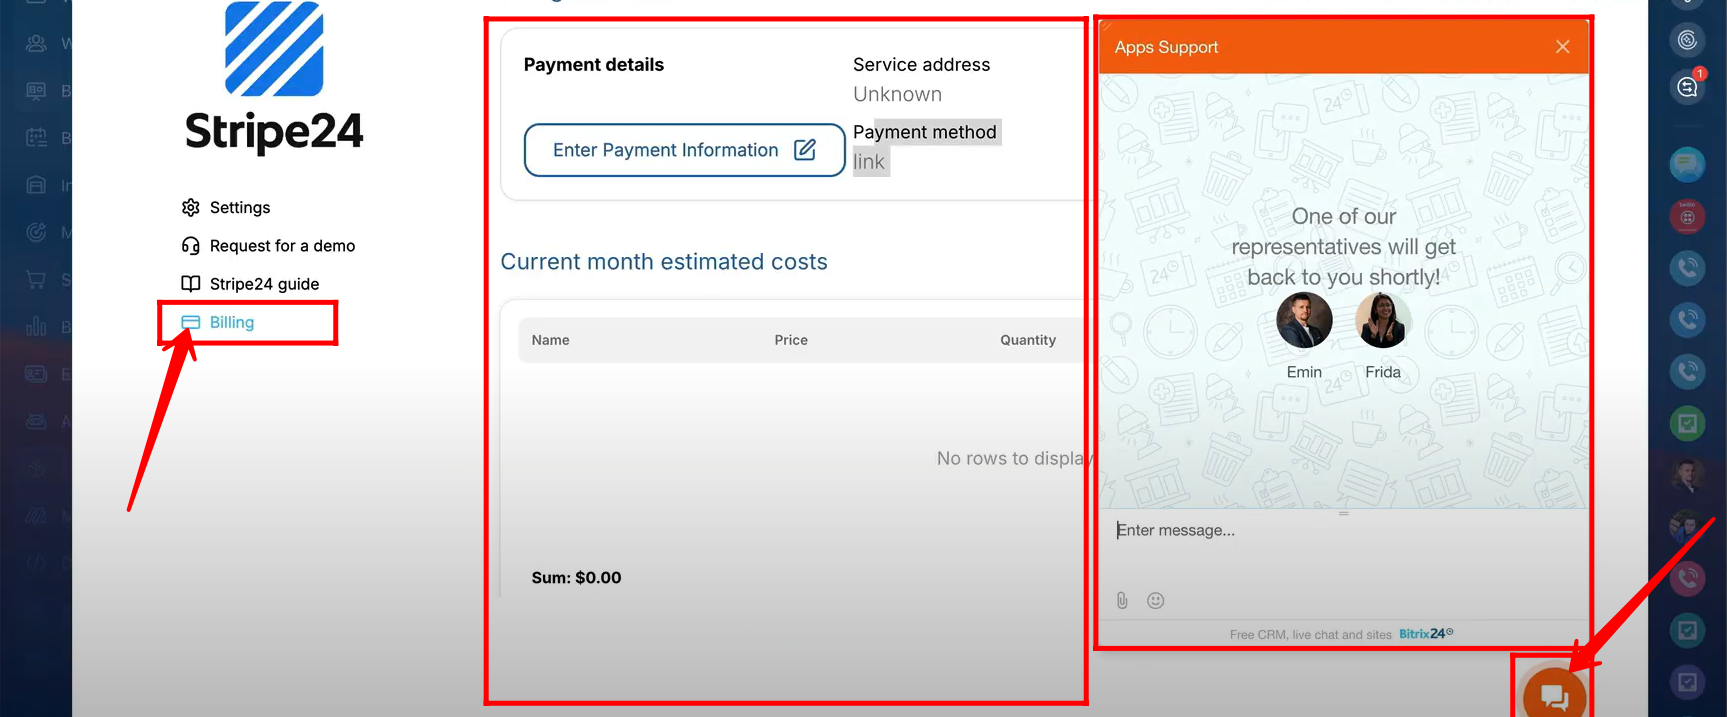
46. In the Stripe24 configuration panel, click on the “Billing” option to add your payment details. Here, you can view all the costs associated with your account. If you need any help, use the chat option to leave a message, and one of our representatives will respond to you shortly.
“You can watch video on Youtube”