| 1813 Views | admin
Bitrix24 offers a powerful platform for managing customer interactions, and the Contact Center module is an essential tool for businesses looking to handle communications efficiently. With the ability to integrate multiple channels such as WhatsApp, Facebook, Live Chat, Telegram, and more, all client messages can be centralized in one place, making it easier for teams to respond quickly and maintain a high level of service.
Open Channels within Bitrix24 provide a structured way to manage client communications. By connecting different messaging platforms, businesses can ensure that messages reach the right agents and that every enquiry is tracked and addressed. This setup not only improves response times but also gives teams the flexibility to manage multiple conversations simultaneously.
In this guide, we will focus on configuring an open channel for WhatsApp using the CallCenter24 integration. You will learn how to set up queues, manage agent information, automate responses, and ensure that all client interactions are captured in the CRM for follow-up. By the end of this guide, you will be able to handle WhatsApp conversations within Bitrix24.
Testing and monitoring the open channel is a crucial step to ensure it functions as expected. Once configured, you can observe how messages flow from clients into Bitrix24, how automated replies are sent, and how internal communications between agents can occur without interrupting the client experience. This approach ensures a smooth, professional, and responsive communication process.
“Detailed Instructions are given below”
1. In Bitrix24, navigate to the Contact Center. Here, you can connect multiple open channels to various sources such as Telephony, Live Chat, Facebook Lead Ads, Facebook Comments, Telegram, Website Forms, WhatsApp, and more. This allows you to consolidate all your messages in one place within Bitrix24. For practice and learning purposes, let’s explore the CallCenter24 WhatsApp integration, which is one of the best configurations for a WhatsApp open channel.
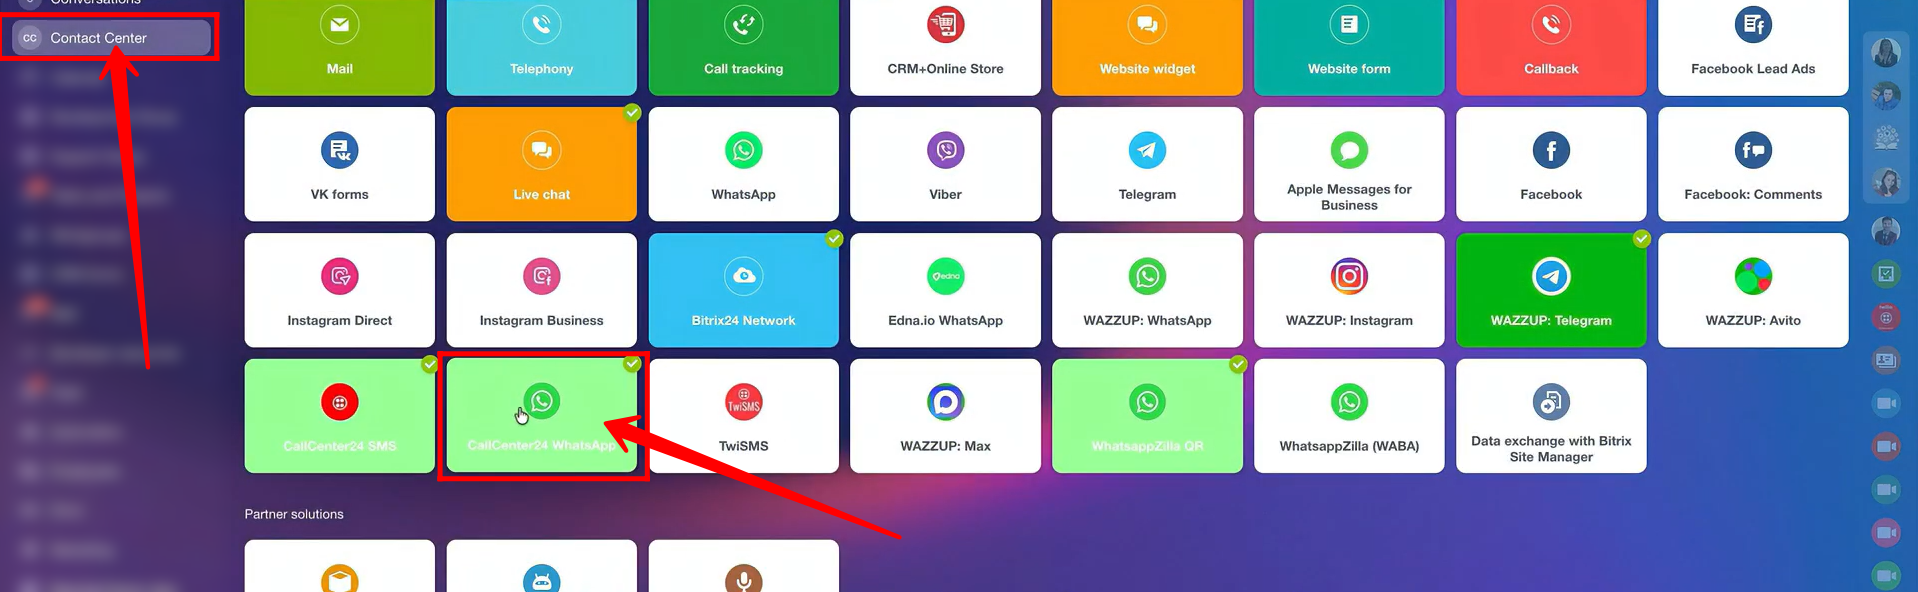
2. Here, you have the option to connect your WhatsApp account through our CallCenter24 application, which we will cover in detail in the next guide. For now, let’s focus on configuring the open channel for this integration. The process of setting up an open channel is very similar across all sources (an open channel serves as a pathway for communication through a specific channel).
If you have previously connected an open channel, you will see an option to configure it. If you are new, you will be prompted to create a new open channel.
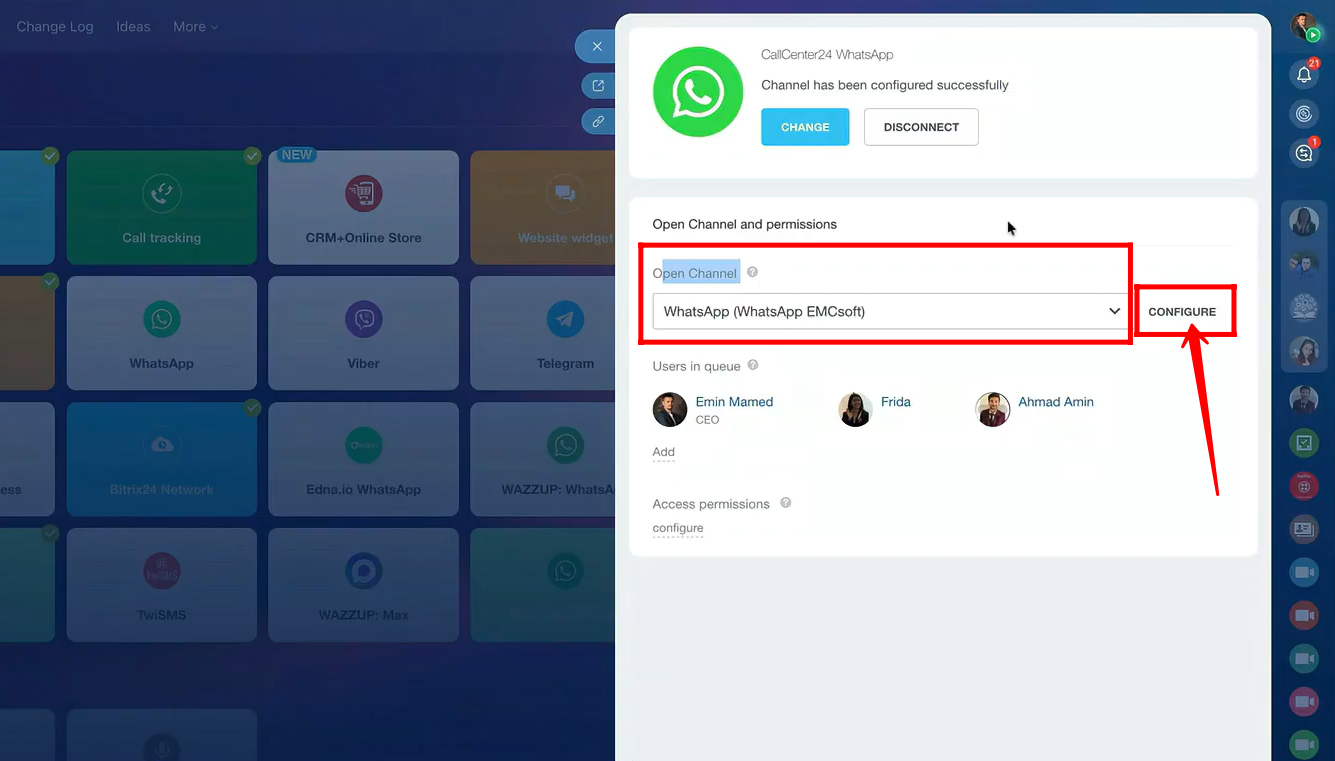
3. In the configuration panel, go to the first tab, Queue. Here, you can add your company employees to the agent queue and set up how incoming messages should be distributed among them. You have three options for distribution of submissions:
- Evenly – messages are distributed equally among all agents.
- Exactly as enqueued – messages are assigned in the order they arrive.
- To everybody – every agent receives the same message.
This setup determines how client messages (via WhatsApp, with number configuration already explained in previous guides) are routed to your employees for handling and replying to leads.
You can also enable or disable the option “Check that an agent is online when routing enquiries”, which ensures that messages are assigned only to available agents.
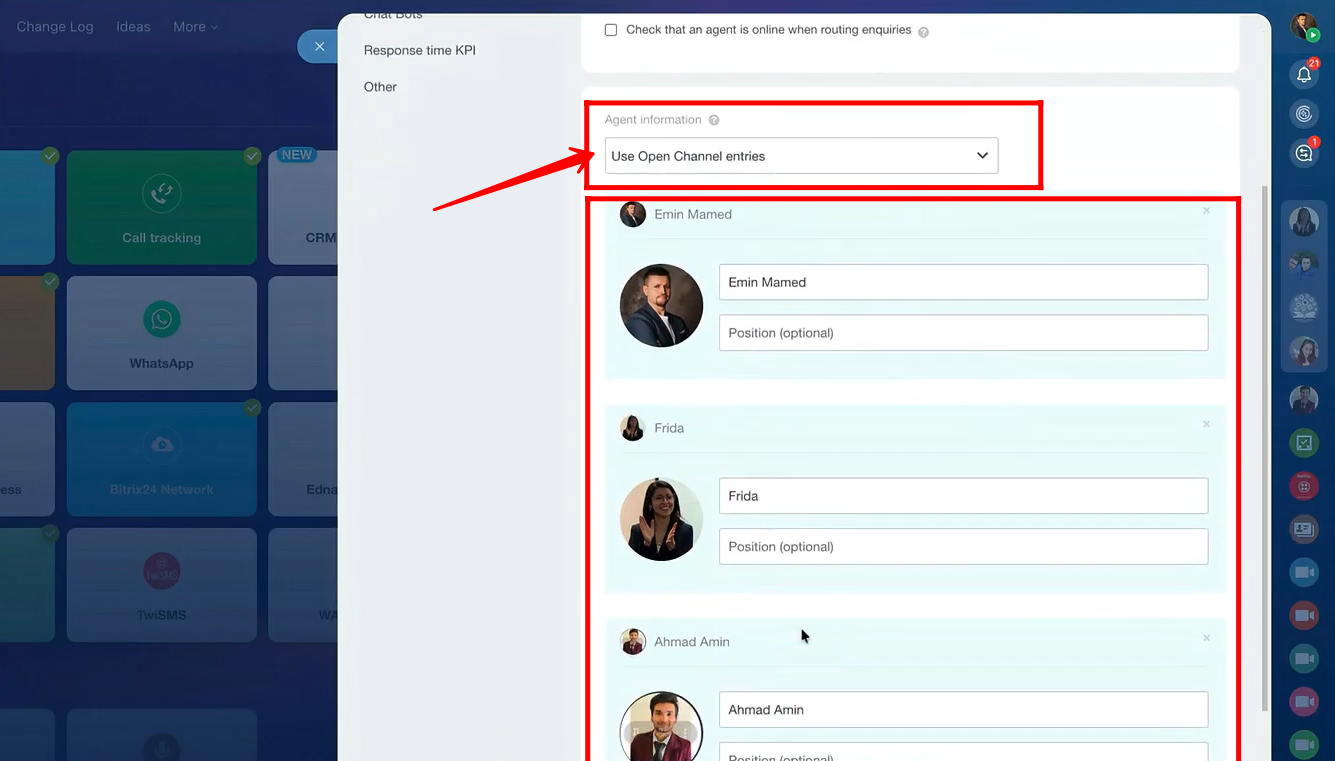
Next, in the Agent Information section, you can choose what information is visible to the client:
- Use employee user profile
- Hide agent information
- Use open channel entries

4. If you select the “Use open channel entries” option in the Agent Information section, you can display the agent’s profile picture, name, and optionally their position to clients.
5. If you select the “Hide agent information” option in the Agent Information section, you can display a default profile picture and name that you configure. Regardless of which agent is handling the lead, clients will always see this default picture and name.

6. You can enable or disable the following options:
- Verify client in CRM database – If the client already exists in your CRM, their information will be linked, and this chat will be associated with that contact.
- Enable chat tracker – If the client sends messages from multiple sources, such as Facebook, Instagram, or WhatsApp, all chats will be linked to the same contact.
If the client is not found in the CRM, you can choose whether to auto-create a lead, auto-create a deal, or auto-create a contact. In this example, we have selected auto-create a lead.
Next, choose the new lead source from the available channel options.
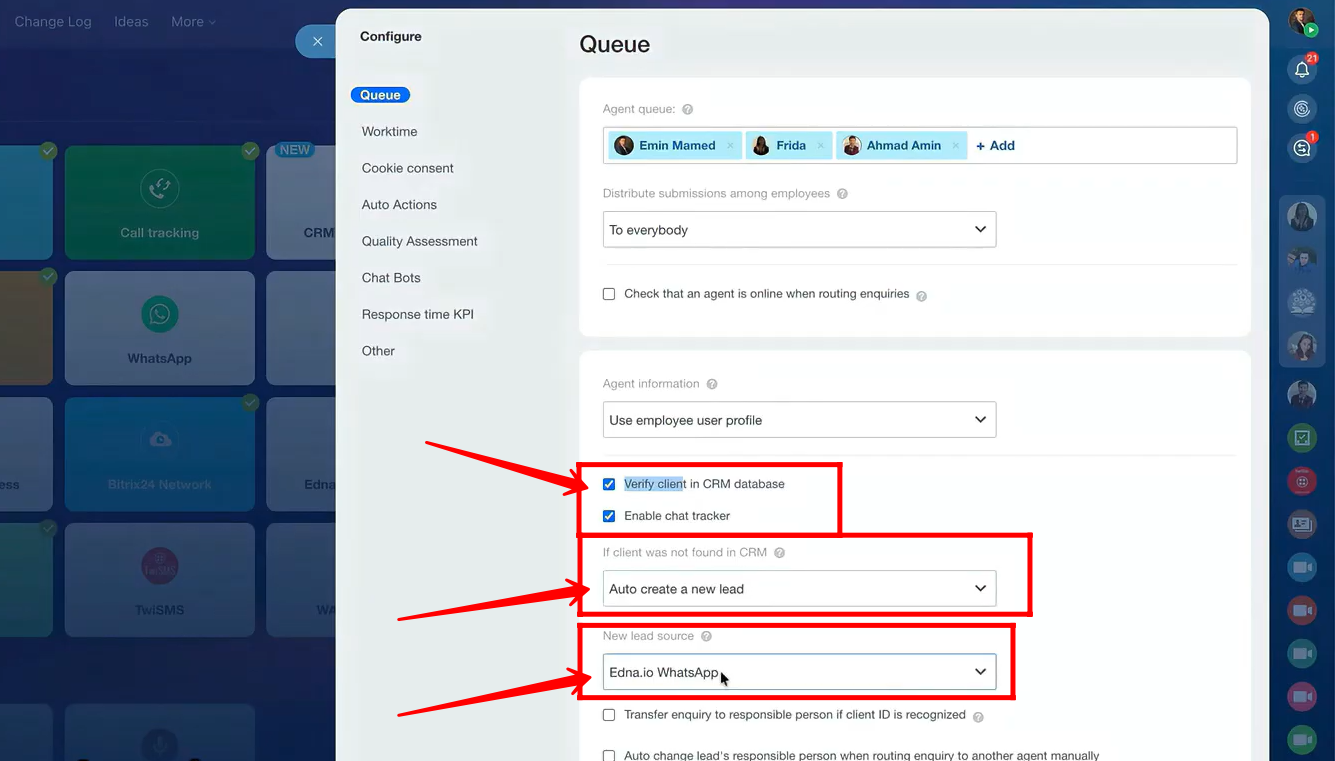
7. We will select “CallCenter24 WhatsApp” as the new lead source.

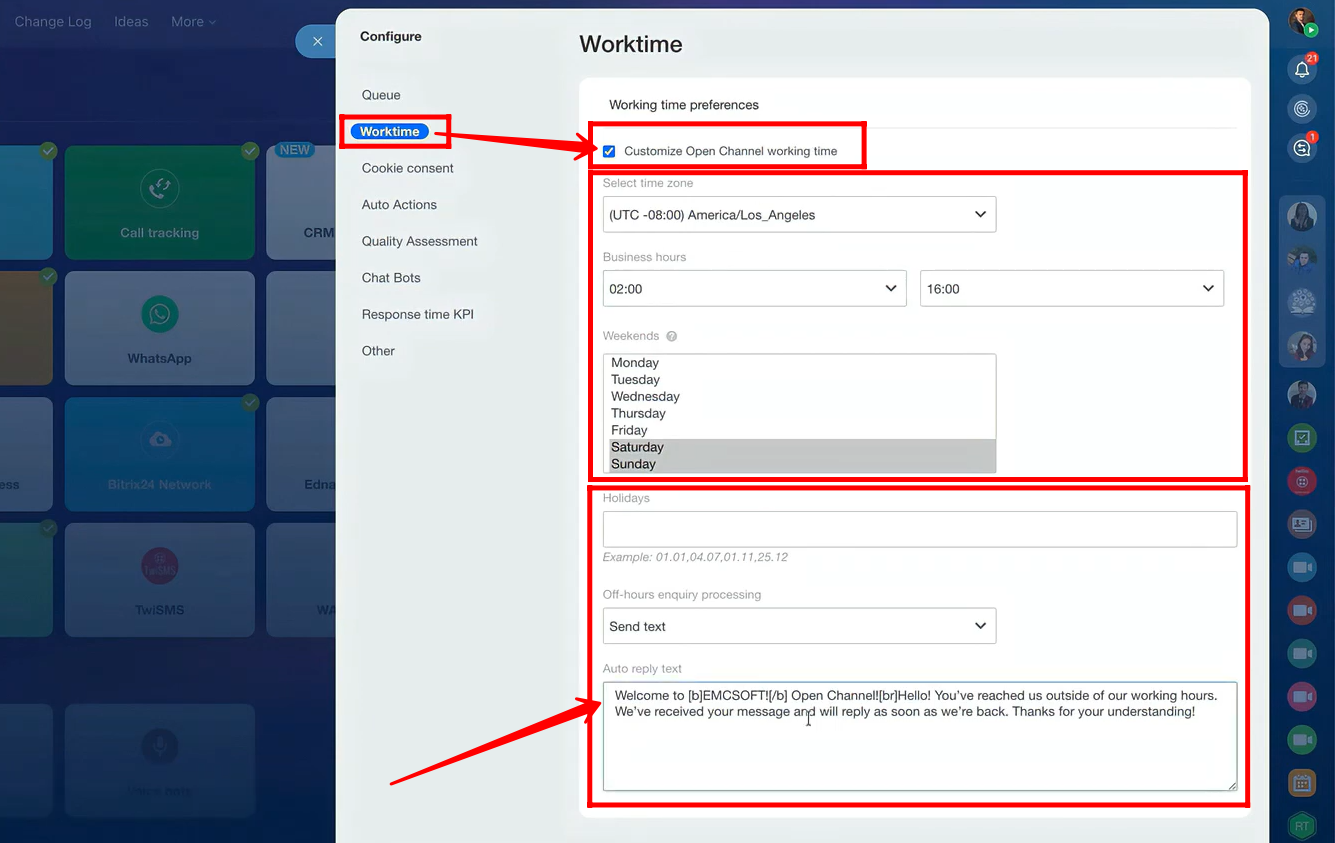
8. Next, go to the Worktime tab. Here, you can customize the working hours for the open channel. Select the time zone, business hours, and weekdays (useful for defining off-days or weekends). You can also manually enter custom holiday dates. Additionally, you can create pre-written messages to automatically reply to enquiries received outside of working hours.
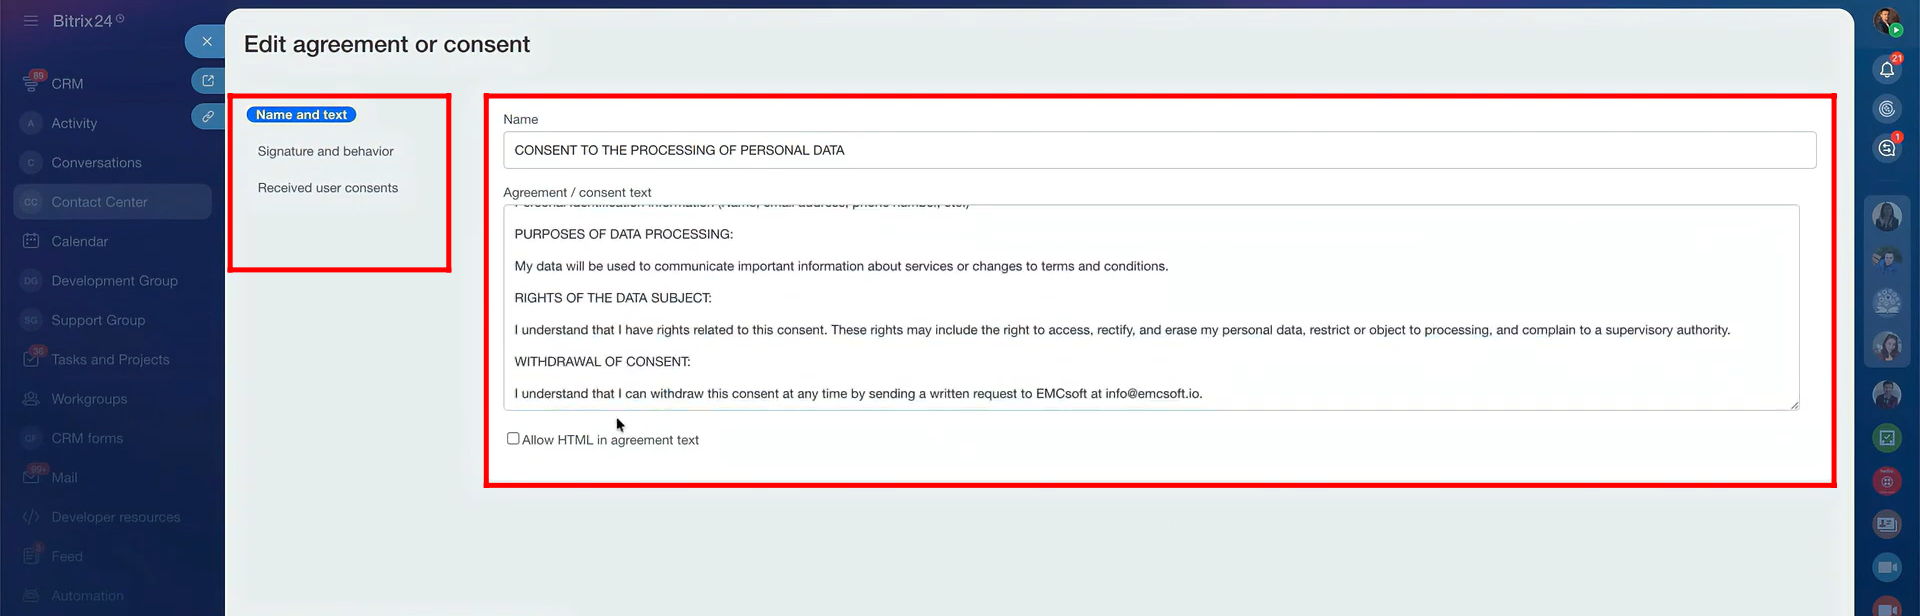
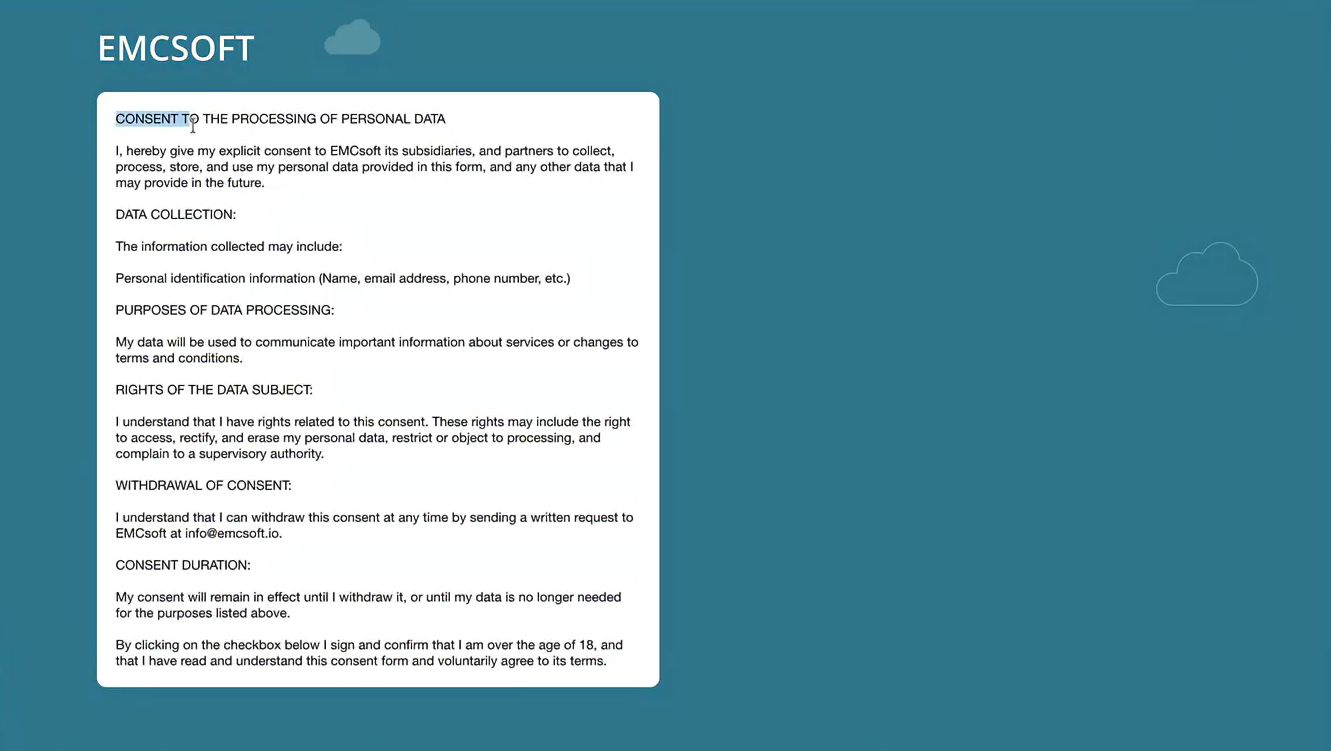
9. Navigate to the Cookie Consent tab. Here, you can enable the option “Send warning about collecting personal data” by checking the box. You can choose an existing consent, edit its settings, or create a new consent from scratch.

10. Here, you can edit the name and consent text of the agreement, add a signature, and make other adjustments in line with your company policy.
11. This is how your client will receive the consent link in the chat. They can click the link to view and read your consent.
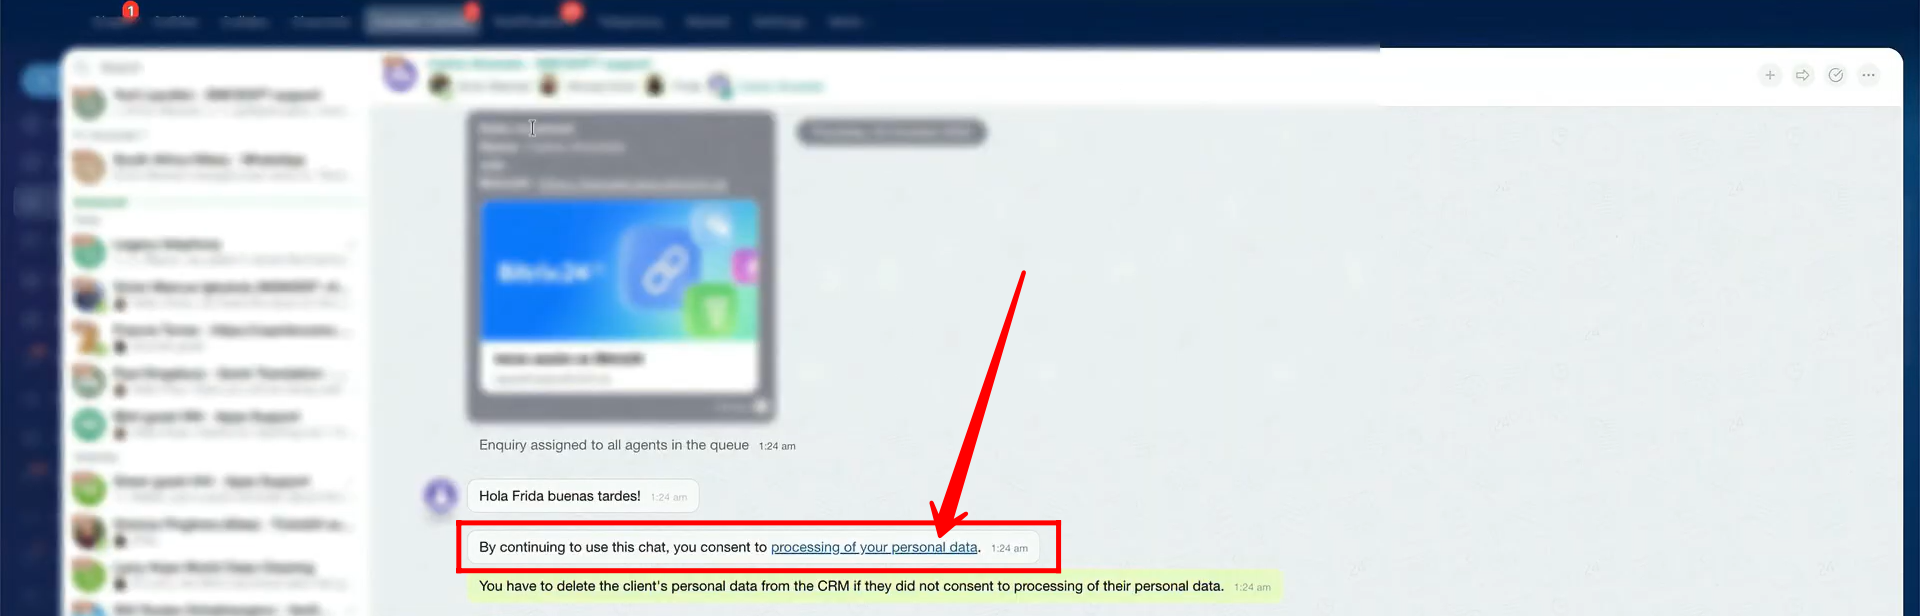
12. Clients will see the consent you configured displayed like this, just as we have set it up for our clients to read.
13. Navigate to the Auto Actions tab. Here, you can configure greetings to be sent either only once on the initial contact or every time a customer starts a new conversation. You can set up an auto-reply message to be sent as the greeting.
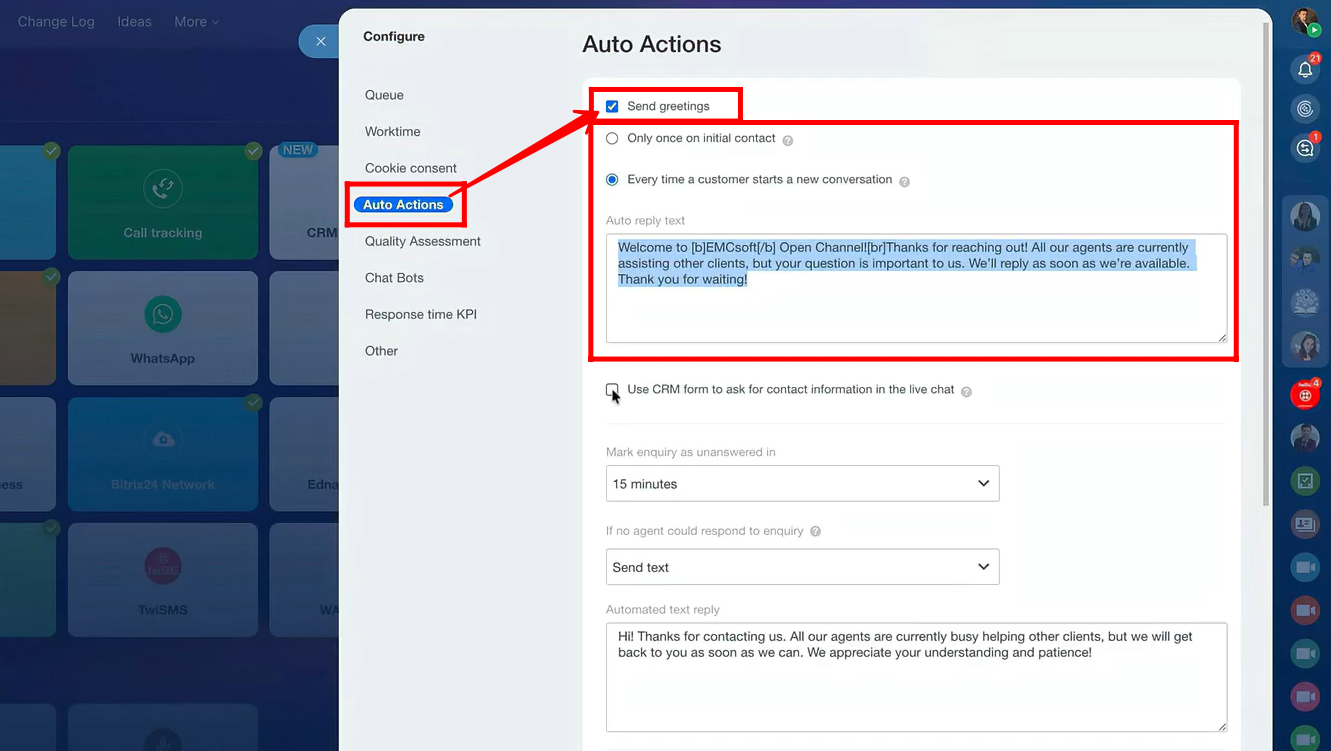
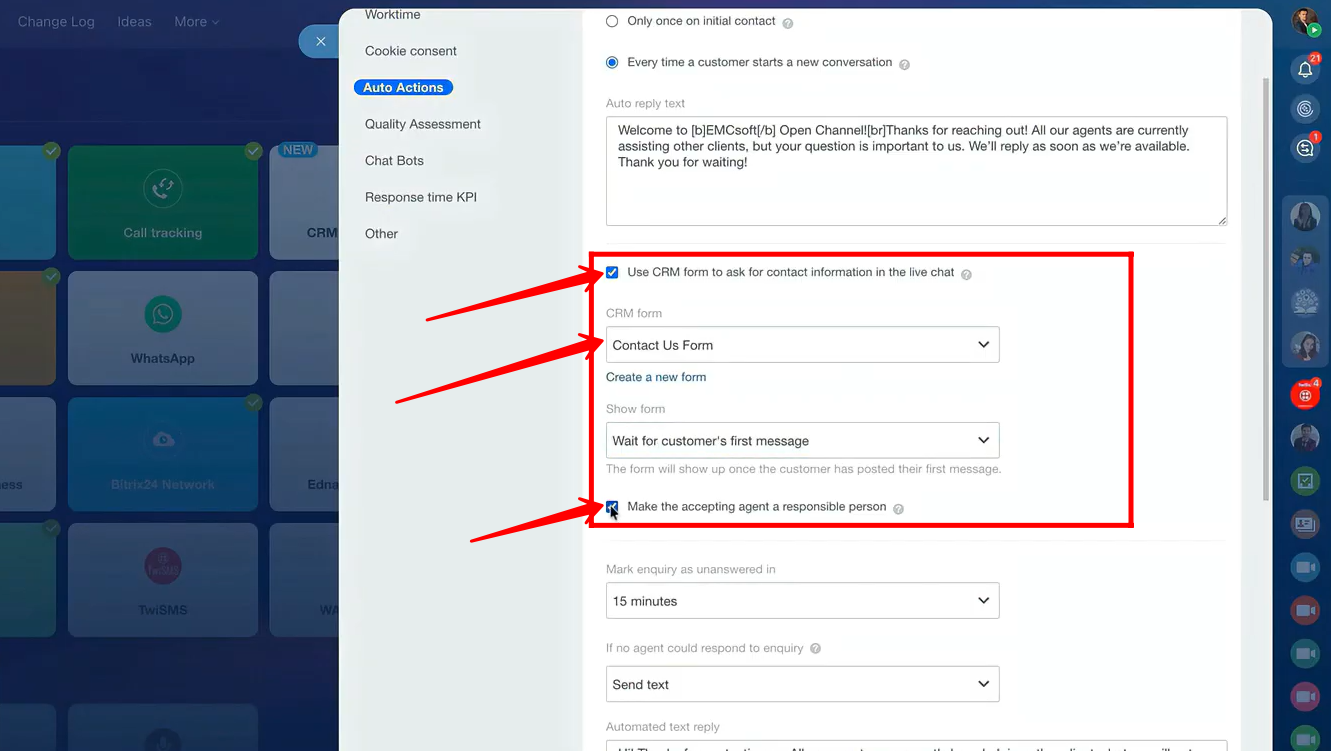
14. You can enable the option “Use CRM form to ask for contact information in the live chat.” Then, select an already configured form and choose when it should appear—either “Before conversation” or “Wait for customer’s first message.”
If needed, you can also enable the checkbox “Make the accepting agent a responsible person.” By default, the responsible person is the employee set in the CRM form settings, but enabling this option will assign responsibility to the agent who accepts the customer’s chat.
15. Go to CRM Forms in the Bitrix24 panel and open the form you selected in the open channel configuration to preview it.
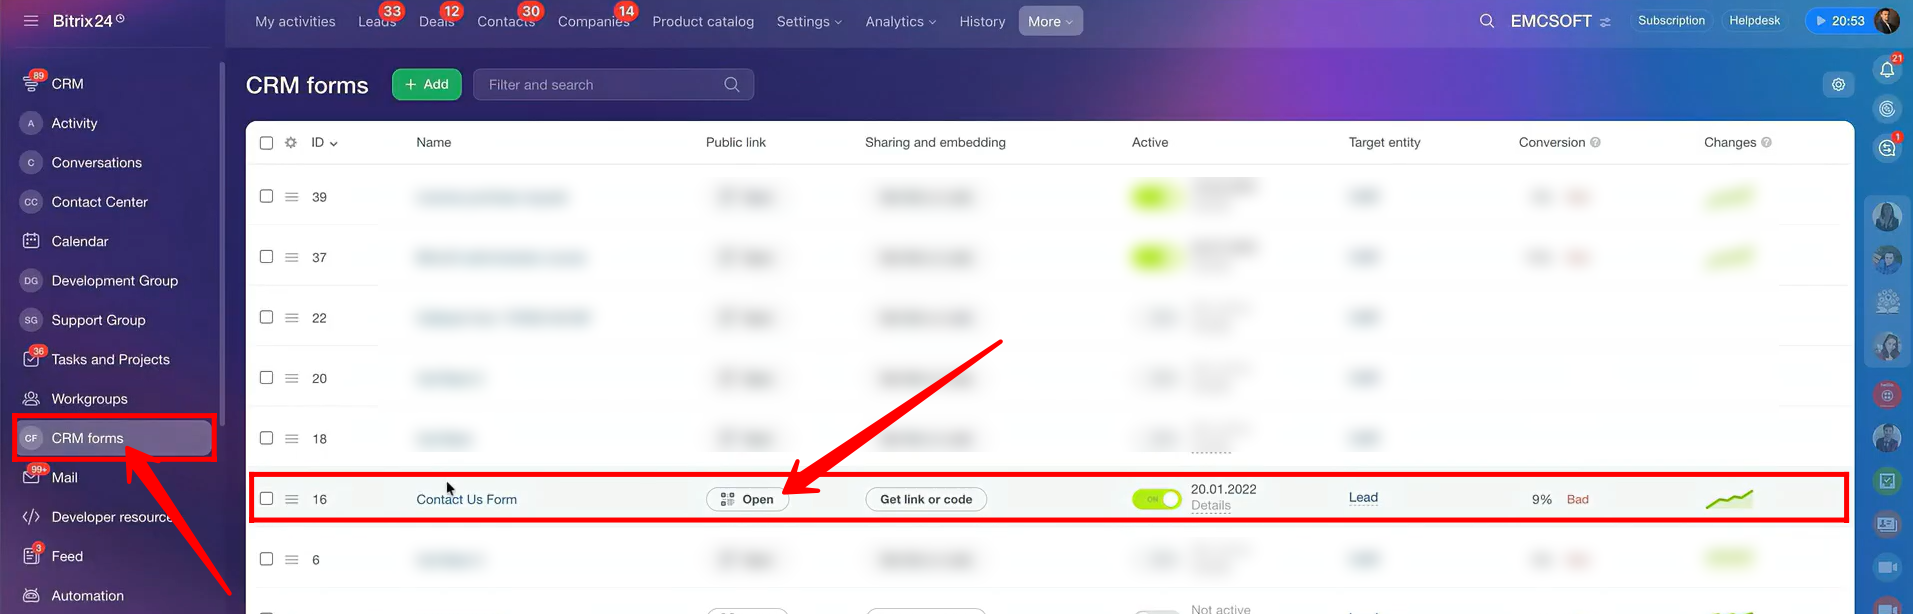
16. Here is the form that will be shown to the client in the live chat to collect their contact information based on our configuration.

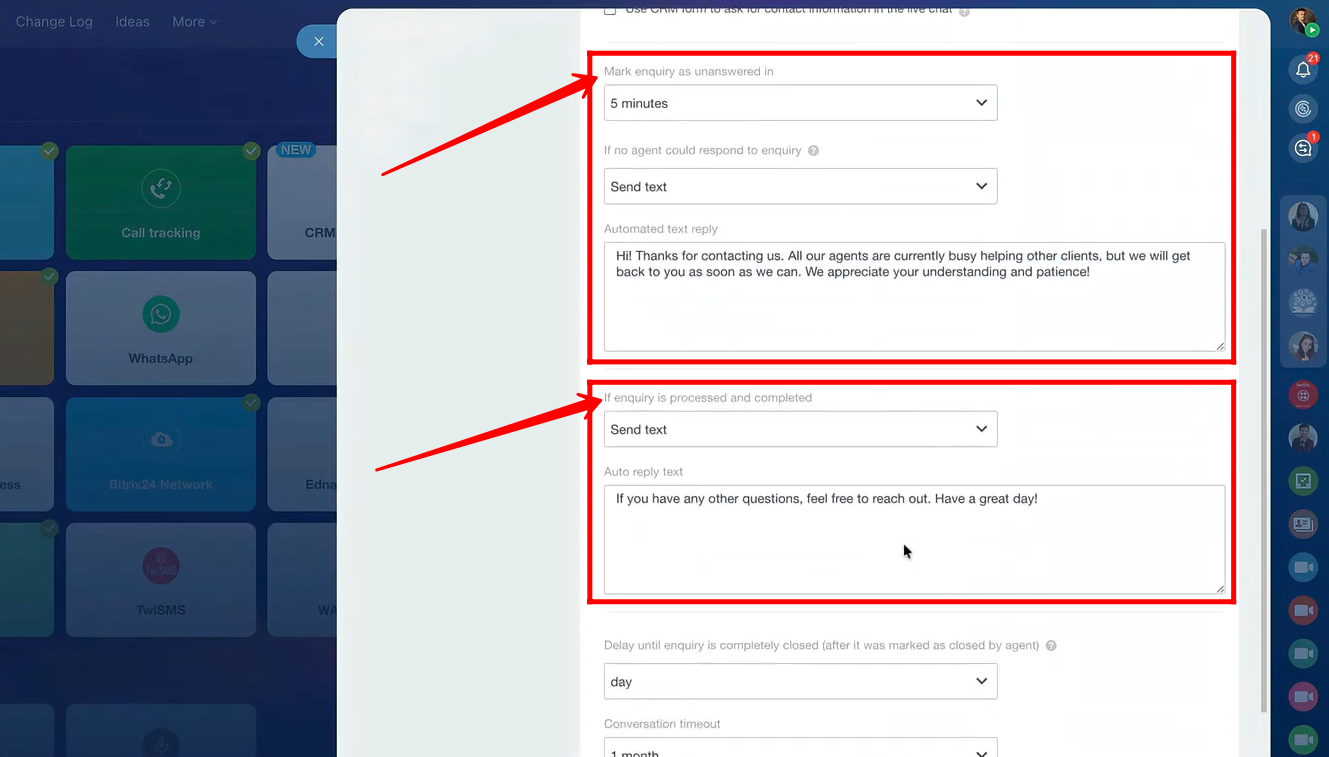
17. You can configure an automatic message to be sent if no agent responds to an enquiry within a specified time (several time-span options are available). You can also set up an additional message to be sent once the enquiry has been completed and processed.
18. Here’s how you can end the conversation: simply click this icon within the chat, and the client will receive the message we configured in the previous step.

19. You can also set the delay time for “Delay until enquiry is completely closed (after it was marked as closed by the agent)”. Several time options are available, and in this example, we’ve set it to 1 day.
You can additionally configure the conversation timeout, choosing what action to perform—such as sending a pre-configured message to the client.
After that, you’ll have the option to select a canned message from your canned response list. If you haven’t already chosen a template, you can edit an existing one or create a new one from scratch.
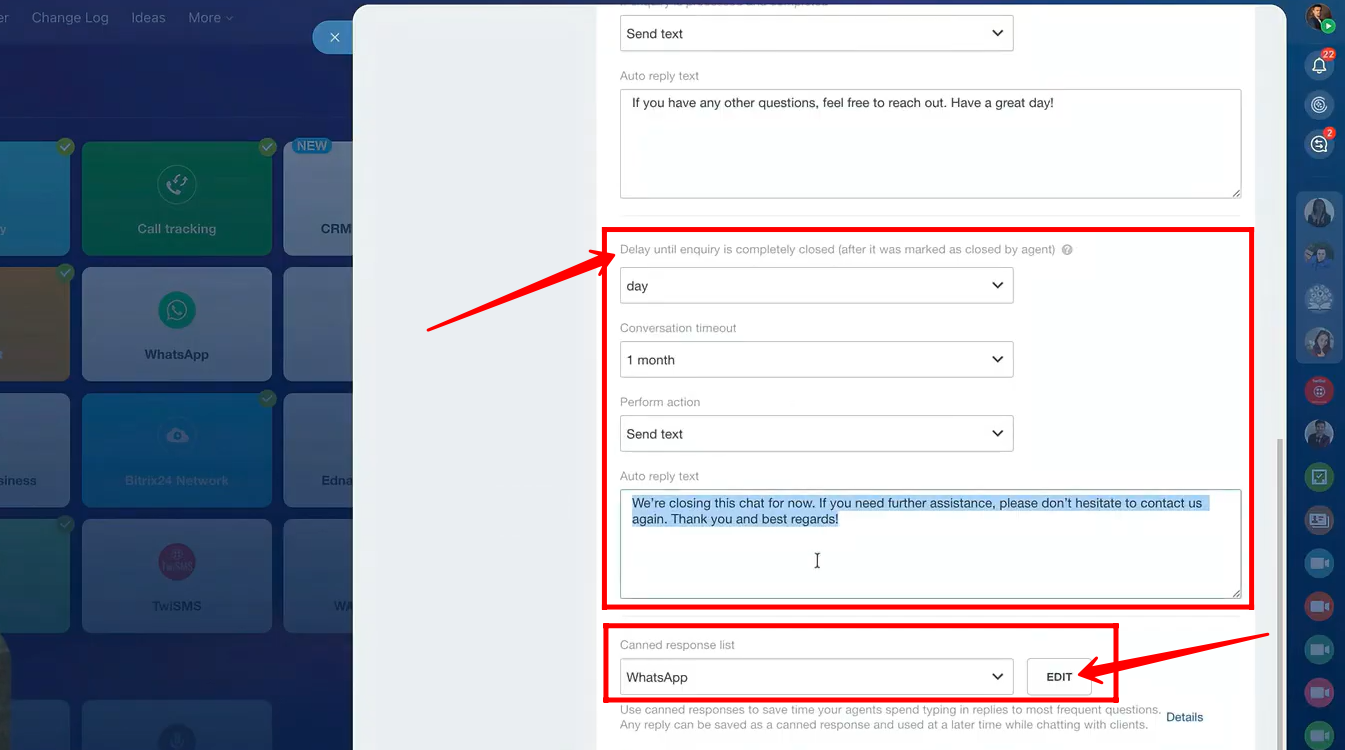
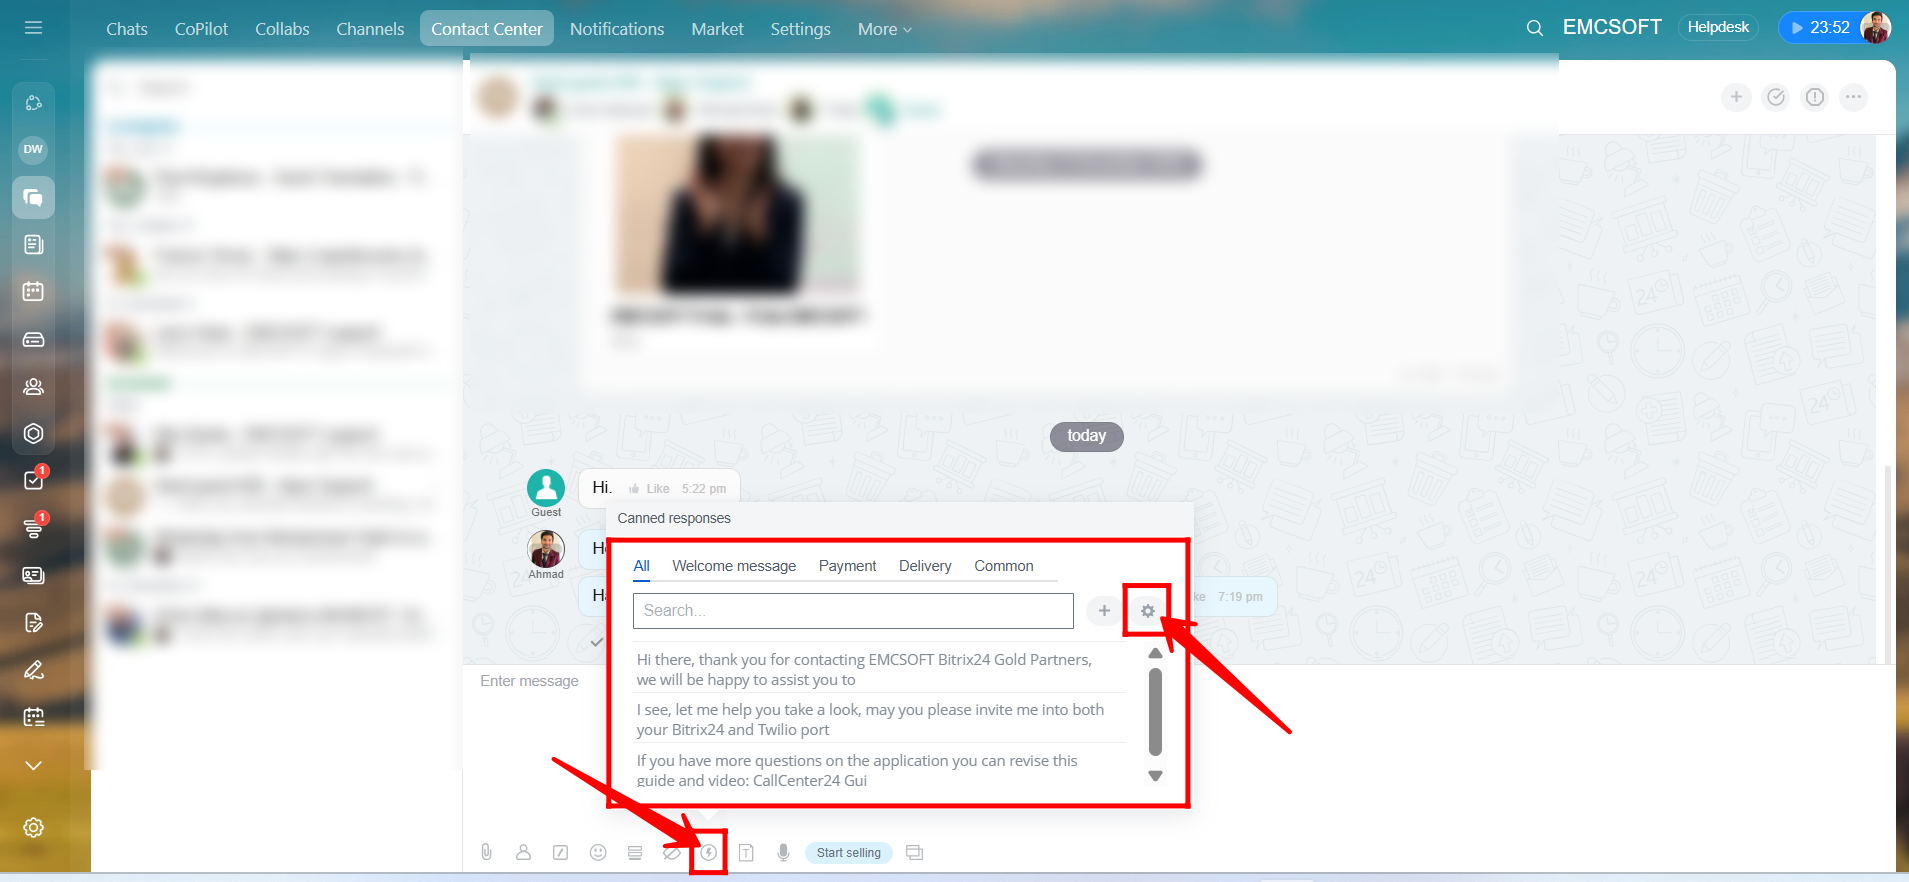
20. In the chat, click the highlighted icon to view your pre-configured canned messages, organized by category (such as welcome messages, payment links, common greetings, etc.). These canned messages allow you to send replies with a single click.
You can also click the settings icon to open the window where you can create new canned messages or edit existing ones.
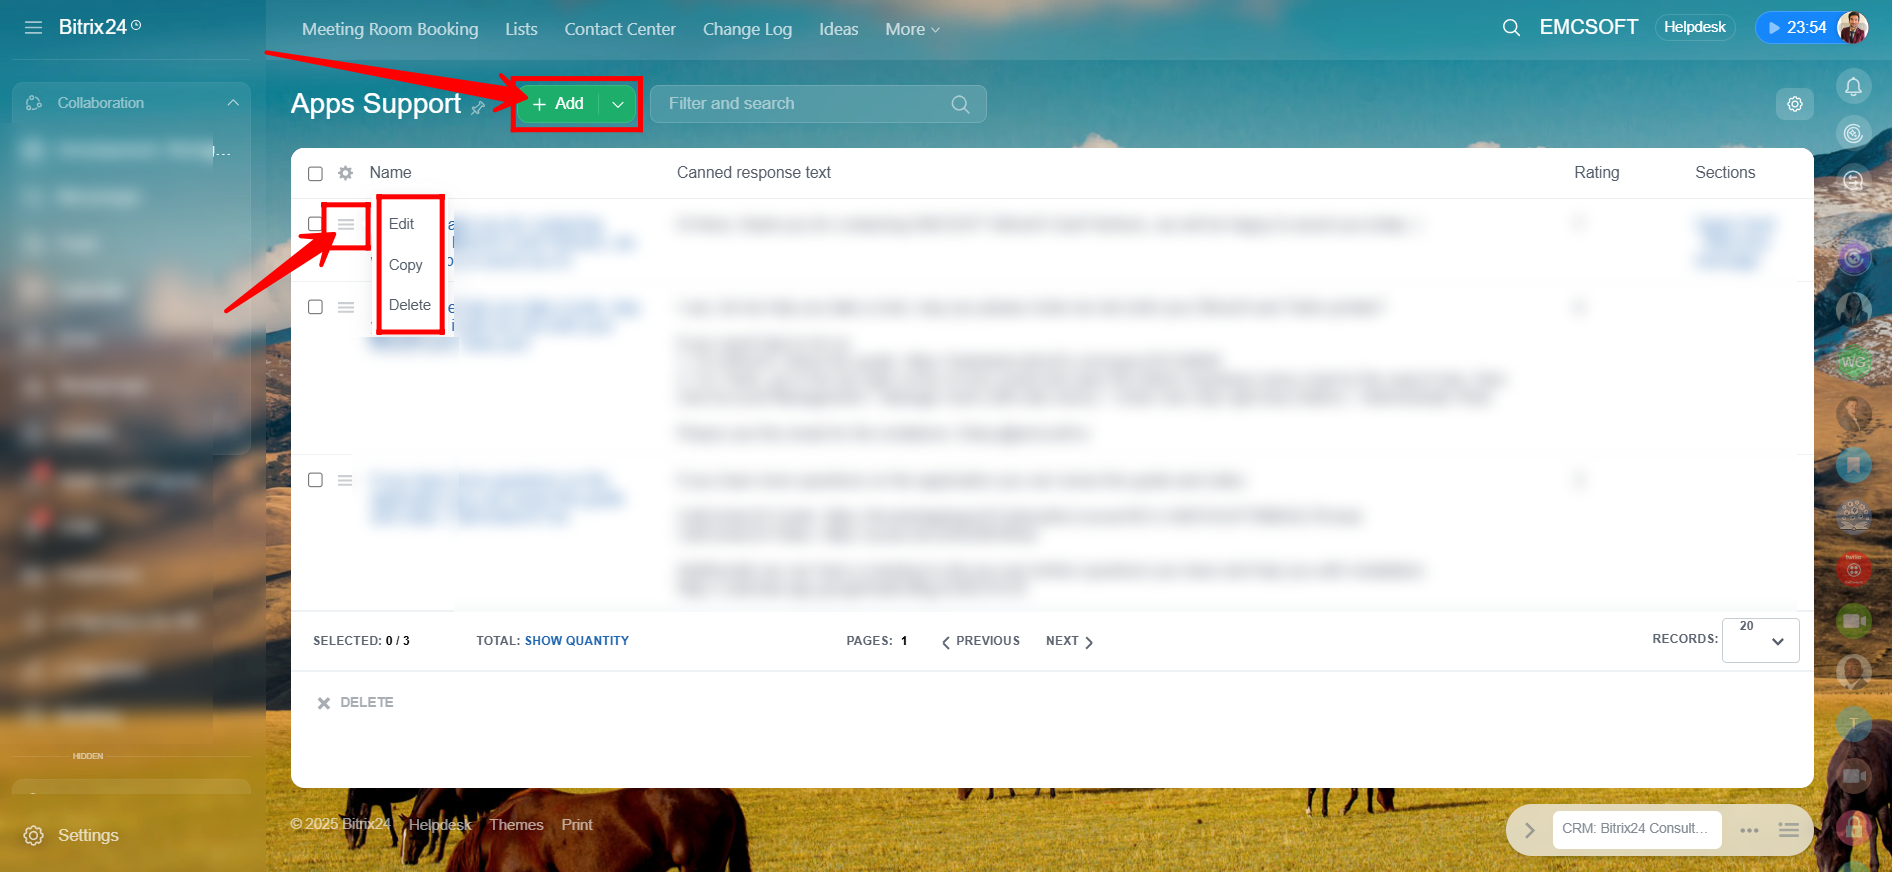
21. Here, you can edit previously configured canned messages or add a new one. You can specify a name for the message and enter the message text itself.
22. You can enable or disable the “Live Typing” option. When enabled, agents can see the message a client is typing in real-time before it is sent. This feature helps reduce response time and allows agents to prepare quicker replies.

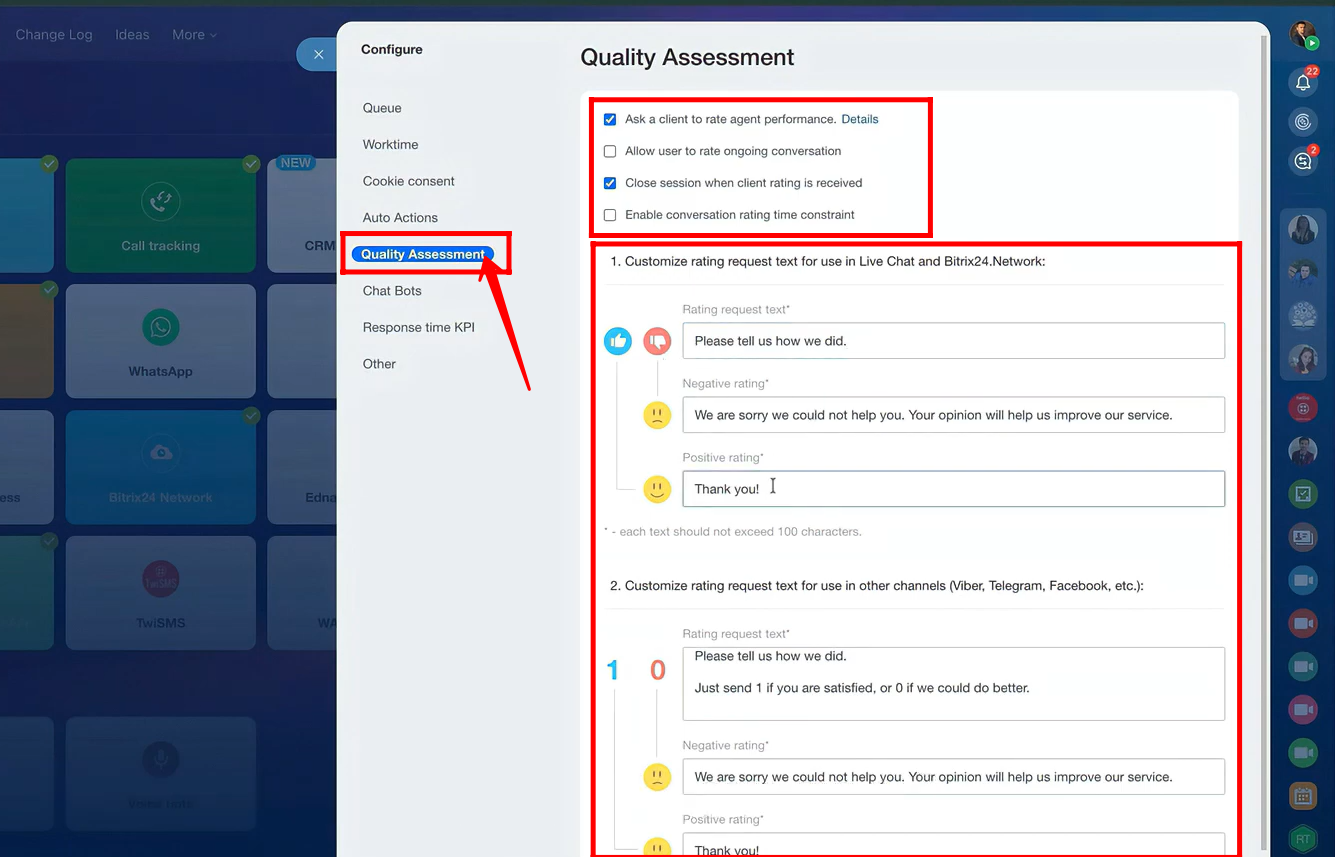
23. Next, navigate to the Quality Assessment tab. Here, you can enable options such as:
- Ask a client to rate agent performance
- Allow user to rate an ongoing conversation
- Close session when client rating is received
- Enable conversation rating time constraint
You can also customize the rating request messages for use in Live Chat and the Bitrix24 Network, including the rating request text, negative rating text, and positive rating text (each limited to 100 characters). Additionally, you can customize rating request texts for other channels such as Viber, Telegram, Facebook, etc., with separate texts for the rating request, negative feedback, and positive feedback.
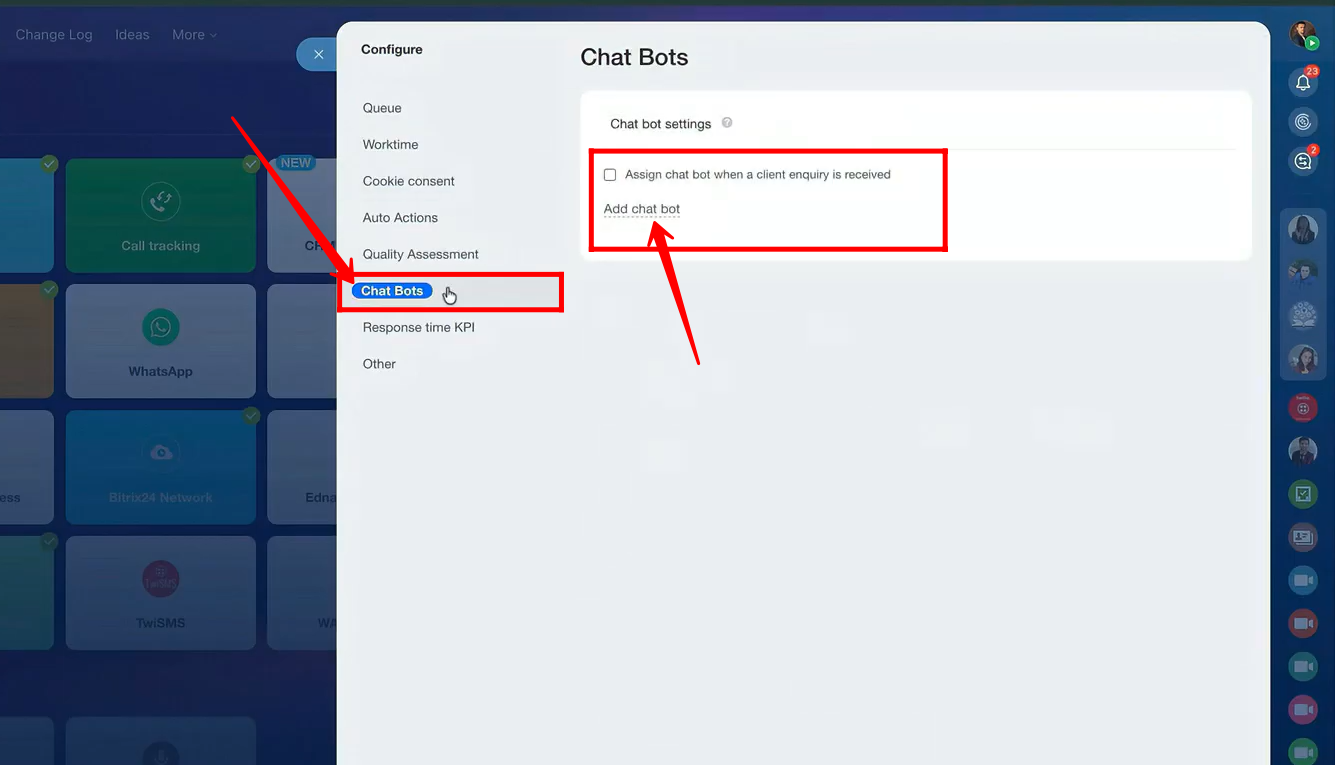
24. Next, navigate to the Chat Bots tab. Here, you can add a chatbot by installing one from the Bitrix24 Market and assign it to handle client enquiries as they are received.
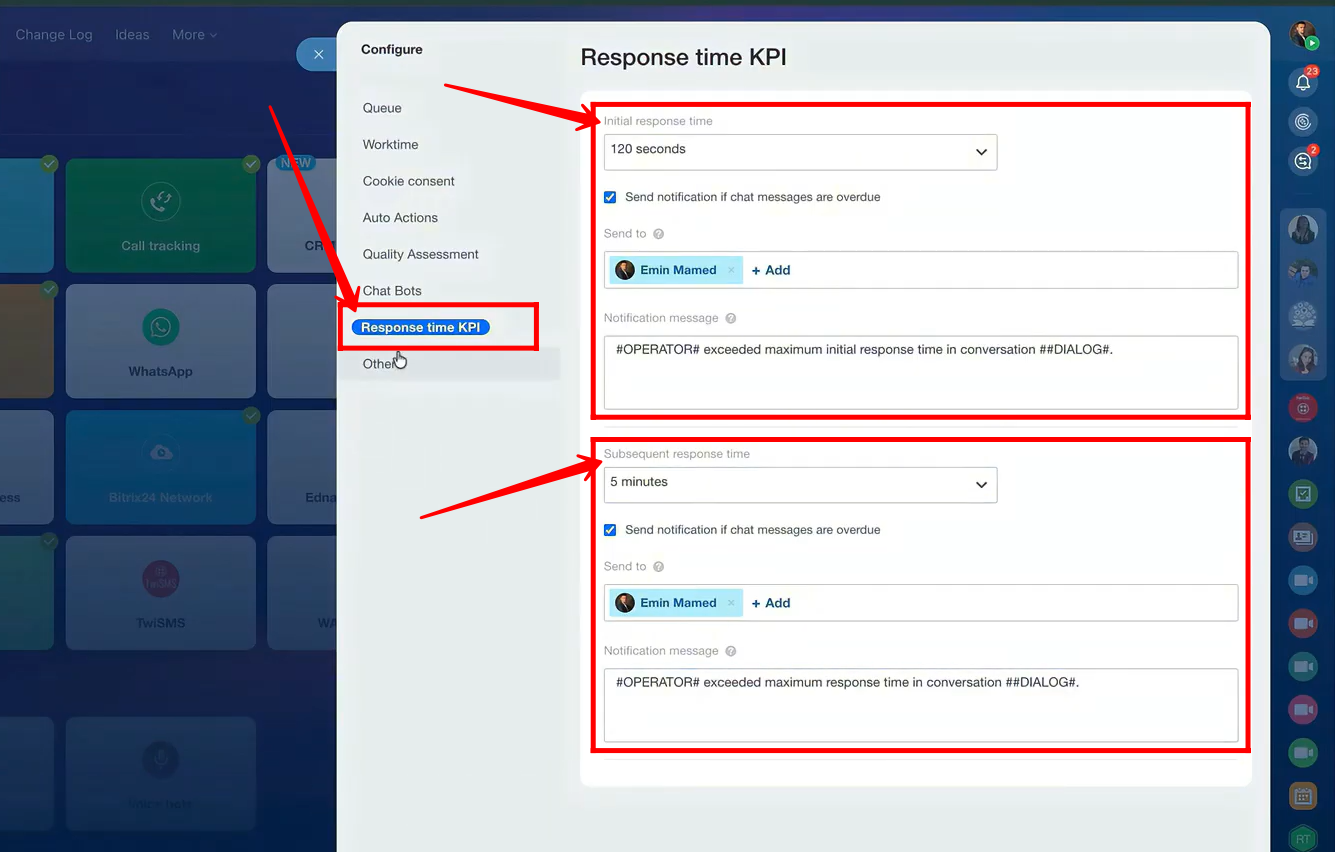
25. Next, go to the Response Time KPI tab. Here, you can configure the initial response time and enable the option “Send notification if chat messages are overdue.” You can also set up a message to be sent to the responsible person. This feature acts as an alert to supervisors if an agent has not responded to client enquiries within the specified time.
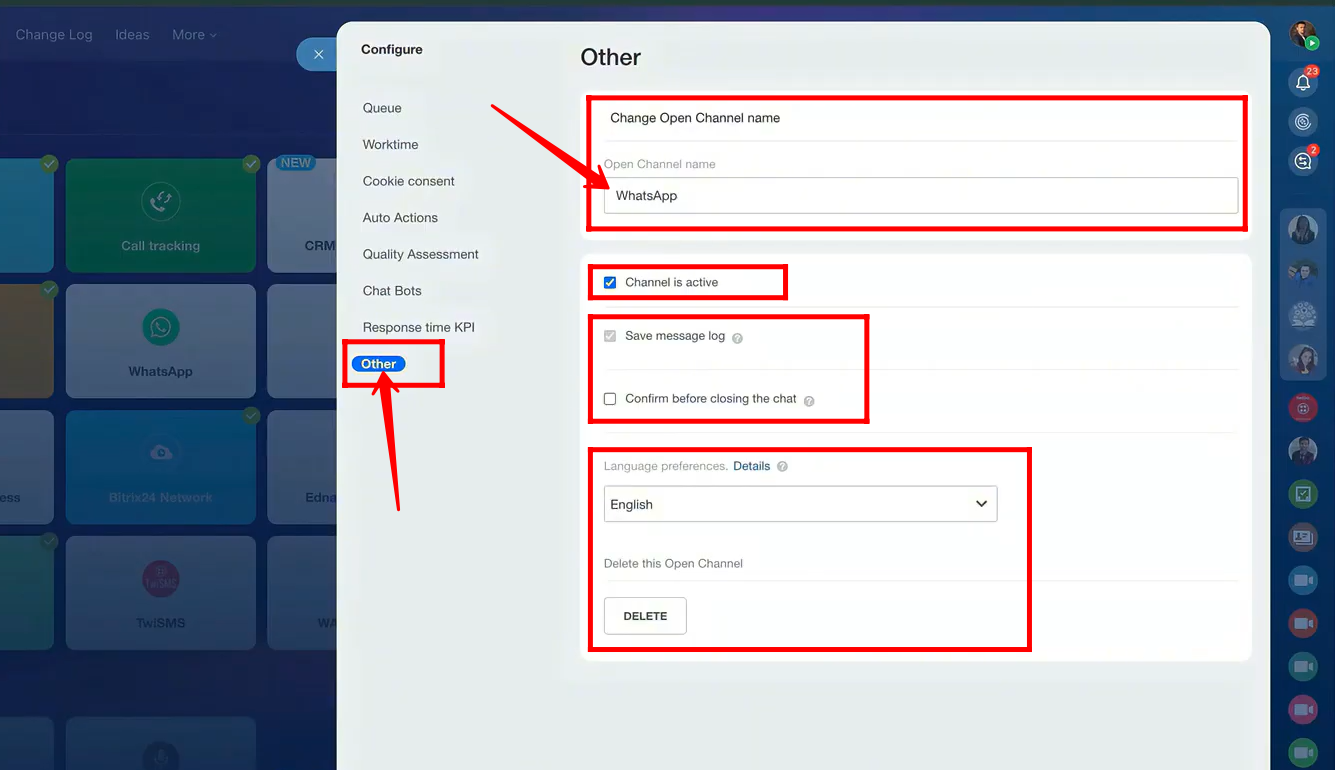
26. The final configuration for the open channel is in the Other tab. Here, you can:
- Name the open channel
- Make the channel active or inactive
- Enable “Confirm before closing the chat”
- Set language preferences
- Or delete the open channel if needed
27. Now that the channel has been successfully configured and the CallCenter24 WhatsApp widget is already connected to our website, we can receive messages through this open channel as WhatsApp conversations. We will cover the widget setup in detail in the next guides. For now, let’s proceed to test the open channel configuration in the following steps.

28. On our website, https://emcsoft.io/ , the WhatsApp widget is already installed. Clients can send us WhatsApp messages through this widget, and we will receive those messages in Bitrix24 chat via the open channel we configured earlier, including all the settings we applied.
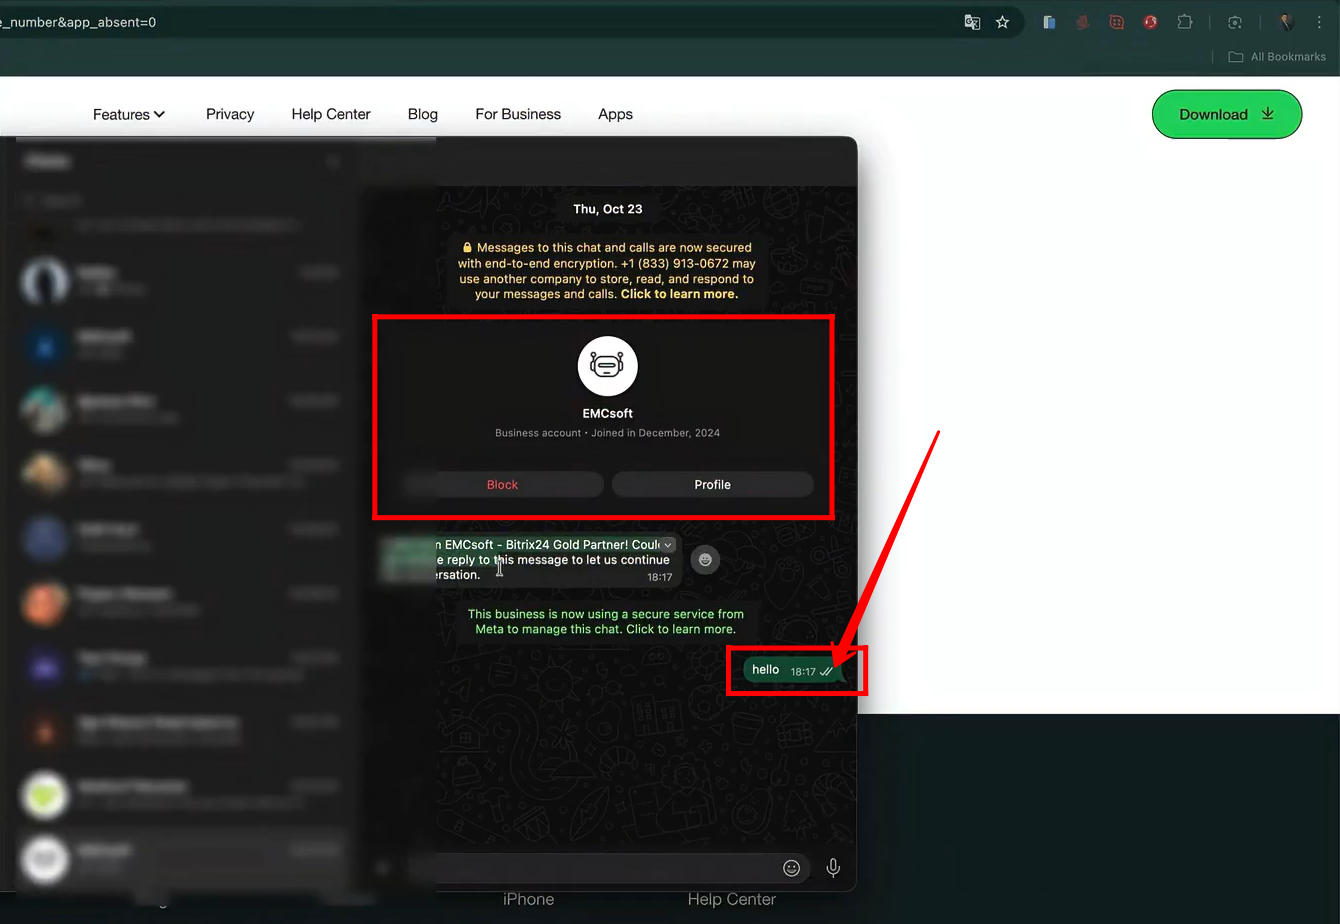
29. Let’s say a client sends us a message, such as “hello”, as shown in the screenshot. In your case, the scenario will be the same: the client will communicate through WhatsApp, but you will see their messages in the Bitrix24 chat window. We will explain this in detail in the next steps.
Clients will see your WhatsApp Business name and profile, which are configured in Twilio under WhatsApp senders (explained in another article). You can send us a message, and we will provide the exact guide link for reference.
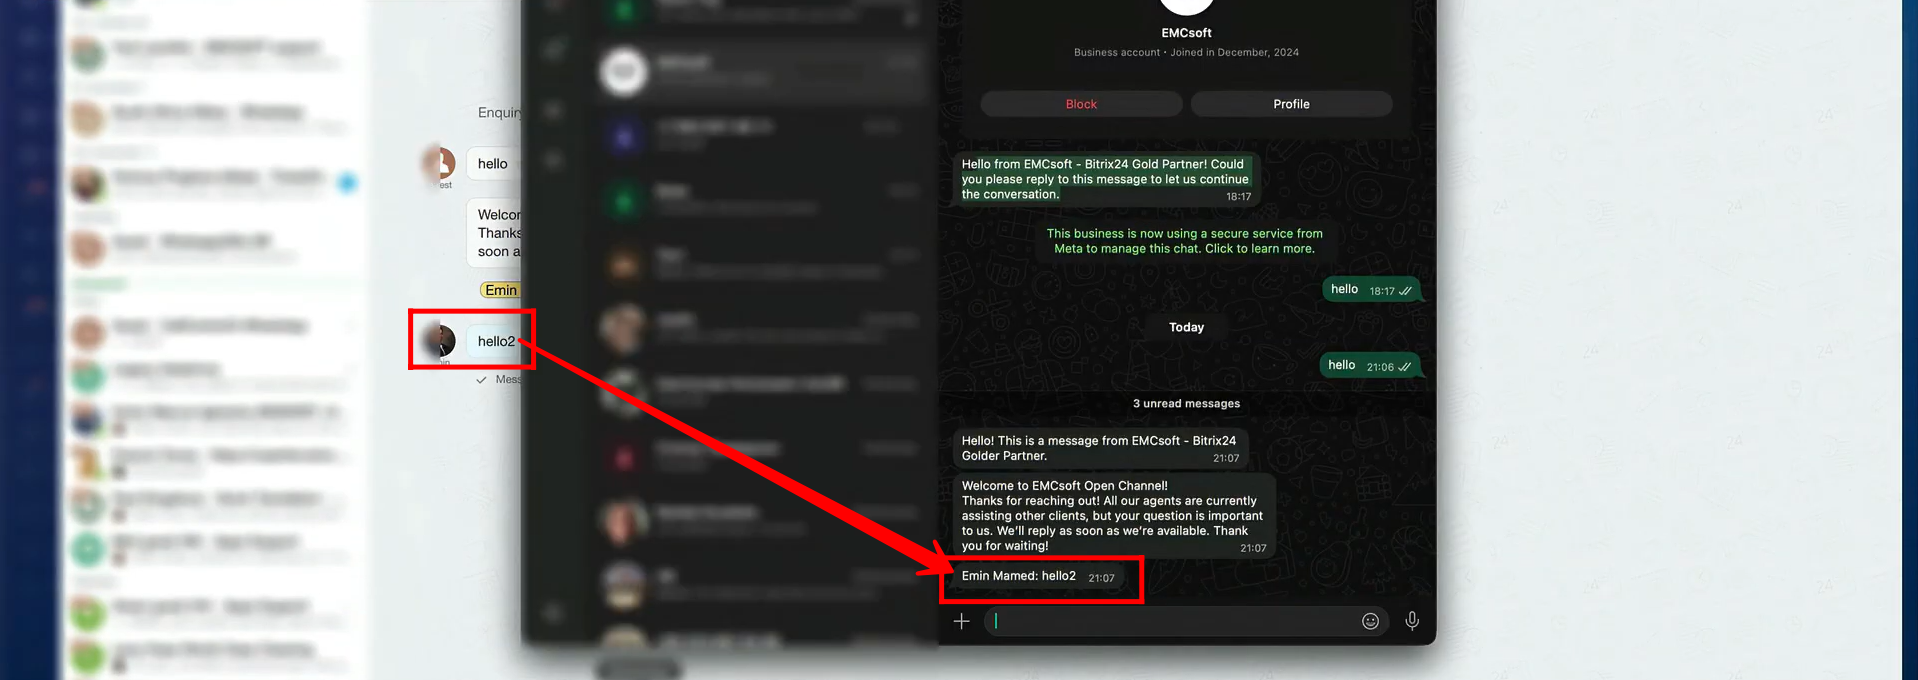
30. Here’s how you will receive a client’s query from WhatsApp in the Bitrix24 Messenger → Contact Center module. You will see the message appear in the chat window, and the client will automatically receive the pre-configured reply message that we set up earlier.

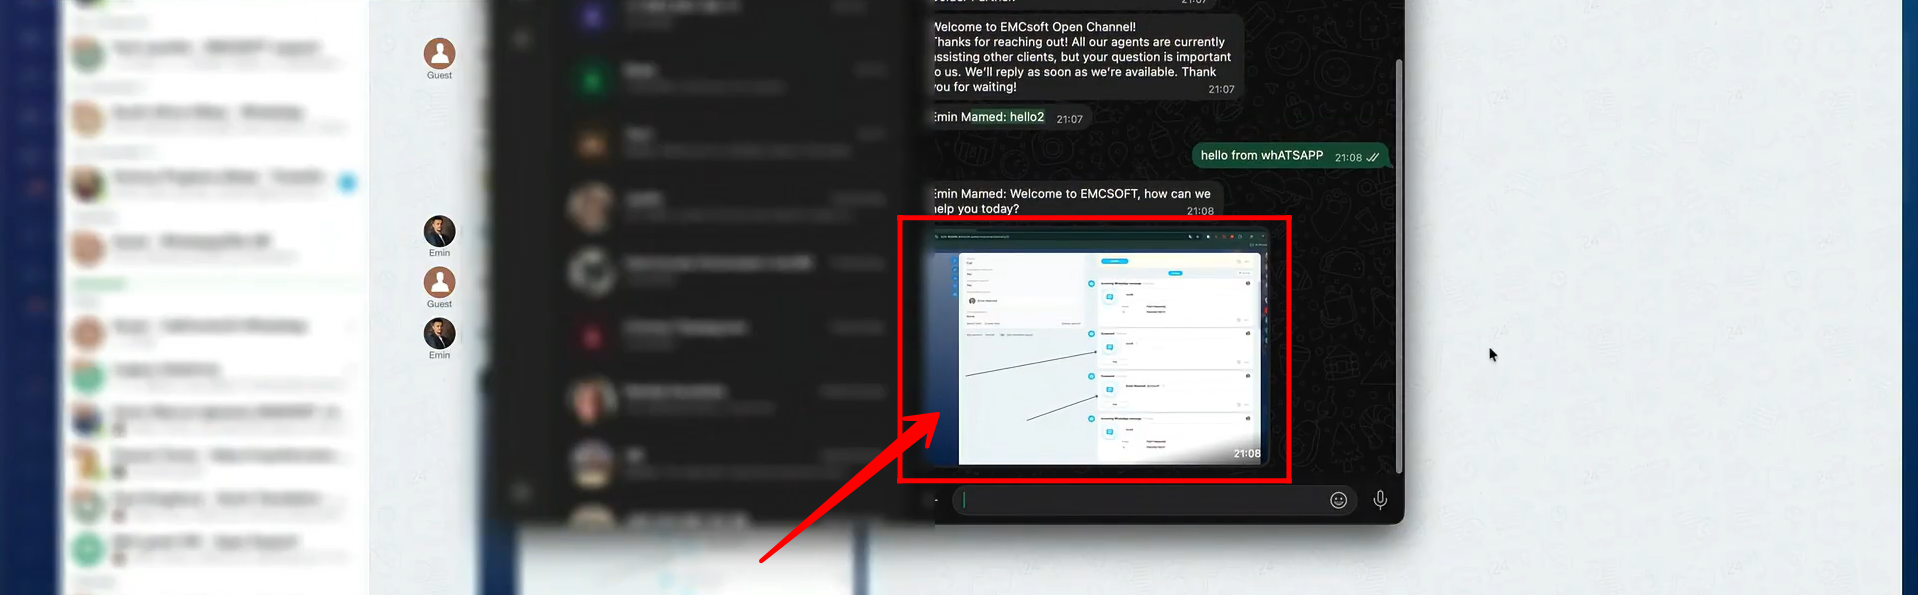
31. When we reply to a client in the Bitrix24 chat window, the client will receive a normal reply on WhatsApp, including the agent’s information. At this stage, the client can see the agent’s name along with the reply text in their WhatsApp chat window.
32. You can easily send and receive images, videos, and voice messages through the open channel without any issues.
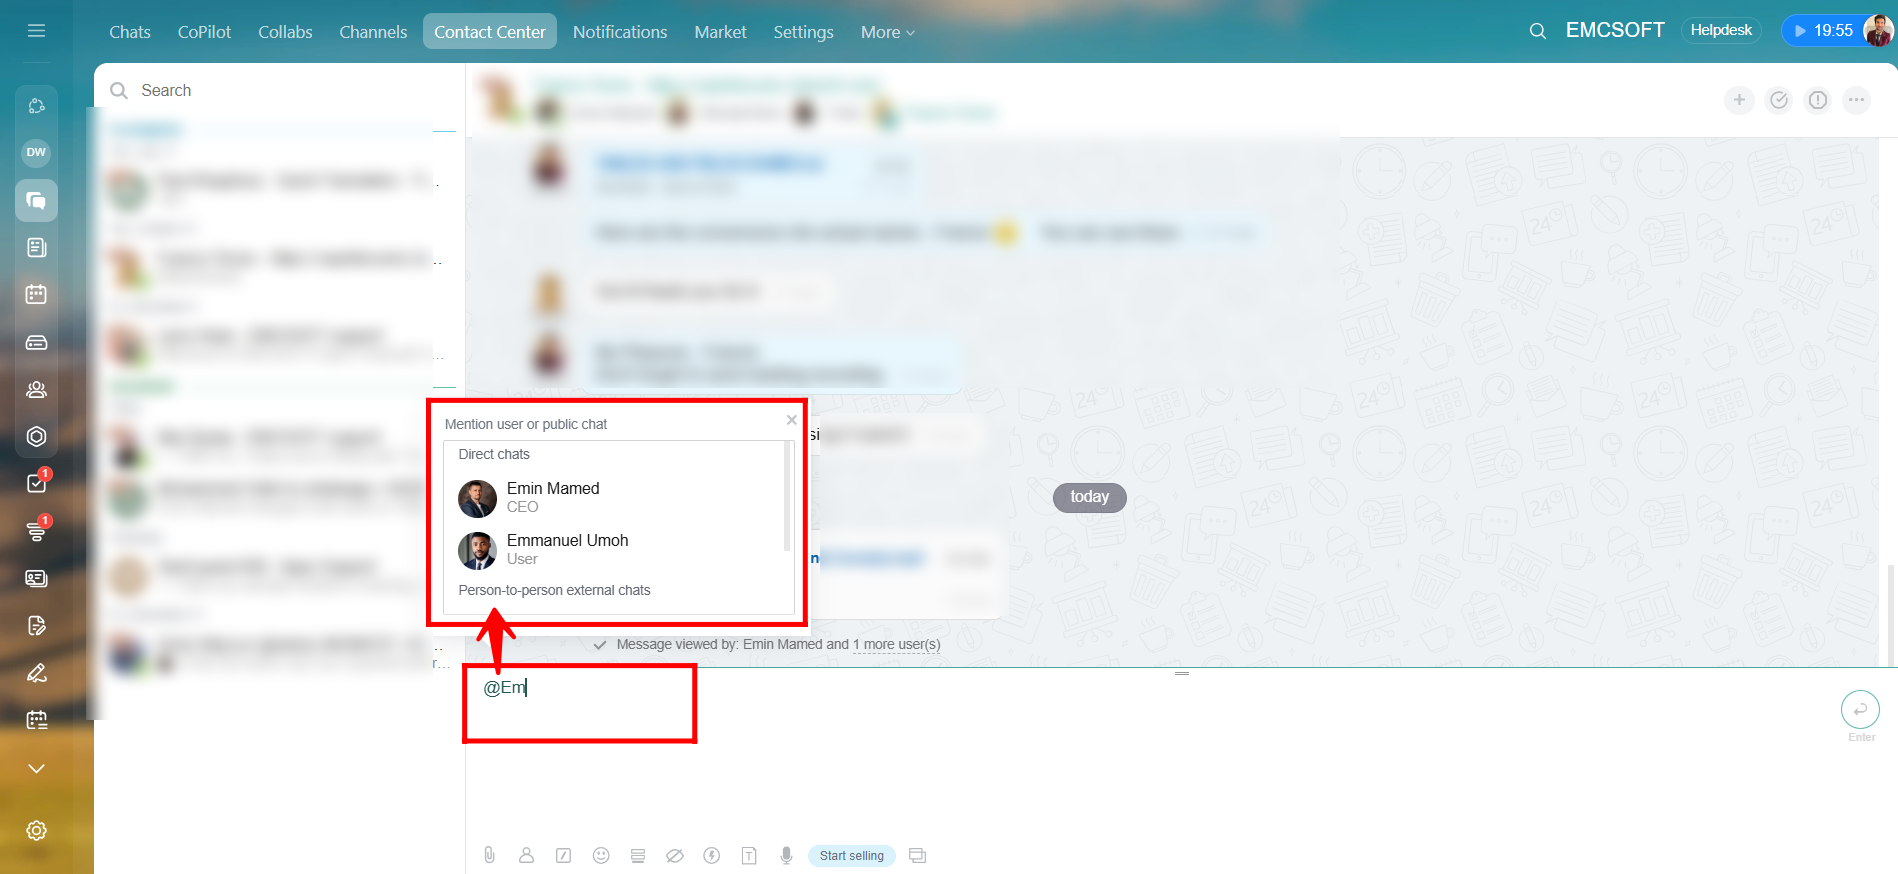
33. In the Bitrix24 open channel chat window, type “@” in the message input box. This will display a list of people in your chat, allowing you to mention them in your message.
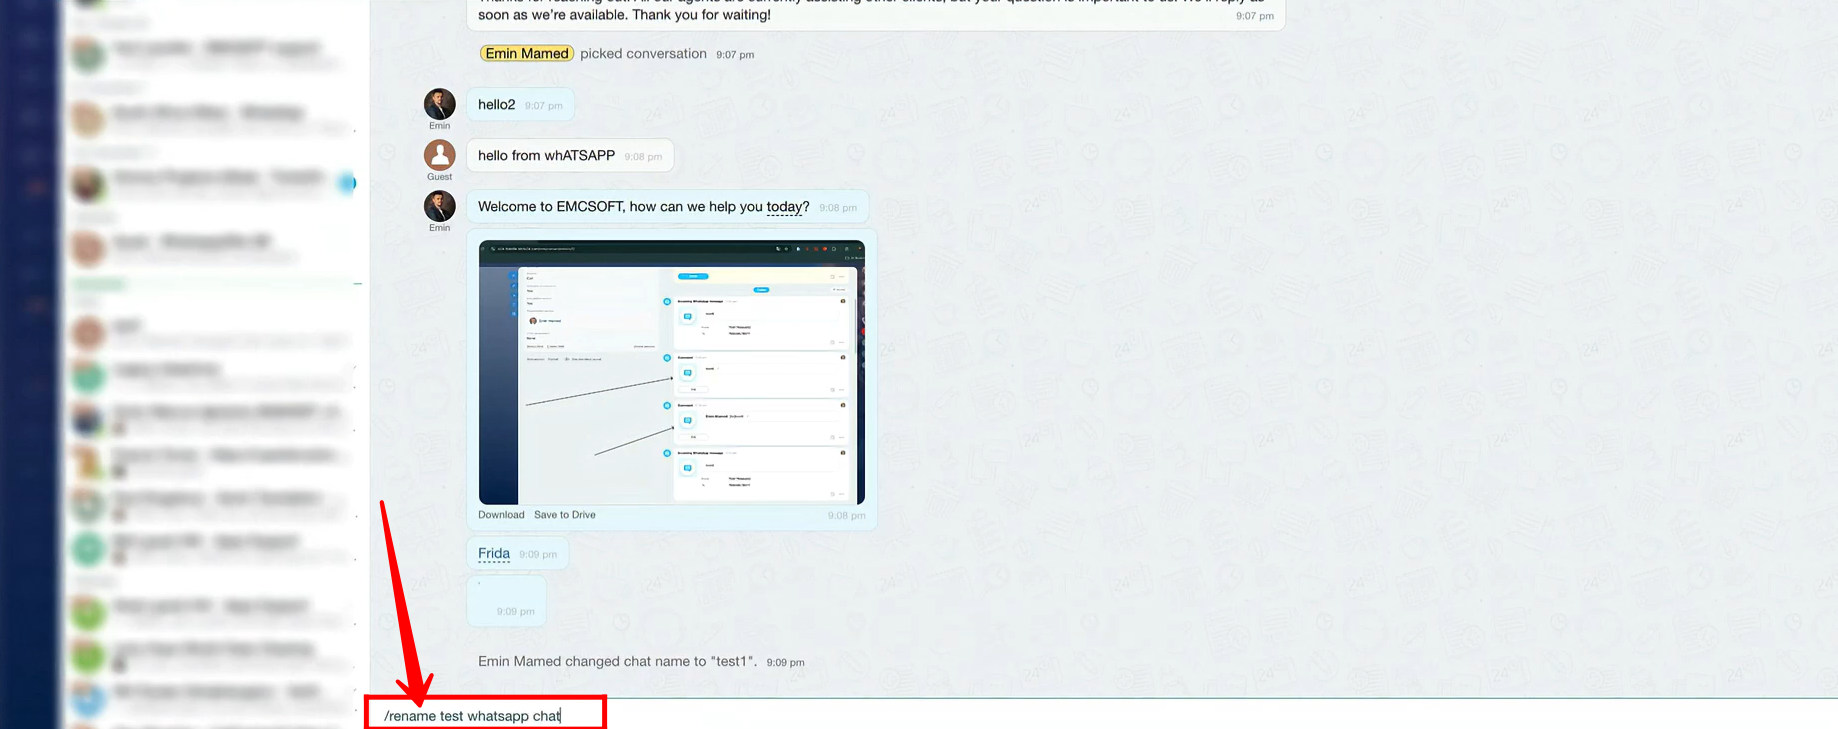
34. You can type “/” in the chat to access various functions for different purposes. Let’s test one of them: type “/rename”—we will explain its use in the next step.

35. In the input box, we wrote “/rename test whatsapp chat”. This command renames the chat in the Bitrix24 window to “test whatsapp chat”. Simply type it and press Enter.
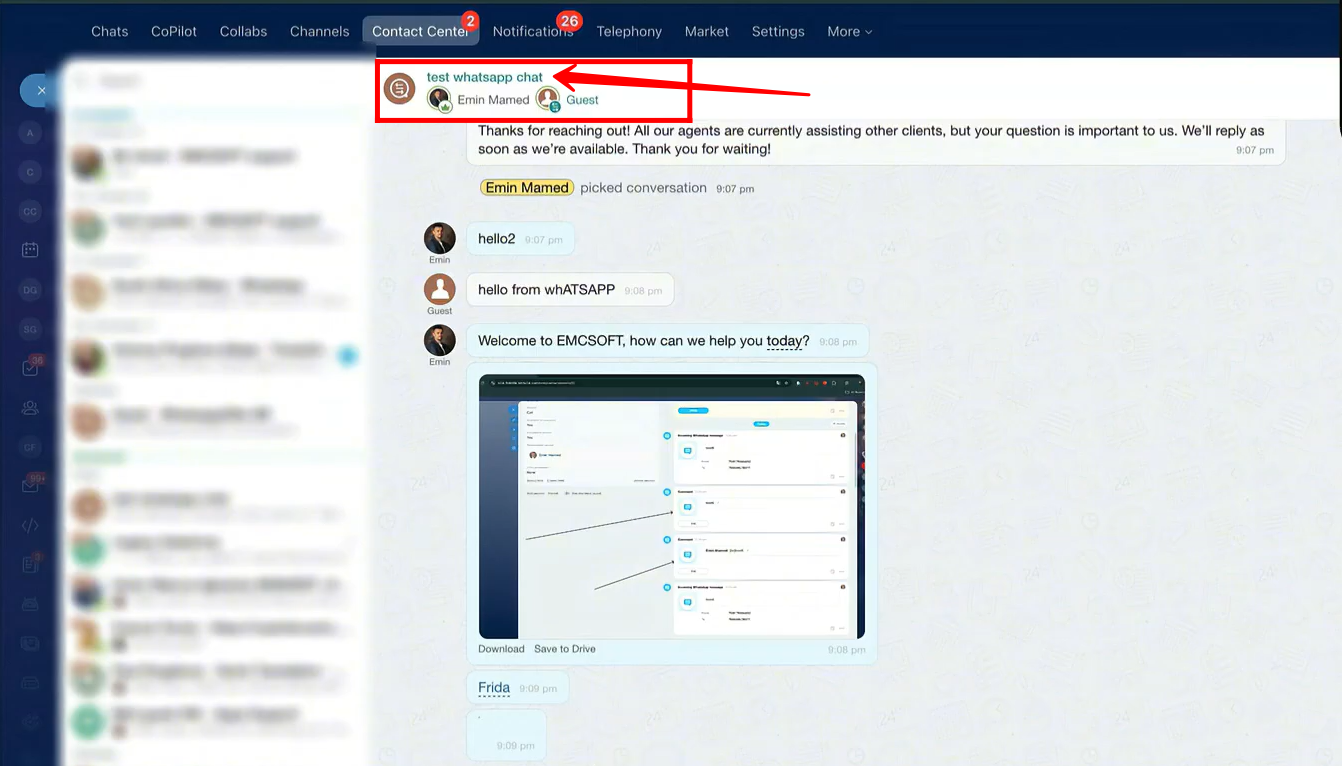
36. As you can see, the chat name has now been updated to “test whatsapp chat.”
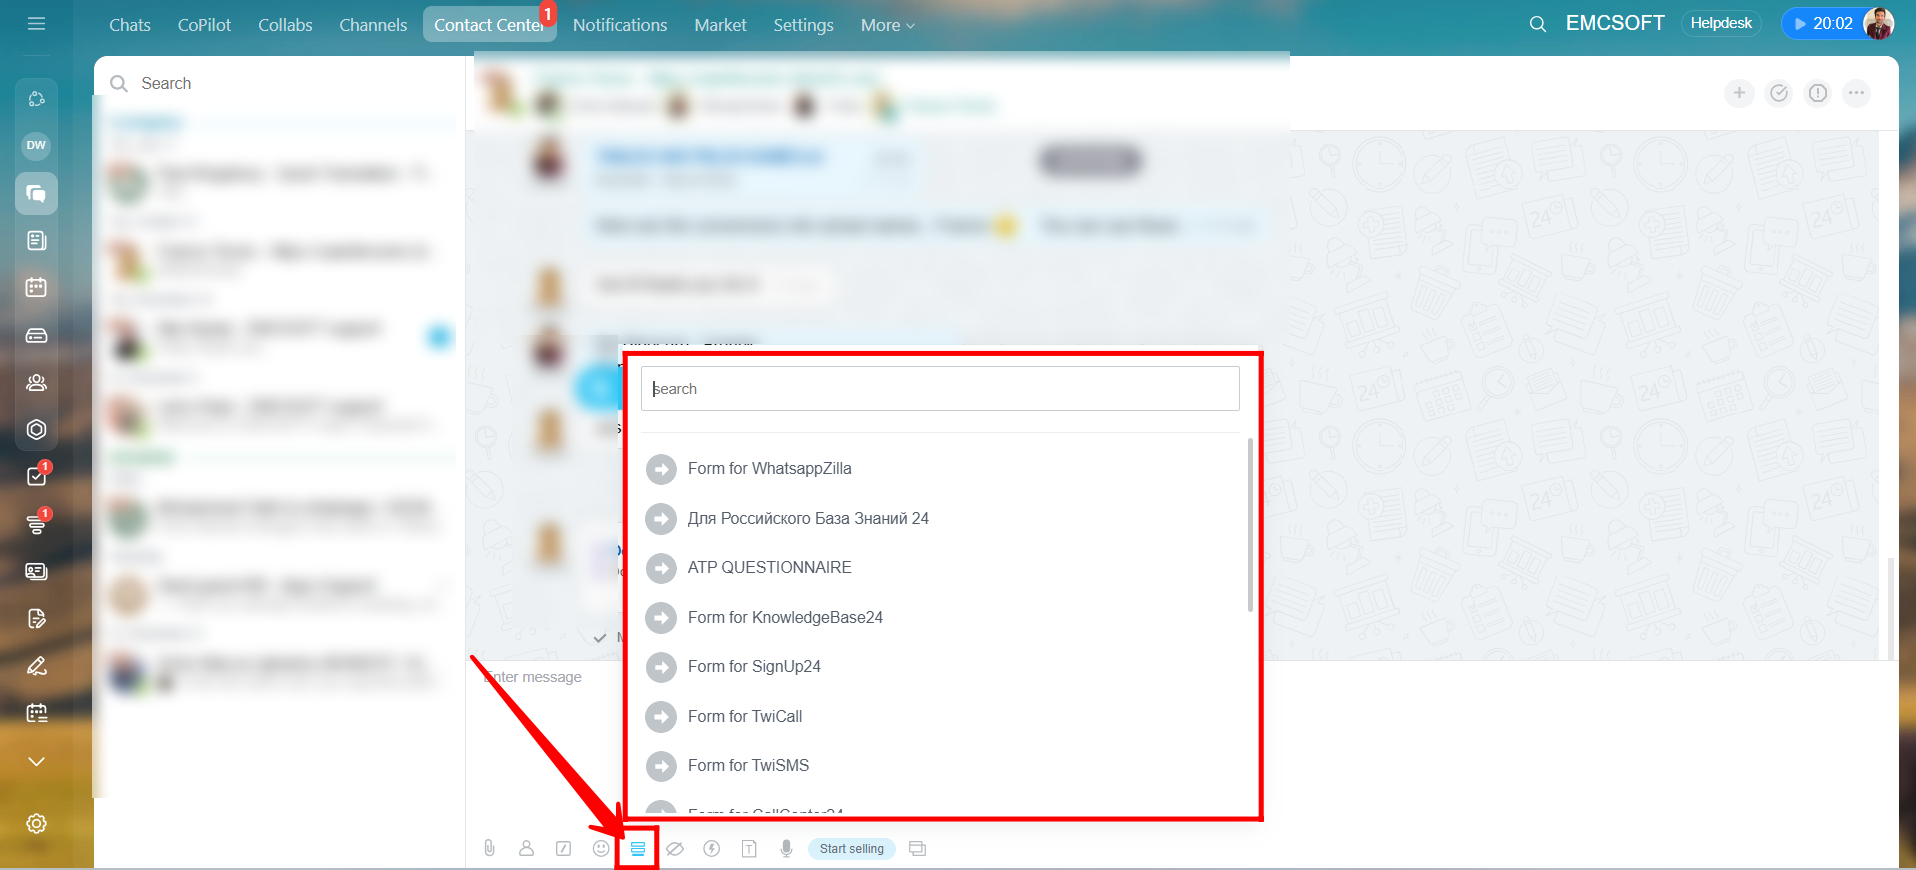
37. You can click the highlighted icon to send pre-configured forms as a link in the chat for clients to fill out. For example, if you need to collect important information from a client and have already created a Bitrix24 form for this purpose, you can share it directly through the chat.
38. Here’s how your client will receive the form link in their WhatsApp chat, allowing them to access and complete the form through the link.
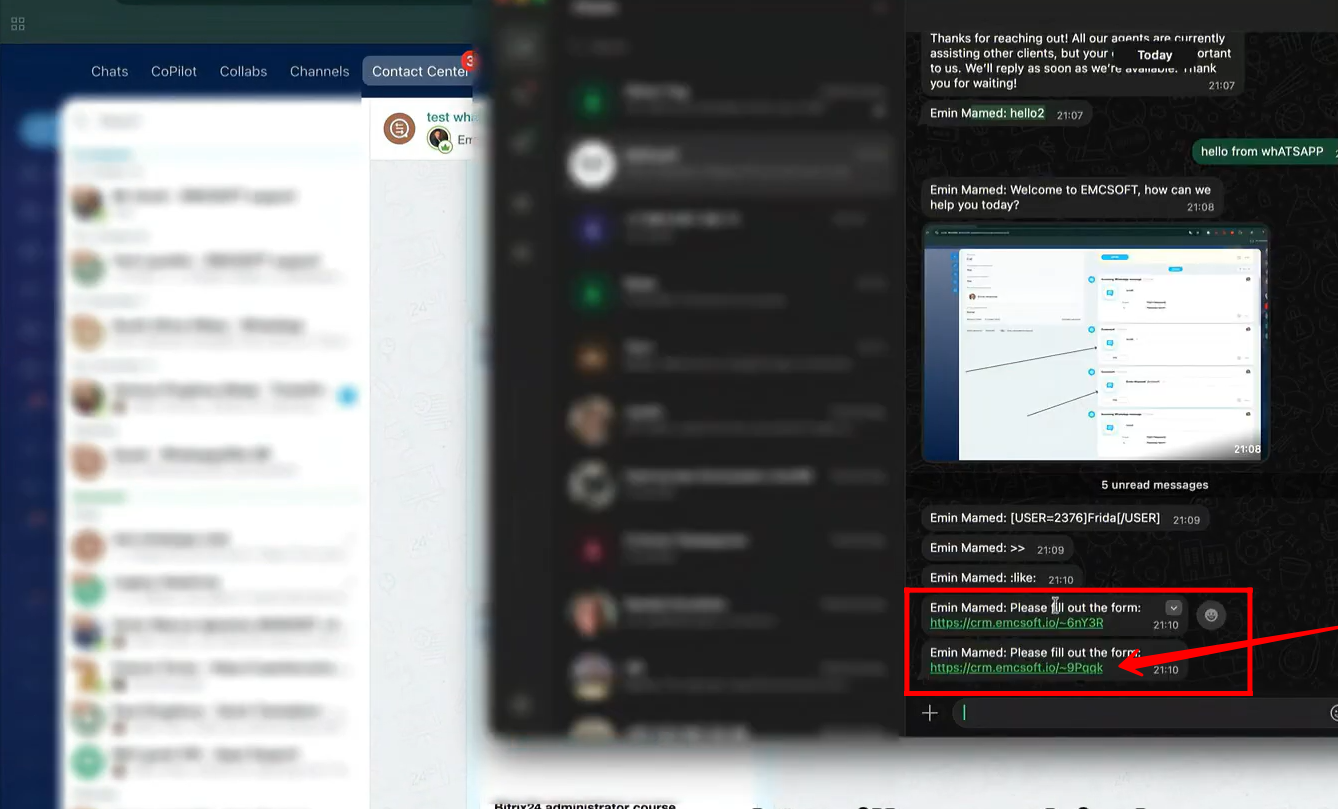
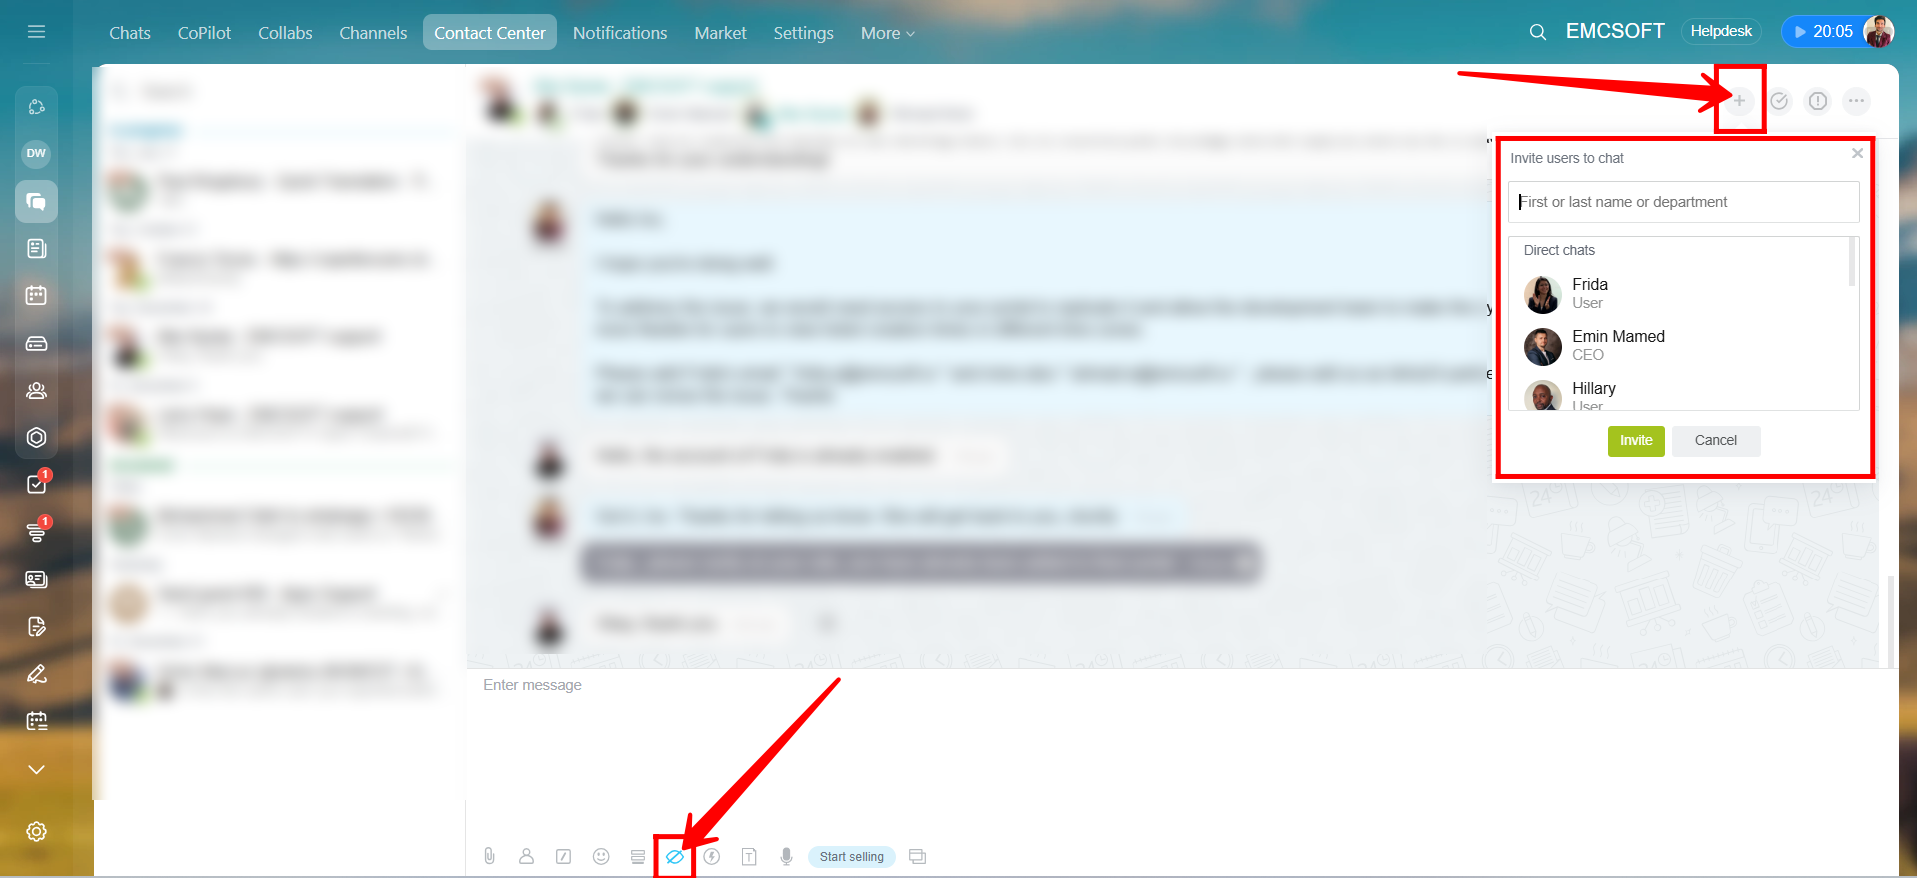
39. By clicking the “+” icon in the top-right options, you can invite users to join the current chat.
Additionally, by clicking the highlighted icon under the input box, you can send a message that is visible only to the users you added or your company employees—the client will not see it. If you disable this option before sending, the message will be visible to everyone, including the client.
This feature allows you to discuss internally while still interacting with the client in the chat.
40. Messages sent only for internal employees will appear like this, marked in grey with a lock icon.

41. Additionally, you can sell your products directly within the chat. To begin, click “Start Selling.”
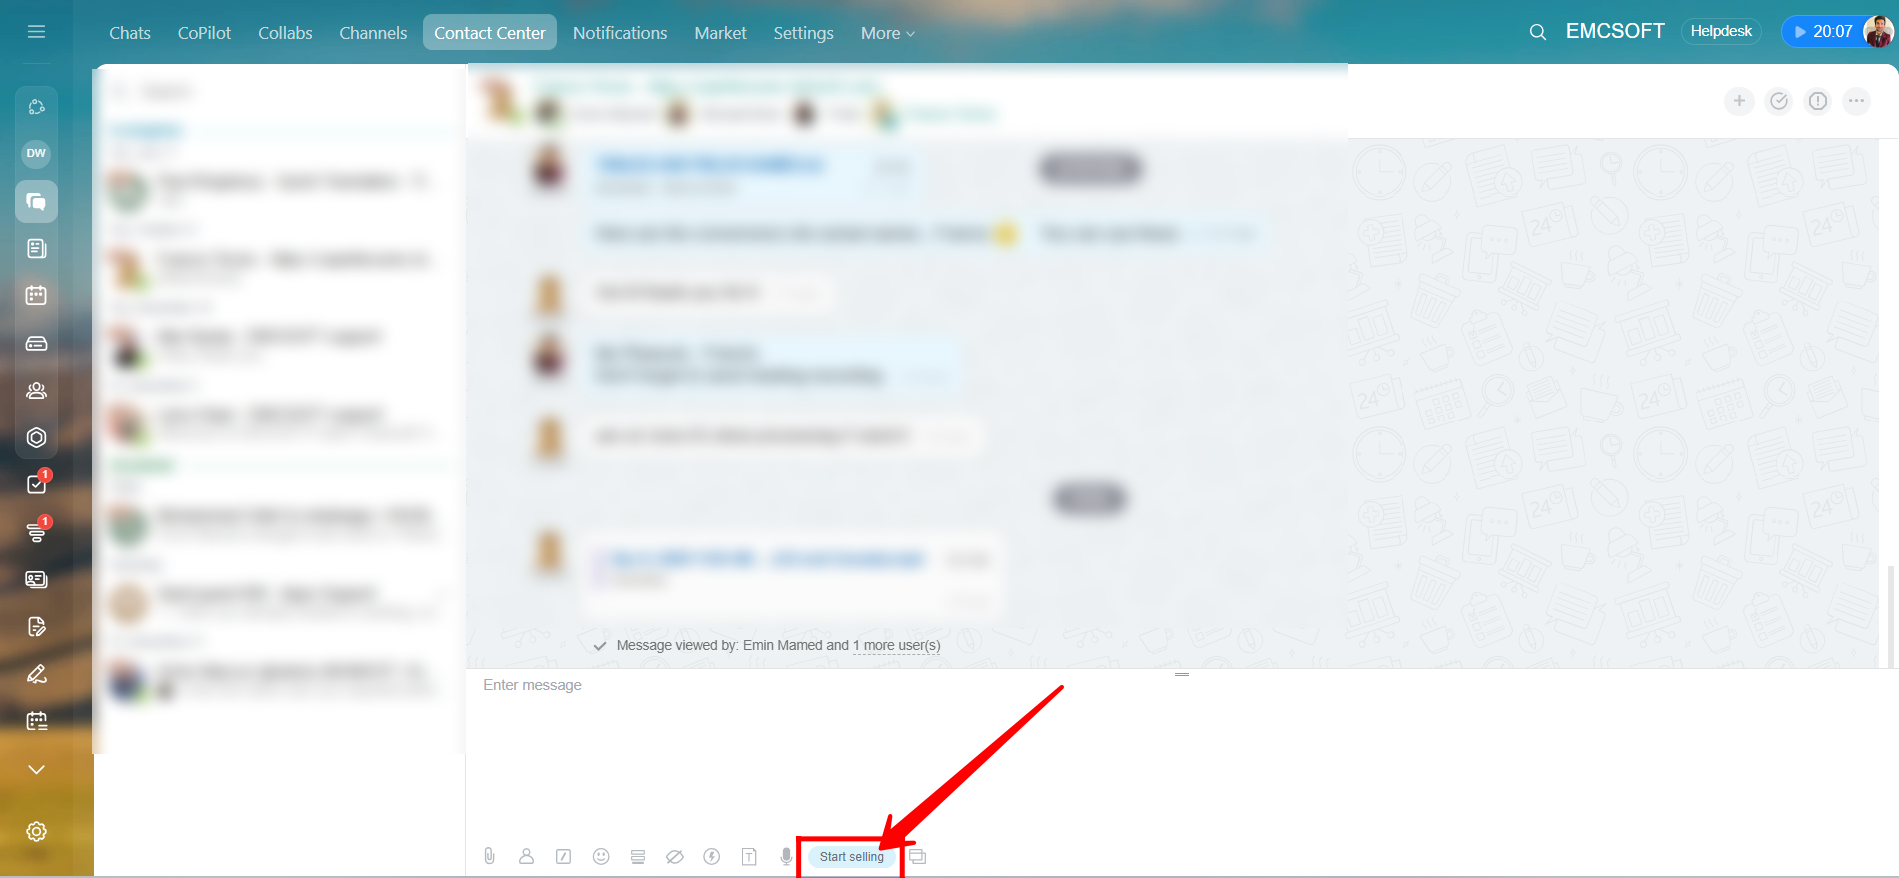
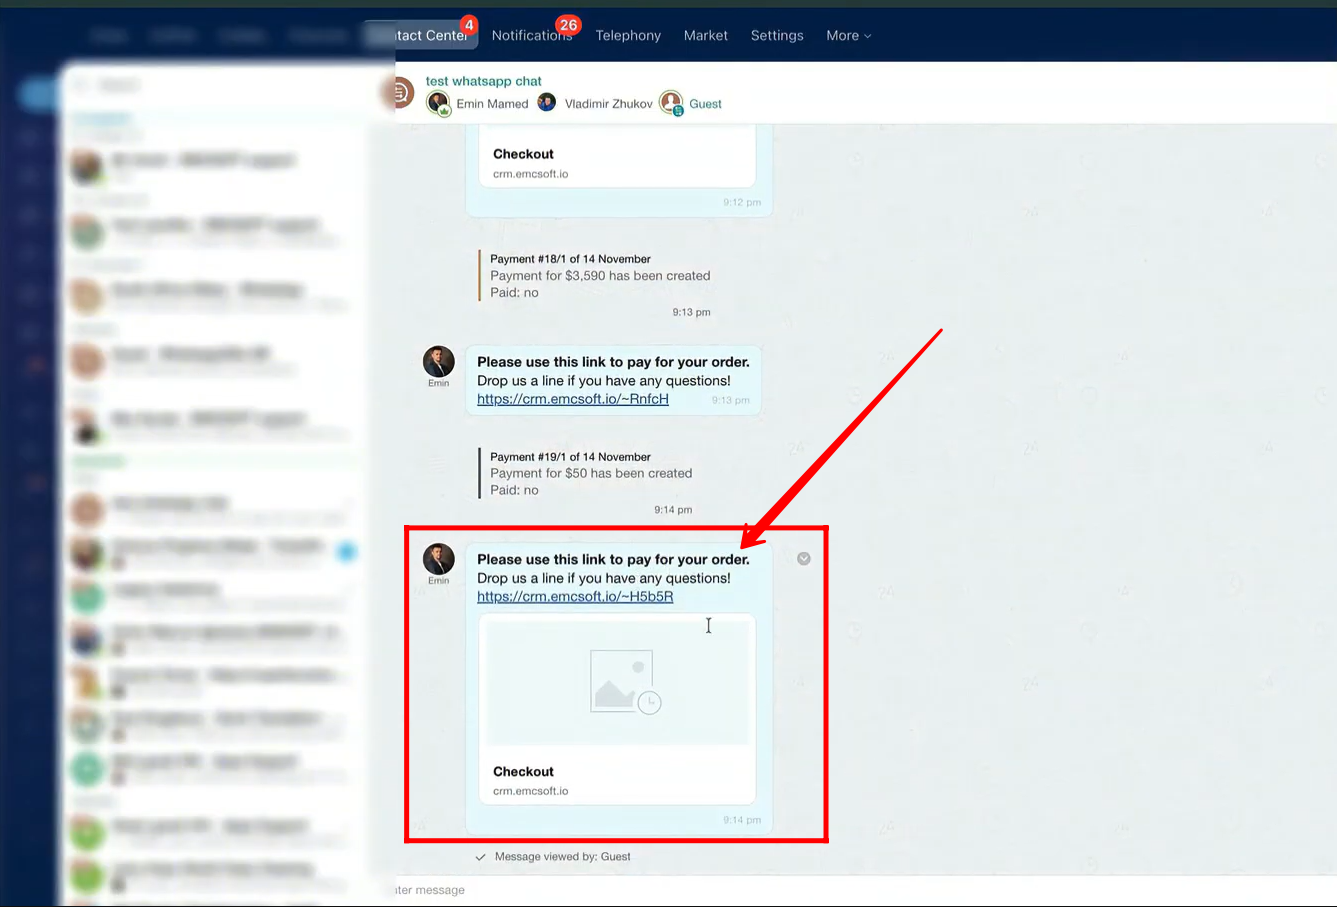
42. Here, you can add the product name, quantity, and price. The total amount payable will be calculated automatically. Once everything is set, you can send the order to the client for payment.

43. Here’s how the payment order link will be sent to the client.
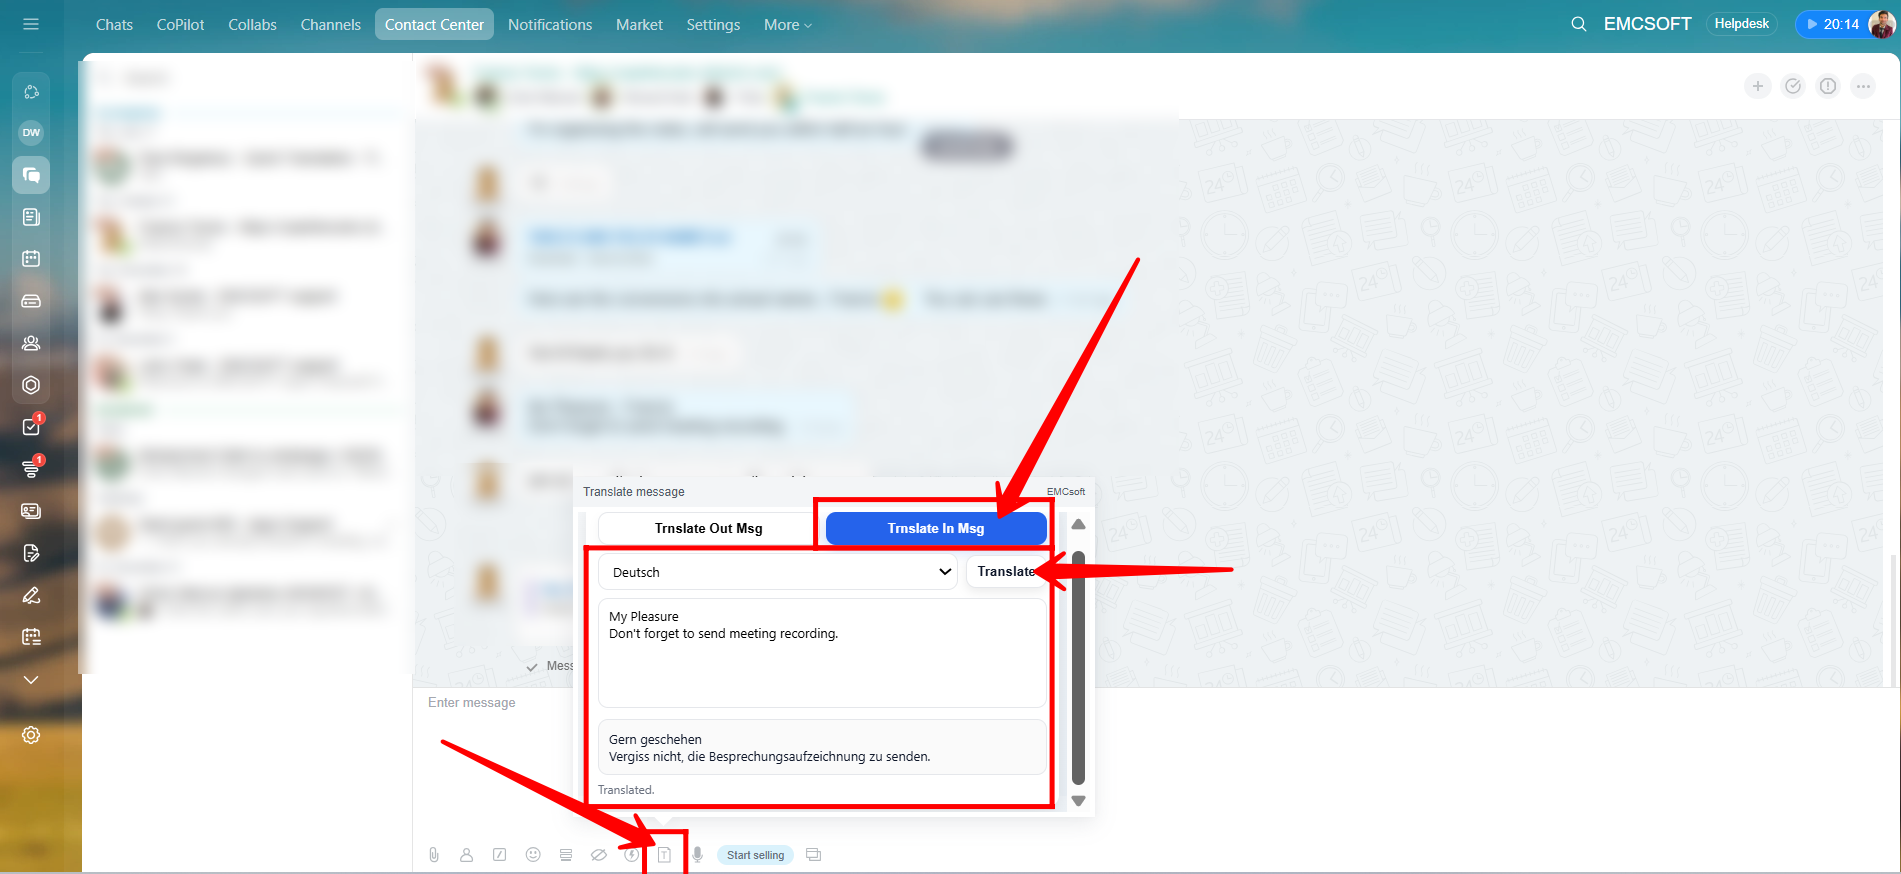
44. Click the highlighted icon to translate messages within the chat before sending them. You will see two options: “Translate Out Msg” and “Translate In Msg.”
Let’s start with “Translate In Msg.” Here, you can paste the client’s message, choose the language you want it translated into, and click Translate to get the translated text.
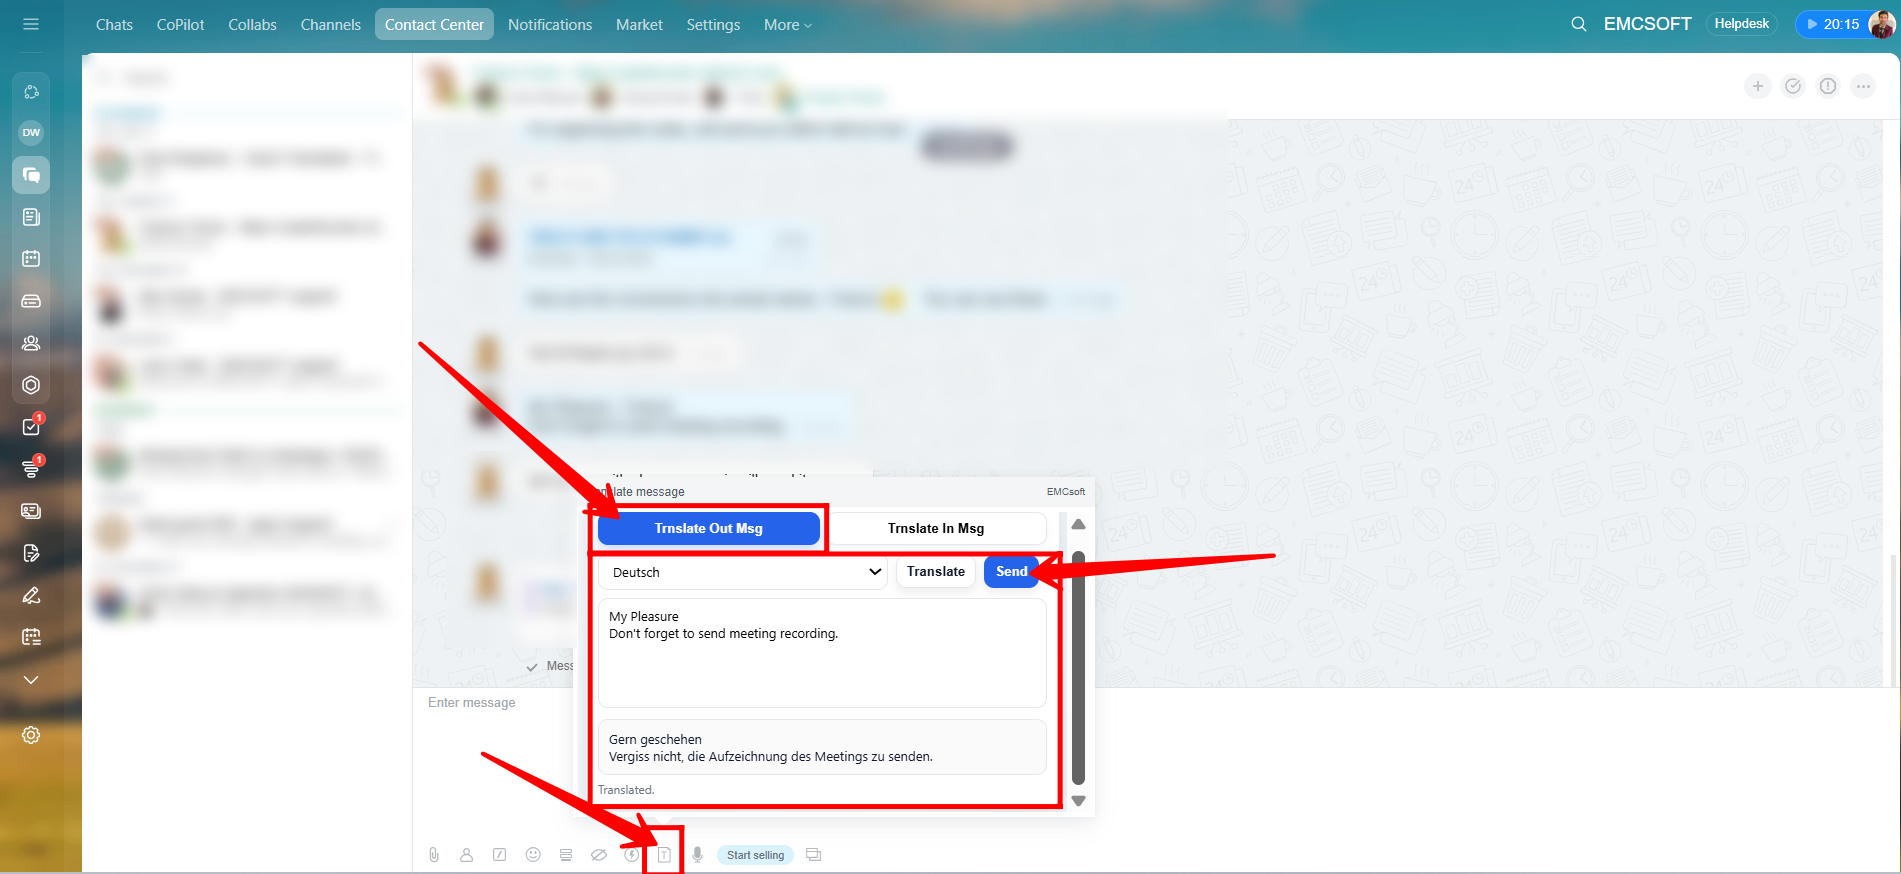
45. Now, let’s click “Translate Out Msg.” Here, you can type your message, choose the language you want to translate it into, and click Translate. Once translated, you will see the Send button, allowing you to send the translated version directly to the client.
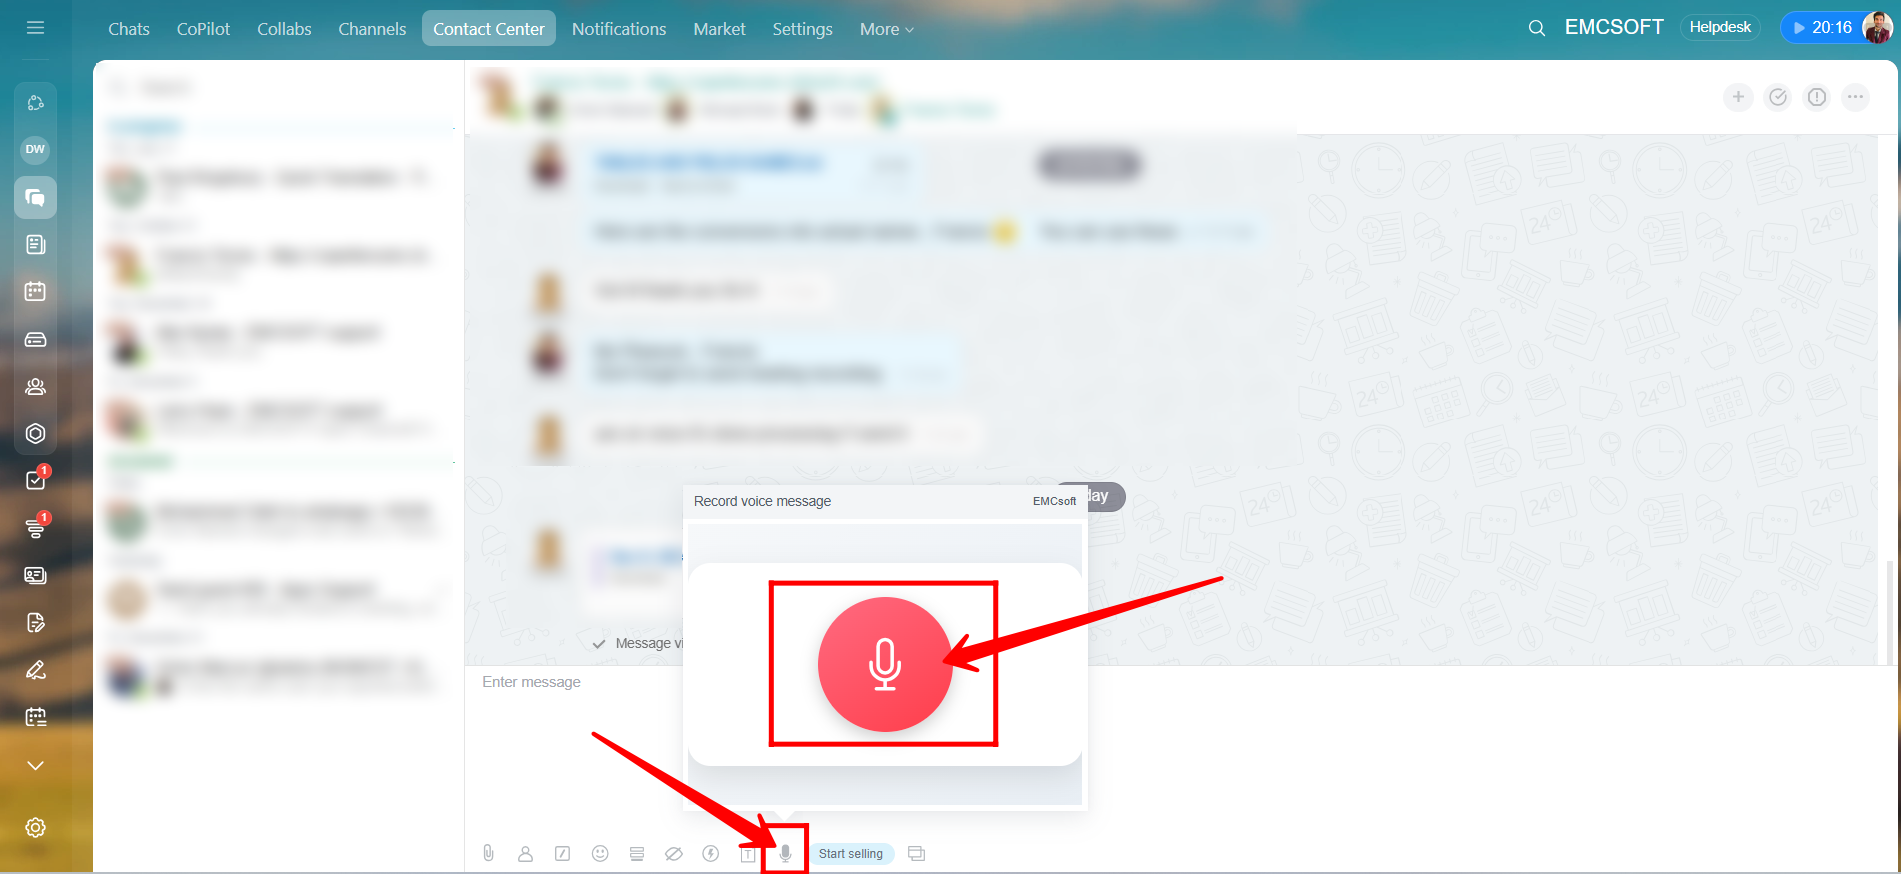
46. Click the highlighted icon, and you will see a microphone option. Click on the mic to start recording your voice, and then send the voice message directly to the client.
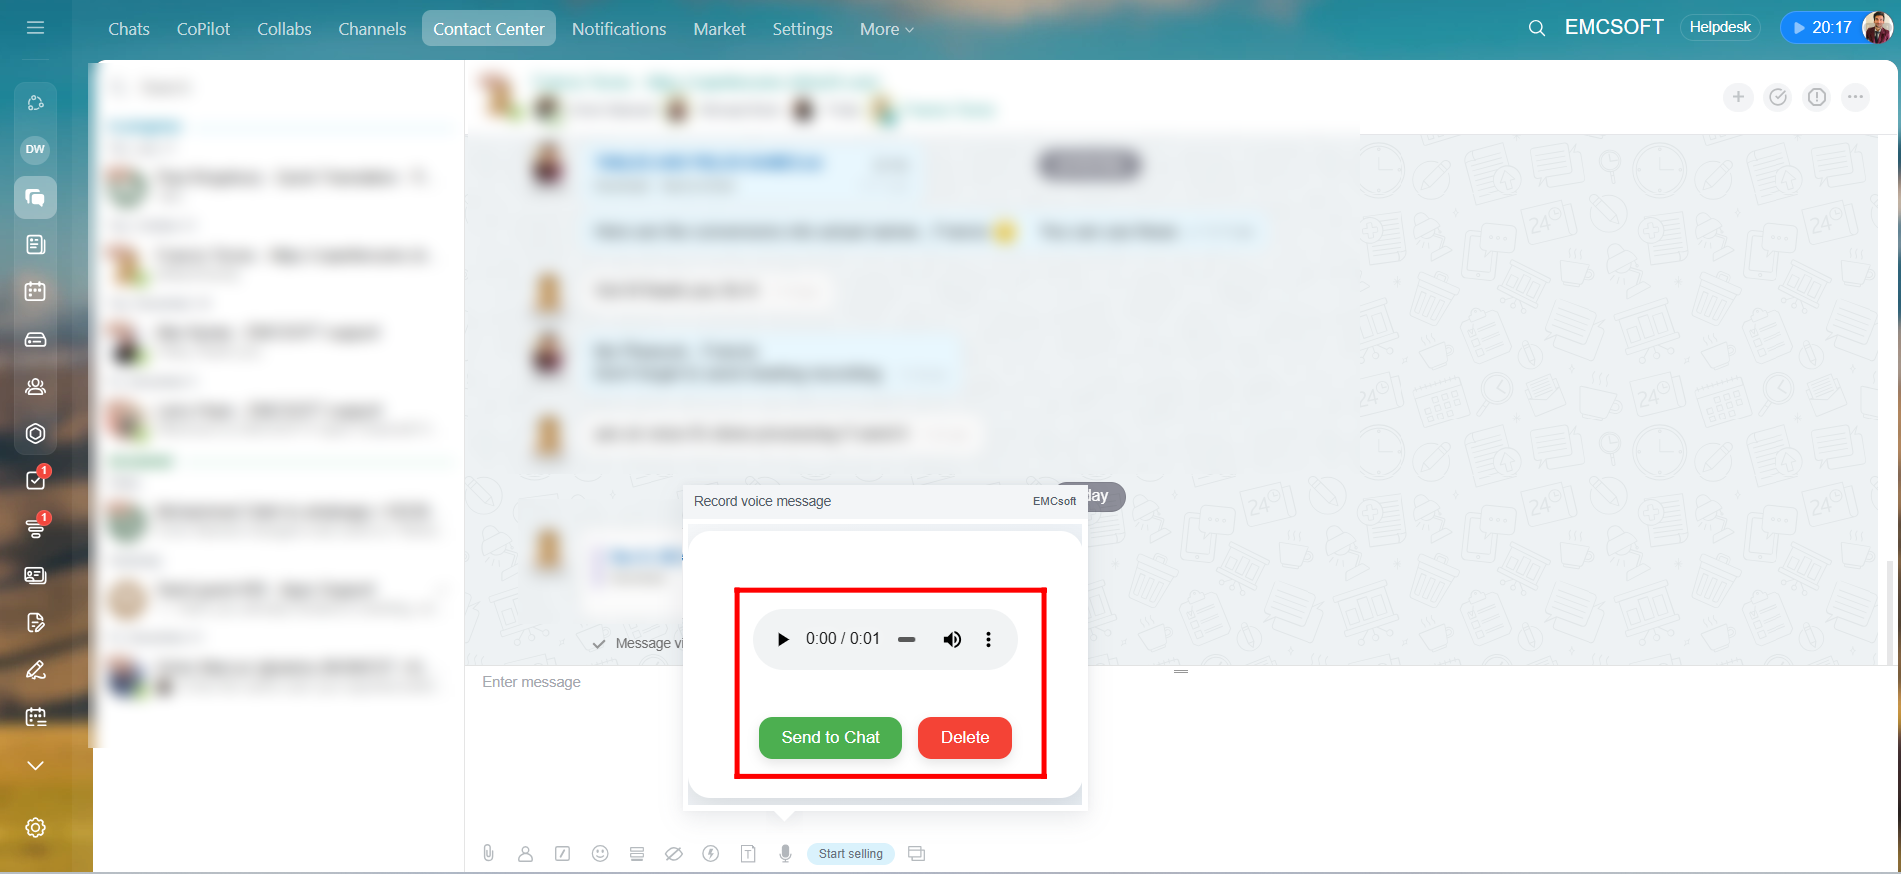
47. After recording your voice message, you will see two options: “Send to chat” to deliver the message to the client, or “Delete” if you want to discard the recording.
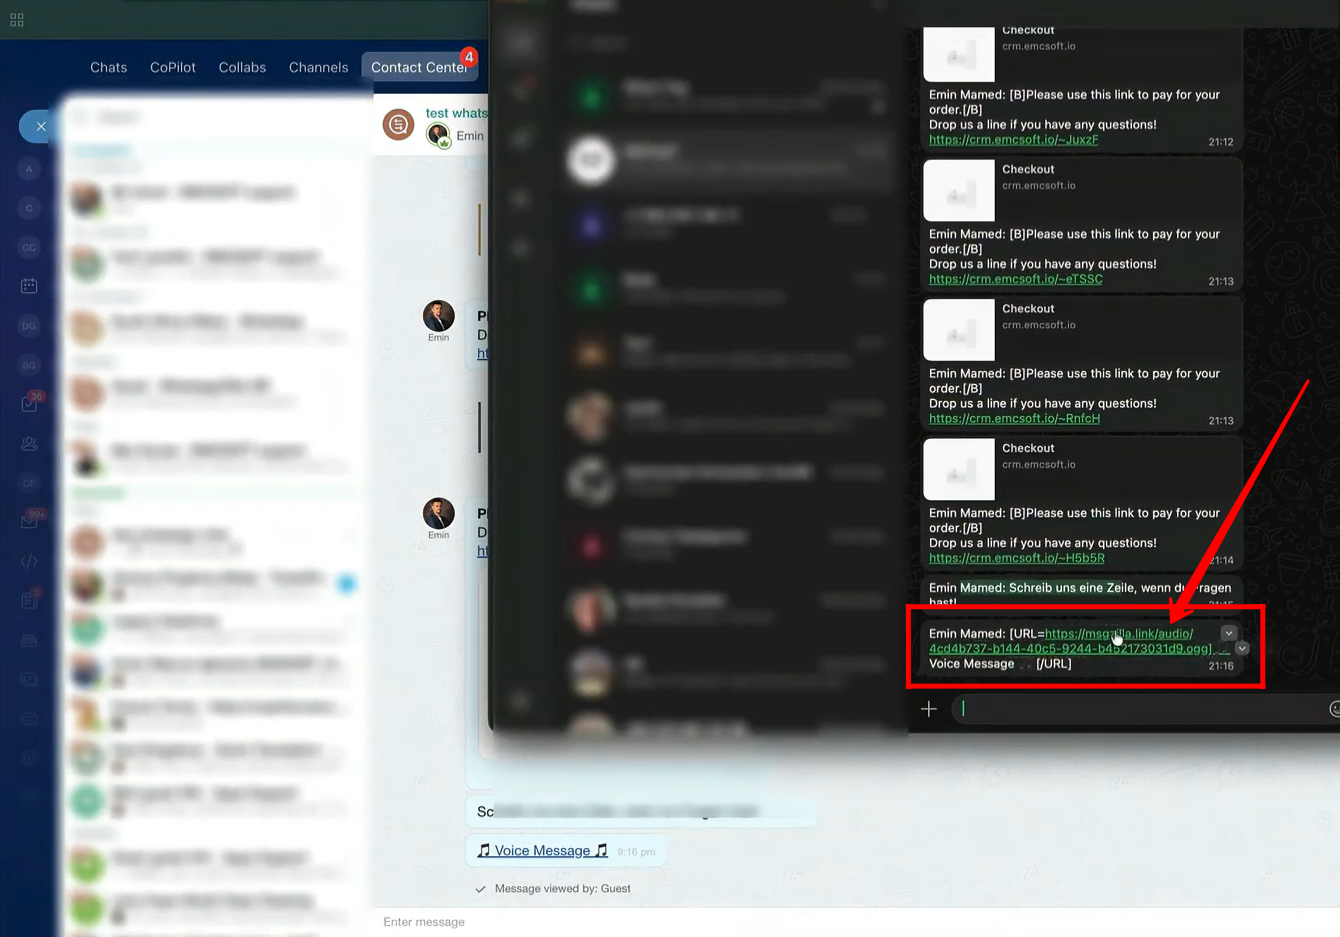
48. This is how your client will receive your recording: as a URL. When the client clicks the link, it will open in a new tab where they can listen to your voice recording.
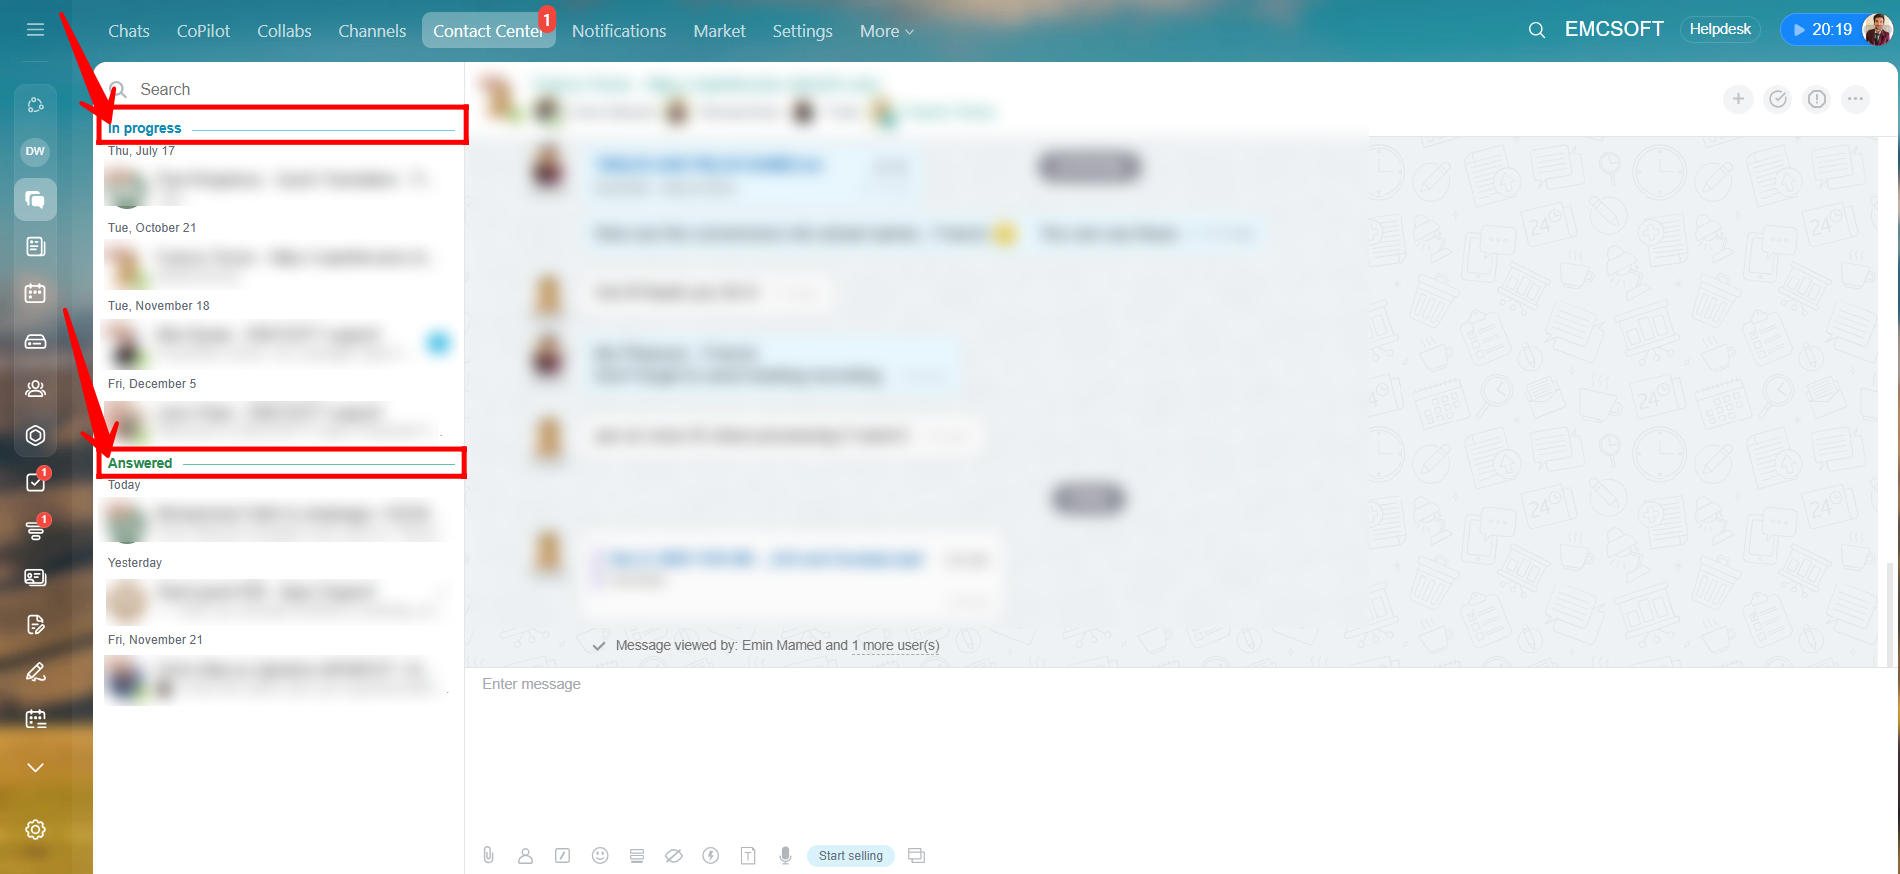
49. Within the Contact Center Messages module, all your conversations are organized into different sections such as In Progress, Answered, Unanswered, Yesterday, and more.
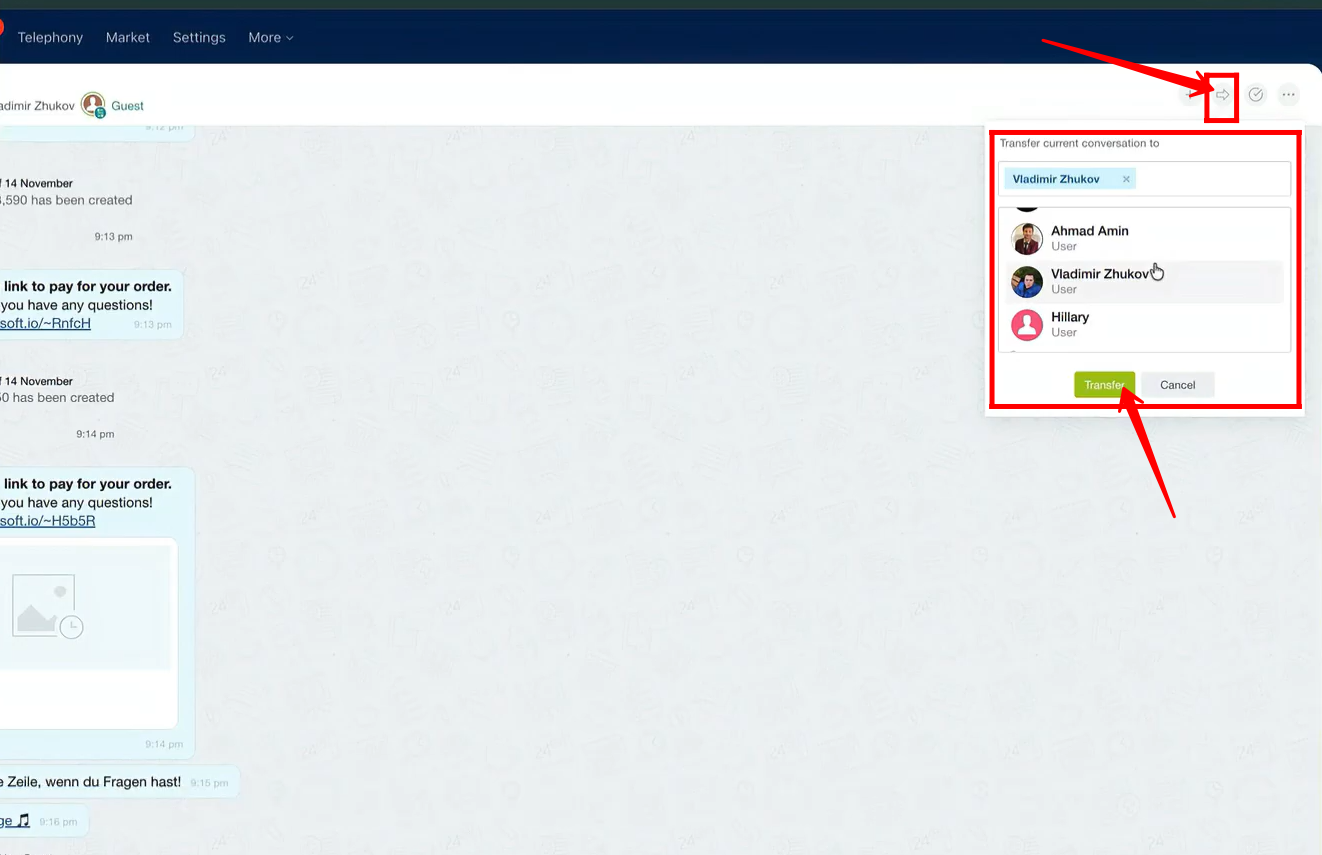
50. By clicking the highlighted icon in the top-right corner of the chat window, you can transfer the conversation to another user. Simply select the user you want to transfer it to, then click Transfer.
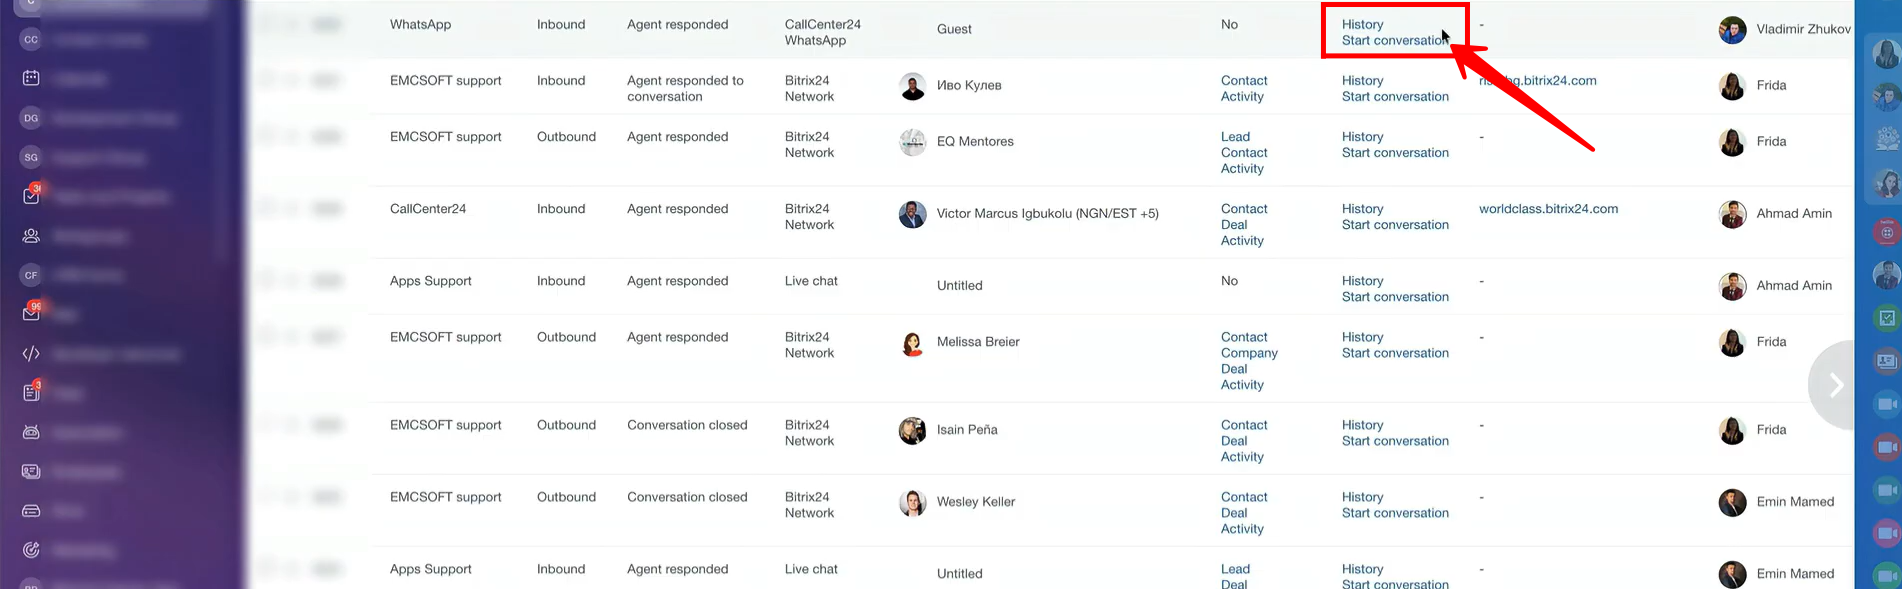
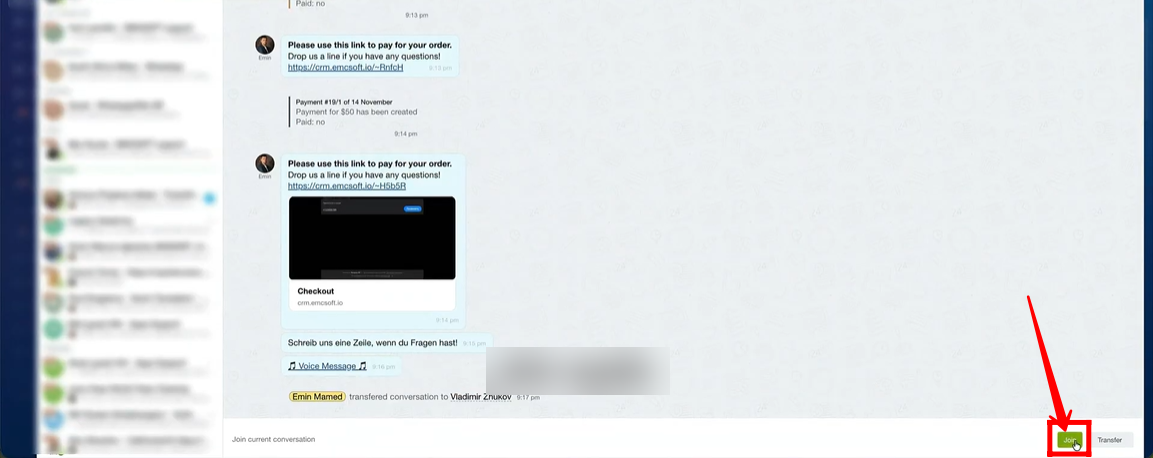
51. If you have administrative rights, you can go to the Conversations section and open a chat in which you are not currently a participant. You will then have the option to join that conversation.
52. Now, we have the option to join the chat.
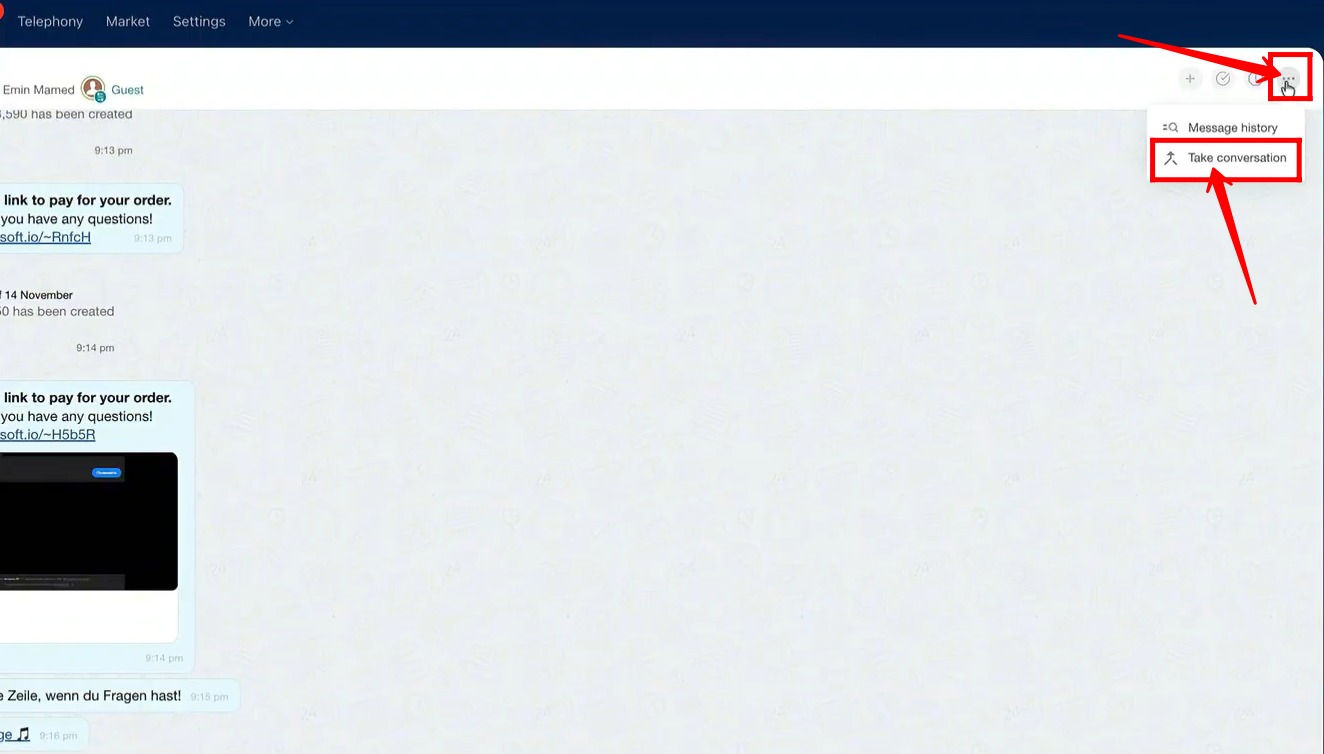
53. If you have the necessary rights, click the three dots in the top-right corner of the chat window and select ‘Take Conversation.’ This will remove other agents from the chat, allowing you to handle the conversation exclusively.
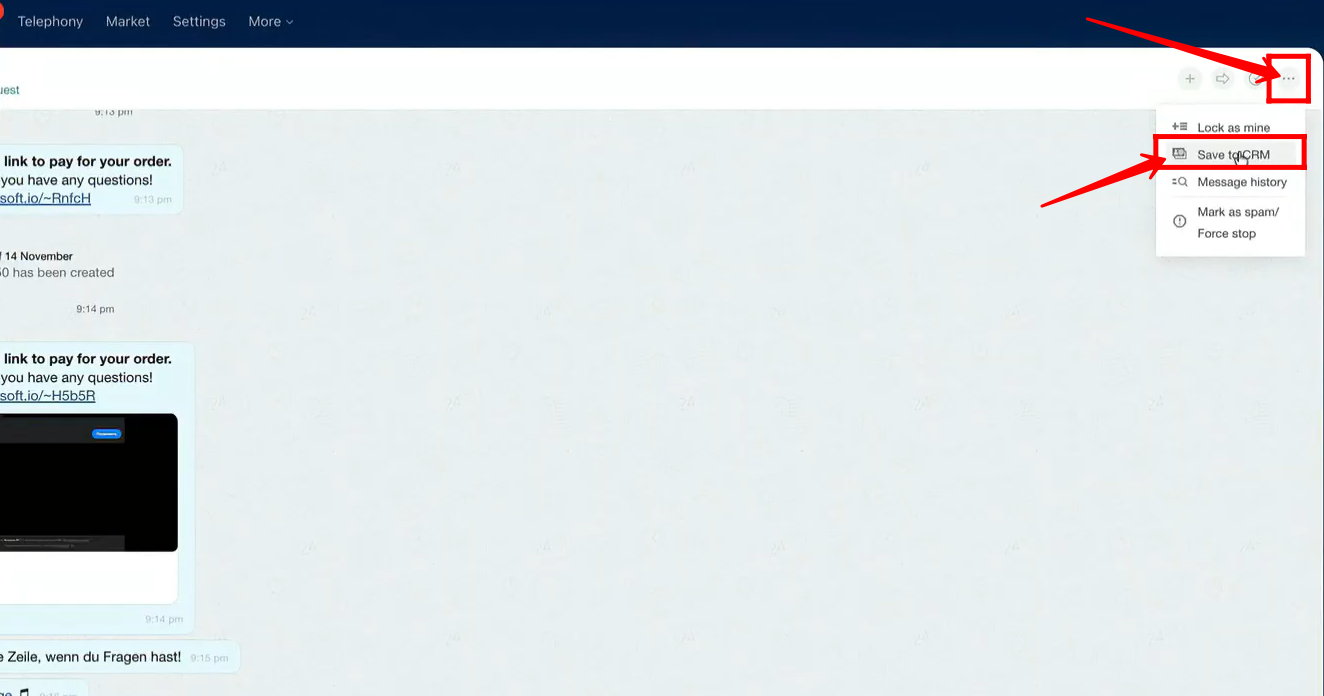
54. If the client’s information is not already saved in your CRM, click the three dots in the chat window and select ‘Save to CRM’.
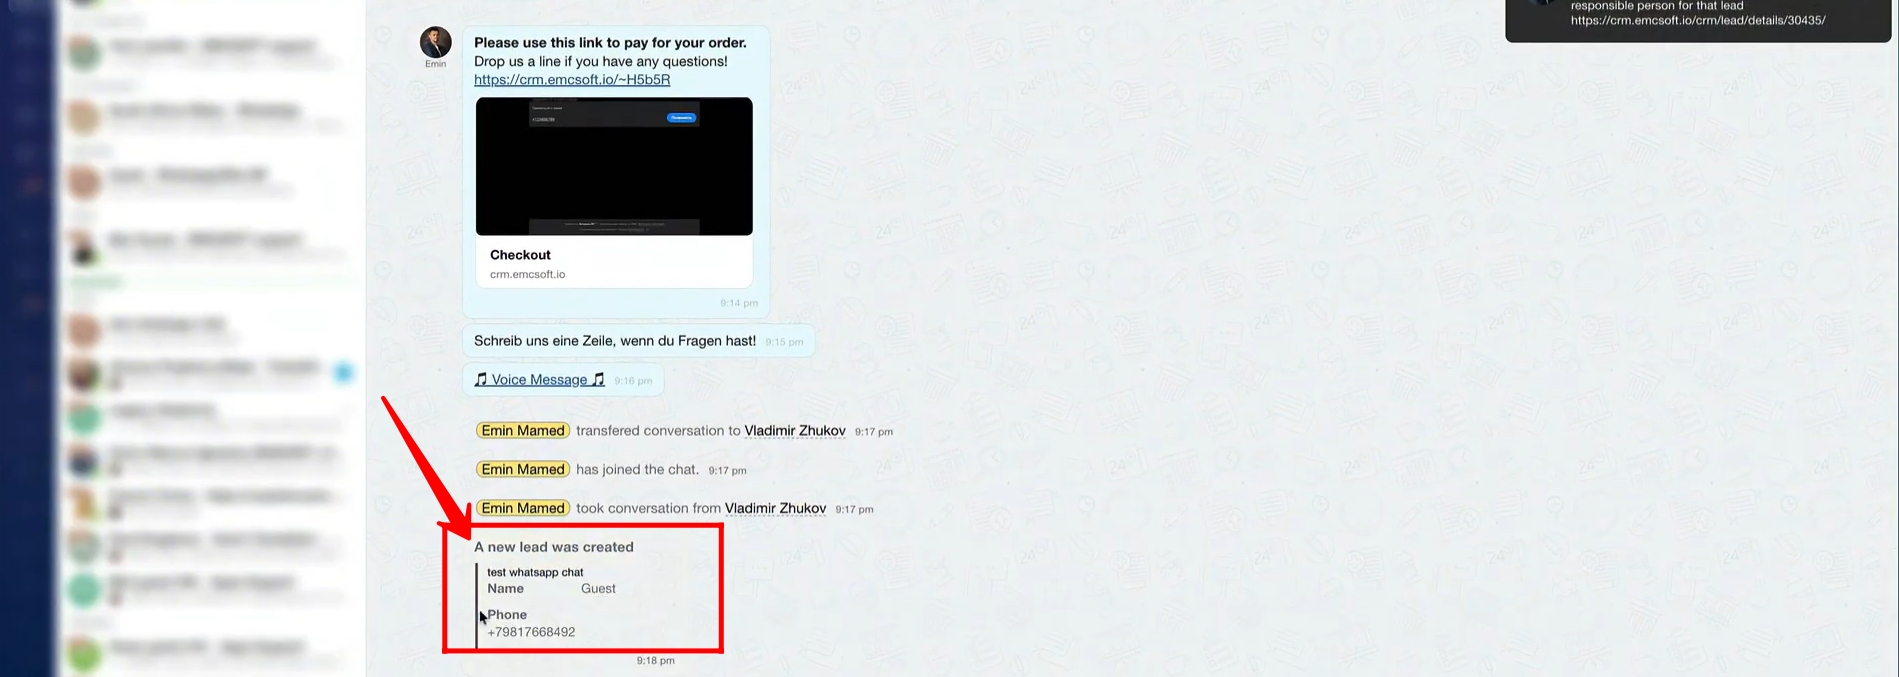
55. You can see that the client’s information has been saved as a new lead in the CRM. Depending on the open channel configuration, it could be saved as a lead or a deal. In this example, we configured it to be saved as a lead.
“You can also watch video on Youtube”