| 832 Views | admin

Telephony in Bitrix24 allows businesses to manage calls directly inside the CRM without relying on separate tools. It helps teams handle inbound and outbound calls, track call history, and connect conversations with CRM records such as leads, contacts, and deals. All call activity remains visible and organized in one system.
Bitrix24 supports different telephony setups based on business needs. You can rent numbers directly from Bitrix24, connect an existing office or cloud PBX, or use third-party telephony applications from the Bitrix24 Market. This flexibility makes it suitable for both small teams and larger organizations with advanced call requirements.
In this training guide, we will walk through the main telephony options available in Bitrix24. You will learn how to configure call connections, manage users and queue groups, set up IVR menus, control access permissions, and review call details and statistics.
By the end of this article, you will have a clear understanding of how telephony works in Bitrix24 and how to use it to manage calls efficiently, track performance, and connect call data with your CRM records.
“Detailed Instructions are given below”
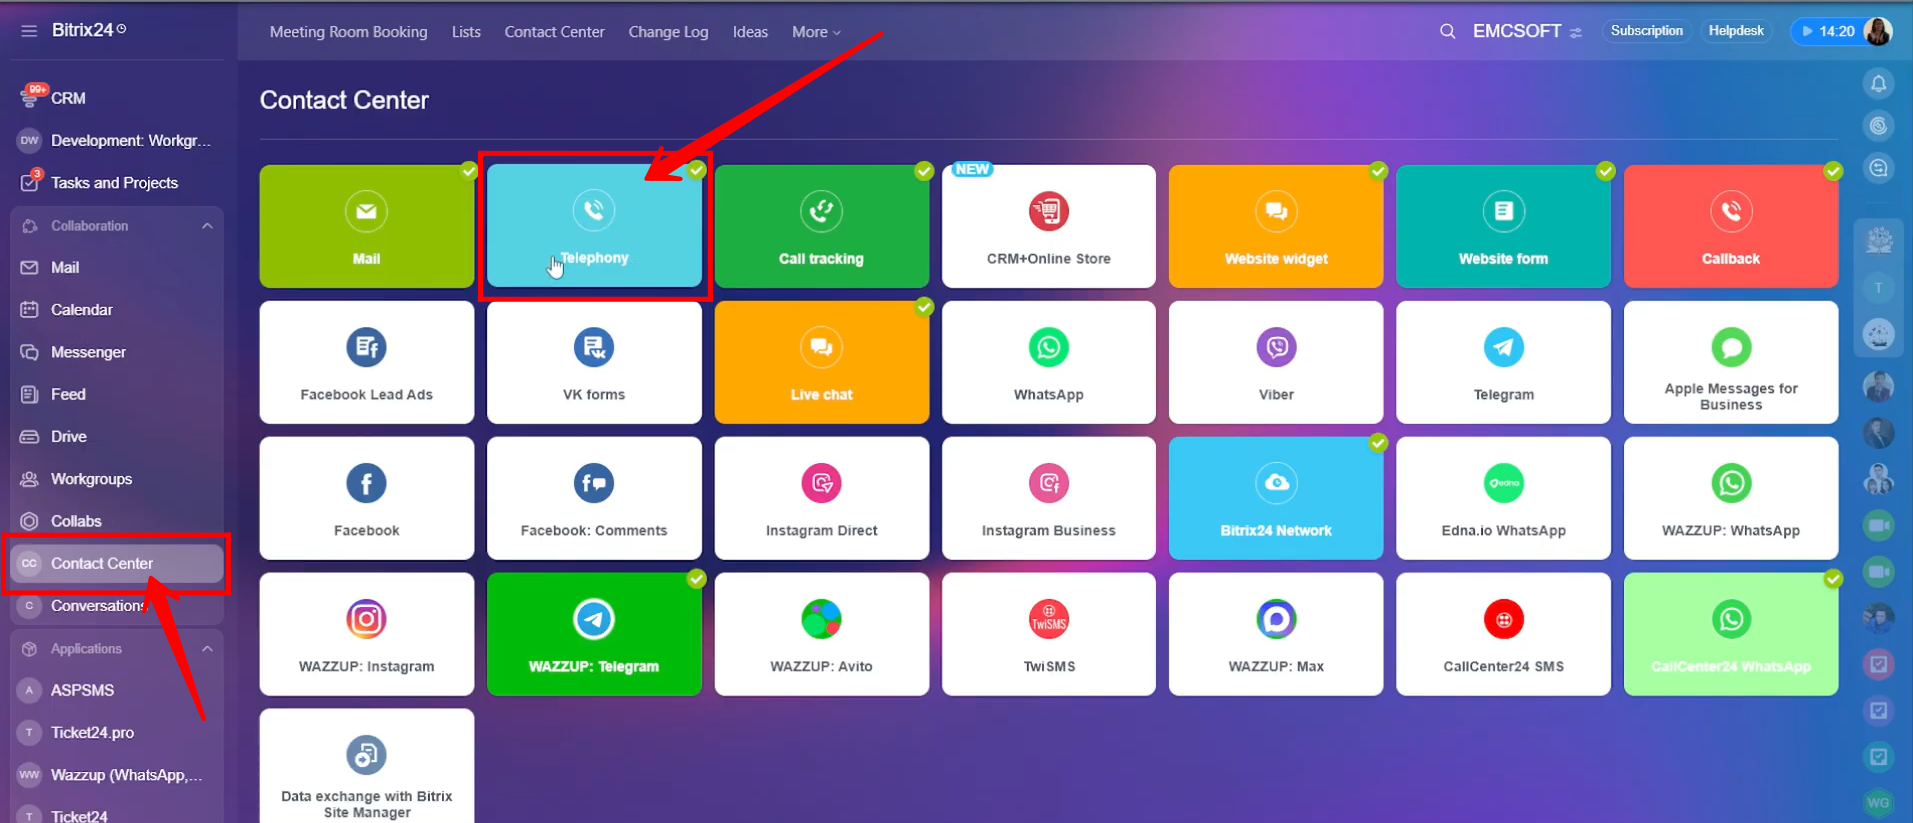
1. Go to Contact Center from the sidebar, or use the search bar to navigate there. Within the Contact Center, click Telephony to manage and explore all telephony-related configurations.
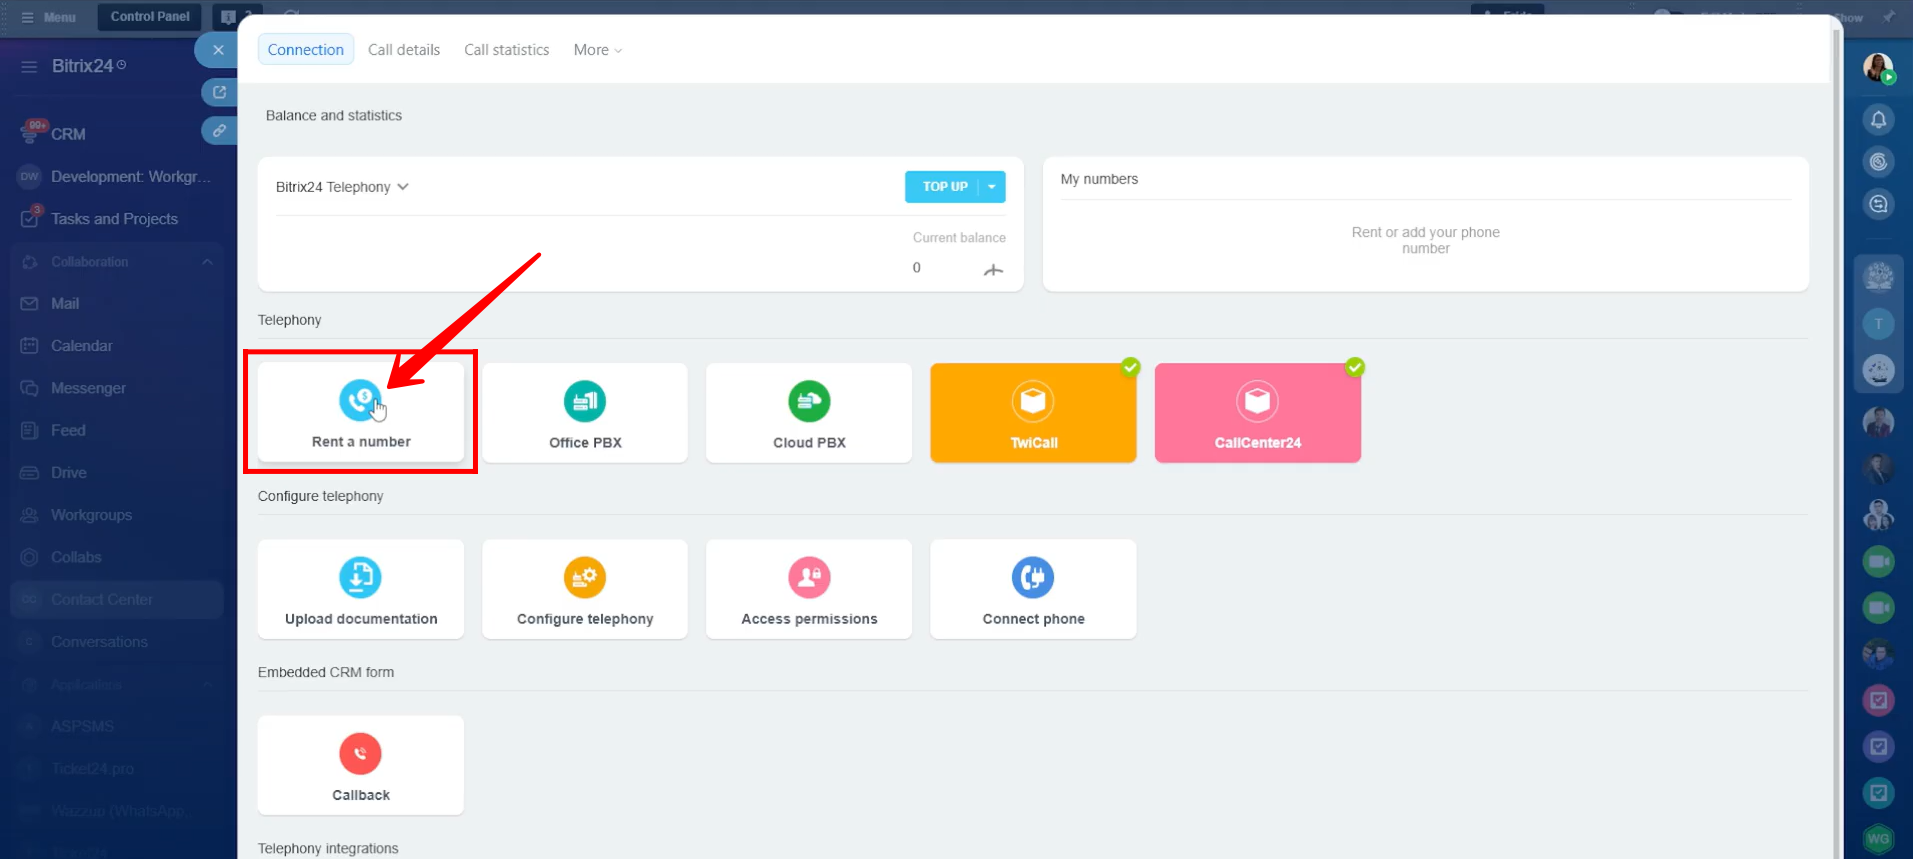
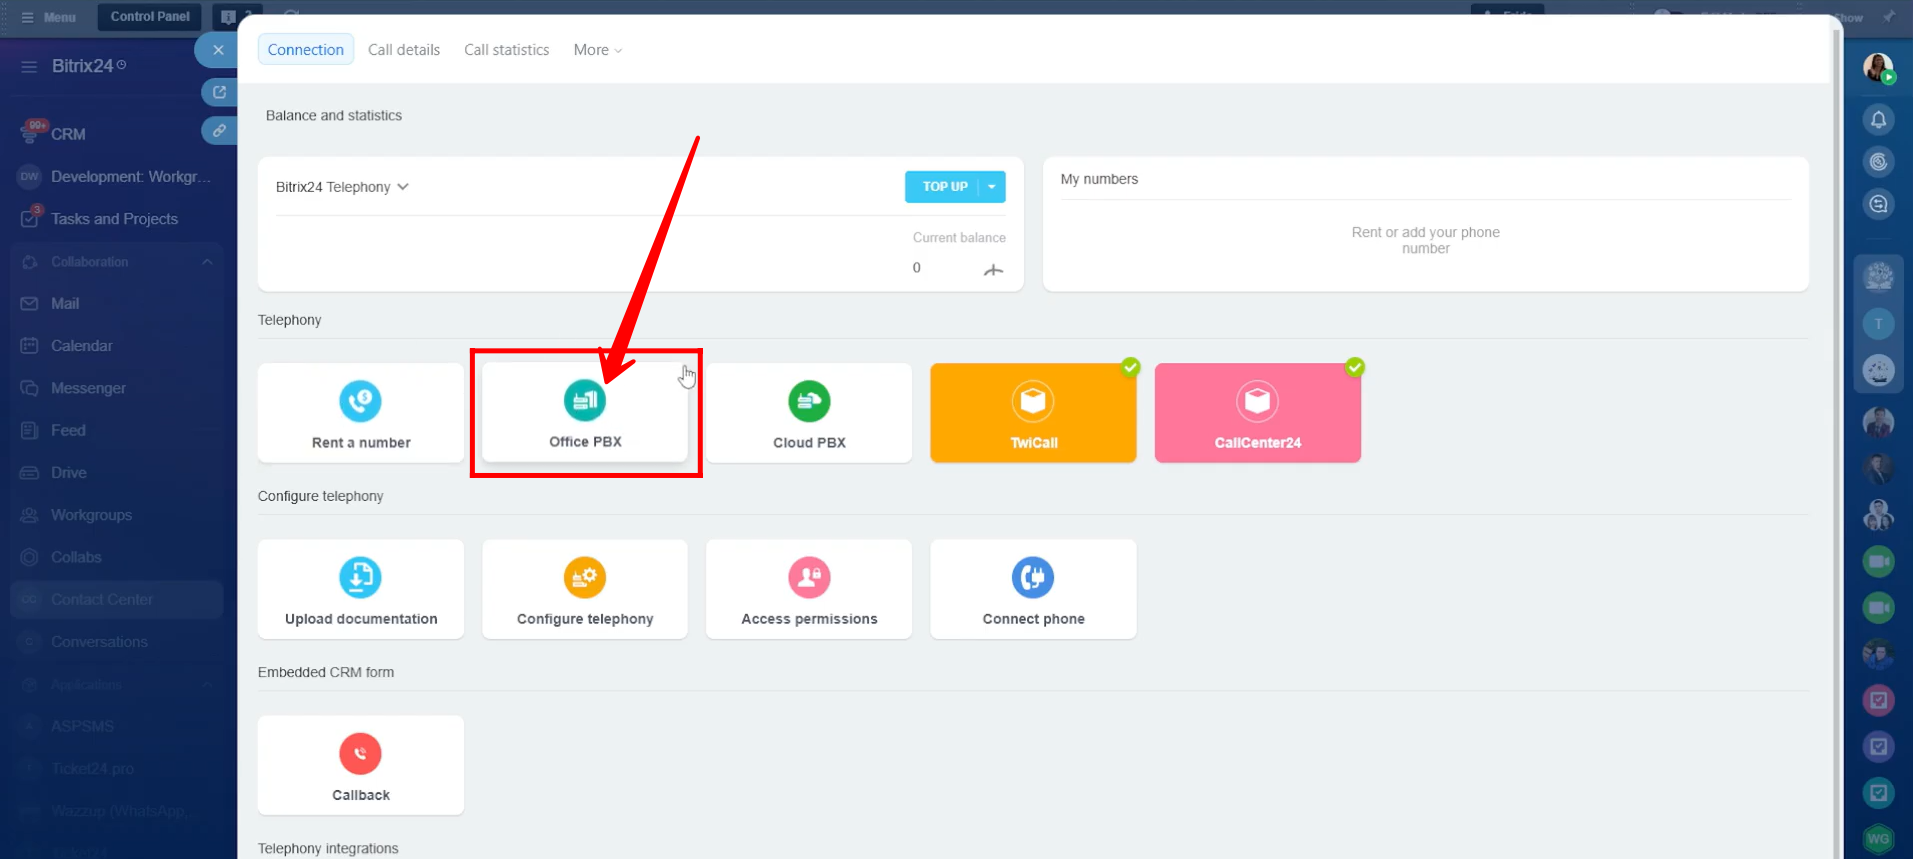
2. There are multiple options available to set up calls, messages, and an IVR environment in Bitrix24. The first option is “Rent a Number” directly from Bitrix24.
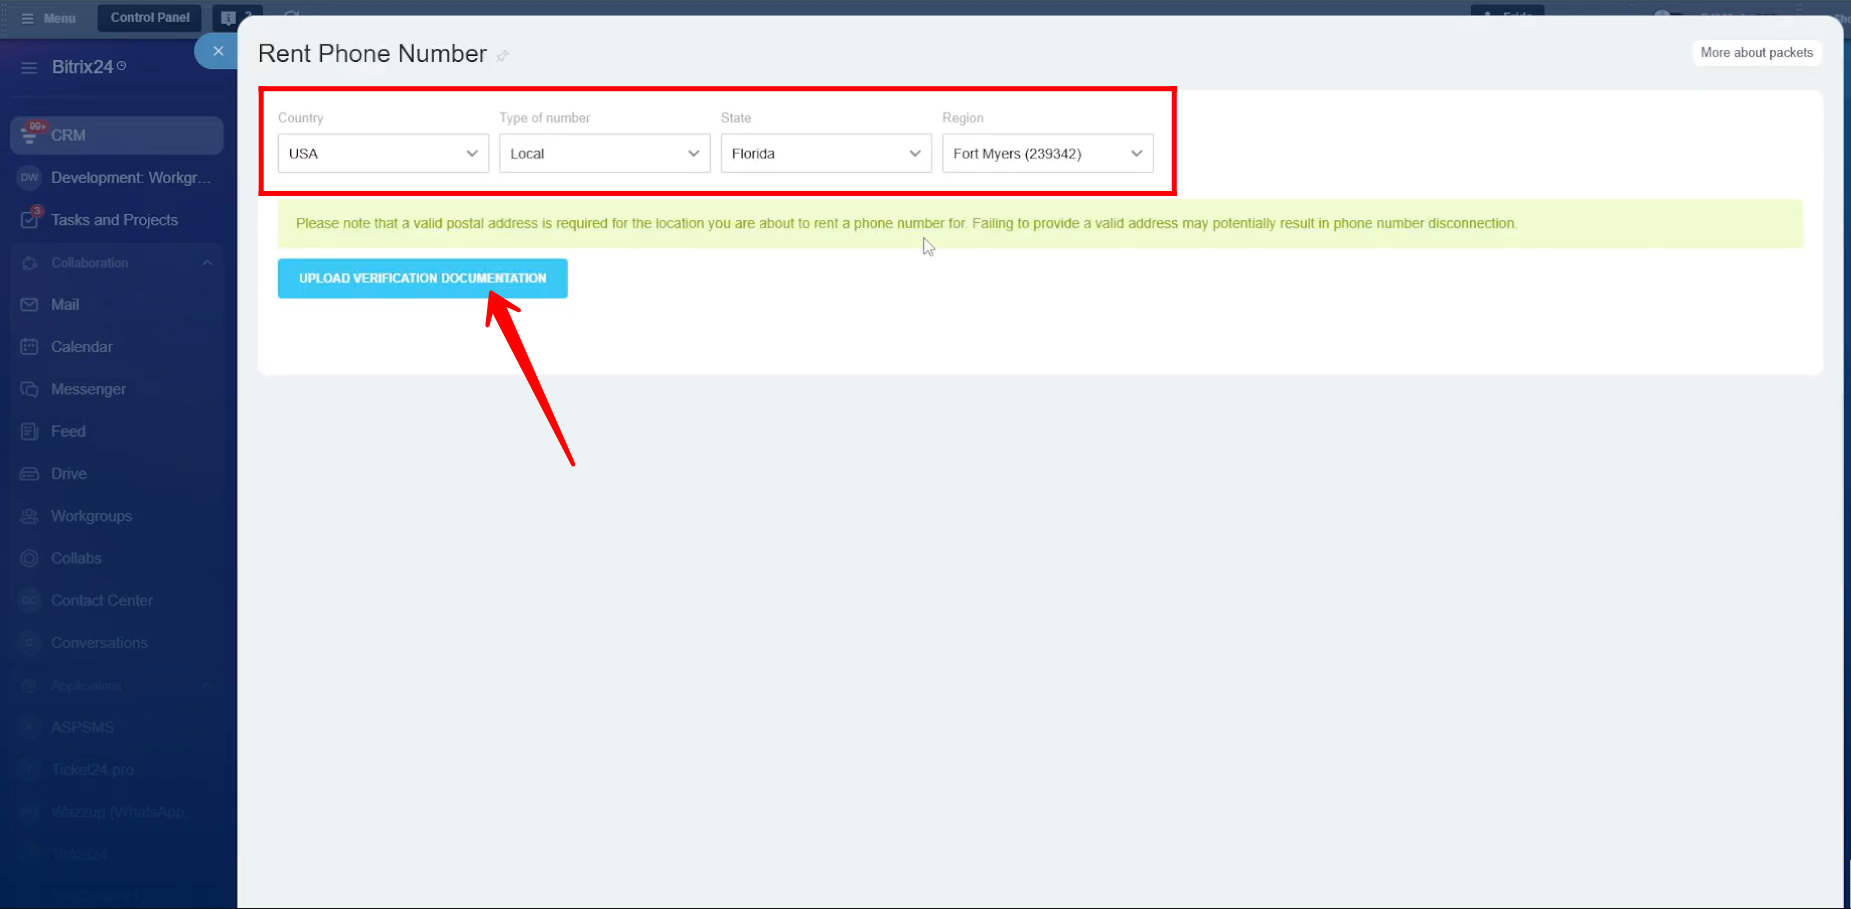
3. Here, you can choose the country for the phone number you want to purchase. You can also select the number type (local, mobile, or toll-free), along with the state and region within that country. To complete the process smoothly, you will need to upload verification documents to confirm your business legitimacy.
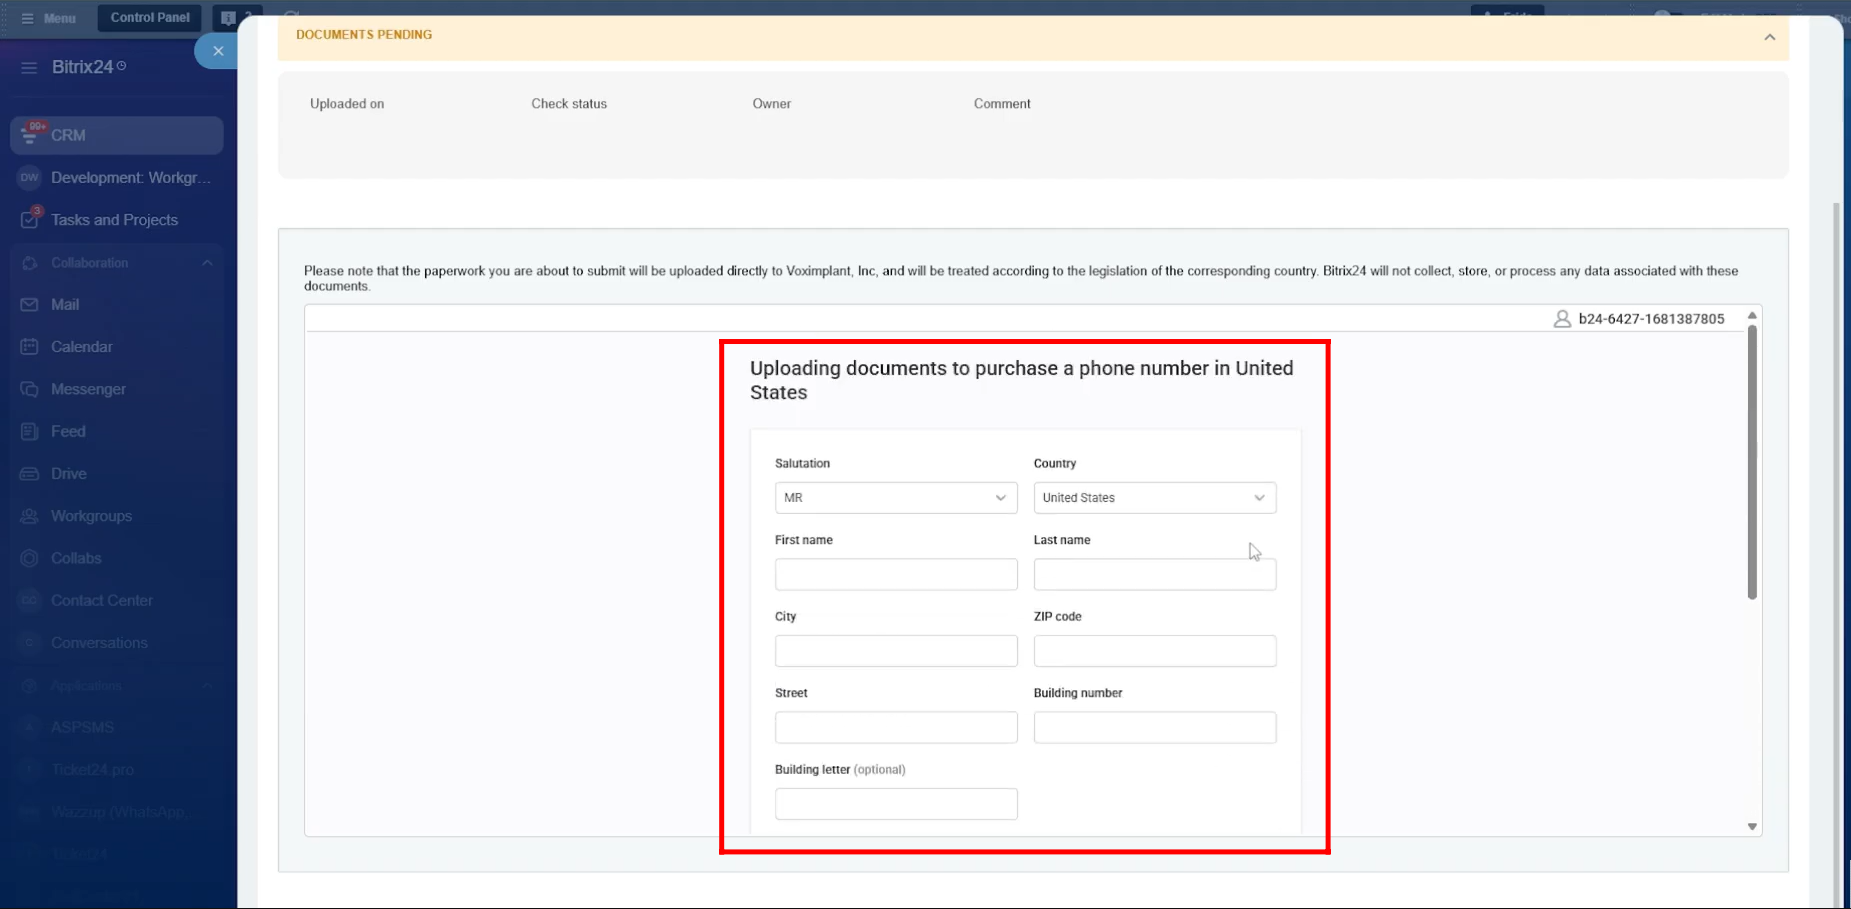
4. Here, you will upload the required documents to purchase a phone number for a specific country. The documents and information needed depend on the country you are buying the number from, as each country has its own regulations. Common details usually include your business name, contact person information, and the physical address of your business.
5. The second option, and the most complex one, is Office PBX. This option is used when you already have a physical or software-based telephony system set up in your office and want to connect it to Bitrix24. It is useful for advanced call routing between employees and departments, but it usually requires on-site equipment.
This type of configuration requires careful setup, as even a small mistake can interrupt the entire company’s call flow. You will need PBX configuration credentials, which are provided by your telephony service provider. You can either purchase new numbers from the provider or connect your existing company numbers to Bitrix24.
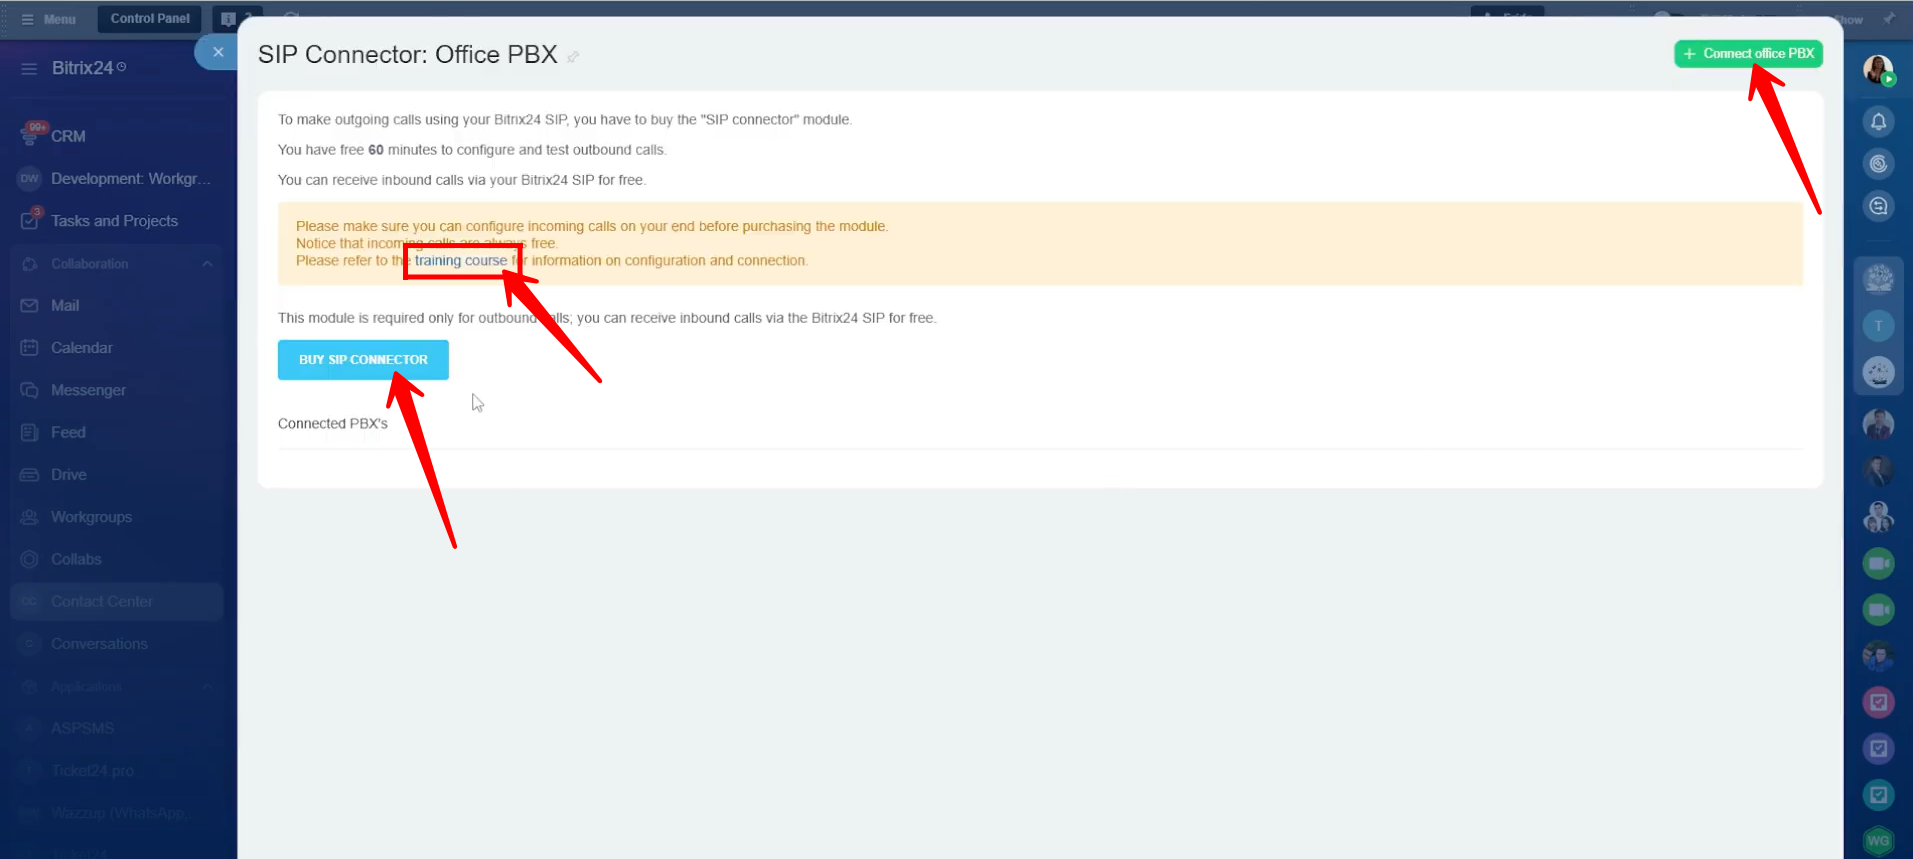
6. Click “+ Connect Office PBX” to start the configuration process. Please note that you must purchase the SIP Connector, as it is required for making outbound calls. Inbound calls can be received through Bitrix24 SIP at no cost.
You will be given 60 minutes to configure and test outbound calls after enabling the SIP Connector. Additionally, you can access the training course from this section to guide you through the Office PBX setup process.
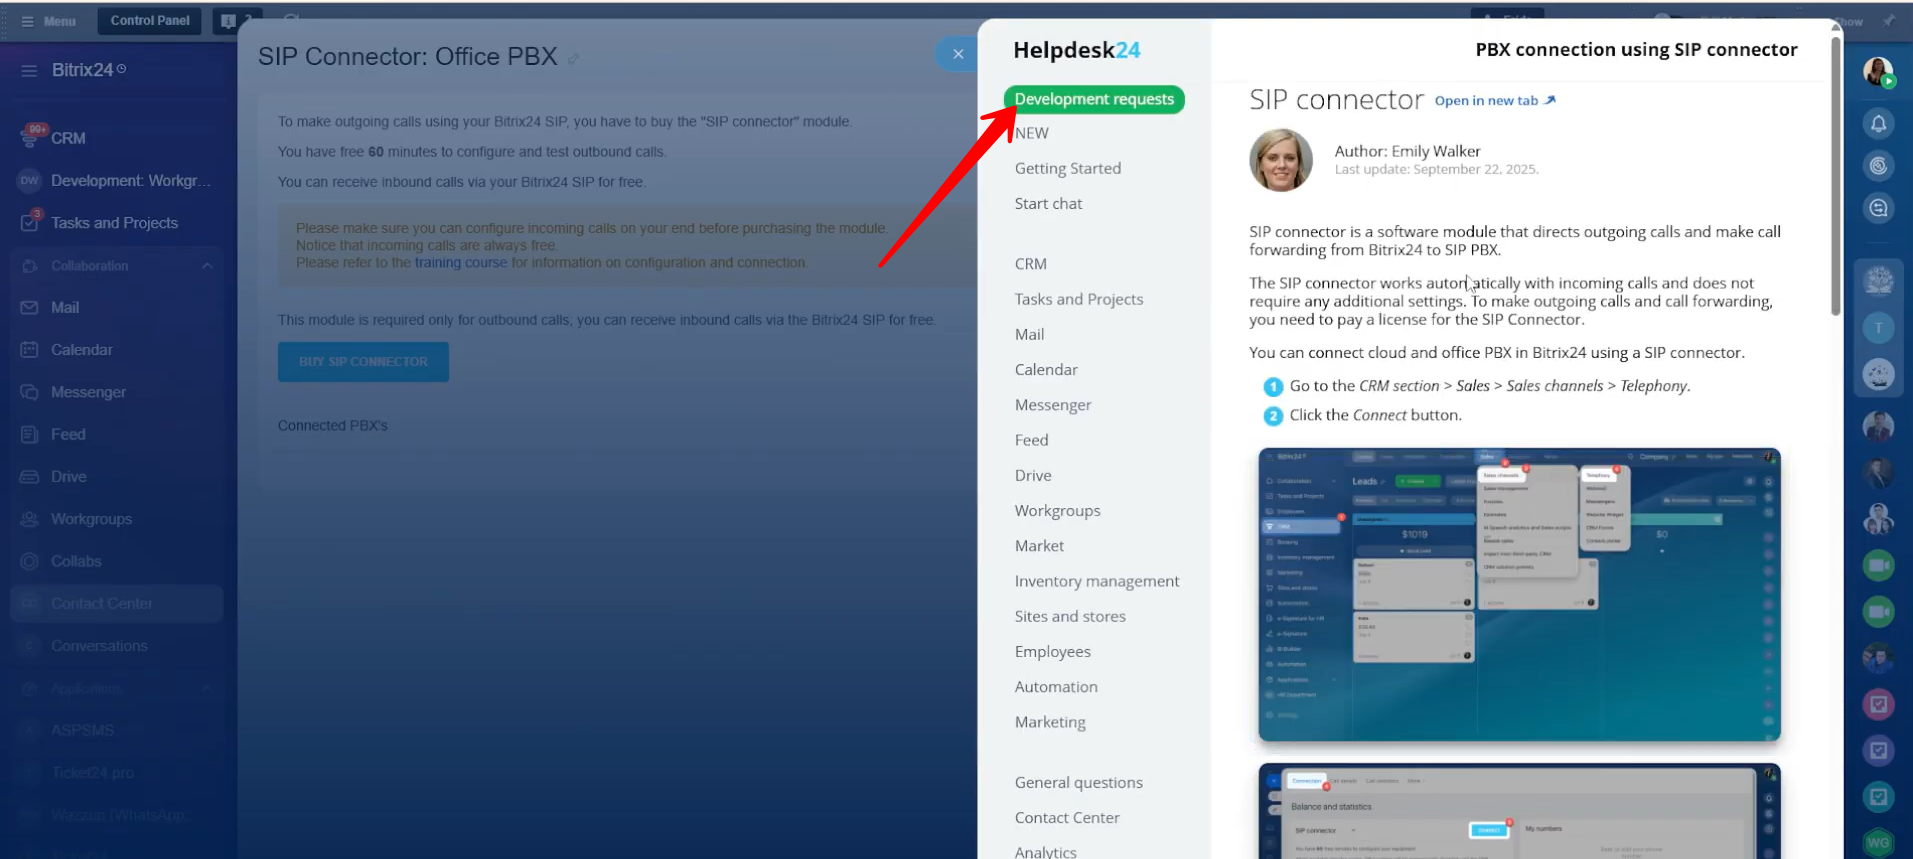
7. In the detailed guide “PBX connection using SIP connector,” you will find all the necessary information to complete the Office PBX configuration process.
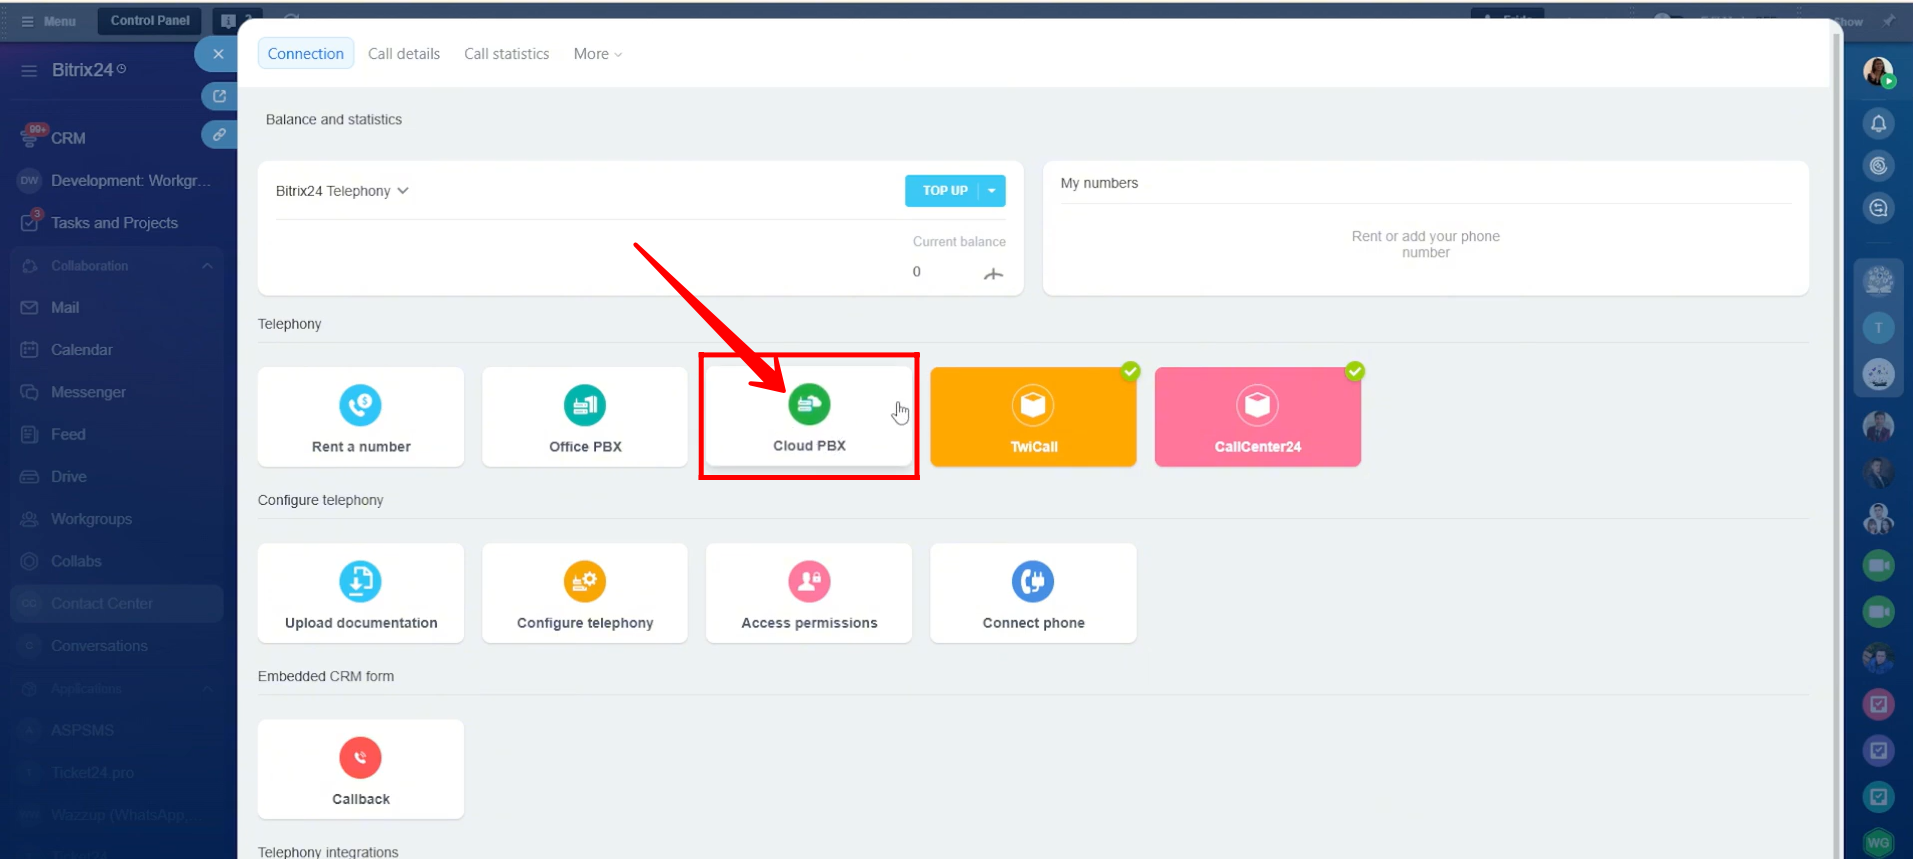
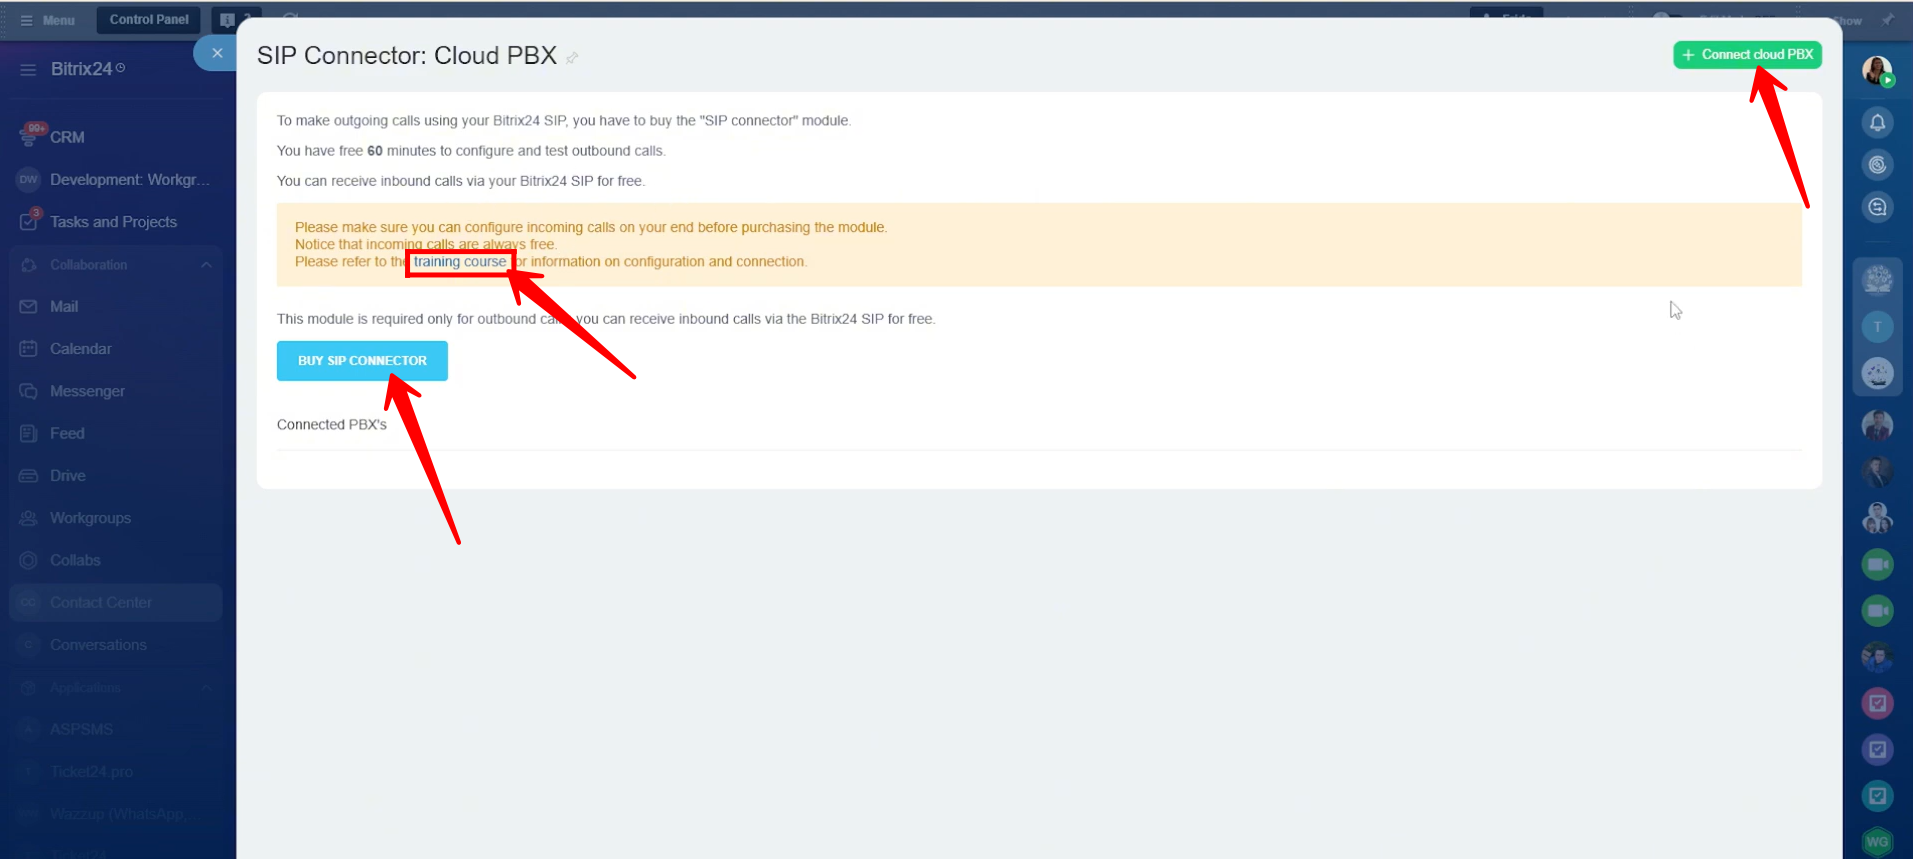
8. Next, there is the Cloud PBX option. If you already have a PBX system hosted on a service provider’s cloud server, or plan to purchase a cloud-based PBX from a provider, you can connect that setup to Bitrix24 from here.
9. Similar to Office PBX, you must purchase the SIP Connector to make outbound calls, while inbound calls are free through the Bitrix24 SIP. You will receive 60 minutes to configure and test outbound calls.
To begin, click “+ Connect Cloud PBX” and complete the required configurations. You can also access the training course from this section for guidance during the setup process.
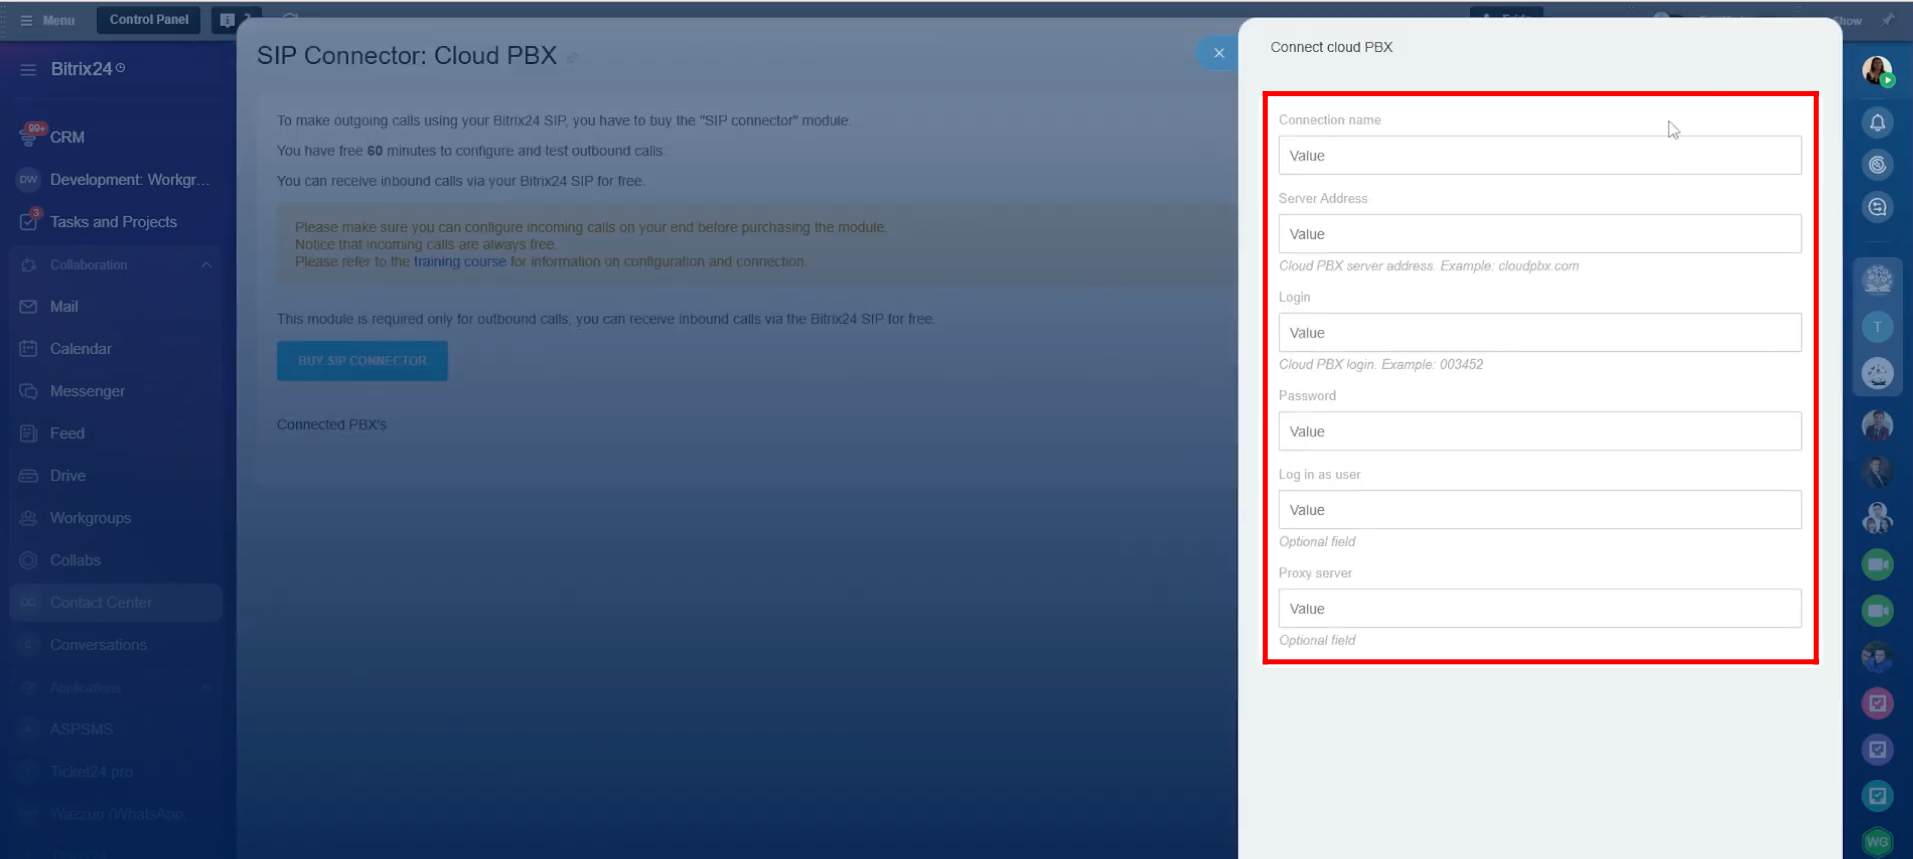
10. To connect a Cloud PBX, you will need to provide the following information: Connection name, Server address (the Cloud PBX server address), Login, and Password. You can also enter Login as user and Proxy server details if required, as these fields are optional.
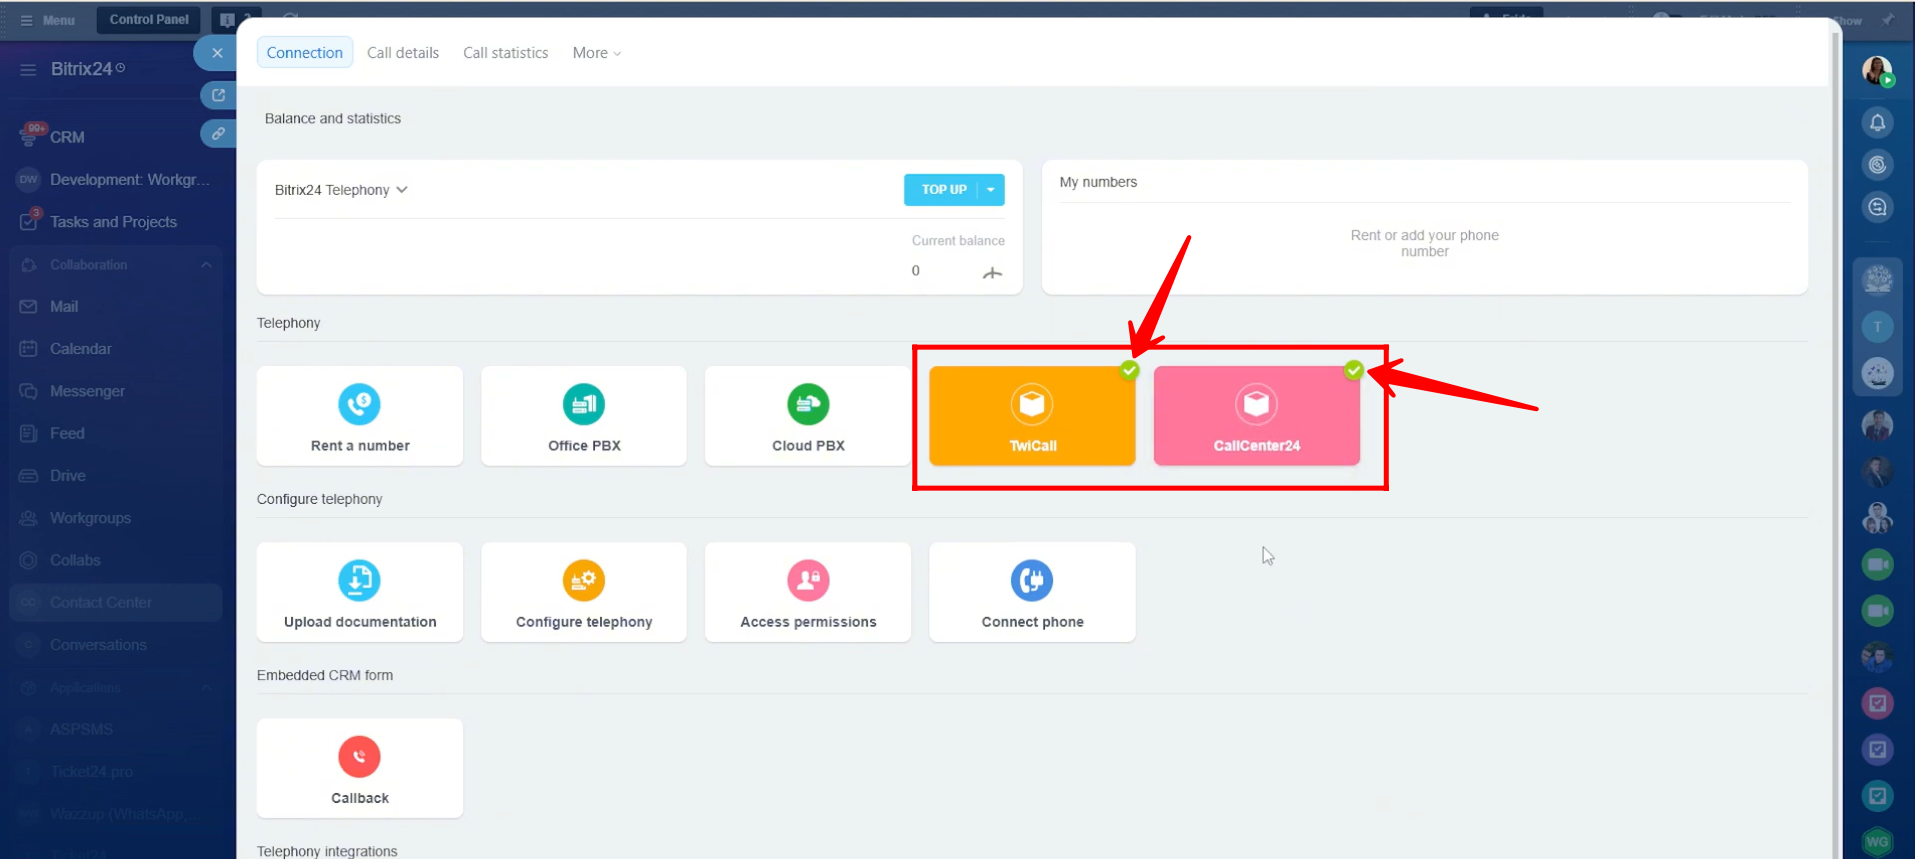
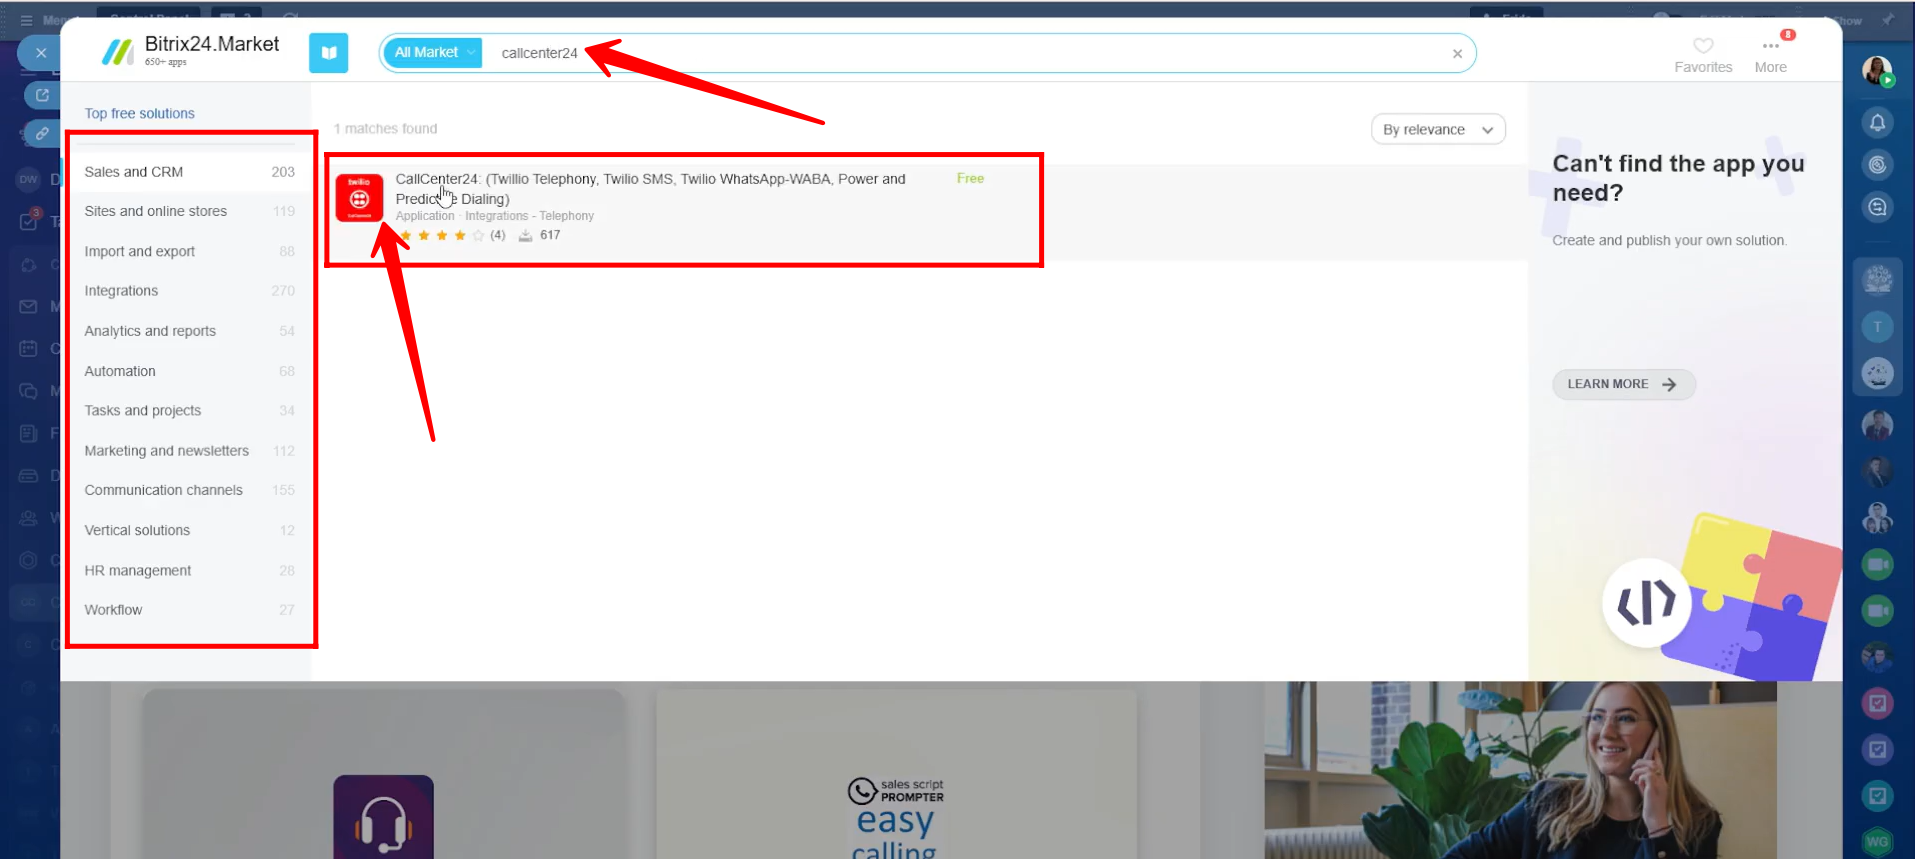
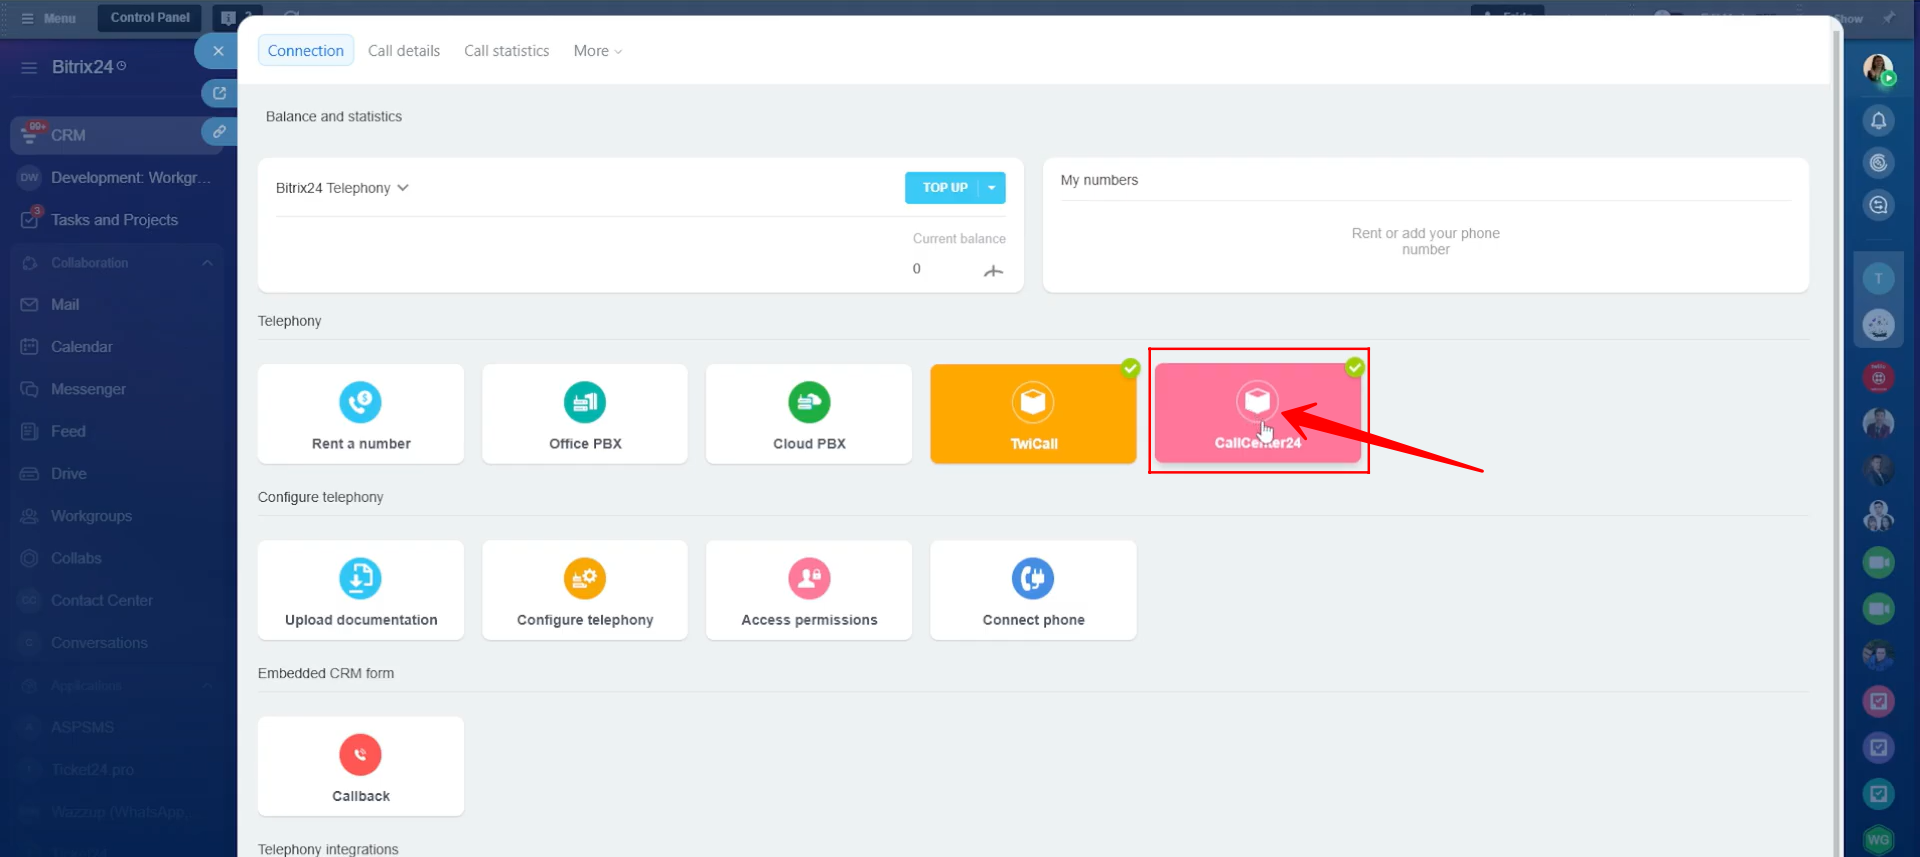
11. If you want to use a telephony solution from the Bitrix24 Market, go to Total Apps under Telephony integrations. There, you will find various applications available in the Market that can be used for telephony purposes.
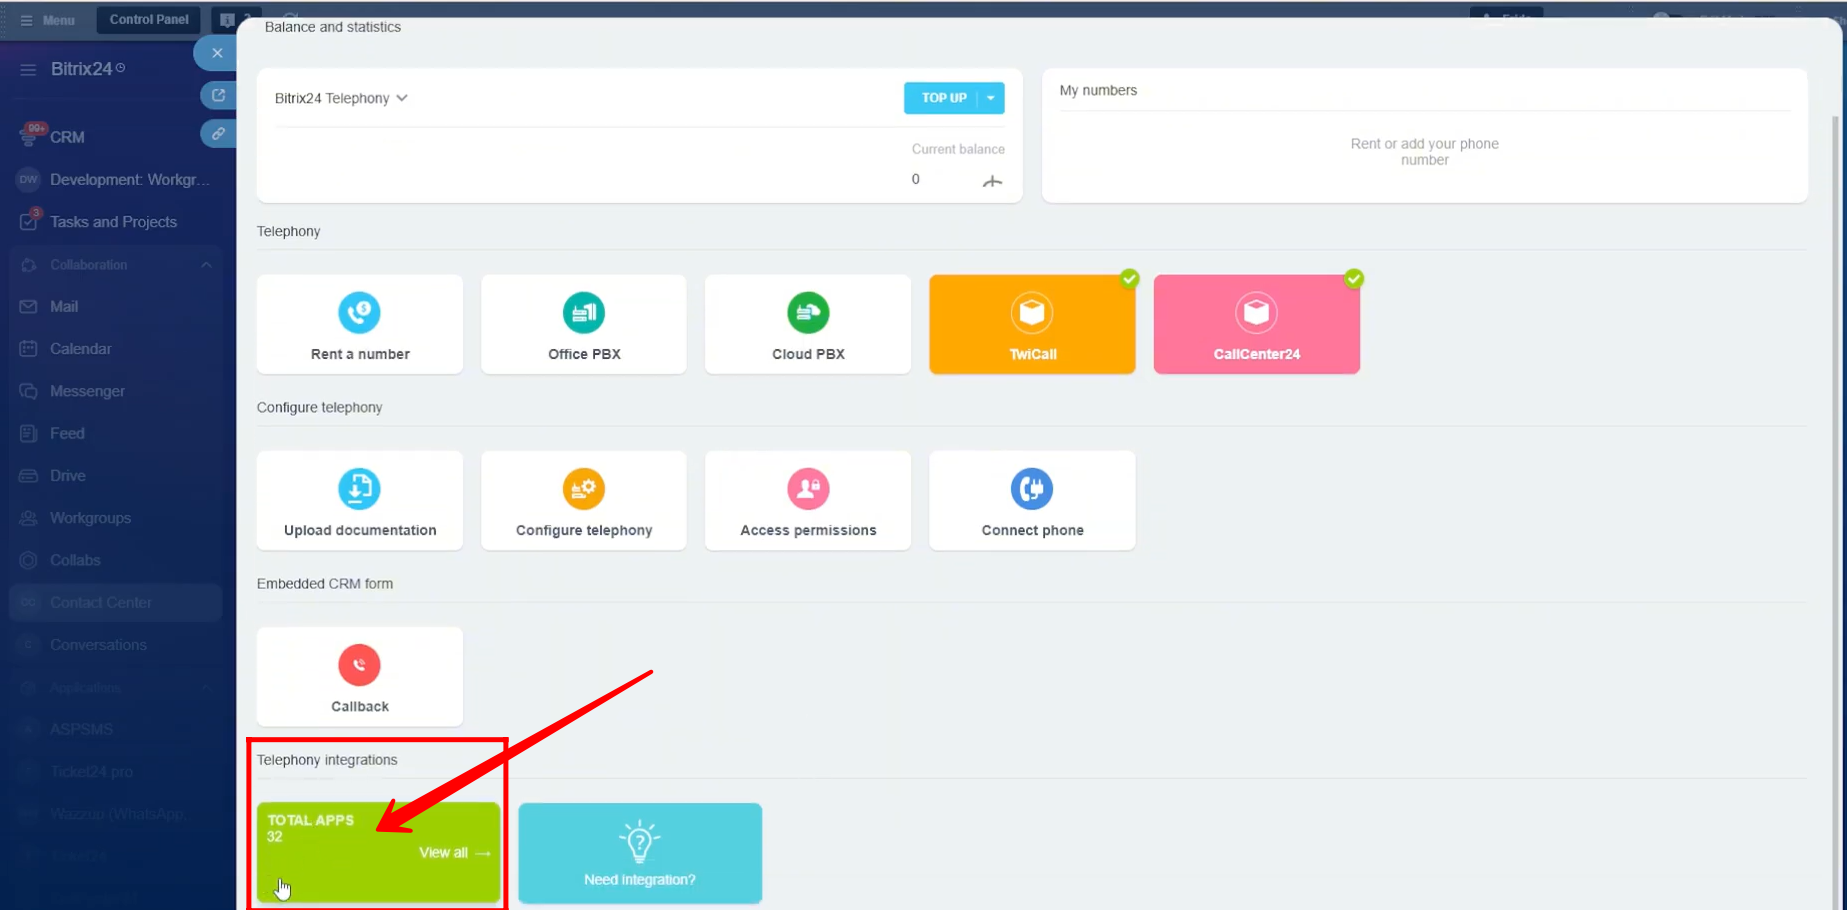
12. We have already installed two telephony applications here: TwiCall and CallCenter24. These are EMCsoft’s own applications.
TwiCall is designed specifically for handling calls, while CallCenter24 offers a broader set of features, including calls, SMS, WhatsApp messaging, IVR setup, voicemail, on-hold messages, and more.
13. You can go to the Bitrix24 Market and use the search bar to find and install our applications, such as CallCenter24.
Please note that to use our applications, you must have at least one active phone number on Twilio. Phone Number is required for calling, SMS, WhatsApp messaging, and other communication features. You can either purchase a new number from Twilio or port your existing number to Twilio before connecting it to CallCenter24.
14. Depending on your situation, if you purchase a phone number directly from Bitrix24 or request assistance from Bitrix24, you will need to comply with the regulations of the country you are operating in. As part of this process, Bitrix24 may ask you to upload specific verification documents based on local requirements.
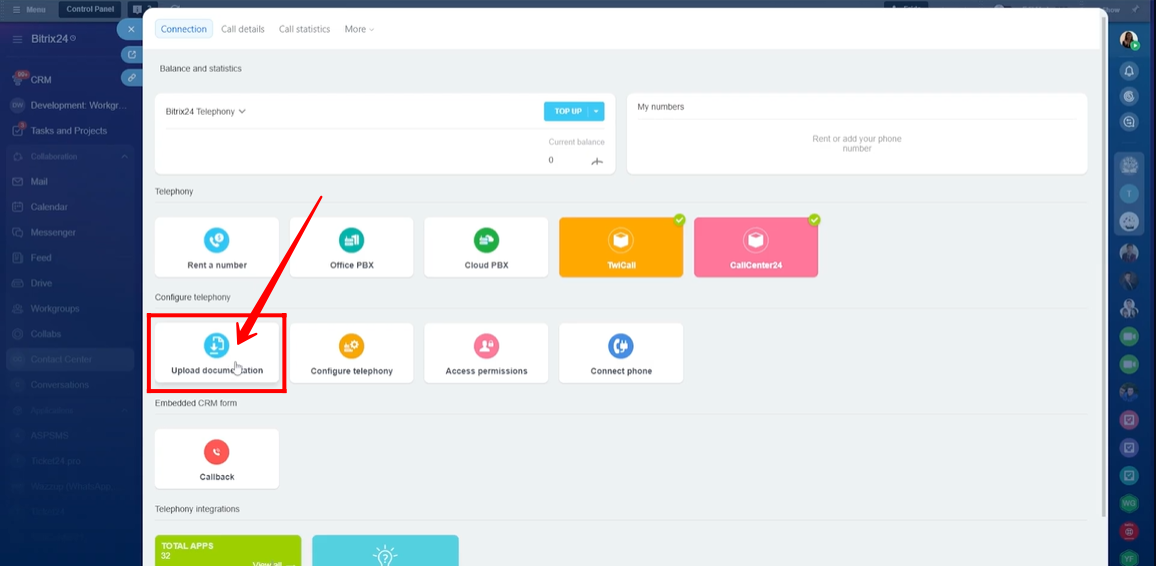
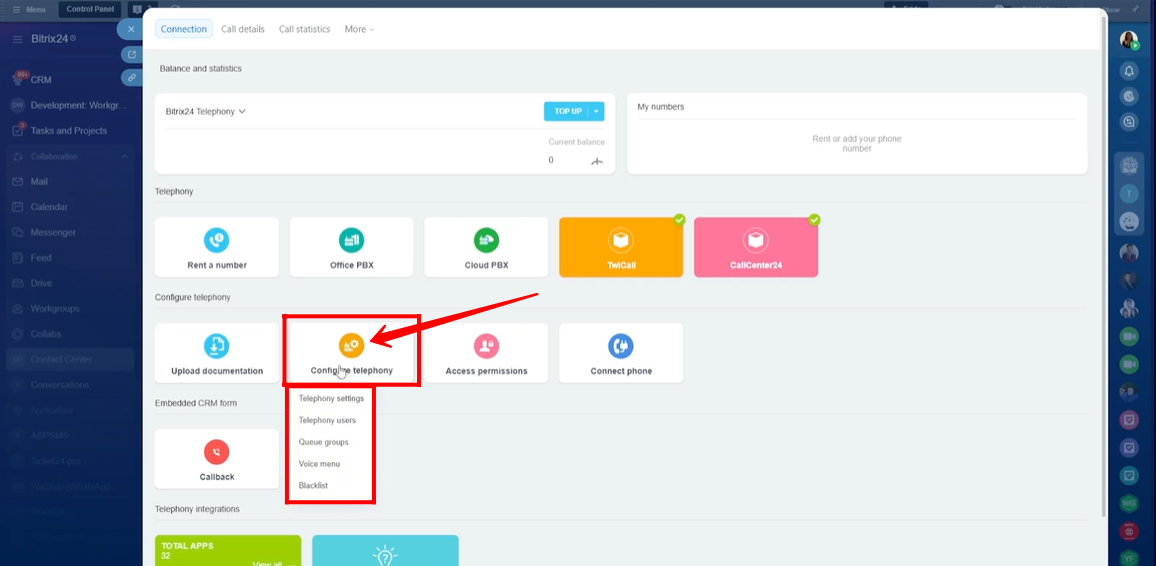
15. Now, let’s explore the Configure Telephony option. From here, you will see several sections, including Telephony Settings, Telephony Users, Queue Groups, Voice Menu, and Blocklist. We will go through each of these options one by one in the next steps.
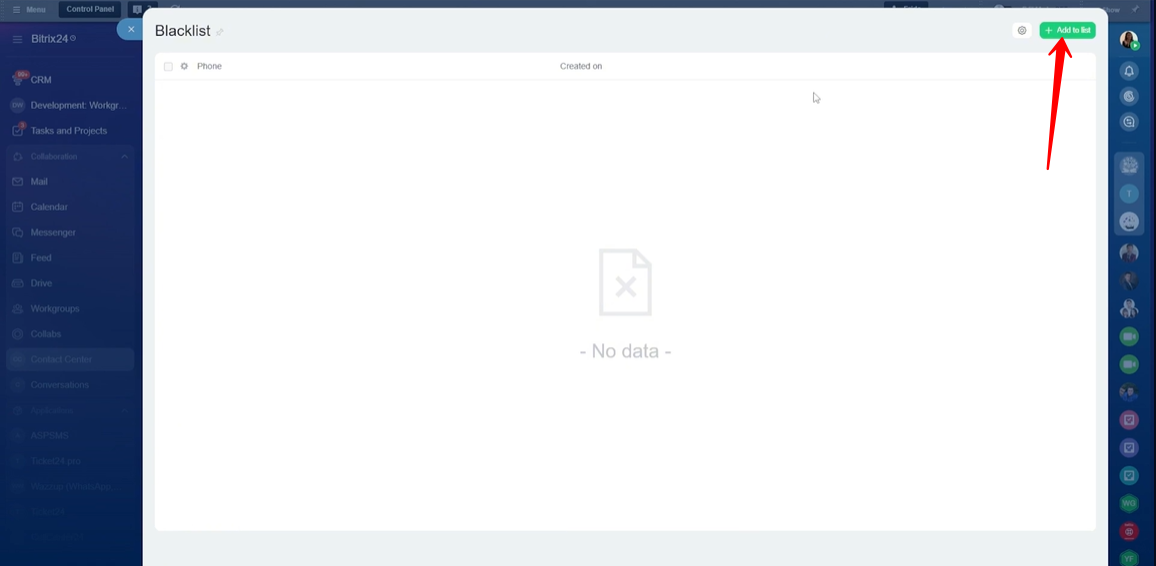
16. Within the Blocklist section, click “+ Add to list.” Here, you can add phone numbers that you want to block. Calls from these numbers will not be received, and outbound calls to these numbers will also be restricted.
17. Within the Voice Menu section, click “+ Add Menu” to create a new voice menu, or edit an existing one. This is where you configure voice menus, voicemail options, and other related call-handling settings.
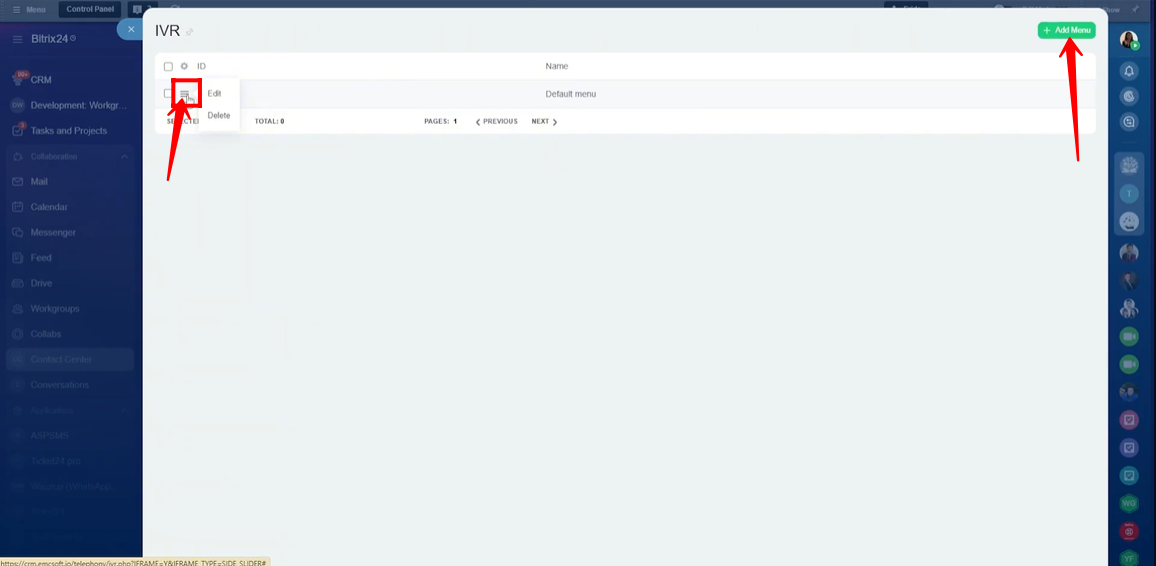
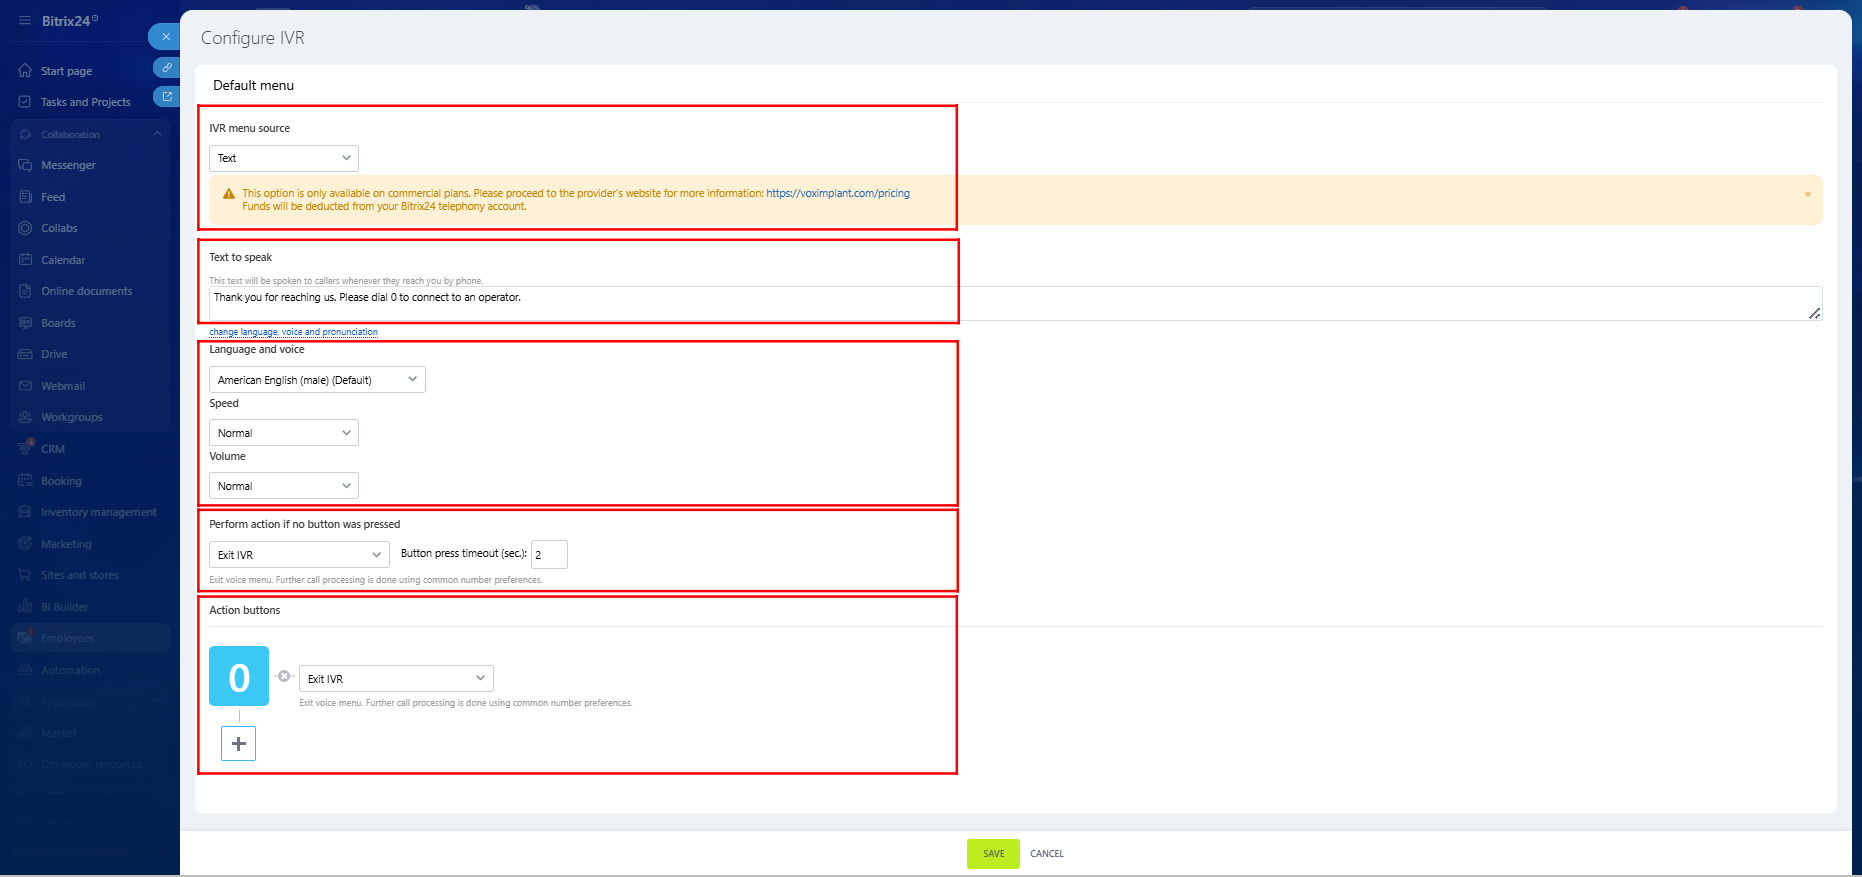
18. Here, you can configure the IVR (Voice Menu) settings. You can either upload an audio file or choose the text option and enter text that will be converted into a voice message.
Next, select the language in which the text should be spoken. Multiple languages are available, along with voice options such as male or female. You can also adjust the speed (very slow, slow, normal, fast, or very fast) and the volume level (very quiet, quiet, normal, loud, or very loud).
You can then choose what should happen if no button is pressed by the caller. The available options include Exit IVR or Repeat the current menu recording. You can also set the button press timeout by defining the number of seconds (a custom value).
The IVR allows you to flexibly assign actions to buttons. You can use buttons 0–9, *, and #, and assign actions such as Exit IVR, Forward to an employee, Forward to a queue group, Forward to an external number, Enter an employee’s extension, Leave a voicemail, or Repeat the current menu recording.
After completing all configurations, make sure to click Save to apply the IVR settings.
19. Within the Queue Groups section, you can configure how incoming calls are distributed among employees. You can click “+ Add Queue Group” to create a new queue group or edit an existing one to adjust call distribution settings.
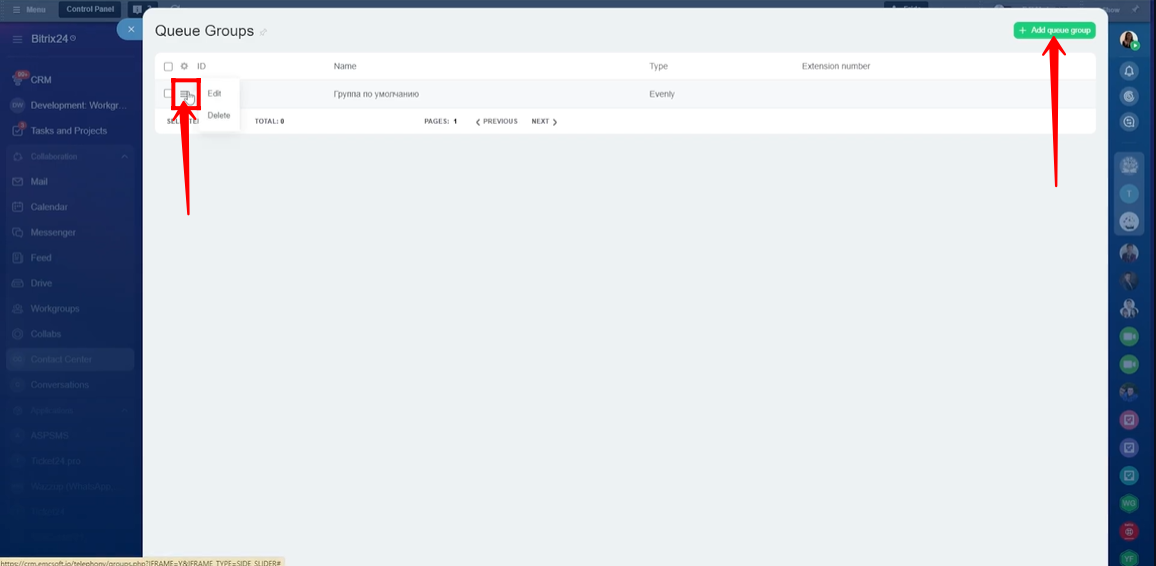
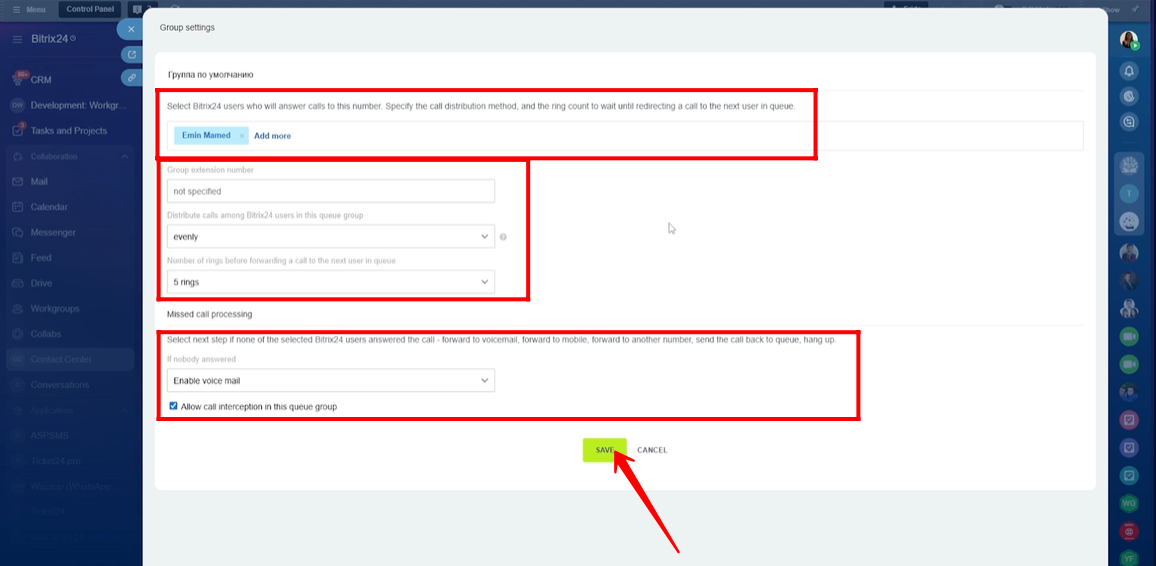
20. You can add multiple employees from your company to create a queue group, and incoming calls will be distributed among these users.
You can assign a group extension number and choose how calls are routed by selecting “Distribute calls among Bitrix24 users in this queue group.” The available options are Evenly, Exactly as enqueued, or To everybody.
You can also define the number of rings before a call is forwarded to the next user in the queue, choosing between 2 to 7 rings.
In the Missed Call Processing section, you can decide what happens if none of the selected users answer the call. Available options include forwarding the call to voicemail, forwarding to a mobile number, forwarding to another number, sending the call back to the queue, or hanging up.
Additionally, you can enable “Allow call interception in this queue group” to let other users pick up calls when needed.
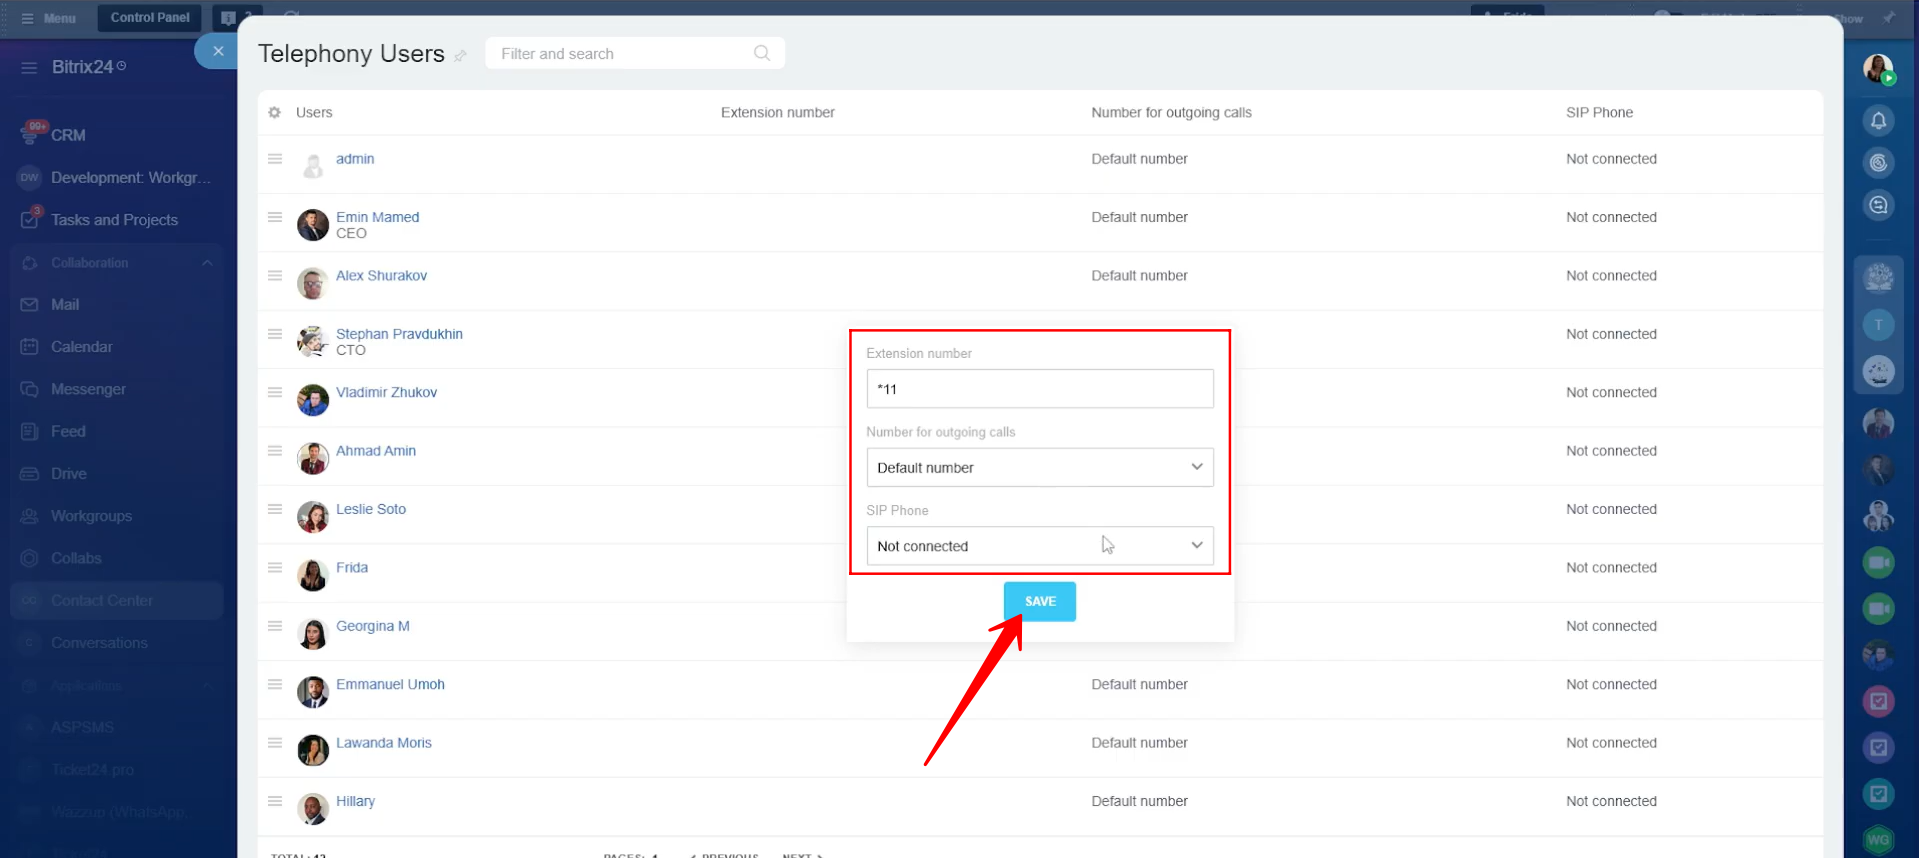
21. Within the Telephony Users section, you can manage telephony settings for each employee individually. Here, you can configure options such as the extension number, the phone number used for outgoing calls, and SIP phone settings for each user.
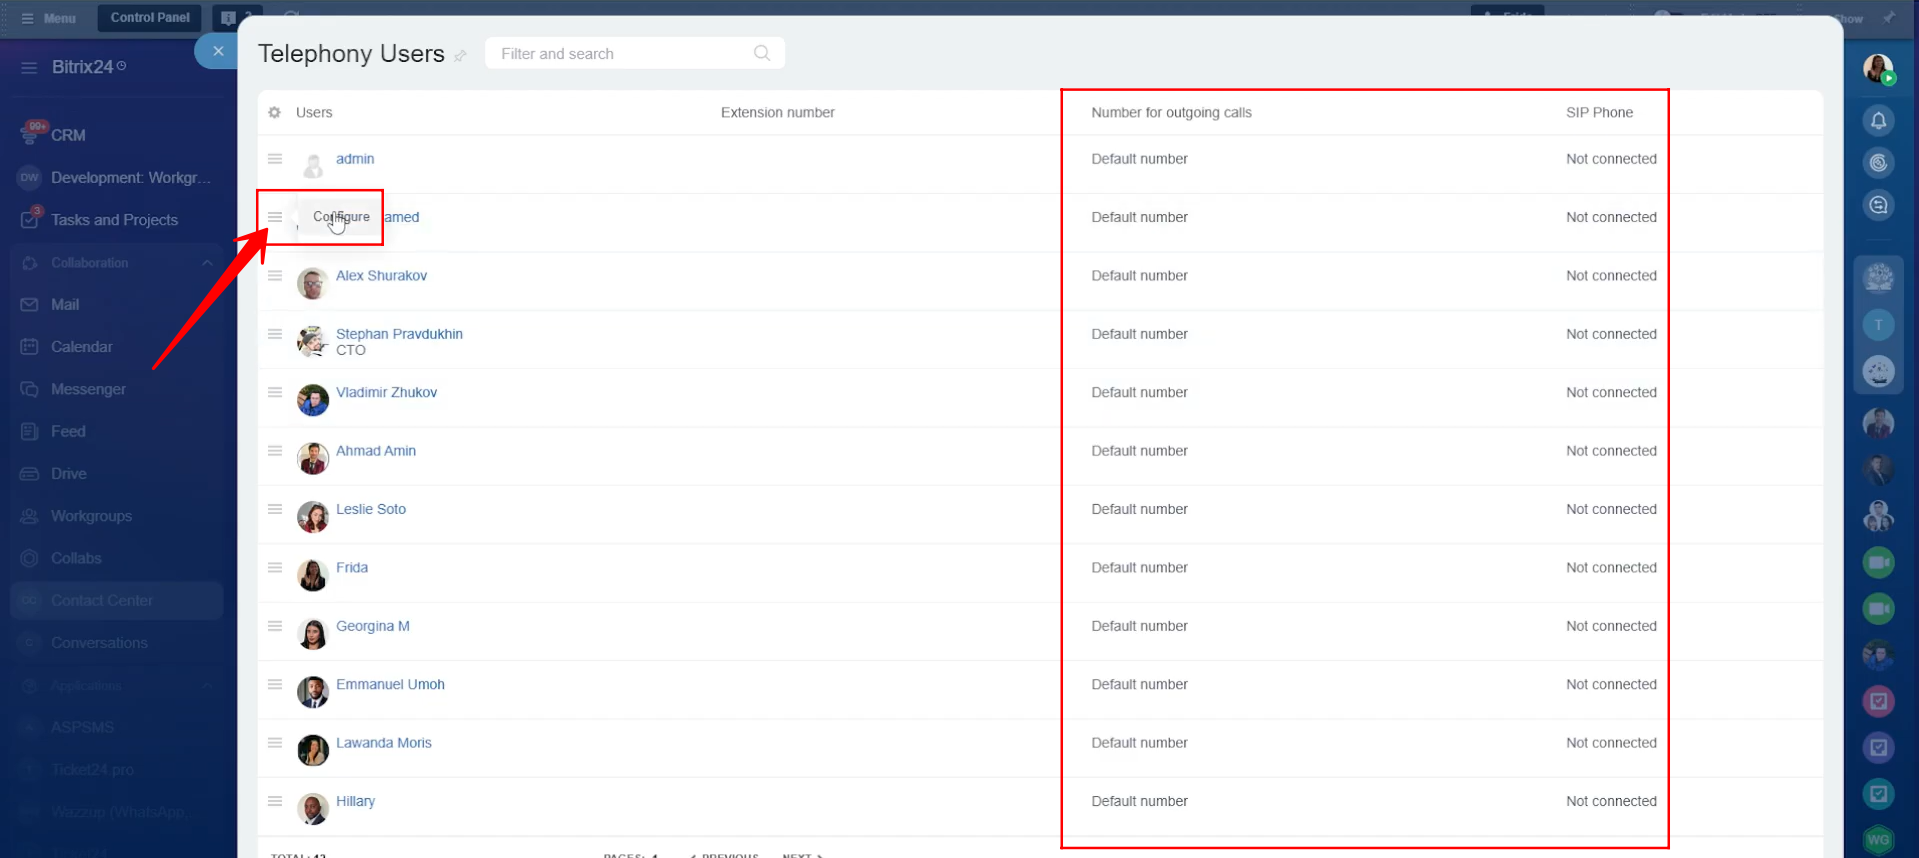
22. You can configure the settings for each user by assigning an extension number if required, selecting the number used for outgoing calls (either the default number or specific third-party application), and choosing whether to connect a SIP phone for that user.
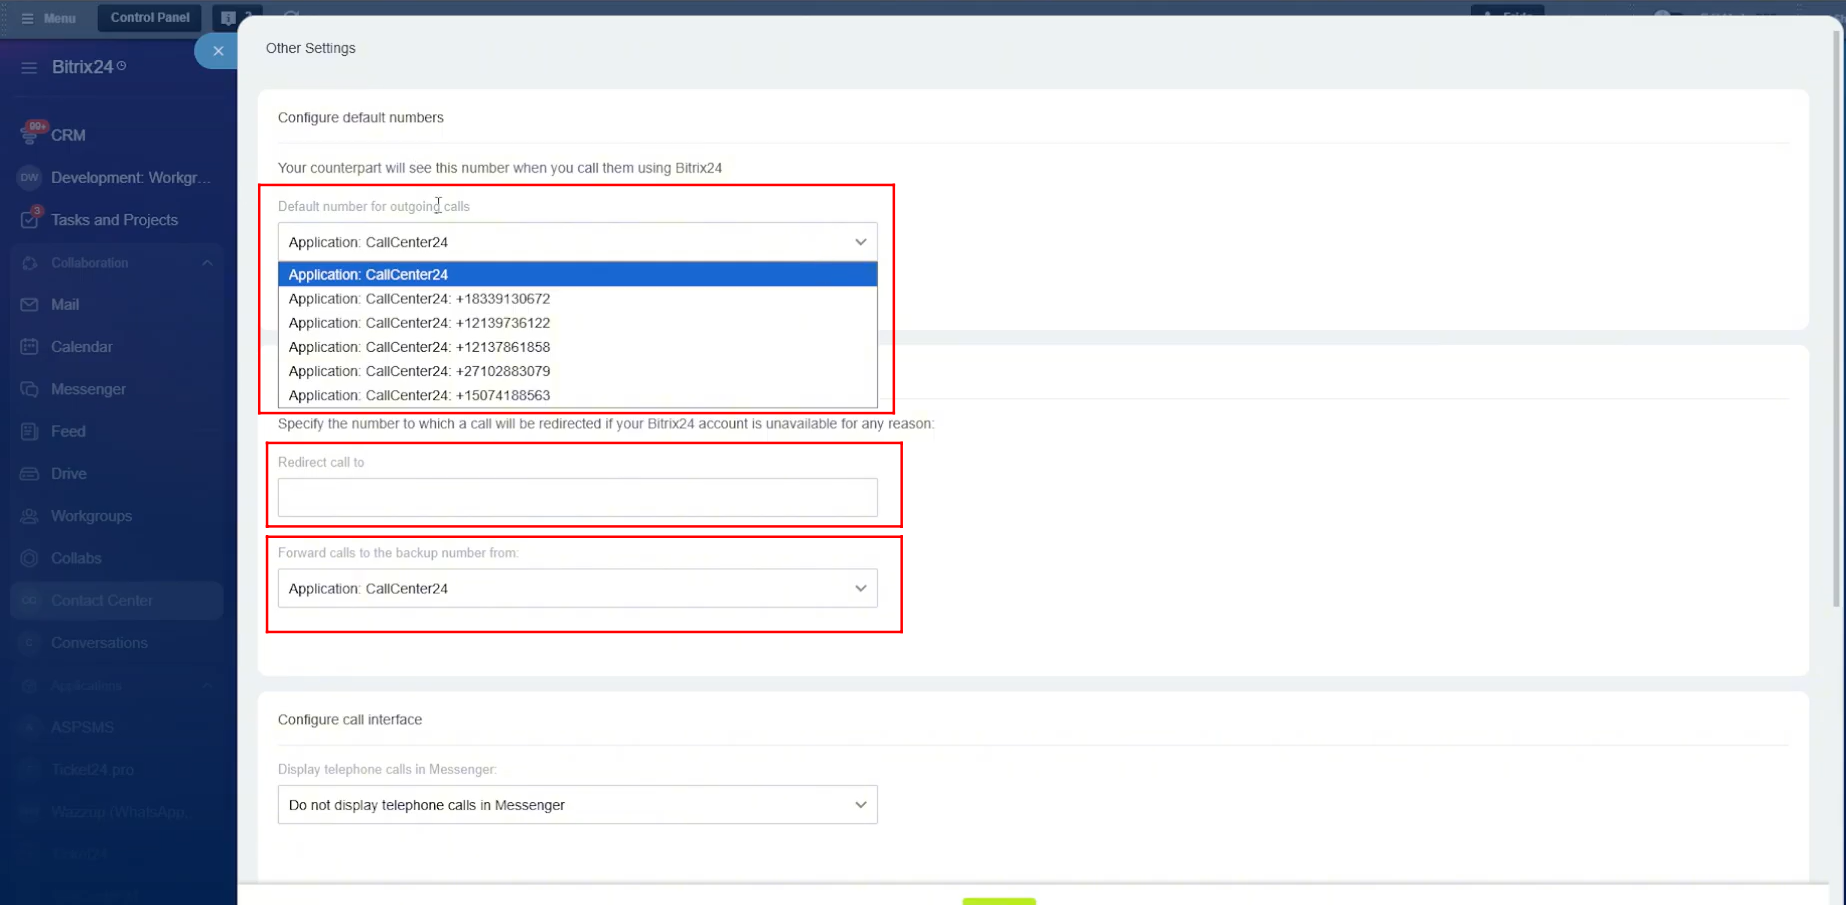
23. Within Telephony Settings, you can define the default number for outgoing calls. In our case, we are using the CallCenter24 application for calling, so we selected Application: CallCenter24 here. Inside the CallCenter24 app, each employee is assigned a different phone number for calls. Since this setting is applied globally, it is better to select the entire application rather than choosing a single number.
You can also specify a fallback number to redirect calls if Bitrix24 becomes unavailable for any reason. However, if different employees need calls redirected to different numbers, it is better not to define a number here. Instead, you can configure separate redirection numbers for each employee directly within the CallCenter24 application.
Additionally, you can define the number used for backup call forwarding. In our setup, we again selected Application: CallCenter24 for this option.
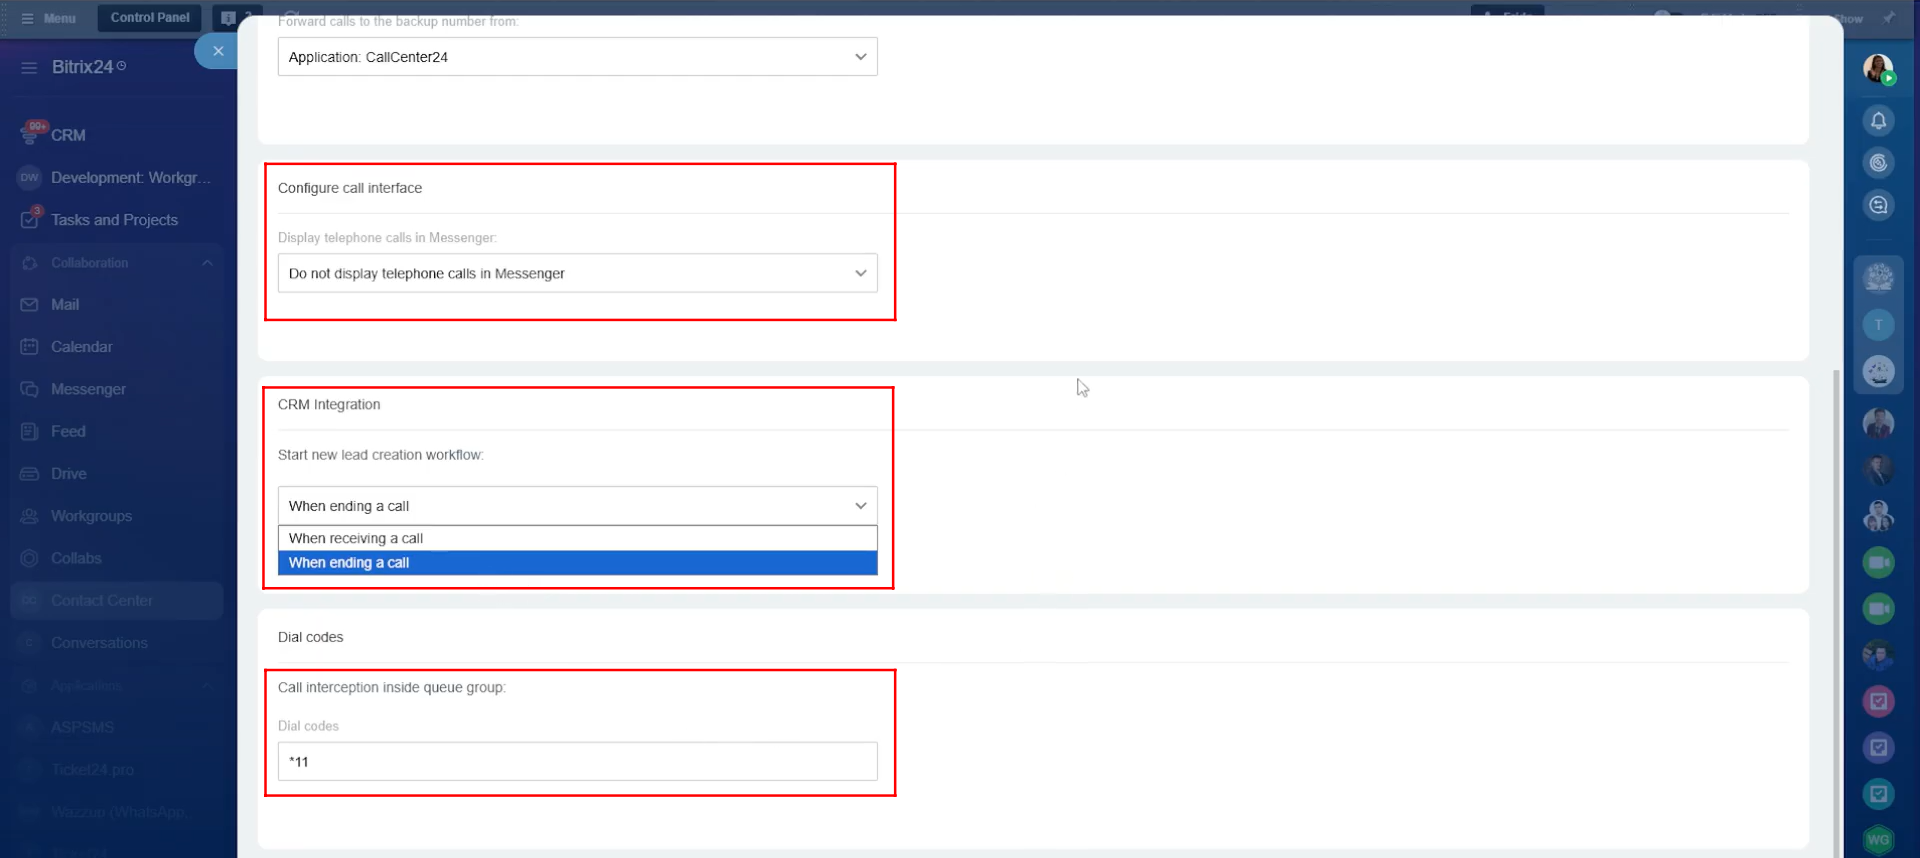
24. You can choose how telephone calls are displayed in Messenger by selecting one of the following options: Create a separate chat for each call, Create a single chat for all calls, or Do not display telephone calls in Messenger. If you are using the CallCenter24 application, you can safely disable this option here. CallCenter24 provides its own dedicated chatbot, where you can access call recordings, call transcriptions, and detailed call reports.
You can also define when a new lead should be created in the CRM—either when a call is received or when a call ends.
Additionally, you can configure dial codes for call interception within queue groups. By default, Bitrix24 uses *11 as the standard interception code, but this can be adjusted if needed.
25. Now, let’s move to Access Permissions. Here, you can define different roles and assign employees to those roles. Each role can be edited to grant specific permissions based on your telephony and access requirements.
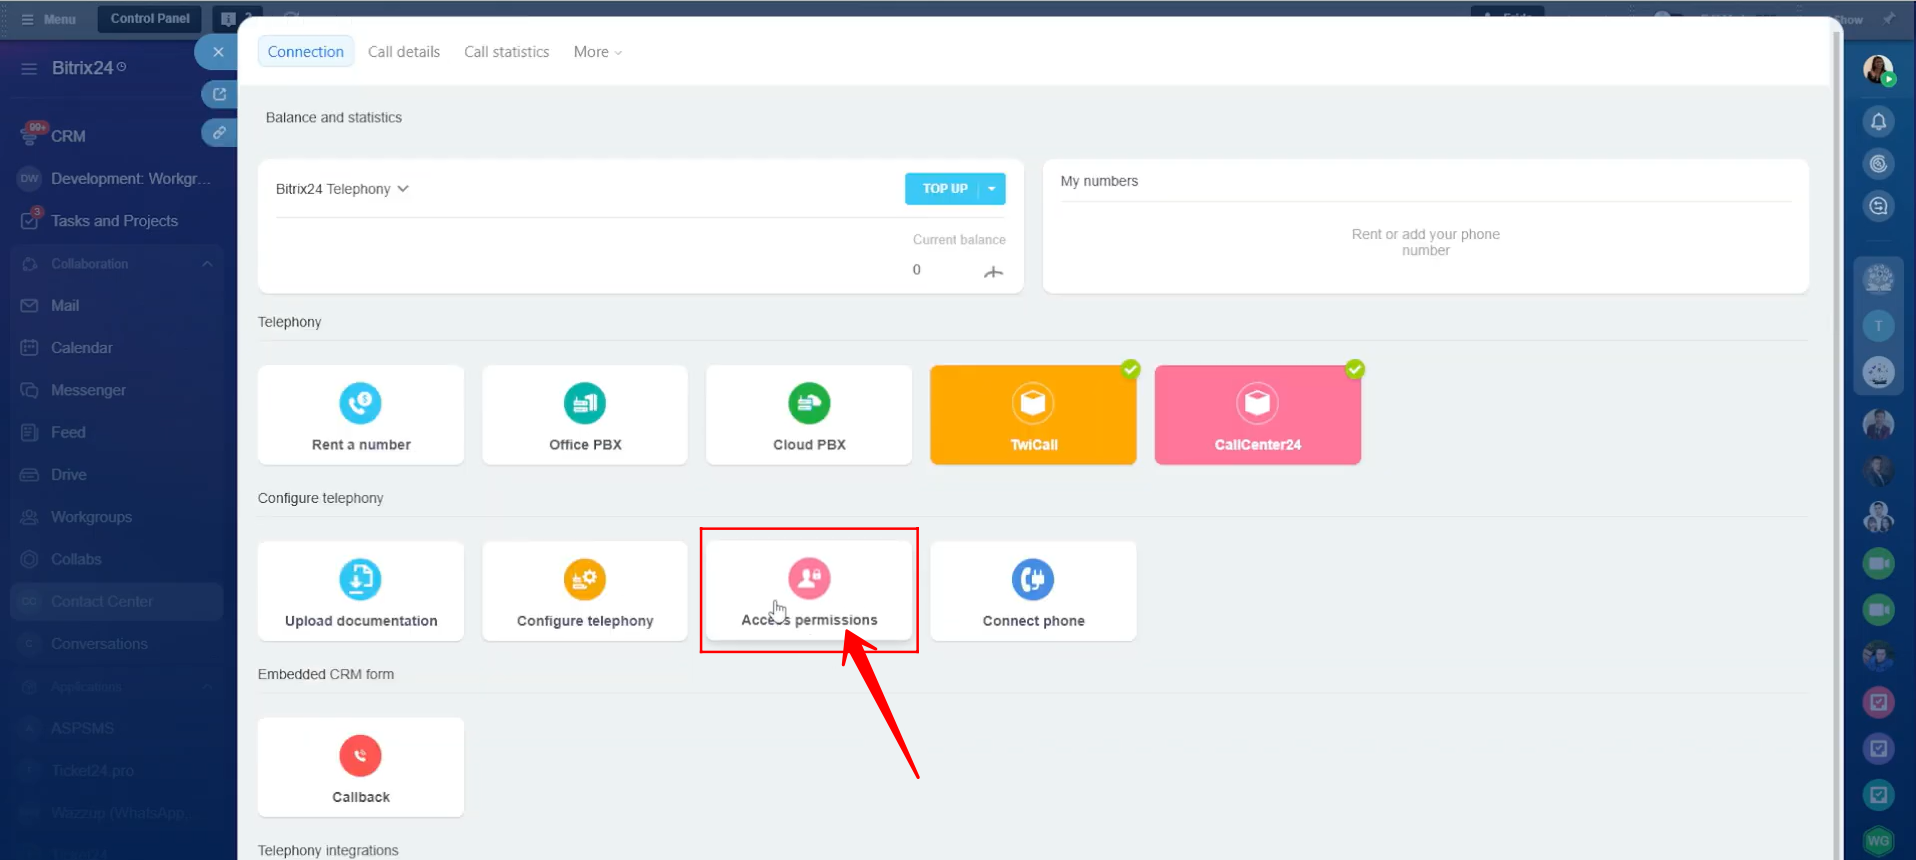
26. Here, you can create multiple roles as needed and assign either individual users or entire departments to a specific role. Click “Add access permission” to create a new assignment for a user or department. To modify what a role can do, click the pencil icon next to the role name and adjust its permissions.
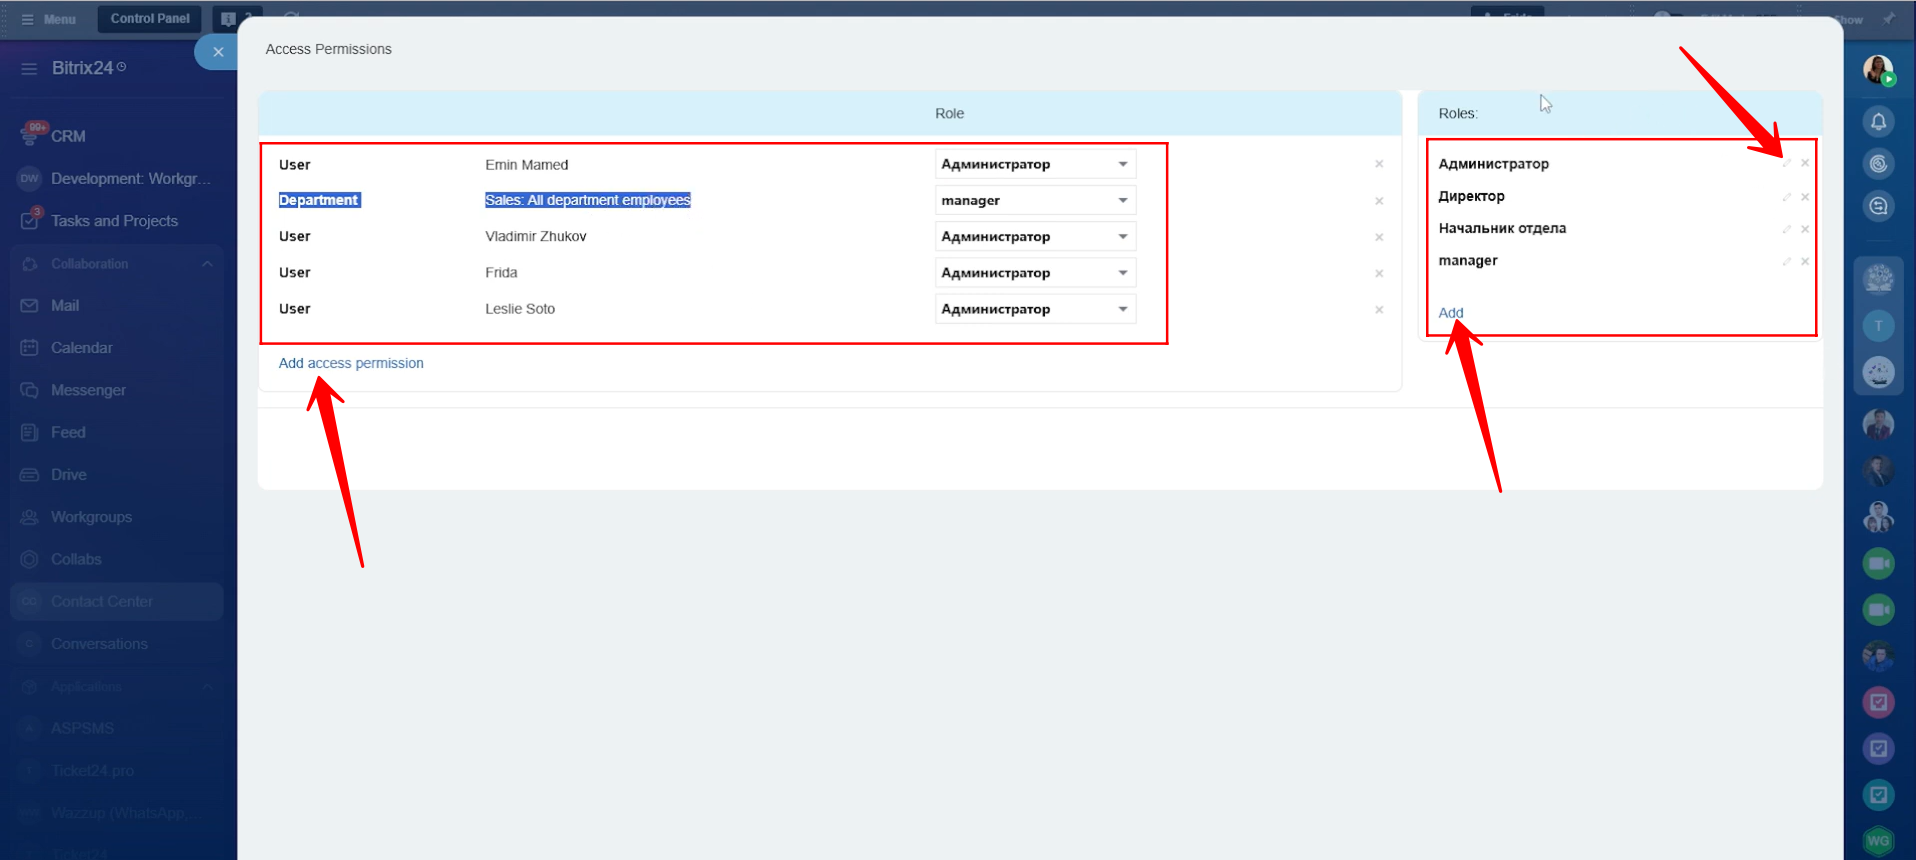
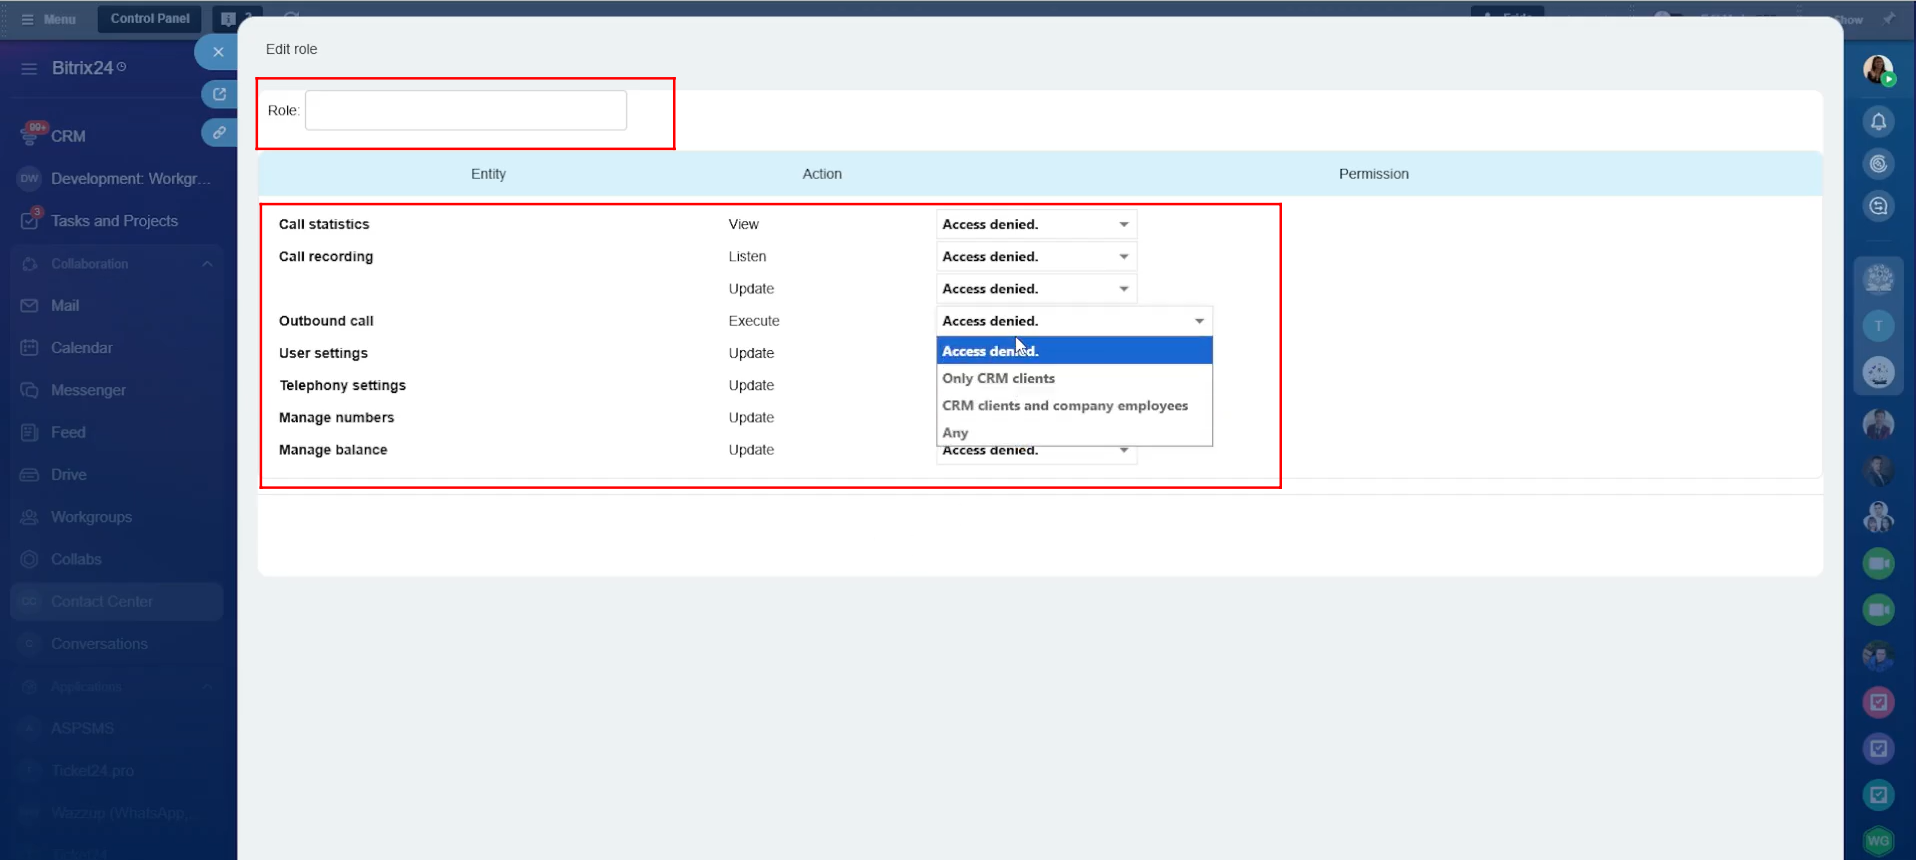
27. When configuring a role, you can assign it a specific name and define permissions for different telephony actions. These actions include viewing call statistics, listening to and managing call recordings, making outbound calls, updating user settings, changing telephony settings, managing phone numbers, and updating the account balance.
For each action, you can choose one of the following permission levels: Access denied, Only CRM clients, CRM clients and company employees, or Any. These options give you full control over what each role is allowed to access and manage.
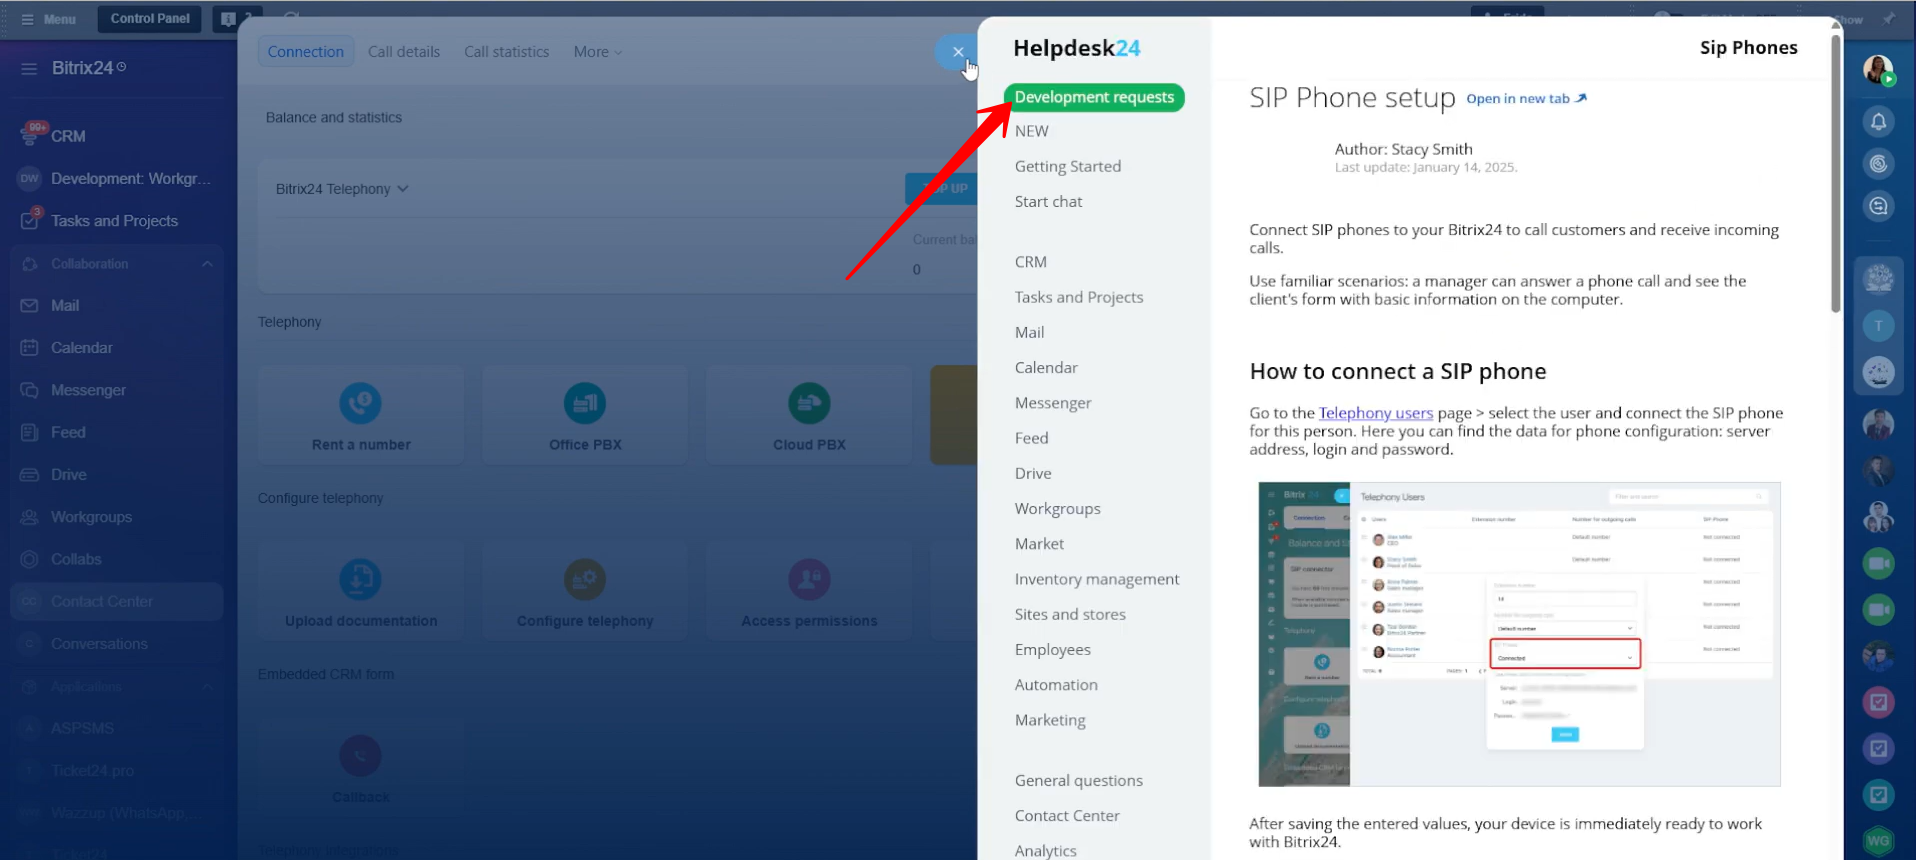
28. If you want to connect a SIP phone, click “Connect Phone.”
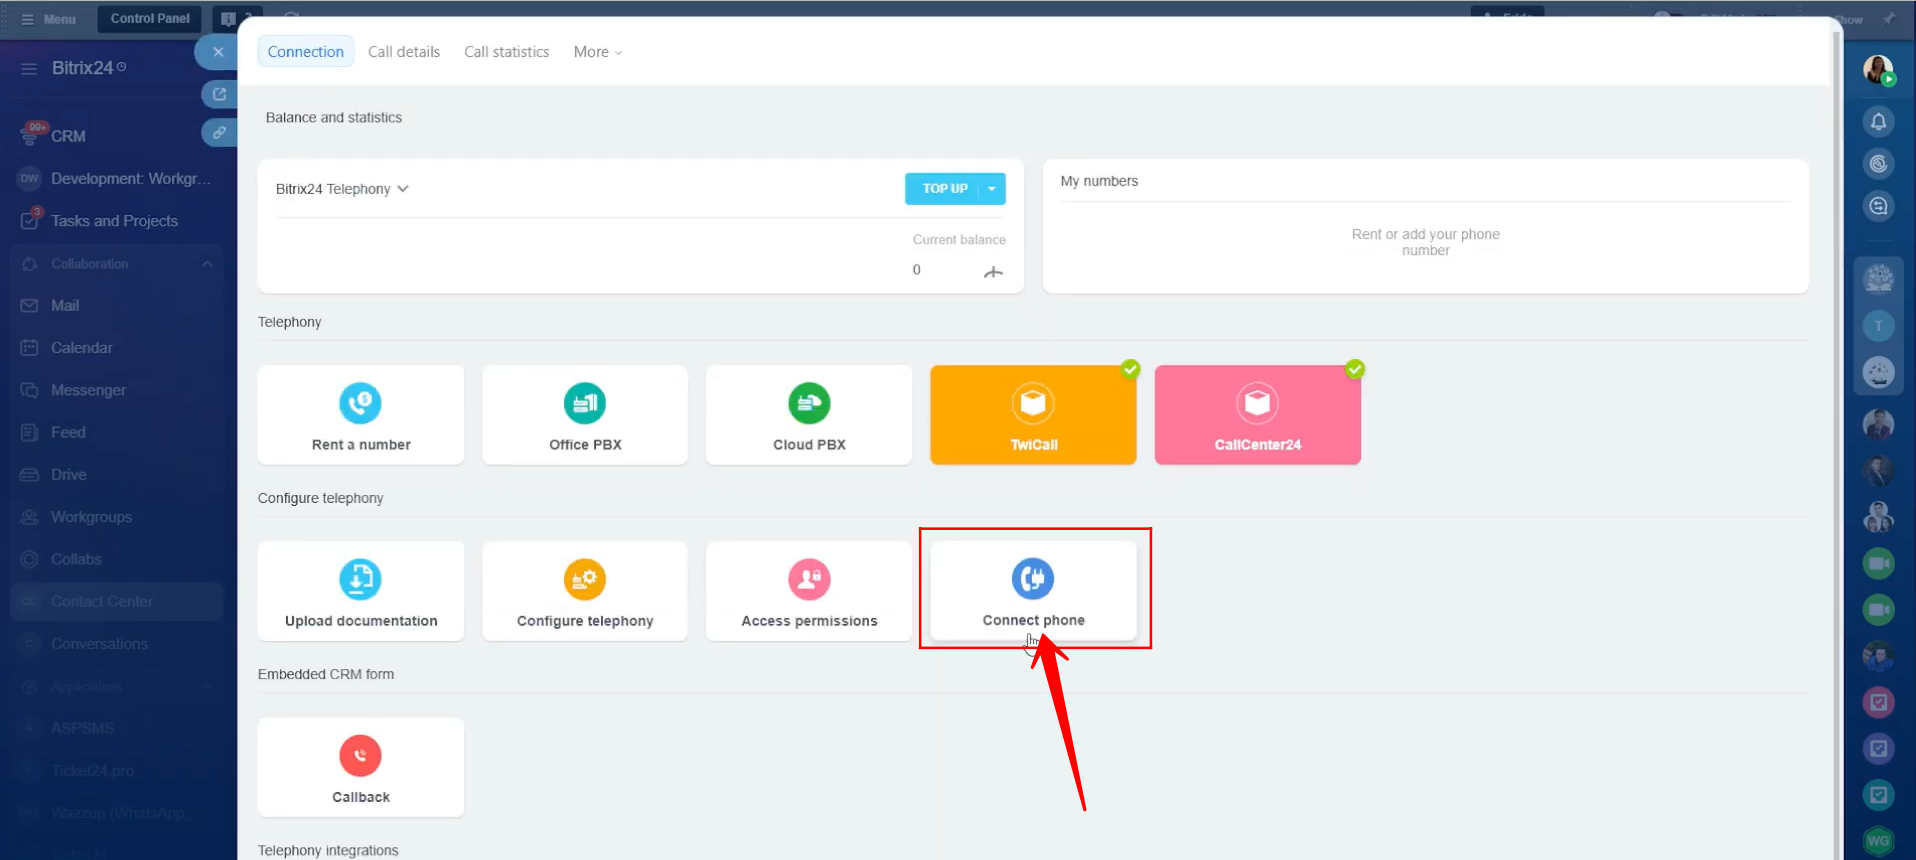
29. You will be redirected to detailed documentation for SIP Phone Setup, where you can follow a step-by-step process and learn about different use cases.
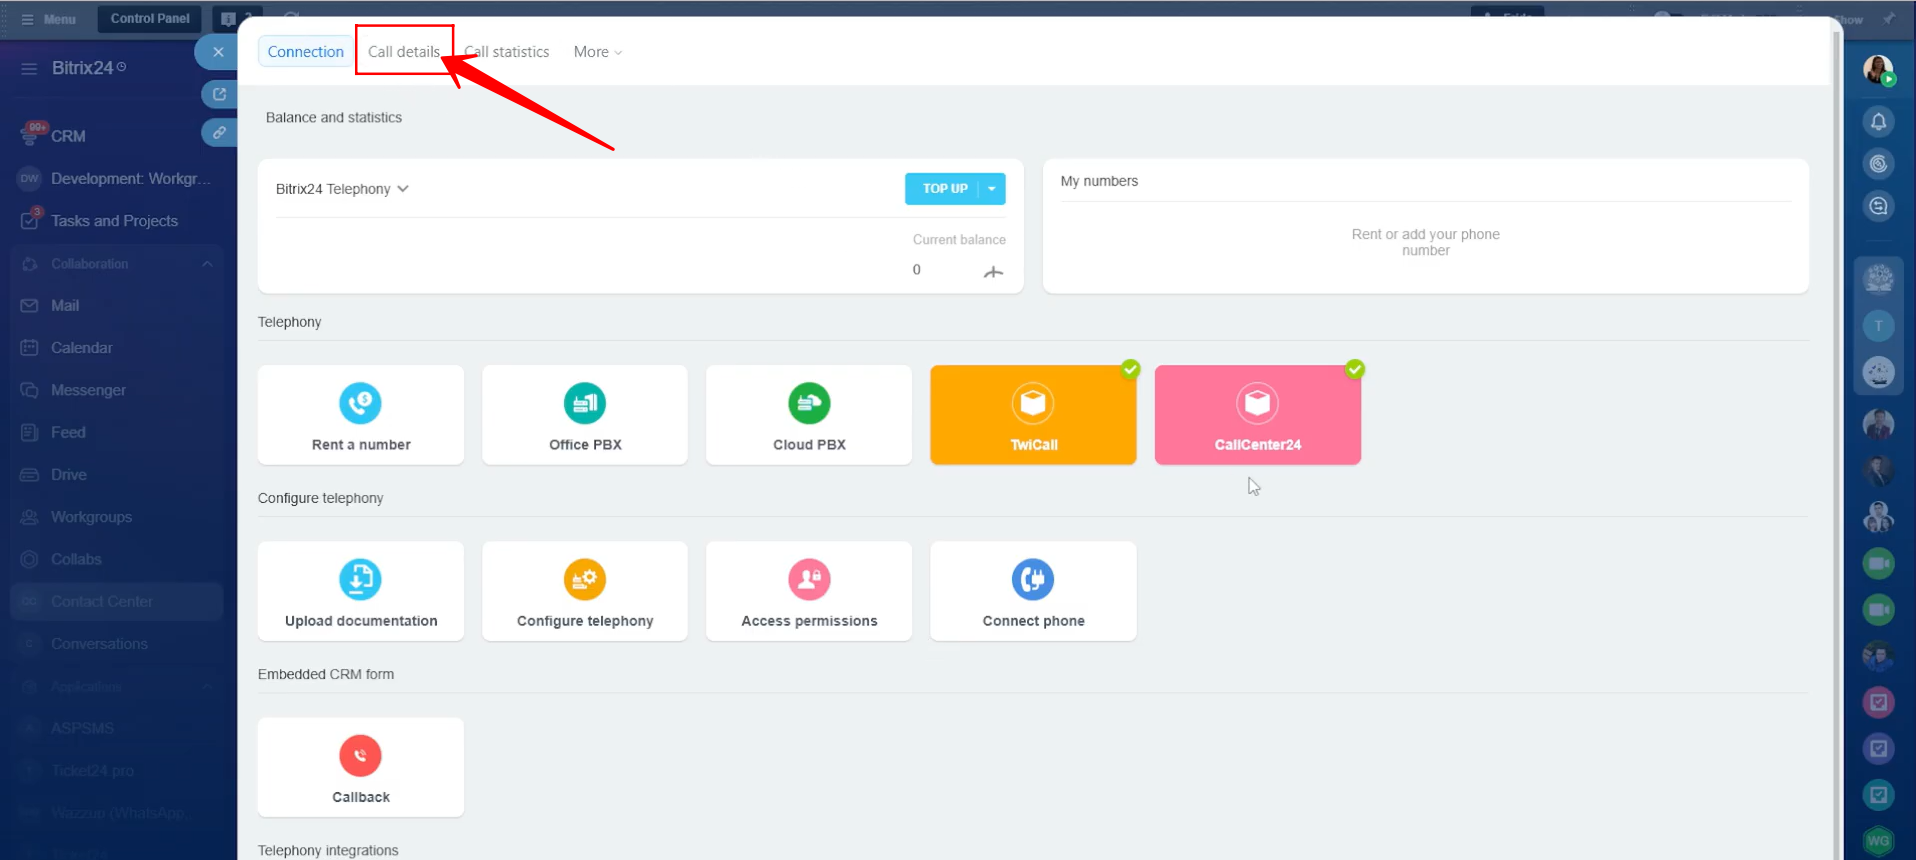
30. We have now explored the Connection tab in Telephony. Let’s move on to the Call Details section to explore it further.
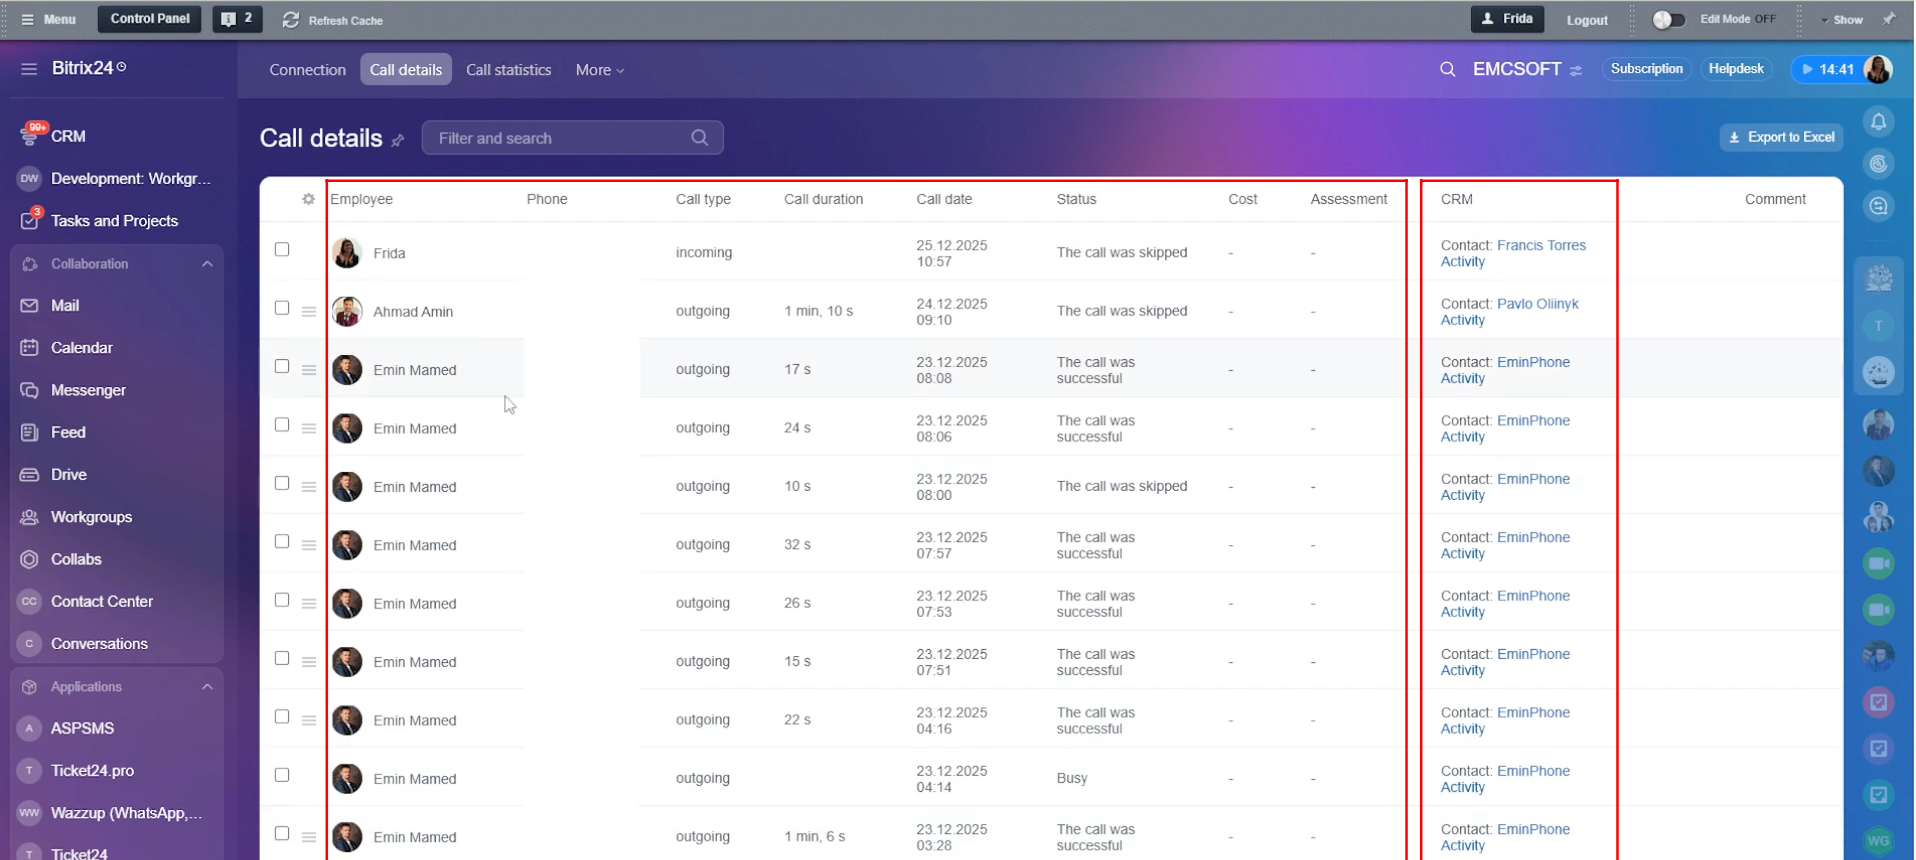
31. Within the Call Details section, you can view a detailed list of call records for all employees. This includes information such as the employee name, phone number, call type (incoming or outgoing), call duration, call date, call status (skipped, busy, successful, declined, and more), cost, assessment, CRM entity link, and comments.
If you are using the CallCenter24 application, you will find this same call data already available inside the CallCenter24 chatbot, where all call reports and related details are centrally displayed.
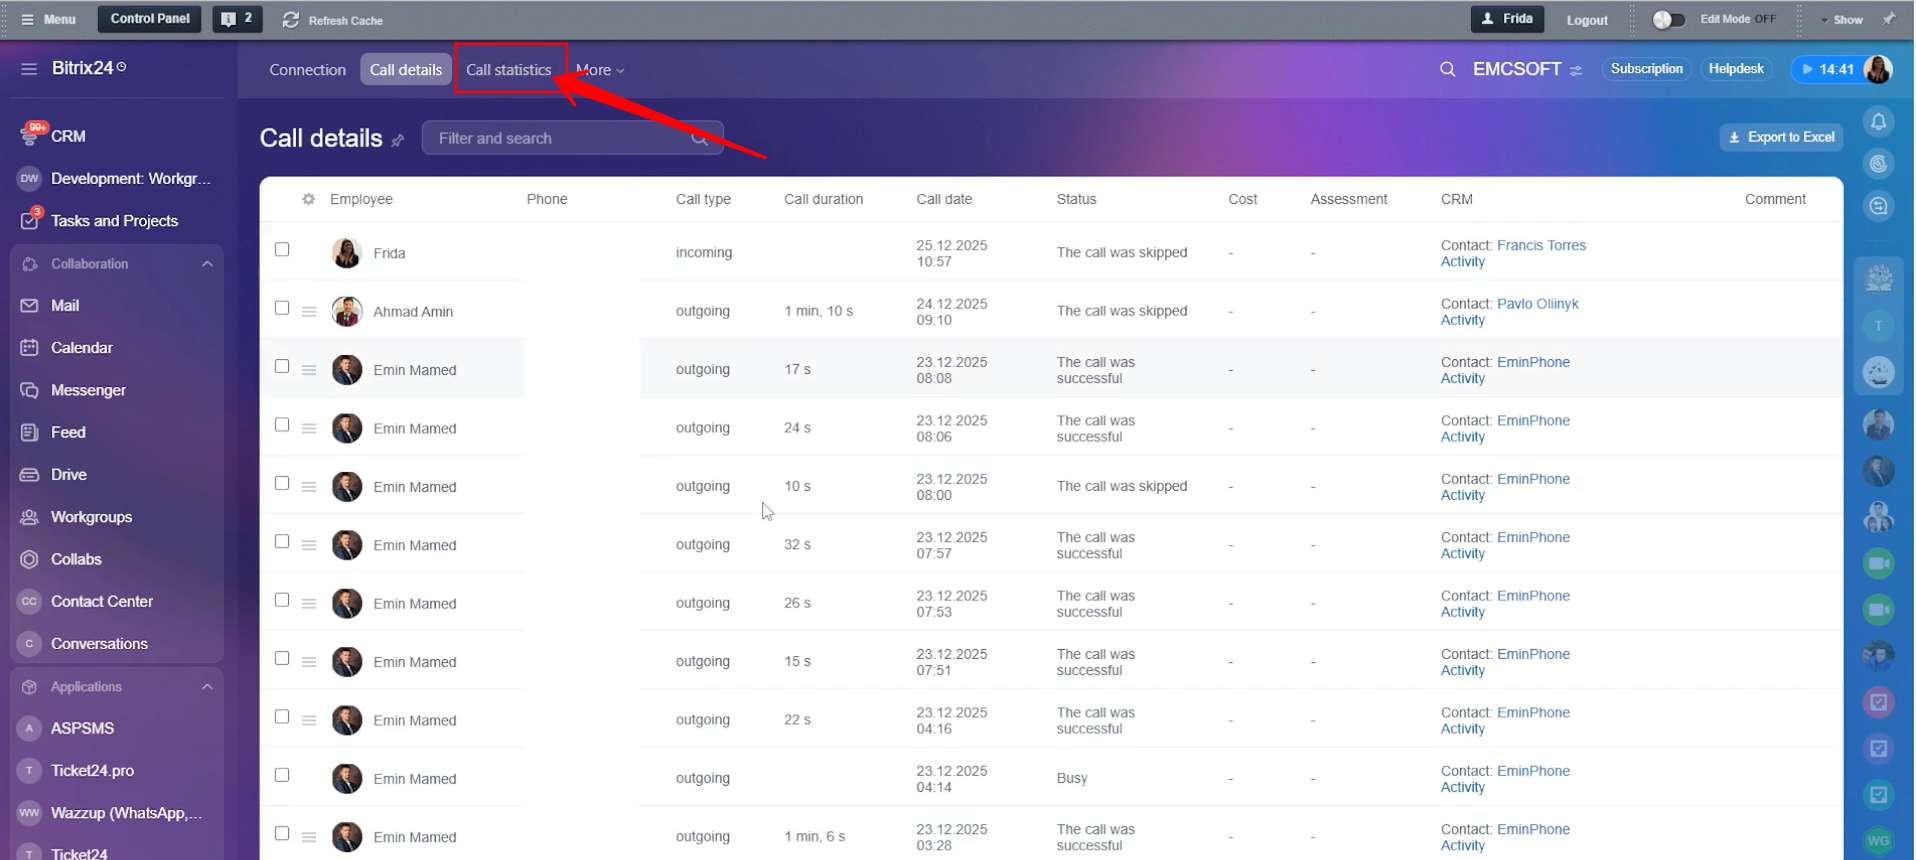
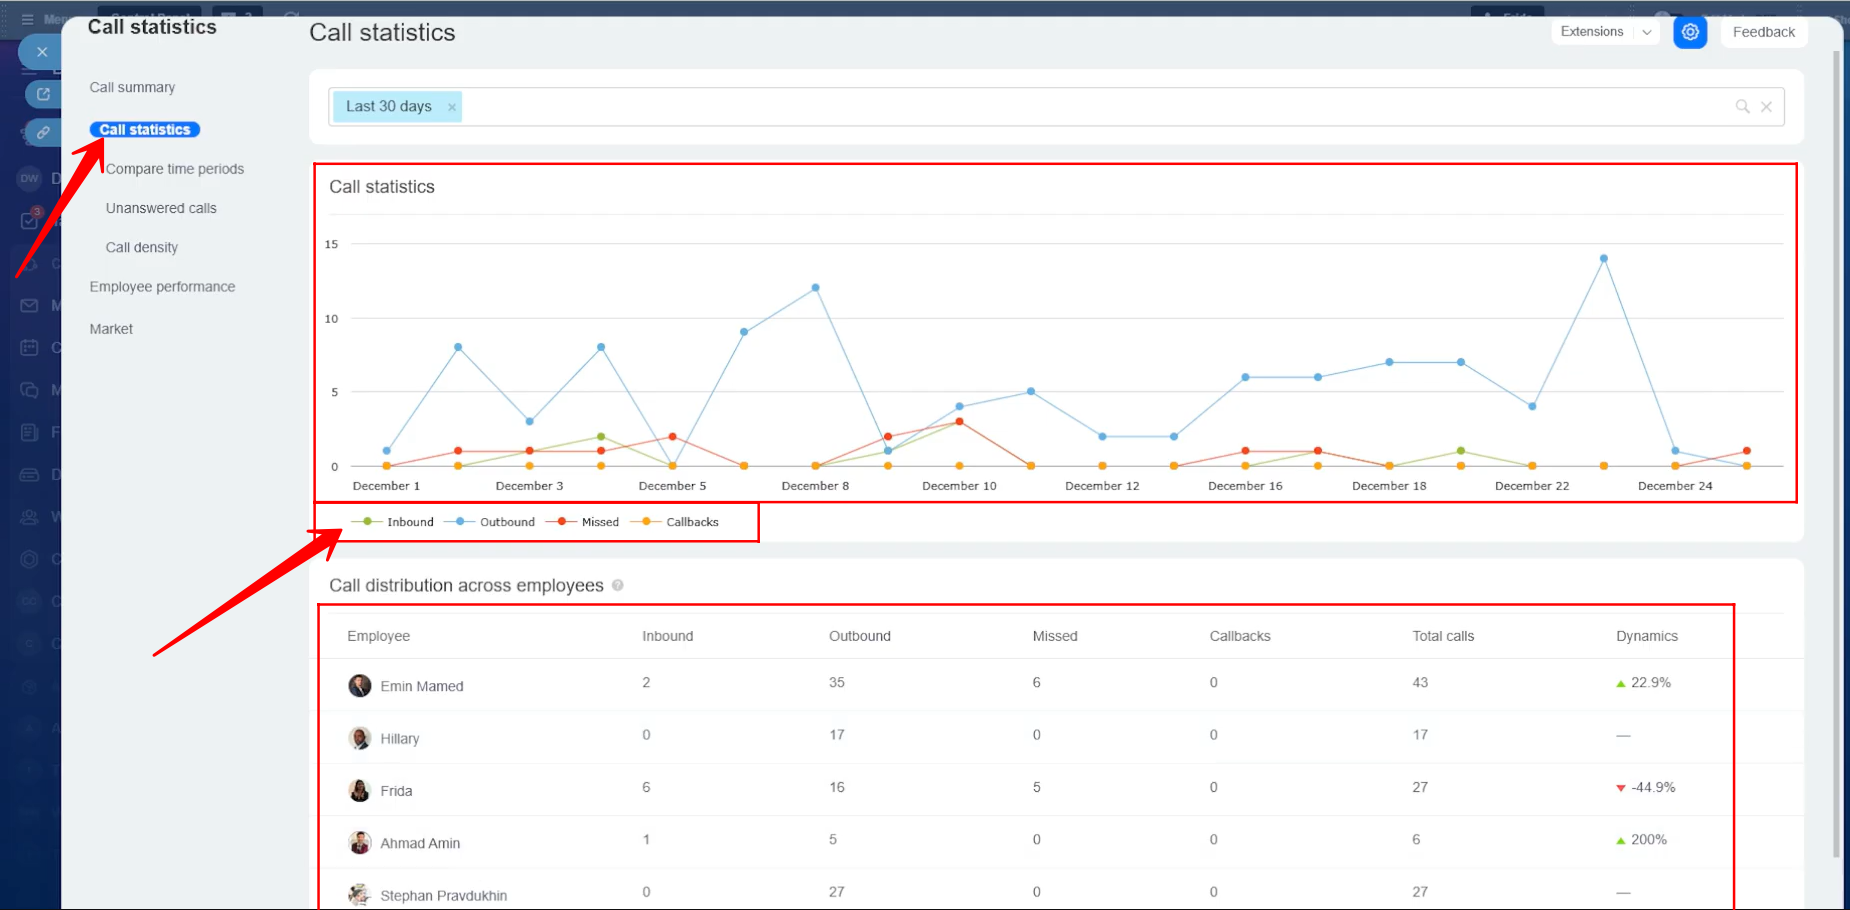
32. Now, let’s move to the Call Statistics tab.
33. Here, you can view a line chart showing statistics for inbound, outbound, missed, and callback calls, displayed with different colored lines based on the selected filters. You can click on any call type to view only that specific line on the chart.
Below the chart, you will also see a table that shows how many inbound, outbound, missed, callback, and total calls were handled by each employee.
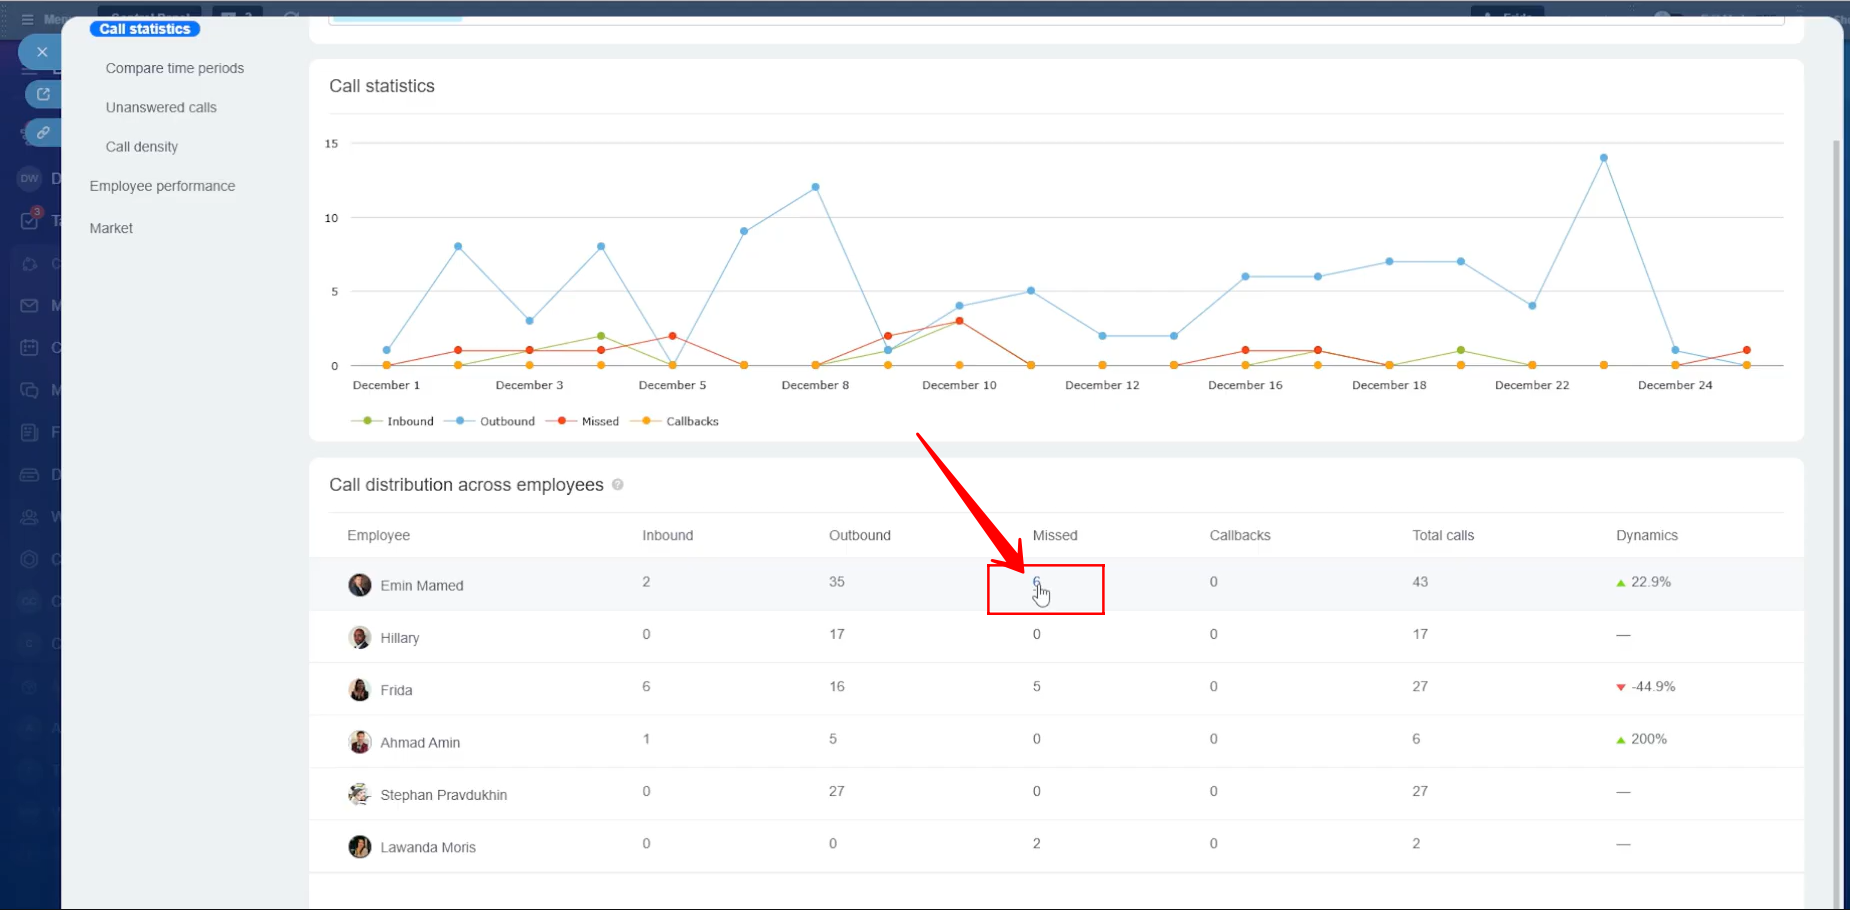
34. To view detailed information for a specific call type and employee, you can click on the number shown in the table. Here, the table shows that an employee missed 6 calls, clicking on the number 6 will narrow down the results and display the detailed call records.
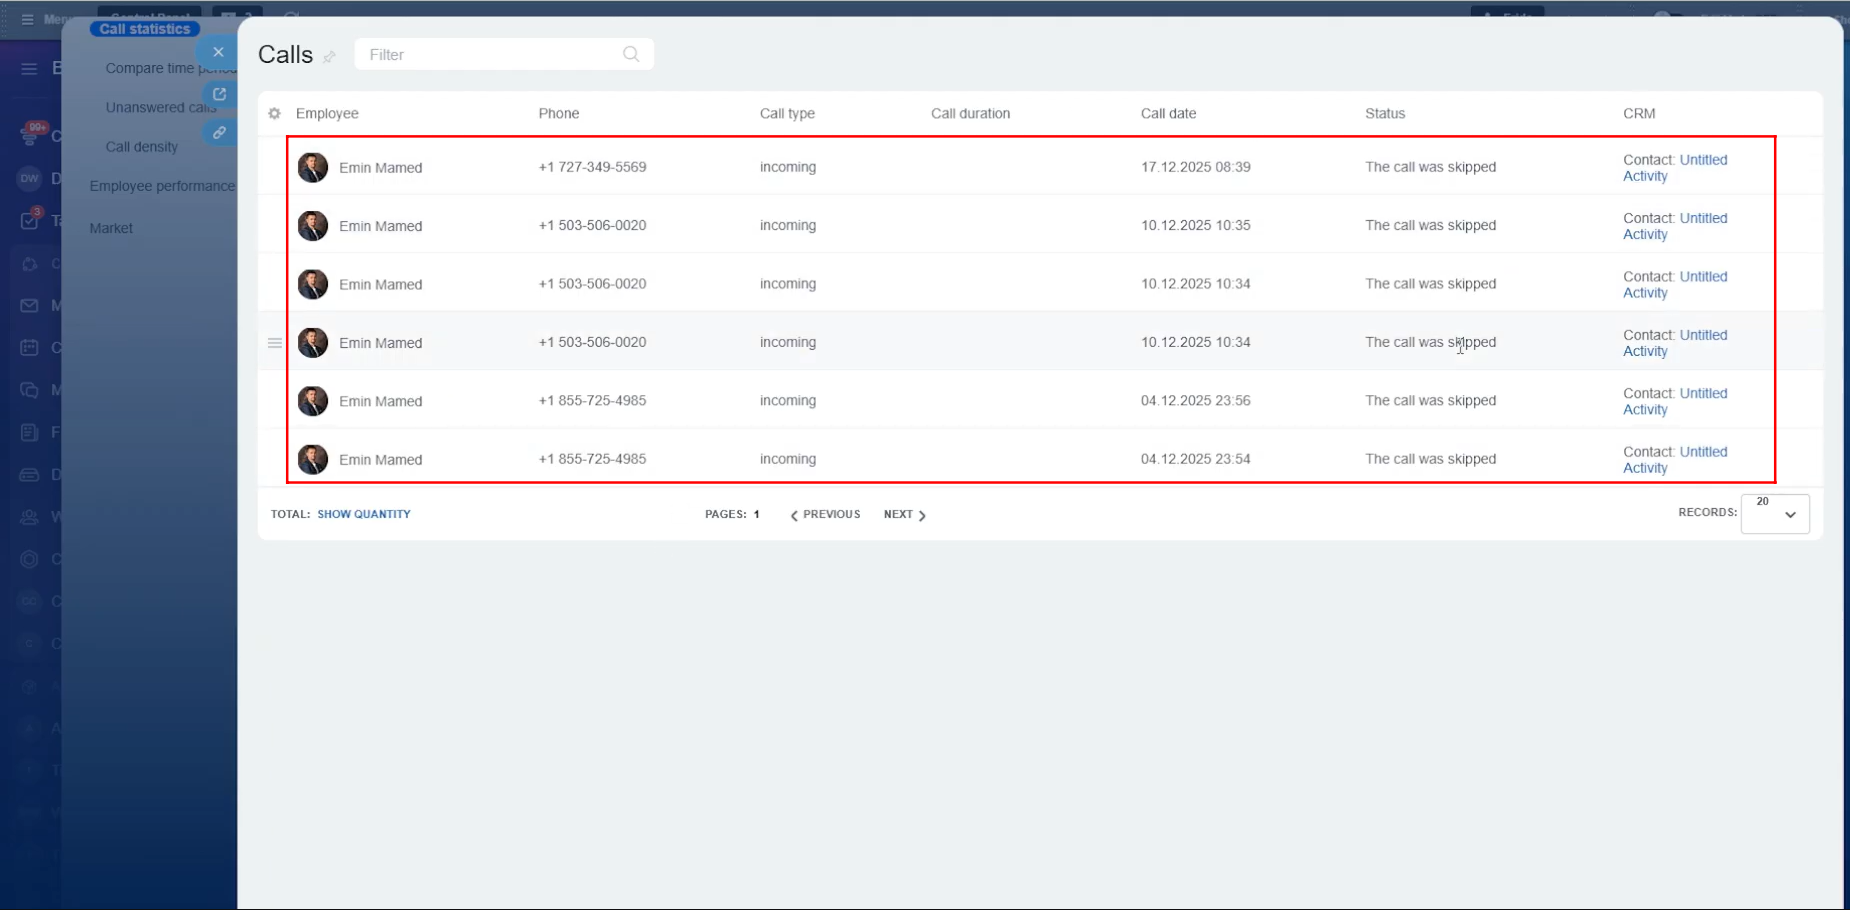
35. Here, you will see only those 6 missed call records, including details such as the employee name, phone number, call type (incoming), call duration (not available in this case because the calls were missed), call date, status (shown as skipped), and the linked CRM entity.
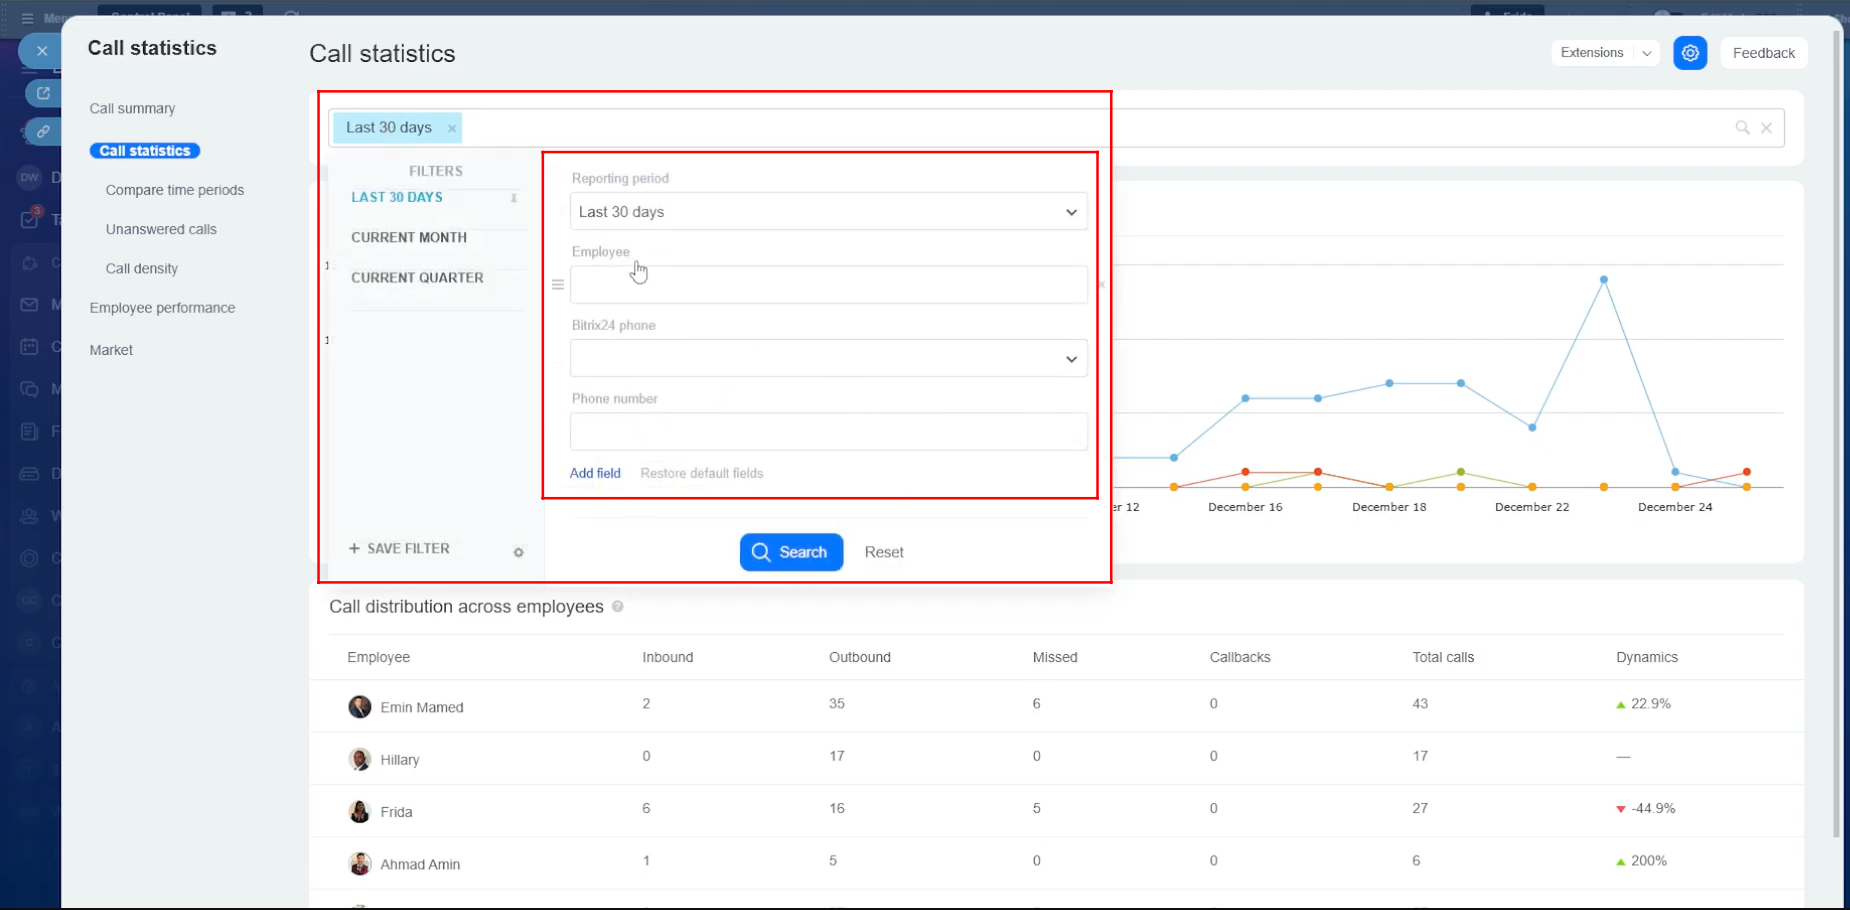
36. Call statistics can be filtered using multiple parameters, such as time period (last 30 days, current month, current quarter, or a custom period), employee, Bitrix24 phone, phone number, and several other available fields. This helps you narrow down and analyze call data more effectively.
37. Now, let’s briefly explain how calling works when you are using the CallCenter24 application. Open any CRM entity such as a Deal, Lead, Company, or Contact. If a phone number is attached to that entity—either directly or through a linked contact—the call icon at the top will be enabled. You can click this icon to start a call immediately.
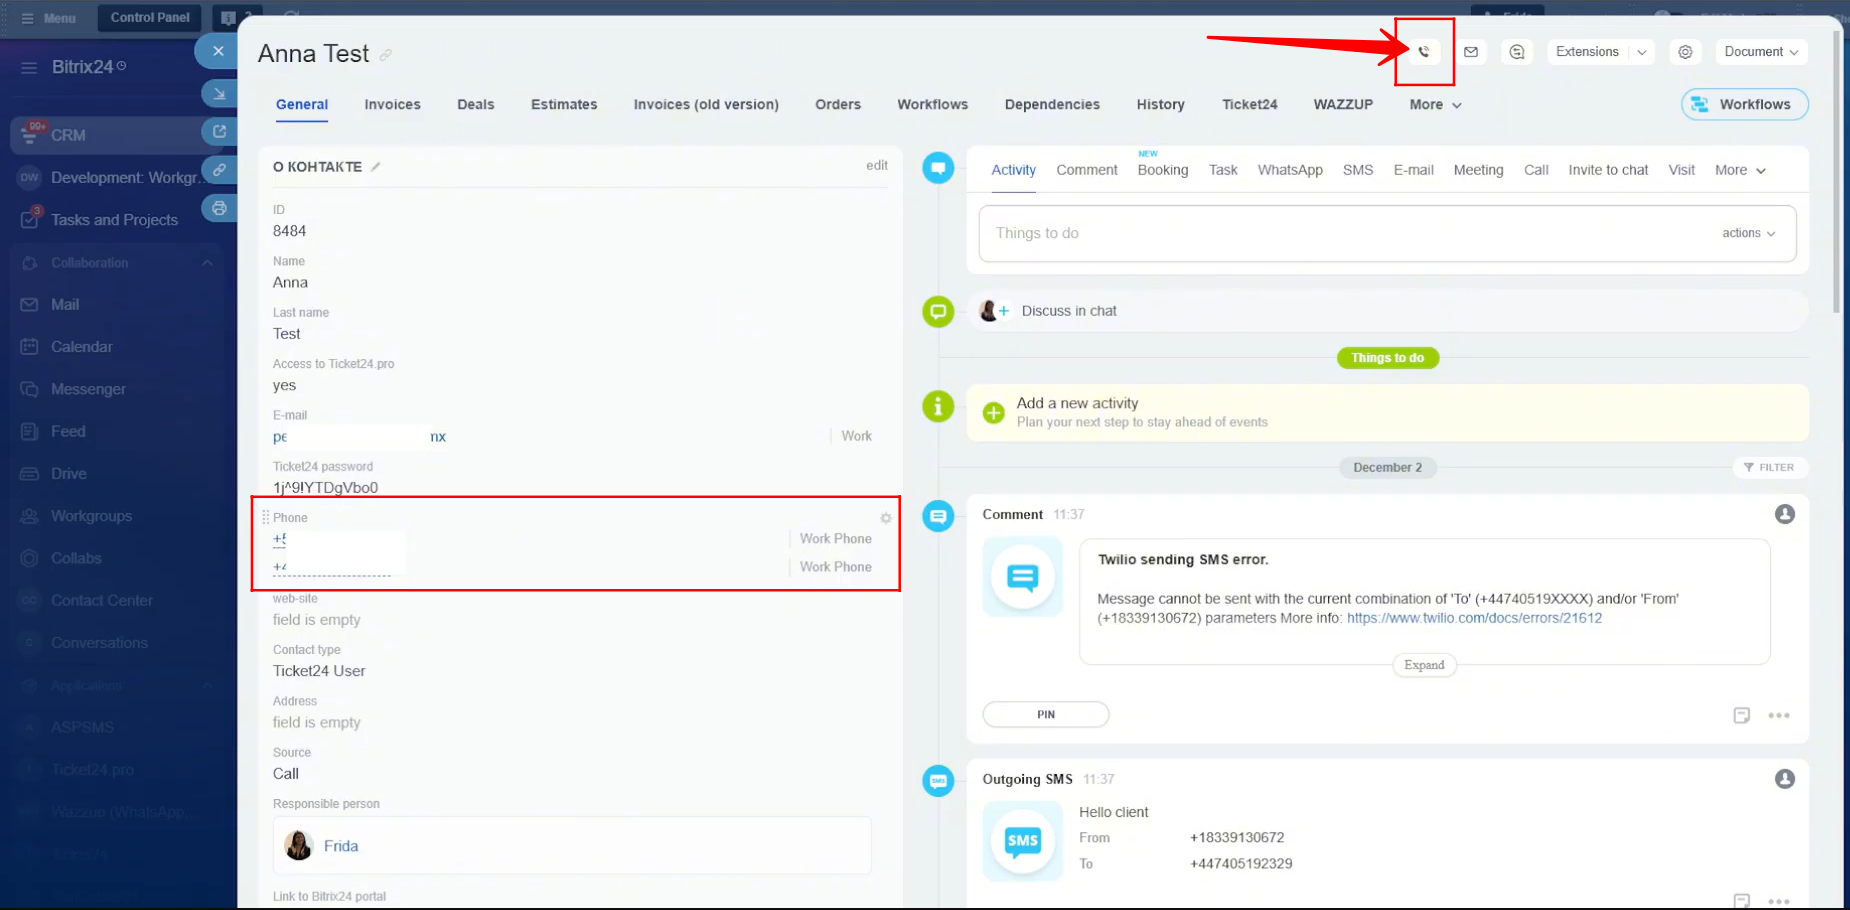
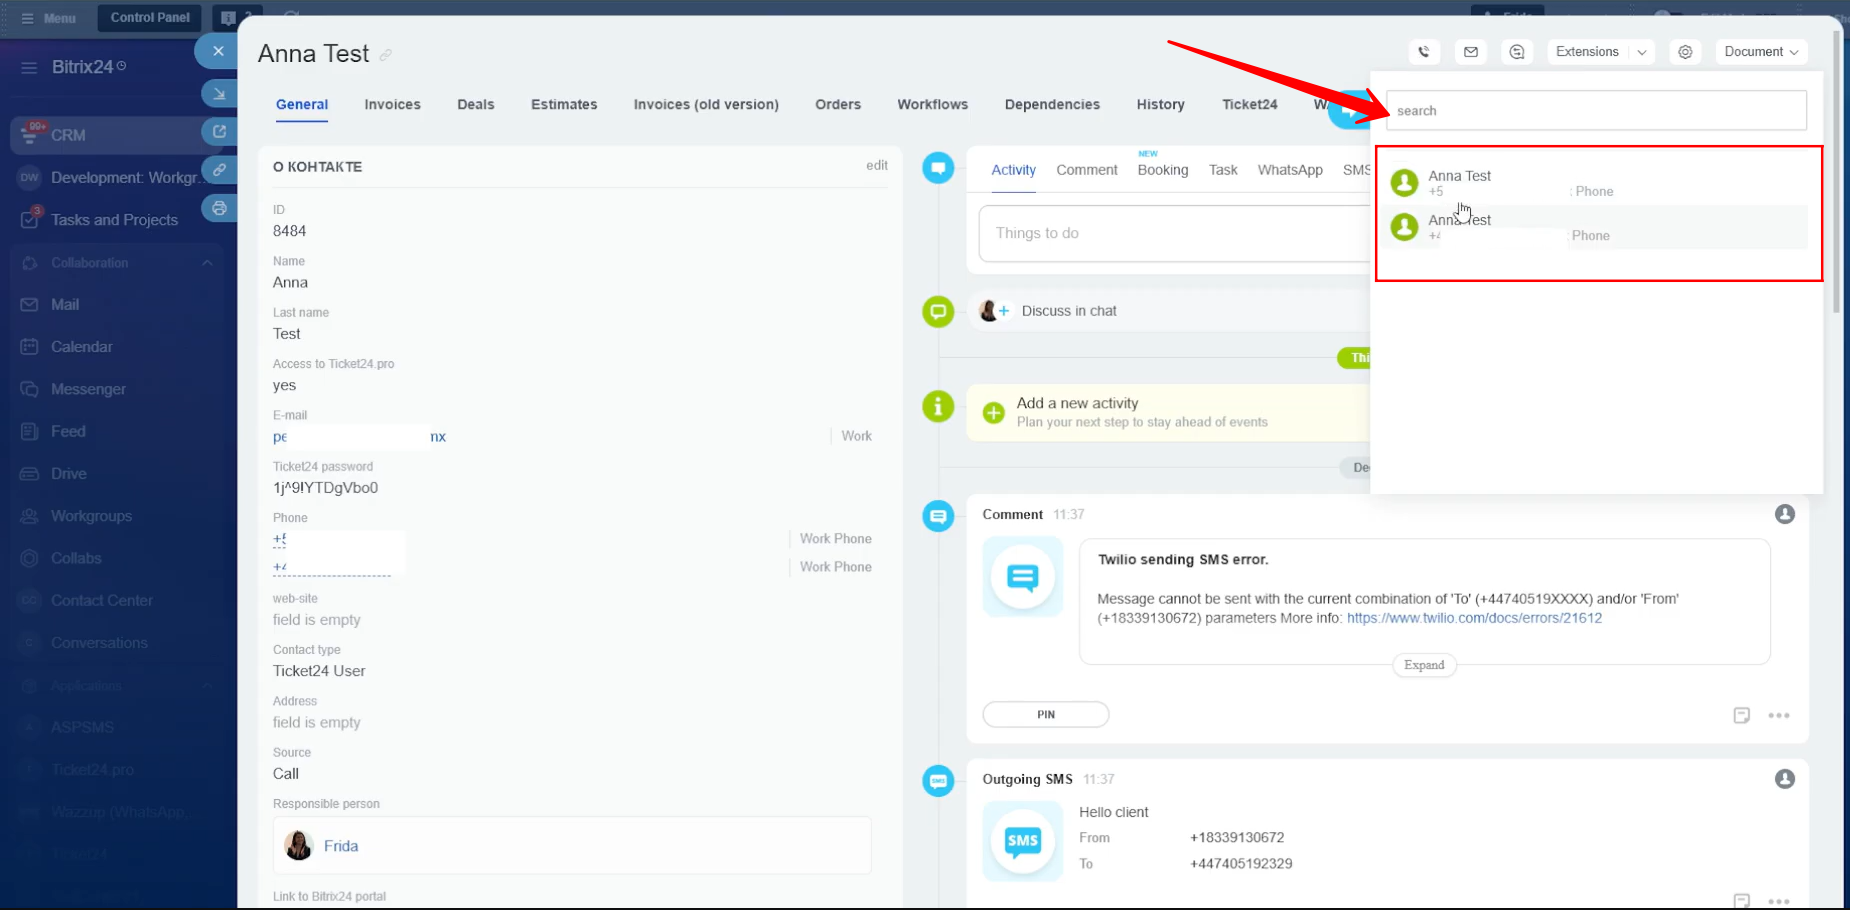
38. If a contact has more than one phone number saved in the entity card, you will be prompted to select the specific number you want to call before the call is placed.
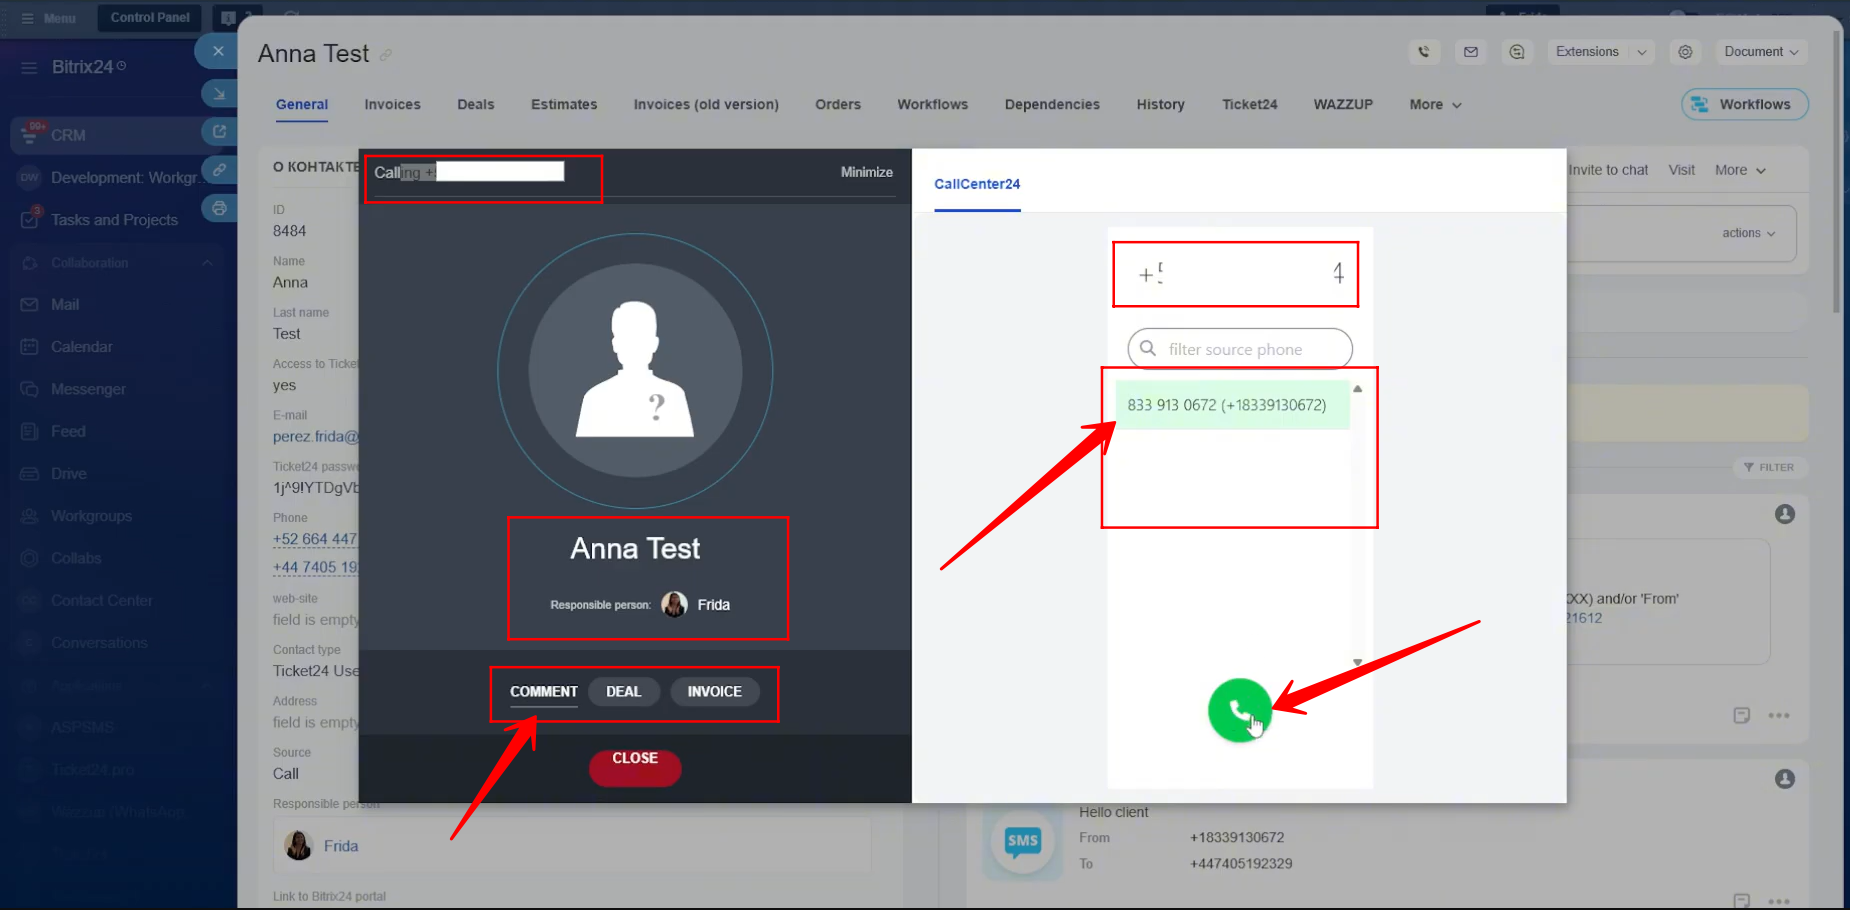
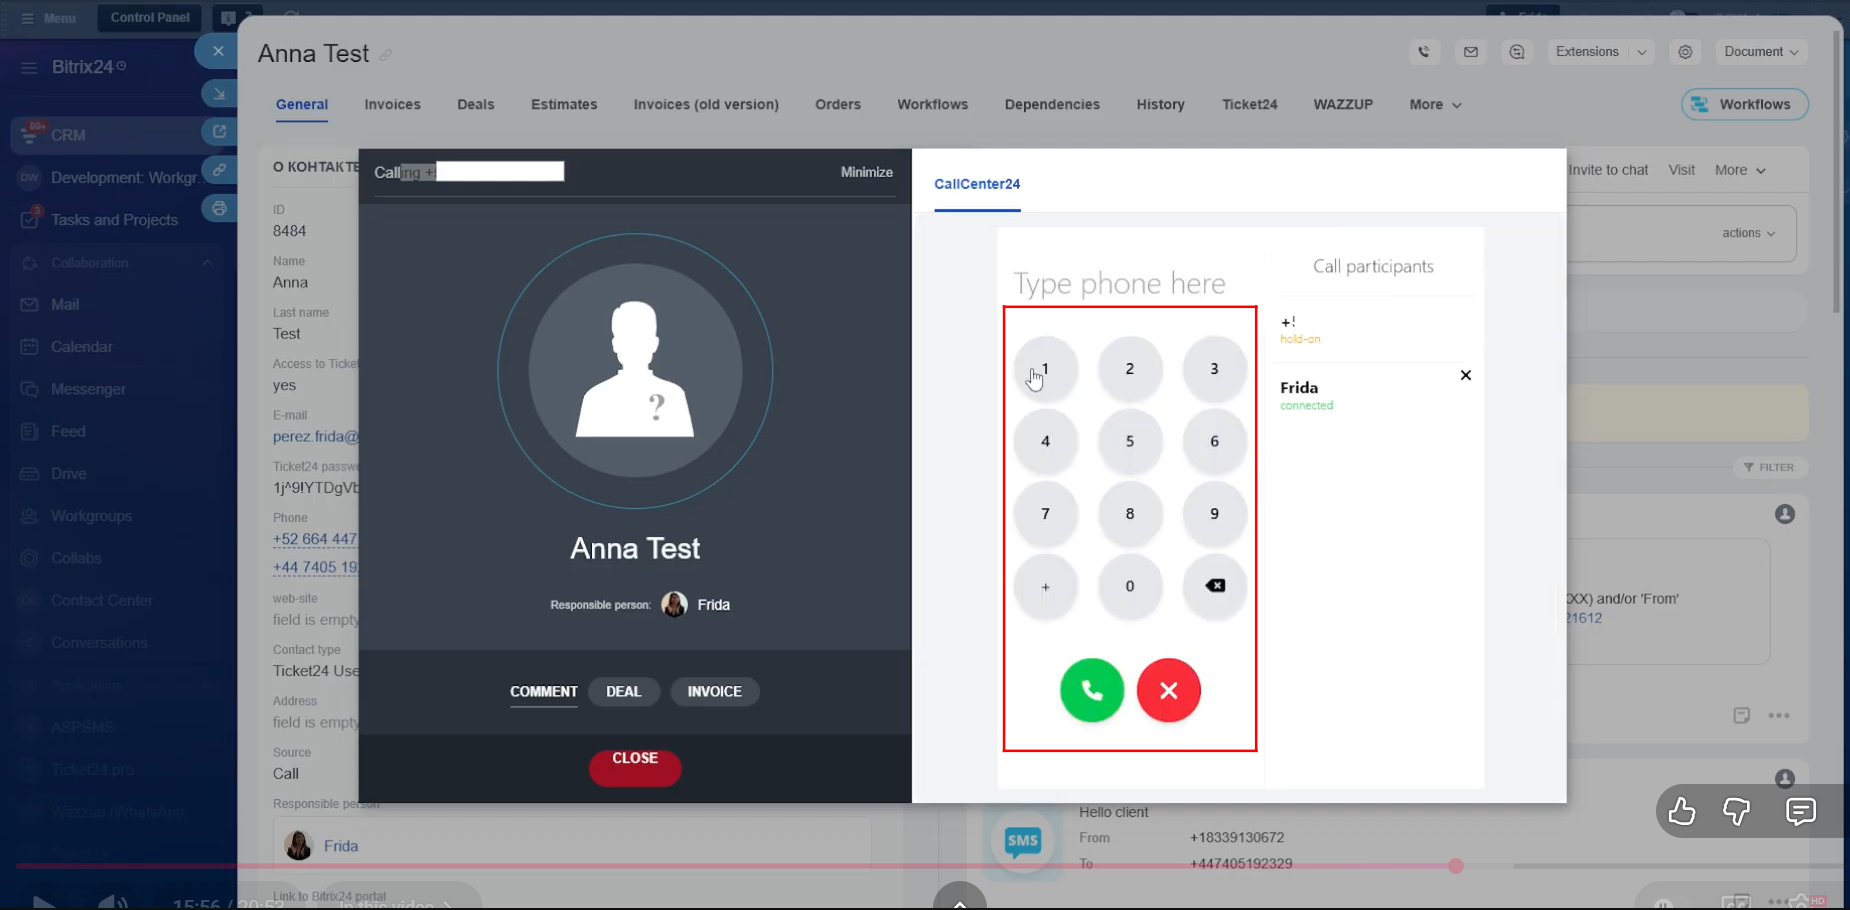
39. This is the call screen you will see when making a call. It displays the number you are calling, and you can also select the FROM number. If you have been assigned more than one number, you will be able to choose which number to call from.
You can also see the contact name and the responsible person linked to that lead or contact. Click the green call button to start the call.
From this same window, while the call is in progress, you can add notes in the comment section. You can also create a deal or an invoice directly from this screen without leaving the call interface.
40. You can see which employee is currently connected, on hold, or disconnected from the call. During the call, you can place the call on hold, mute your microphone, add a new contact from your existing CRM records, or dial a new number to include another participant in the call.
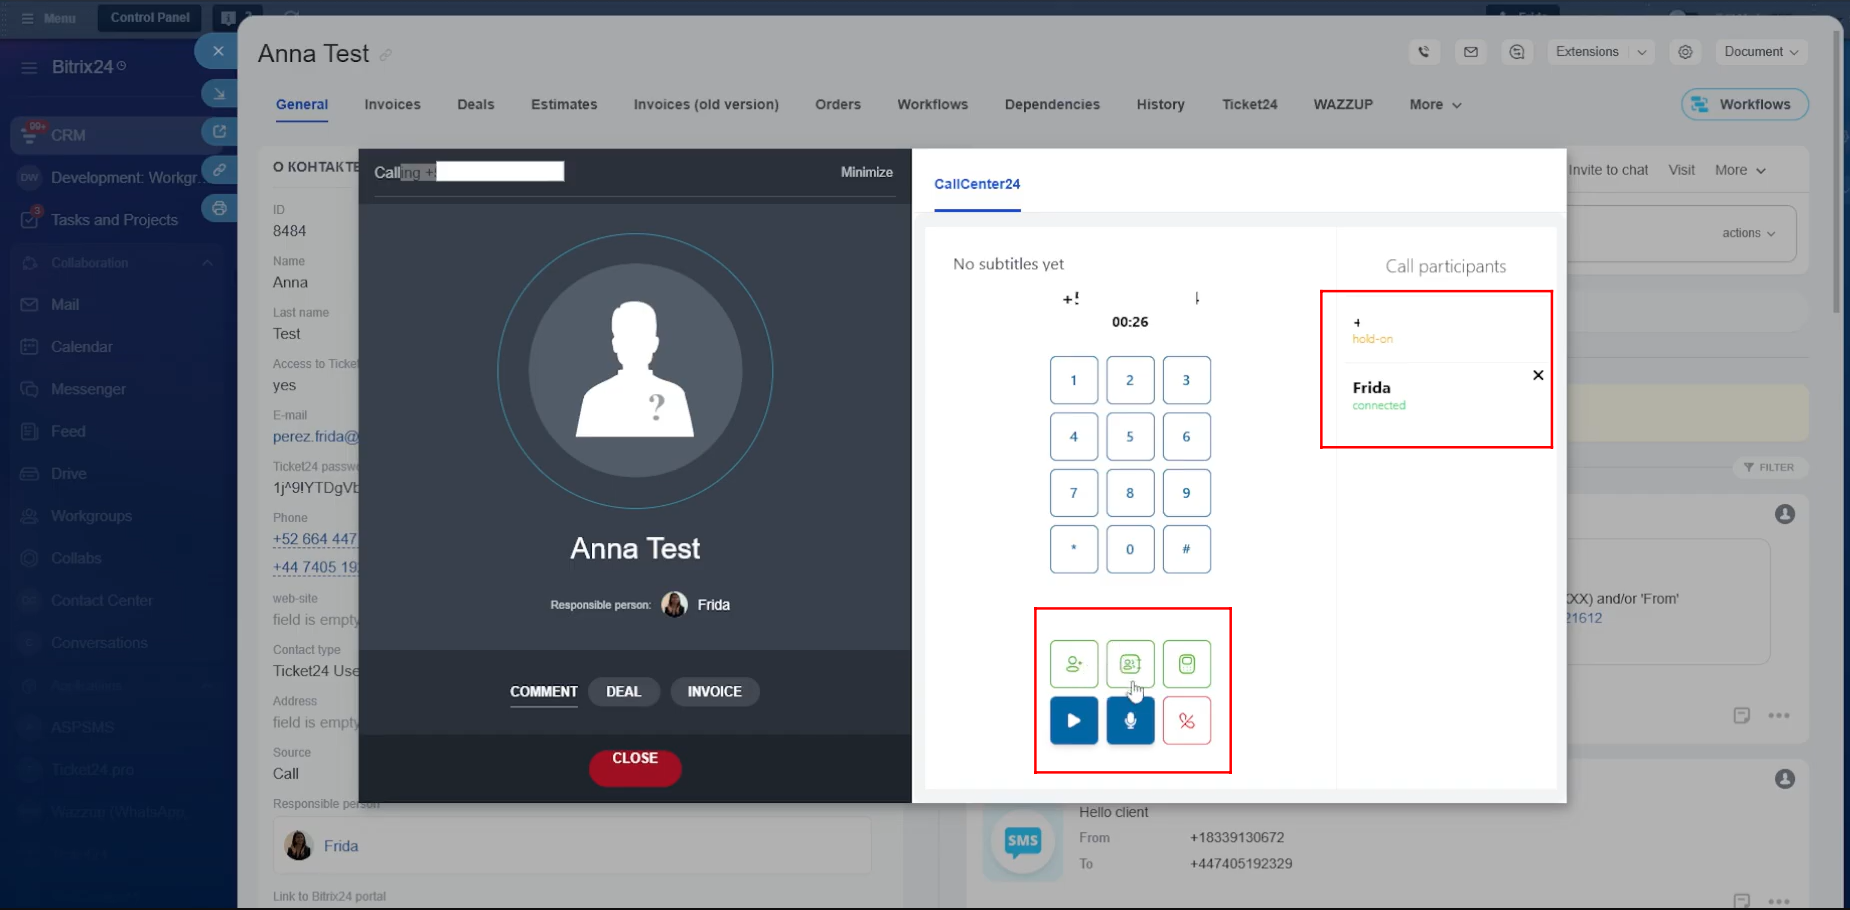
41. This is how you can dial another number during an ongoing call to add a new participant to the conversation.
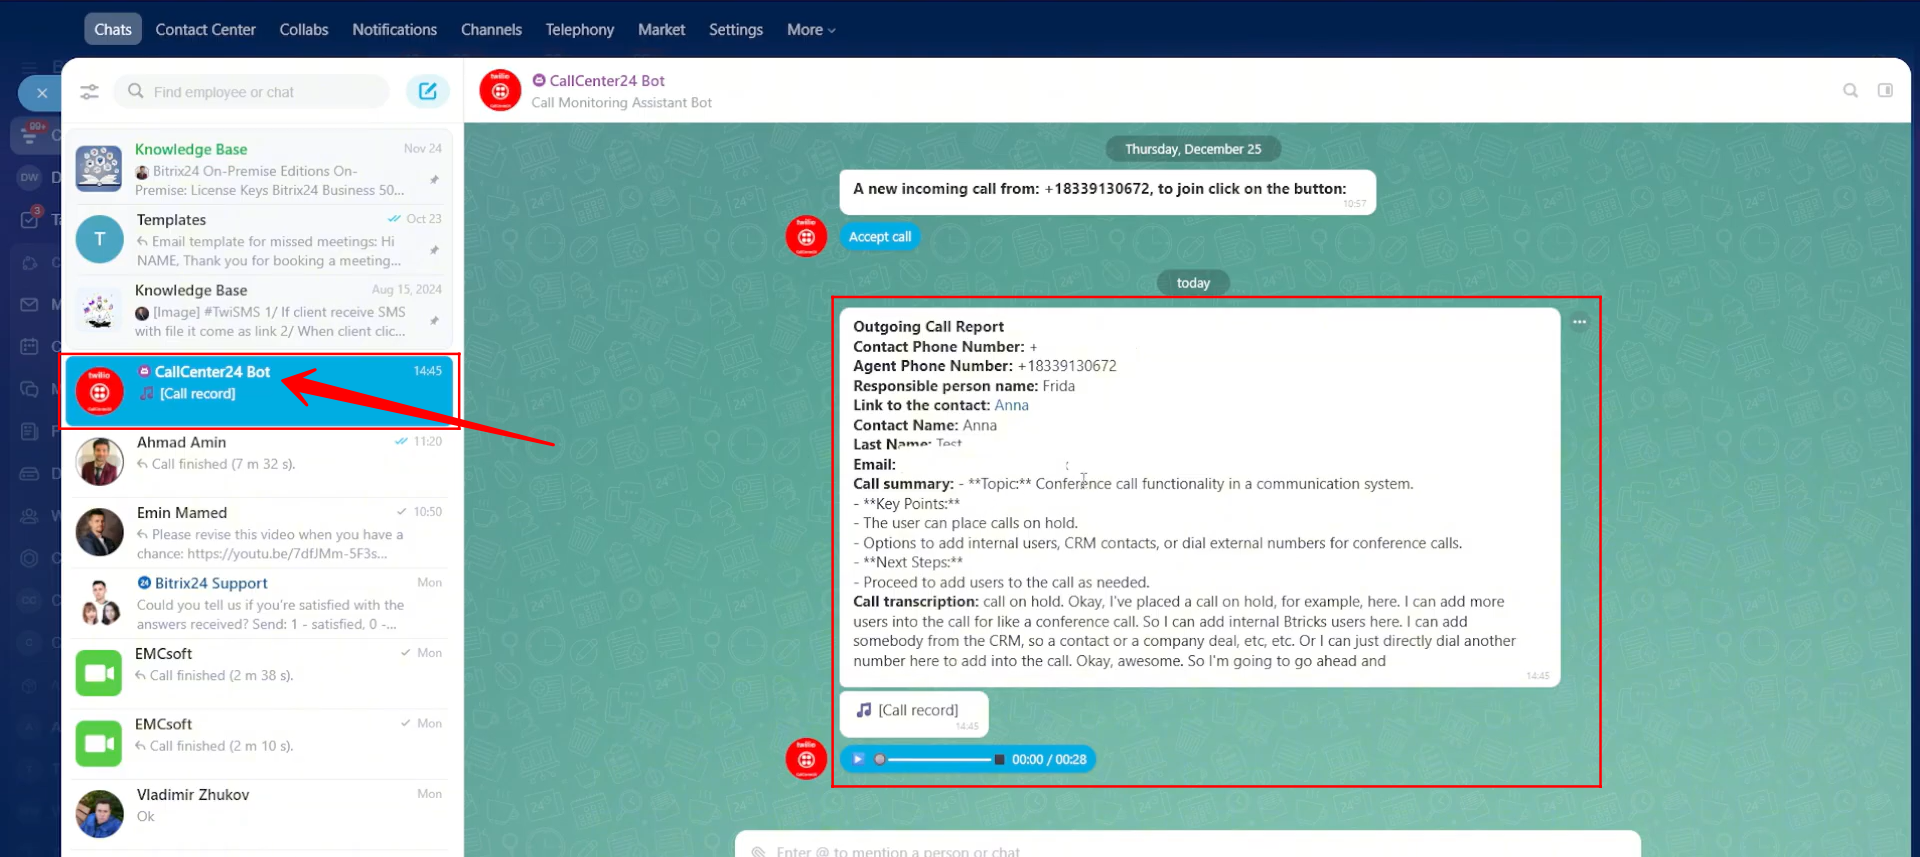
42. If you have enabled call transcriptions and call recording attachments in CallCenter24, then after the call ends, both the recording and the transcription will be automatically attached to the activity timeline of the related CRM entity.
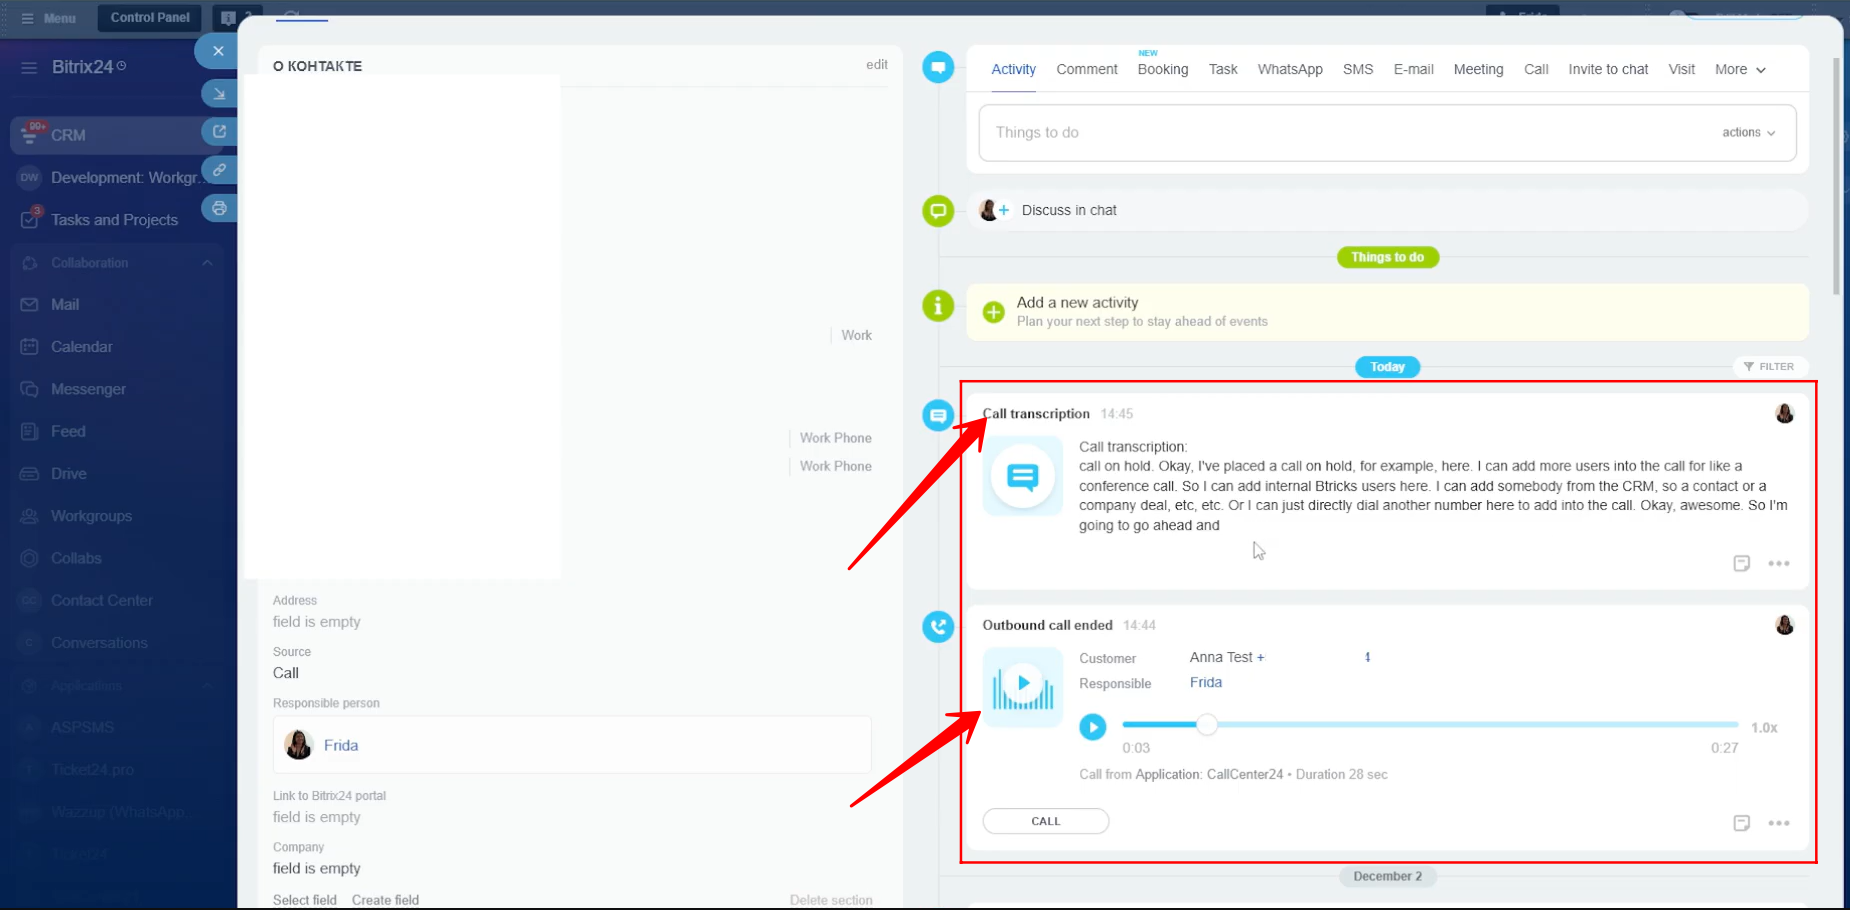
43. In addition to the CRM timeline, the call summary, transcription, and voice recording will also be sent to you in the CallCenter24 chatbot.
If the Supervisor License is enabled for your account in CallCenter24, you will receive complete call reports for all employees in the same chatbot, giving you full visibility into team call activity.
44. You can open CallCenter24 from the Bitrix24 side panel, from the Market under Installed Apps, or by opening Telephony and clicking CallCenter24 from the list of connected telephony applications.
45. We have already explained the CallCenter24 configuration in detail in another article, but let’s briefly review it here.
To assign calling access to an employee, go to Licenses for Calls and click Add New Assignment. Then, select the phone number you want to assign and choose the employee (responsible person) who will make and receive calls using that number.
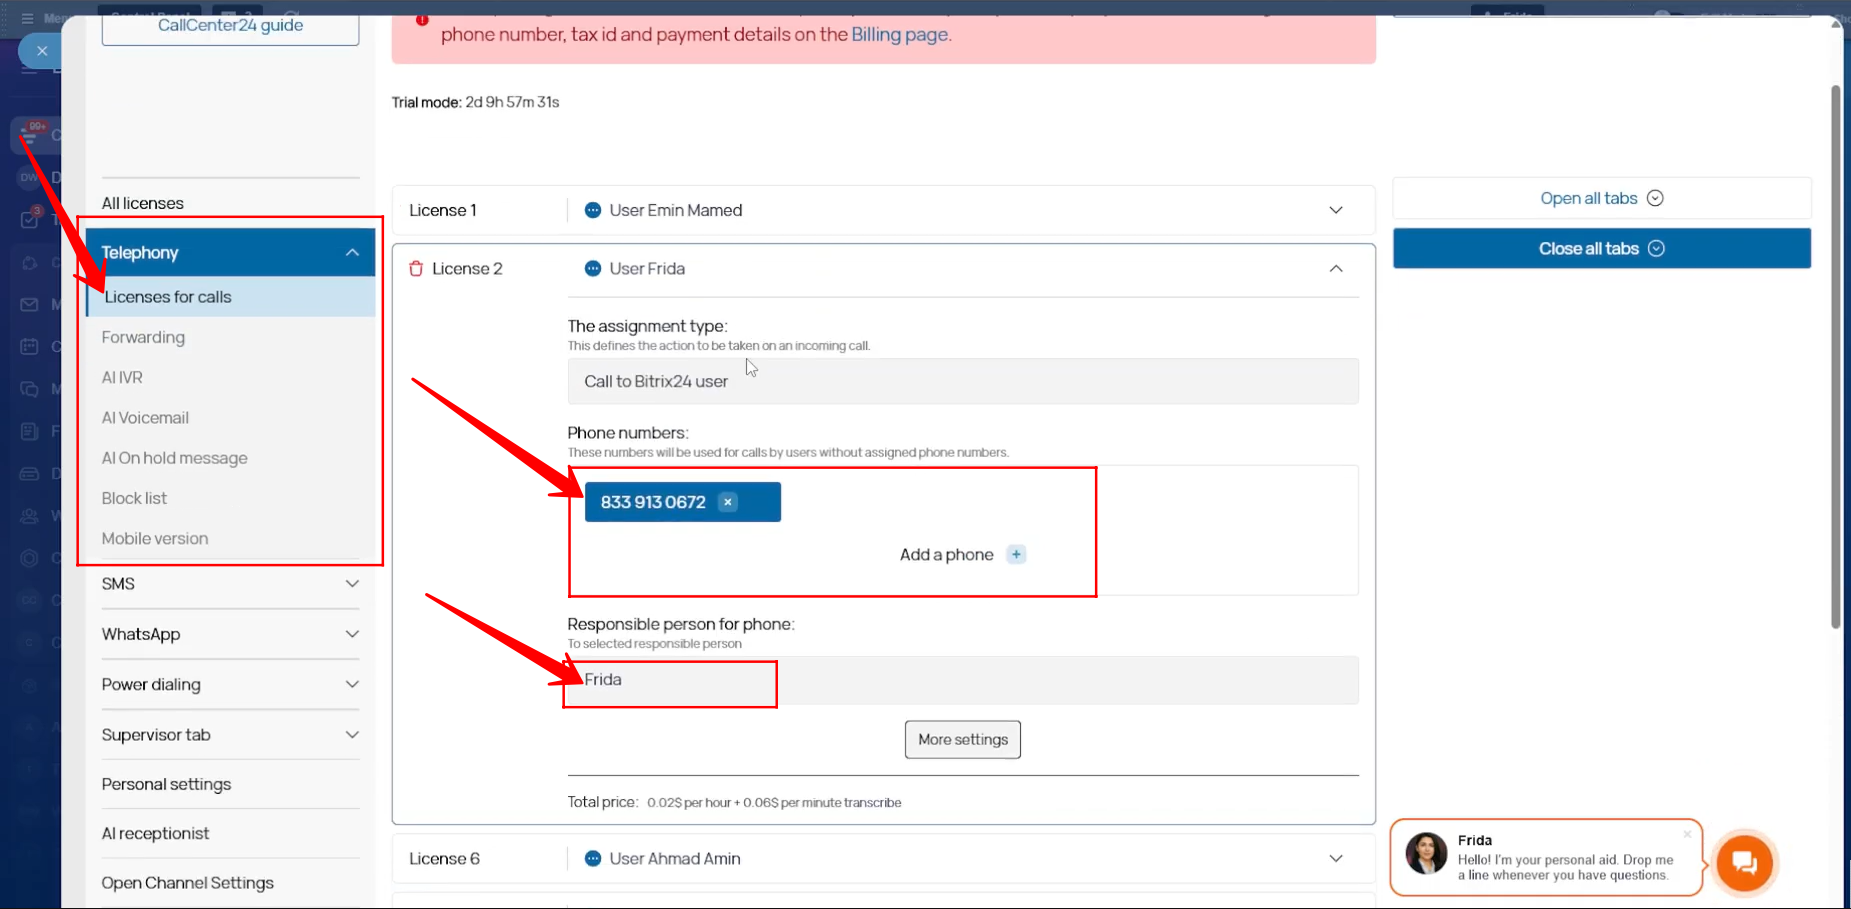
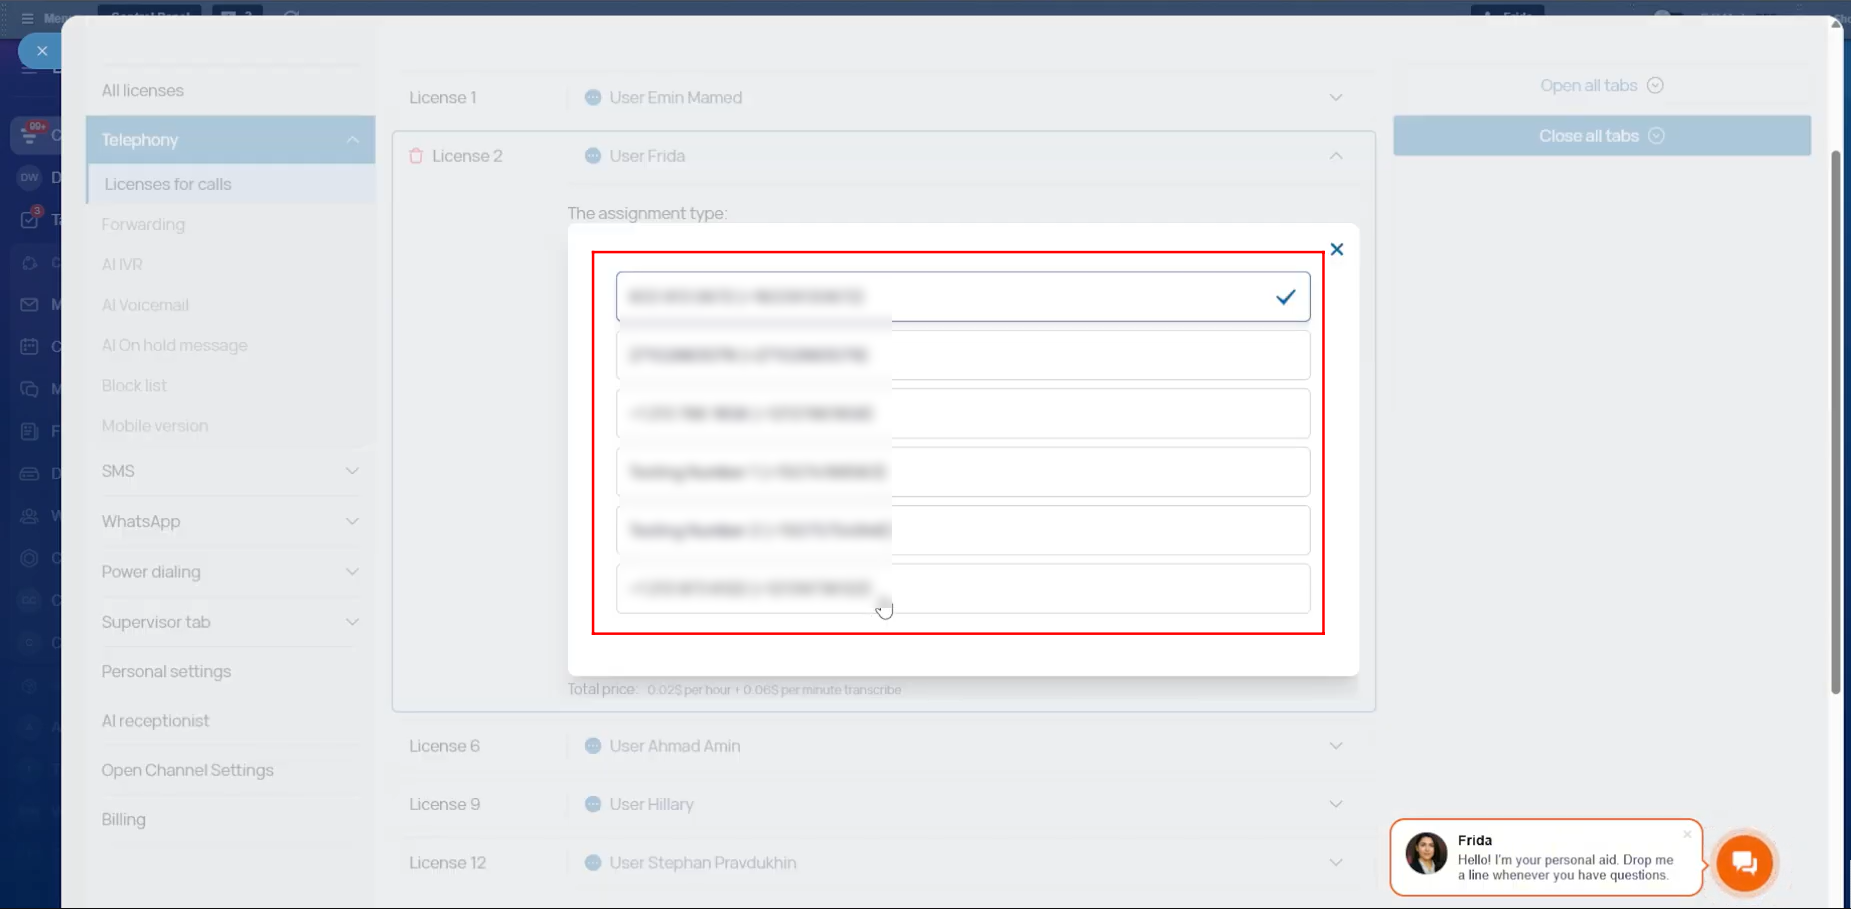
46. During the license setup, you will see a list of all your active Twilio numbers. You can select one or more numbers to assign to the selected responsible person. Multiple numbers can be assigned to the same employee under a single license.
However, if you want to assign calling access to another employee, you must create a separate license for them. Each employee who needs to make or receive calls must have their own license assigned.
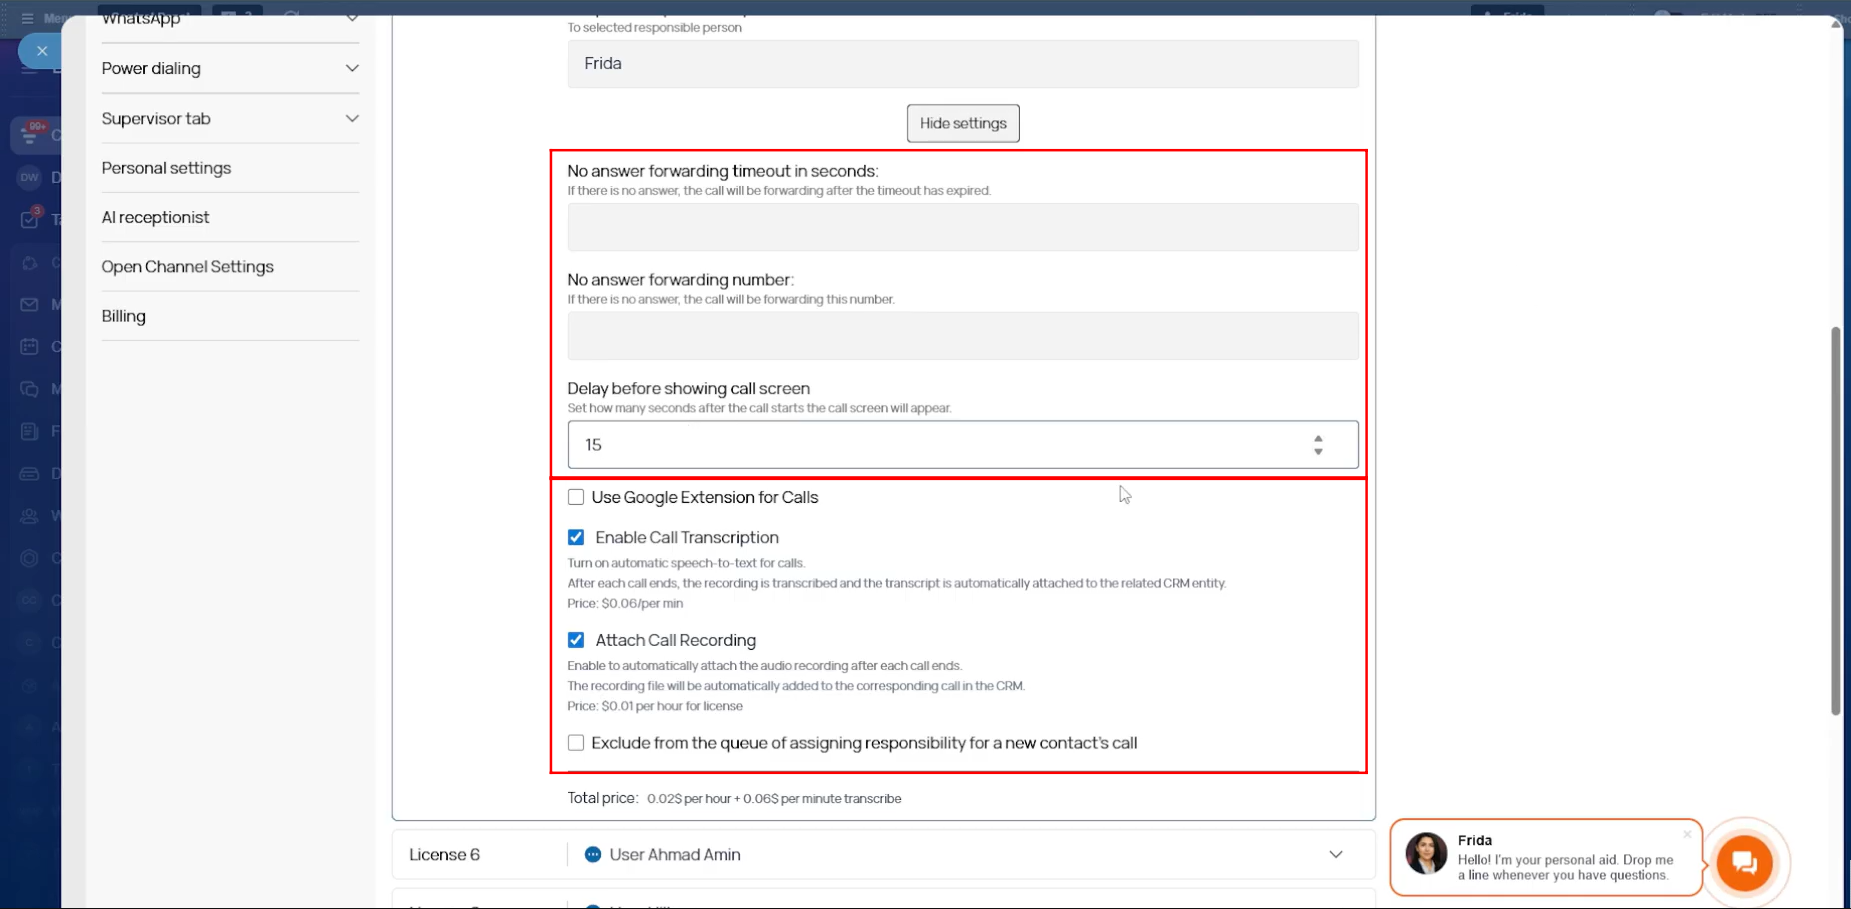
47. Within the settings of each license, you can configure the no-answer forwarding timeout (in seconds) and define the number to forward calls to if the call is not answered. You can also set how many seconds after the call starts the call screen should appear.
In addition, you can enable call recordings and call transcriptions for that license. If needed, you can also activate the option to make calls using the Google Chrome extension.
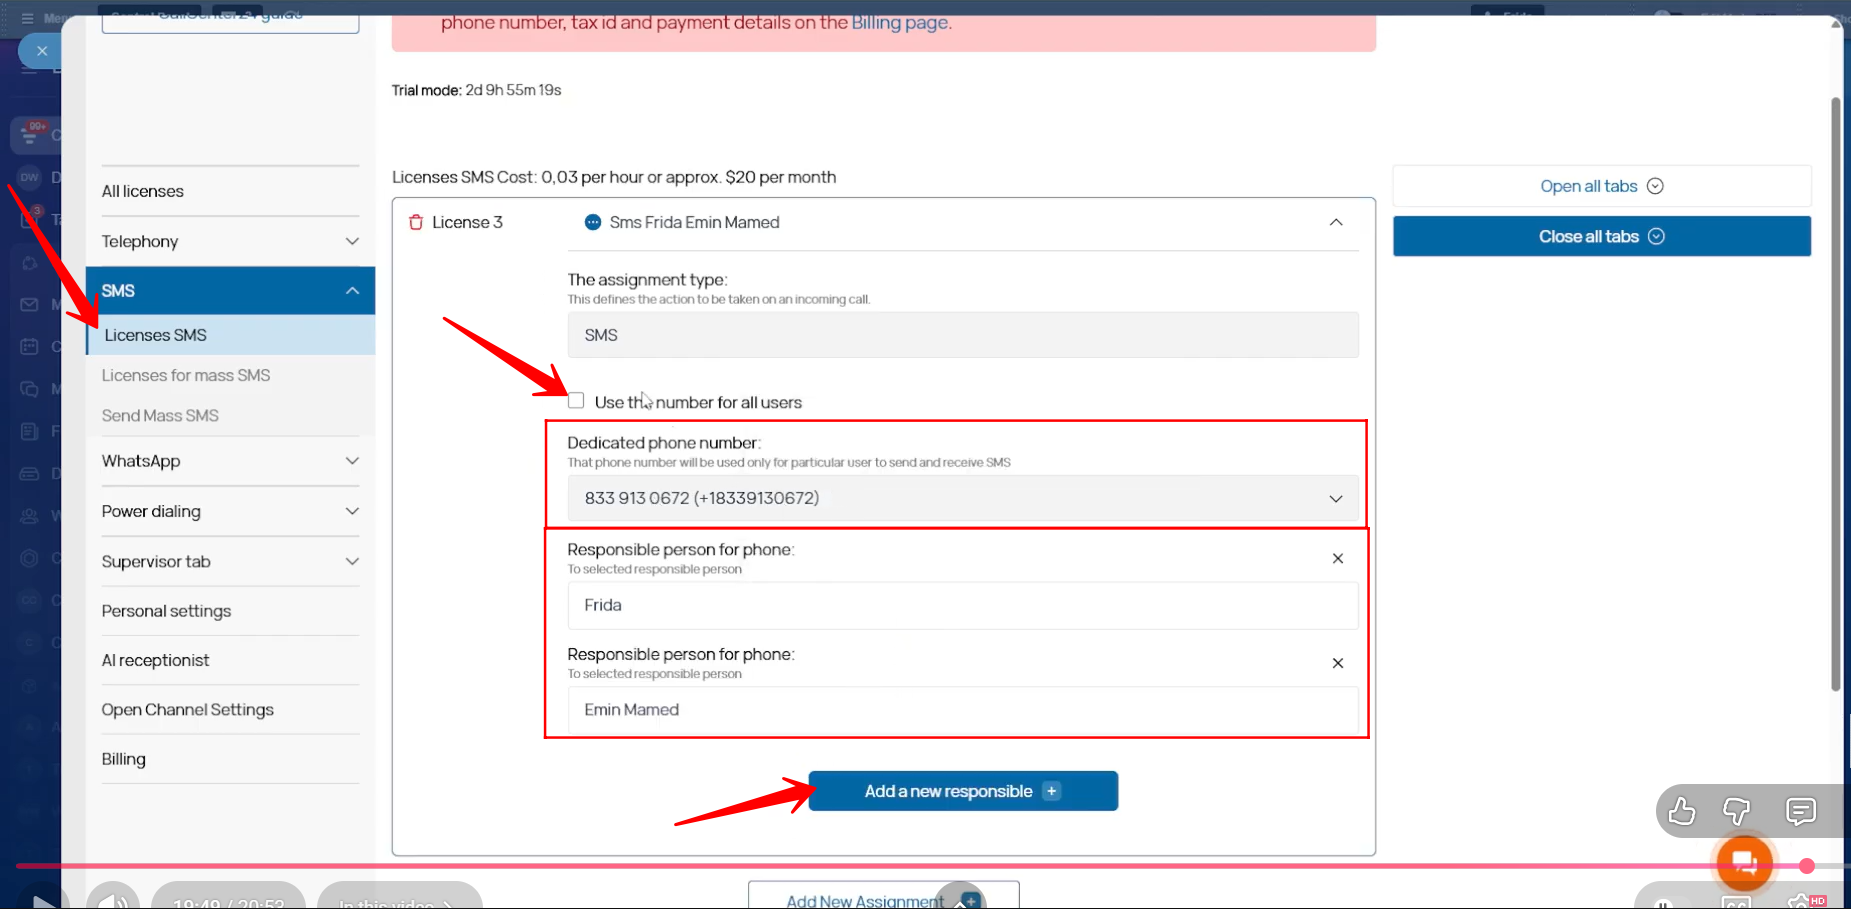
48. To set up an SMS license, go to the Licenses SMS tab and click Add New Assignment. Select the phone number you want to use for SMS and choose whether this number should be available to all users or only specific employees.
Each new phone number used for SMS requires a separate SMS license. The same number can be used for both calls and SMS without any conflict or interruption.
In addition to calling and SMS, CallCenter24 also provides other features such as IVR, On-Hold Messages, Voicemail, WhatsApp Messaging, Power Dialing, Supervisor License, and more, which can be configured based on your business needs.
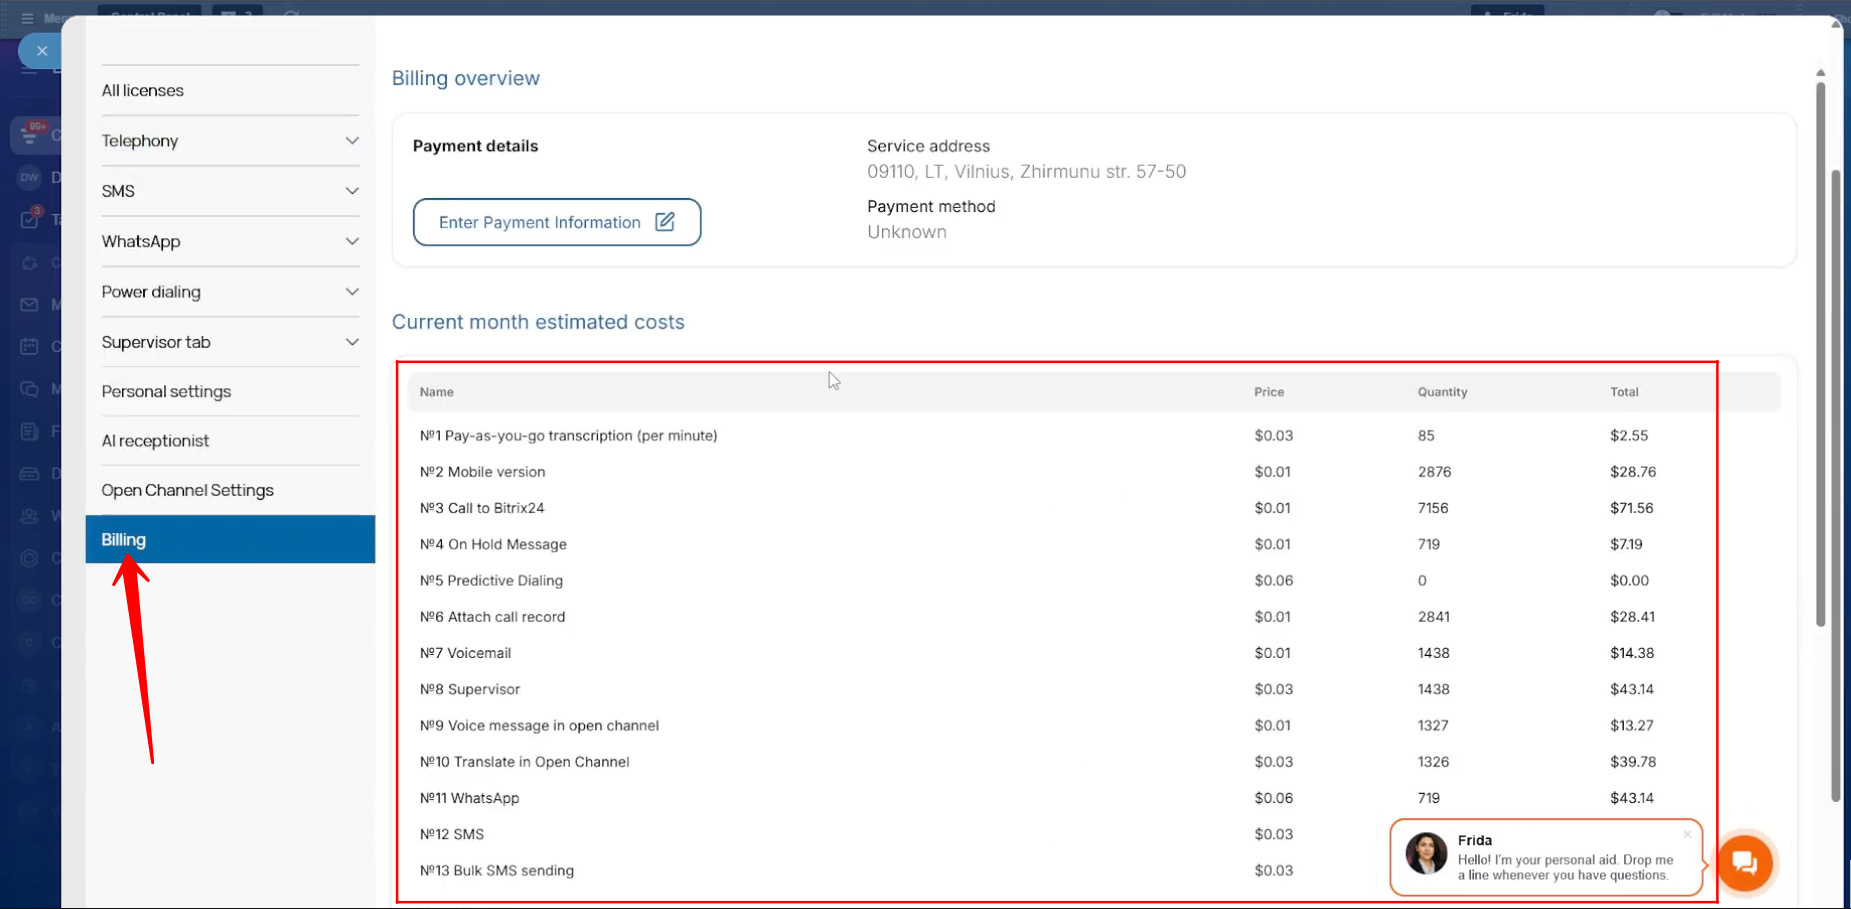
49. In the Billing tab, you need to enter your service address and payment information so the application can bill you automatically each month.
You will also see a detailed list of all licenses you are using. For each service, the billing amount is calculated based on the hourly rate of the licenses, and the total cost is shown clearly.
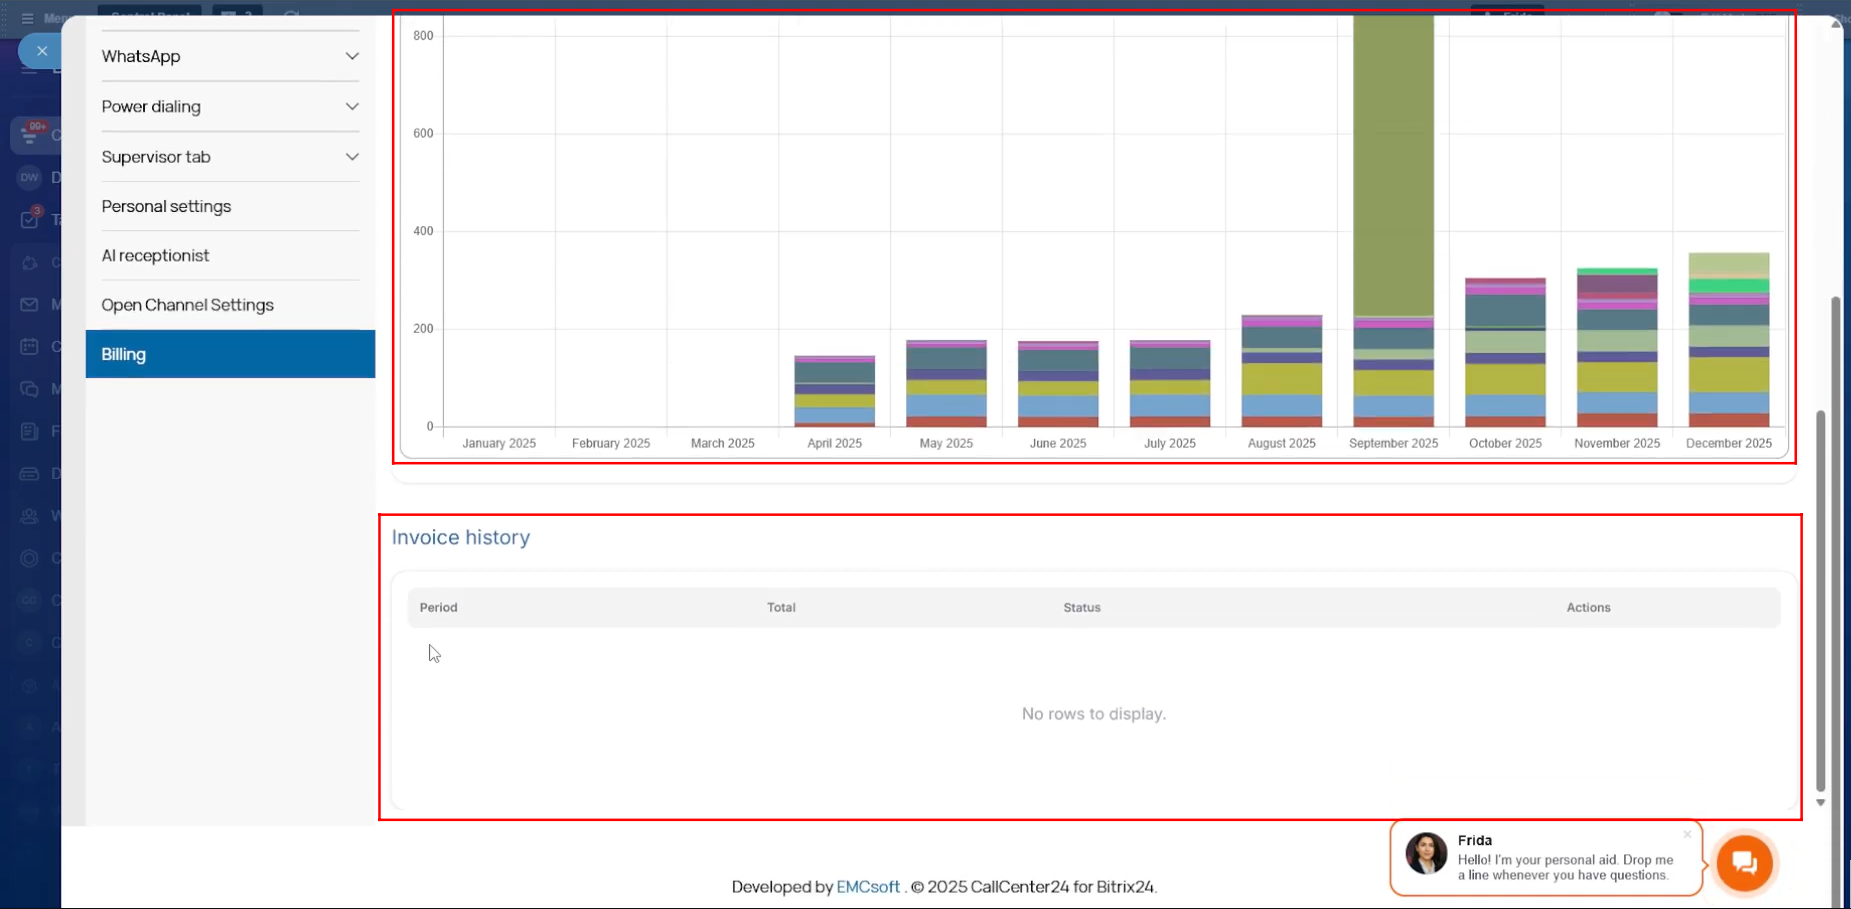
50. You will see a monthly cost forecast displayed as a bar chart. You can also access and download invoices for each month from the Invoice History section.
“You can also watch video on Youtube”