| 5817 Views | Amin

Code mentioned in video:
/bitrix/.settings.php
        'smtp' =>
            array (
                'value' =>
                array(
                    'enabled' => true,
                    'debug' => true, //optional
                    'log_file' => '/var/mailer.log', //optional
                ),
            ),
Outgoing emails in Bitrix on-premise
We have touched this topic before and are coming back to it now with better and more elegant solution.
The core problem is that self-hosted Bitrix24 doesn’t provide SMPT for outgoing emails. When Bitrix users set up SMPT settings in default IMAP section in Bitrix, they assume that outgoing messages SMPT is also automatically configured. Unfortunately, that doesn’t happen and users are puzzled by disappearing emails which they send to clients.
Solution is to manually identify a specific SMPT for outgoing emails.
Email sending procedure
SMPT – Simple Mail Transfer Protocol – is a communication protocol that allows to send and receive emails. Every email goes through the mail server before reaching recipient’s mailbox. Among with relaying SMTP email messages, the server also checks whether an active or working email account is sending the outgoing message. This should prevent spam emails.
What happens when you click send button in your mailbox?
1. Sender’s email client connects to the SMTP server through the specified port, e.g. 587;
2. Email details such as sender email ID, receiver email address and message itself are checked;
3. Then SMTP server come into play and breaks the recipient email address into two parts, name and domain name. For example, if the recipient’s name is abc@gmail.com, the email address is split into abc and gmail.com;
4. If the sender’s email address also comes from @gmail.com, the process is quick and straightforward for the SMTP server. It uses a delivery agent program to deliver the email to that address using the POP3 server for Gmail. But if you are using a hosted SMTP server, then the process will be a bit longer;
5. SMTP server gets recipient’s IP address and checks whether the sender’s email address is active. If everything is ok, then server delivers the message to the recipient SMTP server;
6. The recipient SMTP server receives a message and delivers to inbox folder;
7. In case the recipient email address is incorrect, or if the recipient SMTP relay service rejects the email message from the sender, it returns the email to the sender with appropriate information.
Understanding the details of email sending can help in dealing with mail agents and Bitrix mail configuration accordingly.
By the way, cloud Bitrix provides external SMPT using its own servers and no additional settings are needed.
On a side note, to send emails via SMTP in Bitrix24 cloud version, be sure that server supports SSL. The SSL certificate needs to be valid and self-signed certificates are not applicable. In this article we gave a tutorial for SSL certificate installation.
SMPT server configuration in self-hosted Bitrix
In previous article we suggested creating an additional setting in servers itself with admin rights.
Now we will perform even more simple operations using Bitrix Control panel. You will use an additional code which we provide below.
We remind of the following important moments in configuring SMPT for Bitrix:
• The SMTP server settings are available to any user;
• SMTP servers often have their own limits and restrict mass mailing, or can even block your account if these limits are exceeded;
• Official Bitrix24 helpdesk recommend not to use # and ^ symbols in passwords, as it may cause problems with outgoing mail when using some SMTP-services.
Let’s see how we can set a proper SMPT server for outgoing emails in self-hosted Bitrix24.
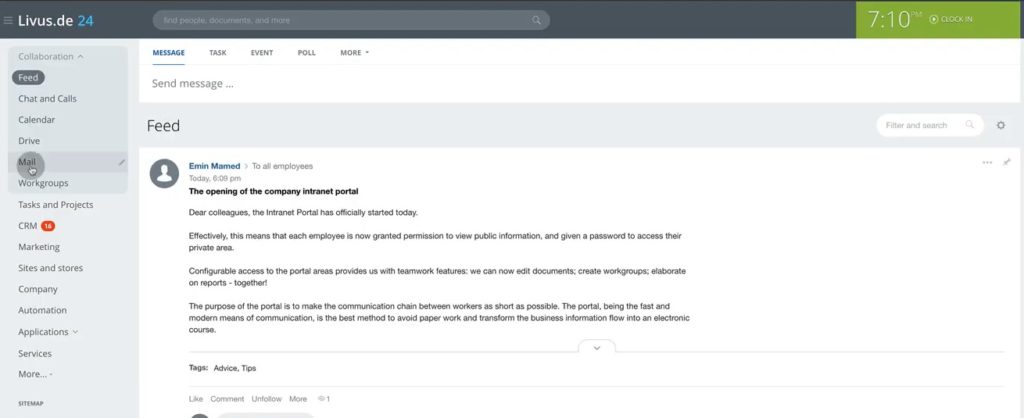
1. Below we have a clean, just installed Bitrix CRM. Go to Mail in left panel.
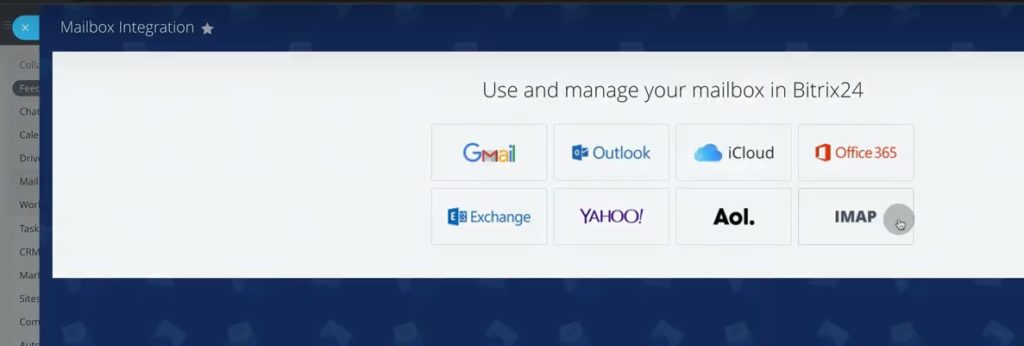
2. There is a list of well-known email agents.
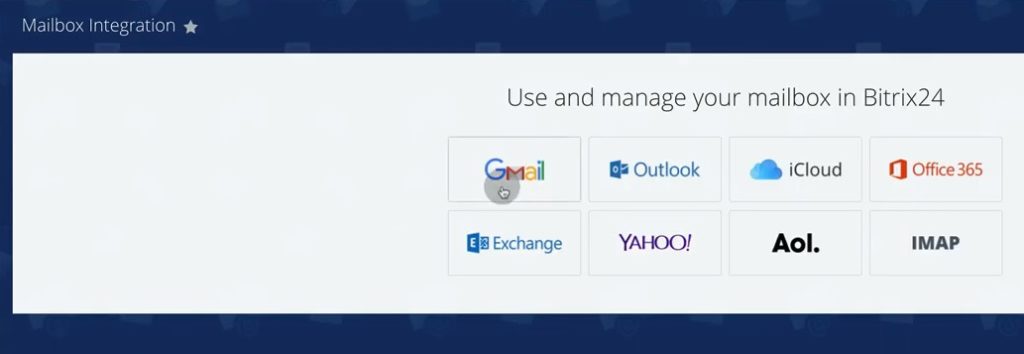
3. However, when you set up IMAP for emails, in fact you are configuring incoming emails only. In self-hosted Bitrix you need to identify SMPT for outgoing emails intentionally.

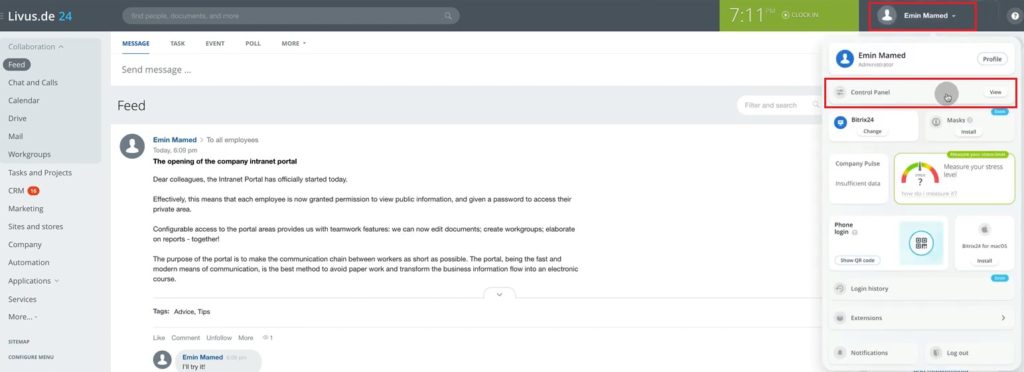
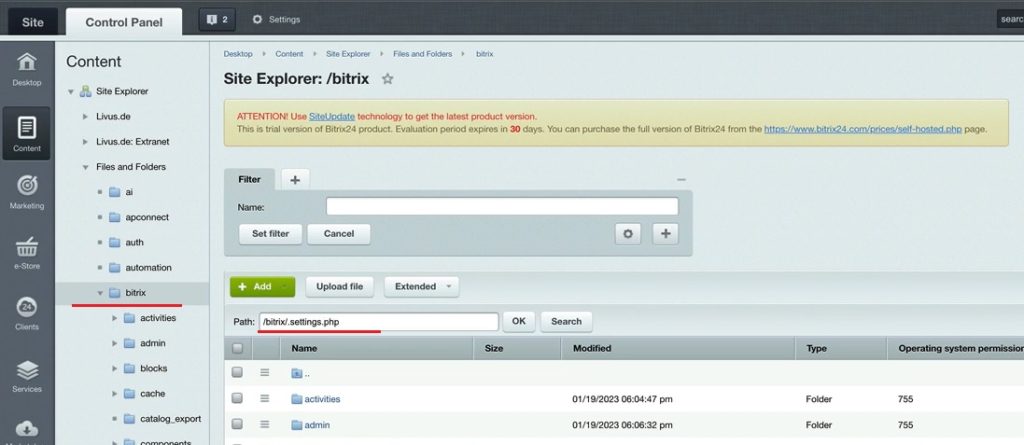
4. To do so, go to main page, open your profile and click on Control panel.
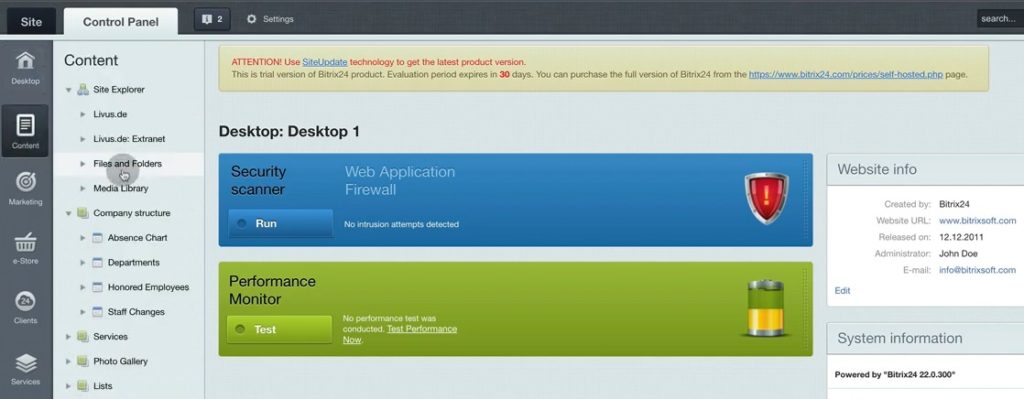
5. Then go to Content – Files and Folders.
6. Find Bitrix folder and type the following path: Bitrix/.settings.php and click Enter.
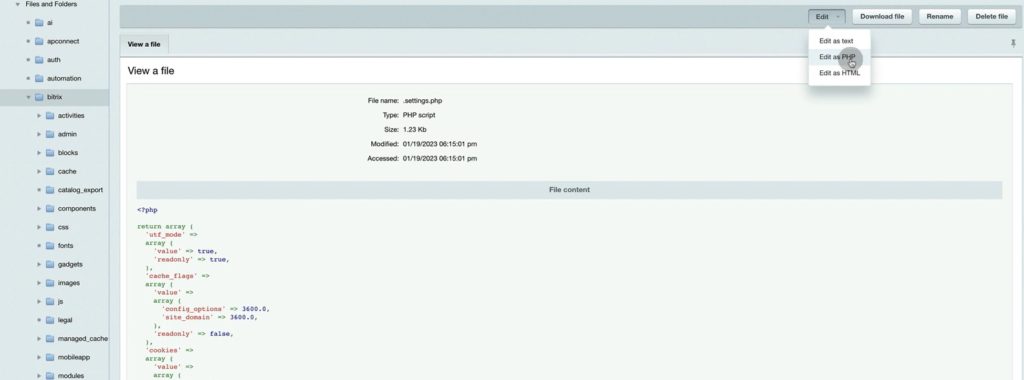
7. Then a file with code will emerge. Click on Edit – Edit as PHP.
8. You will need to enter an additional code.
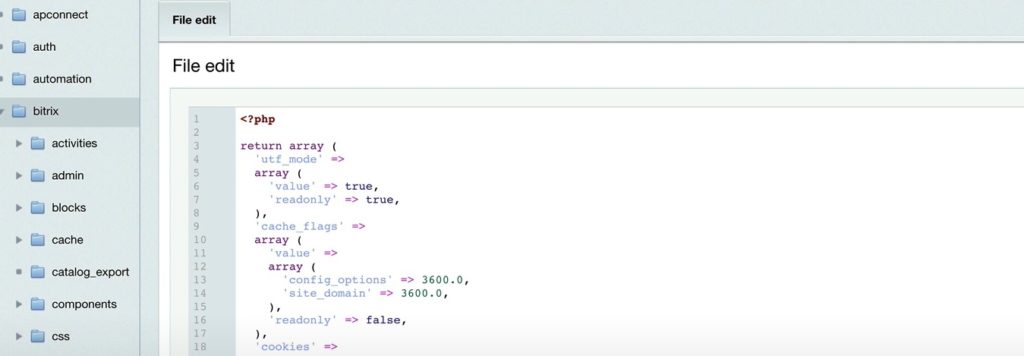
9. For that, move on to a new line after Return array (
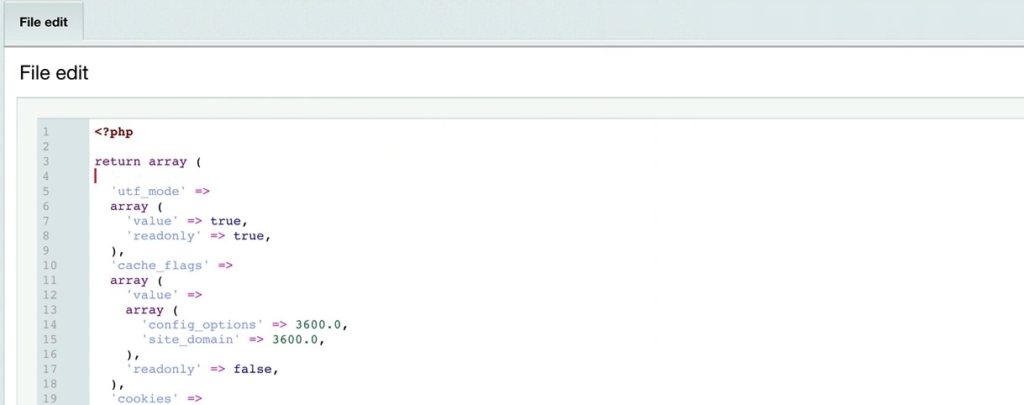
10. And then enter additional code as it is shown below and click Save.

/bitrix/.settings.php
        'smtp' =>
            array (
                'value' =>
                array(
                    'enabled' => true,
                    'debug' => true, //optional
                    'log_file' => '/var/mailer.log', //optional
                ),
            ),
11. Once that changes are saved, go back to Bitrix site – Mail – IMAP. Do not forget to refresh the page.
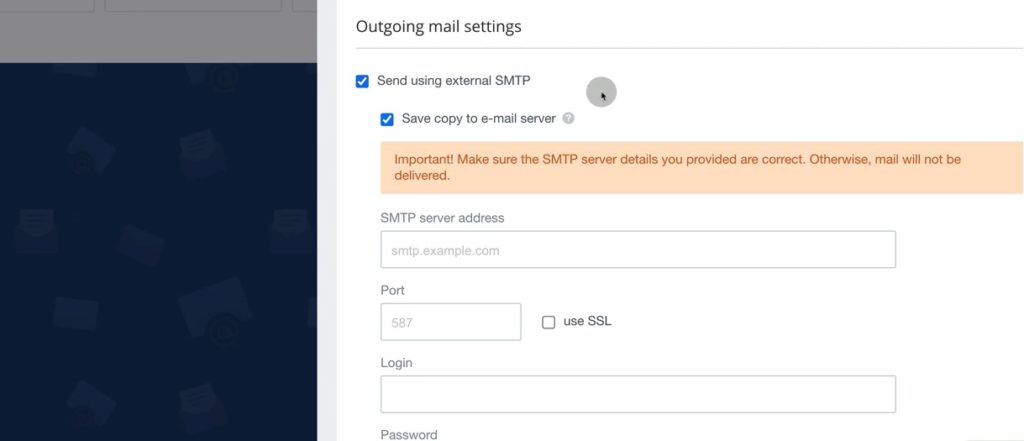
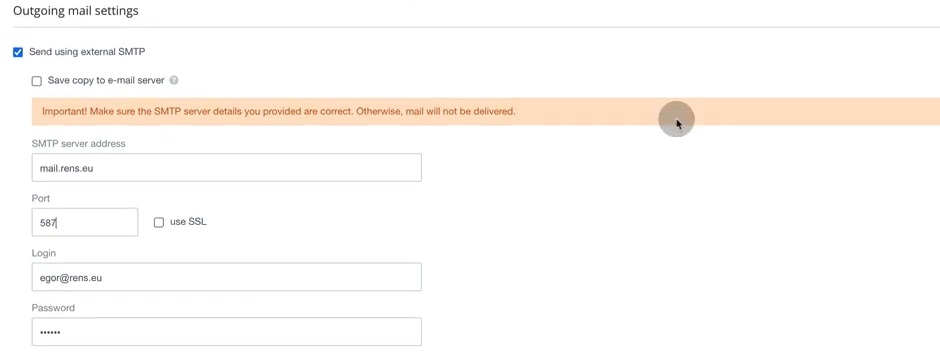
12. You will find out a new section of settings for Outgoing mail settings. As you might remember, in slide #3 there was no such settings.
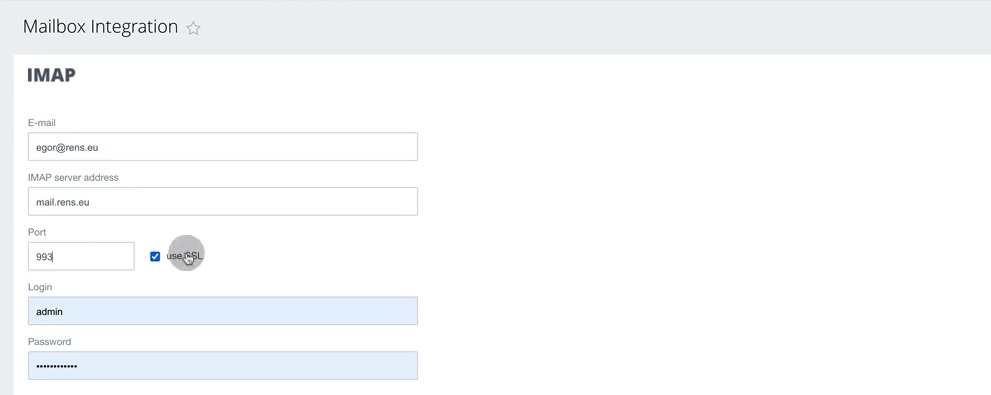
13. Let’s start IMAP configuration. We begin with incoming IMAP. Enter your email, IMAP server address (in our example it’s mail.rens.eu and yours should look similarly). Then enter port, which is usually 993 for incoming messages. Do not forget to tick Use SSL box.
14. Then type your email login and password. Then you can specify with what frequency your emails will be collected in Bitrix.
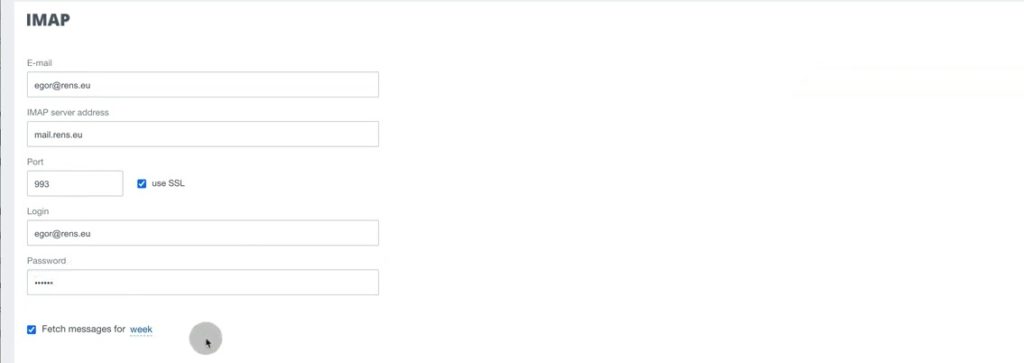
15. With Edit more parameters you can define Sender name which your clients’ will see; mailbox name; email server web interface URL which you can ignore or type the same IMAP server address you entered before.

16. Then we come to outgoing mail settings. Untick the “Save copy to email server” box.

17. Then enter IMAP server address and port number – usually 587 for outgoing emails. Then enter email credentials as before.
That was an instruction of how to: set up outgoing emails for self-hosted Bitrix24. The best way is to perform these operations from the start of using Bitrix.
An additional code mentioned before allows to identify a separate SMPT server for outgoing emails. Therefore, you will have a stable flow of email correspondence in Bitrix CRM.
Service companies which specialize in Bitrix integration help to avoid such pitfalls and configure system in the best way possible. EMCsoft is one of such companies operating globally with dozens of happy corporate and private customers.
We welcome your inquiries and suggestions via this contact form.
You can also watch this video on Youtube.
