| 336 Views | admin

This guide explains how to create and configure document templates in Bitrix24 using symbolic codes. By using symbolic codes, you can automatically pull information from CRM records and display it in generated documents such as invoices, payment requests, quotations, and other business documents.
Throughout this article, we will work with CRM entities such as Deals, Invoices, Contacts, Companies, and My Company Details. You will learn how to identify the correct symbolic codes, add them to a document template, and test the template to make sure the information is displayed correctly.
The article also covers how to include different types of information in your documents, including client details, company information, product details, payment terms, banking information, and responsible employee details. Each section explains where the data comes from and how it can be added to the template.
By the end of this guide, you will have a complete document template that automatically fills information from your CRM records. This helps reduce manual data entry, keeps document information consistent, and makes it easier to generate professional documents whenever needed.
“Detailed Instructions are given below”
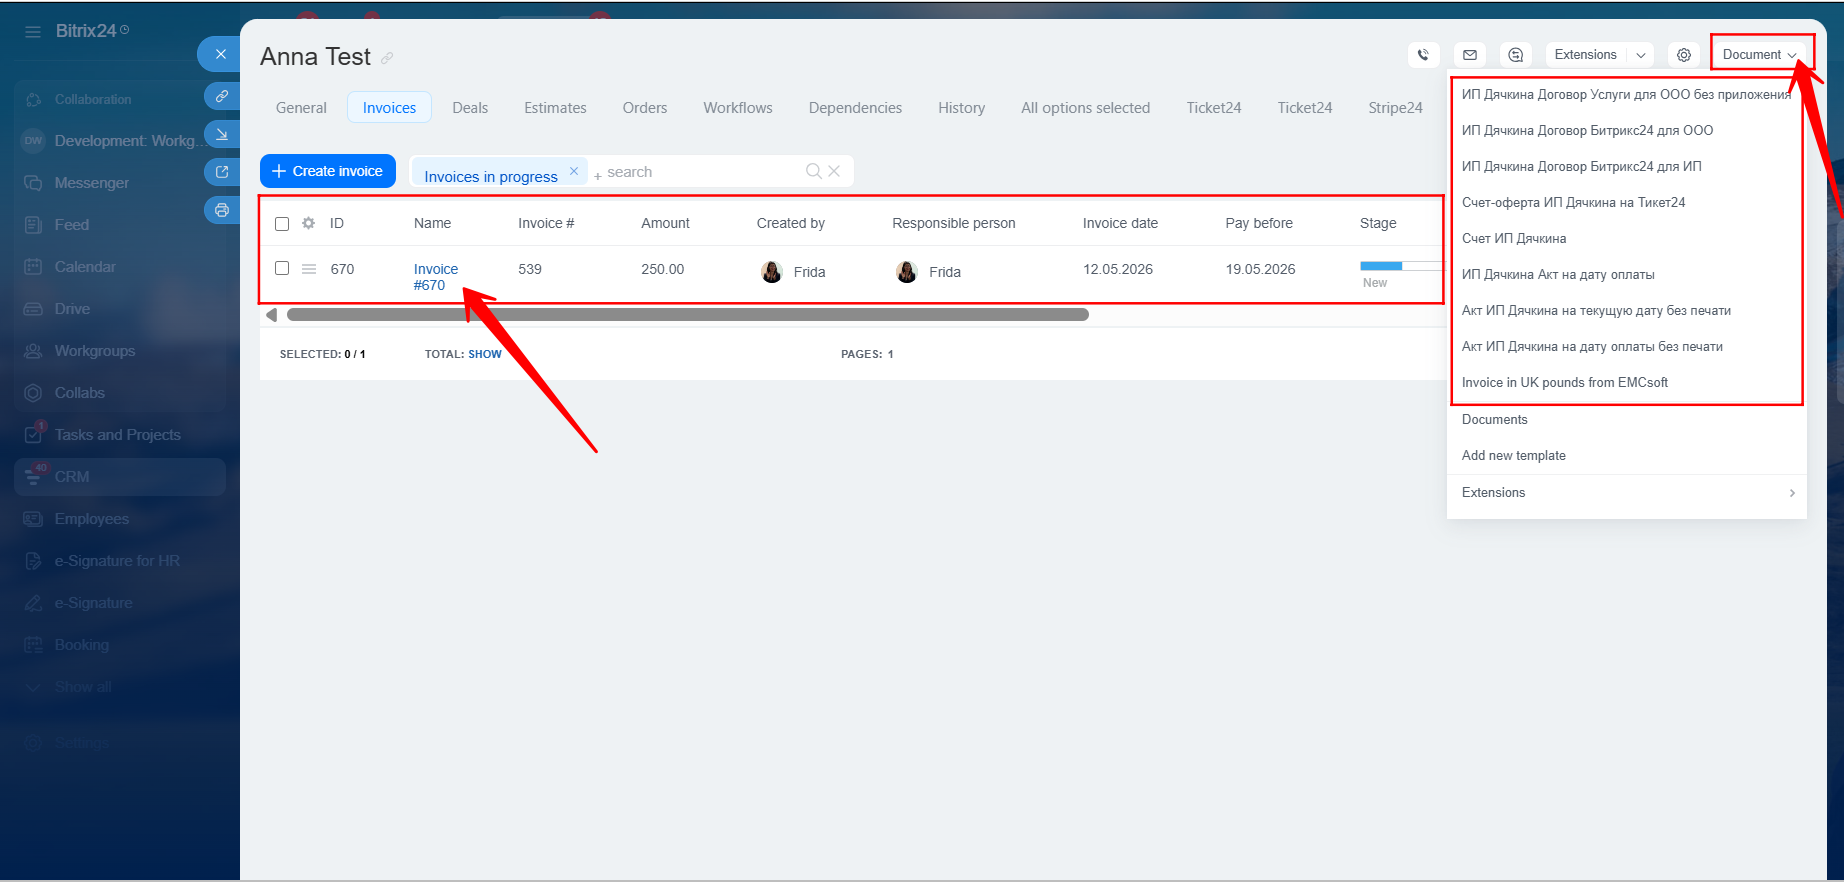
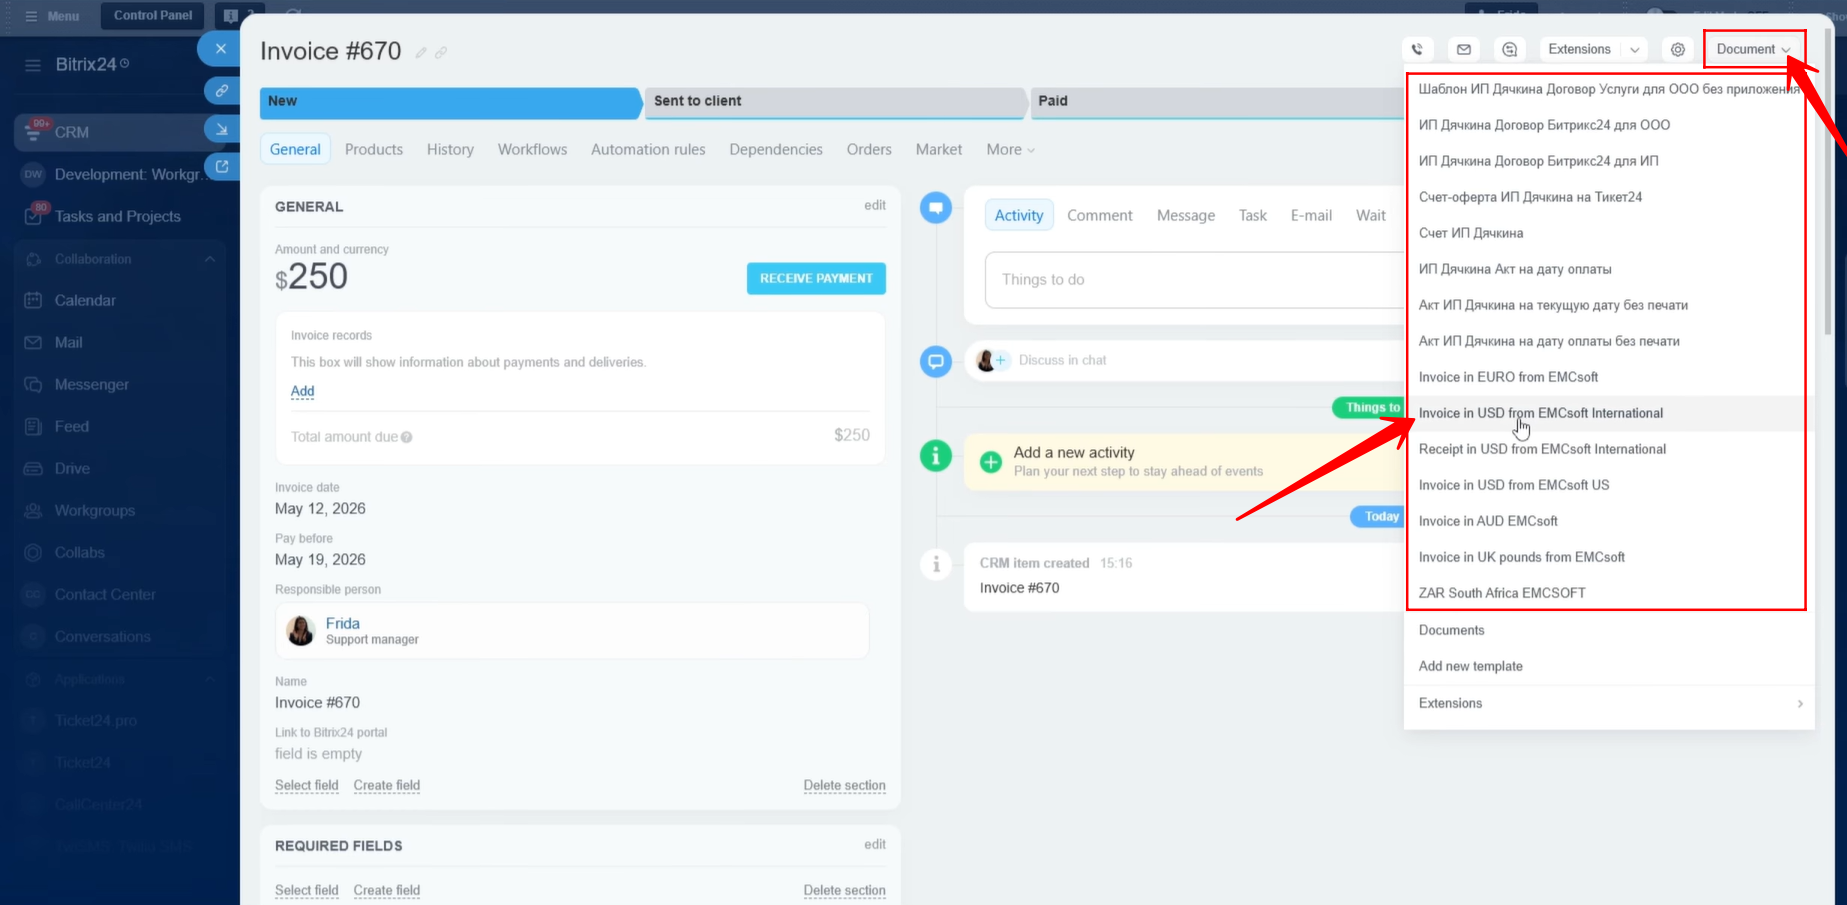
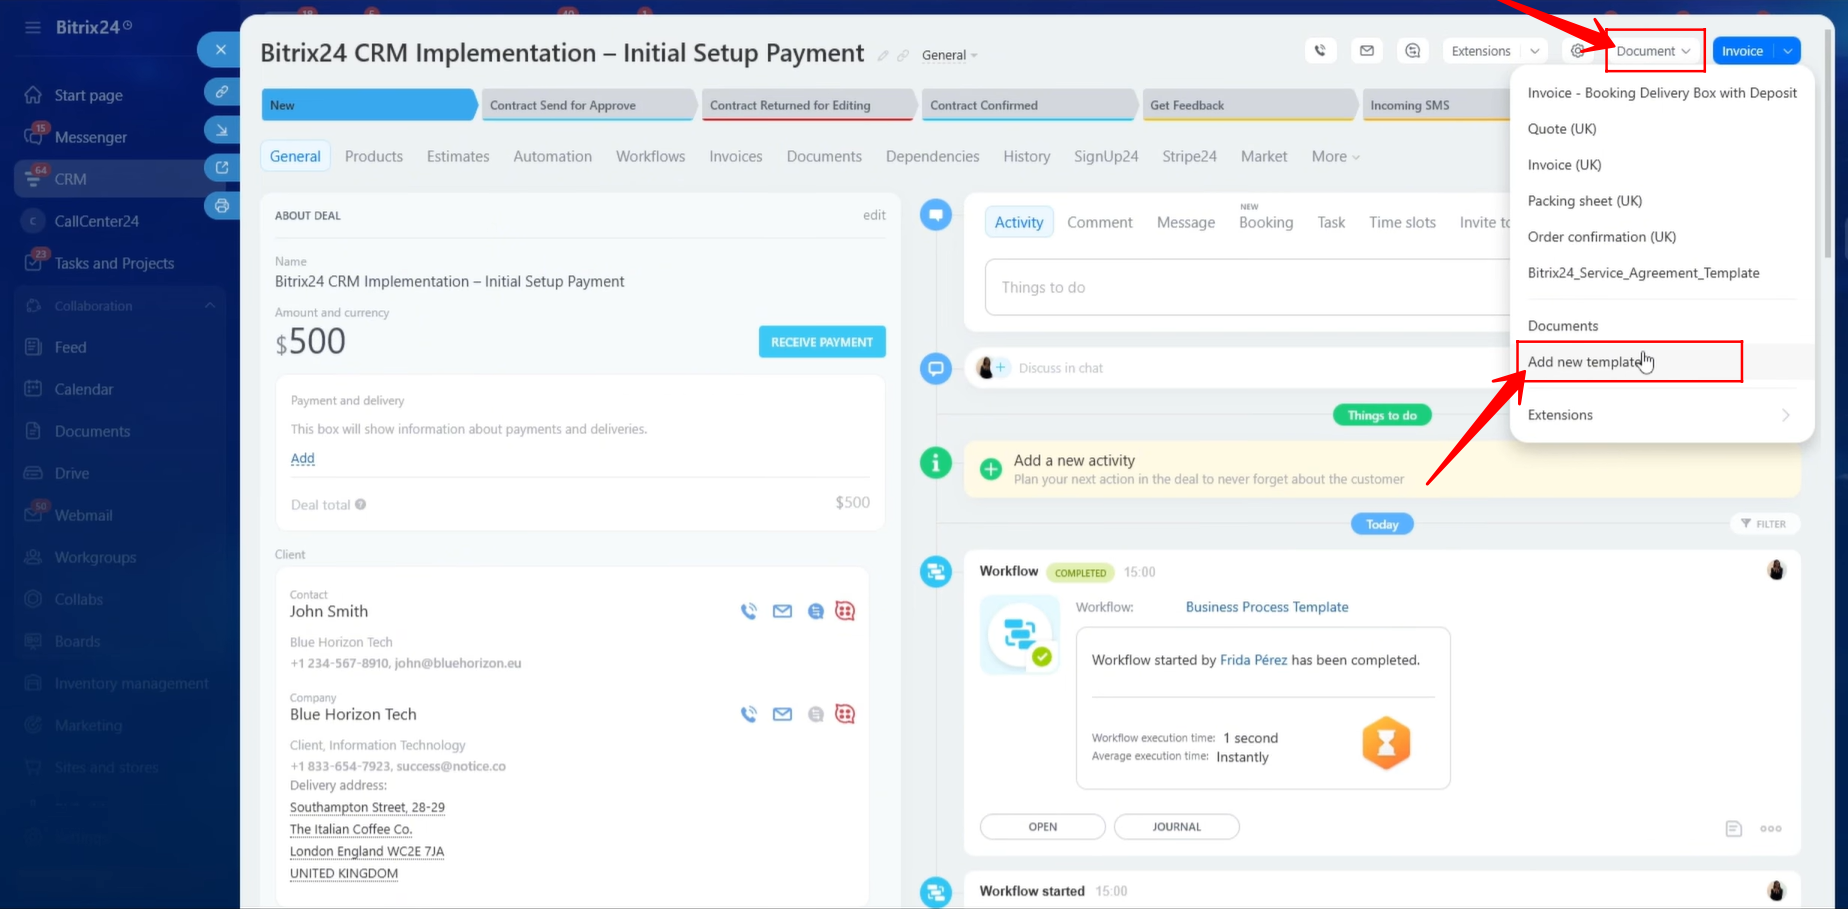
1. First, we will create a document to demonstrate how document generation works. After understanding the process, we will move deeper into creating a template using field symbolic codes. We have already created an Invoice entity linked to a Contact entity. To generate a document within the entity, click “Document” and then select the relevant template. Since we already have a document template containing fields from the Invoice entity, we will generate a document from an invoice. Let’s open the Invoice entity.
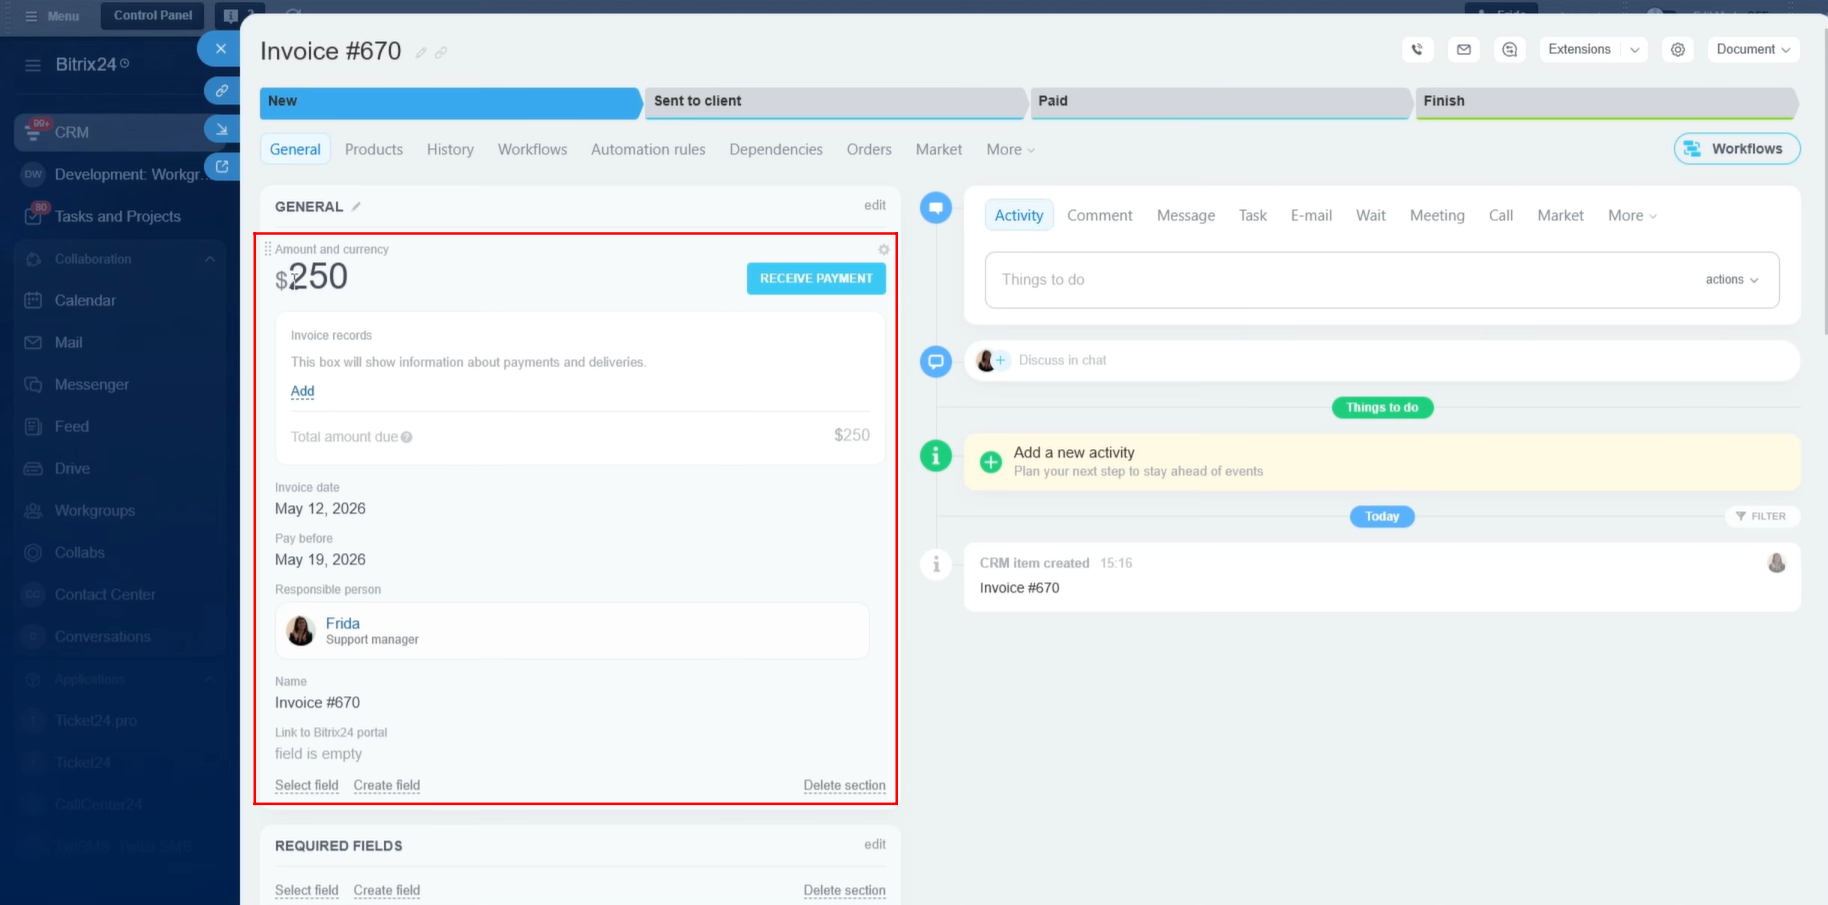
2. Within the Invoice entity, you can see information such as the Amount, Invoice Date, Due Date, and other fields that can be used to populate document templates.
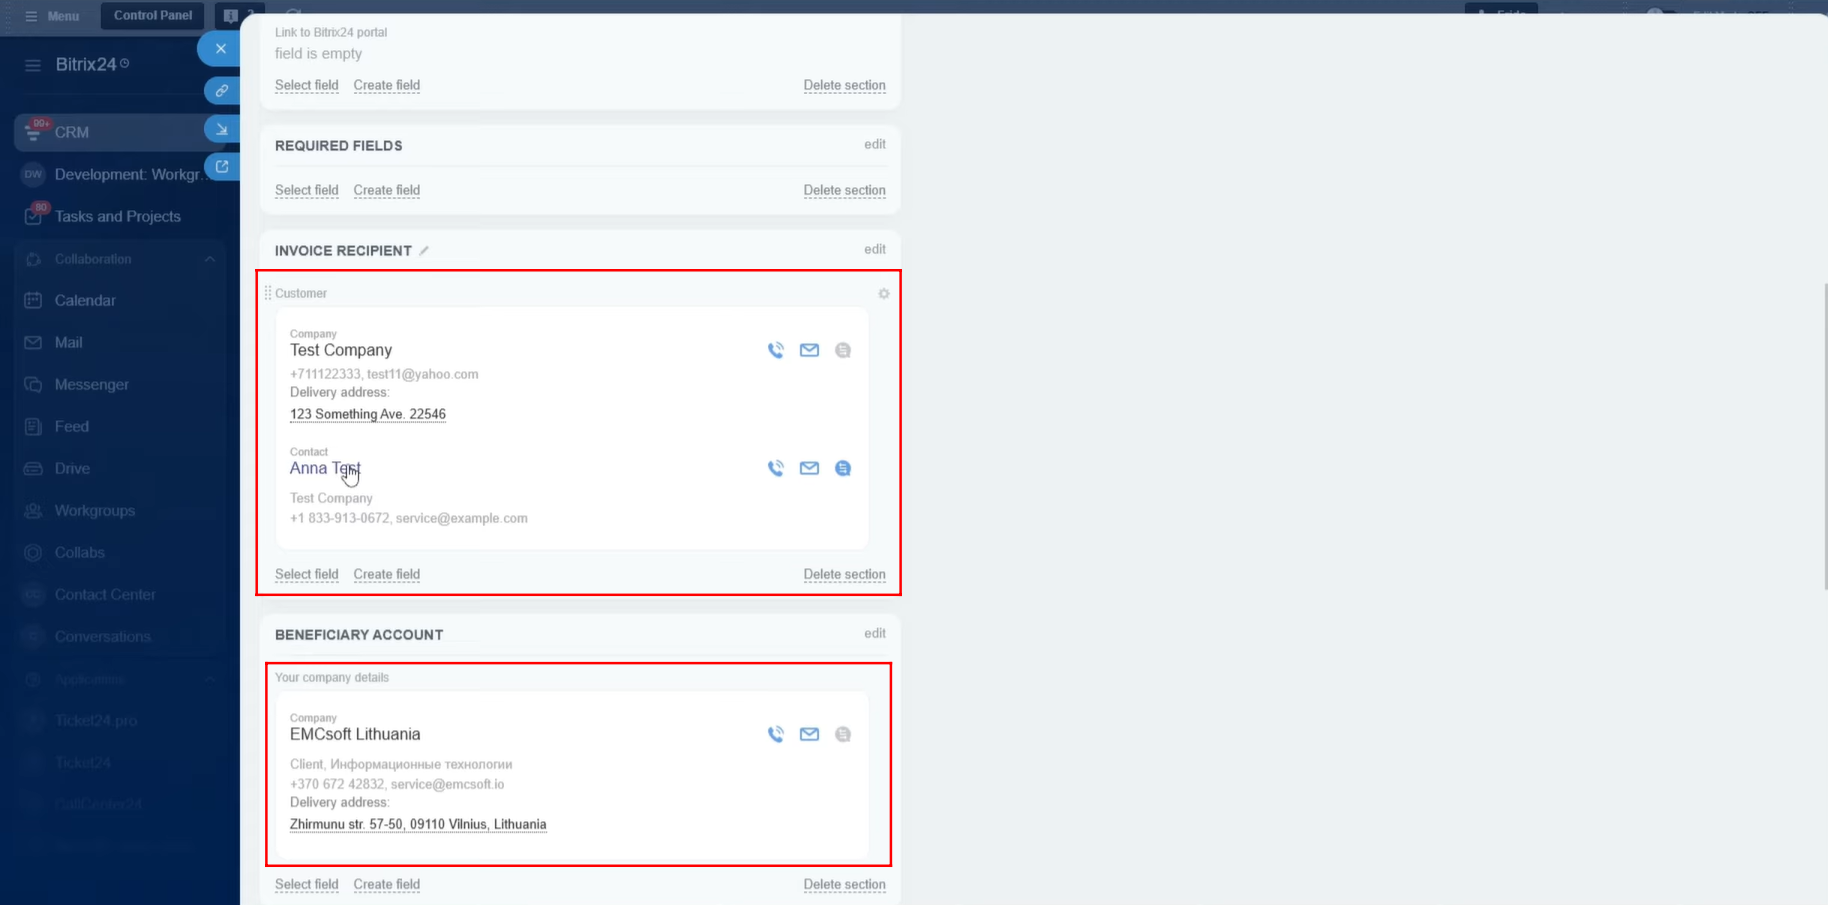
3. The Client Company and Contact entities are linked to the Invoice entity and can be used to retrieve information whenever required. Additionally, our own Company entity is also linked. This is useful when generating invoices that require both the client’s company information and our own company information to be included in the document template.
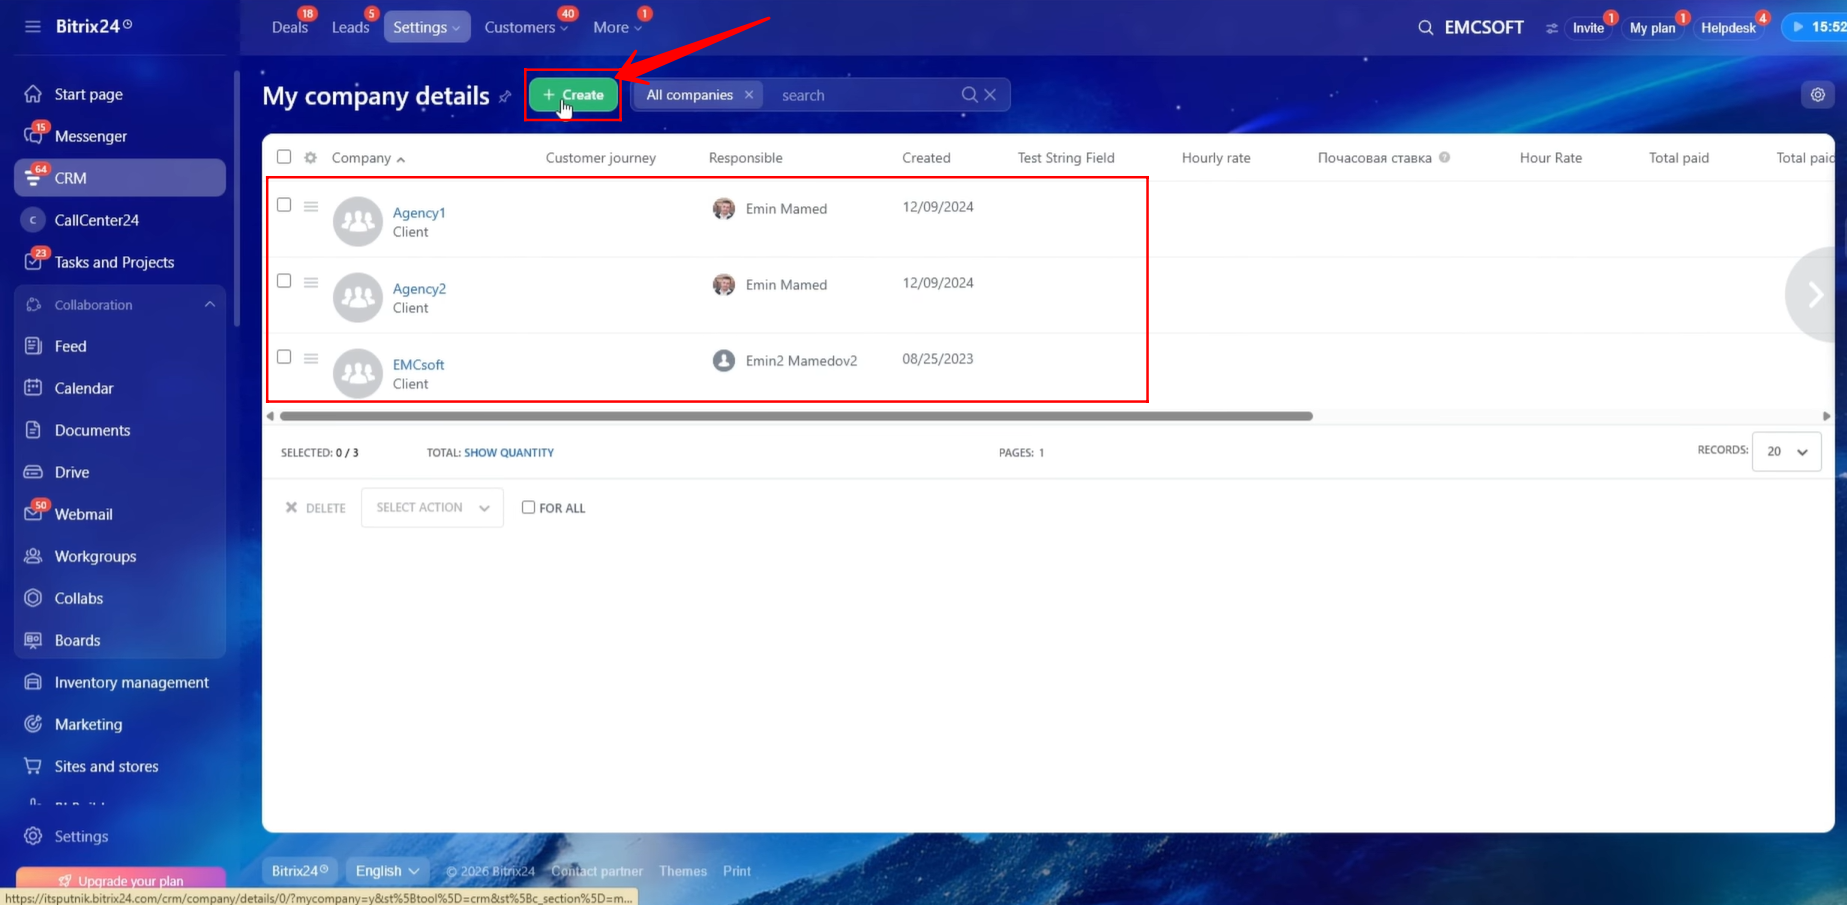
4. Navigate to CRM → Settings → My Company Details.
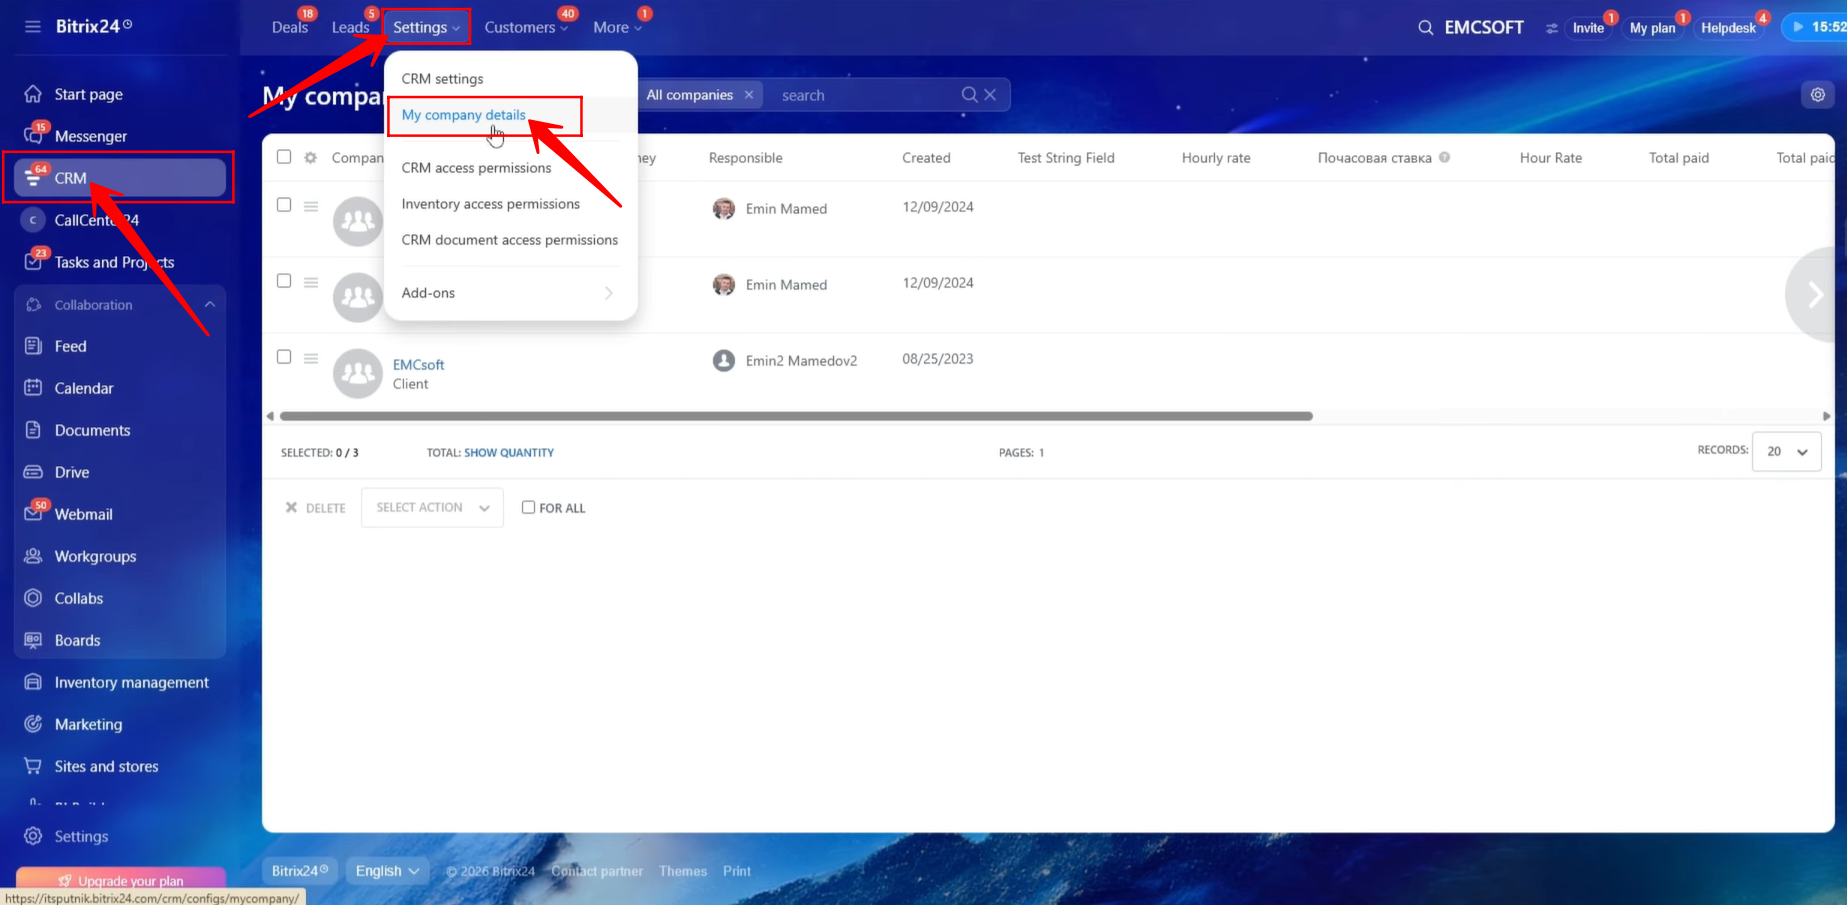
5. Click “+ Create” to add your company’s details and save them in Bitrix24. You can create and store multiple company records if needed. In our example, three company records have already been configured and are visible in the list.
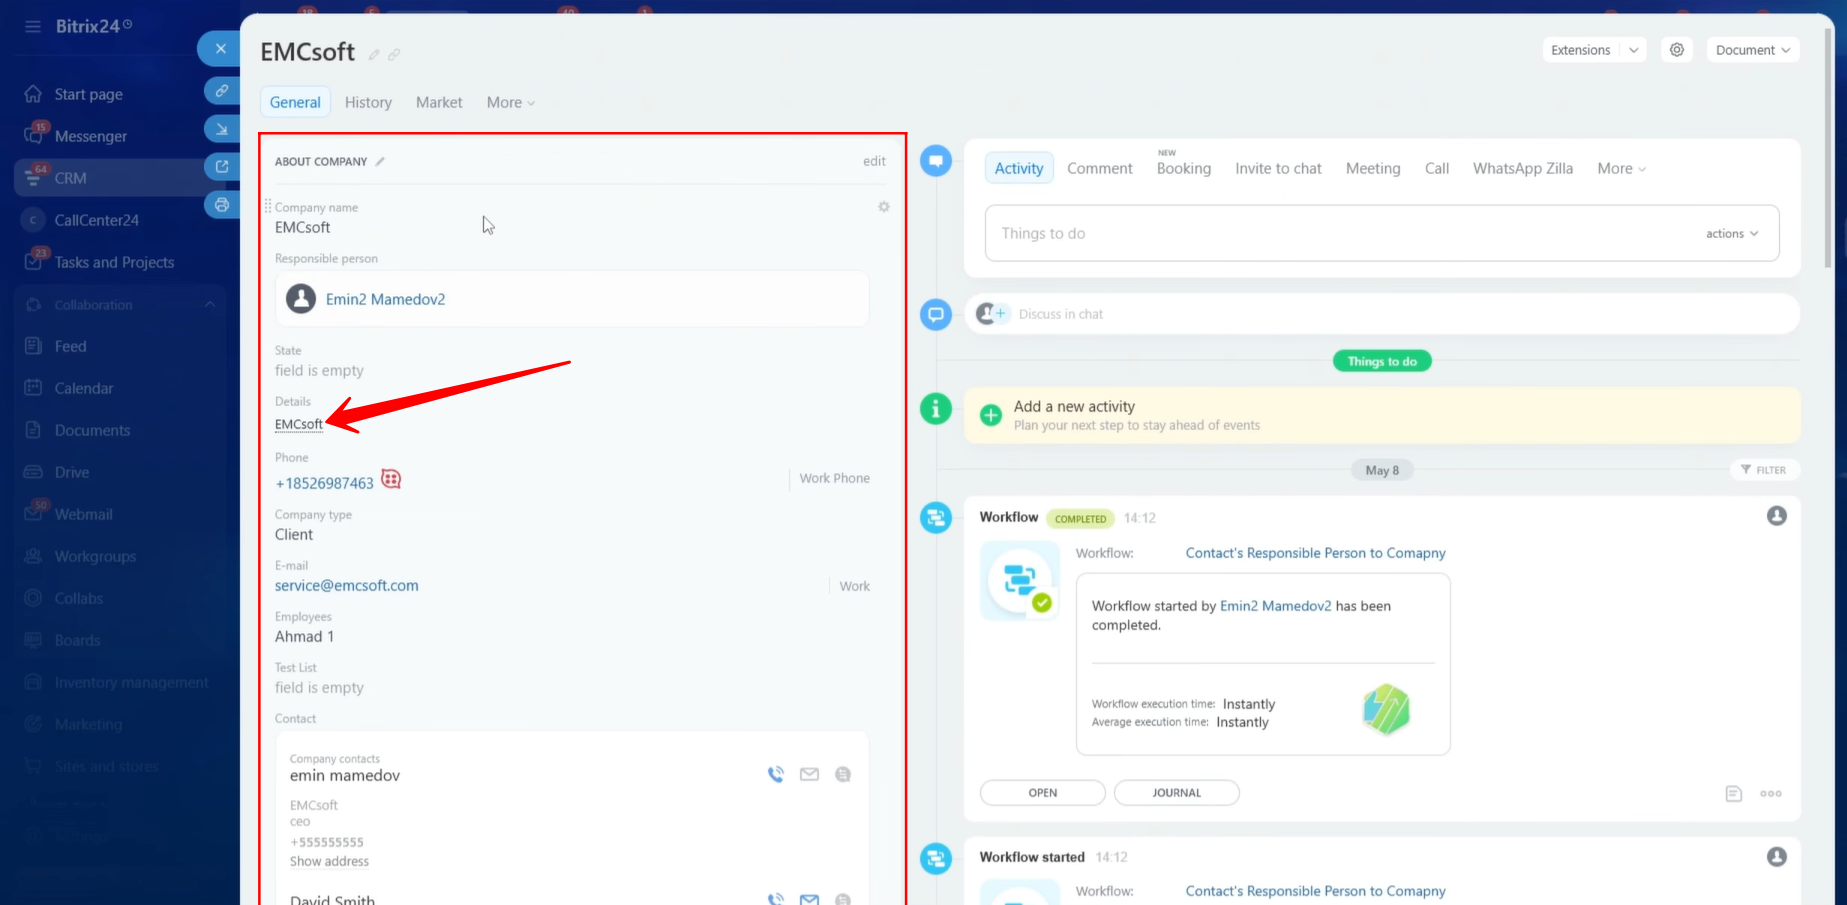
6. We opened one of the company records. Click on the company name to view all available company details.
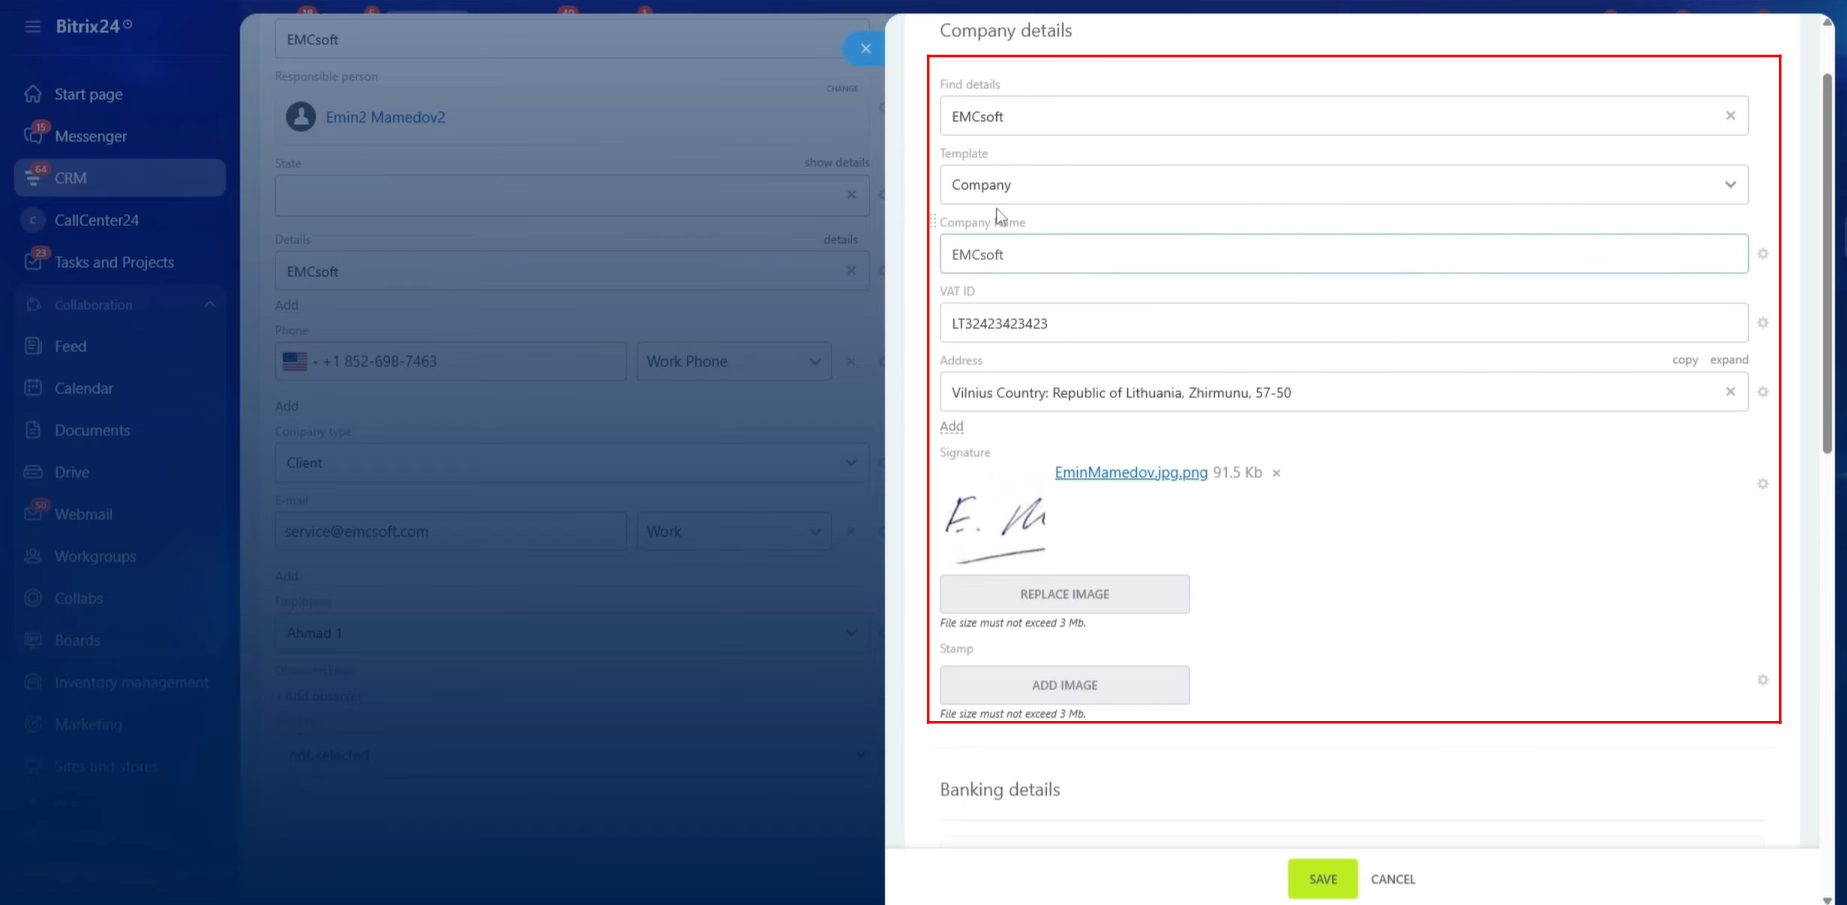
7. Within the company record, you can see fields such as Company Name, VAT ID, Address, and Signature. These fields can be used later within document templates.
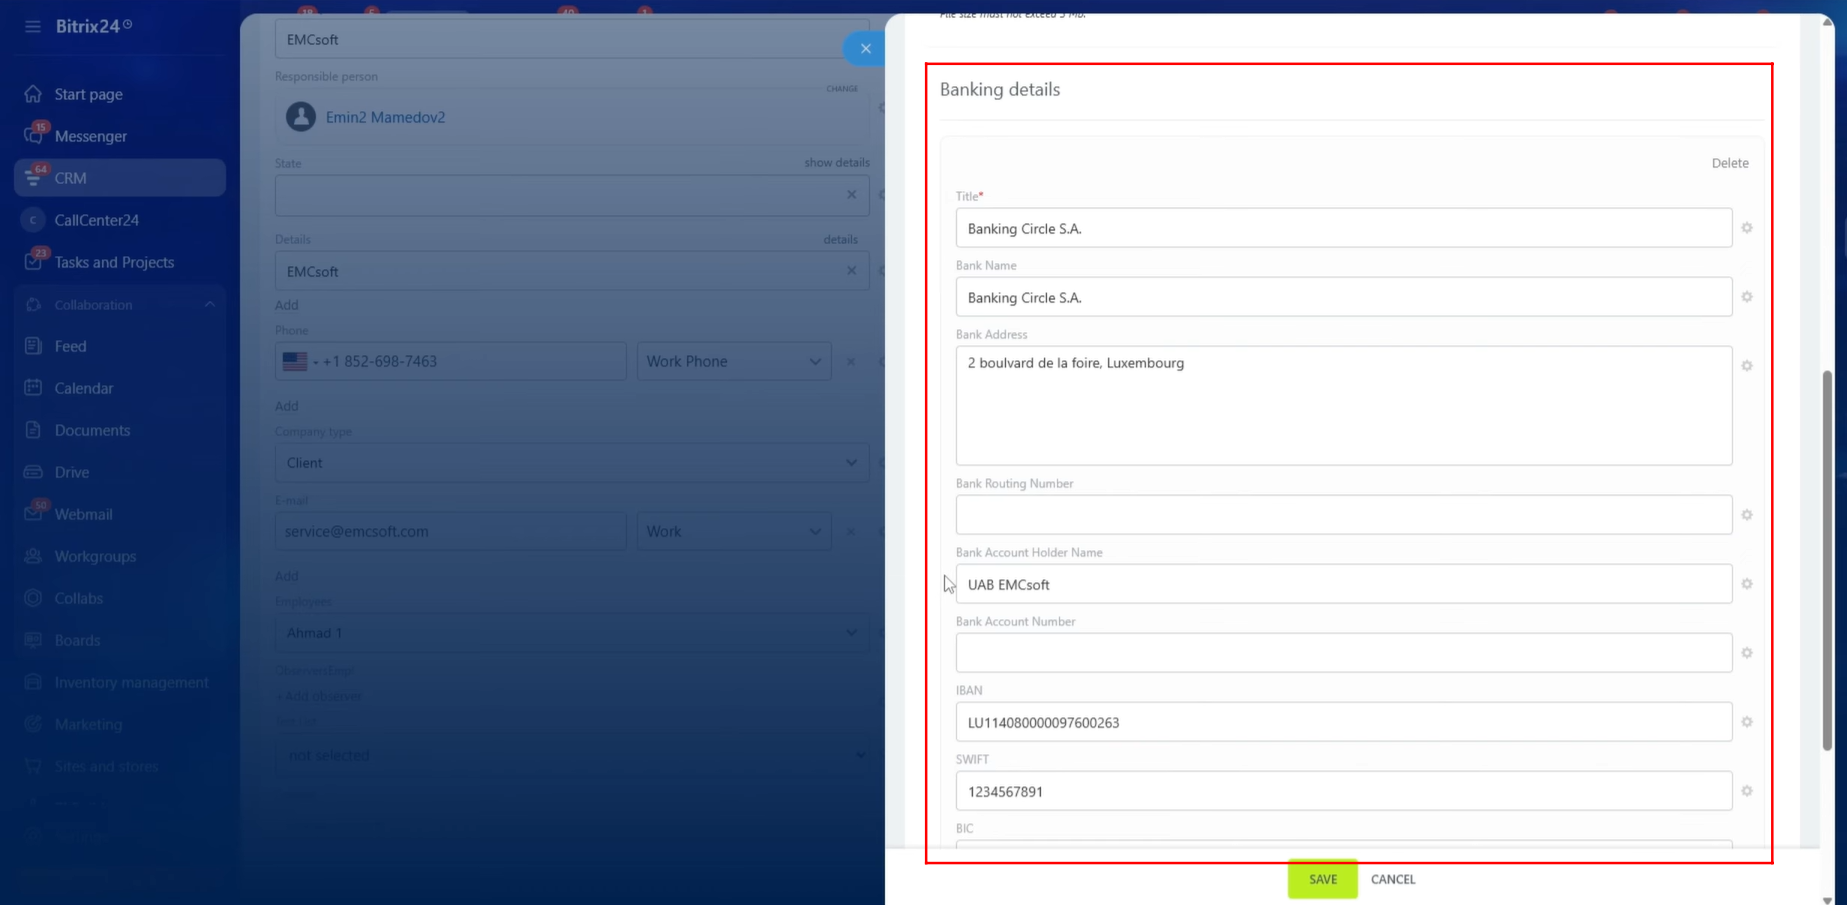
8. Company banking information can also be added and stored. Available fields include Bank Name, Bank Address, Bank Routing Number, Account Holder Name, Account Number, IBAN, SWIFT, and BIC. These details can be utilized throughout Bitrix24, including within document templates.
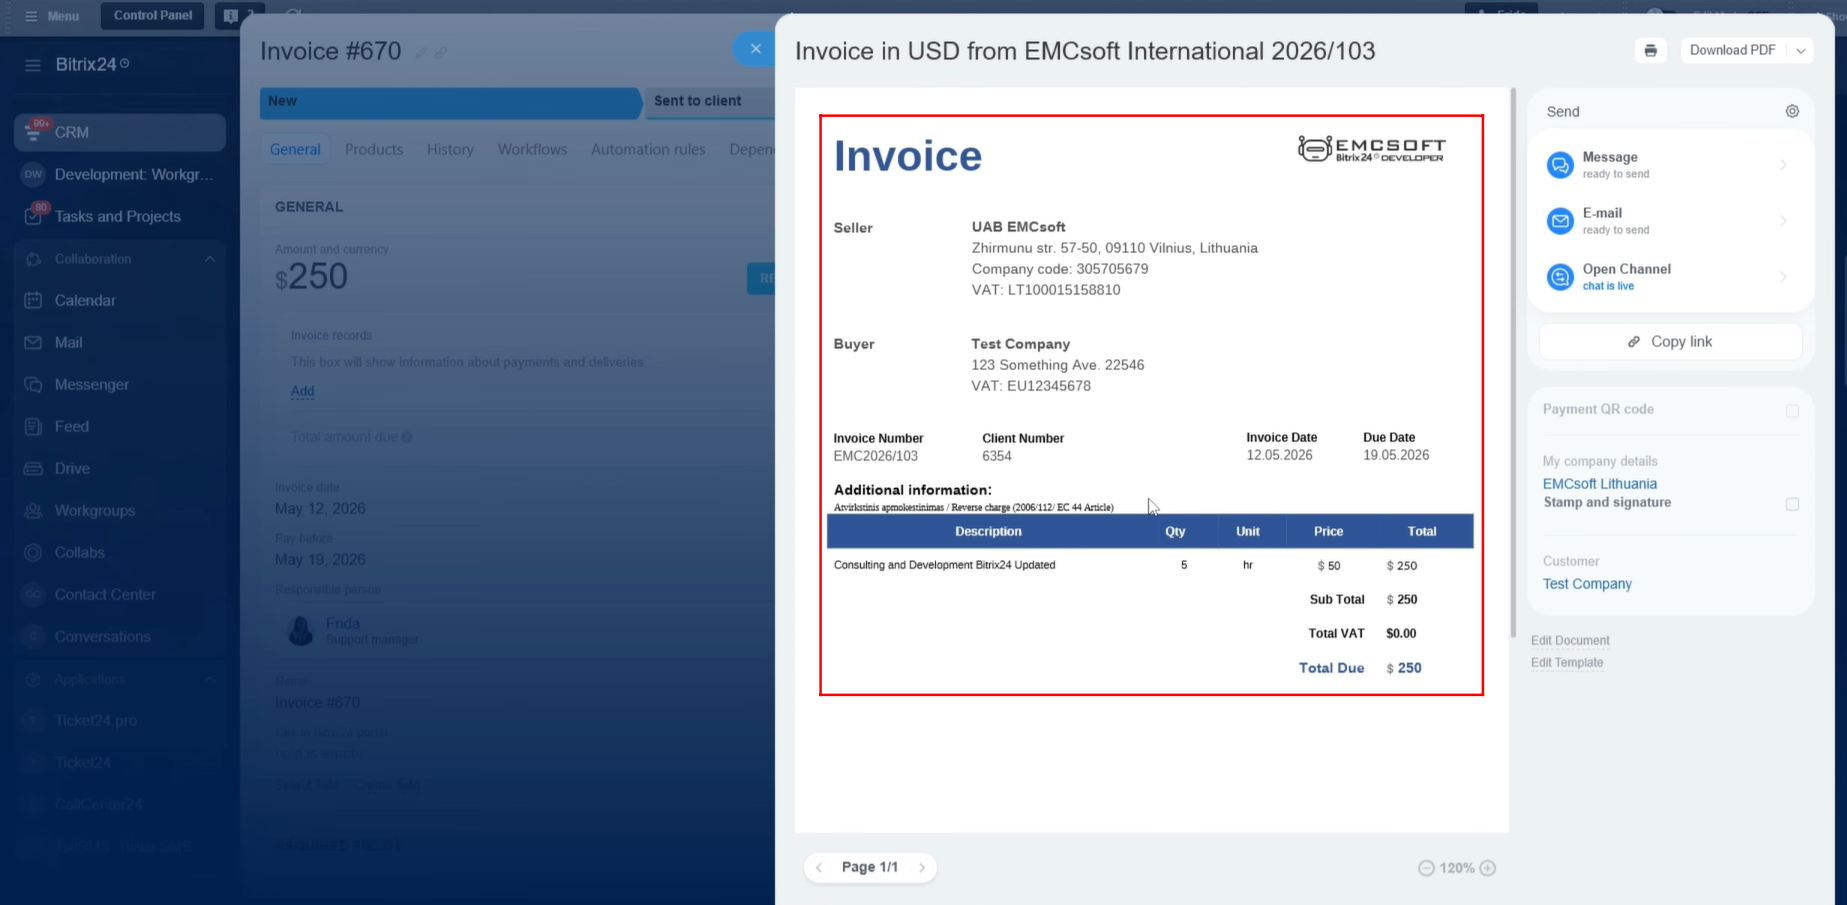
9. We have now clicked “Document” and selected the relevant template to generate a document from within the Invoice entity.
10. The invoice document has been generated successfully, and all Invoice entity fields that were configured within the template have been populated in the document as expected.
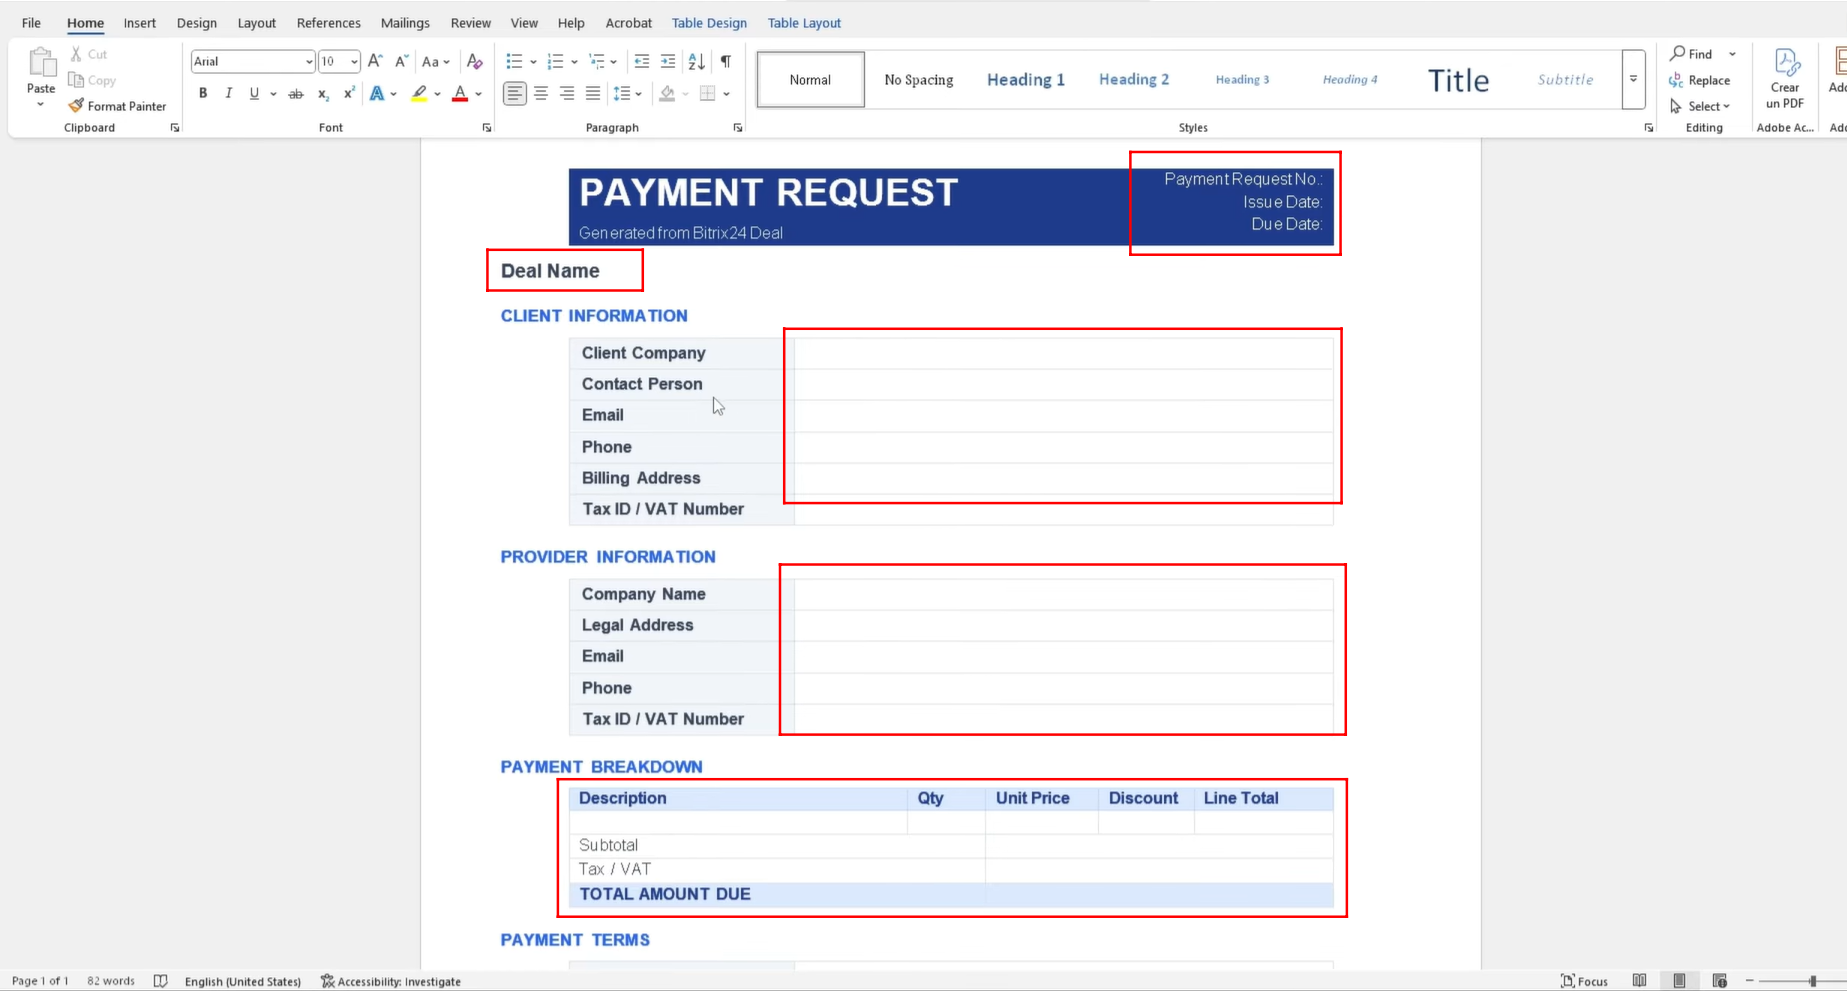
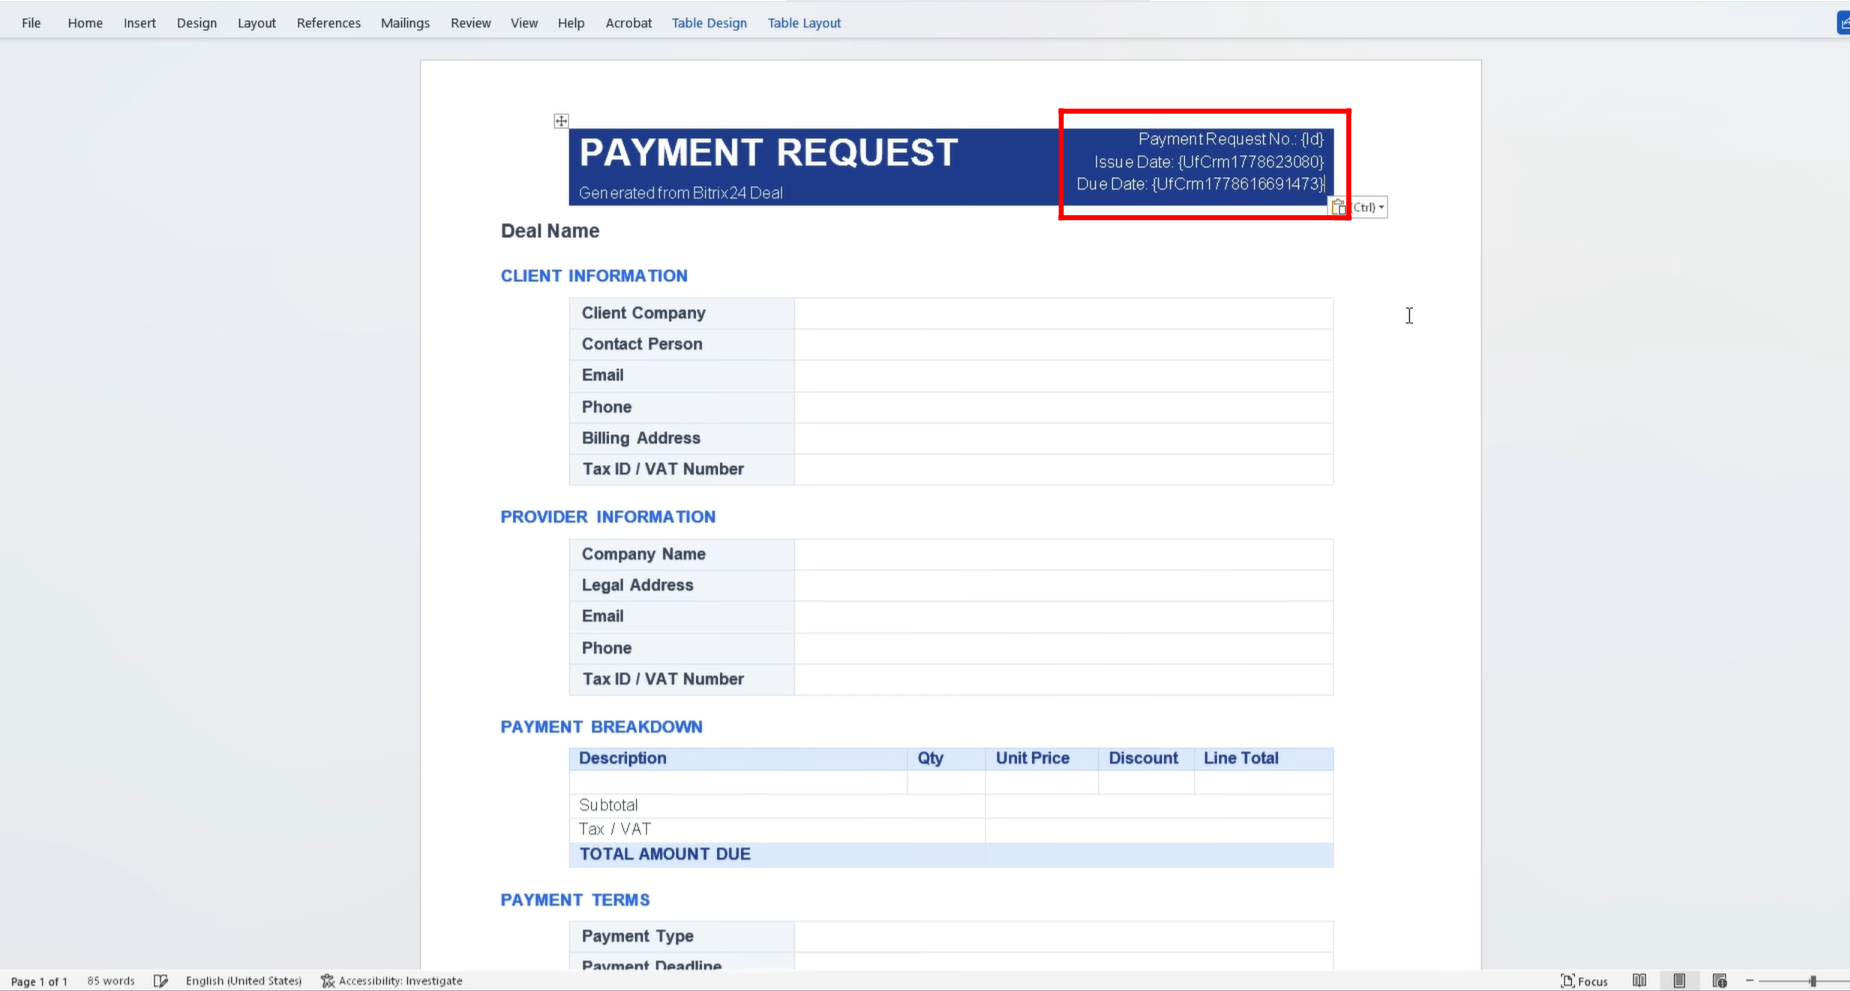
11. We created a template containing all possible information that can be fetched from the CRM. This includes:
- Payment Request Number
- Issue Date
- Due Date
- Deal Name
The template also contains the following sections:
Client Information
- Client Company
- Contact Person Name
- Email Address
- Phone Number
- Billing Address
- Tax ID / VAT
Provider Information
- Company Name
- Legal Address
- Email Address
- Phone Number
- Tax ID / VAT
Payment Information
- Product Description
- Quantity
- Unit Price
- Discount
- Line Total
- Subtotal
- Tax / VAT
- Total Amount Due
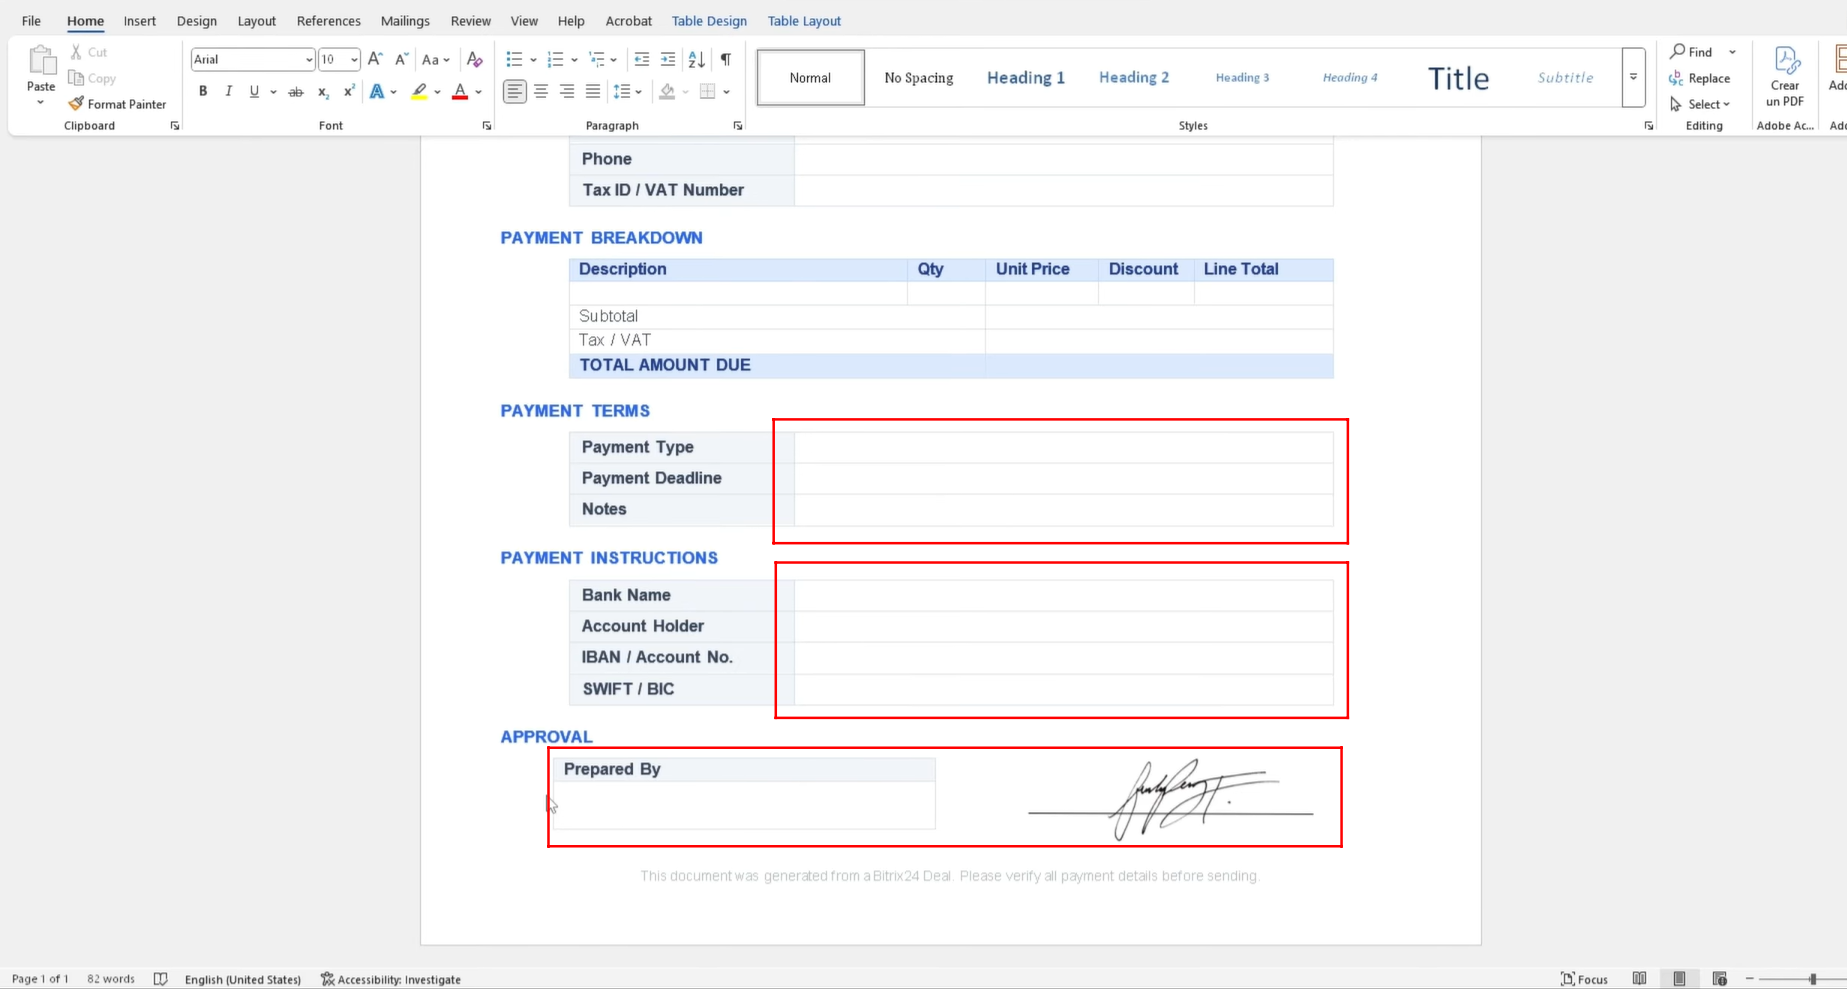
12. Additional information included in the template consists of:
Payment Terms
- Payment Type
- Payment Deadline
- Notes
Payment Instructions
- Bank Name
- Account Holder Name
- IBAN / Account Number
- SWIFT / BIC
Prepared By
- Name of the company representative who prepared the document
- Representative’s Email Address
13. To find and insert placeholder symbolic codes into the template, navigate to Document within a CRM entity. For testing purposes, we are working within the Deal entity. Click “Add New Template” to begin creating a template.
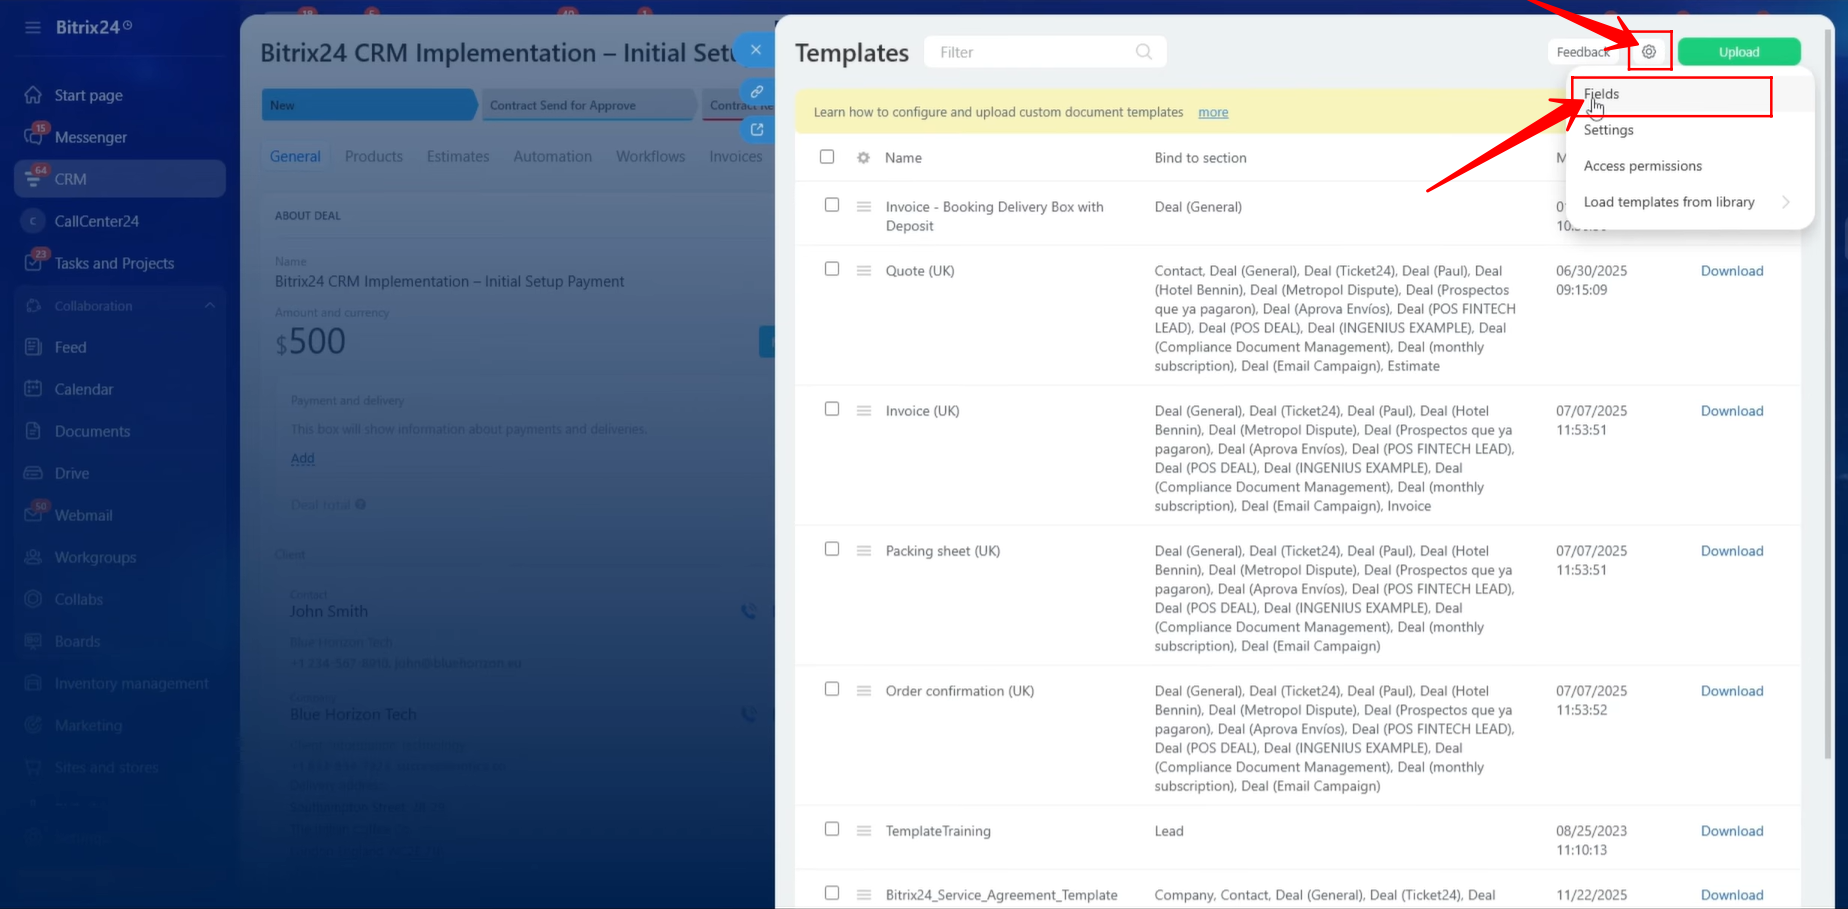
14. Click the Settings icon and navigate to the Fields section.
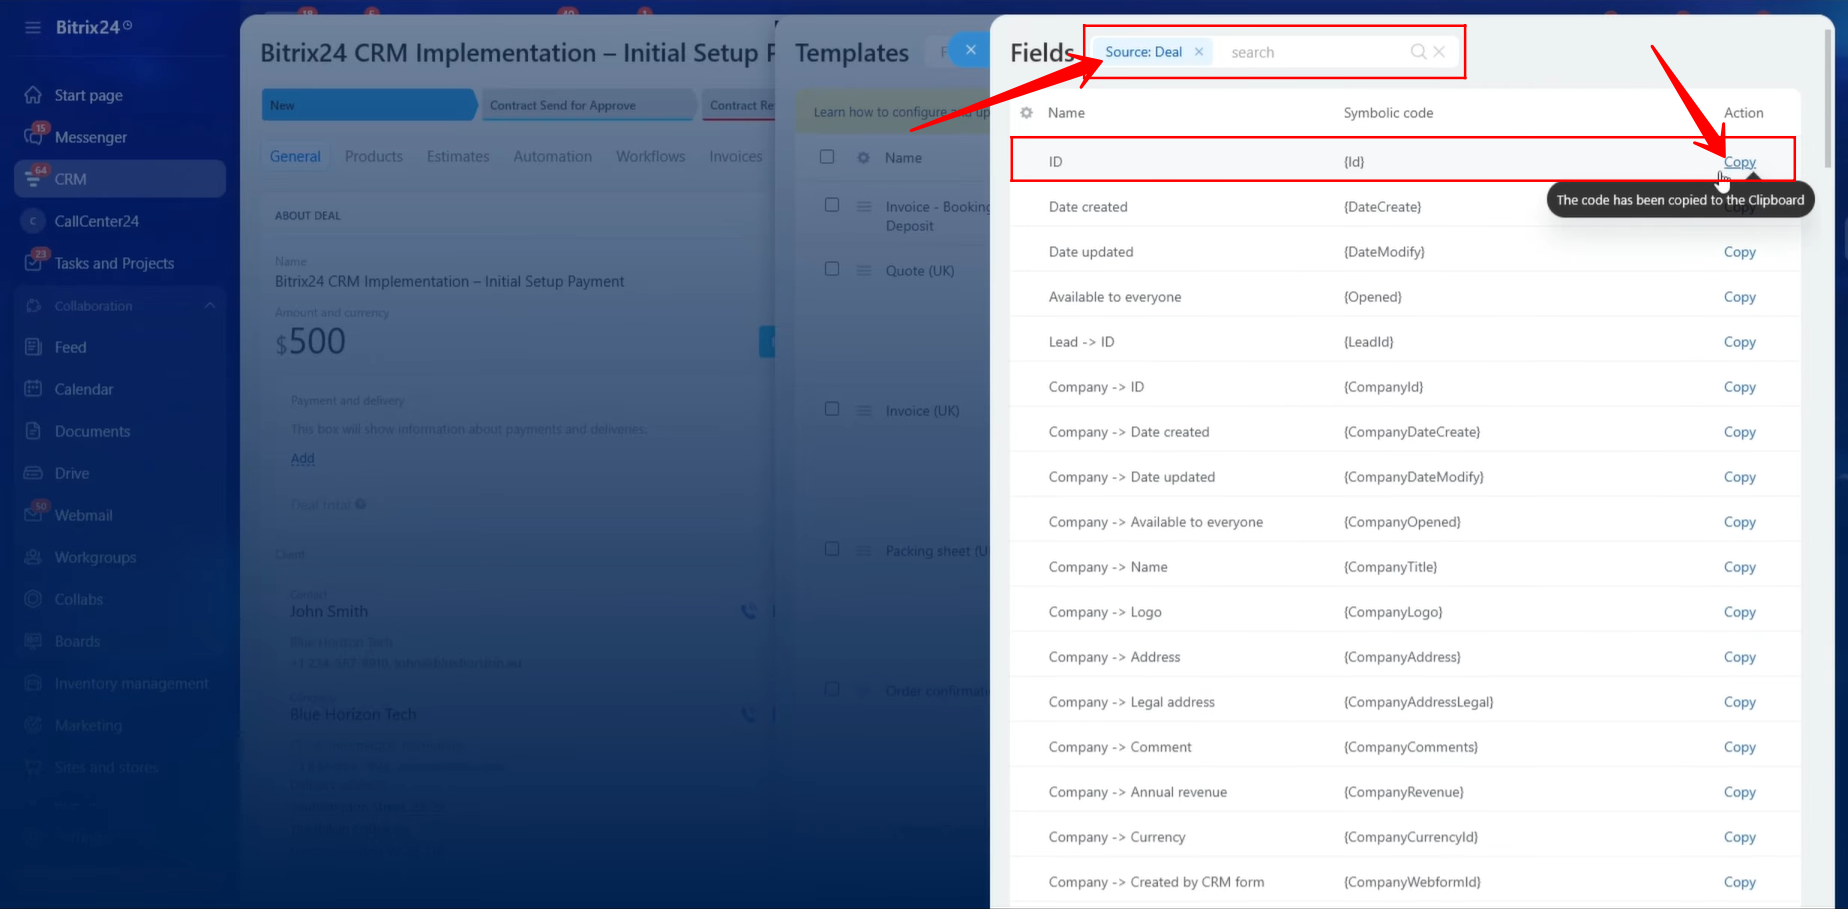
15. Notice that the Deal entity is selected as the default source. Therefore, only fields belonging to the Deal entity and entities linked to the Deal will be displayed.
For the Payment Request Number field in the template, we will use the Deal ID from the CRM as the reference value. We copied the symbolic code for the Deal ID and pasted it into the document template.
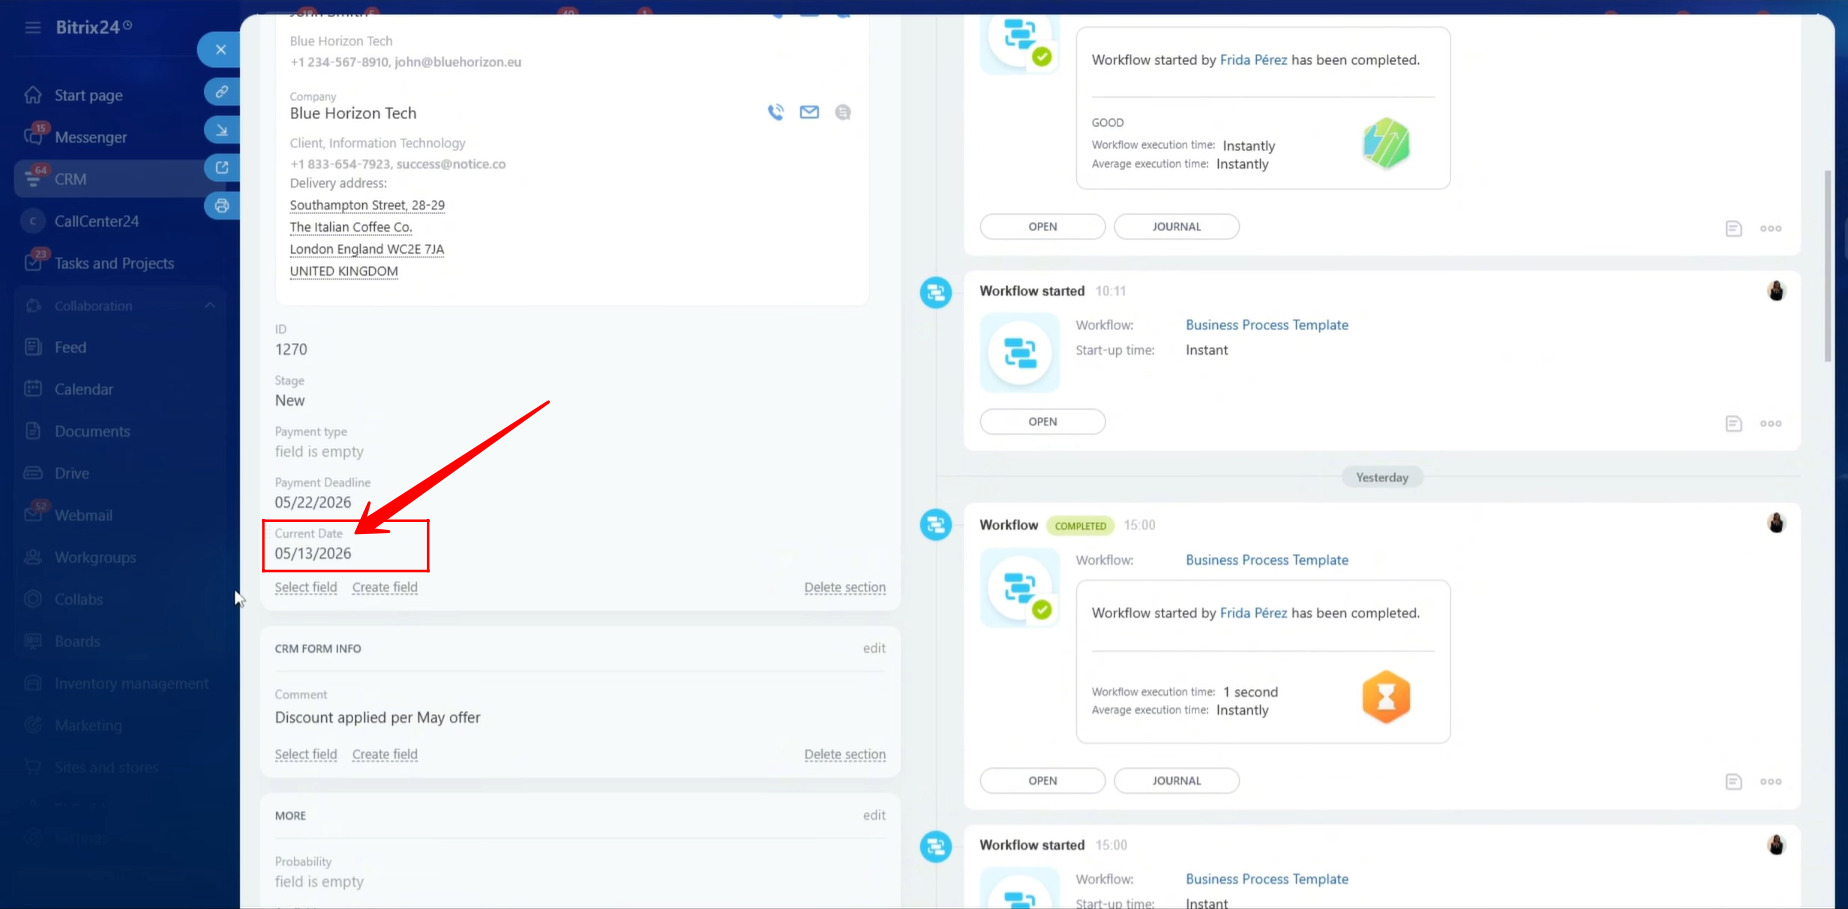
16. For the Issue Date field in the document, we already have a custom field within the Deal entity that represents the current date. We searched for the custom field named “Current Date”, copied its corresponding symbolic code, and pasted it into the document template.
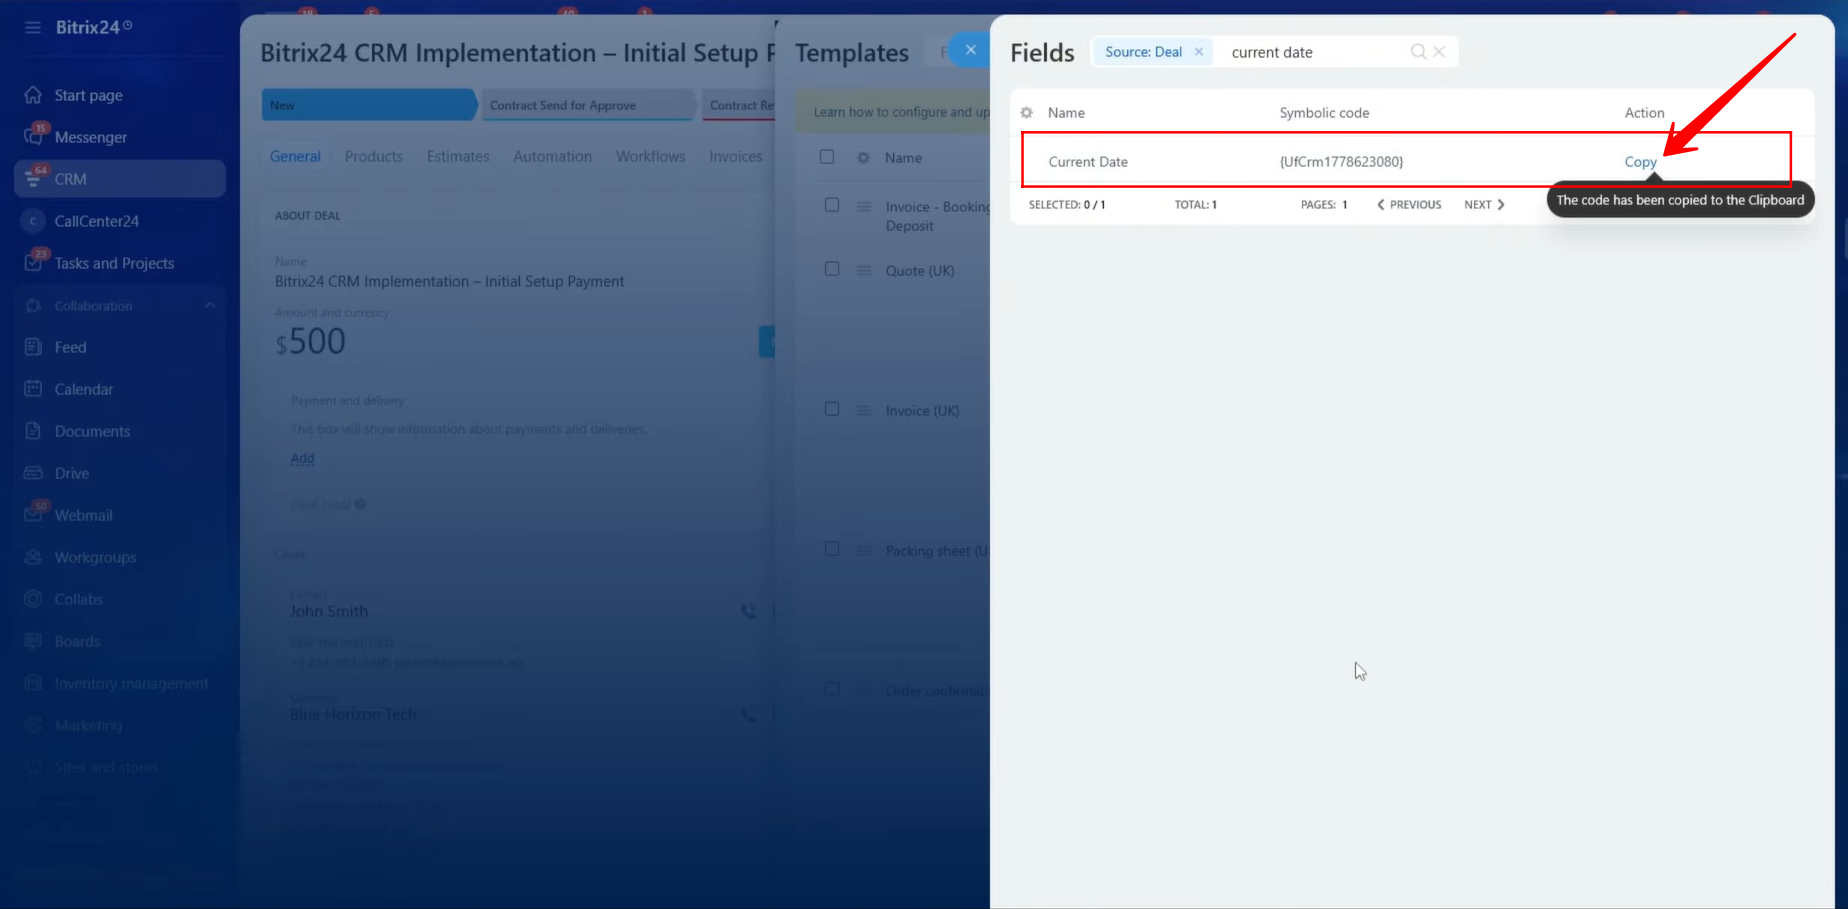
17. As shown, a custom field has already been created within the Deal entity to represent the current date. This field will automatically provide the current date value whenever it is used in a document template.
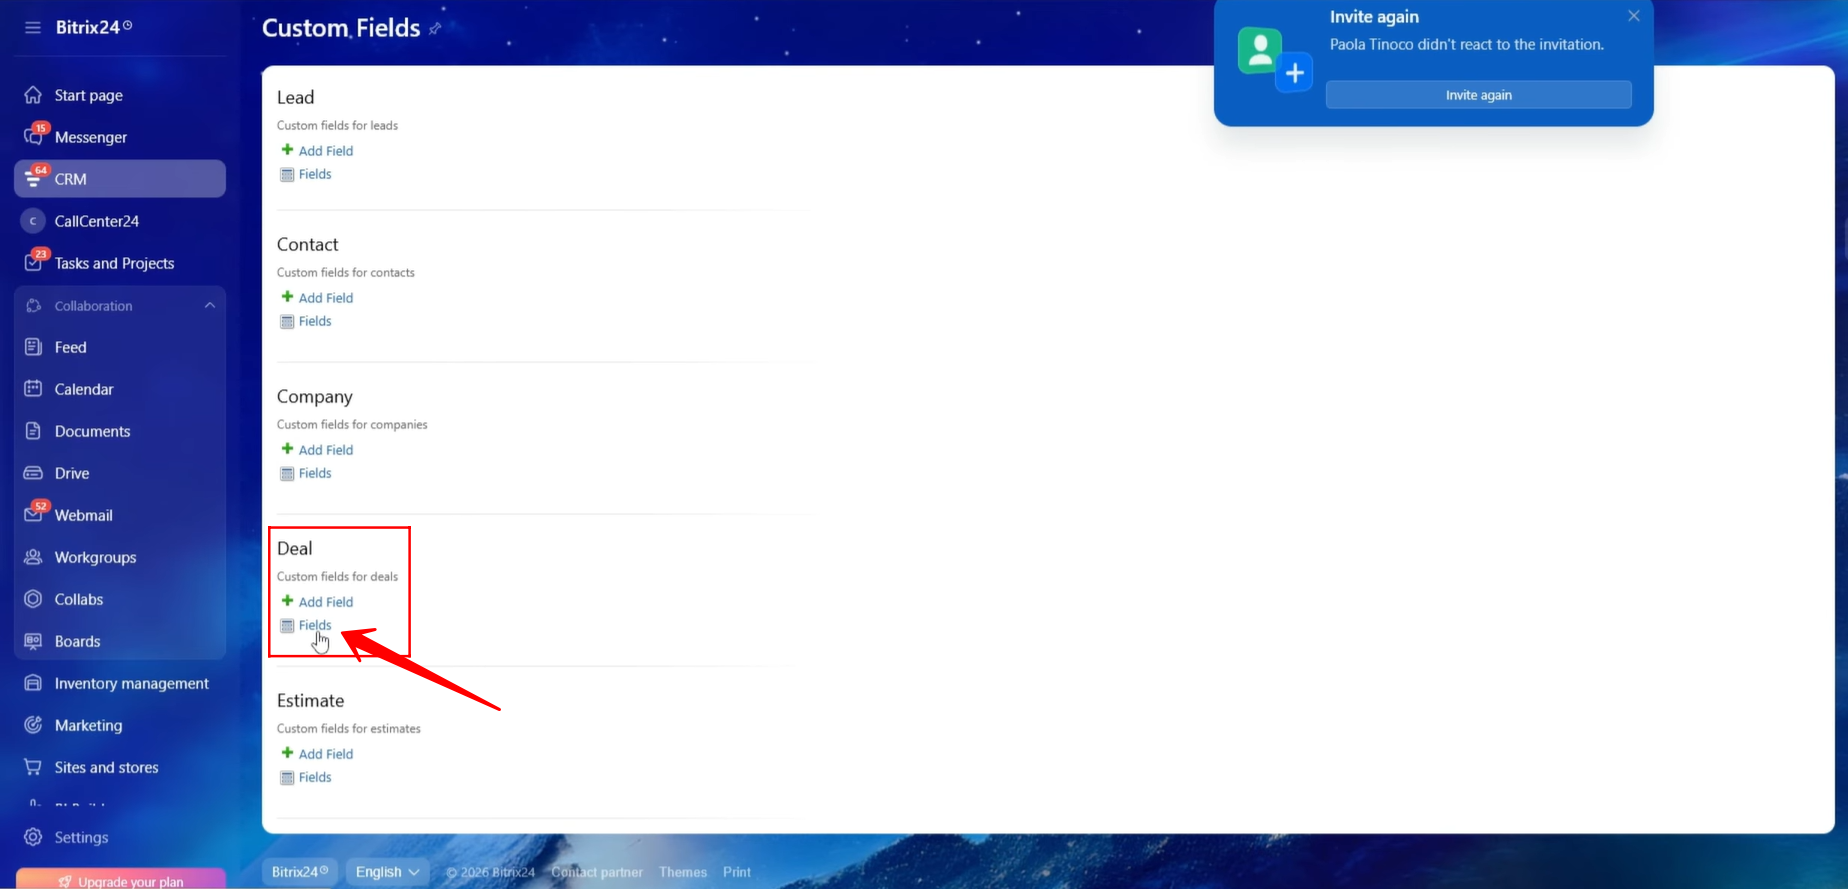
18. Let’s quickly review how the Current Date custom field was configured. Navigate to:
CRM → Settings → CRM Settings → Form and Report Settings → Custom Fields
Next, under the Deal entity and click “Fields” to view all custom fields associated with Deals. If you need to create a new custom field, click “+ Add Field.”
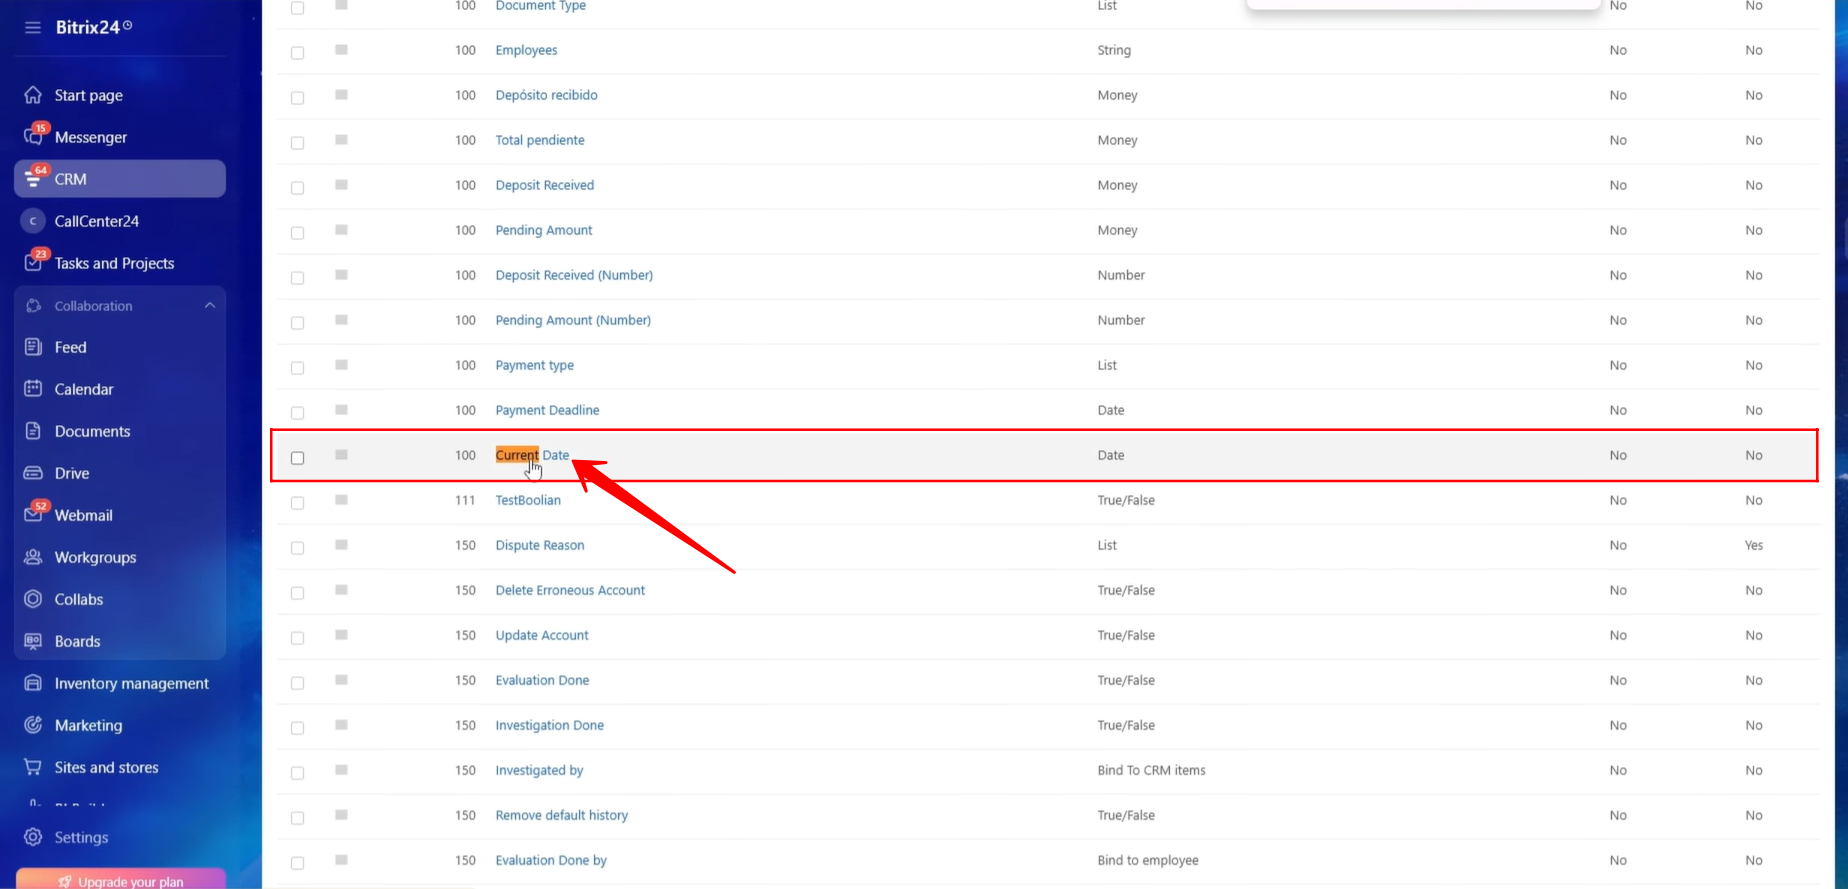
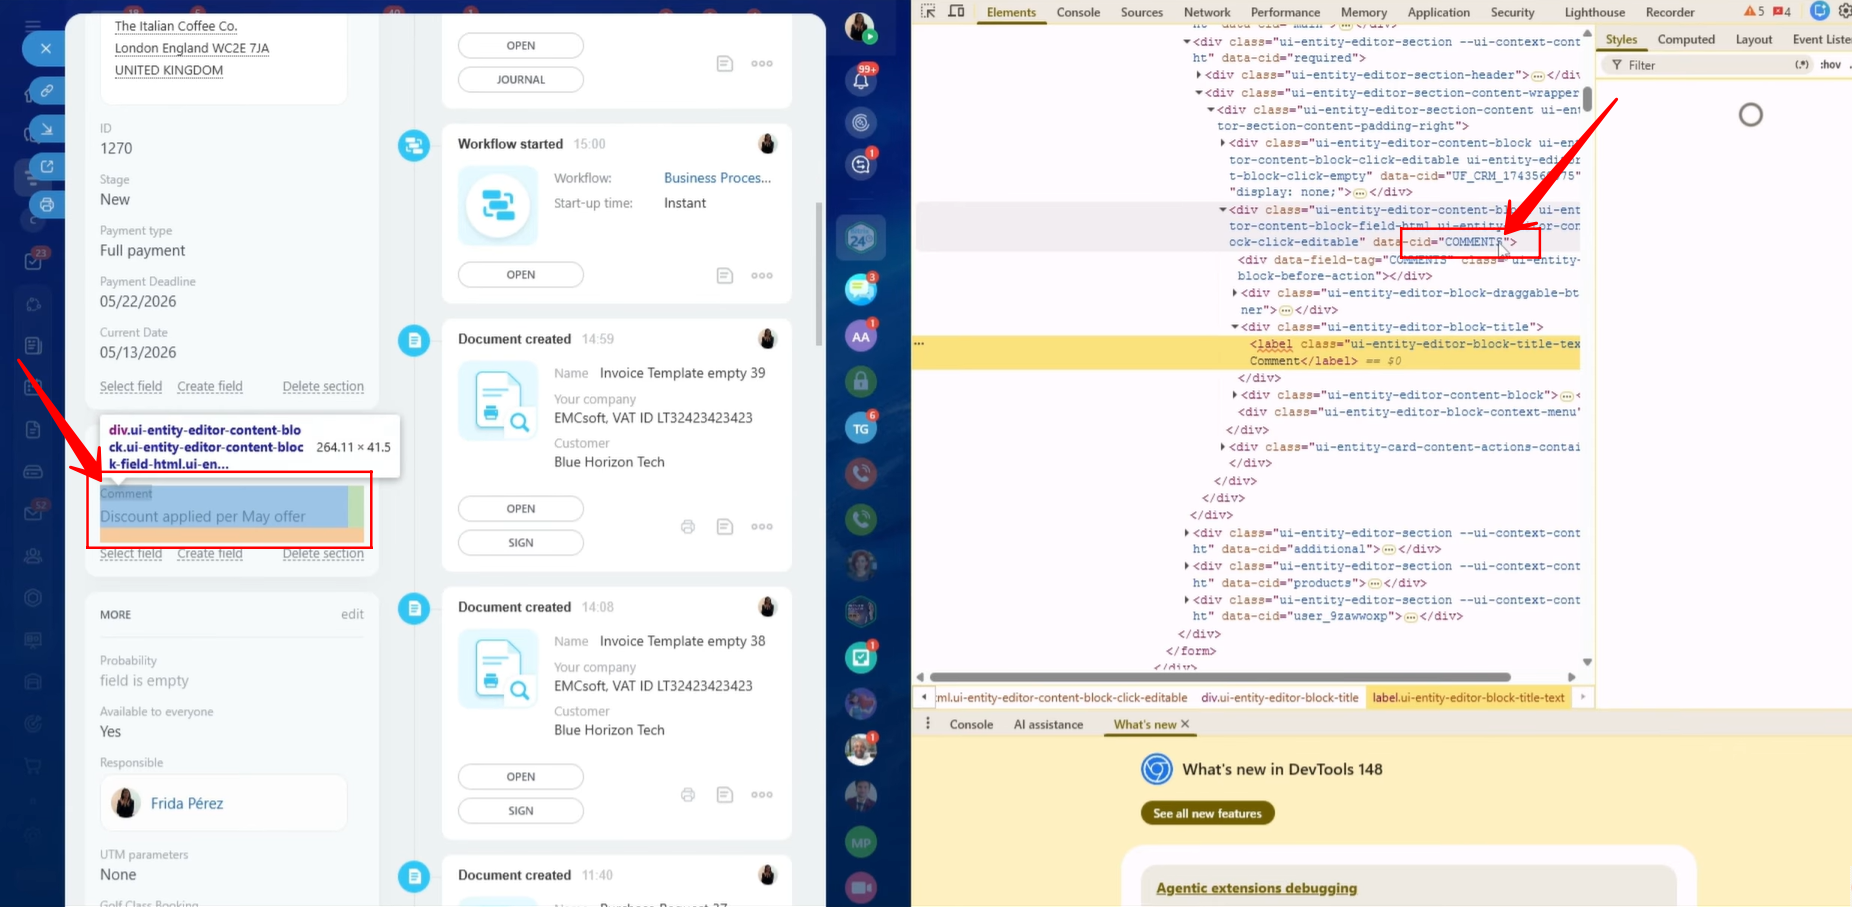
19. We opened the Current Date custom field to review its configuration settings and confirm that it was configured correctly.
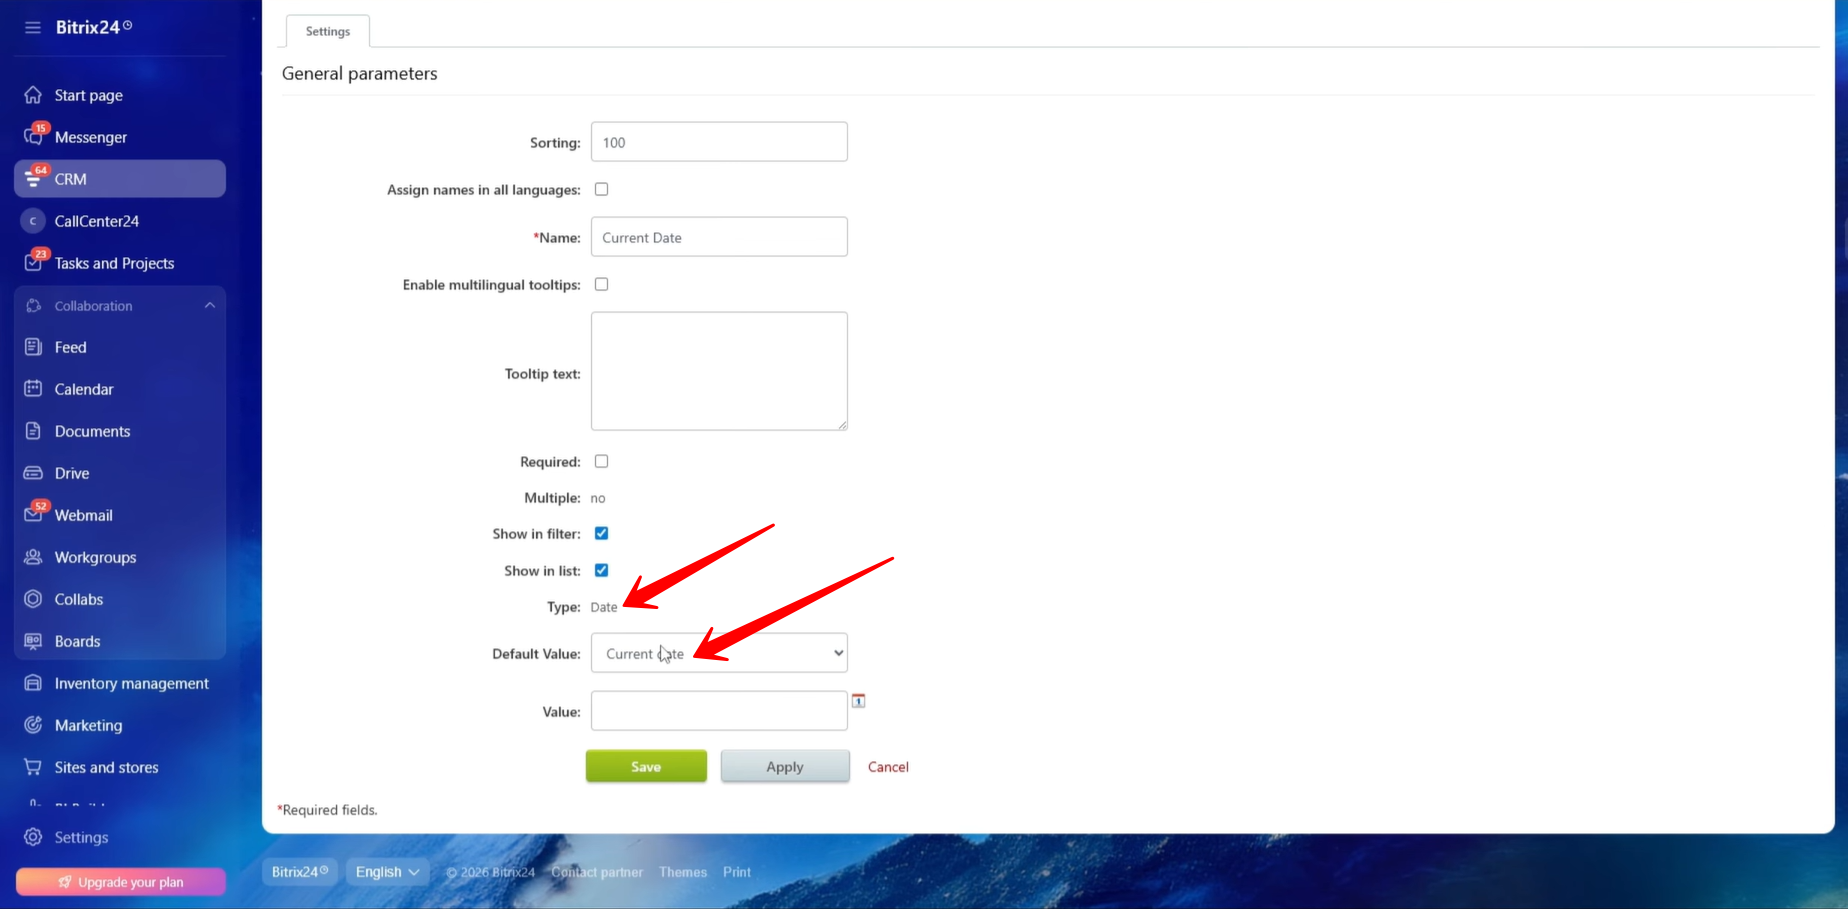
20. The custom field is configured with the field type set to Date, and its default value is configured as Current Date. This ensures that the field automatically populates with the current date whenever a new record is created.
21. Moving forward, the next field required in the document template is Payment Deadline, which will be used as the Due Date in the generated document. We copied the symbolic code for the Payment Deadline field and pasted it into the template.
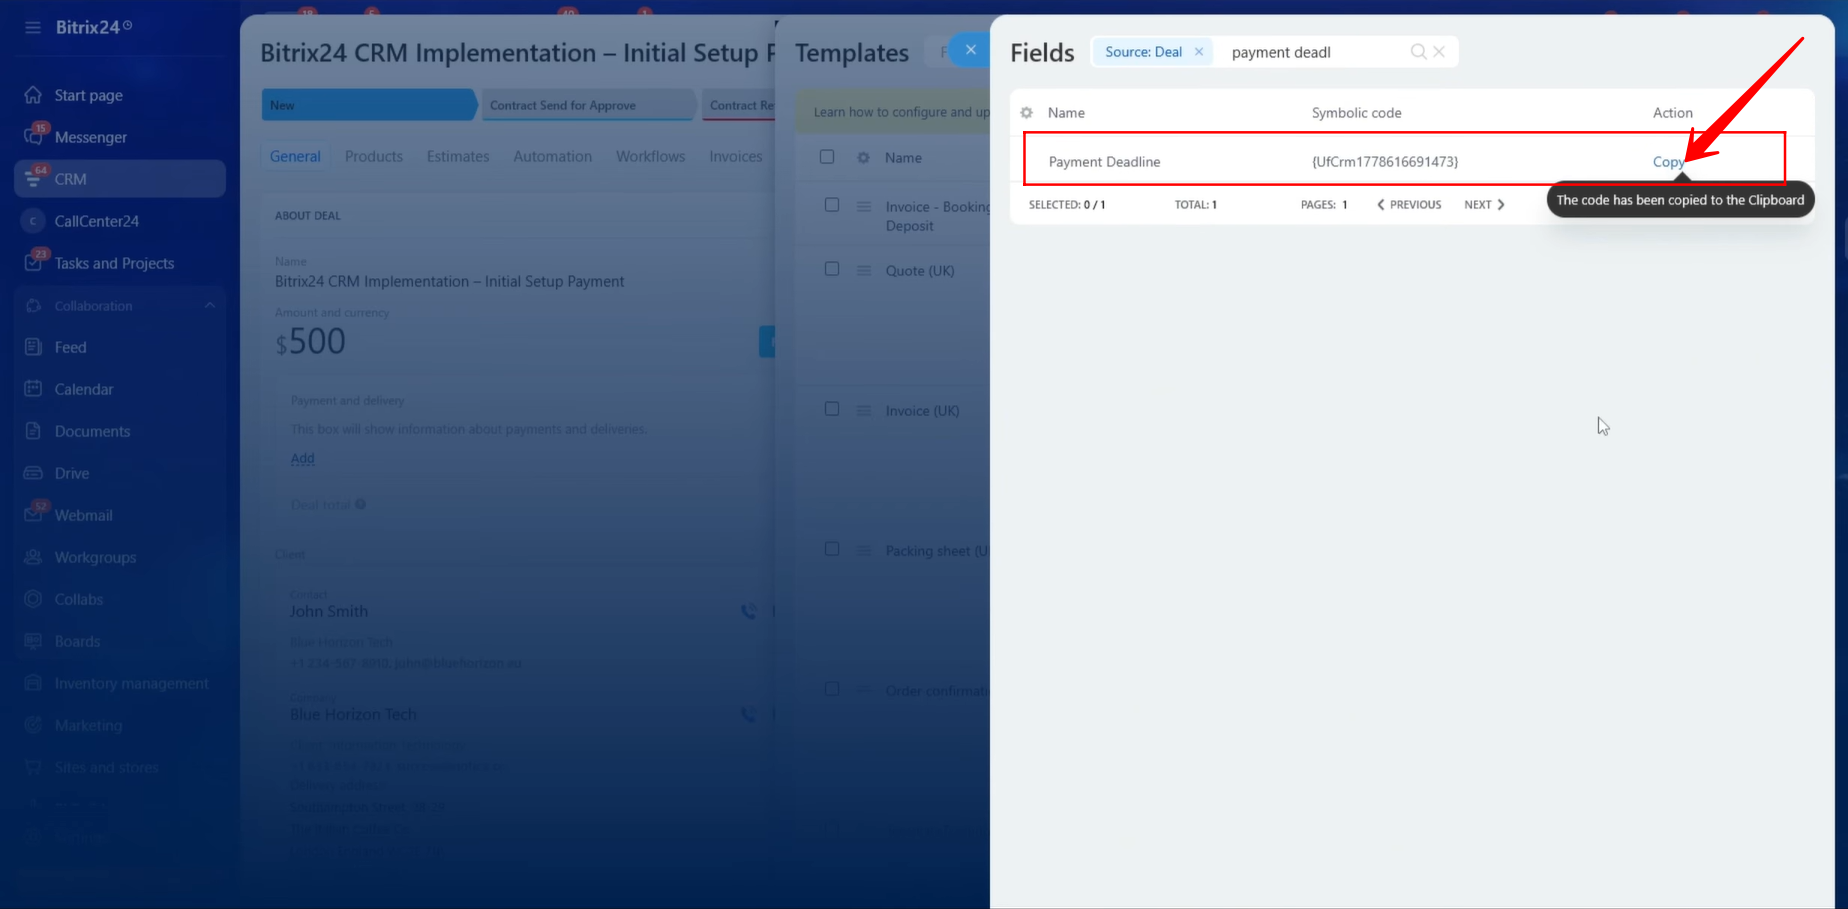
22. At this stage, the symbolic codes for the fields we have selected and copied have already been inserted into the document template. These placeholders will later be replaced with actual CRM data when the document is generated.
23. Next, we need to include the Deal Name in the document template. To accomplish this, we copied the symbolic code associated with the Deal Name field and inserted it into the appropriate location within the template.

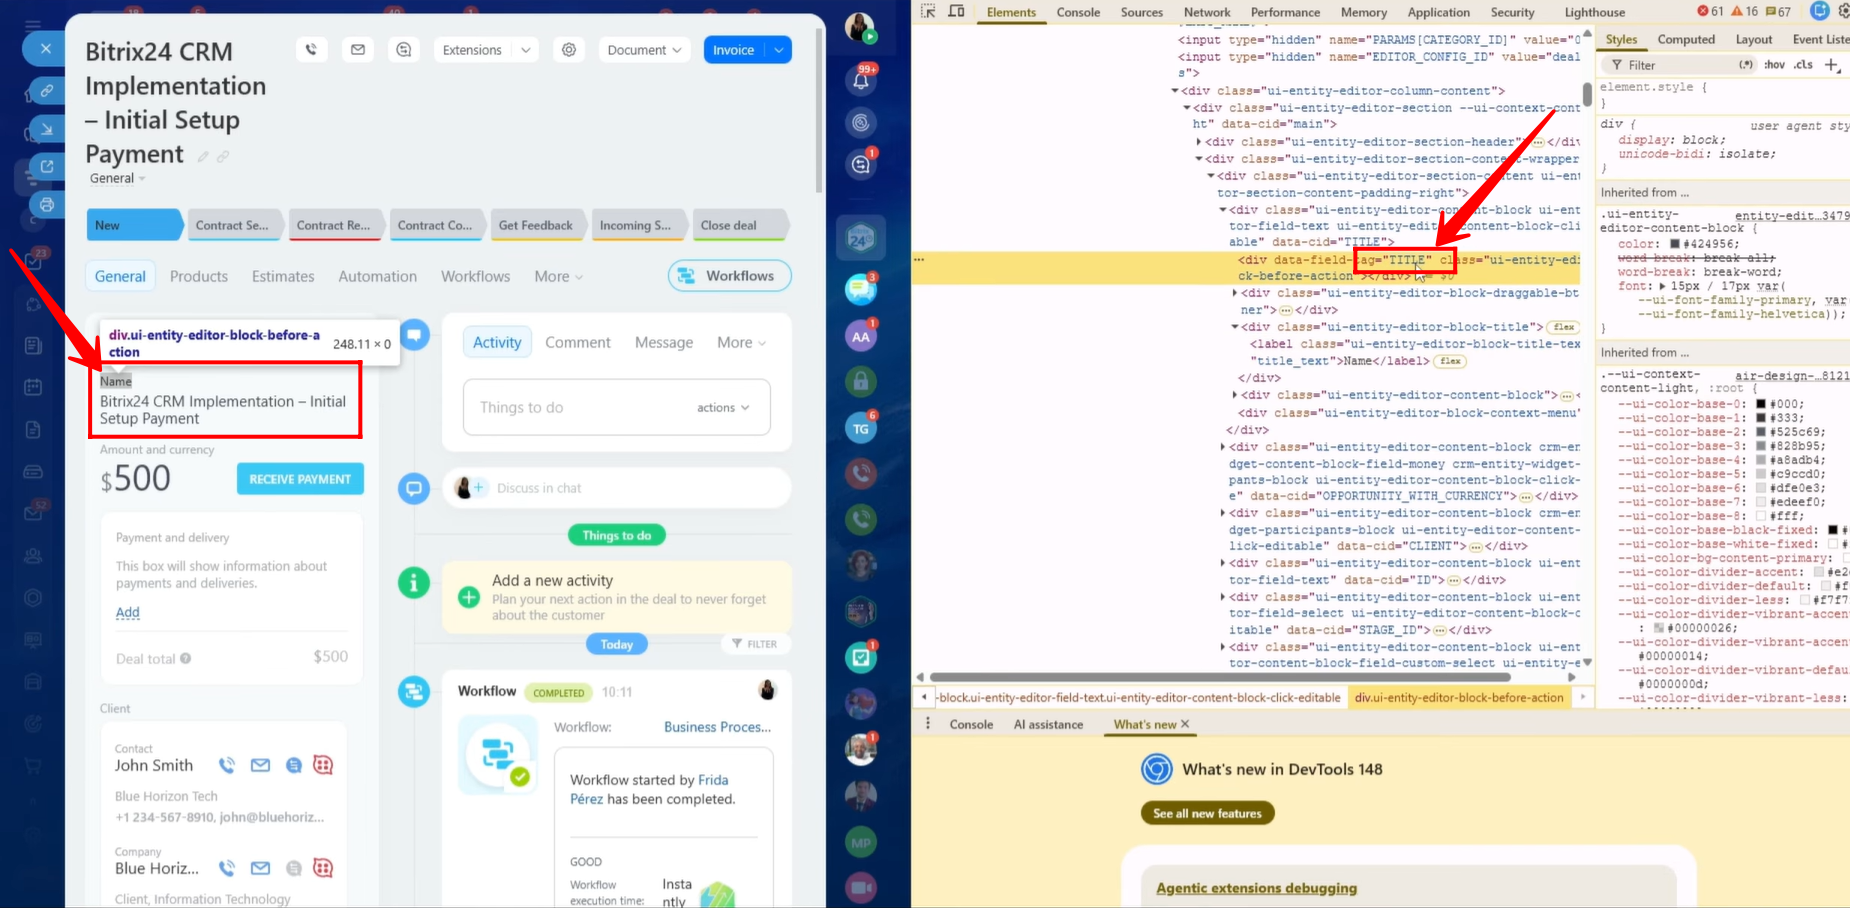
24. In some cases, locating the correct symbolic code can be challenging because multiple fields may have similar names or symbolic code references. When this happens, a reliable method is to identify the field directly from the CRM interface.
To do this, right-click on the field name within the CRM entity card and select “Inspect.” This will open the browser’s developer tools and automatically highlight the HTML code corresponding to that specific field. From there, you can identify the exact field reference and match it with the available symbolic codes listed in the Fields section. This method helps ensure that the correct symbolic code is selected and copied into the template.
25. Before proceeding with additional fields, we will test whether the Deal information is being correctly populated within the document template.
Save the template as a document file. Then navigate to: ‘Document → Add New Template’ within the CRM entity and click “Upload.”
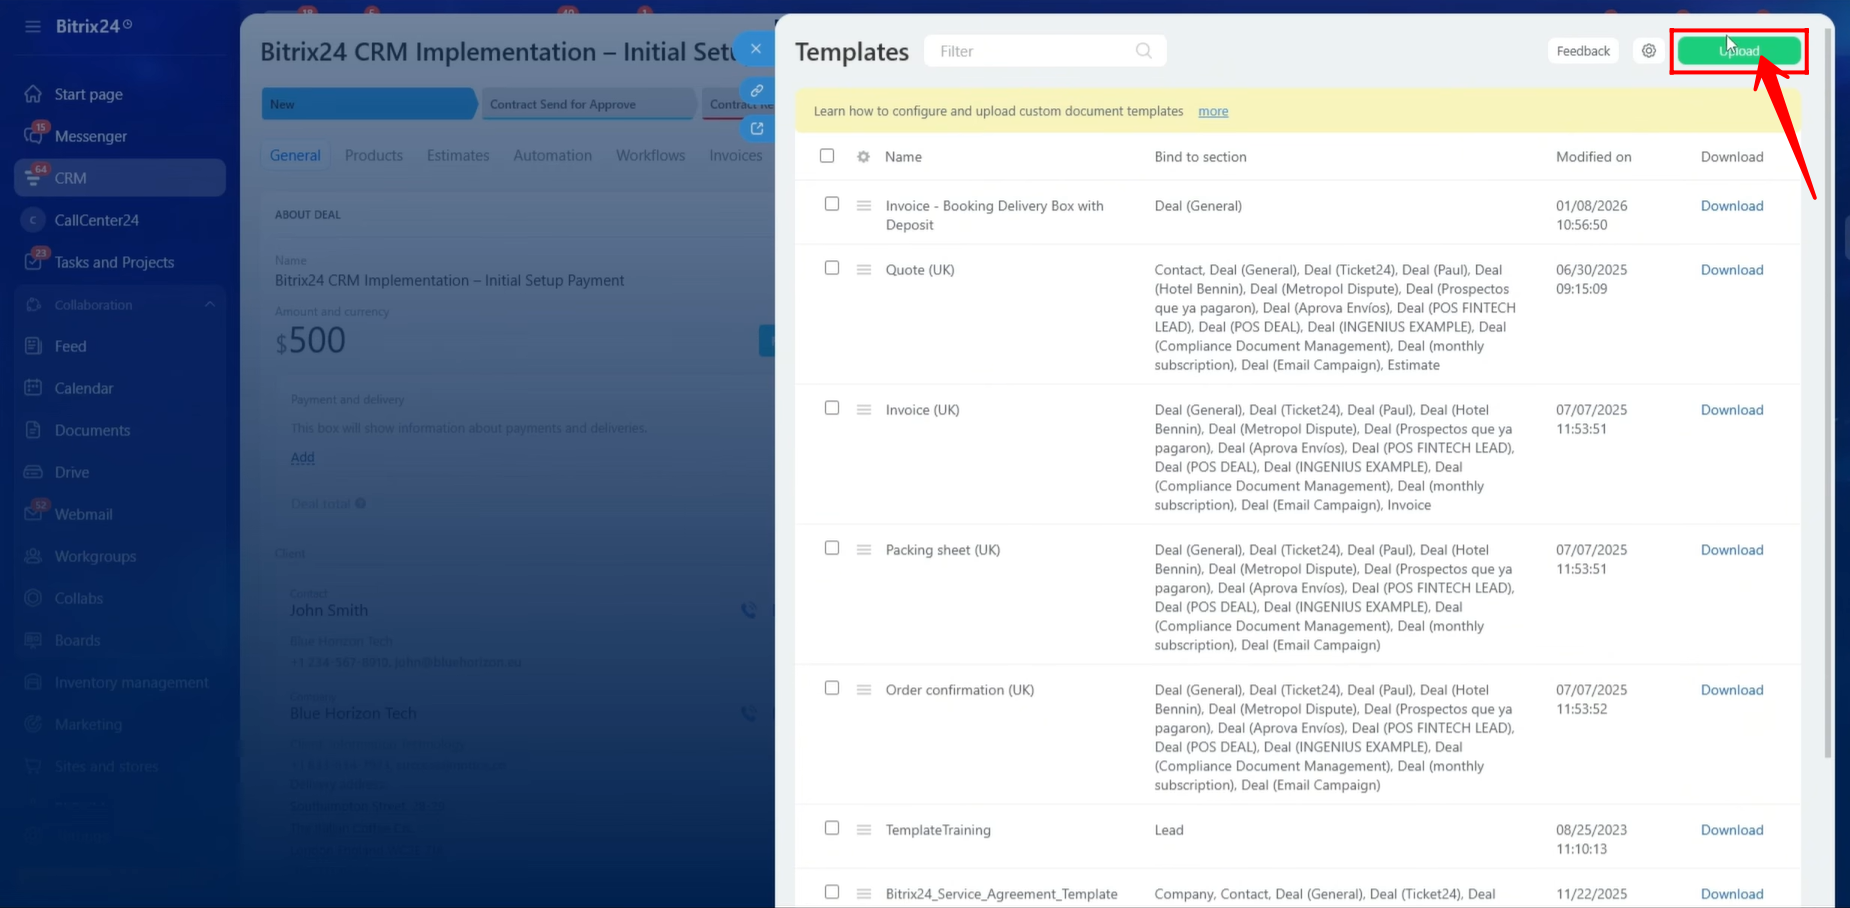
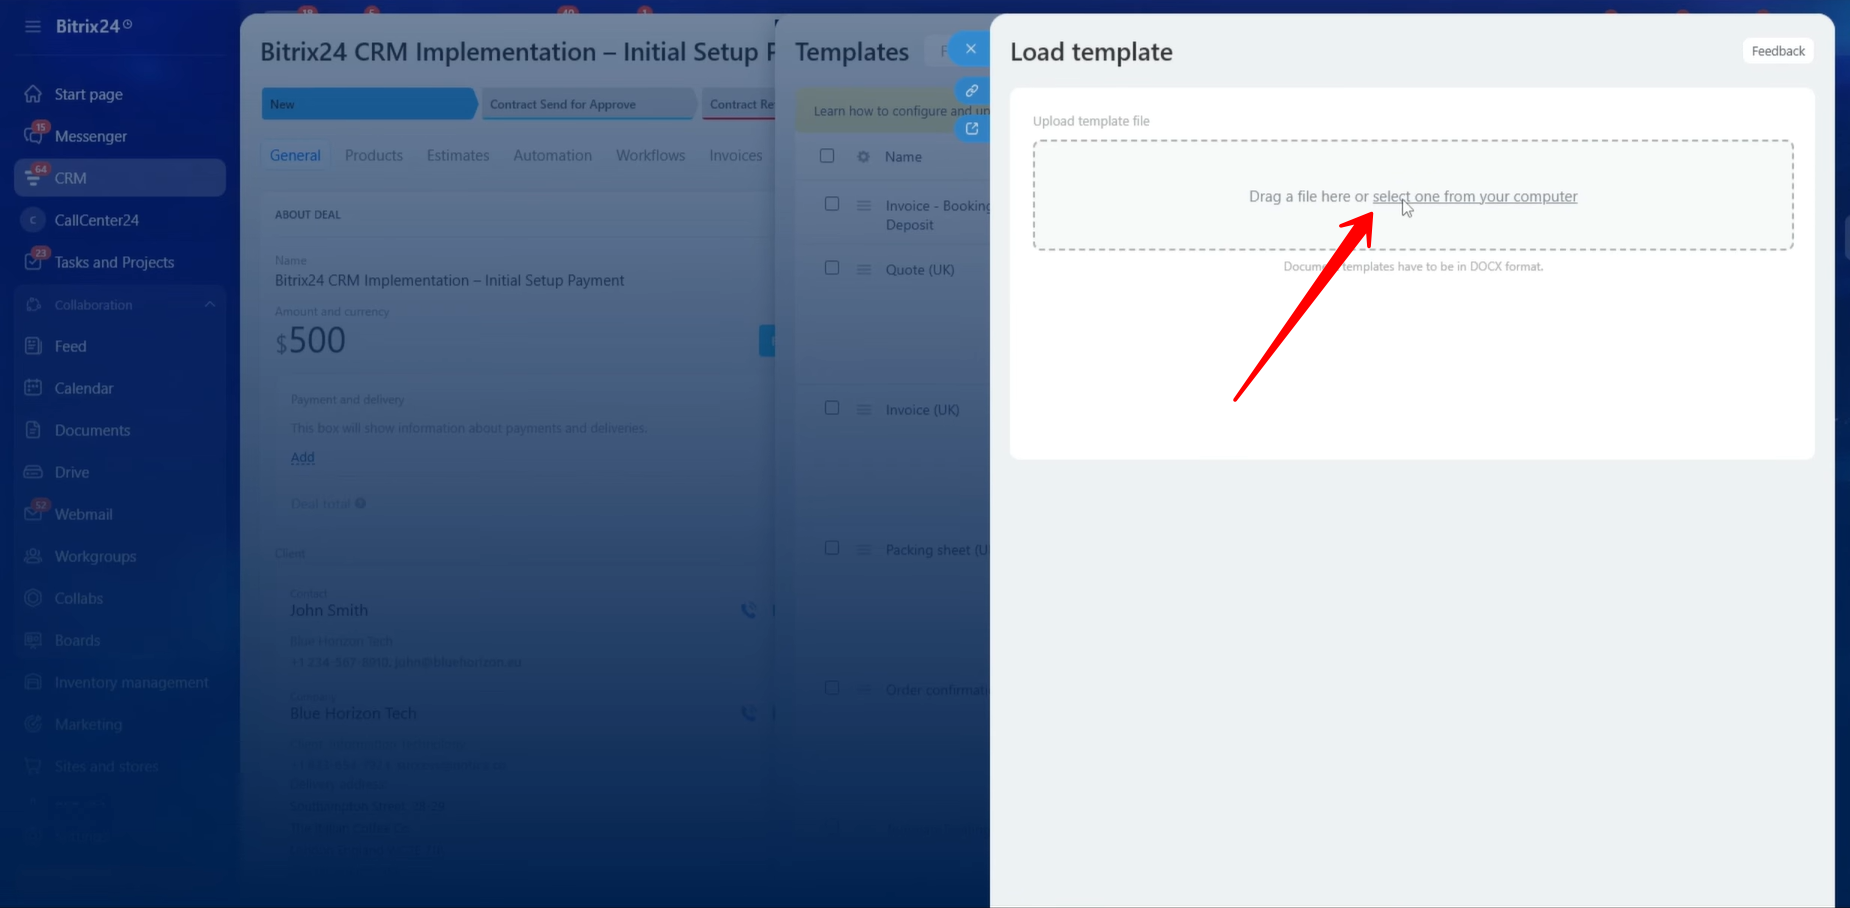
26. Drag and drop the document file into the upload area, or click to browse and upload the file manually. Once uploaded, the document template will be available for use within the Bitrix24 entity and can be used to generate documents using CRM data.
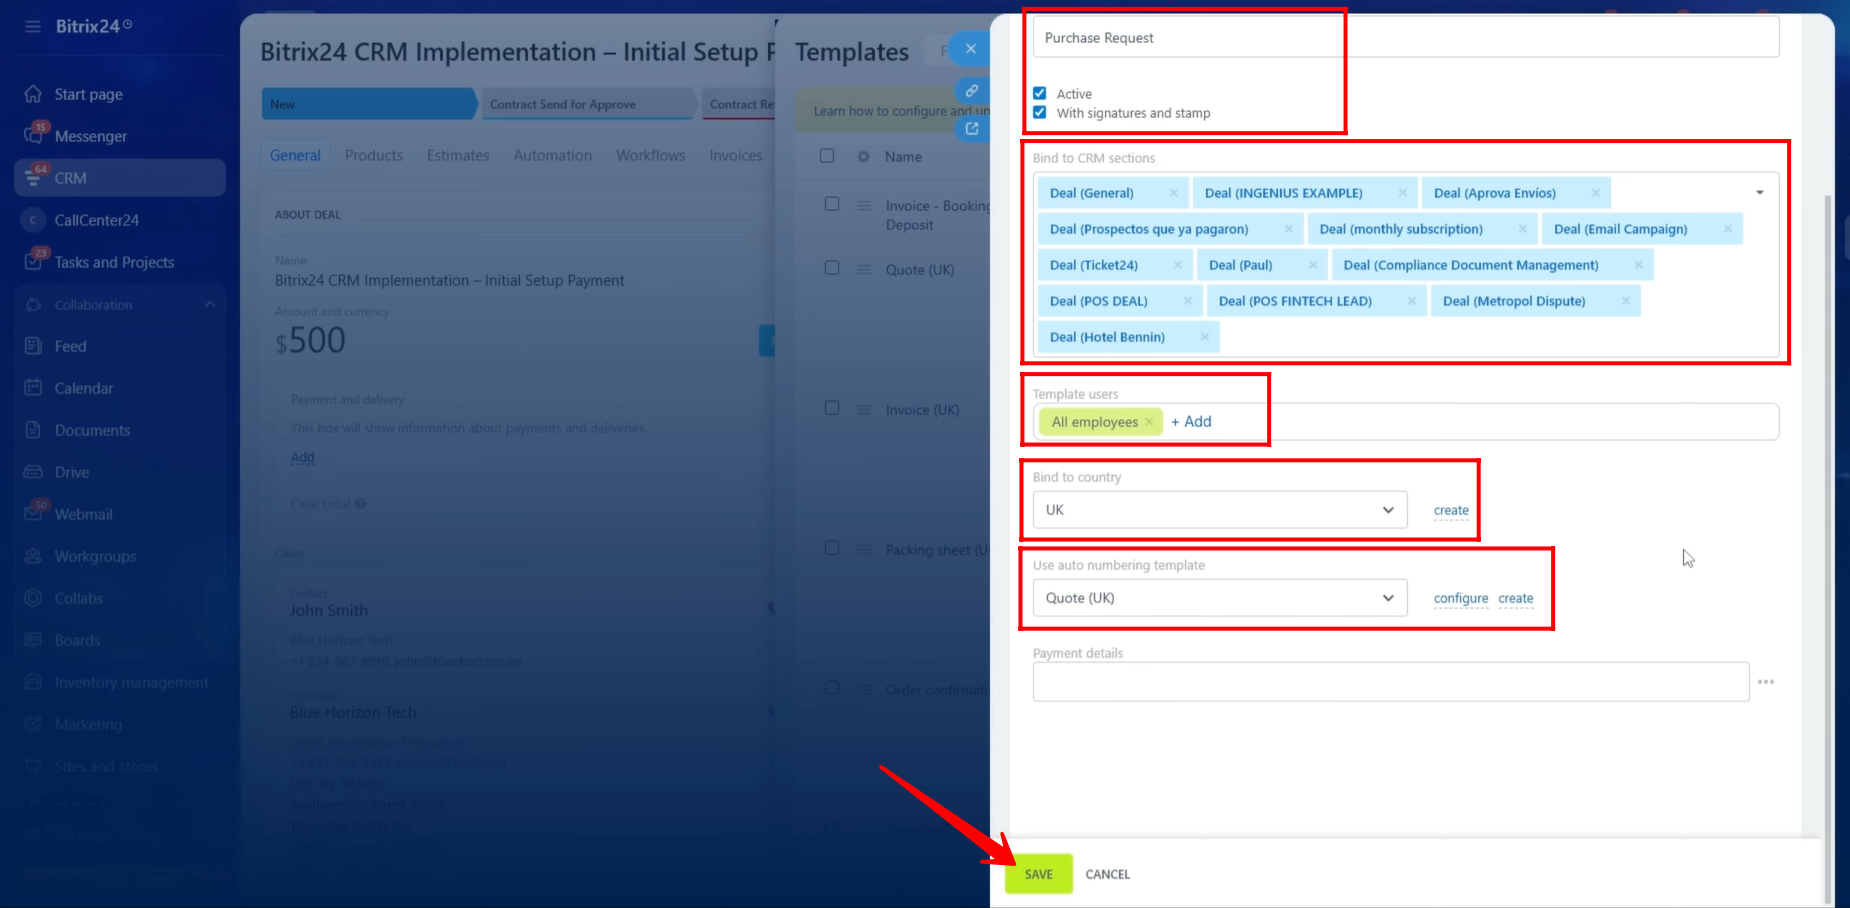
27. After uploading the template, you must provide a name for it so that it can be easily identified and used within Bitrix24 CRM documents. In our example, we named the template “Purchase Request.”
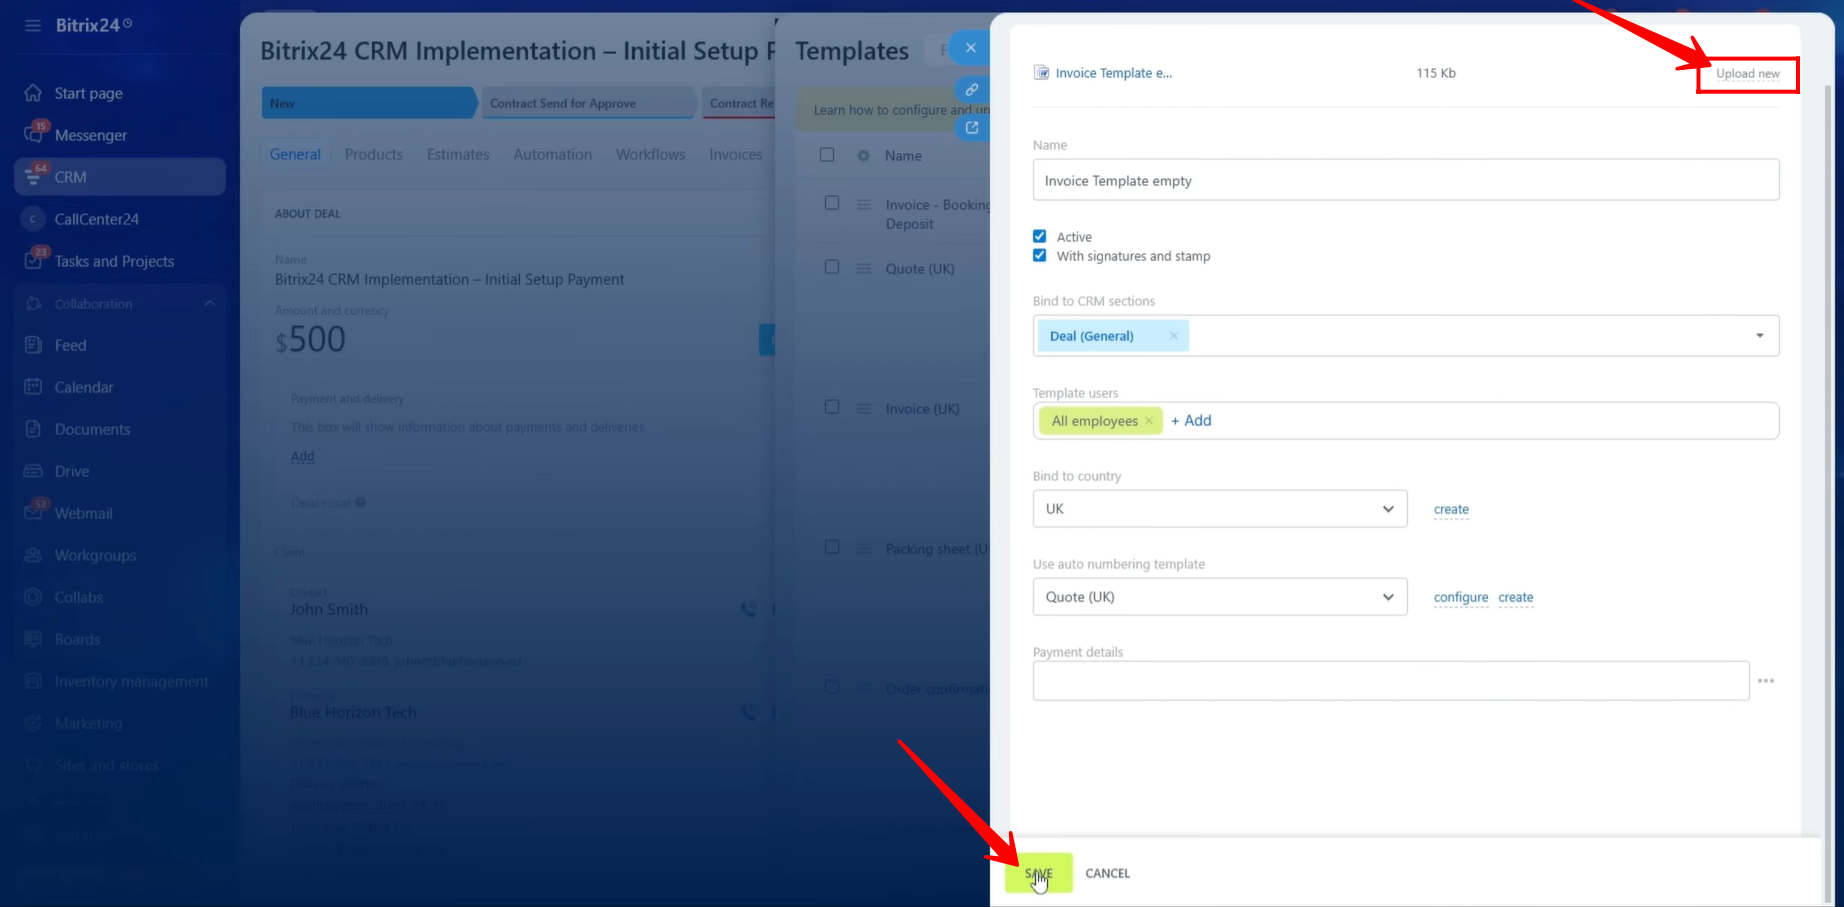
Make sure the template is marked as Active; otherwise, documents cannot be generated using this template.
If you would like to include the preconfigured company signature and stamp stored in My Company Details, enable the “With Signature and Stamp” option.
Next, select the CRM entities to which this template should be linked. It is important to understand that the template will only be available within the entities that you bind it to. Documents can only be generated from those specific entities.
You can also configure user access permissions for the template. This allows you to control which users can generate documents using the template. In our example, we granted access to all employees.
Additionally, there is an option to bind the template to a specific country. The selected country affects the formatting of dates, times, names, currencies, and other localized values within the generated document. If the required country is not available in the list, click “Create” to add a new country configuration.
Bitrix24 also provides an Auto Numbering feature. You can create and configure an automatic numbering variable that generates sequential document numbers. These numbers can be used as references such as Invoice Numbers, Payment Request Numbers, Purchase Request Numbers, or other document identifiers. The numbering sequence can also be modified or reset through the configuration settings whenever required.
Once all settings have been configured, click “Save” to finalize the template setup.
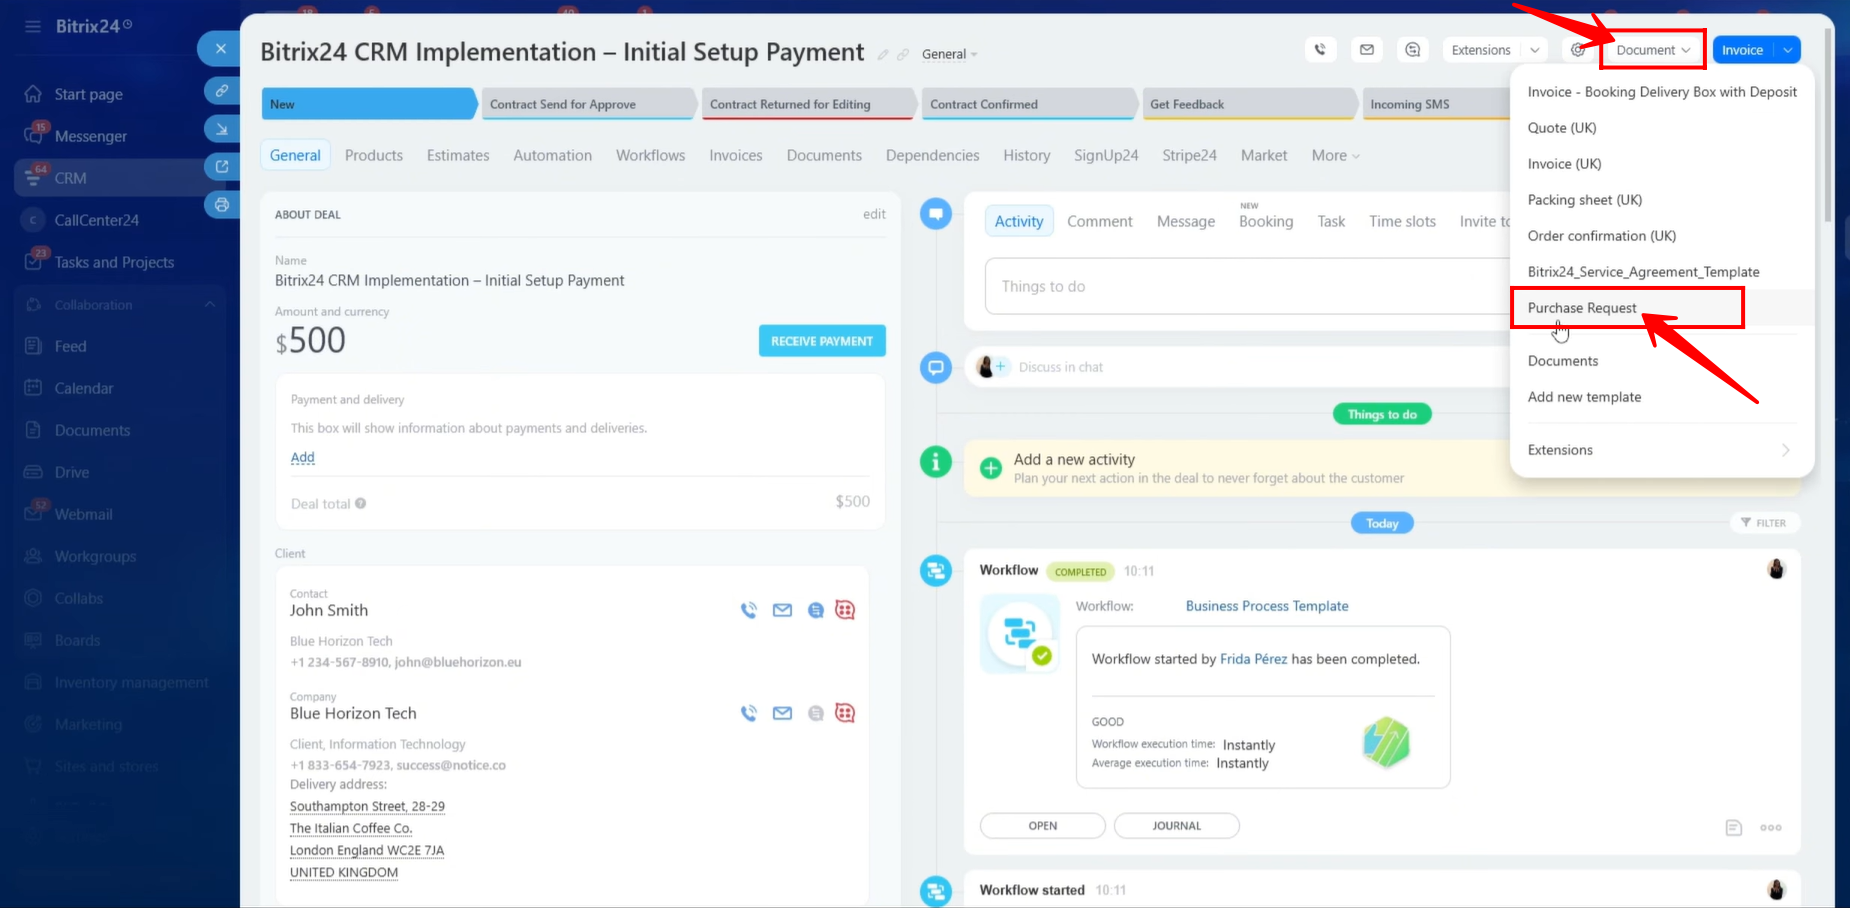
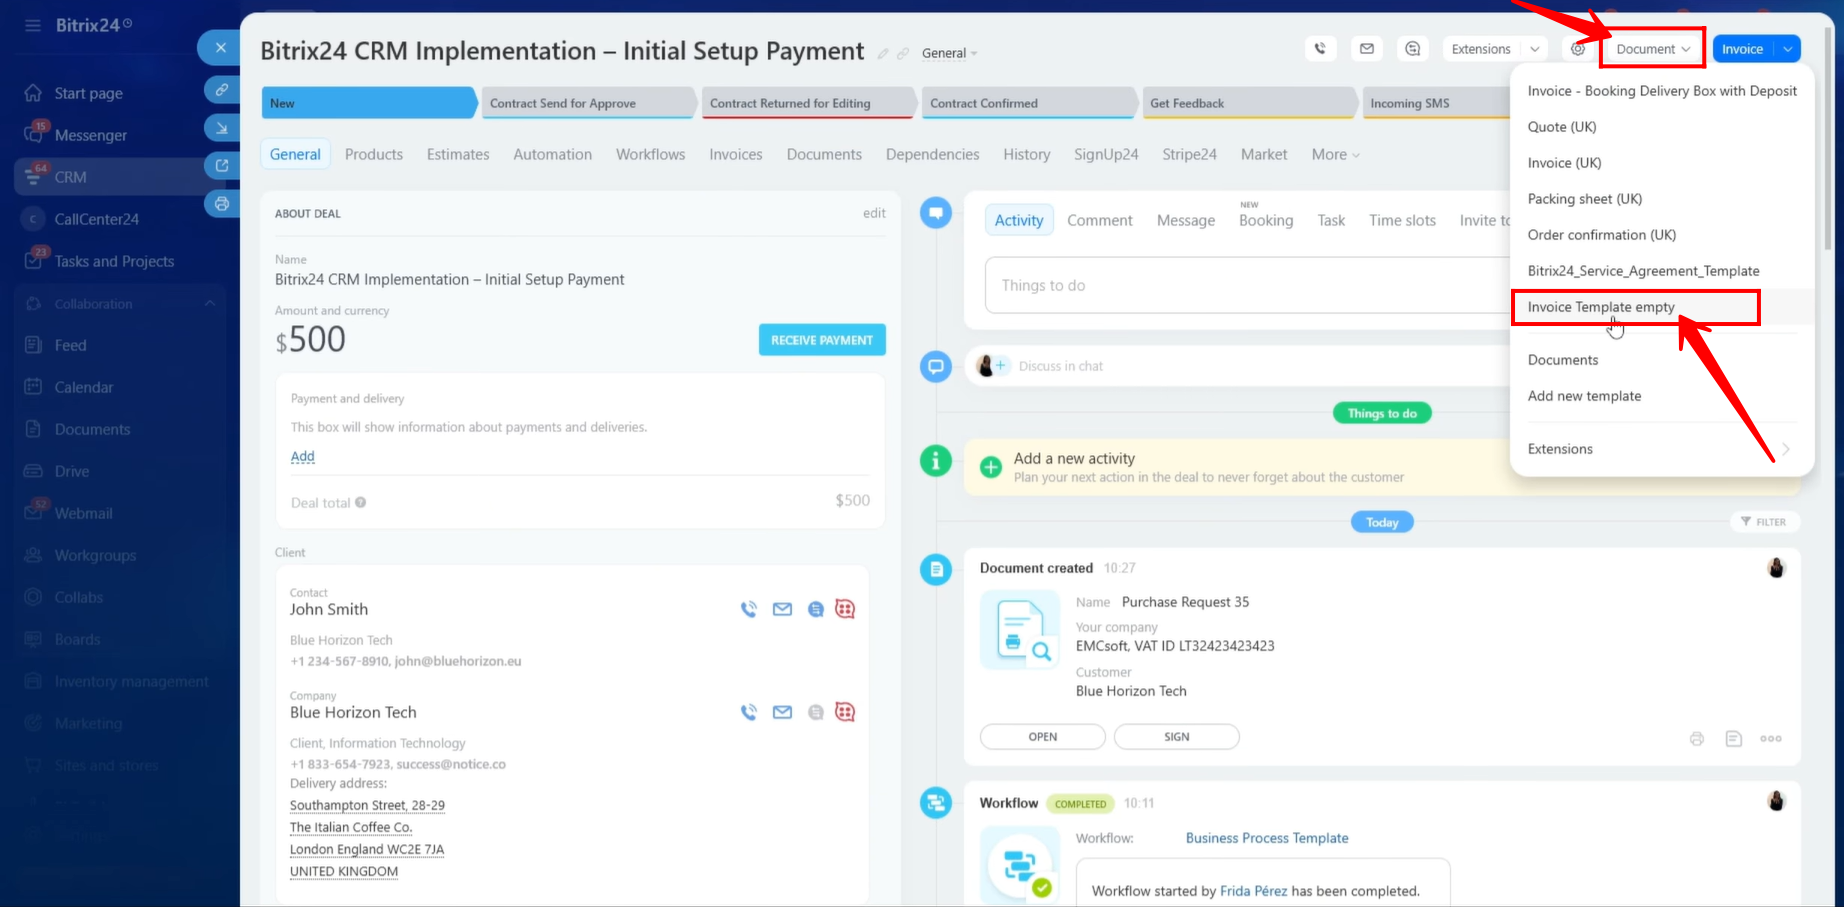
28. Now, open the Deal card and click “Document.” From the list of available templates, select the “Purchase Request” template that we have just configured.
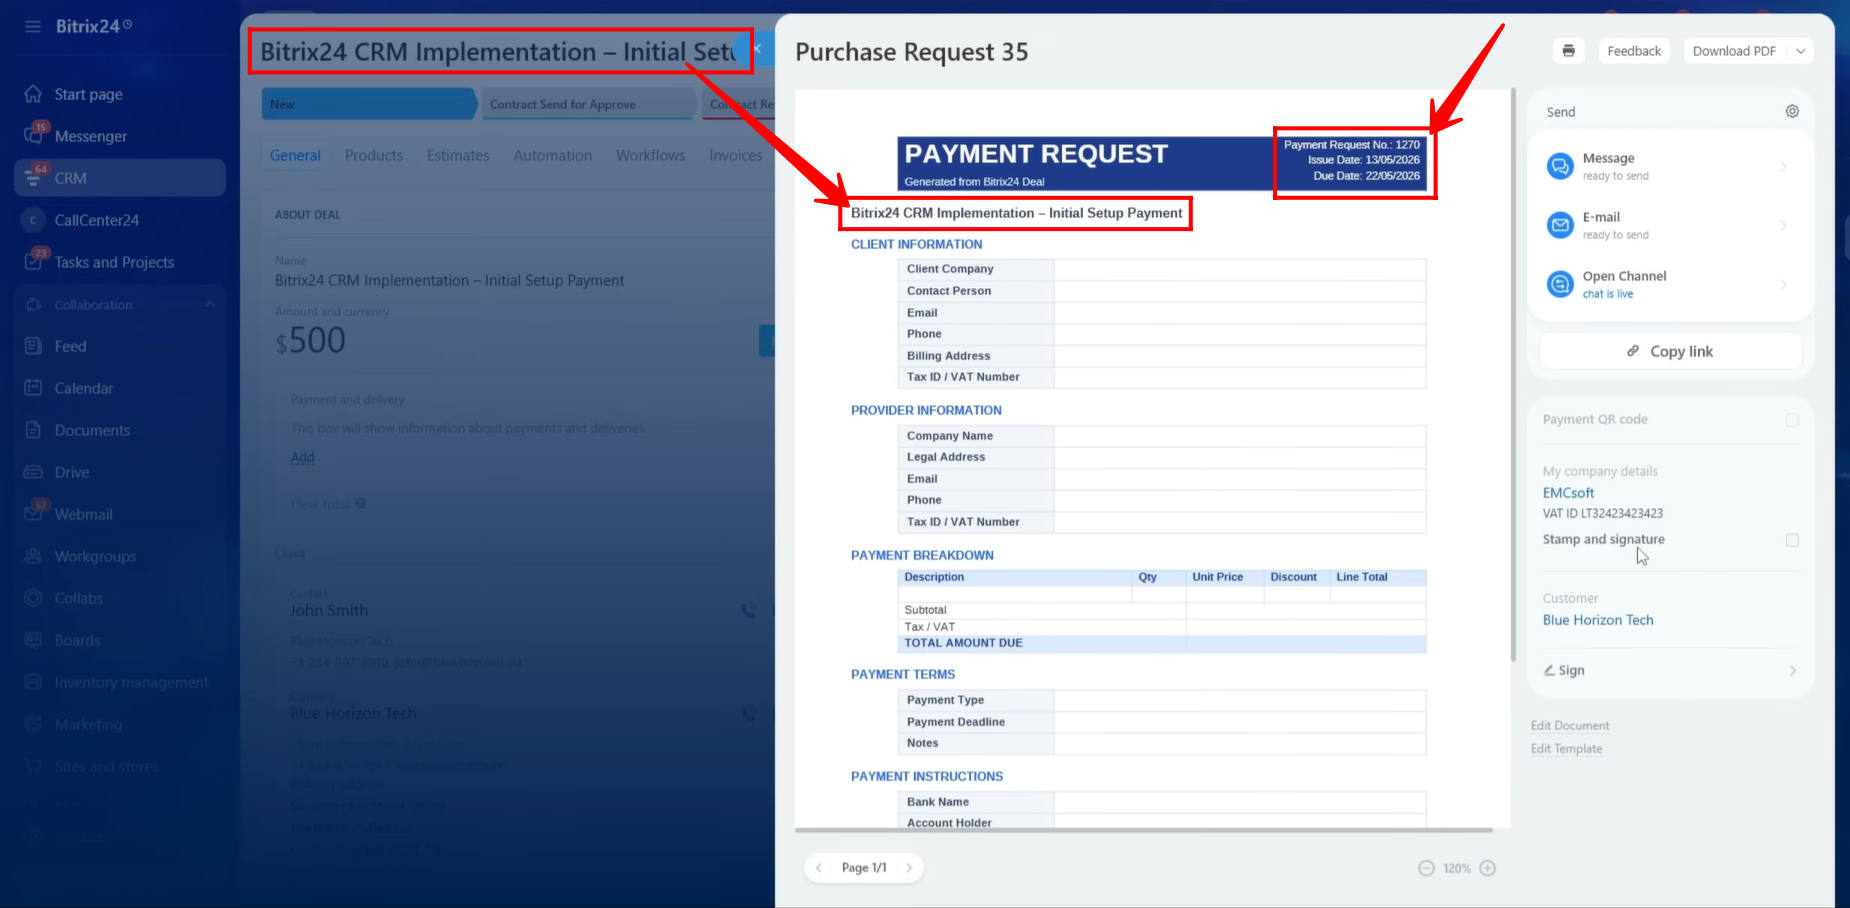
29. The document will be generated automatically. All information from the Deal entity will be fetched and populated into the document template according to the symbolic codes that were configured. After reviewing the generated document, we verified that all information was populated correctly and matched the data stored within the Deal record.
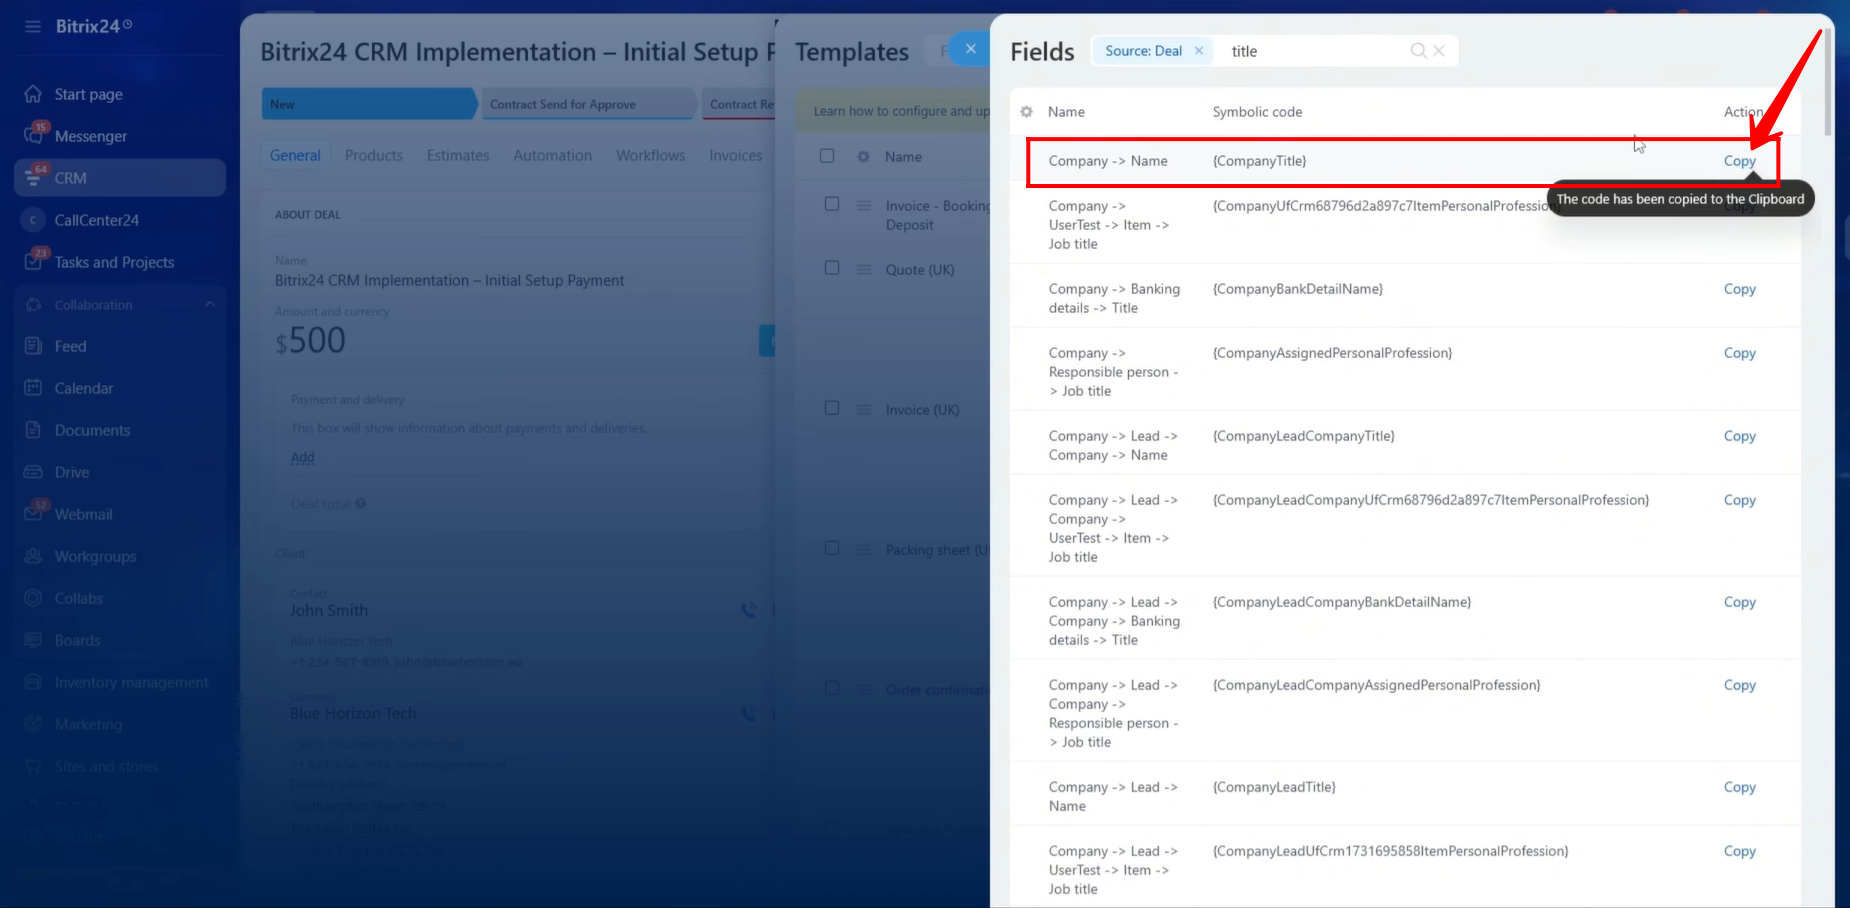
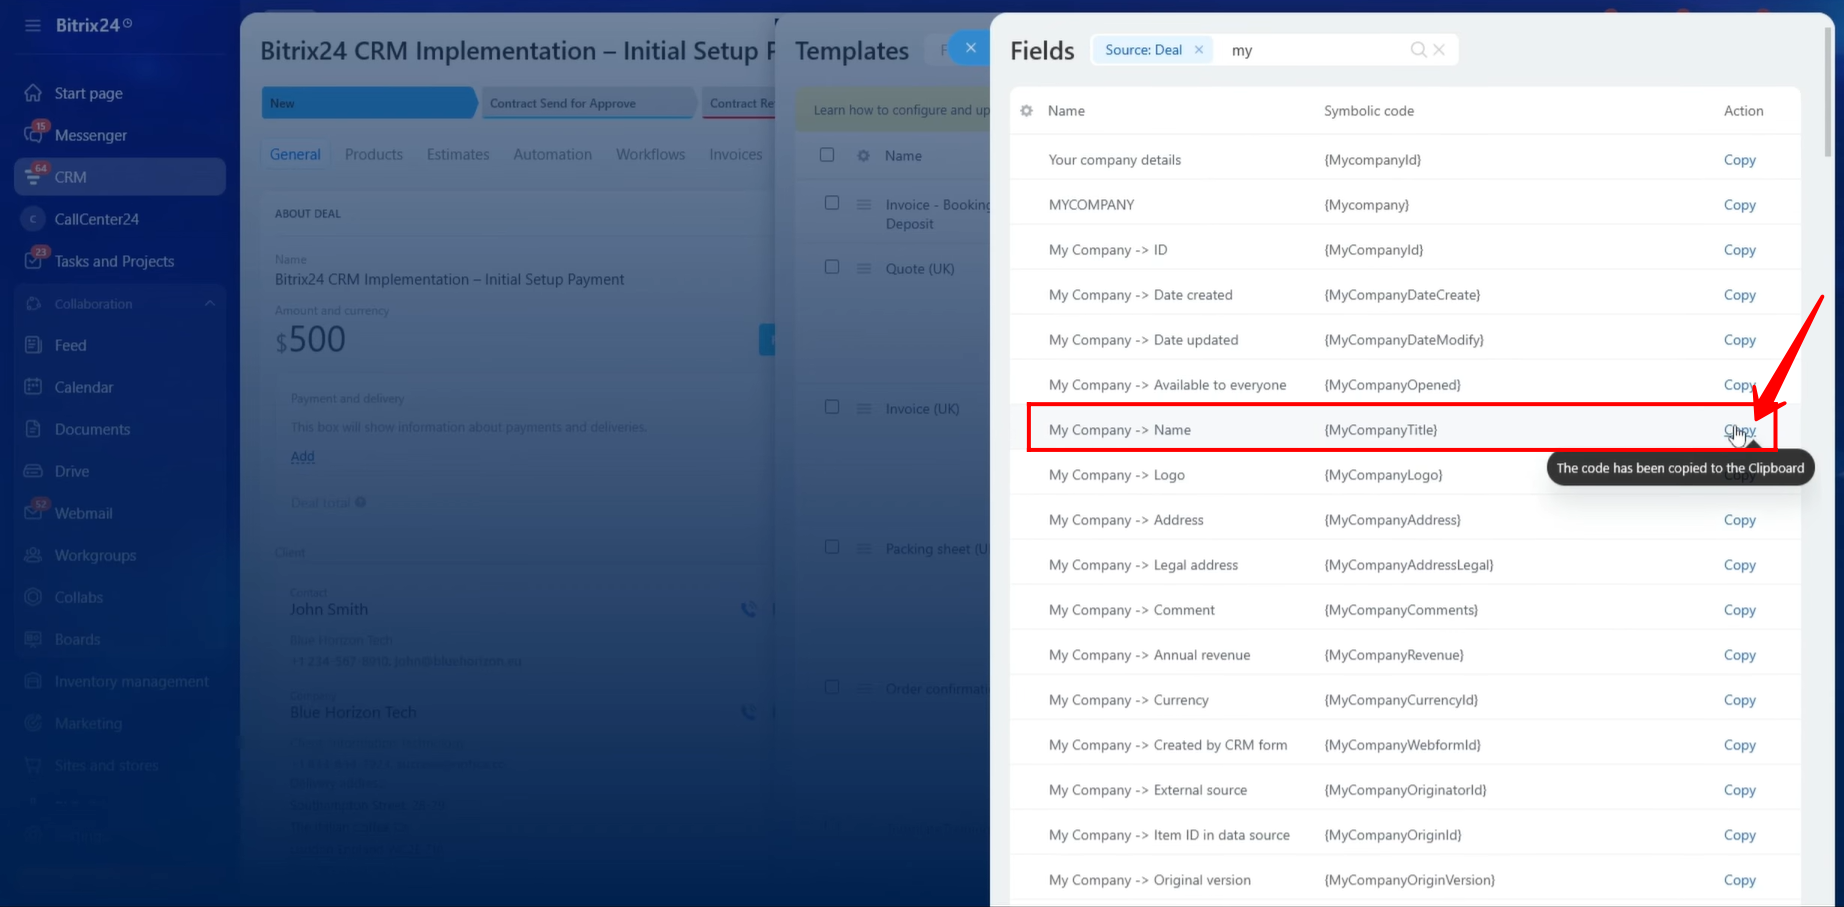
30. Moving forward, we need to include the Client Company’s Name in the document template. To accomplish this, we located and copied the corresponding symbolic code for the Client Company Name field and pasted it into the appropriate section of the template.
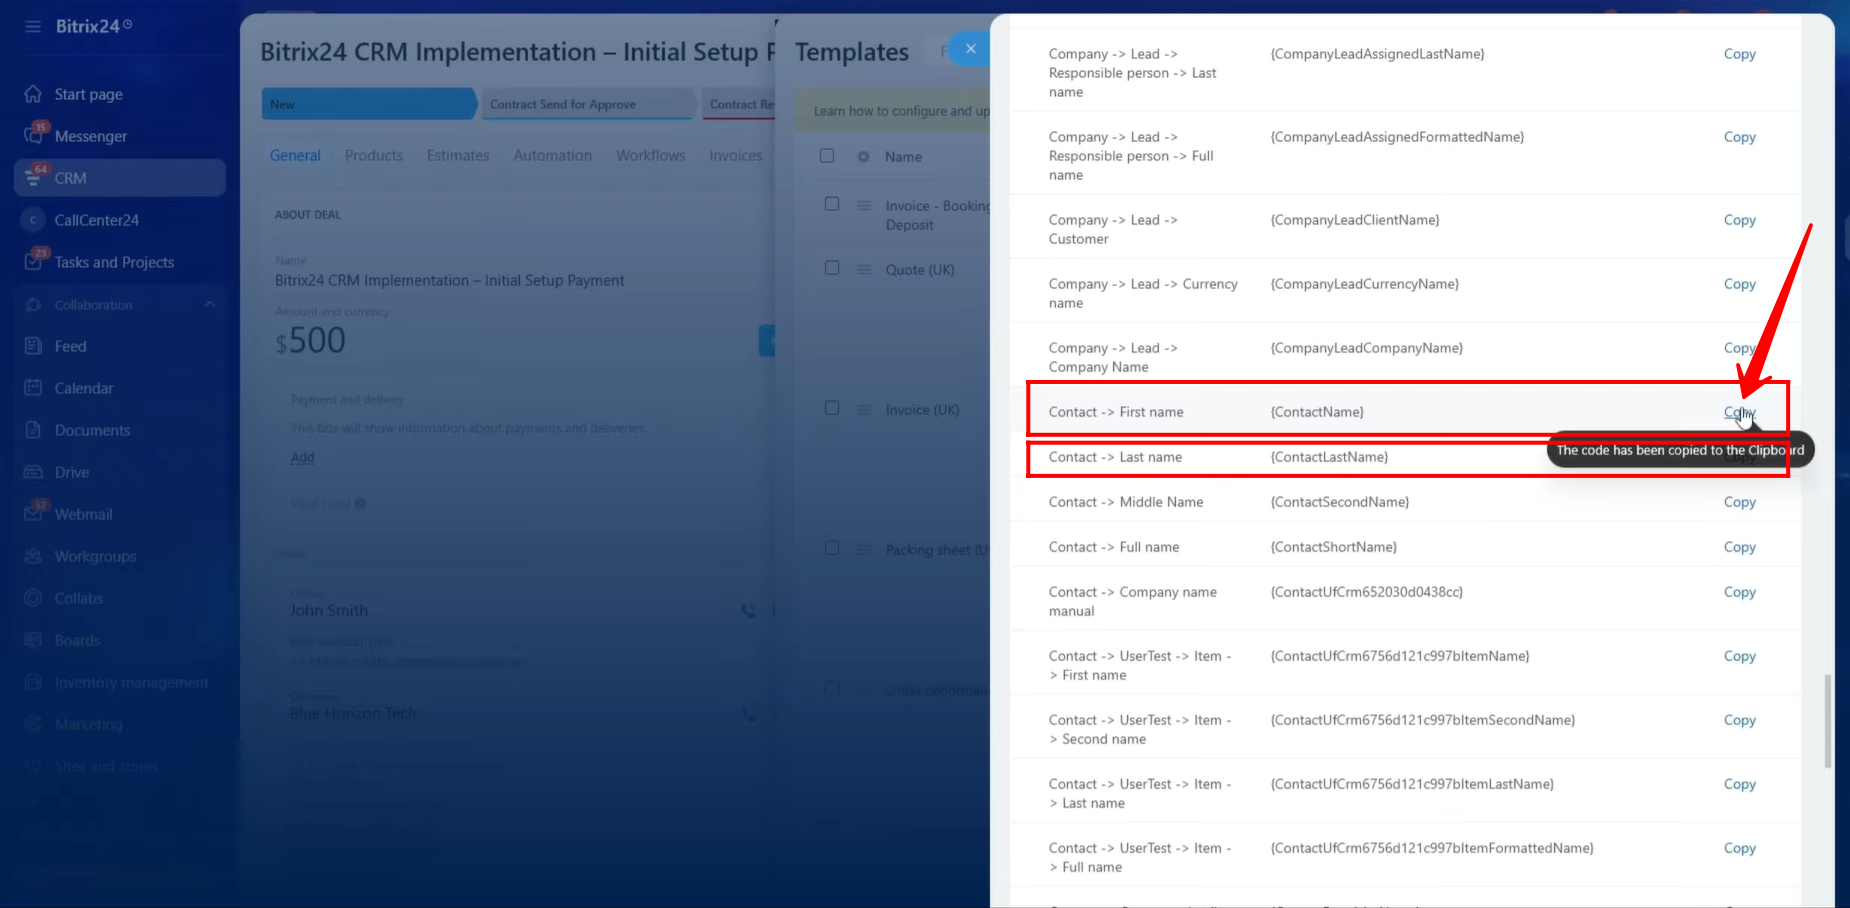
31. Next, we copied the symbolic codes for the Contact Person’s First Name and Last Name from the client’s contact information linked to the Deal.
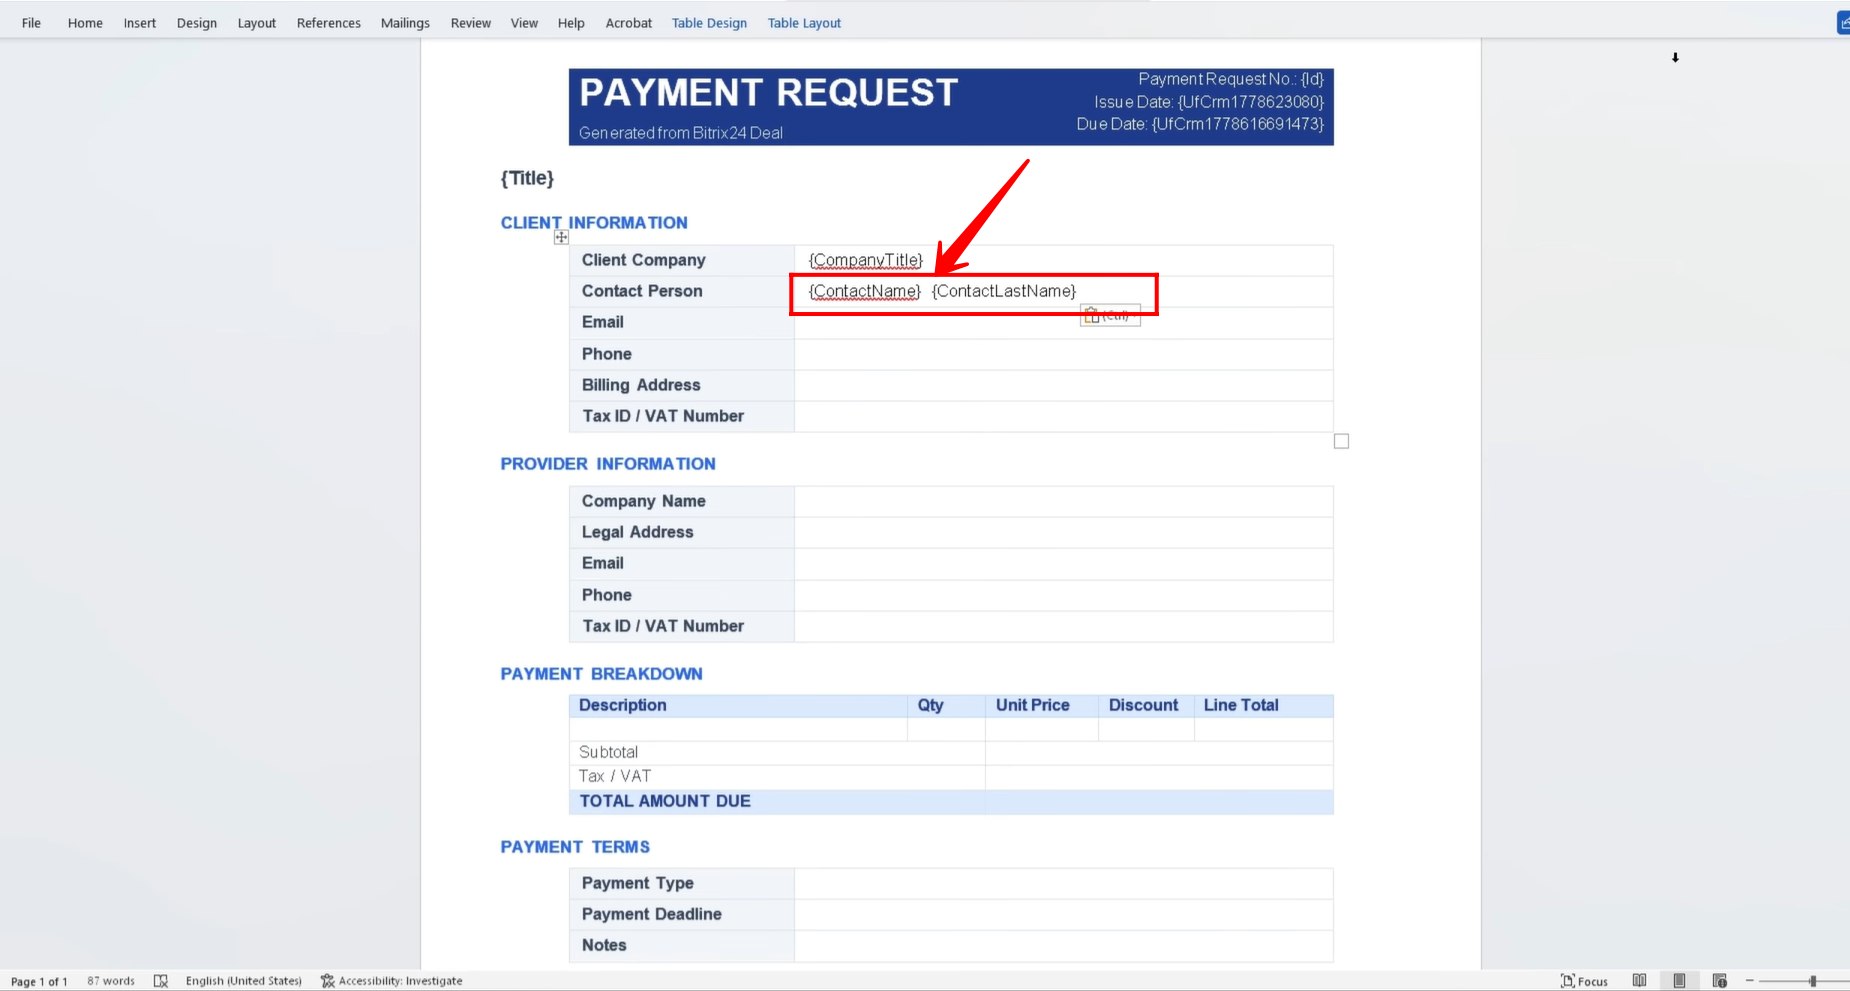
32. As shown, we inserted both the First Name and Last Name symbolic codes into the document template with a space between them. This ensures that the generated document displays the Contact Person’s full name correctly.
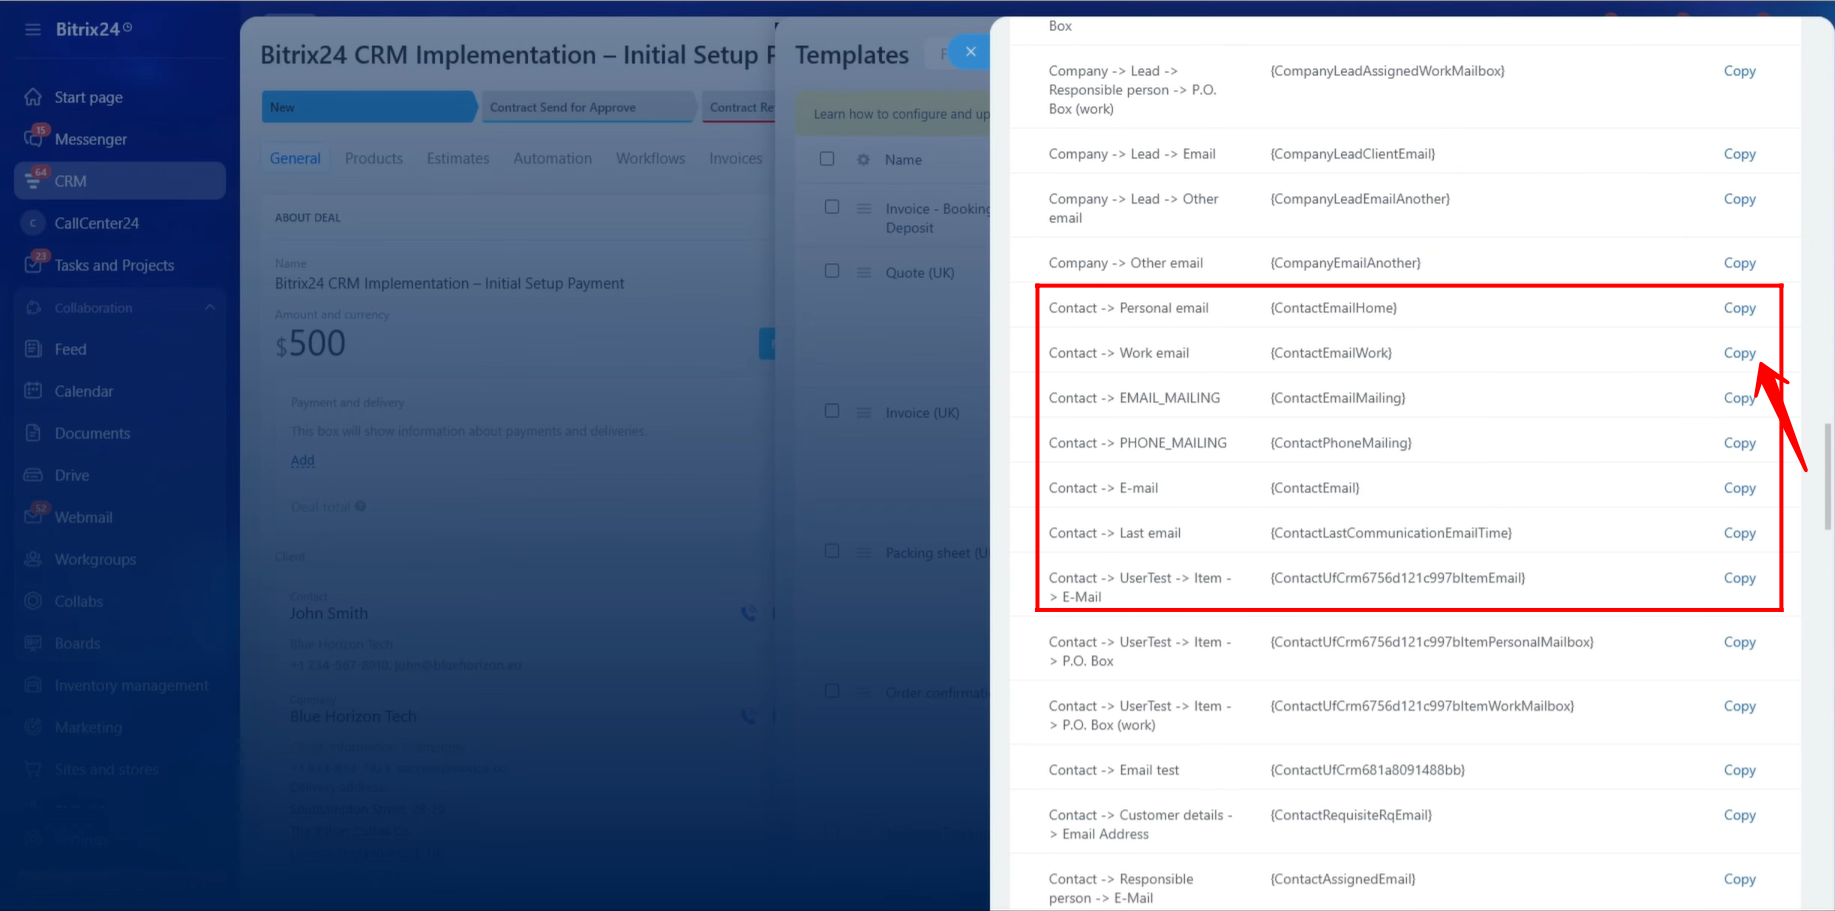
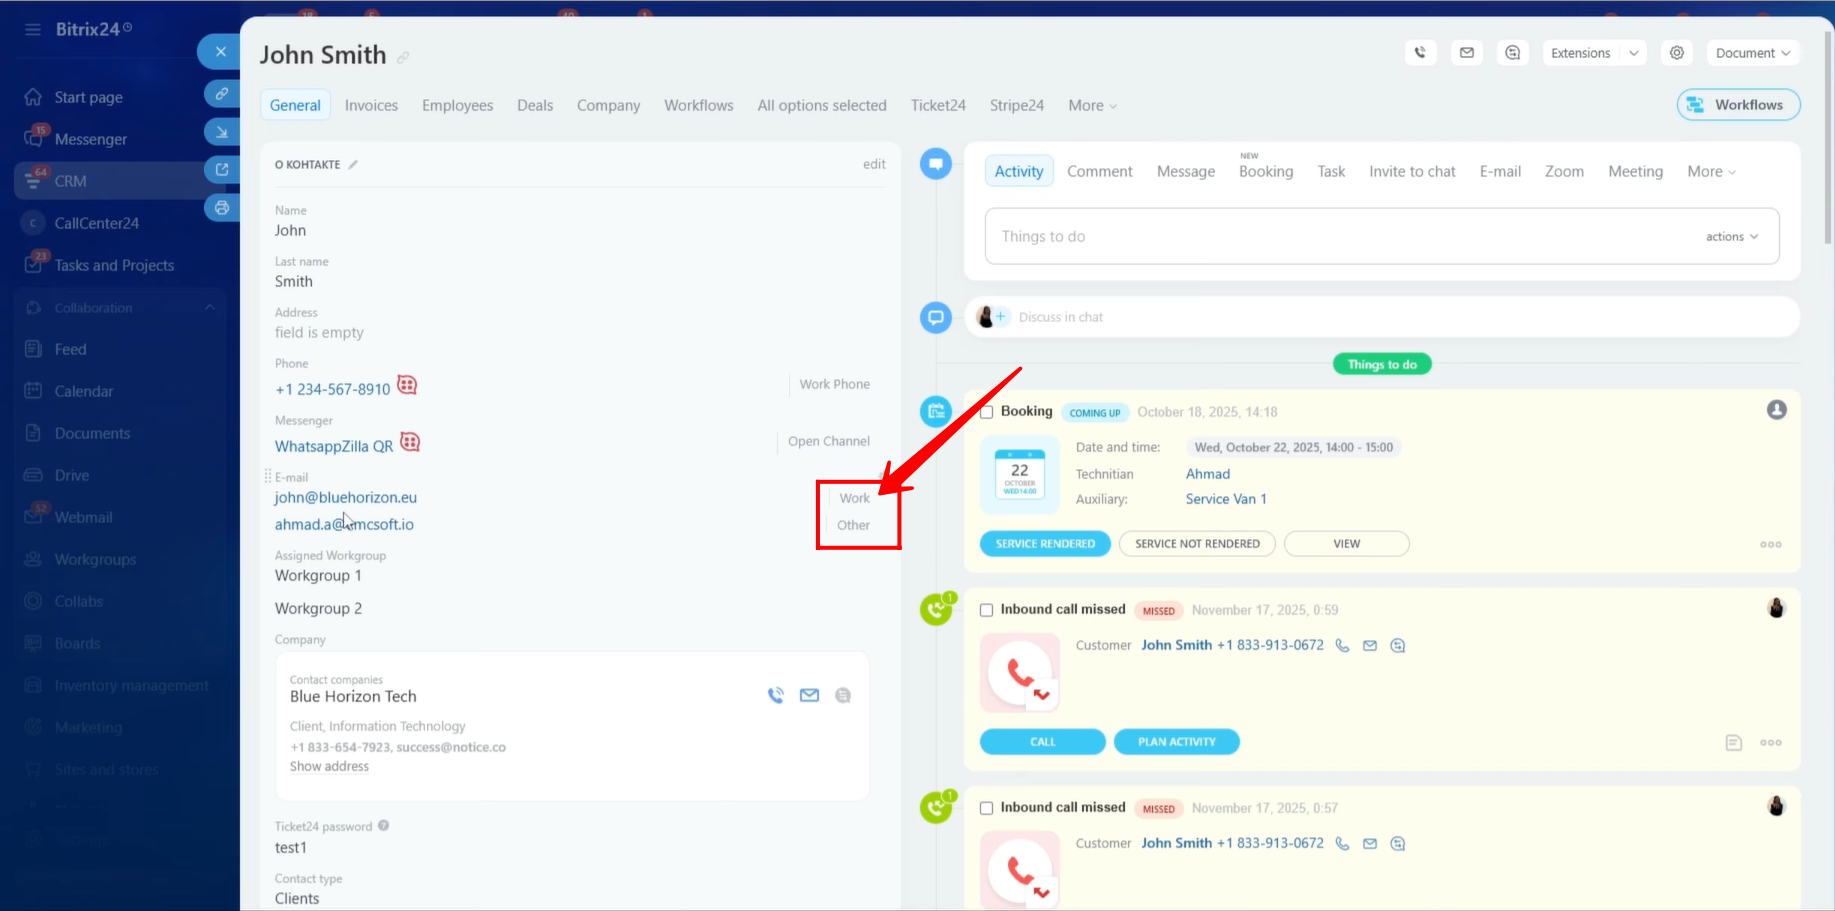
33. To add the Contact Person’s email address to the template, locate the symbolic codes associated with the linked Contact entity. Bitrix24 may provide multiple email field options, such as:
- Personal Email
- Work Email
- Other Email
- Primary Email
- Last Used Email
You should select the specific email field that corresponds to the email address you want displayed in the document template. The correct selection depends on how email addresses are stored within your CRM.
34. In this example, the Contact record contains two email addresses categorized as Work and Other. This allows us to choose the appropriate email type based on the business requirements of the document.
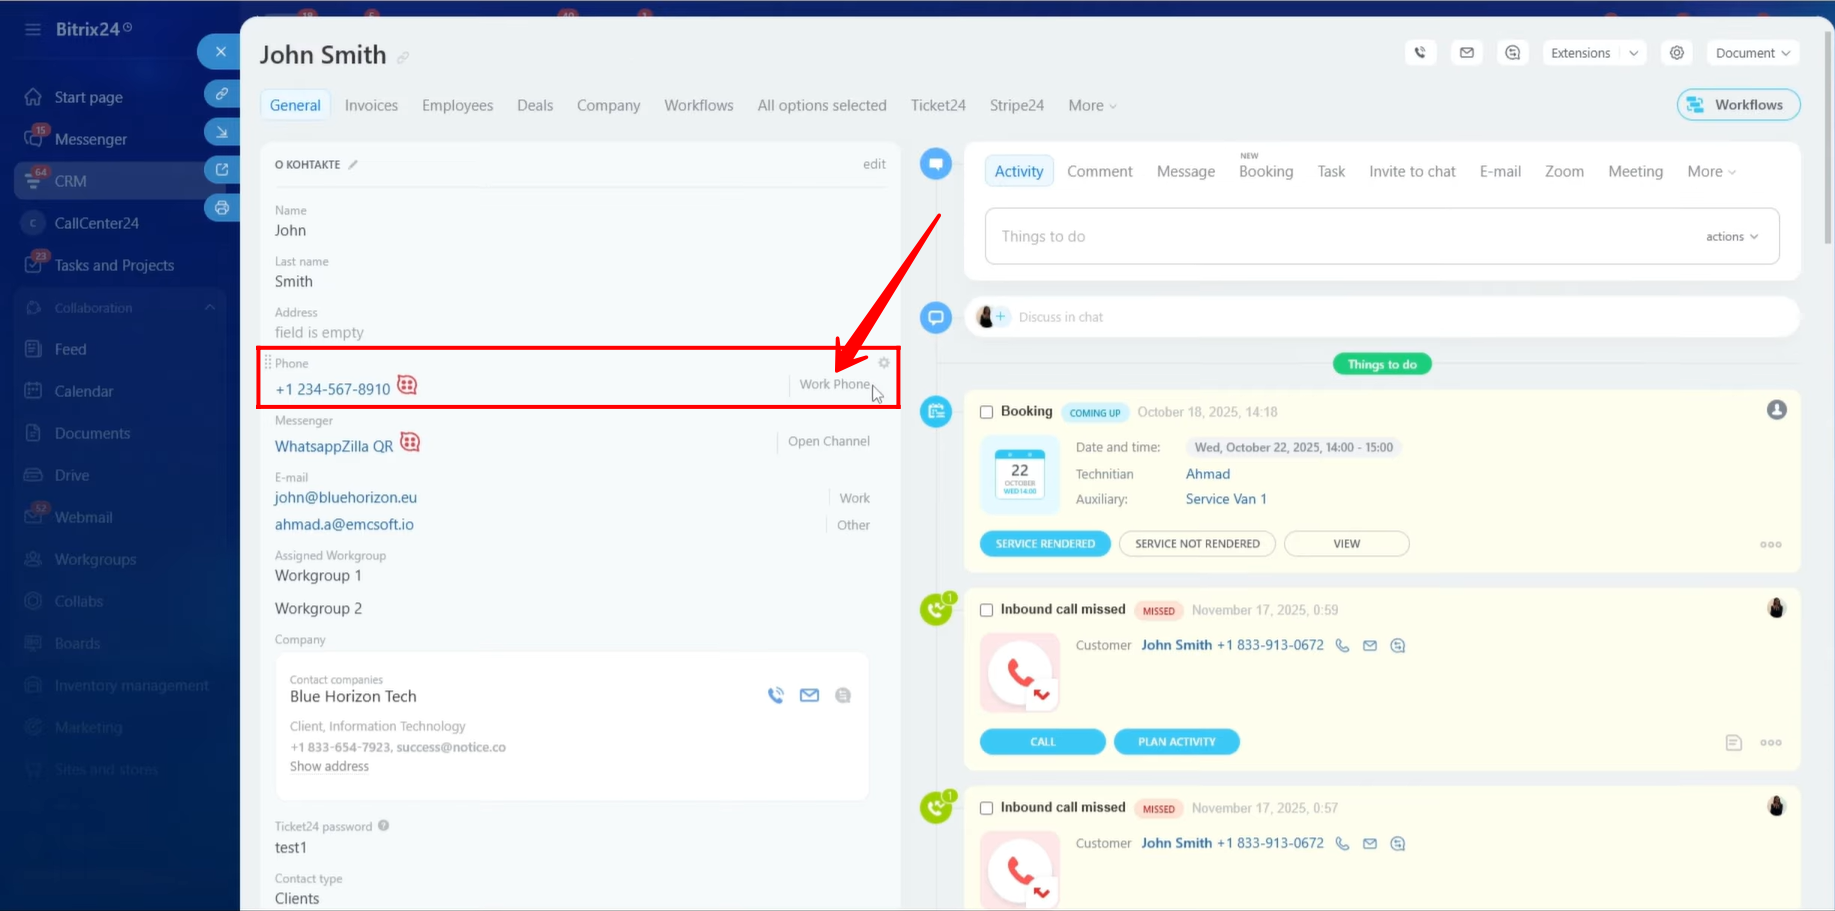
35. Just like email addresses, phone numbers may also be stored under different categories. Separate symbolic codes are available for each phone number type, such as:
- Work Phone
- Personal Phone
- Mobile Phone
- Other Phone
Before selecting a symbolic code, verify which phone number category is being used in your CRM so that the correct number appears in the generated document.

36. In our example, the Contact Person’s phone number is stored under the Work Phone category. Therefore, we copied the symbolic code associated with the Work Phone field and inserted it into the document template.
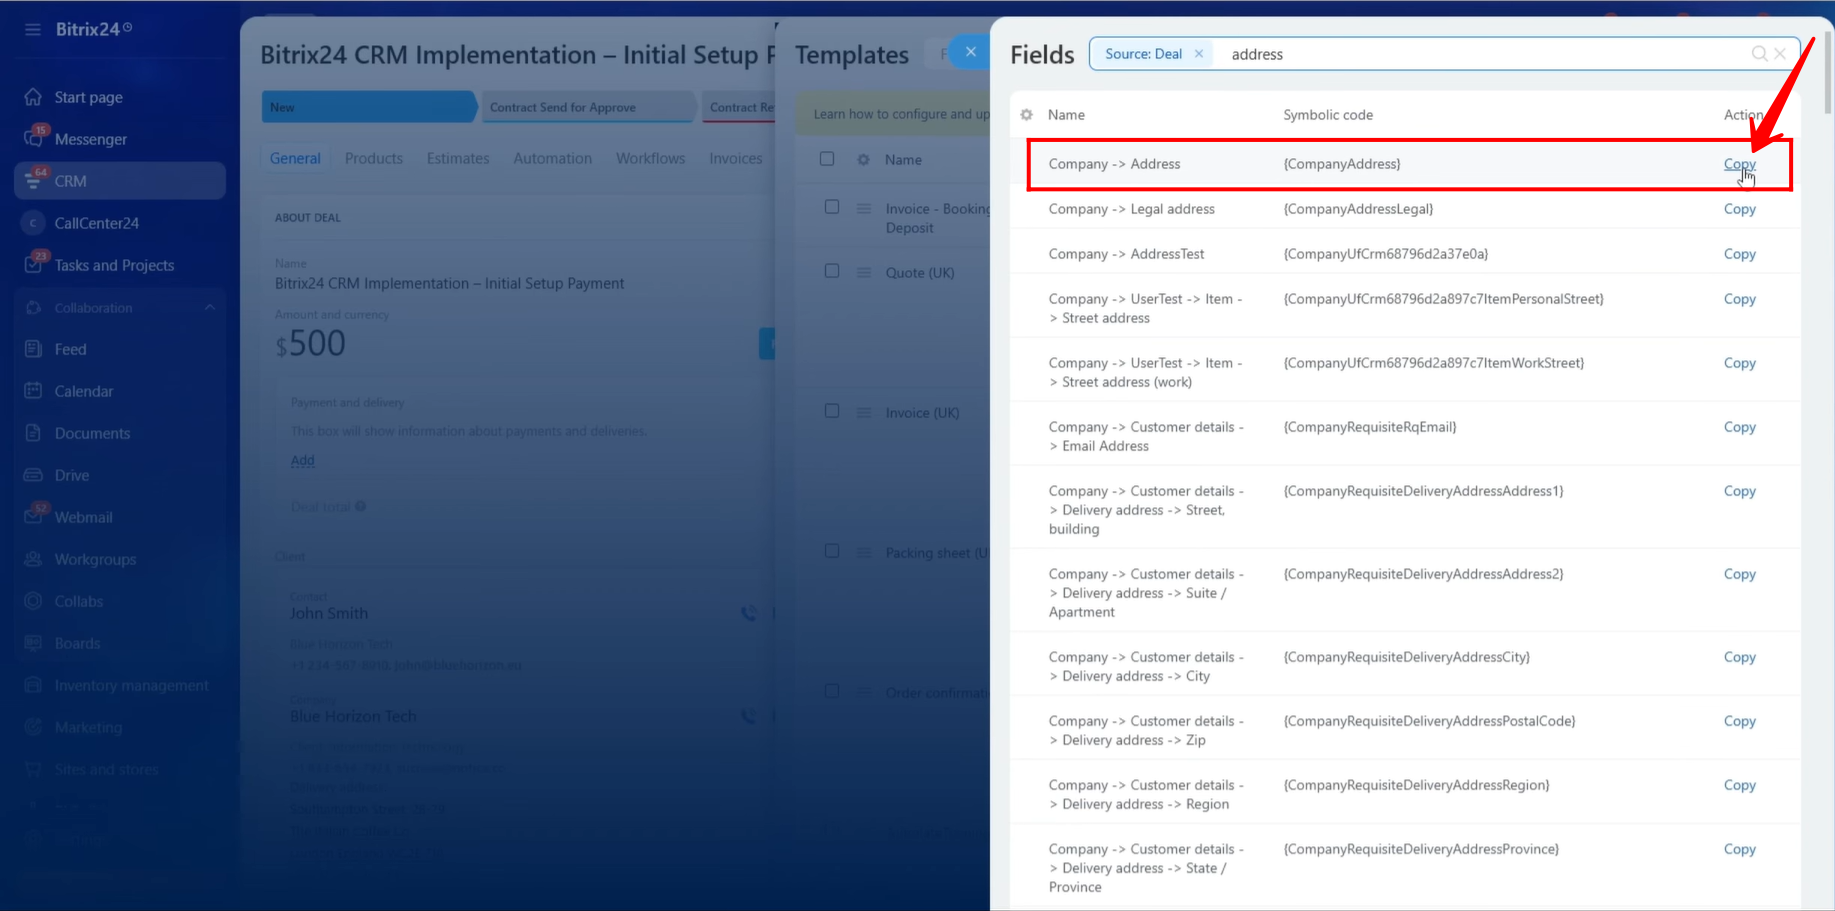
37. Next, we copied the symbolic code for the Client Company’s Address and pasted it into the appropriate section of the document template.
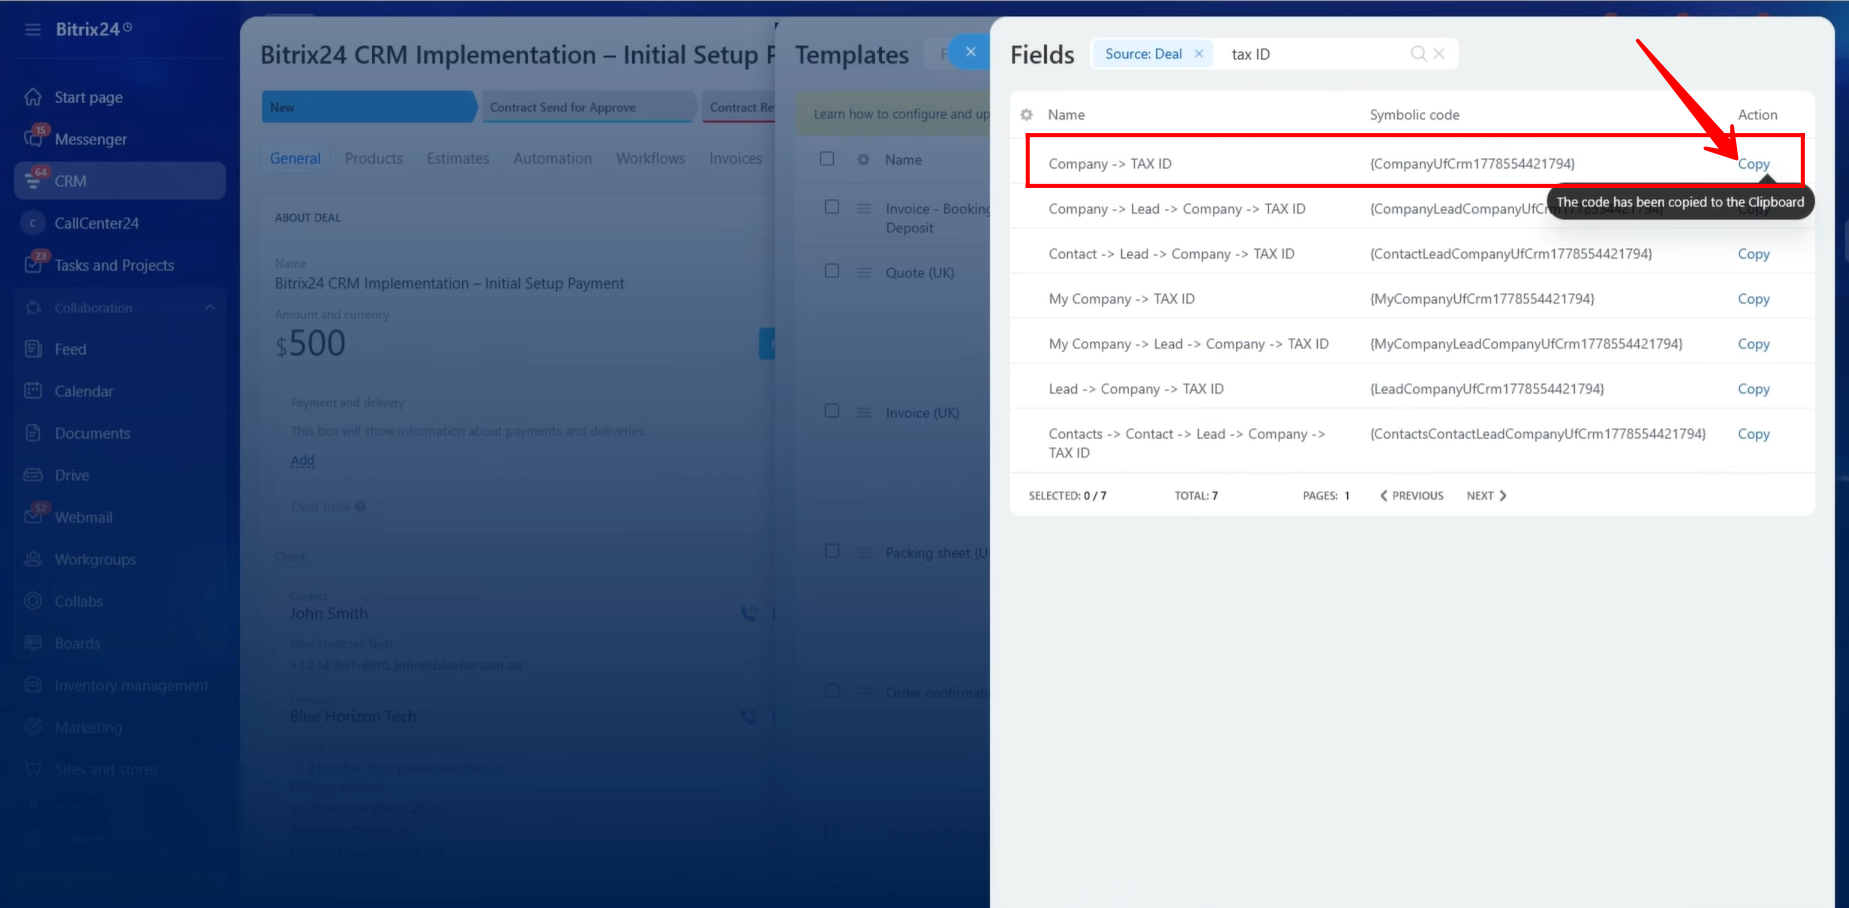
38. We also copied the symbolic code for the Client Company’s Tax ID / VAT Number and inserted it into the document template.
39. At this stage, all symbolic codes related to the Client Company’s information have been added to the document template, including:
- Company Name
- Contact Person Name
- Email Address
- Phone Number
- Company Address
- Tax ID / VAT Number
Before proceeding with additional fields, we will test the document generation process to ensure that all client information is being retrieved and displayed correctly within the template.

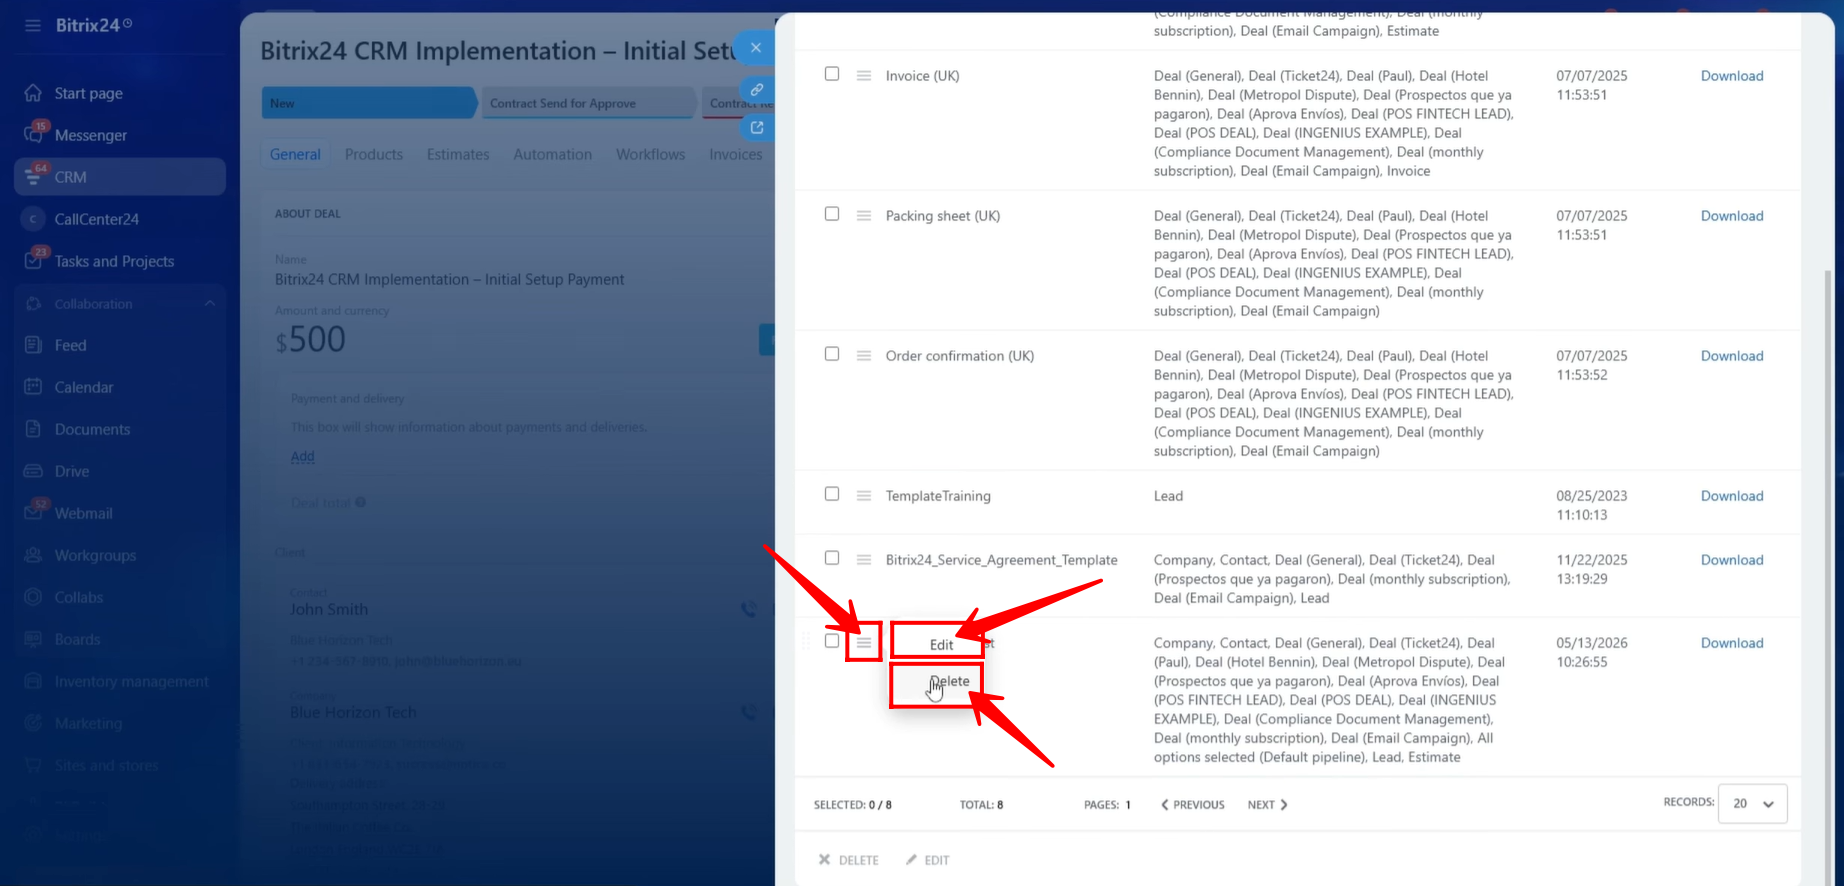
40. If necessary, you can delete the existing template from the Documents section and create a new one. Alternatively, you can edit the existing template to uppload the new template with updated symbolic codes without creating a completely new template. This approach is typically preferred when making minor modifications or adding additional fields to an existing document template.
41. While editing the existing template, click “Upload New” to upload the updated version of the document template. Once the updated file has been uploaded successfully, click “Save” to apply the changes.
42. After updating the template, we replaced the previously referenced document with the updated version. To test the changes, navigate back to the Deal card, click “Document”, and then select the template name that was updated.
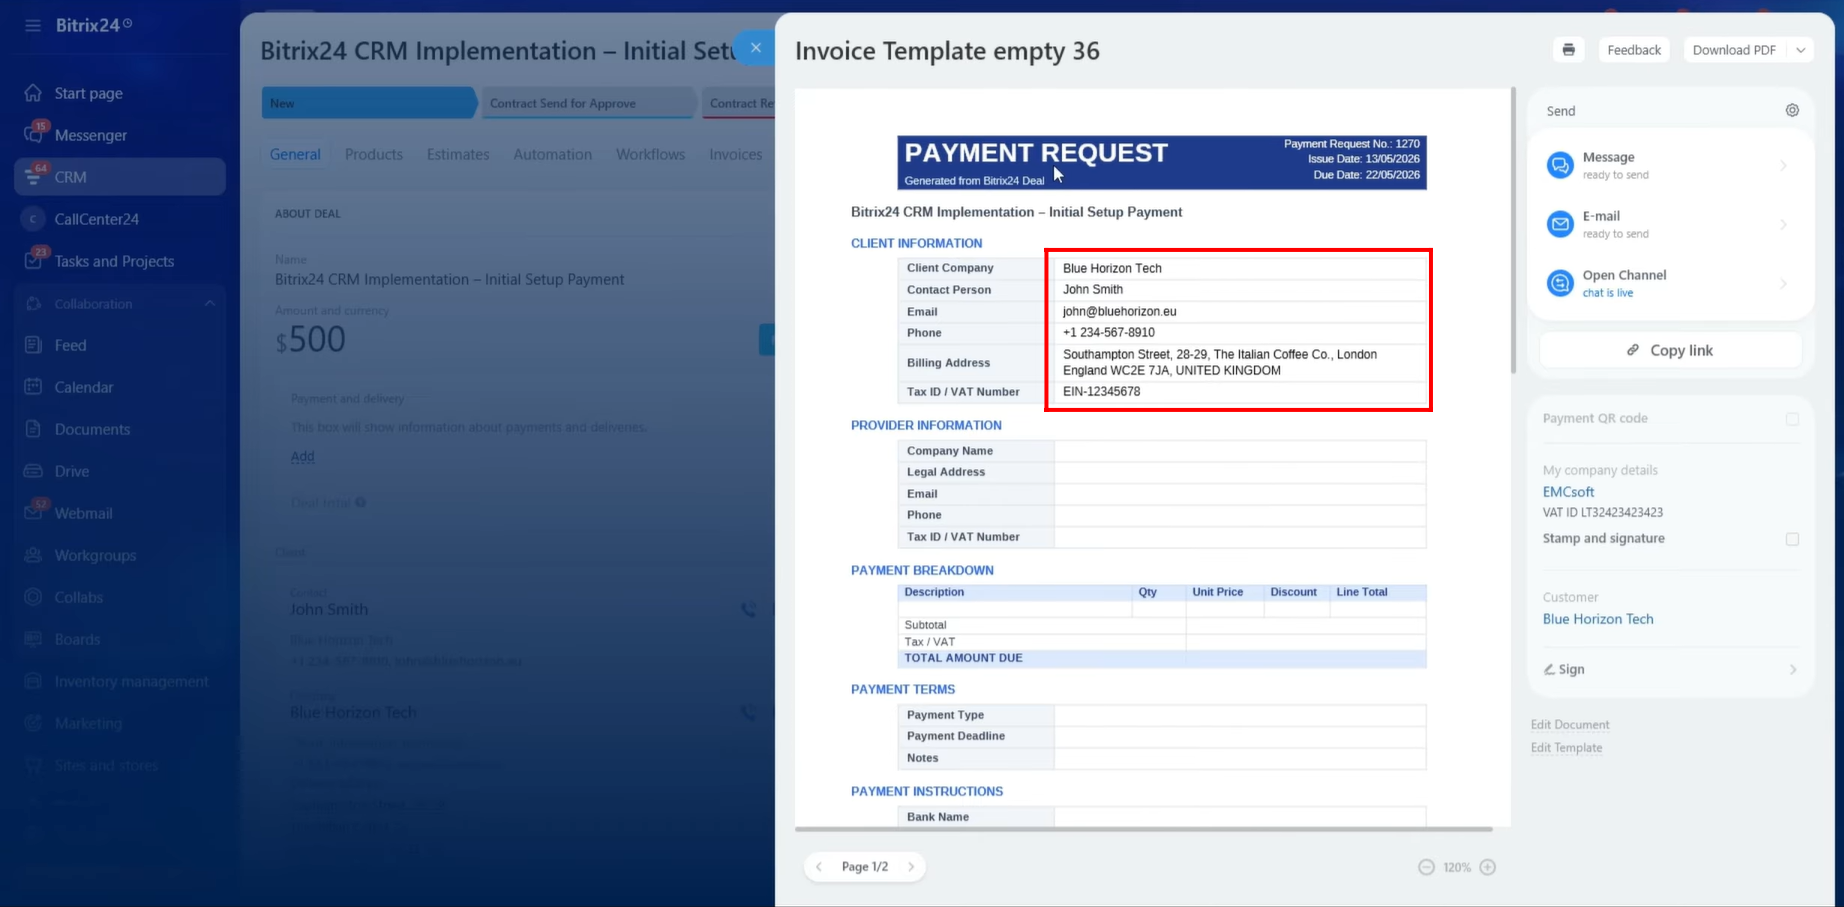
43. The document was generated successfully, and all Client Company information was retrieved from the CRM and populated into the template correctly. We reviewed and verified that all information displayed in the document matched the data stored within the CRM.
44. Next, we copied the symbolic code for our own Company’s Name. You may notice an important difference between the symbolic code used for the Client Company and the one used for your own company.
For the Client Company’s Name, the symbolic code is:
{CompanyTitle}
For your own Company’s Name, the symbolic code is:
{MyCompanyTitle}
This distinction is important because Bitrix24 treats client company information and your company’s information as separate data sources.
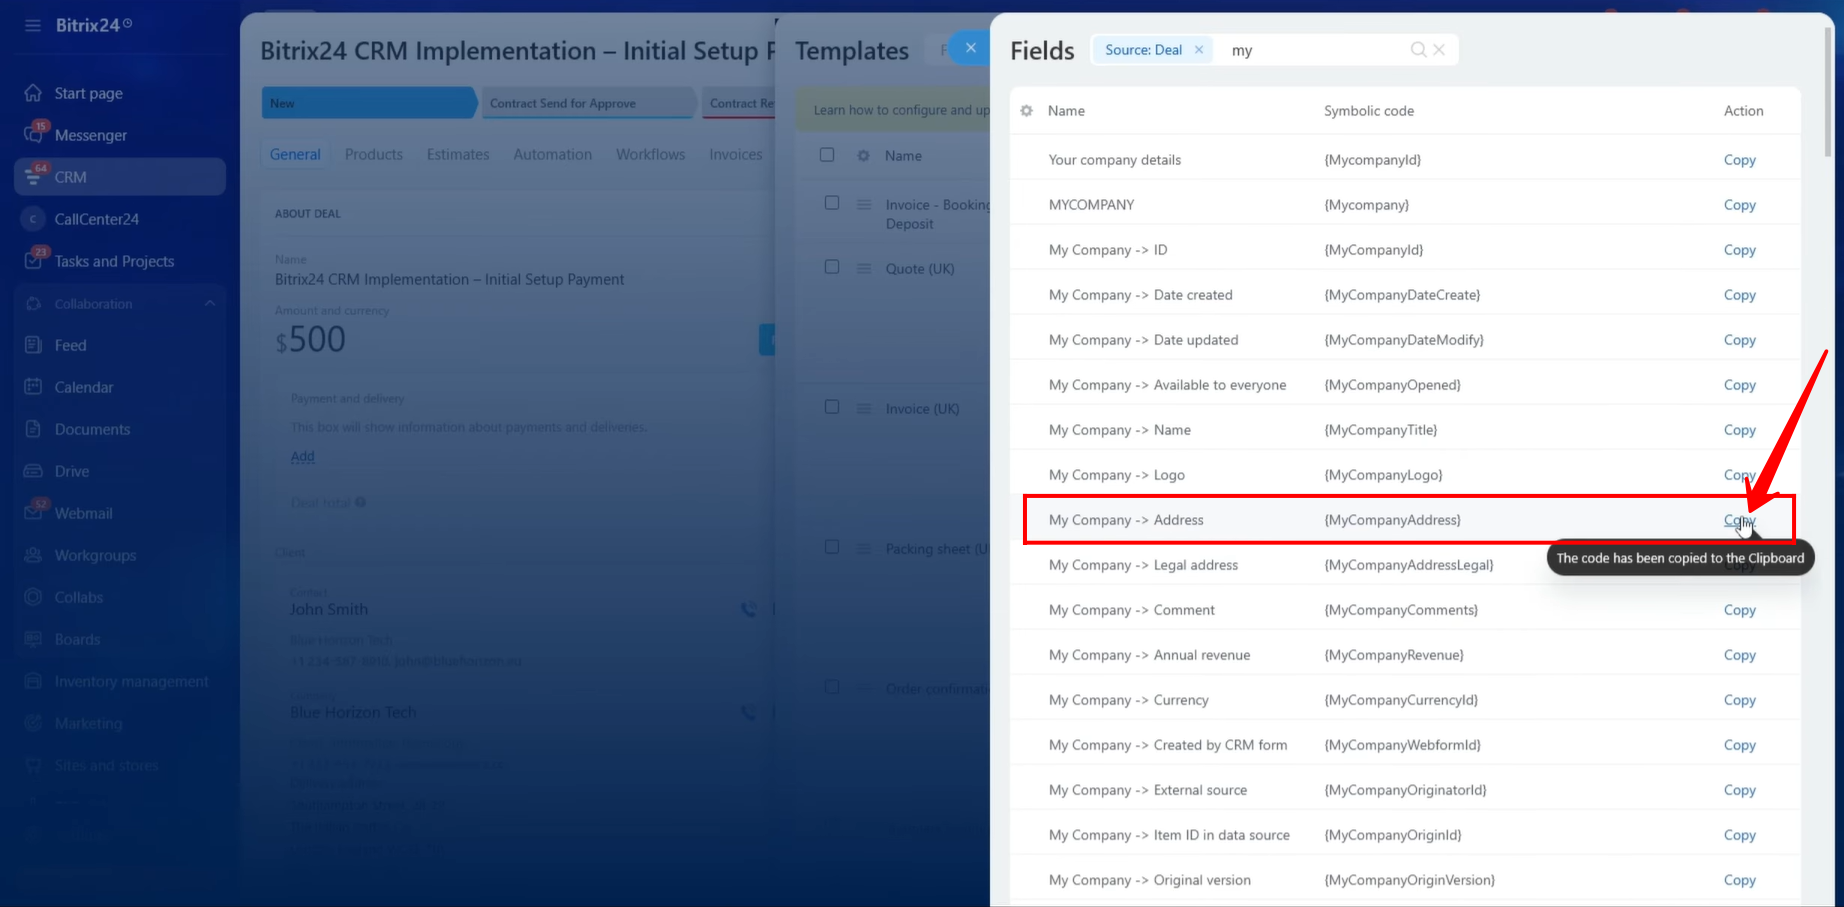
45. Similarly, we copied the symbolic code associated with our company’s address and inserted it into the appropriate section of the document template.
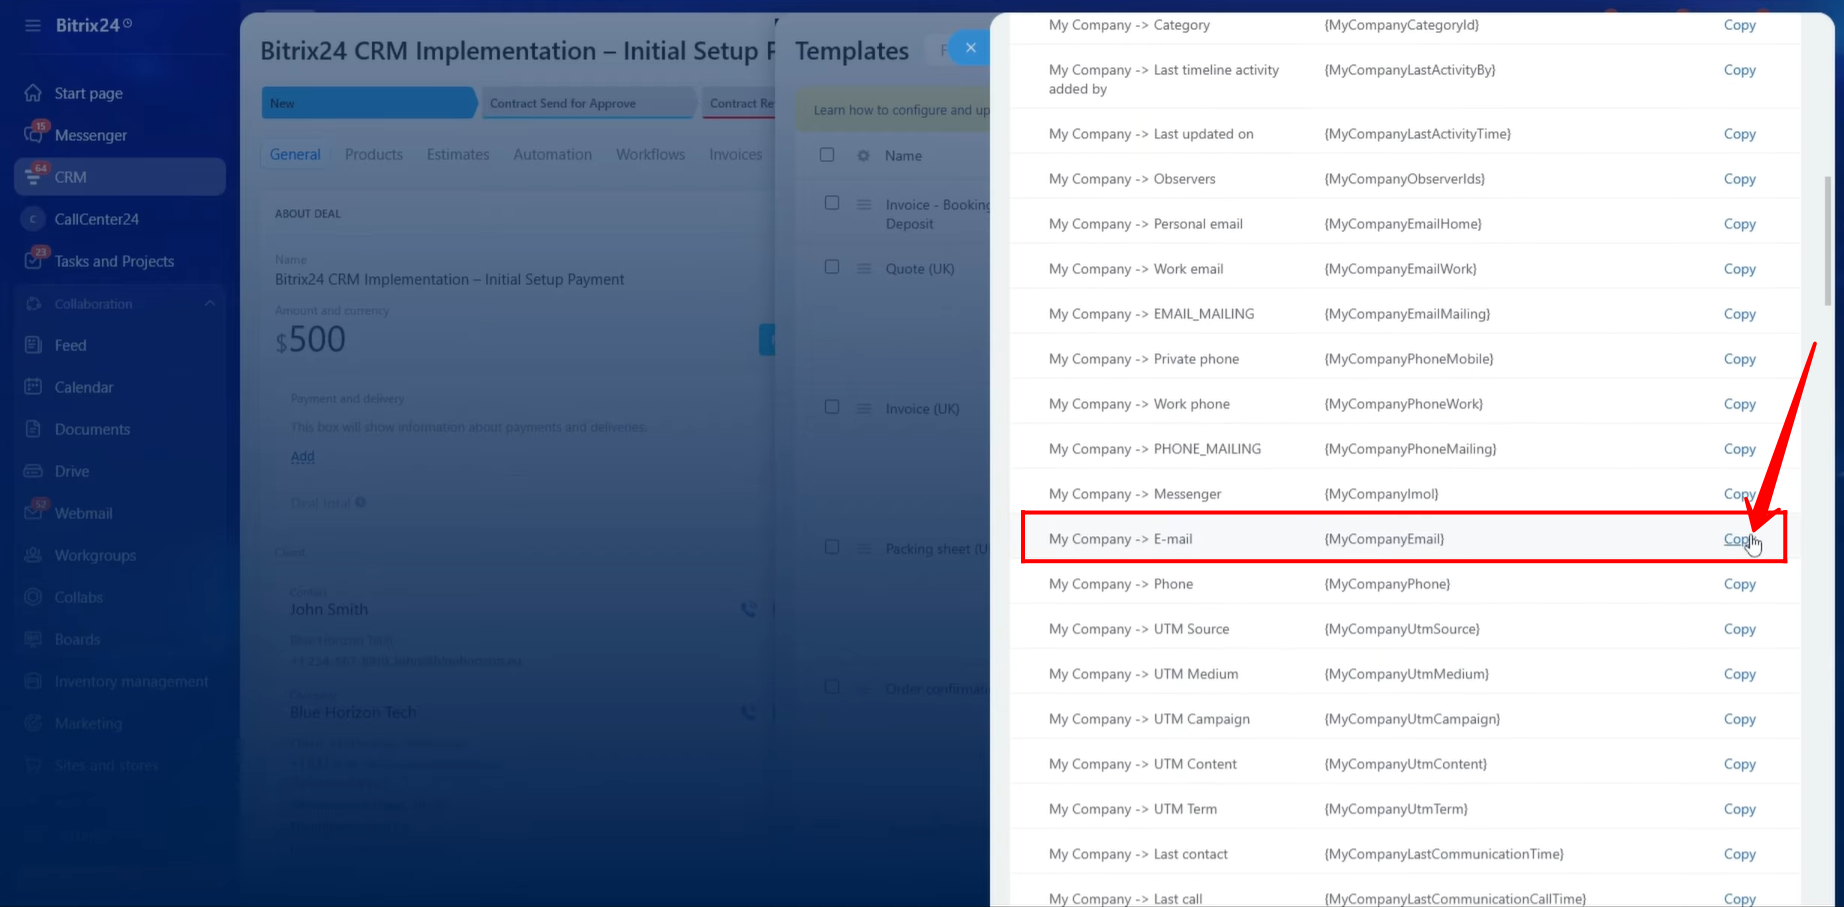
46. Next, we copied the symbolic code for our company’s email address and added it to the template.
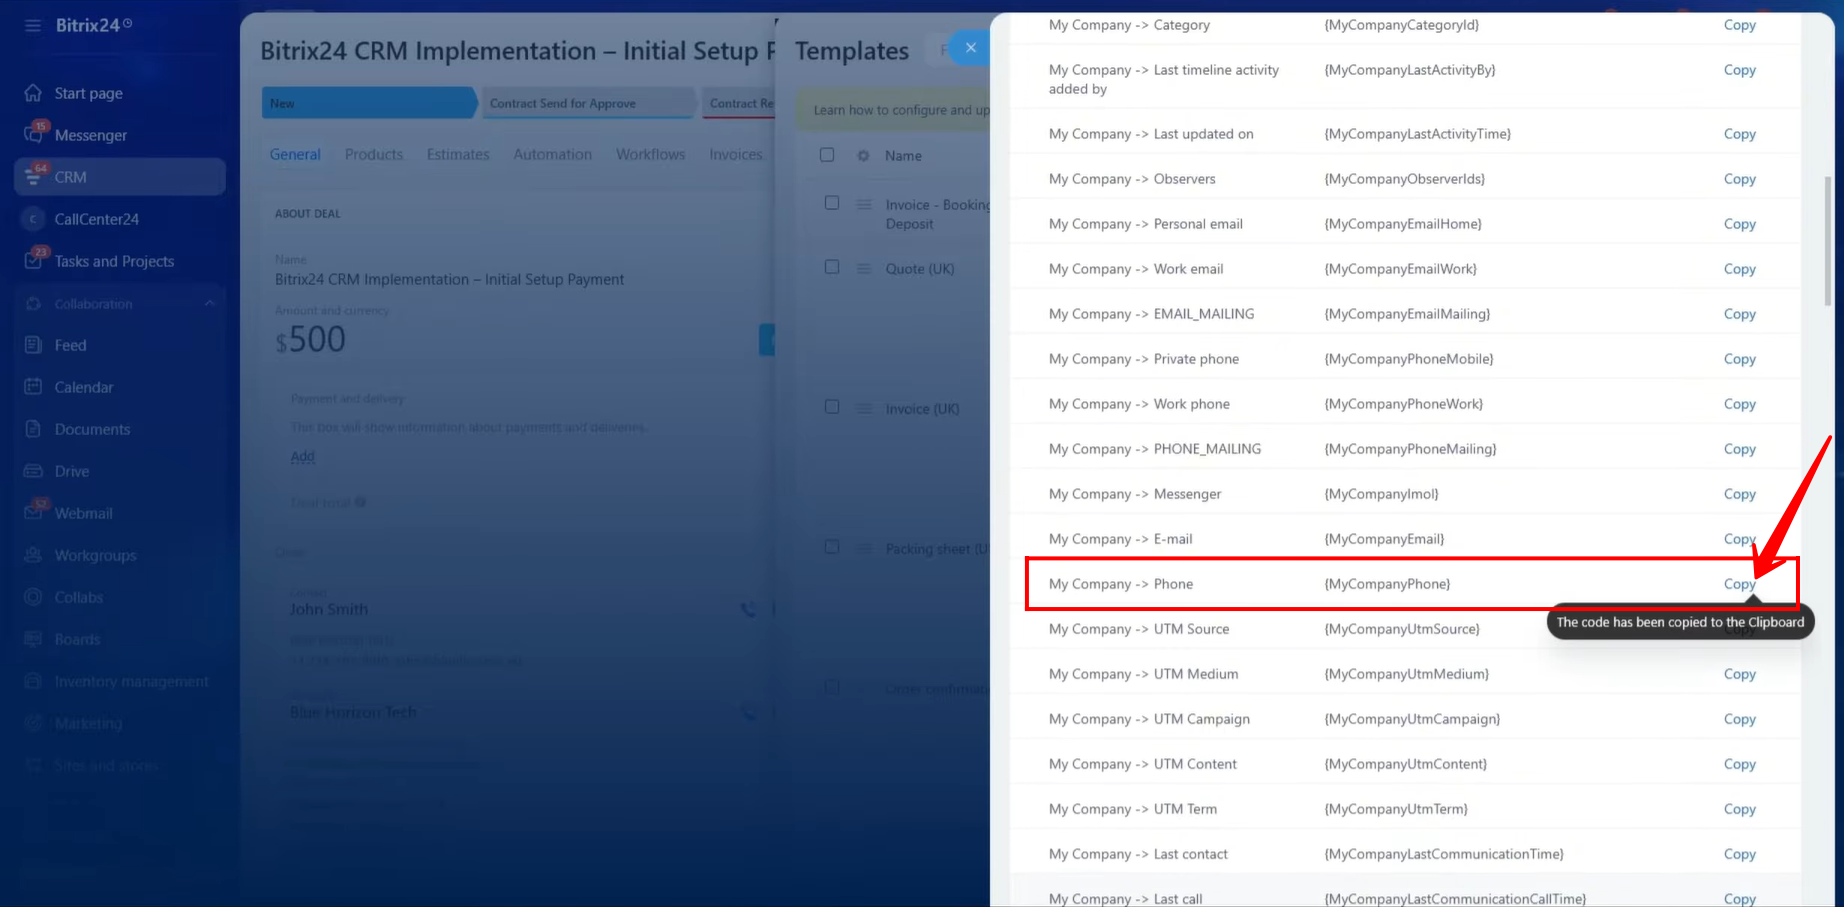
47. We also copied the symbolic code for our company’s phone number and inserted it into the document template.
48. To identify the correct symbolic code for our company’s VAT ID, we right-clicked on the VAT ID field and selected “Inspect.” This redirected us to the corresponding section of the page’s HTML code, allowing us to identify the exact field reference.
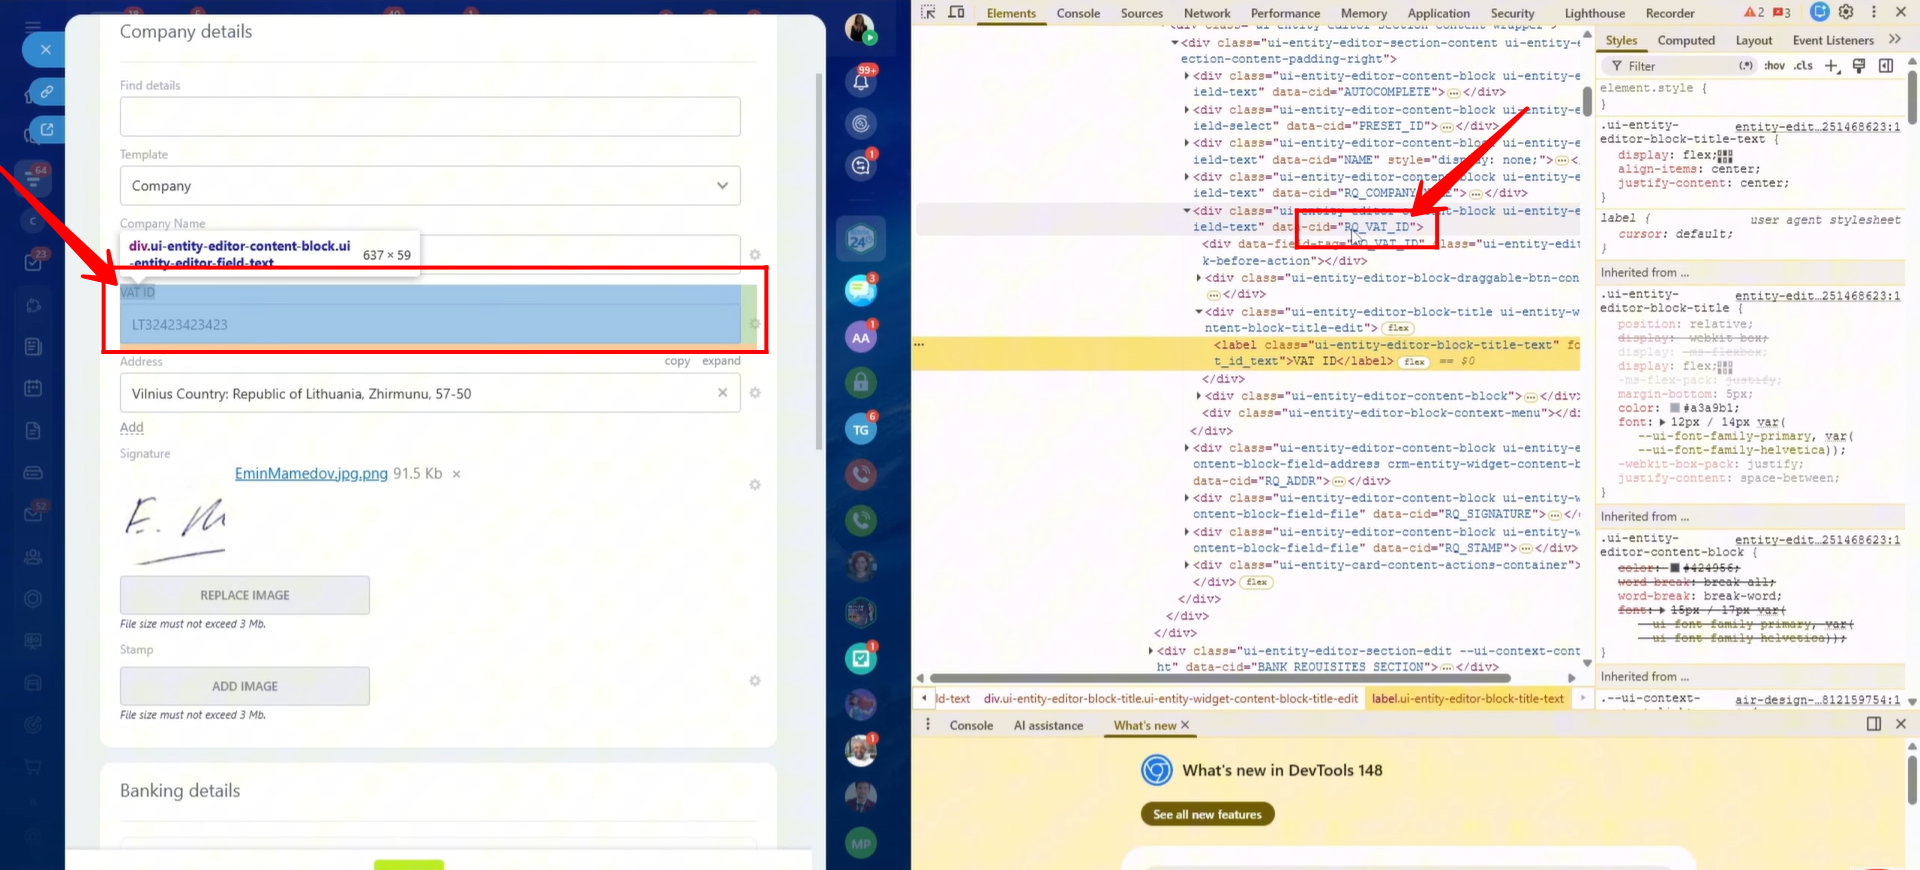
49. The purpose of inspecting the field is that multiple VAT-related symbolic codes may be available, making it difficult to determine the correct one.
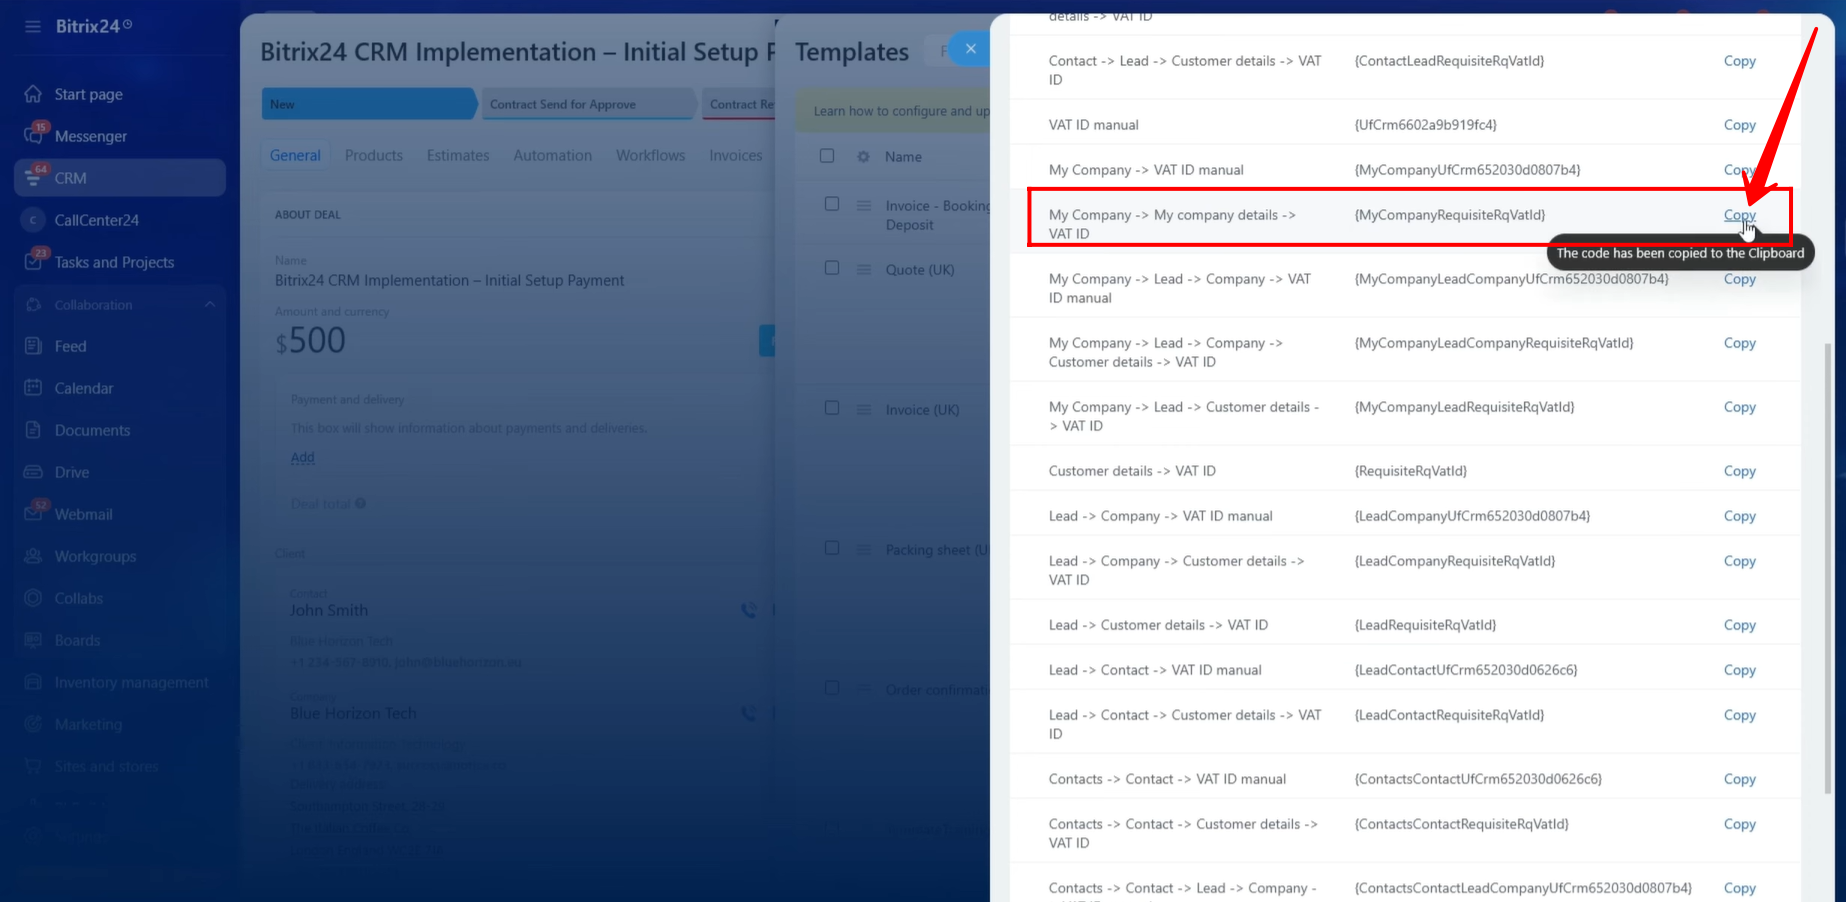
After reviewing the available options, we identified the correct symbolic code for our company’s VAT ID as:
{MyCompanyRequisiteRqVatId}
This symbolic code should be used whenever the company’s VAT ID needs to be displayed within a document template.
50. After identifying all required symbolic codes, we added them to the Provider Information section of the document template. This section now contains the following company details:
- Company Name
- Company Address
- Company Email Address
- Company Phone Number
- VAT ID
These symbolic codes will automatically retrieve and populate the company’s information whenever a document is generated from the template.

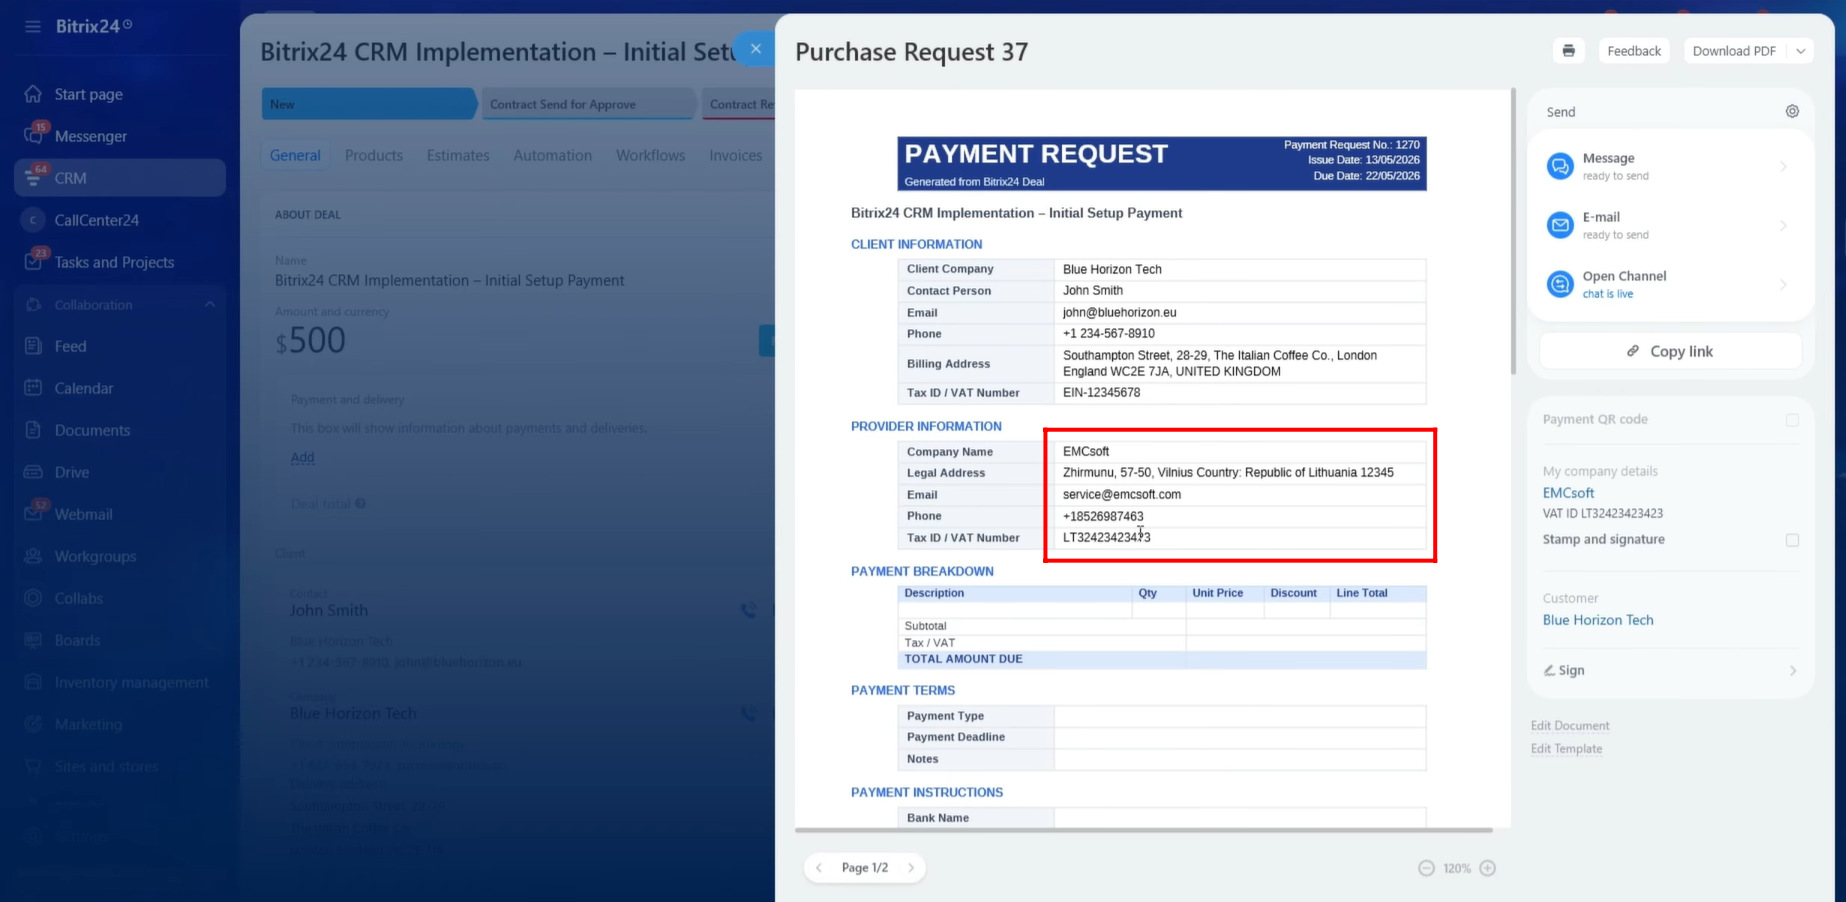
51. After generating the document, all Provider Company information was successfully retrieved from the CRM and populated into the document template. We reviewed the generated document and verified that all company details were displayed correctly.
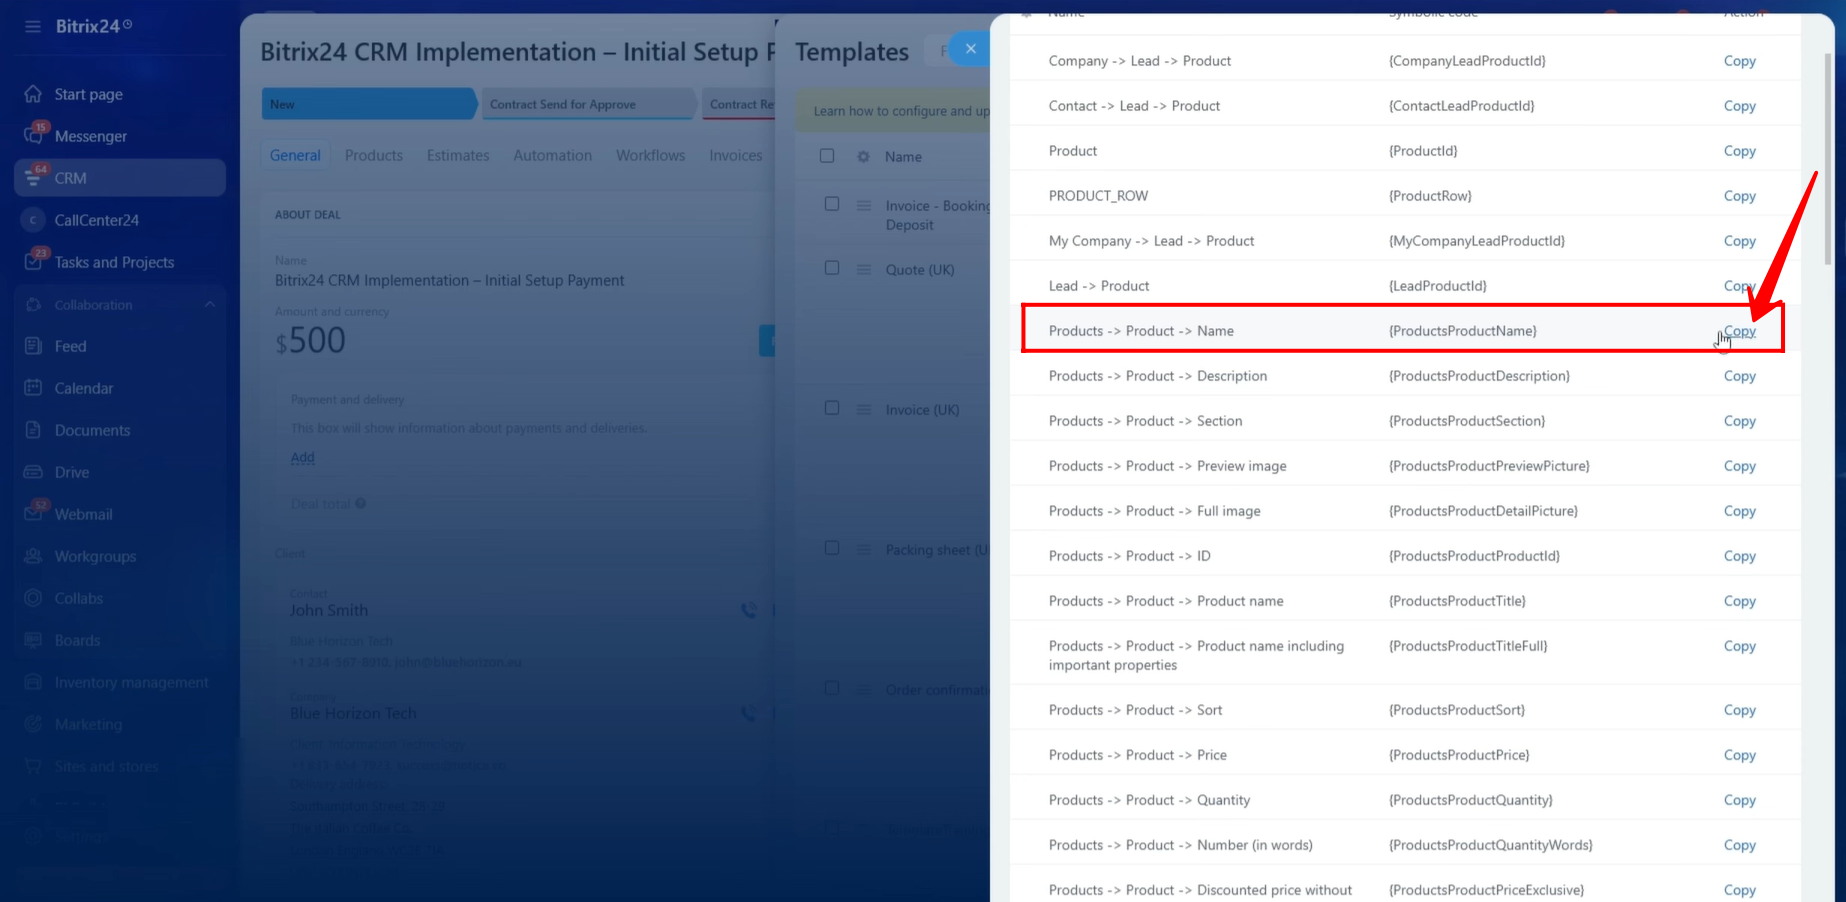
52. Next, we moved to the Payment Information section of the document template. The first field required in this section is the Product Description.
In our case, the Product Name itself clearly represents the purpose of the product. Therefore, we copied the symbolic code associated with the Product Name and inserted it into the Product Description section of the template.
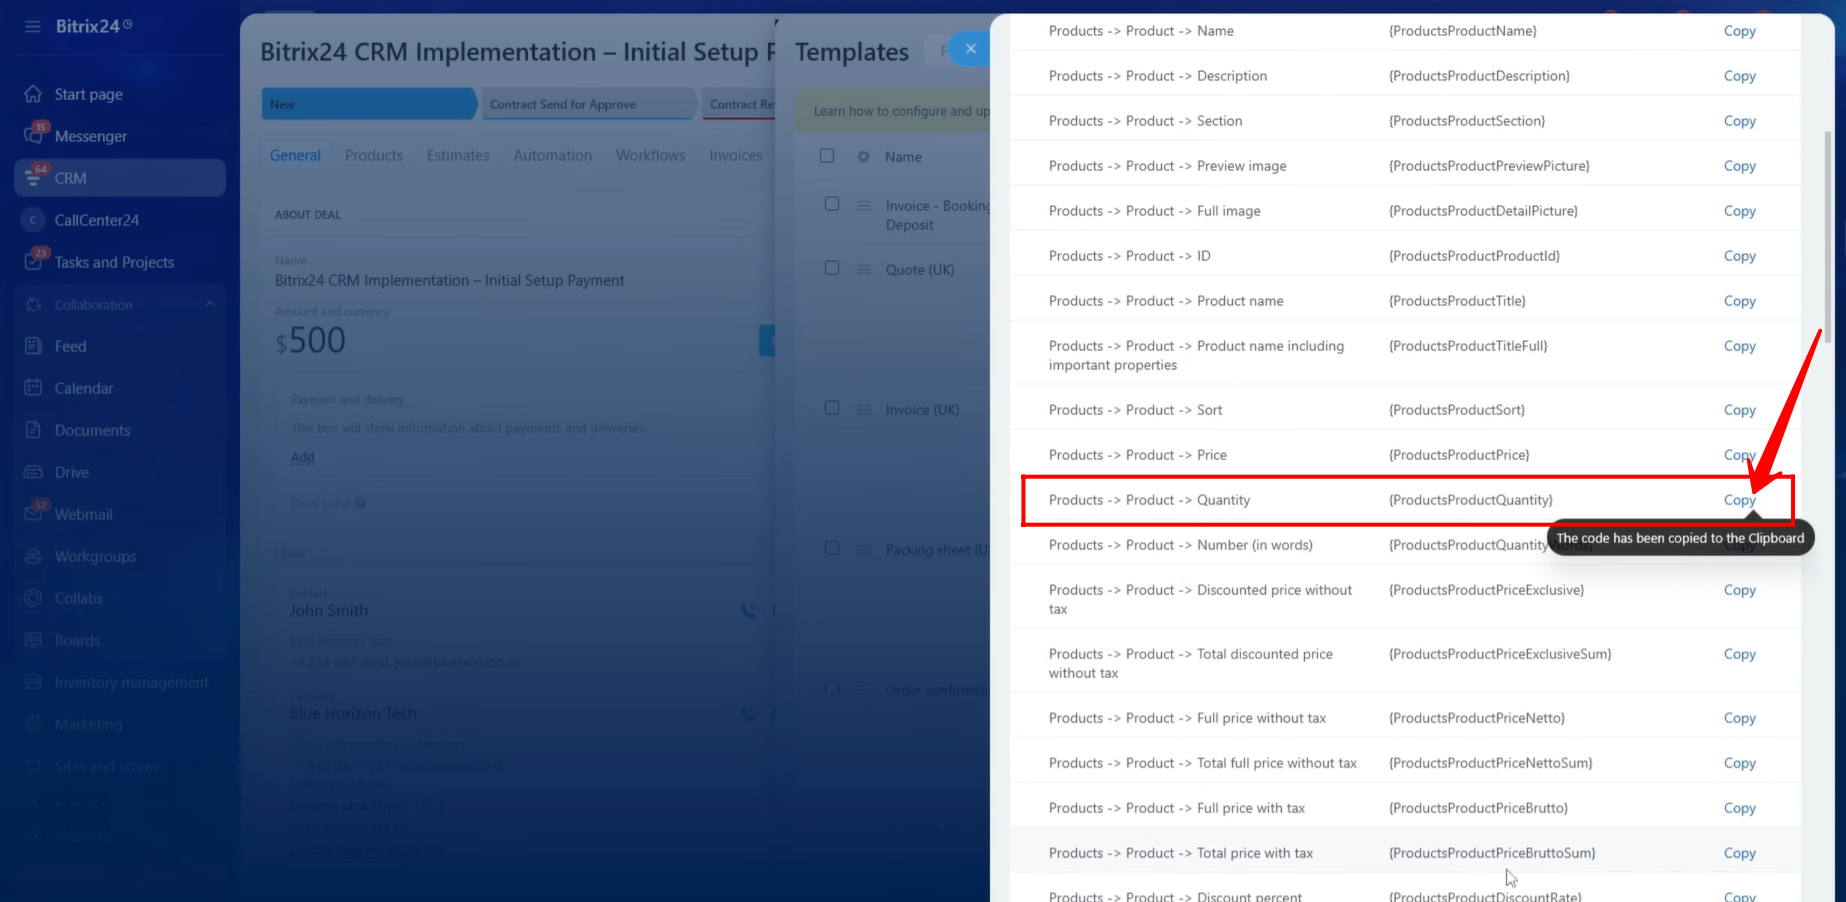
53. To display the Product Quantity in the Payment Information section, we located and copied the symbolic code corresponding to the product quantity field and pasted it into the document template.
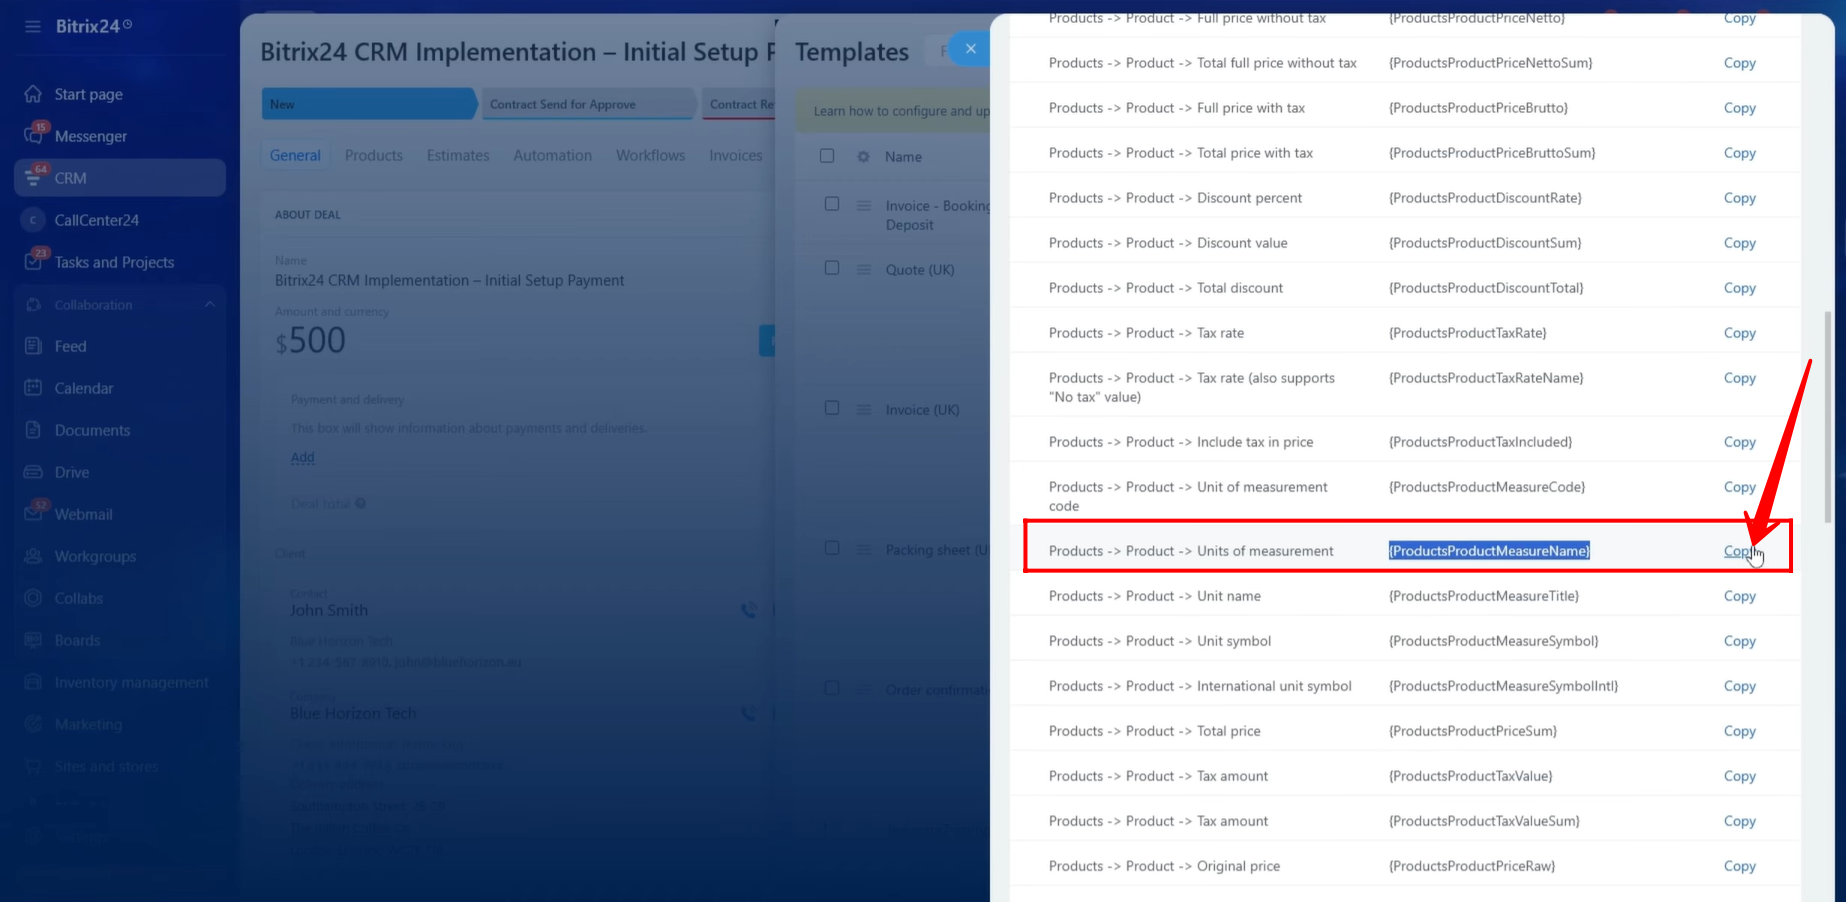
54. To display the Unit Price of the product, we copied the appropriate symbolic code representing the product’s unit price and inserted it into the template.
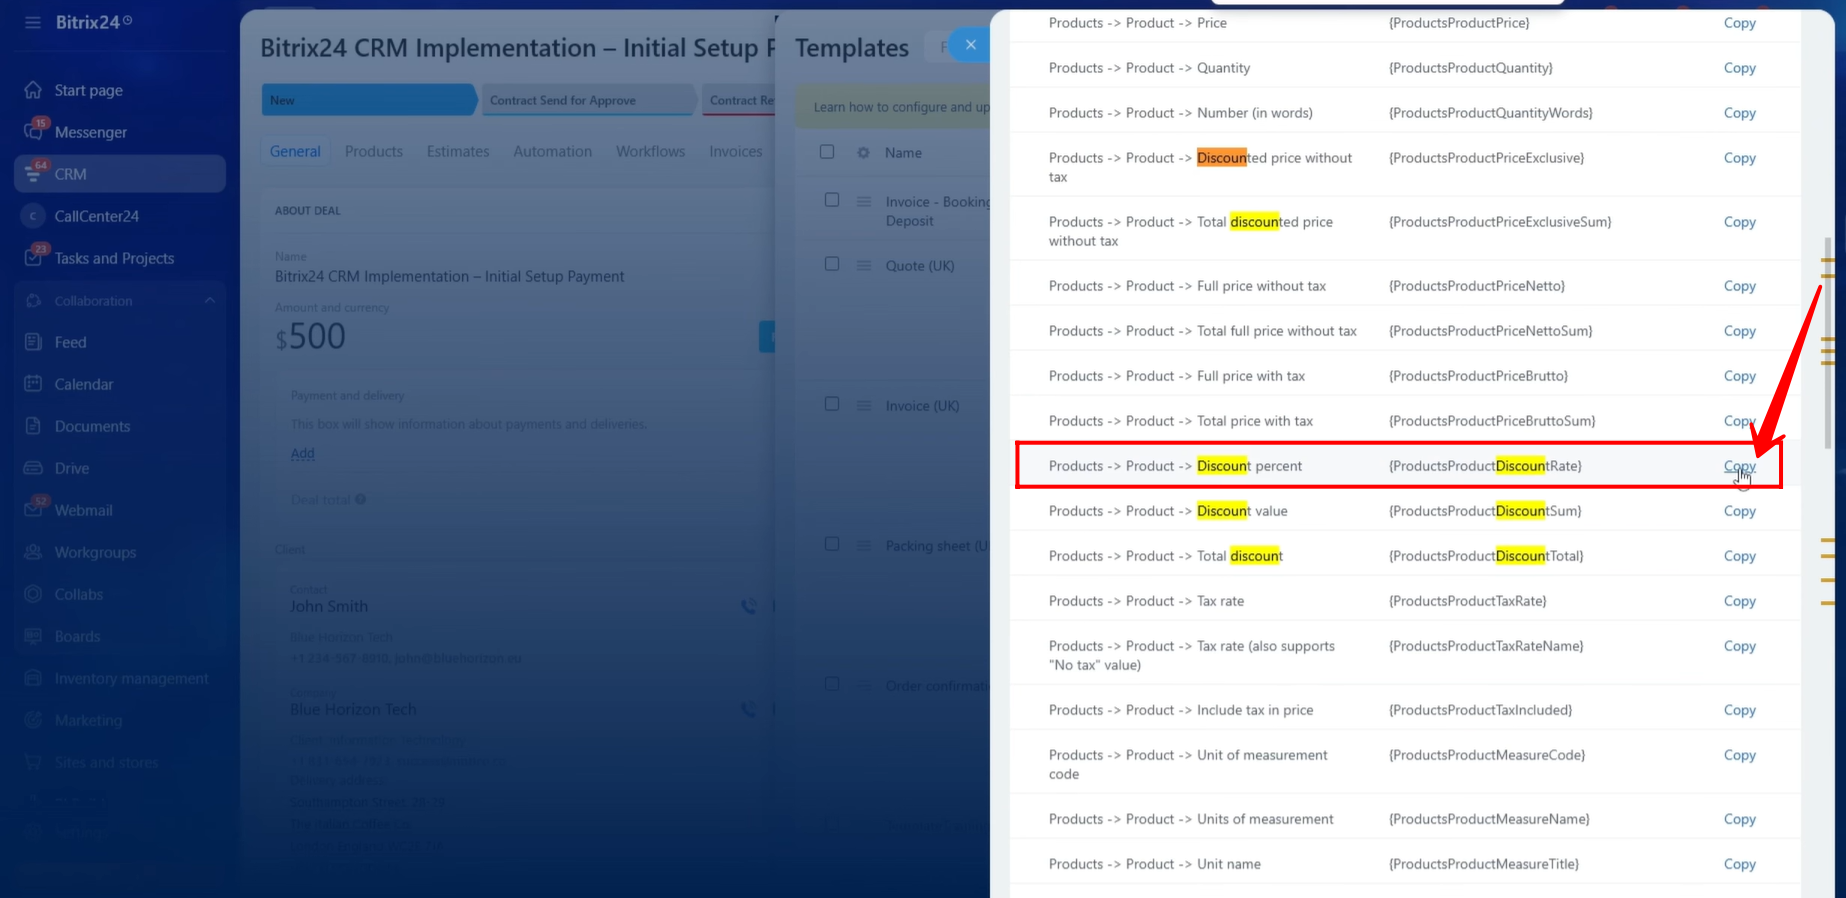
55. To include the Discount Percentage within the Payment Information section, we copied the symbolic code associated with the product discount value and added it to the template.
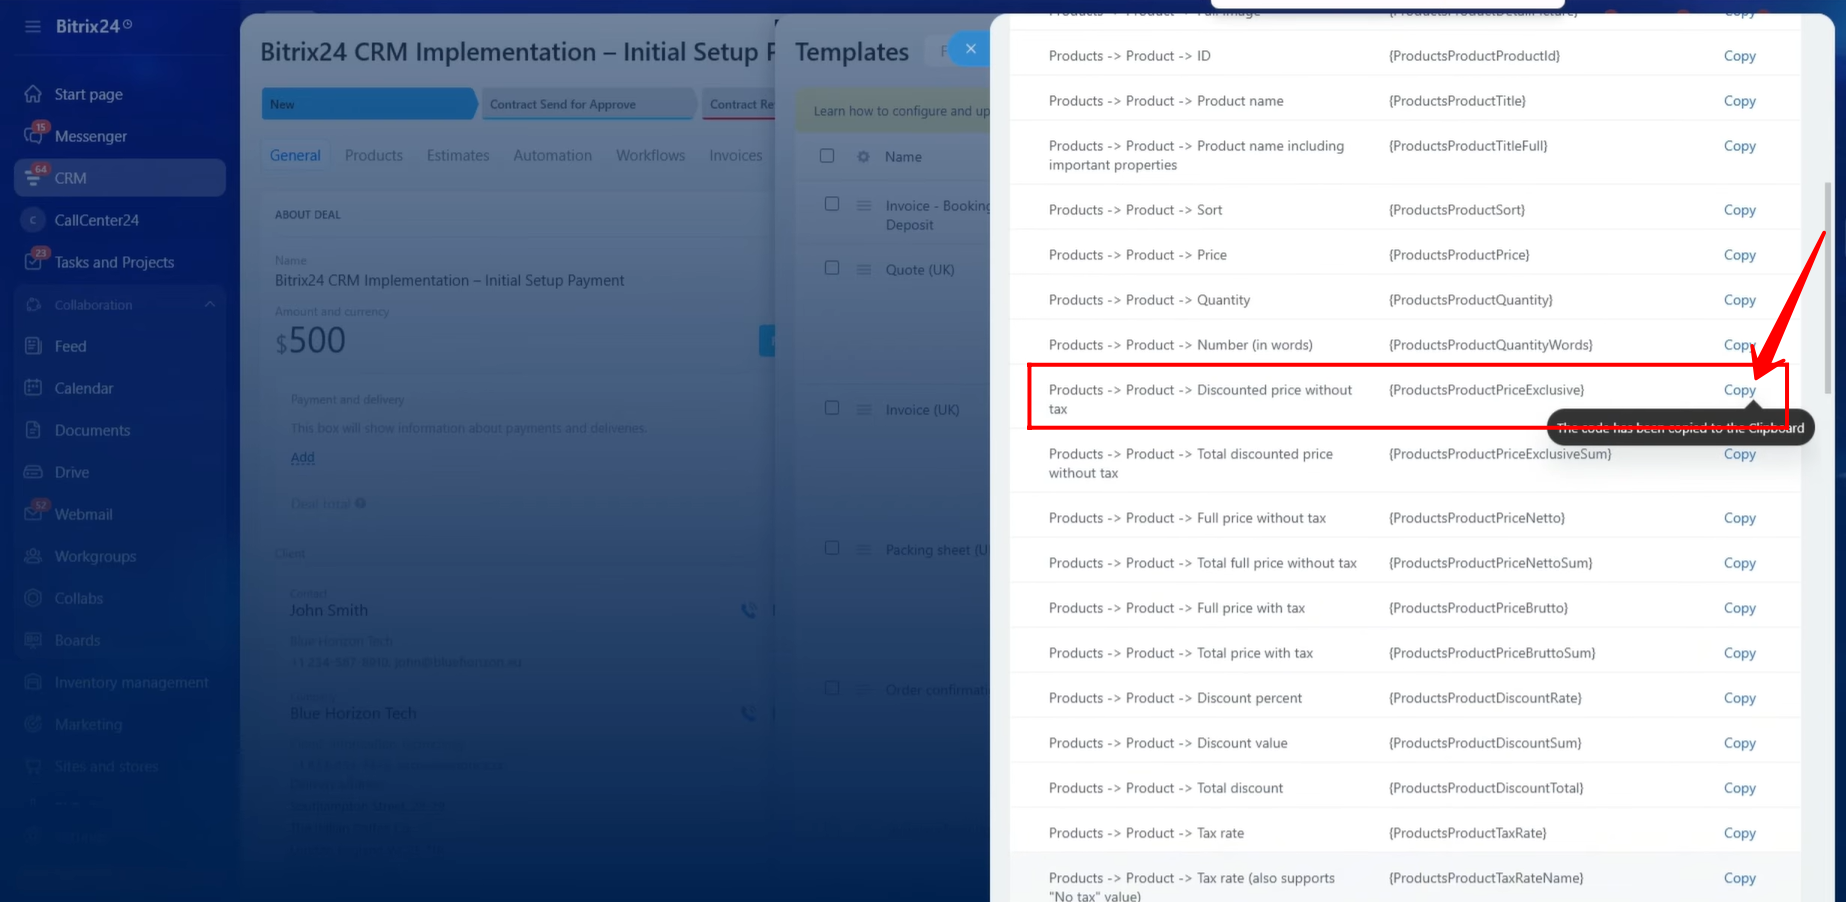
56. To display the Line Total, we copied the symbolic code representing the discounted amount before tax and inserted it into the document template.
57. To display the Subtotal, we copied the symbolic code that returns the total amount before tax and placed it in the appropriate section of the template.

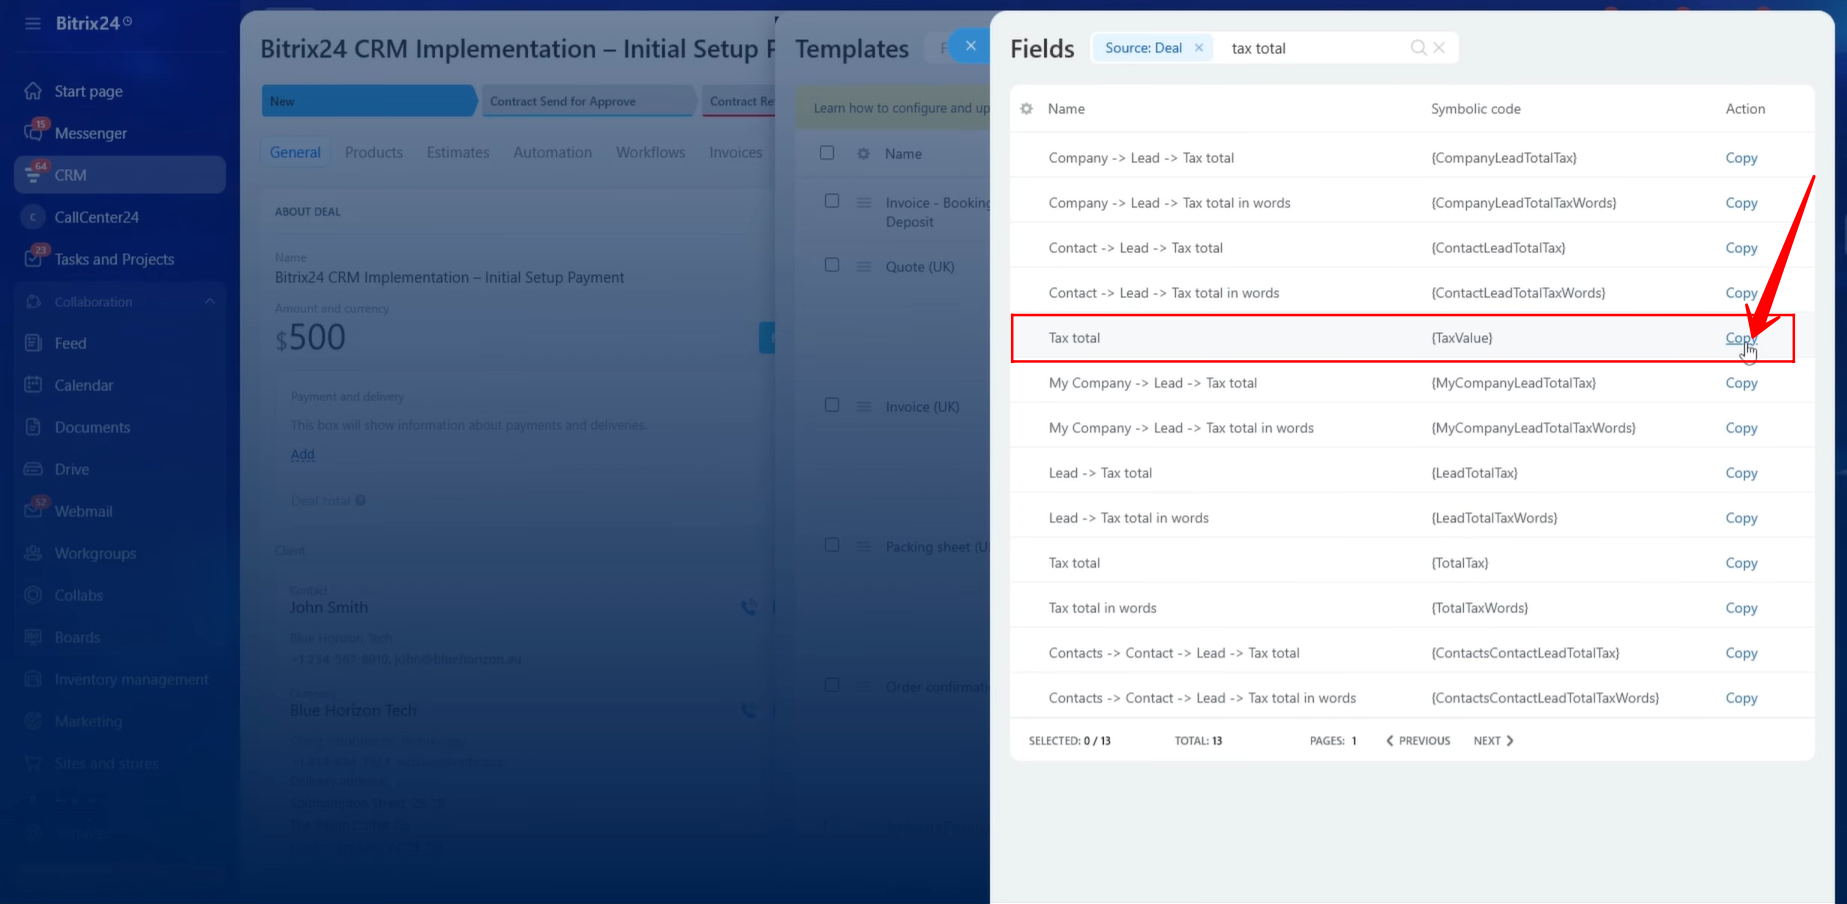
58. To include the Tax/VAT value within the Payment Information section, we copied the symbolic code associated with the product tax field and inserted it into the template.
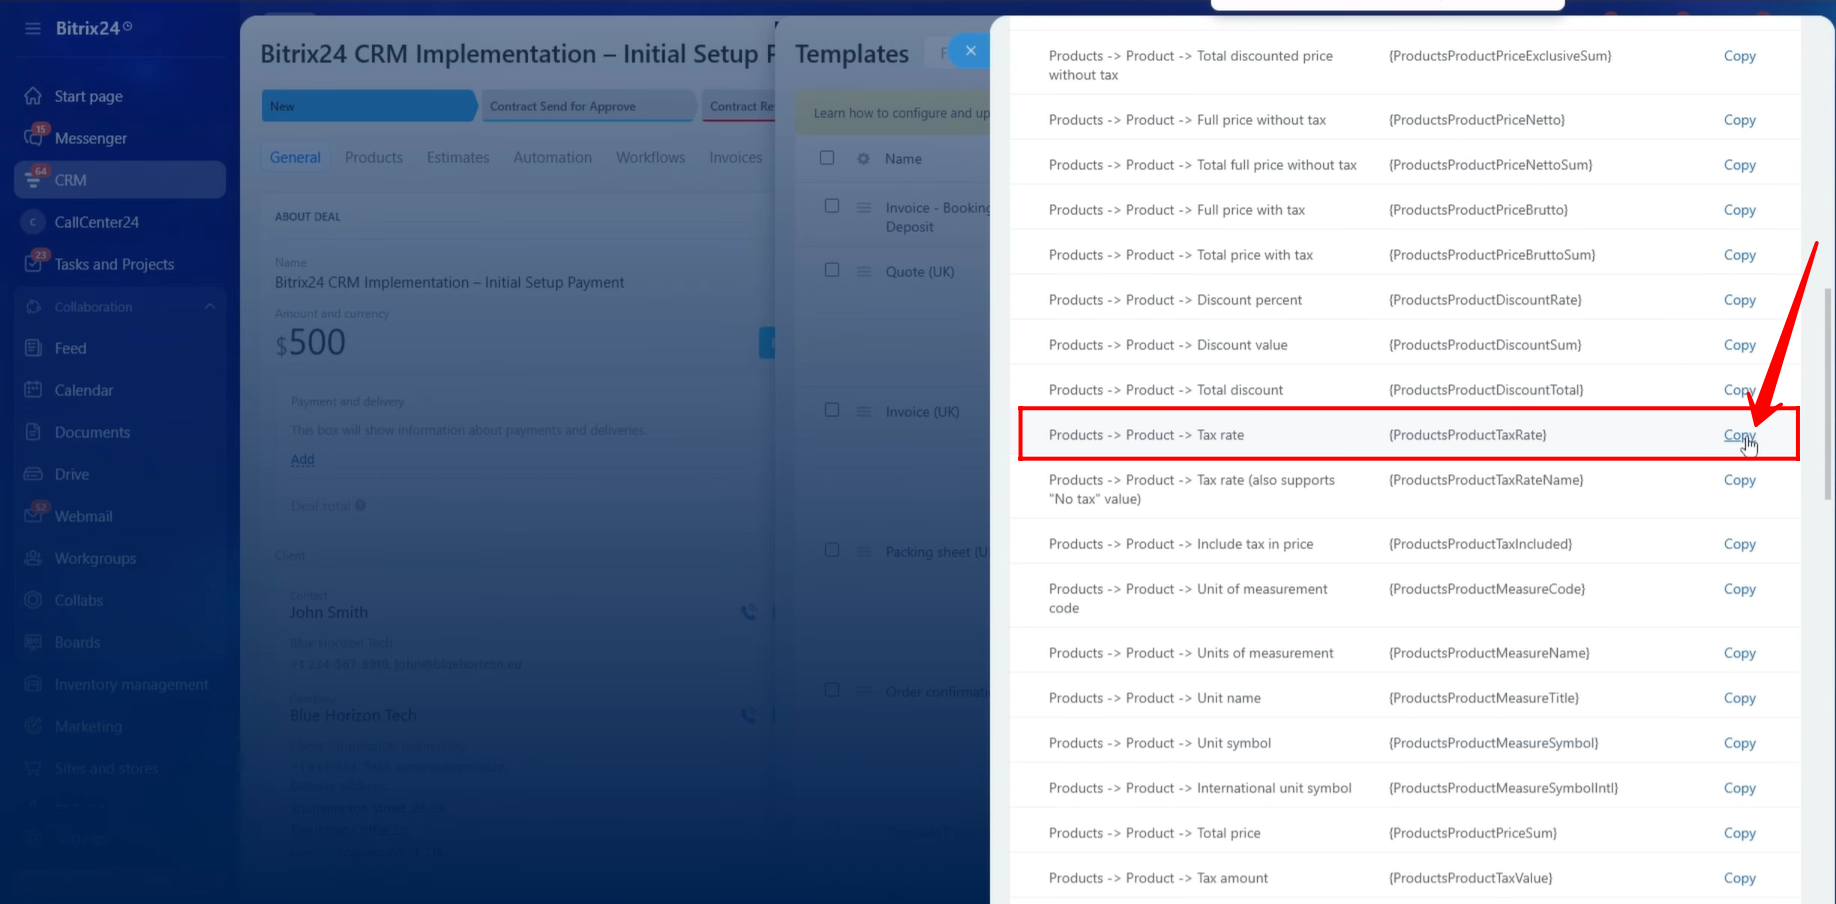
59. To display the Total Amount Due, we copied the symbolic code representing the final payable amount and inserted it into the corresponding location within the document template.
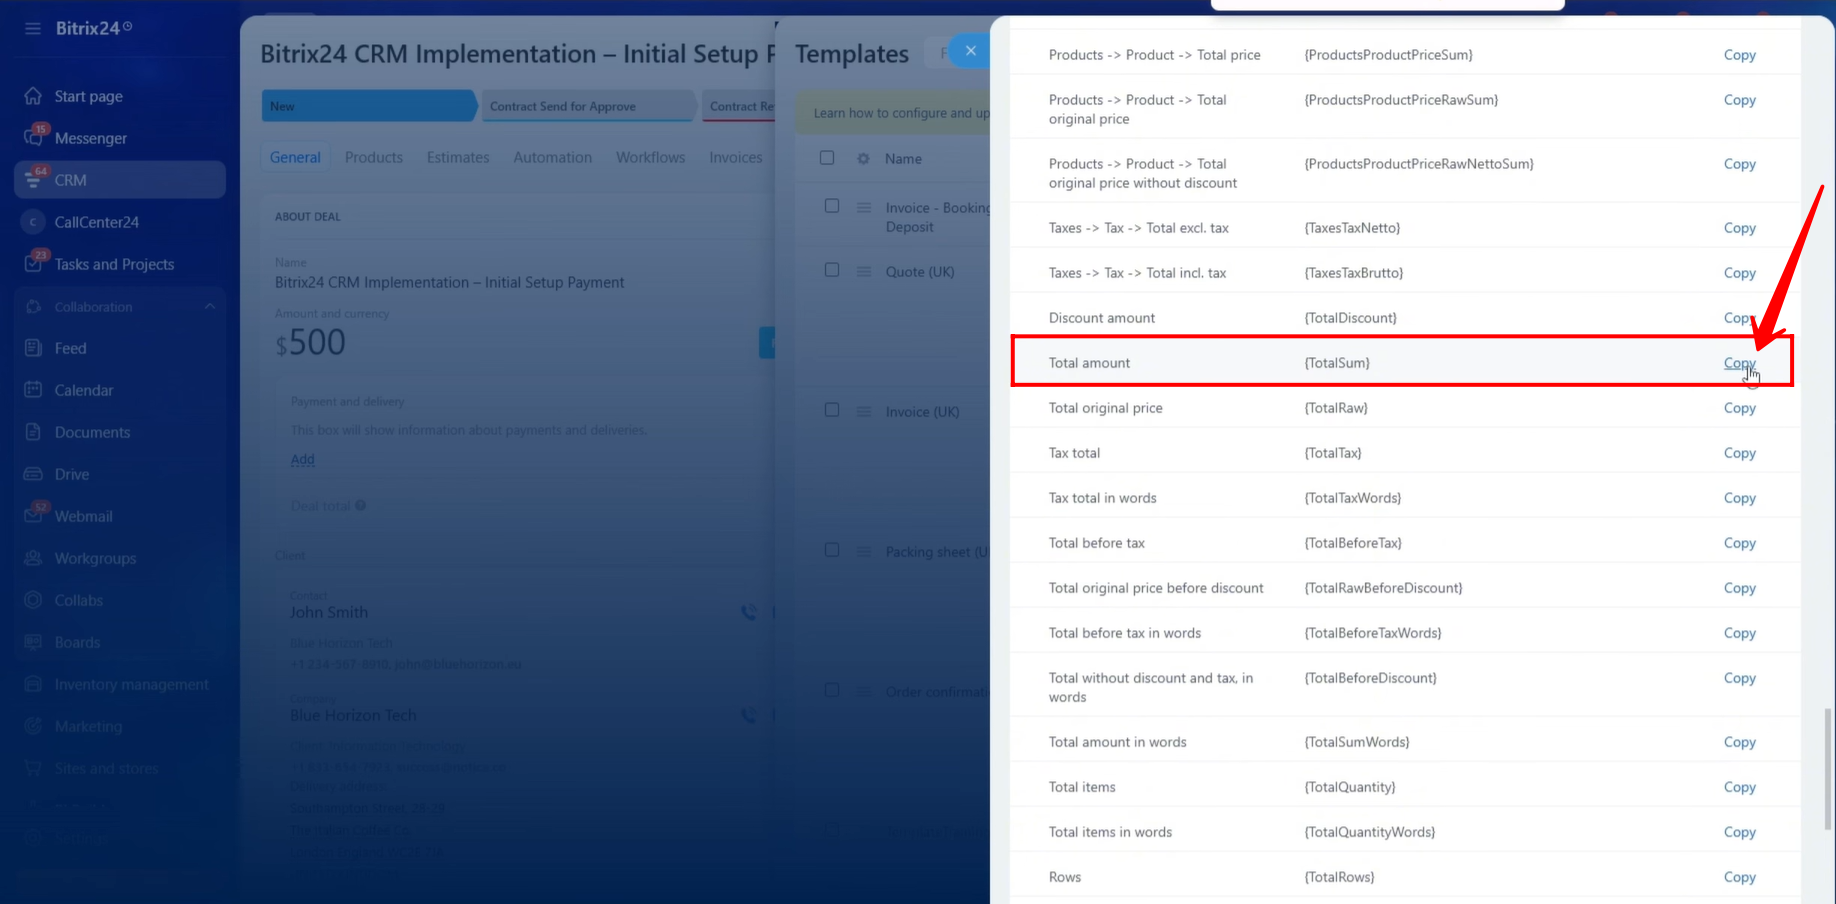
60. At this stage, all symbolic codes related to the payment breakdown have been added to the document template. The Payment Information section now contains placeholders for:
- Product Description
- Quantity
- Unit Price
- Discount Percentage
- Line Total
- Subtotal
- Tax / VAT
- Total Amount Due
When the document is generated, these symbolic codes will automatically retrieve the relevant product and pricing information from the CRM and populate the document accordingly.

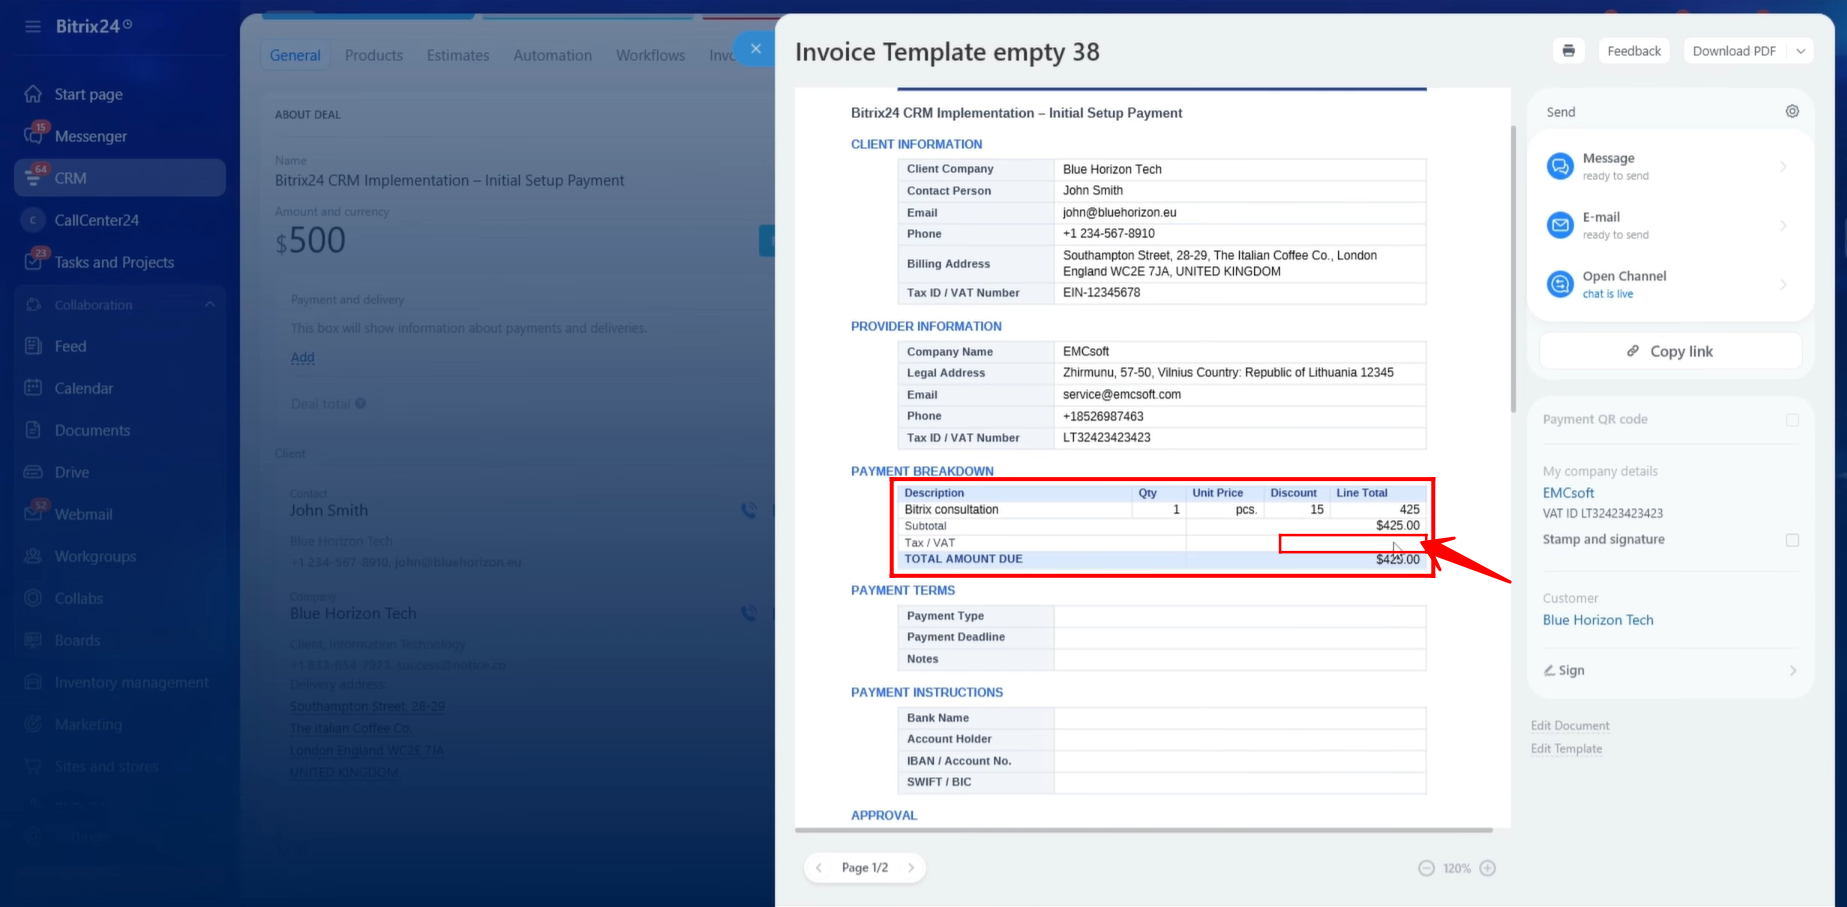
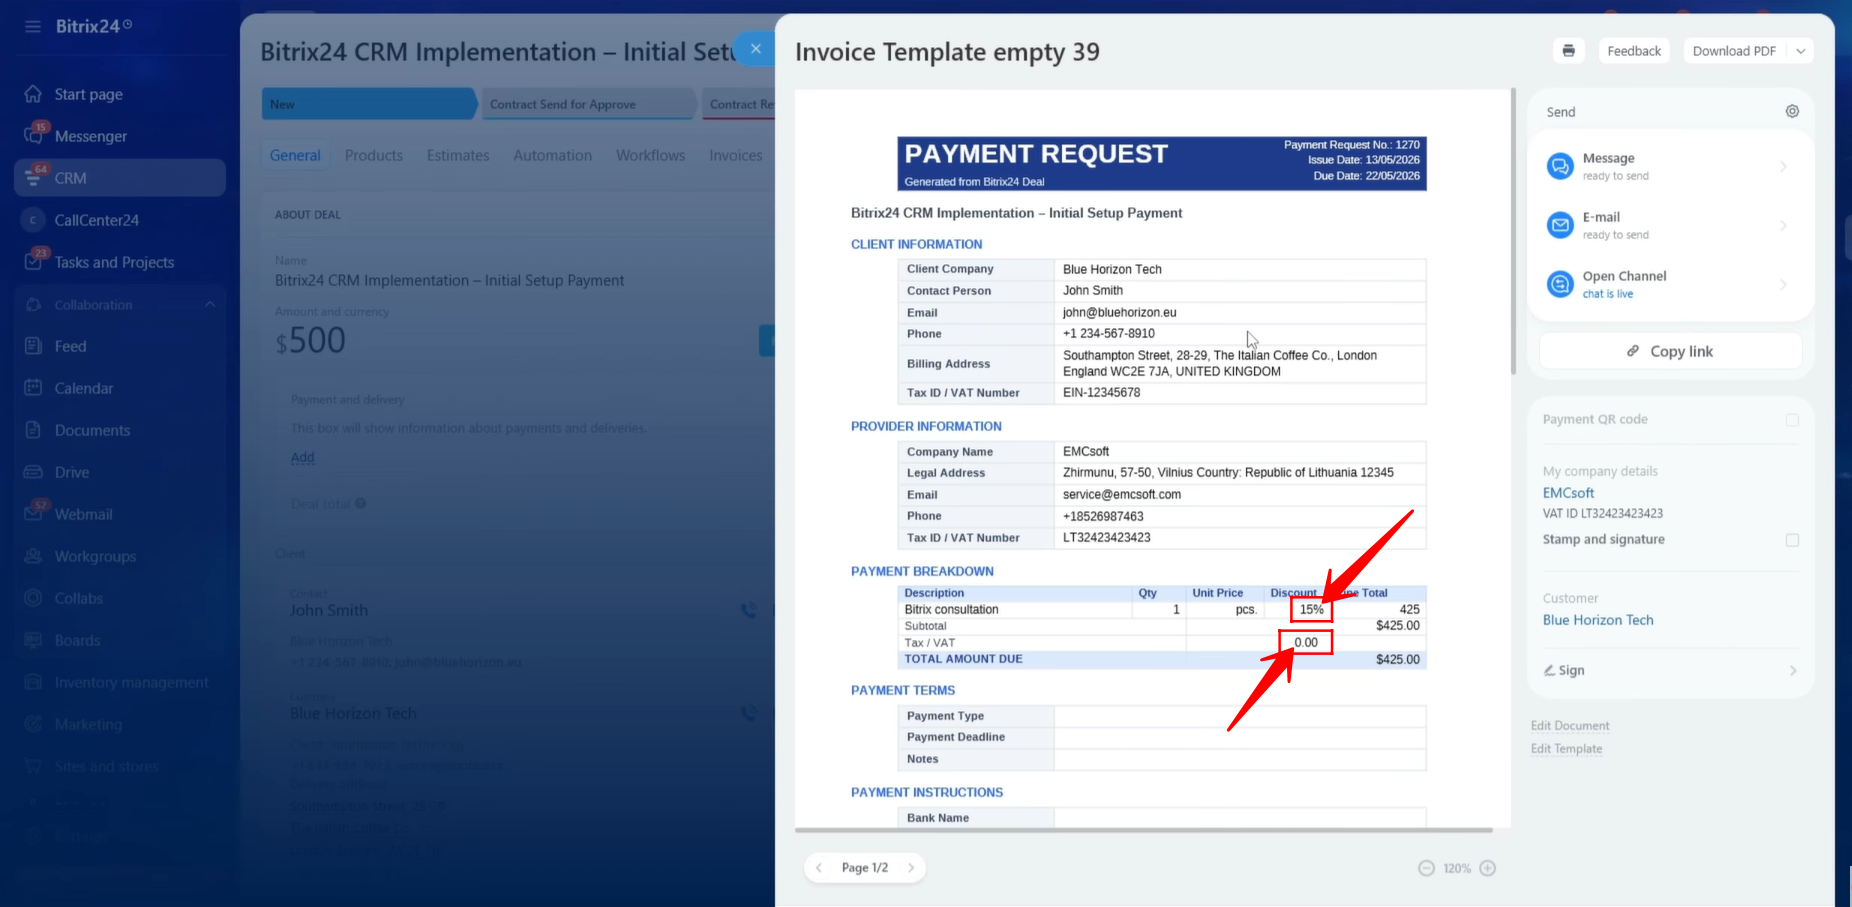
61. After generating the document from the template, we verified that all Payment Information fields were populated correctly except for the Tax/VAT value. Since the Tax/VAT field was not displayed in the generated document, it indicated that an incorrect symbolic code had likely been used. We will identify and correct the issue in the following steps.
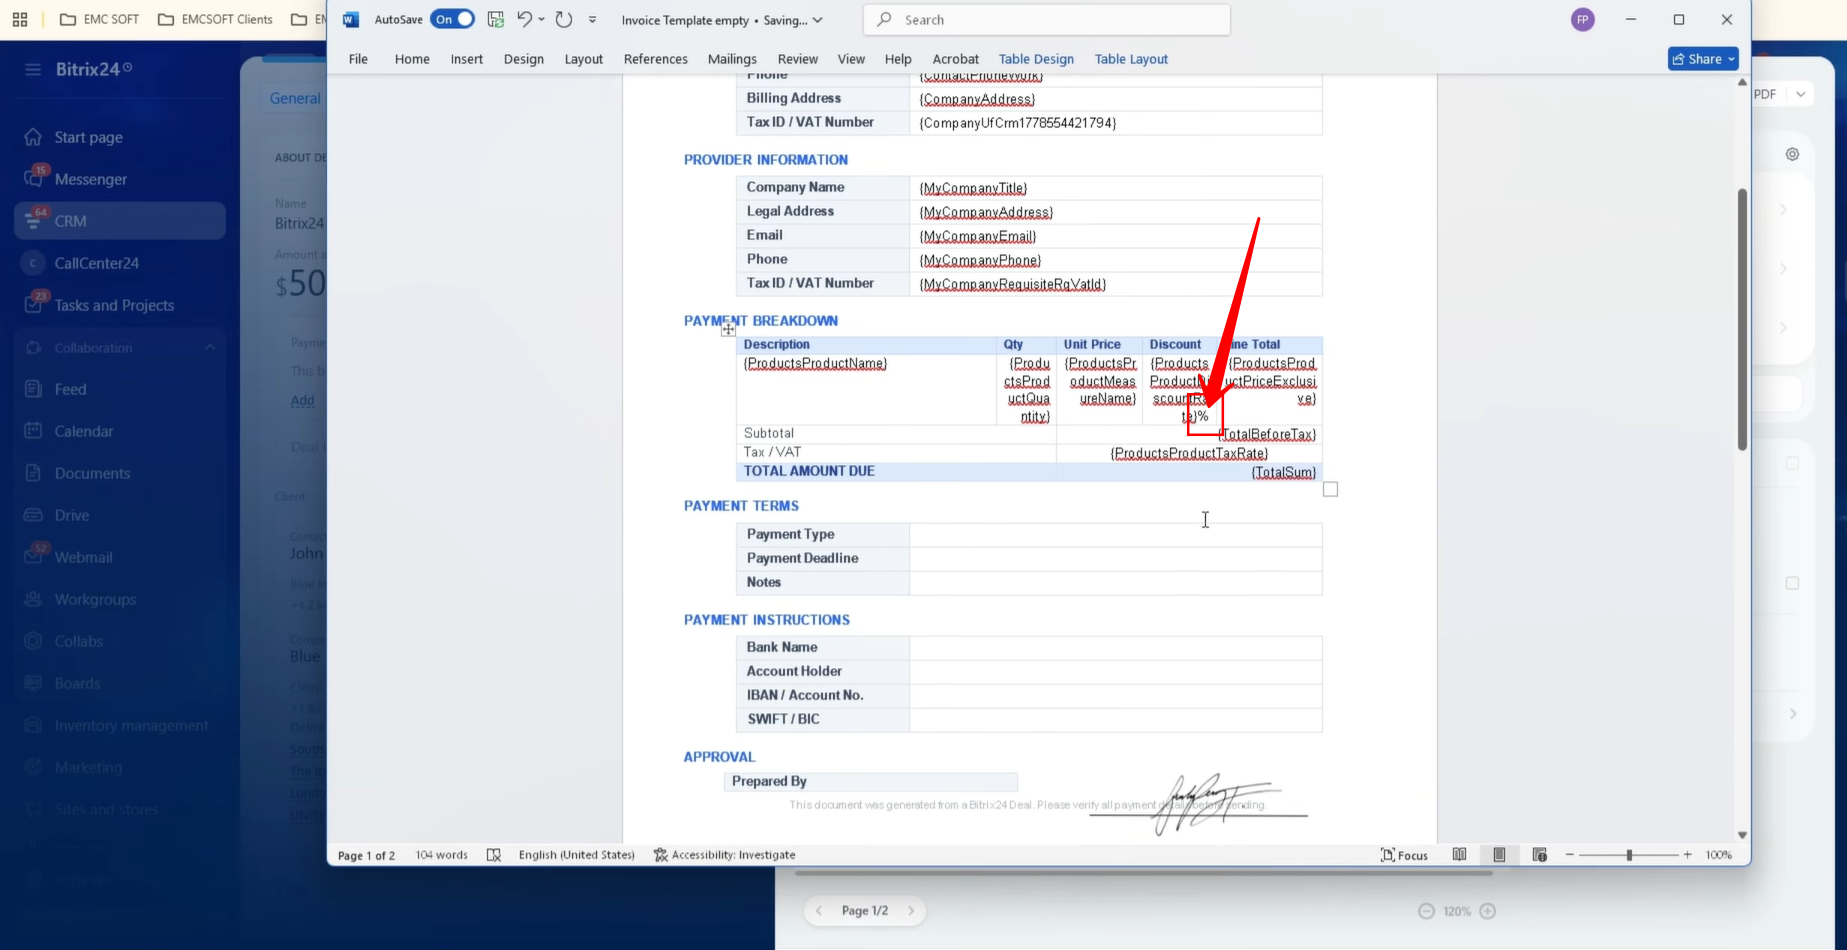
62. You may notice that we manually added the “%” symbol beside the Discount symbolic code within the template. This is necessary because the symbolic code only retrieves the numeric discount value and does not automatically include the percentage sign when displayed in the generated document.
63. To determine the correct Tax/VAT field, we inspected the field using the Inspect method discussed previously. After reviewing the available symbolic codes, we identified the correct symbolic code associated with the product tax value.
64. After updating the template with the correct Tax/VAT symbolic code, we generated the document again. This time, the Tax/VAT value was populated correctly. Additionally, the discount percentage was displayed properly because the “%” symbol had been added beside the discount value within the template.
65. Next, we moved to the Payment Terms section of the document template. To display the Payment Type, we needed to locate the symbolic code associated with the Payment Type field.
Since this is a custom field, we used the Inspect method to identify its corresponding symbolic code.
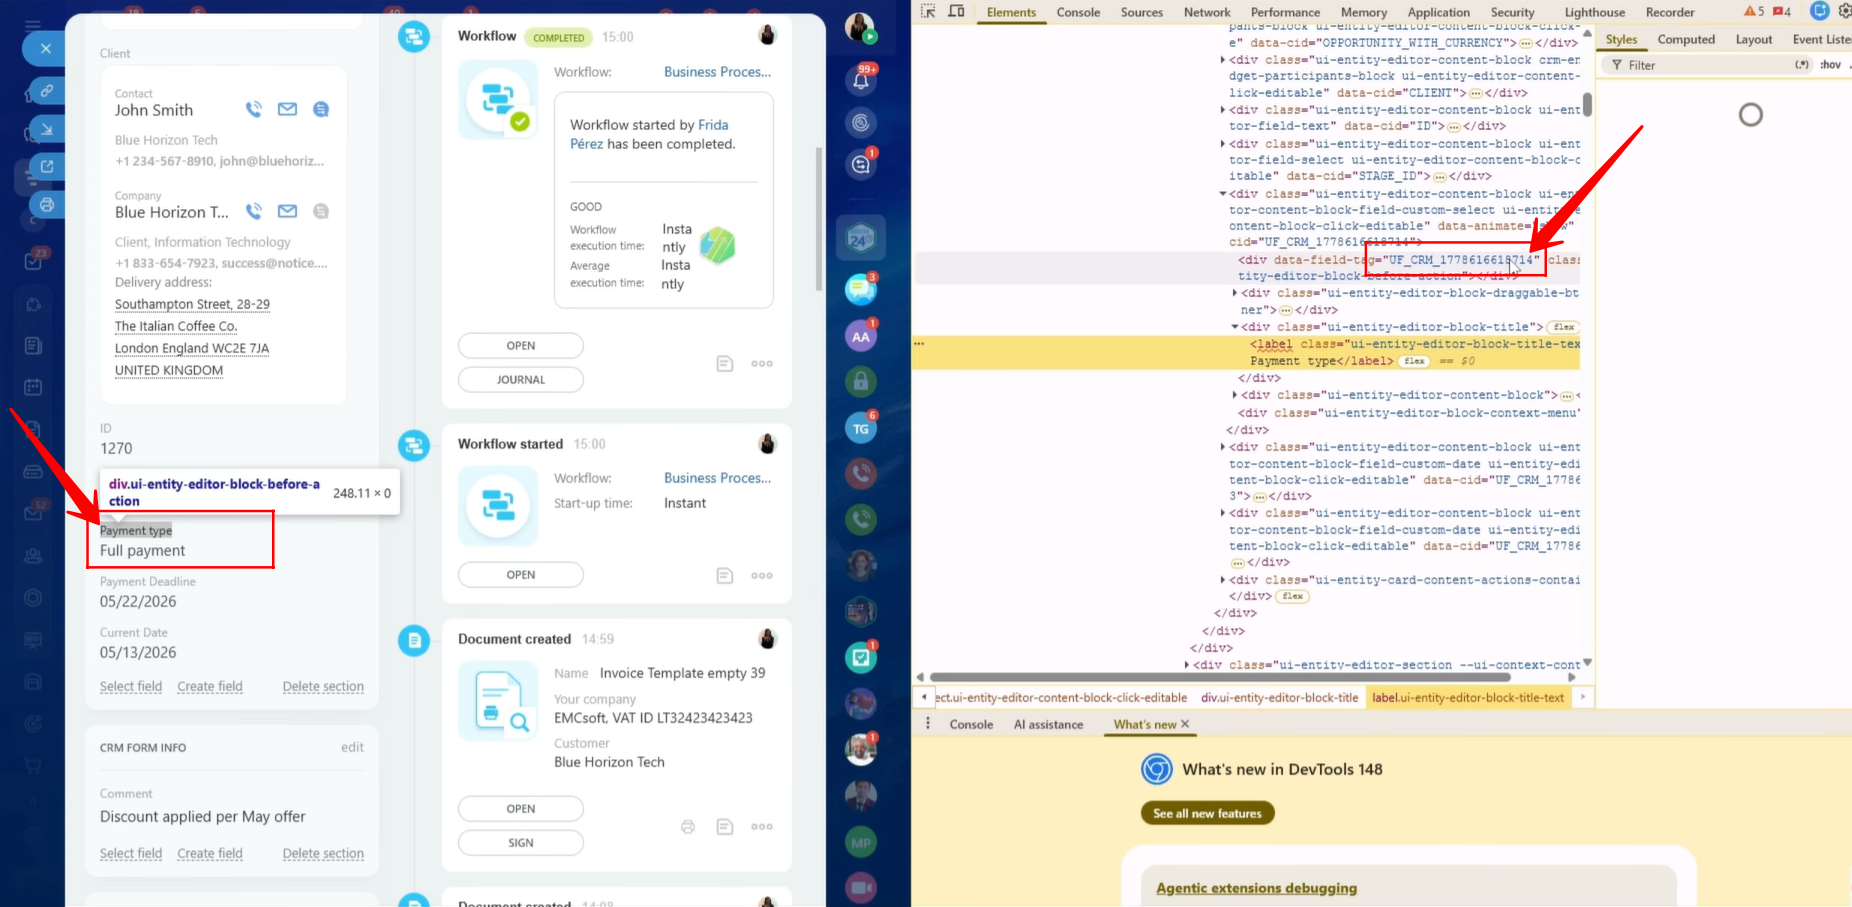
66. Using the inspection process, we successfully located the correct symbolic code for the Payment Type field and copied it for use within the document template.
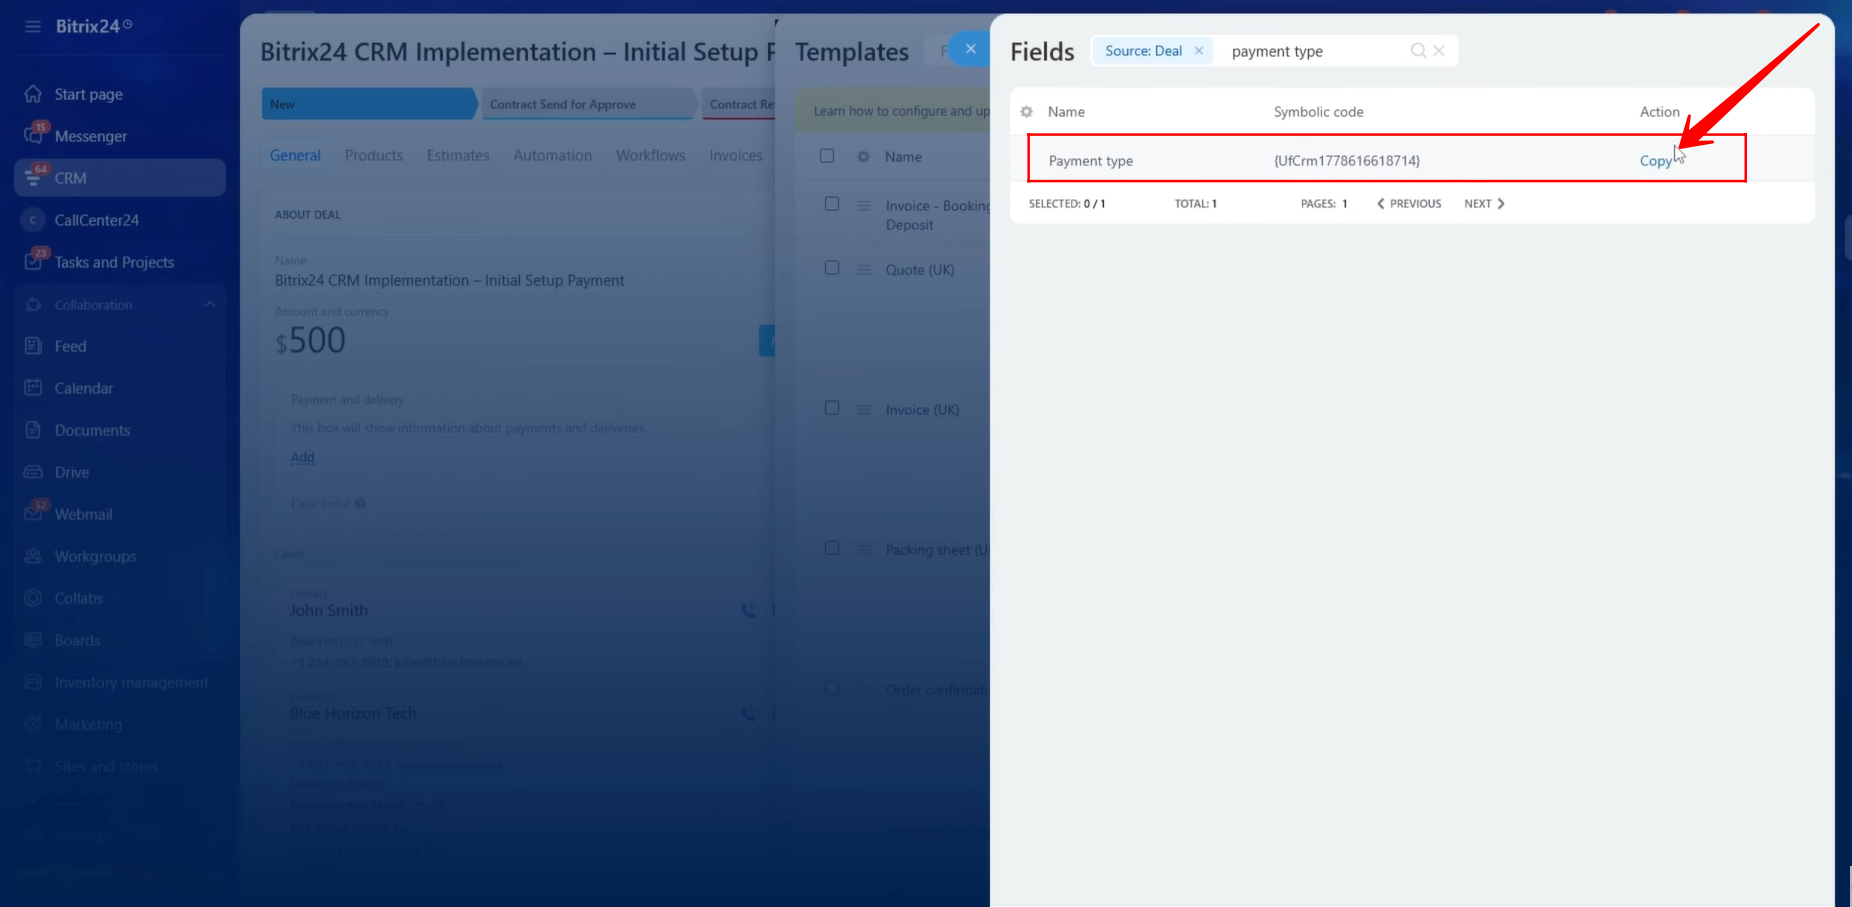
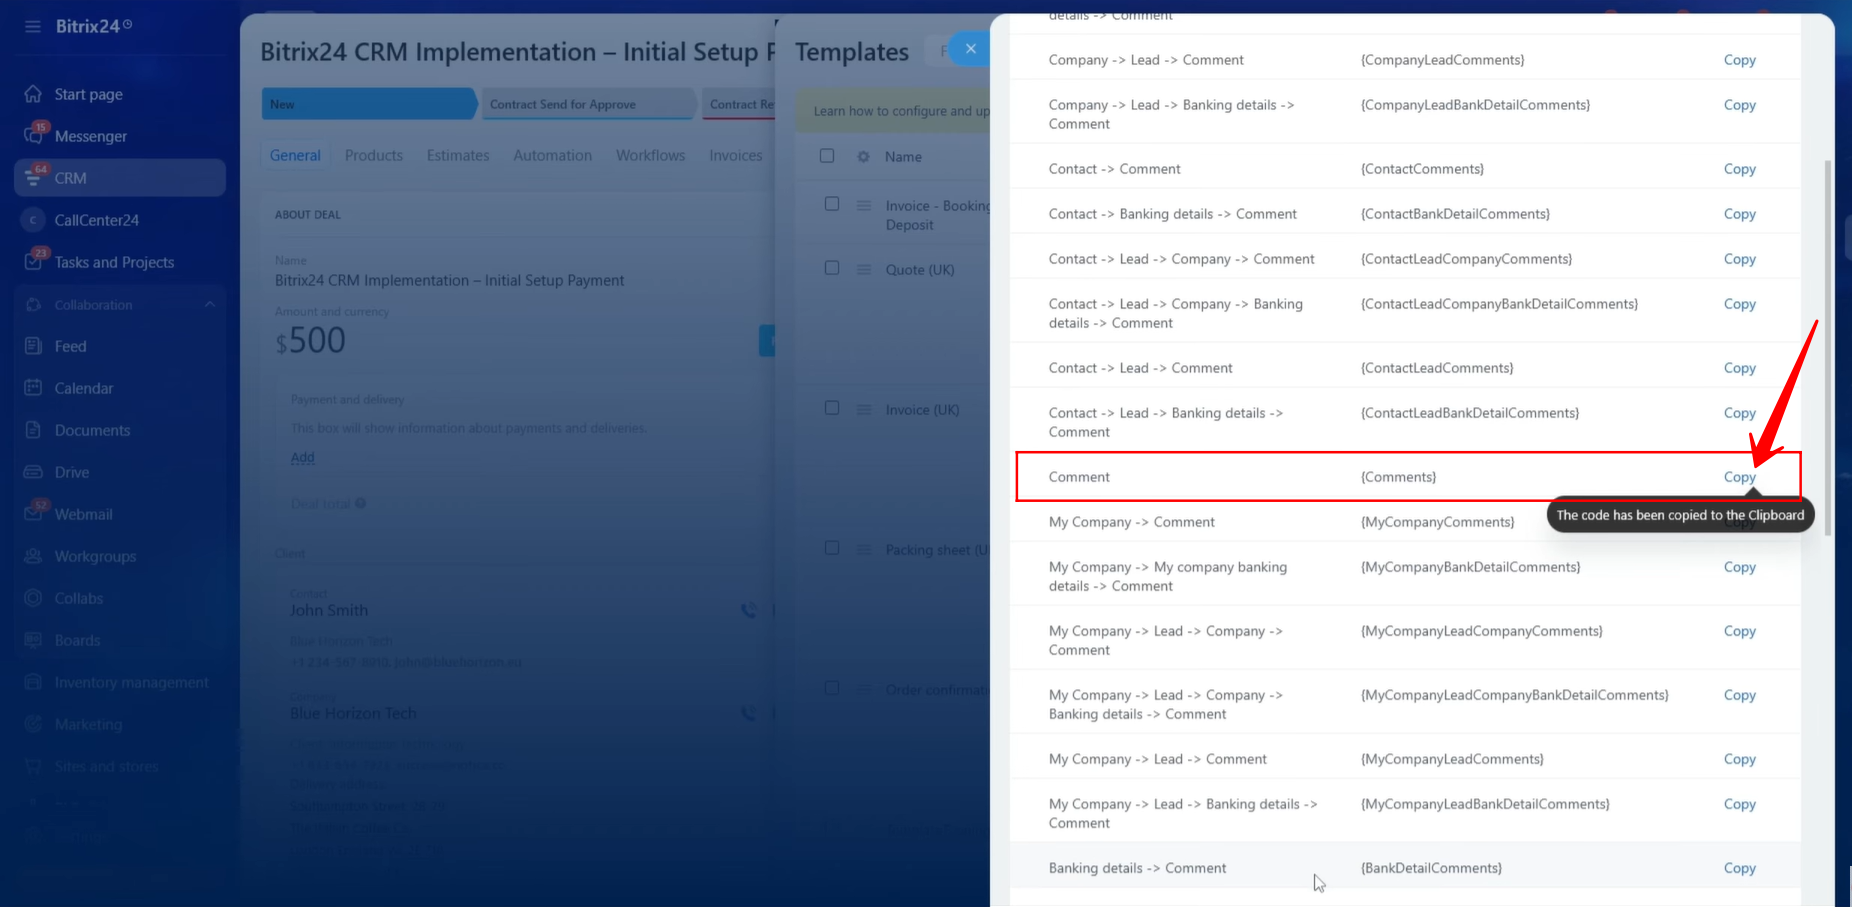
67. To include Comments or Notes within the Payment Terms section, we inspected the Comment field and identified the corresponding symbolic code associated with it.
68. After identifying the Comment field, we copied the correct symbolic code and prepared it for insertion into the document template.
Whenever using the inspection method, it is important to carefully verify that the symbolic code selected from the list of available fields matches the intended CRM field. This helps prevent incorrect data from being displayed in generated documents.
69. We added the symbolic codes for the Payment Type and Comments fields to the appropriate section of the template.
The Payment Deadline field had already been added earlier in the document. We also included it within the Payment Terms section so that all payment-related information would be grouped together in one area of the document.

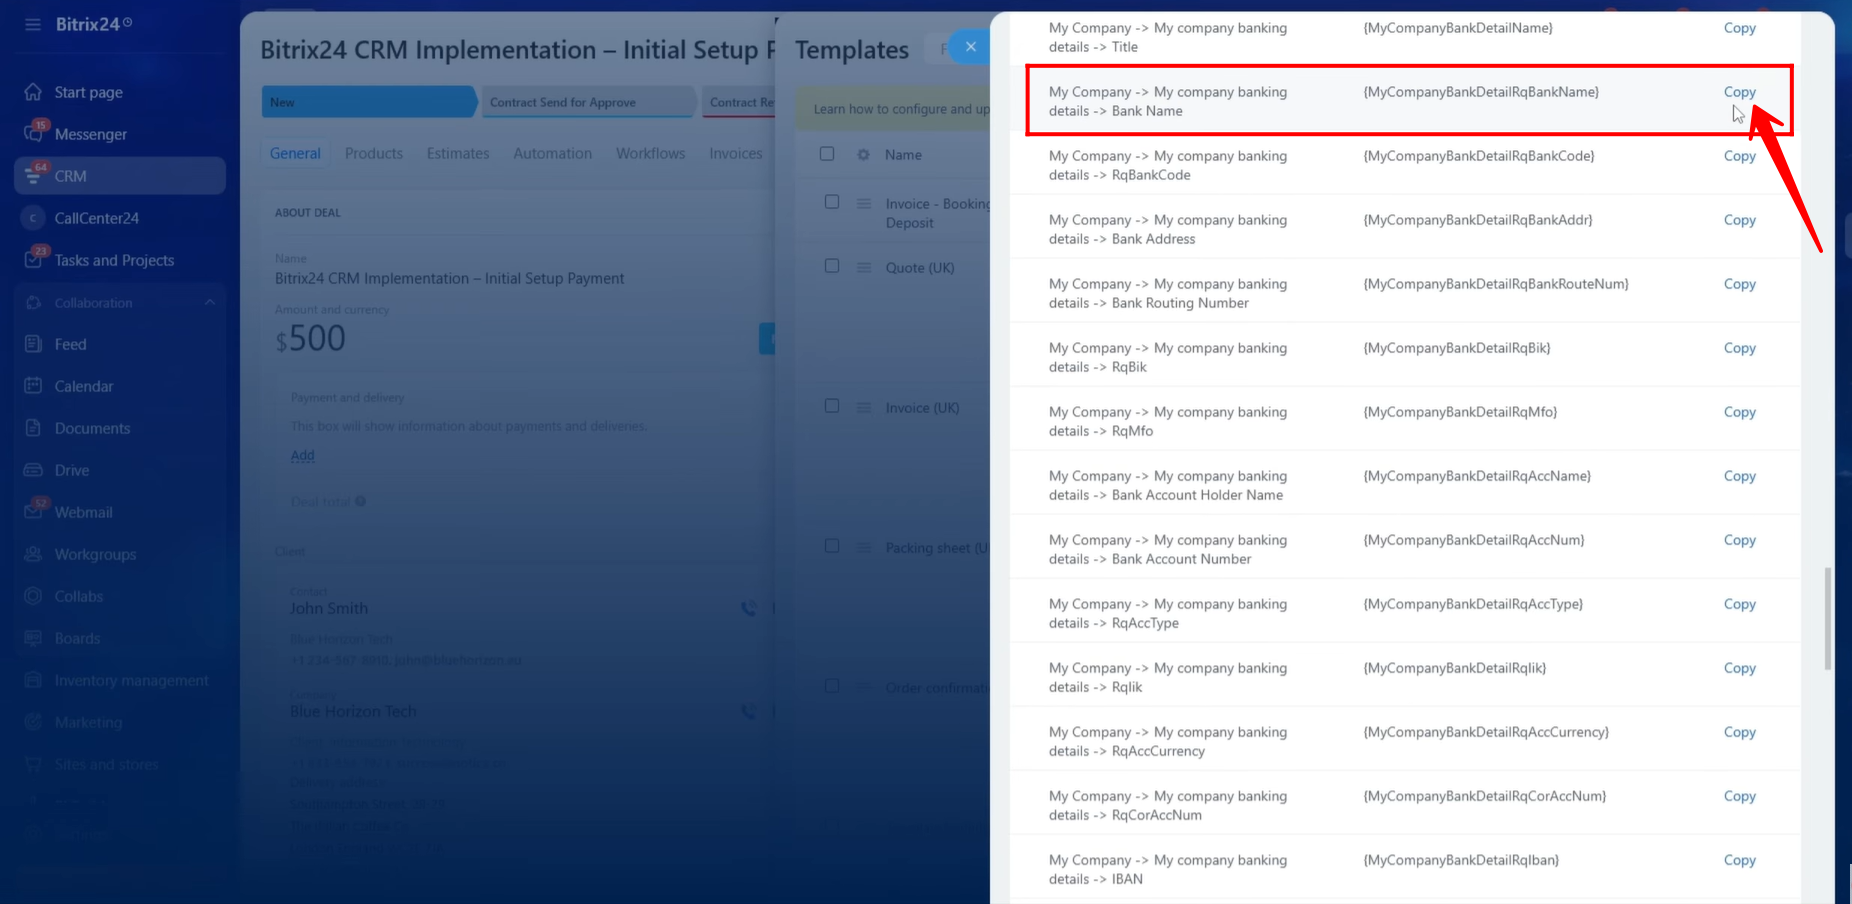
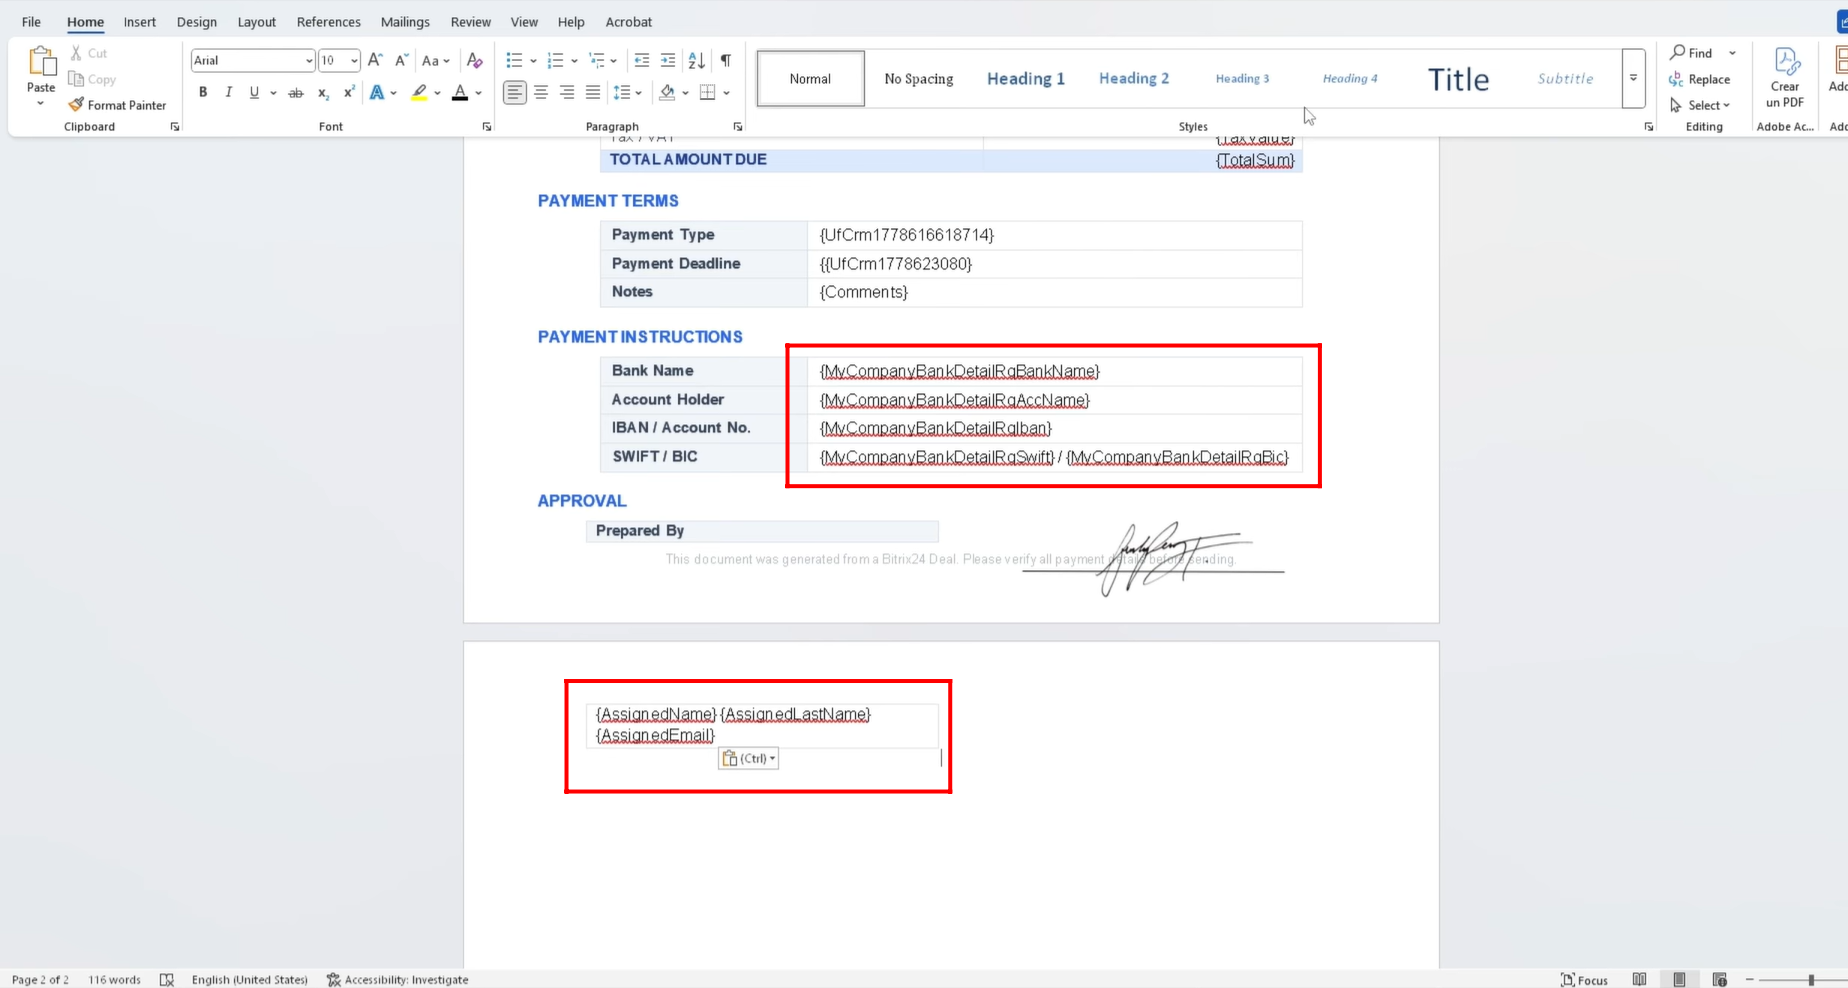
70. Next, we moved to the Payment Instructions section of the template. The first piece of information required was the Bank Name. We located and copied the corresponding symbolic code for the Bank Name field.
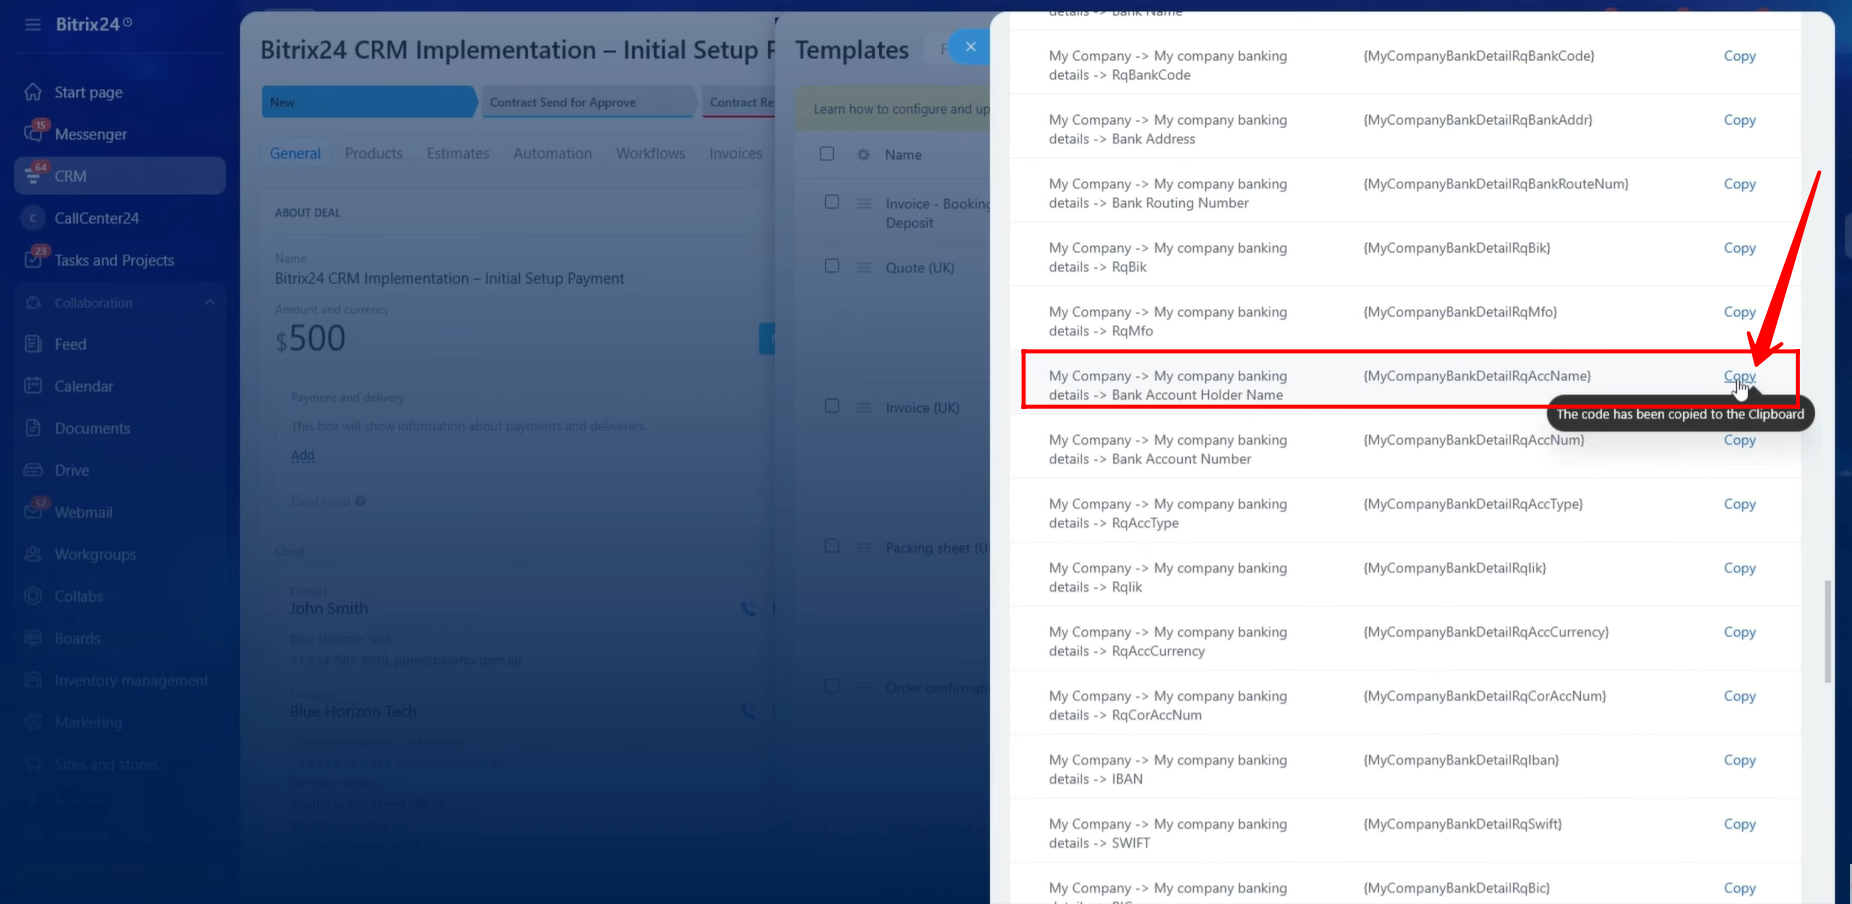
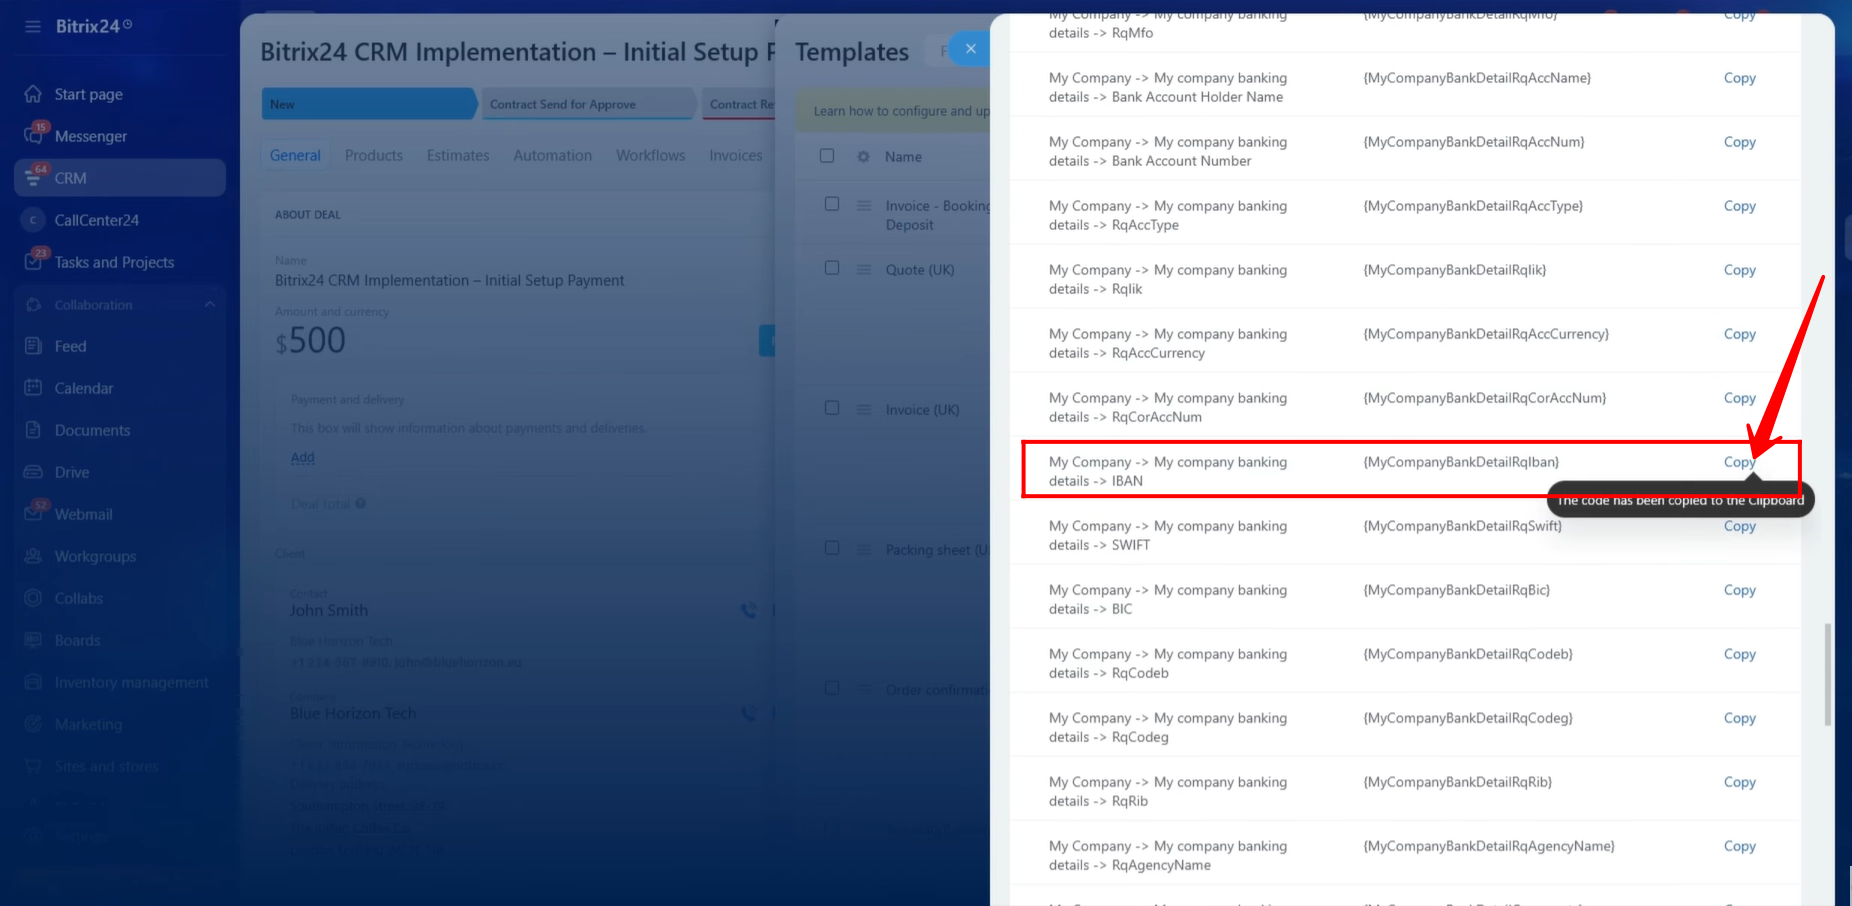
71. We then copied the symbolic code for the Bank Account Holder Name and inserted it into the Payment Instructions section of the template.
72. To display the company’s IBAN information within the document, we copied the corresponding IBAN symbolic code and added it to the template.
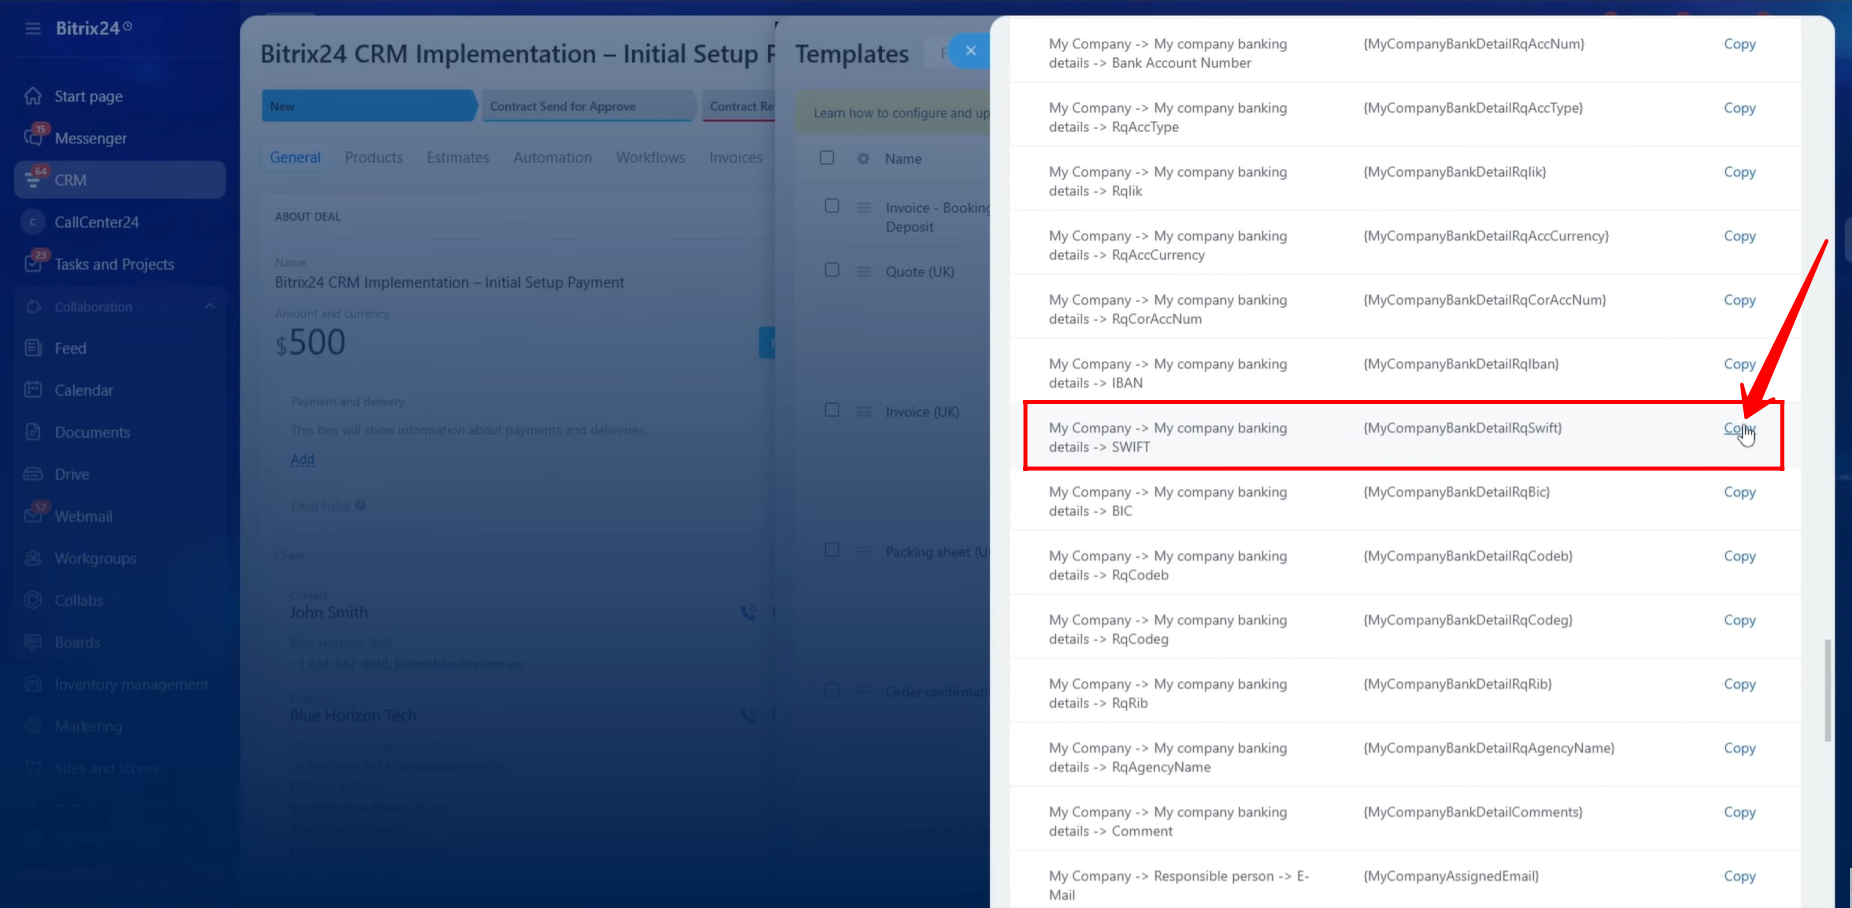
73. Next, we copied the symbolic code associated with the SWIFT Code and inserted it into the Payment Instructions section.
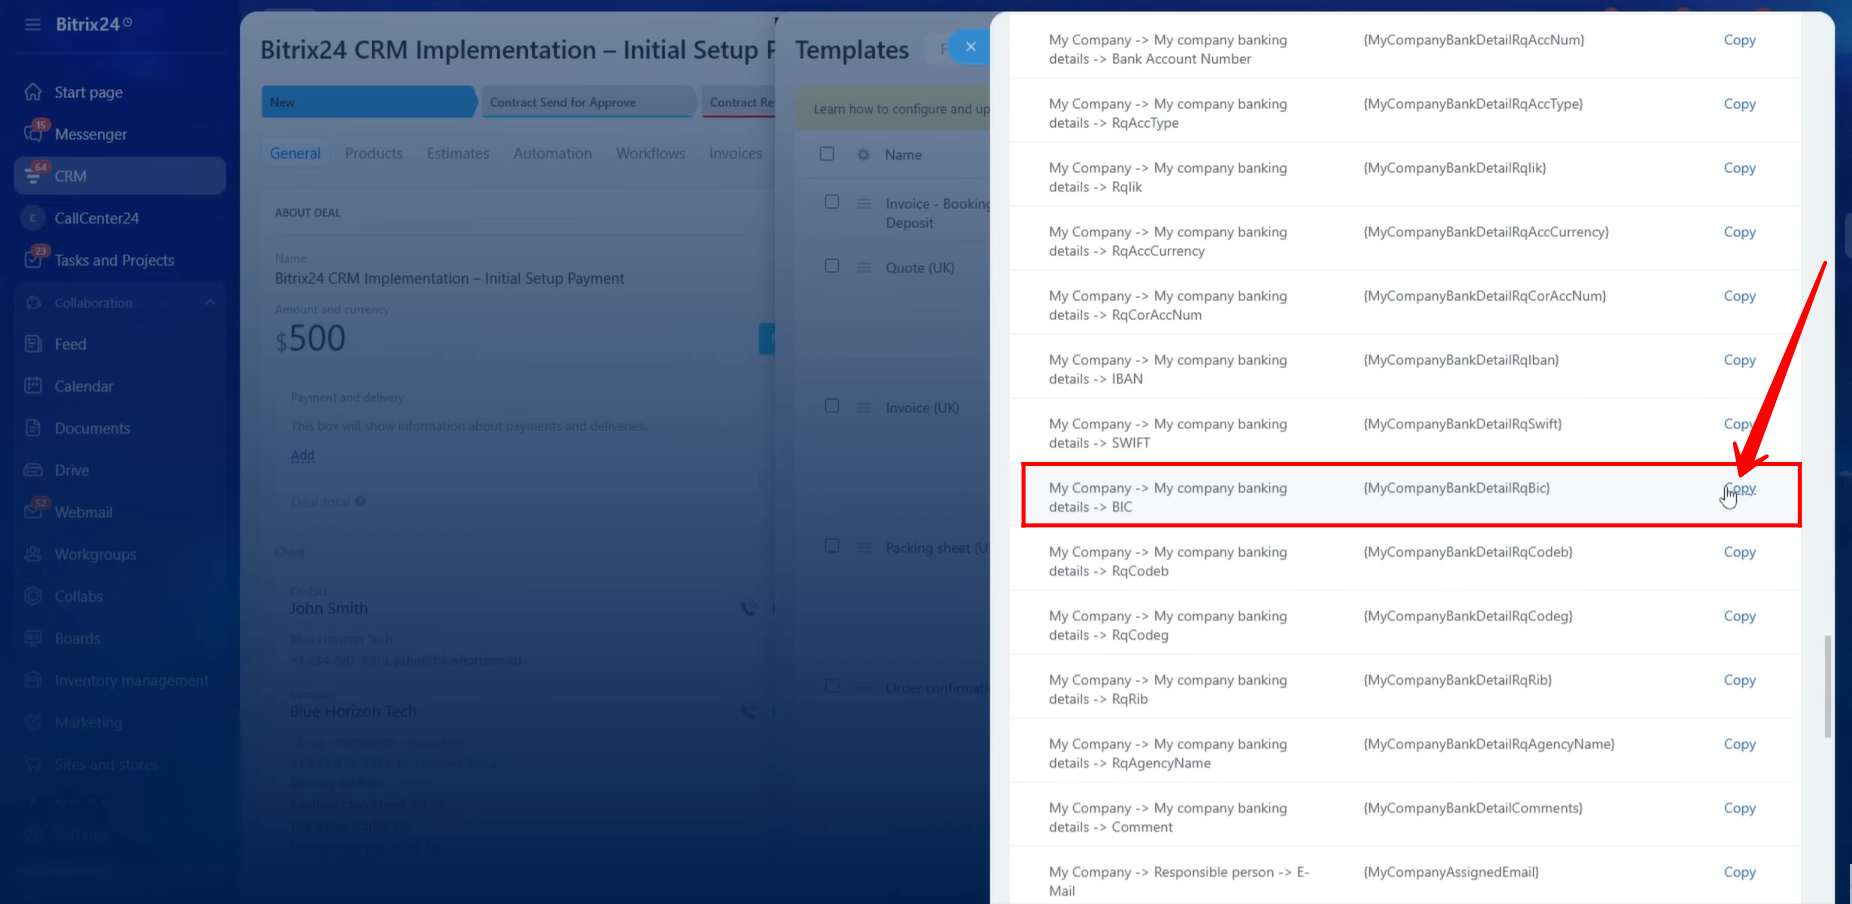
74. Similarly, we copied the symbolic code for the BIC Code and added it to the document template.
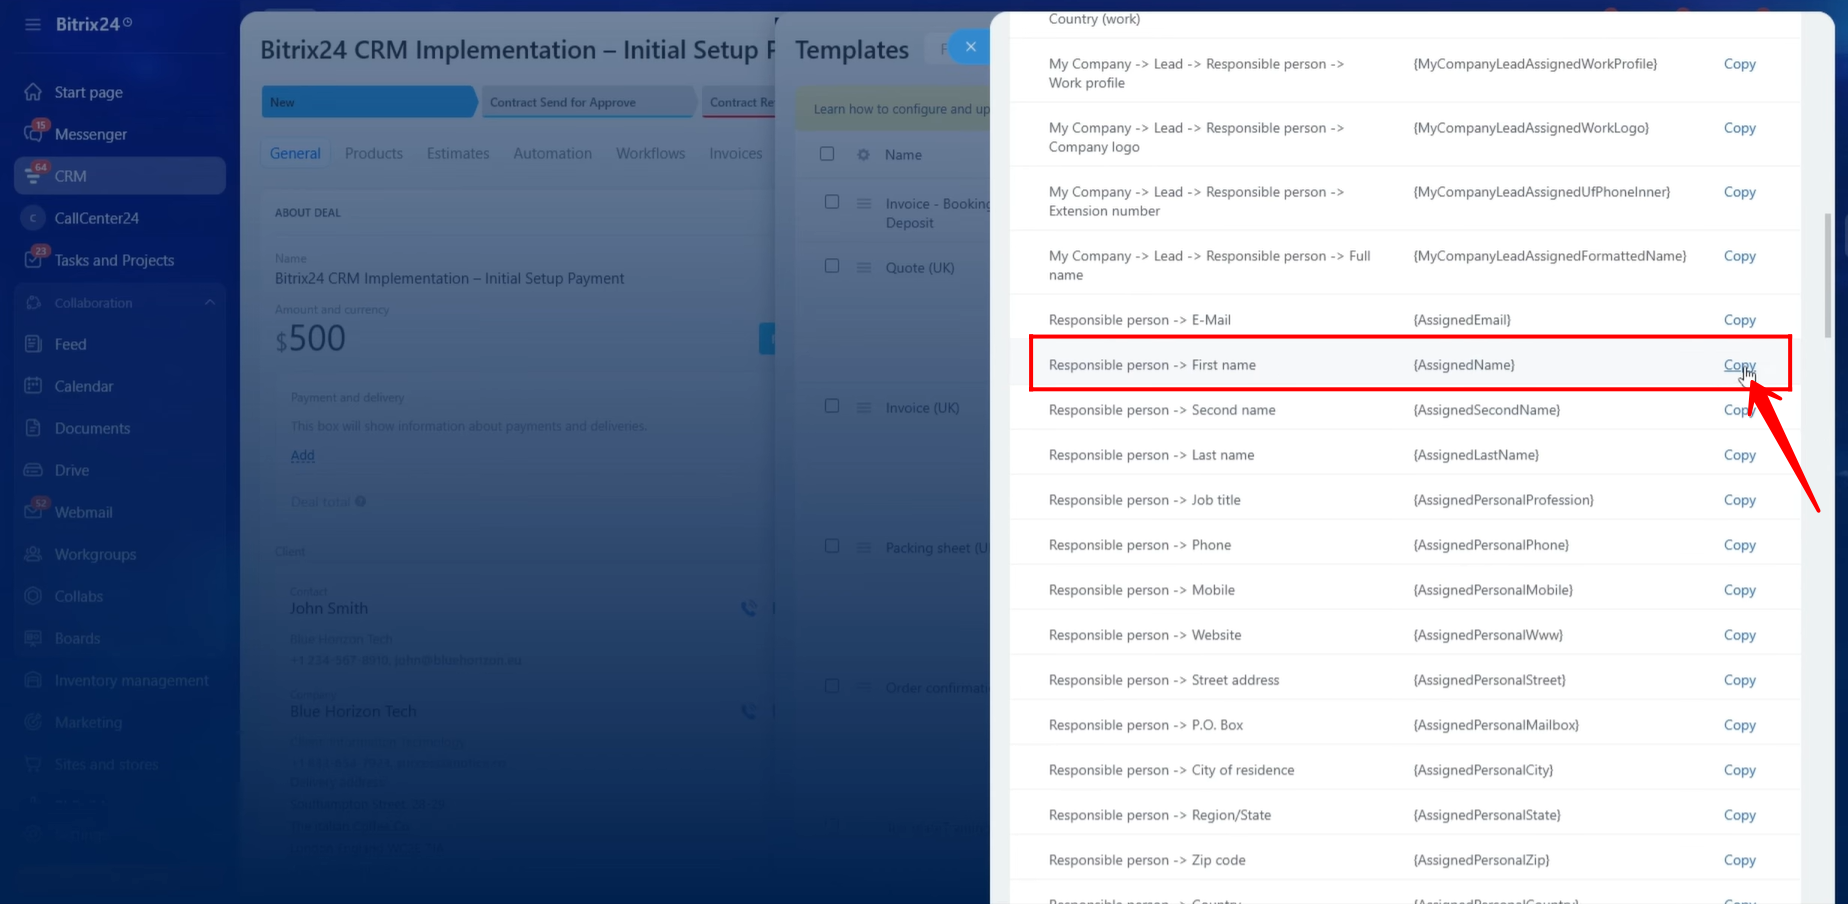
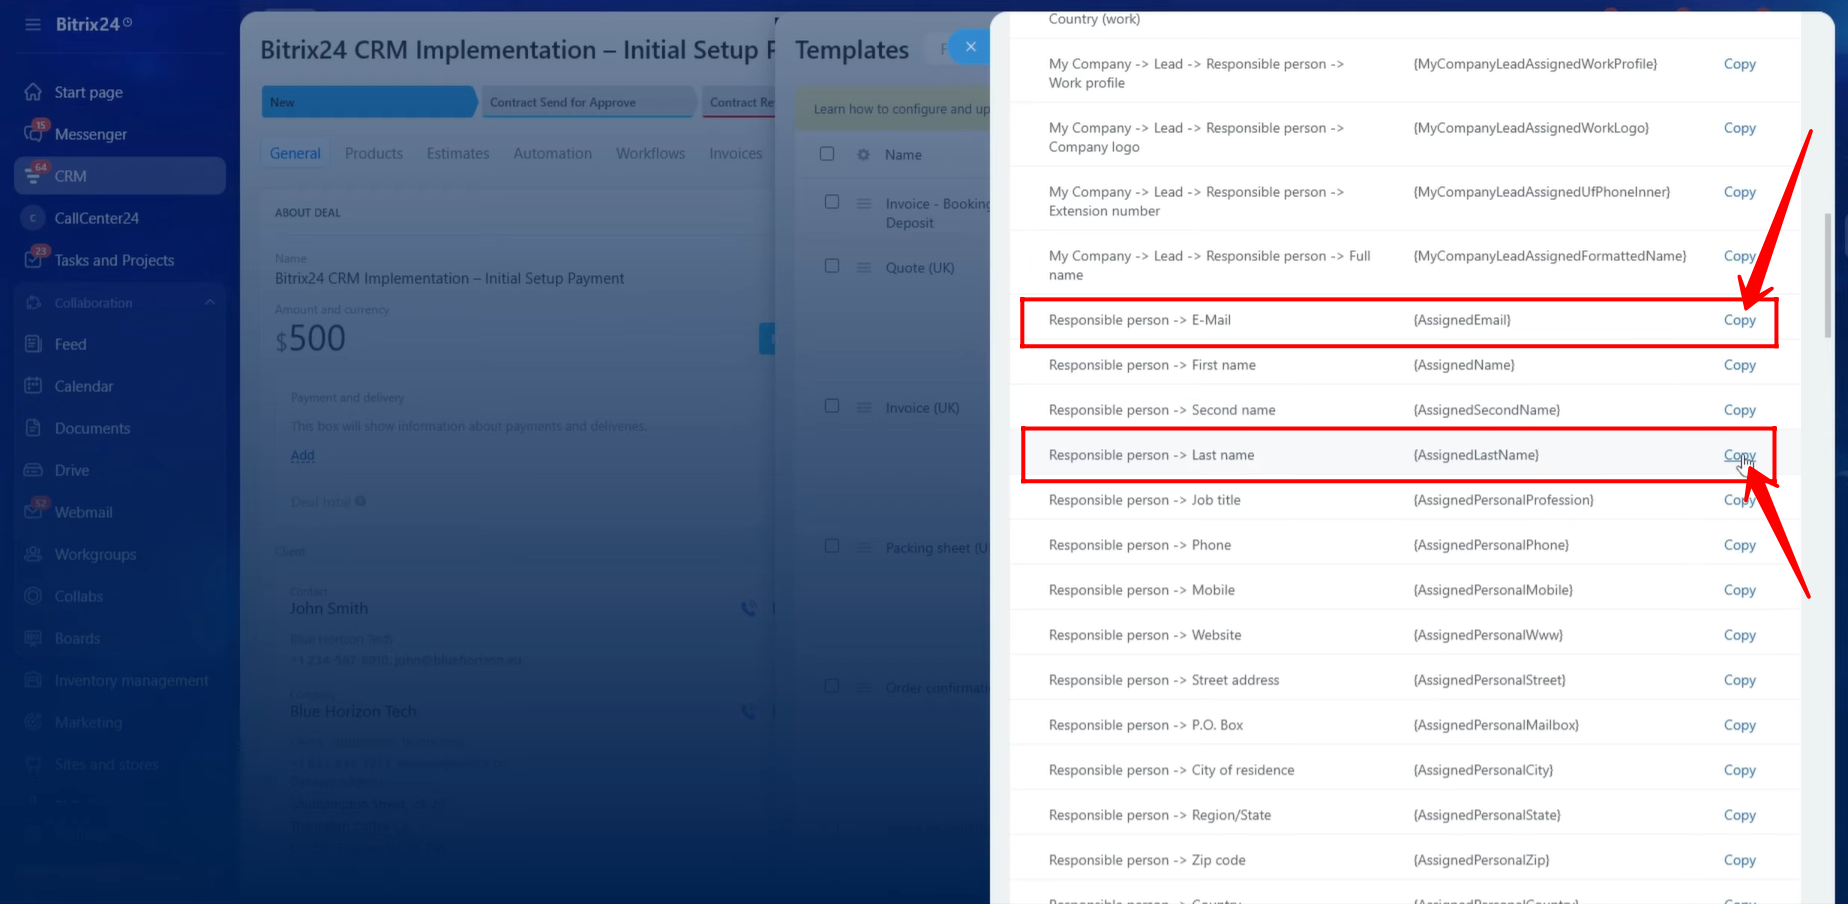
75. Within the Approval (Prepared By) section of the template, we needed to display the information of the Deal’s responsible person. We began by copying the symbolic code associated with the responsible person’s First Name.
76. We then copied the symbolic codes for the responsible person’s Last Name and Email Address and inserted them into the Approval section of the template.
77. At this stage, all symbolic codes required for both the Payment Instructions and Approval (Prepared By) sections had been successfully added to the document template.
The following information was included:
Payment Instructions
- Bank Name
- Account Holder Name
- IBAN
- SWIFT Code
- BIC Code
Approval (Prepared By)
- Responsible Person First Name
- Responsible Person Last Name
- Responsible Person Email Address
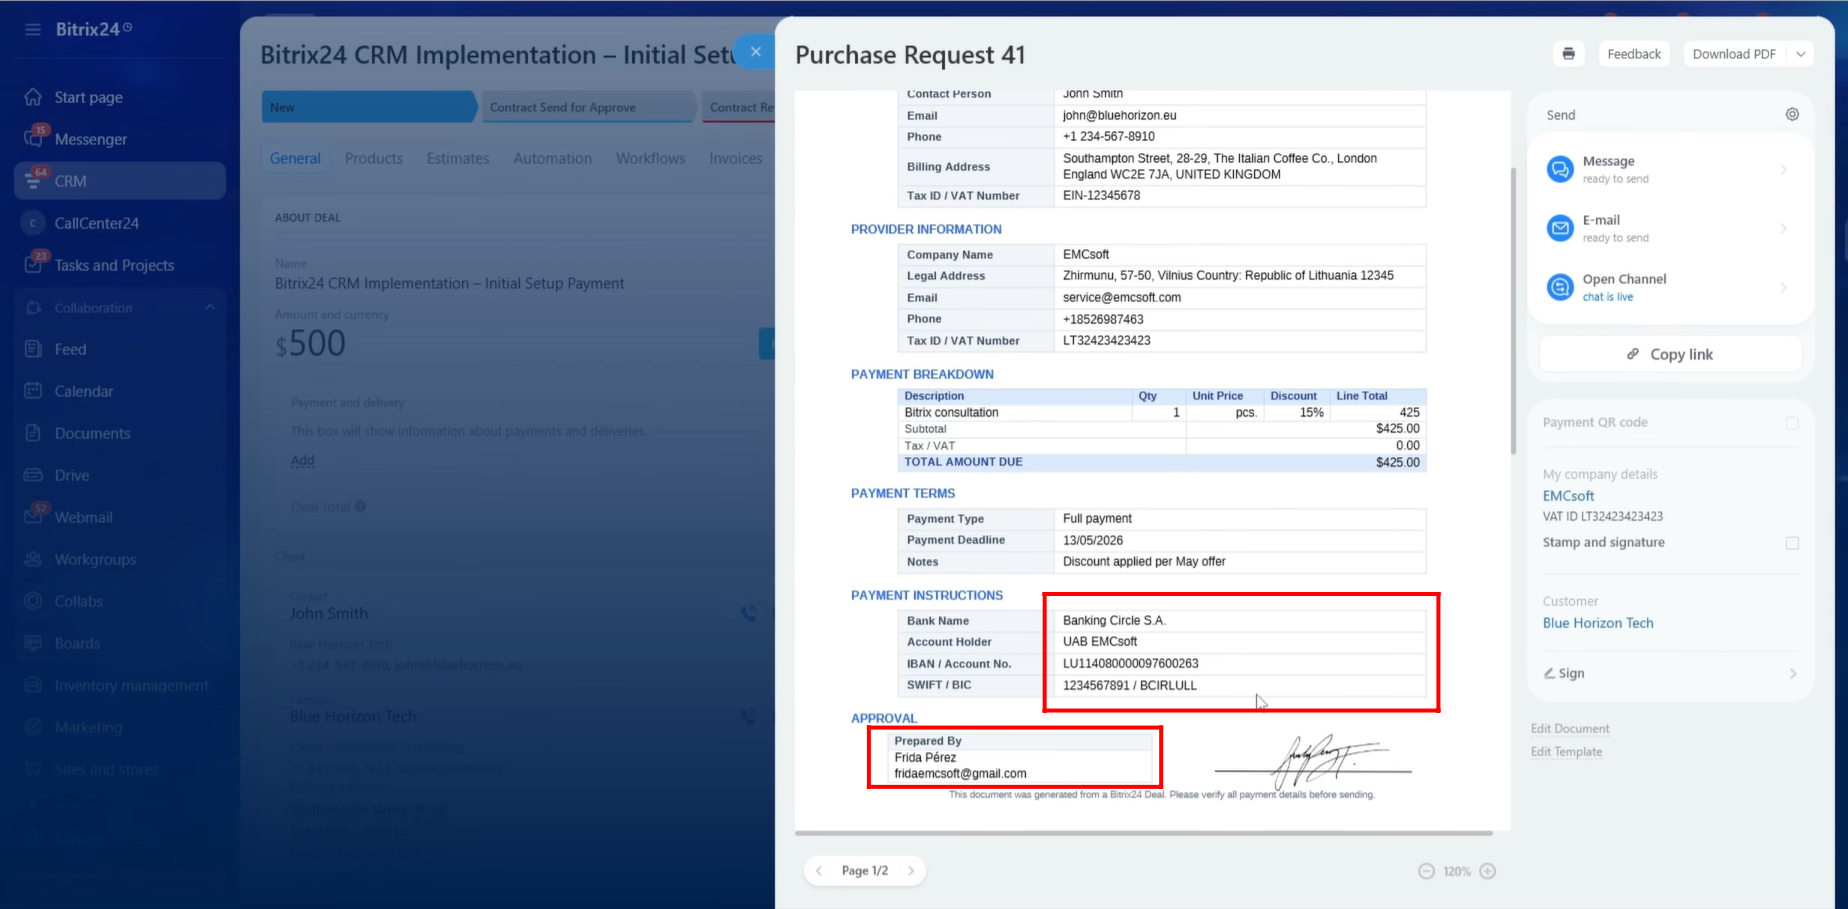
78. After generating the document once again, all information within the Payment Instructions and Approval sections was successfully retrieved from the Deal entity in the CRM and displayed correctly in the document template.
At this point, the document template was fully configured and all required information was being populated correctly from the CRM into the generated document.
“You can also watch video on Youtube”