| 2381 Views | Amin
In the world of business management, streamlining operations and maximizing efficiency is paramount. Enter Bitrix24, a versatile platform that empowers businesses to take control of their administrative tasks with ease. In this article we’ll explore the intricacies of workflow automation, helping you harness the full potential of this powerful tool.
Custom Communication and Beyond
Before diving into the world of automation, let’s recap some essentials. In our previous sessions, we covered a wide array of topics, from custom communication to employee alerts, monitoring, paperwork, payment delivery, and even sales ads. Today, our focus is squarely on “Managing Workflow Items.”
Changing Deal Names with Ease
One of the core aspects of workflow automation is the ability to modify and adapt processes quickly. In this article, we revisit the process of changing the name of a deal. Without the need for complex conditions, you’ll learn how to effortlessly update contact names, last names, company names, and deal creation dates. This hands-on demonstration simplifies a fundamental aspect of workflow management.
Tracking Field Value Changes
For businesses, staying on top of budget changes is crucial. Bitrix24 enables you to create custom fields like ‘budget’ and dynamically adjust your workflow when a budget change occurs. Witness how this feature seamlessly integrates with employee alerts and notifications, ensuring your team is always in the know.
Adding and Changing Observers
Automation is the lifeblood of Berrix, and adding and changing observers is a pivotal aspect. We guide you through setting up conditions based on budget thresholds and assigning specific observers accordingly. See how this process unfolds within your deals, enhancing collaboration and accountability.
Effortless Responsibility Shifts
Changing the responsible person within a deal is a breeze with Bitrix24. Explore the various options available, such as ‘Random Order’ and ‘Specific Order,’ and understand how they can help you manage your team members more efficiently. No more manual adjustments – let automation handle it for you.
Unlocking the Potential of Call Center 24 telephony solution
Bitrix24 call center capabilities are a game-changer in communication. Learn how to make calls, add contacts, and connect with users seamlessly. Discover the power of passing, moving, or transferring calls, streamlining your communication process and boosting productivity.
Tracking Responsible Person Changes
Maintaining transparency in responsibility shifts within your deals is crucial. Our article explores the ‘Track Responsible Person Changes’ feature, which keeps you informed about who is in charge at any given time. Stay on top of your workflow effortlessly.
Document Management Made Simple
Bitrix24 streamlines document management with the ‘Change Stage’ automation. We show you how to create custom fields like ‘Documents Needed’ and use them to dictate the flow of your deals based on specific conditions. Simplify your document handling process and reduce errors.
Dealing with Junk Leads Efficiently
Finally, we delve into ‘Delete Items’ automation. This valuable tool helps you manage junk leads efficiently, providing a hassle-free way to remove irrelevant or outdated data from your system.
Join Us on the Bitrix24 Journey
If you found this article intriguing, we invite you to watch the accompanying video for a visual walkthrough of these advanced Bitrix24 Administration techniques. Don’t hesitate to like the video and leave any questions you may have in the comments section below.
Bitrix24 is a dynamic platform that empowers businesses to optimize their operations. With the knowledge and skills gained from our Advanced Administration Course, you’ll be well on your way to becoming a Bitrix24 pro. Stay tuned for more insightful tutorials as we continue this exciting journey into the world of Bitrix24.
Detailed instructions on how these robots can be used are described below.
1. Go to “Automation Rules”. Click “Create” and go to “Manage Workflow Items”. Add “Modify Item” robot.

2. Move “Modify Item” robot to “In Progress” stage. Click “Edit”.

3. Fix “Execution” and “Time” of robot. Click “Select field” and select “Name”.

4. Now add multiple attributes in field “Name” by selecting from three dots option menu.

5. After adding “Name” field attributes, select person in “change on behalf of”. Click “Save”.

6. Edit “In Progress” stage and change it to “Change name of the deal”.

7. In Deals tab, click “Create”.

8. Name the deal and select contact person.

9. Now, select company. Click “Save”.

10. Move the newly created deal to “Change name of the deal” stage. Refresh the page.

11. Now, you can see the name of the deal has been changed with the same attributes which were added in “Name” field of the robot.

12. Go to “Automation Rules”. Click “Create”. Go to “Manage Workflow Items” and add “Track field value change” robot.

13. Move the robot “Track field value change” to a new stage “Budget Changed”. Click “Edit”.

14. Click “Select field” and select “Budget”.

15. Budget field has been added, click “Save”.

16. In Deals section, add a new stage “Budget Changed”. Open the deal.

17. Add some amount in the “Budget” field. Click “Save”.

18. Now change the budget amount again.

19. The deal will be moved to “Budget Changed” stage.

20. Go to “Automation Rules”. Click “Create”. Go to “Manage Workflow Items” and add “Change Observers” robot.

21. Move back the deal to “Question&Answers” stage. Create a new stage “Add observer to Deal”.

22. Move the robot “Change Observers” to “Add observers to Deal” stage. Click “Edit”.
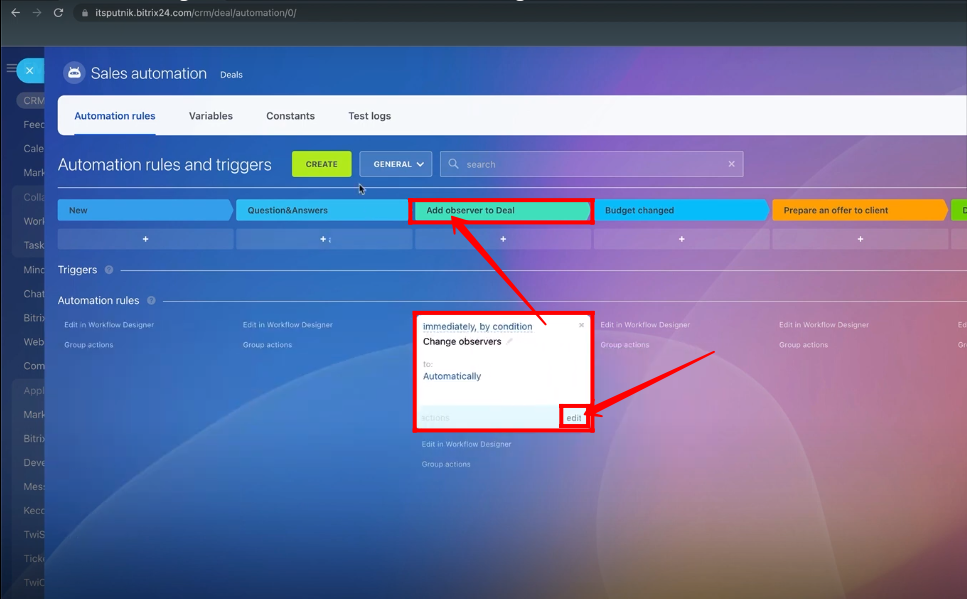
23. Add Condition as “Budget more than 10000” for testing purpose. Click “OK”.

24. Select “add” for “Apply action to observers”. Add a person as an oberserver to add. Click “Save”.

25. Again create a robot “Change Observers”. Click “Edit”. Now the condition will be “Budget less than 10000”. Click “OK”.

26. Select any observer to add. Click “Save”.

27. Move both “Change Observers” robots to “Add observer to Deal” stage.

28. Open the deal and add Budget amount as 15000 (more than 10000).

29. Click on settings icon and check box “Show always”.

30. Manually change the stage of the deal to “Add observer to Deal” stage.

31. A new observer “Mike Smith” has been added to deal as per the condition.

32. Click “Edit” within the deal.

33. Click “Delete” to remove the observer.

34. Change the stage of the deal to “Question&Answers”. Now add Budget amount as 5000 (less than 10000).

35. Change back the stage of the deal to “Add observer to Deal”.

36. A new observer “Marcos Paulo” has been added in the deal as per the condition.

37. Go to “Automation Rules”. Click “Create”. Go to “Manage Workflow Items” and add “Change responsible person” robot.

38. Move “Change responsible person” robot to “Budget Changed” stage. Click “Edit”.

39. You can add as many as responsible persons on behalf of others with specification of orderly manners.

40. For now, add only one responsible person on behalf of the other person. Select “Select new responsible person” order. Click “Save”.

41. Move the deal to “Budget Changed” stage. The responsible person is “Emin Mamed” for the deal. Refresh the page.

42. The responsible person for the deal changed to “Mike Smith”.

43. Go to “Automation Rules”. Click “Create”. Go to “Manage Workflow Items” and add “Track responsible person change” robot.

44. Move the robot “Track responsible person change” to “Responsible person changed” stage. Click “Edit”.

45. Click “Save”.

46. The stage of the deal is “Budget Changed” for now. Open the deal.

47. Click “Change” within the deal to change the responsible person.

48. Select any person to replace the previous responsible person. Click “Save”.

49. The stage of the deal will be changed to “Responsible person changed”.

50. Go to “Automation Rules”. Click “Create”. Go to “Manage Workflow Items” and add “Change Stage” robot.

51. Create two new stages in the Deals tab. In this scenario, the stages are “Client doesn’t need docs” and “Client need docs”.

52. Open the deal and click “Create field”.

53. Select “List” as type of the field.

54. Type field name as “Documents are needed” and add list items as “Yes” & “No”.

55. Edit the robot “Change Stage”. Apply the condition “Documents are needed equal to Yes”.

56. Select the stage “Client need docs”. Select person in “Change on behalf of” and click “Save”.

57. Click “actions” and select “Copy” to create a new robot.

58. Edit new robot “Change Stage (Copy)”.

59. Now the condition will be “Documents are needed equal to No”. Click “OK”.

60. Select stage as “Client doesn’t need docs”. Select person in “Change on behalf of”. Click “Save”.

61. Move back the Deal to “New” stage and open it.

62. Select the option of “Documents are needed” field as “Yes”. Click “Save”.

63. Move the deal to “Question&Answers” stage. Refresh the page.

64. The deal will be moved to the stage “Client need docs”.

65. Move back the deal to “New” stage and open it.

66. Select the option of “Documents are needed” field as “No”. Click “Save”.

67. Move the deal to “Question&Answers” stage. Refresh the page.

68. The deal will be moved to the stage “Client doesn’t need docs”.

69. Go to “Automation Rules”. Click “Create”. Go to “Manage Workflow Items” and add “Change pipeline” robot.

70. Select “Pipeline” as “General” and “Stage” as “New” for a while. Click “Save”.

71. Go to “Sales pipelines and tunnels”.

72. Add pipelines as “Documents needed” and “Documents not needed”.

73. Move back the deal to “New” stage.

74. Move “Change pipeline” robot to “Question&Answers” stage. Click “Edit”.

75. Add condition as “Documents are needed? equal to Yes”. Select “Pipeline” as “Documents needed” and “Stage” as “Documents needed/New”. Click “Save”.

76. Click “actions” and select “Copy” to create a new robot.

77. Edit the “Change pipeline (Copy)” robot. Add condition as “Documents are needed? equal to No”. Select “Pipeline” as “Documents not needed” and “Stage” as “Documents not needed/New”. Click “Save”.

78. Move the deal to “Question&Answers” stage. Make sure you are working in “General” mode.

79. Now, go to “Documents needed” from options.

80. Pipeline of the deal changed which will be in the “New” stage. Open it.

81. The “Documents are needed?” field is marked as “Yes”.

82. Go back to “General” mode from options.

83. Go to “Leads” tab. Click “Automation Rules”.

84. Click “Create”. Go to “Manage Workflow Items” and add “Delete Item” robot.

85. Save “Delete Item” robot.

86. Move the “Delete Item” robot to “Processed” stage.

87. Move the lead to “Processed” stage. The lead will be automatically deleted.You may edit the name of the stage “Processed” to “Delete Lead”.

“You can also watch this video on Youtube”