| 2960 Views | Amin

In this session, we’ll focus on setting up and managing permissions within Bitrix24 CRM. Properly assigning permissions is essential for maintaining data security, ensuring that team members have access to the information they need while protecting sensitive data. We’ll explore different scenarios to illustrate how permissions can be tailored to various roles within your organization.
Assign Permissions Based on Departments
Bitrix24 allows you to assign permissions based on departmental roles, ensuring that team members can only access leads relevant to their department. We’ll guide you through the process of setting up these permissions, showing how to define access rights for different departments such as sales, marketing, and customer support. This helps in streamlining workflow and protecting confidential information.
Assign Permissions Using the Example of Supervisor and Sales Manager
In many organizations, supervisors and sales managers require different levels of access to lead information. We’ll use this example to demonstrate how to assign permissions in Bitrix24, allowing supervisors to have broader access for overseeing operations while restricting sales managers to their specific leads and activities. This ensures a hierarchical access structure that supports effective management and accountability.
Assign Permissions Using the Example of Call Manager and Offer Sending Managers
Different roles within the sales team, such as call managers and offer sending managers, need tailored permissions to perform their tasks effectively. We’ll show you how to set up permissions so that call managers can access and update lead contact details, log call activities, and set appointments, while offer sending managers can generate and send proposals. This setup ensures that each role has the necessary tools to fulfill their responsibilities without unnecessary access to unrelated data.
By understanding and implementing these permission settings, you’ll enhance your CRM’s security and operational efficiency, ensuring that each team member has the appropriate access to perform their duties effectively.
Detailed instructions are described below:
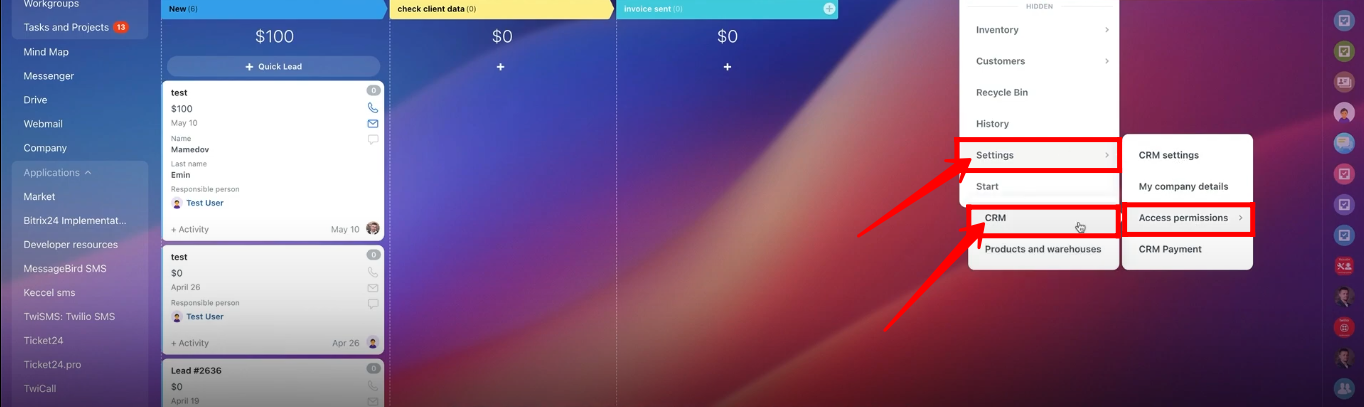
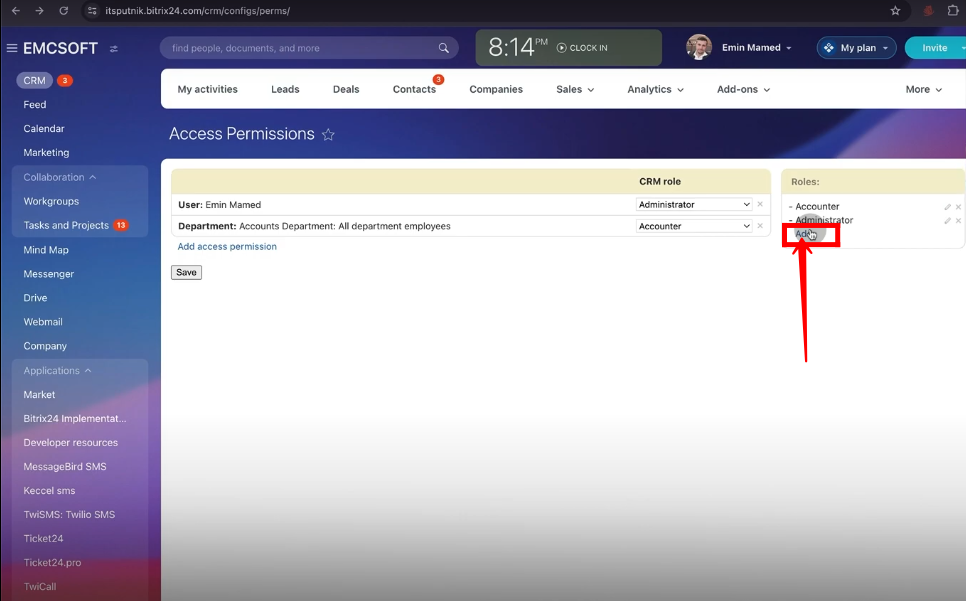
1. Go to “Settings”. Click “Access Permissions” and open “CRM”.
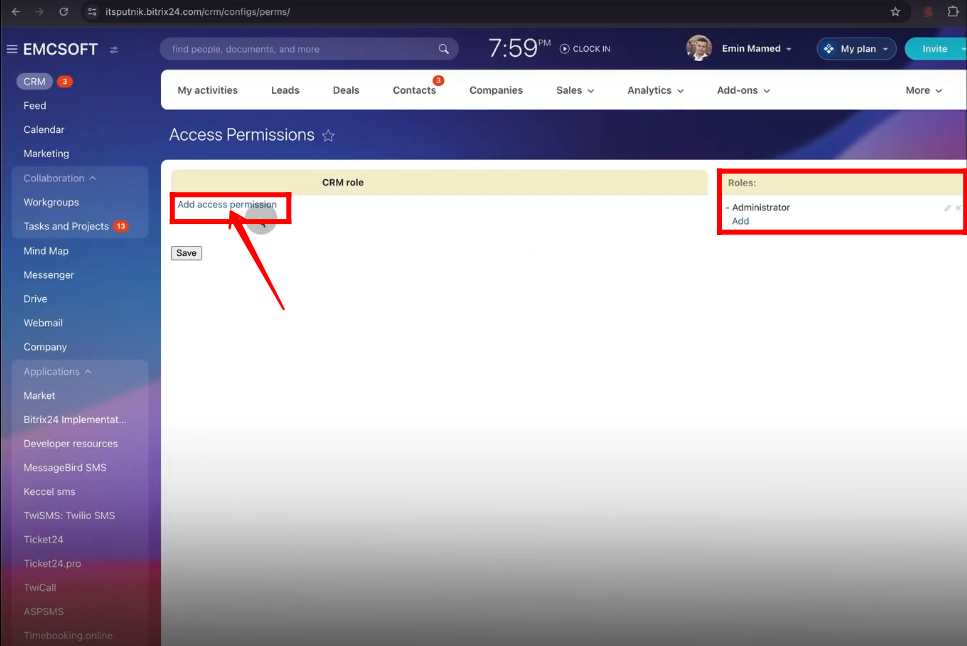
2. Add a new “role” or edit the existing one.
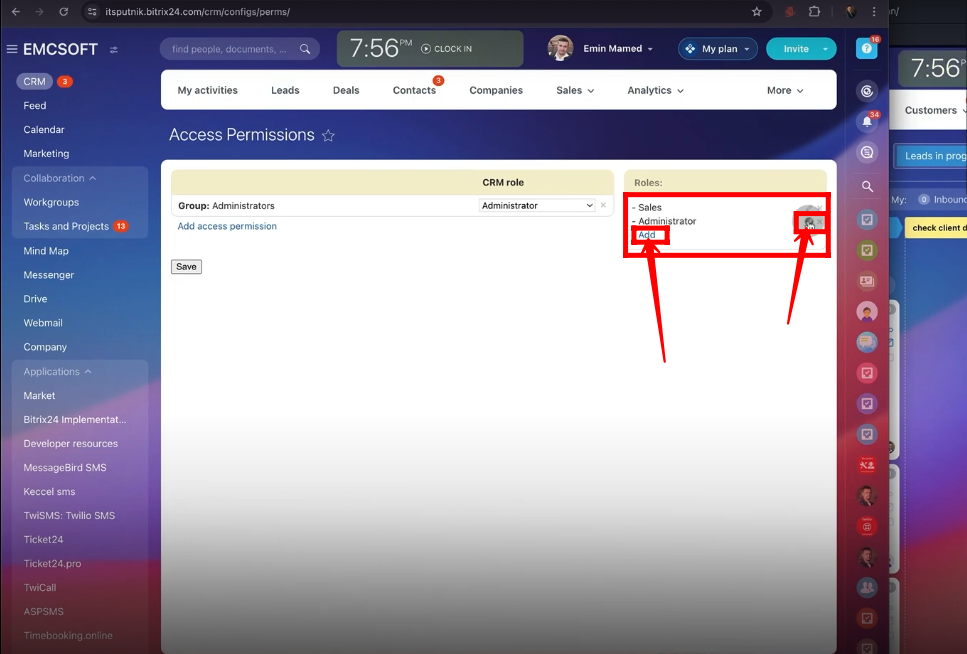
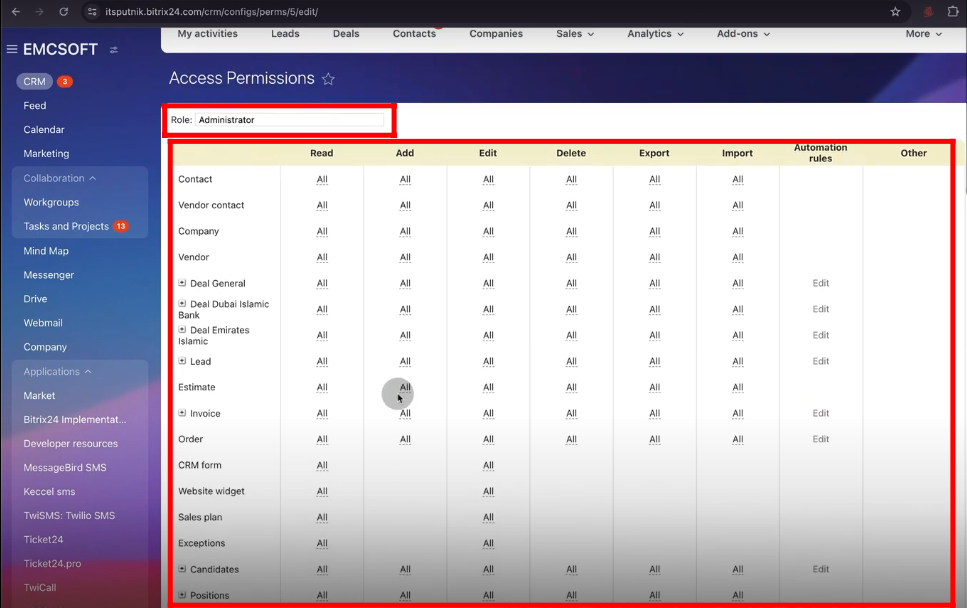
3. The Role name is “Administrator” and all permissions are allowed to this role for testing purposes.
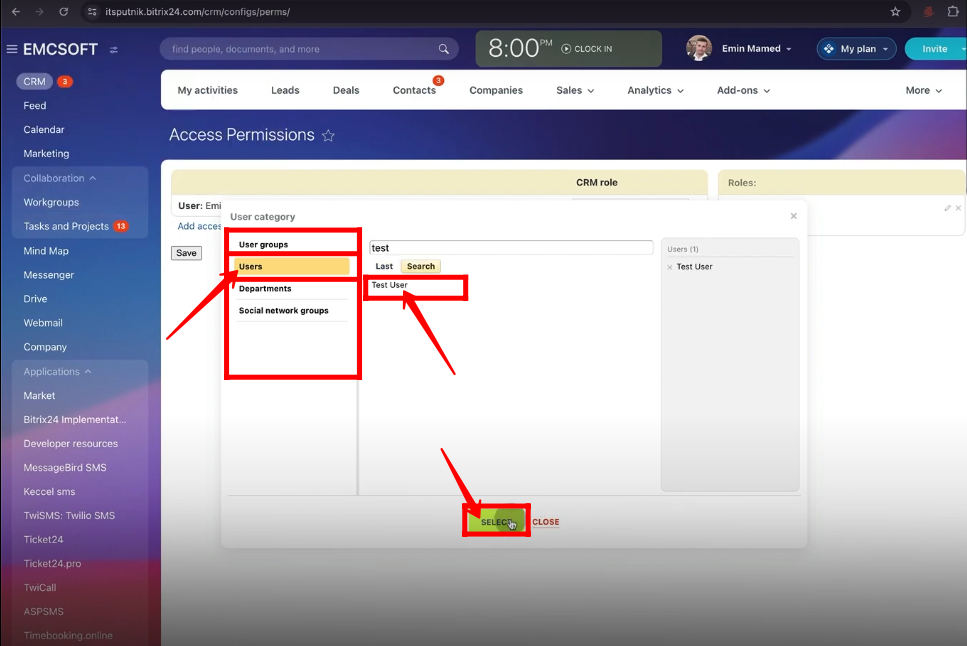
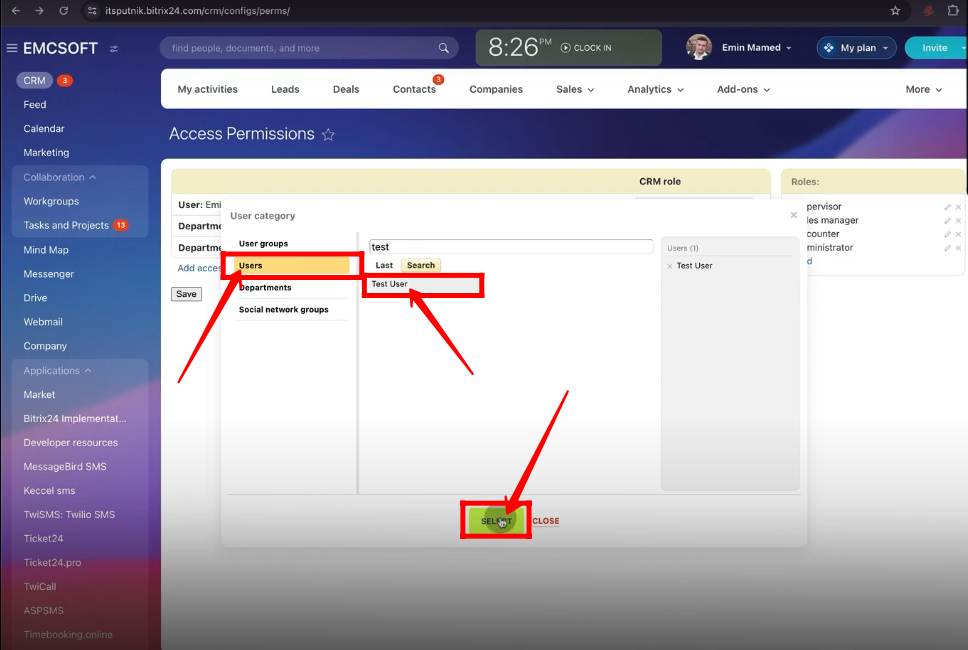
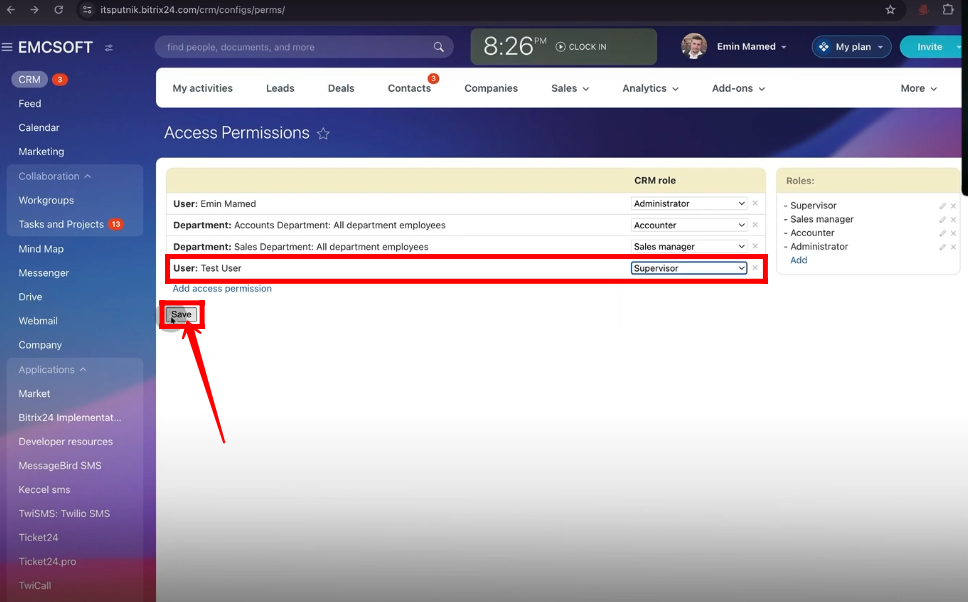
4. Now add users/employees by roles or departments to assign the “Administrator” role to them.
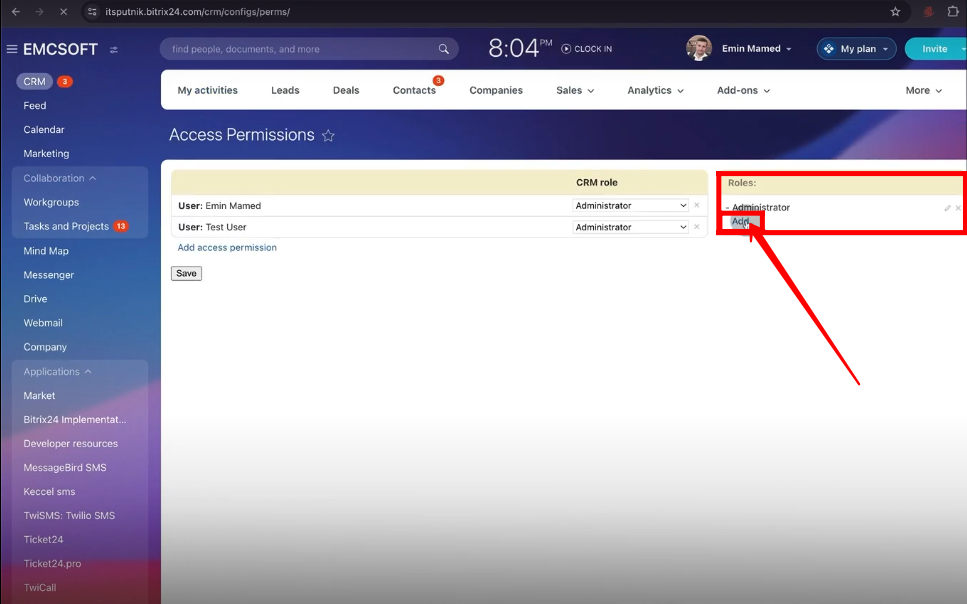
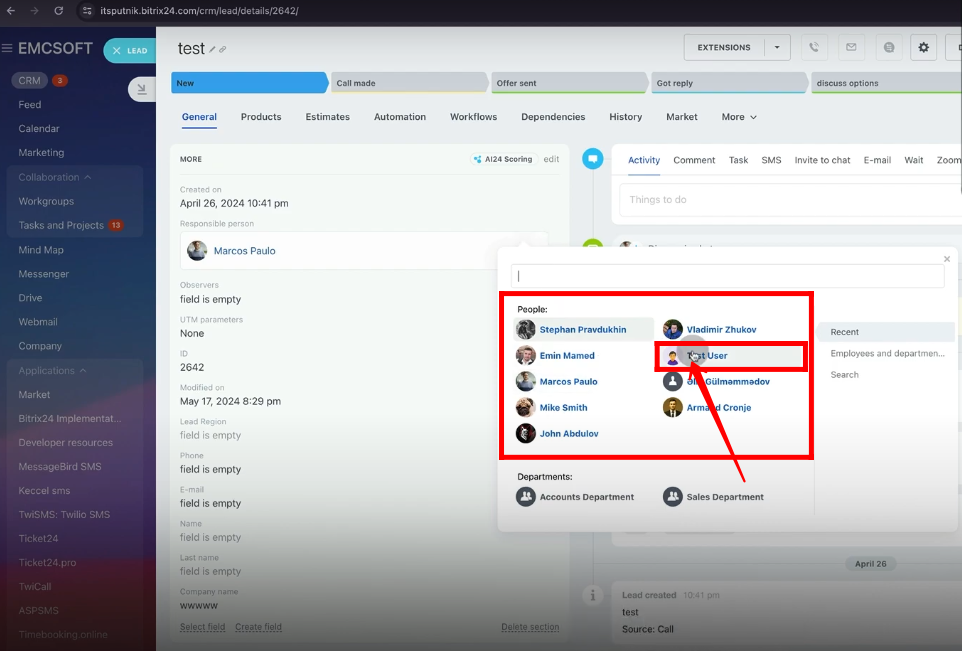
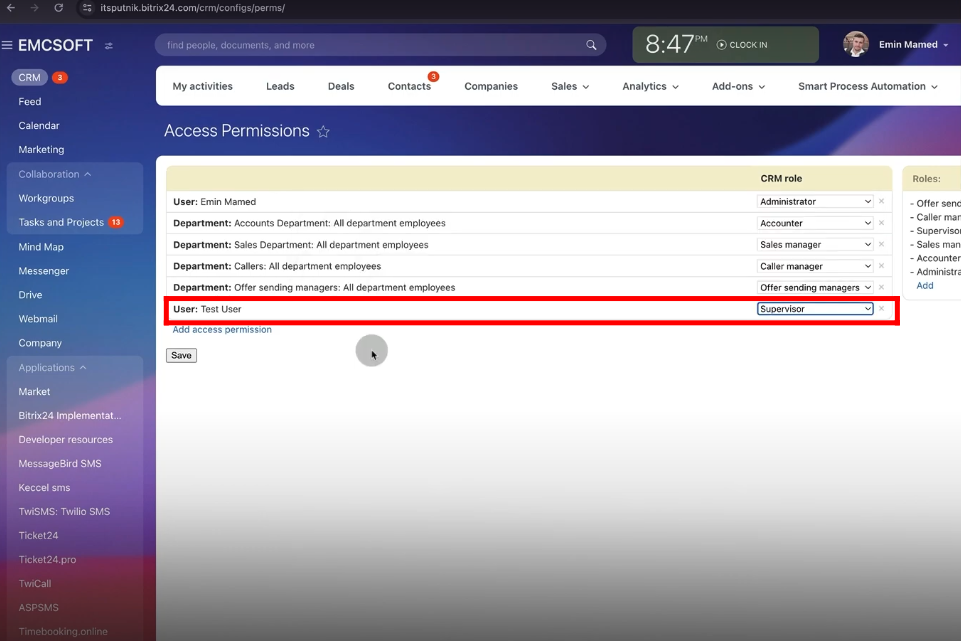
5. “Test User” has been selected from the “Users”.
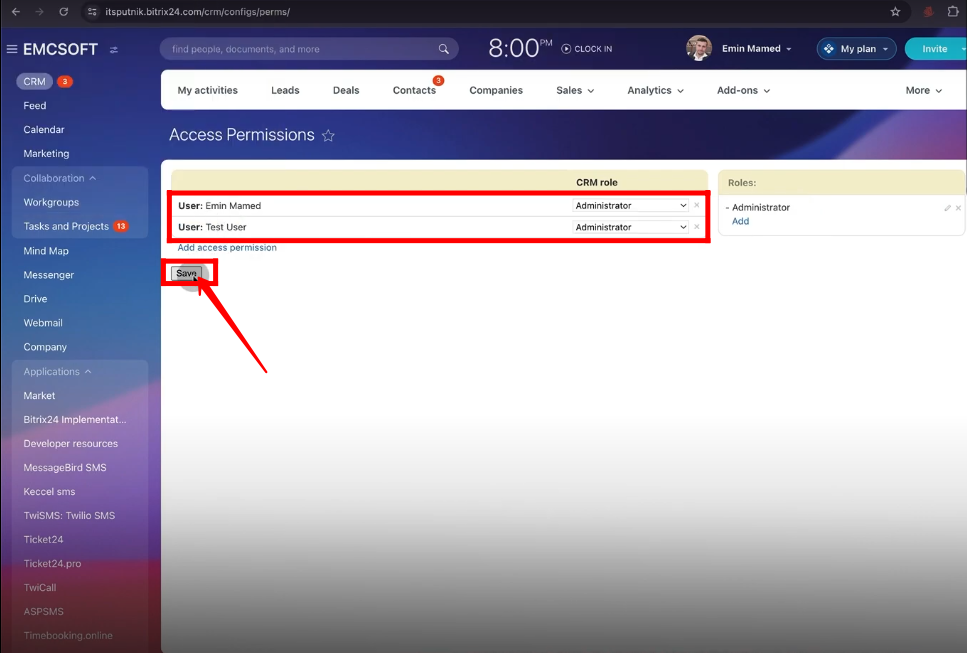
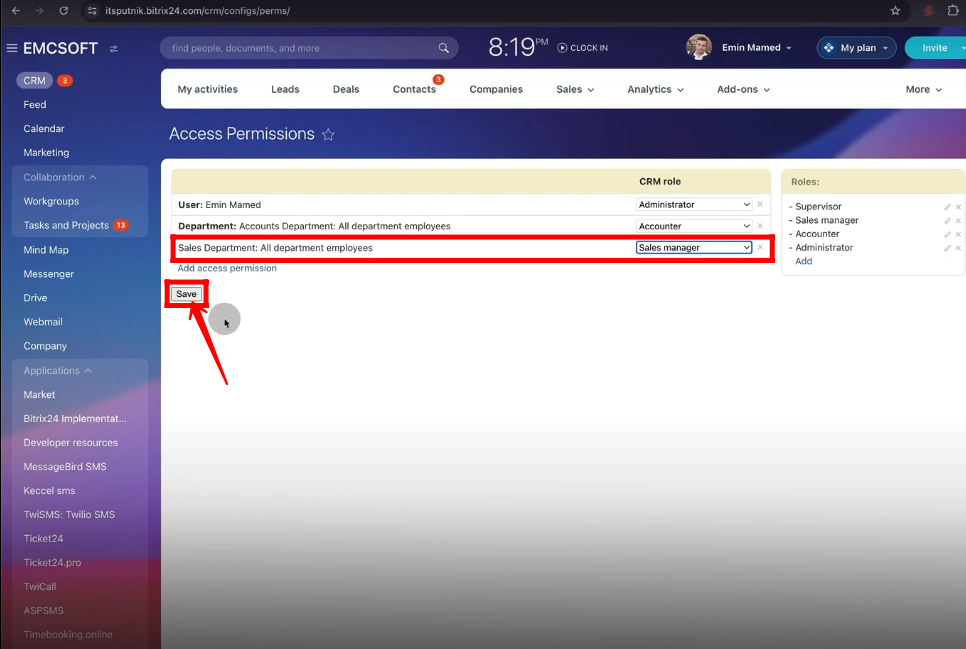
6. Now, there are two users “Emin Mamed” and “Test User”. They have been assigned the CRM role of “Administrator” for testing purposes. Click “Save”.
7. The test user’s panel is opened here and he can do all the stuff that he is allowed to do(all the permissions allowed to the administrator).

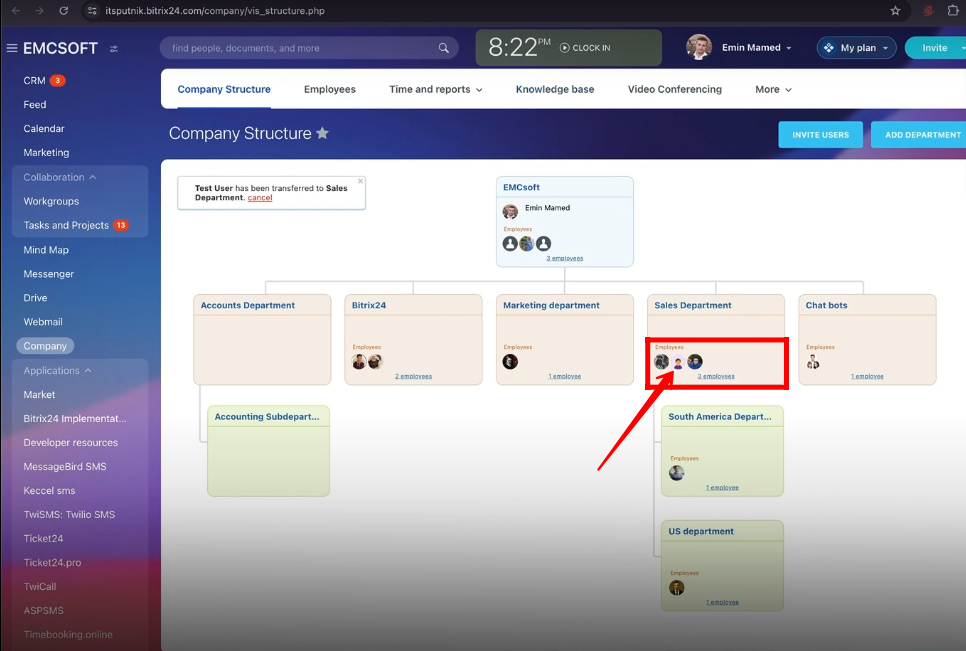
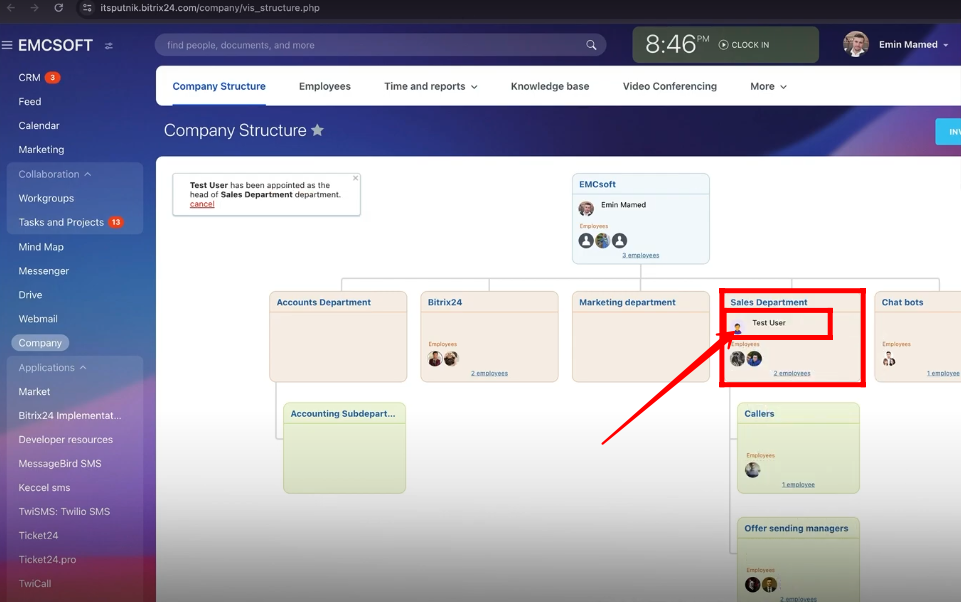
8. Go to “Company” and modify the company structure according to conditions or requirements.
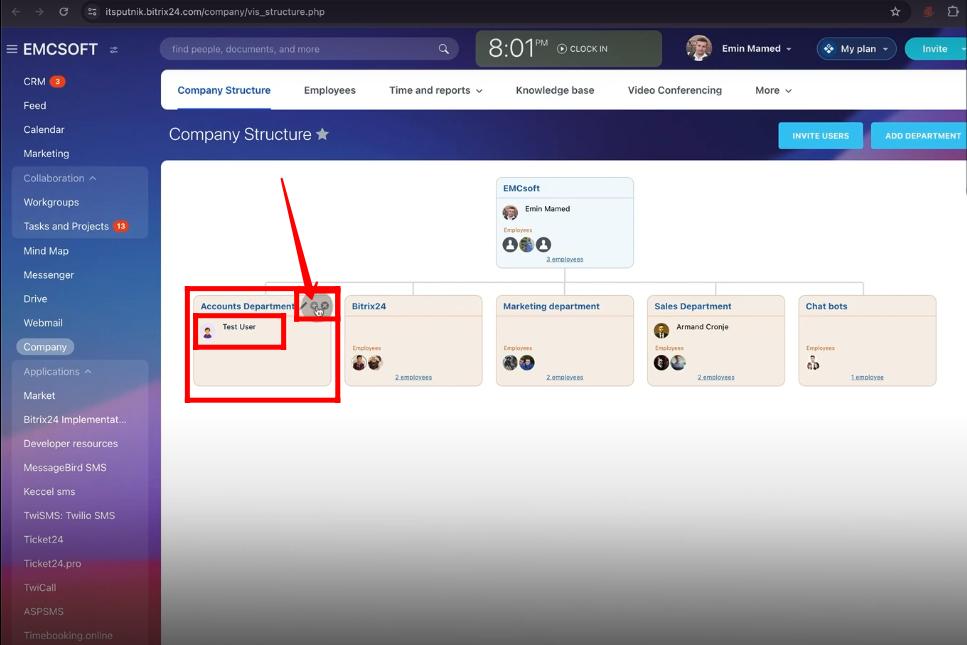
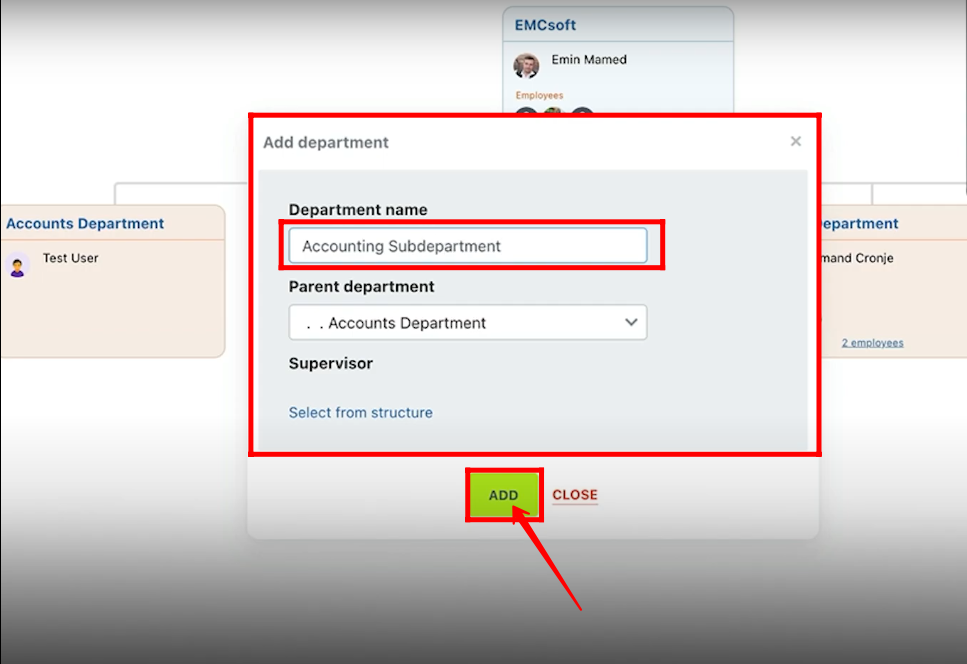
9. Here’s the company structure and the test user is the main lead employee of “The Accounts Department” for now. Edit “Accounts Department” to add a new sub-department.
10. The sub-department name is “Accounting Subdepartment” and the parent department is “Accounts Department”. Click “Add”.
11. Add a new role.
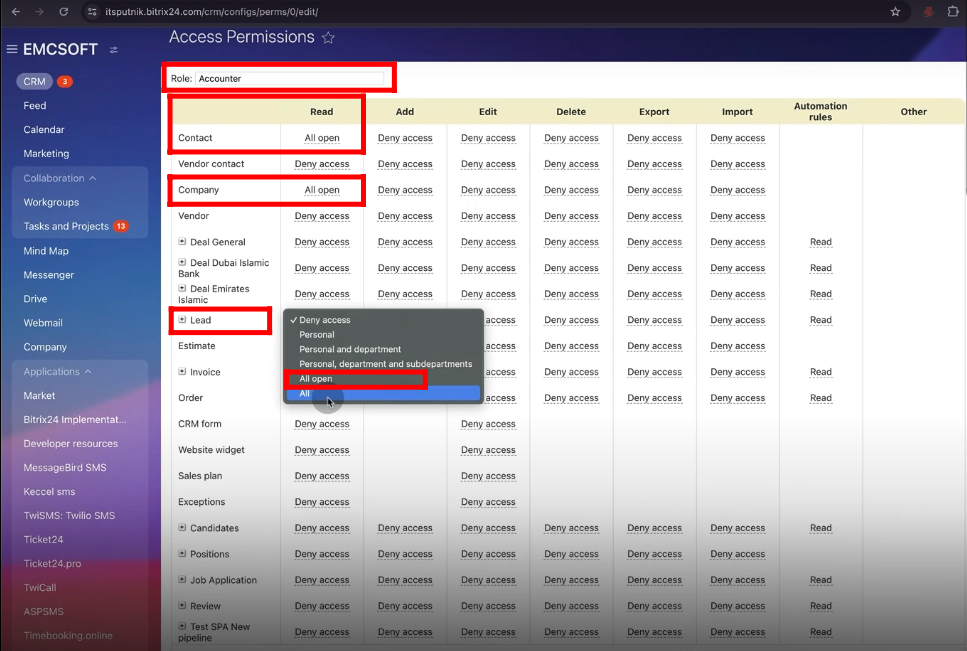
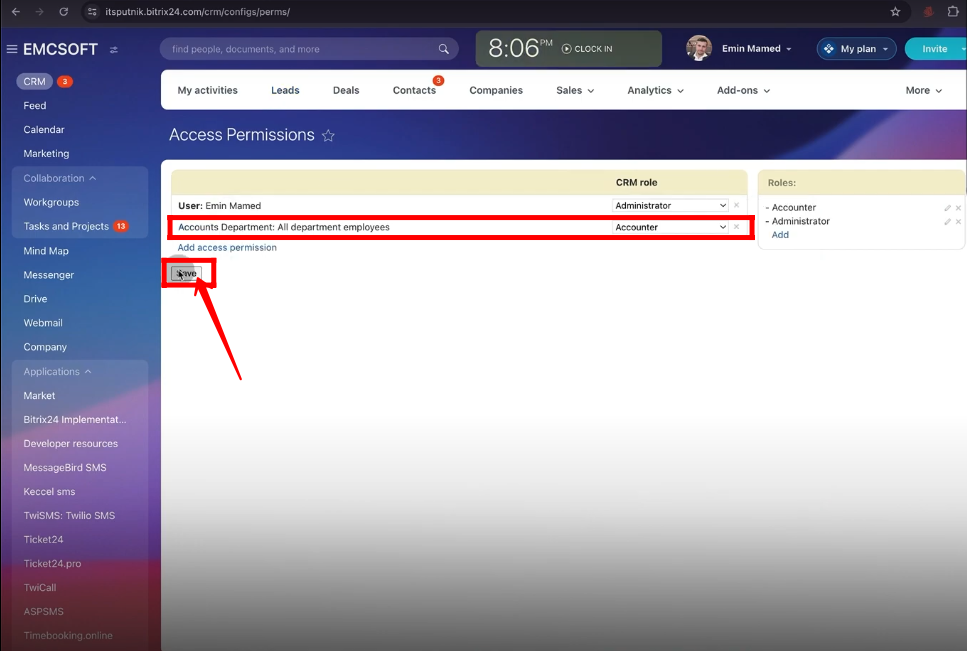
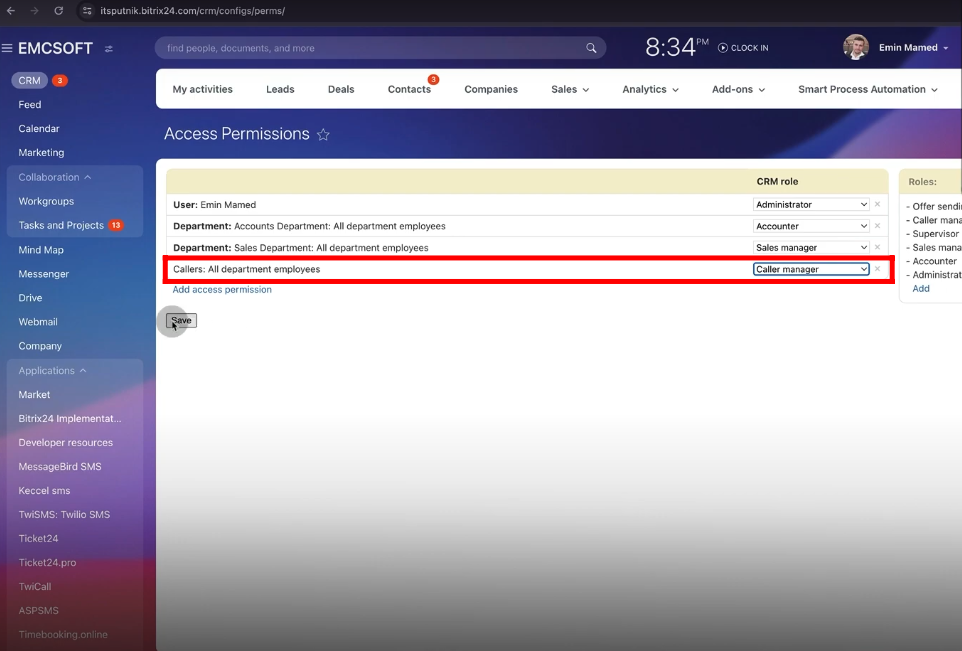
12. The role name is “Accounter”. The “Read” permissions of “Contact”, “Company” and “Lead” as “All open” are allowed for this role.
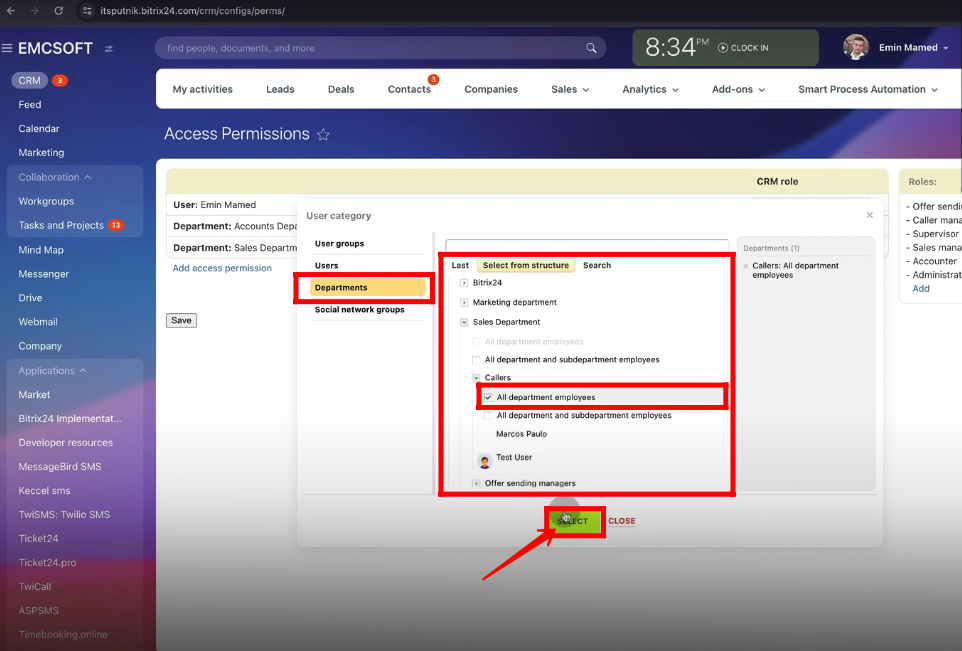
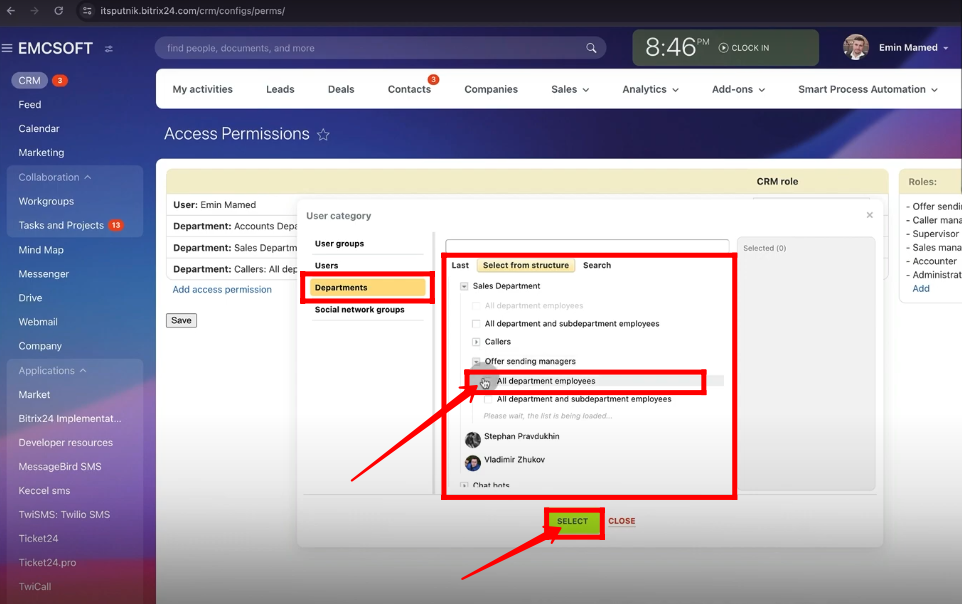
13. Add “All department employees” of “Accounts Department” to assign the “Accounter” role.
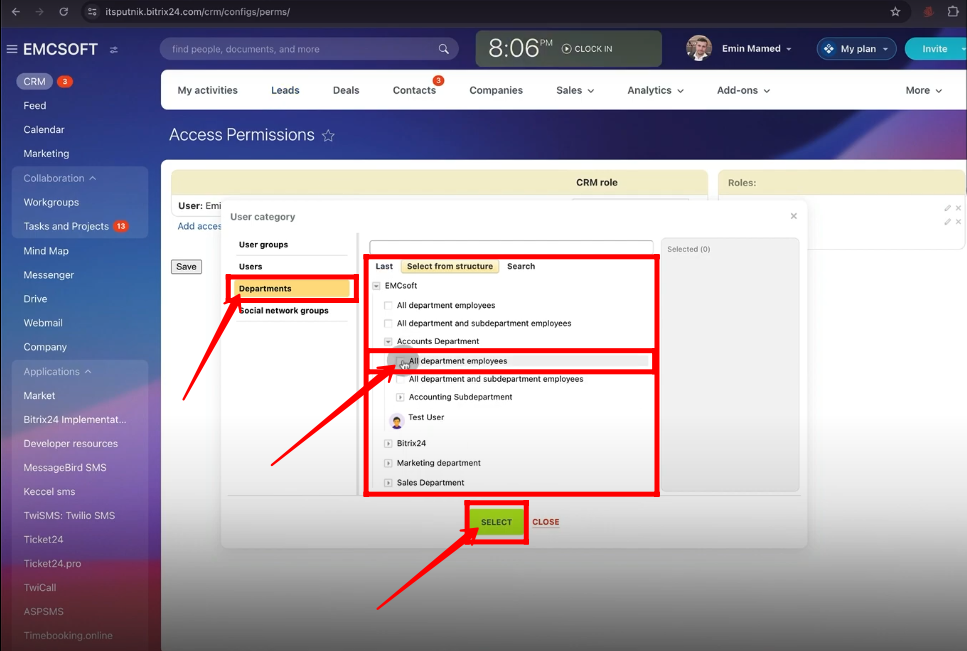
14. So, the accounts department employees have been assigned the “Accounter” role.
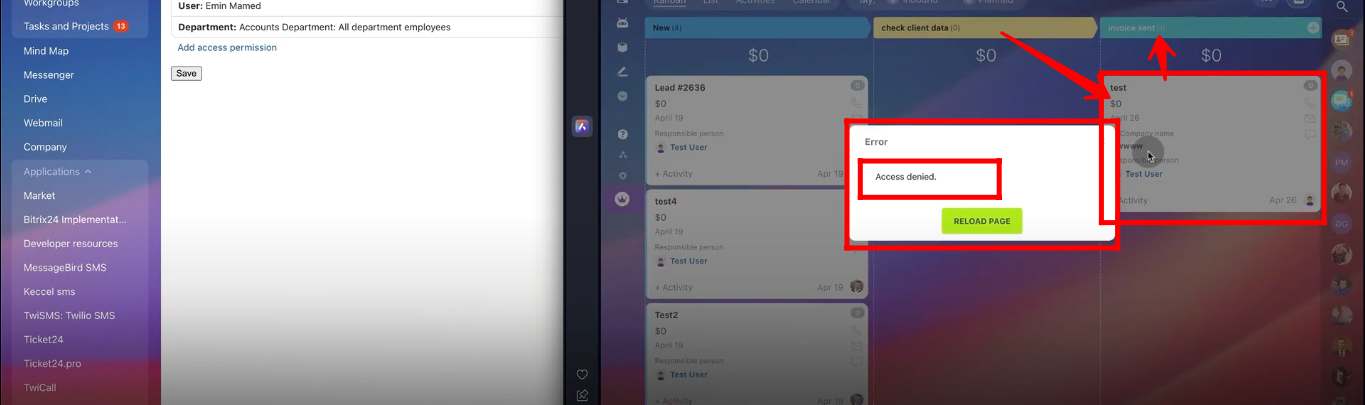
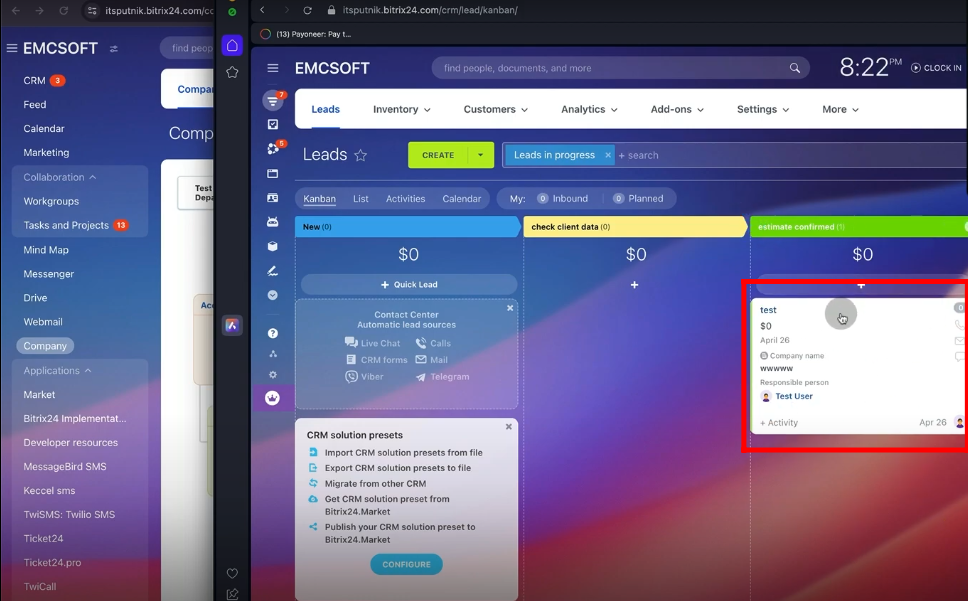
15. Open the test user panel. Let’s move the lead from one stage to another and you will get the alert message “Access Denied” because the “Accounter” role is only allowed to “read” leads.
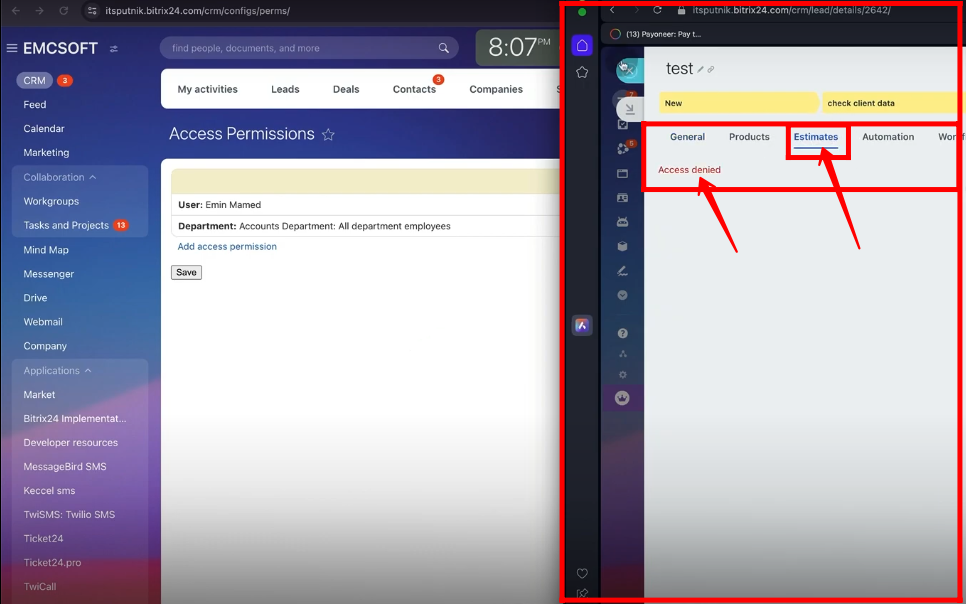
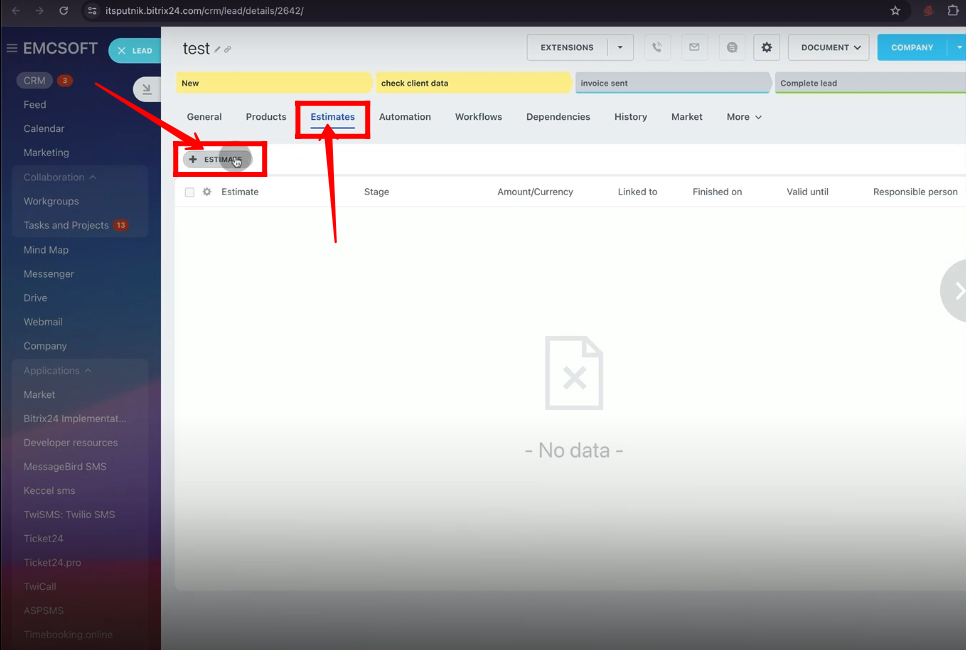
16. Open the lead in the test user panel and go to the “Estimates” tab within the lead. You will get just the message again “Access denied” because of the same reason “Lead Read only Permission”.
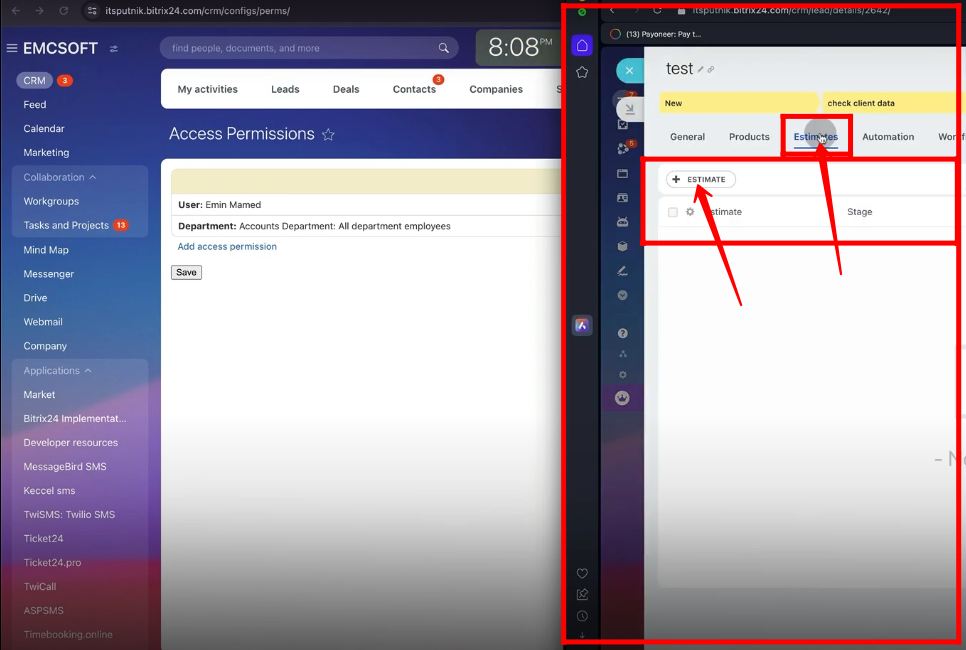
17. Change the permissions for the “accounter” role. Now, the accounter can “read”, “add” and “edit” the “Estimates”.

18. Open the test user panel and you can see that the estimates can be added, deleted or edited.
19. Come back to the “Administrator” panel and add a new estimate within the lead.
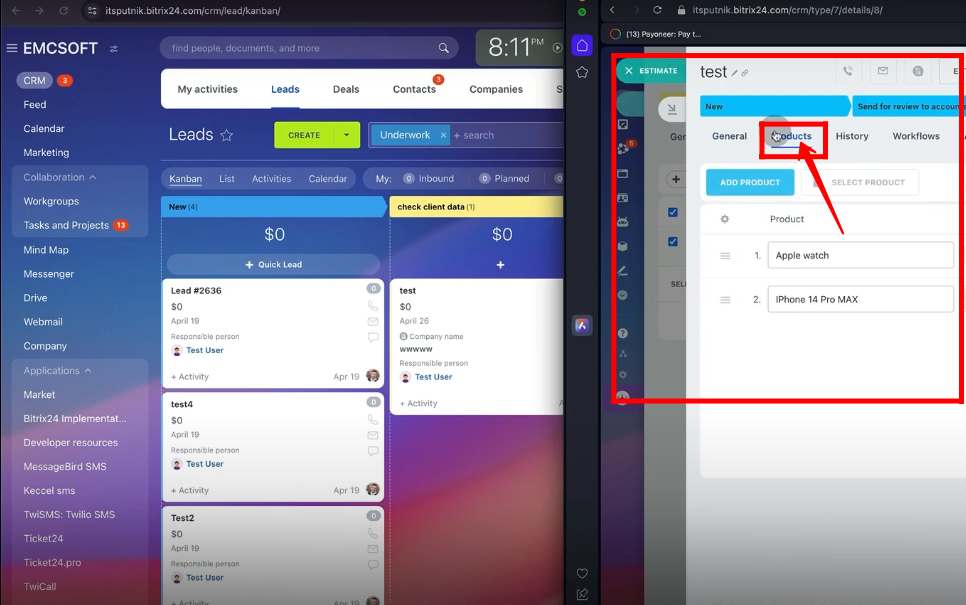
20. Add some products within the estimate.

21. Now go to “Estimates” from “Sales” dropdown.

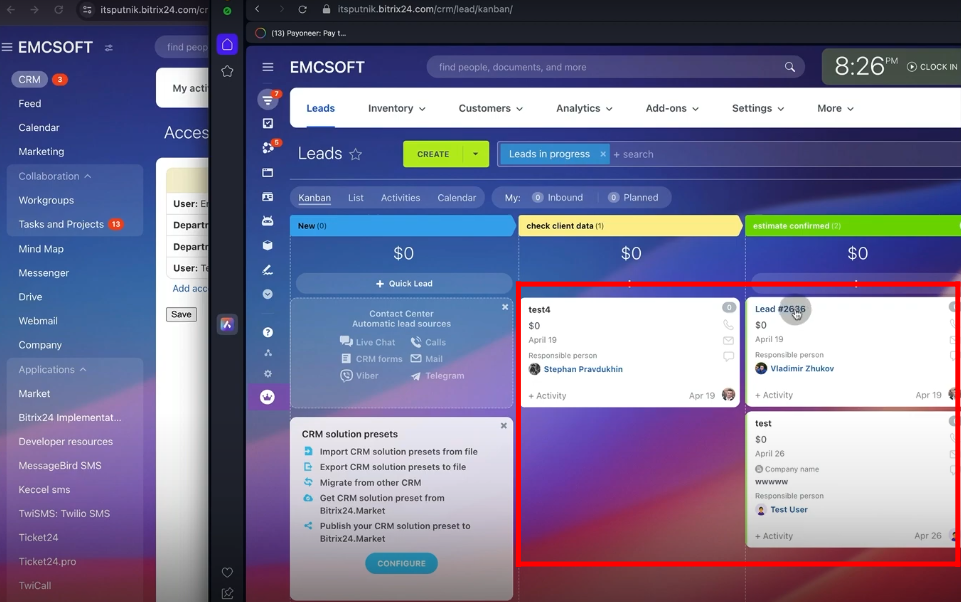
22. You can see the configured estimates are present under different stages in the “Kanban” view.
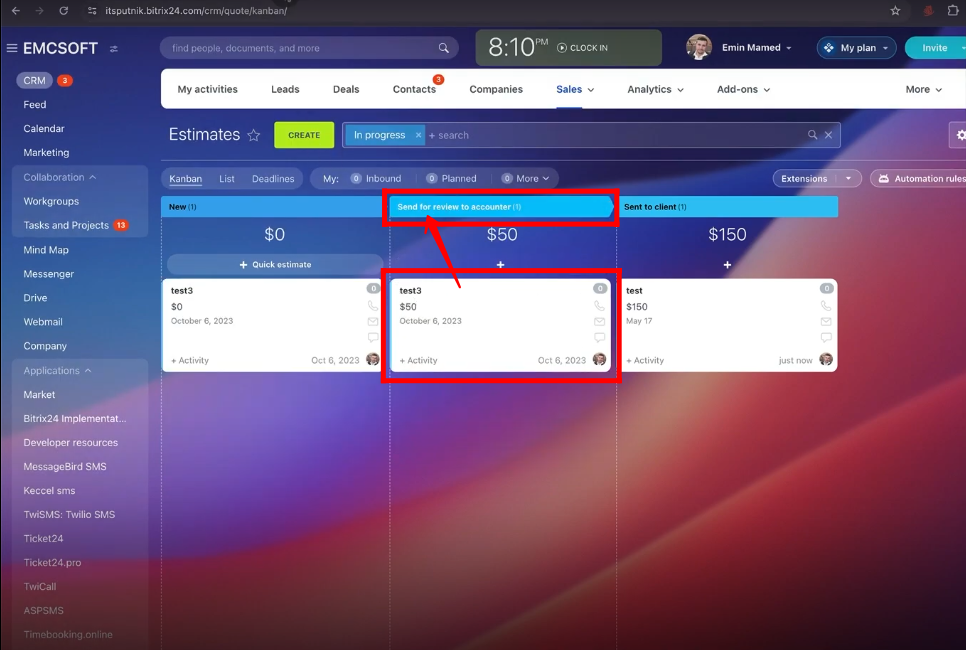
23. Open the lead and you can view the configured estimate with the current stage.
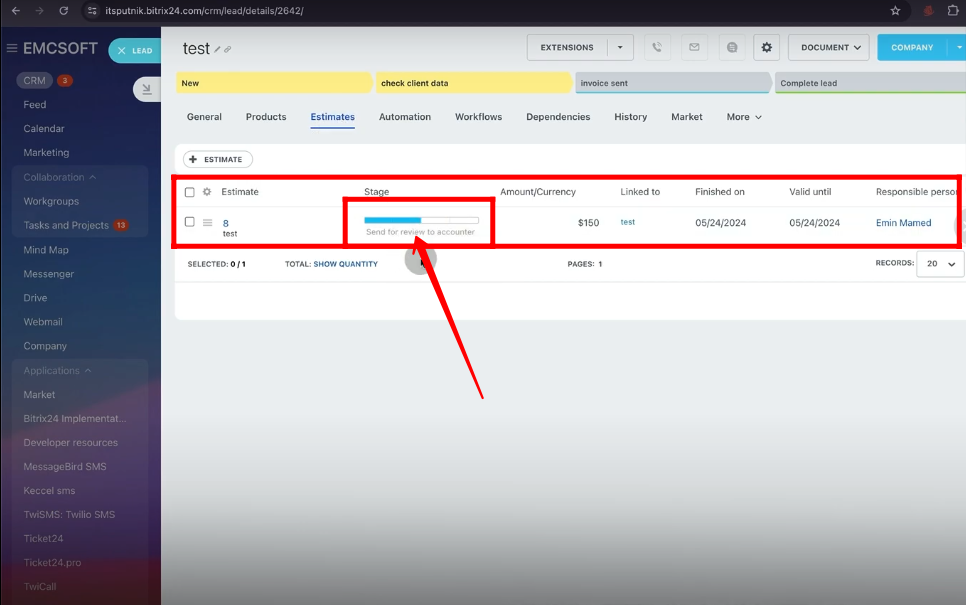
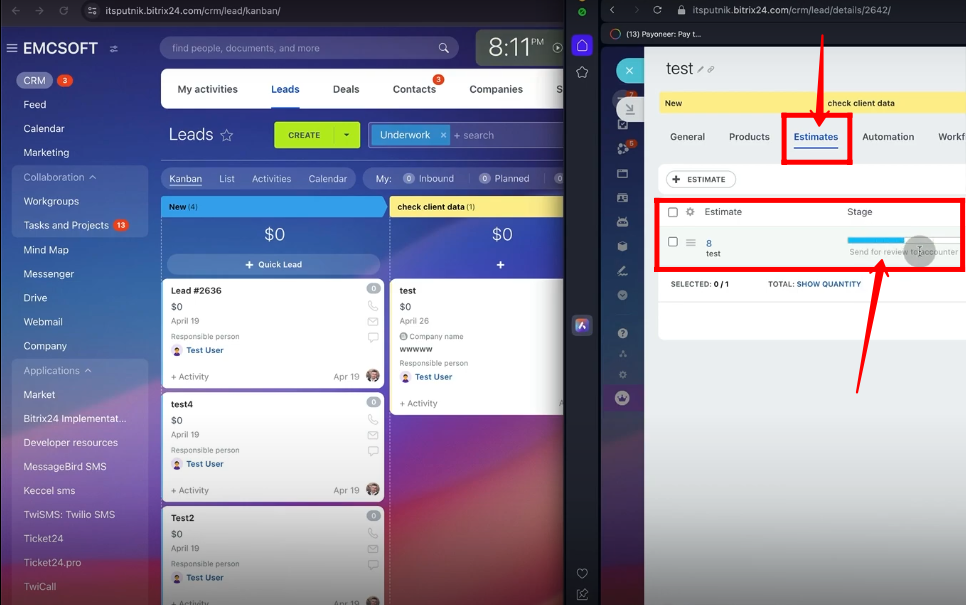
24. Open the test user’s panel and go to “Estimates”.The test user can view the estimates configured within the lead with the current stage of the estimate. The test user can also change the stage of the estimate. Open the estimate.
25. The test user can also view the attached products within the Estimate.
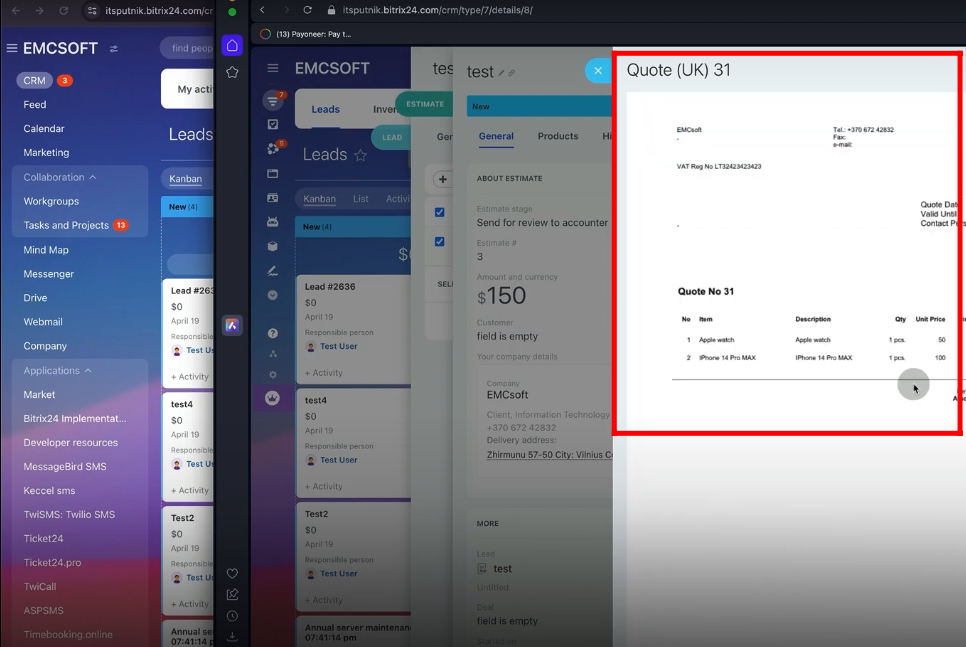
26. Even, the test user can view the documents attached to the estimate or the documents sent to the client due to the automation rule of estimate stages change.
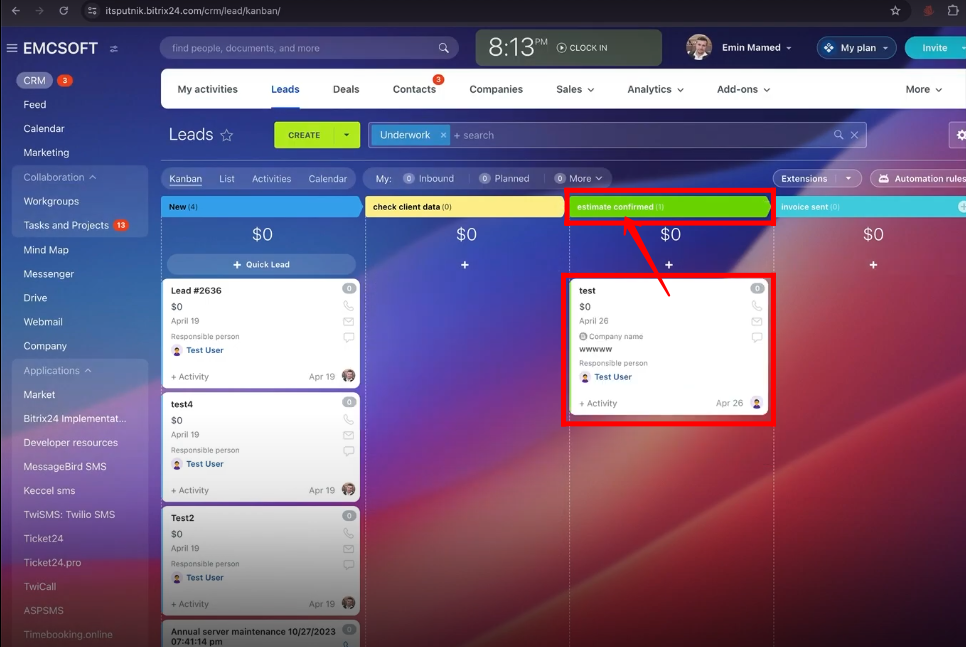
27. The Administrator can create an automation rule to change the stage of lead to “Estimate Confirmed” when the targeted employee accepts the estimation. All the robot configuration guidance is provided in the previous videos.
28. Let’s learn access permissions with a new scenario. Add a new role.
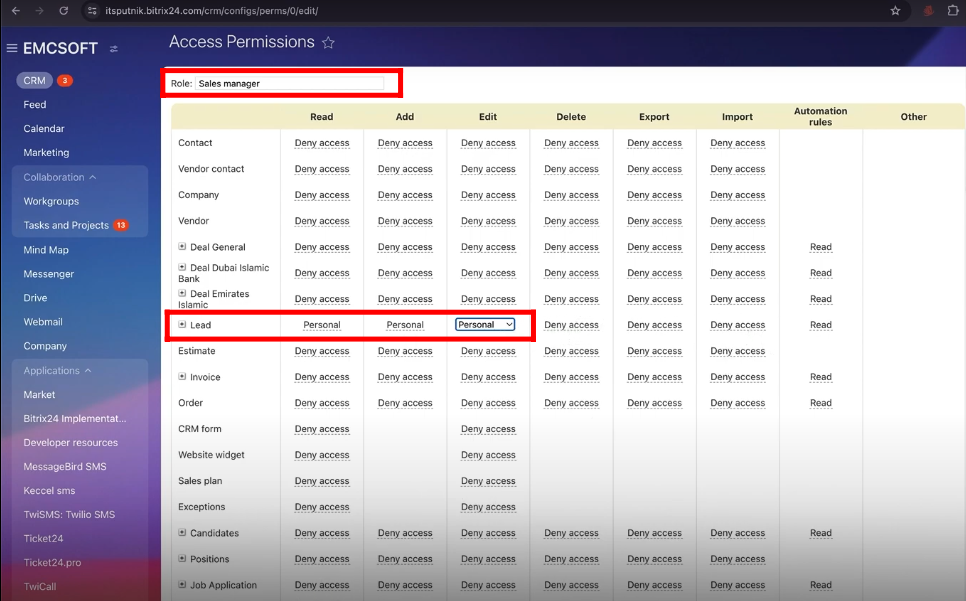
29. The role name is “Sales Manager”. The “read”, “add” and “edit” permissions of the lead as “Personal(Responsible Person)” are allowed for this role.
30. In this case, the “Sales Department” has two sub-departments and the “Test User” is the main lead employee of the “Sales Department”.
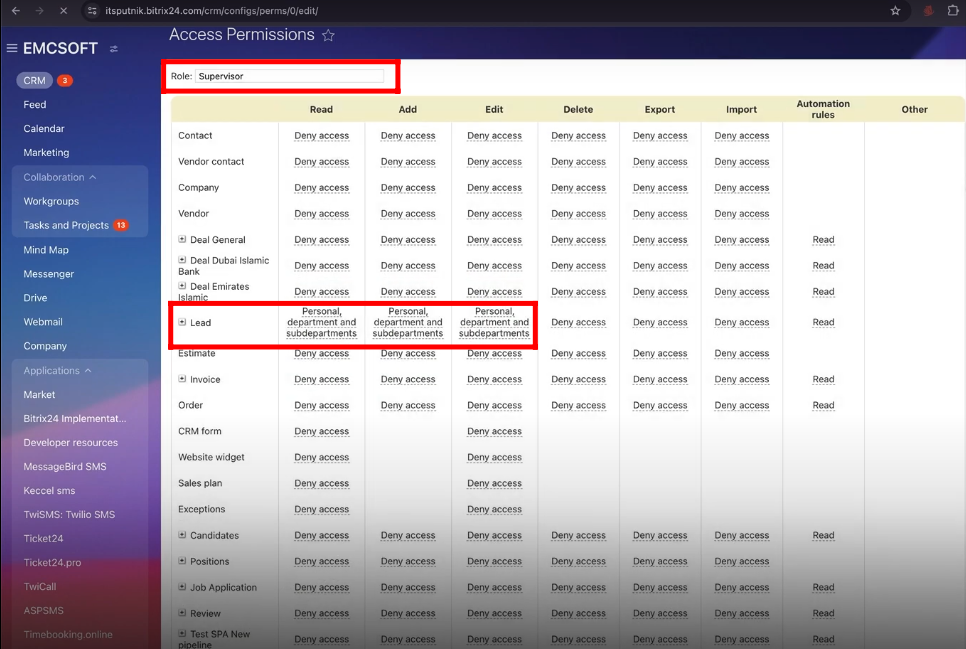
31. Add a new role “Supervisor”. The “read”, “add” and “edit” permissions of the lead as “Personal(Responsible Person), department and subdepartment” are allowed for this role.
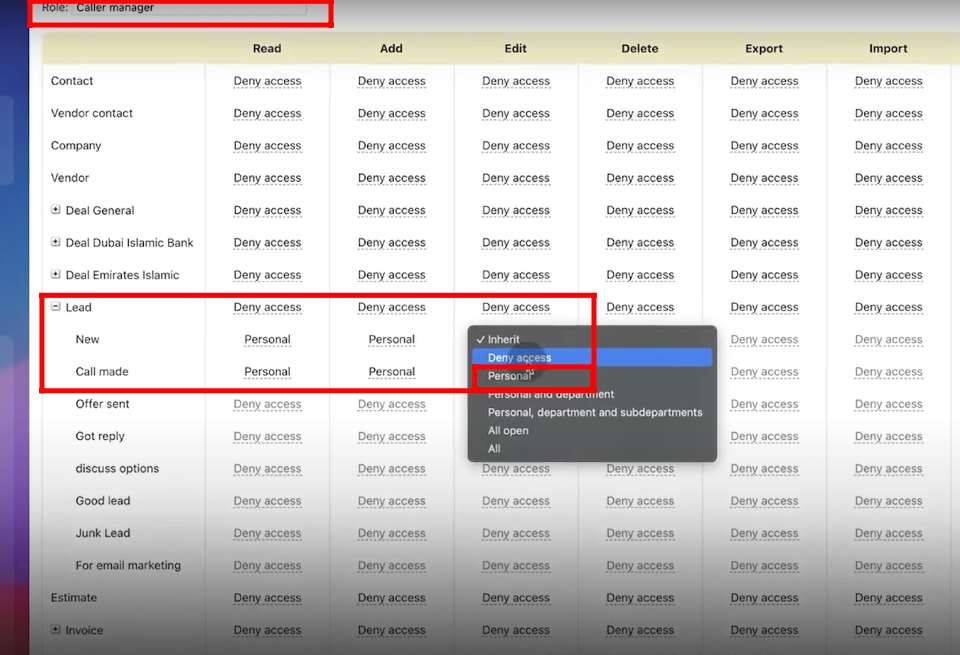
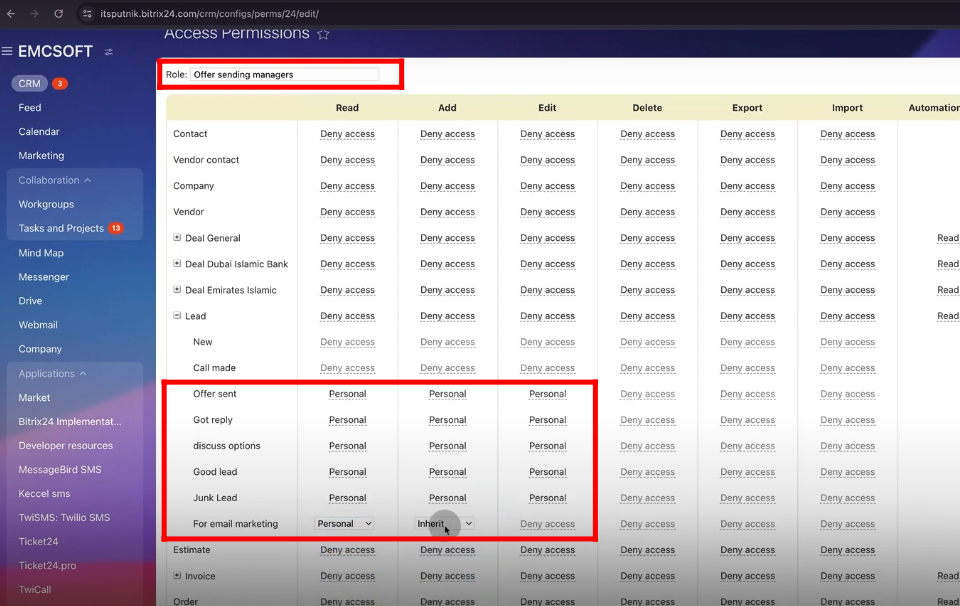
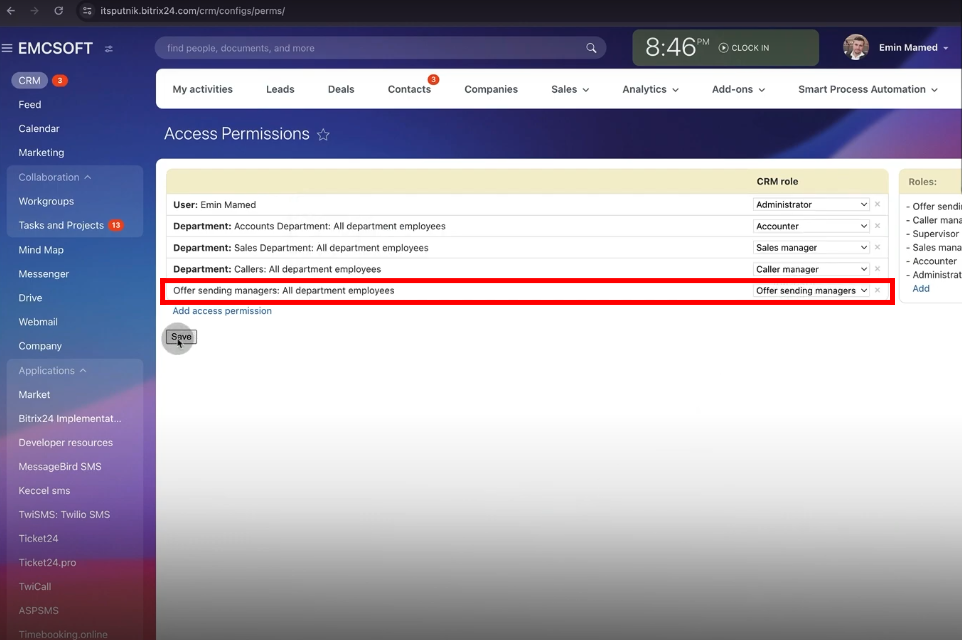
32. “All department employees” of the “Sales Department” have been added to assign the roles by the administrator.

33. The sales department employees are assigned the role of “Sales Manager”.
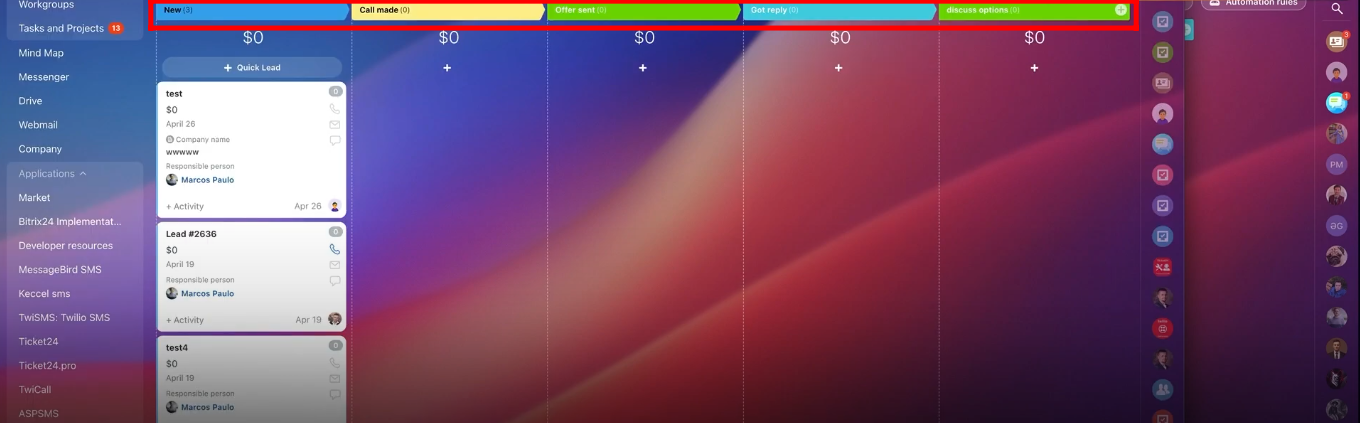
34. Currently, the “Test User” is simply an employee of the “Sales Department”.
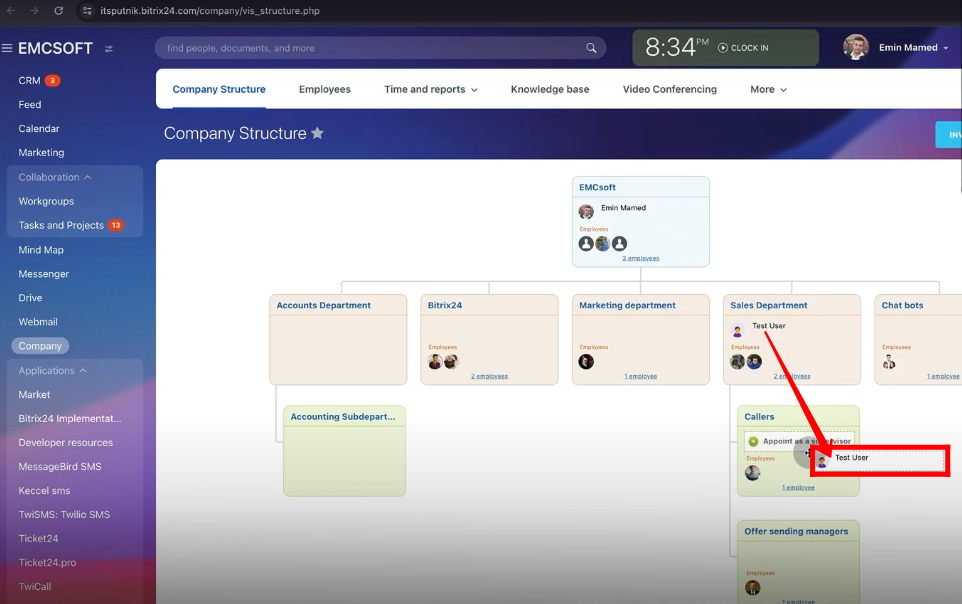
35. Administrative has set up three leads with different responsible persons assigned to leads.
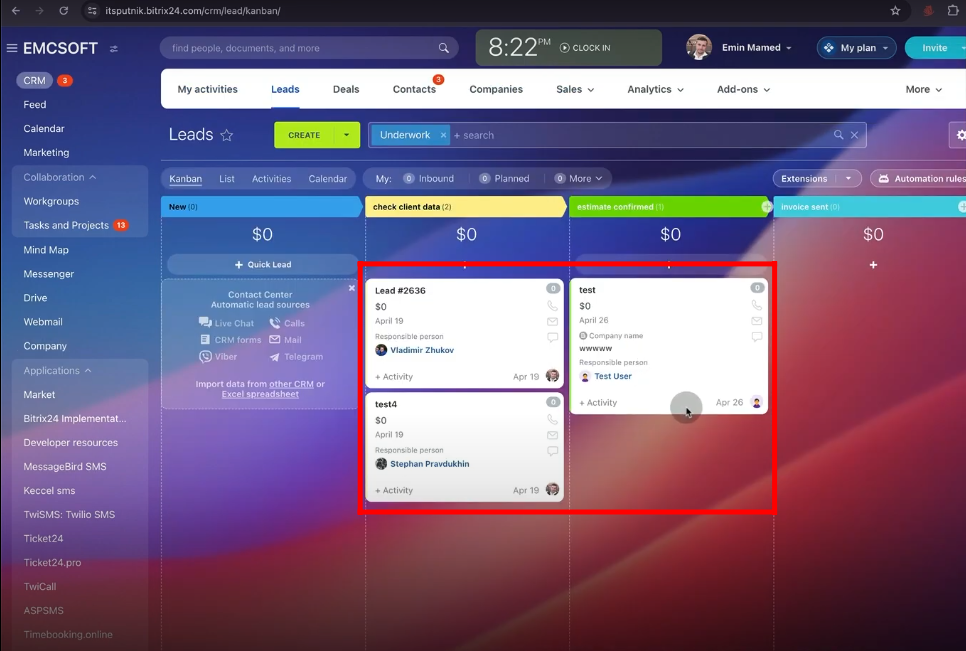
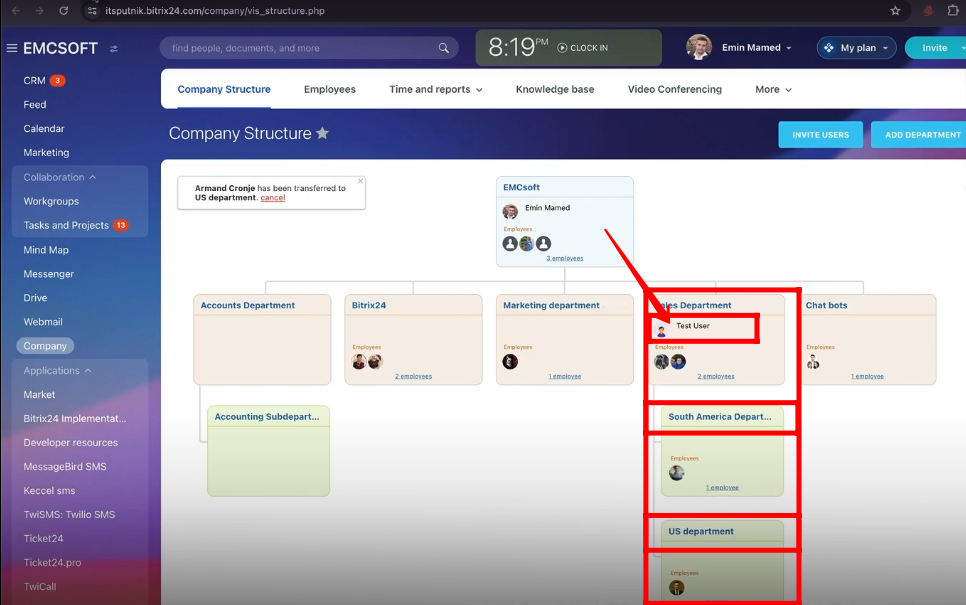
36. However, the “Test User” can only view the lead to which he is responsible because of permissions granted to the role.
37. Now, the “Test User” is the main lead employee of the “Sales Department”.
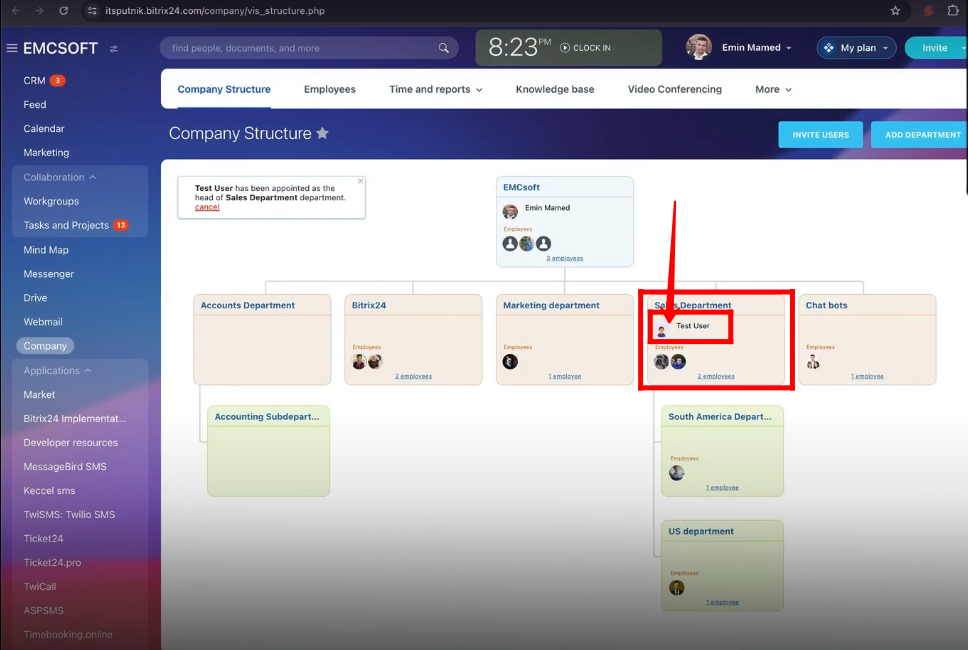
38. The “Test User” is being selected to assign the CRM Role.
39. The CRM Role assigned to the “Test User” is “Supervisor”. Click “Save”.
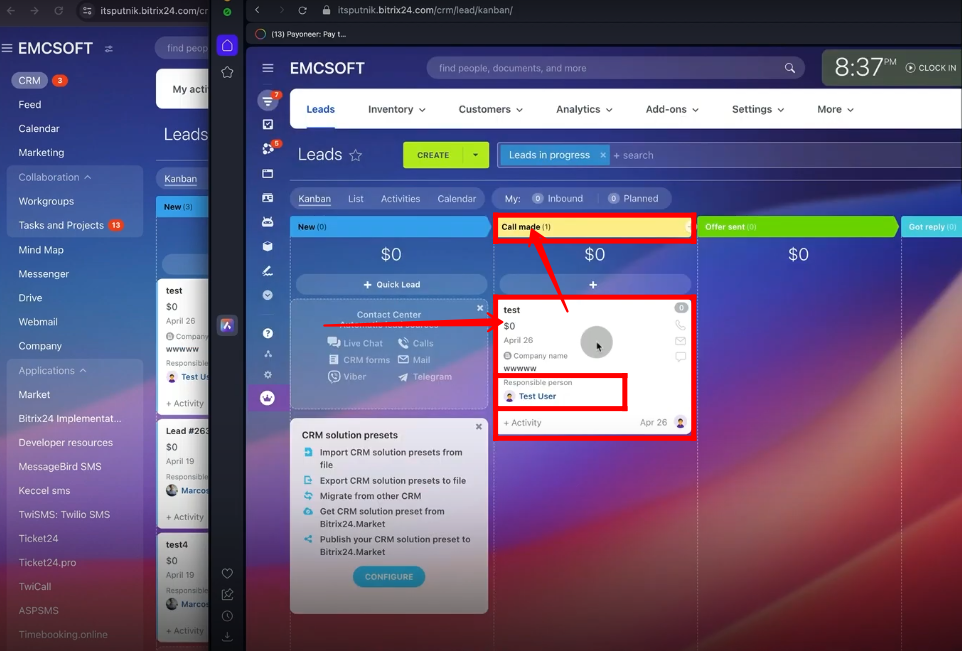
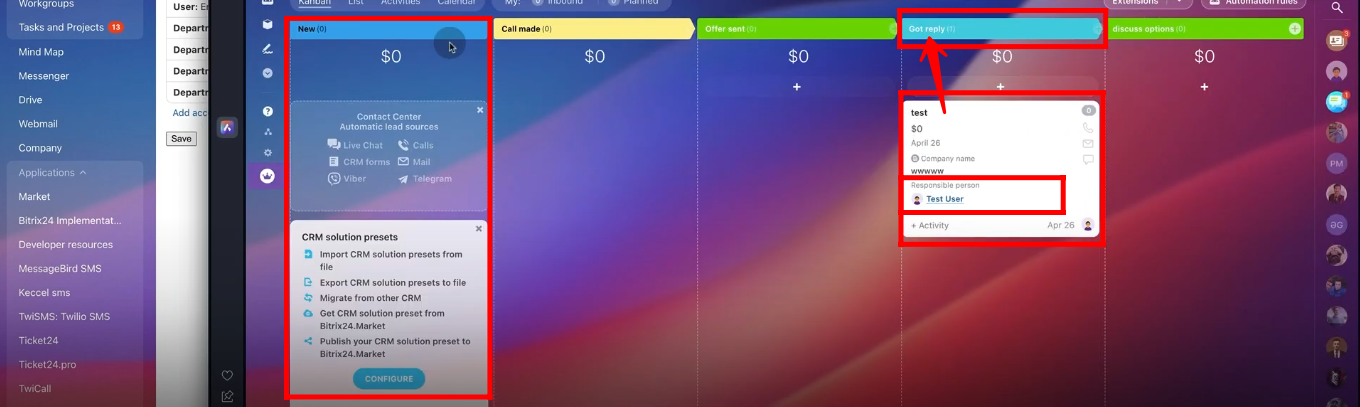
40. Now, the “Test User” can see the lead to which he is responsible and all other leads for which the responsible persons are from the sales department and its sub-departments.
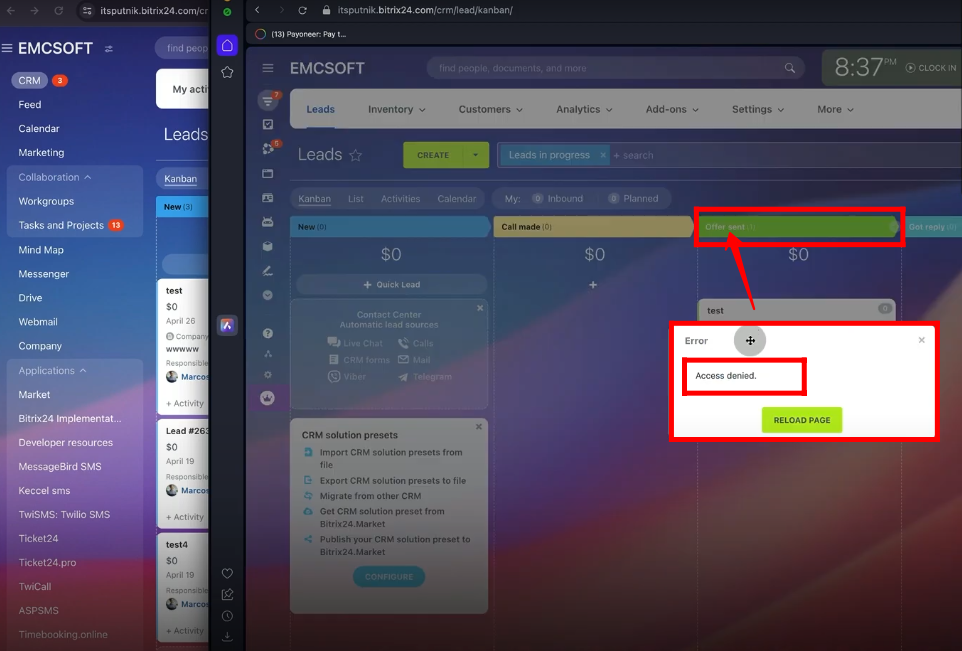
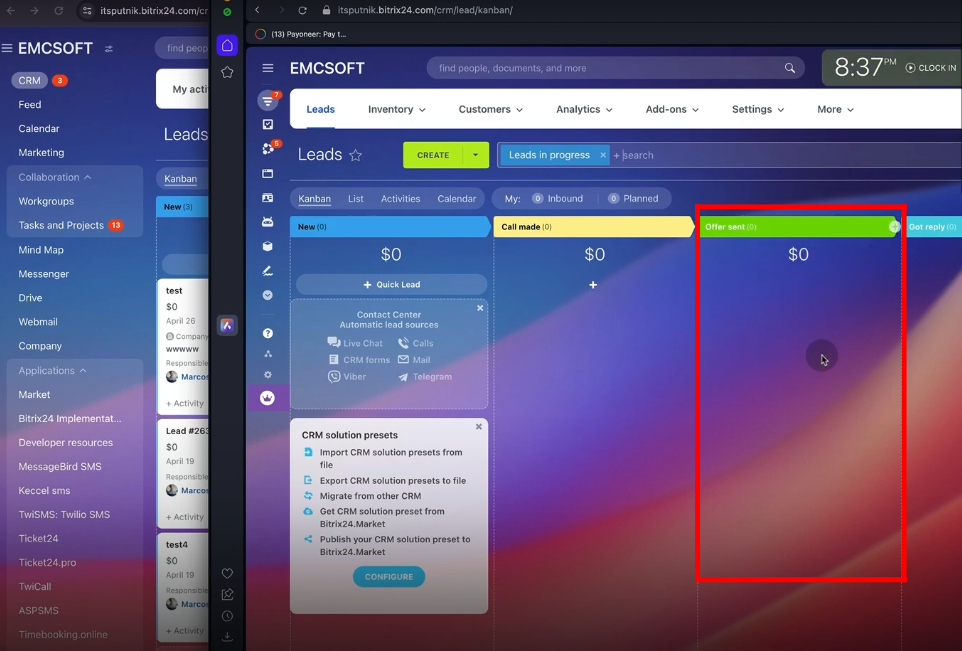
41. Let’s learn access permissions with one more example. A new role is created named “Call Manager”. The call manager can “read”, “add” and “edit” new “personal” leads. Also, the call manager can make personal calls.
42. A new role has been created named “Offer Sending Managers”. This role can work with personal “Offer Sent”, “Got Reply”, “Discuss Options”, “Good Lead”, “Junk Lead” and “For email marketing”.
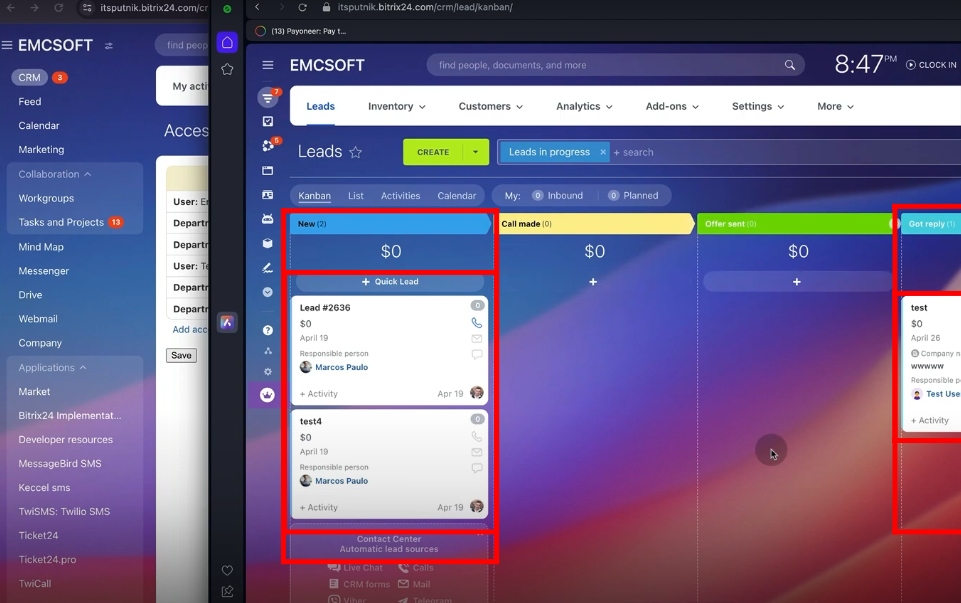
43. For testing purposes, the stages created in the Leads section are “New”, “Call made”, “Offer sent”, “Got Reply” and “Discuss Options”.
44. The sub-departments created under the “Sales Department” are “Callers” and “Converting Department”.

45. The “Test User” has been shifted to the sub-department “Callers” as an employee.
46. All Callers department employees have been selected to assign the role.
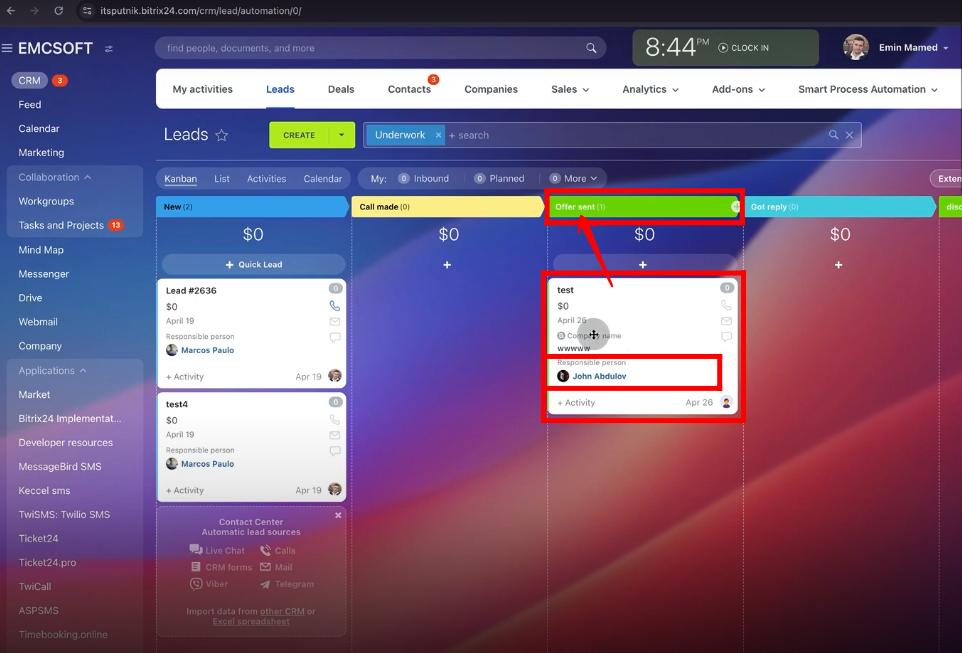
47. All Callers department employees are assigned the role of “Call Manager”.
48. The Administrative person changed the Responsible person to “Test User” for testing purposes.
49. The “Test User” can only move the lead from the “New” to the “Call made” stage for now in his own panel.
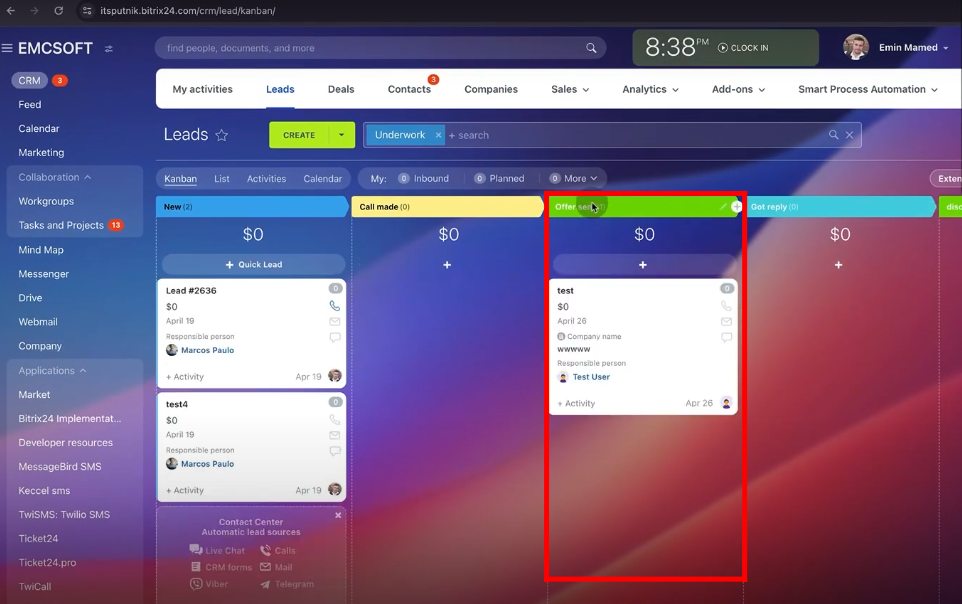
50. When the “Test User” moves the lead from the “Call made” stage to the “Offer sent” stage, then he will get the message “Access Denied” due to permissions granted to the “Call Manager” role.
51. The lead will be automatically removed from the “Test User” panel as the “Call Manager” is not allowed to manipulate leads in the “Offer sent” stage.
52. However, the administrator can view that lead in the “Offer sent” stage.
53. Let’s create a robot “Change Responsible Person” and select employees from the “Offer sending Managers” sub-department. In this case, there are two employees.
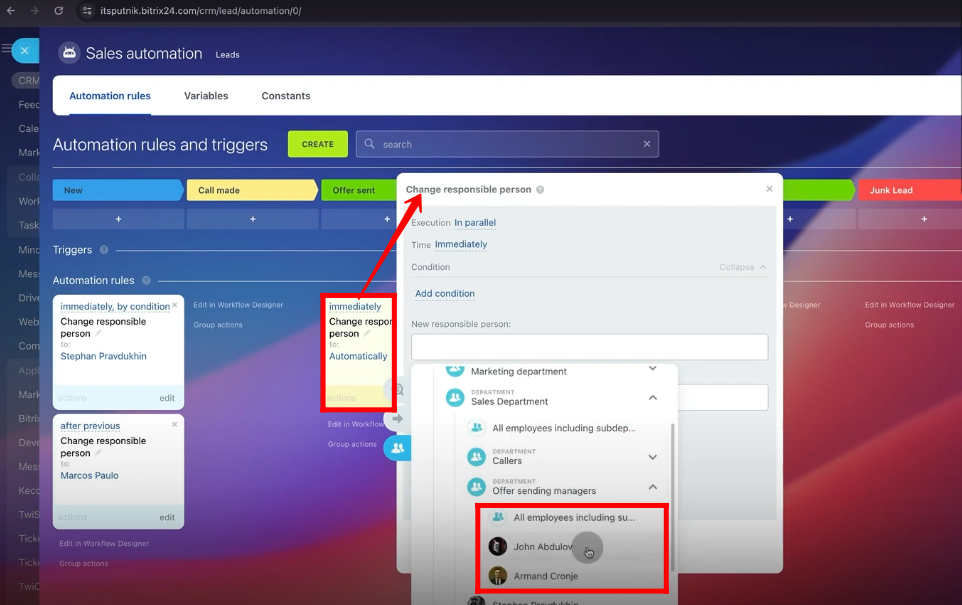
54. The responsible persons are selected. The selection of a new responsible person must be “in a specific order” and “Skip absent employees” must be allowed.

55. The administrator moved the lead to the “Call made” stage. Go back to the “Test User” panel and move the lead to the “Offer Sent” stage again.
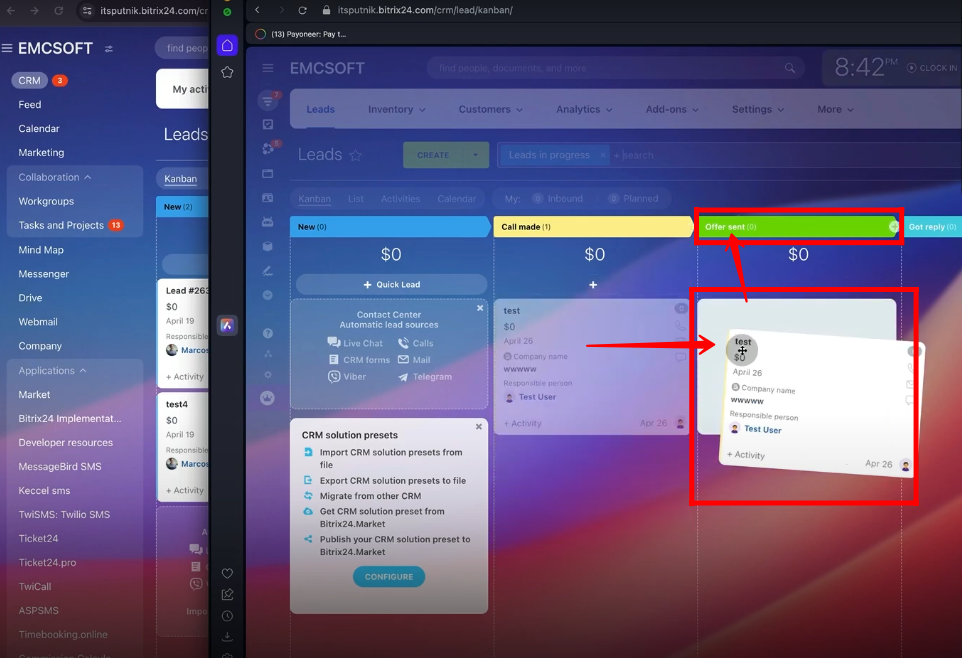
56. You can see the lead’s responsible person has been changed from “Test User” to “John Abdulov” due to the automation rule in the Administration panel.
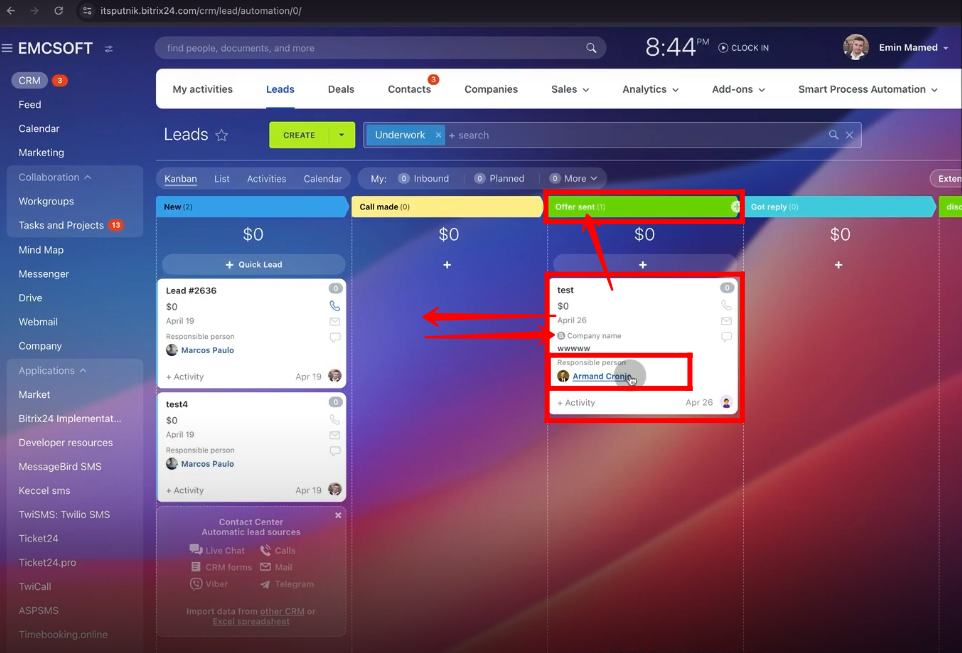
57. Move back the lead to the “Call made” stage and again to the “Offer sent” stage. The Responsible person has been changed to “Armand Cronje”.
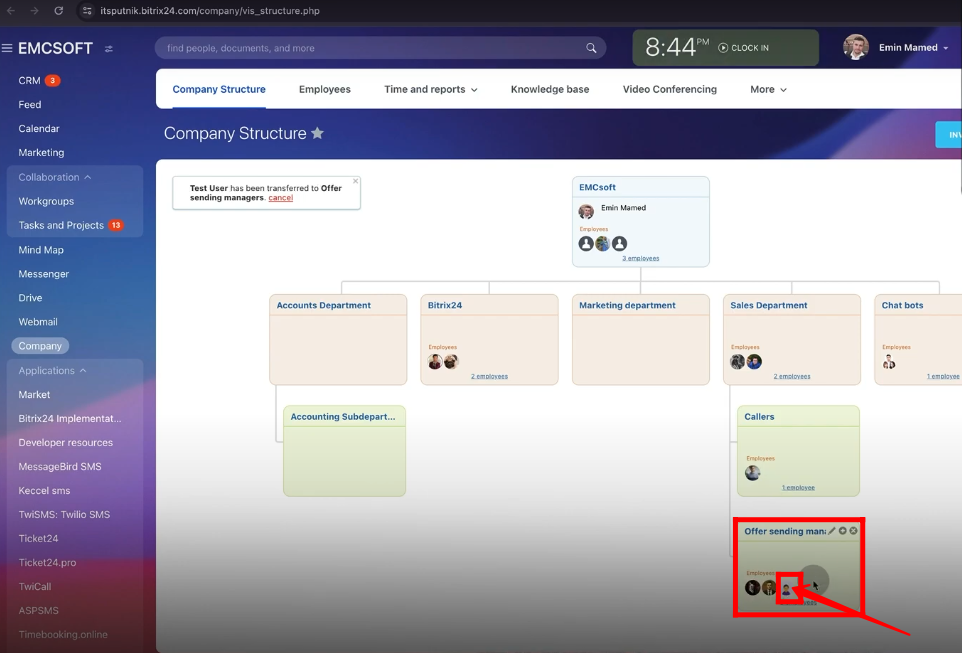
58. The “Test User” has been shifted to the sub-department “Offer sending managers” as an employee.
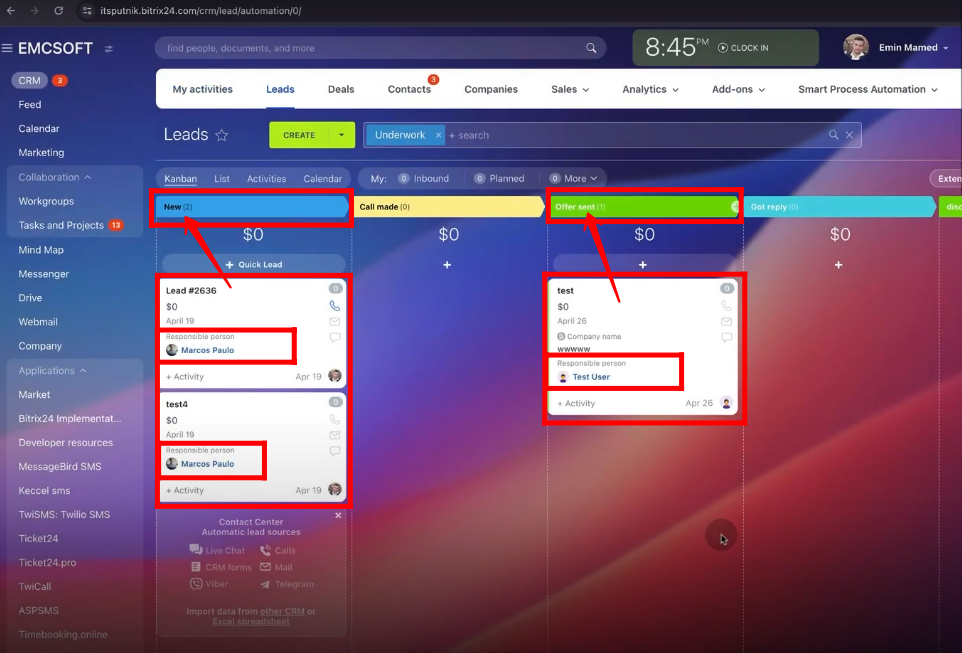
59. Currently, in the administrative panel, there are three leads with different stages and responsible persons.
60. All “Offer sending managers” sub-department employees are being selected to assign the role.
61. All “Offer sending managers” sub-department employees are assigned the role of “Offer sending managers”.
62. Currently, the “Test User” can only view the lead for which he is responsible.
63. The “Test User” is shifted as the main lead employee of the “Sales Department”.
64. The “Test User” has been assigned the role of “Supervisor”.
65. Now, the “Test User” can view his own lead and all leads of other responsible persons of the “Sales Department”.
“You can also watch this video on Youtube”